Casio Ph E K862PSM8DMX
ph_e ph_e_EN YC-400 | Projectors | Manuals | CASIO
2014-07-05
: Casio Ph-E ph-e casio pdf
Open the PDF directly: View PDF ![]() .
.
Page Count: 25

Instruction manual
K862PSM8DMX
Retouching/Printing Software
for Windows
Photohands
Version 1.0
E
2
• Windows is a trademark of Microsoft Corporation.
• Other company and product names are trademarks or registered
trademarks of the respective companies.
• The contents of this document are subject to change without notice.
• The document has been prepared with our utmost effort. However,
please contact us if there are any queries or errors.
Photohands is published by CASIO COMPUTER CO., LTD., and CASIO
COMPUTER CO., LTD. retains all copyrights and other related rights
except for those described above.
This document may not be copied in part or in entirety without permission.
We assume no responsibility for any damage or loss or claims from third
parties resulting from the use of Photohands.

3
Contents
Introduction ............................................................................. 4
■For first time users of Photohands ............................................... 4
■What Photohands does ................................................................ 4
■About This Manual ....................................................................... 5
About Screen Images.................................................................................6
Starting Photohands............................................................... 7
■Starting Photohands from the Start menu.................................... 7
■Starting Photohands from the Task tray ....................................... 8
■Starting Photohands from the Photo Loader menu screen .......... 9
■Starting Photohands from the Photo Loader Library screen ...... 10
■Starting Photohands from the Photo Loader image
view screen ................................................................................ 11
Using Photohands ................................................................ 12
■Displaying Images ...................................................................... 12
■Editing Images ........................................................................... 14
Adjusting the Hue .....................................................................................14
Changing the Size of an Image ................................................................17
Rotating/Inverting an Image .....................................................................19
■Saving Images............................................................................ 21
■Printing Images .......................................................................... 22
Getting Help ........................................................................... 25
Quitting Photohands............................................................. 25

4
Introduction
This manual is the user’s instruction manual for the Photohands retouching/
printing software. Photohands runs under Windows, and this manual does
not include descriptions of Windows operations.
This manual has been written for users who are familiar with the following
basic operations:
• Mouse operations such as clicking, double-clicking, dragging, and
dragging & dropping
• Menu operation using the mouse
• Keyboard entry
• Windows operations
For details of these basic operations, see the PC manual or the Windows
User’s Manual.
All operations in this book are described assuming the use of Windows 98.
■For first time users of Photohands
Read the “Read me” file in the CD-ROM provided. This describes how to
check the system requirements for Photohands and how to install it on your
PC. Check your operating environment and Windows version to be used
before installing Photohands.
■What Photohands does
• Corrects (adjusts contrast or brightness), rotates an image, or changes
the size.
• Prints an image.
IMPORTANT
• Image file formats that can be handled with Photohands are: JPEG, BMP, PNG,
and TIFF*.
* It is not possible to save in TIFF format.
5
■About This Manual
All operations in this manual are described for Windows 98 using a mouse.
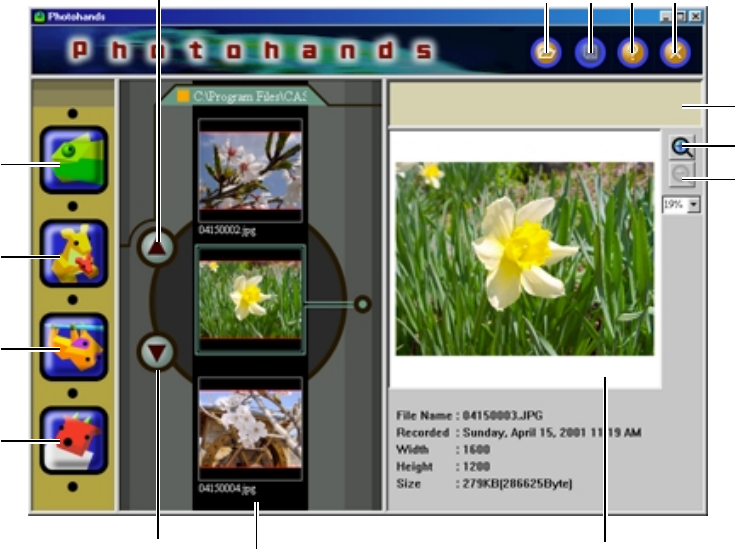
1[Open] icon
“Displaying Images” on page 12
2[Save] icon
“Saving Images” on page 21
3[Help] icon
“Getting Help” on page 25
4[Quit] icon
“Quitting Photohands” on page 25
5[Retouch] icon
“Adjusting the Hue” on page 14
6[Resize] icon
“Changing the Size of an Image”
on page 17
7[Rotate] icon
“Rotating/Inverting an Image” on
page 19
8[Print] icon
“Printing Images” on page 22
9[Zoom In Preview] button
Click to magnify image view in
the preview window.
0[Zoom Out Preview] button
Click to reduce image view in the
preview window.
q[Up Scroll] button
Click to slide up image view in the
film dialog box.
w[Down Scroll] button
Click to slide down image view in
the film dialog box.
eComment Window
Displays information or advice
explaining the task being per-
formed.
1234
5
6
7
8
9
0
q
w
e
Preview windowFilm dialog
6
About Screen Images
• Screen images illustrated in this document are for Windows 98. Views
may differ if using other Windows versions.
• Note that screen images in this document may differ slightly from the
actual screens, but the contents are identical.
7
Starting Photohands
Photohands can be started using any of the following methods.
• From the Start menu
• From the Task tray
• From the Photo Loader menu screen
• From the Photo Loader library index
• From the Photo Loader image viewing screen
IMPORTANT
• Photohands must be installed on your PC before starting it.
■Starting Photohands from the Start menu
1. Switch on your PC to start Windows.
2. From the Start menu, select [Programs] → [Casio] →
[Photohands] → [Photohands 1.0E].
Photohands starts up and the starting window appears.
8
■Starting Photohands from the Task tray
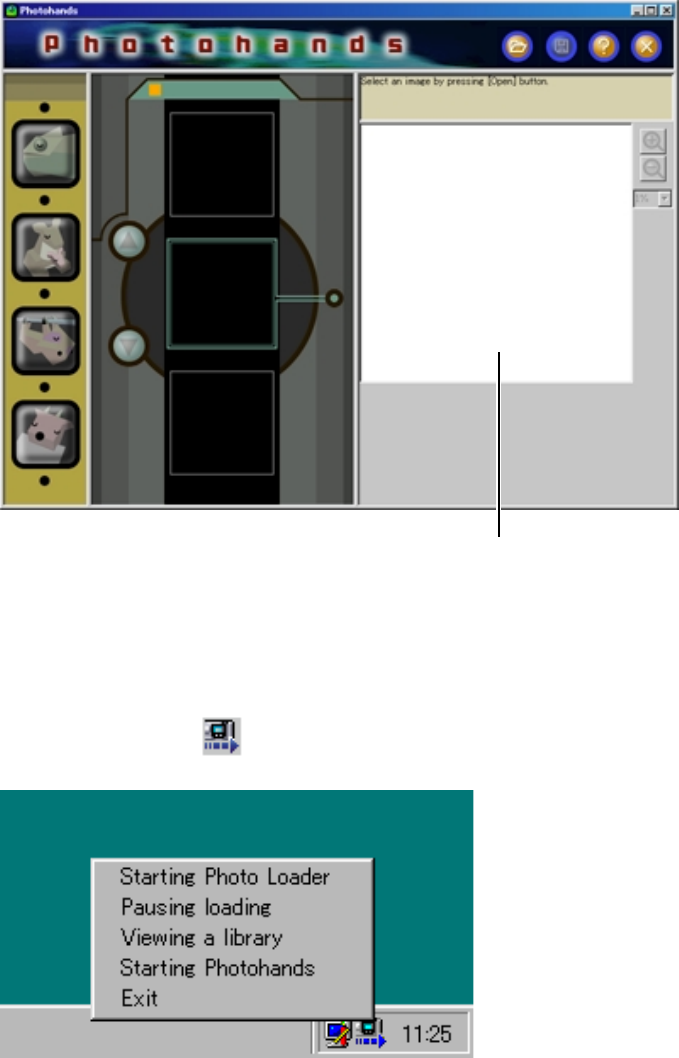
1. Right-click the icon in the Task tray.
2. Select and click [Starting Photohands].
Photohands starts up and the starting window appears.
An image will be displayed in the window on opening
the file. See “Displaying Images” on page 12.
9
■Starting Photohands from the Photo Loader
menu screen
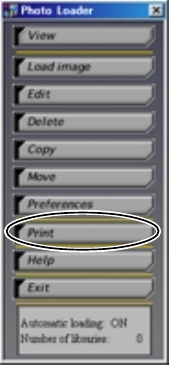
1. Click the [Print] button in the Photo Loader function buttons.
Photohands starts up and the starting window appears.
10
■Starting Photohands from the Photo Loader
Library screen
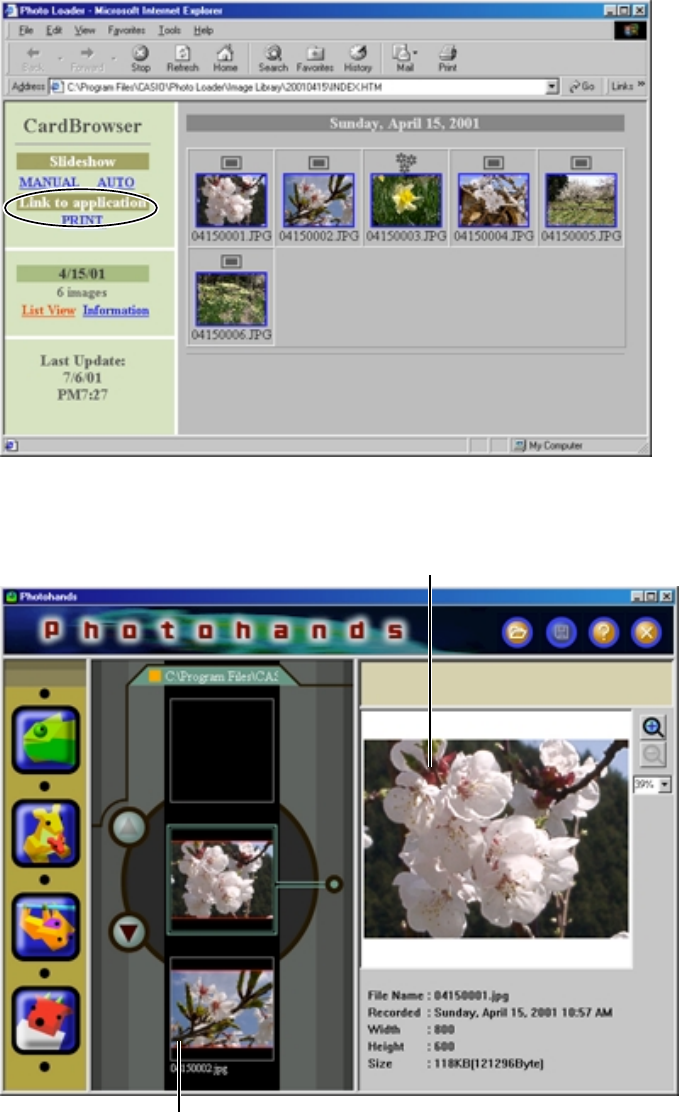
1. Click the [PRINT] button in the Library screen.
Photohands starts up and the starting window appears.
The first image in the Photo Loader library is displayed.
The second image in the Photo Loader library is displayed.
11
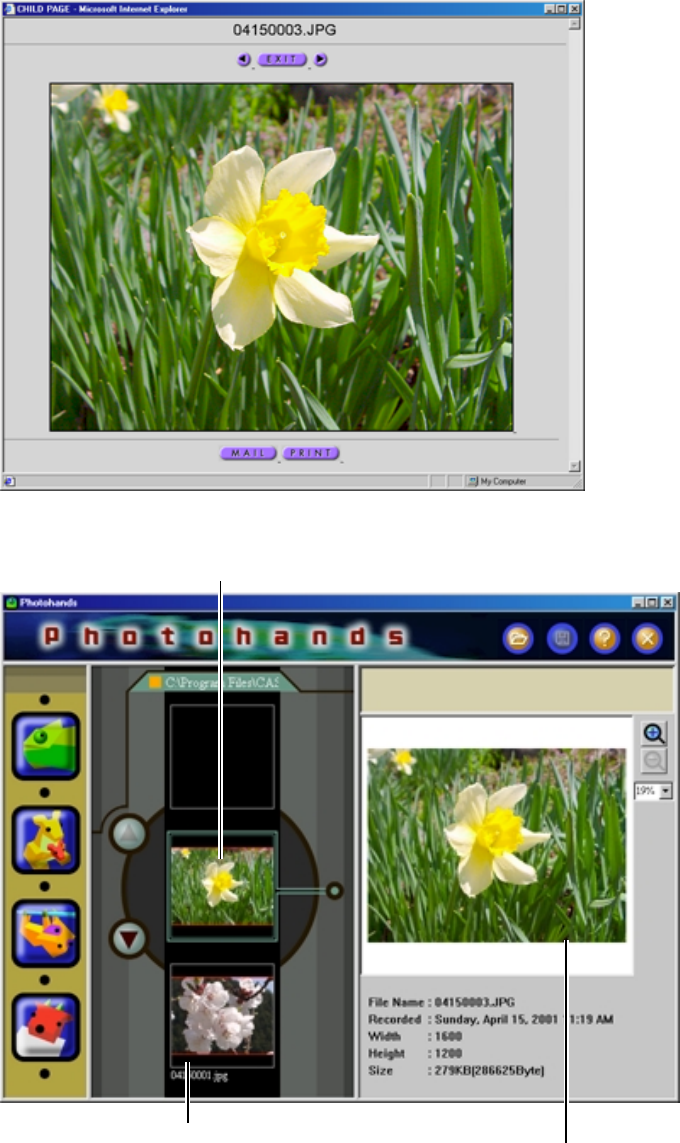
■Starting Photohands from the Photo Loader
image view screen
1. Click the [PRINT] button on the image view screen.
Photohands starts up and the starting window appears.
The image viewed in Photo
Loader is displayed.
The image viewed in Photo Loader is displayed first.
Other images, except for
those in Photo Loader, are
displayed in order.
12
Using Photohands
This section describes how to use the various functions of Photohands.
■Displaying Images
This section describes how to display images.
IMPORTANT
• The image file formats that can be handled with Photohands are: JPEG, BMP,
PNG, and TIFF*.
* Readable TIFF files are non-compressed RGB-TIFF files, and they cannot be
saved in TIFF format.
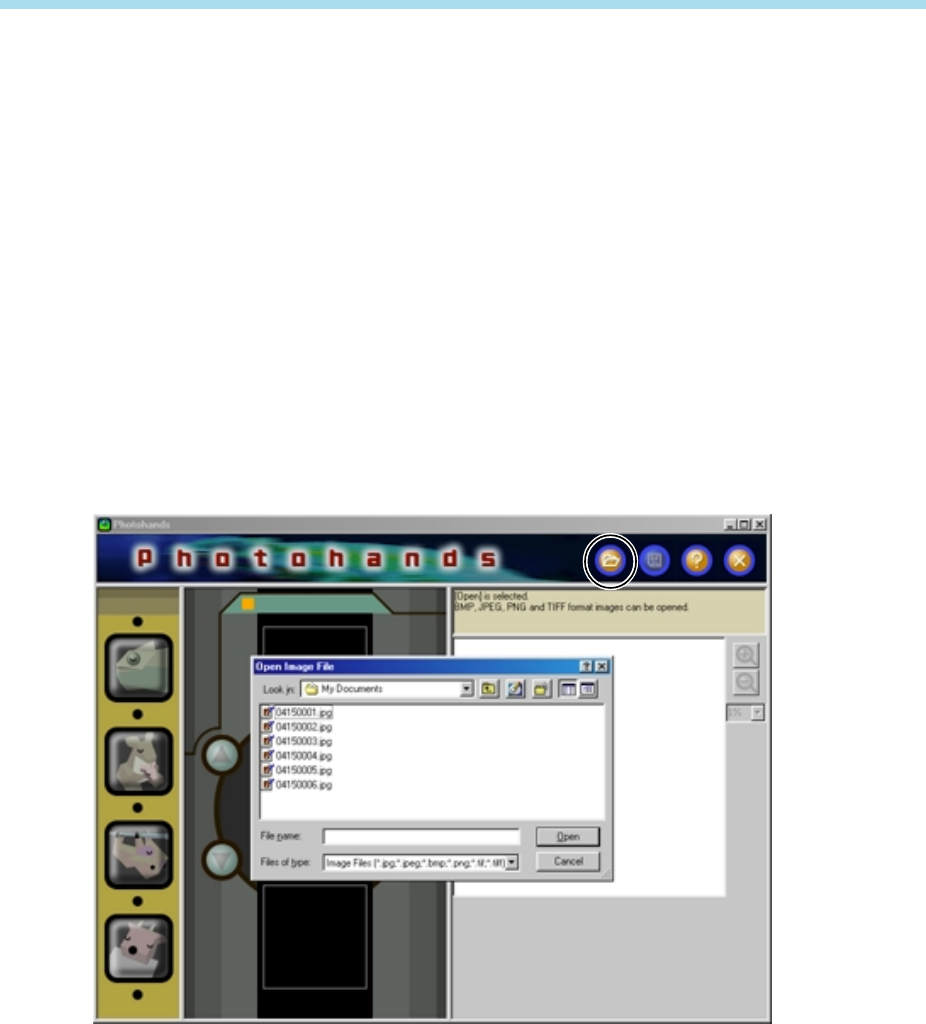
1. Click the [Open] icon.
A dialog box appears.
13
2. Select the image to be displayed.
3. Click the [Open] button.
The selected image is displayed.
The file information is displayed.
14
■Editing Images
This section describes how to edit images.
Three operations are available.
• Correcting the hue
• Changing the size
• Rotating/inverting an image
TIP
• Images can be edited while displayed in the Preview window. Preview the image to
be edited first. See “Displaying Images” on page 12.
IMPORTANT
• Two or more images cannot be edited simultaneously. Save the current image to
quit editing before starting to edit another image. See “Saving Images” on page 21.
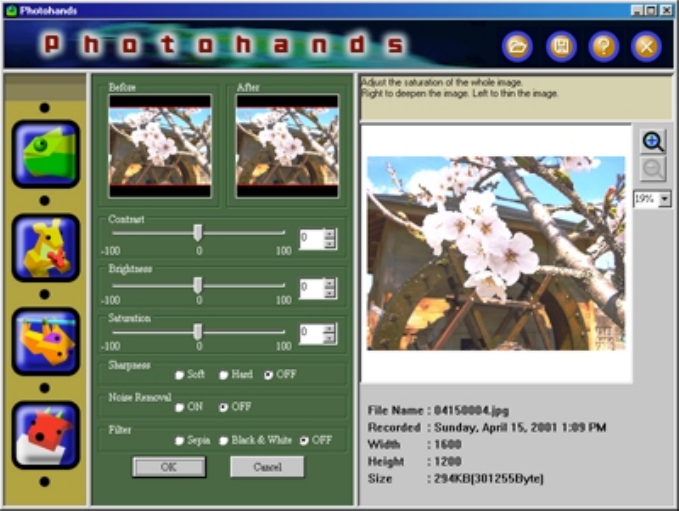
Adjusting the Hue
How to adjust the hue of an image is described.
Six operations are available.
• Contrast: For adjusting the light and shade gradation of the bright
and dark areas of the image.
• Brightness: For adjusting the brightness of the entire image.
• Saturation: For darkening the entire image’s hues when they are
bright or lightening the entire image’s hues when they are
dark.
• Sharpness: For strengthening or weakening the outline of the image.
Set to Sharp when the images are out of focus, or set to
Soft to show the softness of the entire image.
• Noise removal: For removing dust or scratches from the image.
• Filter: For adjusting the selected image to sepia or mono-
chrome.
TIP
• Images can be edited while displayed in the Preview window. Preview the image to
be edited first. See “Displaying Images” on page 12.
IMPORTANT
• Two or more images cannot be edited simultaneously. Save the current image to
quit editing before starting to edit another image. See “Saving Images” on page 21.
15
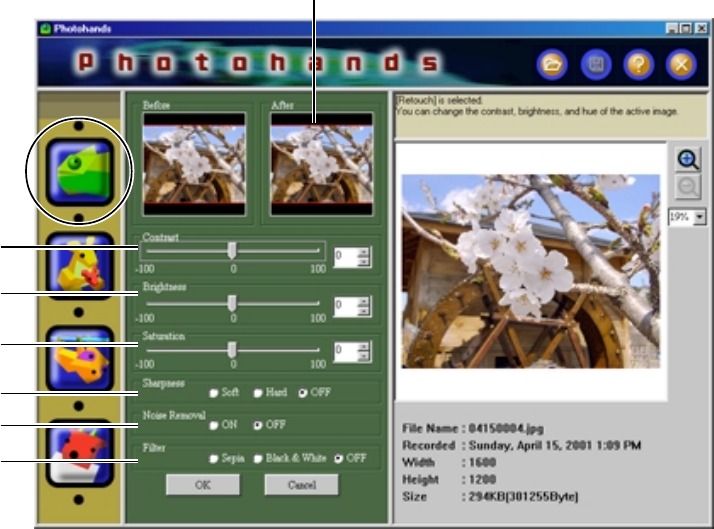
1. Click the [Retouch] icon.
• The retouch dialog box appears.
• Set as described below.
• Click the [Cancel] button to reset each setting.
1 Adjusting contrast
Move in the right direction to sharpen the image. Move in the left
direction to soften the image.
• Enter a value in the range –100 to +100, or
• Drag the slider to set a value.
2 Adjusting brightness
Move in the right direction to lighten the image. Move in the left
direction to darken the image.
• Enter a value in the range –100 to +100, or
• Drag the slider to set a value.
3 Adjusting saturation
Move in the right direction to deepen the color. Move in the left
direction to thin the color.
• Enter a value in the range –100 to +100, or
• Drag the slider to set a value.
1
2
3
4
5
6
For re-drawing images in response
to the settings.
Preview the images by clicking the
[OK] button.
16
4Adjusting sharpness
Check the [Hard] button to sharpen the image, or check the
[Soft] button to tone down the image.
• Check the [Hard] button to increase the sharpness.
• Check the [Soft] button to decrease the sharpness.
• Check the [OFF] button so as not to adjust the sharpness.
5Setting noise removal
This function removes dust or scratches in an image. Click the
[ON] or [OFF] buttons to select the function.
• Check the [ON] button to remove noise.
• Check the [OFF] button to not remove noise.
6Filter setting
This function changes the image color.
Click the [Sepia] or [Black & White] buttons to select the
function.
• Click the [Sepia] button to give a sepia tone image.
• Click the [Black & White] button to give a black-and-white
image.
• Check the [OFF] button so as not to set the filter.
2. Click the [OK] button to view the retouched image.
• The image retouched using the settings in Step 1 is redrawn in
the preview window.
• Each setting returns to the default.
• Click the [Cancel] button to go back to the previous screen
before you click the [OK] button.
17
3. Changing the size, rotating/inverting, printing an image
See “Changing the Size of an Image” on page 17, “Rotating/
Inverting an Image” on page 19, or “Printing Images” on page 22.
4. After retouching, save the image. If not saved, the retouching
or modification will not be applied to the actual image data.
See “Saving Images” on page 21.
IMPORTANT
• If you do not want to overwrite the original image, save the image on a
different location on the computer’s hard disk.
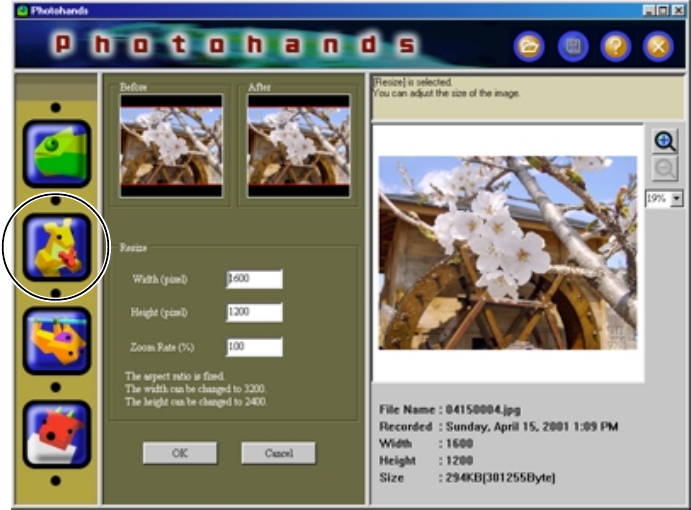
Changing the Size of an Image
This section describes how to change the size of an image.
TIP
• The size of an image can be changed in the Preview window. Preview the image to
be changed first. See “Displaying Images” on page 12.
IMPORTANT
• Two or more images cannot be edited simultaneously. Save the current image to
quit editing before starting to edit another image. See “Saving Images” on page 21.
• Photohands is software for editing images taken with a digital camera, and
therefore is not suitable for editing images larger than those taken with a regular
digital camera.
1. Click the [Resize] icon.
The resize dialog box appears.

18
2. Enter values (pixels) for “Height” and “Width”.
• The size can also be changed by entering a value in the % field.
• The enlargement ratio is maximum 200%.
• The aspect ratio is fixed.
• If the height is changed, the width is automatically changed
accordingly.
• If the width is changed, the height is automatically changed
accordingly.
• Click the [Cancel] button to go back to the previous screen
before you click the [OK] button.
3. Click the [OK] button to change the size.
• The image is redrawn in the Preview window.
• Click the [Cancel] button to go back to the previous screen
before you click the [OK] button.
4. Correcting the hue, rotating/inverting, printing an image
See “Adjusting the Hue” on page 14 and “Rotating/Inverting an
Image” on page 19.
The image is redrawn in accordance with the settings.
19
5. After changing the size, save the image. If not saved, the
changes will not be applied to the actual image data. See
“Saving Images” on page 21.
IMPORTANT
• If you do not want to overwrite the original image, save the image on a
different location on the computer’s hard disk.
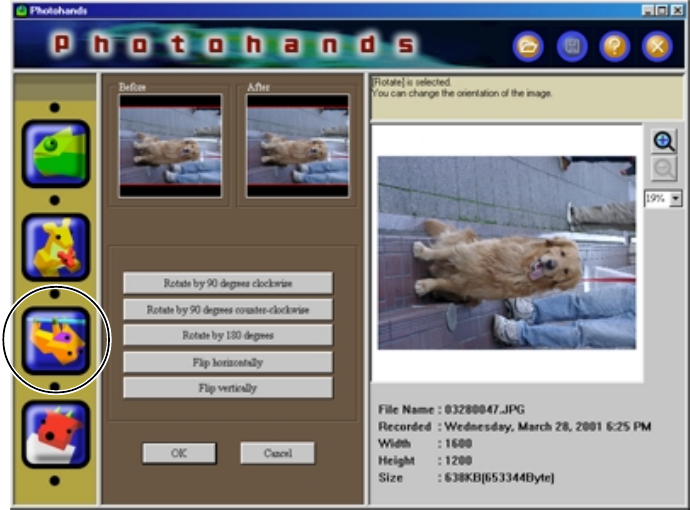
Rotating/Inverting an Image
This section describes how to rotate/invert an image.
TIP
• An image can be rotated or inverted the Preview window. Preview the image to be
edited first. See “Displaying Images” on page 12.
IMPORTANT
• Two or more images cannot be edited simultaneously. Save the current image to
quit editing before starting to edit another image. See “Saving Images” on page 21.
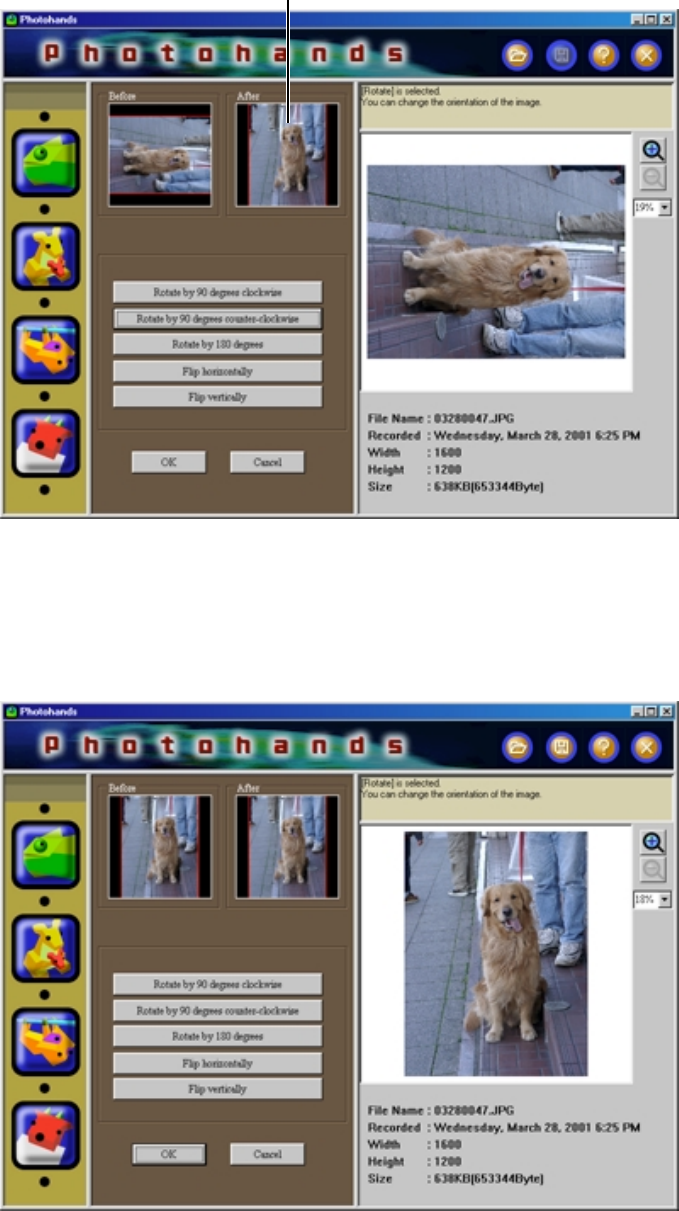
1. Click the [Rotate] icon.
The rotate dialog box appears.
20
2. Click the button to select the direction to rotate.
3. Click the [OK] button to save the rotated or inverted image.
• The image is redrawn in the Preview window.
• Click the [Cancel] button to go back to the previous screen
before you click the [OK] button.
The image is redrawn in accordance with the selected
direction button.
21
4. Correcting the hue, changing the size, printing an image
See “Adjusting the Hue” on page 14, “Changing the Size of an
Image” on page 17 or ”Printing Images” on page 22.
5. Save the image after rotating or inverting. If not saved, the
changes will not be applied to the actual image data. See
“Saving Images” on page 21.
IMPORTANT
• Saving the image updates the Photo Loader library. If you do not wish to
overwrite the image in the Photo Loader library, save the image in another
location on the PC.
■Saving Images
This section describes how to save an image.
IMPORTANT
• Always save the image after the image data has been edited. If not, the edited
content of the image data will not be displayed.
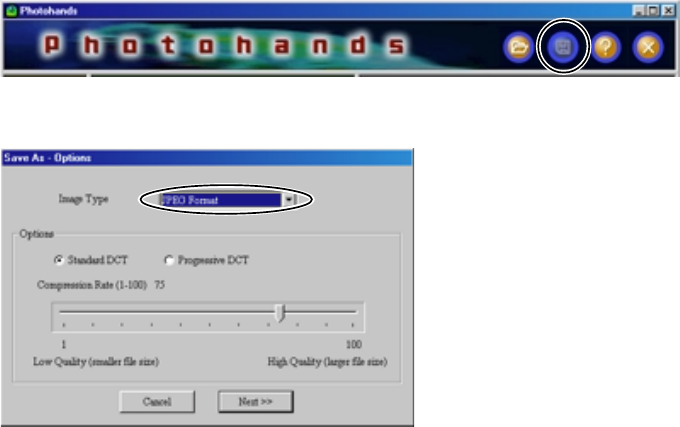
1. After editing the image, click the [Save] icon.
2. Select the file saving format.
• The file formats that Photohands can save are the following:
JPEG, BMP, PNG.
* Images cannot be saved in TIFF format.
• The rate of compression can be adjusted by choosing JPEG. If
the compression rate is set high, the file size will be smaller,
however, the image quality will deteriorate. On the other hand, if
you want to keep image resolution, set the compression rate to
low (high image quality).
22
• When saving with [Progressive DCT], the data displayed will
gradually become clearer from a rough screen, when displaying
on a home page.
3. Click the [Next >>] button.
• Click the [Cancel] button to cancel the action.
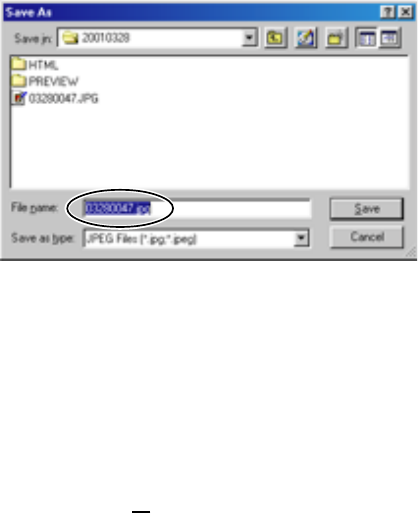
4. Enter a new file name.
IMPORTANT
• If you do not want to overwrite the original image, save the image on a
different location on the computer’s hard disk.
• To support the edited images in Photo Loader, start Photohands from
Photo Loader, and after editing the images, overwrite them or save them
under a different name. After that, re-edit them in Photo Loader.
5. Click the [Save] button.
• The file is saved with the name specified in Step 4.
• Click the [Cancel] button to close the box without saving.
■Printing Images
This section describes how to print an image.
TIP
• Print an image displayed in the Preview window. Preview the image to be printed
first. See “Displaying Images” on page 12.
IMPORTANT
• Another image cannot be printed until the image currently being edited has been
printed. To print another image, quit the printing mode or save the image being
edited to quit editing. See “Saving Images” on page 21.
23
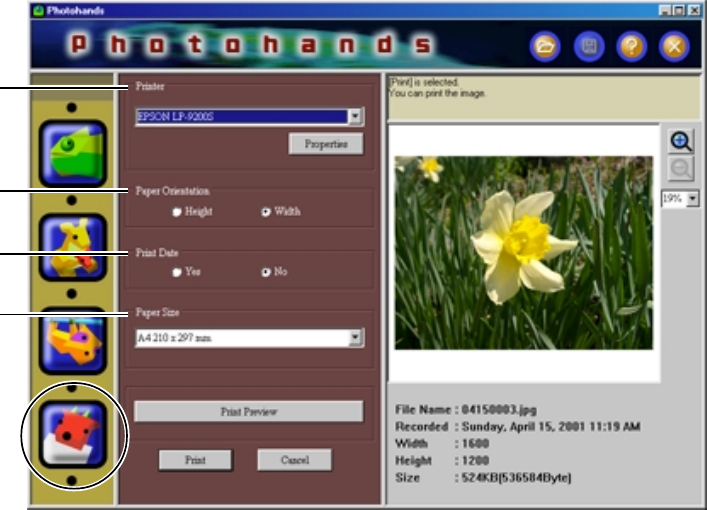
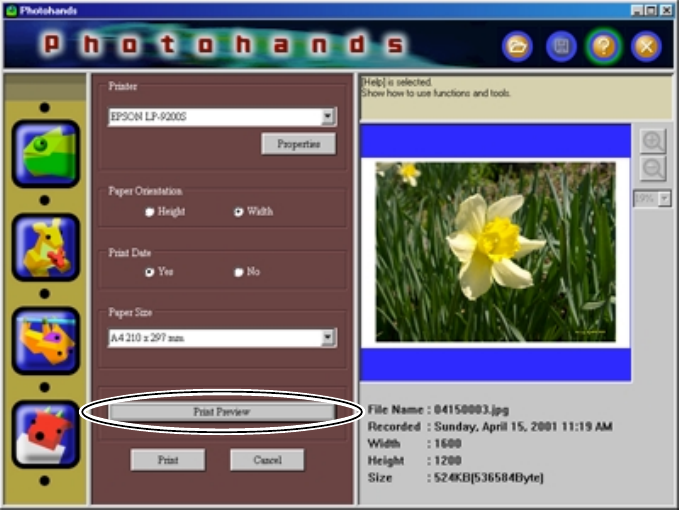
1. Click the [Print] icon.
• The print dialog box appears.
• Set as necessary.
1Printer
Select the destination printer.
2Paper Orientation
Select “Height” or “Width”.
3Print Date
• You can set to print the date or
not. You can also print the date
when the image was taken with
the camera.
• Depending on the printer, the
date may be printed incorrectly.
Be sure to read the printer’s
manual and change the printer
settings such as the printer’s
printing range.
• The date format printed when
printing the date follows the
date format of Windows (long
date). For details, refer to the
Windows user’s manual or the
Windows Help.
1
2
3
4
4Paper Size
Set the paper size.
24
2. Click the [Print] button.
• Printing starts.
• Click the [Print Preview] button to show the print preview image.
• Click the [Cancel] button to abandon the current action.

25
Getting Help
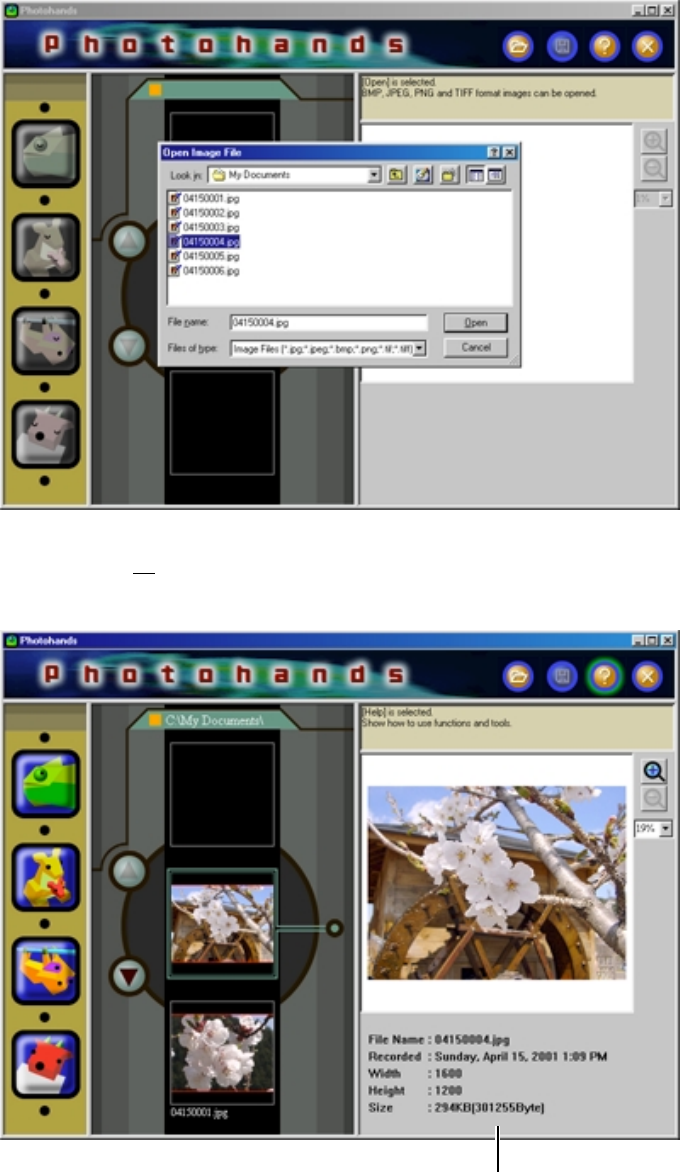
1. Click the [Help] icon.
2. Double-click the item to be viewed.
The item double-clicked is displayed.
Quitting Photohands
1. Click the [Quit] icon.
Photohands quits.
