CastleNet Technology WM1210 Wireless 802.11g MiniPCI Card User Manual
CastleNet Technology Inc. Wireless 802.11g MiniPCI Card
Users Manual Revised

Quick Start Guide
Thank you for purchasing this 802.11g network standard device. Your 802.11g Wireless LAN
Mni PCI Card certainly will bring you into such a high-speed networking sphere.
With the easiness installation and configuration, you can operate your network with much
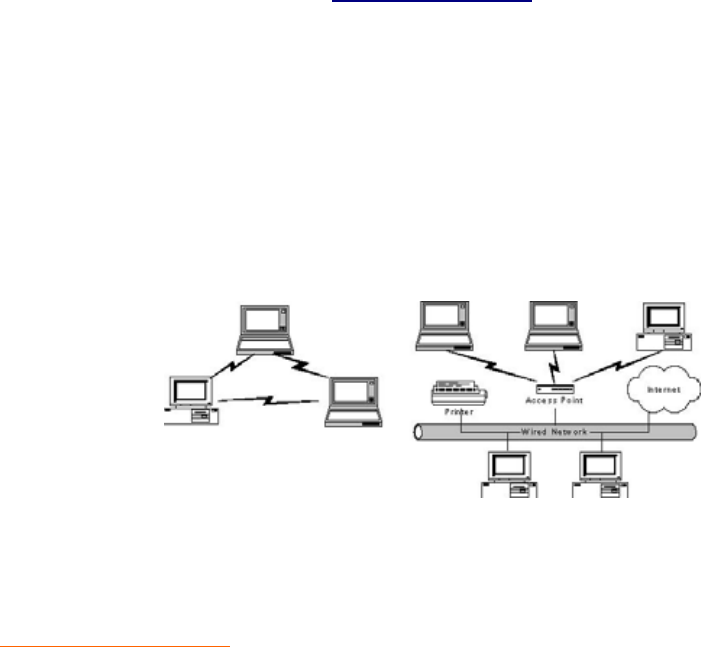
enjoyments in either an independent mode or an infrastructure mode. The former, which is also
known as peer-to-peer or ad-hoc network, lets you directly make connection with other
wireless-equipped computers, and the later, the so-called infrastructure network, allows you to
communicate with wired LAN via an access point.
Ad-Hoc Network Configuration Infrastructure Network Configuration
Please go along with the procedures below to install the 802.11g Wireless LAN Mini PCI Card.
Installation Procedures
1. Insert the 802.11g Wireless LAN Mini PCI Card into an available mini PCI slot of your
computer. The Found New Hardware Wizard dialog box will appear because the system
has detected the insertion of the Card.
2. In the Found New Hardware Wizard dialog box, choose Install from a list or specific location
[Advanced] and then click Next.
3. In the next dialog box, choose Includes this location in the search under Search for the best
driver in these locations.
4. Choose Browse to open the Browse For Folder dialog box.
5. Find the folder named Install from directories on the supplied CD, and then click OK to
close the dialog box.
6. In the Found New Hardware Wizard dialog box, click Next to proceed.
7. If you are operating Windows XP, the system will notify you that the driver has not passed
Windows Logo testing. Because the Card has been tested to work with Windows XP, please
choose Continue Anyway. Otherwise, if you are operating other systems, please skip to next
step.
8. Your system will start to copy the drivers found. It might take a couple of seconds. When
done, click Next.
9. Click Finish when the Completing the Found New Hardware Wizard screen appears.
G060203V10
- 1 –
Note: This module can only be used on Mobile devise.
Federal Communication Commission Interference Statement
This equipment has been tested and found to comply with the limits for
a Class B digital device, pursuant to Part 15 of the FCC Rules. These
limits are designed to provide reasonable protection against harmful
interference in a residential installation. This equipment generates,
uses and can radiate radio frequency energy and, if not installed and
used in accordance with the instructions, may cause harmful
interference to radio communications. However, there is no guarantee
that interference will not occur in a particular installation. If this
equipment does cause harmful interference to radio or television
reception, which can be determined by turning the equipment off and
on, the user is encouraged to try to correct the interference by one of
the following measures:
- Reorient or relocate the receiving antenna.
- Increase the separation between the equipment and receiver.
- Connect the equipment into an outlet on a circuit different from that
to which the receiver is connected.
- Consult the dealer or an experienced radio/TV technician for help.
This device complies with Part 15 of the FCC Rules. Operation is
subject to the following two conditions: (1) This device may not cause
harmful interference, and (2) this device must accept any interference
received, including interference that may cause undesired operation.
FCC Caution: Any changes or modifications not expressly approved by
the party responsible for compliance could void the user's authority to
operate this equipment.
IMPORTANT NOTE:
FCC Radiation Exposure Statement:
This equipment complies with FCC radiation exposure limits set forth for an
uncontrolled environment. This equipment should be installed and operated
with minimum distance 20 cm between the radiator & your body.
This transmitter must not be co-located or operating in conjunction with any
other antenna or transmitter.

This device is intended only for OEM integrators under the following
conditions:
1) The antenna must be installed such that 20 cm is maintained between the
antenna and users, and
2) The transmitter module may not be co-located with any other transmitter
or antenna.
As long as 2 conditions above are met, further transmitter test will not be
required. However, the OEM integrator is still responsible for testing their
end-product for any additional compliance requirements required with this
module installed (for example, digital device emissions, PC peripheral
requirements, etc.).
IMPORTANT NOTE: In the event that these conditions can not be met (for
example certain laptop configurations or co-location with another transmitter),
then the FCC authorization is no longer considered valid and the FCC ID can
not be used on the final product. In these circumstances, the OEM integrator
will be responsible for re-evaluating the end product (including the transmitter)
and obtaining a separate FCC authorization.
End Product Labeling
This transmitter module is authorized only for use in device where the
antenna may be installed such that 20 cm may be maintained between the
antenna and users (for example: AP, Router….etc.). The final end product
must be labeled in a visible area with the following: “Contains TX FCC ID:
RK9-WM1210”.
Manual Information That Must be Included
The OEM integrator has to be aware not to provide information to the end
user regarding how to install or remove this RF module in the users manual of
the end product which integrate this module.
The users manual for OEM integrators must include the following information
in a prominent location “ IMPORTANT NOTE: To comply with FCC RF
exposure compliance requirements, the antenna used for this transmitter
must be installed to provide a separation distance of at least 20 cm from all
persons and must not be co-located or operating in conjunction with any other
antenna or transmitter.