Catapult Sports 32301A PERFORMANCE MONITORING EQUIPMENT User Manual Part 2
Catapult Sports Pty Ltd PERFORMANCE MONITORING EQUIPMENT Part 2
Contents
- 1. User Manual Part 1
- 2. User Manual Part 2
User Manual Part 2

To nish,clickonyournameinthetoprightcornerandchangethe‘Conguration’settingstothevenueyoujustadded.
To changetheeld/venueforoneactivityonly,rightclickonthesession,then‘Edit’andchangevenue.
21
RUNNING A SESSION
22
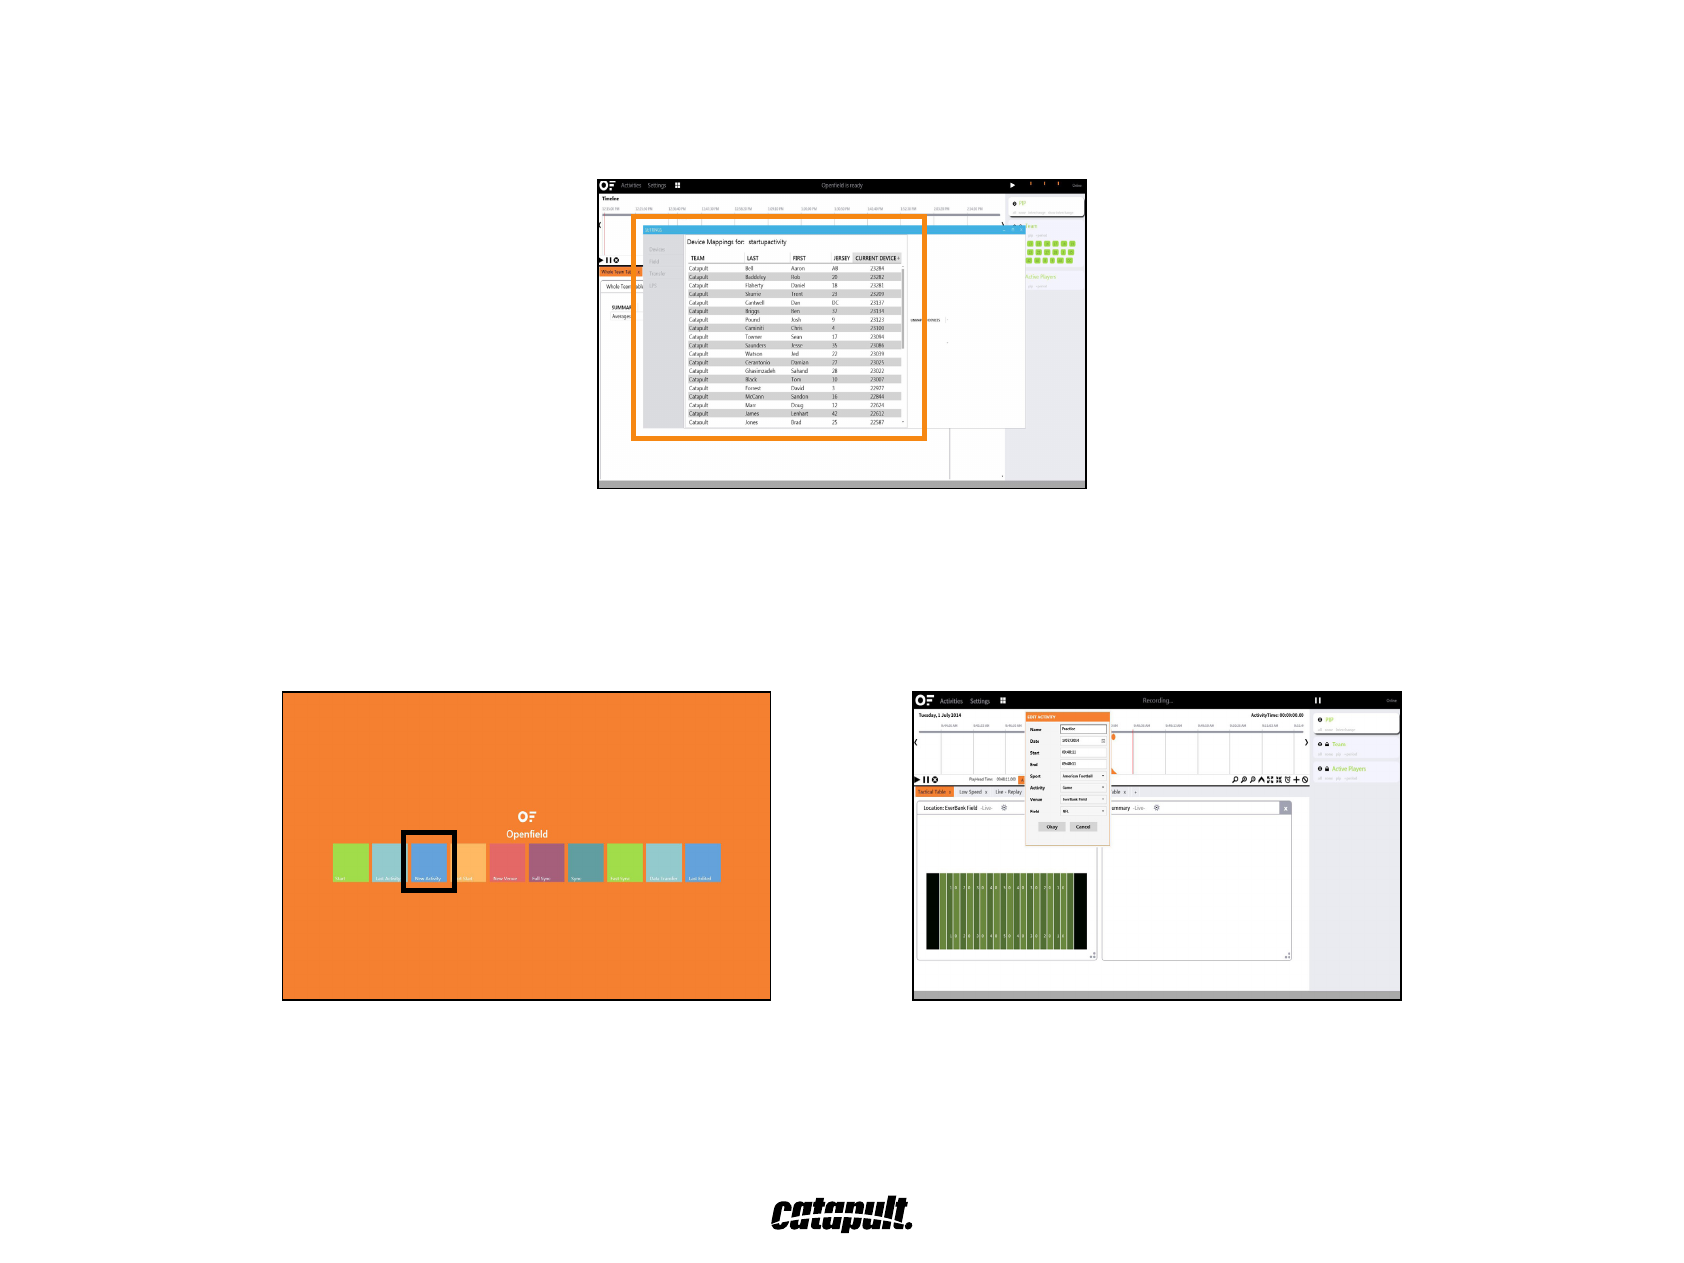
ASSIGNING MONITORS TO AN ATHLETE
Prior to running a real-time session, it’s important each monitor is assigned to an athlete. The ID is found on the back of the monitor.
To assign monitors to athletes, click on ‘Settings’ in the top left corner, then ‘Devices’
STARTING A REAL-TIME SESSION
To runareal-timesession,select‘NewActivity’fromthemaintitlemenu.
Youractivitywillbecreatedinthetimeline.Rightclickandselect‘Edit’togivethesessionaname.
23
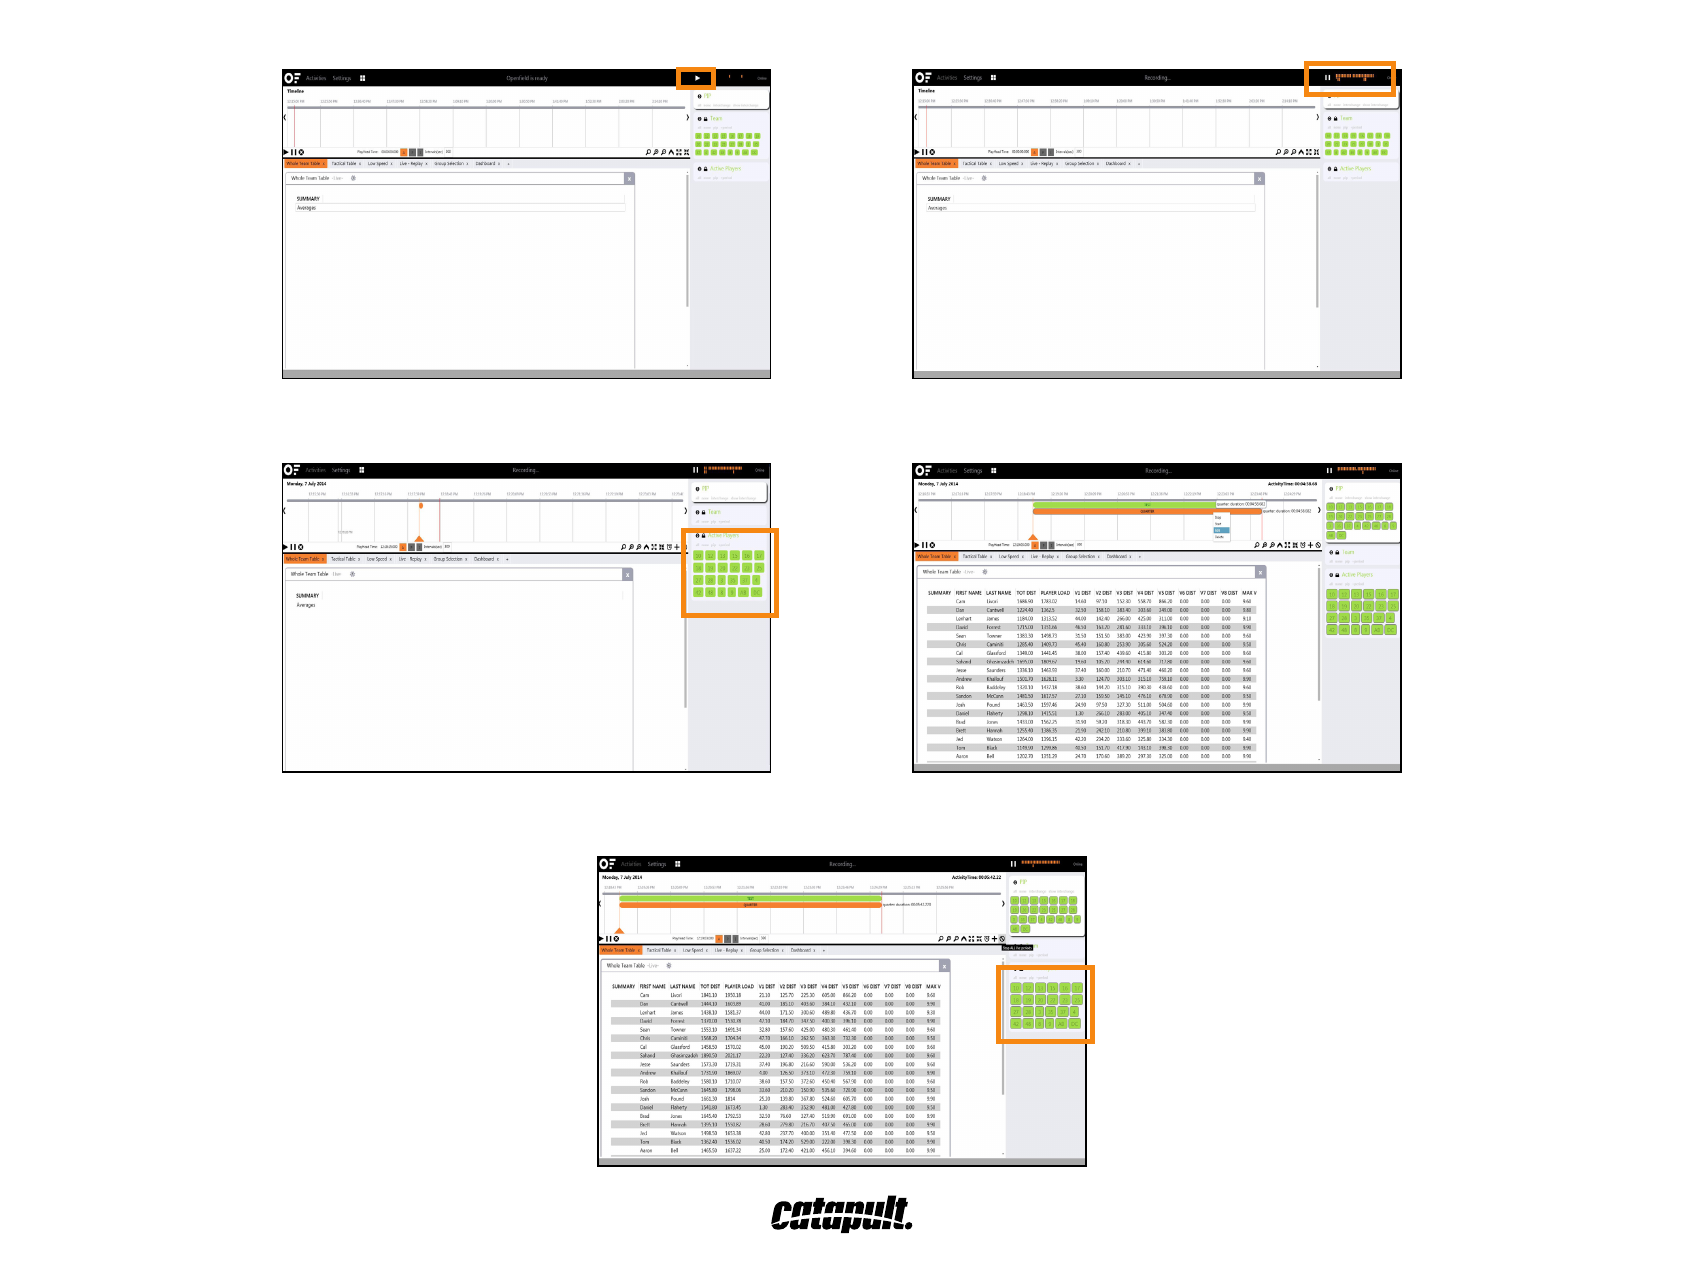
ClickthePlaybuttontointhetoprightcornertostartreceivingdata.Thestreamwillchangepatternwhendataisbeingreceived.
Double-clickon‘ActivePlayers’toshowallathletes.
By selecting ‘all’ and ‘+period’, all athletes are added to the PIP.
24
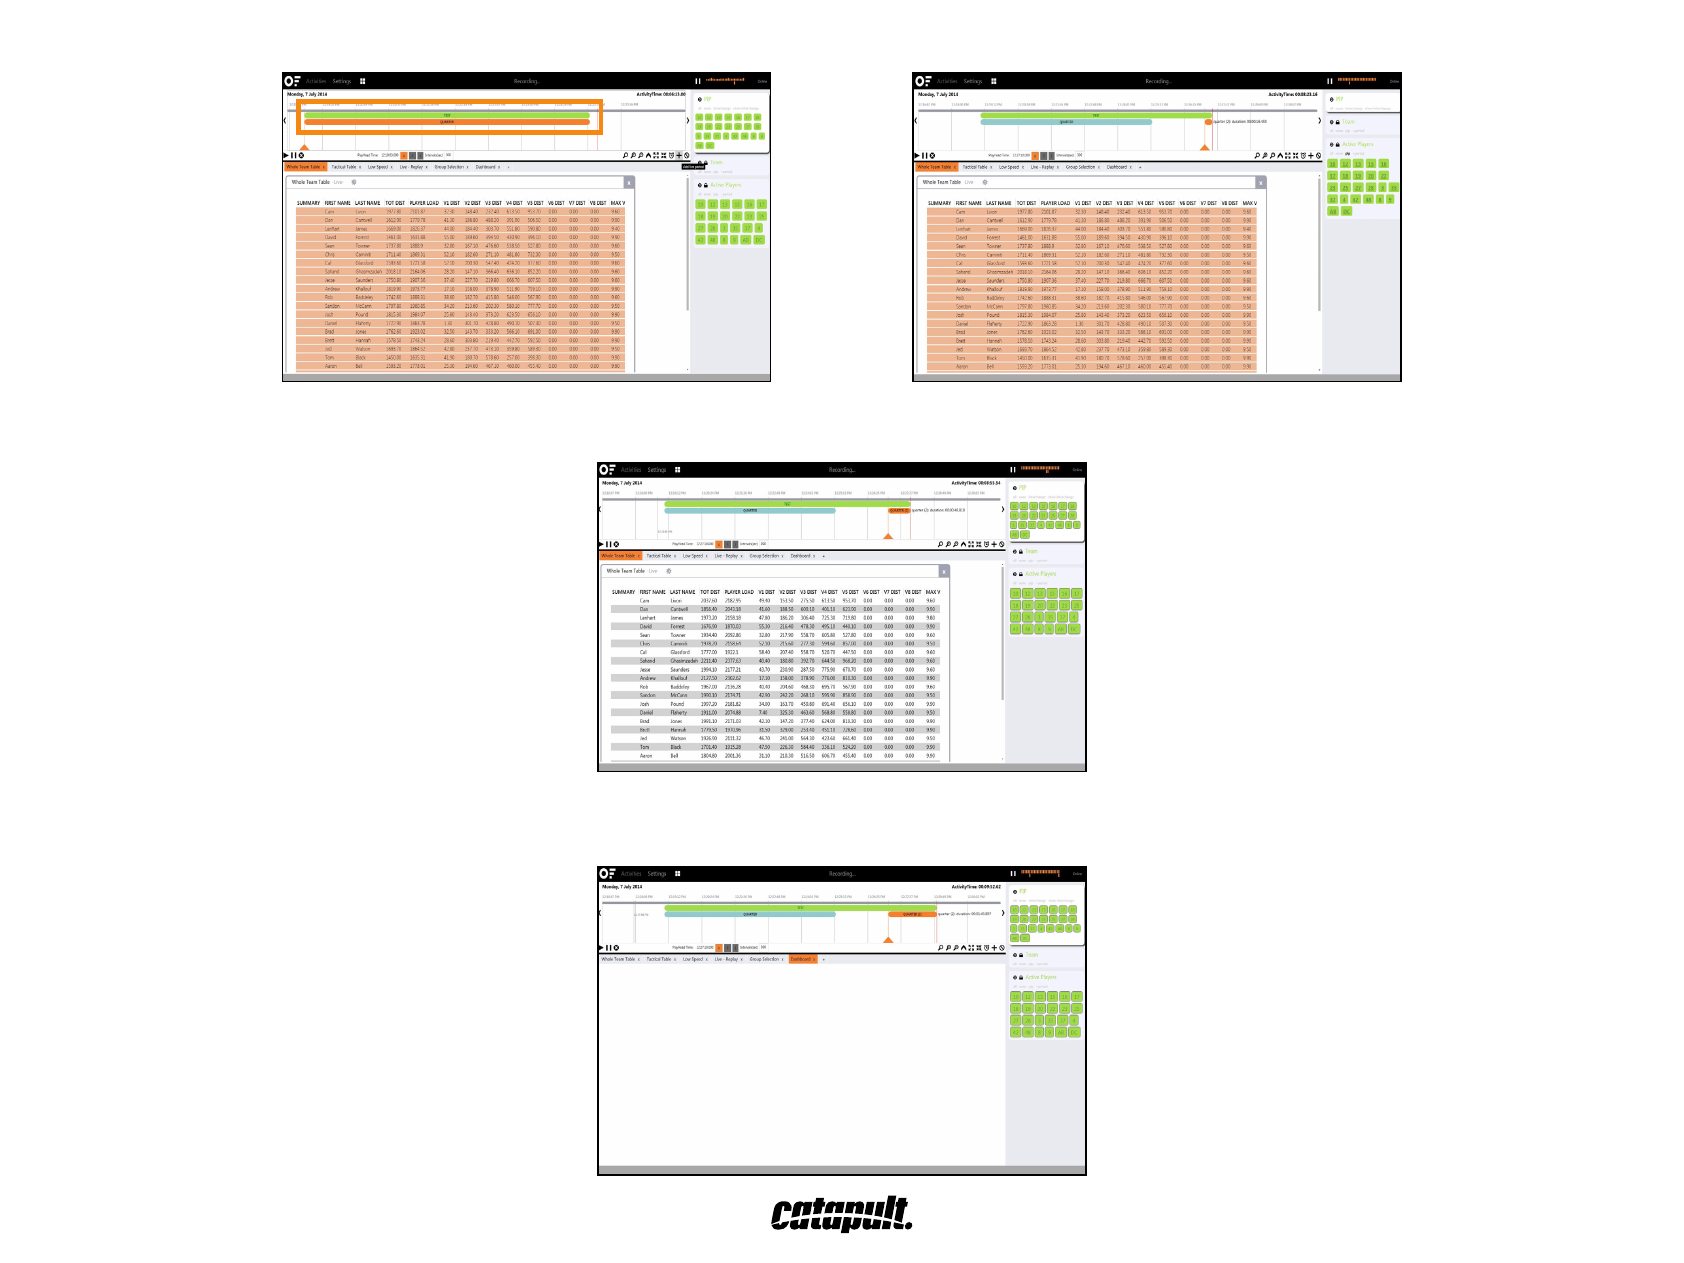
Rightclickontheperiodtoedittheperiodnameonthey.
To stop all live periods, click the ‘Stop ALL live periods’ button.
To add a live period, click the ‘Add live period’ button.
25
Creating and modifying widgets
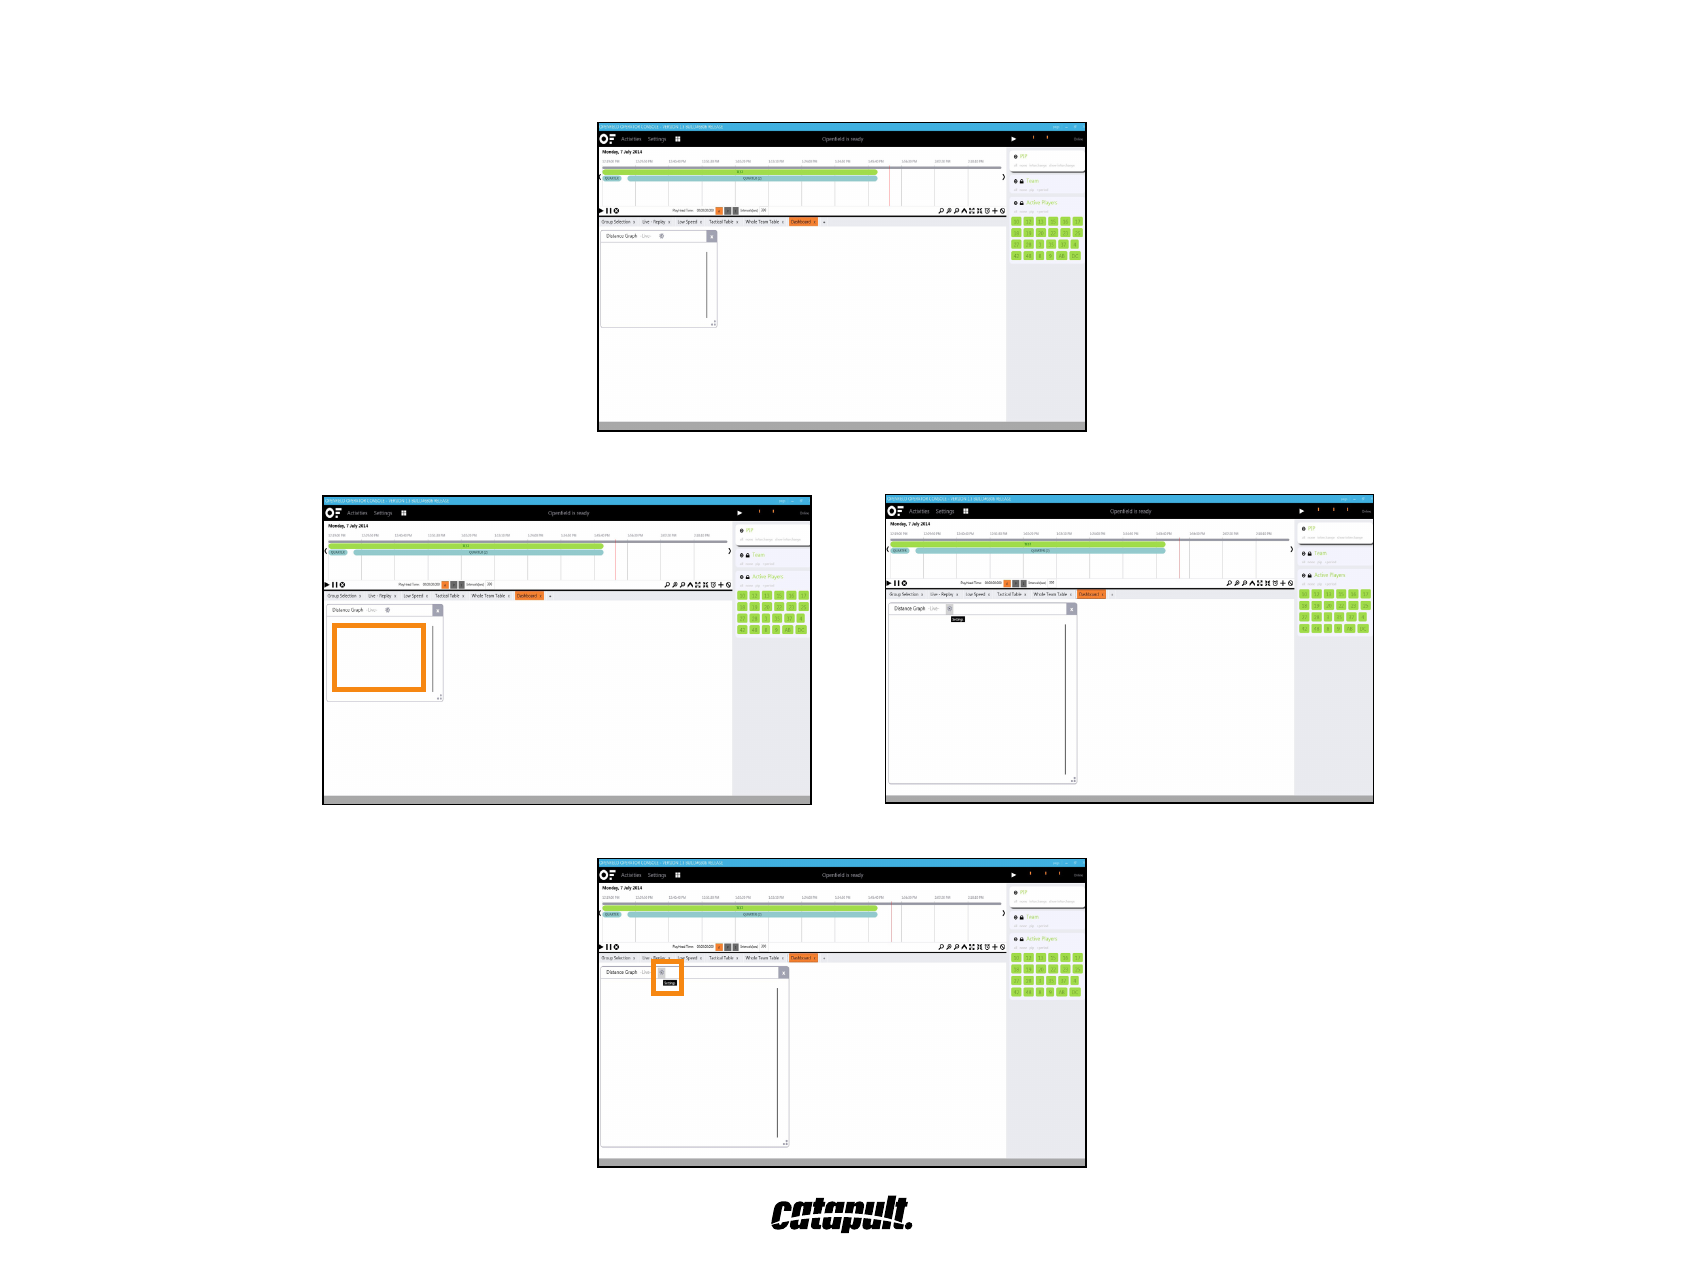
OpenFieldcomeswithpre-builtdashboardstotrackareal-timesession,butyoucancreateyourown.Thiscanbedonebysimplyclickingthe‘+’buttontocreateanewdashboard.
Then,byrightclickinginthewhitespaceofthedashboard,select‘NewWidget’andthedesignyouwishtouse.Clickanddragfromthebottomrightcornertore-sizethewidget.
The parameters and title can be altered by clicking the ‘Settings’ icon.
27
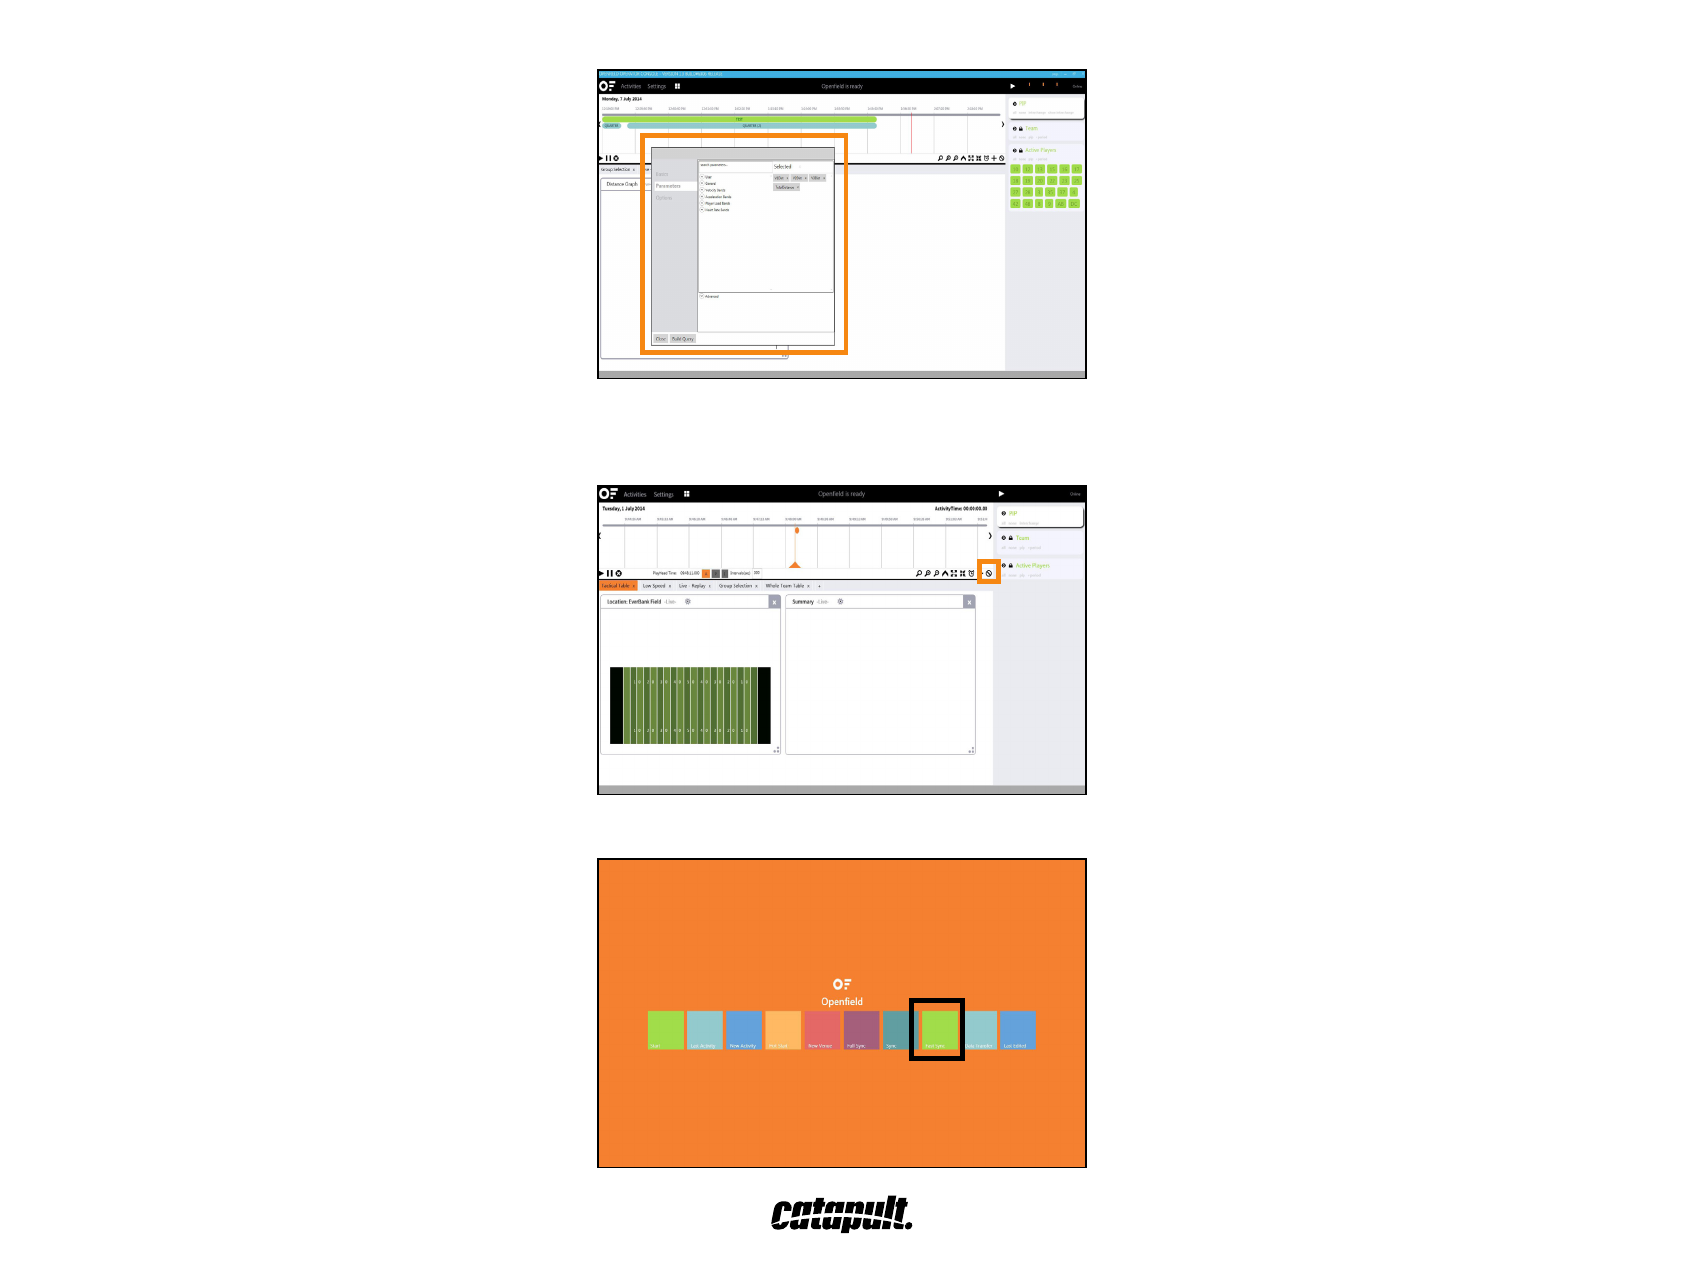
Parametersthatyouwishtoviewcanbedeletedoraddedfromthedropdownlistontheleft,orbysearching.Click‘BuildQuery’whendone.
Finishing a real-time session
To nishareal-timesession,endalllivingrunningperiodsbyclickingthe‘StopAllliveperiods’icon.
Once the periods have stopped, return to your home page and click ‘Fast Sync’ to sync your live data up to the cloud for immediate reporting and feedback.
28
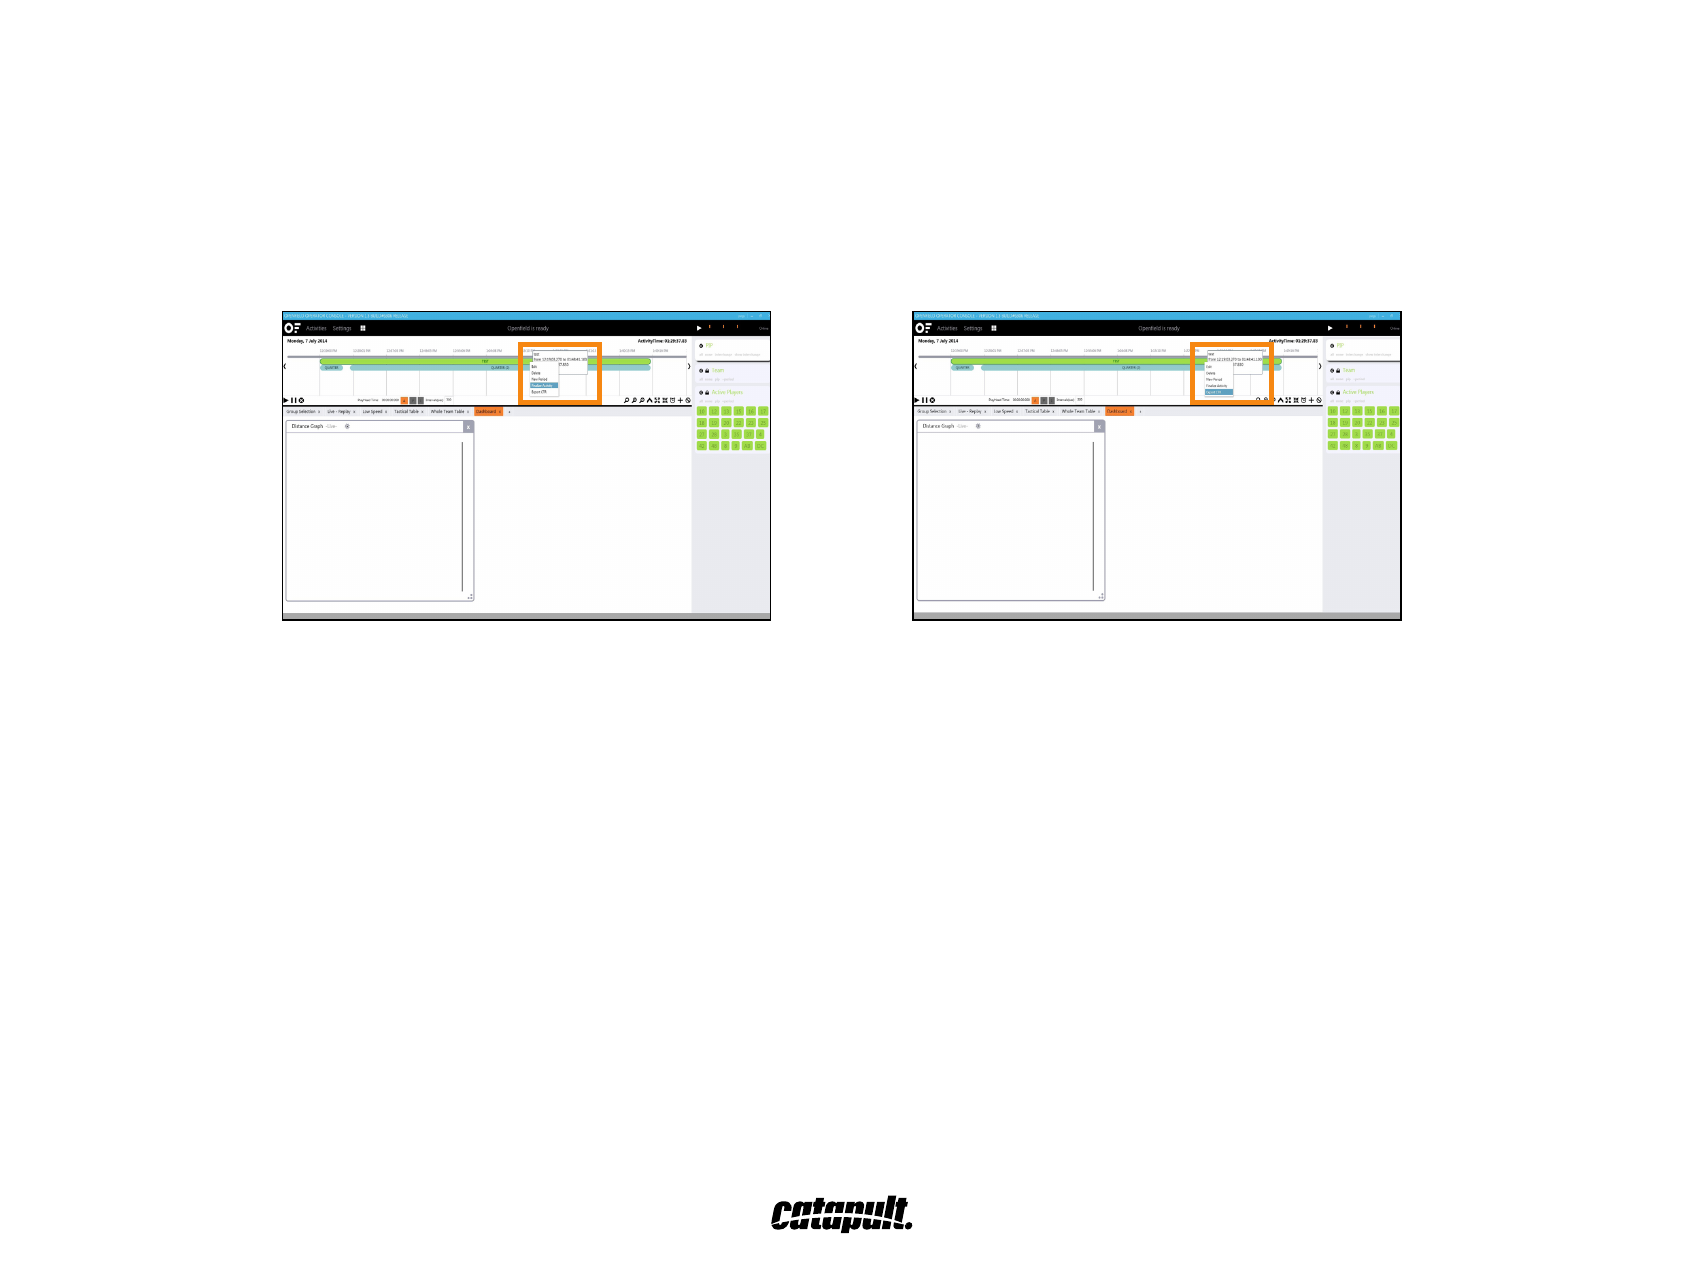
Reporting using real time
Itisrecommendedthatmonitorsaredownloadedtotheconsolebeforegeneratingdetailedreports.
Therearetwowaystoviewyourreal-timedata:
1.Syncingyourreal-timesessiontoviewyourdatathroughthecloud.
2.GeneratingaCTRafternalizingtheactivity.To dothis,rightclickontheactivityandselect‘FinalizeActivity’,then‘ExportCTR’.
29

FINISHING A SESSION
30
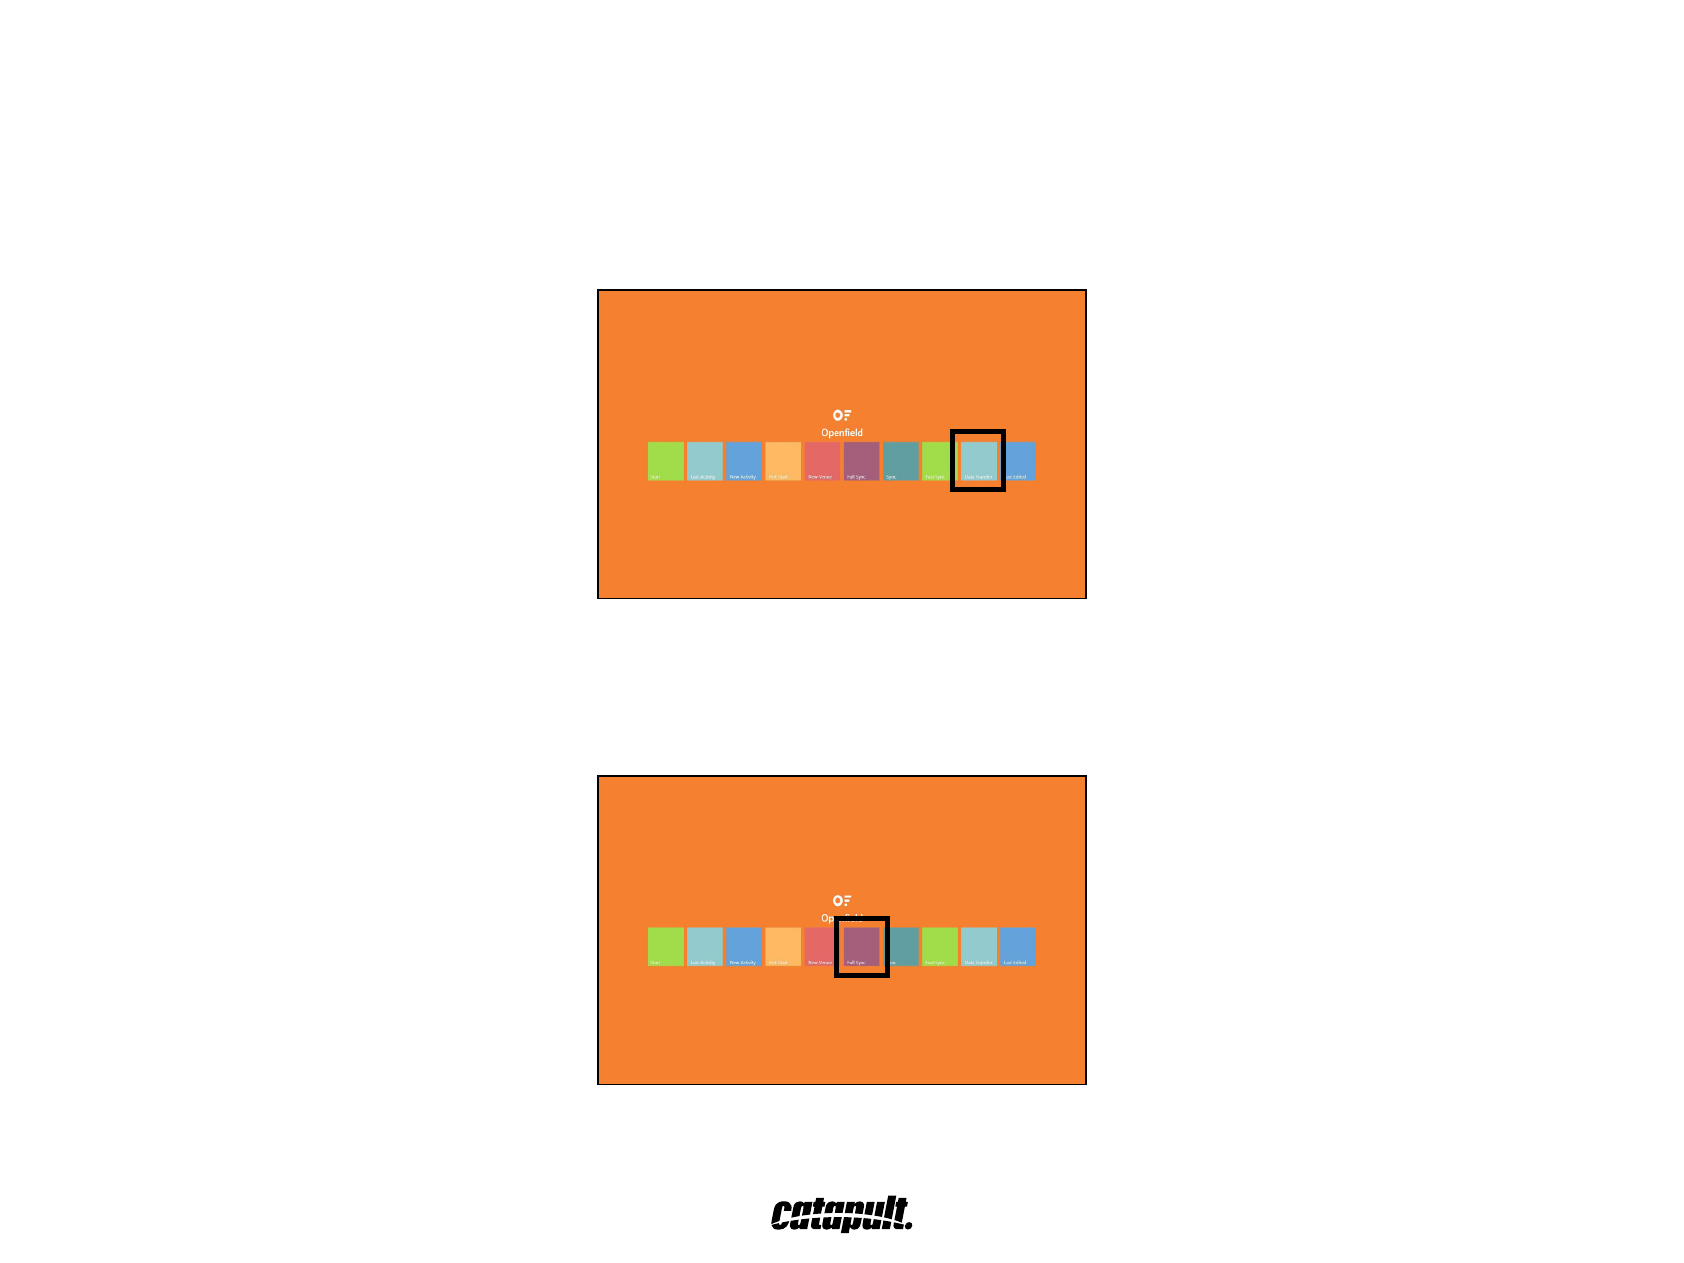
Afteryouhavereceivedyourmonitorspost-session,youwillneedtodownloadthedataandsyncwiththecloud.
Thedatafromthemonitorsallowcalculationofouradvancedalgorithmstotakeplaceandanyinformationmissedwhilerunningreal-time.
TRANSFERRING DATA OFF MONITORS
Plug in your monitors to the charge case and push each monitor into its slot one at a time. Only connect one charge case to the computer at a time.
To viewthedownloadandimportstatusofyourconnectedmonitors,click‘DataTransfer’
Onceallmonitorshavedownloaded,makesureallchargecasesaredisconnectedfromthecomputer.
Return to the main menu and run your desired sync.
31

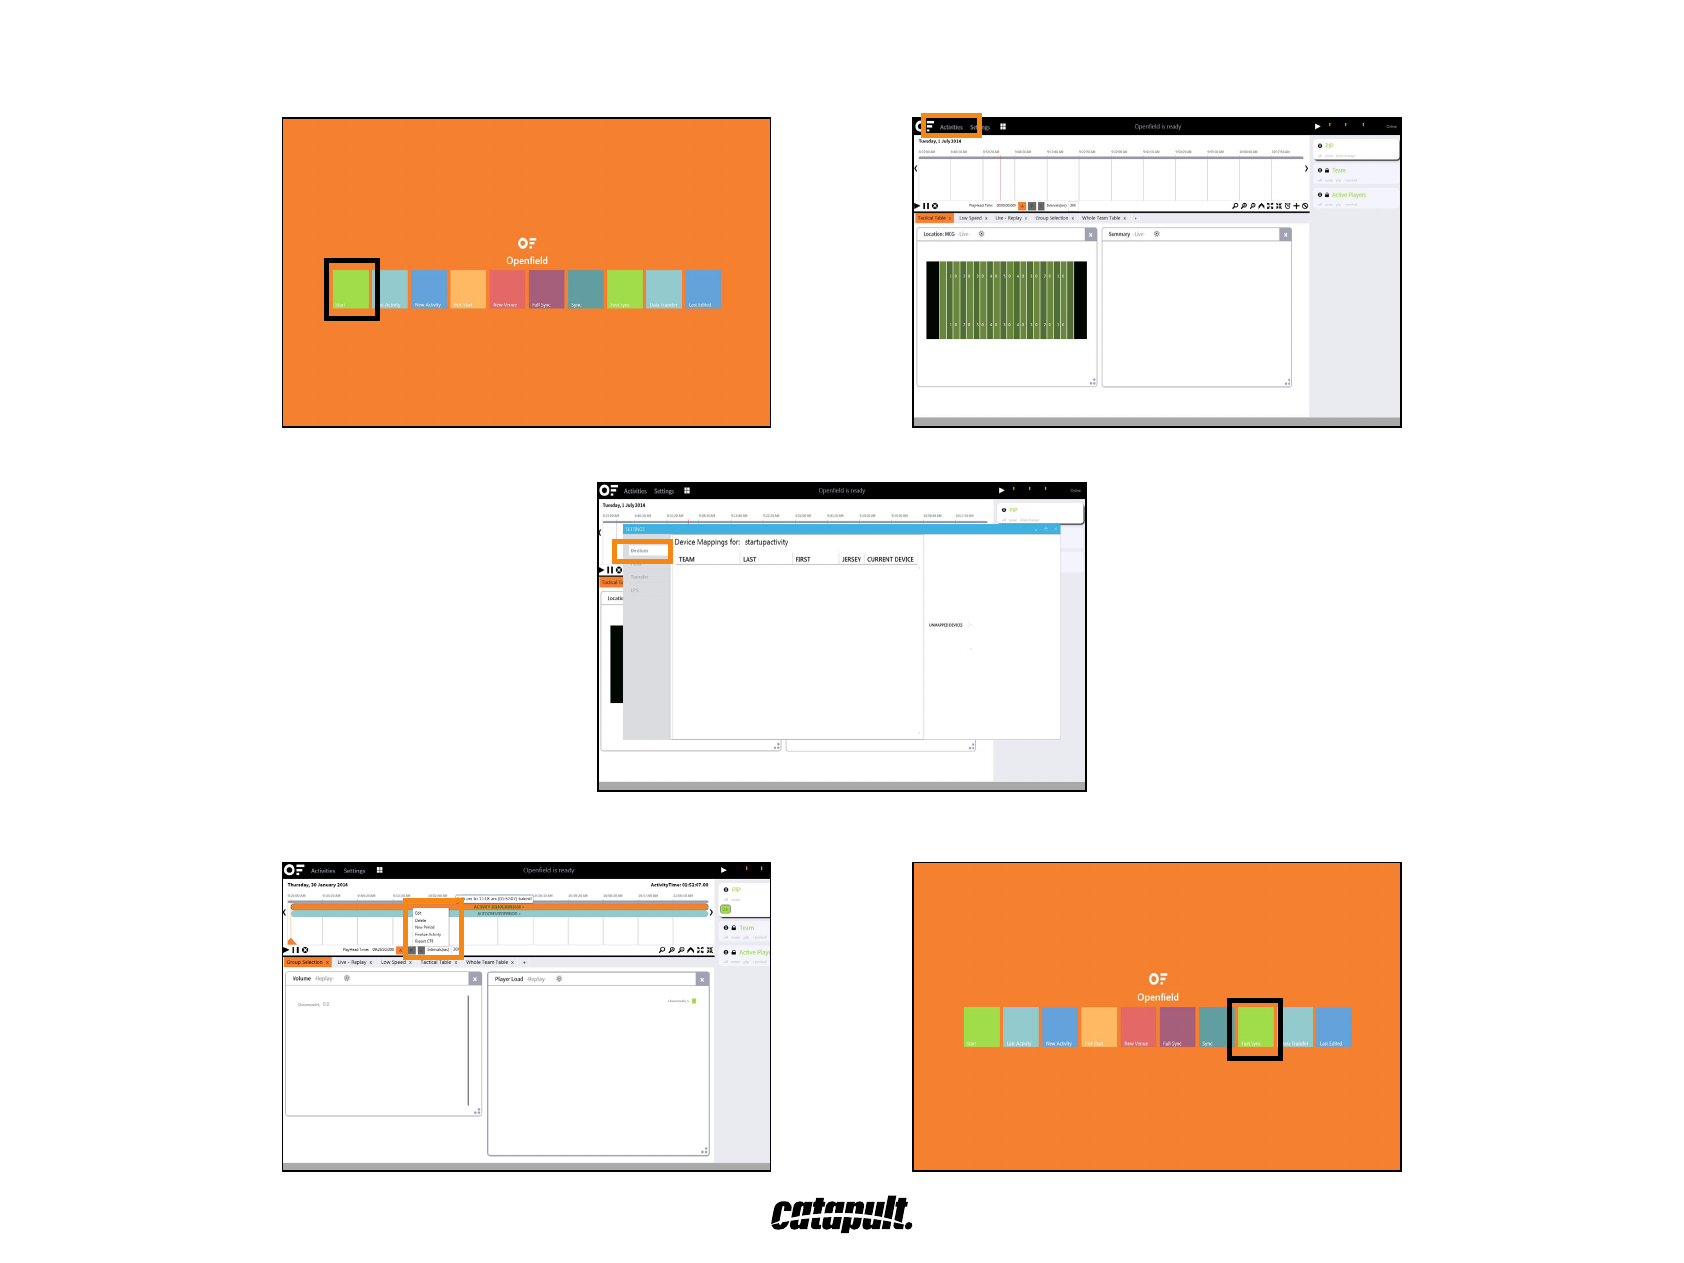
ADJUSTING PERIODS/ADDING NEW PERIODS
Asjusting periods can be done during or after the real-time session. It is highly recommended that any period editing is done on the console before syncing to the cloud.
To edit any periods in the last activity you captured from the main title menu, select ‘Last Activity’.
To adjustthestartorendtimeofanexistingperiod,simplyrightclickontheperiodyouwanttochangeandselect‘Edit’.
To addanewperiodtoalivesessionthathasalreadynished,rightclicktheactivityandselect‘NewPeriod’.Nametheperiodandenterinthestartandendtime.
Nowaddplayerstothisperiodgeneratedvia‘Team’,selecttheathletesyouwanttoadd,andthen‘PIP’.
32
REASSIGNING MONITORS
Ifyouwanttore-assignamonitortoanotherathlete,clickonthe‘Start’tileonthemainmenu.Fromthe‘Activities’panel,selectthesessionyouwanttochange.
Click on ‘Settings’, then ‘Devices’ and re-assign the monitor just for that session.
For these changes to take effect in the cloud, right click on ‘Activity’ and select ‘Finalize’. Then return to the main menu and ‘Fast Sync’.
33

THE WEB USER INTERFACE
36
THE WEB USER INTERFACE
36
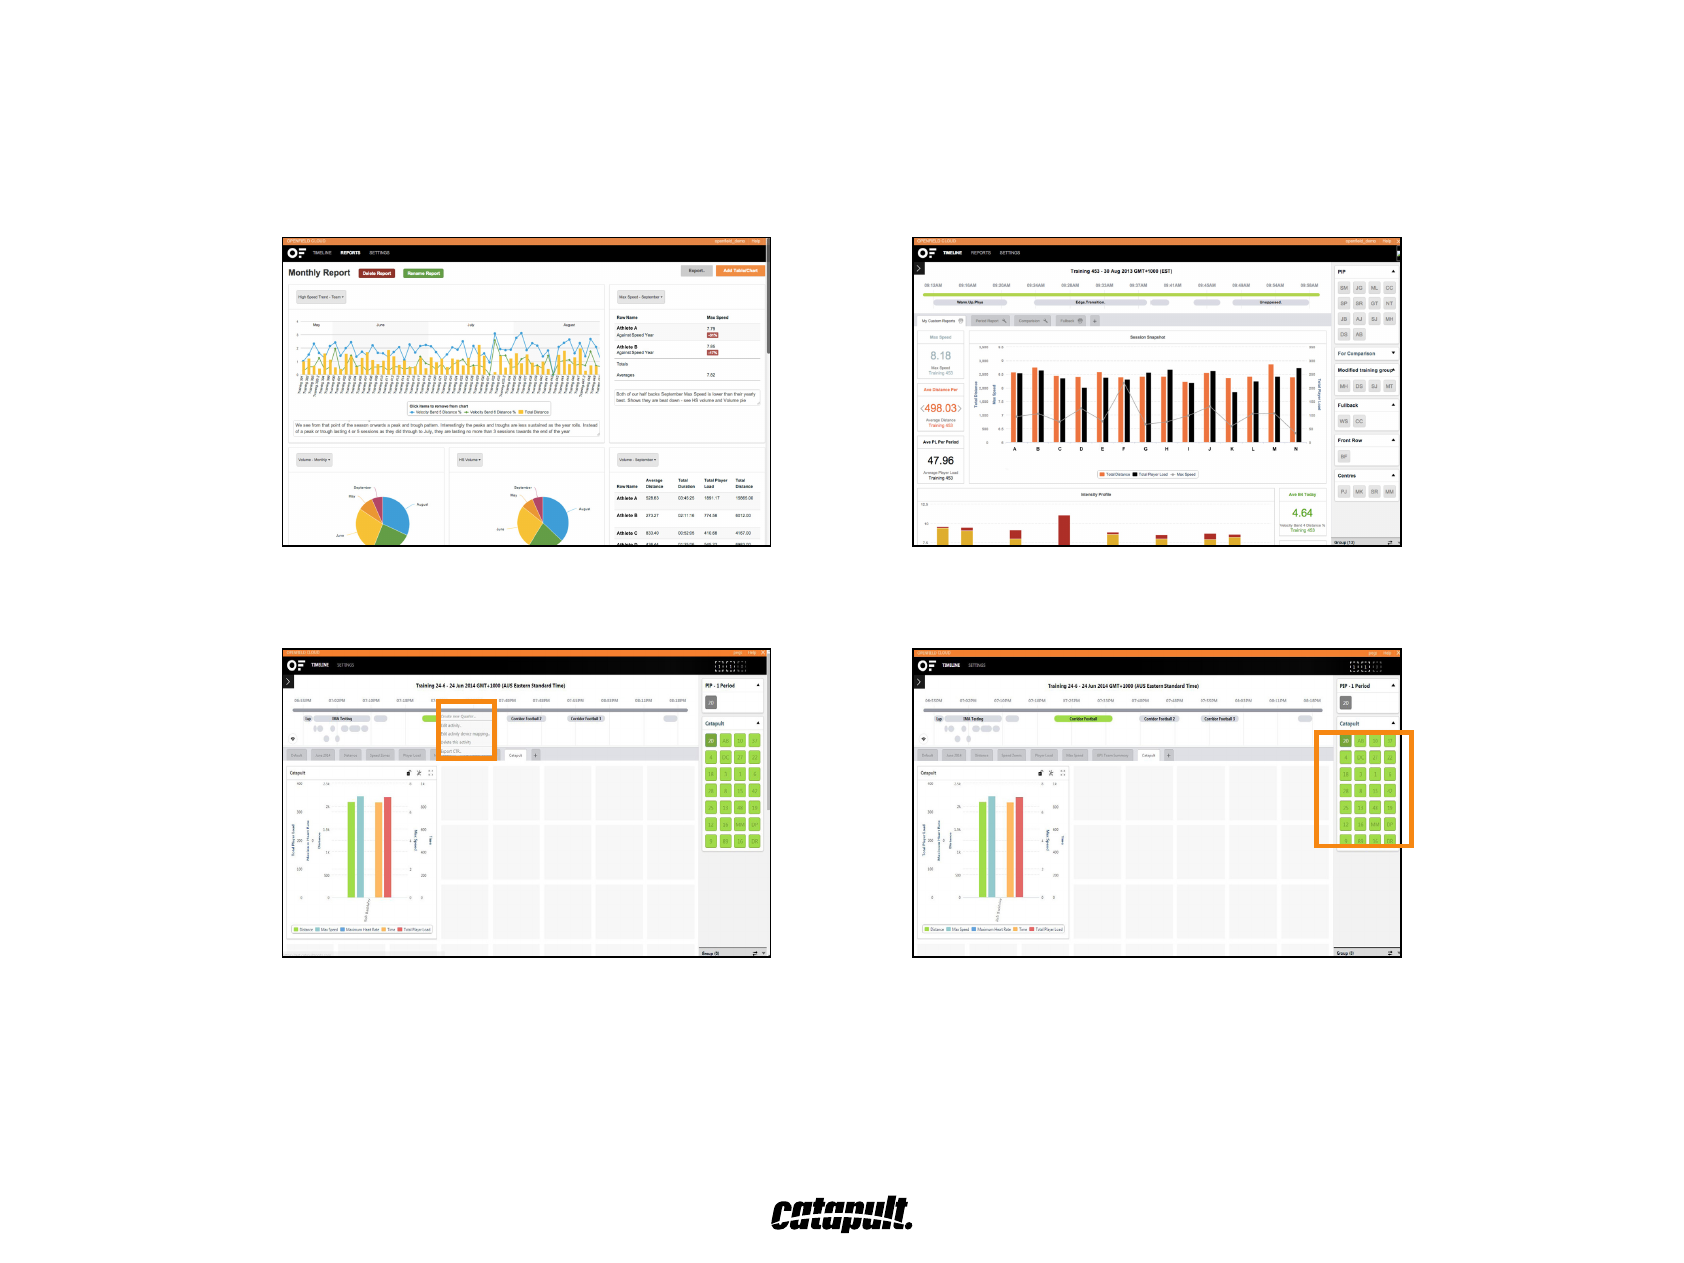
Afteryou’vecompletedtransferringyourdatatothecloud,youcanintoyourwebaccountandstartcreatingreports.
OpenField enables customization of data to let a user make reporting as simple or complex as they choose it to be.
COMPONENTS AND FUNCTION
OpenFieldcloudhasasimpleset-upthatenablesyoutocreatereports,edittimeline,andlteractivities.
Editing the timeline is done by right clicking the period or session. Athletes can be added by clicking on the period or activity and adding them in to PIP from Player Banks.
Activitiescanbeselectedandlteredbyclickingthe‘Activity’arrowonthetopleft.
37
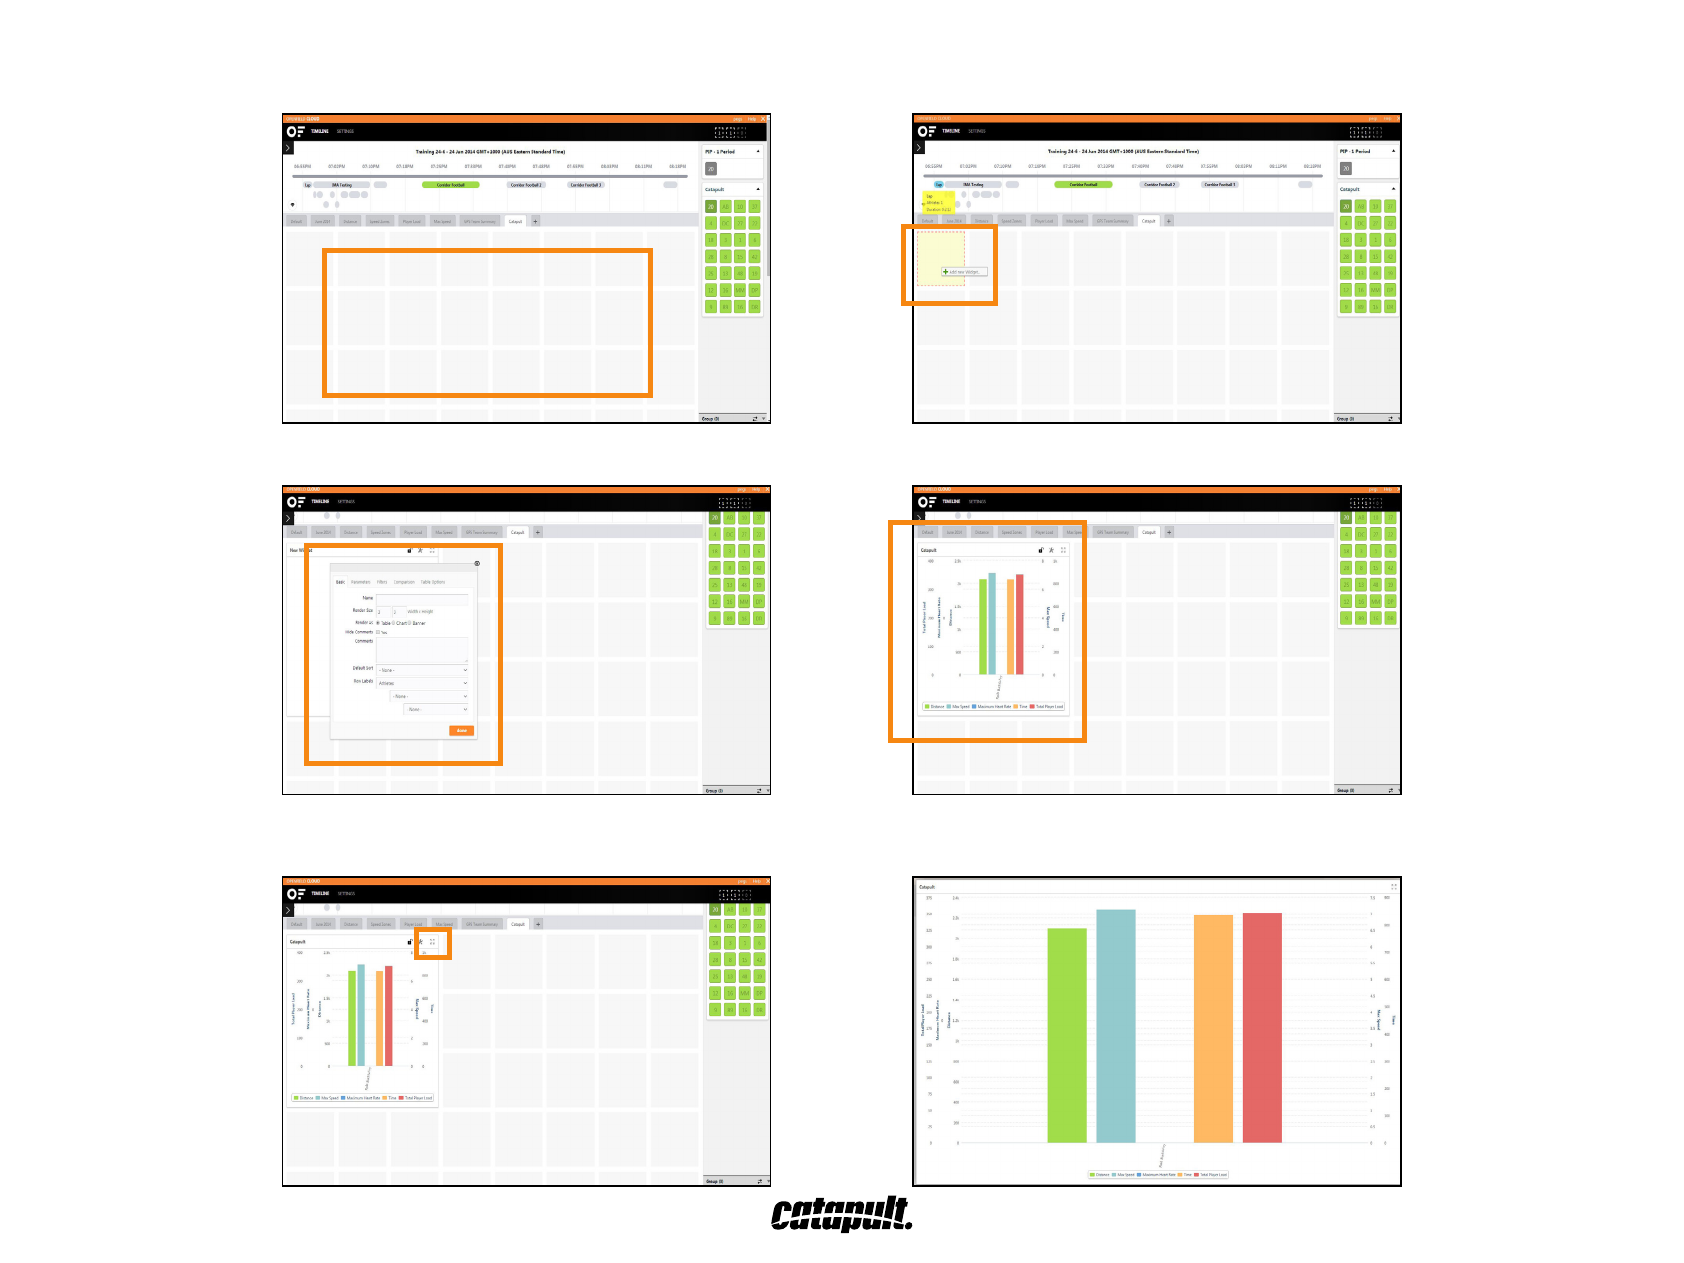
SETTING UP A WIDGET
Widgetscanbeaddedbyclickingonthetilesandselecting‘AddNewWidget’.
Congurethewidget’sdesign.Designscanalsobealteredafterthey’recreatedbyclickingonthewidgets’‘Settings’icon.
Reportscanbeviewedinfullscreenbyrightclickingthetitlecbarandselecting‘ViewFullScreen’
38

SETTING UP A WIDGET
Widgets can be added by clicking on the tiles and selecting ‘Add New Widget’.
Congure the widget’s design. Designs can also be altered after they’re created by clicking on the widgets’ ‘Settings’ icon.
Reports can be viewed in full screen by right clicking the title cbar and selecting ‘View Full Screen’
38
TROUBLESHOOTING
41

THE CATAPULT SPORTS FOLDER
Locatedinyourdocuments.Containsprogramsettingsandles.
Log les
Located in ‘Documents’, ‘Catapult Sports’, ‘OpenField’, ‘Logs’.
Contains log information of your OpenField usage.
42
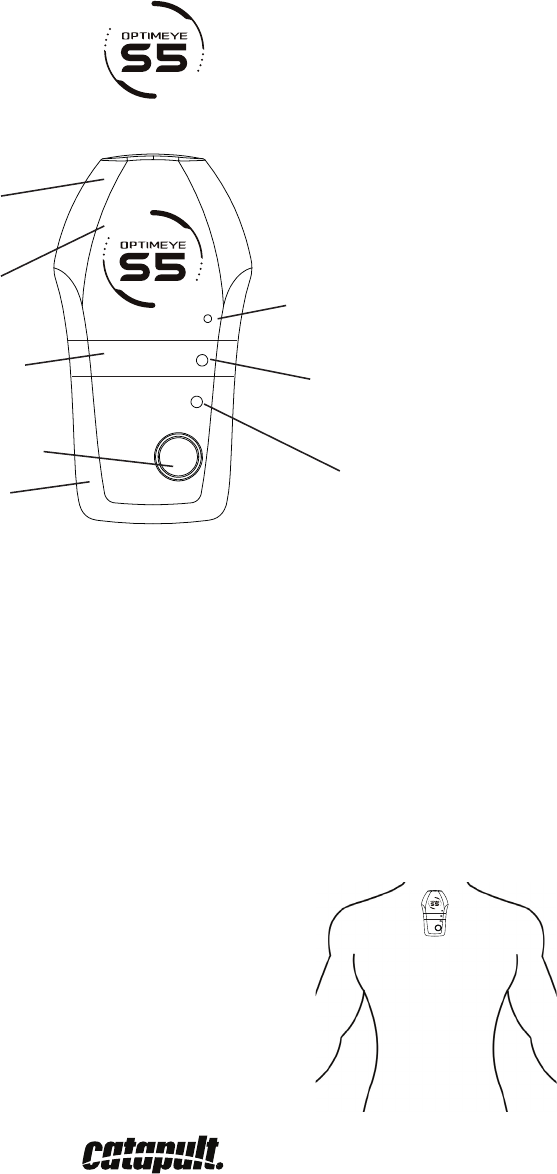
BUTTON
Turn on: Hold for two seconds.
Turn off: Hold facing up, press/hold for three seconds
ATHLETE ID STRIP
Designed to write athlete’s name/playing number
with permanent marker - which can be removed
with alcohol swabs provided.
DIMENSIONS
Height 96mm, Width 52mm, Depth 14mm
ANTENNA
OptimEye S5 logo should always be facing
up and away from athlete.
LED LIGHTS
When on, quickly push button to see battery status.
Three lights mean full, two lights mean 2-4 hours
remaining, one light means less than two hours.
TOP LIGHT
In case: Orange charging, green fully charged.
2QDWKOHWH)DVWˊDVKPHDQVVHDUFKLQJIRU
VDWHOOLWHVVORZˊDVKVKRZVXQLWORFNHGRQ
MIDDLE LIGHT
In case: Shows active USB connection.
On athlete: Shows heart rate has been
within range for 60 seconds.
BOTTOM LIGHT
Shows when SmartBall is within range.
ATHLETE
INITIAL USE
1. Turn on OptimEye S5.
2. Top LED will blink quickly, indicating it is ready for use with inertial sensors only and is searching for GPS signal.
3. Top LED will blink slowly, indicating GPS lock is attained and unit is ready for full use.
4. It is recommended to wait 15 minutes after slow blink is attained for enhanced accuracy and performance.
NOTE: 15-minute lock time only necessary for initial session or you’ve travelled more than 20 miles from location of previous session.
CHARGE CASE
1. Install Catapult software.
2. Place units in designated slots.
3. Plug in charge case to power outlet before plugging in to USB.
4. Please wait while drivers are installed.
5. Complete charge is 90 minutes or less.
NORMAL USE
Acceptance of OptimEye S5 means it will be used under normal use.
Normal use includes placement on the thoracic region of the spine on pads or in a
Catapult-approved padded pocket inside a compression garment -
and in a playing area free of electrical interference.
This placement ensures optimal data reception and transmission, as well as athlete safety.
Any other placement may void warranty or affect performance.
OptimEye S5 is not a medical device.
Please contact support@catapultsports.com for further information.
QUICK START GUIDE
ULTRASONIC WELDED CASE
Unit is splash proof but not waterproof.

APPENDIX
Be sure to read the Warnings and Cautions at the conclusion of this document to learn to use your Optimeye System safely
and responsibly.
CE
The CE mark us used to mark conformity with the European Union EMC directive 99/5/EC, 2004/108/EC and 2006/95/EC.
FCC
“This device complies with Part 15 of the FCC Rules andbIndustry Canada’s licence-exempt RSSbstandards. Operation is
subject to the following two conditions:
(1) This device may not cause interference; and
(2) This device must accept any interference, including interference that may cause undesired operation of the dev ice.”
b
Le présent appareil est conforme à labsectionb15bde labréglementation FCC et CNR d’Industrie Canada applicables aux
appareils radio exempts de licence.
L’exploitation est autorisée aux deux conditions suivantes :
(1) l’appareil ne doit pas produire de brouillage, et (2) l’utilisateur de l’appareil doit accepter tout brouillage radioélectrique
subi, même si le brouillage est susceptible d’en compromettre le fonctionnement.
Warning: Any changes or modifi cations not expressively approved by Catapult Sports Pty Ltd could void the user’s authority
to operate this equipment
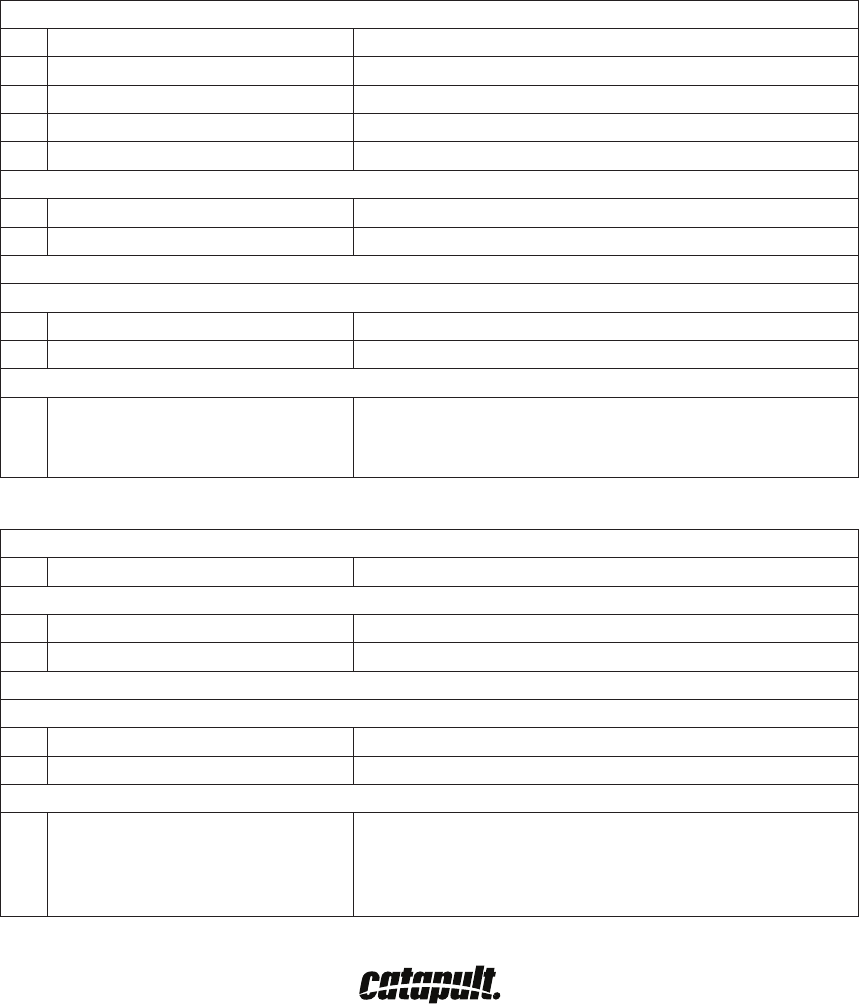
Technical Specifi cations
This section provides technical specifi cations for the Optimeye Athlete Tracking system, consisting of Multi Charger Case &
Power Supply, Optimeye devices, and optional Optimeye Transceiver device.
Multi Charger Case Power Supply
North America 120V, 60Hz, input
United Kingdom, Australia 240V, 50Hz, input
Europe 230V, 50Hz, input
Japan 100V, 50/60Hz, input
All regions (output): 24 V DC @ 8.4A output
Physical Specifi cations
Dimensions: 170 x 85 x 42.5 mm (6.69” x 3.35” x 1.67” )
Weight: 1kg (2.2 lb)
Environmental Specifi cations
Operating temperature: 0° to 40° C (32º to 104º F)
Operating humidity: 90% maximum relative humidity, noncondensing
Electromagnetic Emissions
Meets requirements of:
FCC Class B
EN55022 Class B
EN55024 Class B
Multi Charger Case
All regions (input): 24 V DC, input
Physical Specifi cations
Dimensions: 550 x 330 x 220 mm (21.65” x 12.99” x 8.66” )
Weight: 4kg (8.8 lb)
Environmental Specifi cations
Operating temperature: 0° to 40° C (32º to 104º F)
Operating humidity: 90% maximum relative humidity, noncondensing
Electromagnetic Emissions
Meets requirements of:
EN 55022, EN55024, EN 61000-3-2
EN 61000-3-3
AS/NZS CISPR 22
FCC Part15B

Optimeye S5/X4 device
All regions (input): 5 V DC @ 1.05A max
Physical Specifi cations
Dimensions: 96.5 x 52 x 14 mm (3.8” x 2.0” x 0.55” )
Weight: 0.067 kg (0.148 lb)
Environmental Specifi cations
Operating temperature: 0° to 40° C (32º to 104º F)
Operating humidity: 90% maximum relative humidity, noncondensing
Electromagnetic Emissions
Meets requirements of:
EN 301 489-1,17,19
EN 300 328
EN 62209-2
EN 60950-1
AS/NZS CISPR 22
FCC Part 15B/C
MPE (FCC SAR)
ICES-003
RSS-210
RSS-102
Disposal of the Device
Please dispose of the device in an appropriate way, treating it as electronic waste. Do not throw it in the garbage.
If you wish, you can return the device to your nearest Catapult’s representative.
Warnings and Cautions
Failure to avoid the following potentially hazardous situations may result an accident resulting in death or serious injury.
The Optimeye contains a non-user replaceable, rechargeable lithium-ion battery. The battery may present a risk of fi re or
chemical burn if mistreated.
Do not recharge out of the unit, disassemble, heat above 60°C, or incinerate
Dispose of Optimeye properly. Contact your local waste disposal department for information on properly disposing
of lithium-ion batteries.
The Optimeye has no user-serviceable parts. Should you ever encounter a problem with your unit, please take it to an
authorized Catapult representative for repairs.
Always consult your physician before beginning or modifying any exercise program. If you have a pacemaker or other
implanted electronic device, consult your physician before using the Optimeye system.
Failure to avoid the following potentially hazardous situations may result in injury or property damage.
Use the Optimeye only as a performance monitoring aid. Do not attempt to use the Optimeye for any purpose requiring
precise measurement of direction, distance, location, velocity or topography. This product should not be used to determine
ground proximity for aircraft navigation.
The Global Positioning System (GPS) is operated by the United States government, which is solely responsible for its
accuracy and maintenance. The government’s system is subject to changes which could affect the accuracy and performance
of all GPS equipment, including the Optimeye. Although the Optimeye is a precision navigation device, any navigation device
can be misused or misinterpreted and, therefore, become unsafe.
The Optimeye and its included heart rate monitoring circuit is a consumer device, not a medical device, and could suffer
from interference from external electrical sources. The heart rate readings are for reference only and no responsibility can
be accepted for the consequences of any erroneous readings.
Warning
Caution