Catapult Sports 32301A PERFORMANCE MONITORING EQUIPMENT User Manual Part 1
Catapult Sports Pty Ltd PERFORMANCE MONITORING EQUIPMENT Part 1
Contents
- 1. User Manual Part 1
- 2. User Manual Part 2
User Manual Part 1


INTRODUCTION
3
USER INTERFACE
SYSTEM COMPONENTS
DATA INTERACTION
5
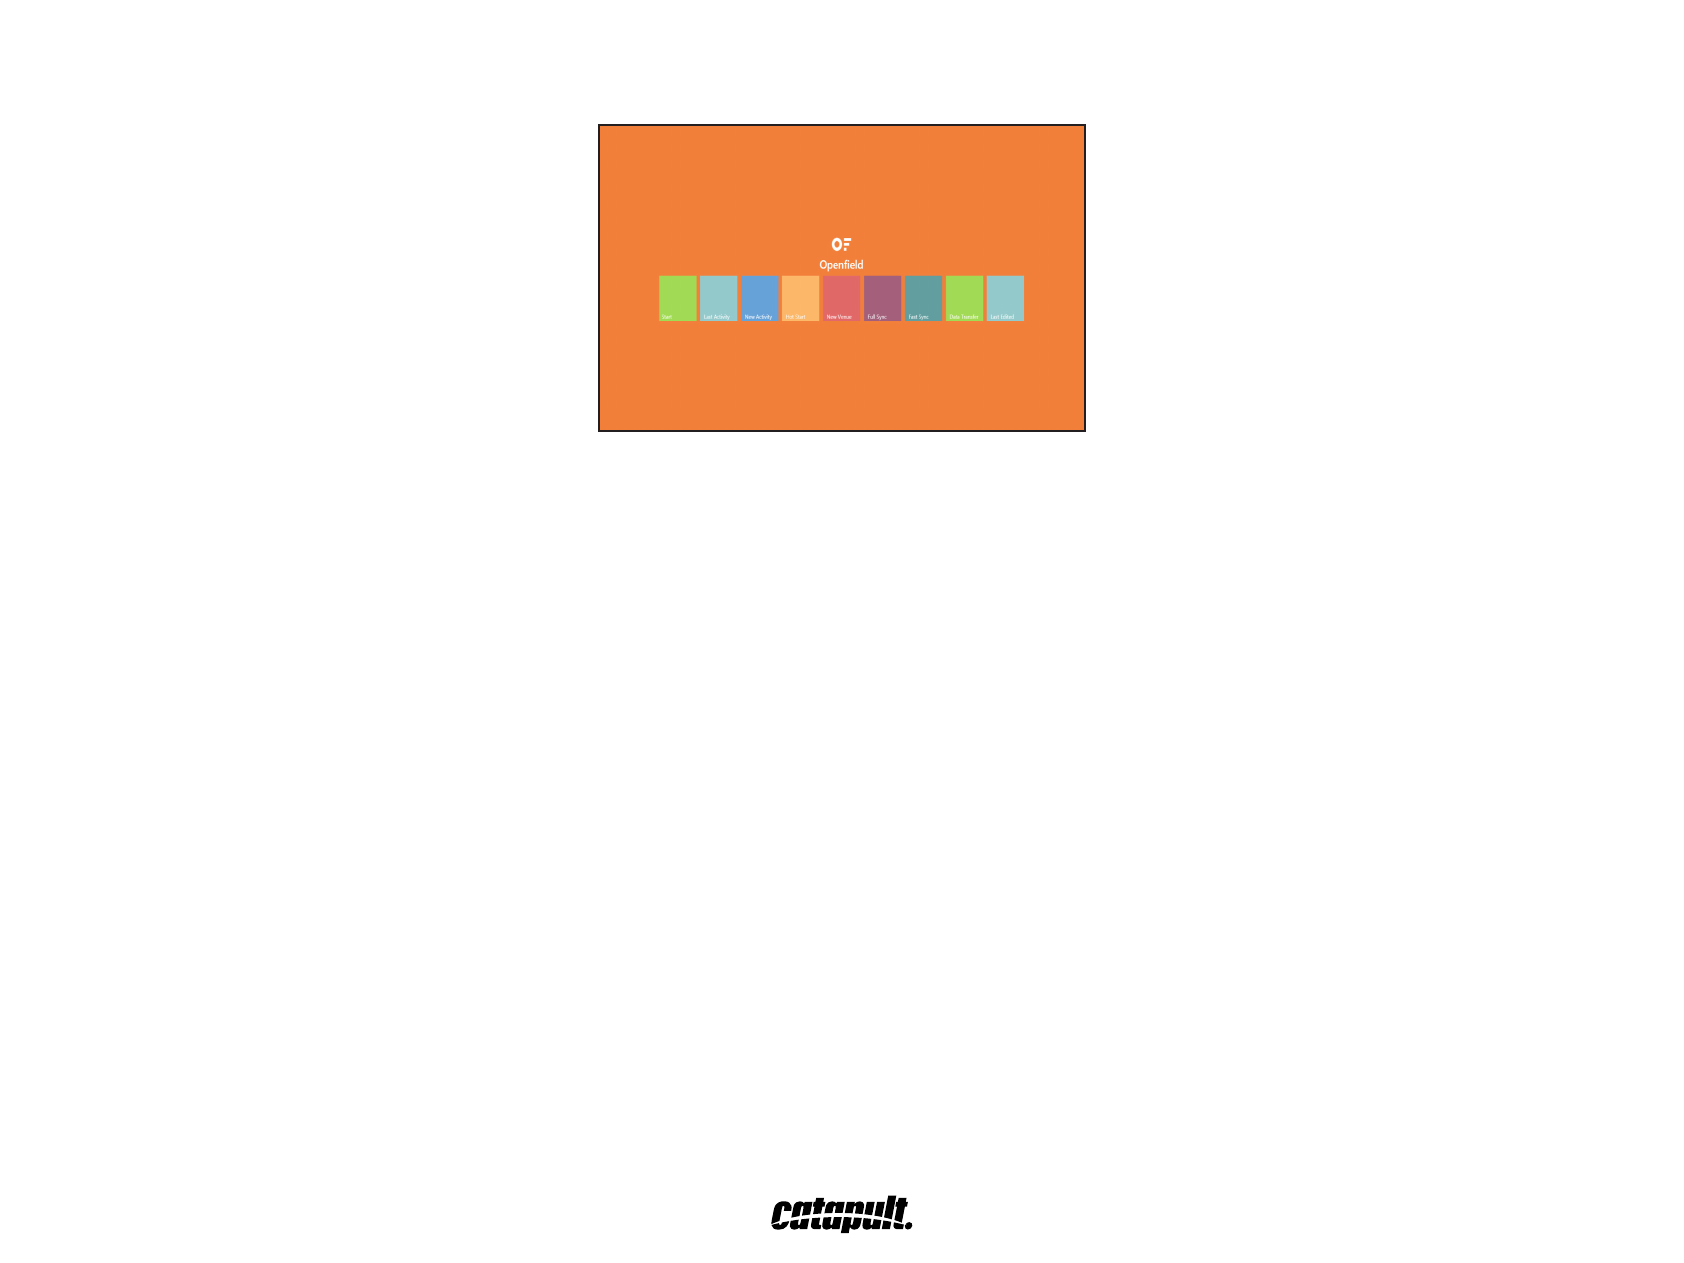
Start
Enters OpenField environment without creating or loading an activity. Use this to assign/map monitors to athletes.
New Activity
Creates a new activity without starting a period. Do this if you want to prepare for a new activity, and have time before it actually starts.
Hot Start
Creates a new activity and starts recording data. Use this if you need to start your activity immediately.
Full Sync
Sends all changed/modied data to the cloud. This should be done at the conclusion of each day.
Fast Sync
Sends key information up to create reports on the cloud.
USER INTERFACE
SYSTEM COMPONENTS
DATA INTERACTION
5
USER INTERFACE
SYSTEM COMPONENTS
DATA INTERACTION
5
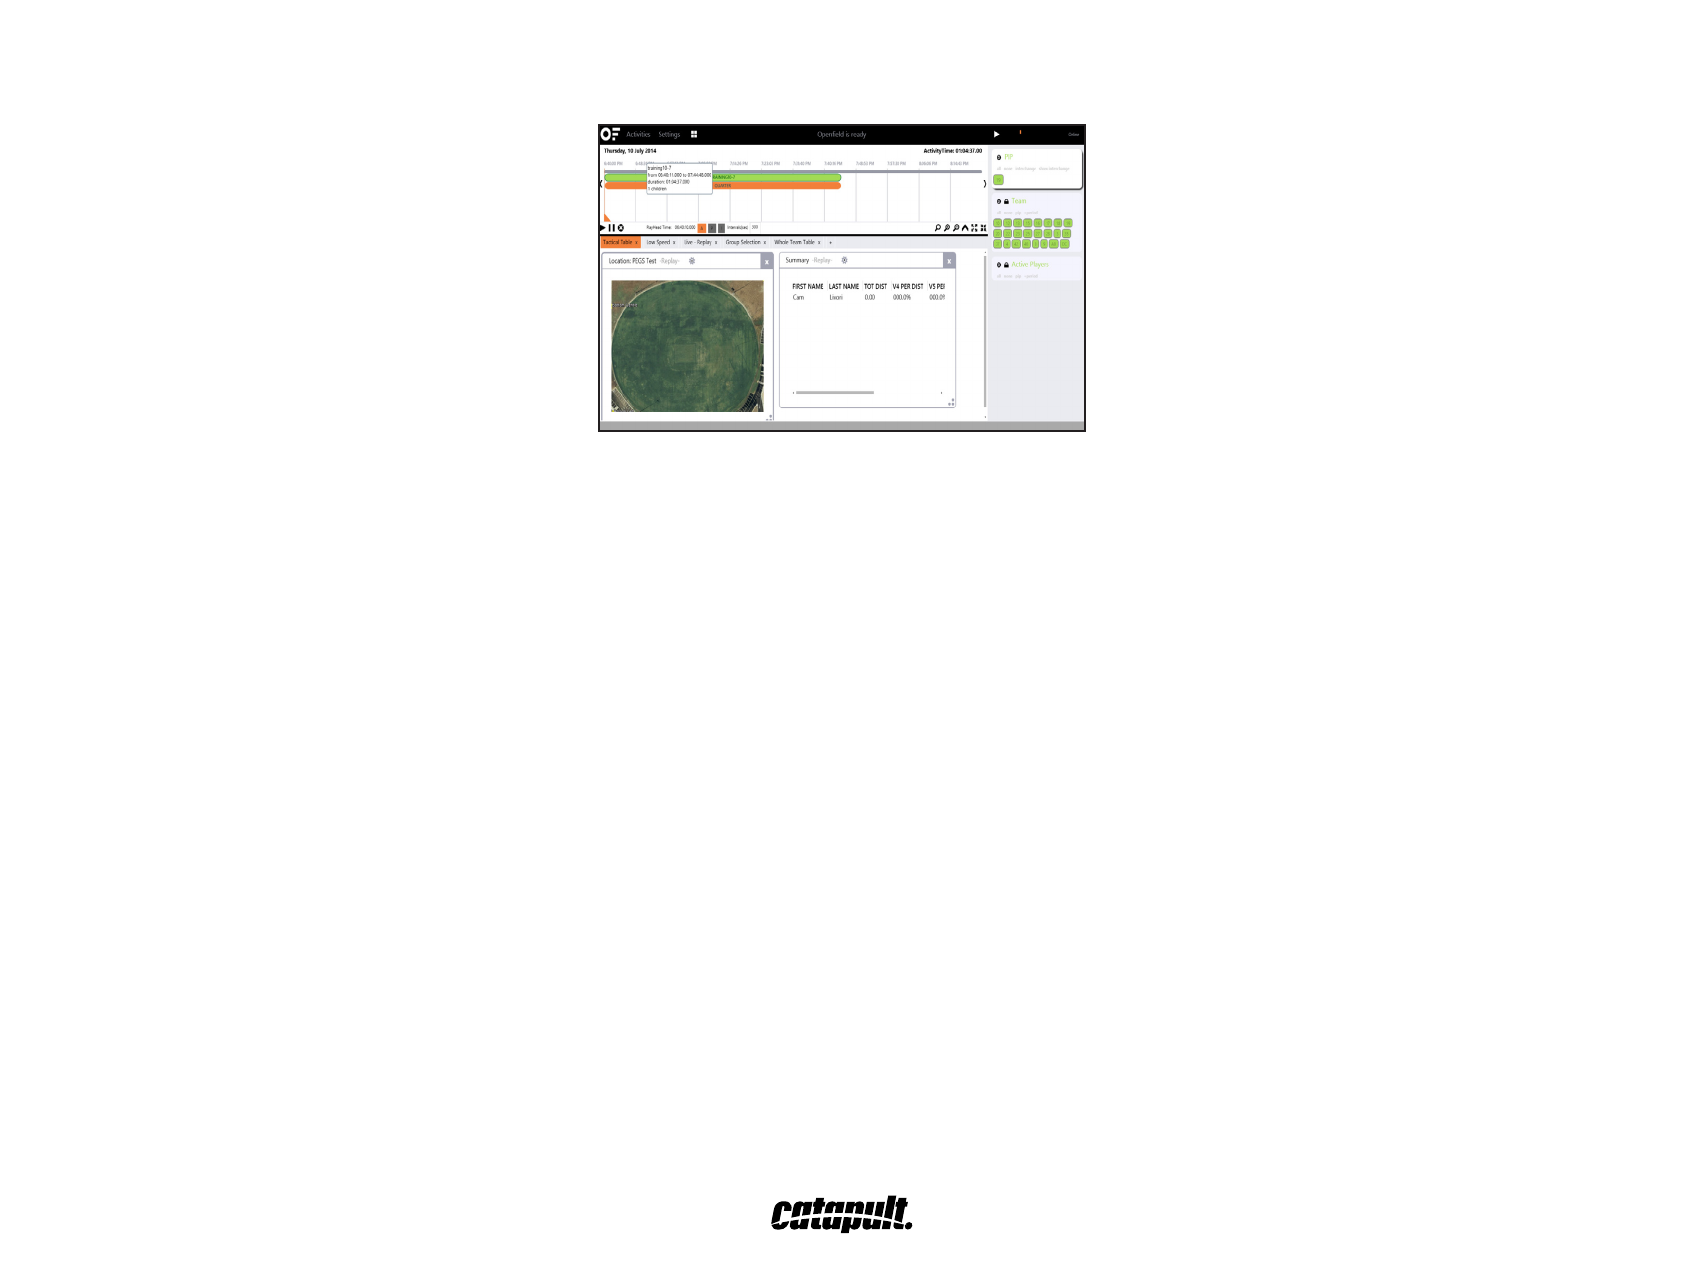
Timeline
Green bar depicts entire activity. Blue bars depict duration of each period or section of your session.
When you select an activity or period it will highlight orange
You are able to zoom in/out on your activity
Controls to the bottom right allow creation of periods and easy navigation.
Controls on the bottom middle of the timeline allow are the zero settings. You can choose to have your data start from zero at the start of the
entire activity (A), from the start of the currently selected period (P), or for a user selected time interval (I).
You can freely change between these modes without affecting your data.
Data View
Made up of a number of individual data elements called widgets.
A widget can be: a tactical view of the players moving on the eld, table of data parameters, bar graph.
With all widgets you can choose your own parameters and ltering to show exactly what you want.
Athletes panel
Used to interact with the members of your team and set up.
USER INTERFACE
SYSTEM COMPONENTS
DATA INTERACTION
5

SETTING UP OPENFIELD
6
PRIOR TO INSTALLING OPENFIELD ON COMPUTER
Logging in/out
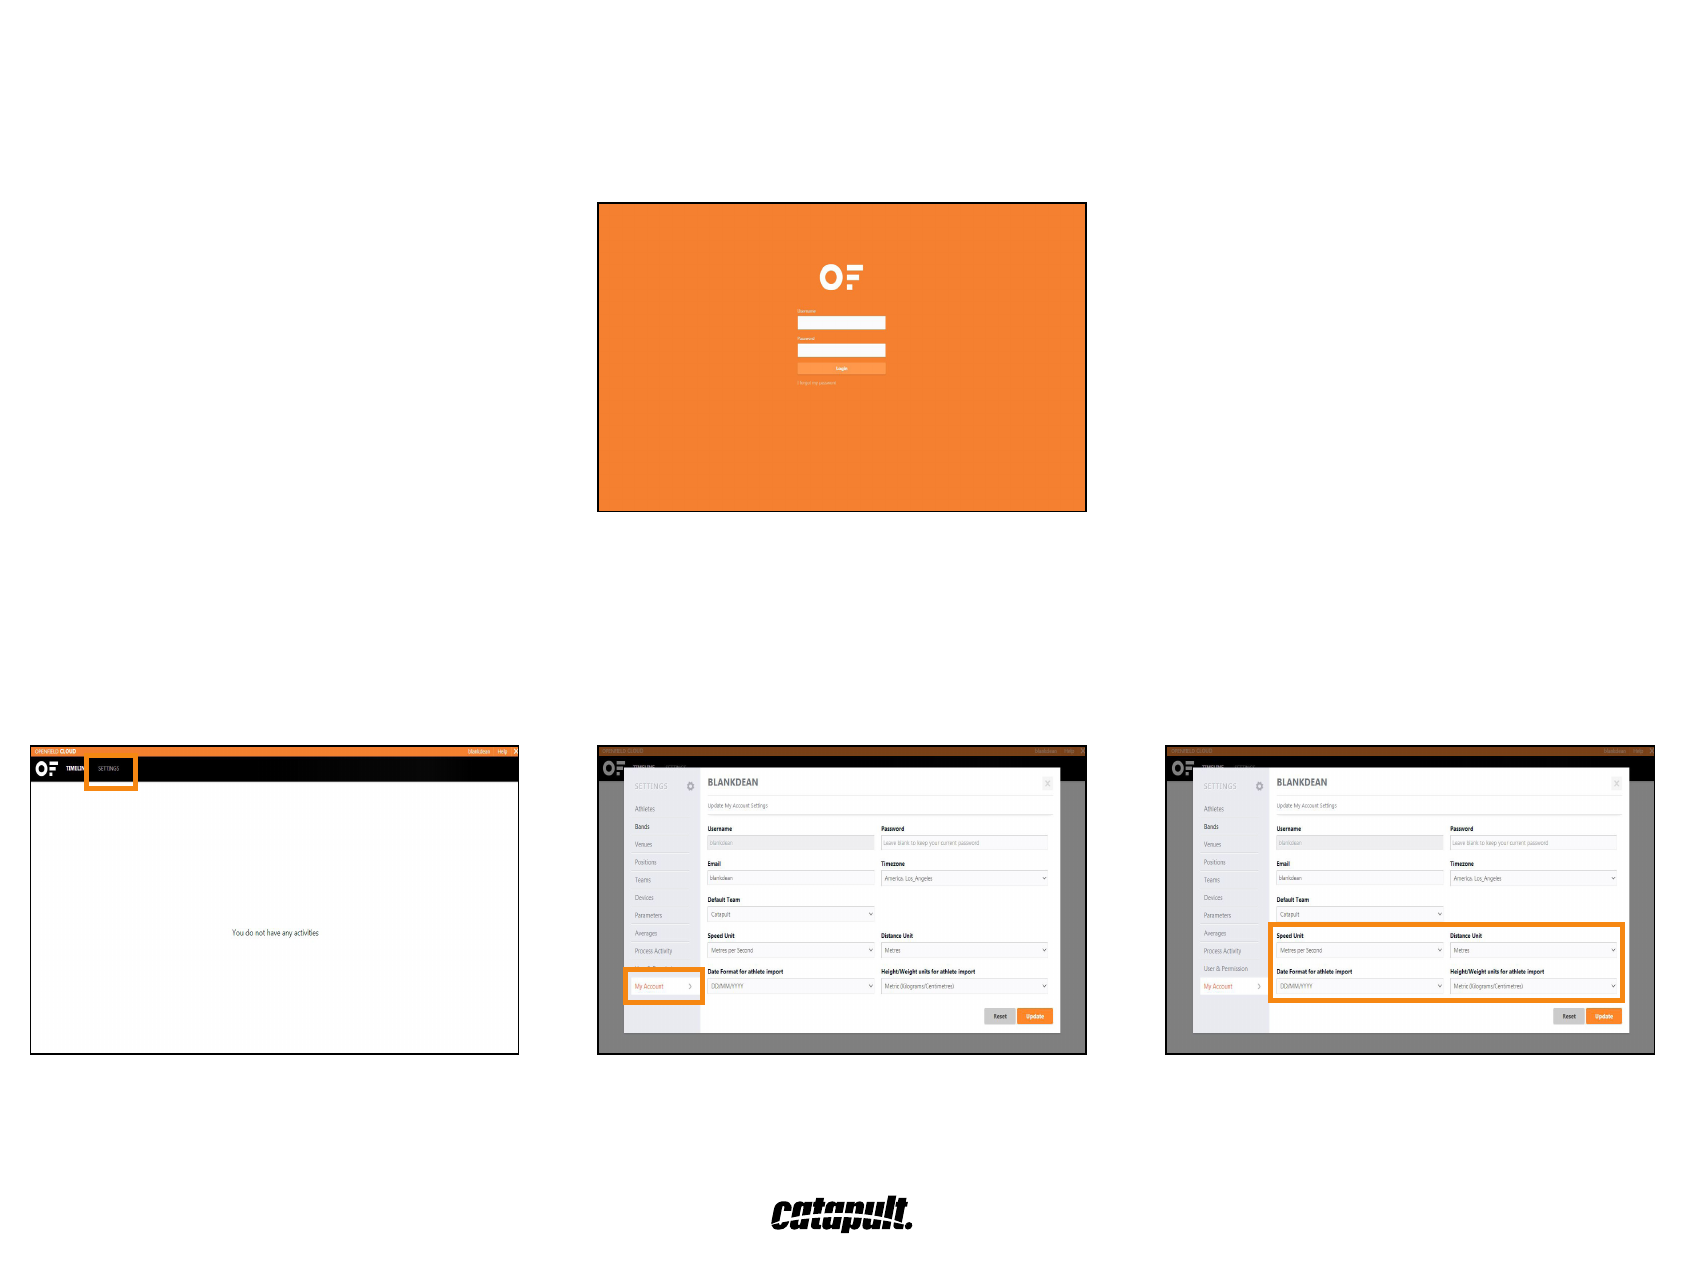
GotoyourOpenFieldcloudwebaddressandenteryourusernameandpassword.
Check account details
Before setting up your athletes and band settings, click on ‘Settings’ then ‘My Account’.
Ensurespeed,distance,dateformat,weightandheightmeasurementsarecorrecttoyourregion.
Thesewillbeimportantwhenbulkimportingathletesandviewingyourdata.
7
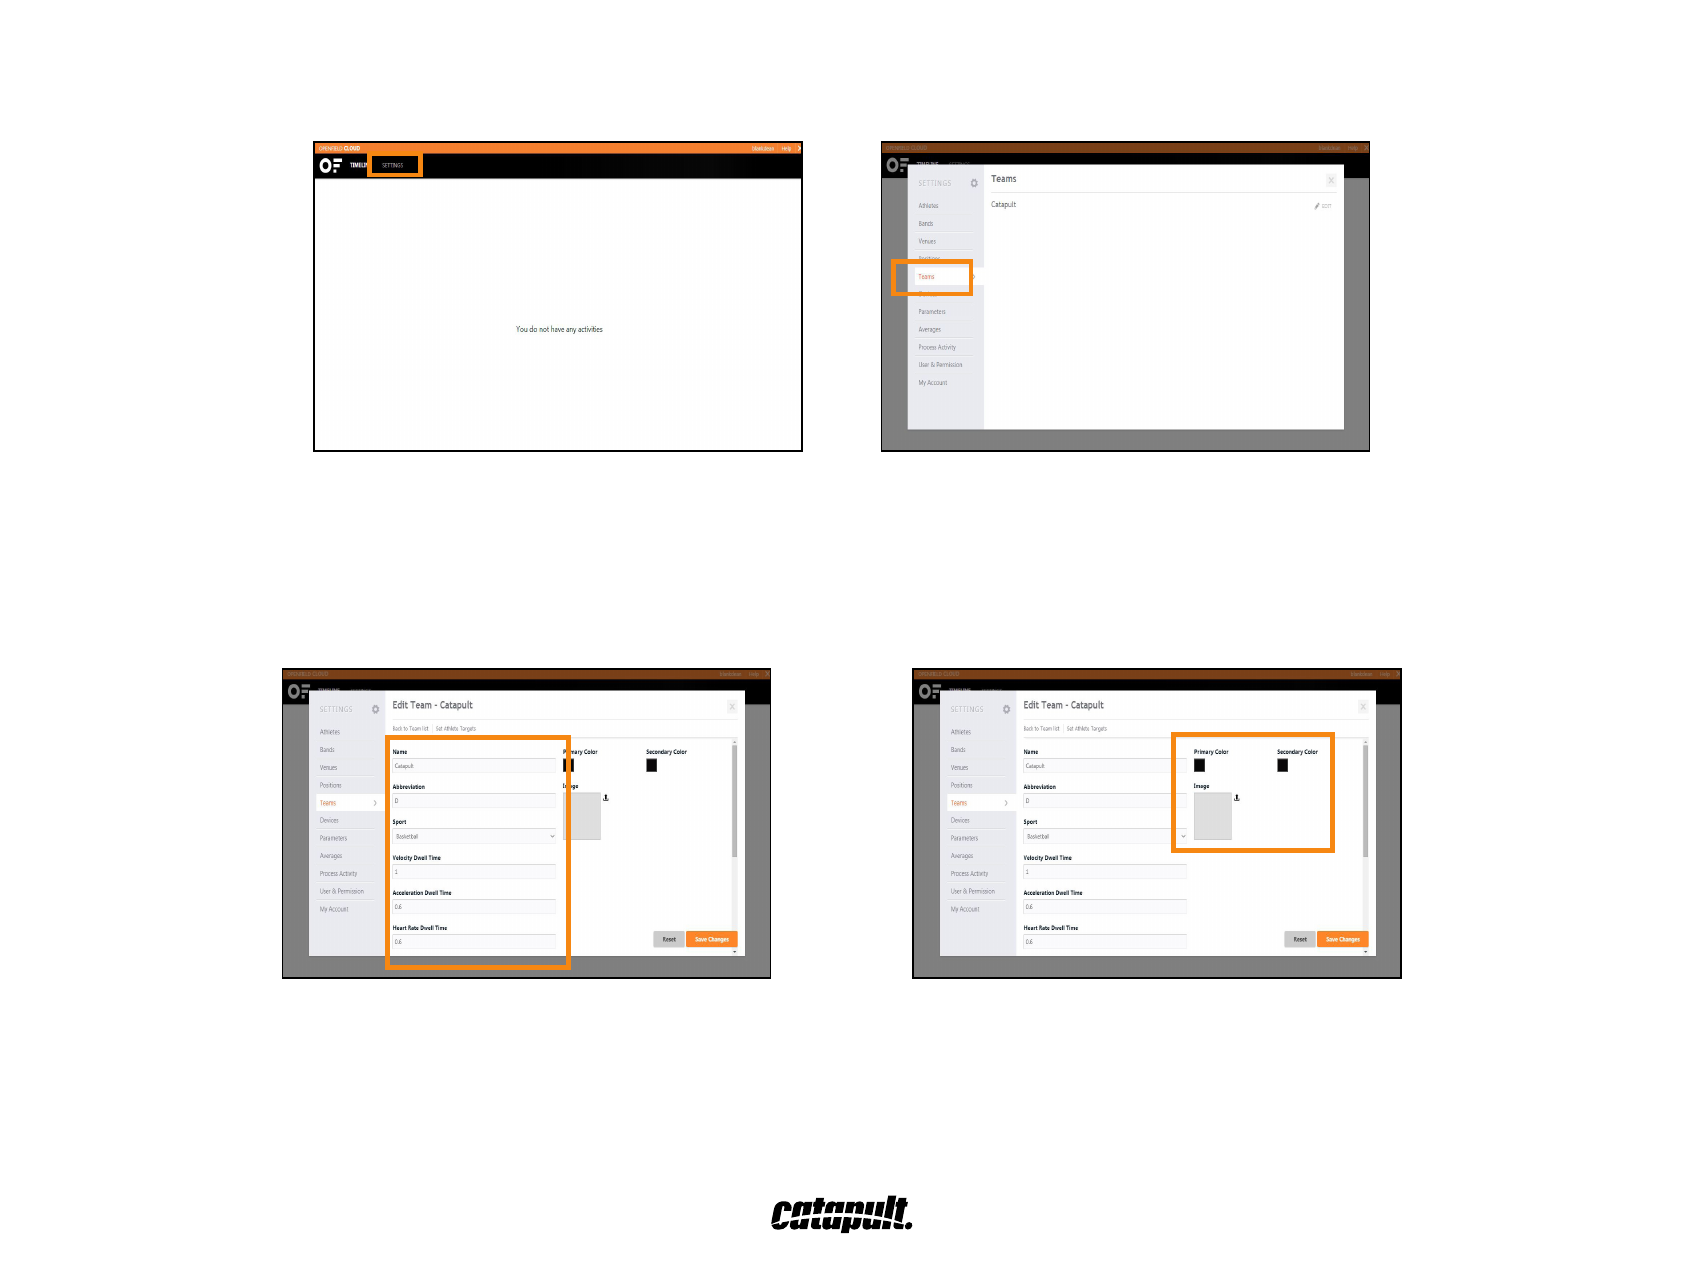
Check team settings
To personalize your team settings, click on ‘Settings’ then ‘Teams’.
AddyourName,Abbreviation,Sport,VelocityDwellTime,AccelerationDwellTime,HeartRateDwellTime,
PlayerLoadDwellTime,RHIEEffortCount,RHIEEffortRecovery,VelocityRHIEBands,AccelerationRHIEBands.
You can also choose your colors and upload your logo.
8
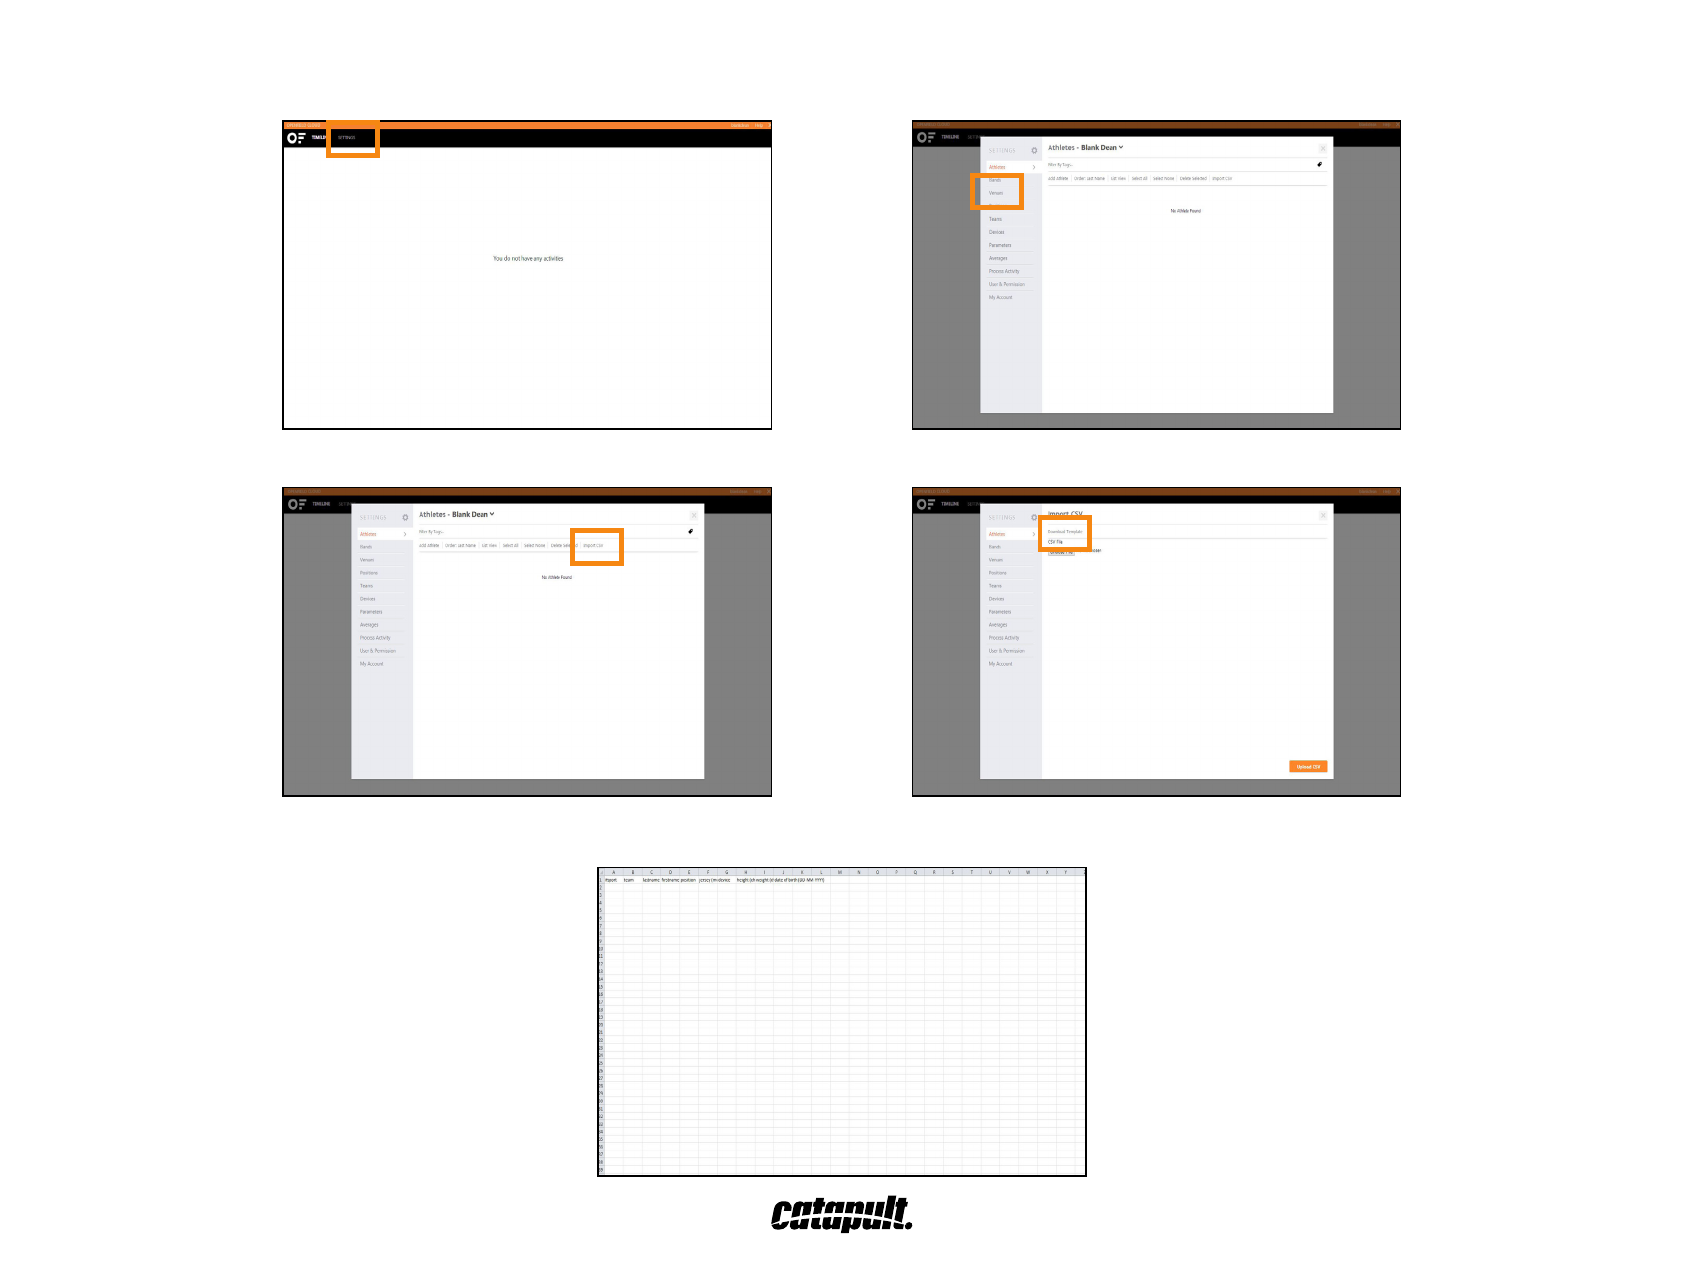
Adding athletes
When in the cloud, you can add athletes by going to ‘Settings’, then ‘Athletes’.
To bulkimportathletes,click‘ImportCSV’,then‘DownloadTemplate’.
Openthedownloadedtemplateandllintheeldslistedinthecells.Leavethe‘Device’eldblank.Beforenishing,savethetemplate.
9
Whenllingintemplateelds,alljerseynumbersmustbeunique.
eg. If you have a number 75 on offense and defence, use ‘75D’ for your defensive player.
GobacktoOpenFieldandndyoursavedtemplateunder‘ChooseFile’onthe‘ImportCSV’page.
To addanathleteindividually,click‘AddAthlete’onthe‘Athletes’page.Fillouttheathleteinformationelds.
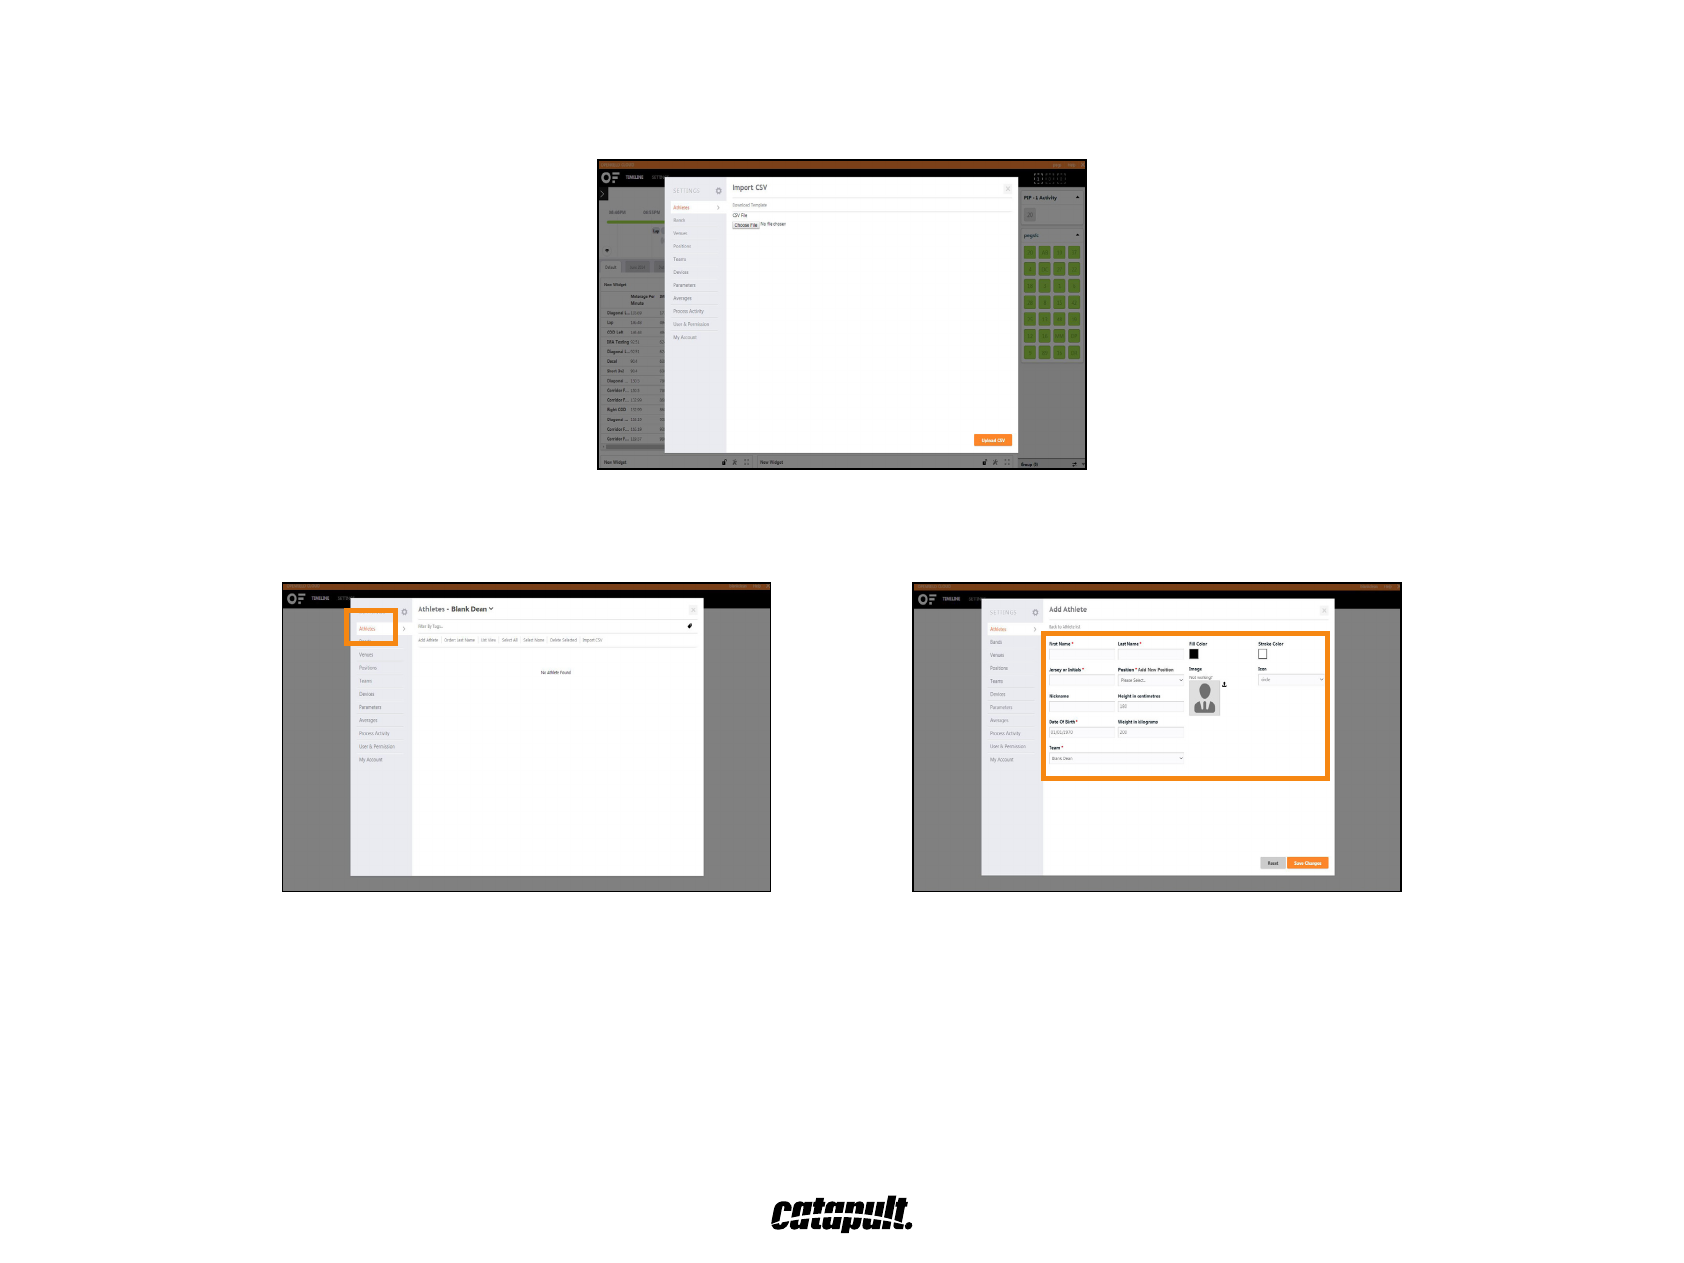
If a position for an athlete doesn’t appear, click ‘Settings’ then ‘Positions’ to add another one.
10
Youcanchoosefromapre-populatedlistofpositionsorclick‘AddNew’ifitisnotlisted.
Enter‘Height’and‘Weight’,thenchoose‘DateofBirth’fromcalendar.
Clickthe‘upload’iconnexttotheimageholdertouploadaphoto.ThesoftwareacceptsJPG,PNGandGIFupto1MBinsize.
Don’t forget to save your changes.
11
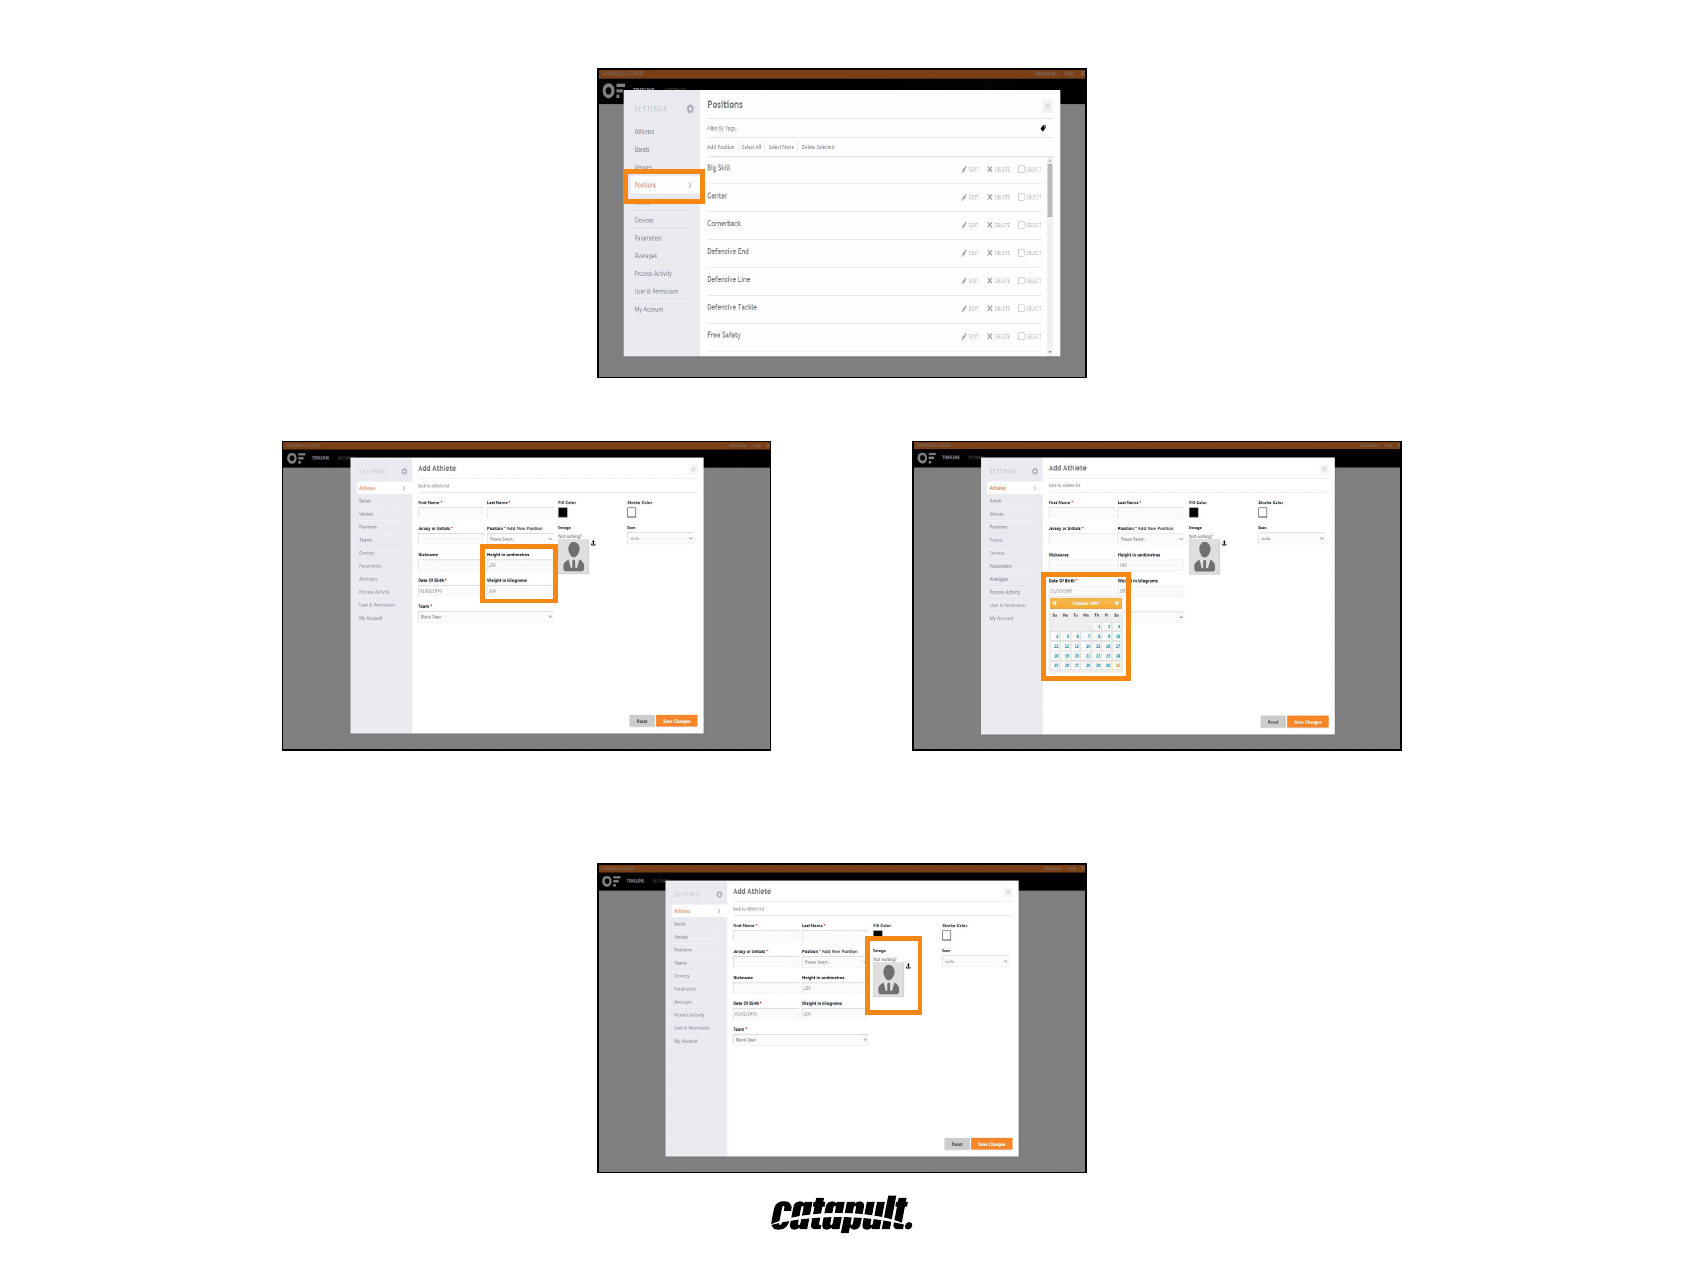
Setting your bands
Set your bands by clicking clicking ‘Settings’, then ‘Bands’.
You can set bands globally (all athletes the same) or individually (per athlete or per position).
Global band settings
Fromthedropdownmenu,choosewhichbandsyouwanttoset.
Nowsetthelowerandupperthresholdsinthebandsettingsbelowthedropdownmenu.
Onceenteredinanupperthreshold,usethetabkeyonyourkeyboardtoquicklynavigatetothenextbandsupperlimitsetting.
Once you have set these bands select “Apply to Selected Athletes”.
12
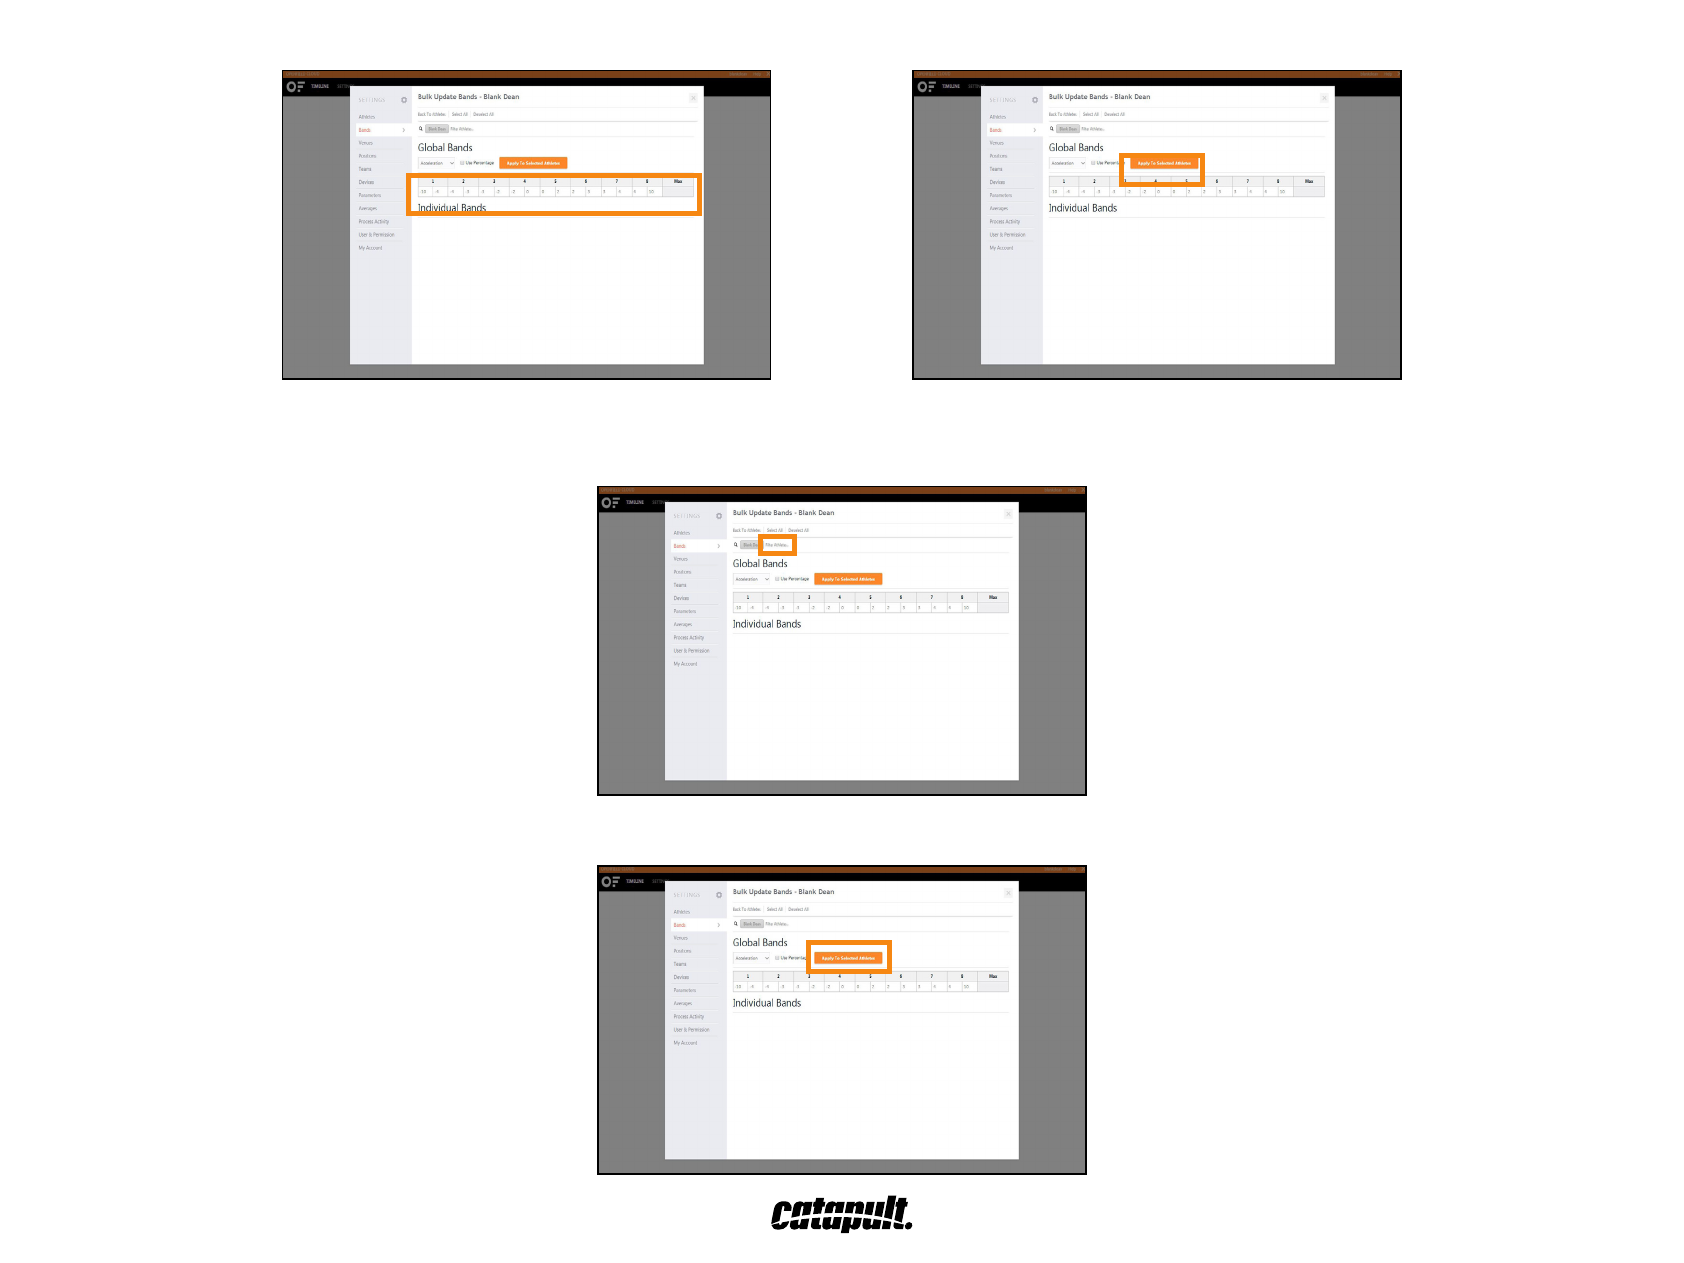
Onceyou’veenteredtheupperthreshold,hittheTabkeyandyouwillautomaticallybetakentothenextband’supperthreshold.
Individual band settings
Usethesearchlterinthetopleftcornerofthescreentondeitherasingleathleteorpositionalgroup.
Onceyouhavelteredtheathlete/positionalgroup,changethebandsasaboveandselect‘ApplytoSelectedAthletes’.Youcanalsoticketindividualboxes.
13
INSTALLING OPENFIELD ON COMPUTER
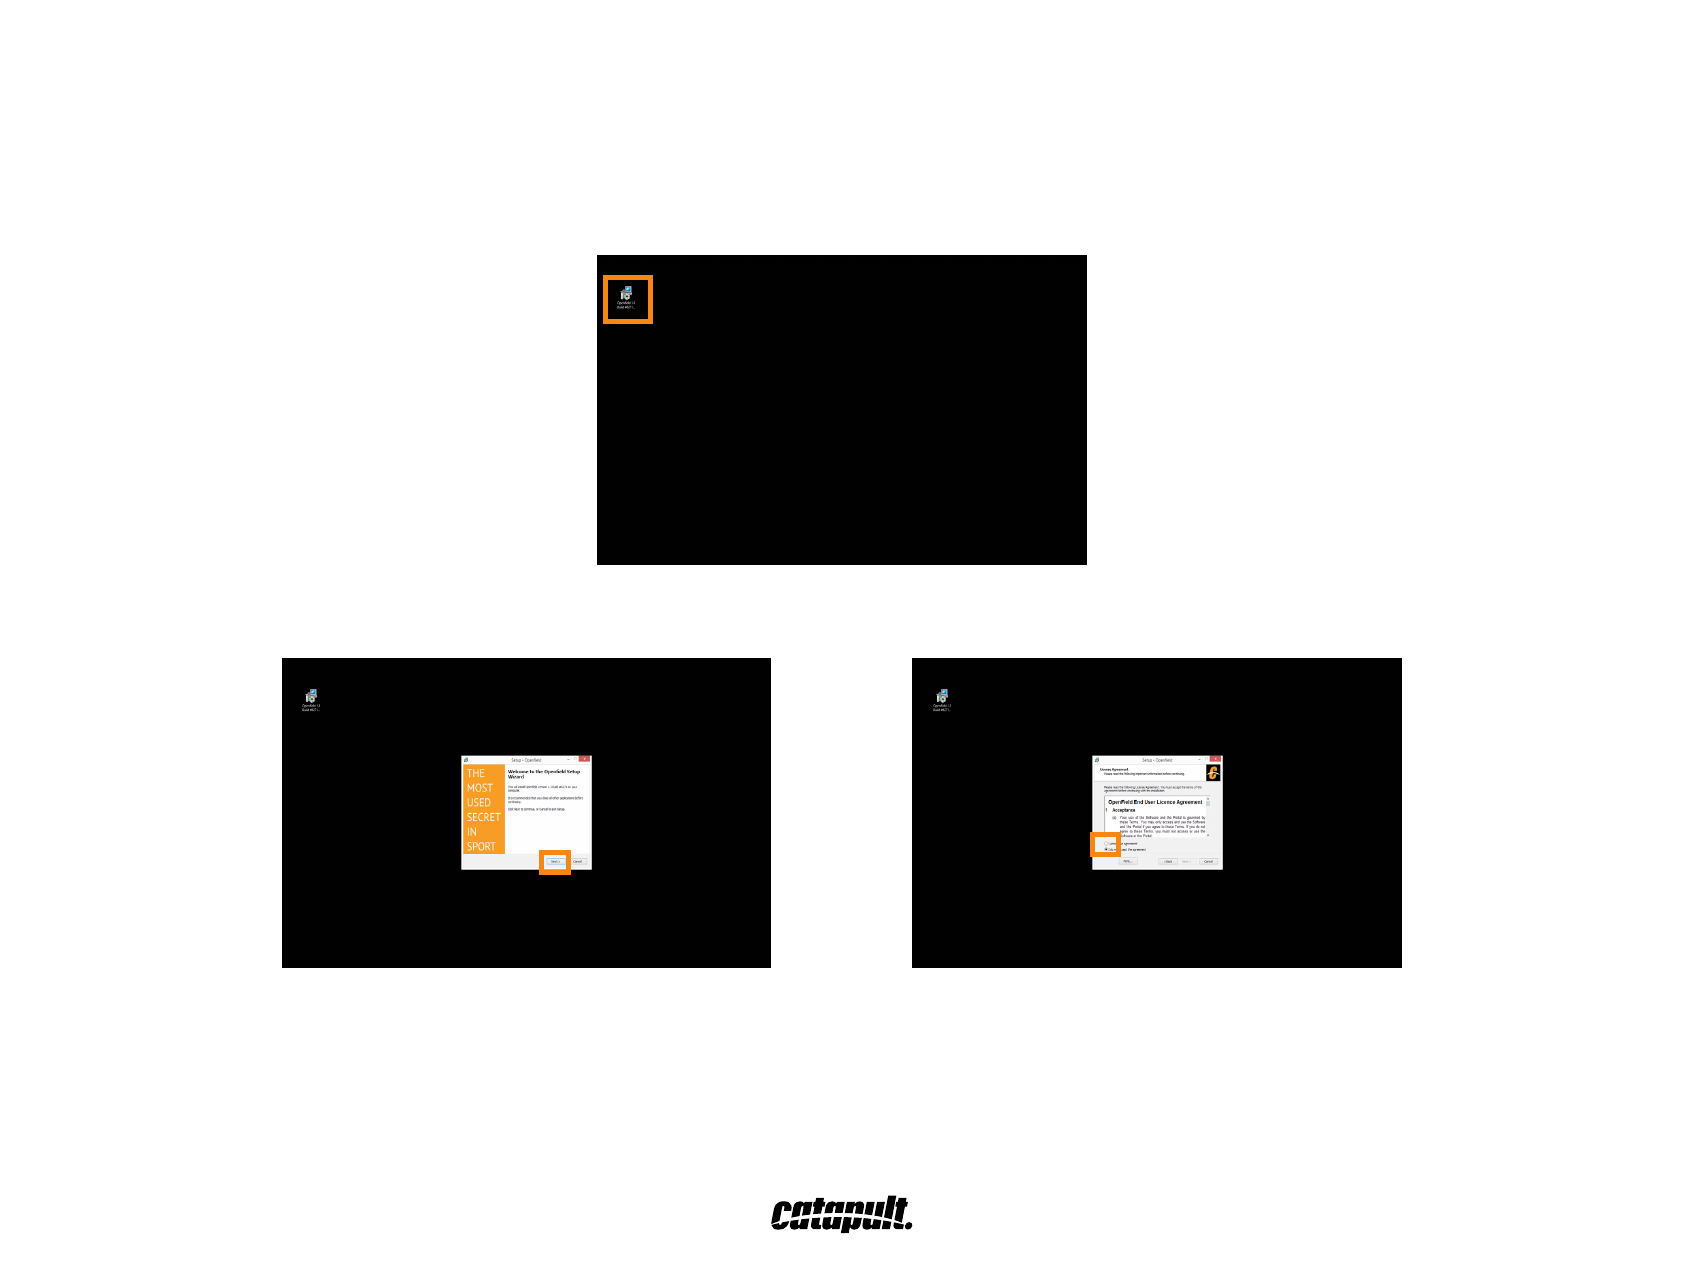
OpenField console is your link to the cloud. You need to install it in order to use the cloud.
RUNNING THE INSTALLER - USER NAME AND DATABASE NAME
Run the OpenField installer.
Click ‘Next’ and accept the terms and conditions. Click ‘Next’ again through the installation process.
YouwillbepromptedtoenteraDatabase,UserNameandRegion.
YourDatabaseandUserNamewillbethecloudusernameprovidedbyyourCatapultrepresentative.
Click‘Next’,createadesktopiconandclick‘Install’tonishtheinstallation.
14
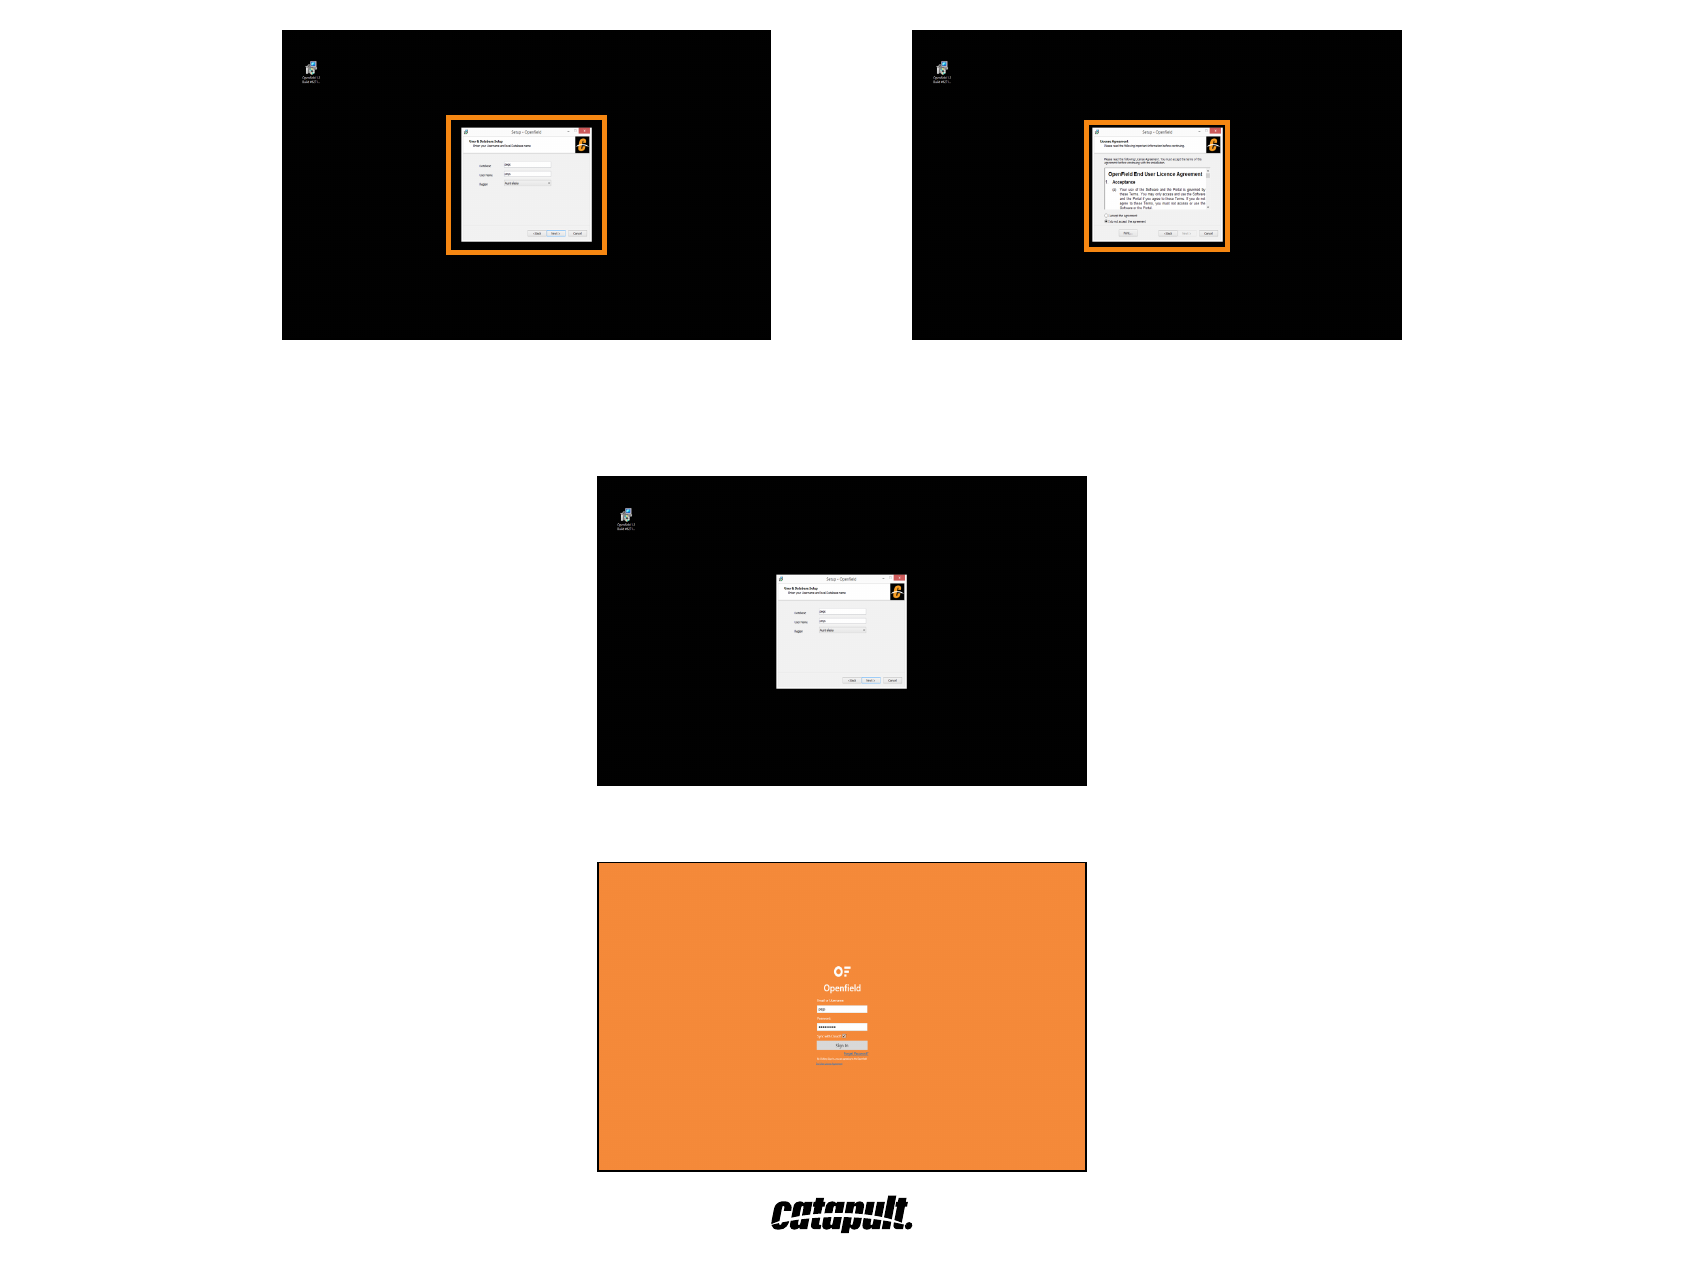
Youwillseeaprompttoinstalldriversifthisisyourrsttimeinstalling.Click‘OK’toinstall.
Dependingonsecurity,promptsmayappearaskingforyoutoallowaccessthroughyourrewall.Click‘AllowAccess’
Click ‘Finish’ to launch OpenField console.
15
Youwillseeaprompttoinstalldriversifthisisyourrsttimeinstalling.Click‘OK’toinstall.
Dependingonsecurity,promptsmayappearaskingforyoutoallowaccessthroughyourrewall.Click‘AllowAccess’
Click ‘Finish’ to launch OpenField console.
15
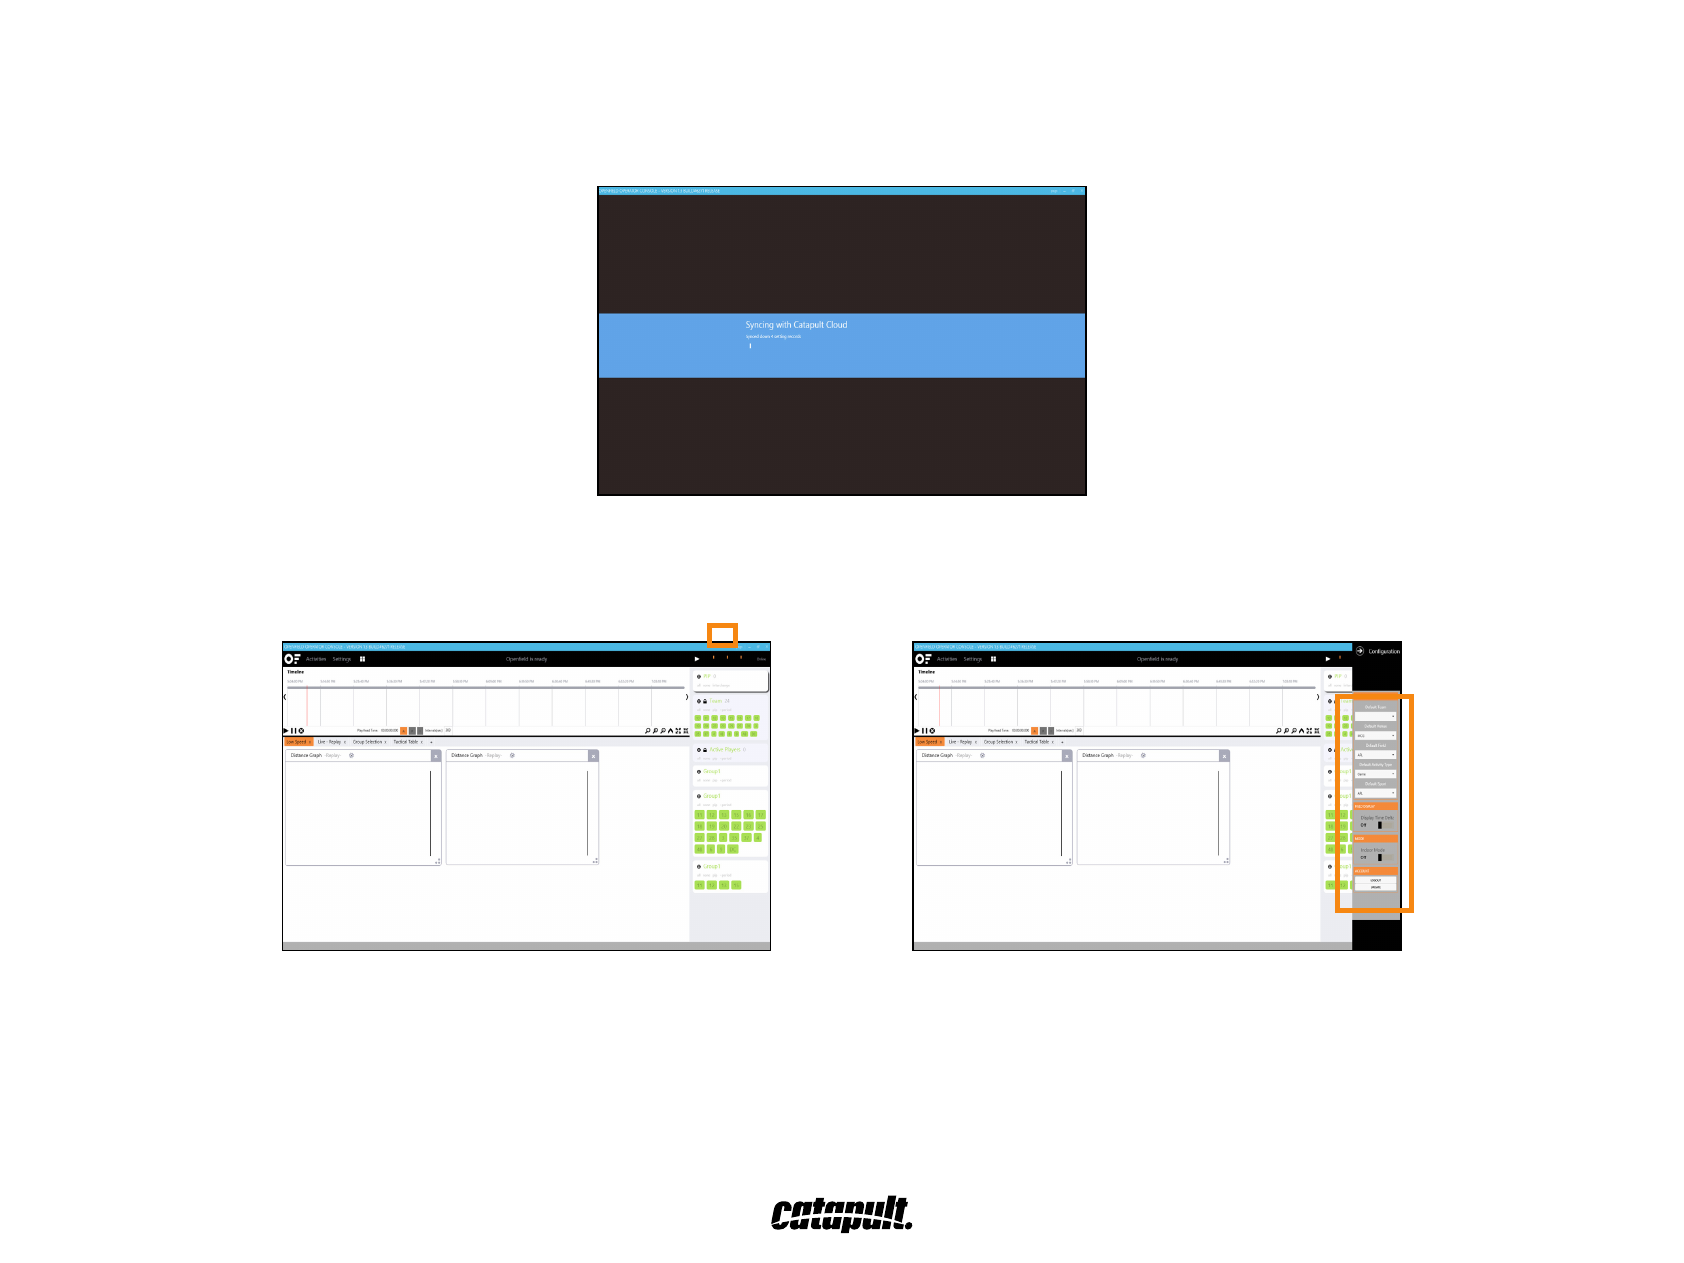
INITIAL SYNC ON OPENFIELD CONSOLE
Thersttimeyouopentheconsole,youwillneedtosyncwiththecloud.Thiswillsyncallyoursettingsandathletes.
Thestatusscreenwillshowtheprogressofthesync.DonotcloseOpenFielduntilitiscomplete.
Youwillseeyourusernameintoprightcorner.Clickonittoshowyour‘Conguration’settings.
Makesurethatallyourdefaultsettings(team,venue,eld,activitytypeandsport)arecorrect.
To re-sync after making changes to your settings, click on the Actions Panel to go to the tiles screen.
Then click the purple ‘Sync’ tile.
Yoursettingswillbeupdatedwhenyoureturntoyourdashboard.
16
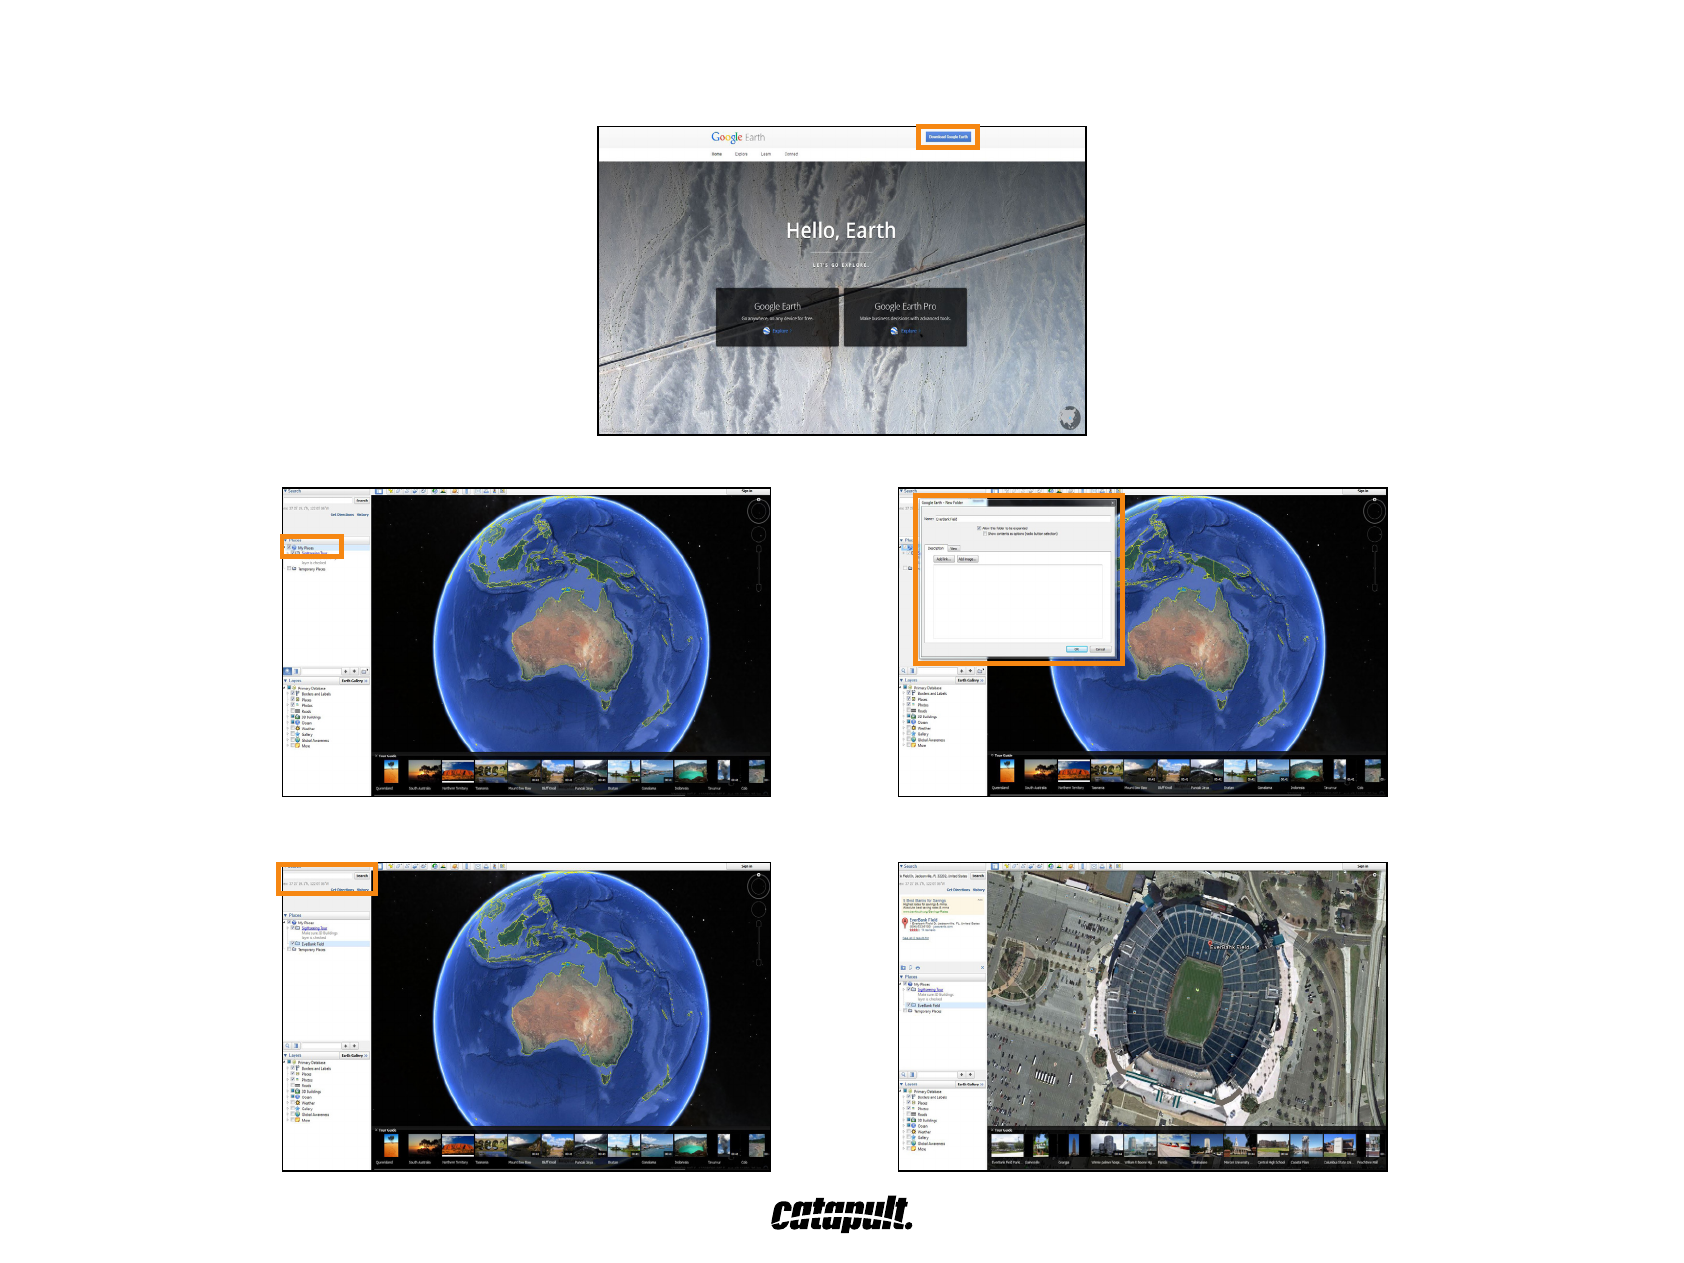
CREATING A VENUE
To createavenueonyourconsole,youwillneedtoinstallGoogleEarth(google.com/earth/).
OpenGoogleEarth.Createanewfolderbyrightclicking‘MyPlaces’inthetopleftcorner,then‘Add’,then‘Folder’.
Namethevenue,click‘OK’,thenentertheaddressunderthesearchbar.GoogleEarthwillzoominonyouraddress.
17
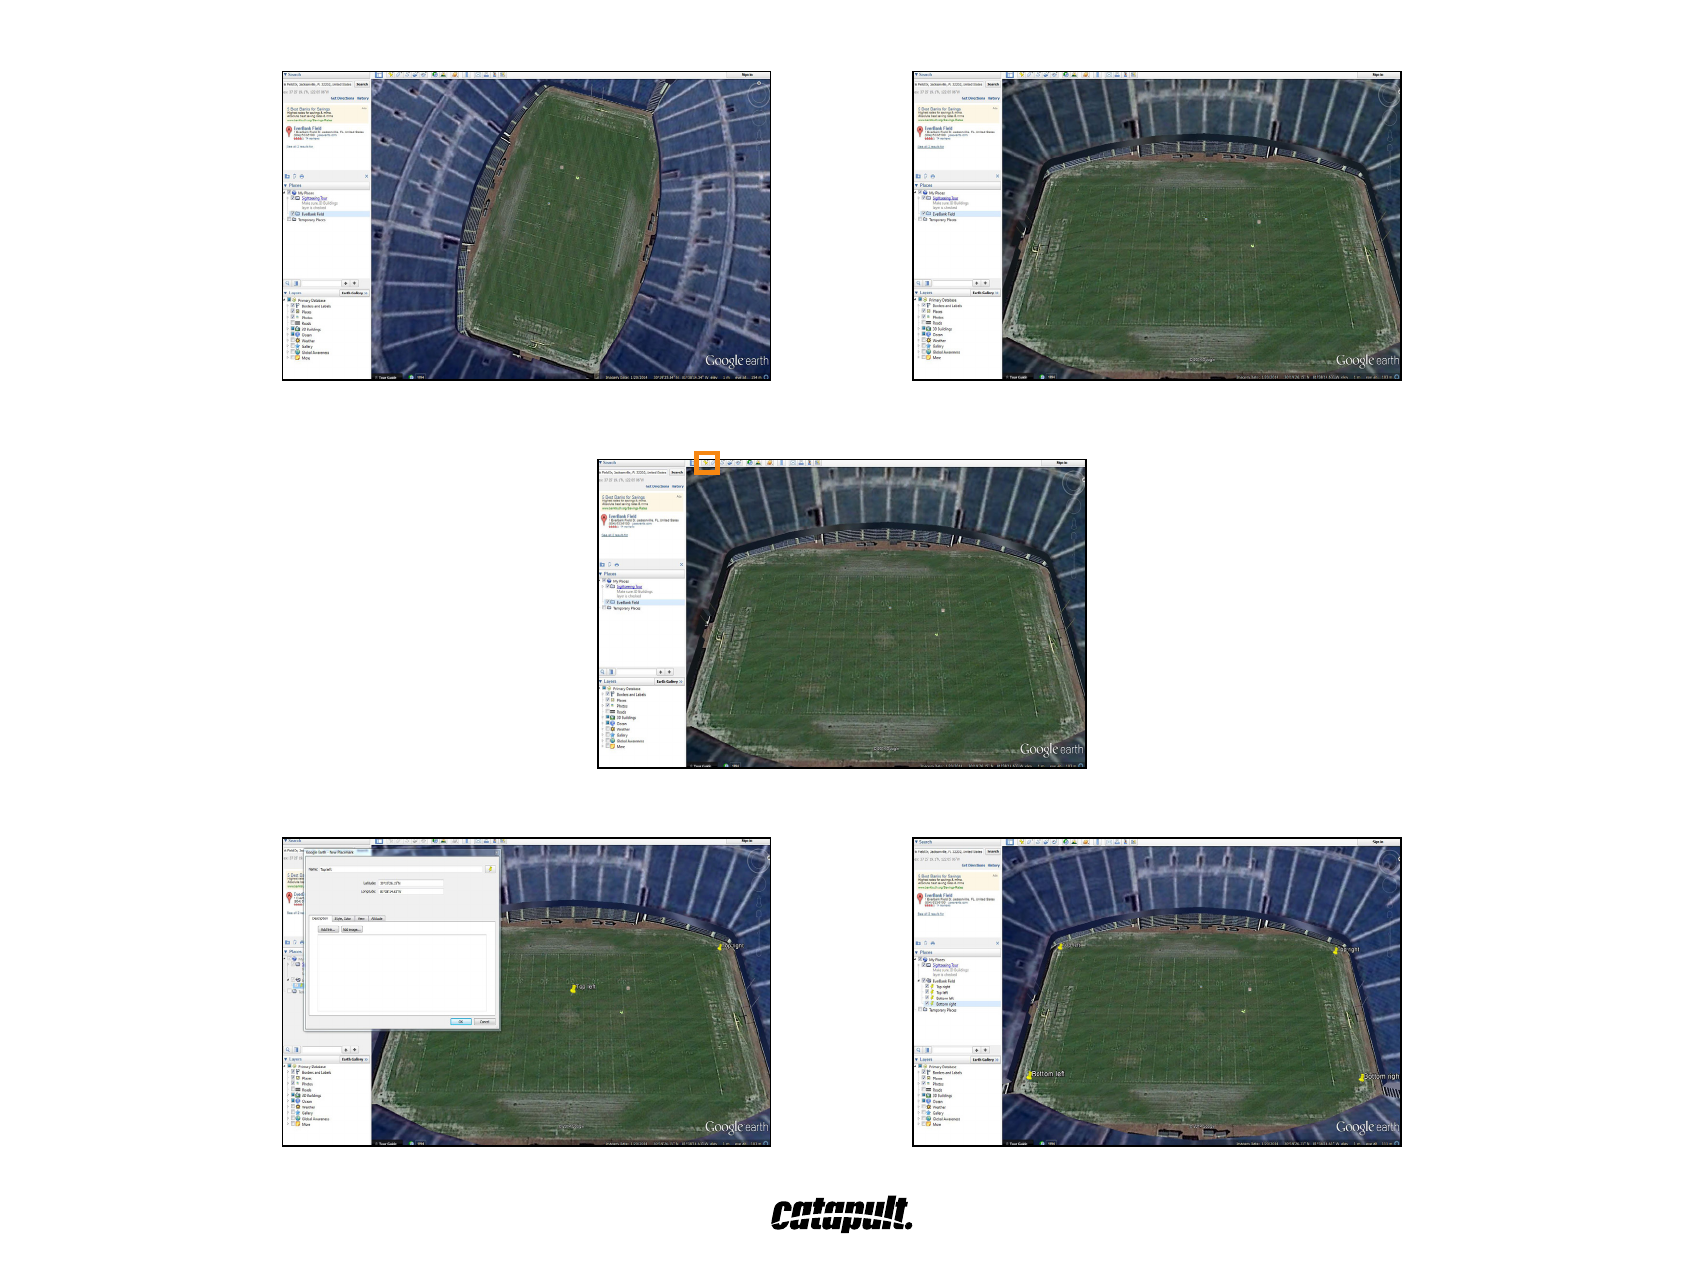
Adjustyourscreenviewsothecornersofyourplayingareaarevisible,andtheeldispositionedasyouwillphysicallybeviewingit.
Click ‘Add Placemark’ to add a placemark.
Place one placemark in each of the four corners of the playing area. Name them: top right, top left, bottom left, bottom right.
18
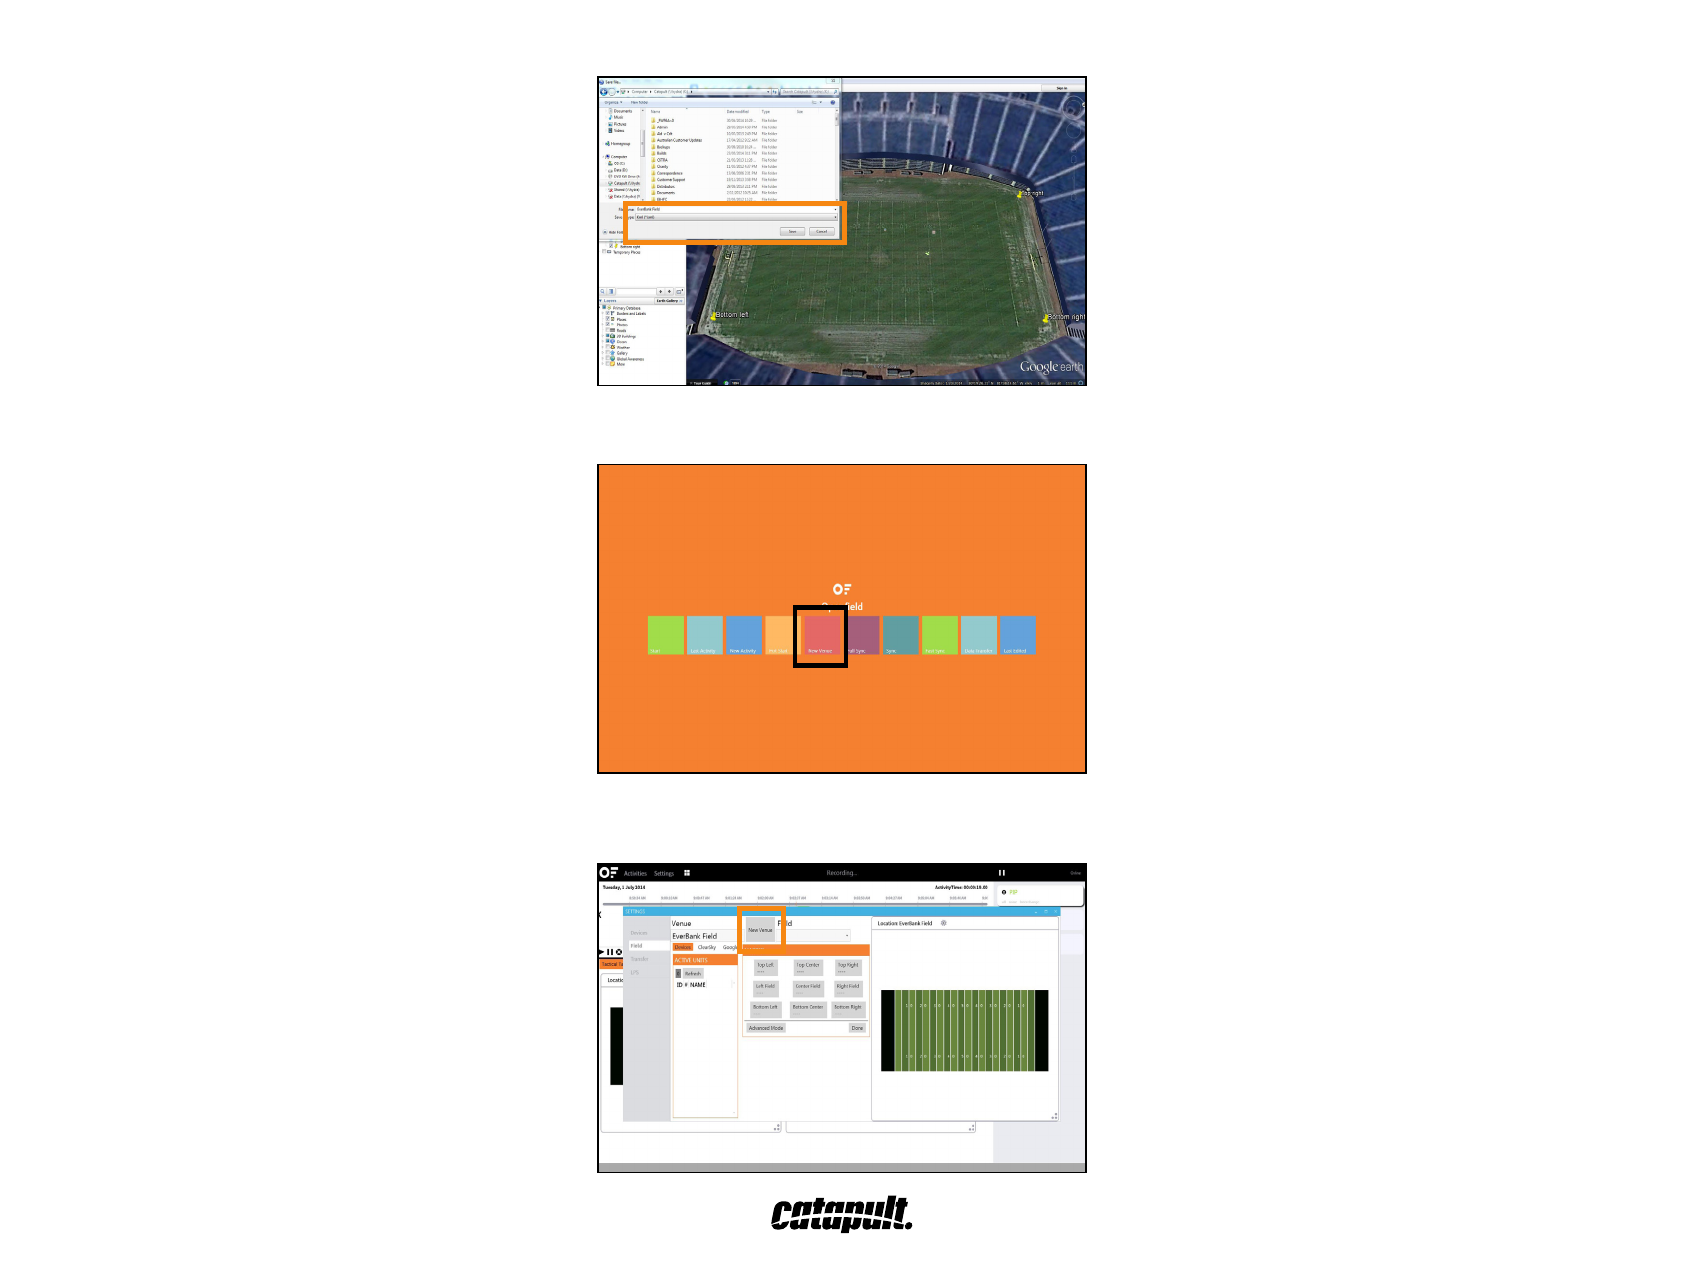
Saveyourworkbyrightclickingonyourfolderontheleft,andclickingon‘SavePlaceAs...’Makesureyou’resavingasaKMLle.
Onceyouhavesavedthisleasa.kml,clickon‘NewVenue’onthemainpage.
Enter the name of the venue.
19
Chooseyoureldunderthe‘Field’dropdownmenu.
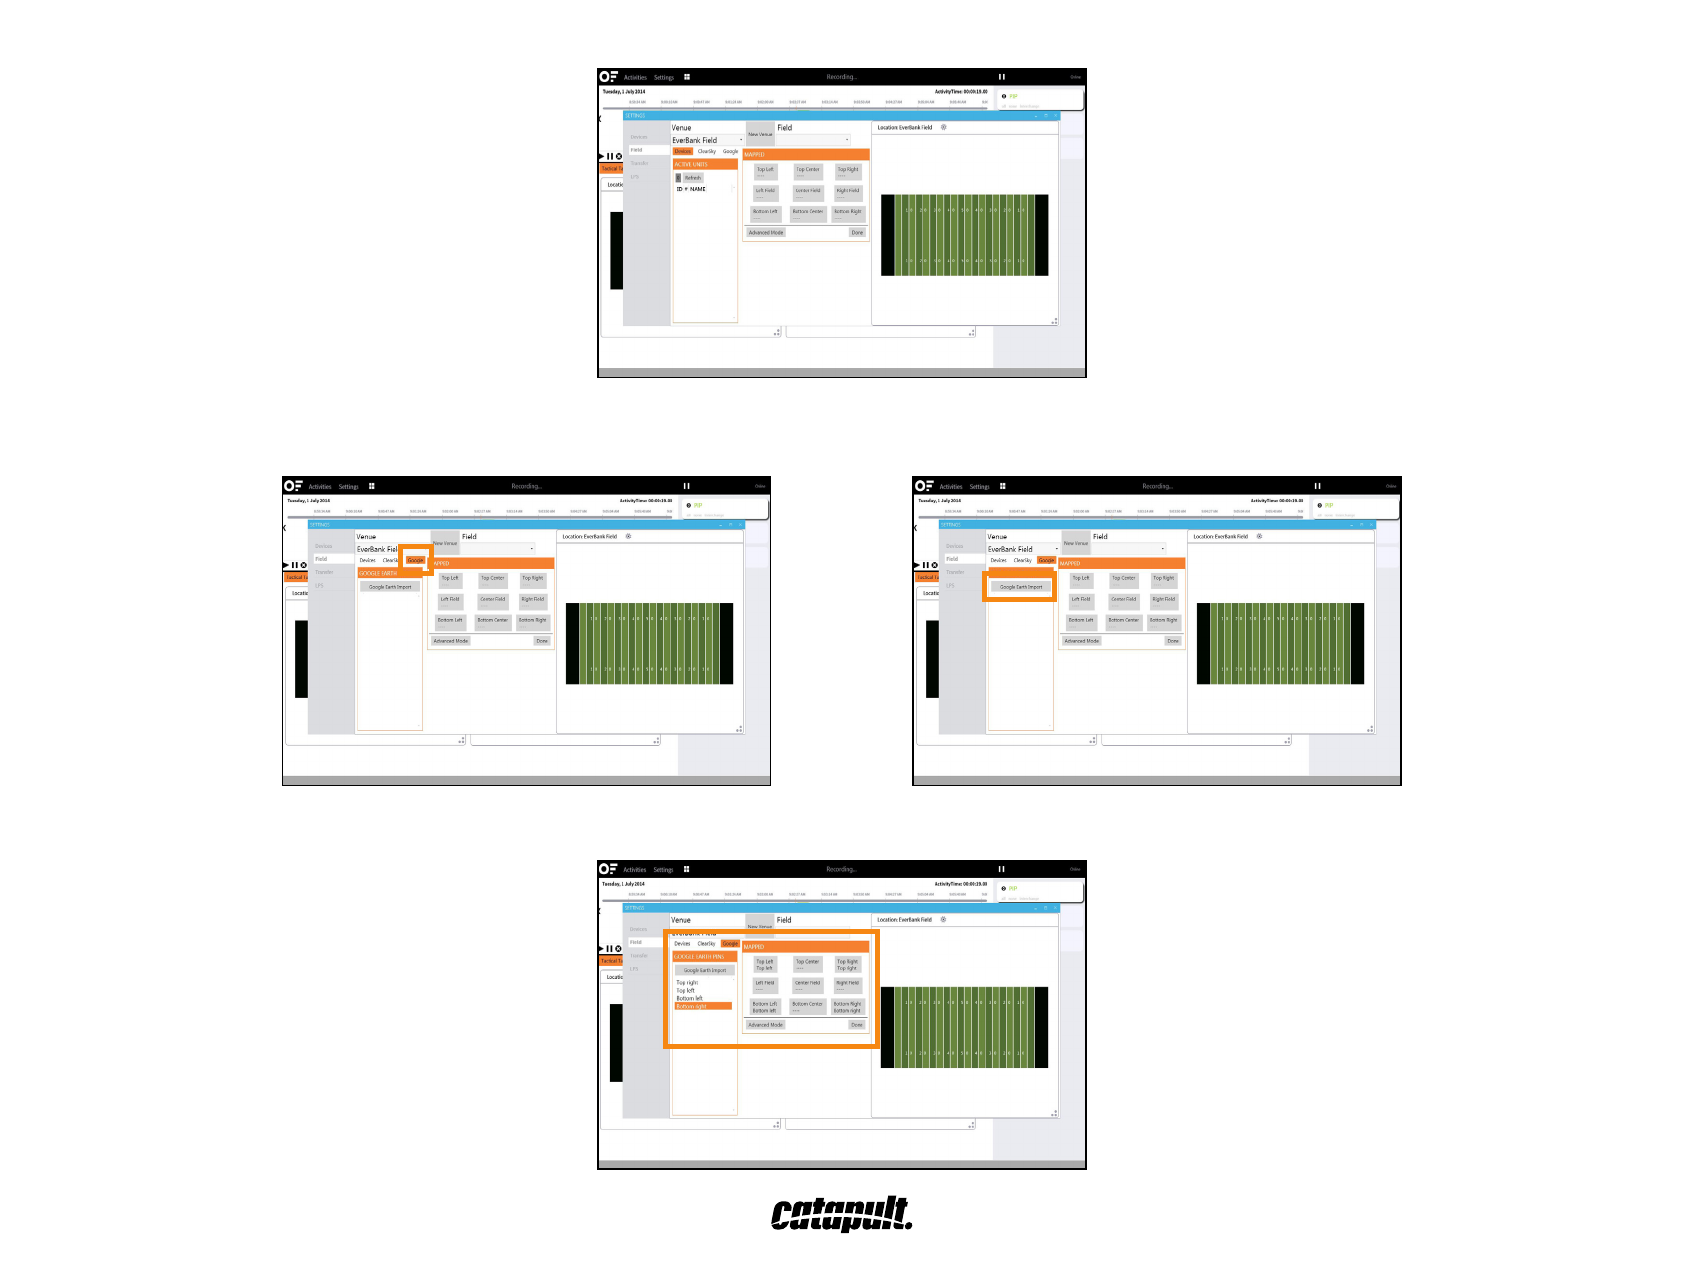
Undervenue,click‘Google’andthen‘GoogleEarthImport’.SelectyourKMLle.
Match your placemarks to the ‘mapped’ points on the screen by clicking the imported point, then its location. Click ‘Done’
20
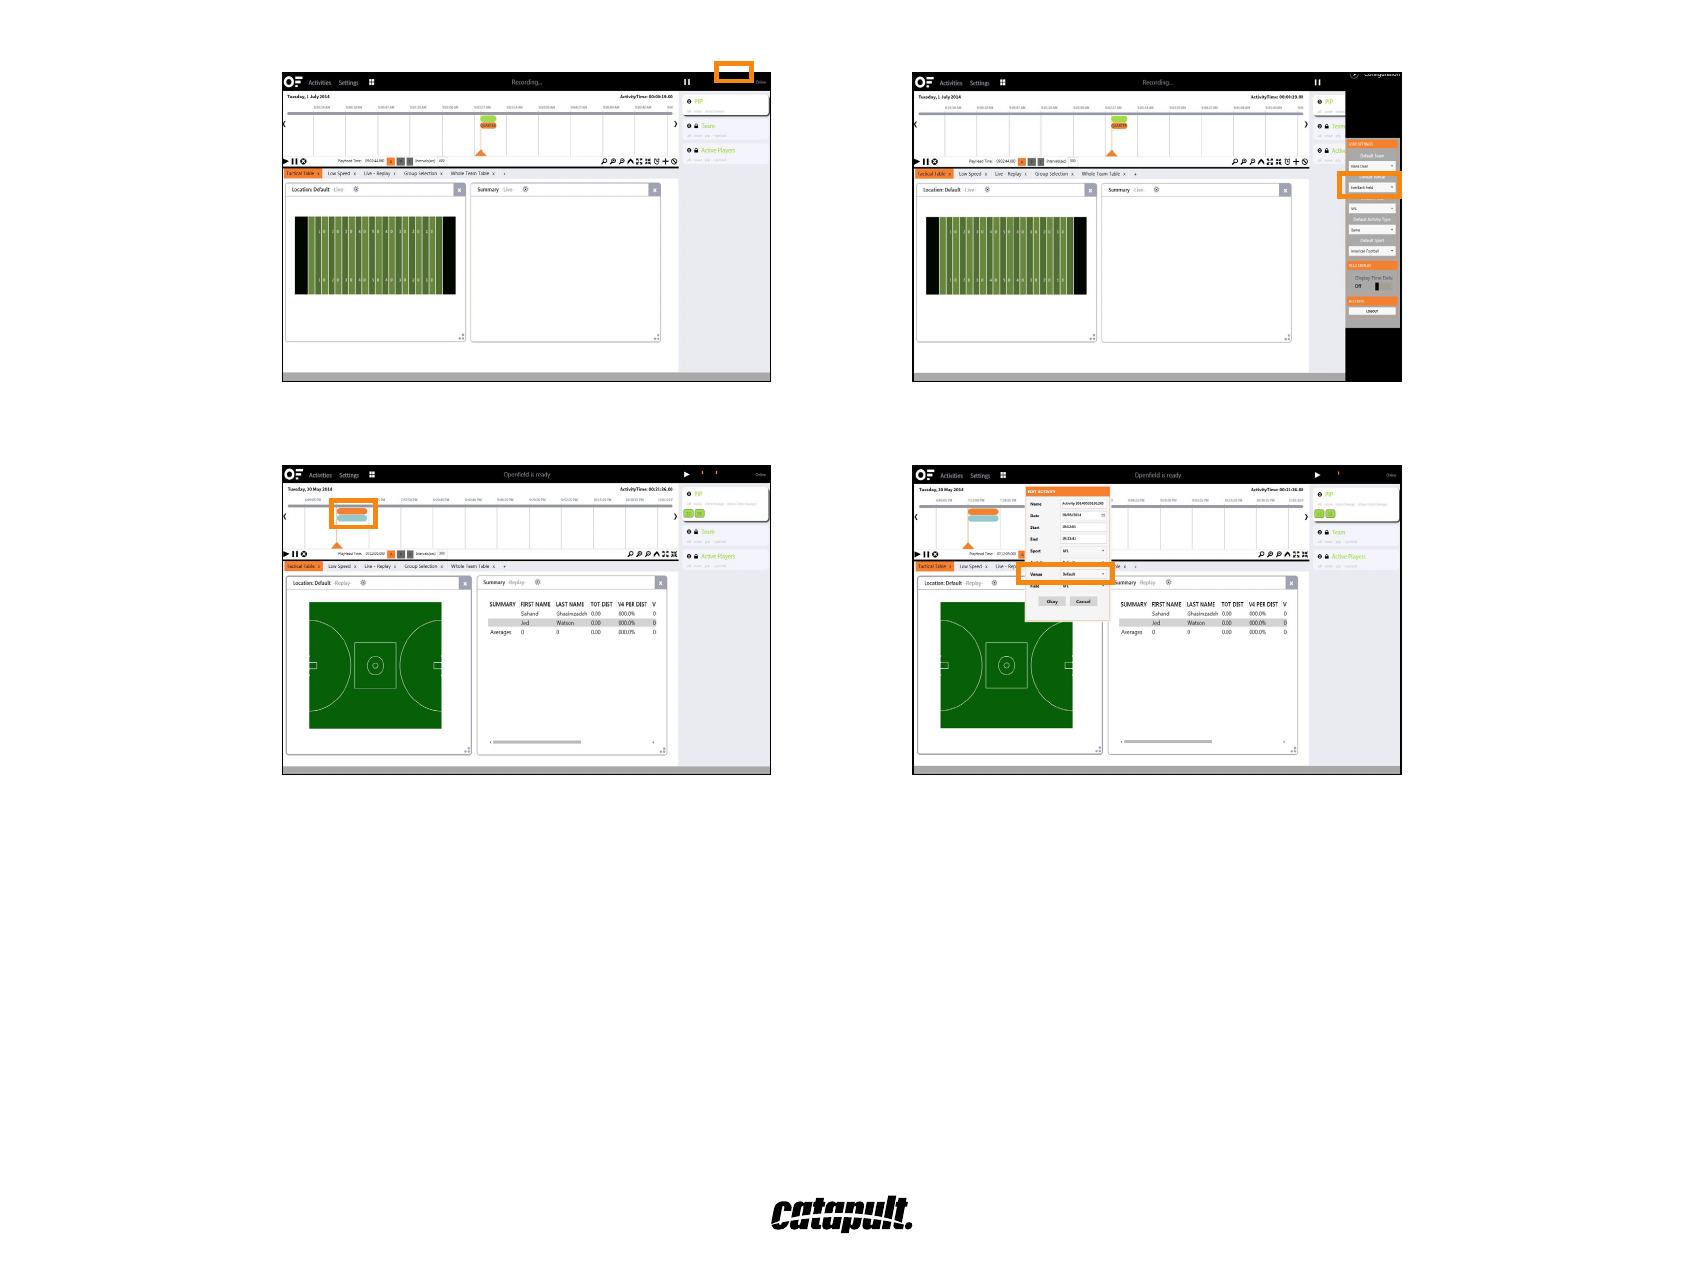
To nish,clickonyournameinthetoprightcornerandchangethe‘Conguration’settingstothevenueyoujustadded.
To changetheeld/venueforoneactivityonly,rightclickonthesession,then‘Edit’andchangevenue.
21