Caterpillar PL161 PL161 User Manual Exhibit D Users Manual per 2 1033 b3
Caterpillar, Inc. PL161 Exhibit D Users Manual per 2 1033 b3
Exhibit D Users Manual per 2 1033 b3
Special Instruction
Installation Procedure for the Product Link
®
PL161
Installation Procedure for the Product Link® PL161
System
Introduction
This Special Instruction will provide instructions for installing the Product
Link
®
PL161 Asset Tracker.
The PL161 is part of a remote monitoring solution that enable efficient and effective
equipment management. In coordination with a mobile device application, the PL161
transmits its information via a cellular GSM communications network to the
Telematics Back Office for use with VisionLink®.
The PL161 provides basic asset tracking with GPS location reporting when in range
of a mobile device with the Cat TrackIt application installed and enabled.
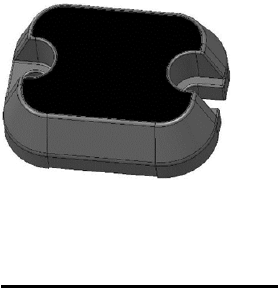
Product Link
TM
Device
Figure1:PL161
PL161 Bluetooth Device
The PL161 is a Bluetooth device that sends data to VisionLink® over a cellular
network using a mobile device with the Cat TrackIt application installed and enabled.
The PL161 has an internal antenna for the transmission of the devices information to
the mobile device.
Important Safety Information
Work safely. Most accidents that involve product operation, maintenance, and repair
are caused by failure to observe basic safety rules or precautions. An accident can
often be avoided by recognizing potentially hazardous situations before an accident
occurs.
A person must be alert to potential hazards. This person must also have the necessary
training, skills, and tools to perform these functions properly.
Safety precautions and warnings are provided in this instruction and on the product. If
these hazard warnings are not heeded, bodily injury or death could occur to you or to
other persons.
Caterpillar cannot anticipate every possible circumstance that might involve a
potential hazard. The warnings in this publication and on the product are, therefore,
not all inclusive. You must not use this product in any manner different from that
considered by this manual without first satisfying yourself that you have considered
all safety rules and precautions applicable to the operation of the product in the
location of use, including site-specific rules and precautions applicable to the
worksite. If a tool, procedure, work method or operating technique that is not
specifically recommended by Caterpillar is used, you must satisfy yourself that it is
safe for you and for others. You should also ensure that you are authorized to perform
this work, and that the product will not be damaged or become unsafe by the
operation, lubrication, maintenance or repair procedures that you intend to use. The
information, specifications, and illustrations in this publication are on the basis of
information that was available at the time that the publication was written. The
specifications, torques, pressures, measurements, adjustments, illustrations, and other
items can change at any time. These changes can affect the service that is given to the
product. Obtain the complete and most current information before you start any job.
Cat dealers have the most current information available.
Note: Safety regulations govern the transport of lithium batteries and devices that
contain lithium batteries. If the operator intends to initiate transport of the PL161
Product Link device, the operator is responsible for understanding and adhering to
local, national, and international regulations related to packing instructions, warning
labels and other safety precautions for devices with lithium batteries.

Required Parts for PL161 System
Table1
Record the Registration Information
Dealer Registration
Before the PL161 is mounted on the equipment, record all the information that will be
needed to subscribe services in the "Dealer Services Portal" (DSP).
Note: The information needed to subscribe services to the equipment is on the label
located on the bottom of the device. Once the PL161 is installed, this information will
no longer be visible without uninstalling the device.
A one page form is included in the PL161 kits. Use the form to aid in recording all the
data that will be required to subscribe services in the DSP. The title of the form is
"Product Link PL161 Asset Tracker Installation Data". If a form was not included in
the kit, or if you need another one, the form can be downloaded from
dealer.cat.com/PL.
Customer Registration
For Customer Registration procedure, please reference the Special Instructions for
Cat Activate
Quantity Part# Description
1 503‐2958 ContGp
1 505‐1738 Plate
2 8T‐0267 Bolt
2 9X‐8256 Washer‐Hard
1 433‐9728 Film
1 433‐9730 Film

Mounting the PL161
Read all instructions prior to installing the hardware.
FCC Notice
This device complies with part 15 of the FCC rules. Operation is subject to the
following two conditions:
1. This device may not cause harmful interference, and
2. This device must accept any interference received, including interference that may
cause undesired operation.
Industry Canada Notice to Users
This device complies with Industry Canada license- exempt RSS standard(s).
Operation is subject to the following two conditions:
1. This device may not cause interference, and
2. This device must accept any interference received, including interference that may
cause undesired operation of the device.
Le présent appareil est conforme aux CNR d'Industrie Canada applicables aux
appareils radio exempts de licence. L'exploitation est autorisée aux deux conditions
suivantes :
(1) l'appareil ne doit pas produire de brouillage, et
(2) l'utilisateur de l'appareil doit accepter tout brouillage radioélectrique subi, même si
le brouillage est susceptible d'en compromettre le fonctionnement
PL161 Mounting Requirements
The following are requirements when deciding where to mount the PL161:
If possible, mount the PL161 so that the potting side is facing out away from
the mounting surface.

The maximum torque for the mounting bolts is 12 N·m (as per 1E0279B).
Do not mount on a cantilever
Do not mount on a flexible surface
Must be mounted on a flat surface
Place the PL161 in an area that is easily accessible and can be serviced in a
reasonable amount of time.
Place the PL161 in an area and with an orientation that it is not used as a "boot
step" or a "fulcrum point".
PL161 Environmental Information
PL161 Environmental Information Table
Parameter Specification
Operating Temperature Range −40°C to 85°C
Storage Temperature Range -50°C to +95°C
Vibration 29.59 Grms
Ingress Protection IP68 (35kPA)
Table2
Installing the PL161
The PL161 has two mounting options, adhesive mount or hard mount.
Note: Avoid mounting the device next to high heat sources such as exhaust stacks.
Note: Avoid mounting the device in a transmitted beam of any radar equipment. For
best adhesion, the PL161 should be mounted at temperatures between 21° C (69.80°
F) and 38° C (100.40° F).
Adhesive Mount Option
Note: Refer to "PL161 Mounting Requirements" before mounting the device.
The PL161 comes with two strips of adhesive tape loose in the kit.
Note: For best adhesion, the PL161 should be mounted at temperatures between 21°
C (69.80° F) and 38° C (100.40° F) and the device should be mounted to a clean/dry
area.

1. Record all the data needed to subscribe services in the "DSP" before mounting
the Product Link device. Refer to "Record the Registration Information".
2. Remove the strip of protective plastic from one side of each adhesive strip.
3. Apply one piece of adhesive tape to each side of the back of the PL161.
4. Remove the remaining strip of protective plastic from each of the adhesive
strips.
5. Firmly press the radio down on the mounting surface.
Hard Mount Option
Note: Refer to "PL161 Mounting Requirements" before mounting the device.
1. Record all the data needed to subscribe services in the "DSP" before mounting
the Product Link radio. Refer to "Record the Registration Information".
2. Clean off an appropriate sized area to weld the mounting plate to.
3. Weld the mounting plate to the surface.
4. Apply thread locker to each bolt (1E2200L or 1E2200A)
5. Bolt the PL161 onto the mounting plate using the provided bolts. Tighten the
mounting hardware to 12 ±3 N·m (8.851 lb ft).