Cellink 4710874204034 Bluetooth USB Adaptor User Manual BTA 6010 user s manual
Cellink Co., Ltd. Bluetooth USB Adaptor BTA 6010 user s manual
Cellink >
Users Manual
- 1 -
User Manual
For
Bluetooth USB Dongle

- 2 -
Introduction
Introduction to Bluetooth Wireless Technology
Bluetooth is a short- range wireless communication technology. It allows wireless connections between
Bluetooth devices such as cellular phones, personal digital assistants (PDA), desktop and notebooks
computers, input-output devices (mouse, keyboards, and printers), and home appliances. Bluetooth
refers to a worldwide standard designed to operate in the internationally recognized ISM (Industrial
Scientific and Medical) frequency band. Within the ISM band (2.4 GHz – 2.48 GHz) Bluetooth
transmissions hop between 79 separate frequencies 1,600 times every second, and with a
communication range of about 10 meters (class II).
Introduction to Bluetooth USB Adapter
Bluetooth USB Adapter is a Bluetooth enabler, that enables your desktop or notebook computer to
connect wirelessly to any other Bluetooth enabled computers and devices. It allows a working range of up
to 10 meters (33 feet) with a 723 Kbps data rate transmission, and complies with Bluetooth 1.2 and USB
1.1 specifications. Bluetooth USB Adapter is an ideal solution for home and mobile networking needs. It is
easy to install and use for wireless connectivity to such as cellular phones, PDAs, printers, computers,
keyboards, mice etc.
Box Content and Picture
- Bluetooth USB Adapter
- Driver CD
- Quick Guide and User Manual

- 3 -
System Requirement
PC System Requirement:
- CPU: Intel Pentium III 500MHz or above.
- Memory: 256MB or more.
- Hard disk space: at least 50MB.
- OS: Windows 98SE/Me/2000/XP
- A free USB port, USB 1.1 compliant.
- CD-ROM Drive.
Mac System Requirement:
- MAC OS: 10.1.4 or later
- Mac OS driver and software provided by Apple.
- A free USB port, USB 1.1 compliant.
- CD-ROM Drive.
- 4 -
Software Installation
Note: Do not plug your Bluetooth USB Adapter into USB port until you have completed the software
installation as the following:
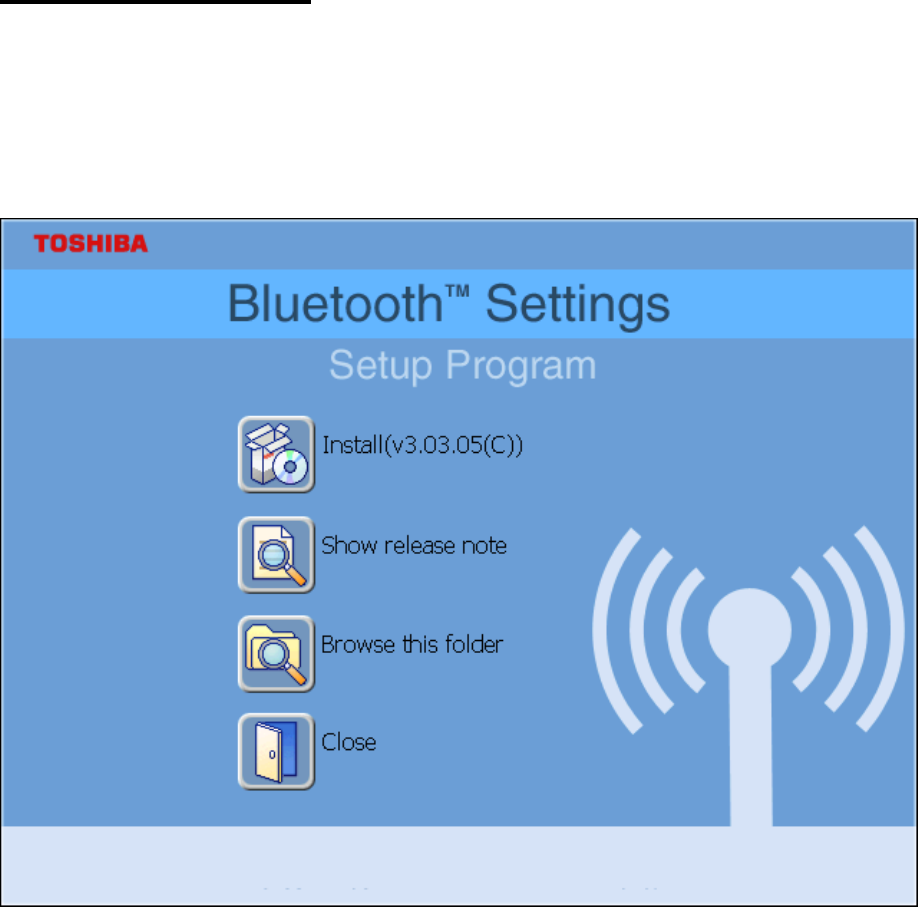
1. Insert the software CD comes with your USB adapter. The “InstallShield Wizard” should automatically
start running. If it doesn’t load, run its “Setup.exe” file.
2. A menu window appears for you to select settings items. Click “Install” to start installation process.
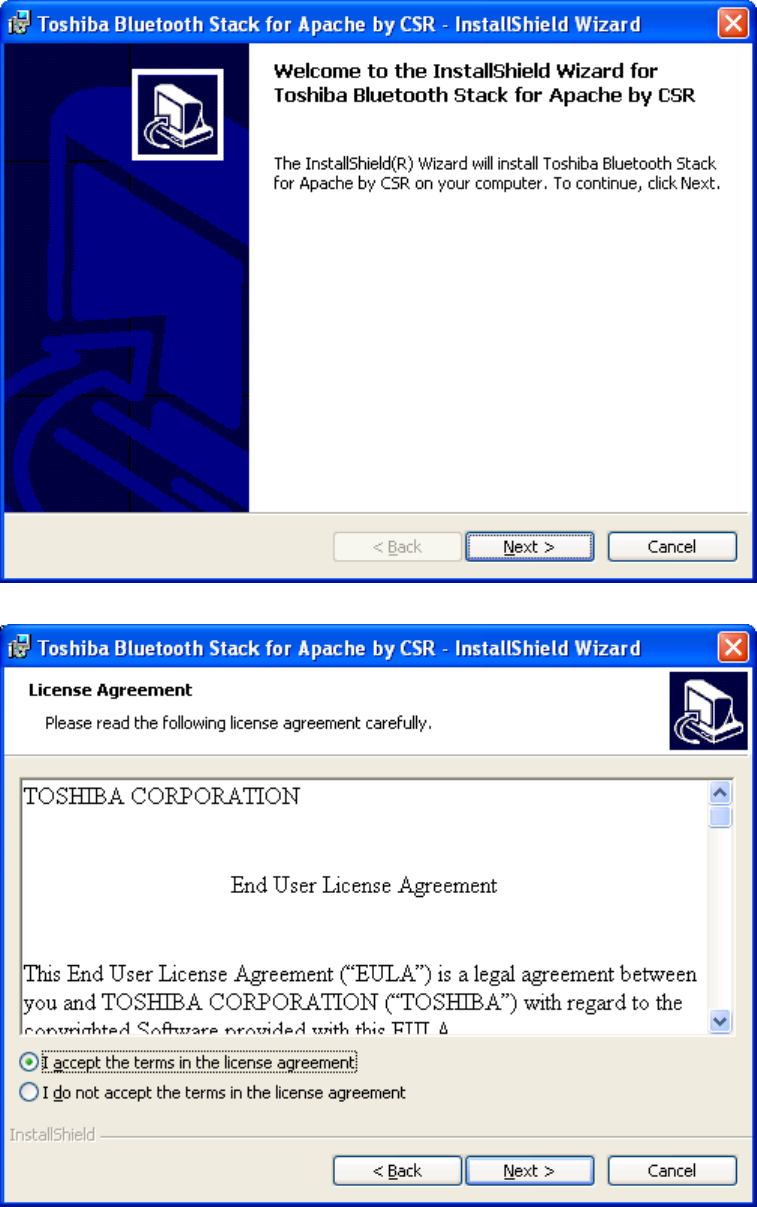
3. The InstallShiel Wizard window should now appear, Click “Next”.
- 5 -
4. Select “Yes” to accept License Agreement.
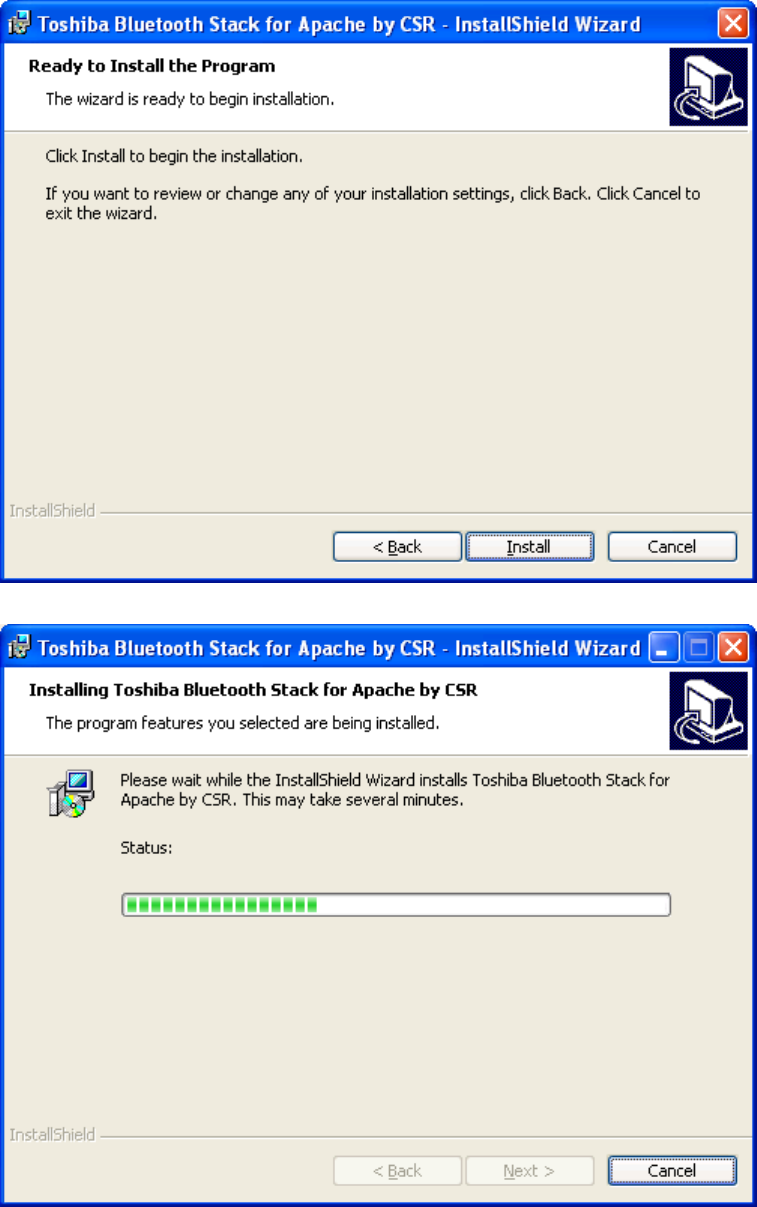
5. Click “Install” to begin the installation.
- 6 -
6. InstallShiel is processing.
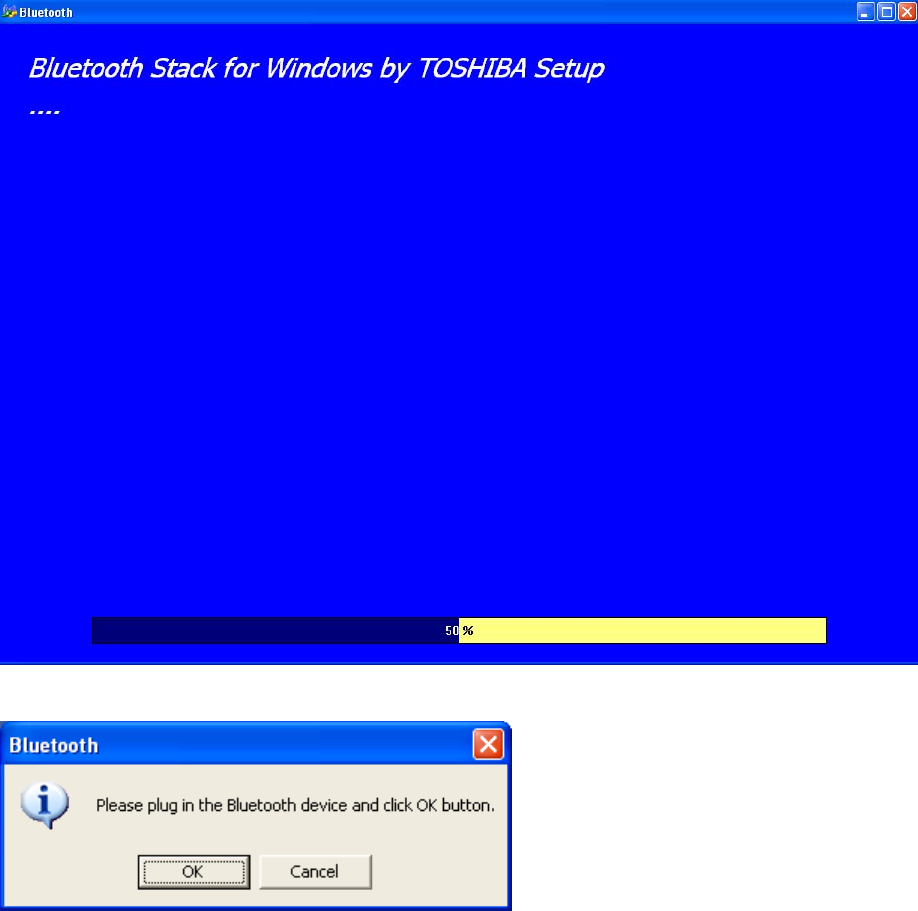
7. Wait for the setup.
- 7 -
8. Now plug the EDR USB adapter onto an available USB port and click “OK” to continue installation.
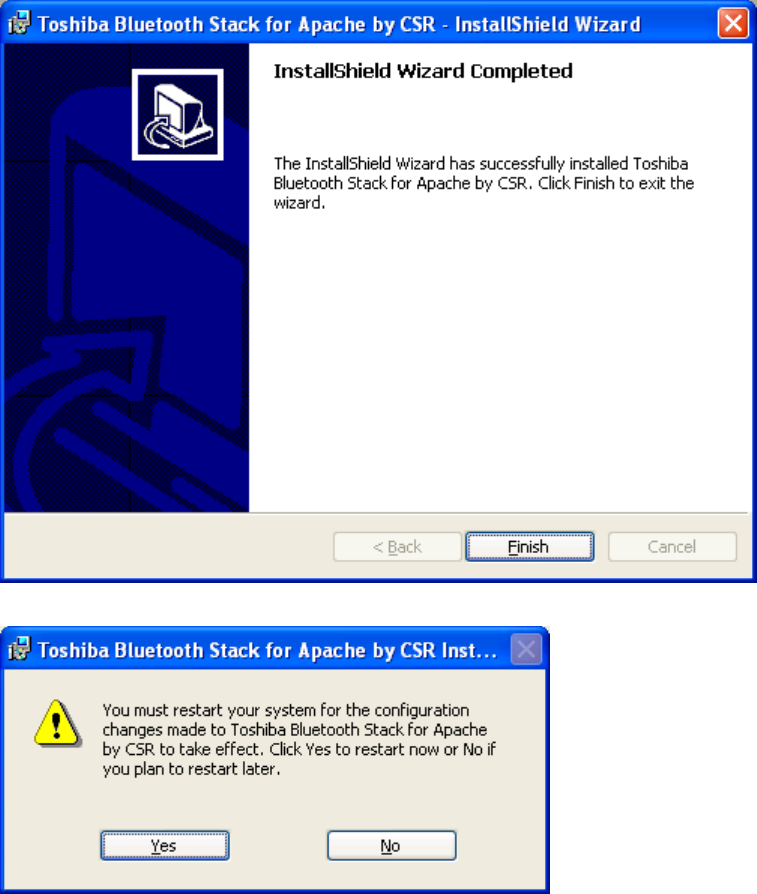
9. Click “Finish” to finish the installation.
- 8 -
10. You will be asked to restart system. Click “Yes” to restart immediately or click “No” to restart later.
- 9 -
Pairing Guide
What’s pairing?
Pairing is a process of associating Bluetooth devices with each other. It allows avoiding entering access
information every time when a connection is requested. Bluetooth devices need to be paired with each
other before attempting a connection at first time.
Paired devices will remain paired, even if:
1. One of the devices is un-powered.
2. A service connection is interrupted or stopped.
3. One or both devices are rebooted.
Pass Key
Paired devices share a unique Pass Key (also referred to as Link Key), by which they authenticate with
each other when connecting. The Pass Key can be alphanumeric, numbers, or letters, and must consist
of one or up to 16 characters.
How to pair devices?
Automatically -- If a passkey is required before connection, devices will pair automatically the first time
they connect (a passkey must be successfully exchanged).
Manually -- In the main window of Bluetooth Manager, right click a device, select Pair Device from the
popup menu, and then input a same passkey on both sides.
Example 1, pair with a Bluetooth Mouse.
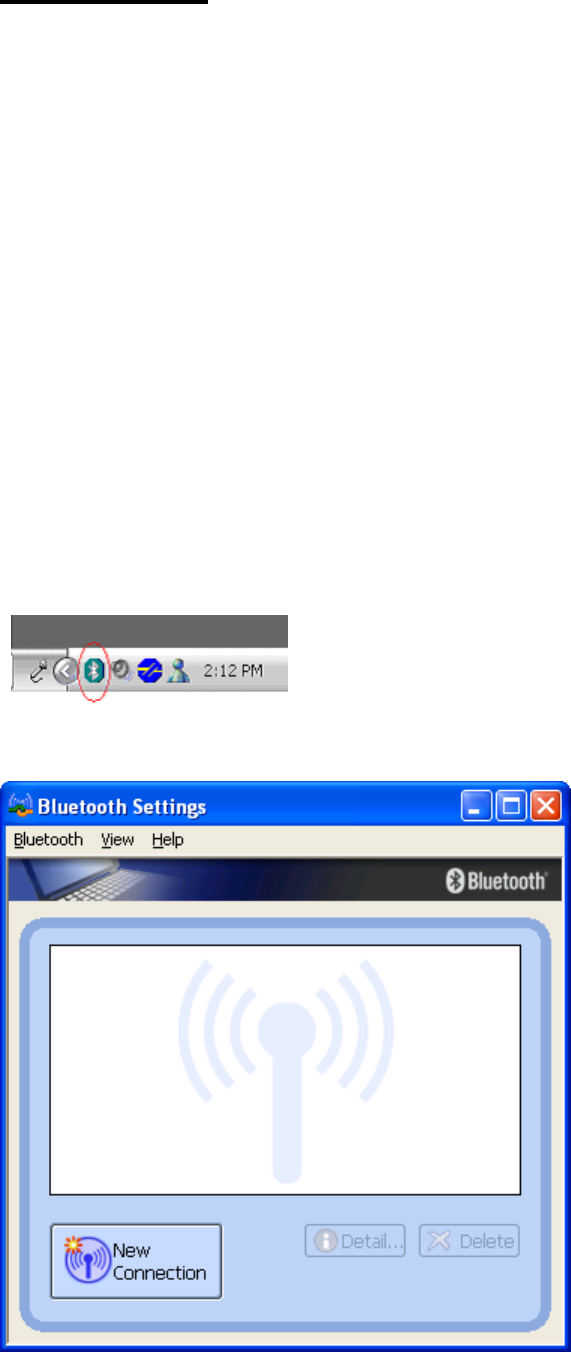
1. Open Bluetooth Manager main window by clicking Bluetooth icons on task bar.
2. Set the Bluetooth Mouse into pairing mode. Click “New Connection” button to start Bluetooth device
searching.
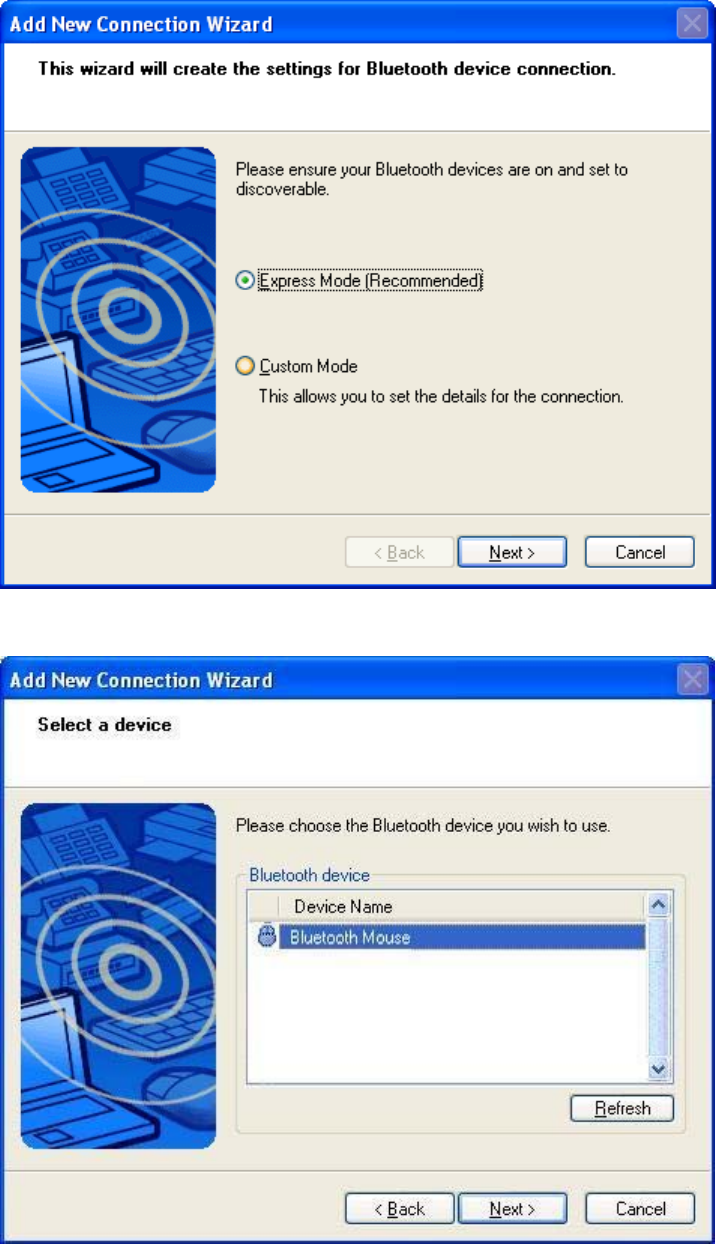
3. Select “Express Mode” and click “Next”. System starts searching Bluetooth devices in working range.
- 10 -
4. Select the “Bluetooth Mouse” in the Bluetooth Device list and click “Next”. If you can’t find the device
you want to pair with, click “Refresh” to search again.
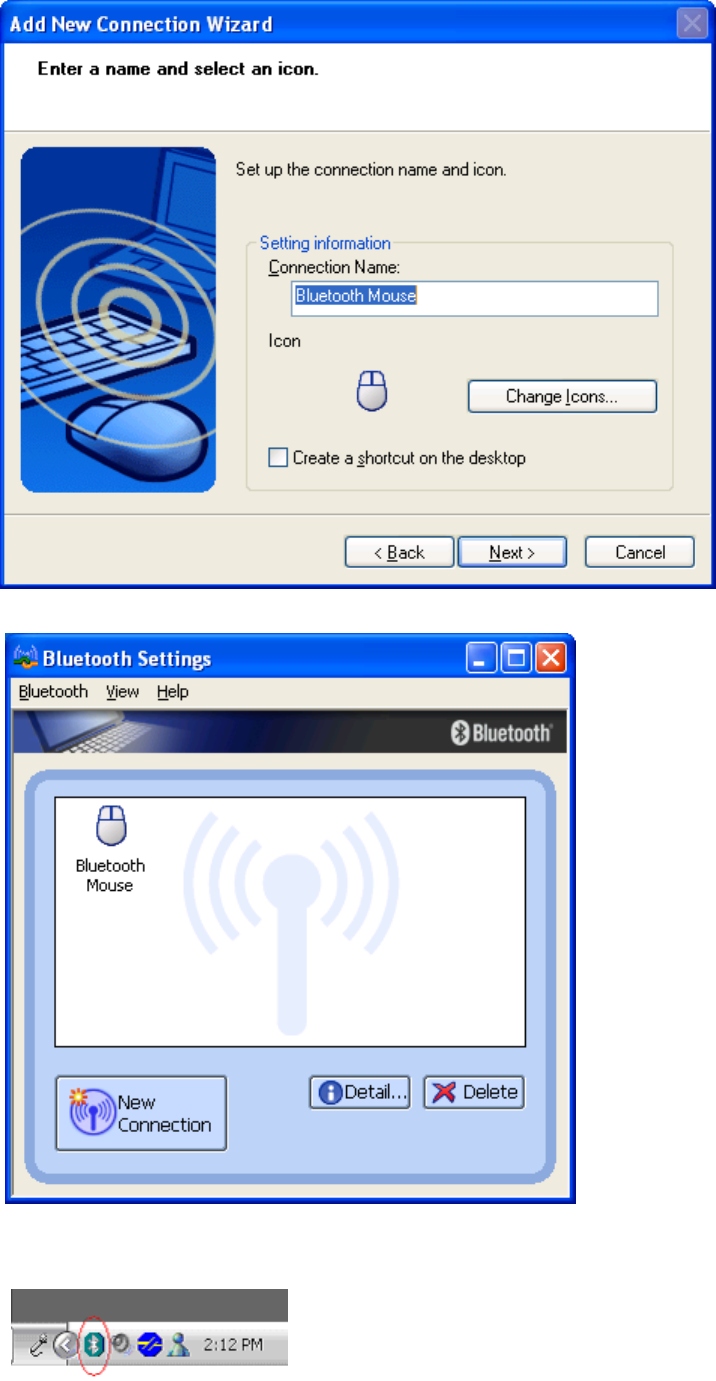
5. Enter a name and select an icon.
- 11 -
6. An icon “Bluetooth Mouse” will appear after pairing process completed.
Example 2, pair with a Bluetooth Headset.
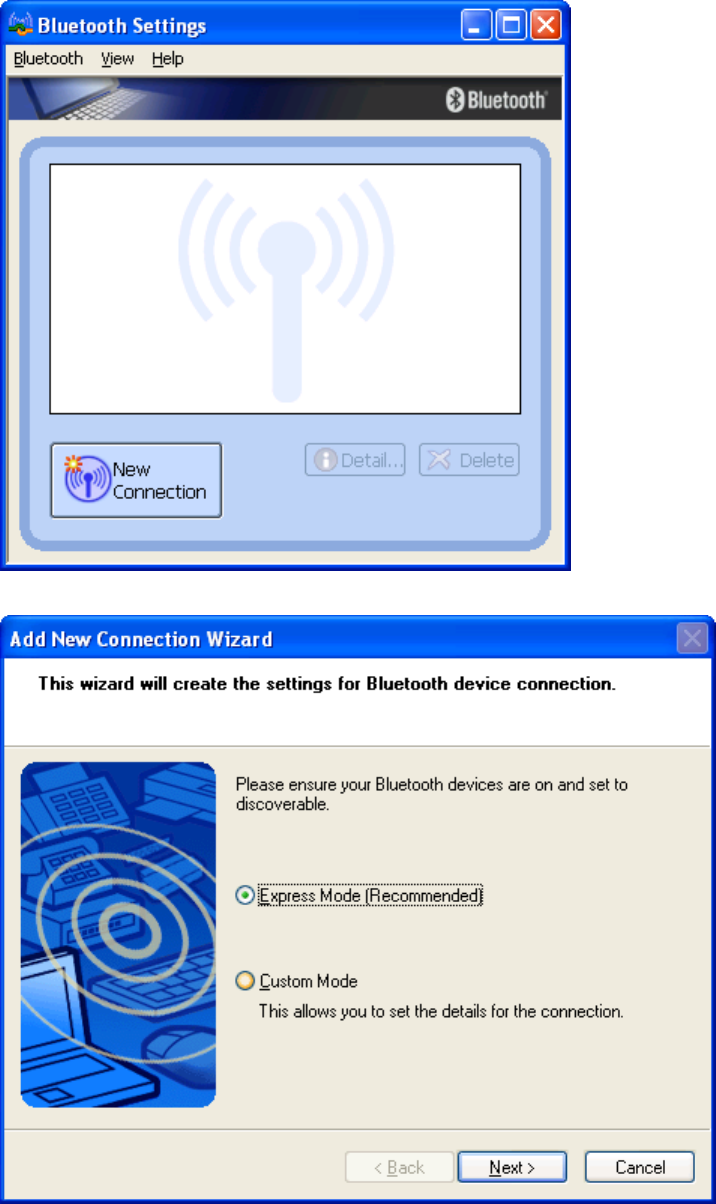
1. Open Bluetooth Manager main window by clicking Bluetooth icons on task bar.
2. Set the Bluetooth Mouse into pairing mode. Click “New Connection” button to start Bluetooth device
searching.
- 12 -
3. Select “Express Mode” and click “Next”. System starts searching Bluetooth devices in working range.
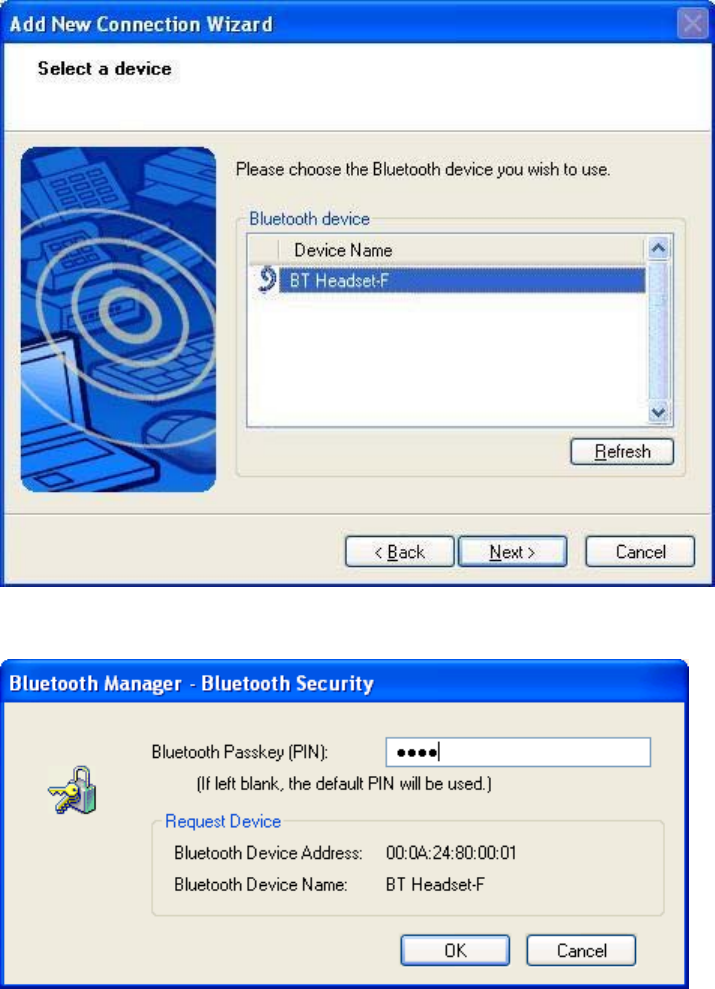
4. Select the “BT Headset-F” in the Bluetooth Device list and click “Next”. If you can’t find the device you
want to pair with, click “Refresh” to search again
- 13 -
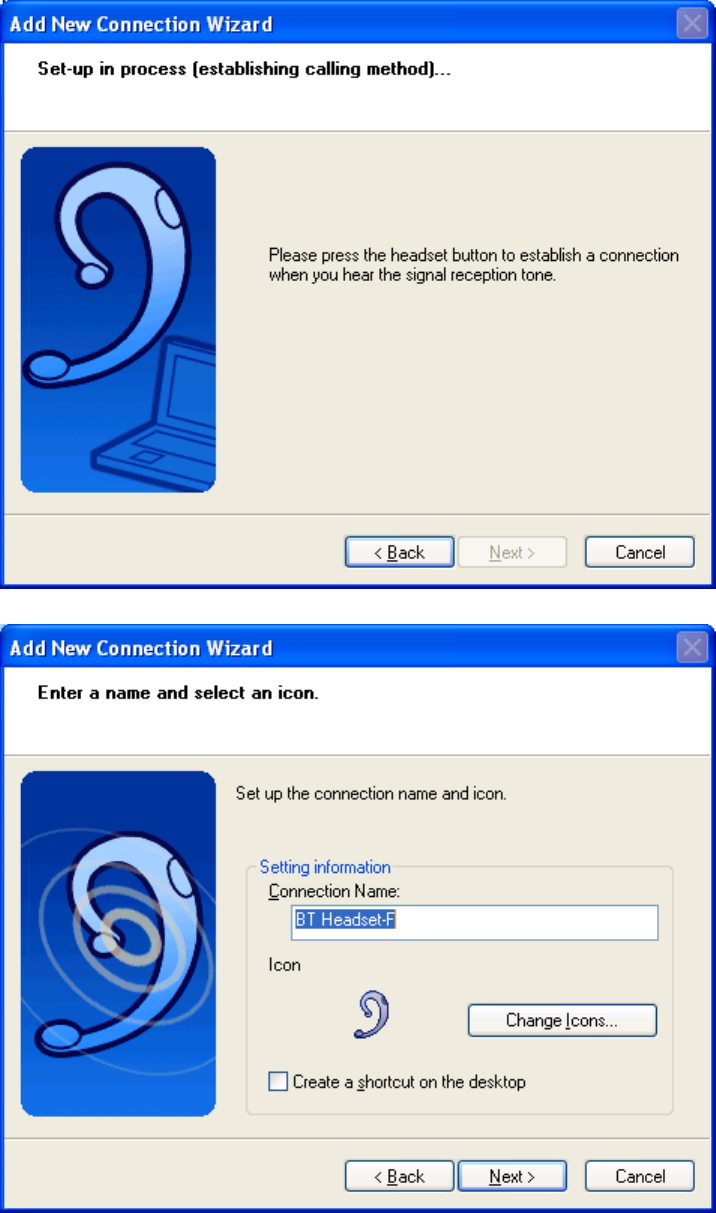
5. You will be required to enter Passkey (PIN Code). Check headset’s manual for the passkey and enter
it.
6. Press Answer button of the headset to continue pairing process.
- 14 -
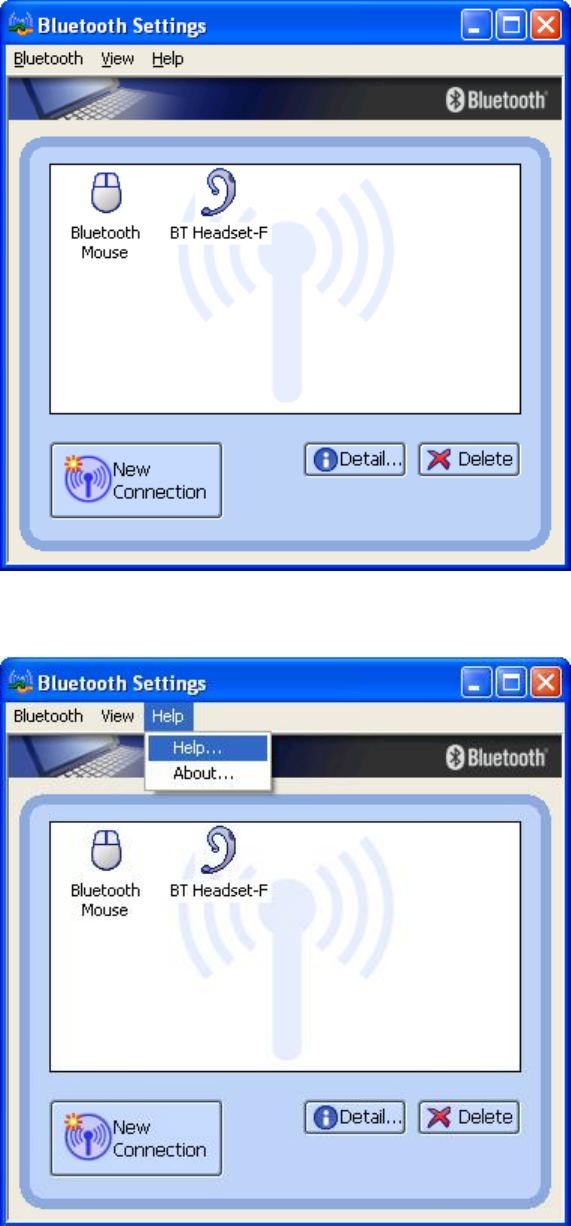
7. Enter a name and select an icon.
8. An icon “BT Headset-F” will appear after pairing process completed.
- 15 -
Note! Read Help file of “Bluetooth Settings” for detail information.

- 16 -
Connect and Disconnect
Connect
There are two ways to setup a Bluetooth connection.
Select Remote Device First
Select a remote device and double click it to refresh its services. Bluetooth passkey may be asked if
security level of either side of the connection is set to High and they are not paired devices. After service
searching finished, the services that the remote device supports are found and the corresponding service
icons on the top of the main window will change to be pink color.
Double click the pink color service icon you want to connect on the top of the Main Window. Connection
will be setup. After connection is OK, the remote device and the service icon will turn green.
Note:
PAN: If the PAN server side does not connect to a DHCP server, it will take about 45 seconds to assign
the IP address for the PAN client. Users have to wait about 45 seconds before using TCP/IP.
DUN: There will be a dial-up dialog box. The user needs to input the ISP phone number, its name and the
password.
FTP: After connection is setup, a FTP Window will pop up. The window shows the shared directories of
the remote device. The window may be empty if there is no file or directory on the remote site.
OPP: There are four kinds of operation modes for OPP: Send My Card, Get Card, Send Objects and
Exchange Cards. At the beginning, the default operation is Send My Card. Users can right click the icon to
select operation on the popup menu. Send My Card will send my card directly to the remote device. Get
Card will try to require the owner’s card from the remote device. Exchange Cards will send my card first
and then get the remote device card. Send Objects will pop up a file dialog box to let users to select some
object files to send to the remote device. Object means the files in the format of vCards2.1, vCalendar1.0,
vMessage and vNote.
Synchronization: There will be a dialog to let user to operate.
Printer: After the connection is established, users can use the printer to print with any other Windows
applications that support printing.
Select Service Icon First
Select a service icon on the top of the main Window. If you have ever browsed the services of some
remote devices, the device that supports the service will be highlighted in yellow.
Double click the remote browse first to check whether the device has the service and then connect to it. If
the remote device does not have the service, connection will fail. The Bluetooth passkey may be asked if
the security level of either side of the connection is set to High and they are not paired devices.
Note:
There are corresponding operation menu on the remote device icon and the service icon. Users can also
start the connection using the pop up menu.
Disconnect
Select the remote device first and right click the service icon on the top of the main window. On the pop up
menu, select Disconnect.
Select the remote device and right click the device icon. On the pop up menu, select Disconnect /
submenu (the connection you want to disconnect).
With FTP and Synchronization, close their operation widow and the connection will be disconnected.
The remote device side can disconnect the connection directly.
- 17 -
If the local Bluetooth device is removed or the remote device is removed, all the connections will be
disconnected. If the remote device moves out of the radio range, all the connections with the remote
device will be disconnected after about 1 minute.
Note:
When the program starts, it will show some words in the bottom right hand corner of the screen.
Example 1, connect/disconnect with a Bluetooth Mouse.
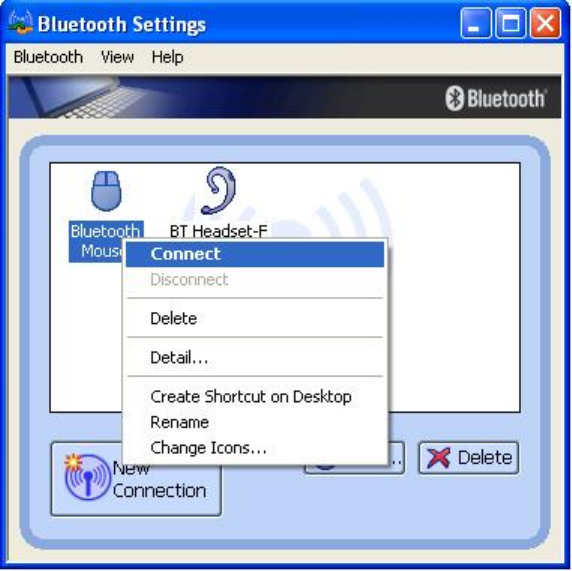
1. Turn on the Bluetooth Mouse. Move the cursor over the icon of Bluetooth Mouse in Bluetooth Settings.
Right click it and select “Connect”.
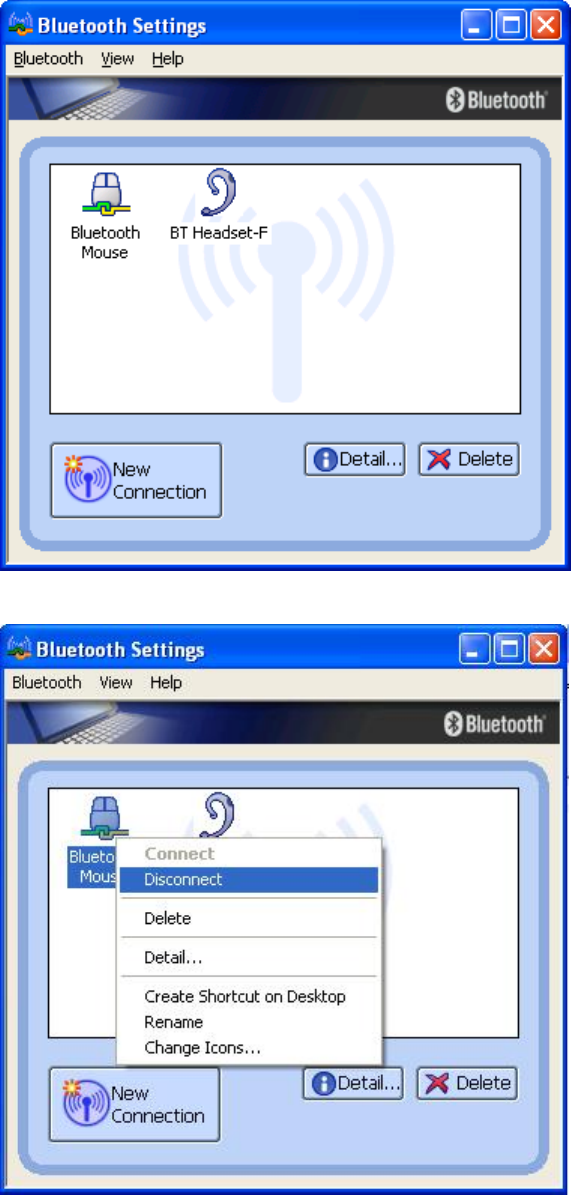
2. The icon of Bluetooth Mouse will be changed to connecting status.
- 18 -
3. To disconnect the mouse, right click on the icon and select “Disconnect”.
Example 2, connect/disconnect with a Bluetooth Headset.
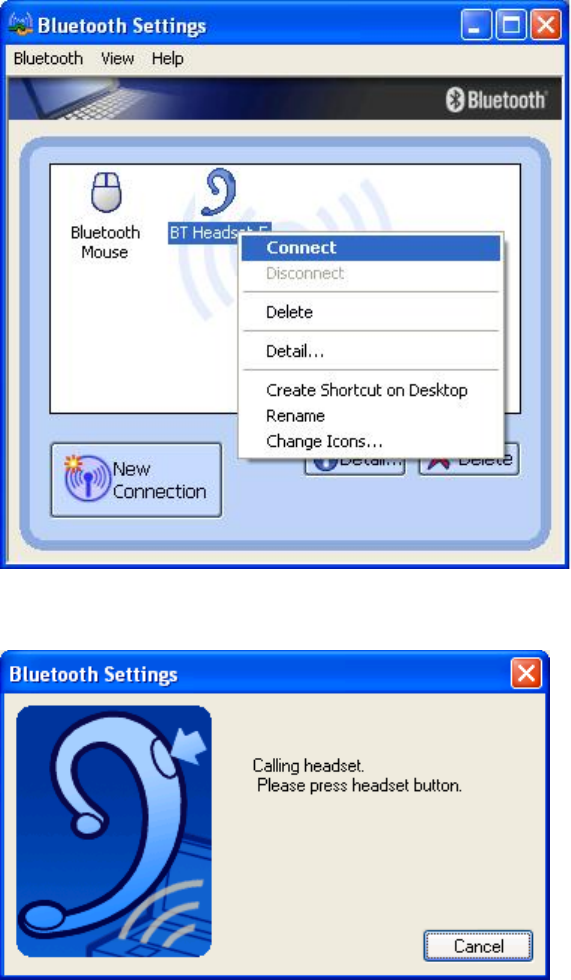
1. Turn on the Bluetooth Headset. Move the cursor over the icon of Bluetooth Headset in Bluetooth
Settings. Right click it and select “Connect”.
- 19 -
2. System is calling the headset. You will hear ring tone from the headset. Press answer button to
continue connecting process.
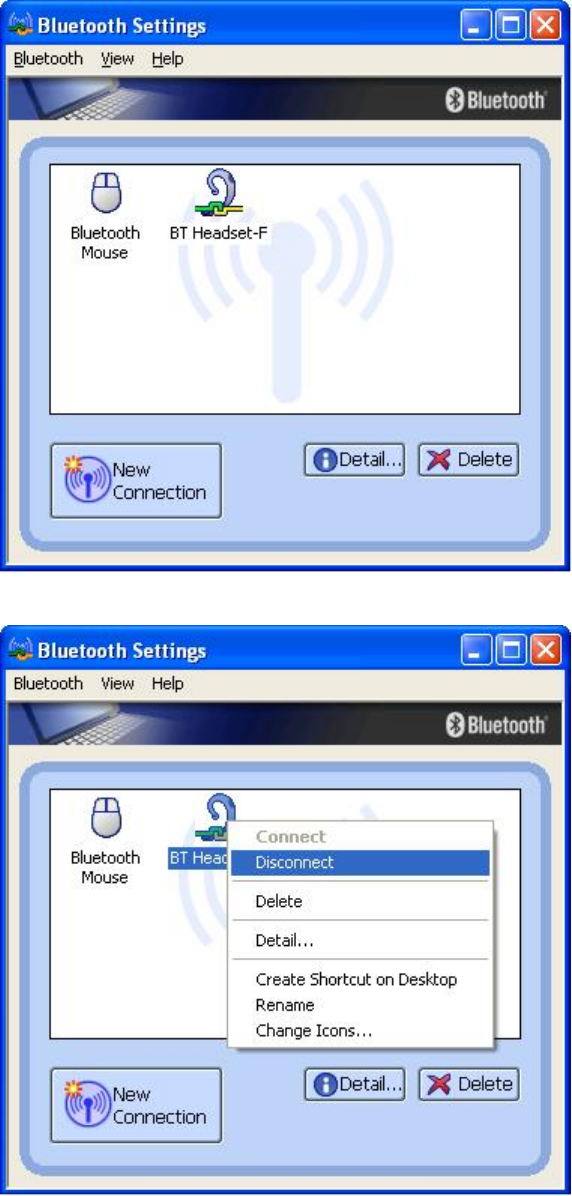
3. The icon of Bluetooth Headset will be changed to connecting status.
- 20 -
4. To disconnect the mouse, right click on the icon and select “Disconnect”.
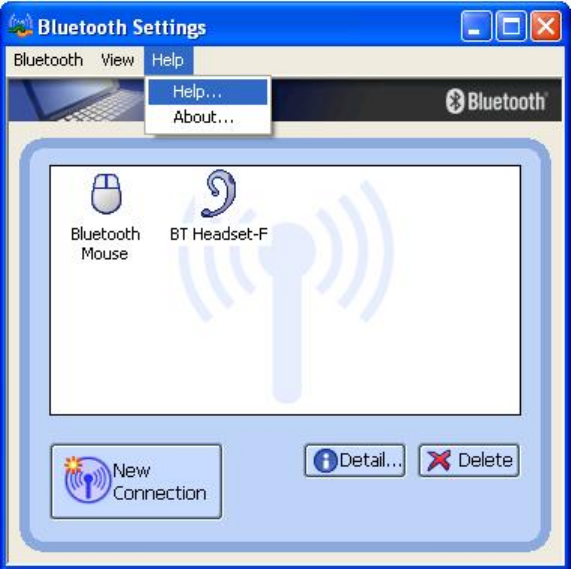
Note! Read Help file of “Bluetooth Settings” for detail information.
- 21 -

- 22 -
CE Statements
This device has been tested and found to comply with the requirements set up in the council directive on
the approximation of the law of member states relating to EMC Directive 89/336/EEC, Low Voltage
Directive 73/23/EEC and R&TTE Directive 99/5/EC.
FCC Safety Statements
This device complies with Part 15 of the FCC Rules. Operation is subject to the following two conditions:
(1) This device may not cause harmful interference.
(2) This device must accept any interference received, including interference that maycause undesired operation.
Any changes or modifications (including the antennas) made to this device that are not expressly approved by the
manufacturer may void the user’s authority to operate the equipment.
FCC RF Radiation Exposure Statement: This equipment complies with FCC RF radiation exposure limits set forth
for an uncontrolled environment. This device and its antenna must not be co-located or operating in conjunction
with any other antenna or transmitter.
This equipment has been tested and found to comply with the limits for a class B digital device,pursuant to part 15 of
the FCC Rules. These limits are designed to provide reasonable protection against harmful interference in a
residential installation.
This equipment generates, uses and can radiate radio frequency energy and, if not installed and used in accordance
with the instructions, may cause harmful interference to radio communications. However, there is no guarantee that
interference will not occur in a particular installation. If this equipment does cause harmful interference to radio or
television reception, which can be determined by turning the equipment off and on, the user is encouraged to try to
correct the interference by one or more of the following measures:
---Reorient or relocate the receiving antenna.
---Increase the separation between the equipment and receiver.
---Connect the equipment into an outlet on a circuit different from that to which the receiver is connected.
---Consult the dealer or an experienced radio/TV technician for help.
Copyright and Trademark Notices
Products and brand names may be the trademarks or registered trademarks of their respective owners.