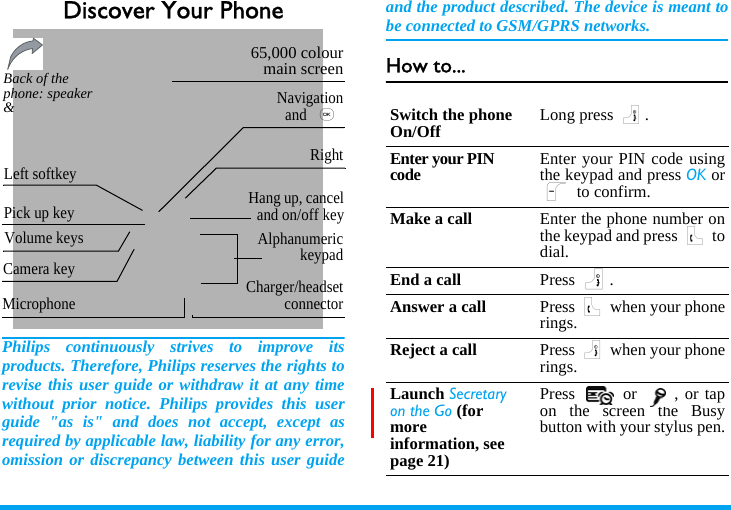
Cellon Communications Technology CT7568 GSM Handset User Manual Philips9 9t

Cellon Communications Technology (Shenzhen) Co.,Ltd. GSM Handset Philips9 9t

User Manual

General Information[Caution]Changes or modifications made in the radiophone, not expressly approved by Philips, willvoid the user's authority to operate theequipment.[RF Energy Interference/Compatibility]This device complies with Part 15 of the FCCRules. Operation is subject to the following twoconditions: (1) this device may not causeharmful interference, and (2) this device mustaccept any interference received, includinginterference that may cause undesiredoperation.[What's in the Box?]Your wireless mobile phone comes with abattery, charger, USB data cable, headset,companion CD, user manual, productand service user data. You can purchase otheraccessories to customize your phone formaximum performance and portability.[Body-worn operation]To maintain compliance with FCC RF exposureguidelines, if you wear a radio product on yourbody when transmitting, always place the radioproduct in a Philips approved clip, holder,holster, case or body harness for this product.Use of non-Philips-approved accessories mayexceed FCC RF exposure guidelines.
Discover Your PhonePhilips continuously strives to improve itsproducts. Therefore, Philips reserves the rights torevise this user guide or withdraw it at any timewithout prior notice. Philips provides this userguide "as is" and does not accept, except asrequired by applicable law, liability for any error,omission or discrepancy between this user guideand the product described. The device is meant tobe connected to GSM/GPRS networks.How to...AlphanumerickeypadMicrophoneNavigationand ,65,000 colourmain screenPick up key Hang up, canceland on/off keyBack of the phone: speaker & Charger/headsetconnectorLeft softkey RightVolume keysCamera keySwitch the phone On/Off Long press ).Enter your PIN code Enter your PIN code usingthe keypad and press OK orL to confirm.Make a call Enter the phone number onthe keypad and press ( todial.End a call Press ).Answer a call Press ( when your phonerings.Reject a call Press ) when your phonerings.Launch Secretary on the Go (for more information, see page 21)Press   or  , or tapon the screen the Busybutton with your stylus pen.
iSoftkeysThe left and right soft keys - L and R - locatedat the top of the keypad allow you to select thecorresponding options that appear on the screenimmediately above them, including during calls.The functions associated with these keys will varyaccording to the current context.Touch ScreenWarning! The stylus pen supplied with yourproduct is the only tool that you can use whentapping the touch screen.  Do NOT use any othertool on the touch screen.You mobile phone features a touch screen that canbe selected with the stylus pen.  You can select anitem, move up and down or select a few itemssimultaneously.Mini-SD cardYour phone supports Mini-SD card.  You can insertthe card and browse its contents or manage the fileswith your phone.However, please do not remove your Mini-SD cardwhile is active or when you are browsing files in thecard, as this may result in data loss.  To remove thecard, you must first end your current operation, thentap the SD card icon at the top of the screen with thestylus pen to disconnect it.  You may then safelyremove the SD card after it has been disconnected.Adjust the earpiece volumePress the up or downvolume keys.Activate/deactivate the loudspeakerLong press ( during acall.Access the Names listPress - in idle mode.Access the Call list Press ( in idle mode. TheCall list displays the Callsmissed, the Calls received andthe Calls dialled.Access the Main MenuPress OK or L Menu inidle mode.Go to previous menuPress R.Quickly return to idle Press ).
iiMain MenuThe Main Menu gives you access to all the differentfeatures of your mobile phone presented in the formof a grid. The table above summarises thearrangement of the Main Menu, the meanings of thevarious icons found there, and the page in thismanual where more detailed informationconcerning the subject can be found.Press , to access the Main Menu when in idlemode, then use the central navigation key - whichdirections are represented in the present guide withthe +, -, < or >signs - to browse theicons and lists. When navigating in a list, a scroll barlocated on the right hand side of the screen showsyour current position in the list. Within lists, press, to access the options related to the selecteditem, press select R Back to go back one level.How to use this manualThe current manual is structured as follows:Business Multimedia Entertainmentpage 15 page 22 page 26Operator Messages Settingspage 29 page 32 page 45Camera Contacts Call Infopage 53 page 58 page 62 Discover your phoneThe current section. Presents anoverview of your mobile phone andinformation on the most commonlyused features.Chapter 1: Getting startedInformation on how to set up yourmobile phone for the first time:installation of the SIM card, battery,etc.Chapter 2: CallingInformation on how to make andreceive calls.Chapter 3: Text entryInformation on how to enter textusing the numeric keypad.
iiiChapters 4 to 12These chapters treat each elementof the Main Menu one at a time.Other sectionsAfter Chapter 12 appear thesections for Icons & Symbols,Precautions, Philips authenticaccessories, SAR information (ifavailable at publication, otherwiseincluded as a separate document),and finally the Limited Warranty.
ivTable of contents1. Getting Started ............................................1Inserting the SIM card ......................................1Switching on the phone ...................................2Charging the battery  ........................................3Setting Hotkeys  .................................................32. Calling ................................................................4Make a call  ..........................................................4Answer and end a call ......................................4Call handsfree  ....................................................4Options during a call  ........................................5Adjust the earpiece volume ............................5Quickcall .............................................................6MMS Foto talk  ...................................................6Handling multiple calls  .....................................63. Text Entry ......................................................9T9® text input ...................................................9Basic text input ............................................... 10Handwriting recognition  .............................. 114. Business ......................................................... 15Calculator ........................................................ 15Money converter  ........................................... 15Organiser ......................................................... 15World clock .................................................... 16Sound recording ............................................. 17Alarm clock ..................................................... 18Snooze mode .................................................. 18Firewall ............................................................. 18Infrared ............................................................. 19Auto Switch On / Off  ................................... 21Secretary on the Go  ..................................... 215. Multimedia ................................................... 23Memory status ................................................ 23Sound album  ................................................... 23Picture album .................................................. 24TV slideshow  .................................................. 26Demo mode .................................................... 266. Entertainment ........................................... 27Western Horoscope ..................................... 27Lunar Calendar ............................................... 27Chinese Festival  ............................................. 27Java .................................................................... 28Brick Game  ..................................................... 29MP3 ................................................................... 297. Operator ...................................................... 32Services +  ........................................................ 32
vWAP ................................................................. 328. Messages ....................................................... 37Broadcast SMS  ................................................ 37E-Mail ................................................................ 37SMS .................................................................... 42MMS .................................................................. 45Dictionary ........................................................ 509. Settings .......................................................... 51Time and date ................................................. 51Sounds .............................................................. 51Security ............................................................. 53Profiles .............................................................. 54Autonomy ........................................................ 55Display .............................................................. 55Network .......................................................... 56Shortcuts .......................................................... 57Language ........................................................... 5910. Camera ....................................................... 61How to...  .......................................................... 61Camera menu  ................................................. 62Settings ............................................................. 64Help ................................................................... 6511. Contacts .................................................... 67Settings ............................................................. 67Names list ........................................................ 67Edit and manage contacts  ............................ 6812. Call Info ...................................................... 71Counters .......................................................... 71Settings ............................................................. 72Call list .............................................................. 73Icons & symbols ............................................ 76Precautions ....................................................... 77Troubleshooting ........................................... 81Philips Authentic Accessories .............. 84Trademark declaration ............................. 85Limited warranty .......................................... 86
vi
Getting Started 11. Getting StartedPlease read the safety instructions in the"Precautions" section before use.To use your phone, you must insert a valid SIM cardsupplied by a GSM operator or retailer. The SIMcard contains your subscription information, yourmobile telephone number, and a memory in whichyou can store phone numbers and messages (formore information, see “Contacts” on page 58).Inserting the SIM cardFollow the steps below to insert your new SIM card.Remember to switch off your mobile phone beforeremoving the back cover.Remove the back coverTo insert the SIM card, you must first remove theback cover. Press on the back cover and then slidethe cover downwards as shown below.Remove the batteryTo remove the battery, pull the edge outwards, thenremove the battery by pulling it up from the bottom.You may lose all your personal settings if youremove the battery when the phone is switched on.
2 Getting StartedInsert the SIM cardSlide the SIM card holder to unlock it and then liftit up on its hinge (1). Remove the SIM card from itsprotective holder and (2) place it in the spaceprovided, making sure that the clipped corner of thecard is in the correct corner and that the goldcontacts are facing down.Close the card holder and slide it into the lockedposition.Slide the battery back into its slot, gold contactsdownwards, then lock it by pushing it downwardsuntil it stops. Replace the back cover by sliding itinto its slots until it stops.Remove the protective film covering the screen andthe camera lens before using the phone.Switching on the phoneTo switch on the phone, long-press the ) key.Enter the PIN code if required. A PIN code is a 4- to8-digit secret code for your SIM card. It ispreconfigured and communicated to you by youroperator or retailer. For more information on PINcodes, see “Security” on page 46.If you enter an incorrect PIN code three times,your SIM card will be blocked. To unblock it, youmust request the PUK code from your operator.When you switch on your mobile phone with yournew SIM for the first time, you will be asked for thefollowing:Set date To set the current date.Set time To set the current time.Time zone To select your time zone.See “Settings” on page 45 for details on thesethree items.
Getting Started 3Charging the batteryYour phone is powered by a rechargeable battery. Anew battery is partially charged and a sound alertwill warn you when the battery reaches low, if thebattery alert is On (see “Sounds alerts” on page 46).Once the battery and battery cover are back in placeyou can charge the phone. Pull away the protectiverubber cap covering the charger connector. Plug inthe connector as shown below. Then plug the otherend into a main AC power socket.The battery symbol indicates the state of charge.During charging, the charge indicators will scroll; ittakes around 2.5 hours to fully recharge your mobilephone. When all the scroll bars are steady thebattery is fully charged. You can then disconnectthe charger.Depending on the network and condition of use, talktime goes up to 8.5 hours and stand-by time up to850 hours.Keeping the charger plugged to the mobile when thebattery is fully charged will not damage the battery. The only way to turn off the charger is to unplug it,so use an easily accessible AC power socket. Youcan connect the charger to an IT supply (Belgiumonly).Setting HotkeysYou can configure the numeric keys 2 to 9 to accessyour favourite features simply by long-pressing onthe numeric key. A number of hotkey shortcuts arepre-configured. For more information, see“Shortcuts” on page 51.Copy SIM names into the phone?If your phone detects any namesand telephone numbers in the SIMcard phonebook, you will beasked if you want to copy theminto the onboard phone book. Ifyou wish to copy the numbers,press OK, otherwise press Cancel.
4 Calling2. CallingMake a callFrom the idle screen1.In idle mode, enter the phone number using thekeypad. To correct an error, press R <C.2.Press ( to dial.3.Press ) or R End call to hang up.For an international call, long press * to enter the"+" sign for the international prefix.Using the phonebook1.Press - in idle mode.2.Select a contact in the list and press (: theselected number is dialled. If you are using theonboard phonebook and the selected contactfeatures more than one number, the numberidentified as the default will automatically beselected. To select a different number, press< or > (see “Contacts” on page 58 formore information).3.Press ) or R End call to hang up.Answer and end a callWhen receiving a call, the number of the caller maybe displayed, depending on whether or not theperson calling has chosen to display his or her ID. Ifthe number is stored in the selected phonebook, thenthe corresponding name is displayed instead of thenumber.•Answer the call: press ( or open the phone ifthe Active flip option is On (see page 64 for moreinformation).•Reject the call: press ) (or long press eithervolume key). If you have activated Call forward(see page 63), the call is diverted to a number orvoice mail.•Hang up: press ) or close the phone.The phone will not ring if in Silent mode (seepage 46).If you have selected Any Key Answer, you can accepta call by pressing any key except ) (see page 63).Call handsfreeFor your own comfort and safety, ensure you movethe phone away from your ear when callinghandsfree, especially when increasing the volume.
Calling 51.In idle mode, enter the phone number using thekeypad or select a contact in the phonebook.2.Press  , or L Options then select Callhandsfree or press,.If you are already on the phone, long press ( toswitch to handsfree mode and back.Options during a callDuring a call, press , or L Options to accessthe following options.Activate h/freeThis option allows you to use your mobile phone’shands-free option.Mute / UnmuteAllows you to mute or unmute the microphone sothat your caller cannot hear you.Record dialogueIn most countries, recording telephoneconversations is subject to legislation. We adviseyou to notify the caller if you intend to record yourconversation and only do so if they agree.To record a conversation during a call, select Recorddialogue and press OK. Press OK again or L Saveto end the recording: an edit window allows you toassign a name to the recording, which is thenavailable in Multimedia > Sound album. Depending on memory capacity (see “Memorystatus” on page 22), recordings can be of up to 30minutes in total.If you select Mute and then Record dialogue, onlythe caller’s voice is recorded.NotepadAllows you to note down a number. You can thenstore it in the phonebook, call it, or send a messageto this number.Other options during a callPress  L Options to be able to perform thefollowing tasks while a call is ongoing: you canaccess and consult the Names list or Call list, hang upby selecting End call, change the Equaliser settings,send or read SMS, or consult and manage events ofthe Organiser.Adjust the earpiece volumeDuring a call, press the up or down volume key toincrease or decrease the volume.
6 CallingQuickcallThe Quickcall feature allows you to set your fourmost frequently dialled numbers. You can thenquickly call one of them by selecting thecorresponding icon or picture on the screen.Setting a Quickcall contact1.In idle mode, press + to access the Quickcallscreen. Select a thumbnail to configure andpress , or L Set.2.Select a name in the contacts list, and press OKagain to access the Picture album and select apicture. Proceed the same way for eachthumbnail.Calling a Quickcall contactTo make a call, press + when in idle mode, thenselect the thumbnail of your choice and press (.To reconfigure a thumbnail, select it and press ,to Replace the name and/or picture.If a picture is already associated with a contact, it isdisplayed in the Quickcall screen. Changing thepicture in one of the menus will also update it in theother.MMS Foto talkThis feature allows you to send a picture via MMSand to add a sound recording to it. The picture canbe selected from the Picture album or can be a pictureyou have just taken with the camera.1.Take a picture, then press Menu, or select apicture from the Picture Album, then press ,orLOptions. In both cases, select Send by... >MMS.2.When the Add sound? message appears, pressL Yes to start recording. Then press LSave to stop and save your recording, or RCancel.3.Rename the picture if you wish or press LOK.4.Select a contact in the list that appears and thenAdd media to go to the MMS creation screen.Press  L Send to send your message, ormodify it as you want before sending it (see“New MMS” on page 41 for moreinformation).Handling multiple callsThe ability to handle two or more calls at one timeand to make conference calls is dependent on youroperator and/or subscription.
Calling 7Making a second callYou can make a second call during an active call orwith a call on hold. While on the phone, dial anumber (or select a contact in the phonebook) andpress (. The first call is put on hold (the numberis displayed on the bottom of the screen) and thesecond number is dialled. You can then press OK toaccess the options among which are:•Switch calls to toggle between calls (you can alsopress < or > to switch calls).•Transfer to connect the two calls. You aredisconnected when the transfer is completed.•Conference to introduce the caller into aconference call.Answering a second callWhen you receive a second call while being alreadyin communication, the phone emits a beep alert andthe screen displays Call waiting. You can then:To receive a second call, you must havedeactivated the Call forward for voice calls (seepage 63) and activated the Call waiting (seepage 63).Answering a third callIf you are in a call and have one call on hold, youcan also receive a third call. To do so, you musteither end one of the calls or introduce the newcaller to a conference.This service is limited to two currentcommunications (one active and one on hold).Press(To answer the call (the first one isput on hold).Press)To reject the call.Press,orLOptionsTo open the options list. You canselect End call to end the currentcall, then answer the incomingcall.Press )To reject the call.Press,orLOptionsTo open the options list. You canselect  Accept to answer theincoming call, or End call to endthe current call, then answer theincoming call.
8 CallingConference callSubscription dependent.A conference call is activated by making severaloutgoing calls or from a multiple call context. Itallows you to speak with up to five people at thesame time. 1.Make a first call with someone, then a secondone (see above).2.Press  , or Options and select Conference.Repeat the process until five members areconnected. 3.Select Remove party to disconnect a member ofthe conference, or select Private call to have aprivate call with this member only (othermembers are put on hold).4.Press ) to disconnect all calls at once.If there is an incoming call during the conferencecall and there are less than five members, you canaccept this new call and add this member to theConference call (if five members are alreadyconnected, you can answer the call, but not add it tothe conference).
Text Entry 93. Text EntryText can be entered in editing screens in twodifferent ways: by using T9® Predictive Text Inputor basic text input. The techniques for using thesetwo methods are discussed below.T9® text inputT9® Predictive Text Input is anintelligent editing mode for enteringtext on a mobile phone. It allows you toenter text more quickly by anticipatingthe word you want to enter based on thekeys you have pushed. You press once on the keycorresponding to each letter needed to spell a wordand T9® suggests a word based on your keystrokes.If several words are available, the first word in thelist is displayed and highlighted. Press +/- orL to browse the list and press OK to insert theword.How to use it?Letters and symbols represented by each key are asfollows:Example: how to enter the word "home":1.Press 4 6 6 3. The screen displaysthe first word of a list: Good.2.Press + or Lto scroll and select Home.3.Press , or > to confirm selection of theword Home.DictionaryIf the word you want to enter is not in the T9®dictionary, you can add it to the database. PressL1>2>3 to scroll to the bottom of the list untilyou reach the entry represented by a series ofhighlighted underscores.2 to 9To key in letters.Tegic Euro. Pat. App. 0842463L or+/-To browse the list of candidate words.>1,Press any of the three keys to insert theselected word followed by a space.RShort press to backspace, long press toclear all text.0To shift letter case: Standard, lower orUPPERCASE letters.#To view the table of symbols andpunctuation.*To shift mode from T9® to basic textinput to numeric.
10 Text EntryPress R Spell to open a basic text editing screen.Enter the new word without spaces using themethods described below and press L OK whendone. You are then returned to the message youwere composing and the new word is inserted.LanguageYou can switch input language while writing amessage by long-pressing the # key. Theavailable languages will depend on where youpurchased your mobile phone.Basic text inputPress * to switch from T9® to basic text input.This method requires multiple key presses to reachthe desired character: the letter "h" is the secondletter on the 4 key, so you must press it twice toenter "h". Short press R Cancel to clear one entry,long press to clear all text. Example: how to enter the word "home":Press 4, 4 (GHI) 6, 6, 6 (MNO), 6(MNO),  3,  3 (DEF). Press , when themessage is completed.Letters, numbers and symbols are located on eachkey as follows:Short press Long press1space 1. , @ / : ; " ’ ! ¡ ? ¿ # + - * = % < > ( ) & £ $ ¥ 12a b c 2 à ä å æ ç 23d e f 3 é è ∆ Φ34g h i 4 Γ ì45j k l 5 Λ56m n o 6 ñ ò ö  67p q r s 7 β Π Θ Σ78t u v 8 ü ù 89w x y z 9 ø Ω Ξ Ψ90To shift letter case: Standard, lower or UPPERCASE letters. 0#To open symbols and punctuation mode.Changes the language used for text edition*To shift mode: T9®, basic or numeric. N/A
Text Entry 11Handwriting recognitionIn handwriting recognition mode, you can enterChinese characters, English letters,  numbers,symbols (including punctuations) by means ofhandwriting recognition.1.Tap   on the touch screen to enter thehandwriting recognition mode. 2.Tap the corresponding icon on the touch screento toggle between Chinese character inputmode, English letter input mode, symbol inputmode and number input mode. 3.Write the text with your stylus pen. The systemcan recognized your your handwritingautomatically and show the recognized result inthe input area, with the proposed candidatecharacters displayed.  4.If the recognized result is not the character youdesire, please choose one from the candidatecharacters and tap it to replace the one in theinput area. 5.After you have finished writing, press ,  tosave. You can pressRto delete the characteror symbol on the left of the cursor in the textarea.  Long pressRwill clear all contents onthe left of the cursor in the text area.The following screen example describes thehandwriting recognition process for Chinesecharacters, English letters, symbols and numbers.Input Chinese characters1.Press   to enter the Chinese character inputmode.2.Write a Chinese character with your stylus penon the touch screen.3.You will see the recognized result on the inputarea.  4.To check for more Chinese characters, pressor< or >.Choose one of the candidatesfrom the input line and tap it to replace the onein the input area..
12 Text EntryInput English letters1.Press   to enter the English letter inputmode.2.Write an English letter with your stylus pen onthe touch screen. The system can differentiatebetween the upper and lower case. You do notneed to shift case before you write.3.You will see the recognized result on the inputarea.4.To check for other English letter, press  or<or >.Choose one of the candidates  from theinput line and tap it to replace the one in theinput area.  Input Symbols1.Press   to enter the symbol input mode.2.Write a symbol with your stylus pen on thetouch screen.3.You will see the recognized result on the inputarea.  4.To check for more symbols, press  or<or>.Choose one of the candidates from theinput line and tap it to replace the one in theinput area..Input numbers  1.Press   to enter the number input mode.2.Write a number with your stylus pen on thetouch screen.3.You will see the recognized result on the inputarea.
Text Entry 134.To check for other numbers, press  or<or>.Choose one of the candidates from theinput line and tap it to replace the one in theinput area.
14 Text Entry
Business 154. BusinessThis menu contains features and options designed tohelp you keep you organised and informed while onthe move.CalculatorYour phone has a built-in calculator thatyou can use to perform basic calculations.Numbers are entered with the keypad andoperators with the navigation keys as indicated inthe table below:An icon at the top of the screen indicates whichnavigation keys to use for entering operators.Press and hold 0 to get the decimal point.Calculator accuracy is to 2 decimal places and isrounded up to the higher decimal figure. Money converterThis menu allows you to convert a sumfrom one currency into another using theexchange rate of your choice. You canconvert from Local to Foreign or vice versa. Enter arate in the Exchange rate field and an amount ineither the Local or Foreign fields: the sum iscalculated automatically.OrganiserThis menu allows to create, store andmanage events in your organiser. When theorganiser alert is On (see “Sounds alerts” onpage 46), a beep or a sound recorded via theSecretary on the go feature (see on page 21) alertsyou when an event is due.The organiser shares the mobile memory capacitywith other features (phonebook, picture album,sound, etc.). To check the memory available inyour phone, select Multimedia > Memory status.AdditionPress>or the * key.SubtractionPress<or the * key twice.MultiplicationPress+or the * key 3 times.DivisionPress-or the * key 4 times.EqualsPress , or #.
16 BusinessCreating a new event1.In Events, select <New>, then the type of eventto create (Holiday, Meeting, To Do).2.Enter the starting and ending date and time ofthe event and name it (e.g. "Meeting withSmith").3.Set a reminder and a frequency: alerts will betriggered at the chosen time.The reminder only applies to Meeting and To Doevents. It will be updated when changing timezones (see “World clock” below).Deleting old eventsThis menu allows you to delete past events. Enterthe starting date (past or future) from which allprevious events will be deleted and press OK twiceto delete all events preceding this date.To delete all events set in your organiser, enter astarting date several years ahead (e.g. 31st ofDecember 2010) to make sure all events precedingthis date are deleted at once.Managing eventsSelect an event in the list and press OK  or  LOptions to access the following options:Changing a repeating event modifies all instancesof this event.Events viewsEvents stored in your organiser can be displayed inDay view, Week view and Month view. Select a viewformat and press OK, then use<or>to displaythe previous or next day, week or month.World clockThis menu allows you to set and displayboth the local time and the time in theforeign time zone of your choice. Note thatif you choose to display the local and foreign timeon your home screen, the image you selected asyour wallpaper will no longer be displayed there,but will be replaced with the standard Internationalclock wallpaper.Delete To delete the selected event.Change To change the selected event.Send by infraredTo transmit the selected event toanother infrared-compatible device.Change soundTo change the sound associated withthe alarm type of the selected event.
Business 17World clockActivate this option if you want to display both thelocal time and the time of another time zone on theidle screen. Press+or-to set the option On orOff. When On, the new menu item Switch local andforeign allows you to display the zone of yourchoice. This feature is not available when the option Noclock is selected in “Clock display” on page 45.Local settingsForeign settingsAlarms, reminders, programmed events are timezone independent! If you set an alarm or an eventat 9:00 AM in time zone A, it will still ring or bedue at 9:00 AM if you change to time zone B.Sound recordingThis menu allows you to make recordingsof up to 12 minutes in length, depending onthe memory status (see “Memory status” onpage 22).Select <New> to begin the recording. The messageSpeak now appears along with a progress bar. Whenyou are finished, press L Save to stop recording.You can then either enter a name for the new soundfile or accept the default name proposed by pressingOK. You then return to the list of Sound recordingsand the new recording is displayed in the list.Set time Allows you to set the time bypressing the appropriate keys.Own time zone Move+or-to select thetime zone corresponding to yourarea.Daylight saving Allows you to set the daylightsaving option On or Off for thelocal time zone.Foreign time zone Move + or - to select thetime zone of your choice.Daylight saving Allows you to set the daylightsaving option On or Off for aforeign time zone.
18 BusinessWhen you select a sound file, it is playedautomatically in a loop. Press OK to access theoptions. You can Set a reminder,  Play recording,Rename or Delete it, Send it by Email, Infrared or MMS(see “Sound album” on page 22 for details), Set asringer or As SMS/MMS ringer.A flashing warning sign indicates that yourrecording will soon reach the maximumauthorized length.  If you do not stop recording, ared envelope icon informs you that your recordingis too long to be sent via MMS.Alarm clockYour mobile phone has a built-in alarmclock with a snooze feature. You can set upto three separate alarms and choose whetheror not the alarm should repeat. To set an alarm,follow the steps below:1.Select an alarm and set it On.2.Then enter the time and press OK.3.Then select the frequency: Once, Every day, Onweekdays.4.Finally, select the type of alarm: Melody, Soundrecording, or Buzzer and press OK.Repeat above steps to set other alarms.The alarm clock will ring even if your mobilephone is switched off and/or the ringer volume isset to Silent. When the alarm rings, press any key tostop it or close the phone (except if the snoozemode is on, see below).Snooze modeThis menu allows you to set the snooze mode On orOff. When the alarm rings and the snooze mode isOn:• press any key (except R Stop) to stop theringing temporarily or close the phone. Thealarm will ring again around 7 minutes later.• press R Stop to stop the ringing and the alarmrepetition.The snooze mode is automatically deactivated after9 alarm repetitions.The snooze mode setting applies to all the alarmsyou have set.FirewallThis menu allows you reject all calls and SMSreceived from the people you include in theblacklist.
Business 19SettingsSelect this menu item and press L Select to accessthe options described belowBlacklistThis menu displays the list of contacts whose callsand SMS will be rejected. Select <New> to add aname and the corresponding number to the list, thenchoose whether you want to reject SMS and/or Callscoming from this person.Select a name in the list and press , or L Selectto Change the related information or Delete it. SelectDetails to display the blacklist details.You can add a name to the blacklist directly fromthe  phonebook, the Calls list and the SMS Inbox:select a contact, a call or a message in the relevantlist, press L Options and simply select Add to theblacklist. The related number will be added to theblacklist.InfraredYour mobile phone has an infrared port thatallows you to send or receive data to orfrom other infrared-compliant devices (e.g.another mobile phone, a computer, a PDA, etc.)through a wireless link.Files that are copyright protected cannot be sent.When connecting with a PC, make sure you haveactivated its infrared option.Position of devicesBefore transmitting data between two devices, theymust be correctly positioned in relation to oneanother. Make sure that:• the infrared ports are facing each other,Notification To select the way you want to benotified of a rejected call or SMS:with a Status icon displayed in idlescreen or an Icon feedback. You canalso choose No notification.Activation Allows you to set the firewall optionOn or Off. When On, your mobilephone will reject all calls and SMSreceived from the people listed in theblacklist. Rejected calls appear inthe Call list and rejected SMS in theSpam SMS Box.
20 Business• they are at a less than 50 cm away from eachother.• nothing obstructs the infrared beam.Sending dataTo send data via infrared from your mobile phone,you must first select the item to be sent: whenselecting a picture, a sound, a name or an event, asub-menu then gives you access to the Send viainfrared option.As soon as your phone finds another infraredcompliant device to communicate with, the sendingautomatically takes place. Messages are displayedon the screen for you to follow the process.If the phone finds several infrared devices, a list isdisplayed on the screen for you to choose from.Press OK to confirm and to send the selected data.Sending is cancelled if your phone cannot findanother device before the time out is reached, if theinfrared link is broken, or if you cancel theprocess.Receiving dataWhen you select Receive your phone is ready toreceive an item via infrared and waits for theanother infrared device to send it. As with sendingdata, messages are displayed on the screen andallow you to follow the process.Receiving is cancelled if your phone isn’tcontacted by another device before the time out isreached, if the infrared link is broken, if the size ofthe file sent is too large or if you cancel theprocess.Saving the dataA message will appear to inform you that you havereceived a file. Press OK to access the optionsdescribed below.Save To save the data, then go back to idle.The items you have received will besaved under their default name, whichyou can change by selecting them in therelevant menus.
Business 21Using the phone as a modemSelect Data to use your phone as a modem. You canuse your mobile phone together with a PC or a PDA,e.g. to connect to the internet or to send faxes.To fully benefit from the services available viainfrared (sending and receiving SMS, e-mails andfaxes, uploading pictures and sound files to yourphone, phonebook synchronisation, GPRS Wizard,etc.), you must install the Philips Mobile PhoneTools software on your PC. This software isavailable on the CD-ROM shipped with your phone.The software supplied on the CD-ROM is notcompatible with Apple Macintosh computers. Itonly supports Windows 98 SE, ME, XP and 2000(Service Pack 3 and up mandatory in this case).Specific software modules for Lotus Notes, LotusOrganizer and Microsoft Outlook are designed toallow synchronisation of your Philips mobile phonewith these applications (refer to their respective userguides for detailed information).Auto Switch On / OffThese two separate menus allow you to set yourmobile phone to switch itself on or off at pre-settimes.To set Auto switch on, select the option and press OK.Select On and press OK. Enter the time at which youwant your mobile phone to switch itself on andpress OK. Select the desired frequency from Once,Every day, or On weekdays and press OK. A messageappears to confirm activation.Proceed the same way for the Auto switch off option.Secretary on the GoPress   or   (depending on where youpurchased the phone) on the keypad for a one touchaccess to the Sound record process of the Soundrecordings menu. The recorded sound is saved inMultimedia > Sounds album or in Business > Soundrecordings and then used as an alarm or a ringer (fordetails, see “Sound recording” on page 17).Show To display the details of the data youhave received.DiscardTo ignore the data received.
22 Business
23 Multimedia5. MultimediaThis menu and its sub-menus contain optionsrelated to the multimedia features of your Xenium9@9E mobile phone.Memory statusThis menu allows you to display thepercentage of memory available in yourphone. Various features share the memorycapacity: pictures, sounds, recorded memos andvoice tags for voice commands, stored messages,phonebook and organiser entries, games, etc.Press  OK to check the memory status. The displayshows you the percentage of memory free and thephone’s total memory in Kilobytes (Kb). Press OKagain to check the detailed list of memory used by eachfeature.Your mobile phone is supplied with many soundsand pictures. You can only delete sounds or picturesin the My melodies or My images folders, e.g. to freememory space for your own sounds and pictures.If the List full message appears when saving a newitem you must delete an item to be able to create oradd a new one.Sound albumThis menu allows you to manage the soundfiles stored in your mobile phone. Theoptions are:Get more... To launch the WAP applicationand download new sound files.View all To access all your sound files in asingle list.Own melodiesTo access your downloaded soundfiles. Protected melodiesTo access the list of copyrightprotected sample sounds.Recordings To access the list of soundrecordings.
Multimedia 24Once in a list, you can then select a sound file andpress OK to access the menu options listed below. Picture albumThis menu allows you to display andmodify the images stored in your mobilephone. The options are:Inside the folders, images are displayed as a text list.Select an image and press > to view the image.Pressing OK gives you access to the menu optionslisted below.Send by... To send the selected sound file viaEmail (see page 32), via Infrared(see page 19) or MMS (seepage 40). Note that sound files fromRecordings folder cannot be sent viaMMS.Set as ringer To set the selected sound as ringer.As SMS/MMSTo set the selected sound as theMessages ringer. This option mustbe activated in the menu Settings >Sounds (see page 45).Rename To Rename the selected sound file.Delete / Delete allTo Delete the selected sound file orall files at once.Get more... To launch the WAP application anddownload new image files. For moreinformation, see page 29.View all To access all your image files in asingle list.My photos To access the photos taken with thephone’s embedded camera.My images To access the images you havedownloaded.Protected imagesTo access the list of copyrightprotected sample images.Icons To access the list of icons you havedownloaded.
25 MultimediaSend by... To send the selected image file viaEmail (see page 32), via Infrared(see page 19) or MMS (seepage 40). Note that you cannotsend pictures that are protected bycopyright.Set as wallpaperTo set the selected picture aswallpaper.Modify pictureUse this menu to access thefollowing options:•Add text To add text to the selected picture.Enter your text in the editingscreen and press OK. Use thenavigation keys to move the text onthe screen: short press to move thetext 1 pixel at a time, long press for5 pixels.Press R Back to go back to thetext editor, or L OK to validateand go to the next option.•Add frameor iconTo add a frame or an icon to theselected picture.• Eraser To Undo the last modification madeon the picture, or to Reset, i.e.cancel all changes at once. PressR Back to cancel or L OK tovalidate.•Send To send the selected picture viainfrared, E-mail or MMS.• Save To save the picture with all thechanges you have applied.Rotate Use this option to rotate theselected image of -90 degrees, +90degrees or +180 degrees.View To display the selected file.Properties To display its properties (size,format, resolution, etc.).Rename To Rename the selected image.Delete / Delete allTo  Delete the selected file or allfiles at once.Pictures in the Protected imagesfolder cannot be sent nor deleted.
Multimedia 26TV slideshowThis menu allows you to display thepictures listed in the Picture album(automatically in a slideshow or manuallyone-by-one) on the main internal screen of yourphone and/or on a TV screen via the TV Linkaccessory.TV Link may not supplied with your product. Inthis case, you must purchase it separately. See“Philips Authentic Accessories” on page 73 fordetails.ManualThis menu allows you to display the picturesmanually. Browse the list of pictures by pressing+ or -. Press > to activate the graphicalfull-screen display and send it to the TV, press <to go back to the list. When a picture is selected,press OK or Select to open the rotation options (90°or 180°).AutomaticThis menu allows you to display the picturesautomatically in a slideshow.1.Select the time value that will be appliedbetween each picture of the slideshow (10, 15or 20 seconds) and press OK or L Select.2.In the list that appears, select the pictures ofyour choice by pressing < or >. Choose(Un)Check all to select or deselect all pictures atonce.3.Press OK to start the slideshow and R to stopit.In both modes, the last selection made isautomatically saved and can be played several timesin a row, even when you quit the TV Slideshowmenu.Demo modeThis menu displays a short video clip.This menu option is available even if youhave not inserted a SIM card.
27 Entertainment6. EntertainmentWestern Horoscope, Lunar Calendar and ChineseFestival features are available only in the Chineselanguage menu (see page 52). Your phone may ormay not have the Chinese Language menudepending on where the phone is purchased.Western HoroscopeThis menu allows you to display your horoscope forany given day. To consult your horoscope, you mustfirst either enter your sign or your birth date. If youknow your sign, you can select it from the Select signmenu, otherwise select Set birth date, press OK andenter your birth date. Press OK to display thecorresponding sign.In the Horoscope menu, you can select Today orOther day depending on the horoscope you want toconsult (in the second case, enter the relevant datebefore pressing OK).Lunar CalendarThis menu gives you the correspondence betweenGregorian and Chinese calendars by displaying thecorresponding date in lunar mode from a selectedGregorian date.Features requiring date & time information (e.g.organiser events) depend on Gregorian dates only.Press OK to access the date edition window. Changethe date if needed by pressing the correspondingkeys, then press OK to convert to lunar mode.Lunar in idleThis option allows you to display the lunar calendaron the idle screen. Press + or - to activate ordeactivate this option.Chinese FestivalThis menu informs you of the next major Chinesefestivals, from a given date. Select From now orselect From a date and enter the date from which youwant to know what Chinese festivals will occur. Inboth cases, press OK to display the six next festivals.
Entertainment 28JavaYour mobile phone features a Java run-timeenvironment, which allows you to run Javaapplications, such as games downloaded onthe network.The first time you launch Java, a message appears toalert you that the installation and configuration ofJava will take several moments. This is a one-timeoccurrence.SettingsOnce Java has been installed, you may then proceedwith configuration.Auto launchAllows you to set the automatic launch of Java Onor  Off. When On, a Java application will beautomatically launched immediately followinginstallation.Network accessBearer To select the type of network usedwhen launching a connection and toconfigure the corresponding settings.•GSM or GPRS: your mobile will onlyuse the GSM or the GPRS networkfor e-mail connections.•GPRS first: your mobile will first tryto connect to the GPRS network,then to the GSM network if theGPRS network isn’t available.Selecting the above option requires you to haveboth GSM and GPRS settings configured. Seepage 49 for details.DNS addressAllows you to enter the DNS addressof the external data network you wantto connect to.Network accountAllows you to select one of the dataprofiles you have defined in Settings >Network > Access settings (see page 49).
29 EntertainmentNetworkThis menu gives you access to operator-specificsettings, including DNS and proxy addresses. Whenavailable, all items of this menu are pre-configured,so that you shouldn’t have to change them.This menu is operator dependent. As such its iconand content may vary.Java applicationsWhen the Java window is displayed, press OK toaccess the list of available games. Select a game andpress OK again. Use L and R softkeys to selectthe menu as displayed on the screen. Press Exit toquit the Java application, or press Menu to accessthe list of available options allowing you to createand manage new folders.Brick GameThe goal of this game is to destroy bricks byhitting them with a ball. Destroying allbricks give you access to the next level.Keys used are the following:MP3This menu allows you to play downloadedmusic from your mini-SD card. Note: Before using your mini-SD card, pleaseinsert the new mini-SD card into your Philips9@9t mobile phone to initialize it.  You can access the following options from themenu::4 and 6To move the racket left or right.* and #To start the game by throwing theball left or right.0To pause the game up to 2 min.(after which the screen returns toidle mode and the game is lost).Playlist Display the MP3 list. Play Play selected songs.Delete Delete the current playing MP3.Message View current MP3 messages.Settings Select the playback access mode.
30 Entertainment:Play settings Select the playback mode.Repeat selected Repeat a selected song.Repeat all Repeat two or above selected songs.Shuffle Play the songs in the playlist indifferent order.Set as ringtoneSet the current playing MP3 asringtone.
Entertainment 31
Operator 327. OperatorThis menu contains the services and featuresprovided by your operator. Consequently, themenus described below may vary or may not beavailable, depending on your subscription. Contactyour network operator for more details.The services provided may involve making a phonecall or sending a SMS for which you may becharged.Services +This menu option is reserved for operator-specific services. Please contact youroperator for more information about theseoptions.WAPThis menu allows you to access servicessupplied with your network, such as news,sports, weather, etc.If your phone was pre-configured, it isn’tnecessary for you to change the settings describedin this section. With some operators, settings canbe set remotely.To launch a WAP session, select Operator > WAP >Homepage.Your mobile phone connects to the networkaccording to the Access settings you have defined inthe menu Settings > Network (see page 49). In case ofa connection error, the screen displays "Go tomenu": press ( or L Options to access the WAPoptions (see page 34).HomepageThis is the link to the first WAP site you accesswhen launching a WAP session. In most cases, thismenu item is preconfigured and will connect to yourUse + or -To browse the on-line pages.Press  , orL SelectTo select a highlighted item.Press R Back To return to the previous page.Press  ) orselect  Options >ExitTo end the WAP session.
33 Operatoroperator’s WAP homepage. To change this defaulthomepage see “Options” on page 34.BookmarksThis menu allows you to store your favourite WAPsite addresses, rename them and access themquickly from the list.Press  L Options while browsing, then selectBookmarks: the name and URL fields will beautomatically filled in with the information of thepage you are browsing.Select  Add bookmark and start entering the newname for the edit screen to appear. Press,, thenproceed the same way to enter the URL address.The Manage bookmarks menu allows you to Deleteor Edit the selected bookmark.Go to URLThis menu allows you to enter a WAP site addressand to connect directly when selecting it (a quickway to access WAP addresses without saving themas bookmarks).All the addresses you enter in this menu and connectto at least once, will appear in a list. Select one ofthe items and press , to reconnect to thecorresponding page, without having to re-enter itscomplete address.SettingsIn order to access WAP sites, you must firstconfigure a WAP connection profile.Select profileTo select one of the available profiles, then definethe connection settings for each of them.All connection settings described below apply tothe selected profile.Browser optionsTo activate or deactivate the downloading of imagesattached to WAP pages.Selecting Off will speed up the global downloadingtime of the pages browsed.Rename profileTo rename the currently selected profile (startentering the new name for the edit screen to appear).CacheTo empty an area of the phone’s memory where thepages browsed during a WAP session are stored.Network•Homepage: to change the homepage name andaddress (start entering the new name for the editscreen to appear).
Operator 34•Network access allows you to select one of thedata profiles you have defined in Settings > Accesssettings (see page 49).•Bearer allows you to select the type of networkused by the selected profile when launching aconnection (see page 49).•Proxy address and Proxy port allow you to define agateway address and port number to be usedwhen launching a WAP connection using theselected profile.•Security: to display the list of installed securityCertificates (then display its details or delete it),the Session info or the Current certificate.Push inboxThis menu allows you to read and manage messagesautomatically sent to you by the network and / or byyour operator. In some cases, a red "@" sign will be displayed onthe screen to inform you that you have received anew push message. Press , or L Read to readit or R Back to go back to idle. Push messages include URL links for quick accessto the corresponding WAP services: a single clickon the link will connect to the WAP site forbrowsing or downloading multimedia files intoyour handset.If your push inbox is full, a message will adviseyou to delete some messages in WAP > Push Inbox.OptionsWhile browsing, press LOptions to access:Homepage To access the default homepage.Back To go back to the previouslybrowsed page.Forward To go to the next browsed page.Refresh To reload the currently browsedpage from its original server.Set as homepageTo save the currently browsedWAP page as the default homepage.Save as... To save images embedded in thepages that are displayed in thePicture album.
Operator 35Exit To end a WAP session.BookmarksGo to URLSettingsPush inboxSee page 33 for description of theseoptions.
36 Operator
37 Messages8. MessagesBroadcast SMSThis menu allows you to manage thereception of SMS broadcasts regularlytransmitted to all subscribers on thenetwork. It gives you access to thefollowing options:District codeTo select the type of messages you want to bepermanently displayed on the idle screen (in thiscase, enter the type in both District code and Topicsmenus).ReceptionTo set the reception of cell broadcast messages On orOff.TopicsTo define the type of messages you want to receive.To configure a topic, select <New>, enter the codeprovided by the operator, and, if desired, associate aname. You can also select an existing topic in thelist, which you can rename or delete.You can enter up to 15 different topics in the list.To obtain the codes corresponding to the differenttopics, contact your operator.E-MailThis menu allows you to access your e-mailwith your Xenium 9@9E mobile phone.You can send and receive e-mails withattachments from two different e-mail accounts.Depending on your service provider and yoursubscription, your mobile phone may have beenpre-configured with an e-mail account, in whichcase the parameters are already set.If not included in your mobile phone contract, youwill need to subscribe to an e-mail service in orderto send and receive e-mails. In this case, allparameters are communicated to you by yourprovider.The sections below describe in detail how toconfigure your mobile phone for e-mail. To enterspecial characters, such as @ or %, please see “TextEntry” on page 13.SettingsTo configure an e-mail account, select one and pressOK to access the menus detailed below.
Messages 38Rename profileTo rename an account from its default name. If oneof the accounts has been pre-configured, it may belocked, in which case it cannot be renamed.Email serverTo configure the settings needed to connect to youre-mail service.You must obtain the POP3 and SMTP addressesfrom your e-mail service provider.If you wish to use a GPRS connection to accessyour e-mail, you may need to use the SMTP serverof your mobile service provider to send e-mails.AdvancedNetwork accessBefore you can consult your e-mails, you first needto configure your connection to the internet.GSM SettingsWhen you use a GSM connection to connect to theinternet, your mobile phone dials a numberprovided by your network operator and the data issent and received over this connection, somewhatlike a dial-up internet connection from a PC. TheGSM connection parameters are described in thetable below.Password The password to access your e-mailaccount.E-mail addressYour e-mail address.SMTP addressThe Simple Mail Transport Protocol(SMTP) address. This is the server foryour outgoing mail and is usually in aformat like smtp.yourmail.com.POP3 addressThe Post Office Protocol (POP)address. This is the server for yourincoming mail and is usually in aformat like pop.yourmail.com.Login The login (or user name) to accessyour e-mail account.Port POP3 The port number on the POP3server. This is usually port 110.Port SMTP The port number on the SMTPserver. This is usually port 25.DNS addressThe IP address of your DomainName Server.SMTP authenticat.SMTP authentication is usually setto  Off. Contact your provider formore information.
39 MessagesGPRS settingsIf using GSM is like a dial-up internet connection, aGPRS connection would be the equivalent ofbroadband. GPRS (or Global Packet Radio Service)is a protocol for sending data rapidly using a radiosignal.To configure a GPRS connection, you may need toprovide a a user name and password, although someGPRS connections function without them. You willneed to provide the APN (or Access Point Name).BearerThis menu option allows you to choose which howto establish an internet connection.•GSM: your mobile will only use the GSMnetwork for e-mail connections.•GPRS: your mobile will only use the GPRSnetwork for e-mail connections.•GPRS first: your mobile will first try to connect tothe GPRS network. If no GPRS network isavailable, then it will try with the GSM network. For these features to work, you must first haveentered the corresponding settings.Inbox E-mailThis menu allows you to connect to your mailboxand download the e-mail headers (sender andsubject lines) from the server. You may then chooseto retrieve the corresponding e-mails.1.Select Inbox E-mail: your phone automaticallyconnects to the e-mail server and downloadsthe list of e-mail headers if any (five at a time).2.If  Next (or Previous) appears at the end (orbeginning) of the list, other e-mail headers arepending: select one of the available optionsand press , to retrieve them.Phone numberThis is the number your mobilephone dials to establish a connection.First choose ISDN or Analogic(depending on your networkoperator) and then enter the Phonenumber provided by your operator.Login & PasswordThe login and password provided byyour GSM network operator toaccess this service.Auto disconnectEnter an inactivity time-out valueafter which the phone willautomatically end the call (if aconnection was in progress). Thevalue must be over 30 seconds.
Messages 403.Select a header, and press ,to display theDetails. The following status icons may appearto each header:4.If there is no icon next to the header, you canpress , and select Get mail to download thee-mail. Repeat this operation to download eache-mail corresponding to each selected header.If the e-mail you have received containsattachments (an image, a text file, or anothere-mail), they are identified by a specific icon:You must download and save a picture before youcan view it in the Picture album. If there isn’t enoughmemory to store the new picture, you must deleteother items (images, sounds, messages, etc.) to freeup memory to save the new picture.An image file may not be accepted by your mobilephone if it isn’t in the correct format. Images mustbe in JPEG, BMP or GIF format.The optimal image size is 128 x 160 pixels (thedimensions of the screen). If you are transferringimages from your home computer, you can use animage editing program to create images of thecorrect size.The e-mail size is too large (over 50 Kb),it cannot be downloaded.The e-mail is marked to be deleted (seepage 41).Contains the details of the e-mail header(date and time, sender’s e-mail address,etc.), press , to display these details.The text of the e-mail itself can be viewedas an attachment, press , to read it (noadvanced options in this case).A text file (text only, ".txt" format) isattached to the e-mail, press , to read it(no advanced options in this case).The application needed to manage thisattachment isn’t available in your phone,or the e-mail is too large to be uploaded.Another e-mail is attached to the one youreceived. Up to five e-mails can beattached, although there will be noadvanced options.A picture is attached to this e-mail. Selectit in the list and press , twice to store itin your phone (you can rename it if youwish).
41 Messages5.Select an e-mail header and press , to accessthe following options: New mailThis menu allows you to send e-mails to one orseveral recipients at a time, including with anattachment such as a JPEG picture. Once received,your messages can be forwarded and theattachments visualised with the appropriatesoftware.If you exit the New mail menu before sending youre-mail or if you cancel the sending while it takesplace, the e-mail content is deleted without beingstored.Add to namesTo add the sender’s e-mail address toyour phonebook, even when youhaven’t yet downloaded his e-mail.Select <New> to create a new contact,or a name in the list to add or change thee-mail address.You must have selected the phonephonebook in this case; this menu itemwill NOT appear if you selected theSIM phonebook.Delete To mark the e-mail to be deleted (selectthis option again to unmark it). Whenyou exit the E-mail menu, you will beasked to confirm deletion of the selecteditem(s) from the e-mail server.Reply To reply to the sender (whose addresswill be automatically added to the list).Proceed as described in “Inbox E-mail”on page 39.Forward To forward the downloaded e-mail tosomeone else. Proceed as described in“Inbox E-mail” on page 39.Add contactsTo select the recipient(s) of your e-mail, provided that you have enterede-mail addresses for contacts saved inyour phone phonebook (see “Contacts”on page 58).After you have added contacts, selectone of them and press ,to Change thee-mail address, Remove it from the list.If you select a contact from the SIMphonebook, an edit window will allowyou to enter an e-mail address.
Messages 42You can only attach one picture (JPEG, GIF orBMP) or one sound at a time. If you accept anincoming call while writing an e-mail, the menu isclosed and the phone goes back to idle when youhang up.SMSThis menu allows you to send text messagesusing the Short Messaging Service (SMS)and to manage the messages you send andreceive.New SMSTo compose and send an SMS, follow the stepsdetailed below:1.Select New SMS, then Enter phone no. or Fromcontact list and press L Select or ,.2.Enter a number or select a contact and press,, then one of the following options:3.Enter your text and press OK to access the nextoptions:Add mediaAllows you to design your message. Enter the subject and text, then press, to access the next options:•Add sound or Add graphic to attach asound or a picture to your e-mail,•Send now to send it to the selectedrecipient(s),•Modify to redesign your e-mail.<New> To write a new message.Last messageTo edit, modify and re-send the lastmessage sent.This menu also lets you recall themessage you were entering andmight have lost if you pressed the( key by accident and returned toidle screen.Template To select a pre-configured messagesuch as Can you ring me back on thisnumber?Save To store the current message and itsattachments in the Archive menu.Send now To send the current message.Add sound To attach a melody.Add graphic To attach an image or an animation.Language To change the language for typing.
43 MessagesYou can send up to two attachments of two differenttypes together with your SMS. Images andanimations and pictures are exclusive: if you firstselect an animation and then an image, only theimage will be taken into account and vice-versa.Copyright protected pictures and sounds cannot besent by SMS.SMS InboxThis menu allows you to read SMS messages youhave received. The messages are displayed in a list.At the end of the list, the <Delete All> item allowsyou to delete all the messages at once. Deleting oldmessages is useful to free memory space in order toreceive new messages.When a message is displayed, press OK or LOptions to access the menu options listed below.Delete To delete the selected message.Edit SMS To edit, modify and resend theSMS to someone.Reply by SMS To reply to the sender.Move to Spam BoxTo move the selected message inthe Spam Box (this will delete itfrom the SMS Inbox).Add to blacklistTo add the sender’s phone numberto the Firewall blacklist (seepage 18 for details).This option isn’t available if thesender’s identity (i.e. his phonenumber) is hidden.Move to archiveTo store messages in the phonememory. You can then consultthem in Messages > SMS > Archive.Moving a message to the archivedeletes it from the SMS Inbox list.Forward to To forward the selected message.Note that attachments cannot beforwarded.Call handsfreeTo call the sender of the messagehandsfree.Call back To call the sender of the message(operator- dependent).Store number To save the number of the senderif it is attached to the message.
Messages 44Spam BoxThis menu lists all SMS that were rejected via theFirewall option (see “Firewall” on page 18 fordetails on this feature). Select a message in the listand press L Options to access the following items:SettingsThis menu allows you to configure the SMSsettings. The options are:No. extracted To extract a number included inthe message itself, if this numberis included in double quotes(several numbers can be includedand extracted). This menu is onlyvisible if there is a number toextract.Store melody To save the melody that was sentwith the SMS. This menu is onlyvisible if there is a melody toextract.Store graphic To save the graphic and/oranimation that was sent togetherwith the SMS. This menu is onlyvisible if there is an image toextract.Add to blacklist To add the sender’s phonenumber to the Firewallblacklist.This option isn’t available ifhis identity (i.e. phonenumber) is hidden.Move to inbox To move the selected messagein the SMS Inbox (this willdelete it from the Spam Box).Delete To delete the selected message.SMS centre To select your default SMS centre.If not available on your SIM card,you must enter your SMS centrenumber.Signature When  On, allows you to add asignature at the end of yourmessage. You can Edit,  Change orSave the signature.
45 MessagesArchiveThis menu allows you to consult all the messagesstored in the phone’s memory using the Auto saveSMS or Move to archive options. The <Delete allSMS> item allows you to delete all SMS at once.When a message is displayed, press , orLOptions to access the following options: Delete,Edit SMS, Forward to, Call back, Call handsfree.MMSYour mobile phone can also send andreceive MMS (Multimedia MessagingService) messages. With MMS you canValidity periodTo select the length of time yourmessages are to be stored in theSMS centre. This is useful when therecipient is not connected to thenetwork (and thus cannot receiveyour message immediately). Thisfeature is subscriptiondependent.Auto save SMSWhen  On, this option willautomatically save messages sent inthe Archive menu.Reply path When On, this option allows you totransmit the number of your SMSmessage centre together with themessage. The recipient can thenreply using your own SMS centreand not theirs. This speeds up therate of transmission. This feature issubscription dependent.Delivery reportWhen  On, this option will informyou via SMS whether your ownSMS was received or not. Thisfeature is subscriptiondependent.SMS chat When  On, allows you to displayreceived SMS on the idle screen.You can then quickly reply to amessage received by pressing OK,entering your message in the editscreen, and pressing OK again.If you receive an SMS while youare reading one, you can reply to thefirst one before reading the second.Alternatively, you can press Back toexit the first message. The secondmessage then appears on yourscreen.
Messages 46send messages that contain pictures, sounds, andtext.When sending MMS messages, your recipient mustalso have an MMS-enabled phone in order to beable to view your message.Receiving MMSIf someone sends you an MMS, an icon and a soundalert will inform. If the sender of the message hasasked for a Read report, a prompt will ask you tosend it or not. Once the MMS is downloaded, it isavailable in MMS > Inbox (see below). If the size of the MMS to download is bigger thanthe memory available in your phone, you must freememory by deleting data (picture, sounds, etc.).See “Memory status” on page 22.New MMSWhen you select Create MMS, you are first asked toenter the contact to whom you wish to send theMMS. You can select one or more existing contactsor enter a new mobile phone number.Next you will be asked to Add media. In the MMScreation screen, five icons allow you to add a Picture,add Text, add Sound, Send the message or access theMMS options. Use+or-to move from oneoption to the next and press , or L to accessthe menu.1.Design your message: add a Picture, a Text and/or a Sound. Press> to create more slides.2.The last icon on the left-hand side lets youaccess the MMS options (see below).3.Select Send to send the MMS to the selectedrecipient(s).Pictures are chosen from the Picture album.Copyright protected pictures cannot be sent viaMMS.Sounds can be chosen from the Sound Albummelodies. If you wish to send a sound memo, youneed to record it when creating the MMS. In thiscase, in Sound... menu, select <Records>, then<New> and follow the procedure that appears on thescreen. Recordings previously saved cannot be sentvia MMS.The following options are available when creatingnew MMS messages: Add slide To create a new slide and add it toyour slide show. Press < or >to browse slides once you havecreated several.
47 MessagesOnce your message is completed, select Send nowand press ,. A progress bar allows you to followthe sending of your message, press LCancel if youwish to cancel the sending. If you saved the MMSas a draft, it will be available in the Drafts menu. Ifyou have sent the MMS, it is available in the Outbox.InboxYou MMS inbox lists all the Read and Unread MMS,Notifications,  Delivery and Read reports. To read amessage, select it and press >. Press , or LOptions to access the following options:Next slide /Previous slideTo move to the next/previousslide. Note that this option onlyappears if the MMS contains morethan one slide.Edit subject To edit and change or enter thesubject of your message.Delete slide To delete the selected page (ifthere is more than one in themessage).Saveas draftTo save your message as a draftthat you can edit, complete andsend later on.Saveas templateTo save your message as atemplate, that you can use as abasis for other MMS (e.g. "Happybirthday" type of message.Preview MMS To preview the slide show youhave created.Slide duration To change the value of slideduration set in Settings >Application settings (see page 49),and to set a delay between eachslide.Play To switch back to automaticmode: the MMS is then playedas a continuous slide show.Next / previousslideTo move to the next or previousslide. You can also press<or>when viewing the MMS inmanual mode. Note that thisoption only appears if the MMScontains more than one slide.Save picture To detach the picture of thecurrent slide and save it in thePicture album.
Messages 48Do NOT delete notifications before you haveretrieved the MMS, or you will not be able toretrieve the MMS. Notifications are automaticallydeleted once you have received the full MMS.DraftsLists all messages saved as drafts, or automaticallysaved if you quit the MMS menu before saving orsending your MMS. You can Play, Edit, Send, viewDetails and Delete drafts.TemplatesLists all messages saved as templates. You can Play,Edit and Delete them.OutboxLists the messages you have Sent or created but Notsent yet. You can Play, Delete or view the Details ofall these messages, Send or Forward  them tosomeone.Messages you have saved can only be sent from theDraft or Outbox folders. You can NOT recover anitem (whether message, notification or report) thatyou have deleted. Press R Back to canceldeletion.SettingsYour phone may have been pre-configured todirectly access the services offered. If not, contactyour operator to receive the information itemsdescribed in the present section and enter them asgiven. With some operators, access parameterscan be set «over the air».Choose an MMS profile in the list and select Modifyto access the following settings.Save sound To detach the sound of thecurrent slide and save it in theSound album.Close To close the MMS and go backto the list of options.
49 MessagesApplication settingsRetrieval modeAllows you to choose from:•Manual: you connect manually to theserver by selecting a notification inthe  Inbox, selecting Read todownload, then Play.•Automatic: new MMS are directlyplaced in the Inbox. Select the MMSand press > to play it.This mode is deactivated whenroaming.Validity periodTo select how long your MMS will bestored on the server, from 1 hour to 1week (maximum). This is useful whenthe recipient is not connected to thenetwork (and thus cannot receive yourmessage immediately).Read reportThis option can be set On or Off andinforms you (via an SMS) when thestatus of the MMS you have sent haschanged, i.e. if it was read or deleted.Delivery reportThis option can be set On or Off andinforms you (via an SMS) of the statusof delivery, e.g. if your MMS wasreceived or rejected.Auto saveThis option can be set On or Off andallows you to automatically save themessages sent in the Outbox menu.Slide durationAllows you to select the durationbetween each slide of the MMS.
50 MessagesNetwork settingsDictionaryThis feature allows you to enrich the T9dictionary used for writing messages.Select  <New>, enter the word of yourchoice and simply press , to save it. For detailedinformation on entering with T9, please see “T9®text input” on page 13).Network accessTo choose a connection profilefrom the ones you have set (see“Access settings” on page 49).Bearer To select the type of network usedwhen launching a connection: GSM,GPRS or GPRS first.MMS center To enter the MMS address of theserver you will connect to.Gatewayaddress GatewayportTo enter the IP and Port numbers ofthe server’s gateway.
Settings 519. SettingsThis menu allows you to change the settings relatedto each available option (sounds, time and date,security, etc.) and to customise your phone.Time and dateSet timeAllows you to set the time using the keypador with the navigation keys.You should select your Time zone and activateDaylight savings (if appropriate) before setting thetime.Clock displayAllows you to select Analogue, Digital, Tiny digital orNo clock time formats when shown in idle mode.Set dateAllows you to set the date by pressing theappropriate numeric keys or the navigation keys.Own time zoneAllows you to select your current time zone. Whenyou enter the menu, you are presented with a map ofthe world that which you can navigate with the upand down navigation keys. Each time zone isidentified according to its position relative toGreenwich Mean Time (GMT) and by the maincities within that time zone.Daylight savingAllows you to set the daylight saving to On (insummer time) or Off (in winter time). If daylightsaving is On and you set the time to 12:00, it willautomatically switch to 13:00 when turning theoption to Off.SoundsRinger volumeThis option allows you to adjust the volumeof your ringer. Press+or-to adjust thevolume of your ringer from Silent toIncreasing.RingtoneAllows you to select a ringer tone. The list alsoincludes recorded sounds and melodies you saved.Scroll through the list and wait to hear the selectedmelody being played.
52 SettingsMessages ringerAllows you to set On or Off an alert for each timeyou receive a new message. When On, you canselect the alert of your choice from the ringers list.EqualiserThis option allows you to choose from differentaudio settings. It is only available while a call is inprogress. Scroll through the list and wait a fewseconds to hear the difference.Animation soundsAllows you to set On or Off the sounds of yourmobile phone when you switch it on or off.Key tonesAllows you to switch the key tones On or Off.Sounds alertsAllows you to set alert sounds for the followingitems:•Organiser: when an event programmed in yourorganiser is due,•Missed call,•Battery alert: when the battery is running low andrequires charging,•Minute alert for a beep alert that sounds everyminute during a call to help you manage theduration of your call (the beep cannot be heard bythe caller).Select or deselect the item(s) of your choice bypressing < or >.This menu only allows you to set the alert soundsOn or Off, NOT the alerts themselves. E.g. settingthe Organiser alert Off will not prevent your phonefrom displaying the Reminder screen (if youprogrammed one), but the corresponding soundwill not be played.Vibra alertAllows you to set the vibra alert On or Off whenreceiving a call, when an event set in the organiseris due, when you receive a message and when thealarm rings.The vibra alert is always Off when you connect thecharger or the Cigarette Lighter Adapter.SilentWhen this mode is On, all alerts are deactivated andthe vibra alert is active.The Silent mode also applies to key tones.
Settings 53SecurityThis menu allows you access the featuresrelating to the security of your mobilephone and the data you store there.Change codesAllows you to change your PIN and PIN 2 codes, aswell as the call Barring code. Depending on yourSIM card, some features or options may require aPIN2 secret code given to you by your operator.If you enter a wrong PIN code 3 times, your SIMcard is blocked. To unblock it, request the PUKcode from your operator or retailer. If you enter anincorrect PUK code 10 times in a row, the SIMcard will be blocked and unusable. If this happens,contact your operator or retailer.PIN protectionThis allows you to set the PIN protection On or Off.When On, you will be asked to enter your PIN codewhen switching your phone on.You cannot change your PIN code if this option isOff.Public namesAllows you to manage a specific names list calledPublic Names list, and restrict calls to this list via theCall restriction option.This feature is subscription dependent andrequires a PIN2 code (see page 53).Call barringAllows you to limit the use of your phone to specificcalls. This can be applied to Incoming calls (All calls orWhen roaming) and/or to Outgoing calls (All calls,International calls and Intl. Exc. Home). In both cases,the Cancel option applies to all calls at once. ThePublic names Allows you to consult, edit andmodify your Public Names list via aPIN2 code.CallrestrictionAllows you to restrict the calls tothe  Public names list when Publiconly is selected.This feature is subscriptiondependent and requires a PIN2code (see page 53). This optionmight also apply to WAP ande-mail connections over GPRS.
54 SettingsStatus option allows you to know whether a type ofcall is barred or not.This feature is network dependent and requires aspecific call barring password supplied by yourservice provider.ProfilesA profile is a group of predefined settingsthat allow you to quickly adapt your phoneto your environment. Selecting Meeting, forexample, will set your ringer volume to silent,activate the vibrating alert and deactivate the keytones (the other items are set according to yourPersonal settings). When your meeting is over,selecting  Personal will reactivate all your usualsettings. The details of each profile are displayedwhen selecting a profile.You can also associate a hotkey with a profile (e.g.,long press key 3 to activate Outdoors). Longpressing the same key deactivates it and returns youto your Personal settings. For more information, see“Hotkeys” on page 57.Personal The information that appears herewill depend on how your mobilephone has been configured.Autonomy Vibra alert OnRingtone MediumBacklight 10 secAnimation OffHeadset Ringtone MediumCar Ringtone HighBacklight OnOutdoors Ringtone HighMeeting Vibra alert OnRingtone SilentKey tones Off
Settings 55AutonomyThis menu gives you a direct access to the featuresthat consume the most energy and allows you toimprove your battery life by quickly changing eachsetting.DisplayThis menu allows you to configure how themenus are displayed on screen.Deactivating most of the functions in this menuincreases battery life (see “Autonomy” above).Backlight intensityAllows you to choose from different levels ofbacklight intensity.WallpaperAllows you to set the wallpaper of the main screenOn or Off. The wallpaper is not displayed in idlewhen the World clock option is On (see page 16).External lightsAllows you to set the feature On or Off. When On,the LED above the sub-display will flash:• when receiving a call,• when an alarm is triggered,• upon an event (call missed, SMS received, etc.),• according to network availability.ContrastAllows you to choose from different levels ofcontrast.BacklightBacklight is activated when receiving incomingcalls or messages, browsing menus, etc. Select oneof the available values.
56 SettingsNetworkContact your phone operator to have fullinformation about GPRS availability overits network and for an appropriatesubscription. You might also need to configure yourphone with the GPRS settings supplied by youroperator, by using the menus described in thissection. Then select the bearer (GSM or GPRS) inthe menus of each application to be used (e.g. WAP,MMS, e-mail, etc.).Access settingsThis menu allows you to create different dataprofiles that can be used for connecting to variousservices: for example, when using WAP or whensending MMS, the selected profile will be used toconnect to the GSM or GPRS network.Options described below are operator and/orsubscription dependent. Error messages duringconnections are mainly due to incorrect parameters:contact your operator before first use, in order tohave the appropriate settings, which you mayreceive by SMS in some cases. Some pre-configured profiles might be locked, preventing re-programming and renaming.Select an item in the list and press ,to access thefollowing options:Change name To rename the selected profile.Show To display all parameters of theselected profile.GSM Settings To change the GSM settings:•Login & Password,•Phone number needed toestablish the connection andprovided by your operator(ISDN or Analogue),•Inactivity time, a value of over30 seconds after which thephone disconnectsautomatically (if a connectionwas in progress).
Settings 57GPRS attachThis menu allows you to define how your mobilephone connects to the GPRS service.Register againProvides you with a list of the networks available inthe area when the Manual mode is selected. Selectthe network you want to register with and press ,to confirm.Preferred listAllows you to build a network list in order ofpreference. Once defined, the phone will try toregister on the network, according to yourpreferences.ShortcutsThis feature allows you to configureshortcuts to the features and options youaccess most frequently.HotkeysAllows you to set up direct access to a specificfunction or a contact by linking it to a key. A longpress on the key in idle mode will thenautomatically activate the function or call theassociated number (Flash dial).A number of Hotkeys have been preconfigured, e.g.6 for Silence, but you can reprogram them (keysGPRS settings To change the GPRS settings:•Login, •Password, •Inactivity time•the APN menu allows you toenter the address of the externaldata network you want toconnect to, a text string used toestablish the connection.Always on Your phone automaticallyconnects to the GPRS service (ifavailable). This option allowsquicker access to GPRS features,but increases energyconsumption.For data calls Your phone will connect to theGPRS service only whenrequired. This option reducesenergy consumption, butincreases the connection delay.
58 Settingsfrom 2 to 9 only). The following keys arelocked:Depending on your service provider, other hotkeysmay be predefined and locked.1.In the list, select a key from 2 to 9 andpress OK. If the key was already programmed,select Change.2.Browse the list to select the function you wishto associate with this key and press , orLSelect. If you select Flash dial, you will beasked to select a contact in the contacts list.3.To use a hotkey, press and hold the programmedkey when in idle mode.Voice commandAllows you to set up a direct access to a specificfunction by linking it to a voice tag.You can associate a voice command to mostfunctions supported by the hotkeys.1.Select <New>, then browse the list to select afunction and press , or LSelect.2.When Press OK and speak appears, record yourvoice tag. Make sure you are in a quietenvironment, choose a short and simple wordand clearly pronounce it.3.The next menu gives you access to Delete, Play,Change function and Change voice options. PressR Back to create another voice tag.To use the voice command, press and hold ,when in idle mode, then say the recorded voice tag.To reprogram a voice command: select it, pressLOK  and select Change function. This will bringyou to the list of available functions.Voice dialAllows you to set a voice tag that will dial thedefault number for the corresponding contactsimply by saying the voice tag. To set up voice dial,proceed as follows:1.Select <New>, then a contact in the list, thenpress , or L Options.When the phonebook in phone is selected, choosethe number of your choice in the list that isdisplayed.1Call voice mailbox.*Dial international call.#Change language used.
Settings 592.When  Add voice tag? appears, follow theinstructions displayed on the screen. To use the voice dial, press and hold , when inidle mode, then say the voice tag corresponding tothe number you want to dial.Up to 15 voice tags can be defined and sharedbetween voice dial and voice command. Recordedvoice tags are available in their respective menuand can be deleted, played or changed.Quick CallThis feature allows you to set your four preferred ormost frequently dialled numbers. You can thenquickly call one of them by selecting thecorresponding icon or picture on the screen, therebyremoving the need to enter and browse the Contactslist. See “Quickcall” on page 10 for details.LanguageThis menu allows you to select a languagefor all menu texts. Use+or -to browsethe list and select a language by pressing, or L Select.
60 Settings
Camera 6110. CameraYour Xenium 9@9E mobile phone features a built-in digital camera. You can take pictures, store themin your phone or transfer them to your PC viaInfrared, use them as wallpaper or send them to yourfriends via MMS or E-mail. This chapter describes indetail how to use the camera.How to...This section describes how to perform the mostcommon operations with your camera.Activate the camera To activate the camera mode, simply press thecamera side key: the camera application isautomatically launched.After a period of inactivity, the cameraautomatically exits.When the camera is active, the preview screen isdisplayed and the lens is automatically focused.The table below details the operations of the variouskeys in camera mode.Take a picture1.Frame your picture and press , or thecamera side key to take the picture.2.Once the picture is taken, a view screen isdisplayed. Press   to ignore the picture, orpress   to access the following options (see“Camera menu” below for details).+ - Zoom in / out< > Increase/decrease exposure compensation,or camera side key Take a picture)or Exit Camera mode and return to home screen0Activate/deactivate the self-timer*Activate/deactivate the burst mode#Toggle through the image resolutionsLAccess the Options menuRReturn to previous screen
62 CameraIf there is no action before the view screen time-out, the picture is automatically saved.Pictures are named with the date of the shot, e.g."0410_154157.jpg" for a picture taken on October4, at 15: 41:57.The number of pictures you can save variesaccording to the settings: the higher the resolution,the bigger the file size. A message will warn you ifthere isn’t enough memory left. In this case, youmust delete data before storing a new picture.Using the self-timer1.In Camera mode, press 0.2.Adjust your picture, and press OK to start thecountdown of 10 seconds (this value cannot bechanged).Press R to stop the timer and go back to previewmode.3.A sound is played three seconds before thepicture is taken, then again when it’s actuallyshot.Camera menuThis section describes in detail the Camera menuoptions.My photosWhen you take a picture and save it, the file is storedin your My photos folder. When you open the menu,your photos are displayed as thumbnails. Use the upand down navigation keys to move through the list. To view the image full-screen, press OK. Use the upand down navigation keys to move through the listof images. Press L Options to access thefollowing:Store To save the picture in your personalphotos folder using the defaultnumbering (you can then rename itfrom the folder itself).Send by... To send the picture by MMS, E-mailor Infrared.Modify pictureTo save the picture and modify it (see“Picture album” on page 23).Discard To ignore the picture and go back topreview mode.
Camera 63Slide showSelecting this option will launch a slide show of thecontents of the My photos folder. During the slideshow, each photo will be displayed briefly on thescreen. Press any key to end the slide show andreturn to the previous screen.Continuous shootActivating this menu option allows you to take a"burst" of 9 photos with one press of the button.Note that to use the Continuous shoot, the resolutionmust be set to Screensize (for more information, see“Resolution” on page 64).Send by... Use this menu to transfer an image toanother device. The options are:MMS, Email and Infrared.Set as wallpaperTo set the selected photo as the imageto be displayed in the background ofyour screen.Modify pictureThis option launches the imageediting program (see “Picture album”on page 23).Properties Choosing this option displays thefollowing properties of the selectedimage: Name, Size (in Kb), Resolutionand Format.Rotate This option allows you to rotate animage; The options are: - 90 degrees,+ 90 degrees, + 180 degrees.Changes are automatically applied.View To display the picture in full screen.Rename Use this option to rename an imagefile.Delete all Use this option to delete all the filesin your My photos folder. A warningmessage appears: Do you really wantto delete? Press L Yes to delete allor R No to return to the previousscreen.Delete Use this option to delete only theselected file from your My photosfolder. A warning message appears:Do you really want to delete? Press LYes to delete all or R No to return tothe previous screen.
64 CameraWhen the camera is finished processing the images,they are displayed on screen as thumbnails. Youmay then press L Options to access the optionsdescribed below.When you save or delete an image from the group,it is removed from the thumbnail view and stored inthe My photos folder.Picture orientationThis feature allows you to choose how photos aredisplayed in your photo album so that they can beviewed correctly. The options are: Landscape  &Portrait.FramesThis feature allows you to take photos withdecorative frames. The Standard frames foldercontains frames that were loaded on your mobilephone when you purchased it.Colour modeThe  Colour mode feature allows you to apply anumber of different visual effects to your images.The options are:Night modeWhen activated, this feature allows you to takepictures in low-light situations.Self-TimerThis feature allows you to take a time-delayedpicture so that you can get into the frame as well. Touse the Self-Timer, select On in this menu, return tothe view-finder mode, frame your picture, and thenpress OK.BrightnessUse this menu option to adjust the exposurecompensation of your mobile phone’s screen.SettingsResolutionUse this menu option to choose the size of thephotos you take. The options are:Save To save the selected image.Save all To save all the images in the group.Send by... To send the selected image by MMS,Email, or Infrared.Delete To delete the selected image.Delete all To delete all the images in the group.• None • Embossed • Edge• Black & White • Negative • Edge2• Sepia • Digital
Camera 65• SXGA - 1.3 Megapixels (1280 x 1024)• VGA (640 x 480)• QVGA (320 x 240) • Screensize - Wallpaper (128 x 160)Please note that the higher the resolution, the largerthe file size.Picture qualityThis menu allows you to adjust the quality of thepictures taken with your camera: Low, Medium, High.The lower the quality, the smaller will be theresulting image files, thereby allowing you to storemore photos on your mobile phone.Sound settingsTo set the Alert and Shutter sounds. The first oneoccurs before the shot, the second one when thepicture is shot. Select Default or one of the availablesounds.Reset settingsTo reset all camera settings to their default values.A warning message appears: Do you really want toreset all parameters? Choose Yes or No.HelpThis menu option provides you with on-screen helpin taking pictures with your mobile phone.
66 Camera
67 Contacts11. ContactsContacts are stored in one of the two availablephonebooks: in your SIM card (number of entriesdepending on capacity) or in your phone (up to 999names). When entering new names, they will onlybe added to the phonebook you have selected.SettingsThis menu contains the settings forconfiguring the phonebooks for yourmobile phone.Delete allTo delete all contacts at once. This option onlyapplies to the onboard phonebook, not to the SIMphonebook.Contacts selectThis menu allows you to select the phonebook touse, either In SIM or In phone. Press + or - toselect a phonebook. Contacts added to the selectedphonebook can then be copied into the other, via theCopy to SIM or Copy to phone options.Your mobile phone only manages one phonebook ata time and will ignore the information relative to theother one, e.g. if "Smith" is present in bothphonebooks and if you delete it in the phone, itremains unchanged in the SIM.StatusSelect this menu to display the total number ofcontacts you have saved in each phonebook, out ofthe total number available.Copy to phoneThis option will copy the content of your SIM cardinto your phone. If you cancelled or aborted theautomatic copy of your SIM phonebook when youfirst switch on your phone, you can do it manuallywith this option.Selecting this option twice will duplicate all thenames.Names listIt is in this menu that you can manage thenames, telephone numbers, and e-mailaddresses of your contacts. You can alsoaccess the Names list directly from the home screenby pressing -.
Contacts 68Adding contacts to the SIM phonebook1.Select <New> in the list.2.Enter the name and the number of your choice,then the type of number allocated to the name(Phone, Fax or Data) and press OK to store thisname in your phonebook.A number is limited to 40 digits, depending on yourSIM card. Entering international prefix, countryand area codes allows you to dial a number fromany location.Adding contacts in the phone phonebook1.Select <New> in the list.2.Enter the first, then last name (up to 20 latincharacters); one of the two fields can be empty,but not both.3.Then select the Number type. Numeric fieldscan hold up to 40 digits and one "+" sign andalphanumeric fields (e-mail and note) featureup to 50 latin characters. Each contact canfeature a maximum of 5 numeric fields (e.g. 2mobile numbers, 3 work numbers, an e-mailaddress and a text note).If you wish to personalise this contact with a pictureand/or a sound, see below.Own numbersThe Own numbers item that appears in the contactslist allows you to store your own phone number. Weadvise that you enter your mobile number as well asany other relevant information.Although all its fields can be empty, the Ownnumbers item cannot be deleted.Emergency numberThe emergency number will call the emergencyservices number in your country. In most cases, youcan call this number even if you haven’t yet inserteda SIM card or entered your PIN.In Europe the standard emergency number is 112,in the UK it is 999.Edit and manage contactsPress-when in idle mode to access thephonebook. To search for a given name:1 to 9and #Press the key for the letter that youwant to go to in the list (e.g. press8 twice to access the letter"U"). The first record starting withthis letter is selected in the list.
69 ContactsIn the SIM phonebookChoose a contact in your SIM phonebook and pressOK or Options to access the following options:In the onboard phonebookChoose a contact of your phone phonebook andpress OK or Options to access the following options:Select Show to access the list of numbers or fieldssaved for this contact. Select <New> to create a newfield or select one of the number and press , toaccess a second set of additional options, amongwhich are:#Press this key then enter the firstletters of the name you aresearching, and press OK to godirectly to that name.You can also use the <Search>item appearing in the phonebook.CallCall handsfreeSend SMSSend MMSVoice dialFlash dialDeleteChangeAdd to blacklistCopy to phoneDetailsCall handsfreeSend SMSSend MMSSend by infraredCallShowDeleteAdd to blacklistChange nameSelect pictureSelect soundMake defaultThe first number you enter becomesthe default number which isautomatically dialled when pressing(. This option allows you to setanother default number.Copy to SIM cardTo copy a contact of your phonephonebook into the SIM phonebook(it is then always updated whenswitching phonebooks or when usinganother phone).Show To display the details of the selectedfield.Change typeTo change or to define the field typeof the selected number.Change To change the number of the selectedfield.Voice dial To set a voice tag that will call thecontact when pronounced (seepage 52).Flash dial To set a direct access to this contactby linking to a key (see page 51).
Contacts 70Alphanumeric fields (note and e-mail) can only bechanged or deleted.Adding picture and sound to contactsContacts stored in the phone phonebook can bepersonalised with a picture and/or a sound.This function is only available when you select theonboard phonebook.1.Select a contact and press OK or L Options.2.In the list, choose Select picture to add a picturefrom the Picture album and choose Selectmelody to open the list of ringers and add amelody.When the contact calls, the picture and/or soundassociated with this contact will be displayed/played.The picture associated with a contact is also usedfor the Quickcall feature.When you change it, it isalso updated in the Quickcall settings.
71 Call Info12. Call InfoThe menus described in this section are used formanaging how your Xenium 9@9E mobile phonehandles calls and their related costs.CountersThis menu allows you to track the cost andduration of your calls. Most optionsmentioned below are subscriptiondependent.GPRS countersThe GPRS counter allows you to monitor theamount of data received via GPRS sessions. Thisfeature is subscription and network dependent.GSM countersThis feature is used for keeping track of yourincoming and outgoing GSM calls. Please note thatthe  GSM call counters do not include WAPconnections.MobilesessionThis option will display the lastconnection session or transfervolume of your mobile phone (e.g.after a WAP connection overGPRS).PC session This option will display the lastconnection session or transfervolume of your PC transmission.The call counters managed by your mobile phonemight differ from the ones used by your operator.You should therefore consider the call countersdisplayed on the screen as informative items, butNOT as the actual charge rate basis.Last call info To display the duration and/or costof your last call.TotaldurationTo Show or Reset the time durationof Outgoing or Incoming calls.
Call Info 72SettingsThis menu allows you to set all the options relatedto calling: call forwarding, call waiting, etc.Info at call endTo set On or Off the systematic display of the lengthand/or cost of each call when hanging up.Any key answerWhen On, this options allows you to accept a call bypressing any key, except ) (used to reject a call).Call waitingCaller IDTo  Show or Hide your identity to yourcorrespondent. The Status will inform you on whichoption is activated.Call forwardTo divert incoming calls to your mailbox or to anumber (whether in your contacts or not) andapplies to: Data calls, Voice calls and Fax calls.Total cost To display the accumulated costand to set the counter to zero (maybe protected by PIN/PIN2 codes).•Show how much has been spentbased on the Charge rate.•Reset the current total cost.•Show balance to check theremaining credit (based on theCost limit).•Cancel cost limit •Cost limit to enter the cost limitused in the Show balance menu.•Charge rate to set the rate perunit. First enter the currencyused (3 characters maximum),then enter the cost per unit.With GSM callApplies to All calls, Voice calls, Fax callsand  Data calls. When this option isactive, you hear a beep if someonetries to call you while already on acall. Select the Status option to findout whether the GSM call waiting isactive or not.With GPRS callAllows you to set On or Off the callwaiting for voice incoming callswhile a GPRS connection is ongoing.
73 Call InfoBefore activating this option, you must enter yourvoice mailbox number (see next section). Thisfeature is subscription dependent, and differentfrom the call transfer, which takes place when one/several calls are in progress.MailboxesTo enter your voice mailbox numbers (if notavailable on your SIM card).In some cases, you might have to enter twonumbers: one to listen to your mailbox, the otherone to forward calls. Contact your operator formore information.Active flipWhen  On, this option allows you to pick up anincoming call by simply opening the phone. Closingthe phone always hangs up an ongoingcommunication.IP PrefixTo set the prefix provided by your operator (up to 10digits can be stored) in order to make IP calls. Thisfunction is subscription and network dependent.Contact your operator for configuration parameters. Auto redialWhen On, if the person you are calling is busy, yourphone will automatically redial the number until asuccessful connection is made or until themaximum number of attempts is reached (10). Thephone beeps at the beginning of each attempt andemits a special beep if the connection is successful.The time between redials increases with eachattempt.Call listThis menu provides you with the list of outgoing andincoming calls, attempts at auto redialling and calldetails. The different types of calls - calls made, callsmissed and calls received - are represented by differenticons. They are displayed in chronological order withUnconditional Will divert all the incomingcalls. If you select this option, youwill not receive any calls until youdeactivate it.Conditional Allows you to choose when youwant to divert incoming calls: If noreply,  If not reachable or If busy.Each option can be setindependently.Status Will display the status of all callforwarding.
Call Info 74the most recent on top. If the correspondent is listedstored in your contacts, the corresponding name isdisplayed.ResetTo reset the whole list at once and delete all listedcalls.Call listSelect a number in the list, and press ( to redialthe number or press OK or LOptions to access theoptions:  Details,  Call or Call handsfree thiscorrespondent,  Send SMS,  Send MMS,  Delete theselected call or Store the associated number (if notalready in your phonebook). Add to blacklist allowsyou to add the sender’s phone number to theFirewall blacklist (see page 18).This option isn’t available if the sender’s identity(i.e. his phone number) is hidden.The menu Rejected calls lists all calls that have beenrejected via the Firewall option (see “Firewall” onpage 18 for details on this feature).
Call Info 75
76 Icons & symbolsIcons & symbolsIn idle mode, several symbols can be displayedsimultaneously on the main screen.If the network symbol isn’t displayed, the networkis not currently available. You may be in a badreception area, moving to a different location mayhelp.Silent - Your phone will not ring whenreceiving a call.Vibra - Your phone will vibrate whenreceiving a call.GPRS attach - Your phone is connected to theGPRS network.SMS message - You have received a newmessage. Voice mail - You have received a new voicemail.Battery - The bars indicate the battery level (4 bars = full, 1 bar = low).Alarm clock activated.Roaming - Displayed when your phone isregistered to a network other than your own(especially when you’re abroad).SMS full - Memory for messages is full. Deleteold messages to receive new ones.Call Forward Unconditional to number - Allyour incoming voice calls are beingforwarded to a number other than voice mail.Call Forward to voice mailbox - All your callsare being forwarded to voice mail.Home zone - A zone designated by yournetwork operator. Subscription dependent,contact your service provider for details.GSM Network: your phone is connected to aGSM network.Reception quality: the more bars are shown thebetter the reception is.SMS Chat - option is set to On.Memory full - The phone’s memory is full.Delete items to store new ones.MMS message - You have received a newmultimedia message.Wap message - You have received a messagein the wap push inbox.Auto switch on/off - option is set to On.
77PrecautionsRadio WavesYour cellular mobile phone is a low powerradio transmitter and receiver. When itis operating, it sends and receives radiowaves. The radio waves carry your voiceor data signal to a base station that is connected tothe telephone network. The network controls thepower at which the phone transmits.• Your phone transmits/receives radio waves in theGSM frequency (900 / 1800 / 1900 MHz).• The GSM network controls transmission power(0.01 to 2 watts).• Your phone complies with all relevant safetystandards.• The CE mark on your phone shows compliancywith European electromagnetic compatibility(Ref. 89/336/EEC) and low voltage directives(Ref. 73/23/EEC).Your cellular mobile phone is your responsibility.To avoid damage to yourself, to others or to thephone itself, read and follow all the safetyinstructions and make them known to anyoneborrowing your phone. Furthermore to preventunauthorised use of your phone:Keep your phone in a safe place and keepit out of small children's reach.Avoid writing down your PIN code. Try toremember it instead. Switch off the phone and remove the battery if youare going to leave it unused for a long time.Change your PIN code after purchasing the phoneand to activate call restriction options.The design of your phone complies withall applicable laws and regulations.However your phone may causeinterference with other electronic devices.Consequently you should follow all localrecommendations and regulations when usingyour cellular phone both at home and when away.Regulations on the use of cellular phones invehicles and aircraft are particularly stringent.Public concern has been focused for some time onthe possible health risks for users of cellular phones.The current research on radio wave technology,including the GSM technology, has been reviewedand safety standards have been drawn up to ensureprotection from exposure to radio wave energy.Your cellular telephone complies with allapplicable safety standards and the RadioEquipment and Telecommunications TerminalEquipment Directive 1999/5/EC.
78Always switch off your phone...Inadequately protected or sensitive electronicequipment may be affected by radio energy. Thisinterference can lead to accidents.Before boarding an aircraft and/or whenpacking the phone in your luggage: the useof mobile phones in an aircraft may bedangerous for the operation of the aircraft, disruptthe mobile phones network and may be illegal.In  hospitals, clinics, other health carecentres and anywhere else where you maybe in the close vicinity of medicalequipment.In areas with a potentially explosiveatmosphere (e.g. petrol stations and alsoareas where the air contains dust particles,such as metal powders).In a vehicle transporting flammable products (evenif the vehicle is parked) or a vehicle powered byliquefied petroleum gas (LPG), check first that thevehicle complies with the applicable safety rules.In areas where you are requested to turn off radiotransmitting devices, such as quarries or other areaswhere blasting operations are in progress.Check with the vehicle manufacturer thatelectronic equipment used in yourvehicle will not be affected by radioenergy.PacemakersIf you have a pacemaker:• Always keep the phone more than 15 cm fromyour pacemaker when the phone is switched on,in order to avoid potential interference.• Do not carry the phone in a breastpocket.• Use the ear opposite to the pacemaker tominimise the potential interference.• Switch off your phone if you suspect thatinterference is taking place.Hearing aidsIf you are a user of a hearing aid, consult yourphysician and hearing aid manufacturer to learnwhether your particular device is susceptible tocellular phone interference.Improved performanceIn order to improve the performance of yourphone, reduce radio energy emission, reduce
79battery consumption and ensure safe operationadhere to the following guidelines:For the optimal and satisfactory operationof the phone you are recommended to usethe phone in the normal operating position(when not using in hands-free mode orwith a hands-free accessory).• Do not expose your phone to extremetemperatures.• Treat the phone with care. Any misuse will voidthe International Guarantee.• Do not immerse the phone in any liquid; if yourphone is damp, switch it off, remove the batteryand let them dry for 24hrs before using themagain.• To clean the phone, wipe it with a soft cloth.• Placing and receiving calls consumes the sameamount of battery energy. However, the mobileconsumes less energy in idle screen when kept inthe same place. When in idle screen and whileyou are moving, your phone consumes energy totransmit updated location information to thenetwork. Setting the backlight for a shorter periodof time as well as avoiding unnecessarynavigating in the menus will also help to save thebattery’s energy for longer phoning and stand-byperformances.Battery information• Your phone is powered by a rechargeable battery.• Use specified charger only.• Do not incinerate.• Do not deform or open the battery.• Do not allow metal objects (such as keys in yourpocket) to short circuit the battery contacts.• Avoid exposure to excessive heat (>60° C or140° F), moisture or caustic environments.You should only use Philips AuthenticAccessories, as the use of any otheraccessories may damage your phone andwill make all guarantees for your Philipsphone null and void.Make sure damaged parts are replaced immediatelyby a qualified technician and that they are replacedwith genuine Philips replacement parts.Your mobile phone and your carStudies have shown that speaking on thetelephone while driving lowers yourconcentration, which can be dangerous.Adhere to the following guidelines:
80• Give your full attention to driving. Pull off theroad and park before using the phone.• Respect the local regulations in countries whereyou drive and use your GSM phone.• If you want to use your phone in a vehicle, installthe hands-free car kit which is designed for thatpurpose.• Ensure that your phone and car kit do not blockany air bags or other security devices fitted inyour car.The use of an alarm system to operate a vehicle'slight or horn to indicate incoming phone calls isprohibited on public roads in some countries. Checklocal regulations.EN 60950 NormIn hot weather or after prolonged exposure to thesun (e.g., behind a window or a windscreen), thetemperature of your phone's casing might increase,especially when featuring a metallic finish. Be verycareful in this case when picking up your phone andalso avoid using it with an ambient temperature over40° C.Environmental careRemember to observe the local regulationsregarding the disposal of the packagingmaterials, exhausted batteries and oldphone and please promote their recycling.Philips has marked the battery and packaging withstandard symbols designed to promote the recyclingand appropriate disposal of your eventual waste.The battery should not be disposed ofwith general household waste.The labelled packaging material isrecyclable.A financial contribution has been madeto the associated national packagingrecovery and recycling system.The plastic material is recyclable (alsoidentifies the type of plastic).
81TroubleshootingThe phone does not switch onRemove/reinstall the battery. Then charge thephone until the battery icon stops scrolling. Unplugfrom charger and try to switch the mobile on.The display shows BLOCKED when you switch onSomebody tried to use your phone but didn’t knowthe PIN code nor the unblocking code (PUK).Contact your service provider.The display shows IMSI failureThis problem is related to your subscription.Contact your operator.Your phone doesn’t return to the idle screenLong press the hangup key or switch off the phone,check that the SIM card and the battery are installedcorrectly and switch it on again.The network symbol is not displayedThe network connection is lost. Either you are in aradio shadow (in a tunnel or between tall buildings)or you are outside the network coverage area. Tryfrom another place, try to reconnect to the network(especially when abroad), check that the antenna isin place if your mobile has an external antenna, orcontact your network operator for assistance/information.The display doesn’t respond (or the display responds slowly) to key pressesThe display responds more slowly at very lowtemperatures. This is normal and does not affect theoperation of the phone. Take the phone to a warmerplace and try again. In other cases please contactyour phone supplier.Your battery seems to over heatYou might be using a charger that was not intendedfor your phone. Make sure you always use thePhilips authentic accessory shipped with yourphone.Your phone doesn’t display the phone numbers of incoming callsThis feature is network and subscription dependent.If the network doesn’t send the caller’s number, thephone will display Call 1 or Withheld instead.Contact your operator for detailed information onthis subject.You can’t send text messagesSome networks don’t allow message exchangeswith other networks. First check that you entered
82the number of your SMS centre, or contact youroperator for detailed information on this subject.You can’t receive and/or store JPEG picturesA picture may not be accepted by your mobilephone if it is too large, if its name is too long, or ifit doesn’t have the correct file format.You have the feeling that you miss some callsCheck your call divert options.During battery charge, the battery icon shows no bar and the outline is flashingOnly charge the battery in an environment wherethe temperature does not go below 0°C (32°F) orabove 50°C (113°F).In other cases please contact your phone supplier.The display shows SIM failureCheck that the SIM card has been inserted in theright position. If the problem remains, your SIMcard may be damaged. Contact your operator.When attempting to use a feature in the menu, the mobile displays NOT ALLOWEDSome features are network dependent. They areonly available, therefore, if the network or yoursubscription supports them. Contact your operatorfor detailed information on this subject.The display shows INSERT YOUR SIM CARDCheck that the SIM card has been inserted in theright position. If the problem remains, your SIMcard might be damaged. Contact your operator.The autonomy of your phone seems lower that indicated in the user guideThe autonomy is linked to your settings (e.g., ringervolume, backlight duration) and the features youuse. To increase the autonomy, and wheneverpossible, you must deactivate features you do notuse.Your phone doesn’t work well in your carA car contains many metallic parts that absorbelectromagnetic waves which can affect the phone’sperformances. A car kit is available to provide youwith an external antenna and enables you to makeand receive phone calls without handling thehandset.Check with local authorities if you are allowed touse the phone whilst driving.Your phone is not chargingIf your battery is completely flat, it might takeseveral minutes of pre-charge (up to 5 minutes insome cases) before the charging icon is displayed onthe screen.
83
84Philips Authentic AccessoriesSome accessories, such as a battery and a charger,are included as standard in the package of yourmobile phone. Additional accessories may also beprovided or sold separately. Package contents maytherefore vary.To maximise the performance of your Philipsmobile phone and not to void the warranty, alwayspurchase Philips Authentic Accessories that arespecially designed for use with your phone. PhilipsConsumer Electronics cannot be held liable forany damage due to use with non authorisedaccessories.ChargerCharges your battery in any AC outlet. Smallenough to carry in a briefcase/handbag.Carry caseProtects your phone from nicks and scratches.Data connect kitProvides easy data connection to your Philipsmobile phone. The USB cable enables high speedcommunication between your phone and yourcomputer. The provided software allows you todownload pictures and melodies and to synchroniseyour contacts and appointments.When your mobile phone is connected to the PCvia a USB data cable, the cable also acts ascharger to charge your phone (9@9t USBcharging compatible with most PCs).
85Trademark declarationJAVA is a trademark of SunMicrosystems, Inc.T9® is a trademark of TegicCommunications Inc.In-Fusio and the gamesengine Exen are trademarksof In-Fusio France.Tegic Euro. Pat. App. 0842463
86Limited warranty1.  What Does This Limited Warranty Cover?Philips warrants to the original retail purchaser(“Consumer” or “You”) that this Philipscellular product and all accessories originallyprovided by Philips in the sales package(“Product”) are free from defects in materials,design and workmanship under normal use inaccordance with the operating instructions andpursuant to the following terms and conditions.This limited warranty extends only to theConsumer for Products purchased and used inthe original country of purchase. The limitedwarranty is valid only in Philips’ intendedcountry of sales of the product.2.  How Long is The Limited Warranty Period?The limited warranty period for the Productextends for ONE (1) YEAR from the date ofpurchase of the Product, documented by validproof of purchase. The limited warranty fororiginal Philips rechargeable battery extendsfor six (6) months from the date of purchase.3.  What Will Philips Do if The Product is NotFree From Material Defects in Materials andWorkmanship During The Limited WarrantyPeriod?During the limited warranty period, Philips orits authorized service representative will, at itsoption either repair or replace, without chargefor parts or labour, a materially defectiveProduct with new or refurbished parts orProduct and return such repaired or replacedProduct to the Consumer in working condition.Philips will retain defective parts, modules orequipment.Repaired or replaced Product will be coveredby this limited warranty for the balance of theoriginal limited warranty period or ninety (90)days from the date of repair or replacementwhichever is longer. Repair or replacement ofProduct, at Philips’ option is your exclusiveremedy.4.  What is Not Covered By This LimitedWarranty?This limited warranty does not cover:a)  Product that has been subjected to misuse,accident, shipping or other physicaldamage, improper installation, abnormal
87operation handling, neglect, inundation,fire, water or other liquid intrusion; orb)  Product that has been damaged due torepair, alteration, or modification byanyone not authorized by Philips; orc)  Product that has reception or operationproblems caused by signal conditions,network reliability or cable or antennasystems; ord)  Product defects or problems caused byuses with non-Philips products oraccessories; or e)  Product which warranty/quality stickers,product serial number or electronic serialnumber has been removed, altered orrendered illegible; or f)  Product purchased, used, serviced, orshipped for repair from outside the originalcountry of purchase, or used forcommercial or institutional purposes(including but not limited to Products usedfor rental purposes); or g) Product returned without valid proof ofpurchase or which proof of purchase hasbeen altered or is illegible.h) Normal wear and tear or Force Majeure.5.  How Do You Get Warranty Service?a)  Return the Product to an authorized servicecenter of Philips. You may contact thelocal Philips office for the location of thenearest authorized service center.b) The SIM card must be removed from theProduct before it is given to Philips. Philipsassumes no liability for damaged or loss ofthe SIM card or the data contained therein.c) If the Product failure is not covered by thislimited warranty, or this limited warrantyis inapplicable, void or invalid due to anyterms and conditions stated herein, theConsumer will be charged for the cost ofrepair or replacement of the Product and allother related cost incurred in repairing orreplacing the Product.d)  IMPORTANT - you are required to returnthe Product together with a valid proof ofpurchase which must identify the point ofpurchase, date of purchase, Product modeland Product serial number clearly.6.  Other Limitation: This Warranty is The EntireAgreement.EXCEPT FOR THE EXPRESSWARRANTIES SET FORTH ABOVE ANDTHOSE IMPLIED BY LAW AND WHICHCANNOT BE EXCLUDED OR MODIFIEDBY AGREEMENT, PHILIPS PROVIDES NO
88OTHER WARRANTY WHETHEREXPRESS OR IMPLIED (WHETHER BYSTATUTE, UNDER THE OPERATION OFLAW OR OTHERWISE) AND SPECIALLYDISCLAIMS ANY WARRANTY OFSATISFACTORY QUALITYMERCHANTABILITY OR FITNESS FOR APARTICULAR PURPOSE.PHILIPS’ TOTAL LIABILITY FORDAMAGES RELATING TO OR ARISINGOUT OF THE PURCHASE OR USE OF THEPRODUCT, REGARDLESS OF THE TYPEOR CAUSE OF SUCH DAMAGE OR THEFORM OR CHARACTERISATION OF THECLAIM ASSERTED (E.G. CONTRACT ORTOPIT), SHALL NOT EXCEED THEORIGINAL PURCHASE PRICE PAID FORTHE PRODUCT.HOWEVER IN NO EVENT SHALL PHILIPSBE LIABLE FOR ANY PUNITIVE,SPECIAL, INCIDENTAL, INDIRECT ORCONSEQUENTIAL DAMAGES (INCLUDINGBUT NOT LIMITED TO THE LOSS OF USE,LOSS OF TIME, INCONVENIENCE,COMMERIAL LOSS, LOST PROFITS,LOST BUSINESS OPPORTUNITIES, COSTOF SUBSTITUTION OF GOODS ORSERVICES, INVESTMENTS, DAMAGE TOGOODWILL OR REPUTATION, OR LOSSOF DATA AND CLAIMS BY THIRDPARTIES) RESULTING FROM PURCHASEOR USE OF THE PRODUCT, TO THEFULLEST EXTENT ALLOWED BY LAW,WHETHER OR NOT PHILIPS HAS BEENADVISED OF THE POSSIBILTY OF SUCHDAMAGES. THESE LIMITATIONS SHALLAPPLY NOTWITHSTANDING THEFAILURE OF THE ESSENTIAL PURPOSEOF ANY LIMITED REMEDY.This limited warranty represents the completeand exclusive agreement between theConsumer and Philips with respect to thiscellular Product and it supercedes all prioragreements between the parties, oral or written,and all other communications between theparties relating to the subject matter of thislimited warranty. No carrier, retailer, agent,dealer, employee, thereof, or employee ofPhilips is authorized to make modifications tothis limited warranty and you should not rely onany such representation.This limited warranty does not affect theConsumer’s statutory rights under applicablenational laws in force.
SAR INFORMATION  The SAR limit of USA (FCC) is 1.6 W/kg averaged over one gram of tissue. Device types 9@9t (FCC ID: T38CT7568) has also been tested against this SAR limit. The highest SAR value reported under this standard during product certification for use at the ear is0.242 W/kg and when properly worn on the body is 0.115 W/kg. This device was tested for typical body-worn operations with the back of the handset kept 1.5cm from the body. To maintain compliance with FCC RF exposure requirements, use accessories that maintain a 1.5cm separation distance between the user's body and the back of the handset. The use of belt clips, holsters and similar accessories should not contain metallic components in its assembly. The use of accessories that do not satisfy these requirements may not comply with FCC RF exposure requirements, and should be avoided.    1.1  FCC  declaration of conformity for Section 15.105         NOTE: This equipment has been tested and found to comply with the limits for a Class B digital device, pursuant to part 15 of the FCC Rules. These limits are designed to provide reasonable protection against harmful interference in a residential installation. This equipment generates, uses and can radiate radio frequency energy and, if not installed and used in accordance with the instructions, may cause harmful interference to radio communications. However, there is no guarantee that interference will not occur in a particular installation. If this equipment does cause harmful interference to radio or television reception, which can be determined by turning the equipment off and on, the user is encouraged to try to correct the interference by one or more of the following measures: — Reorient or relocate the receiving antenna. — Increase the separation between the equipment and receiver. — Connect the equipment into an outlet on a circuit different from that to which the receiver is connected.                 — Consult the dealer or an experienced radio/ TV technician for help.

Navigation menu