Cellon Communications Technology UT2010 GSM & GPRS Mobile Phone User Manual
Cellon Communications Technology (Shenzhen) Co.,Ltd. GSM & GPRS Mobile Phone
UserManual.wiki
>
Cellon Communications Technology
>
UT2010 User Manual
User Manual
Navigation menu
Upload a User Manual
Namespaces
Wiki Guide
HTML
PDF
Info
Views
User Manual
Discussion / Help
Navigation


![11network conditions, user settings, method of use, the actual results may vary. The only way to turn off the charger is to unplug it, so it is advisable to use an easily accessible AC power socket. If you do not intend to use your phone for several days, we recommend that you remove the battery. If the battery is completely discharged, the battery icon will reappear after a few minutes of charging. 3.4 Inserting a T-Flash Card 1. Lift up the T-Flash card cover on the right side of the SIM card slot. Pull the cover down if it is locked and then lift it. A word “OPEN” will prompt you the correct direction. 2. With the metal contacts facing down, gently slide the T-Flash card into the slot. 3. Press and pull the cover up to lock it. A word “Lock” will prompt you the correct direction. 3.5 Important Password Phone lock password is 1122; 3.6 Keypad Lock and Unlock Go to Settings > Security Setup > Auto Keypad Lock to select the time for keypad lock. In idle mode, if the time expires, the keypad will be locked automatically. Press the Right Soft Key [Unlock] and then the # Key to unlock the keypad.](https://usermanual.wiki/Cellon-Communications-Technology/UT2010/User-Guide-1058484-Page-13.png)
![124 Text Entry 4.1 Input Method Your mobile phone supports several input methods, which include: ♦ Zi English ( ABC/ abc): Enter English text using Zi editor; ♦ Multi-Tap ( abc/ ABC): Press the keys that are marked with the corresponding letter you wish to enter. Press once to get the first letter on the key, press twice quickly to get the second letter and so on until the letter you want is displayed on the screen. ♦ Numeric(123): Enter numbers. During text editing, you can press the # Key to switch input modes or press the Left Soft Key [Option] and select Input Method to select different input modes; the icon under the title bar will display your current input mode. Note: Depending on the user requirements, there may be other language input methods available, such as Spanish. The operation is similar to English input. 4.1.1 Entering Symbols In any input mode, press the * Key to open the symbols input screen. Press the Navigation Key to scroll through the symbols. Press the Left Soft Key or the OK Key to confirm the symbol input.](https://usermanual.wiki/Cellon-Communications-Technology/UT2010/User-Guide-1058484-Page-14.png)
![141. Press the # Key to switch to ABC; 2. Press 4 6 6 3, the first word “GOOD” appears; 3. Press ▼ to browse and select “HOME”; 4. Press the Left Soft Key [Select] or ▶ to confirm “HOME”. 4.3 Multi-tap English Input If you wish to use Multi-tap English input mode, press the # key to select " ABC" or “ abc”. This method requires multiple key presses to reach the desired character: the letter "h" is the second letter on the 4 key, so you must press 4 twice quickly to enter "h". Using this mode requires you to press a key as many times as needed to enter the desired letter. To enter the word «home» in Multi-tap input mode “ abc”, press key 4(GHI), 4 (GHI), 6(MNO), 6(MNO), 6(MNO), 6 (MNO), 3(DEF), 3 (DEF). 4.4 Numeric Input Press the # Key to select "123", then you can enter the numbers. 4.5 Other Language Input Method Depending on the user requirements, there may be other language input methods available, such as Spanish. The operation is similar to English input.](https://usermanual.wiki/Cellon-Communications-Technology/UT2010/User-Guide-1058484-Page-16.png)
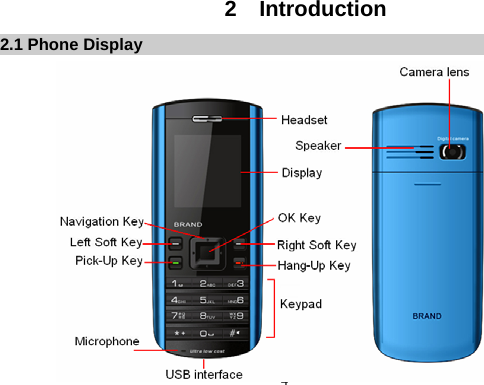
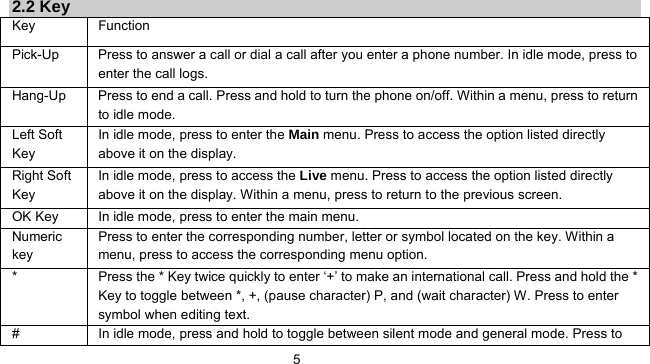
![155 Calling 5.1 Make a Call Note: You can make a call only when the network name appears on the screen. 1. Enter the phone number. 2. Press the Pick-Up Key to dial the number. 5.1.1 Mute or unmute a call During a call, press the Left Soft Key [Options] and select Mute on or off. If you select Mute on, the microphone will be deactivated. When you switch from one call to another, muting will be cancelled. 5.1.2 Adjusting speaker/earpiece volume During a call, press the Navigation Key Up/ Down to increase or decrease the volume 5.1.3 Call recording During a call, press the Left Soft Key [Option] and select Sounder Recorder to record the conversation. When you end the call, the recording will stop and will automatically be saved in the WAV format under File Manager > Phone / Memory card > Audio according to the storage you set in the menu of Sounder Recorder. You can also press the Right Soft Key [Stop] from the recording menu to end the recording. Note: in most countries, recording telephone conversations is subject to legislation. We advise you to notify the caller if you intend to record your conversation and only do so if they agree. 5.2 Making an International Call](https://usermanual.wiki/Cellon-Communications-Technology/UT2010/User-Guide-1058484-Page-17.png)
![161. Press the * Key twice quickly until "+" appears on the screen. 2. Enter the country code. 3. Enter the area code (normally without the 0 before it), followed by the phone number. 4. Press the Pick-Up Key to call directly. 5.3 Making an Emergency Call You can make an emergency call anytime, regardless of whether the mobile phone has been registered on the network. In idle mode, enter the emergency call number (specific number in the caller's country), then press the Pick-Up Key. If there is no SIM card, pressing the Right Soft Key [SOS] can also bring you to the emergency call screen, displaying the confirmation. Press the Left Soft Key [Yes] to directly make an emergency call. 5.4 Making a Second Call (Network Dependent) You can make a second call by putting the current call on hold: 1. During a call with the first caller, enter the second caller’s number using the keypad. 2. Press the Pick-Up key to dial the second party’s number. The first caller will be automatically placed on hold.This is a network-dependent feature. Please contact your service provider for more details. 5.5 Making a Conference Call (Network Dependent) Your phone supports multi-party calls of up to five members. When there is a call waiting while you are already on the phone, you can carry out the following operations to establish the multi-party call: 1. Press the Pick Up Key to answer the second call. The first call will be put on hold automatically.](https://usermanual.wiki/Cellon-Communications-Technology/UT2010/User-Guide-1058484-Page-18.png)
![172. Select Conference from Option. The two calls will be combined and a conference call is established. During the multi-party call, you can answer a new incoming call or add a new member to the call by dialing the new member (the ongoing multi-party call will be put on hold automatically). Once the call is established, select Conference from Option to add the new member to the multi-party call (you can add up to five members). This is a network-dependent feature. Please contact your service provider for more details. 5.6 Switching Calls (Network Dependent) When you have one active call and one call on hold, you can press the Left Soft Key [Option], and then select Swap to switch between the 2 calls. You can also press the Pick-up Key to swap. 5.7 Calling Hands-Free During a call, press the Right Soft Key [H-free]. Note: When the headset is plugged into the phone, you cannot activate hands-free mode. 5.8 Answering a Call Press the Pick-Up Key to answer a call. 5.9 Rejecting a Call Press the Hang-Up Key to reject a call. 5.10 Answering a Second Call (Network Dependent) If you have activated Call waiting, a new incoming call screen is shown to inform you when there is a second incoming call. You can:](https://usermanual.wiki/Cellon-Communications-Technology/UT2010/User-Guide-1058484-Page-19.png)
![181. Press the Pick-Up Key or select Answer from [Option] to answer the second call. The current call will be put on hold automatically. 2. Press the Hang-Up key or the Right Soft Key [Reject] to reject the second call and continue with your current call. 5.11 Ending a Call Press Hang-Up key to end a call.](https://usermanual.wiki/Cellon-Communications-Technology/UT2010/User-Guide-1058484-Page-20.png)
![196 Function Menu 6.1 How To Use 6.1.1 Select Menu Press the Left Soft Key [Menu] or the OK Key to enter main menu in idle mode. Press the Navigation Key Up/Down to change menus and press the Left Soft Key [Ok] to enter the selected menu. Note: The functions described below only appear when a SIM card is inserted. If you power on your phone without a SIM card, you will have limited access to menu functions when you press the Left Soft Key [Option]. Press the Right Soft Key [SOS] to make an emergency call.The aim of this function is to allow you to dial emergency number by keypad when you have no SIM card. You can exit a menu and return to idle mode by pressing the Right Soft Key [Back] or the Hang-Up Key. 6.2 Main Menu](https://usermanual.wiki/Cellon-Communications-Technology/UT2010/User-Guide-1058484-Page-21.png)
![20 Phonebook Messages Call Center File Manager Multimedia Fun & Games Services Organizer Settings 6.3 Phonebook Your phone features two phonebooks. The SIM phonebook is located on your SIM card and the number of entries you can store depends on the SIM card. The second phonebook (Smart phonebook) is integrated in the phone memory and the maximum number of name cards you can store is 500. When you add a new contact to your phonebook, the new contact will only be added to the storage location you have selected. 6.3.1 View In the phonebook, select a contact and press the Left Soft Key [Options] to access the following operations:](https://usermanual.wiki/Cellon-Communications-Technology/UT2010/User-Guide-1058484-Page-22.png)
![21♦ Call: Dial the selected contact. ♦ Send SMS: Send SMS to the selected contact. ♦ Send MMS: Send MMS to the selected contact. ♦ View: View the details of the selected contact, it will list all the detail content of every field; ♦ Edit: Edit the select contact; ♦ Delete: Delete the selected contact; ♦ Copy: If it is stored in phone, choose this option will copy the selected contact to SIM; if it is stored in SIM, choose this option will copy it to phone. ♦ Move: Same as copy, only the original contact will be deleted; ♦ Duplicate: Duplicate the contact in the same memory. ♦ Send vCard: Send the vcard by SMS, MMS or save to file. 6.3.2 Quick Search Enter the first letter of the entry you want to search for in the search bar; press the # Key to switch between the input methods. The maximum number of the letters is five. 6.3.3 Search Contact Enter the name of the entry you want to search, press the # Key to switch between the input methods. After entering name, press the Left Soft Key [Options] to choose Search, mobile phone will display the entry after searching. 6.3.4 Add New Contact](https://usermanual.wiki/Cellon-Communications-Technology/UT2010/User-Guide-1058484-Page-23.png)
![22To create a new SIM/phone contact: To SIM Press the Navigation Key Up/Down to select a field. ♦ Name: Press the Left Soft Key [Edit] to enter the name; ♦ Number: Enter the phone number; After entering a name and number, press the Right Soft Key [Done] or the Left Soft Key [Ok] to save. To Phone Press the Navigation Key Up/Down to select a field. ♦ Name: Press the Left Soft Key [Edit] to enter the name; ♦ Number: Enter the phone number, press the Right Soft Key [Clear] to erase uncorrect numbers; ♦ Home Number: Enter the phone number, press the Right Soft Key [Clear] to erase uncorrect number; ♦ Company Name: Press the Left Soft Key [Edit] to enter the name; ♦ Email Address: Press the Left Soft Key [Edit] to enter the Email address; ♦ Office Number: Enter the Office number; ♦ Fax Number: Enter the Fax number; ♦ Birthday: Enter the birthday, press the Navigation Key Left/ Right to move cursor to left or right; ♦ Associate Picture: Press the Navigation Key Left or Right to select a picture and then press the Left Soft Key [View] to view the selected picture;](https://usermanual.wiki/Cellon-Communications-Technology/UT2010/User-Guide-1058484-Page-24.png)
![23♦ Associate Sound: Press the Navigation Key Left or Right to select a sound; the selected sound will play after few seconds; ♦ Caller Group: Press the Navigation Key Left or Right to select a group. After editing, you can press the Right Soft Key [Done] or the Left Soft Key [Ok] to save. 6.3.5 Copy All You can copy all contacts from Phone to SIM or from SIM to Phone by selecting From Phone or From SIM. 6.3.6 Delete All ♦ From Phone: Enter the phone lock password to delete all the contacts from phone. The default password is 1122. ♦ From SIM: Enter the phone lock password to delete all the contacts from SIM. ♦ One By One: Select which individual contacts to delete. 6.3.7 Caller Group You can create caller groups, which allow you to send text messages to many recipients at the same time. Five groups are available to edit, you can press the Navigation Key Up/Down to modify following fields: name, associate sound, associate picture, and member list. 6.3.8 Extra Number This menu allows you to keep a list of useful numbers such as Owner number, Service dial number and SOS number.](https://usermanual.wiki/Cellon-Communications-Technology/UT2010/User-Guide-1058484-Page-25.png)
![246.3.9 Settings ♦ Memory Status: Press to view the SIM and phone memory status, it lists the used memory and total memory of contacts. ♦ Preferred Storage: Press to select the preferred storage: SIM or phone; ♦ Fields: Press the Left Soft Key [On] or [Off] to activate or deactivate the different fields for the phone contact, including Home number, Company name, Email address, Office number, Fax number, Birthday, Associate picture, Associate sound and Caller group. If one field is set off, it will disppear when you view a contact or edit a contact. ♦ Name List Filter: Press to select the phonebook you want to manage, SIM only, phone only or both. If select “SIM Only”, it will only show the contacts stored in SIM when you enter Phonebook > View. ♦ My vCard: First, you should create your vcard by selecting Edit my vcard. Then you can sent your vcard by SMS, MMS or Save it to file. Note: You can save your vCard to your phone or memory card and then find it in the menu of File Manager. ♦ vCard Version: Select the vCard version, 2.1 or 3.0. 6.4 Messages The menus described in this section allows you to send/receive messages and manage your messages. Only devices that have compatible features can receive and display multimedia messages. The](https://usermanual.wiki/Cellon-Communications-Technology/UT2010/User-Guide-1058484-Page-26.png)
![25appearance of the message may vary depending on the receiving device. 6.4.1 SMS Inbox Inbox allows you to view your received SMS messages. In the Inbox folder, indicates an unread text message, indicates a message you have read. Press the Navigation Key Up or Down to select a message; the send time and sender’s number is displayed in the list (if the number exists in your phonebook, the contact name will be shown). Press Left Soft Key [Ok] to read the content of the selected message, including sender, send date, send time and text. When reading the SMS message, press Left Soft Key [Option] to access the following options: ♦ Reply: Reply to sender via SMS; ♦ Delete: Remove the message from your Inbox; ♦ Edit: Edit message; ♦ Forward: Forward the message to another recipient; ♦ Copy To Phone (if the message is saved to the SIM card): By selecting this option, a confirmation screen pops up, then you can press Left Soft Key [Yes] to copy the SMS to phone or press Right Soft Key [No] to cancel copying; ♦ Move To Phone (if the message is saved to the SIM card): Move the selected message to phone; ♦ Copy To SIM (if the message is saved to the phone): Copy the selected message to SIM;](https://usermanual.wiki/Cellon-Communications-Technology/UT2010/User-Guide-1058484-Page-27.png)
![26♦ Move To SIM (if the message is saved to the phone): Move the selected message to SIM; ♦ Chat: Press to set the chat room info and start new chat with the sender. ♦ Delete All: Press to delete all messages in the inbox; ♦ Copy All: Copy all messages from SIM to phone or from phone to SIM; ♦ Move All: Move all messages from SIM to phone or from phone to SIM; ♦ Use Number: By selecting this option, the sender’s number or the numbers in the message will be shown in a list; press Left Soft Key [Option] to Dial, Save to phonebook or Send SMS. ♦ Use URL: You can connect to the URL or add it to bookmark. Outbox The Outbox allows you to view unsent messages in a list. If you select “Save” or “Save and send” while writing SMS, the messages will be saved in Outbox too. In the Outbox folder, indicates an unsent text message, indicates a message you have saved and sent sucessfully. You can press the Navigation Key Up or Down to select a message and then press Left Soft Key [Ok] to read the message. When reading a SMS, you can also press Left Soft Key [Option] to Send, Edit, Delete, Copy to phone or SIM, Move to phone or SIM, Delete all, Copy all, Move all, Use URL or Use number. See the Inbox section above for more details on these options. Write SMS message To write message, please refer to the Text entry section of this manual for detailed information.](https://usermanual.wiki/Cellon-Communications-Technology/UT2010/User-Guide-1058484-Page-28.png)
![27After entering text, you can access the following options by press Left Soft Key [Option]: ♦ Done: Press to confirm entered text and select from the following Send Options: Send Only: Select to open the number editor and enter your number, or press the Left Soft Key [Search] to search a contact in the phonebook. Press the Left Soft Key [Ok] to send the message; Save and Send: Press to save the message to Outbox and send the message; Save: Press to save the message to Outbox; Send To Many: Press to send the message to more than one recipient. Select Edit recipients to add or delete recipient in a list and then select Send Now to send the message to all the recipients in the list; Send By Groups: Press to send the message to the group you selected. ♦ Use Template: Press to select a template and insert it into pre-written message; ♦ Insert Object: Press to select picture, animation or melody and insert in message, “My Picture”, “My Animation”, “My Melody” are shortcuts to File Manager menu. ♦ Format Text: Press to adjust text size, style, alignment or select a new paragraph; ♦ Insert Number: Press to select a contact in the phonebook and insert the contact’s number to the message; ♦ Insert Contact: Press to select a contact in the phonebook and insert the contact’s name to the message;](https://usermanual.wiki/Cellon-Communications-Technology/UT2010/User-Guide-1058484-Page-29.png)
![28♦ Insert Bookmark: Press to select a bookmark in Services > WAP > Bookmarks and insert it to the message. ♦ Input Method: Press to select input method. Template View templates of SMS for you to insert into the message. Press the Left Soft Key [option] to edit, erase or write message. SMS Settings This feature allows you to edit SMS message settings: ♦ Profile Setting: Press to select a profile. The profile includes profile name, SC Address, Valid Period and Message Type. ♦ Common Setting: Press to set the delivery report and reply path. The item “Reply path” allows you to transmit the number of your SMS message center together with message, the recipients can then reply using your SMS centre and not theirs. This speeds up the rate of transmission. This feature is subscription dependent. ♦ Memory Status: Press to view the SMS status in SIM card and your phone. ♦ Preferred Storage: Press to choose where to store messages - the SIM card or Phone. If you choose SIM, the messages you receive will be stored in the SIM card, when the memory in SIM card is full, the messages you receive will be stored in phone automatically. 6.4.2 MMS](https://usermanual.wiki/Cellon-Communications-Technology/UT2010/User-Guide-1058484-Page-30.png)
![29Write MMS message 1. In idle mode, press the Left Soft Key [Menu] to enter the main menu. 2. Select Messages > MMS > Write Message,The MMS editing screen will appear. 3. You can edit To, Cc, Bcc, Subject fields. Press the Navigation Key Up or Down to move to the field, and then press Left Soft Key [Edit] to edit the field. When move to “Edit Content” field, you should press the Left Soft Key [Edit] to enter MMS content editor. Note: you can send the MMS to E-mail by entering an E-mail address in the To, Cc, or Bcc field. 4. Enter the MMS content in the MMS content editor then press Left Soft Key [Options] to access the following options: Done: Confirm that you have finished writing and go back to MMS editing screen; Input Method: Choose a input method form all the methods list; Add Picture: Go to File Manager to choose an image and then add it to the MMS; Add Audio: Go to File Manager to choose an audio and then add it to the MMS; Add Attatchment: Go to File Manager to choose a file and then add it to the MMS; Add Slide Before: Add a new slide before current slide; Add Slide After: Add a new slide after current slide; Add Bookmark Text: Go to Bookmark menu to add its URL to the MMS. Preview: Preview the MMS; Slide Timeing: Press to set a delay between each slide; 5. When you have finished writing the MMS, press the Right Soft Key [Done] to go to following](https://usermanual.wiki/Cellon-Communications-Technology/UT2010/User-Guide-1058484-Page-31.png)
![30options: send only, save and send, save to drafts, save as template, send options and exit. In the option of “Send Option”, you can set validity period, delivery report, read report and priority 6. Send the message by choose “Send Only” or “Save and Send”. Inbox Inbox allows you to view your received MMS messages. When reading the MMS message, press Left Soft Key [Option] to download, use details, save object, and so on. Outbox The Outbox allows you to view unsent messages, If you select “Save and send” while writing MMS, the messages will be saved in Outbox too. When reading a MMS, you can press the Left Soft Key [Option] to view, send, edit, delete, delete all, save as template, view properities, save object or use details. Drafts The Draft box allows you to view the messages saved. Template View templates of MMS for you to insert into the message. MMS Message Settings This feature allows you to edit MMS message settings: ♦ Compose: Creation mode: If you select Restricted, the device prevents you from sending](https://usermanual.wiki/Cellon-Communications-Technology/UT2010/User-Guide-1058484-Page-32.png)
![33Received Mode This menu allows you to receive messages on various topics, such as weather or traffic conditions, from your service provider. Press Left Soft Key [On] or [Off] to set the reception of broadcast messages On or Off. If you select Off, you will not receive any broadcast messages, even if you have set the corresponding channel numbers. Read Message When you receive a broadcast message, the message content will be displayed on the idle screen until you press Right Soft Key [Back]. If you want to read it again, enter this menu. Languages Select the languages in which you want to receive messages. Channel Setting Select to Add, Edit or Delete channel. To obtain the codes corresponding to the different types of messages, you must contact your operator. 6.5 Call Center 6.5.1 Call History Missed Calls Select to view missed calls. Press Left Soft Key [Ok] to view detailed information, including date, time, name, number and call times. Press Left Soft Key [Option] to access following operations: ♦ Delete: Press to remove the selected call log from the list;](https://usermanual.wiki/Cellon-Communications-Technology/UT2010/User-Guide-1058484-Page-35.png)
![35Note: Some features in this menu require you to enter PIN2 code. Please contact your service provider for PIN2 code. SMS Counter Your mobile phone will automatically record how many messages you sent and received. You can view the number of messages by selecting this menu. Press the Left Soft Key [Reset] to reset. GPRS Counter Select to view the GPRS volume of the Last sent, Last received, All sent, All received. If you want to reset all the logs, select Reset counter. 6.5.2 General Call Settings Caller ID This feature allows you to show or hide your identity (i.e. your phone number) to your correspondent. You can select Set by network, Hide ID or Send ID. Note: This feature is network/ subscription dependent. Call Waiting If activated, when a second incoming call come, it will prompt you. Select Query status to find out whether the call waiting is active or not. Call Divert Select to divert incoming calls to your mailbox or to a number (whether in your contacts or not) and you can choose from the following options: All voice Calls, If Unreachable, If no answer, If busy or All data calls.](https://usermanual.wiki/Cellon-Communications-Technology/UT2010/User-Guide-1058484-Page-37.png)
![36You can also cancel all divert settings by selecting Cancel all divert. Call Barring Allows you to limit the use of your phone to specific calls. This can be applied to incoming calls (all calls or when roaming) and/or to outgoing calls (all calls, international calls, international calls except to home PLMN). To activate call barring, you need to enter a communication limit code. This barring code will then be sent to the network for validation. Note: This operation only supports GSM calls. You can cancel all call barring. You can modify your barring code by selecting Change Barring Password. Auto Redial When On, if the person you are calling is busy, your phone will automatically redial the number until a sucessfully connection is made or until the maximum number of attempts is reached. Speed Dial Enable Speed Dial: Press the Left Soft Key [On/Off] to activate or deactivate. Set Number: Select 2 to 9 as the speed dial location. Press the Left Soft Key [Options] and select Edit to enter the phonebook. Press the Navigation Key Up/Down to select the contacts and press the Left Soft Key [Ok] to confirm and save. After setting, you can make a speed dial call by pressing and holding the related key in idle mode. More Call Time Display: Press the Left Soft Key [On] or [Off] to display the duration of your calls.](https://usermanual.wiki/Cellon-Communications-Technology/UT2010/User-Guide-1058484-Page-38.png)
![37Call Time Reminder: Select to choose a type of call time reminder including Off, Single or Periodic. You can enter the time for “Single” and “Periodic”. Line Switching: Press the Left Soft Key [Select] to toggle between line 1 and line 2. Closed user group: You can specify a group of people to whom you can call and who can call you (network service). Press the Left Soft Key [Add] to add a group. You should enter the name and index. When calls are limited to closed user groups, calls may be possible to the official emergency number programmed into your device. 6.6 File Manager This menu allows you to manage the files saved in your phone and memory card. When highlight on one of them, related memory information is displayed at the top of the screen, including total volume and free volume. There are folders of images, audio, ebook, my music, and photos. Note: maybe some folders do not appear, such as “My Music”, if user enters Multimedia > Audio Player, “My Music” folder will automatically be created in File Manager. 6.6.1 Phone Press Left Soft Key [Option] to access the following options: ♦ Open: Select to view folders in the phone. Press the Left Soft Key [Option] to access the following options: Open: Select to open the folder, it will list all the files in the selected folder, you can press the Left Soft Key to view/play, delete, forward, copy, move, sort by, or other operations. New Folder: Select to create a new sub-folder in the selected folder;](https://usermanual.wiki/Cellon-Communications-Technology/UT2010/User-Guide-1058484-Page-39.png)
![38 Rename: Select to rename the selected folder; Delete: Select to delete the selected folder; Sort by: Select to sort by name, type, time, size or none; ♦ New Folder: Select to create a new folder in phone; ♦ Format: Select to format the Phone memory. 6.6.2 Memory Card You should insert a T-FLASH card at first. Then you can enter this menu to view the files and folders in memory card. The operation is similar to the operation on phone. 6.7 Multimedia 6.7.1 Camera Your mobile phone features a digital camera that allows you to take pictures, store them, set them as wallpaper or send them to your friends. Please ensure that the camera lens is clean before you take pictures, as small dust particles can strongly affect the picture quality. How to ... Launch Camera From idle mode, press the Left Soft Key to enter the main menu then select Multimedia>Camera Take a picture Press the OK Key or the 0 Key. After taking, the picture will be saved as JPEG format in File Manager menu automatically. You can press the Left Soft Key [Contin…] to return to camera](https://usermanual.wiki/Cellon-Communications-Technology/UT2010/User-Guide-1058484-Page-40.png)
![39preview screen. Exit Press the Hang-Up Key or the Right Soft Key [Back]. At any point in time, you can press the Hang-Up Key to cancel the current operation and return to the idle mode. Camera Option Menu When the camera mode is activated you can change a number of settings by pressing the Left Soft Key [Options] before taking a picture: Options Description Photos Enter the album according to the storage, if the storage is phone, it will shotcut to File Manager > Phone > Photos. Camera settings ♦ Banding: 50Hz, 60 Hz; ♦ Delay Timer: off, 5 secs, 10 secs, 15 secs; You should press the Navigation Key Left or Right to toggle between these selections. Image settings ♦ Image Size: 128X96, 352x288; ♦ Image Quality: low, normal, high; Scene mode Select auto or night; Storage Set the storage for camera: phone or memory card. If set to Memory Card, the picture taken will be stored in File Manager > Memory card > Photos](https://usermanual.wiki/Cellon-Communications-Technology/UT2010/User-Guide-1058484-Page-41.png)
![40Restore default Restore all the camera settings to the default settings. Note: When there is not enough memory space, you will not be able to save the picture and you will be prompted with a warning message. So you should delete existing pictures before you can store new ones. 6.7.2 Image Viewer This menu lists the picture from File Manager > Phone/Memory card > Photos according to its storage setting. You can press the Left Soft Key [Option] to view, change broswer style, forwad, rename, delete, delete all, sort, choose storage or send to wallpaper. 6.7.3 Audio Player Keys Operation The keypad operations during music playback are as follows: Key Description The OK Key Short press to Start/Pause/resume music playback. Navigation Key Down ▼ Press to stop the music. Navigation Key ◀ or ▶ Short press to select the previous song/next song. Press and hold to rewind/fast forward the track during playback. *, # Adjust volume. Once you have set the volume, the settings will be saved](https://usermanual.wiki/Cellon-Communications-Technology/UT2010/User-Guide-1058484-Page-42.png)
![41until the next time you adjust the volume. Left Soft Key [List] List the audio file from the storage you set. Right Soft Key [Back] Return to previous menu. Navigation Key Up ▲ Access the setting menu. Audio Player Setting menu Press Left Soft Key [List] to list the audio files and then press the Left Soft Key [Option] to choose Settings, you can set your prefered storage, list auto gen, skin, repeat, shuffle, and background play. Note: this menu lists the music file in File Manager > Phone/Memory card > My Music which is the storage you selected. 6.7.4 Sound Recorder This menu allows you to make recordings.The length depends on the memory status Press the Left Soft Key [Option] and select Record to start recording. Press the Left Soft Key [Pause] or [Conti] to pause or resume the recording. When you are finish recording, press the Right Soft Key [Stop] to save the recording. You can then either enter a name for the new sound file or accept the default name by pressing the Left Soft Key [Option] and select Save. Note: Saved sound files can be found in the File Manager > Phone/ Memory card > Audio menu according to your storage setting.](https://usermanual.wiki/Cellon-Communications-Technology/UT2010/User-Guide-1058484-Page-43.png)
![42When you select a sound file, press the Left Soft Key [Option] to access the following options: ♦ Record: To make a new recording; ♦ Play: To play the recording; ♦ Append: To add more to an existing recording; Note: This feature is only available when the file format is ARM. ♦ Rename: To rename the file; ♦ Delete: To delete the recording; ♦ Delete All Files: To delete all recordings; ♦ Settings: To set Pref. Storage, File format and Audio quality; ♦ Forward: To forward the recording to user profiles, or MMS. Note: if select “To User Profile”, the forwarded sound is available in the melody list when modifying user profiles. 6.7.5 FM Radio Note: The radio will not work unless the headset is attached. Attach the headset included with your phone to the charging port located at the bottom of the phone. To operate the radio: 1. Press the Navigation Key Up to activate or deactivate the FM radio. 2. Press the * / # Key to adjust the volume. 3. Press the Navigation Key Down to activate or deactivate Auto search.](https://usermanual.wiki/Cellon-Communications-Technology/UT2010/User-Guide-1058484-Page-44.png)
![434. Press the Navigation Key Right/Left to switch the channels.If auto search is activated, pressing the Navigation Key Right/Left will switch the available searched channels; if auto search is deactivated, pressing the Navigation Key Right/Left will switch to varying channels by 0.1 intervals. 5. Press the Navigation Key Up to access the Settings menu. 6. Press the OK Key or the Left Soft Key [Options] to access the following options: ♦ Channel List: Select to view the list of preset channels. Press the Left Soft Key [Option] to play, delete or edit the selected channel. ♦ Manual Input: Select to manually input a channel number and then play it. ♦ Preset Auto Search: Select to auto search the available channels and save the searched channels into the preset channel list. ♦ Settings: Select to set the background play, loud speaker and skin. 6.7.6 Melody compose Press the Left Soft Key [Add] to begin to compose a new melody. 1. Press 1-7 Keys to edit the music rhythm; 2. Press the 8 Key to add a vibrator. 3. Press the 0 Key to add a pause. 4. Press the Right Soft Key can erase the rhythm before. 5. When finish, you should press the Left Soft Key [Option] to play, set play speed, select instrume, or save the melody.](https://usermanual.wiki/Cellon-Communications-Technology/UT2010/User-Guide-1058484-Page-45.png)
![44If select Save, it will be saved in File Manager > Phone > Audio. The format is IMY. You can send it to your friends by MMS. 6.8 Fun & Game 6.8.1 Games Your mobile phone provides you with several games. Four Games There are three games in your mobile phone: Riches, Copter and Puzzle. Press the Left Soft Key [Ok] to enter the options of every game: ♦ Start Game: start the selected game; ♦ Game Level: set the game level, maybe some games do not have game level; ♦ Best Grages: select to view the best grade of the selected game; ♦ Game Help: view the descriptions about the selected game; Game Setting You can also adjust the following settings by selecting Game setting: ♦ BGM: Select to set background music On or Off; ♦ Sound Effect: Select to set game sound On or Off; ♦ Game Vibration: Select to set game vibration On or Off. 6.8.2 Themes This menu allows you to choose the theme of your mobile phone: Theme1, theme2 and theme3. You can](https://usermanual.wiki/Cellon-Communications-Technology/UT2010/User-Guide-1058484-Page-46.png)
![46Bookmark list, where you can manage and organize them.When you enter the menu, a list of bookmark entries is displayed. To connect to the web address of a particular bookmark entry, press the Left Soft Key [Option] and then choose Goto. Recent Pages: Select to view the history of recent pages. Offline Pages: Select to view the history of offline pages. Input Address: Select to enter a web address then press the Left Soft Key [Option] and choose Done to connect to this address.If there is an address list, you can press the Left Soft Key [Option] and then choose Goto, Edit, Add Bookmark, Delete or Delete All. Service Inbox: Select to view the push messages sent by WAP. Settings: Select to configure the browser parameters including: ♦ Edit Profiles: You can activate one of the profiles or edit them. If editing the profiles, you can edit the profile name, homepage, data account, connection type, user name and password. Note: If you want to edit the profiles, please contact your operator for more information. ♦ Browser Option: Select to set the time of timeout and set Show Images on or off. Some web pages may contain material, such as graphics and sounds, that require a large ammount of memory to view. To browse web pages without graphics to save memory, select Show Images off. ♦ Service Message Settings: Select to choose Enable Push on or off; set Trust Setting disable or always; set SL setting; set Trust list. ♦ Clear Cache: To empty an area of the phone’s memory where the pages browsed during a WAP](https://usermanual.wiki/Cellon-Communications-Technology/UT2010/User-Guide-1058484-Page-48.png)
![47session are stored. ♦ Clear Cookies: clear the cookies. ♦ Trusted Certificates: Select to view the trusted certificates, you can delete them. 6.10 Oragnizer This menu contains features and options designed to keep you organised and informed while on the go. 6.10.1 Calendar This menu displays the calendar. The month view is the default view and today’s date is highlighted in blue and also by a red square. You can select a different date by the red square with the Navigation Keys. The days that have events will be filled in yellow color. Calendar includes the following options: ♦ View Tasks: Select to view tasks scheduled on the selected date. “Empty” appears if nothing is scheduled. Press the Navigation Key Left/Right to change the date or press the Left Soft Key [Add] to add a new task; ♦ Add Task: Select to add new task (refer to “To Do List”); ♦ Jump To Date: Select to enter the date you want to view in the calendar; ♦ Go To Weekly View: Select to switch to the weekly view screen; 6.10.2 To Do This menu allows you to create, store and manage tasks in your organiser.](https://usermanual.wiki/Cellon-Communications-Technology/UT2010/User-Guide-1058484-Page-49.png)
![48Create New Task To create a new task: 1. If there’s no event, press the Left Soft Key [Add] to create a new task; if there’s already an event, press the Left Soft Key [Option] and select Add to create new task; 2. Select the task type: Reminder, Meeting, Course, Date, Call or Anniversary; 3. Edit the different task fields, such as date, time, Note, Alarm, Repeat, Location and Priority; 4. Press the Right Soft Key [Done] to save the task. Note: A new task cannot be saved with a blank Note. 6.10.3 Alarm Your mobile phone has a built-in alarm clock with snooze feature. You can set up to five separate alarms and choose whether or not the alarm should repeat. To set an alarm: 1. Select an alarm and then press the Left Soft Key [Edit] to create; 2. Then to edit different fields of the alarm, including: On/Off, Enter time, set Repeat, set audio options, select snooze minute and alert type. Finally, press the Right Soft Key [Done] to save the settings. The alarm clock will ring even if your mobile phone is switched off and/or the ringer volume is set to silent. Snooze If Snooze is on, you can press the Right Soft Key [Snooze] to stop the ringing temporarily or close the phone. The alarm will ring again around the snooze minute you set. Pressing the Left Soft Key [Stop] or the OK Key to stop the ringing and the alarm repetition.](https://usermanual.wiki/Cellon-Communications-Technology/UT2010/User-Guide-1058484-Page-50.png)
![496.10.4 World Clock This menu allows you to set different World clocks and set Daylight saving On or Off. Press the Left Soft Key [Ok] to enter the menu. A world map appears on screen - press the Navigation Key Left/Right to select the world clock.The corresponding city, date, and time is displayed on the top and bottom of the screen. Press the Left Soft Key [Option] to set Daylight savings to On or Off for foreign city. 6.10.5 Calculator Your mobile phone has a built in calculator. Enter the numbers with the keypad. An icon will apear on the screen indicating how to do calculations: Keys Operation The Navigation Key Up Additon The Navigation Key Down Subtraction The Navigation Key Left Multiplication The Navigation Key Right Division Left Soft Key or the OK Key To calculate Right Soft Key To clear or exit Calculator # key To enter decimal point](https://usermanual.wiki/Cellon-Communications-Technology/UT2010/User-Guide-1058484-Page-51.png)
![50Note: press the Navigation Key Up/ Down can switch between M-, -, +, M+; press the Navigation Key Left/ Right can switch between MC, x, ÷, MR. 6.10.6 Currency Converter This application allows you to convert currency. First, input the rate, press the # Key to enter a decimal point, then input the local value. Press the Left Soft Key [OK] to view the foreign value. 6.10.7 Stopwatch Typical Stopwatch Split Timing: allows you to record no more than 20 groups of split time while timing. The start time is 00:00:00, every record will continue with the timing. To operate the stopwatch: Keys Operation Left Soft Key or the OK Key To start, pause, resume timing Right Soft Key To record split time or exit Up/ Down To view records Lap Timing: allows you to record no more than 20 groups of lap time while timing. The start time of every record is 00:00:00.To operate: Keys Operation Left Soft Key or the OK Key To start, pause, resume timing](https://usermanual.wiki/Cellon-Communications-Technology/UT2010/User-Guide-1058484-Page-52.png)
![51Right Soft Key To record lap time or exit Up/ Down To view records Note: If you press the Hang-Up key while timing, the activated stopwatch will not stop and when you try to enter another stopwatch Split time or Lap timing, a confirmation screen will appear asking if you want to stop previous stopwatch.Select Yes to stop previous and to enter the next stopwatch. View Record: Select to view, delete, or delete all saved records. nWay Stopwatch Press Left Soft Key [Start] to activate the stopwatch, and then you can press the Navigation Key Left/Right/Up/Down to record four different groups of data. 6.10.8 E-book Reader This menu allows you to read an e-book and complete related operations. If there’s an e-book file in a list, its size and date will be shown under the title bar, press the Left Soft Key [Option] to select Open E-book to read the E-book. After opening the E-book, you can access the following options by pressing the Left Soft Key : ♦ Find: Select to find any text in case sensitive or case insensitive in the e-book. ♦ Find Next: Select if there’s more than one matched text-you can select this option to find next match; ♦ Jump To: Allows you to jump to the Beginning, Middle or End of the e-book or enter the exact percentage you want to advance;](https://usermanual.wiki/Cellon-Communications-Technology/UT2010/User-Guide-1058484-Page-53.png)
![52♦ Go To Bookmark: If there’s bookmark, you can select and go to the bookmark you added before; ♦ Add Bookmark: Select to add bookmark; ♦ Delete Bookmark: Select to delete a bookmark; ♦ Book Info: Select to view detail information about the e-book, including title, size and format. ♦ Settings:Select to set Font style, Font size, Scroll by, Auto scroll, Scroll speed, Full screen, Encoding and alignment; ♦ Apply Global Settings: Applay global settings; ♦ Help: Select to view help information about how to use shortcuts when reading an e-book. ♦ Close: Select to close the reading e-book. 6.11 Settings You can configure your mobile phone to best suit your usage preferences. 6.11.1 User profiles This menu allows you to select a profile from General, Meeting, Outdoor, Indoor, Headset. Press the Left Soft Key [Options] to access the following options: ♦ Activate: Select to activate the selected profile. ♦ Customize: Select to modify the following settings: Tone Setup: Select a ringtone for Incoming calls, Power on, Power off, Message tone and Keypad tone. Volume: Select to adjust the volume for Ring tone and Key tone.](https://usermanual.wiki/Cellon-Communications-Technology/UT2010/User-Guide-1058484-Page-54.png)
![53 Alert Type: Select to set the alert type as Ring, Vibration only, Vibra and ring or Vibra then ring. Ring Type: Select to set the ring type as Single, Repeat or Ascending. Extra Tone: Press the Left Soft Key [On/Off] to activate or deactivate such tones as Warning, Error, Camp on and Connect. Answer Mode: Press the Left Soft Key [On/Off] to activate or deactivate any key answering. Note: Headset profile can only be activated by plugging in a headset. 6.11.2 Phone Setup This menu allows you to configure some general settings for your mobile phone: Time and Date Set Home City: Select a city from a list and set it as your home city. Set Time/ Date: Press to edit the fields of time, data and daylight saving. Set Format: Press the Navigation Key Up/Down to edit the field, including Time format and Date format, then press the Navigation Key Left/Right to select formats. Schedule Power On/ Off You can set up to four times that your mobile phone will automatically power on or off. Press the Navigation Key Up/Down to select a group and press Left Soft Key [Edit] to set following fields: ♦ Status: To activate or deactivate; ♦ Power: To select power on or power off;](https://usermanual.wiki/Cellon-Communications-Technology/UT2010/User-Guide-1058484-Page-55.png)
![54♦ Time: To enter time. Language This menu allows you to select a language for all menu texts. If you select “Automatic”, your mobile phone will choose the language according to your SIM card. Display Characteristic Wallpaper: You should press the Navigation Key Up/Down to select image, press the Left Soft Key [View] to preview the picture, press the Navigation Key Left/Right to view the previous or next image then press the Left Soft Key [OK] to confirm and set it as wallpaper. Screen Saver: Press to set status and waiting time by selecting Setting menu; and then select a image through Select menu for the screen saver. Power On Display: Press to select power on animation; Power Off Display: Press to select power off animation; Main menu style: Press to set the style for main menu. Show Date and Time: Press the Left Soft Key [On/Off] to show or hide the date and time in idle screen; Show Own Number: Select to turn it on or off. Greeting Text This menu allows you to set the status and greeting text. If set On, the greeting text will be displayed after the welcome animation. Dedicated Key Select to assign functions to the four Navigation Keys – Up, Down, Left or Right.](https://usermanual.wiki/Cellon-Communications-Technology/UT2010/User-Guide-1058484-Page-56.png)
![55Auto Update of Date and Time Press Left Soft Key [On/Off] to turn it on or off. Flight Mode Select from Normal mode, Flight mode and Query when power on. Misc Setting Select to set brightness level and the time for LCD backlight. 6.11.3 Network Setup Network Selection New Search: Press to search for a new network; Select Network: Press to select a network from the network list; Selection Mode: Press the Left Soft Key [Change] to toggle between manually and automatically. Preferred Network Preferred Network allows you to build a preferred network list, Once defined, the phone will try to register on the network, according to your preferences. GPRS Connection You can press the Left Soft Key [Change] to modify your GPRS connection: When needed or Always. ¾ Wnen needed: Your phone will connect to the GPRS service only when required. This option reduces energy consumption, but increases the connection delay. ¾ Always: Your phone automatically connects to the GPRS service (if available). This option allows quicker sccess to GPRS features, but increases energy consumption.](https://usermanual.wiki/Cellon-Communications-Technology/UT2010/User-Guide-1058484-Page-57.png)
![566.11.4 Security Setup SIM Lock To prevent your SIM card from illegal use, your SIM card is protected by a PIN code. If you set the SIM lock to On, you can only use your mobile phone by entering the correct PIN code every time you turn it on. If you enter the wrong PIN code three times, your SIM card will be locked and a PUK code will be required. Contact your service provider for more information. Phone Lock To prevent your mobile from illegal use, you can activate Phone lock. If activated, you will need to enter the correct Phone lock password before you can use it. When you set it to on or off, the phone lock password is also required. If you forget the password, contact your service provider for assistance in unlocking the phone. Note: The initial password is 1122. If you want to change your password, go to Settings > Security Setup > Change Password. Auto keypad lock Select to set the time for auto keypad lock, if the time expire, the keypad will be locked automatically, you should press the Right Soft Key [Unlock] and then the # Key to unlock it. Fixed Dial Mode: Select to activate or deactivate fixed dial by entering the right PIN2 code; Fixed Dial List: Select to edit the names in the Fixed Dial List.](https://usermanual.wiki/Cellon-Communications-Technology/UT2010/User-Guide-1058484-Page-58.png)
![57Barred Dial This feature allows you to set barred dialing. Note: This feature depends on a SIM card. Change Password Select to modify password, including PIN, PIN2 and Phone lock passwords. 6.11.5 Restore Factory Settings By pressing the Left Soft Key [Ok], you will be required to enter the phone lock password to restore the phone to its original factory settings. After entering and confirming the correct phone lock password, most of the settings in your mobile phone will be restored to factory settings. 6.11.6 Shortcuts This feature allows you to make a list of shorcuts for quick use. If there’s no feature defined as a shortcut, press the Left Soft Key [Add] to create a new shortcut. If there’s a feature in the shortcut list, press the Left Soft Key [Option] to access the following operations: Add, Edit, Delete, Delete all, Enable/Disable, Change order. Note: To use shortcuts, you should first enter Main Menu>Settings>Phone Setup>Dedicated Key to define one of Dedicated key as Shortcuts. Then press the related Dedicated key in idle mode to access the features defined in the shortcut list.](https://usermanual.wiki/Cellon-Communications-Technology/UT2010/User-Guide-1058484-Page-59.png)