Cellon Communications Technology UT2133 GSM & GPRS Dual Standby Mobile Phone User Manual
Cellon Communications Technology (Shenzhen) Co.,Ltd. GSM & GPRS Dual Standby Mobile Phone
UserManual.wiki
>
Cellon Communications Technology
>
UT2133 User Manual
User Manual
Navigation menu
Upload a User Manual
Namespaces
Wiki Guide
HTML
PDF
Info
Views
User Manual
Discussion / Help
Navigation


![114 Text Entry 4.1 Input Method Your cellular phone supports several input methods, which include: ♦ Smart Input Method ♦ Multi-Tap. ♦ Numeric(123). During text editing, you can press the # Key to switch input modes or press the Left Soft Key [Option] and select Input Method to select different input modes; the icon under the title bar will display your current input mode. 4.1.1 Entering Symbols In any input mode, press the * Key to open the symbols input screen. Press the Navigation Key to scroll through the symbols. Press the Left Soft Key or the OK Key to confirm the symbol input. 4.2 Smart Input Method 4.2.1 What is it? Smart text Input is an intelligent editing mode for messages, which includes a comprehensive dictionary. It allows you to quickly enter text. You need to press once on the key corresponding to each letter needed to spell a word: keystrokes input will be analyzed. You can press the Navigation Key Up or Down to browse the previous or next available word. 4.2.2 How to use it Letters and symbols represented by each key are as follows:](https://usermanual.wiki/Cellon-Communications-Technology/UT2133/User-Guide-1185710-Page-12.png)
![122 to 9 Press to input letters 1 Press to input symbol 0 Press to input space ◀/▶ Press to confirm the letter or word, or move the cursor to left or right. ▲/▼ Press to browse the last or next available word. Left Soft Key (Select) or the OK Key Press to confirm the letter or word Right Soft Key (Clear) Press to clear a letter, press and hold to clear all entries # Switch between input mode * Press to activate punctuation mode Example: How to enter the word "HOME" 1. Press the # Key to switch to ABC; 2. Press 4 6 6 3, the first word “GOOD” appears; 3. Press ▼ to browse and select “HOME”; 4. Press the Left Soft Key [Select] or ▶ to confirm “HOME”. 4.3 Multi-tap Input This method requires multiple key presses to reach the desired character: the letter "h" is the second letter on the 4 key, so you must press 4 twice quickly to enter "h". Using this mode requires you to press a key as many times as needed to enter the desired letter. To enter the word «home» in Multi-tap input mode “ abc”, press key 4(GHI), 4 (GHI), 6(MNO), 6(MNO), 6(MNO), 6 (MNO), 3(DEF), 3 (DEF).](https://usermanual.wiki/Cellon-Communications-Technology/UT2133/User-Guide-1185710-Page-13.png)
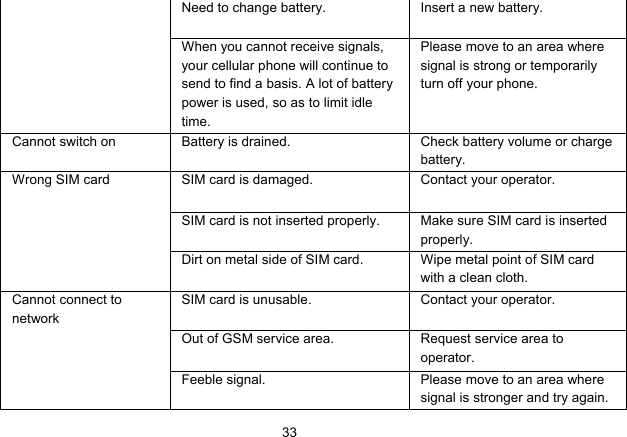
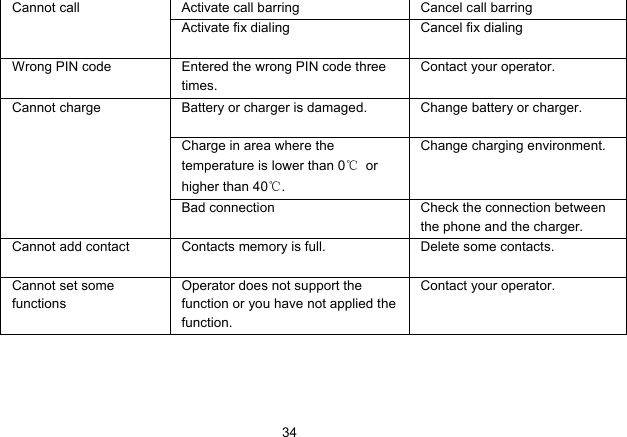
![145 Calling 5.1 Making a Call Note: You can make a call only when the network name appears on the screen. 1. In idle mode,enter the phone number. 2. Press the Pick-Up Key to dial the number. 3. Press the Hang-Up Key to end the call. Note: During a call, press the Navigation Key Up/Down to adjust the volume. You can press the Left Soft Key [Option] to choose Sound Recorder. Note: in most countries, recording telephone conversations is subject to legislation. We advise you to notify the caller if you intend to record your conversation and only do so if they agree. 5.2 Making an International Call 1. Press the * Key twice quickly until "+" appears on the screen. 2. Enter the country code. 3. Enter the area code (normally without the 0 before it) followed by the phone number. 4. Press the Pick-Up Key to call directly. 5.3 Answering a Call Press the Pick-Up Key to answer a call. Press the Hang-Up key to reject a call.](https://usermanual.wiki/Cellon-Communications-Technology/UT2133/User-Guide-1185710-Page-15.png)
![156 Function Menu 6.1 How To Use 6.1.1 Select Menu Press the Left Soft Key [Menu] to enter main menu in idle mode. Press the Navigation Key Up/Down to change menus and press the Left Soft Key [Ok] to enter the selected menu. You can exit a menu and return to idle mode by pressing the Right Soft Key [Back] or the Hang-Up Key. 6.2 Main Menu Messages Fun & Games Ideas Claro Call Center WAP Phonebook Multimedia Organizer Settings](https://usermanual.wiki/Cellon-Communications-Technology/UT2133/User-Guide-1185710-Page-16.png)
![16 6.3 Messages 6.3.1 Creating a text message 1. Select Menu > Messages > Messaging > Write message. 2. Write a message, please refer to the Text entry section of this manual for detailed information. 3. After entering text, you can access the following options by pressing the Left Soft Key [Option] and then select Done: Send Only: Press to enter a phone number or select a recipient from the contact list, and send the message. Save and Send: Press to save the message to Outbox and send the message. Save: Press to save the message to Outbox. Send To Many: Press to add several recipients at a time and send the message. Send By Groups: Press to send the message to the group you selected. Note: Make sure the SC Address in the activated profile is correct; otherwise, you cannot send or receive the messages. 6.3.2 Creating a multimedia message 1. In idle mode, press the Left Soft Key [Menu] to enter the main menu. 2. Select Messages > MMS > Write Message,The MMS editing screen will appear.](https://usermanual.wiki/Cellon-Communications-Technology/UT2133/User-Guide-1185710-Page-17.png)
![173. You can edit To, Cc, Bcc, Subject fields. Press the Navigation Key Up or Down to move to the field, and then press Left Soft Key [Edit] to edit the field. When moving to “Edit Content” field, you should press the Left Soft Key [Edit] to enter the MMS content editor. Note: you can send the MMS to E-mail by entering an E-mail address in the To, Cc, or Bcc field. 4. Enter the MMS content in the MMS content editor then press Left Soft Key [Options] to access the following options: Done: Confirm that you have finished writing and go back to the MMS editing screen. Input Method: Choose a input method from the methods list. Add Picture: Go to the File Manager to choose an image file and then add it to the MMS. Add Audio: Go to the File Manager to choose an audio file and then add it to the MMS. Add Attatchment: Go to the File Manager to choose a file and then add it to the MMS. Add Slide Before: Add a new slide before the current slide. Add Slide After: Add a new slide after the current slide. Add Bookmark Text: Go to Bookmark menu to add its URL to the MMS. Preview: Preview the MMS. Slide Timing: Press to set a delay for current slide. 5. When you have finished writing the MMS, press the Right Soft Key [Done] to go to the following options: send only, save and send, save to drafts, save as template, send options and exit. 6. Send the message by choosing “Send Only” or “Save and Send”. 6.3.3 Email](https://usermanual.wiki/Cellon-Communications-Technology/UT2133/User-Guide-1185710-Page-18.png)
![18To create an account 1. First, you should create the data account. In idle mode, press the Left Soft Key [Menu] to access main menu, and then select WAP > Data account > GPRS, there you can input the APN. 2. Go back to idle mode by pressing the Hang-up Key. Press the Left Soft Key [Menu] to access main menu. 3. Select Messages > Email > Email accounts. Press the Left Soft Key [OK] to enter the accounts list. 4. Press the Left Soft Key [Option] to add a new email account, follow the steps which prompt you to go ahead. 5. You should enter the email address, choose protocol, choose data account, enter the address of incoming server and outgoing server, enter user name and password, enter the account name. 6. After you finished, your phone will save the new account automatically. To activate the email account 1. In idle mode, press the Left Soft Key [Menu] to access main menu, and then select Messages > Email > Email accounts. 2. Choose one of your favorite account, press the Left Soft Key [Options] and then select Activate to activate the selected account. 3. Go back to the Email menu, select Send and receive to refresh the inbox and outbox according to the activated email account. To write an email 1. In idle mode, press the Left Soft Key [Menu] to access main menu, and then select Messages >](https://usermanual.wiki/Cellon-Communications-Technology/UT2133/User-Guide-1185710-Page-19.png)
![19Email >Write Email. 2. Add the Email address in the fields of To, Cc, and Bcc you want to send to. 3. Press the Navigation Down Key to scroll to the subject field, enter the subject by pressing the Left Soft Key [Edit]. 4. In the attachment field, you can attach the files from the File Manager menu. 5. Set the priority for this email. 6. Enter the email content. 7. When you have finished, press the Right Soft Key [Done], a popup screen will appear to prompt you the mail size. 8. Press the Left Soft Key [OK] to send, send and save, save to drafts, or quit without save. To adjust the advanced setting 1. In idle mode, press the Left Soft Key [Menu] to access main menu, and then select Messages > Email > Email accounts. 2. Select the activated account, press the Left Soft Key [Options] and select Edit. 3. Press the Navigation Down Key to select Advaned settings. 6.3.4 Voice Mail Service This menu allows you to set your voice mailbox number and listen to your voice messages. Note: You can forward your calls to your voice mailbox (the phone number for callers to leave a message) via the Call forwarding feature. 6.3.5 Broadcast Message](https://usermanual.wiki/Cellon-Communications-Technology/UT2133/User-Guide-1185710-Page-20.png)
![201. Select Menu > Messages > Broadcast message. 2. Press the Left Soft Key [On] to activate this function. 3. Press the Navigation Key Down to select Channel setting to enter the channel number. Note: To obtain the codes corresponding to the different types of messages, you must contact your operator. 6.4 Fun & Game 6.4.1 Games Your cellular phone provides you with several games. 6.4.2 Themes This menu allows you to choose the theme of your cellular phone: theme1, theme2 and theme3. You can activate one of them, set the update period or set the order. 6.4.3 More Games This menu is a shortcut to WAP URL. 6.5 Ideas Claro Note: The submenus of this feature depends on the operator and different operators may provide different services (some SIM cards do not support STK), which cannot be modified. Please contact your operator.](https://usermanual.wiki/Cellon-Communications-Technology/UT2133/User-Guide-1185710-Page-21.png)
![22WAP settings. Please contact your operator for more information. 1. Press Menu > WAP > Data account. 2. Select the network type, press the OK Key. 3. Set the account information, and save the settings. 4. Go to Menu > WAP > WAP > Settings > Edit profile. 5. Select one of the profile, press the OK Key. 6. Select Edit profile, press the OK Key. 7. Set the profile information, and save it. 8. Activate the account. Connecting to the Network 1. Press Menu > WAP > WAP > Input address. 2. Enter the URL addess. 3. Press the Left Soft Key [Option] and select Done to access the address. 6.8 Phonebook Your phone features two phonebooks. The SIM phonebook is located on your SIM card and the number of entries you can store depends on the SIM card. The second phonebook (Smart phonebook) is integrated in the phone memory. 6.8.1 Search contact 1. Press Menu > Phonebook > Search contact. 2. Enter the contact name. 3. Press the Left Soft Key [Options] and select Search.](https://usermanual.wiki/Cellon-Communications-Technology/UT2133/User-Guide-1185710-Page-23.png)
![23Note: You can select Menu > Phonebook > Quick search to access the phonebook list. Then enter the first few letters of the contact name to search. 6.8.2 Add New Contact To create a new SIM/phone contact: 1. Select Menu > Phonebook > Add new contact. 2. Select To SIM (saves contact on sim card memory) or To phone (saves contact on handset memory) for saving the contact. 3. Select Edit option to enter all related information about the contact. 4. Press the OK Key or Done to save the contact details. 6.9 Multimedia 6.9.1 Camera Your cellular phone features a digital camera that allows you to take pictures, store them, set them as wallpaper or send them to your friends. Please ensure that the camera lens is clean before you take pictures, as small dust particles can strongly affect the picture quality. How to ... Launch Camera From idle mode, press the Left Soft Key to enter the main menu then select Multimedia > Camera Adjust settings Press the Left Soft Key [Options]](https://usermanual.wiki/Cellon-Communications-Technology/UT2133/User-Guide-1185710-Page-24.png)
![24Take a picture Press the OK Key or the 0 Key. After taking, the picture will be saved as JPEG format in Settings > File Manager > Phone/Memory card >Photos menu automatically. You can press the Left Soft Key [Continue] to return to camera preview screen. Exit Press the Hang-Up Key or the Right Soft Key [Back]. Note: When there is not enough memory space, you will not be able to save the picture and you will be prompted with a warning message. So you should delete existing pictures before you can store new ones. 6.9.2 Image Viewer This menu lists the picture from Settings > File Manager > Phone/Memory card > Photos according to its storage setting. 6.9.3 Audio Player Keys Operation The keypad operations during music playback are as follows: Key Description The OK Key List the audio file from the storage you set. Navigation Key Down ▼ Press to stop the music. Navigation Key ◀ or ▶ Short press to select the previous song/next song. Press and hold to rewind/fast forward the track during playback.](https://usermanual.wiki/Cellon-Communications-Technology/UT2133/User-Guide-1185710-Page-25.png)
![25*, # Adjust volume. Once you have set the volume, the settings will be saved until the next time you adjust the volume. Left Soft Key [List] List the audio file from the storage you set. Right Soft Key [Back] Return to previous menu. Navigation Key Up ▲ Press to Start/Pause/resume the current music. Note: this menu lists the music file in Settings > File Manager > Phone/Memory card > My Music which is the storage you selected. 6.9.4 Sound Recorder 1. Select Menu > Multimedia > Sound Recorder. 2. Press the Left Soft Key [Options] and select Settings to set your preferred storage, file format and audio quality. 3. Back to the previous menu, select Record. 4. In the recording screen, you can press the Left Soft Key to pause or continue. 5. If you have finished, press the Right Soft Key [Stop] to stop recording. 6. Enter the name of the file you just recorded. 7. Press the Left Soft Key [Options] and select Save. Note: Saved sound files can be found in the Settings > File Manager > Phone/ Memory card > Audio menu according to your storage setting.](https://usermanual.wiki/Cellon-Communications-Technology/UT2133/User-Guide-1185710-Page-26.png)
![266.9.5 FM Radio Note: The radio will not work unless the headset is attached. Attach the headset included with your phone to the charging port located at the bottom of the phone. To operate the radio: 1. Press the Navigation Key Down to activate or deactivate the FM radio. 2. Press the * / # Key to adjust the volume. 3. Press the Navigation Key Up to activate or deactivate Auto search. 4. Press the Navigation Key Right/Left to switch the channels.If auto search is activated, pressing the Navigation Key Right/Left will switch the available searched channels; if auto search is deactivated, pressing the Navigation Key Right/Left will switch to varying channels by 0.1 intervals. 5. Press the OK Key or the Left Soft Key [Options] to access FM settings. 6.9.6 Melody compose 1. Press 1-7 Keys to edit the music rhythm. 2. Press the 0 Key to add a pause. 3. Press the Right Soft Key to erase the prior rhythm. 4. When finished, press the Left Soft Key [Option] to play, set play speed, select instrument, or save the melody. If you select Save, it will be saved in Settings > File Manager > Phone > Audio. The format is IMY. You can send it to your friends by MMS.](https://usermanual.wiki/Cellon-Communications-Technology/UT2133/User-Guide-1185710-Page-27.png)
![27 6.10 Organizer This menu contains features and options designed to keep you organized and informed while on the go. As most of the features are very simple, here you can only view some important features. 6.10.1 Create a new task 1. Select Menu > Organizer > Calendar. 2. Press the Navigation Key to select a date. 3. Press the Left Soft Key [Option] and select Add Task. 4. Select the task type. 5. Enter the task informations. 6. Press the Right Soft Key [Done] to save it. 6.10.2 Set an alarm 1. Select Menu > Organizer > Alarm. 2. Select an alarm and then press the Left Soft Key [Edit] to create. 3. Press the Navigation Key Left or Right to turn it on or off. 4. Enter other informations, such as time, repeat, and so on. Note: The “snooze” item allows you to set the snooze minutes. When the alarm is activated, you can select Snooze to activate the snooze function.](https://usermanual.wiki/Cellon-Communications-Technology/UT2133/User-Guide-1185710-Page-28.png)