Cellon Communications Technology UT3000C GSM Mobile Phone User Manual
Cellon Communications Technology (Shenzhen) Co.,Ltd. GSM Mobile Phone Users Manual
Users Manual

Preface
Thank you for purchasing this cellular phone.
To guarantee your cellular phone works properly, please follow the instructions in this manual to prevent
any possible incidents or malfunctions.
Follow all safety warnings to avoid injury or property damage.
Screen displays and illustrations in this user’s manual are designed to help you to operate your phone.
We continuously strive to improve our products. Therefore, we reserve the rights to revise this user
manual or withdraw it at any time without prior notice.
2
Contents
Preface---------------------------------------------------------------------------------------------------------------------------- 1
1. Introduction -----------------------------------------------------------------------------------------------------------------4
1.1 PACKAGING ....................................................................................................................................... 4
1.2 PHONE DISPLAY................................................................................................................................. 5
1.3 KEY .................................................................................................................................................. 6
1.4 ICONS & SYMBOLS ............................................................................................................................. 7
2. Getting Started ------------------------------------------------------------------------------------------------------------- 9
2.1 INSERTING THE SIM CARD .................................................................................................................. 9
2.2 TURNING THE PHONE ON ................................................................................................................... 12
2.3 CHARGING THE BATTERY .................................................................................................................. 12
3. Text Entry -------------------------------------------------------------------------------------------------------------------13
3.1 INPUT METHOD ................................................................................................................................13
3.2 ENTERING SYMBOLS ......................................................................................................................... 13
3.3 SMART ENGLISH INPUT ..................................................................................................................... 14
3.4 MULTI-TAP ENGLISH INPUT ................................................................................................................ 15
3.5 NUMERIC INPUT ............................................................................................................................... 15
3.6 OTHER LANGUAGE INPUT METHODS................................................................................................... 15
4. Calling ------------------------------------------------------------------------------------------------------------------------16
4.1 MAKING A CALL................................................................................................................................16
4.2 ENDING A CALL ................................................................................................................................16
4.3 MAKING AN INTERNATIONAL CALL....................................................................................................... 16
4.4 MAKING AN EMERGENCY CALL........................................................................................................... 17
3
4.5 MAKING A SECOND CALL (NETWORK DEPENDENT) .............................................................................. 17
4.6 MAKING A CONFERENCE CALL (NETWORK DEPENDENT) ...................................................................... 17
4.7 SWITCHING BETWEEN CALLS (NETWORK DEPENDENT) ........................................................................ 18
4.8 USING A HANDS-FREE....................................................................................................................... 18
4.9 ANSWERING A CALL.......................................................................................................................... 18
4.10 REJECT A CALL .............................................................................................................................. 18
4.11 ANSWERING A SECOND CALL (NETWORK DEPENDENT) ...................................................................... 18
4.12 ENDING A CALL .............................................................................................................................. 18
5. Function Menu-------------------------------------------------------------------------------------------------------------19
5.1 HOW TO USE ................................................................................................................................... 19
5.2 MAIN MENU ..................................................................................................................................... 19
5.3 PHONEBOOK .................................................................................................................................... 20
5.4 CALENDAR....................................................................................................................................... 23
5.5 ALARM ............................................................................................................................................ 24
5.6 CONTACT ........................................................................................................................................ 24
5.7 MESSAGES ...................................................................................................................................... 24
5.8 TOOLS ............................................................................................................................................ 30
5.9 SETTINGS ........................................................................................................................................ 31
5.10 ENTERTAINMENT ............................................................................................................................ 36
5.11 CALL HISTORY................................................................................................................................38
6. Precautions-----------------------------------------------------------------------------------------------------------------39
7. Troubleshooting ----------------------------------------------------------------------------------------------------------42
8. Safety Information and Notices--------------------------------------------------------------------------------------45
12 MONTH LIMITED WARRANTY---------------------------------------------------------------------------------------52

4
1. Introduction
1.1 Packaging
There are various accessories for your cellular phone. Your pack will include standard battery x 1,
charger x 1, and user manual x 1. Please note:
Use only accessories and charging devices approved by the phone manufacturer, otherwise you would
risk serious damage to health and property.
Failure to do this may invalidate your warranty.
Accessories may be different in different regions.
5
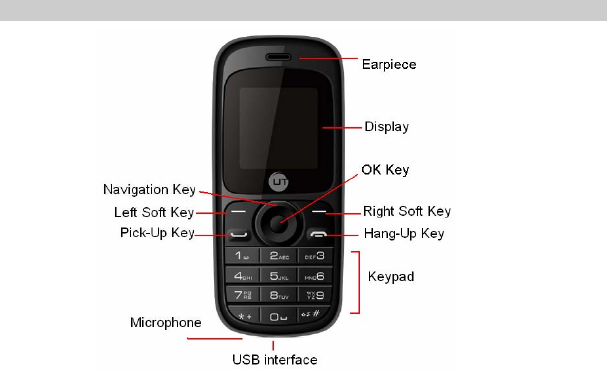
1.2 Phone Display

6
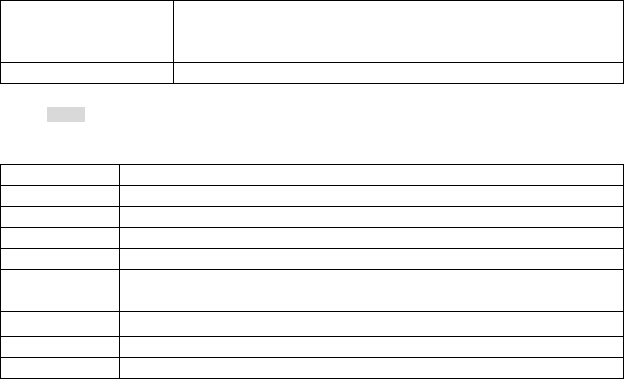
1.3 Key
Key Function
Pick-Up Press to answer a call or make a call after you enter a phone number. In idle mode,
press to view the call log.
Hang-Up Press to end or reject a call. Press and hold to turn the phone on/off. Within a menu,
press to return to idle mode.
Left Soft Key In idle mode, press to enter the main menu. Press to access the option listed directly
above it on the display.
Right Soft
Key
In idle mode, press to access the phonebook list. Press to access the option listed
directly above it on the display. Within a menu, press to return to the previous screen.
OK In idle mode, press to enter the main menu. Within a menu, press to confirm and/or
select the option listed above it.
Numeric Key Press to enter the corresponding number, letter or symbol located on the keypad. Within
a menu, press to access the corresponding menu option.
* Press and hold to enter ‘+’ to make an international call. Press to switch input modes
when entering text.
# In idle mode, press and hold to activate or deactivate the silent mode. Press and hold to
enter pause character (P) and wait character (W) when entering number. Press to enter
7
symbol when editing text.
Navigation
Key
Within a menu, press Up, Down, Left or Right to scroll through menu options. In idle
mode, press Left to enter the Calendar menu; press Up to enter the Inbox menu; press
Right to enter the Messages menu; press Down to enter the Phonebook list.
Note: “Press” in this manual, means press the key and release; “press and hold” means to
press and hold the key for at least two seconds.
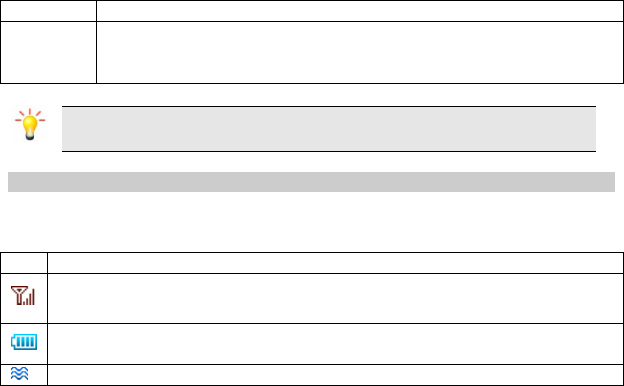
1.4 Icons & Symbols
In idle mode, network and battery icons are displayed all the time. The rest of the icons appear if the
feature is available. If the network symbol is not displayed, the network is currently unavailable. You may
be in a bad reception area and moving to a different location may help.
Icon Description
Network - The left portion indicates whether your phone is already registered with a network and
the right portion indicates signal strength (from no signal to strongest signal).
Battery - Indicates battery level. When charging, a scrolling icon will be displayed. The more bars
the stronger the charge.
Roaming – Appears when your phone is registered to a network other than your own.
8
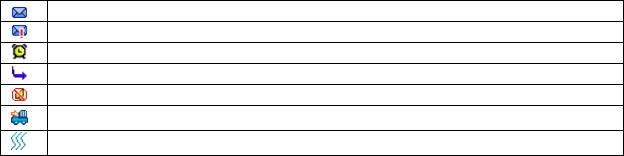
SMS- Indicates that you have received a new SMS.
SMS full- Indicates that the memory is full.
Alarm Clock - Indicates that the alarm clock is activated.
Call Divert - Indicates that the Call Divert to All Call function is activated.
Silence – Indicates that silent mode is activated.
Auto answer - Indicates that Auto answer is on.
Vibrate – Indicates that the vibration is on.
9
2. Getting Started
Please read the safety instructions in the "Safety information and notices" section before use.
Before using your phone, you must insert a valid SIM card supplied by your GSM operator or retailer. The
SIM card contains your subscription information, your mobile telephone number and a small amount of
memory in which you can store phone numbers and messages.
2.1 Inserting the SIM Card
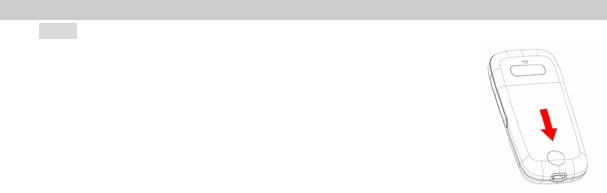
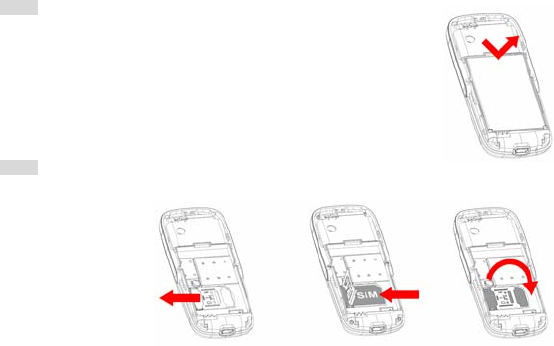
2.1.1 Remove the back cover
Make sure the phone is switched off. You need to remove the back cover of your
phone before you can insert the SIM card. Hold the phone with the front facing
downwards; press and pull the back cover down; slide and lift the back cover up
to remove it. See the picture beside.
10
2.1.2 Remove the battery
Put your finger in the black slot located at the top of the battery slot and lift the
battery up and out of the phone. See the picture beside.
2.1.3 Insert the SIM card
Lift up the SIM card cover. Pull the cover to left if it is locked and then lift it.
Put the SIM card into the card
slot. The metallic contacts are
facing downwards.
Close the cover and then pull
it to right to lock it. See the
picture beside.
11
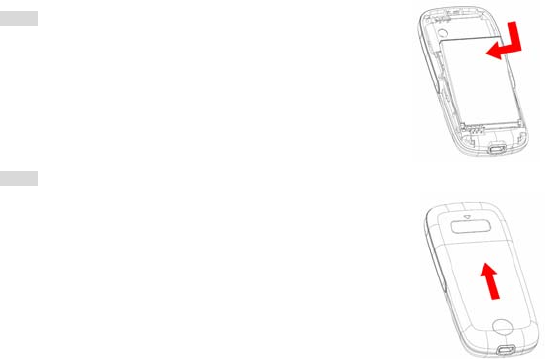
2.1.4 Install the battery
With the metallic contacts of the battery facing the metallic contacts in the
battery slot, press the battery down into its slot until it locks into place. See
the picture beside.
2.1.5 Install the back cover
Align and hook the back cover to the middle-top of the phone and then push
the back cover up until it locks into place. See the picture beside.

12
2.2 Turning the Phone on
To turn the phone on, press and hold the Hang-Up Key. You may be asked to enter the PIN code (the 4
to 8 digit secret code of your SIM card). It is preconfigured and provided to you by your network operator
or retailer. If you enter an incorrect PIN code 3 times in succession, your SIM card will be locked. To
unlock it, you must obtain the PUK code from your network operator.
2.3 Charging the Battery
Your phone is powered by a rechargeable battery. The new battery is partially charged. A sound alert will
warn you when the battery level becomes low.
Make sure the battery is inserted. To charge the battery, plug in the connector at the bottom of your
phone (USB Interface) and then plug the other end into an AC power socket. The battery symbol
indicates the charging status.
During charging, the charge indicators will scroll; it takes about 3 hours to fully charge the battery.
When all the scroll bars are steady, the battery is fully charged. You can then disconnect the charger.
Talk time can go up to 270 minutes. Stand-by time can go up to 450 hours. Depending on the network
conditions, user settings and method of use, the actual results may vary. The only way to turn off the
charger is to unplug it, so it is advisable to use an easily accessible AC power socket. If you do not intend
to use your phone for several days, we recommend that you remove the battery. If the battery is
powerless, the battery icon will reappear after a few minutes of charging.

13
3. Text Entry
3.1 Input Method
Your phone supports several input methods, which include:
Smart: Enter text using smart editor.
Multi-Tap: Press the keys that are marked with the corresponding letter you wish to enter. Press once to
get the first letter on the key, press twice quickly to get the second letter and so on until the letter you
want is displayed on the screen.
123: Enter numbers.
During text editing, you can press the * Key to switch the input methods. The icon on the top of editor will
display your current input method.
Press and hold the # Key will list all the input methods, you can press the OK Key to add or cancel, and
then press the Left Soft Key [Done] to confirm.
Note: Depending on the user requirements, there may be other language input methods available.
The operation is similar to English input.
3.2 Entering Symbols
In any input mode, press the # Key to open/close the symbols input screen. If the symbols occupy more
than one screen, press the Navigation Key Up or Down to scroll through the pages. Press the OK Key to
14
confirm the symbol input.
3.3 Smart English Input
3.3.1 What is it ?
Smart English Input is an intelligent text editing mode for messages, which includes a comprehensive
dictionary. It allows you to quickly enter text. You need to press the key corresponding to each letter
needed to spell a word only once: the keystrokes you input are analyzed and the word suggested is
displayed at the bottom of the editor.
3.3.2 How to use it
Alphabet and symbols represented by each key are as follows:
“2~9” Press to input letters.
1 Press to input symbols.
0 Press to enter a space; press and hold to enter 0.
Navigation Key ▲/▼/◀/▶ Press to browse the last or next available word.
Left Soft Key [Select] Press to confirm the letter or word.
Right Soft Key [Clear] Press to clear a letter, press and hold to clear all entries.
* Press to switch the input modes.
# Press to activate/deactivate punctuation mode, press and hold to list all
the available input methods.

15
Example: How to enter the word "HOME"
1. Press the * Key to select the input method of Smart ABC.
2. Press 4 6 6 3, “GOOD” appears.
3. Press ▶ or ▼ to select “HOME”.
4. Press the Left Soft Key [Select] or the OK Key to confirm “HOME”.
3.4 Multi-tap English Input
If you wish to use Multi-tap English input mode, press the * key to select abc/Abc/ABC. This method
requires multiple key presses to reach the desired character: the letter "h" is the second letter on the 4
key, so you must press 4 twice to enter "h". Using this mode requires you to press a key as many times
as the order of the letter.
To enter the word “home” in basic text input mode “abc”, press key 4 (GHI), 4 (GHI), 6 (MNO), 6 (MNO), 6
(MNO), 6 (MNO), 3 (DEF), 3 (DEF).
3.5 Numeric Input
Press the * Key to select “123” then you can enter the numbers.
3.6 Other Language Input Methods
Depending on the user requirements, there may be other language input methods available, such as
Spanish.

16
4. Calling
4.1 Making a Call
You can only make a call when the network name appears on the screen.
1. Enter the phone number.
2. Press the Pick-Up key to dial the number; or press the Left Soft Key [Options] to select Dial.
4.1.1 Muting or unmuting a call
During a call, press the Left Soft Key [Options] and select Mute or Unmute. If you select Mute, the
microphone will be deactivated. When you switch from one call to another, muting will be cancelled.
4.1.2 Adjusting speaker/earpiece volume
During a call, press the Navigation Key left or right ◀/▶ to decrease or increase the volume (if you are
not browsing the call options menu).
4.2 Ending a Call
To end a call, press the Hang-Up key or select End active call from the Options menu.
4.3 Making an International Call
1. Press and hold the * Key until "+" appears on the screen.
2. Enter the country code.
3. Enter the area code (normally without the 0 before it) followed by the phone number.
4. Press the Pick-Up Key to dial.

17
4.4 Making an Emergency Call
You can make an emergency call anytime, regardless of whether the cellular phone has been registered
on the network. In idle mode, enter the emergency call number (specific number in the caller's country)
then press the Pick-Up Key.
If there is no SIM card, pressing the Right Soft Key [SOS] and then press the OK Key to directly make an
emergency call.
4.5 Making a Second Call (Network Dependent)
You can make a second call by putting the current call on hold:
1. During a call with the first caller, enter the second caller’s number using the keypad.
2. Press the Pick-Up key to dial the second party’s number. The first caller will be automatically placed on
hold. This is a system-dependent feature, please contact your service provider for more details.
4.6 Making a Conference Call (Network Dependent)
Your phone supports multi-party calls of up to five members. When there is a call waiting while you are
already on the phone, you can carry out the following operations to establish the multi-party call:
1. Press the Pick-Up key to answer the second call. The first call will automatically be placed on hold.
2. Select Establish Conference Call from the option menu. The two calls will be combined and a
conference call is established.
During the multi-party call, you can answer a new incoming call or add a new member to the call by
dialing the new member (the ongoing multi-party call will automatically be placed on hold). Once the call

18
is established, select Establish Conference Call from the option menu to add the new member to the
multi-party call (you can add up to five members).
This is a network-dependent feature, please contact your service provider for more details. Some SIM
card do not support this function.
4.7 Switching Between Calls (Network Dependent)
When you have one active call and one call on hold, you can press the Left Soft Key [Options], and then
select Swap to switch between the 2 calls.
4.8 Using a Hands-free
To talk handsfree during a call, press the Left Soft Key [Handsfree] while making a call.
4.9 Answering a Call
Press the Pick-Up Key to answer a call.
4.10 Reject a Call
Press the Hang-Up Key to reject a call.
4.11 Answering a Second Call (Network Dependent)
If you have activated call waiting, you will be alerted when there is a second incoming call. You can:
1. Press the Pick-Up Key to answer the second call. The current call will be automatically placed on hold.
2. Press the Hang-Up Key to reject the second call and continue with your current call.
4.12 Ending a Call
Press Hang-Up key to end a call.

19
5. Function Menu
5.1 How to Use
5.1.1 Select Menu
In idle mode, press the Left Soft Key to access the Main Menu. Press the Navigation Key Up, Down, Left
or Right to select a menu option then press the Left Soft Key [Select].
Note: The functions described below are only available when a usable SIM card is inserted. Your
phone will enter a limited idle mode if powered on without SIM card, and only limited menus will be
available for use. Press the Right Soft Key [SOS] to make an emergency call. The aim of this
function is to allow you to dial an emergency number when you do not have a SIM card.
5.1.2 Quick Select
From the main menu, you can also directly press 1 to 9 to enter the related 9 grid menus. For an example,
press 1 to enter the Phonebook menu in main menu.
5.1.3 Exit
To exit a menu, press the Right Soft Key to return to the previous menu, or press the Hang-Up key to
return to idle mode.
5.2 Main Menu
20
Phonebook Calendar
A
larm
Contact Messages Tools
Settings Entertainment Call History
5.3 Phonebook
Your phone features two phonebooks. The SIM phonebook is located on your SIM card and the number
of entries you can store depends on the SIM card. The second phonebook (Smart phonebook) is
integrated in the phone memory. When you add a new contact to your phonebook, the new contact will
only be added to the phonebook you have selected.
5.3.1 Create Contacts
To create a new SIM/phone contact:
Enter New Contact Press the Left Soft Key in idle mode, and select Phonebook > Phonebook
> <Add new>.
Choose storage Press the Left Soft Key [Options] to choose the storage for the new entry:
Phone or SIM.
21
Enter contact details Enter the following fields for SIM card contacts: Name, Number.
Enter the following fields for onboard phonebook contacts: Name, Mobile,
Home, Office and etc.
Store the new contact Press Left Soft Key [Save].
To create a contact, you must enter at least a phone number and a name.
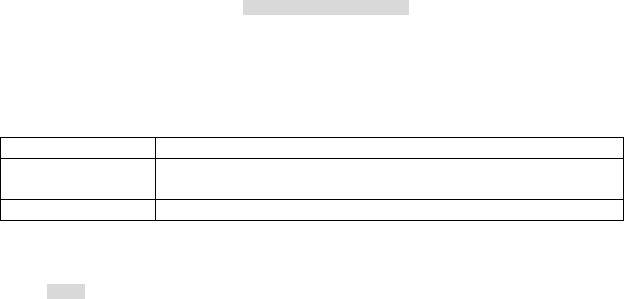
5.3.2 Phonebook Options
In the phonebook, you can display the details of a contact by selecting it and pressing the Left Soft Key
[Options] to access the following operations:
Options Description
View View the details for the selected contact.
Send message Send a SMS to the selected contact.
Dial Call the selected contact.
Delete Delete the selected contact.
Default number Set Mobile number, Home number, Office number or Fax number as the default
number (this option only appears for contacts saved in the phone).
Send contact Send the selected record: via SMS.
Copy to SIM Copy the phone entry to the SIM card.
Copy to phone Copy the SIM entry to the phone.

22
Move to SIM Same as copy, only the original contact will be deleted.
Move to phone Same as move, only the original contact will be deleted.
Add picture Add a picture ID to the selected contact (this option only appears for contacts saved
in the phone).
Select multiple Select several contacts at a time or select all contacts.
Storage location Select location for the new contact: SIM card or Phone memory (this option only
appears if you choose All Contact List in Advanced menu).
5.3.3 View Group
The feature allows you to organize your contacts so that you can send messages to all the members of
the group at the same time. From the Contacts menu, select View group and the list of groups is
displayed. Select a group then press the OK Key to display the members of the group.
5.3.4 Special Numbers
This menu allows you to keep a list of useful numbers such as your own numbers and SOS numbers.
5.3.5 Quick Call
This feature allows you to set 4 numbers which are your preferred or most frequently dialed. You can
then quickly call one of them by selecting the corresponding icon or picture on the screen, thereby
eliminating the need to enter and browse the contact list. Press the Left Soft Key [Add] to add a number
to the selected location, you can also add a picture to the number.

23
5.3.6 Advanced
This menu provides you with advanced features so that you can view and edit your contacts: From the
Contacts menu, select Advanced to access the following options:
Options Description
Choose contact list Switch between SIM, Phone or All SIM & phone contacts.
Copy to SIM Copy all the entries to the SIM card.
Copy to phone Copy all the entries to the Phone.
Move to SIM Move all the entries to the SIM card.
Move to phone Move all the entries to the Phone.
Delete all phonebook Delete all contacts.
5.4 Calendar
This menu displays the calendar. You can create new appointments, view appointments list, delete or
modify appointments in the calendar.
To access the Calendar from idle mode, press the OK Key, select Calendar. If the current date and time
correspond with the date and time of the event, the phone will sound an alarm (if needed), and the screen
will display a prompt to indicate the event.

24
Add New Event
To add an event, select a date from the calendar, then press the Left Soft Key to select New event. After
entering detailed information, you should press the Left Soft Key [Save] to save the event.
5.5 Alarm
Your phone has a built-in alarm clock with snooze feature.
1. To access the Alarm from idle mode, press the OK Key, select Alarm.
2. Press the Navigation Key up or down ▲/▼ to select an alarm then press the OK Key to set alarm.
3. Enter the time you want the alarm to sound, then press the OK Key.
4. Select an alarm date from Monday to Sunday and then press Left Soft Key [Save] to save settings.
When the set alarm time is reached, the alarm will ring even if your phone is switched off. Press any key
to disable the alarm and the phone will be switched off automatically.
5.6 Contact
This menu allows you to view the contact list, you can refer to section 5.3 for detailed information.
5.7 Messages
5.7.1 Create Message
SMS enables you to send text messages to another party. You can use the SMS menu to send
messages to another phone or a device that is capable of receiving SMS.
25
Create, Edit and Send SMS
You need to enter the correct message center number before you can send SMS. The number can be
obtained from your network operator.
1. In idle mode, press the Left Soft Key to enter the main menu.
2. Select Messages > Create Message then press the OK Key. The SMS editing screen will appear.
3. Enter the SMS content in the SMS editor and press the Left Soft Key [Options] to access the following
operations:
Options Description
Continue Enter the phone number of the recipient. You can also select it from Contacts
list or Groups. Press the OK Key to send the SMS.
Save Save the SMS to the Draft box.
If your SMS is not successfully sent, you can resend it.
If your SMS cannot be sent successfully after several attempts, please check if your SMS center number
has been set correctly.
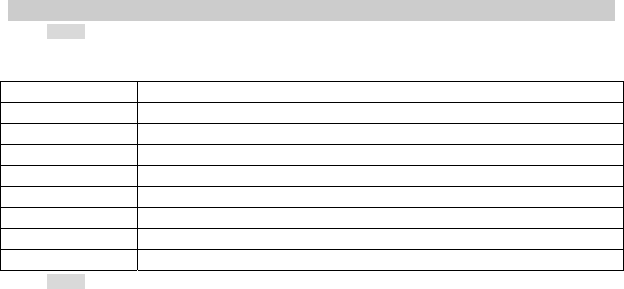
5.7.2 Inbox
The Inbox stores the messages you have received.
1. In idle mode, press the Left Soft Key to enter the main menu.
2. Select Messages > Inbox then press the OK Key
3. If there are messages in the Inbox, they will be listed on the screen in the order they were received (the

26
most recent message will appear at the top of the list).
4. Press the Navigation Key Up or Down▲/▼ to select a message. When a message is selected, its
contents will be displayed on the screen. Press the Left Soft Key to access the following operations:
Options Description
View View the selected message.
Reply Select to reply to the sender’s message.
Forward Select to forward the message to another recipient.
Delete Delete the selected message from the Inbox.
Delete all Delete all the selected messages in the Inbox.
Archive to SIM Move the selected message from Phone to SIM (if available).
Move to My message Move the selected message to My message menu (if available).
Details View information about the message such as date, time and sender.
Dial Extract the sender's number from the message and dial the number.
Smart search You can search the contact by Name, Number or Time.
Select multiple You can select several messages one by one or all at once.
5. Press the OK Key to enter the next screen where the message details will be displayed.
5.7.3 Outbox
The Outbox allows you to save the messages that have not been successfully sent.

27
1. In idle mode, press the Left Soft Key to enter the main menu.
2. Select Messages > Outbox then press the OK Key.
3. If there are messages in the Outbox, they will be listed on the screen.
4. Press the Navigation Key Up or Down▲/▼ to select a message. When a message is selected, its
contents will appear on the screen.
5. Press the OK Key to enter the next screen where the details will be displayed.
5.7.4 Sent
The Sent folder allows you to save the messages you have successfully sent. The operations are similar
to Outbox.
5.7.5 Draft
The Drafts folder lists the messages that were created and saved.
Select a message from the Draft box and press the Left Soft Key [Options] to: View, Edit, Delete, Delete
all, Details, Select multiple to delete.
5.7.6 Broadcast SMS
This is a network service which allows you to receive text messages of various contents, such as news,
traffic, etc. These messages are provided by the network to subscribers within a certain network area. If
this service is available, the network will provide you with the broadcast channel numbers. To access
Broadcast SMS from idle mode, press the Left Soft Key to enter the main menu, select Messages, then
Broadcast SMS.

28
From there you can access the following options:
Reception: Select to turn on/off the reception of new cell broadcast messages.
Topics: Add, change or delete channels.
Reception
You can set the reception of broadcast messsages On or Off. If you select Off, you will not receive any
broadcast messages, even if you have set the corresponding channel numbers.
When you receive a broadcast message, the message content will be displayed on the screen. Once you
exit from the message screen, you will not be able to read it again. To obtain the codes corresponding to
the different types of broadcast messages, you must contact your operator.
5.7.7 Message Settings
To access SMS Message Settings from idle mode, press Menu > Messages > Messages Settings >
SMS to open the list of SMS accounts. Press the Left Soft Key [Options] > Edit to edit the following SMS
settings:
Service Center Number
This menu allows you to save and edit the SMS service center number of your home network. If the
service center number is empty, you will not be able to send any SMS.
Validity Period
Allows you to select the duration by which your messages will be stored in the service center. You can
select from: 1 hour, 12 hours, 1 day, 1 week and Maximum (default). Press the Left Soft Key to change

29
the value. This option is useful when the recipient is not connected to the network and is not able to
immediately receive your messages.
Delivery Report
Press the Left Soft Key to select On or Off to set whether or not to receive a report that your message
was successfully sent to the recipient.
Signature
Press the Left Soft Key to select On or Off (Default is Off). If set to On, an editor opens where you can
enter your signature. The signature will be added to the end of your message before it is sent to your
recipient. If the SMS is too long after adding the signature, the signature will not be included.
Storage Location
You can press the Left Soft Key [Change] to select the preferred storage location of your messages: SIM
card or Mobile phone.
5.7.8 Memory status
This menu allows you to check the memory status of the messages in phone and SIM card.
5.7.9 My messages
Allows you to check message which is moved to My message.
5.7.10 SMS archive
This menu allows you to view all the messages which is stored in the SIM card.
30
5.8 Tools
5.8.1 Calculator
Your phone has a built in calculator. Enter the numbers with the keypad. To access the Calculator from
idle mode, press the OK Key, select Tools then Calculator. Key operations are as follows:
Keys Operations
The OK Key To calculate.
Left Soft Key To open options: Calculate, Percent and Modular.
Up + Addition
Down - Subtraction
Left / Division
Right * Multiplication
* key Positive sign or negative sign
# key Enter a decimal
5.8.2 Countdown
This feature allows you to countdown a time you set.
1. Press the Left Soft Key to enter main menu in idle mode and then select Tools>Countdown.
2. Press the numeric keys to edit time in the format of hh:mm:ss and press the Navigation Key left or
right ◀/▶ to select which part you want to edit.

31
3. Press the OK Key or the Left Soft Key [OK] to start the countdown.
4. Press the OK Key or the Left Soft Key [Pause] to pause the countdown.
5. Press the Left Soft Key [Options] to select Go or Reset to continue or reset the time.
5.8.3 Firewall
This function provides a simple and quick method for you to avoid nuisance calls and SMS. Blacklist
contains a list of phone numbers from which you do not wish to receive calls or SMS. Whitelist contains a
list of phone numbers only from which you want to receive calls or SMS.
Enable or Disable
Select Tools > Firewall > Enable>Black list or White list and choose from the following options:
• SMS
• Incoming call
• SMS and incoming call
Or select Tools > Firewall > Enable>Off to disable.
5.8.4 STK Application
Note: The submenus of this feature depends on the operator and different operators may provide
different services (some SIM cards do not support STK), which cannot be modified.
Please contact your operator.
5.9 Settings

32
You can configure your phone to best suit your usage preference. You can press the Navigation Key left
or right ◀/ ▶ to switch tabs to configure the following settings: System, Display, Sounds and
Connectivity.
5.9.1 System
This menu allows you to configure general settings:
Profiles: Select Personal, Car, Flight, Home, Meeting, Outdoor or Silent.
Languages: Set the display language of the phone.
Time & Date
Display time: Select On or Off. When you select On, the time information will be displayed in idle screen.
Set time: Set the time in the format HH:MM. If the time format is 12 hours, am or pm will display in the
screen, you can press the Navigation Key Up or Down ▲ and ▼to switch.
Set date: Set the date.
Time format: Set the time format as 24 hours or 12 hours.
Date format: Set the date format as YYYY/MM/DD, YYYY.MM.DD, DD.MM.YYYY, YYYY-MM-DD or
DD-MM-YYYY.
Power-on time: Set a time for the phone to be turned on. You can select On or Off. When you select On,
you need to enter the time you want your phone to be switched on.
Power-off time: Same as above.
Security

33
PIN protection: Select On or Off. When you select On, you need to enter the PIN code when you switch
on the phone. The default PIN code is network dependent on your service provider. Please contact your
service operator for the PIN information.
Safeguard: You can safeguard important information such as messages, phonebook, call list, or quick
call on your phone by activating this function. You can also change the safeguard password. The default
safeguard password is 1234.
Change password:
• Change PIN: Modify the PIN code.
• Change PIN2: Modify the PIN2 code.
• Change safeguard password.
Quick: Displays a list of shortcut features. You can edit a shortcut key.
Memory Status: You can check the memory status of Phonebook and Messages.
Auto keypad lock: You can set the time for keypad locking automatically.
Default Settings: Restore your phone settings to the default values.
5.9.2 Display
You can configure your phone with different display settings:
Wallpaper: Select a picture to be the wallpaper.
Screen saver: Select the screen saver image for your phone.
Dialing display: Select the font size, font color, and background color for the dialing display.

34
Backlight Level: Select backlight level. You can select the backlight level by pressing the Navigation
Key up or down ▲ or ▼. Press the OK Key or the Left Soft Key to confirm.
Backlight Duration: Select backlight duration from 60 seconds, 30 seconds and 15 seconds.
Keypad backlight: Select the keypad backlight, normal mode, custom mode, or night mode.
Greeting: Turn greeting On or Off. When you select On, you can edit the greeting message.
Network Provider: Select On or Off. When you select On, the network provider log will be displayed in
the idle screen.
5.9.3 Sounds
You can set your phone to operate with different sound profiles.
Alert Type: Select the alert type for the incoming call and a new SMS.
Ringtones: Select the ringtone for Contacts calls, Other calls, Alarm, Calendar, Messages and
Broadcast SMS.
Ring Volume: Select the volume level.
Key Sound: Select from off, Low, Medium and High.
Low Battery Alert: Turn warning On or Off.
5.9.4 Connectivity
Call Settings
The following submenus are available:
Auto answer: Turn Auto answer on/off. If on, the incoming call will be answered automatically.
35
Any key answer: Turn Any key answer on/off. When this function is on, you can answer incoming calls
by pressing any key, except the Hang-Up key, the Right Soft Key and the Left Soft Key.
Minute reminder: Select On or Off to activate or deactivate the minute reminder during a call.
Call services: The available options include:
Call time: Display the duration of your calls: Last call, Total incoming calls, Total outgoing calls and
Total calls.
Call waiting: Select Enable or Cancel, or check Status. This feature is network/ subscription
dependent. Contact your service provider for more details.
Own ID: Select Show ID or Hide ID or Set by network to determine if your phone number or identity
will be displayed when calling someone.
Caller ID: Select to check the setting of displaying the identity of the person calling you. This feature
is network/ subscription dependent. Contact your service provider for more details.
Cost settings: This feature is network/ subscription dependent.
Call divert: Select to divert incoming calls to your mailbox or to a number (whether in your contacts or
not). You can also cancel all divert settings by selecting Cancel all.
Call barring: Allows you to limit the use of your phone to specific calls. To activate call barring, you need
to enter a communication limit code. This barring code will then be sent to the network for validation.
Auto redial: You can set the auto redial option On or Off. When set to On and the party you wish to call is
not connected, you will be asked if you want to redial.

36
Message Settings
For more information, see “Messages > Message Settings”.
Network Settings
The network name will be displayed on the idle screen. If the phone is not able to identify the network
name, it will display the country code and the network code of the unknown network.
Select Network: This will vary according to the search mode you have selected. If you select Automatic,
the network will be searched automatically. If you select Manual, the search will start only when you
confirm to start searching.
Search Mode: Select Automatic or Manual.
Preferred Networks: The Preferred network list is stored in the SIM card. It specifies the priority by
which your phone will register to the available network during automatic registration.
5.10 Entertainment
Some of the features described here are dependent on the configuration of your phone, the country in
which you purchased your phone, and/or your service provider.
5.10.1 FM Radio
This menu is only available when headset is plugged in.
1. In idle mode, press the Left Soft Key to enter the main menu.
2. Select Entertainment > FM radio and then press the OK Key.

37
3. FM radio will display the station last time you set.
At the first time you use, we suggest you to press the Left Soft Key and select Search and save.
The keypad operations are as follows:
Key Description
The OK Key Open options menu.
◀ or ▶ Adjust station according to seek type.
▲ or ▼, or the Volume
Side Keys
Adjust volume. Once you have set the volume, the settings will be saved
until the next time you adjust it again.
Left Soft Key [Options] Open options menu.
Right Soft Key [Back] Return to previous menu.
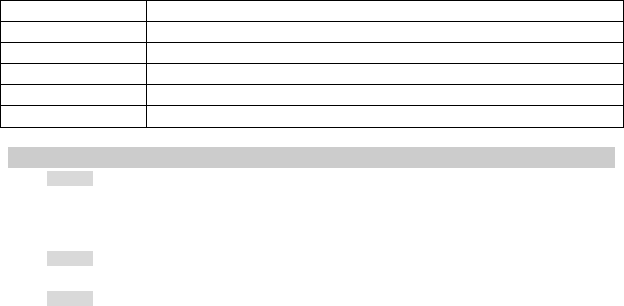
Press Left Soft Key to access following Options:
Options Descriptions
Seek type Fine tune or Preset station. When the fine tune is set, press ◀ or ▶ in FM
main menu will change the station by 0.1 every time. When the preset station
is set, press ◀ or ▶ in FM main menu will change the station between the
preset stations.
Preset station 30 stations for you to preset. You can delete, rename or replace a preset
station.
38
Enter station Enter the station for FM radio.
Minimize Minimize the FM radio screen.
Turn on speaker Speaker on.
Save Save the current station to the preset station.
Search and save Search the available stations and save them to the preset station.
Exit Exit the FM radio.
5.11 Call history
5.11.1 Call List
This menu provides you with a list of calls you have missed, answered and made. The calls include All
calls, Missed calls, Answered calls and Outgoing calls, which are displayed in chronological order with
the most recent call at the top of the list.
5.11.2 Clear History
This menu allows you to clear the call histories.
5.11.3 Call Timer
This menu allows you to view or clear the call timer history.

39
6. Precautions
Please carefully read and observe the terms below:
Safe power on
Do not use your cellular phone where it is forbidden to use or you might cause a disturbance or
danger.
Safe transportation first
Please observe all related local laws and regulations.
Please drive with both hands.
Safe transportation should be considered when driving.
Disturbance
All cellular phone performances may be disturbed.
Turn off when in the hospital
Please follow related limitations.
Please turn your cellular phone off when near a medical instrument.

40
Turn off on an airplane
Please follow related limitations.
Do not use your cellular phone on an airplane.
Turn off when at a gasoline station
Do not use your cellular phone at a filling station or around fuels or chemicals.
Turn off around exposure Area
Please observe related limitations and do not use your cellular phone near an area where
explosions can occur.
Proper use
As described in this manual, your cellular phone can be used only in a proper location.
If possible, please do not touch the antenna area of your phone.
Use qualified after sale service
Only a qualified technician can install or repair your cellular phone.

41
Accessories and batteries
Only use the authorized accessories and batteries and do not connect to incompatible
manufacturers or products.
Waterproof
Your cellular phone is not waterproof. Please keep it away from water.
Backup
Remember to make a backup or keep a written record of all important information saved in your
cellular phone.
Connect to other devices
Please read the user manual of the device to get more detailed security instructions before
connecting to other devices and do not connect to an incompatible product.
SOS emergency calls
Make sure your cellular phone is switched on and in a service area. In idle mode, input the SOS
number, then press the Dial Key. Advise where you are and do not hang up without
permission.

42
7. Troubleshooting
Common
issue
Reason Troubleshooting
Using cellular phone in an area where the
network connection is poor, such as around a
tower or basement where a radio wave cannot
be sent effectively.
Try to avoid.
Using cellular phone when network is busy,
such as an on-off duty time, line busy.
Try to avoid.
Bad
connection
Related to the distance of the send basis of the
network.
Ask your operator to provide a
map of your service area.
It is caused by network connection and it is a
regional problem.
Aftersound or
cacophony
Network connection is not good in some areas.
Hang up and redial the number.
Idle time
becomes
short
Idle time is related to network settings. If the cellular phone is in an
area where the network
connection is not good, please
temporarily shut off your phone.

43
Need to change battery. Insert a new battery.
When you cannot receive signals, your cellular
phone will continue to send to find a basis. A lot
of battery power is used, so as to limit idle time.
Please move to an area where
signal is strong or temporarily
turn off your phone.
Cannot
switch on
Battery is drained. Check battery volume or
charge battery.
SIM card is damaged. Contact your operator.
SIM card is not inserted properly. Make sure SIM card is inserted
properly.
Wrong SIM
card
Dirt on metal side of SIM card. Wipe metal point of SIM card
with a clean cloth.
SIM card is unusable Contact your operator.
Out of GSM service area. Request service area to
operator.
Cannot
connect to
network
Feeble signal. Please move to an area where
signal is stronger and try again.

44
Cannot call Activate call barring Cancel call barring
Wrong PIN
code
Entered the wrong PIN code three times. Contact your operator.
Battery or charger is damaged. Change battery or charger.
Charge in area where the temperature is lower
than 0℃ or higher than 40℃.
Change charging environment.
Cannot
charge
Bad connection Check the connection between
the phone and the charger.
Cannot add
contact
Contacts memory is full. Delete some contacts.
Cannot set
some
functions
Operator does not support the function or you
have not applied the function.
Contact your operator.

45
8. Safety Information and Notices
Using the Cellular Phone and Charger
Danger:
Only use the battery and charger approved by the manufacturer. Using other brands may cause battery
leakage, overheating, explosion or even fire.
Caution:
Keep the phone away from dust, water and damp areas. Dust, water or other liquids may cause
overheating, electrical leakage, and/or phone failure.
The phone, battery, charger and AC adapter are not waterproof. Keep them away from water and liquid.
Warning:
Do not bump, shake or tamper with the phone or charger. This may cause battery leakage, overheating,
explosion or even fire.
Do not place the battery, phone or charger near a microwave or high-voltage device. This may cause
battery leakage, overheating, explosion or even fire; also prevent the phone and AC adapter from
overheating, smoking or short circuiting.
Do not use the phone around volatile oil. This may cause fire, breakdown or damage.
To avoid any damage or breakdown, do not disassemble the phone, battery, charger or internal
components by yourself.

46
Using the Cellular Phone
Warning:
Do not use the phone while you are driving. Pull over and stop your automobile to dial or answer to a
phone call.
Usage of cellular phones in aircrafts or hospitals is prohibited. Turn the phone off to prevent interference
with electronic medical devices. Follow any rules or regulations in such places.
Do not use the phone at a gas station, near fuel or near chemicals.
Do not use the phone near electronic medical devices such as hearing aids, pacemakers and
auto-control devices such as fire detectors and automatic doors.
If you have to use your cellular phone near an electronic medical device such as a pacemaker, please
contact your manufacturer or dealer for information about preventing interference.
Caution:
Electronic systems in automobiles such as anti-lock brakes, speed control, or fuel spraying systems, are
usually not influenced by wireless devices. Manufacturers of these systems will tell you whether they are
provided with good screening functions. If you suspect that an automobile failure is caused by a wireless
wave, please contact your automobile dealer.
Avoid using your phone in crowded places.
Do not store your cellular phone near or with a credit card, disk or other magnetic materials. This may
effect information stored on your phone.

47
Keep your phone away from pins. Pins can be absorbed by the phone’s receiver magnet, which may
cause harm.
Using the Battery
Danger:
Do not dispose of the battery into a fire. Doing so may cause battery explosion or even fire.
If you have difficulties installing the battery, do not force the installation. This may cause battery leakage,
overheating, explosion or even fire.
Keep metal objects away so they do not come in contact with the battery or its connectors as it may
cause the battery to short circuit, overheat or explode.
Do not weld the polarities of the battery directly together. This may cause battery leakage, overheating,
explosion or even fire.
Battery liquid is severely harmful for your eyes. If battery liquid gets in your eyes, do not rub them.
Instead, wash your eyes with water first and then go directly to a doctor for help.
Do not use or store your phone in high temperature areas. This may cause battery leakage, overheating,
explosion or even fire.
Warning:
Replace the battery when the normal usage time begins to decrease or if you notice the battery is
overheated or has changed shape or color.
If battery liquid leaks onto your skin or clothes, immediately wash the affected parts with water.

48
If the battery begins to leak or emits a strange odor, properly dispose of the battery according to local
regulations. Do not throw it into a fire.
Caution:
Do not leave the product or its battery inside a vehicle or in places where the temperature may exceed
60°C (140°F), such as on a car dashboard, window sill, or behind a glass that is exposed to direct
sunlight or strong ultraviolet light for extended periods of time. This may damage the product, overheat
the battery, or pose a risk to the vehicle.
Using the Charger
Danger:
Only use the charger that came with the phone. Using a different charger may cause the phone to
breakdown or an explode.
If the charger short circuits, a fire may occur.
Do not use a damaged, worn or broken charger. This may cause a fire.
Clean dust away from the power socket to avoid the possibility of a fire.
Do not store the charger near any liquids. If liquids spill onto the charger it may cause it to overheat or
breakdown.
If liquid does spill onto the charger, immediately unplug the power cable to prevent overheating, fire or
another type of breakdown.
Do not use the charger in places with high humidity like a bathroom. This may cause a fire or other

49
breakdown.
Do not touch the charger, power cable or socket with wet hands. This may cause an electric shock.
Caution:
Keep the environment temperatures within the range of 0ºC ~40ºC while charging. Temperature below
0ºC or higher than 40ºC will cause insufficient charging, terminate charging or even cause the battery to
explode.
Unplug the charger from its power source before cleaning it.
Do not place heavy objects on the power cord. This may cause electric shock or fire.
Hold the plug while unplugging the power cord. This will avoid any potential damage or even fire.
Requirements for Cellular Phone
Avoid using your cellular phone in extremely high or low temperatures. Use the phone in a temperature
range between -10~55℃and humidity of 35%~85%.
It is recommended that you do not use your cellular phone near a telephone, radio or other radio
frequency sensitive devices.
Requirements for the Battery
When not in use, store the battery in a cool, well-ventilated place with sunshine.
If you will not be using the cellular phone for an extended period of time, charge the battery on a regular
basis to avoid battery breakdown.
The phone battery wears out fast. If charging the battery does not improve its performance, it is time to

50
replace the battery. Properly dispose of the battery according to local regulations. Do not throw it into a
fire.
Requirements for the Charger and AC Adapter
Do not charge your phone under the following circumstances: sunshine, temperatures equal to or lower
than 0ºC, temperatures equal to or higher than 40ºC, high humidity, dust, high vibration areas, or near a
TV, a radio, etc.
Specific Absorption Rate (SAR) information
Your phone has been designed to comply with applicable safety requirements for exposure to radio
waves. These requirements are based on scientific organizations through periodic and thorough
evaluation of scientific studies. These guidelines include safety margins designed to assure the safety of
all persons, regardless of age and health.
The radio wave exposure guidelines employ a unit of measurement known as the Specific Absorption
Rate, or SAR. Tests for SAR are conducted by using standardized method with the phone transmitting at
its highest certified power level in all used frequency bands.
Your phone are designed to meet the relevant guidelines for exposure to radio waves.
Cleaning and Maintenance
The cellular phone, the battery and the charger are not waterproof. Do not use them in places with high
humidity like a bathroom and also avoid spilling any liquids on them.
Use a soft cloth to clean the cellular phone, the battery and the charger.
51
Do not use alcohol, diluted liquid or benzene to clean the cellular phone.
If dust gets in the sockets the phone can be damaged, short-circuit or even the lose the ability to be
re-charged. Be sure to clean the socket regularly.
52
12 MONTH LIMITED WARRANTY
PERSONAL COMMUNICATIONS DEVICES (the Company) warrants to the original retail purchaser of
this PCD handheld portable cellular telephone, that should this product or any part thereof during normal
consumer usage and conditions, be proven defective in material or workmanship that results in product
failure within the first twelve (12) month period from the date of purchase, such defect(s) will be repaired
or replaced (with new or rebuilt parts) at the Company’s option, without charge for parts or labor directly
related to the defect(s).
The antenna, keypad, display, rechargeable battery and battery charger, if included, are similarly
warranted for twelve (12) months from date of purchase.
This Warranty extends only to consumers who purchase the product in the United States or Canada and
it is not transferable or assignable.
This Warranty does not apply to:
(a) Product subjected to abnormal use or conditions, accident, mishandling, neglect,
unauthorized alteration, misuse, improper installation or repair or improper storage;
(b) Product whose mechanical serial number or electronic serial number has been removed,
altered or defaced.
53
(c) Damage from exposure to moisture, humidity, excessive temperatures or extreme
environmental conditions;
(d) Damage resulting from connection to, or use of any accessory or other product not approved
or authorized by the Company;
(e) Defects in appearance, cosmetic, decorative or structural items such as framing and
non-operative parts;
(f) Product damaged from external causes such as fire, flooding, dirt, sand, weather conditions,
battery leakage, blown fuse, theft or improper usage of any electrical source.
The Company disclaims liability for removal or reinstallation of the product, for geographic coverage, for
inadequate signal reception by the antenna or for communications range or operation of the cellular
system as a whole.
When sending your wireless device to PERSONAL COMMUNICATIONS DEVICES for repair or service,
please note that any personal data or software stored on the device may be inadvertently erased or
altered. Therefore, we strongly recommend you make a back up copy of all data and software
contained on your device before submitting it for repair or service. This includes all contact lists,
downloads (i.e. third-party software applications, ringtones, games and graphics) and any other data
added to your device. In addition, if your wireless device utilizes a SIM or Multimedia card, please
remove the card before submitting the device and store for later use when your device is returned,
54
PERSONAL COMMUNICATIONS DEVICES is not responsible for and does not guarantee restoration of
any third-party software, personal information or memory data contained in, stored on, or integrated with
any wireless device, whether under warranty or not, returned to PERSONAL COMMUNICATIONS
DEVICES for repair or service.
To obtain repairs or replacement within the terms of this Warranty, the product should be delivered with
proof of Warranty coverage (e.g. dated bill of sale), the consumer’s return address, daytime phone
number and/or fax number and complete description of the problem, transportation prepaid, to the
Company at the address shown below or to the place of purchase for repair or replacement processing.
In addition, for reference to an authorized Warranty station in your area, you may telephone in the United
States (800) 229-1235, and in Canada (800) 465-9672 (in Ontario call 416-695-3060).
THE EXTENT OF THE COMPANY’S LIABILITY UNDER THIS WARRANTY IS LIMITED TO THE
REPAIR OR REPLACEMENT PROVIDED ABOVE AND, IN NO EVENT, SHALL THE COMPANY’S
LAIBILITY EXCEED THE PURCHASE PRICE PAID BY PURCHASER FOR THE PRODUCT.
ANY IMPLIED WARRANTIES, INCLUDING ANY IMPLIED WARRANTY OF MERCHANTABILITY OR
FITNESS FOR A PARTICULAR PURPOSE, SHALL BE LIMITED TO THE DURATION OF THIS
WRITTEN WARRANTY. ANY ACTION FOR BREACH OF ANY WARRANTY MUST BE BROUGHT
WITHIN A PERIOD OF 18 MONTHS FROM DATE OF ORIGINAL PURCHASE. IN NO CASE SHALL
THE COMPANY BE LIABLE FOR AN SPECIAL CONSEQUENTIAL OR INCIDENTAL DAMAGES FOR
BREACH OF THIS OR ANY OTHER WARRANTY, EXPRESS OR IMPLIED, WHATSOEVER. THE
COMPANY SHALL NOT BE LIABLE FOR THE DELAY IN RENDERING SERVICE UNDER THIS
55
WARRANTY OR LOSS OF USE DURING THE TIME THE PRODUCT IS BEING REPAIRED OR
REPLACED.
No person or representative is authorized to assume for the Company any liability other than expressed
herein in connection with the sale of this product.
Some states or provinces do not allow limitations on how long an implied warranty lasts or the exclusion
or limitation of incidental or consequential damage so the above limitation or exclusions may not apply to
you. This Warranty gives you specific legal rights, and you may also have other rights, which vary from
state to state or province to province.
Any Changes or modifications not expressly approved by the party responsible for compliance could
void the user's authority to operate the equipment.
This device complies with part 15 of the FCC Rules. Operation is subject to the following two
conditions: (1) This device may not cause harmful interference, and (2) this device must accept
any interference received, including interference that may cause undesired operation.
SAR Information
56
The SAR limit of USA (FCC) is 1.6W/kg Averaged over one gram of tissue. Device types C3000C (FCC
ID : T38UT3000C) has also been tested against this SAR limit. This device was tested for typical
body-worn operations with the back of the handset kept 1.5cm from the body. To maintain compliance
with FCC RF exposure requirements, use accessories that maintain a 1.5cm separation distance
between the user’s body and the back of the handset. The use of belt clips, holsters and similar
accessories should not contain metallic components in its assembly. The use of accessories that do not
satisfy these requirements may not comply with FCC RF exposure requirements, and should be avoided.
Specific Absorption Rate Data
This Model wireless phone meets the government’s requirements for exposure to radio waves.
Your Mobile phone is a radio transmitter and receiver. It is designed and manufactured to exceed limits
for exposure to radio frequency (RF) energy set by the Federal Communication Commission (FCC) of the
U.S Government. These limits are part of comprehensive guidelines and establish permitted levels of RF
energy for the general population. The guidelines are based on standards that were developed by
independent scientific organizations through periodic and thorough evaluation of scientific studies. The
standards include a substantial safety margin designed to assure the safety of all persons regardless of
age or health.
The exposure standard for wireless mobile phones employs a unit of measurement known as the Specific
Absorption Rate, or SAR, The SAR limit set by the FCC is 1.6 W/Kg. Tests for SAR are conducted
using standard operating positions accepted by the FCC with the phone transmitting at its highest
57
certified power level in all tested frequency bands. Although the SAR is determined at the highest
certified power level, the actual SAR level of the phone while operating can be well below the maximum
value. This is because the phone is designed to operate at multiple power levels so as to use only the
power required to reach the network. In general, the closer you are to a wireless base station, the lower
the power output.
Before a phone model is available for sale to the public in the U.S, it must be tested and certified to the
FCC that it does not exceed the limit establish for safe exposure. The tests are performed in positions
and locations (e.g, at the ear and worn on the body) reported to the FCC.
While there may be differences between the SAR levels of various phones and at various positions, they
all meet the governmental requirements for safe exposure. Please note that improvements to this
product model could cause differences in the SAR value for later products, in all cases, products are
designed to be within the guidelines.
Additional information on Specific Absorption Rates (SAR) can be found on the Cellular
Telecommunications & Internet Association (CTIA) Web site:
http://www.phonefacts.net
In the United States and Canada, the SAR limit for mobile phones used by the public is 1.6 W/Kg
averaged over one gram of tissue. The standard incorporates a substantial margin of safety to give
additional protection for the public and to account for any variations in measurements.
Software Copyright Notice
58
The software products described in this manual may include copyrighted and third-party software stored
in semiconductor memories or other media. Laws in the United States and other countries preserve for
manufacturer and third party software providers certain exclusive rights for copyrighted software, such as
the exclusive rights to distribute or reproduce the copyrighted software. Accordingly, any copyrighted
software contained in the product may not be modified, reverse engineered, distributed, or reproduced in
any manner to the extent allowed by law. Furthermore, the purchase of the product shall not be deemed
to grant either directly or by implication estoppels, or otherwise, any license under the copyrights, patents
or patent applications or any third-party software provider, except for the normal, non-exclusive
royalty-free license to use that arises by operation of law in the sale of a product.
Safety and General information
This section contains important information on safe and efficient operation of your mobile phone. Read
this information before using your mobile phone.
Exposure To Radio Frequency (RF) Energy
Your mobile phone contains a transmitter as receiver. When it is ON, it receives and transmits RF energy.
When you communicate with your mobile phone, the system handling your call controls the power level at
which your mobile phone transmits.
Your mobile phone is designed to comply with local regulatory requirements in your country concerning
exposure of human beings to RF energy.
Operational Precautions
59
For optimal mobile phone performance and to be sure that human exposure to RF energy does not
exceed the guidelines set forth in the relevant standard, always follow these instructions and precautions.
Product Operation
When placing or receiving a phone call, hold your mobile phone just like you would a landline phone.
If you wear the mobile phone on your body, always place the mobile phone in a manufactured-supplied or
approved clip, holder, holster, case or body harness. If you do no use a body-worn accessory supplied or
approved by the manufacturer, keep the mobile phone and its antenna at least 1.5 centimeters from your
body when transmitting.
When using any data feature of the mobile phone, with or without an accessory cable, position the mobile
phone and its antenna at least 1.5 centimeters from your body.
Using accessories not supplied or approved by the manufacturer may cause your mobile phone to
exceed RF energy exposure guidelines.
RF Energy Interference/Compatibility
Nearly every electronic device is subject to RF energy interference from external sources if inadequately
shielded, designed, or otherwise configured for RF energy compatibility. In some circumstances your
mobile phone may cause interference with other devices.
60
This device complies with part 15 of the FCC Rules. Operation is subject to the following two conditions:
(1) this device may not cause harmful interference,
and (2) this device must accept any interference received, including interference that may cause
undesired operation.
IN USA: PERSONAL COMMUNICATIONS DEVICES
555 Wireless Blvd.
Hauppauge, NY 11788
(800) 229-1235
IN CANADA: PCD COMMUNICATIONS CANADA LTD.
5535 Eglinton Avenue West
Suite# 234
Toronto, ON M9C 5K5
(800) 465-9672 Ref: 340000413000C_C_105