CertainTeed Gypsum 21000 Automated drywall corner system. User Manual
Structus Building Technologies, Incorporated Automated drywall corner system. Users Manual
Users Manual
User Manual
Safety Guidelines
This manual contains information that is very important to know and understand. This
information is provided for SAFETY and to PREVENT EQUIPMENT PROBLEMS. To help
recognize this information, observe the following symbols.
Indicates an imminently hazardous situation
which, if not avoided, WILL RESULT in death or
serious injury.
Indicates a potentially hazardous situation,
which if not avoided, COULD RESULT in death
or serious injury.
Indicates a potentially hazardous situation!
If not avoided, MAY RESULT in minor or
moderate injury. It may also be used to alert
against unsafe practices.
DANGER
WARNING
CAUTION
NOTICE
Indicates important information , that if not
followed, may cause damage to machine.
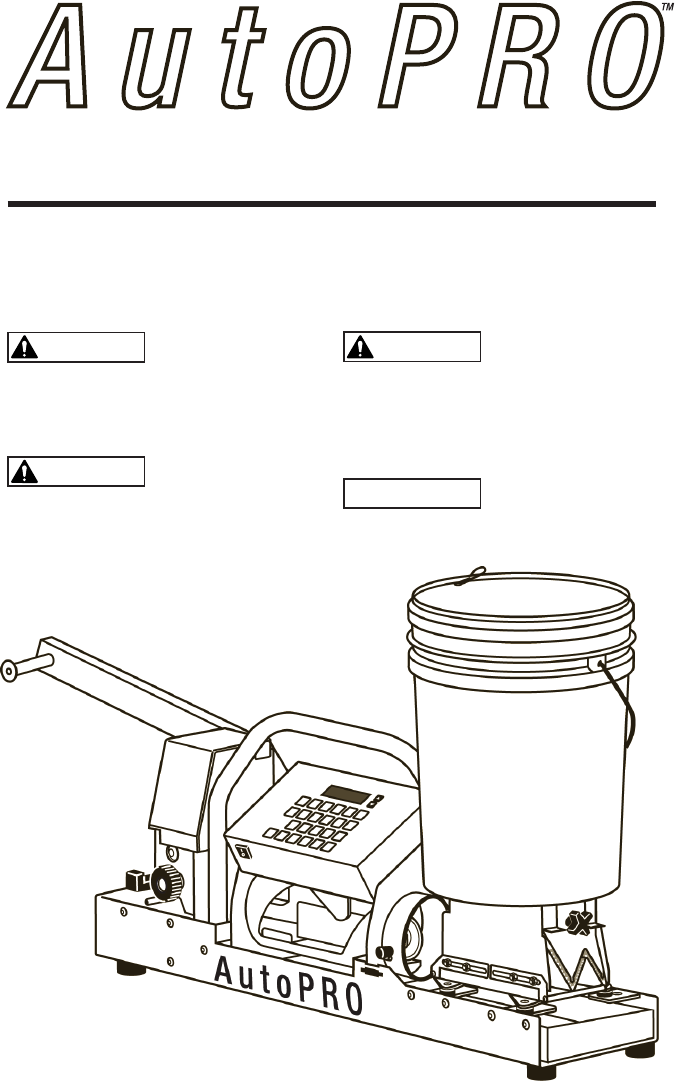
Automated Drywall
Corner Trim System
2. AutoPRO User Manual
Safety Guidelines
General Safety and Warnings for AutoPRO
machine operation
Read manual carefully. Be thoroughly familiar with
the controls and the proper use of the machine.
Follow all local electrical and safety codes, as well
as the U.S.A., National Electrical Codes (NEC) and
Occupational Safety and Health Act (OSHA). Only
persons well acquainted with these rules should be
allowed to use the machine.
Wear safety glasses and approved hearing
protection when operating the machine.
Operate machine on dry, level surface. DO NOT lay
machine on side.
Turn off machine when not in use.
Do not operate machine if it is wet.
Use only well-maintained equipment. Repair or
replace damaged parts at once. Maintain unit
according to this manual.
Keep all panels and covers securely in place.
All visitors (especially children) should be kept at a
safe distance from the machine.
DO NOT use setting-type compounds in AutoPRO as
they will damage the machine.
Structus recommends ready-mix All-Purpose joint
compound ONLY for use in the AUTOPRO machine
when running corners.
DO NOT modify this machine with non-Structus
products, as modification could affect performance,
safety or durability. In addition, damage or
performance problems resulting from modification
may not be covered under warranty. AUTOPRO is
engineered to be used with the LevellinePRO roll
product ONLY.
AutoPRO is engineered to be used with the
LevellinePRO roll product ONLY.
DO NOT store the AutoPRO machine in temperatures
below 32˚ F.
Do not use a grounding adapter with this machine!
Improper use of grounding plug can result in a
possible risk of electric shock!
All wiring and electrical connections should be
performed by a qualified electrician. Installation
must be in accordance with local codes and national
electrical codes.
Motors, electrical equipment and controls can cause
electrical arcs that will ignite a flammable gas or
vapor. Never operate or repair in or near a flammable
gas or vapor. Never store flammable liquids or gases
in the vicinity of the compressor.
Do not wear loose fitting clothing while operating
machine. Keep hands and loose fitting clothing away
from moving parts.
Do Not attempt to move AutoPRO with Hopper
Assembly in place. To move or transport
AutoPRO, remove Hopper Assembly.
CAUTION
NOTICE
WARNING
DANGER
CAUTION
NOTICE
WARNING
DANGER
CAUTION
NOTICE
WARNING
DANGER
CAUTION
NOTICE
WARNING
DANGER
CAUTION
NOTICE
WARNING
DANGER
CAUTION
NOTICE
WARNING
DANGER
CAUTION
NOTICE
WARNING
DANGER
CAUTION
NOTICE
WARNING
DANGER
CAUTION
NOTICE
WARNING
DANGER
CAUTION
NOTICE
WARNING
DANGER
CAUTION
NOTICE
WARNING
DANGER
CAUTION
NOTICE
WARNING
DANGER
CAUTION
NOTICE
WARNING
DANGER
CAUTION
NOTICE
WARNING
DANGER
CAUTION
NOTICE
WARNING
DANGER
AutoPRO User Manual 3.
FCC statement:
Note: This equipment has been tested and found to comply with the limits for a Class B digital
device, pursuant to part 15 of the FCC Rules. These limits are designed to provide reasonable
protection against harmful interference in a residential installation. This equipment generates,
uses and can radiate radio frequency energy and, if not installed and used in accordance with
the instructions, may cause harmful interference to radio communications. However, there
is no guarantee that interference will not occur in a particular installation. If this equipment
does cause harmful interference to radio or television reception, which can be determined by
turning the equipment off and on, the user is encouraged to try to correct the interference by
one or more of the following measures:
• Reorient or relocate the receiving antenna.
• Increase the separation between the equipment and receiver.
• Connect the equipment into an outlet on a circuit different from that to which the receiver is
connected.
• Consult the dealer or an experienced radio/TV technician for help.
Changes or modifications not expressly approved by Structus Building Technologies, Inc.
could void the user’s authority to operate the equipment.
Industry Canada notice:
This device complies with Industry Canada licence-exempt RSS standard(s). Operation is
subject to the following two conditions: (1) this device may not cause interference, and (2)
this device must accept any interference, including interference that may cause undesired
operation of the device.
Le présent appareil est conforme aux CNR d’Industrie Canada applicables aux appareils
radio exempts de licence. L’exploitation est autorisée aux deux conditions suivantes : (1)
l’appareil ne doit pas produire de brouillage, et (2) l’utilisateur de l’appareil doit accepter tout
brouillage radioélectrique subi, même si le brouillage est susceptible d’en compromettre le
fonctionnement.
FOREWORD
Welcome to the growing number of drywall contractors who are using the AutoPRO Automated
Drywall Corner Trim System. We are proud of the innovative engineering and quality construction
of each AutoPRO machine that we build.
This instruction manual explains the operation of the AutoPRO system. Please read it thoroughly
and follow the instructions carefully.
All information and specifications in this manual are current at the time of printing. However,
because of our commitment to continual product improvement, we reserve the right to make
changes at any time without notice.
For questions and further information, please contact us:
1-888-662-6281
www.levelline.com
For additional downloadable copies of this manual, visit
www.levelline.com or call 1-888-662-6281.
4. AutoPRO User Manual
IMPORTANT INFORMATION BEFORE USING AutoPRO
Recommended Compounds
Structus recommends ready-mix All-Purpose joint compound thinned with water ONLY for use in
the AutoPRO machine when running corners.
Modification of AutoPRO
DO NOT modify this machine with non-Structus products, as modification could affect
performance, safety or durability. In addition, damage or performance problems resulting from
modification may not be covered under warranty. AutoPRO is engineered to be used with the
LevelinePRO roll product ONLY.
Using Roll Product in the Machine
AutoPRO is engineered to be used with the LevellinePRO roll product ONLY.
Moving AutoPRO
If the AutoPRO hopper is full of joint compound, Structus recommends removing the hopper
assembly before maneuvering the AutoPRO machine.
Storing AutoPRO
DO NOT store the AutoPRO machine in temperatures below 32˚ F.
Do NOT operate machine if it is wet.
AutoPRO User Manual 5.

6. AutoPRO User Manual
TABLE OF CONTENTS
Page
2 Safety Guidelines
3 FCC Statement
4 Foreward
5 Important Information
7 Primary Machine Components
8 Operation of Machine
8, 9 Components Overview
10, 11 Loading LevellinePRO
12 Mounting and Securing Machine
12 Setting for Inside or Outside Corner Trim
12 Language
13 Calibration
14 Remote Control Setup
14 Entering Data
14 Viewing Data
15 Editing Data
15 Deleting Data
15 Storing/Recalling Data
15 Running Corners
16 Pulling corners out of machine
16 Exit “Run Mode”
16 End of Roll
17 Adjusting Hopper Gates
17 Using Stand-Alone Hopper
18 Cleaning and Storing
18 Cleaning the AutoPro
18 Storing the Hopper
18 Troubleshooting
21 Specifications
AutoPRO User Manual 7.
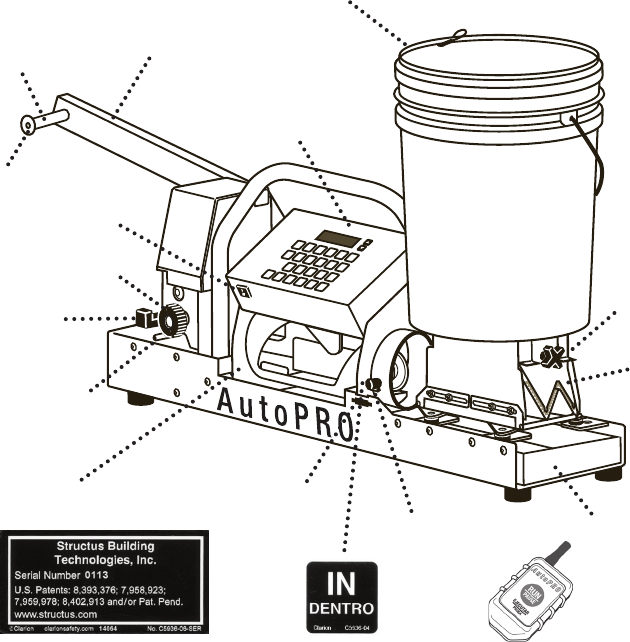
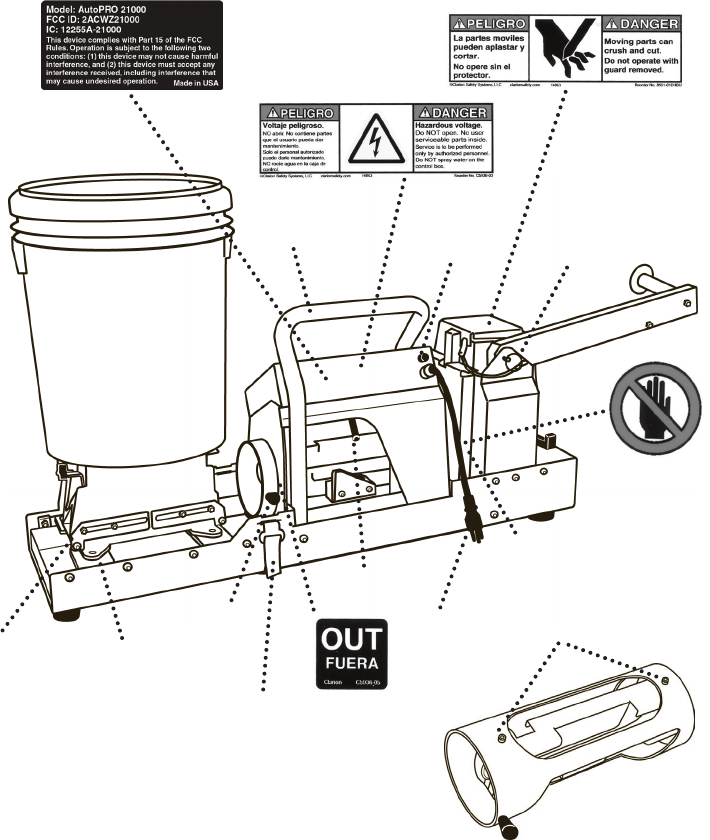
Primary machine
components
CAUTION
NOTICE
WARNING
DANGER
Spindle Arm
Release Pin
Folded
Spindle Arm
Tapered
Feet
Hopper
Assembly Carrying
Handle
Carrying
Handle
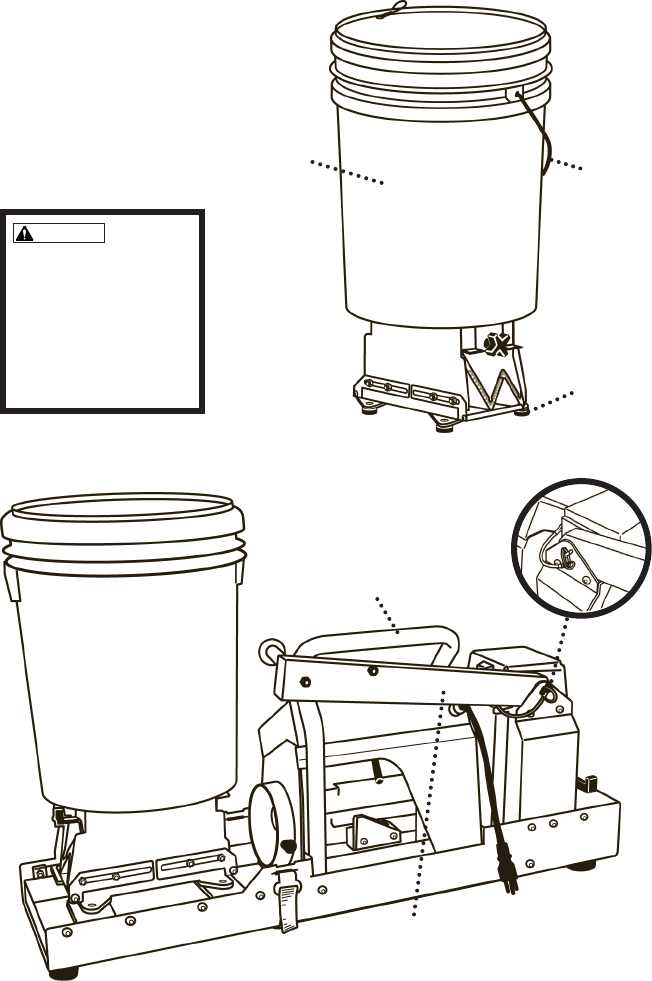
Do Not attempt to move
AutoPRO with Hopper
Assembly in place.
To move or transport
AutoPRO, remove Hopper
Assembly.
8. AutoPRO User Manual
OPERATION OF MACHINE - Machine components
Machine
Serial Number Mud Pan
Spindle
Cap
Feed Release
Lever
Hopper Gate
Adjustment
Knob
Hopper
Gates
Feed Knob
Spindle Arm
Spindle
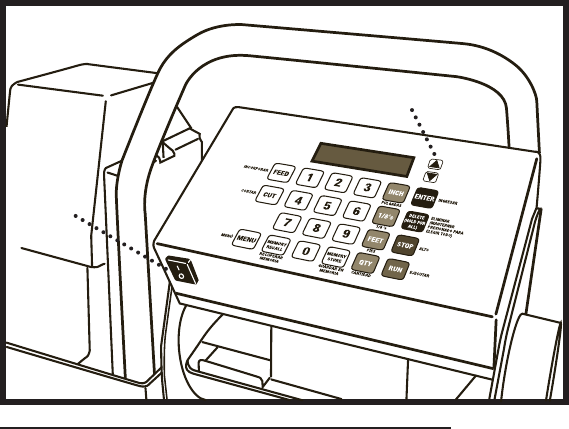
Remote Control
On/Off
Switch
5 Gallon
Hopper with
attached lid
Control Panel
Inside Corner
Setting
Security Strap
Anchor Slot Folder Handle
Guides
AutoPRO User Manual 9.
Hopper
Supports
Outside Corner
Setting
Cutting Blade
Assembly
Security
Strap
Antenna
Spindle Arm
Release Pin
Fuse
Carrying Handle
Folder Handle
Tapered Feet
110 Volt Plug
Folder
Guide
Screws
10. AutoPRO User Manual
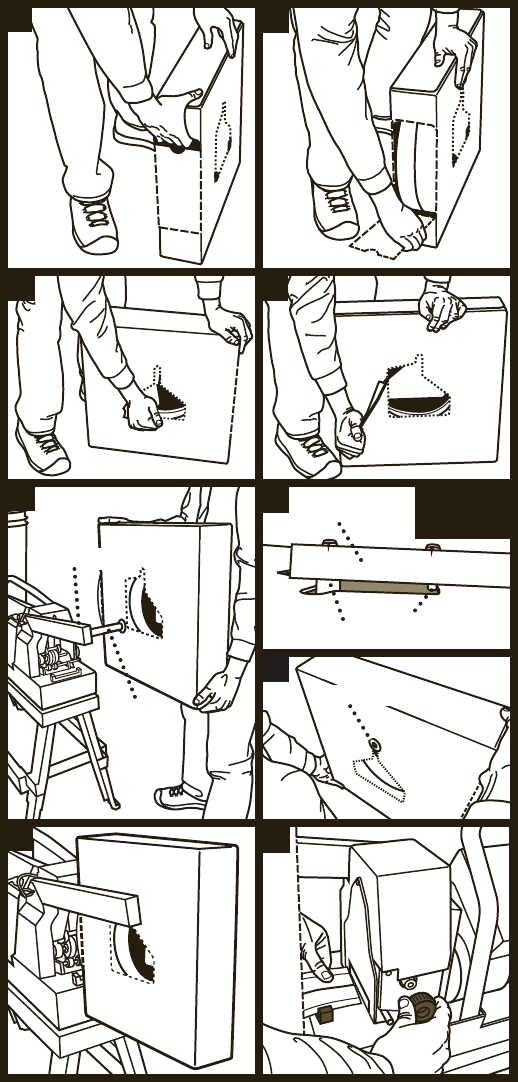
5.
1. 2.
3. 3.
4.
6.
8.
7.
Spindle Arm
Corner Pin
Spindle
Spindle Arm Top View
Spindle Spindle Cap
To load LevellinePro into the AutoPro machine:
1. Push in perforated section above finger hole.
2. Tear out perforated large end panel and remove.
3. Using finger holes, remove perforated panels on both sides of the box.
4. Lift box with perforated end panel facing machine, and mount over
spindle.
5. Box should fit snugly against spindle arm, resting on the spindle and
corner pin (as shown in #7).
6. On opposite box side, make sure box sits on spindle and is secured in
place by spindle cap.
8. Pull end of LevellinePro out of box between guides.
9. Feed LevellinePro through open slot into feed rollers using the feed
knob. Make sure center groove in product lines up with centering roller.
Turn feed knob until product stops against inside cutter blade.
10. To remove or adjust position of LevellinePro, push down on feed
release lever.
AutoPRO User Manual 11.
Carrying the
LevellinePRO
Box
9.
10.
Guide
Feed Rollers
Feed Knob
Feed Release
Lever
Centering
Roller
Mounting and securing the AutoPRO
WARNING - A fully loaded AutoPRO weighs over 150 lbs - DO NOT
operate or load the AutoPRO with product or joint compound without
securing it firmly to a stable bench, cart or platform with the supplied
strap. Make sure the bench, cart, or platform is rated for this load.
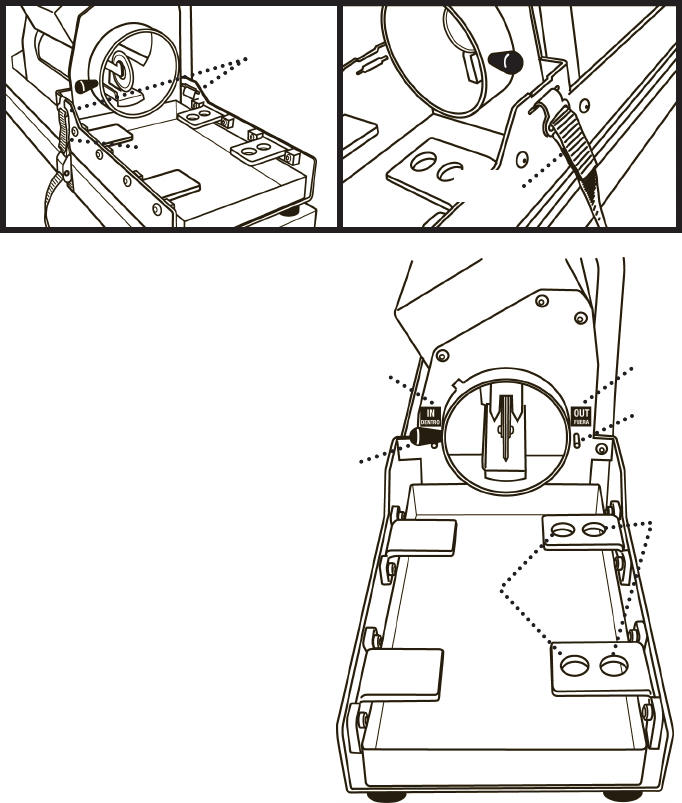
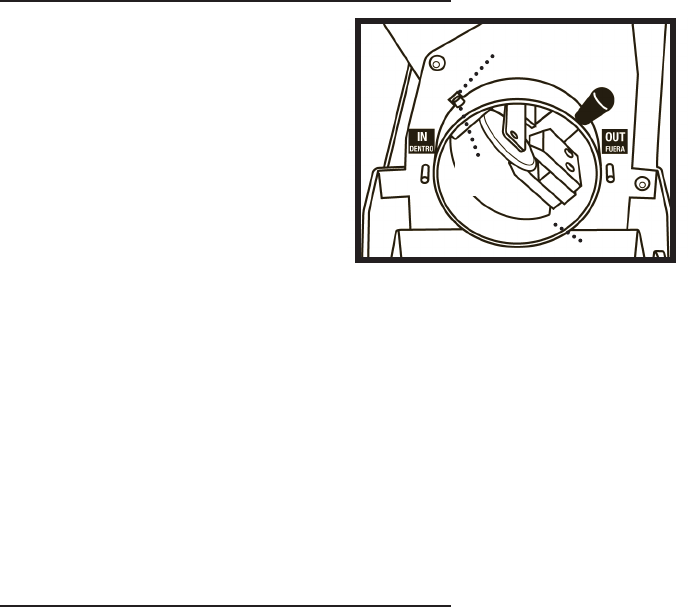
Setting for outside or inside corner
For an outside corner:
1. Rotate the folder handle away
from you until the folder handle
rests against the stop pin in the
OUT position.
2. Locate the hopper with the
tapered feet in the far set of
locating holes.
For an inside corner:
1. Rotate the folder handle toward
you until the folder handle rests
against the stop pin in the IN
position.
2. Locate the hopper with the
tapered feet in the near set of
locating holes.
Language
To set the language of the display to English or Spanish:
1. Press MENU and select “2 - English/Español”.
2. Select language.
12. AutoPRO User Manual
Inside
Corner
Position
Outside
Corner
Position
Folder
Handle
Inside
Corner
Holes
Outside
Corner
Holes
Security Strap
Anchor Slots
Security
Strap
Security
Strap
Stop Pin
AutoPRO User Manual 13.
CALIBRATION
The AutoPRO is calibrated at the factory but may require periodic
calibration.
To calibrate the AutoPRO:
1. Make certain the product is loaded properly and the product box is
touching the end of the AutoPRO.
2. Remove the hopper (calibration may be performed with hopper in
place if it is empty, clean, and in the “outside corner” position).
3. Set the folder to “outside corner” position.
4. Press MENU and select “1- Calibration”.
5. Press RUN to begin calibration. The AutoPRO will run one short corner.
6. Pull the short corner out of the AutoPRO and discard.
7. Press RUN to dispense the calibration corner.
8. Measure the corner with a tape measure to the nearest 1/16th inch.
9. Enter the measurement, using the 1/8’s button for 1/16ths, and press
ENTER.
For example, if the calibration corner measures 120 12/16 inches, enter:
a. “120”…….”IN”
b. “12”……...”1/8’s”
c. Press ENTER to calibrate.
10. Press MENU to exit. The AutoPRO is now calibrated. (Confirm
calibration by measuring next output corner.)
Outside
Corner
Position
Outside
Corner
Holes
On/Off
Switch
Scroll Arrows

Remote setup
The remote supplied with the AutoPRO is already
setup at the factory - follow these steps to setup
an additional remote.
1. Press MENU and select “2 - Learn Remotes”.
2. Press the remote button while the 10-second
timer counts down.
3. After 10 seconds the screen will change to the
“Test Remotes” screen.
4. While in the “Test Remotes” screen verify that the OFF changes to ON
when the remote button is pressed.
5. Press MENU to exit.
ENTERING DATA
Entering corner measurements and quantities:
Note: Minimum corner length is 28”.
1. Begin by entering numeric length and the unit of measure.
For example, two corners measuring 6 feet, 3 5/8 inches would be
entered as:
”6”…………... “FT”
“3”…………...“IN”
“5”……….…..“1/8’s”
“2”……………“QTY” (NOTE: if quantity step is skipped, the quantity
defaults to 1)
2. Check the display on the AutoPRO to be sure that it displays the
corner data correctly. If you make a mistake at any time while entering
measurements and quantities, you can override the data by re-entering it
correctly.
3. Press ENTER to store this line in the list and advance to the next
corner entry line.
4. Continue entering corners in this manner until you have entered all the
corners that you would like to run in one batch.
Viewing data
1. Press the “^” scroll arrow (up) to scroll upwards in the list.
2. Press the “v” scroll arrow (down) to scroll downward in the list.
14. AutoPRO User Manual

AutoPRO User Manual 15.
Editing data
1. To edit an entry, use the scroll arrows until the asterisk “*” is next to
the line you want to edit.
2. Retype the measurement that you need to change (FT, IN, 1/8’s, or
QTY).
3. When you are done editing, press ENTER so that the AutoPRO keeps
your changes.
Deleting data
Deleting all data:
1. To delete all of your entered corner data in the current list, press and
hold DELETE HOLD FOR ALL.
2. Press ENTER to confirm that you want to delete all.
Deleting one line:
1. Scroll through the lines of data until the entry you need to delete is on
the third line of the display.
2. Press DELETE.
Storing/recalling data
The AutoPRO can store lists of corners in Memory Store so that they can
easily be recalled. The AutoPRO can store up to ten lists at a time.
1. Enter your measurements, one after the other, as described above,
until your list is complete.
2. Press MEMORY STORE and a corresponding memory number (i.e.
“MEMORY 1”).
3. When you are ready to reuse the list, simply press MEMORY RECALL
and the corresponding memory button.
4. If a Memory button is full of data and you wish to override the data
with new information, enter your new measurements and quantities,
press MEMORY STORE and a corresponding memory number. This will
override the previous list.
RUNNING CORNERS
Enter “run mode”:
1. Make certain the product is loaded properly and the product box is
touching the end of the AutoPRO.
2. Make certain the folder and hopper are both set for the desired corner
(inside or outside).
3. Press RUN or the remote button to enter “run mode” and dispense the
first corner on the list.
4. To pause the corner output, press STOP or the remote button during
output - press RUN or the remote button to resume.
5. Press RUN or the remote button to dispense the next corner on the list.
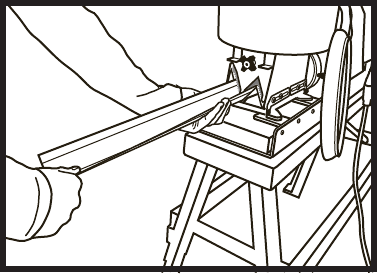
Pulling corners out of the AutoPRO
1. Support the corner as it comes out of the AutoPRO. Wait to pull out the
product until you hear the AutoPRO
cut the corner - if you pull the
corner before the cutter fires, it
may cause length errors.
2. After the AutoPRO cuts the
corner, be certain to pull the corner
from the AutoPRO smoothly and
at a consistent speed to ensure
optimal joint compound coverage
on the corner. Pulling the corner
out too rapidly may result in gaps
in joint compound coverage.
Exit “run mode”
1. Press STOP to exit “run mode” in order to edit the corner data, edit the
list, recall a stored list, etc.
End of roll
In the event that the end of a roll is reached while dispensing a corner
the AutoPRO will stop dispensing and not cut.
1. Remove the current corner from the AutoPRO. DO NOT PRESS CUT
BEFORE REMOVING THE CORNER - pressing cut before removing the
corner may cause a small piece of product to remain in the cutter which
may jam the AutoPRO.
2. Press CUT to reset the AutoPRO.
3. Load a new roll of product, making certain that the product stops
against the cutter blade (to ensure proper corner length).
4. Press RUN to repeat the corner or press ENTER to skip to the next
corner.
16. AutoPRO User Manual
AutoPRO User Manual 17.
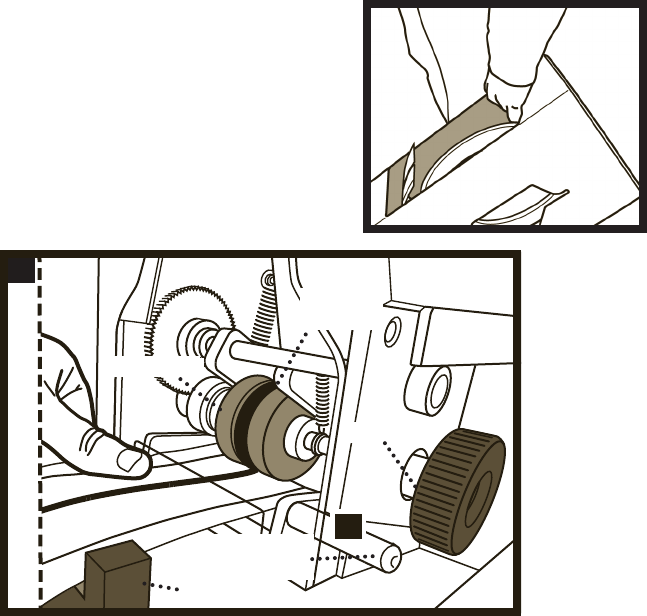
Adjusting hopper gates
Adjust the hopper gates to reduce
leakage while ensuring sufficient
coverage. If the gates are too tight
the product may jam in the AutoPRO.
1. Adjust gate by loosening knob and
sliding the gate up or down. Tighten
the knob once the gate is in position.
2. As the viscosity of your joint
compound may vary from bucket to
bucket, you may need to adjust the
hopper gates periodically to get the desired coverage.
3. If you are getting coverage inconsistency, check your joint compound
thickness and add water as needed.
INSTALLATION TIPS
Use a roller tool for best results.
Use a roller to achieve the best
installation results, prevent high-
siding, achieve an even taper on both
sides of the corner and get a straight
corner edge.
To use: install mudded side of
LevellinePRO to corner. Place a roller
over corner and roll with consistent,
smooth pressure.
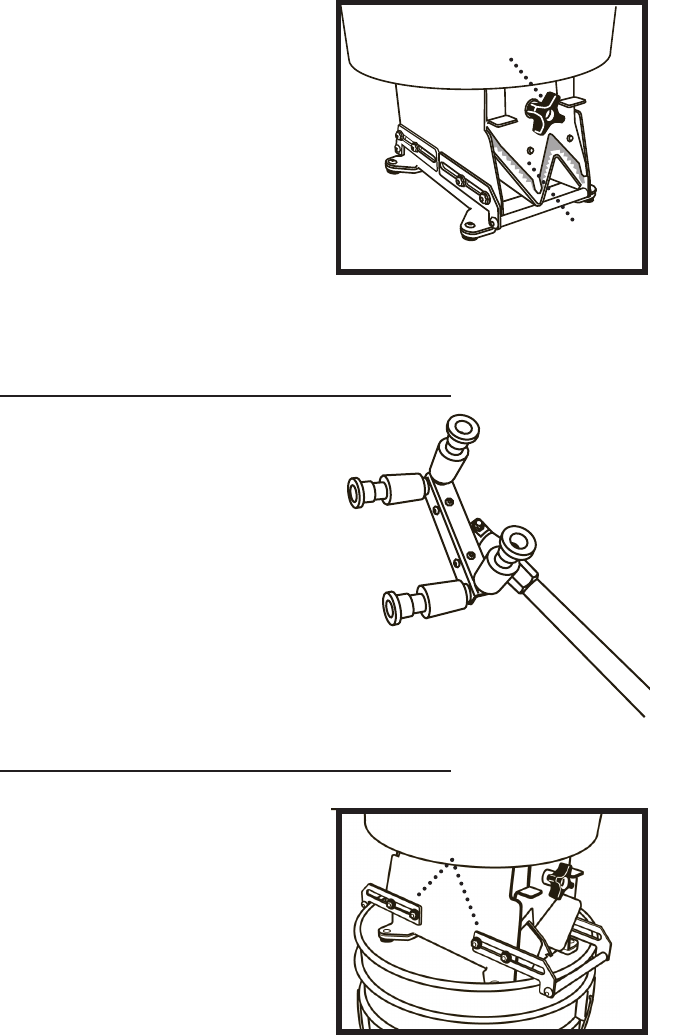
USING STAND-ALONE HOPPER
The AutoPRO hopper can be used
separately from the AutoPRO
machine to apply joint compound to
other corner products.
1. Remove the hopper from the
machine.
2. Extend both hopper supports.
3. Place the hopper on to a 5-gallon
Hopper Gate
Adjustment Knob
Hopper
Gates
Hopper Supports
Extended
bucket, making certain the hopper supports are fully extended and
hooked over the edge of the bucket.
4. Push the corner through the inlet gate of the hopper.
CLEANING AND STORING
Cleaning the AutoPRO
WARNING - DO NOT IMMERSE OR
SPRAY-DOWN THE AUTOPRO CUTTER,
ELECTRONICS, OR WIRING.
1. Unplug the AutoPRO before cleaning.
2. Wipe down the AutoPRO with
a damp sponge, removing joint
compound from all surfaces.
3. If necessary, remove and rinse off
the mud pan. Don’t forget to replace the mud pan when finished.
4. If necessary, remove and rinse off the folder by rotating the folder until
the screws line up with the notch in the frame. Don’t forget to replace
the folder when finished.
Storing the hopper
To reduce the amount of cleaning each day the hopper can be stored
overnight, with or without joint compound.
1. Place lid on top of hopper.
2. Place hopper in to a clean 5-gallon bucket filled with 5” of water.
TROUBLESHOOTING
Issue: display is blank.
Check the following:
1. The AutoPRO is unplugged.
Solution: plug the AutoPRO in to 110 volt grounded outlet.
2. The AutoPRO is turned off.
Solution: turn on the AutoPRO machine.
3. The AutoPRO fuse is blown.
Solution: replace the fuse with a 5x20 mm, 6.3A, 250V, slow-blow fuse.
4. The cooling fan is running but the display is blank.
Solution: The AutoPRO has power but the display may be defective - call
Customer Service at 1-888-662-6281.
18. AutoPRO User Manual
Frame
Notch
Folder
Guide
Screws
AutoPRO User Manual 19.
Issue: unable to edit data.
Check the following:
1. AutoPRO is in “run mode”.
Solution: press stop to exit “run mode”.
Issue: display reads “FEED ERROR”
Check the following:
1. The product is not loaded correctly.
Solution: Make certain the product is loaded correctly and the center
groove in the product lines up with the centering roller.
2. The product is jammed in the AutoPRO.
Solution: inspect the cutter, folder, and hopper for product jam.
Solution: make certain the folder and hopper are in the proper setting
(both set for inside or outside corner).
Solution: make certain the hopper is positioned correctly, with the inlet
facing the folder exit.
3. The hopper gates are too tight.
Solution: open the hopper gates slightly.
4. The joint compound has hardened or is too thick.
Solution: Make certain the joint compound is not hardened in the hopper
or gates and/or replace the joint compound with a thinner mixture.
Issue: display reads “BLADE ERROR”.
Check the following:
1. Cutter blade is up. The cutter blade must be down before a measured
corner will run - this is to make certain the product is starting at the
blade so the proper length can be measured.
Solution: press FEED as necessary to advance the current corner until It
clears the hopper then press CUT to lower the cutter blade.
Issue: display reads “END OF ROLL”.
Check the following:
1. Box is empty.
Solution: see “End of roll” in the “RUNNING CORNERS” section.
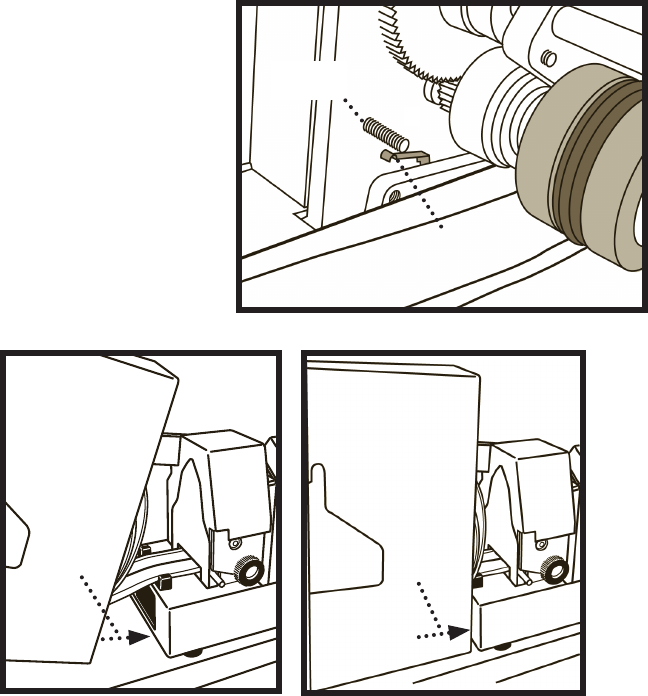
2. Product sensor is out of adjustment.
Solution: make certain the lever of the product sensor does not contact
the activating screw when product is loaded.
Issue: display reads “PRODUCT ERROR”.
Check the following:
1. Box is loaded incorrectly.
Solution: make certain the box is loaded correctly on the spindle arm and
the box is tight against the rear of the machine.
Issue: outside corner is greater than 90°.
Check the following:
1. Folder blocks are worn.
Solution: the folder blocks are symmetric and can be swapped side-
to-side to extend the life. Replace the folder blocks if both sides of the
folder blocks are worn.
20. AutoPRO User Manual
Make certain the lever
of the product sensor
does not contact the
activating screw when
product is loaded.
Box Loaded
INCORRECTLY
Box Loaded
CORRECTLY
Gap
between
box and
Machine
Box tight
against
Machine
Product
Sensor
Activating
Screw

AutoPRO User Manual 21.
Issue: Inconsistent joint compound coverage.
Check the following:
1. Hopper is low/empty.
Solution: add joint compound to hopper.
2. Joint compound is too thick.
Solution: add water to the joint compound.
AutoPRO SPECIFICATIONS:
Dimensions:
Width: 9” (12” with hopper)
Length: 36” (56” with product loaded)
Height: 16” (26” with hopper)
Weight:
Dry weight: 43 lbs.
Full weight: 160 lbs.
LevellinePRO box weight: 17 lbs.
Power: 110 volt
Fuse: 5x20 mm, 6.3A, 250V, slow-blow

1-888-662-6281
info@structus.com
©2014 Structus Building Technologies, Inc. Part No. 21041-B
For additional downloadable copies of this manual,
visit www.levelline.com or call 1-888-662-6281.
®
Manufactured and distributed by Structus Building Technologies, Inc. MADE IN U.S.A. This
product is protected by one or more of the following patents: US 8,393,376, US 7,958,923,
US 7,959,978, US 8,402,913, US 7,823,617, US 7,645,352, US 7,325,582, US 7,220,317
and/or Patents pending
The leader in high-performance drywall corner solutions.