Chamberlain Group The 1D7991 Garage Door Controller User Manual 114A4657 indd
Chamberlain Group Inc, The Garage Door Controller 114A4657 indd
Contents
- 1. User Manual
- 2. user guide
- 3. user manual
user guide
2
Before starting...
YOU MUST HAVE:
• Router with Wi-Fi
• Broadband Internet Connection
• Wi-Fi Hub Serial Number (located on the bottom of the Wi-Fi hub)
To reduce the risk of SEVERE INJURY to persons:
• DO NOT enable the Chamberlain Universal Smartphone Garage Door
Controller if operating either one-piece or swinging doors. To be enabled
ONLY on a sectional door.
Read instructions thoroughly BEFORE beginning.
If using this product with residential door openers,
this product must be used only with door openers
manufactured after 1993 that utilize photoelectric
sensors. The photoelectric sensors are always
located on or near the bottom of the door track.
STOP

3
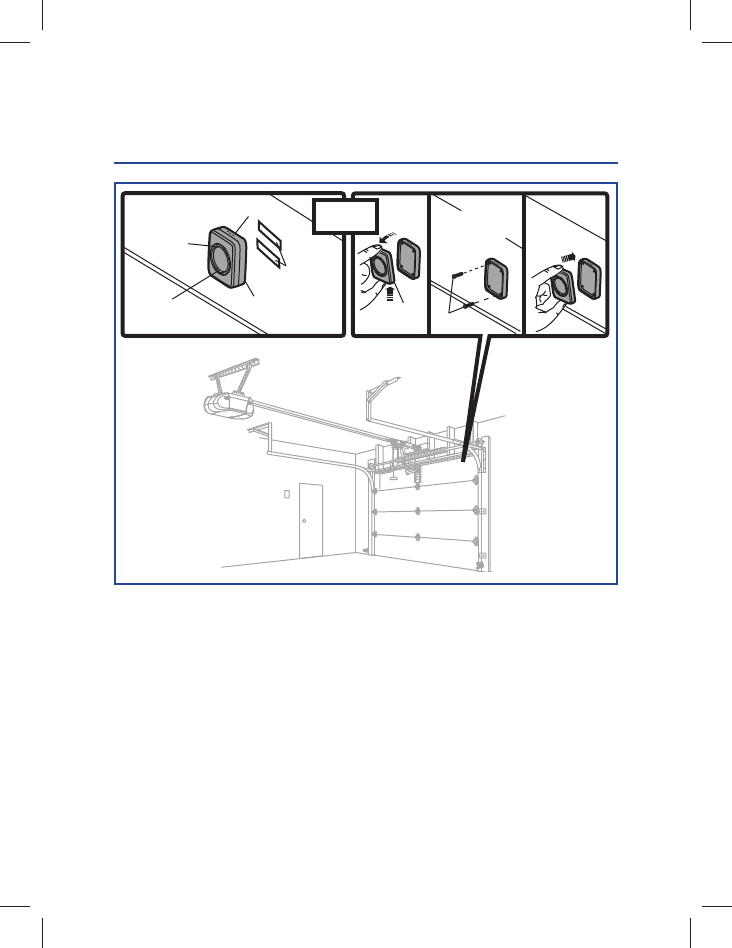
INSTALL THE DOOR SENSOR
1
STEP
Position the door sensor vertically and attach to a clean, dry location on the top
panel of the garage door with fastening strips (provided).
OR
Press in the bottom of the door sensor and remove the front cover. Position
the door sensor vertically and attach to the top panel of the garage door with
screws (provided). Replace the front cover.
LED
Front
Cover Screws
Test BUTTON
Top Panel
of Garage Door Top Panel
of Garage Door
Fastening
Strips
Door
Sensor
Top OR
4
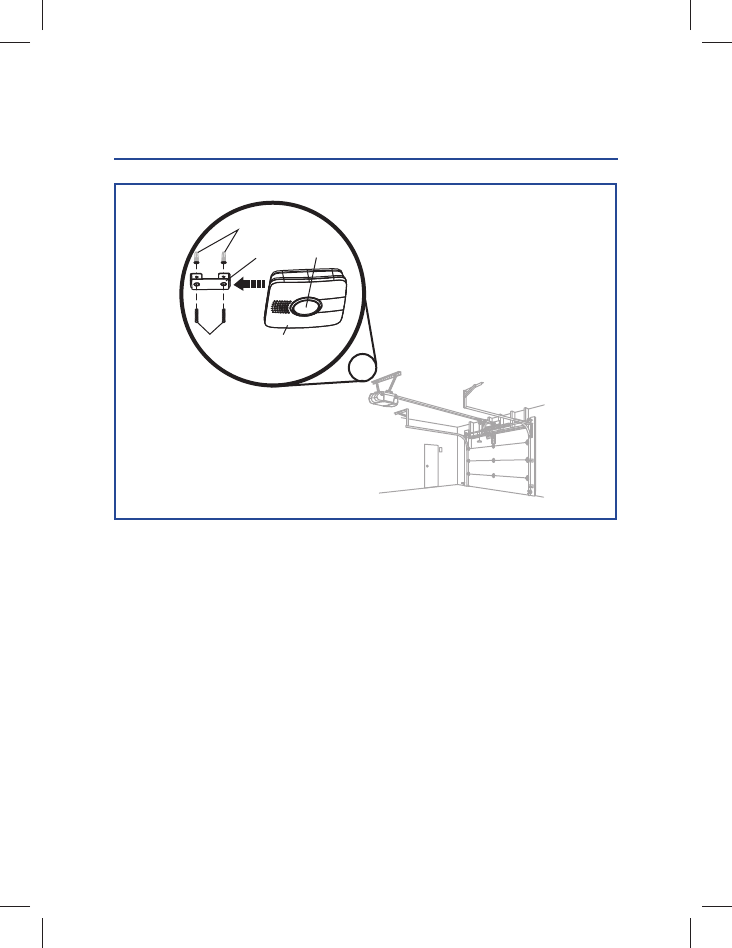
Install the bracket for the Wi-Fi hub on the ceiling near the garage door opener.
Use the bracket as a template and mark holes for the bracket. Be sure the Wi-Fi
hub is visible when standing in the path of the door. Slide the Wi-Fi hub onto
the bracket. Connect to AC power.
The blue, green, and yellow LEDs on the Wi-Fi hub will blink momentarily
indicating a successful power up. Then the blue LED will blink indicating the
Wi-Fi needs to be setup.
Bracket
Anchors
Screws Wi-Fi Hub
Light
INSTALL THE WI-FI HUB
2
STEP
5
OR
APPLE® DEVICES (IPHONE® 3GS, 4, 4S, AND 5,
IPOD TOUCH® 3RD THROUGH 5TH GENERATION):
1. Connect your Apple® mobile device to your Wi-Fi network.
2. On your Apple® mobile device, go to Settings > Bluetooth, and
turn on Bluetooth.
3. Find the Bluetooth MyQ-nnn device and select MyQ-nnn device to
pair.
4. Follow the mobile device prompts to add the Wi-Fi hub to your Wi-Fi network
and then download the Chamberlain MyQ® Home Control app.
NOTE: It may take a few minutes for the Wi-Fi hub to connect to the Internet.
When fully connected to the Internet, the green LED on the Wi-Fi hub will be
on solid.
5. Launch the app and follow the onscreen instructions.
CONNECT TO THE INTERNET
3
STEP
ANDROIDTM AND ALL OTHER DEVICES:
1. Go to the mobile device’s Wi-Fi Settings and turn on Wi-Fi.
2. Locate the list of available Wi-Fi networks and select “MyQ-nnn” network.
3. Launch the mobile device’s web browser and type “setup.myqhome.com”
into the web browser’s address bar.
4. The MyQ® Wi-Fi Setup page will open.
5. Follow the steps in the MyQ® Wi-Fi Setup page to complete the setup.
NOTE: The network’s name and its associated security key/password
(if applicable) will be required.

6
Need help?
Go to the Help section at
www.mychamberlain.com, or call
Chamberlain Technical Support at
1-800-528-9131.
ONE YEAR LIMITED WARRANTY
The Chamberlain Group, Inc. warrants to the fi rst retail
purchaser of this product that is free from defect in materials
and/or workmanship for a period of 1 year from the date of
purchase.

7
NOTICE: To comply with FCC and/or Industry Canada (IC) rules,
adjustment or modifi cations of this transceiver are prohibited.
THERE ARE NO USER SERVICEABLE PARTS.
This device complies with Part 15 of the FCC rules and IC
RSS-210. Operation is subject to the following two conditions:
(1) this device may not cause harmful interference, and (2)
this device must accept any interference received, including
interference that may cause undesired operation.

The Chamberlain Group, Inc.
845 Larch Avenue
Elmhurst, Illinois 60126-1196
©2013 The Chamberlain Group, Inc.
All Rights Reserved
114A4657
Apple, App Store, iPhone, and iPod touch are trademarks of Apple
Inc., registered in the U.S. and other countries.
Android™ is a registered trademark of Google Inc.
“Made for iPod” and “Made for iPhone” mean that an electronic accessory
has been designed to connect specifi cally to iPod or iPhone respectively,
and has been certifi ed by the developer to meet Apple performance
standards. Apple is not responsible for the operation of this device or its
compliance with safety and regulatory standards. Please note that the use
of this accessory with iPod or iPhone may affect wireless performance.

INSTALLATION RAPIDE
Contrôleur
universel
de porte de
garage pour
téléphone
intelligent
10
Avant de commencer…
VOUS DEVEZ AVOIR :
• Routeur avec capacité Wi-Fi
• Une connexion Internet haut debit
• Numéro de série du hub Wi-Fi (situé sur la partie inférieure du hub Wi-Fi ou
sur la carte de confi guration Wi-Fi)
ATTENTION
ATTENTION
AVERTISSEMENT
AVERTISSEMENT AVERTISSEMENT
AVERTISSEMENT
AVERTISSEMENT
AVERTISSEMENT
AVERTISSEMENT
AVERTISSEMENT
Pour réduire les risques de BLESSURES corporelles GRAVES :
• N'UTILISEZ PAS l'ouvre-porte de garage universel contrôlé par smartphone
LiftMaster sur des portes rigides ou battantes. Il doit être utilisé
UNIQUEMENT sur des portes articulées.
Lisez bien les instructions AVANT de commencer.
Si vous prévoyez d'utiliser ce produit pour une
application domestique, il ne doit être utilisé qu'avec
des ouvre-portes fabriqués après 1993 utilisant des
capteurs photoélectriques. Les capteurs
photoélectriques sont toujours situés sur ou près de
la partie inférieure du guide de la porte.
ARRET
11
INSTALLER LE DÉTECTEUR SUR PORTE
1re
Positionnez le détecteur de la porte verticalement et attachez-le avec les bandes
de sûreté (incluses) sur une surface propre et sèche du panneau d’en haut de la
porte de garage.
OU
Appuyez sur le bas du détecteur de la porte et retirez le couvercle du devant.
Positionnez le détecteur de la porte verticalement et attachez-le avec les écrous
(inclus). Replacez le couvercle du devant.
DEL
Couvercle
du devant Écrous
Bouten test
Sèche du panneau
d’en haut Sèche du
panneau d’en
haut
Bandes
de sûreté
Détecteur
sur porte
Haut OU

12
Installez le support du hub Wi-Fi au plafond près de l'ouvre-porte de garage.
Utilisez le support pour le repérage et marquez l'emplacement des trous du
support. Veillez à ce que le voyant d'avertissement du hub Wi-Fi soit visible
lorsque vous vous tenez debout sous la porte complètement ouverte. Faites
coulisser le hub Wi-Fi sur le support. Branchez l'alimentation CA.
Les DEL bleue, verte et jaune du hub Wi-Fi clignoteront temporairement,
indiquant une mise sous tension correcte. La LED bleue clignote alors,
indiquant que le Wi-Fi doit être confi guré.
Support
Chevilles à
murs secs
Écrous Hub Wi-Fi
Ampoule
INSTALLER LE HUB WI-FI
2e

13
OU
APPAREILS APPLE® : (IPHONE® 3GS, 4, 4S, ET 5, IPOD
TOUCH® 3RD A 5TH GÉNÉRATION )
1. Connecter votre appareil mobile Apple à votre réseau Wi-Fi.
2. Sur votre appareil mobile Apple®, aller à Paramètres > Bluetooth
et activer
3. Trouver le dispositif Bluetooth MyQ-nnn et sélectionner l’appareil
4. Suivre les invites de l’appareil mobile pour ajouter le concentrateur
Wi-Fi à votre réseau Wi-Fi, puis télécharger l’application LiftMaster MyQ®
Home Control.
REMARQUE : La connexion du concentrateur Wi-Fi à Internet peut prendre
quelques minutes. Une fois la connexion pleinement établie, la DEL verte
s’allumera sur le concentrateur Wi-Fi.
5. Lancer l’application et suivre les étapes dans l’application pour terminer la
confi guration.
CONNECTER À L’INTERNET
3e
ANDROIDTM ET TOUTS APPAREILS AUTRES
1. Allez dans paramètres de l'appareil mobile Wi-Fi et Wi-Fi s'allume.
2. Accédez à la liste des réseaux Wi-Fi disponibles et sélectionnez « MyQ-nnn »
réseau.
3. Lancer le navigateur web de l'appareil mobile et tapez « setup.myqhome.com »
dans la barre d'adresse du navigateur web.
4. Il ouvrira la page de confi guration d'une connexion Wi-Fi MyQ®.
5. Lancer l’application et suivre les étapes dans l’application MyQ® pour terminer
la confi guration.
REMARQUE : Le nom du réseau et sa sécurité associé clé/mot de passe (le cas
échéant) sera requis.

14
Besoin d'aide ?
Consultez la section Aide sur
www.mychamberlain.com, ou appelez
l'assistance technique Chamberlain au
1-800-528-9131.
GARANTIE LIMITÉE D'UN AN
Chamberlain, Inc. Offre la garantie au premier acheteur en
magasin s'appliquant à ce produit, certifi é exempt de tout
défaut concernant les matériaux et/ou sa fabrication, pendant
une période d'un an à compter de la date d'achat.

15
AVIS. - Les règles de la FCC et/ou d'Industrie Canada (IC) interdisent tout
ajustement ou toute modifi cation de ce récepteur. IL N’EXISTE AUCUNE
PIÈCE SUSCEPTIBLE D’ÊTRE ENTRETENUE PAR L’UTILISATEUR.
Cet appareil est conforme aux dispositions de la partie 15 du règlement
de la FCC et de la norme IC RSS-210. Son utilisation est assujettie
aux deux conditions suivantes: (1) ce dispositif ne peut causer
des interférences nuisibles, et (2) ce dispositif doit accepter toute
interférence reçue, y compris une interférence pouvant causer un
fonctionnement non souhaité.

The Chamberlain Group, Inc.
845 Larch Avenue
Elmhurst, Illinois 60126-1196
©2013 The Chamberlain Group, Inc.
Tous droits réservés
114A4657
Apple, App Store, iPhone et iPod touch sont des marques de commerce
d’Apple Inc. déposées aux États-Unis et dans d’autres pays.
Android™ sont des marques déposées de Google Inc.
« Made for iPod » et « Made for iPhone » signifi ent qu’un accessoire
électronique a été conçu pour se connecter spécifi quement et respectivement
à un iPod ou iPhone et qu’il est certifi é par le développeur comme
satisfaisant aux normes de performance d’Apple. Apple n’est pas responsable
du fonctionnement de cet appareil ou de sa conformité aux normes
sécuritaires et réglementaires. Veuillez noter que l’usage de cet accessoire
avec iPod ou iPhone peut avoir un impact sur la performance sans fi l.