Chamberlain Wireless TIU2 Telephone Interface Unit User Manual OTIU EX manual
Chamberlain Wireless Products Inc. Telephone Interface Unit OTIU EX manual
User Manual

Thank you for purchasing the Oracle Pro Gate System.
This product has been designed and manufactured in
The USA, utilizing the highest quality standards available.
.
Made With Pride In the USA.
A manufacturer’s full One Year Warranty covers this product
No Wiring or Trenching
Required
O r a c le (tm )
O u t d o o r W ir e le s s
T e le p h o n e
In t e r f a c e U n it
•
Easy to install
• Highly miniaturized unit requires minimal space
• Up to 1000-foot range
• Range extendable by using Oracle Repeaters
• Digitally encrypted protocol for totally secure conversation
• Digital sound quality ensures crystal clear audio
• Highly adaptive penetration and channel handling protocols
• Compatible with multiple Oracle PRO, MiniGAP, and FrontDoor
units
• Identify which gate or door a visitor is at with Caller ID and
Distinctive Ring Tone
• Gate Tamper Alert
• Call forwarding function lets you control Gate Access when you
are away
• Can command the Gate at any time using telephone keypad
o Distinctive Call Waiting
o Call Waiting ID
o Places Conversation On-Hold
o Auto Reconnect to 1st Connection
o Busy Detect & Retry on Forwarded Calls
o
Programs via Telephone Keypad
This product is compatible with Oracle PRO Gate Access Panel (GAP)
model 600-10 or later and/or Oracle Repeater (RPT-1) model 604-3 or later.
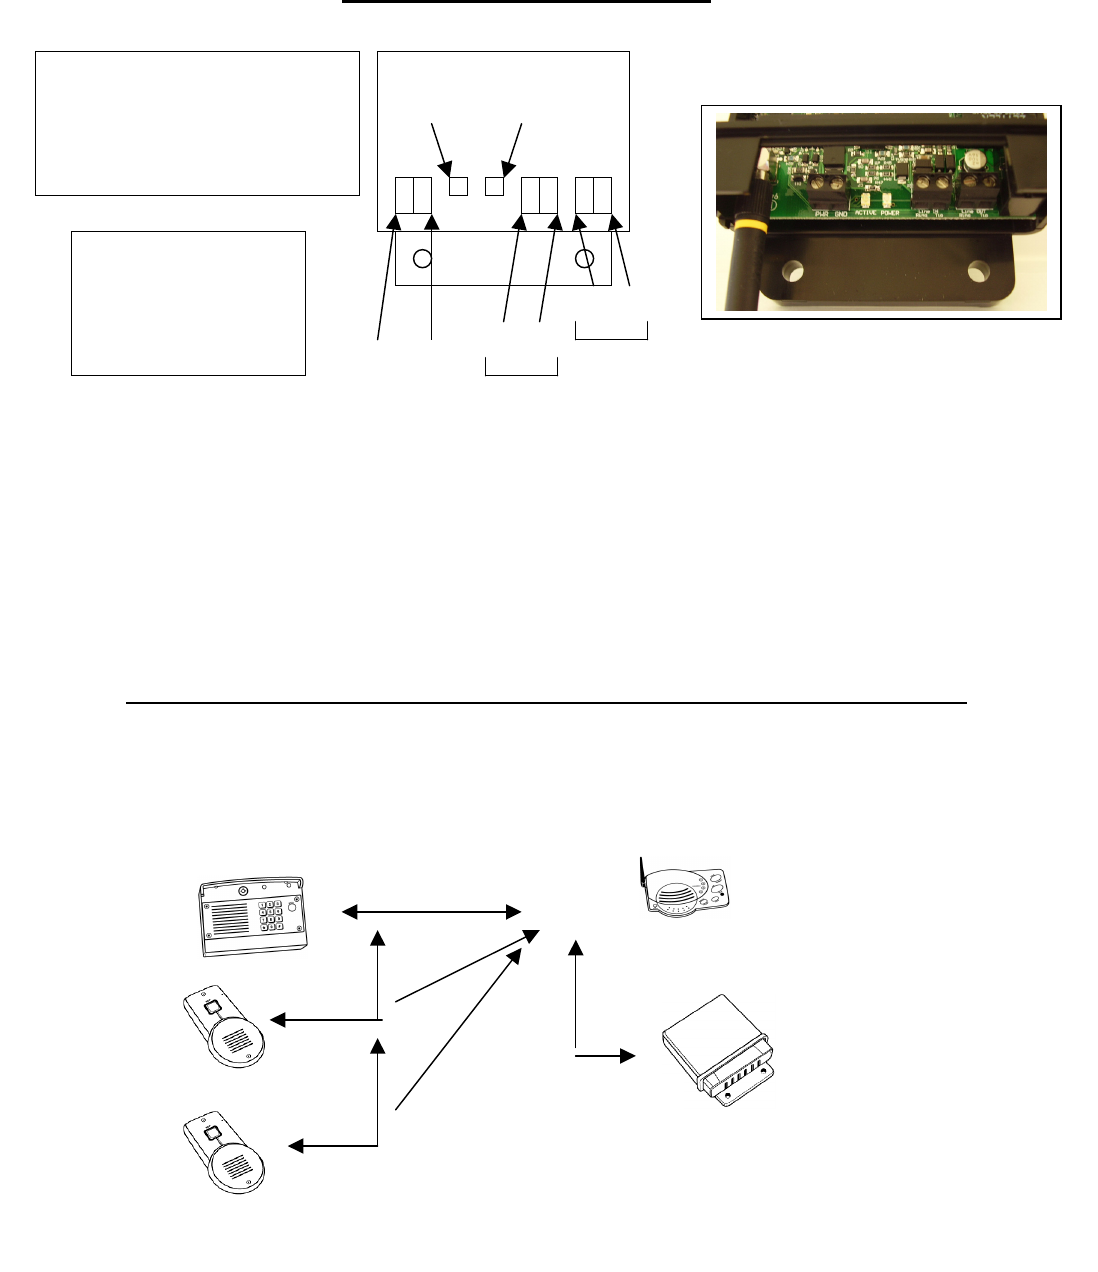
INSTALLING THE OTIU-EX
1) What will are you connecting the OTIU-EX-EX to?
• Oracle Front Door go to step 1
• GAP unit go to step 2
• Mini GAP go to step 4
• Repeaters go to step 5
ACTIVATING THE OTIU-EX WITHIN AN EXISTING NETWORK
RING
When activating the OTIU-
EX within an existing network, simply follow the instructions for “Activating
the OTIU-EX with GAP” if the GAP is the Active (Main) Unit, the instructions for “Activating the OTIU
-
EX with MiniGAP” if the MiniGAP is the Active Unit, or “Activating the OTIU-
EX with a FrontDoor” if the
FrontDoor is the Active Unit. A few examples of an existing network are pictured as follows:
Active
Mode Intercom
OTIU-EX
Front Door
MiniGAP
NOTE: By activating the OTIU-EX to the Active Unit, you are activating the OTIU-EX into the existing
network with no further steps to take.
+18V
POWER
ACTIVE
RING
TIP
TIP
PHONE
GND
LINE
To wire up the power adapter:
Ground – Solid Black Wire
+18V – Striped Wire
The OTIU
-
EX should
be mounted near the
de-mark location.
Antenna pointing
downward.
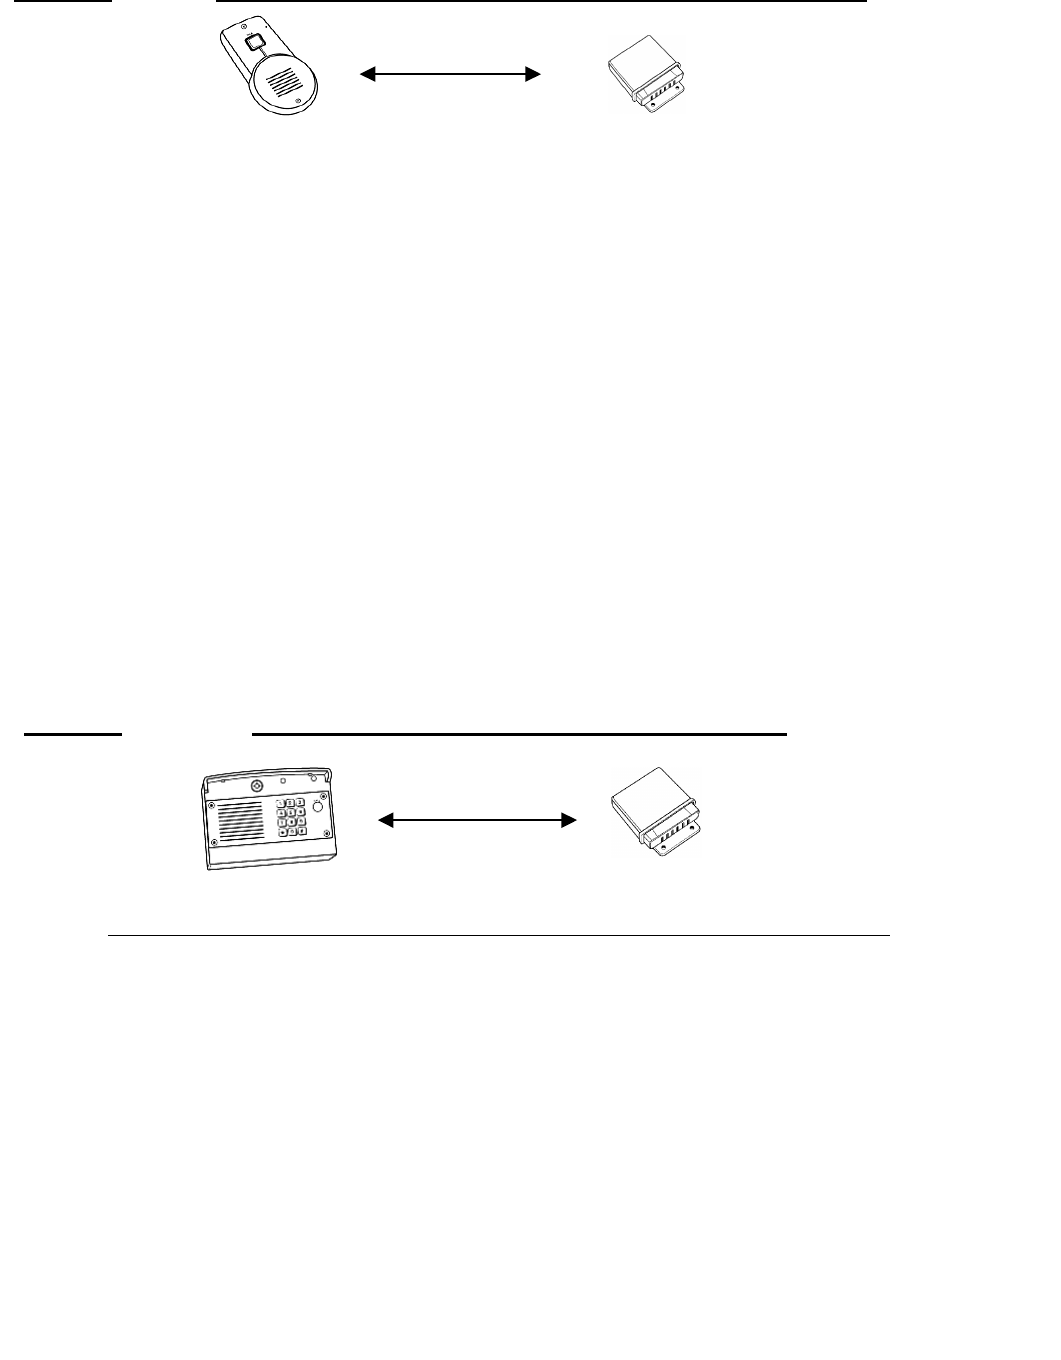
STEP 1 ACTIVATING THE OTIU-EX WITH FRONTDOOR
(IF THERE IS NOT AN EXSISTING NETWORK)
(NOTE: Both step A & B must occur within 15 seconds of each other)
STEP2 ACTIVATING THE OTIU-EX WITH GAP
(NOTE: Both step 1 & 2 must occur within 15 seconds of each other)
Using the phone that is connected to the OTIU-EX, once you hear a dial tone press: * * 0 7
1.
Hang up and the LEARN light will flash for up to 15 seconds. If it does not and you hear an
error tone, see “How do I clear the memory”, in the FAQ section. Othe
rwise, repeat the
process.
2.
On the FrontDoor, press and hold down the learn button for 1 second, to put it into learn
mode.
NOTE: The learn button is a little black button located on the inside of the unit at the very top
of the circuit board.
The OTIU will ring the telephone and Caller ID will display "Unit Learned".
If hooking up multiple OFD units refer to “MULTI-OFD MODE” in OFD manual.
1. Using the phone that is connected to the OTIU-EX, once you hear a dial tone press: ** 07
Hang up and the LEARN light will flash for up to 15 seconds. If it does not and you hear an
error tone, see “How do I clear the memory”, in the FAQ section. Otherwi
se, repeat the
process.
2. On the Gate Access Panel (GAP), enter the Master PIN number:
For example: 1234 “Beep”
Followed by: 05
The OTIU-EX will ring the telephone and Caller ID will display "Unit Learned".
If hooking up multiple GAP units see
MULTI
-
GAP MODE
in Gap Manual
STEP 4 ACTIVATING THE OTIU-EX WITH MINIGAP
(IF THERE IS NOT AN EXSISTING NETWORK)
(NOTE: Both step 1 & 2 must occur within 15 seconds of each other)
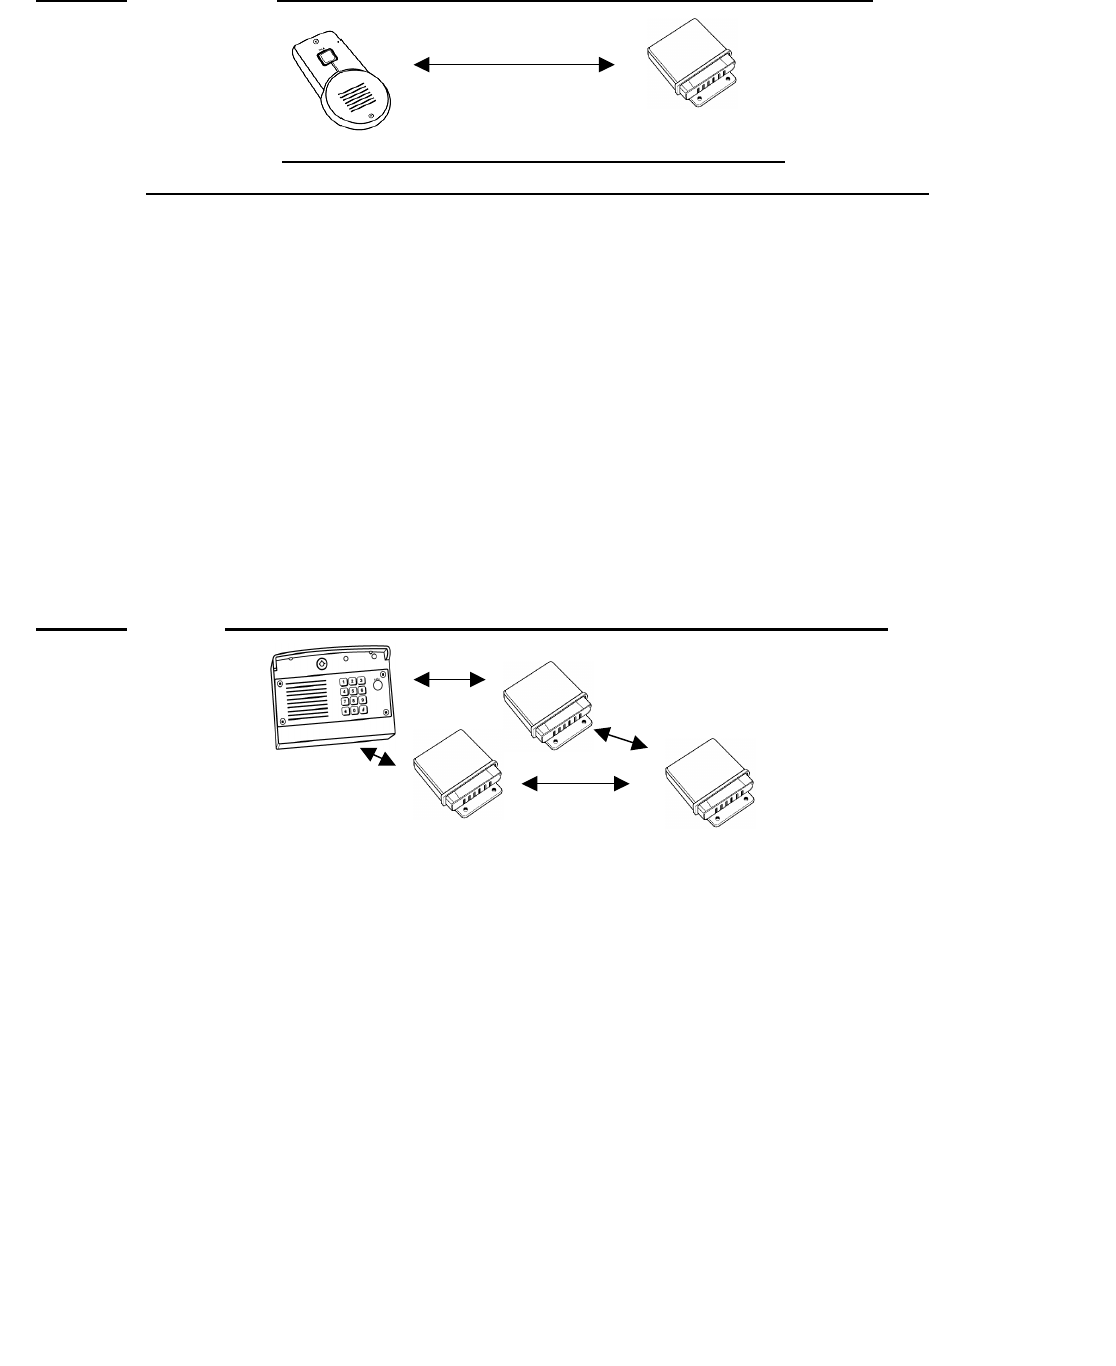
STEP 5 ACTIVATING THE OTIU-EX WITH A REPEATER
(WITHIN AN EXISTING NETWORK)
(NOTE: Both step 1 & 2 must occur within 15 seconds of each other)
1. Using the phone that is connected to the OTIU-EX, once you hear a dial tone press: **07
Hang up and the LEARN light will flash for up to 15 seconds. If it does not and you hear an
error tone, see “How do I clear the memory”, in the FAQ section. Otherwi
se, repeat the
process.
2. On the MiniGAP, press and hold down the learn button for 1 second, to put it into learn mode.
NOTE: The learn button is a little black button located on the inside of the unit at the
very top of the circuit board.
The OTIU-EX will ring the telephone and Caller ID will display "
Unit Learned
".
Using the phone that is connected to the OTIU-EX. Once you hear a dial tone press: **07 “Beep”
1. Hang up and the LEARN
light will flash for up to 15 seconds. If it does not and you hear an error
tone, see “How do I clear the memory”, in the FAQ section. Otherwise, repeat the process.
2. Press the LEARN button on ONE of the Repeater Units. The LED by the LEARN
button will light
up for several seconds, then will go out and the OTIU-
EX will ring the telephone and display “Unit
Learned”, indicating a successful activation.
NOTE: If the Repeater Units have not been previously activated to anything within an existing
network, please follow the directions found in the Oracle Wire-free Repeater product manual.
STUCCO: When used in a
dwelling with stucco or cement walls, the RF range is reduced greatly.
The Oracle Repeater will solve this issue. Place the repeater close to the house to mitigate this
problem.

USING THE OTIU-EX
CALLER ID FUNCTION
(Does NOT require Caller ID Service with your telephone company)
CALL WAITING FUNCTION
(Does NOT require Call Waiting Service with your telephone company)
TO CHANGE THE NUMBER OF TIMES THE OTIU-EX RINGS THE PHONE
When a visitor presses the CALL button, the telephone that is connected to the OTIU-
EX will give a
distinctive ring up to 4 times. Or in the case of having an expandable phone system, all phones within
the system will ring. Simply answer the phone and you
will automatically connect to the Intercom at the
gate or door.
After you have connected to the Intercom, you can then activate that Gate by dialing:
* 9
NOTE: At any time, you can pick up the telephone that is plugged into the OTIU-EX and dial *9 to a
ctivate
the primary gate controller.
When there is a gate visitor, the OTIU-
EX will display 'Gate Visitor' on a Caller ID telephone (or Caller
ID box) that it is directly connected to.
When there is a door visitor, the OTIU-
EX will display 'Front Door' or 'Back Door' depending on how
you have your FrontDoor set up (see the FrontDoor unit instruction manual).
**If someone is Tampering with the Gate, the OTIU-
EX will ring the phone once and display !Gate
Tamper!.
If you are talking on the telephone that is plugged into the OTIU-
EX, you will hear a distinctive call
waiting beep on the line and the Caller ID will display, as above, alerting you to a visitor. To place the
call on hold and connect to the Oracle Interc
om, press the FLASH button (or switchhook) as you would
to answer any call waiting call.
If you are talking on a different telephone, which is not in an expandable phone system, the telephone
that is connected to the OTIU-EX will ring as normal and the phone call will not be interrupted.
By default, the OTIU-
EX will ring the telephone 4 times. You might want to change the number of
times the telephone rings for any given reason.
For example, if you have an answering machine and it is programmed to pick up after 4 rings, you
might want to change the OTIU-
EX to ring the telephone only 3 times. This will prevent your answering
machine from picking up if your phone is not answered when someone presses the “CALL” button on
your GAP, MiniGAP, or FrontDoor Unit.
NOTE: If your answering machi
ne does pick up, the visitor will hear your answering machine
message through the speaker.
Using the telephone that is directly connected to the OTIU-EX, dial:
**102 for 2 rings up through **105 for 5 rings

CALL FORWARDING FUNCTION
(Does NOT require Call Forwarding Service with your telephone company)
TO PROGRAM A FORWARDING PHONE NUMBER
VERIFYING THE CALL FORWARDING PHONE NUMBER
TO ENABLE/DISABLE CALL FORWARDING
If you are going to be away from home, you can have the OTIU-
EX call you when there is a visitor.
When a visitor presses the CALL button, the OTIU-
EX will ring the home telephone 1 time. If the
telephone is not answered, the OTIU-EX will dial the call-fo
rwarding number that you have
programmed into it (see below). After ringing the forwarding number 3 times, the OTIU-
EX will hang
up. If a visitor presses the CALL button again, the process will repeat.
When you answer a call from the OTIU-EX, you will h
ear a repeating beep for up to 10 seconds. If
you want to accept the call from the OTIU-EX simply dial: 0
Hang up to disconnect.
To control the gate, dial: *9
NOTE: The OTIU-
EX checks to see if the home line is busy prior to dialing the forwarding number. If
it is busy, the OTIU-EX will wait and try a second time. Once the OTIU-
EX dials out to the forwarding
number, if the forwarding number is busy, the OTIU-EX will wait and try a second time as well.
To program in forwarding telephone number, use the telephone that is directly connected to the
OTIU-EX, and dial: *# “beep”
Enter the telephone number (up to 14 digits) that you wish to forward calls to. To accept the new
number simply press: # “beep”
NOTE: For long distance calls, be sure to include the proper prefix.
Using the telephone connected to the OTIU-EX, dial: **06 “beep” Hang up the telephone
The telephone will ring and the forwarded number that you have programmed into the OTIU-
EX will
be displayed on the Caller ID screen.
To enable the Call Forwarding function, use the telephone that is directly connected to the OTIU-
EX
and dial: **01 “beep”
To disable the Call Forwarding function, use the telephone that is directly connected to the OTIU-
EX
and dial:
**02 “beep”

REMOTE ACTIVATION THROUGH ANSWERING MACHINE
QUICK LIST OF FUNCTIONS
TROUBLESHOOTING AND FREQUENTLY ASKED QUESTIONS
I connect the OTIU-EX but I don't hear a dial tone
I dial *9 and hear a beep, then an error tone
How do I clear the memory of the OTIU-EX
While entering numbers, it goes to a dial tone
It is not getting the expected transmission range
It is not getting the expected transmission range
You can remotely activate the gate if you have an answering machine. Simply call your home and
when the answering machine picks up, dial:
*9
The OTIU-EX will recognize the command and activate your gate.
Enable call forwarding **01
Disable call forwarding **02
Activating the OTIU-EX **07
Verify call-forwarding number **06
Clear memory **#8
Activate gate *9
Change number of rings **10 -- (2-5)
Check the phone connections and if it is a two-line phone, be sure that it is on LINE 1. If you receive a dual-
tone error
sound when attempting to open a gate, make sure that the OTIU-
EX is indeed programmed to the correct GAP, MiniGAP, or
FrontDoor Unit and that the Gate Controller in question has been taught to the master unit as well. If an OTIU-
EX has
already been taught, trying to re-teach it will sound a dual-tone error as well. See “How do I clear the memory”.
Check the batteries in the GCU and/or check to make sure that the GCU is installed correctly.
Clearing the memory will not clear any OTIU-
EX settings or programmed phone numbers. To clear the memory, use the
telephone that is directly connected to the OTIU-EX and dial: **#8 “beep”
All numbers and symbols will be dialed within 3 seconds of each other, otherwise the unit times out and goes back to a dial
tone.
STUCCO:
When used in a dwelling with stucco or cement walls, the RF range is reduced greatly. The Oracle
Repeater will solve this issue. Place the repeater close to the house to mitigate this problem.
Trees, metal or anything electrical between units can limit the range, as can having any units mounted on a tree, masonry,
or metal surface. If you have radio devices, such as video transmitters that run on 900 MHz, try turning them off and see if
the reception is improved. Do not place the OTIU-
EX near a computer or any other “Radio Noise Source”. Keep the
antenna vertical and at least 6” away from any objects.

TROUBLESHOOTING AND FREQUENTLY ASKED QUESTIONS CONT.
I dial **, but it won't accept the rest of the command
Check the line and phone connections.
The telephone doesn't ring when someone presses "CALL"
I hear a buzzing or I fail to connect when answering a call
Only the first couple of words from the caller are heard
Lower the GAP Microphone Sensitivity (See the GAP Product Manual).
A. If the “active” light of the OTIU-EX flashes after the “CALL” button is pressed, check the phone connections.
B. If the “active” light of the OTIU-EX does not flash after the “CALL” button is pressed, See Section 2 – Activation.
Move the OTIU-EX as far away from the phone and/or computer, as you can. You can also try changing the channel of
the telephone if possible and/or the channel on the GAP (See the GAP Product Manual).
One year limited WARRANTY
International Electronics Inc. (IEI) warrants this product to be free of defects in materials and workmanship, for one year. For a period of ONE
YEAR following purchase, IEI will repair or replace the product free of charge, including parts, labor, return shipping to you, and handling.
After the initial one year of operation, the limited lifetime warranty will cover parts, labor, and return shipping to you, with a minimal handling
charge specific to the product, as listed below:
Oracle Outdoor Telephone Interface: $75.00
INSTALLER: If you have installation questions, please contact your Distributor.
CONSUMER BEFORE INSTALL: If you have questions, please contact your Installer.
CONSUMER AFTER INSTALL: If you have operation questions or are in need of warranty service, please contact our Product Support
department by email at techsupp@nwlink.com or call 360-254-1564 Tuesday-Friday 7-5 Pacific Time. If the issue is not resolvable, a
manufacturer’s warranty repair order may be issued. To have the product(s) sent for warranty service. A Return Authorization number will be
issued for warranty service, which must be put on the outside of the package, to be received and handled properly. Packages for warranty
service may be sent to the following address. Packages with no RA# may not be accepted.
IEI
5913C NE 127th AVE, Suite 800
Vancouver, WA 98682
Please include a note describing the problem that you are having and a copy of your original sales receipt (within the first year). If the warranty
service is outside the first year, please include a check made out to IEI, based on the list of handling fees, shown above. Please note that you
may need to send multiple units for warranty service, testing, and upgrading, though only the applicable fee for handling the failed unit(s) will be
charged.
Please allow 2-4 weeks for service and return shipping. If an EXPEDITED repair/replacement is requested, a 100% surcharge applies. In this
case, please write EXPEDITED after the RA number. IEI will attempt to return expedited repair orders within one week, except during holidays.
All repairs or replacements are at the discretion of the Manufacturer. This warranty excludes items that have been abused, altered, incorrectly
installed, or repaired by an unauthorized person. Changes or modifications not expressly approved by the Manufacturer could void the user’s
authority to operate the equipment. The manufacturer is not responsible for any radio or TV interference caused by unauthorized modifications to
this equipment. Such modifications could void the user’s authority to operate the equipment. This warranty is limited to the product only. No
consequential damages are covered.
This device complies with part 15 of the FCC Rules. Operation is subject to the following two
conditions: (1) This device may not cause harmful interference, and (2) this device must
accept any interference received, including interference that may cause undesired operation.
International Electronics, Inc.
FCC ID: JLFTIU2
Country Of Origin: USA