Chamberlain 40 To The Manual 9bdadefe 2932 44e2 95e9 2d0c34f01d23
User Manual: Chamberlain 40 to the manual
Open the PDF directly: View PDF ![]() .
.
Page Count: 90
Baja Marine
Owner’s Manual
40 Outlaw
Owner’s Manual Part Number: MRP 1817554
© Baja Marine Corporation 2006
R
Speed changes you. TM.

Baja Marine COrpOratiOn, 2600 Sea ray Blvd., KnOxville, tn 37914
FOr inFOrMatiOn Call 1-865-971-6270 Or Fax 1-865-971-6716
internet addreSS: http://www.BajaMarine.COM
R
Speed changes you. TM.
i
40 Outlaw®
welCOMe
Congratulations on becoming the new owner of
the world’s #1 performance boat. Baja® Marine
Corporation welcomes you into our worldwide and
ever-expanding family of boating enthusiasts.
The Owner’s Manual Packet, to be kept on
board your Baja, gives you important information
on the features of your Baja. Take the time to
carefully review the information in your Owner’s
Manual Packet and really get to know your boat.
Everyone that operates the boat should read
this manual.
The Owner’s Manual Packet contains the
following:
• Owner’s Manual: The Owner’s Manual gives
you important operating and safety information,
as well as reminders about your responsibilities
as a boat owner/operator.
• Original Equipment Manufacturer (OEM)
Information: This section of your Owner’s
Manual Packet contains information from the
manufacturers of equipment installed on your
boat. Examples include the engine, engine
control and steering system. Throughout
the Owner’s Manual you will be referred to
information provided by manufacturers of
specic systems.
Because your purchase represents a substantial
investment, we know you will want to take the
necessary measures to protect its value. We
have outlined a program for proper operation,
periodic maintenance and safety inspections. We
urge you to follow these recommendations. If you
have questions which are not fully covered by
the Owner’s Manual Packet, please consult your
authorized dealer for assistance.
Thank You For Selecting A Baja®!
R
Speed changes you. TM.

ii
40 Outlaw®
THIS PAGE INTENTIONALLY LEFT BLANK

iii
40 Outlaw®
intrOduCtiOn
1. This Manual
The material within this manual and your Owner’s
Manual Packet:
• Gives you basic safety information
• Describes the features of your boat
• Describes the equipment on your boat
• Describes the fundamentals of boat use
• Contains service and maintenance information
You must learn to operate this boat as well as
read, understand and use this manual.
What this manual does not give you is a course in
boating safety, or how to navigate, anchor, or dock
your boat. Operating a power boat safely requires
more skills, knowledge, and awareness than is
necessary for a car or truck.
2. Your responsibiliTies
For your safety, the safety of your passengers, other
boaters, and people in the water, you must:
• Take a boating safety course
• Get instruction in the safe and proper handling of
your boat
• Understand and follow the “Rules of the Road”
• Learn how to navigate
• Register your boat: In addition to the registration
requirements for your boat in the state where it is
used most frequently, many states require additional
registration when an out-of-state boat is used within
their boundaries. Contact state boating authorities
or any marine dealer for registration requirements.
3. sources of inforMaTion
In North America, contact one of the following for
boating courses:
• U.S. Coast Guard Auxiliary
• U.S. Power Squadron
• Canadian Power and Sail Squadrons
• Red Cross
• State Boating Ofces
• Yacht Club
Contact your dealer or the Boat/U.S. Foundation at
1-800-336-2628
Outside of North America, contact your boat dealer
and/or your governmental boating agency for
assistance.
A book that provides a comprehensive background
in boating is Chapman Piloting, Seamanship
and Small Boat Handling, by Elbert S. Maloney,
published by Hearst Marine.
4. Dealer responsibiliTies
In addition to a pre-delivery check and service of
the boat, your dealer is to give you:
• A description and demonstration of the safety
systems, features, instruments, and controls on your
boat
• An orientation in the general operation of your boat
• An “In Service Form” completed by you and the
dealer after inspection of the boat
• A review of all warranty information and how to obtain
warranty service
• The complete Owner’s Manual Packet
If you do not receive all of these materials, or have
any questions, contact your dealer or call:
1-865-971-6270.
5. WarranTies
Each component and/or system on your boat has
its own warranty that will be found with the specic
information and manual for that component. These
are included with your Owner’s Manual Packet.
Locate and read the individual warranties; then put
them together for easy future reference. The Baja®
warranty is on the warranty information card in your
packet and is repeated in this section.
iv
40 Outlaw®
6. hull iDenTificaTion nuMber (hin)
The “Hull Identication Number” located on the
starboard side of the transom, is the most important
identifying factor and must be included in all
correspondence and orders. Failure to include it
creates delays. Also of vital importance are the
engine serial numbers and part numbers when
writing about or ordering parts for your engine
other major components or appliances. Refer
to the Engine Operator’s Manual for locations of
engine serial numbers and record them for future
reference.
7. ManufacTurer’s cerTificaTion
As a boat manufacturer, Baja builds its products
to guidelines established under the Federal Boat
Safety Act of 1971. The Act is promulgated by the
United States Coast Guard who has authority to
enforce these laws on boat manufacturers that sell
products in the United States. Baja ensures that all
of its products comply with these laws.
The National Marine Manufacturers Association
(NMMA) provides Baja with a third party certication.
The NMMA is an organization that represents the
marine industry and assists manufacturers, boat
dealers, marinas, repair yards, and component
suppliers in areas of legislation, environmental
concerns, marine business growth, and state and
federal government agency interaction. The third
party certication that Baja participates in uses the
well known Standards and Recommended Practices
of the ABYC, American Boat and Yacht Council.
Baja Marine Corporation participates extensively
in the American Boat and Yacht Council which is a
nonprot organization that develops and publishes
voluntary standards and recommended practices for
boat and equipment design, construction, service,
and repair. We utilize all applicable ABYC standards
in the construction of our boats.
Finally, Baja sells their products world wide and
as such must conform to the various rules and
regulations required by other countries. Most
notably, are the ISO standards in Europe which
require the application of the CE (Common
European) mark. This mark, much like the NMMA
certication in the U.S., gives you, the boat owner,
specic information concerning your craft.
8. service, parTs anD repair for
Your boaT
When your boat needs service, parts or repair,
take it to an authorized Baja® Marine dealer. To
nd a dealer in your area visit our website at www.
bajamarine.com or call:
Domestic/International
1-865-971-6270
Fax: 1-865-971-6716
To nd repair and parts facilities for the equipment
installed on your boat, refer to the manual for that
component.
If an issue is not handled to your satisfaction:
1. Discuss any warranty-related issues directly with
the service manager of the dealership or your
sales person. Give the dealer an opportunity to
help the service department resolve the matter
for you.
2. If an issue arises that has not been resolved to
your satisfaction by your dealer, contact Baja®
Marine at 1-865-971-6270 and ask to speak with
a customer service representative.
intrOduCtiOn
hull identiFiCatiOn nuMBer lOCatiOn
(Fig. iv.1)
hin nuMBer

v
40 Outlaw®
R
Speed changes you. TM.
abouT Your express liMiTeD WarranTY
Baja Marine offers an Express Limited Warranty on
each new Baja purchased through an authorized
Baja dealer. A copy of the Limited Warranty was
included in your owner’s packet. If for any reason
you did not receive a copy of the Limited Warranty,
please contact your local dealer or call 1-865-971-
6270 for a replacement copy. ♦ This is a summary of
several provisions of the Limited Warranty. Please
read the Limited Warranty, which is the controlling
document.
Under the Limited Warranty, Baja Marine covers
structural berglass deck or hull defects which
occur within ve (5) years of the date of delivery
and parts found to be defective in factory material
or workmanship within one (1) year of the date of
delivery. In addition, laminate blisters resulting
from defects in factory material or workmanship
are covered for three (3) years from the original
date of purchase, or for four (4) years from date of
manufacture.
Baja’s obligation under the Limited Warranty is
limited to repair or replacement of parts that are
judged defective by Baja Marine and does not
include transportation, haul out, or other expenses.
The foregoing is the sole and exclusive remedy
provided by Baja Marine.
The Limited Warranty does not cover engines, stern
drives, controls, propellers, batteries, trailers, or
other equipment or accessories carrying their own
individual warranties, nor does the Limited Warranty
cover engines, parts or accessories not installed by
Baja Marine. The Limited Warranty does not cover
cosmetic gel coat nish. Boats used for commercial
purpose are excluded from coverage. See the Baja
Marine Express Limited Transferable Warranty for
other exclusions.
BAJA MARINE EXPRESSLY DISCLAIMS THE
IMPLIED WARRANTIES OF MERCHANTABILITY
AND FITNESS. NEITHER BAJA MARINE NOR
THE SELLING DEALER SHALL HAVE ANY
RESPONSIBILITY FOR LOSS OF USE OF THE
BOAT, LOSS OF TIME, INCONVENIENCE,
COMMERCIAL LOSS OR CONSEQUENTIAL
DAMAGES.
The unexpired term of the Limited Warranty may be
transferred to a new owner upon the new owner’s
written request to Baja Marine Corporation, 2600 Sea
Ray Blvd., Knoxville, TN 37914 and accompanied
by the payment to Baja Marine Corporation of fty
dollars ($50.00).
Thank you for your decision to buy a Baja.
♦ The Baja Marine Express Limited Transferable
Warranty is subject to change at any time at Baja’s
discretion. The information contained herein is general
information about the Limited Warranty for the owner’s
general knowledge, but does not alter or amend the terms
of the Limited Warranty.

vi
40 Outlaw®
40 Outlaw Owner’S Manual • taBle OF COntentS
inTroDucTion
1. This Manual ............................................................iii
2. Your Responsibilities ..............................................iii
3. Sources of Information ...........................................iii
4. Dealer Responsibilities ...........................................iii
5. Warranties ..............................................................iii
6. Hull Identication Number (HIN) ............................ iv
7. Manufacturer’s Certication ................................... iv
8. Service, Parts and Repair for Your Boat ................ iv
About Your Express Limited Warranty ......................... v
secTion 1 • safeTY
1. Safety Labels .......................................................1.1
2. Legally Mandated Minimum Required
Equipment ......................................................... 1.2
3. Fire Extinguishing System ...................................1.2
4. Carbon Monoxide ................................................ 1.2
5. Lifesaving Equipment .......................................... 1.4
6. Additional Recommended Equipment for Safe
Operation ..........................................................1.5
7. Impaired Operation ..............................................1.5
8. Load Capacity......................................................1.6
A. United States ................................................ 1.6
B. International ..................................................1.6
9. Power Capacity ................................................... 1.6
10. Propellers .......................................................... 1.6
11. Stability .............................................................. 1.7
12. Maintain Control ................................................ 1.7
13. Weather ............................................................. 1.8
14. Chart Your Course ............................................. 1.8
15. Water Sports ...................................................... 1.9
A. Swimming .....................................................1.9
B. Skiing ............................................................1.9
C. Diving .........................................................1.10
16. Emergency Situations......................................1.10
A. Medical Emergency .................................... 1.11
B. Water Rescue ............................................. 1.11
C. Fire ............................................................. 1.11
D. Flooding, Swamping and Capsizing ........... 1.11
E. Collisions and Leaking ................................ 1.12
F. Grounding ...................................................1.12
G. Propulsion, Control or Steering Failure ...... 1.12
17. Safety Hotlines ................................................ 1.12
18. International Requirements ............................. 1.13
19. Environmental Considerations.........................1.13
A. Fuel and Oil Spillage ..................................1.13
B. Waste Disposal ........................................... 1.14
C. Excessive Noise .........................................1.14
D. Wake/Wash ................................................ 1.14
20. Nautical Terms ................................................. 1.15
21. Key to Symbols on Controls & Prints .............. 1.16
22. Warning Label Locations ................................. 1.17
secTion 2 • General boaT arranGeMenT
1. Docking/Lifting/Trailering ..................................... 2.1
2. Passenger Locations ........................................... 2.1
3. Basic Boat Dimensions and Clearances (United
States Standard S.A.E.) .................................... 2.2
4. Propulsion System...............................................2.3
5. Propellers ............................................................ 2.3
6. General Deck Layout ...........................................2.4
7. Description of Major Controls .............................. 2.5
A. Gear Shift and Throttle Control ..................... 2.5
B. Power Trim Unit and Gauge ......................... 2.5
C. Trailer Switch ................................................ 2.6
D. Trim Tabs ......................................................2.6
E. Ignition Shutdown Switch .............................2.7
F. Engine Alarm System ....................................2.7
8. Important Gauges ................................................2.7
A. Tachometer and Hour Meter ......................... 2.7
B. Oil Pressure, Water Temperature, Voltmeter
and Fuel Gauges ...........................................2.8
9. Navigation and Anchor Lights .............................. 2.8
secTion 3 • usinG Your boaT
1. Pre-Launch, Launch and Post-Launch Checklist 3.1
2. Trailer Launching and Loading ............................3.2
3. Fueling the Boat .................................................. 3.2
4. Boarding .............................................................. 3.3
5. Personal Flotation Devices (PFD’s) ..................... 3.3
6. Passenger Instruction and Location .................... 3.4
7. Starting the Engine .............................................. 3.4
8. Shifting to Drive the Boat .....................................3.5
9. Stopping the Engine ............................................ 3.5
10. Steering Systems .............................................. 3.6
A. Hydraulic Steering ........................................ 3.6
B. Power Steering ............................................. 3.7
secTion 4 • bilGe & unDerWaTer Gear
1. Bilge.....................................................................4.1
A. Fuel & Oil Spillage ........................................ 4.1
B. Drain Plug .....................................................4.1
C. Bilge Pumps ................................................. 4.1
D. Bilge Blower(s) ............................................. 4.2

vii
40 Outlaw®
2. Engines and Stern Drive......................................4.2
A. Maintenance and Service ............................. 4.2
B. Vibration and Causes ................................... 4.2
C. Impact to Stern Drive .................................... 4.3
D. Propeller Removal and Installation ............... 4.3
secTion 5 • fuel sYsTeM
1. Fuel System.........................................................5.1
2. Fueling Precautions .............................................5.2
A. Static Electricity and the Fuel System .......... 5.2
B. General .........................................................5.2
C. Before and During Fueling – Checklist ........ 5.2
D. After Fueling – Checklist ...............................5.3
secTion 6 • elecTrical sYsTeMs
1. Electrical Systems .............................................. 6.1
A. Batteries .......................................................6.1
B. Ignition Protection .........................................6.1
C. Breakers and/or Fuses ................................. 6.2
D. Fuse Panel ................................................... 6.2
2. Electrolytic Corrosion & Zinc Anodes .................. 6.2
3. Marine Electronic Cathodic Anti-corrosion System
(Mercathode®) ...................................................6.3
4. Electrical Systems ............................................... 6.3
secTion 7 • opTions & accessories
1. Options & Accessories Locations ........................7.1
2. Automatic Fire Extinguisher System (Option) ...... 7.2
3. Fire Extinguisher Port .......................................... 7.2
A. Canvas Care and Maintenance .................... 7.3
B. Trailering With Canvas .................................7.3
5. Horn .....................................................................7.3
6. Swim Platform w/ Ladder (Optional) ....................7.3
7. Depth Finder (Optional) ....................................... 7.3
8. Stereo System ..................................................... 7.4
9. Head Systems ..................................................... 7.4
A. Requirements for Operators ......................... 7.4
B. Portable Head with Pump-Out .......................7.4
C. VacuFlush® Head (Option) ............................. 7.5
D. Holding Tank Operation ................................. 7.5
E. Vent Filter ......................................................7.5
10. Exhaust Systems ...............................................7.5
40 Outlaw Owner’S Manual • taBle OF COntentS
secTion 8 • requireD inspecTion, service, &
MainTenance
1. Summary Guide for Inspection, Service and
Maintenance ...................................................... 8.1
2. Useful Service Information .................................. 8.3
3. Inspection, Service and Maintenance Protocol ... 8.4
A. Bilge Area ..................................................... 8.4
B. Topside and Supplies....................................8.5
4. Winterization Checklist for Boats Stored on Land 8.5
A. Boat Storage ................................................. 8.5
B. Engine ..........................................................8.5
C. Battery(ies) ...................................................8.5
D. Fuel Systems ................................................ 8.6
5. Fitting Out After Storage ......................................8.6
A. Fuel System .................................................. 8.6
B. Battery(ies) ................................................... 8.6
C. Miscellaneous ............................................... 8.6
6. Security Considerations.......................................8.7
7. Power Steering System Maintenance ................. 8.7
8. Quick Reference Checklist .................................. 8.8
A. Boarding the Boat .........................................8.8
B. Preparing to Depart and After Launching ..... 8.9
C. Departing ....................................................8.10
D. Returning to Port ......................................... 8.10
E. Securing the Boat ........................................ 8.11
F. If the Engine Does Not Start ........................ 8.11
9. After Market Equipment Checklist ..................... 8.12
10. Maintenance Log ............................................. 8.13
secTion 9 • care & refinishinG
1. Paint Cleaning Agents & Other Substances ........9.1
2. Fiberglass & Gelcoat ........................................... 9.1
3. Stains & Scratches .............................................. 9.1
4. Permanently Moored or Docked Boats................9.2
5. Topside Areas ...................................................... 9.2
A. Stainless Steel and Alloy Fittings ..................9.2
B. Salt Crystals .................................................9.2
6. Acrylic Plastic Sheeting (Plastic Glass) ...............9.2
7. Canvas and Clear Vinyl ....................................... 9.2
8. Exterior Upholstery Fabric ................................... 9.3
9. Interior Upholstery Fabric .................................... 9.3
inDex

viii
40 Outlaw®
Information in this publication is based upon the latest product specications available at printing. Baja®
Marine Corporation reserves the right to make changes at any time, without notice, in the colors, equipment,
specications, materials and prices of all models, or to discontinue models. Should changes in production models
be made, Baja® Marine is not obligated to make similar changes or modications to models sold prior to the date
of such changes.
Owner’s Manual
40 Outlaw
Printed in the U.S.A. May 2006
© Baja Marine Corporation • A Brunswick Company
MRP# 1817554
Baja Marine Corporation 2600 Sea Ray Blvd., Knoxville, TN 37914
For information call 1-865-971-6270 or fax 1-865-971-6716
Internet Address: http://www.bajamarine.com
R
Speed changes you. TM.
R
Speed changes you. TM.
Baja®,, and are registered trademarks of the Brunswick Corporation.
Speed changes you. TM
40 Outlaw®
1.1
SeCtiOn 1 • SaFety
SAFE boating means:
• Knowing the limitations of your boat
• Following the "Rules of the Road"
• Keeping a sharp lookout for people and objects
in the water
• Not boating in water or weather conditions
that are beyond the boat's and the operator's
capability
• Never boating when the operator is under the
inuence of drugs or alcohol
• Being aware of your passenger's safety at all
times
• Reducing speed when there is limited visibility,
rough water, and nearby people in the water,
boats, or structures
Boating in beautiful weather and calm water
conditions can be a wonderful experience.
Pleasurable boating, however, requires considerably
greater skills than operating a land vehicle. To
obtain these skills, you must:
• Take a Coast Guard, U.S. Power Squadron,
or equivalent boating safety course. Call the
Boat/U.S. Foundation at 1-800-336-2628 for
information on available courses.
• Get hands-on training on how to operate your
boat properly.
In addition:
• Maintain your boat and its safety and other
systems as recommended in this manual.
• Have the boat inspected by a qualied mechanic
or dealer at least annually.
• Ensure that the Coast Guard required safety
equipment is on board and functions properly.
(See page 1.2)
• Operating a high performance boat such as
a Baja requires different skills than operating
other boats. Make sure you have the necessary
skills, and if you are unsure, ask your dealer
for a demonstration, or seek further instruction
until you can properly operate your Baja® with
condence.
1. safeTY labels
Safety precautions are given throughout this
manual and labels are mounted at key locations
throughout the boat. This safety information
advises the owner/operator and passengers of
safety precautions to follow when operating and/or
servicing equipment.
• Do not remove or obstruct any safety label.
• Replace any label which becomes illegible.
Replacement safety labels can be obtained by
calling your dealer or Baja Marine at 1-865-971-
6270.
The meanings associated with each of the four basic
types of labels are:
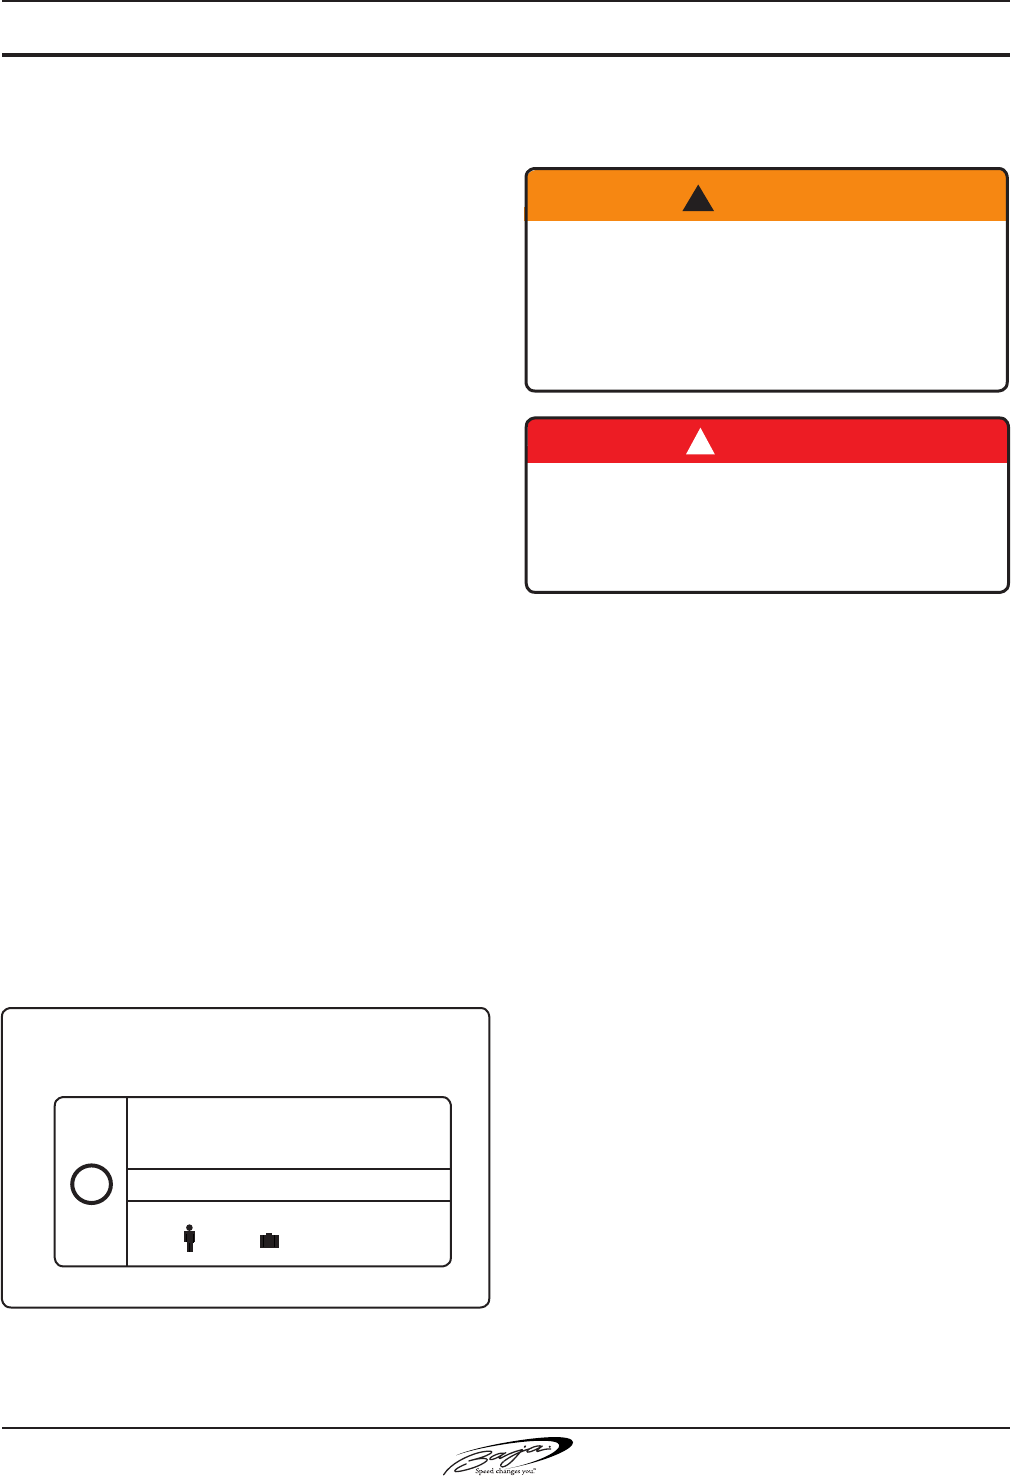
CAUTION - Hazards or unsafe practices which
COULD result in minor injury or product or
property damage if the warning is ignored.
! CAUTION
DANGER - Immediate hazards which WILL result
in severe personal injury or death if the warning
is ignored.
! DANGER
Information which is important to proper
operation or maintenance, but is not hazard-
related.
NOTICE
WARNING - Hazards or unsafe practices which
MAY result in severe personal injury or death if
the warning is ignored.
! WARNING
40 Outlaw®
1.2
SeCtiOn 1 • SaFety
2. leGallY ManDaTeD MiniMuM
requireD equipMenT
The following equipment is the minimum required by the
U.S. Coast Guard for a boat 40' to less than 65' [12.2
meters to less than 19.8 meters] in length.
Personal Flotation Devices (PFDs): One Coast Guard
approved Type I, II or III device is mandatory for each
person aboard. One throwable Type IV device is also
required to be on board. A Type V device is acceptable
if worn for approved use. See Page 1.4 for a description
of these PFD classications. Always wear a PFD when
boating.
Fire Extinguisher - Portable: If no xed re extinguishing
system is installed in the engine and generator spaces,
the U.S. Coast Guard requires two (2) Type B1 or one
(1) Type B2 re extinguishers be on board. If your
boat is equipped with a xed re extinguishing system
in the engine and generator spaces, the U.S. Coast
Guard requires one (1) Type B1 re extinguisher be on
board. The American Boat and Yacht Council (ABYC)
recommends that you have three (3) Type B1 ABC re
extinguishers on board located in the following areas:
outside the engine compartment, at the helm station,
and in the galley.
Whistle, Horn: You must have on board some means
of making a loud sound signal, for example, whistle or
horn.
Visual Distress Signals: If you operate your boat in
coastal waters or on the Great Lakes, you must have
visual distress signals for day and night use on board. At
least three (3) U.S. Coast Guard approved pyrotechnic
devices, marked with date showing service life, must be
carried, be readily accessible, in serviceable condition,
and not expired. Store pyrotechnic signals in a well-
marked waterproof container in a dry location.
Other: Your Baja boat is equipped with the required
navigation lights, engine exhaust and ventilation
systems.
3. fire exTinGuishinG sYsTeM
Your boat may be equipped with the optional automatic re
extinguisher system, located in the engine compartment.
In the event of a re, the heat sensitive automatic head in
the engine compartment will release a re-extinguishing
vapor, totally ooding the area.
The dashboard contains an indicator light for the
automatic re extinguishing system. The light will be ON
when the ignition is on and indicates that the system is
ready. If the light goes out while the ignition is on, the
system has discharged.
When discharge occurs, immediately shut down all
engines, powered ventilation, electrical systems, and
extinguish all smoking materials. Do not immediately
open the engine compartment! This feeds oxygen
to the re and the re could restart.
Wait at least fteen (15) minutes before opening the
engine compartment. This permits the re-extinguishing
vapor to "soak" the compartment long enough for hot
metals and fuels to cool. Have portable extinguishers
at hand and ready to use in case the re re-ignites. Do
not breathe fumes or vapors caused by the re.
4. carbon MonoxiDe
In rainy and/or cold weather, fresh air must circulate
through boat to avoid carbon monoxide poisoning.
! DANGER
! DANGER
Sleeping on boat requires an operating Carbon Monoxide
detection system in each sleeping location.
Fumes from engines, generators, and other equipment
and appliances using burning fuel contain odorless,
colorless carbon monoxide gas.
Carbon monoxide can cause brain damage or death.
Open all doors, curtains, windows, and hatches to let
fresh air circulate, when running engine, generator or
burning any fuel when boat is anchored, moored or
docked.
DANGER
!
PFD REQUIREMENTS DIFFER
Depending on the state or country of operation
the operator of a vessel may be ned for failure
to comply with local or national rules regarding
PFD usage.
NOTICE
40 Outlaw®
1.3
SeCtiOn 1 • SaFety
Symptoms of carbon monoxide poisoning are dizziness,
ears ringing, headaches, nausea, and unconsciousness.
Get fresh air if anyone shows signs of carbon monoxide
poisoning, and/or if carbon monoxide detector alarm
sounds.
A poisoning victim's skin often turns cherry red. Because
carbon monoxide gas (CO) is odorless, colorless and
tasteless, it is unlikely to be noticed until a person is
overcome.
Dangerous concentrations of carbon monoxide will be
present if:
• there is an exhaust leak
• a nearby vessel's engine is running
• insufcient fresh air is circulating where people are
present
• fumes move from the rear of the boat into the cockpit
and cabin area
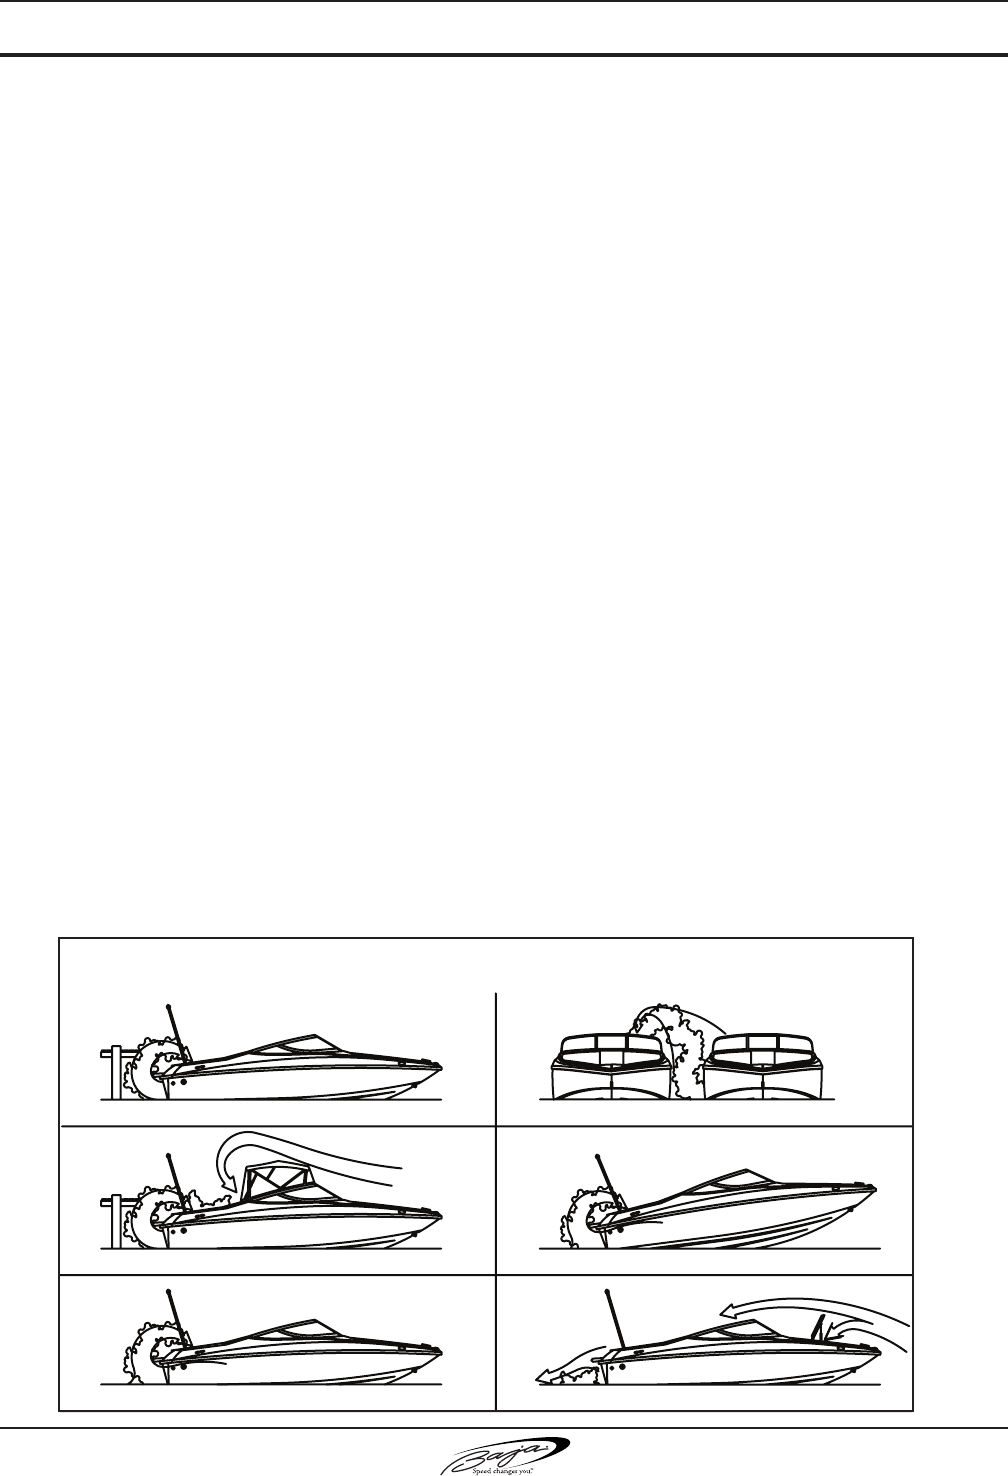
Figure 1.3.1 gives examples of boat operating conditions
that can lead to high concentrations of carbon monoxide
gas.
To minimize the danger of CO accumulation when the
engine is running or using fuel burning appliances:
• Be sure to have sufcient ventilation when using
canvas or window-type side curtains when underway,
anchored, moored, or docked.
• If a convertible or camper top is installed, operate
with the forward hatch open and leave cabin door
open.
• Operate all fuel burning appliances, such as charcoal,
propane, LPG, CNG, or alcohol cooking devices in
areas where fresh air can circulate. Do not use such
devices where there is no noticeable air movement,
especially in the cabin, when anchored, moored, or
docked.
• Do not idle engine without moving boat for more than
15 minutes at a time.
• Inspect exhaust system regularly. (See Section 8,
Required Inspection, Service and Maintenance.)
If CO poisoning is suspected, have the victim breathe
fresh air deeply. If breathing stops, resuscitate. A
victim often revives, then relapses because organs are
damaged by lack of oxygen. Seek immediate medical
attention.
carbon MonoxiDe MoniTor
Your boat may have a carbon monoxide (CO) monitor
mounted in the cabin. The CO monitor is an electronic
instrument that detects CO. When there is a build-up of
CO in the cabin, the monitor will alert the occupants by
a ashing DANGER light and alarm.
Read and understand the CO monitor information and
operating instructions. It is extremely important that you
become totally familiar with your CO monitor and its
functions.
exaMpleS OF hOw high levelS OF CarBOn MOnOxide
May aCCuMulate
(Fig 1.3.1)
Blocking Hull Exhausts. Operating
at slow speed or dead in the water.
Using canvas curtains.
Winds blowing exhaust
toward boat occupants.
Operating engine and/or generator
in conned spaces.
Operating with the bow high.
Good ventilation.
Illustration #D
Illustration #E
Illustration #F
Illustration #A
Illustration #B
Illustration #C
40 Outlaw®
1.4
SeCtiOn 1 • SaFety
Even strong swimmers can tire quickly in the water
and drown due to exhaustion, hypothermia, or both.
The buoyancy provided by a personal otation
device (PFD) will allow the person who has fallen
overboard to remain aoat with far less effort and
heat loss, extending survival time necessary to nd
and retrieve them.
Boat operators are required to carry one wearable
personal otation device (Type I, II, III or V) for every
person on board. Boats must also have at least one
throwable device (Type IV).
The law requires that PFDs must be readily
accessible, if not worn. "Readily accessible" means
removed from storage bags and unbuckled. But,
children and non-swimmers must wear PFDs at all
times when aboard. It is common sense to have
everyone on board wearing PFDs. A throwable
device must also be right at hand and ready to
toss.
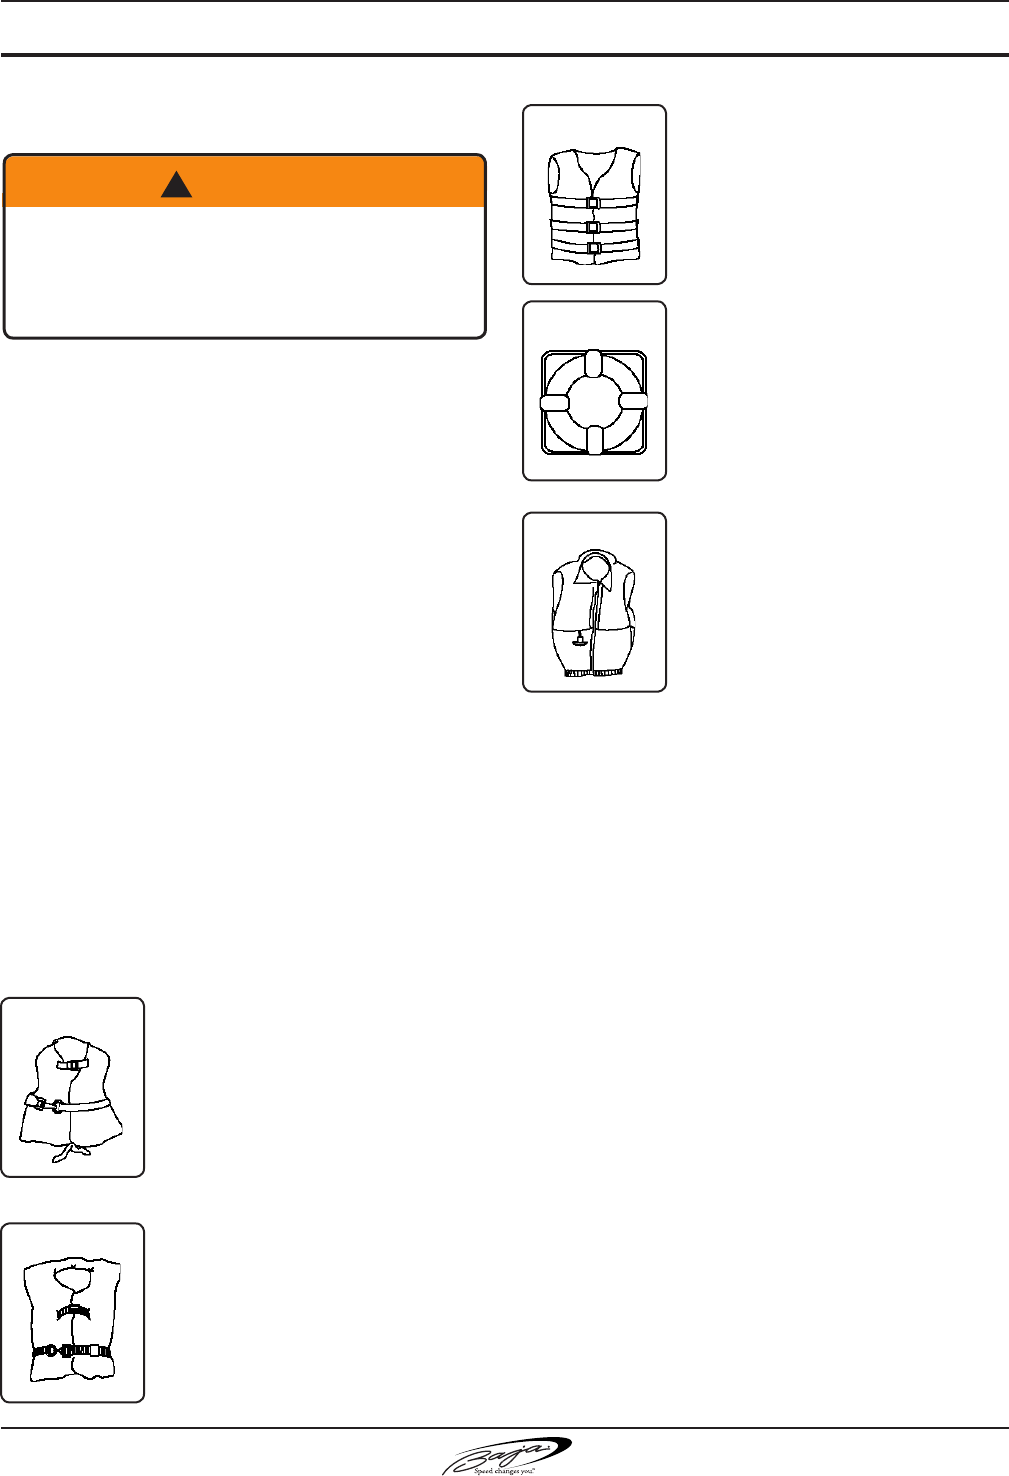
PFD Classications:
(FIG. 1.4.1) Off-Shore Life Jacket (Type I) – most
buoyant, it is designed to turn an
unconscious person face up; used in
all types of waters where rescue may
be slow, particularly in cold or rough
conditions.
(FIG. 1.4.2) Near-Shore Life Vest (Type II) –
"keyhole" vest with flotation-filled
head and neck support is also
designed to turn a person face up,
but the turning action is not as
pronounced; used in calm, inland
waters or where quick rescue is
likely.
(FIG. 1.4.3) Flotation Aid (Type III) – vest is
designed so conscious wearers can
turn face up; often designed for
comfort while engaged in sports such
as skiing.
(FIG. 1.4.4) Throwable Devices (Type IV) –
horseshoe buoys, ring buoys and
buoyant cushions are designed to be
grasped, not worn.
(FIG. 1.4.5) Special-Use Devices (Type V) –
sailboat harnesses, white-water
vests, oat coats, and hybrid vests
which have minimum inherent
buoyancy and an inflatable
chamber.
Before purchasing PFDs, ensure that there is an
attached tag indicating they are approved by the
U.S. Coast Guard or by your national boating law
enforcement agency.
Children and non-swimmers must wear PFDs at
all times when aboard.
• All passengers and crew should wear them.
• A loose PFD is often useless in an
emergency.
• The operator is responsible for instructing
everyone aboard on the location and use of
PFDs.
• Size PFDs for the wearer. Children require
special attention in the use of PFDs.
• Test PFD buoyancy at least once a year.
5. lifesavinG equipMenT
Have all passengers and the operator wear a
Personal Flotation Device (PFD) at all times when
boating.
When someone is overboard, it can be too late to
have them put on a PFD.
! WARNING
40 Outlaw®
1.5
SeCtiOn 1 • SaFety
Drugs and/or alcohol impair the operator's ability to
control the boat safely.
Death or serious injury can result from improper boat
operation.
! WARNING
6. aDDiTional recoMMenDeD
equipMenT for safe operaTion
In addition to legally mandated equipment, the
following items are necessary for safe boating
especially if your boat is out of sight of land.
• First aid kit
• Visual distress signals for day and night
use (required in some areas; consult local
regulations)
• Charts of your intended cruising area
• Compass
• GPS or Loran position locating devices
• Marine VHF radio with weather channels
• Emergency position-indicating radio beacon
(EPIRB)
• Manual bilge pump
• Moisture repellent
• Anchor, chain and line (The anchor must be
properly sized for your boat. Ask your dealer
or marine supply store for recommendations.)
• Mooring lines
• Fenders
• Boat hook
• Waterproof ashlight(s)
• Extra batteries for flashlights and portable
electronic devices
• High power spotlight, if you intend to boat at
night
• Spare keys
• Instruction manuals for engine and
accessories
• Lubricating oil
• Tool kit:
Assorted screwdrivers (Phillips and at blade)
Pliers (regular, vise-grip, and tongue & groove)
Wrenches (box, open-end, allen, adjustable)
Socket set (metric or U.S. standard as appropriate)
Electrical tape and duct tape
Hammer
Utility Knife
• Spare parts kit (spark plugs, fuses, hose clamps
and ask your dealer to recommend other
parts)
• Extra propeller(s)
7. iMpaireD operaTion
Drugs and/or alcohol will prevent you from operating
your boat safely. This single factor is involved in
more marine accidents and deaths than any other.
The detrimental effects of alcohol and drugs are
increased by the wind, waves and sun, quickly
impairing your ability to react properly and promptly
in an emergency.
40 Outlaw®
1.6
SeCtiOn 1 • SaFety
When engine is running, keep passengers away from
areas not designed for riding, such as seat backs,
bow, gunwales, transom platform, front and rear
decks and on sun pads.
Passengers can fall overboard if not seated properly
on the seats provided.
! WARNING
Never carry more weight or passengers than
indicated on the certication plate, regardless of
weather or water conditions.
The boat can capsize, swamp or sink.
! DANGER
8. loaD capaciTY
a. uniTeD sTaTes
Use common sense and sound judgement when
placing equipment and/or passengers in your boat.
The number of people on board must be reduced if
you go out in poor weather and rough water.
• The number of seats does not indicate how
many people a boat can carry in poor weather
and rough water
• Above idle speed, all passengers must be
seated on the seats provided.
The United States Coast Guard does not provide
specic numbers for passenger capacity or
cargo weight for recreational vessels larger
than 20 feet (6.09 meters). For safety sake,
use the following information provided for the
international loading standards for maximum
number of passengers plus cargo weight.
b. inTernaTional
The certication plate (Fig. 1.6.1) located near
the helm indicates maximum weight and number
of persons your boat can handle under calm sea
conditions. Do not exceed the load capacities
stated. The number of people on board must be
reduced if you go out in poor weather and rough
water. Above idle speed, all passengers must be
seated on the seats provided.
9. poWer capaciTY
Your boat's engine and accessories were selected
to provide optimum performance and service.
Installing a different engine or other accessories
may cause unwanted handling characteristics.
Should you choose to install a different engine, or
to add accessories that will affect the boat's running
trim, have an experienced marine technician
perform a safety inspection and handling test before
operating your boat again. Certain modications to
your boat will result in cancellation of your warranty
protection. Always check with your dealer before
making any modications to your boat.
10. propellers
Your Baja© has been equipped with propellers
which our tests have shown to be the best suited for
general use with our engine under normal conditions
and load. Do not change the pitch of your propellers
without getting your dealer's recommendations rst.
If you change to a different propeller pitch, under no
circumstances use propellers which allow the
engine to operate at higher than recommended
RPM. (Your engine manual species the maximum
recommended RPM).
40 Outlaw CE OPTION CERTIFICATION PLATE
(INTERNATIONAL) (EXAMPLE) (FIG. 1.6.2)
Baja Marine Corp.
40 Outlaw
MAXIMUM
8 + = 725 kg
C E
0609
C
IMCI
40 Outlaw®
1.7
SeCtiOn 1 • SaFety
Death or serious injury can result if you fail to observe
these safety rules:
• Anyone who controls the boat must have taken
a boating safety course and have been trained in
the proper operation of the boat.
• Always operate the boat at speeds that will not
put people or property in danger.
• Be constantly aware of conditions in all directions
when underway and before turning.
• Reduce speed, use a lookout to identify possible
hazards or difculties, and turn on navigation
lights when:
- visibility is impaired;
- in rough water; and
- in congested waterways.
• Watch your wake. It can capsize a small boat or
damage moored boats or other property. You are
responsible for damage caused by your wake.
! WARNING
Distribute passengers and gear as uniformly as
possible from front to rear and left to right.
The manufacturer's load rating is the maximum
allowed under calm conditions.
Reduce boat loading if weather, water or other
conditions are adverse.
! WARNING
To maintain rated power, propellers should be free
of nicks, excessive pitting, and any distortions
that alter them from their original design. Badly
damaged propellers should be replaced, but those
that are chipped, bent, or merely out of shape can be
reconditioned by your marine dealer. It is advisable
to carry an extra propeller aboard in case you
damage the one in use.
11. sTabiliTY
Your boat was manufactured to specic stability
and otation standards for the capacity shown
on the certication plate. Any increase from the
recommended load capacities will put your boat in
jeopardy of capsizing, swamping and/or sinking.
In addition:
• Stability may be substantially reduced if
equipment is added above the deck.
• Stability is substantially reduced by loose uids
or weight within the hull. Keep bilge area as dry
as possible.
12. MainTain conTrol
On the water there are no marked trafc lanes, no
trafc signs or lights, and boats have no turn signals
or brakes. The boat operator must keep her or his
attention focused not only on what's ahead but
what's on the left, right and behind the boat.
Observe the safety rules listed below:
The operator must always be alert to approaching boats
(from the rear, right and left sides, as well as those
ahead). In addition, the operator must be on the lookout
for people in the water, partially submerged debris, and
other navigational hazards such as rocks, sand bars,
and dangerous currents, to name a few.
Your passengers are relying on you to operate and
maneuver the boat safely so that they are not in danger
of going overboard. If you turn too quickly, increase or
decrease speed abruptly, your passengers are at risk of
being thrown overboard or thrown about the boat.
When visibility becomes impaired because of weather,
time of day or high bow angle you must slow down so
that you have sufcient time to react if an emergency
occurs. Nearby boats face similar risks in avoiding a
collision with you.
DO NOT ATTEMPT TO BOAT IN
SEVERE WEATHER CONDITIONS
DEATH OR SERIOUS INJURY CAN OCCUR
GET TO SHORE BEFORE
THE WEATHER TURNS BAD
! DANGER

40 Outlaw®
1.8
SeCtiOn 1 • SaFety
The wind speed and wave height specied as the upper
limit for your category of boat does not mean that you
or your passengers can survive if your boat is exposed
to these conditions. It is only the most experienced
operators and crew that may be able to operate a boat
safely under these conditions. You must always be aware
of weather conditions and head for port or protected
waters in sufcient time to avoid being caught in high
winds and rough water. Do not take chances!
Getting caught in severe weather is hazardous. Bad
weather and/or rough sea or water conditions can cause
an unsafe situation. Consult local weather information, or
listen to the NOAA weather reports for the latest weather
conditions or any impending deterioration of the weather
before setting out and while underway. The following are
a few basic weather-related rules:
• Check the weather forecast and the water conditions
before leaving and while underway.
• A sudden change in wind direction or speed or
an increase in wave height indicates deteriorating
weather.
• Have everyone wear a personal otation device.
• If a storm approaches, immediately seek a safe
harbor.
• If a storm hits, have everyone sit in the cabin or on the
cockpit deck in the boat. Head the bow into the wind
with enough power to maintain slow headway.
• If you encounter fog, determine your position, set a
safe course, slow down and alert other boats of your
presence with a sound signal.
• If a lightning storm approaches, the safest action is to
dock and disembark. If you cannot return to shore,
have passengers go inside the cabin and remain
there until the storm passes.
• Lightning seeks ground when it strikes. The best
protection is a properly grounded lightning rod
placed high enough over the deck to provide a
protective umbrella over the hull. Depending upon
the likelihood of your being in a lightning storm,
consult your dealer for installation of a lightning rod.
If caught in a storm, stay clear of the lightning rod,
all attached wiring, and all metal parts of the boat.
• Stay out of the water during a lightning storm. If
caught swimming during a storm, get back into the
boat and remain there until the storm passes.
General consiDeraTions
• Know how your boat handles under different
conditions. Recognize your limitations and the boat's
limitations. Modify speed in keeping with weather,
sea, and trafc conditions.
• Instruct passengers on the fundamentals of operating
your boat in case you are unable to do so.
• You are responsible for passengers' actions. If they
place themselves or the boat in danger, immediately
correct them.
13. WeaTher
There are four design categories of boats based
upon their ability to withstand wind and sea or water
conditions:
A. Ocean
Wind speed: above 40 knots (46 mph)
Wave height: above 4 meters (13 feet)
Boat may be used for extended ocean voyages.
B. Offshore
Maximum wind speed: 40 knots (46 mph)
Maximum wave height: 4 meters (13 feet)
Boat can be used offshore, but not for extended
ocean voyages.
C. Inshore
Maximum wind speed: 27 knots (31 mph)
Maximum wave height: 2 meters (6.5 feet)
Boat use is limited to coastal waters, large bays,
estuaries, lakes and rivers.
D. Sheltered waters
Maximum speed: 15 knots (18 mph)
Maximum wave height: 0.5 meters (1.5 feet)
Boat use is limited to small lakes, rivers and
canals.
Your 40 Outlaw boat is Design Category C.
14. charT Your course
To avoid boating in unsafe areas where there are
underwater obstructions, shallow water, unnavigable
conditions such as dangerous currents, and others, you
must chart a course. This means having and using
the National Oceanic and Atmospheric Administration
(NOAA) charts for coastal waters, observing and
understanding all navigational aids, using the knowledge
and guidance of experienced boaters, and being aware
of the tide times where appropriate.
40 Outlaw®
1.9
SeCtiOn 1 • SaFety
Shut engine off if an object is struck or if you run
aground.
Check for hull leaks and propulsion system damage,
before restarting engine.
Use hand pump if bilge pumps don't remove water.
Boat very slowly, if you must proceed with a damaged
propulsion system.
! WARNING
Your boat's propeller can kill or injure persons in
the water.
Always stay away from areas designated for
swimming or diving. Unless you are towing a skier,
stay away from water ski areas. Recognize markers
used for such areas.
When engine is running, close and lock transom
door and do not permit anyone to use boarding
ladder and swim platform.
DANGER
!
Skiers must wear an approved PFD.
! WARNING
If the skier suddenly releases the tow rope, it can
backlash into the cockpit. Spotters who are watching
the skier must be made aware of this fact and be
prepared to deect the rope by hand to avoid injury.
! WARNING
Hitting an object in or under the water or boating in
dangerous currents can cause serious injury or death
to boat occupants.
You must know where the hazards are and avoid
them.
In uncharted waters, boat very slowly and post a
lookout.
! WARNING
If you are in an unfamiliar area without knowledge of the
hazards, proceed very slowly and have someone watch
for hazards.
Let others know where you're going. A oat plan
describes your intended cruising course and itinerary,
boat description, and your expected time and date of
return. Give the oat plan to a friend or relative, so they
can give the information to a national boat agency, like
the U.S. Coast Guard, in the event you fail to return.
15. WaTer sporTs
a. sWiMMinG
• Do not permit anyone to swim from a moving boat,
or a boat with an engine running.
• Many localities prohibit swimming from boats except
in designated areas.
• Make sure boat's engine is turned off and the stern
drive, if equipped, is fully down before allowing
people to swim anywhere near your boat. Shut the
engine OFF and remove the key from the ignition
switch so that nobody will accidentally start the
engine while swimmers are nearby.
• Turn off engine when taking swimmers or skiers
aboard or when they are entering the water. Never
permit use of the transom swim platform while engine
is running.
• Slow down and look for swimmers or skiers when
cruising in an area where there might be persons in
the water.
b. skiinG
• Anyone who water skis must know how to swim.
• Never drive the boat directly behind a water skier.
At 22 knots (25 m.p.h.), it takes only 5 seconds to
overtake a fallen skier who was 60 meters (200 feet)
in front.
• Keep a downed skier in sight and on the operator's
side of the boat when approaching the skier. Never
back up to anyone in the water.
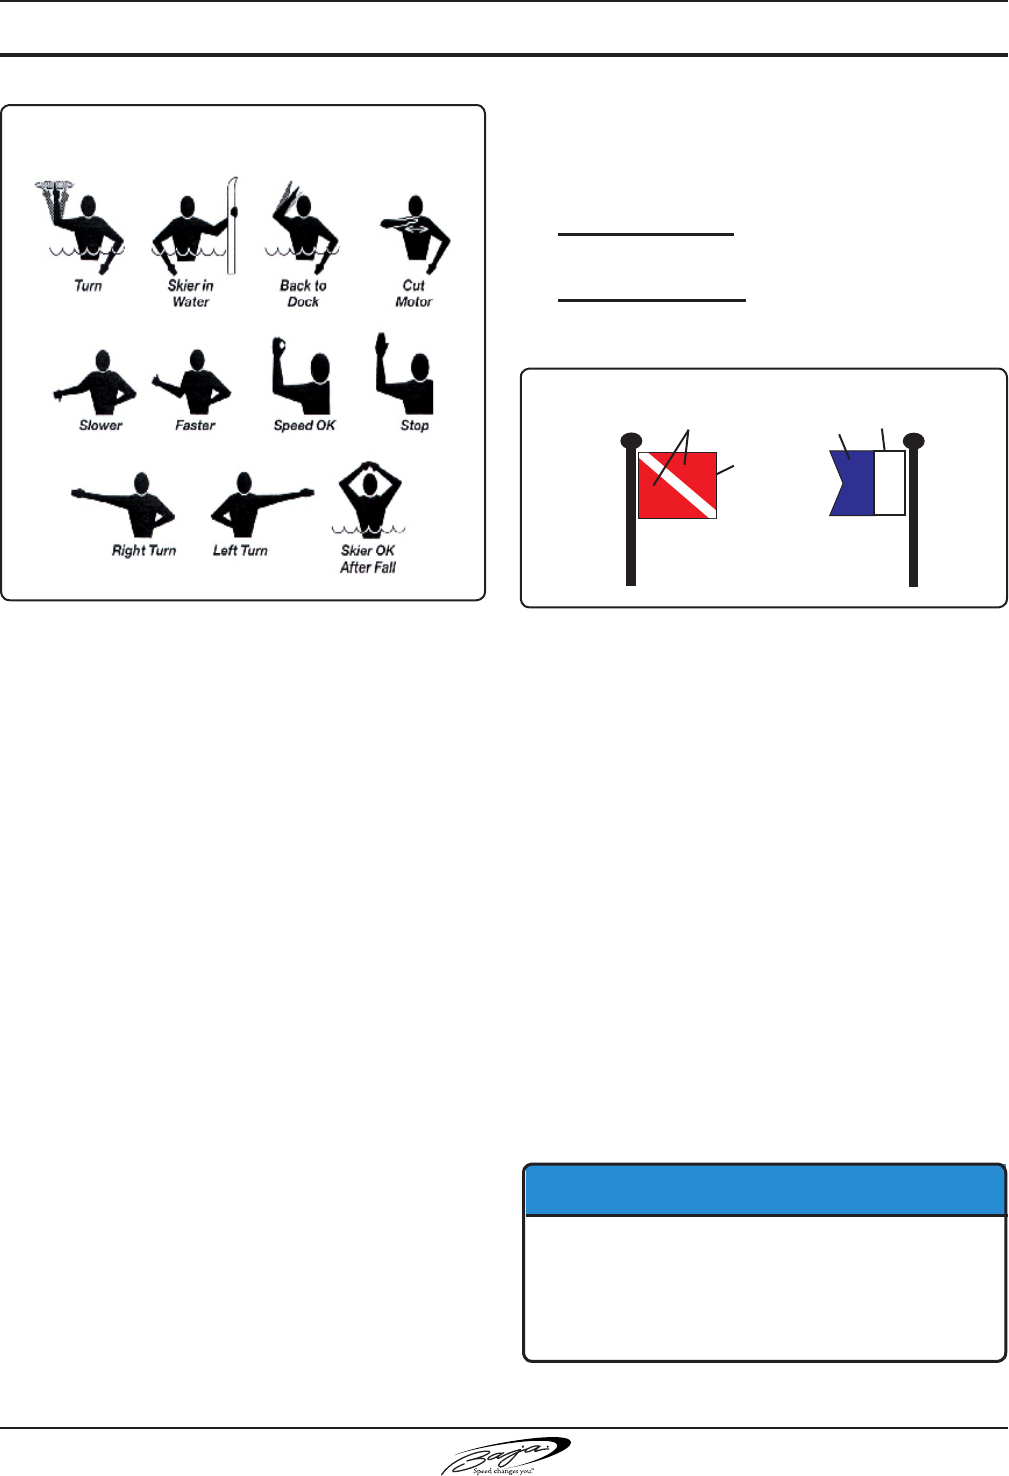
• Learn the signals to communicate with a skier. The
skier is to control the boat through hand signals. (See
Figure 1.10.1)
40 Outlaw®
1.10
SeCtiOn 1 • SaFety
SKIING SIGNALS (FIG. 1.10.1)
DIVERS FLAGS
(FIG. 1.10.2)
CODE ALPHA
FLAG
SPORT DIVER'S
FLAG
RED
WHITE
BLUE WHITE
Turn - Arm raised, circle with index nger extended.
Skier in Water - Extend one ski vertically out of water.
Back to Dock - Pat top of head.
Cut Motor - Draw nger across throat.
Slow Down - Thumb pointed down or palm down, move
hand up and down.
Faster - Thumb pointed up or palm up, move hand up
and down.
Speed OK - Raise arm and form a circle with thumb and
index nger.
Stop - Raise arm with palm vertical and facing
forward.
Turn Right - Extend right arm out from body to the
right.
Turn Left - Extend left arm out from body to the left.
OK After a Fall - Clasp hands together overhead.
C. Diving
Recognize and respect diving ags. (See Figure
1.10.2) Keep at least 30 meters (100 feet) away.
Sport Divers Flag – Red ag with diagonal white
stripe marks a diver in the water.
Code Alpha Flag – Blue and white pennant
designates boat being used in dive operations
in General
When engaged in water sports, be safe and courteous
to others sharing the water:
• Be considerate to shermen.
• Do not water ski in congested areas.
• Keep the boat and skier away from navigation
markers.
• Stay well clear of other boats and skiers.
16. eMerGencY siTuaTions
Prevention is the safest approach. We hope that you are
never involved in an emergency situation.
If you are involved in an emergency situation, it is
imperative that you know how to react, in order to protect
the lives in your care.
ASSISTING OTHER BOATERS: All boaters
have an obligation to help other boaters who
are in distress, as long as rendering assistance
does not endanger you, your passengers, or
your boat.
NOTICE

40 Outlaw®
1.11
SeCtiOn 1 • SaFety
a. MeDical eMerGencY
You may be far from professional medical help when
you are boating. At least two people on board your
boat should be CPR certied, and should have
taken a rst aid course. Equip your boat with a
rst aid kit.
b. WaTer rescue
A person who has fallen overboard will die from
hypothermia in water temperatures below 70°F if
not rescued quickly. Water rescue consist of three
steps: returning to the victim, making contact with
the victim, and getting the victim back on board.
Returning to the Victim
• Immediately make everyone aware of the incident
and keep the victim in sight.
• Slow the boat and keep pointing toward the person
overboard. At night, direct the best available light
source at the person.
• Throw a life preserver, even if the person is wearing
a PFD. It will serve as another marker.
Making Contact
• Slow the boat and circle toward the victim.
• Try to approach heading into the wind or into the
waves.
• Keep the victim on the right (starboard) side so the
boat operator has the victim constantly in sight.
• When almost alongside, turn off the engine in gear
to prevent propeller "windmilling."
Getting Back Aboard
• Try to reach the victim with a pole, or by throwing
a life preserver. Do not swim to rescue the victim,
except as a last resort.
• Assist the person in boarding the boat. The person
should normally be brought in over the stern.
• If the person is injured or cannot get into the boat,
a rescuer should put on a PFD with a safety line
attached to the boat and enter the water to assist
the victim.
• Handle the victim with care. Spinal injuries may have
occurred.
c. fire
Fire is a serious boating hazard. Boats can burn
quickly. Do not remain on board and ght a re
for more than a few minutes. If the re cannot be
extinguished within a few minutes, abandon the
boat.
Have re extinguishers handy. A small re can be
extinguished quickly with the right size and type of
re extinguisher.
• Extinguish smoking materials, shut off blowers,
stoves, engines and generators.
• Throw burning materials overboard, if possible.
• If the re is accessible, empty the contents of re
extinguishers at the base of the ames.
• If the re is in the engine compartmentand you have
an automatic extinguisher that activates, wait 15
minutes before opening the compartment. Have a
portable extinguisher ready in case the re ares
up.
• Signal for help.
• Grab distress signals and survival gear. Put on
PFDs. Prepare to abandon ship.
D. flooDinG, sWaMpinG anD capsizinG
In the event of ooding, swamping or capsizing:
• Try to shut off engines, generators and blowers
before leaving the boat.
• Have everyone put on Personal Flotation Devices
(PFDs).
• Account for all who were on board.
• If the boat is oating stay with the boat. Hang on, or
climb on the boat and signal for help.
• Only as a last resort should you attempt to swim to
shore - it is further away than it looks and you can
tire and drown.

40 Outlaw®
1.12
SeCtiOn 1 • SaFety
e. collisions anD leakinG
In the event of collisions and leaking:
• Slow down or stop to reduce water intake, unless
maintaining speed will keep the hole above water.
• Switch on bilge pump.
• Operate manual bilge pump, if the powered bilge
pump can't handle the water ow.
• Account for everyone on board and check for
injuries.
• Have everyone put on PFDs.
• Stay with the boat.
• Signal for help.
• If a leak patch is attempted, it should be done from
the outside.
• In the event of a collision, you are required to le an
accident report. Contact a state enforcement agency
or the nearest Coast Guard ofce. If you are boating
outside of U.S. waters, consult the nation you are
visiting for accident reporting requirements.
f. GrounDinG
In the event of running aground:
• Check for leaks. If water is coming in, stop the intake
of water before attempting to get the boat free.
• Inspect for damage to the hull, propulsion and
steering systems.
• Determine if the tide, wind and current will drive the
boat harder aground or will help to free it.
• Determine the water depth all around the boat,
and the type of bottom (sand, mud, rocks, etc.). If
it can be done without exposing persons to a risk
of injury, the boat should be moved away from
hard obstructions, and toward open water with soft
ground.
• Do not attempt to have your boat towed by other than
a trained and competent service, such as the Coast
Guard or a salvage company. Recreational craft are
not designed to tow other recreational craft.
G. propulsion, conTrol or sTeerinG
failure
If the drive train fails, or the controls or steering do
not respond properly or at all:
• Shut off engine.
• Put out the anchor to prevent drifting.
• Determine whether or not you can repair the problem
yourself. See the proper manuals for assistance
in troubleshooting the engine, steering and engine
controls.
• If you are not sure you can x the problem, or if
conditions are adverse, signal for help.
17. safeTY hoTlines
The safety information in the preceding pages
gives only the general areas of concern for
boating safety. It is not intended to be, nor
can it be, exhaustive. You must take a boating
safety course, and get hands-on instruction in
the proper and safe operation of your boat from
experienced persons before cruising.
The U.S. Coast Guard offers many pamphlets on
safety and other information not covered in this
manual. Contact your local Coast Guard unit or call
the toll-free safety hotlines below for information.
• U.S. Coast Guard 1-800-368-5647
• Canadian Coast Guard 1-800-267-6687
It is recommended that these and other important numbers
be stored in your cell phone for quick reference.
In other countries, ask your marine dealer for
information on how to contact the national boating
law enforcement agency.
40 Outlaw®
1.13
SeCtiOn 1 • SaFety
! WARNING
A wide variety of components used on this vessel
contain or emit chemicals known to the State of
California to cause cancer and birth defects and other
reproductive harm.
EXAMPLES INCLUDE:
• Engine and generator exhaust
• Engine and generator fuel, and other liquids such
as coolants and oil, especially used motor oil
• Cooking fuels
• Cleaners, paints, and substances used for vessel
repair
• Waste materials that result from wear of vessel
components
• Lead from battery terminals and from other
sources such as ballast or shing sinkers
TO AVOID HARM:
• Keep away from engine, generator, and cooking
fuel exhaust fumes.
• Wash areas thoroughly with soap and water after
handling the substances above.
18. inTernaTional requireMenTs
This vessel and its systems have been constructed
in accordance with standards and specications in
effect at the time of manufacture as published by
the various regulatory authorities listed below.
1. Ministere De La Mer – France
2. Registro Italiano Navale – Italy
3. Det Norske Veritas – Norway
4. Securite des Nauires – Canada
5. J.C.I. (Japan Craft Inspection) – Japan
6. N.K.K. (Nippon Kaiji Kyokai) – Japan
7. B.S.I. (British Standards Institute) – England
8. Ministerio Obras Publicas Y Transporters – Spain
9. EC Recreational Craft Directive – European
Community
Further information concerning these requirements
may be obtained from Baja® Marine Customer
Service: 1-865-971-6270.
19. environMenTal consiDeraTions
The following warning is offered for boats sold in
the State of California in accordance with California
Heath & Safety Code §§ 25249.5-.13:
a. fuel anD oil spillaGe
Regulations prohibit discharging fuel or oily waste
in navigable waters. Discharge is dened as any
action which causes a lm, sheen or discoloration on
the water surface, or causes a sludge or emulsion
beneath the water surface. A common violation is
bilge discharge. Use rags or sponges to soak up
fuel or oily waste, then dispose of it properly ashore.
If there is much fuel or oil in the bilge, contact a
knowledgeable marine service to remove it. Never
pump contaminated bilge overboard. Help protect
your waters.
Fill tank(s) less than rated capacity. Allow for fuel
expansion.
40 Outlaw®
1.14
SeCtiOn 1 • SaFety
NOTICE
It is illegal for any vessel to dump plastic trash anywhere
in the ocean or navigable waters of the United States.
! WARNING
SPEED HAZARD- Watch your wake. It might capsize
a small craft. You are responsible for damage caused
by your wake.
! CAUTION
Reduce speed in congested waterway.
Be alert for No Wake Markers.
b. WasTe Disposal
• Many areas prohibit overboard sewer discharge.
Close and disable ow-through waste systems
to prevent discharge in such areas.
• Bag all refuse until it can be disposed of
ashore. Regulations prohibit disposal of plastic
anywhere in the marine environment and
restrict other garbage disposal within specied
distances form shore.
c. excessive noise
Many areas regulate noise limits. Even if there
are no laws, courtesy demands that boats operate
quietly.
D. Wake/Wash
Power boat wakes can endanger people and
vessels. Each power boat operator is responsible
for injury or damage caused by the boat's wake. Be
especially careful in conned areas such as channels
or marinas. Observe "no wake" warnings.

40 Outlaw®
1.15
SeCtiOn 1 • SaFety
20. nauTical TerMs
Abeam – object 90 degrees ( 90° ) to center line on either side
of boat.
Abaft – a point on a boat that is aft of another.
Aft - toward the rear or stern of the boat.
Beam - the maximum width of a boat.
Bilge - the lowest part of the hull on the inside where uids
collect.
Bow - the forward part of a boat.
Bow Eye - bolt with looped head mounted on extreme forward
part of bow, used for towing or tying up boat.
Bulkhead - vertical partition in a boat
Chine - meeting juncture of side and bottom of boat.
Chock - deck tting, used as a guide for mooring or anchor
lines. Also, a wedge to stop wheels from rolling.
Cleat - deck tting with arms or horns to which lines are tied
or made fast.
Cockpit - the open space from which a boat is operated.
Deck - upper structure which covers the hull between
gunwales.
Downwind - in the direction the wind is blowing toward
Draft – depth of water required to oat boat and its propulsion
system.
Fathom - six feet.
Fenders - rope or plastic pieces hung over the side to protect
the hull from chang against a dock or another boat.
Freeboard - height of exposed hull from water line to deck.
Ground tackle - general term referring to anchors, anchor
lines, etc.
Gunwale (pronounced gun'l) - where the hull and deck come
together; the "sides" of the boat in the cockpit area.
Hatch - an opening in the deck to provide access below.
Head - toilet or toilet area in a boat.
Headroom - vertical distance between the deck and cabin or
canopy top.
Helm - steering and controls console.
Hull - the lower part of a boat beneath the deck and cockpit
that provides buoyancy to oat the weight of the craft and its
load.
Keel - the major longitudinal member of a hull; the lowest
external portion of a boat.
Knot - unit of speed in nautical miles per hour.
Lee - the side that is sheltered from the wind.
PFD - Personal Flotation Device; life jacket or preserver.
Port - term designating left side of the boat when facing
forward.
Rudder - Movable xture at the stern used for steering.
Scupper - hole permitting water to drain overboard from deck
or cockpit.
Sheer - curve or sweep of the deck as viewed from the side.
Snub - to check or tighten a line suddenly.
Starboard - term designating right side of the boat.
Stern - the rear (aft) end of a boat.
Stern drive - outboard unit of an inboard/outboard (I/O) engine
installation.
Stringer - longitudinal members fastened inside the hull for
additional structural strength.
Transom - the rear part of the boat across the back, to which
the drive unit and swim platform are attached.
Upwind - in the direction the wind is blowing from.
Wake - disturbed water that a boat leaves behind as a result
of forward motion.
Windward - toward the direction from which the wind is
blowing.
40 Outlaw®
1.16
SeCtiOn 1 • SaFety
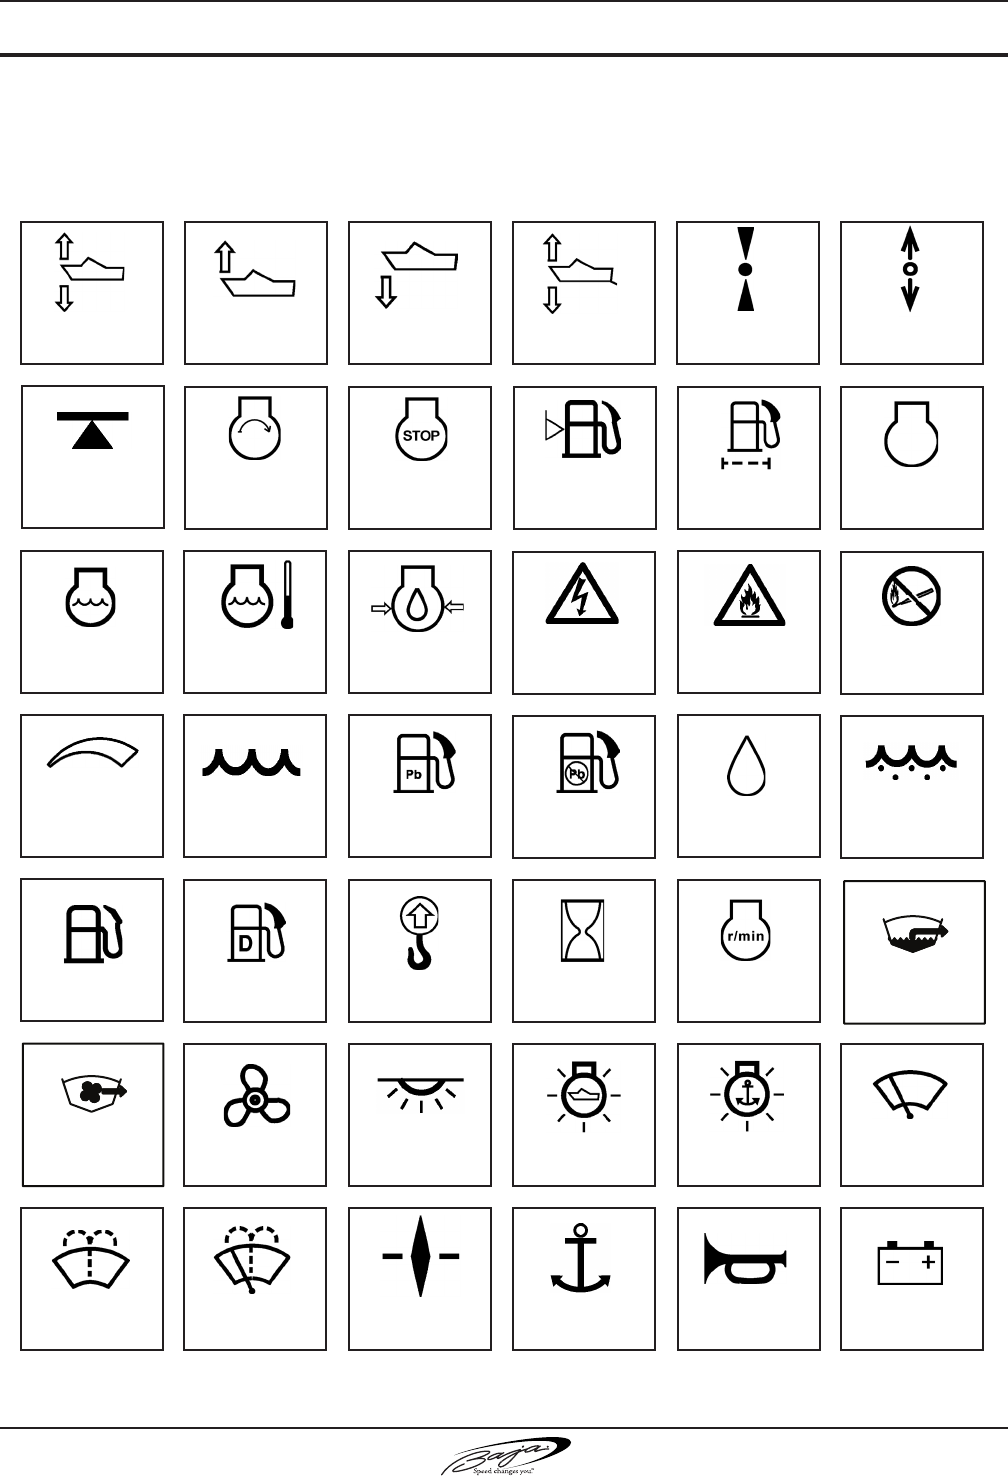
21. keY To sYMbols on conTrols & prinTs
These symbols may be found on your controls and gauges and/or used in this owner's manual. This page
is to help you understand what the symbols mean.
PROPULSION
SYSTEM
TRIM
PROPULSION
SYSTEM TRIM
BOW UP
PROPULSION
SYSTEM TRIM
BOW DOWN
TRIM TAB
TRIMMING
OPERATION
SINGLE
LEVER CONTROL
(THROTTLE & SHIFT)
CONTROL
LEVER OPERAT-
ING DIRECTION
LIFT POINT
OR PROPER
LOCATION OF
SLING
ENGINE
START
ENGINE
STOP
FUEL
LEVEL
FUEL
FILTER ENGINE
ENGINE
COOLANT
ENGINE
(COOLANT)
WATER JACKET
TEMPERATURE
ENGINE OIL
PRESSURE
WARNING
ELECTRICAL
HAZARD
FIRE
RISK
NO OPEN FLAME
NO SMOKING
ROTARY CONTROL
(QUANTITY INCREASES
WITH WIDTH OF
SYMBOL)
FRESH WATER
BASED COOLANT LEADED
FUEL
UNLEADED
FUEL
WASTE
WATER/SEWAGE
FUEL,
GENERAL
DIESEL
FUEL
LIFT
POINT
ELAPSED
TIME
ENGINE
ROTATIONAL
SPEED
PROPELLER INTERIOR
LIGHT
RUNNING LIGHTS
UNDER POWER
ANCHOR
LIGHT
WINDSHIELD
WIPER
WINDSHIELD
WASHER
WINDSHIELD
WIPER AND
WASHER
COMPASS ANCHOR HORN BATTERY
OIL
BILGE
PUMP
BILGE
BLOWER
40 Outlaw®
1.17
R
Speed changes you. TM.
22. WarninG label locaTions
warning laBel lOCatiOnS
(Fig 1.17.1)
Located in Owner’s Packet
California Residents Only
The above warning is attached to the steering wheel prior to delivery of any
boats sold in the state of California in accordance with California Health and
Safety Code §§ 25249.5-.13
Fisheries and Oceans
Canada
Coast Guard
Peches et Oceans
Canada
Garde cotiere
Canada
BUILDER-CONSTRUCTEUR MODEL- MODELE
BAJA MARINE
CORPORATION AGC
THE MANUFACTURER CERTIFIES
THAT THIS PRODUCT COMPLIES
WITH THE CONSTRUCTION
STANDARDS FOR SMALL
VESSELS.
LE FABRICANT CERTIFIE QUE CE
PRODUIT EST CONFORME AUX
NORMES DE CONSTRUCTION DES
PETITS BATEAUX.
NO. -no POXV 1454
Baja Marine Corp.
40 Outlaw
MAXIMUM
8 + = 725 kg
C E
0609
C
IMCI
only w/ re port
optional
optional
optional

40 Outlaw®
1.18 R
Speed changes you. TM.
THIS PAGE INTENTIONALLY LEFT BLANK
40 Outlaw®2.1
SeCtiOn 2 • general BOat arrangeMent
! CAUTION
Do Not use cleats for lifting.
2. passenGer locaTions
1. When the boat is moving, all passengers must
be on the seating provided or, if standing,
holding on rmly.
While the person at the wheel must alert
passengers before any sudden or erratic boat
movement, such as crossing wakes, rapid turns,
sudden acceleration or deceleration, etc., an
emergency action may be necessary before
passengers can be warned. All passengers
must be prepared for rapid boat movement and
be able to hold on to prevent loss of balance.
2. When persons are on the working deck area,
for anchoring, mooring, or in emergencies,
they must be holding on and be positioned so
as to prevent falling. In bad weather and/or
rough water, if it is essential to be on deck,
persons should be closely tied to cleats, railing
stanchions, or other securely fastened boat
hardware.
3. Engines must be turned off and the stern drive
fully down if the boat is near swimmers or
persons are on the swim platform or the swim
ladder.
Boat motion can be erratic.
You can fall overboard or be injured by hitting
something in or on the boat.
All persons must be in cockpit area or cabin and be
prepared for sudden boat movement.
Use front or bow deck area only during anchoring,
mooring or emergencies.
! WARNING
Wet decks are slippery.
You can be seriously injured if you slip and fall.
Wear slip resistant footwear secured to your feet and
hold on to rails or boat structure.
! WARNING
BOw eye lOCatiOnS
(Fig 2.1.2)
Bow Eye
BOW & STERN EYES
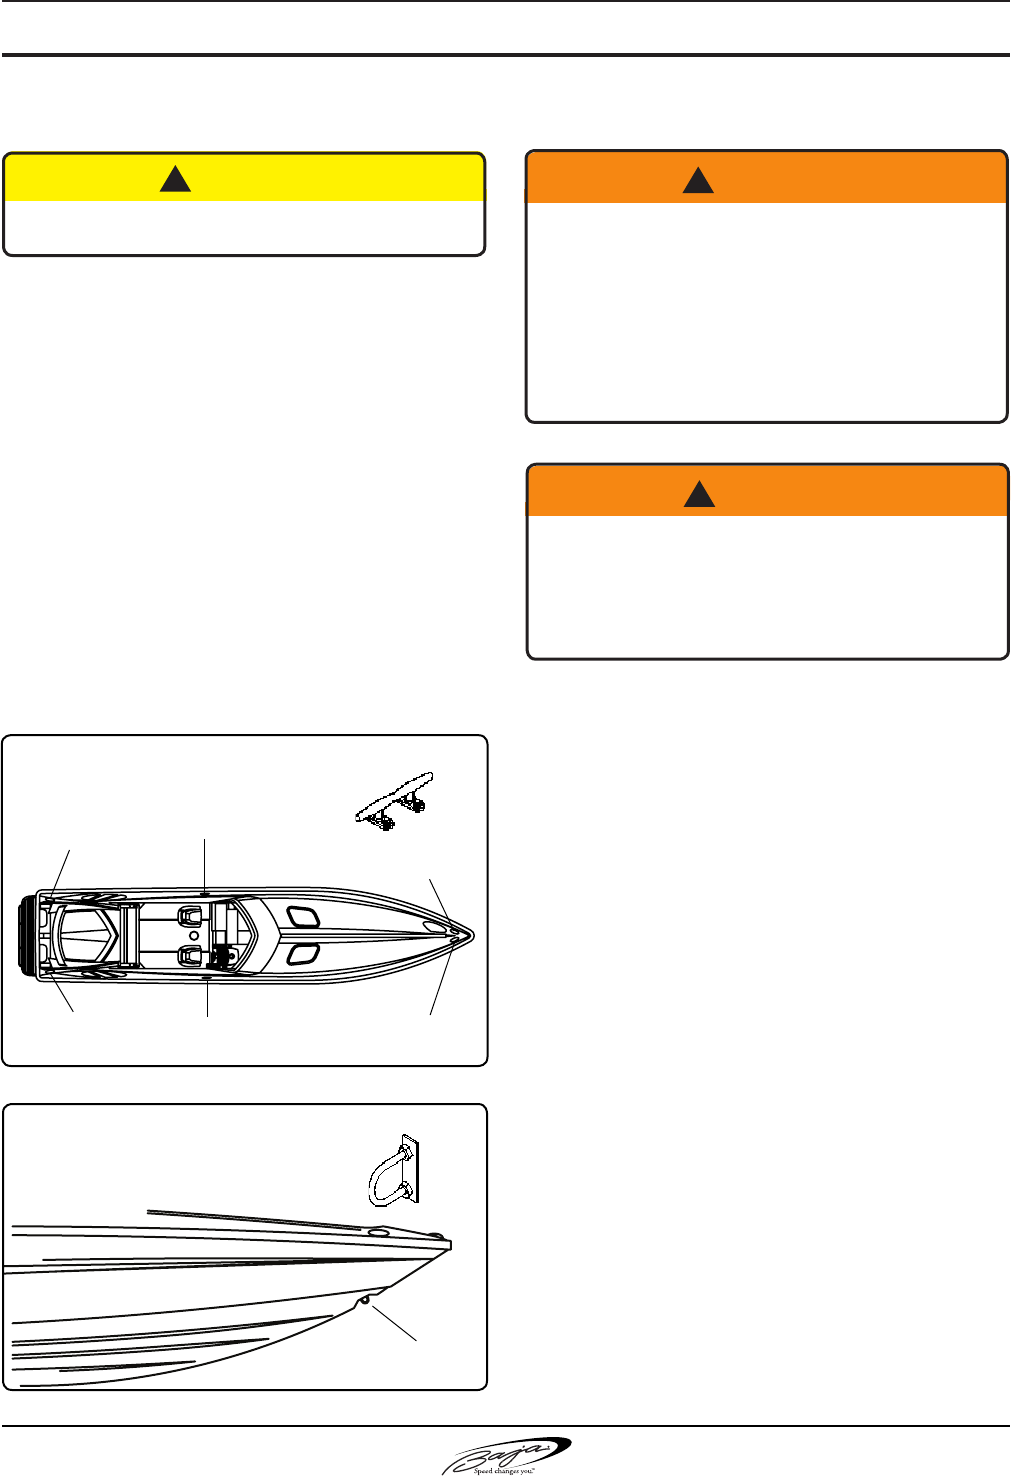
1. DockinG/lifTinG/TrailerinG
CLEATS: Cleats must not be used for lifting
the boat; they are intended for docking or mooring
use only.
BOW AND STERN EYES: The bow eye must be
used to haul the boat onto a trailer. The stern eyes
must be used as tie down points for trailering the
boat. The bow and stern eyes may be used for short
term lifting of the boat such as for service. Long
term lifting with the bow and stern eyes may cause
stress on the berglass and gel coat.
For long term storage, use at, wide belt-type slings
and spreaders long enough to keep pressure from
gunwales. Do not place slings where they may lift
on underwater ttings.
Cleat
CLEAT
Cleat
Cleat
Cleat lOCatiOnS
(Fig 2.1.1)
Cleat
Cleat Cleat
40 Outlaw®
2.2
SeCtiOn 2 • general BOat arrangeMent
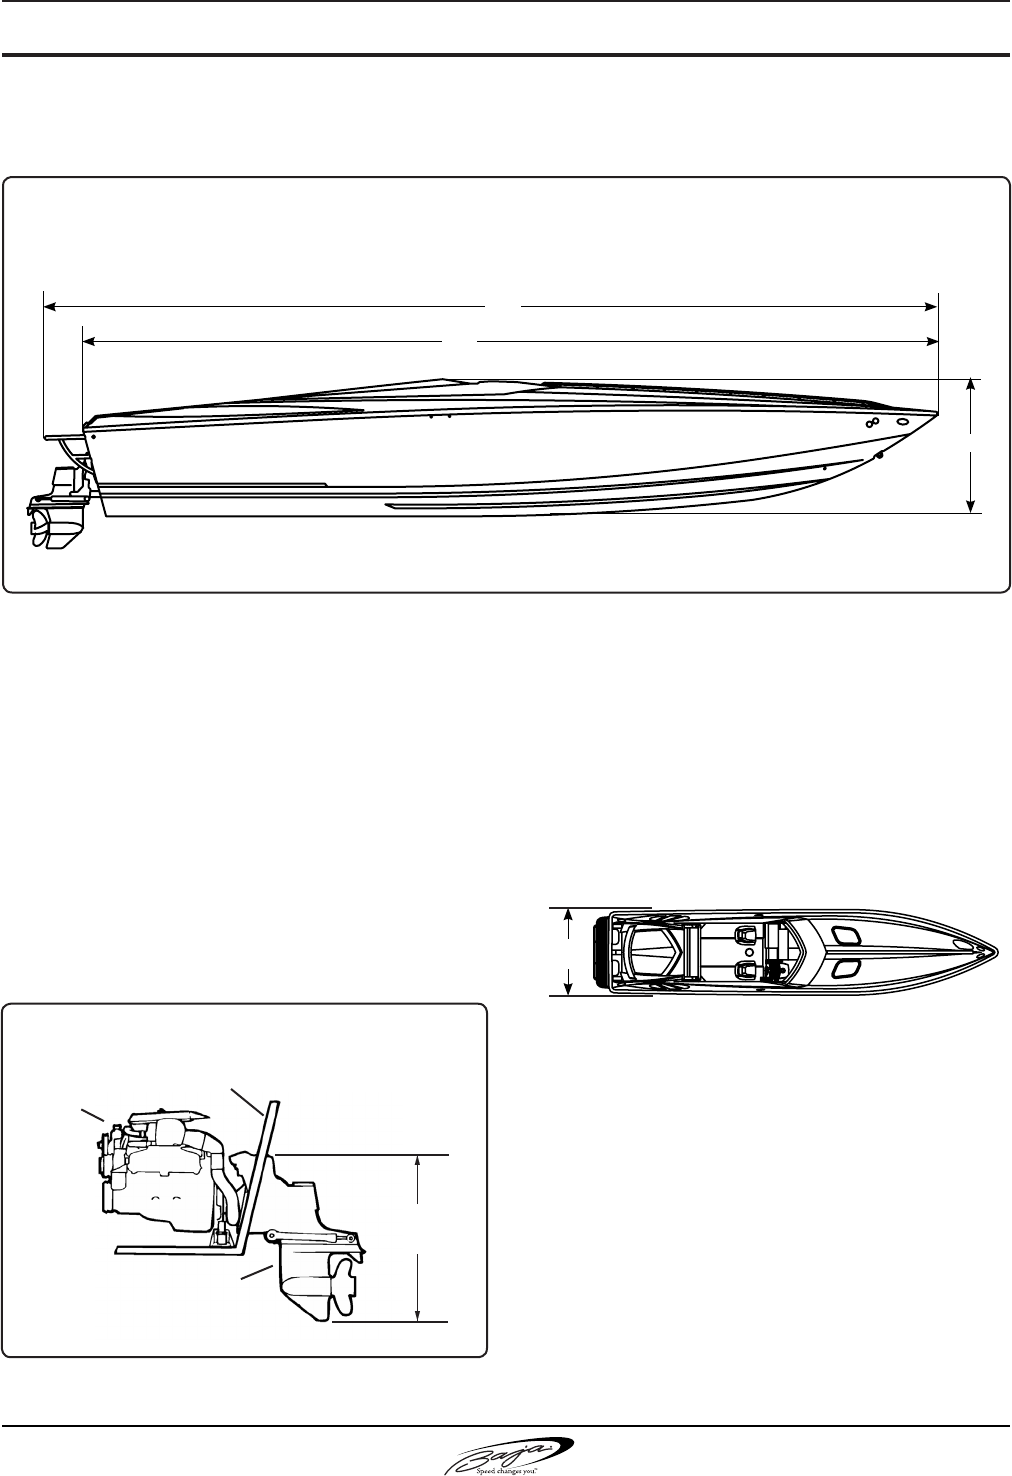
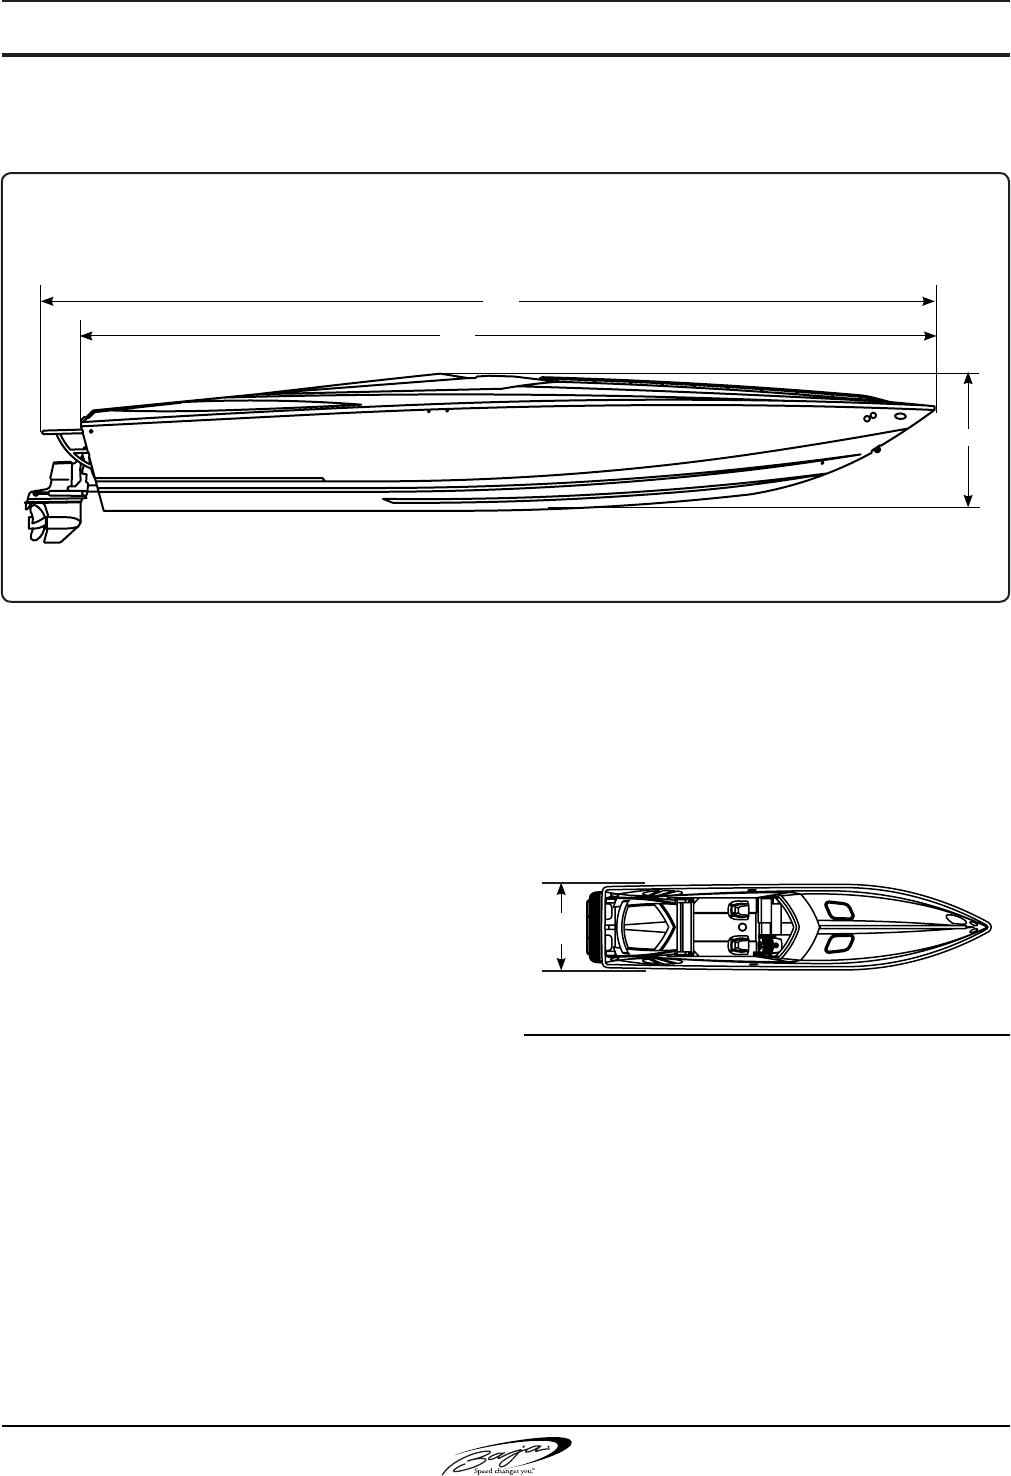
3. basic boaT DiMensions anD clearances (uniTeD sTaTes sTanDarD s.a.e.)
40 Outlaw specificaTions
Overall Length .................................................................40'6"
Overall Length w/ Swim Platform ....................................42'7"
Beam (width) .....................................................................8'6"
Draft (stern drive down – Twin) .......................................... 40"
Draft (stern drive up in trailering position)...........................35"
Draft (stern drive down – Triple) ........................................ 46"
Draft (stern drive up in trailering position)...........................41"
Dry Weight (Twin) ..............................................9,300 pounds
Dry Weight (Triple) ...........................................12,000 pounds
Fuel Capacity........................................................ 296 gallons
heiGhT DiMensions
Keel To Top
Of Windshield.....................................................................79"
From Waterline to
Top of Windshield................................................................59"
8’6”
Beam
(FIG. 2.2.3)
BOat diMenSiOnS and ClearanCeS
(Fig. 2.2.1)
42'7"
79"
Specication measurements are approximate
and subject to variance.
Stern drive (inBOard-OutBOard) engine
(Fig 2.2.2)
STERN DRIVE UNIT
(LOWER UNIT)
DRAFT
(Stern Drive Down)
40"/101cm
WATER LINE
HULL
(TRANSOM)
ENGINE
40'6"
40 Outlaw®2.3
SeCtiOn 2 • general BOat arrangeMent
basic boaT DiMensions anD clearances (MeTric)
40 Outlaw SpeCiFiCatiOnS
Overall Length..............................................................12.3 m
w/std. Swim Platform....................................................13.0 m
Beam (width).................................................................2.59 m
Draft w/ stern drive down (Twin)........................................101.6 cm
Draft w/ stern drive up in trailering position.....................88.9 cm
Draft w/stern drive down (Triple).......................................116.8 cm
Draft (stern drive up in trailering position).....................104.1 cm
Dry Weight (Twin).........................................................4,445.3 kg
Dry Weight (Triple)......................................................5,443.2 kg
Fuel Capacity.........................................................1,120 liters
height diMenSiOnS
From Keel
without Windshield.........................................................2.0 m
From Waterline
without Windshield......................................................1.5 m
4. propulsion sYsTeM
Your boat is equipped with a stern drive type
propulsion system also known as an inboard-
outboard engine. (See Figure 2.2.2) This type of
propulsion system has the engine inside the boat
secured to the hull's stringers at the rear end of
the hull. The stern drive unit, also called the lower
unit because it hangs below the hull, is part of the
propulsion system that attaches to the outside of
the hull or transom. The stern drive unit pivots to
steer the boat.
For engine operating instructions, see page 3.4.
BOat diMenSiOnS and ClearanCeS
(Fig. 2.3.1)
(FIG. 2.3.2)
5. propellers
Your Baja® has been equipped with a propeller
which our tests have shown to be the best suited for
general use under normal conditions and load.
Under no circumstances use a propeller which
allows the engine to operate at higher than the
maximum RPM for your engine. (See the Engine
Operator's Manual.)
13.0m
2.0m
12.3m
2.59 m
Beam
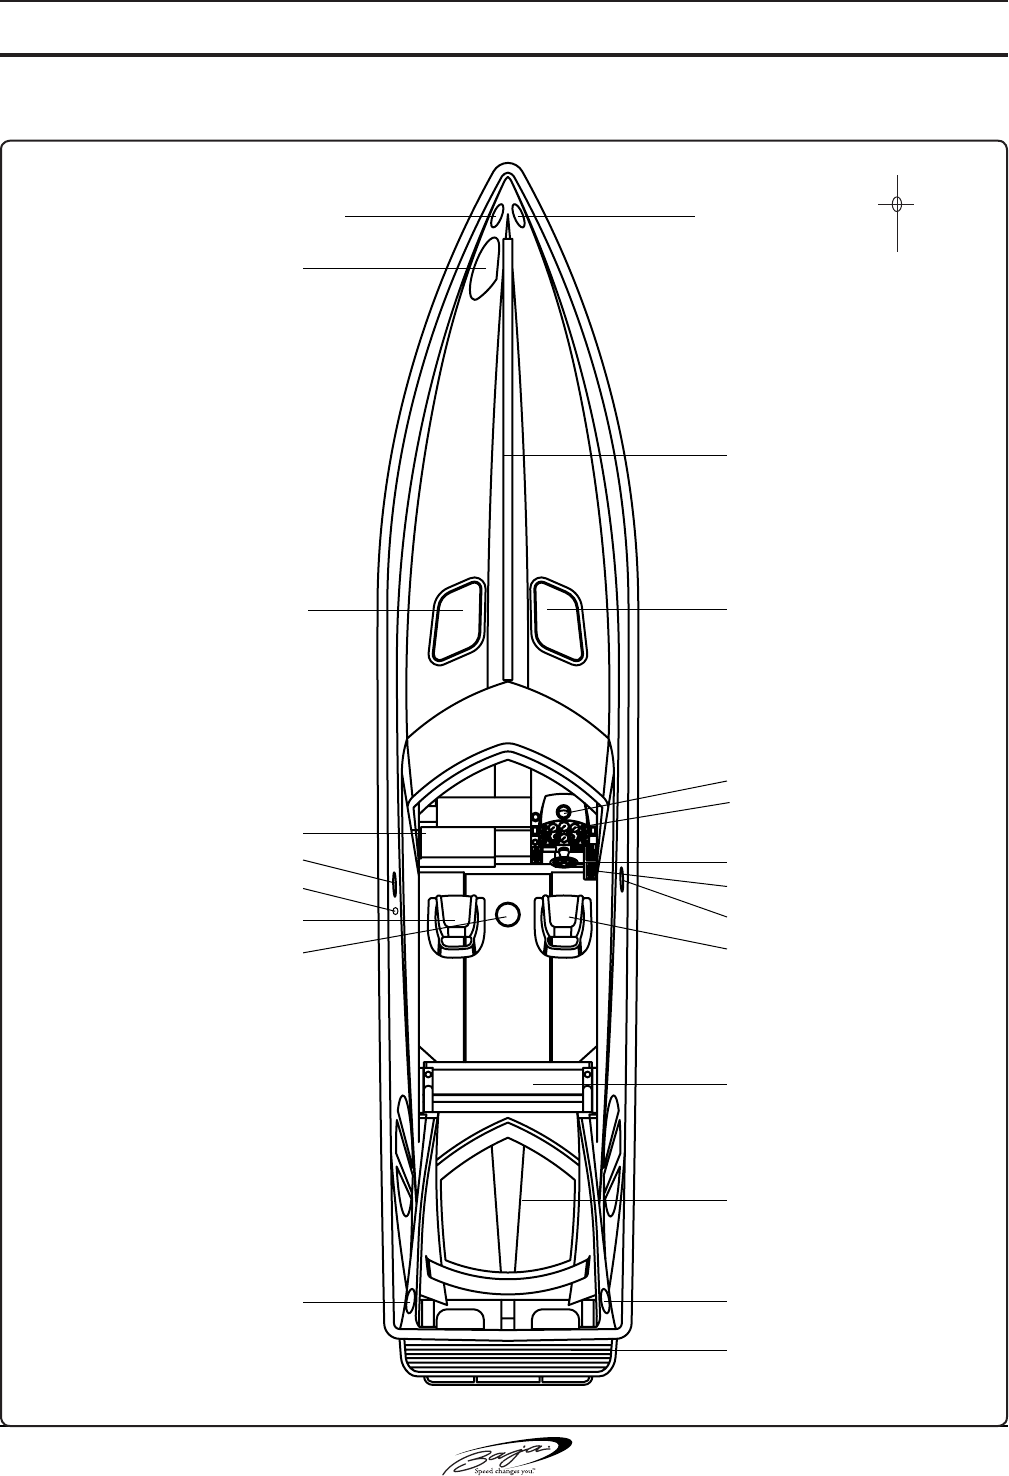
40 Outlaw®
2.4
SeCtiOn 2 • general BOat arrangeMent
6. General Deck laYouT
GENERAL DECK LAYOUT
(FIG. 2.4.1)
FWD
REAR
(AFT)
LEFT
(PORT)
RIGHT
(STBD)
Cleat
Cleat
Deck Hatch
Shift/Throttle Controls
Steering Wheel
Helm Seat
Passenger Seat
Glove Box
Cleat Cleat
Deck Hatch
Aft Seating
Anchor Storage
Engine Hatch
Inspection Plate
Swim Platform
Fuel Fill
Bow Rail
Gauges
Compass
Cleat
Cleat
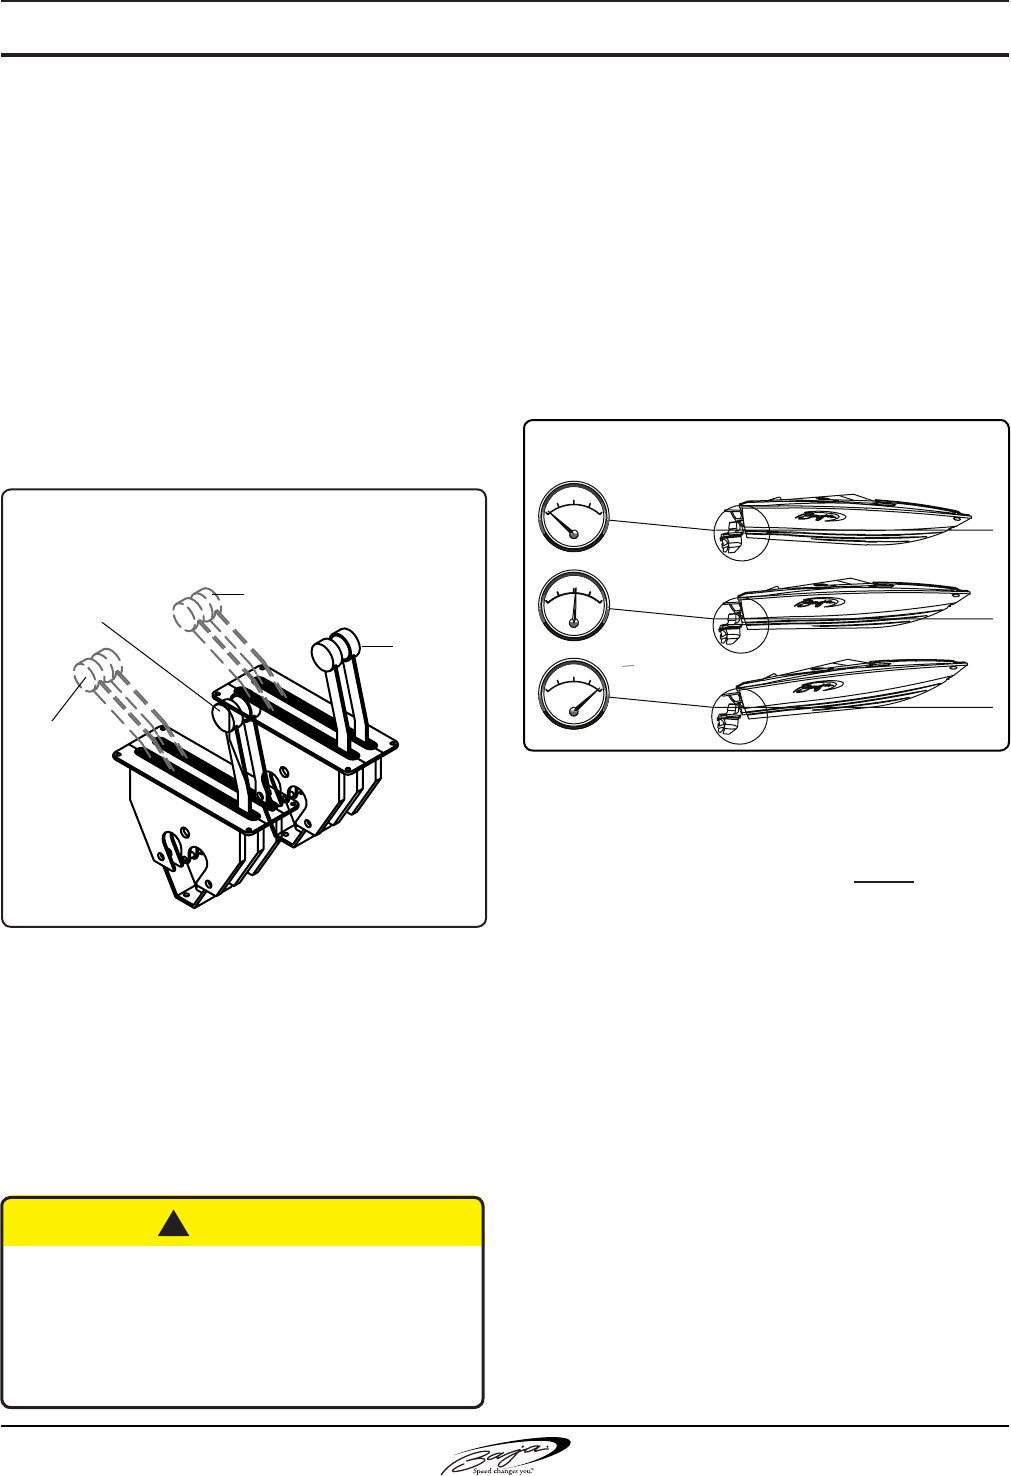
40 Outlaw®2.5
SeCtiOn 2 • general BOat arrangeMent
7. DescripTion of Major conTrols
a. Gear shifT anD ThroTTle conTrol
The shift/throttle control unit for the engine is activated
by individual handles. (See Figure 2.5.1) The shift
handle must be in neutral position to start your engine.
Moving the shift handle forward engages the forward
gear. Then move the throttle arm or handle forward to
increase engine speed and propeller RPM, moving the
boat faster. To shift to reverse, bring the shift handle
lever back to the neutral position after bringing back the
throttle handle rst, then move it further back to engage
the reverse gear. Move the throttle handle to increase
engine speed and propeller RPM, moving the boat faster
in reverse.
The throttle control adjusts the RPM of the engine and
thus, the rotational speed of the propeller. Regulating the
RPM of the engine controls the speed of the boat.
Forward motion creates forward moving water called a
"following" wake. If the boat is moving forward and the
shift/throttle is moved quickly from forward to reverse,
the boat will stop rapidly and then move backward. The
following wake continues to move forward and can rise
above the transom and ood the boat.
b. poWer TriM uniT anD GauGe
The Power Trim allows the operator to raise and lower
the stern drive unit while underway to provide the ideal
boat angle (in relation to water surface) for a given load
and water condition. (See Figure 2.5.2)
Trimming UP rotates the stern drive and propeller away
from the transom. Trimming DOWN rotates the stern
drive and propeller closer to the transom.
When the stern drive is trimmed DOWN, the bow of your
boat is being forced down. If the trim is in the full DOWN
position when accelerating from idle to plane, the boat
will plane faster with less bow rise. Once on plane, the
stern drive unit can be trimmed UP slightly. This will
raise the bow of the boat slightly and increase speed.
You will need to try small differences in the stern drive
position to determine the trim position you prefer under
various conditions.
If you raise the stern drive up too far while on plane, you
could cause a loss of speed and power due to a condition
called propeller "ventilation." If this happens, there will
be a sudden increase in engine RPM and loss of speed.
Do not let this condition exist. Immediately reduce your
engine RPM and trim the outdrive DOWN slightly until
engine slows down and you regain forward speed.
The trim gauge indicates the position of the stern drive
relative to the transom.
REFER TO YOUR ENGINE OPERATOR'S MANUAL
FOR PROPER TRIM GAUGE SETTING.
Do not shift to reverse too soon. Wait for the following
wake to dissipate.
eFFeCtS OF pOwer triM
(Fig. 2.5.2)
DOWN UP
DOWN UP
DOWN UP
Cockpit can ll with water if boat is moving forward
fast enough to create a wake, and then quickly put
into reverse.
Before shifting into reverse, shift to neutral, wait for
the boat to stop rapidly moving forward, then shift
into reverse.
! CAUTION
Throttle levers
in full throttle
position
Shift levers in
forward positon
Shift levers
in reverse
position
Throttle
levers in idle
position
GEAR SHIFT AND THROTTLE CONTROL
(FIG. 2.5.1)
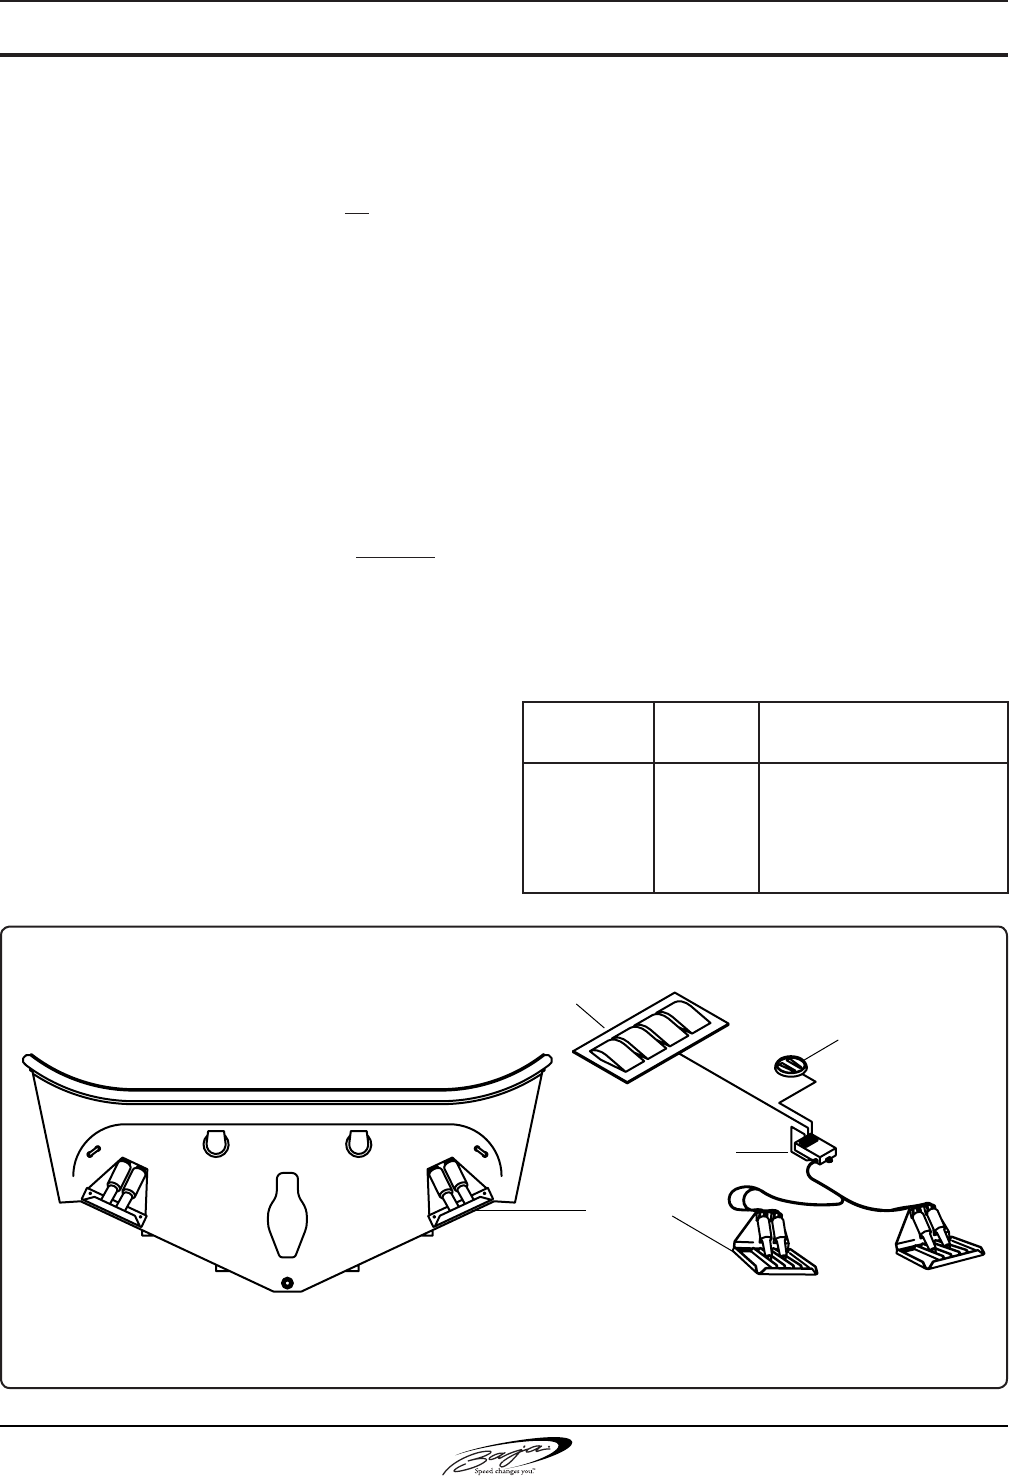
40 Outlaw®
2.6
SeCtiOn 2 • general BOat arrangeMent
c. Trailer sWiTch
The trailer switch (Power Tilt) is not to be confused
with the Power Trim function. The trailer switch is
to be used only when the engine is off.
The trailer switch allows the drive unit to be raised
for trailering, beaching and launching. To operate,
press and hold the trailer switch until the drive unit
reaches the end of upward travel. The mechanism
that raises the lower unit will stop operating at the
end of the upward travel. To bring the drive unit
down into boating position, push the power trim
switch down.
D. TriM Tabs
The trim tabs (see Figure 2.6.1) are different from
the stern drive unit trim control. The trim tabs are
two at plates, hinged below the water line on the
transom at the rear and are raised and lowered
hydraulically by using the rocker switches located
at the helm station.
The trim tabs are used to adjust the sideways
listing of the boat due to uneven loading, a strong
cross wind or propeller torque. The twisting effect
of propeller torque is especially pronounced when
running the engine at high horsepower output.
To correct the listing, adjust the trim tabs to level
the boat. When the boat is level, right to left, the
steering effort will be the same for right and left
turns.
Lower the trim tab on the listing (lower) side by
pushing the top half of the rocker switch in one-half
second bursts until the boat is righted.
Using both switches to lower both tabs on a side-
to-side balanced boat will lower the bow, when
on plane, if the rear of the boat is highly loaded.
Again, use only short bursts of the rocker switches
to adjust the trim.
When running at cruising speed, the trim tabs should
be fully up, unless the rear is heavily loaded.
In heavy following seas or when running in an inlet,
best maneuverability is obtained with a bow high
attitude. To be sure the tabs are full up, push the
bottom halves of the rockers for several seconds.
running
attitude liSt Push
BOW UP
BOW UP
BOW UP
BOW DOWN
BOW DOWN
------
Port
Starboard
Port
Starboard
Top of Both Switches
Top of Starboard Switch
Top of Port Switch
Bottom of Starboard Switch
Bottom of Port Switch
triM taBS
(Fig 2.6.1)
The optional installed trim tabs may vary from above picture.
ROCKER SWITCH
CONTROL MODULE
TRIM TAB
TRIM INDICATOR

40 Outlaw®2.7
SeCtiOn 2 • general BOat arrangeMent
8. iMporTanT GauGes
a. TachoMeTer anD hour MeTer
The tachometer (see Figure 2.7.2) indicates the
revolutions per minute (RPM) of the engine (it does
not indicate the speed of the boat). Your Engine
Operator's Manual indicates the maximum full
throttle RPM at which your engine should operate.
This must not be exceeded or serious engine
damage will occur. The tachometer should also
be used to determine the most comfortable and
economical cruising RPM.
The hour meter measures cumulative hours of
operating time on the engine. Use the hour meter
to keep a careful log of when to maintain the engine
as well as to estimate fuel consumption. Do not
leave ignition key in the "ON" position with engine
off, because the hour meter will continue to run,
even though the engine is not operating.
e. iGniTion shuTDoWn sWiTch
Figure 2.7.1 shows the ignition shutdown switch.
The purpose of the switch is to shut down the
engine if the operator unintentionally leaves the
helm station. Situations in which this could occur
are rough water, bad weather and other adverse
boating conditions. In these situations, the safety
of the boat and its passengers is enhanced by using
the ignition shutdown switch, since the boat will stop
when the operator can no longer control the boat.
However, unexpected engine shutdown may result
in unintentional harm. For example, a passenger
may lose balance and fall, or control could be lost
during docking. No specic guidelines can be given
for switch use. The ultimate decision of when to use
an ignition shutdown switch rests with the operator
or owner.
When the switch is used, the operator must securely
clip the lanyard to their belt or clothing so that if the
operator falls overboard or into the boat, the switch
is activated and the engine shuts down.
To reset ignition shutdown switch after it has been
activated, simply reinstall the switch clip above
the shut-off switch and ip the switch to the "UP"
position.
f. enGine alarM sYsTeM
The Engine Operator's Manual will tell you if your
engine is equipped with an audible alarm and how
to use it.
The alarm indicates a problem with engine water
temperature, oil pressure and/or stern drive oil
level.
typiCal taChOMeter with hOur Meter
(Fig 2.7.2)
Always check oil pressure and water gauges
before leaving dock and while underway, even
if your engine has an alarm.
Shut down engine immediately if gauges are
not in normal ranges, or alarm sounds.
Do not restart engine until problems are
corrected.
! CAUTION
ignitiOn ShutdOwn SwitCh
(Fig 2.7.1) Ignition
Shutdown
Switch
Clips to Switch
Clips to You
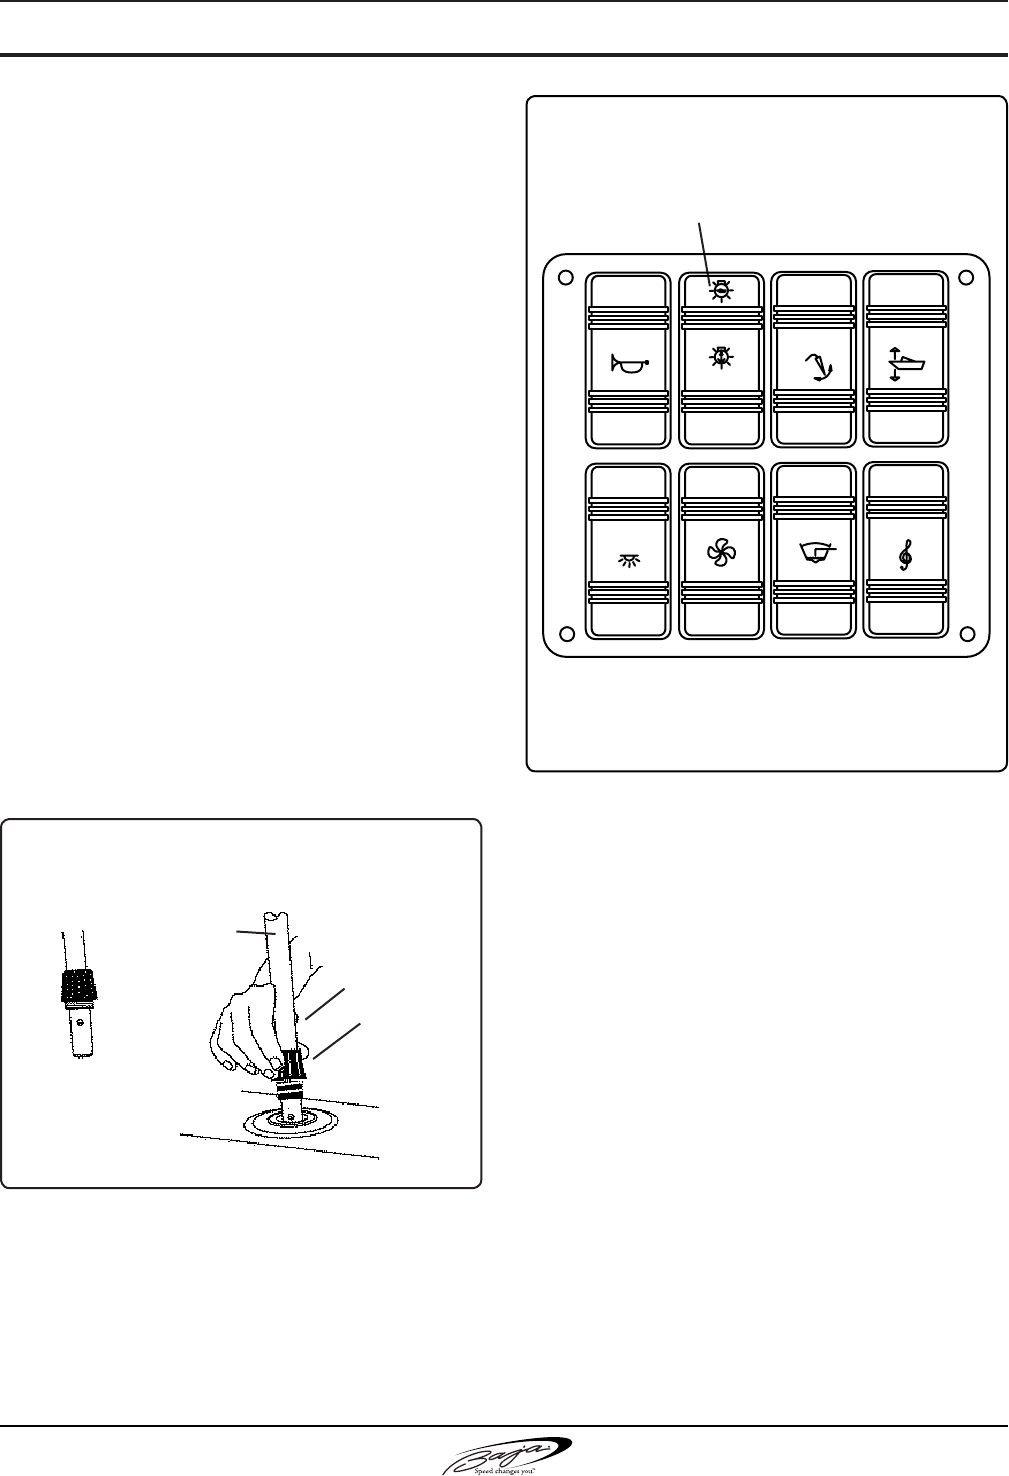
40 Outlaw®
2.8
SeCtiOn 2 • general BOat arrangeMent
inSerting the aFt reMOvaBle navigatiOn/
anChOr light (lOCated at the Stern OF the BOat)
(Fig 2.8.1)
ANCHOR LIGHT
MAST
SCREW IN TYPE
CONNECTOR
COMPRESSION
TYPE CONNECTOR
DECK ANCHOR
LIGHT FITTING
b. oil pressure, WaTer TeMperaTure,
volTMeTer anD fuel GauGes
These gauges function on your boat the same way
they do on your car or truck. You must continually
check these gauges visually to make certain there
are no engine system problems even if your boat
engine has an alarm system.
9. naviGaTion anD anchor liGhTs
Navigation lights must be on while underway
from sunset to sunrise or in conditions of reduced
visibility. "Underway" means the boat is not docked
or at anchor. Trolling or drifting with engine off is
considered "underway" and navigation lights must
be used. (See Figures 2.8.1 and 2.8.2)
If you are anchored in open water, i.e. where other
boats can approach yours, you must display your
anchor light: a white light that can be seen from all
possible directions, i.e. 360 degrees.
Read the "Federal Requirements and Safety Tips
for Recreational Boats" provided in your Owner's
Manual Packet..
navigatiOn and anChOr lightS SwitCheS
(Fig 2.8.2)
Navigation Lights (forward) - Bow & Stern Lights are on.
Anchor Light (back) - Only Stern Light is on.
Nav./Anchor Lights
HORN NAV/ANC
LTS
TRAILER TRIM
COURT
LT
BLOWER BILGE STEREO

3.140 Outlaw®
SeCtiOn 3 • uSing yOur BOat
1. pre-launch, launch anD posT-
launch checklisT
Listed below are the critical items you must check
and do each time you use your boat. It does not list
all of the necessary maintenance and service items
required to keep your boat running properly. These
other items are found in Section 8.
before launch
Drain plug installed
Enough fuel for trip
Float plan given to friend or relative
Navigation charts for trip
Weather forecast - safe
in The WaTer, before boarDinG passenGers or
sTarTinG enGine
Stern drive down
Equipment stored and balanced
No gas smell in engine compartment
Engine oil and steering uid levels - OK
Battery switch on
No uid in bilge
Bilge pump working
Bilge blower on
Radio and navigation equipment functioning
passenGers
Wearing PFDs
Seated properly
Given safety instructions
sTarTinG enGine
Make sure you have read and understand the
dangers of Carbon Monoxide (CO) information
in this manual.
Bilge blower on for at least four (4) minutes. Feel
to conrm airow at hull vent on hull side. Inspect
bilge area for visual and odor conrmation that
there are no fuel leaks.
Throttle-only position, handle pumped before
starting, if necessary.
Oil pressure, engine temperature, voltage - OK
after starting and warm up.
unDerWaY
Gradual acceleration and deceleration and
turning.
Aware of surroundings at all times.
Operate so as to prevent buildup of Carbon
Monoxide (CO) (See section 1.3)
Monitor weather
Use navigational aids in water and on shore
Keep passengers safe
Do not operate impaired
Check fuel consumption regularly
Check all gauges frequently
enD of Trip
Equipment dry and stored.
Electronic equipment and switches off.
Battery switch off.
Stern drive in trailering position.
Notify person who had oat plan.
Boat covered properly for trailering, docking or
mooring.
Drain plug removed (if boat is not kept in
water).
Hull and propeller inspected for damage.
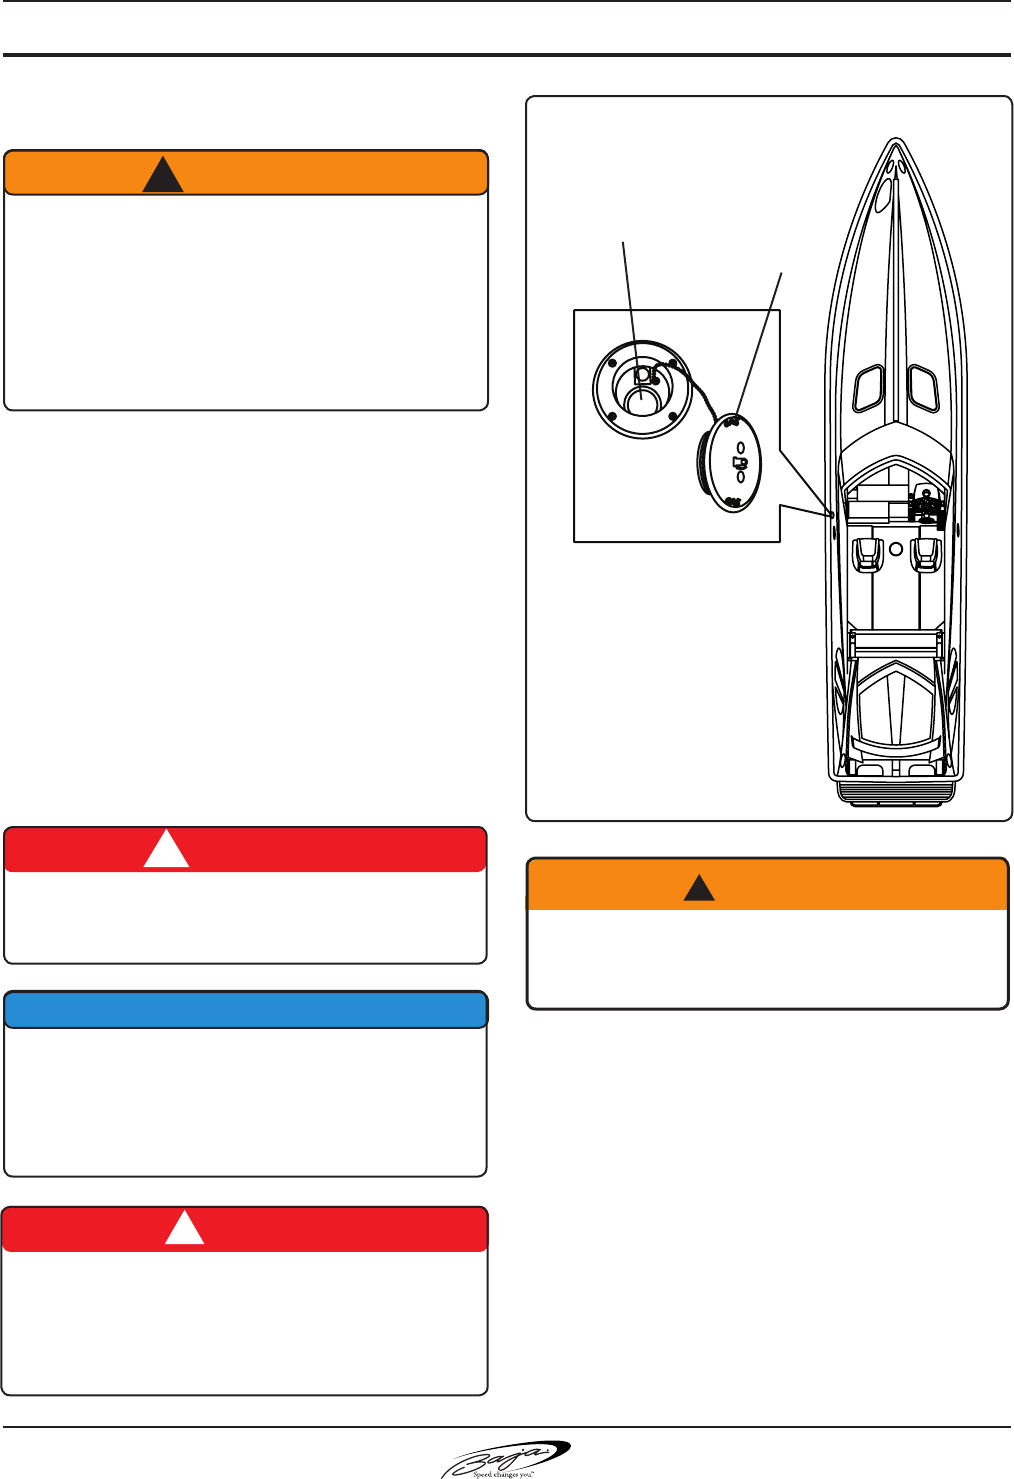
3.2
SeCtiOn 3 • uSing yOur BOat
40 Outlaw®
3. fuelinG The boaT
The fuel ll cap is located on the port side of the
boat (Figure 3.2.1). Do not mistake the water tank
ll and waste pump out caps for the gasoline
ll cap.
Refer to your engine manual for the proper grade
of gasoline.
before fuelinG
• Fuel during daylight hours.
• Tie boat to the dock.
• Shut off engine, bilge blower and all other
electrical equipment.
2. Trailer launchinG anD loaDinG
Your trailer must be capable of carrying the boat’s
weight as well as supporting the boat near the keel,
front (bow), and rear (stern) areas. Using a trailer
not designed to support the boat properly, can cause
structural damage to the hull. A damaged hull can
be unsafe.
PROPER TOWING OF A BOAT AND TRAILER
REQUIRES SPECIAL SKILLS. MAKE CERTAIN YOU
PRACTICE HOW TO MANEUVER A BOAT AND
TRAILER AND GET TRAINING BEFORE TOWING,
LAUNCHING, AND LOADING YOUR BOAT.
An improper trailer can cause structural damage to
the hull.
A damaged hull can be unsafe; it could cause the
boat to sink.
Use a trailer that can properly support the boat’s
weight and shape. Get professional help in picking
the right trailer for your boat.
! WARNING
NO SMOKING
GASOLINE VAPORS ARE EXPLOSIVE
! DANGER
! DANGER
Gasoline vapors can explode from static
electricity if fueling is not done properly.
Read and understand this section and
section 5 • Fuel System
! WARNING
Leaking fuel is a re and explosion hazard. Inspect
system regularly. Examine fuel tanks for leaks or
corrosion at least annually.
NOTICE
GASOLINE RECOMMENDATIONS
Minimum octane rating of 87 AKI.
Refer to the engine owner’s manual
for additional information
Fuel Fill lOCatiOn
(Fig. 3.2.1)
Fuel Tank Opening
Fuel Fill Cap
3.340 Outlaw®
SeCtiOn 3 • uSing yOur BOat
• Shut off gas burning appliances (gas stove,
etc.).
• Close all hatches, doors, and keep engine
compartment closed to prevent gasoline fumes
from entering the cabin or cockpit area.
• All passengers must leave the boat until it is
refueled and engine is safely started.
• There must be no smoking or any ames within
20 feet of the boat, before, during, and for at
least 5 minutes after fueling is completed.
• Open fuel ll cap and insert hose nozzle into
the fuel ll opening. Fuel ll hose nozzle must
contact the fuel ll opening BEFORE adding
fuel to prevent discharge of static electricity.
fillinG The Tanks
• Check the ll plate label to ensure that fuel is
placed ONLY in the fuel tank. The fuel ll plates
are located on the port side of your boat (Figure
3.2.1).
• Keep nozzle in contact with fuel ll opening at
all times during fueling.
• Listen as tank lls and stop adding fuel before
it spills from the vent. Fuel must have room for
expansion.
• Look for leaking fuel near fuel ll and near
tank.
afTer fillinG
• DO NOT wash spilled fuel overboard. Wipe up
any spill with rags or paper towels and dispose
of them properly on shore.
• Open engine compartment and look for fuel
leaks or smell for fumes. This is especially
important if your boat is equipped with gasoline
engines. Leave compartment open until no odor
is apparent. Close compartment.
• If fumes in the engine compartment do not
disappear, do not turn on blower or start engine.
Get help from trained and experienced persons
before using the boat.
• Turn on blower for four minutes, then restart
engine.
• Assist passengers back into the boat.
4. boarDinG
• DO NOT overload the boat.
• Board one person at a time and give assistance
as needed.
• Transfer gear and equipment by handing it from
a person on the dock to a person on board. You
can lose your balance and be injured if you
attempt to board while carrying equipment or
gear.
• Distribute the weight of equipment and
passengers as evenly as possible to keep the
boat balanced.
• Stow gear and equipment so that it is accessible,
but everything is to be stored in places so as to
prevent it from ying about if the boat encounters
rough water or weather.
5. personal floTaTion Devices
(pfD’s)
• Operator must instruct all passengers on location
and use of PFD’s (See Section 1- Safety, page
4 for type and usage).
• Children and all non-swimmers, adults as well
as children, must wear properly-sized PFDs at
all times when aboard. Check applicable state
regulations for PFD wear requirements.
• ALL passengers should wear PFDs. By the
time someone falls overboard, it can be to late
for them to put on a PFD and fasten it properly.
This is especially true in colder waters, below
70o F, where survival time, before hypothermia
sets in, is measured in minutes.
Wet decks are slippery.
You can be seriously injured if you slip and fall.
Wear slip-resistant footwear secured to your feet and
hold onto rails or boat structure.
! WARNING
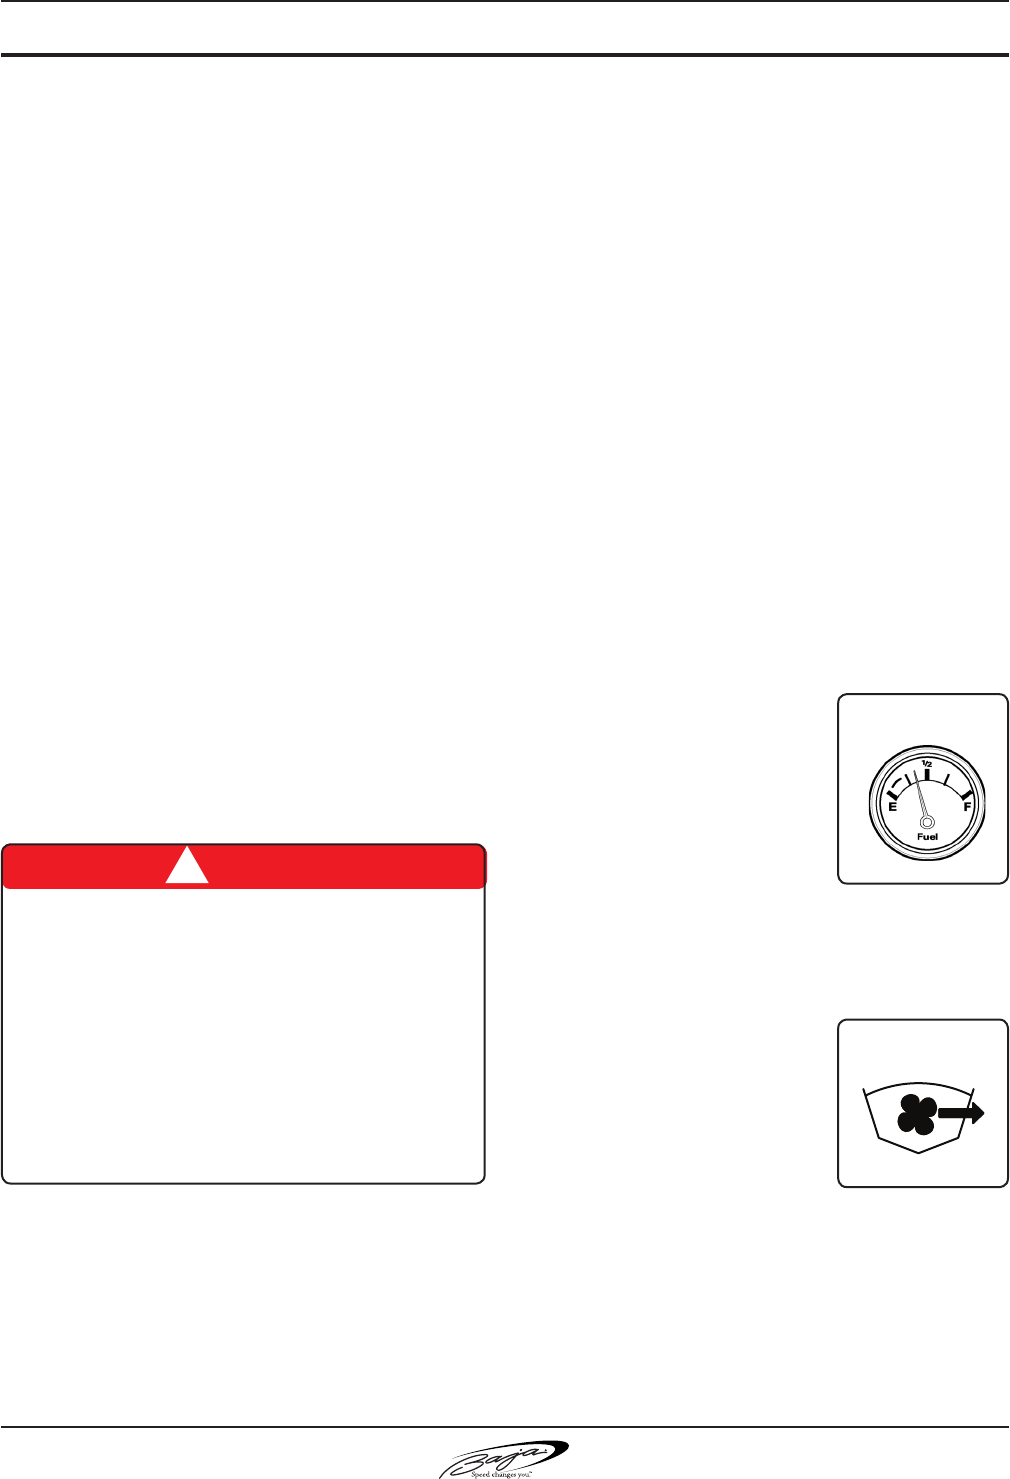
3.4
SeCtiOn 3 • uSing yOur BOat
40 Outlaw®
• If there are passengers not wearing PFDs,
the PFDs must be readily accessible. “Readily
accessible” means out of the storage bag and
unbuckled.
• All throwable otation devices (cushions, rings,
etc.) must be right at hand.
6. passenGer insTrucTion anD
locaTion
• Everyone on board must be told about the boat’s
behavior from starting to getting up on plane.
• Before the operator does any high-speed
maneuvers or rapidly accelerates or decelerates
the boat, passengers must be warned to sit and
hold on and must heed the warning.
• The operator may have to make rapid changes
in speed and/or direction to avoid a problem,
with little or no time for alerting passengers. It
is critical that all passengers be seated in the
designated seating areas and holding on to
prevent falling overboard or getting knocked
about in the boat at all times when the boat is
underway.
7. sTarTinG The enGine
The engine operation and maintenance manual
furnished with your boat describes pre-start and
starting procedures. We urge you to thoroughly read
and understand your engine manual.
Listed below are basic pre-start and starting
reminders. These are not a substitute for the engine
manufacturer’s specic recommendations.
Open the engine compartment and check for the
smell of gasoline.
• IF YOU SMELL GASOLINE, get everyone off
the boat, do not operate any electrical switches
or light any matches, lighters, etc. Get trained
help to nd and x the problem, before starting
the engine or operating any switches on the
boat.
• If you DO NOT smell gasoline:
1. Check all uid levels and any other necessary
checks as specied in Section 8 and in the
engine manual.
2. Check that water level in bilge is minimal. Verify
that the bilge pump is operating by turning the
bilge pump switch to MANUAL and listening for
the pump running and check to see that bilge
water is being pumped overboard.
3. Close engine compartment.
4. Check fuel level. Be sure
you have enough fuel for
your trip. Remember the
“1/3 Rule”: Use no more
than 1/3 of your fuel for
outbound trip; use 1/3 of
the fuel for return trip; keep
1/3 for reserve in case of
emergency (FIG 3.4.1).
5. Run bilge blowers for at least 4 minutes before
attempting to start engine (FIG 3.4.2).
Unlike your automobile engine
which is naturally ventilated
even when it is not moving, your
boat engine compartment (the
bilge) does not have sufcient
natural ventilation when the
boat is not moving or moving
slowly. That is why the engine compartment must
have forced ventilation, using the bilge blower, to
remove potentially explosive gasoline vapors before
the engine is started and when the boat is moving
slowly.
Because it may be difcult to remember to turn on
the bilge blower every time you slow down the boat,
Gasoline vapors can explode
Before starting the engines, open engine compartment
and check for gasoline smell.
• If you smell gasoline, do not start engine; get
everyone off the boat and get trained help to nd
and x the problem.
• If there is no gasoline smell, perform checks
specied by manual, then and only then, close
engine compartment and run blower for at least
4 minutes before starting.
! DANGER
(Fig. 3.4.1)
(Fig. 3.4.2)
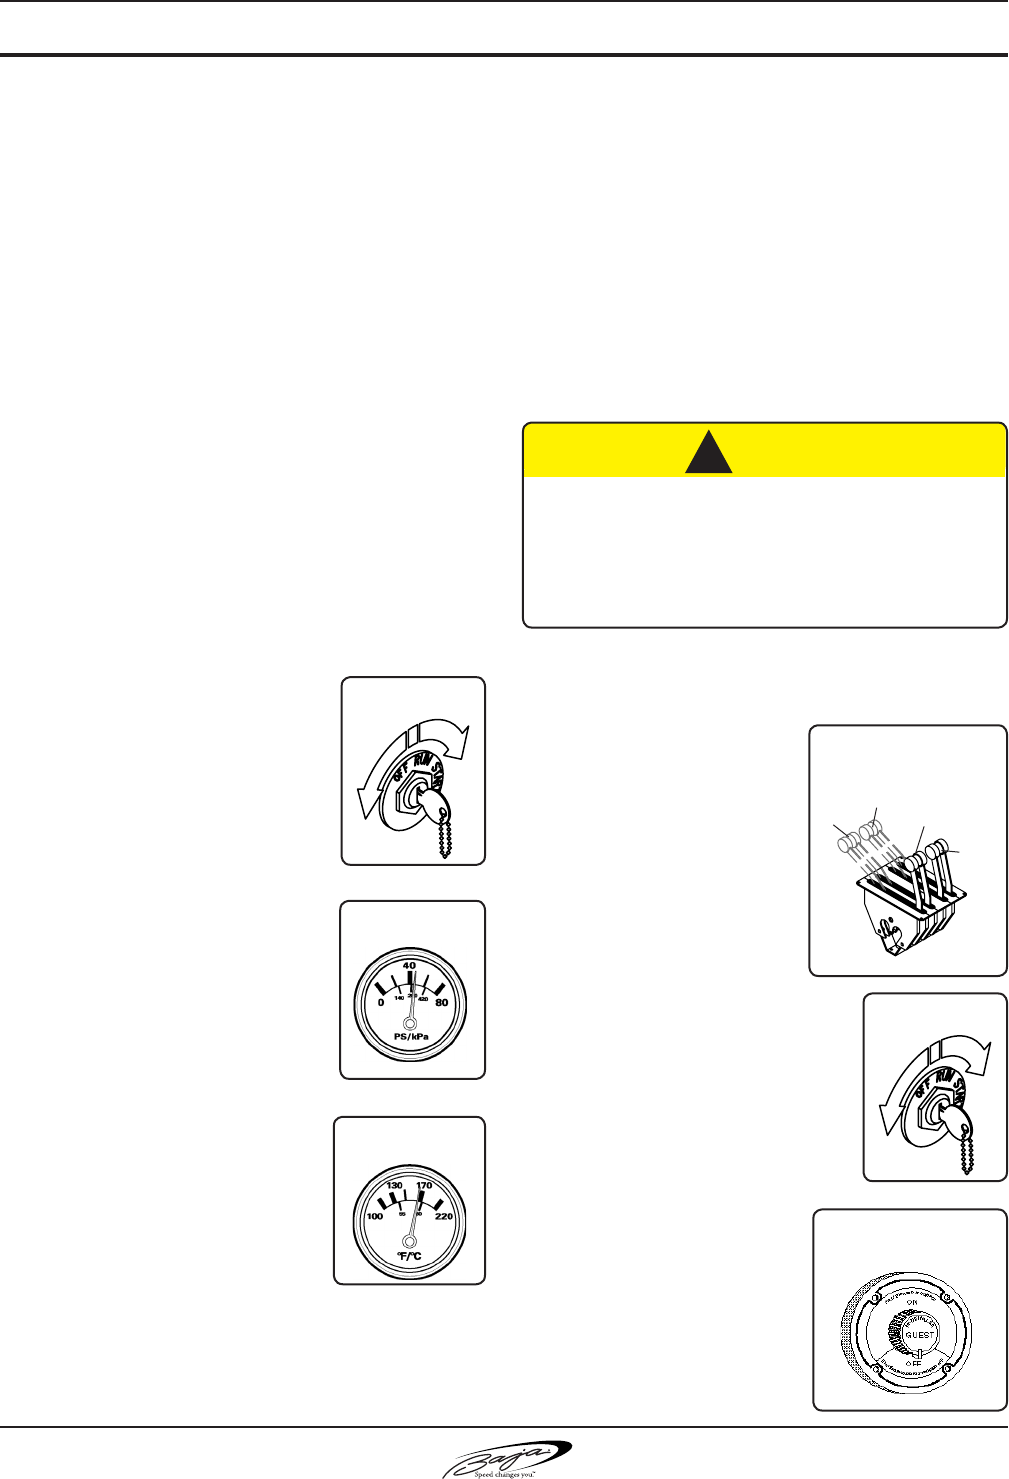
3.540 Outlaw®
SeCtiOn 3 • uSing yOur BOat
it is recommended that the bilge blower run all the
time the engine is running.
6. Place drive unit in full DOWN/IN position.
7. Put shift control lever into neutral; then for a:
COLD ENGINE - Move throttle lever forward
to full open throttle, then return to about 1/4
throttle. In cold weather, it may be necessary
to pump lever several times before engine will
start.
WARM ENGINE - Move throttle lever about 1/4
open throttle position. Do not pump lever.
FLOODED ENGINE - Move throttle lever to full
open position. DO NOT pump lever. When the
engine starts, move throttle lever back rapidly
to decrease engine speed to between 1000 and
1500 RPM.
8. TO START ENGINE:
Turn ignition keys clockwise,
as you would an automobile
(Fig. 3.5.1).
9. After engine starts, reduce
speed to between 1000 and
1500 RPM and check oil
pressure.
10. If oil pressure is correct, let
engine warm up to normal
temperature range as specied
in the engine manual, before
shifting into forward or reverse
gear (Fig. 3.5.2).
IF ENGINE TEMPERATURE
GOES ABOVE NORMAL
RANGE. SHUT DOWN THE
ENGINE IMMEDIATELY. GET
TRAINED HELP TO FIND
AND FIX THE PROBLEM
(Fig. 3.5.3).
IF OIL PRESSURE GOES ABOVE OR BELOW
OPERATING RANGE, SHUT ENGINE DOWN
IMMEDIATELY. GET TRAINED HELP TO FIND
AND FIX THE PROBLEM.
8. shifTinG To Drive The boaT
Bring throttle lever all the way back. Once done,
the drive is ready to shift.
Move shift lever either forward or reverse. Then
move throttle lever forward, the drive unit will
engage and boat will start to move slowly in either
forward or reverse. Once clear of the dock, mooring,
people and/or the no-wake zone and the boat has
been shifted into forward gear, move throttle lever
forward to desired engine speed.
9. sToppinG The enGine
1. Move throttle levers all
the way back. Once
done, move shift lever to
neutral position, which
is located in the center.
(Fig. 3.5.4).
2. Turn ignition keys counter
clockwise to turn off engine
(Fig. 3.5.5).
3. If you are leaving the boat
for more than two hours,
turn battery switches
OFF (Fig. 3.5.6)
(Fig. 3.5.3)
(Fig. 3.5.2)
! CAUTION
Cockpit can fill with water if boat is moving
forward, when it is put into reverse.
Before shifting into reverse, shift to neutral, wait
for the boat to stop moving forward, then shift
into reverse.
(Fig. 3.5.1)
(Fig. 3.5.5)
(Fig. 3.5.6)
(Fig. 3.5.4)
Throttle levers
in full throttle
position
Shift levers
in forward
positon
Shift levers in
reverse position
Throttle
levers in idle
position
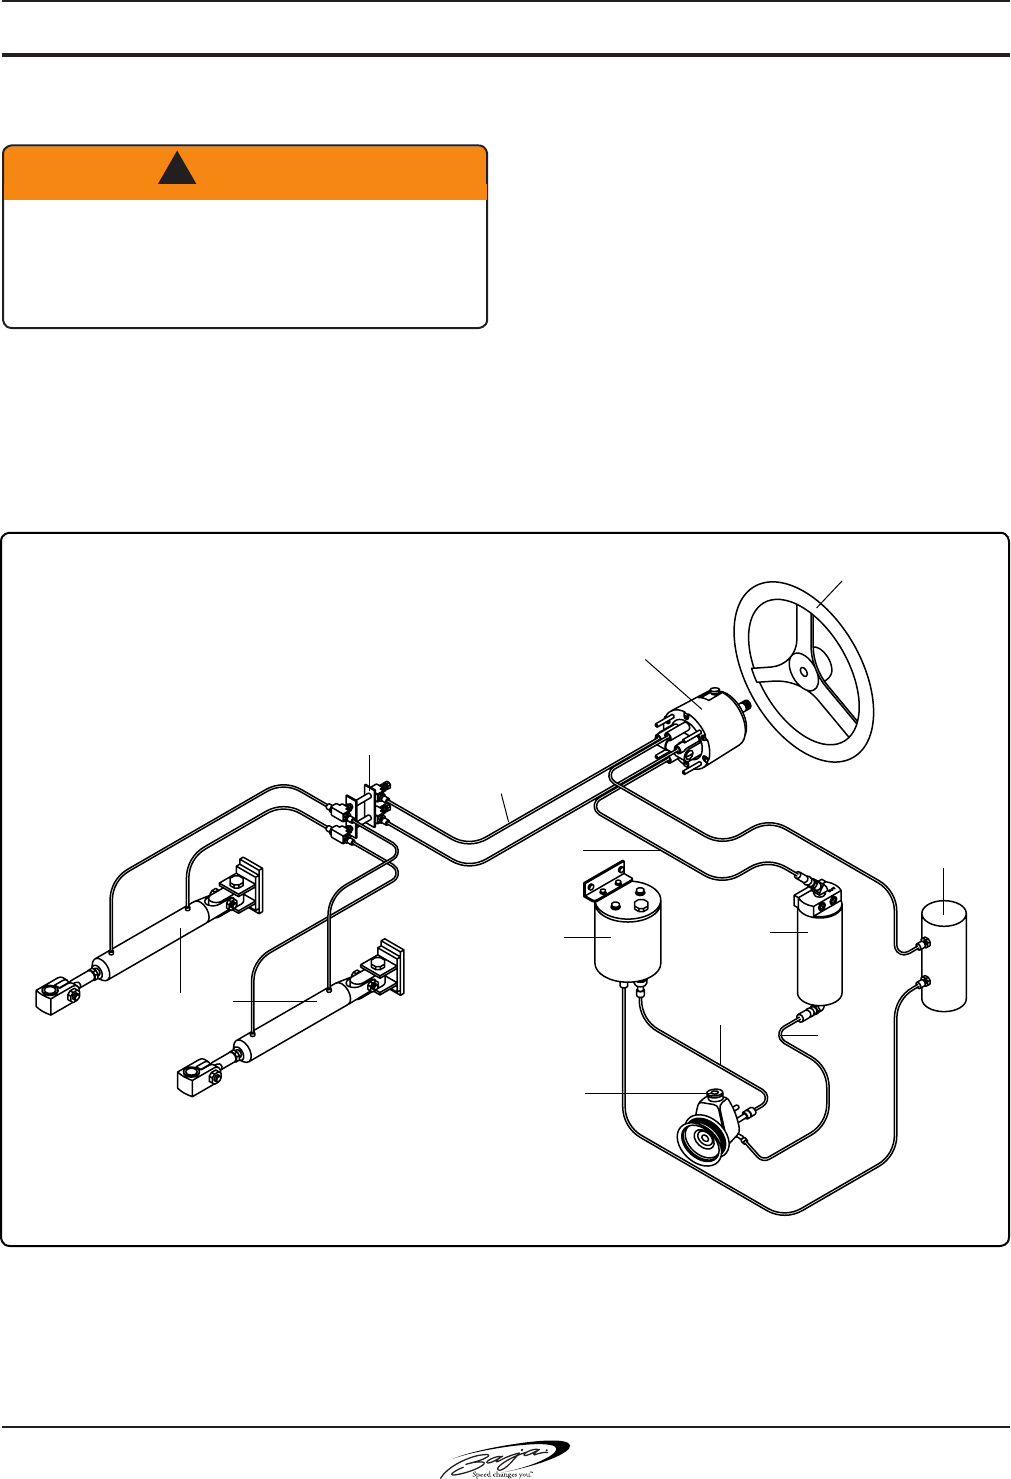
3.6
SeCtiOn 3 • uSing yOur BOat
40 Outlaw®
10. sTeerinG sYsTeMs
Your Baja® may be will be equipped with one of
two types of steering. Please refer to the Owner’s
Packet for information on the steering system
installed on your boat.
a. hYDraulic sTeerinG
Some Baja® boats may use a hydraulic steering
system (Fig. 3.6.1). Periodically remove the plug in
the helm unit and check the oil level visually. The
oil level should be within ½” of the ller hole. See
section 8 of this manual for inspection, service and
maintenance recommendations.
The system must be lled with hydraulic oil meeting
Mil Spec H-5606 A.
R E F E R T O O W N E R ’ S PA C K E T F O R
I N S T R U C T I O N S A N D W A R R A N T Y
INFORMATION.
Failure of the steering system will cause loss of
control of your boat. Any change in steering such as
looseness, tightness, binding, etc., must be checked
immediately by your Baja dealer.
! WARNING
hydrauliC Steering SySteM
(Fig 3.6.1)
STEERING
WHEEL
HELM
HYDRAULIC LINES
HYDRAULIC RAMS*
OIL COOLER
OIL FILTER
CHECK AND ADD
FLUID HERE
RESERVOIR
HYDRAULIC FITTING
FLUID PRESSURE
LINE
FLUID
RETURN
LINE
FLUID
RETURN
LINE
*The illustration shown is specic to boats with two engines.
The number of hydraulic rams is determined by the number of
engines a boat is equipped with.
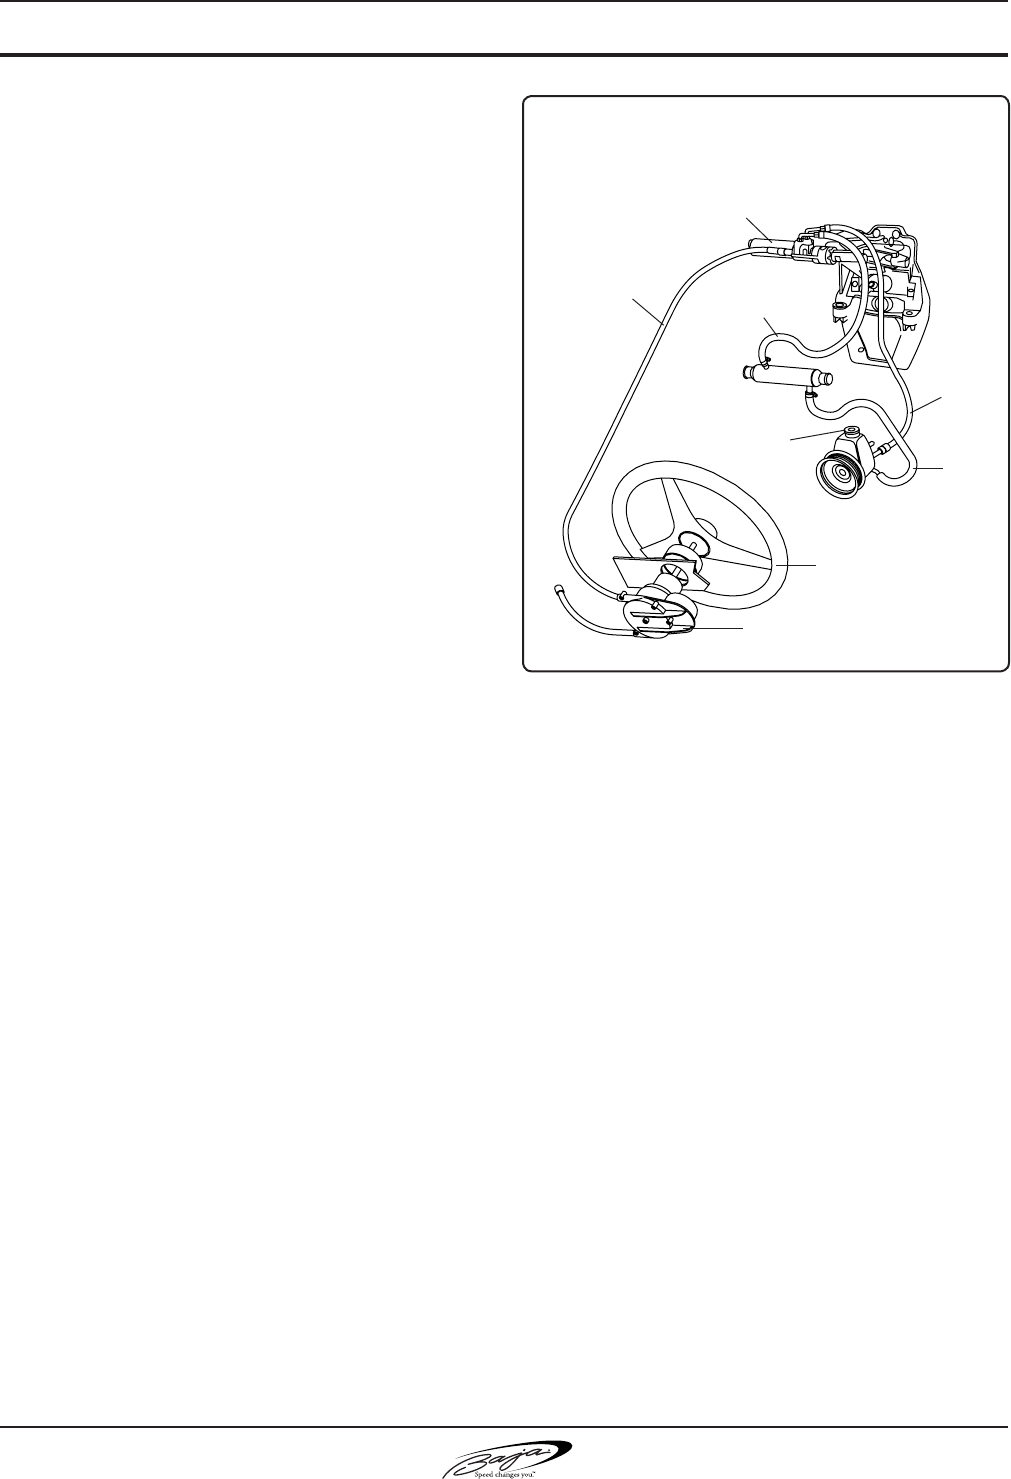
3.740 Outlaw®
SeCtiOn 3 • uSing yOur BOat
b. poWer sTeerinG
The power steering system is an enclosed push-pull
cable that is hydraulically assisted (power steering)
at the stern drive end (Fig. 3.7.1).
The cable and its connections to the steering wheel
and to the out drive MUST be inspected at least
twice a year by your Baja® dealer.
The power steering pump uid level MUST be
checked every time prior to using the boat. Refer
to the steering system information in your Owner’s
Packet.
See section 8 of this manual for inspection, service
and maintenance recommendations.
pOwer Steering SySteM
(Fig 3.7.1)
POWER STEERING
CYLINDER
STEERING CABLE FLUID
RETURN LINE
FLUID
PRESSURE
LINE
FLUID
RETURN
LINE
STEERING WHEEL
CHECK & ADD
FLUID HERE
HELM
STEERING ROTOR

3.8
SeCtiOn 3 • uSing yOur BOat
40 Outlaw®
THIS PAGE INTENTIONALLY LEFT BLANK
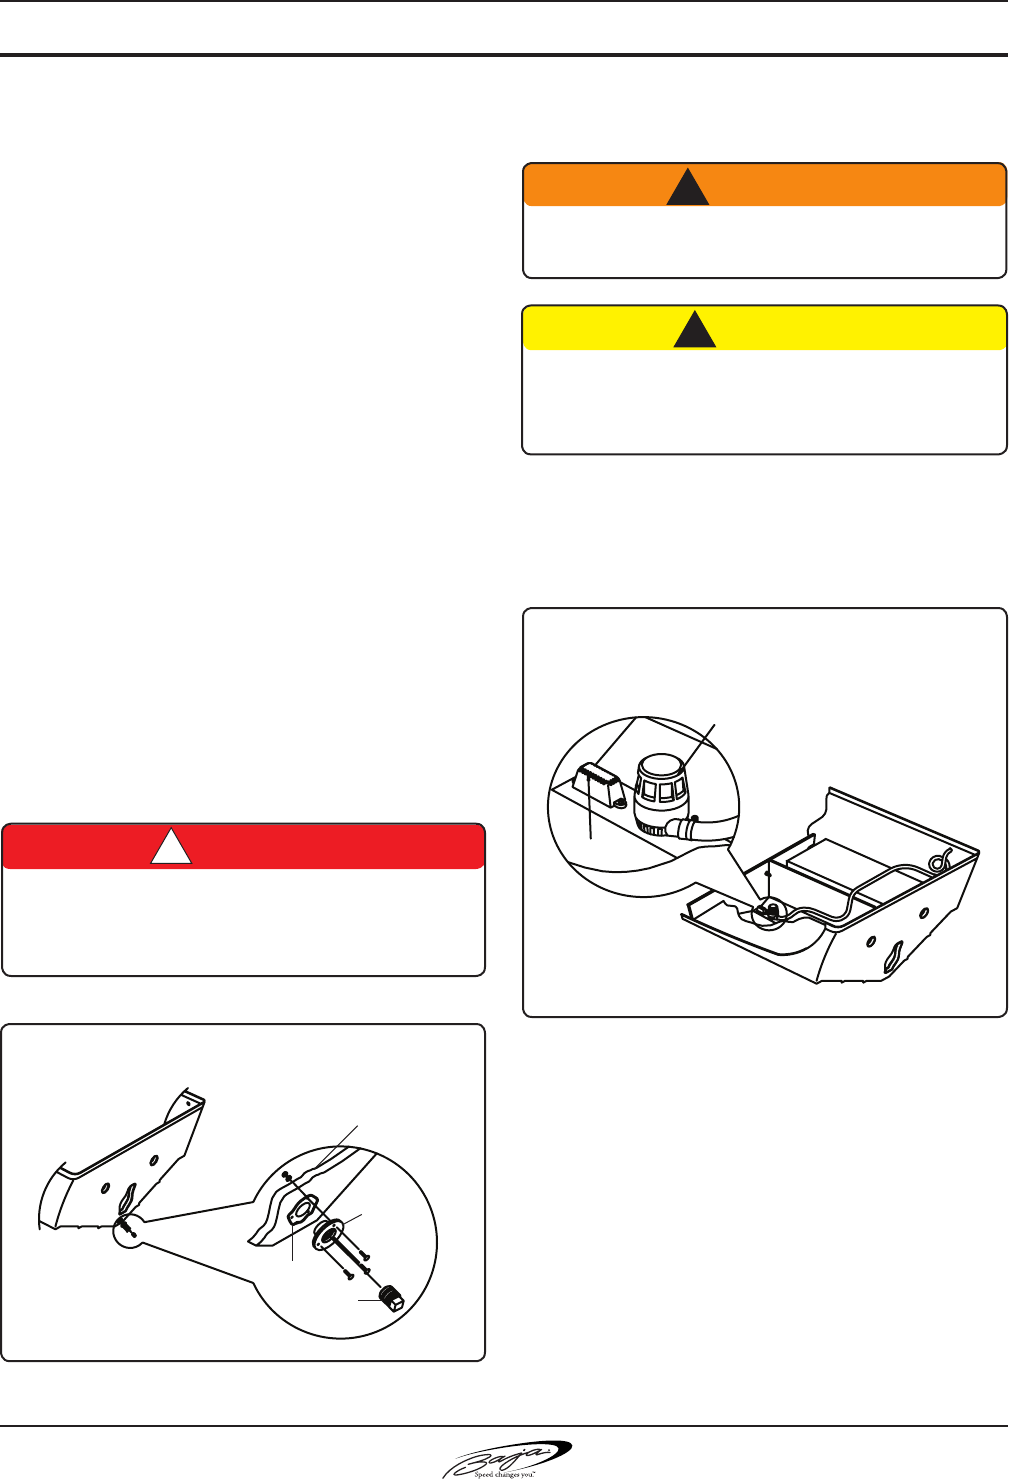
4.1
40 Outlaw®
SeCtiOn 4 • Bilge & underwater gear
1. bilGe
a. fuel & oil spillaGe
Regulations prohibit discharging fuel or oily waste
in navigable waters. Discharge is dened as any
action which causes a lm, sheen or discoloration on
the water surface, or causes a sludge or emulsion
beneath the water surface. A common violation is
bilge discharge. Use rags or sponges to soak up
fuel or oily waste, then dispose of it properly ashore.
If there is much fuel or oil in the bilge, contact a
knowledgeable marine service to remove it. Never
pump contaminated bilge overboard.
Fill fuel tank less than rated capacity. Allow for fuel
expansion.
b. Drain pluG
The bottom of the engine compartment is called
the “bilge”. It is the lowest and inner part of the hull.
Water and other liquids will collect here.
After removing your boat from the water, unthread
the drain plug to drain the bilge (Figure 4.1.1).
c. bilGe puMps
A bilge pump and oat switch are located in the
bottom of the bilge (Figure 4.1.2). The bilge pump
is manually activated from the switch panel located
on the helm.
Before starting the engine, press the bilge pump
switch so that the switch light comes ON. Make
sure the pump is working by opening the engine
compartment, listening to hear the pump running
and check to see that liquid is being pumped out
from the hull discharge. If the bilge has more liquid
than normal, see Maintenance Section for locating
and correcting the problem.
drain plug
(Fig 4.1.1)
Transom/hull cut-
away view
Garboard
Drain
Urethane Caulk
Garboard
Drain Plug
Run bilge pumps in the manual position only as
long as necessary to remove water. Running bilge
pumps dry can damage the pump motor.
! CAUTION
Sinking Hazard – Ensure the bilge pumps are
operating properly.
! WARNING
! DANGER
Install and tighten drain plug before launching boat.
Boat will sink if drain plug is not in place and tight.
Bilge puMp and FlOat SwitCh
(Fig 4.1.2)
Bilge Pump
Float Switch
4.2
40 Outlaw®
SeCtiOn 4 • Bilge & underwater gear
Except for checking the operation of the bilge pump
using the ON position, leave the switch in the OFF
(AUTO) position. In the OFF (AUTO) position, when
the bilge liquid is deep enough to activate the oat
switch, the bilge pump turns on and pumps out the
bilge liquid until the oat switch drops and shuts
off the pump.
If the liquid level in the bilge is higher than
normal and the bilge pump empties the bilge
when you use the ON switch, the oat switch
is not operating properly. Have it checked
immediately. If the ON switch does not operate
the pump, DO NOT use the boat until the
problem is corrected.
The emergency high water bilge pump and oat
switch are wired to the high water bilge alarm.
Should the pump be activated by water in the sump,
the alarm will sound. If alarm sounds, immediate
attention to the engine room is required.
Maintenance
Frequently inspect the area under the oat switches
to ensure they are free from debris and gummy
bilge oil. To clean, soak in heavy duty bilge cleaner
for 10 minutes, agitating several times. Check
for unrestricted operation of the oat. Repeat the
cleaning procedure if necessary.
Inspect the bilge pump intakes and keep them
free of dirt or material which may impede the
ow of water through the pump.
D. bilGe bloWer(s)
To prevent buildup of gasoline fumes to the
explosive level in the engine compartment, the bilge
blowers must be run for at least four (4) minutes
before starting the engine and kept running at all
times when the engine is running to insure that
there will be adequate ventilation when you are
moving slowly. The blowers may also remove
deadly carbon monoxide (CO) which may be in the
bilge. Run blowers when using the generator
or engine.
2. enGines anD sTern Drive
a. MainTenance anD service
Engine failure away from shore can be dangerous.
You must follow the recommended maintenance
schedule to best ensure trouble-free operation of
your engine and stern drive.
b. vibraTion anD causes
Some vibration is to be expected in your boat
because of the action of the engines and the
propeller. But excessive vibration indicates
conditions which must be promptly corrected to
avoid damage. The following are some conditions
which may cause vibrations.
• Weeds, ropes, shing lines, nets or your own trailing
lines can become wrapped around the propeller
and/or shaft, causing vibration and loss of speed.
Always stop the boat, make sure it is clear to the rear,
and then reverse the propeller after going through
a weedy area to unwrap and clear away any weeds
which may have accumulated. If this doesn’t clear
the entanglement, and you can’t anchor or moor
the boat in shallow water to get to the stern drive in
the water, the boat will have to be taken out of the
water.
• A badly damaged or distorted propeller or shaft is
an obvious cause of vibration. Run at slow speed to
shore. REPLACE IMMEDIATELY.
• If the engine mounts fail and the engine can contact
the hull while it is running, vibration will be felt. Run
at slow speed to shore. REPLACE IMMEDIATELY.
EXPLOSION/FIRE HAZARD – Run blower at least
four (4) minutes before starting engine or generator.
Check bilge and engine compartment for fumes.
! WARNING
Do not allow obstructions to interfere with bilge blower
or ventilation intake operation. Engine performance
may be adversely affected.
! WARNING
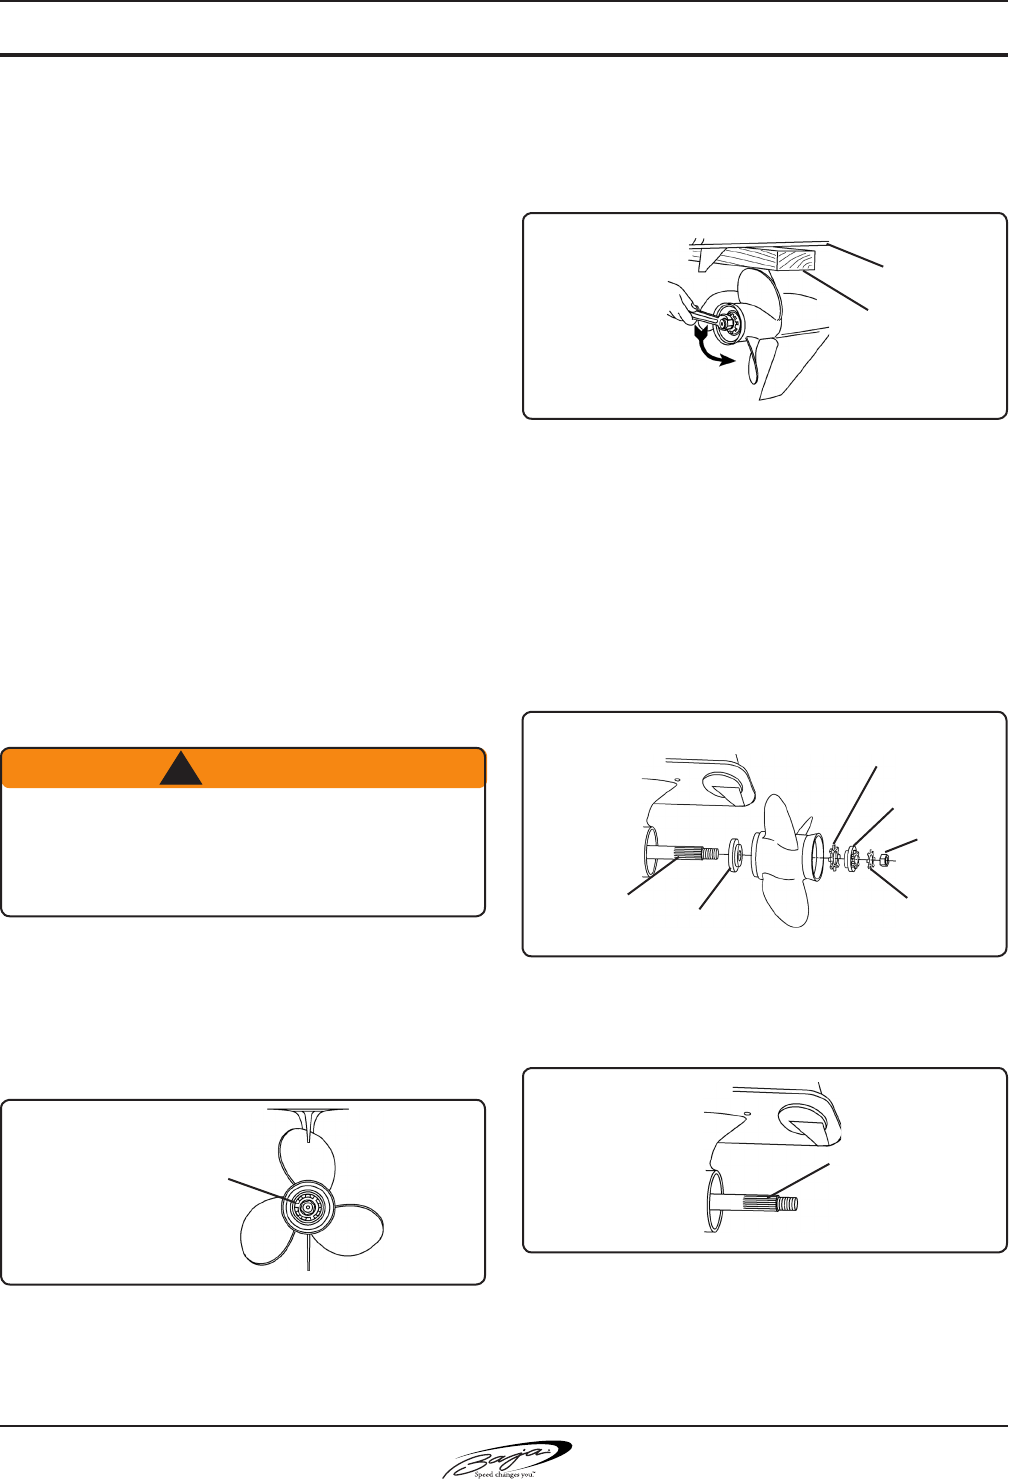
4.3
40 Outlaw®
SeCtiOn 4 • Bilge & underwater gear
c. iMpacT To sTern Drive
The stern drive can be damaged by impact, either
while trailering or boating. To minimize the possibility
of impact damage while trailering, keep the stern
drive raised to the trailering position.
The hydraulic system used to raise and lower the
stern drive can cushion impact and lessen damage
from head-on impacts to the stern drive from
underwater objects BUT ONLY when the boat is
moving forward. There is no protection if the stern
drive is struck during reverse operation or from an
angle when moving forward.
If you strike a submerged object, STOP THE
ENGINE as soon as possible and examine the
stern drive unit for damage. Even if no damage is
visible, there could be internal problems or difculty
maneuvering. If you must use the boat after impact,
run at the lowest speed possible.
D. propeller reMoval anD insTallaTion
a. Shut off engine, remove key, shift into neutral
and put tape over ignition switch key slot.
b. Straighten the bent tabs on the propeller nut
retainer (Figure 4.3.1).
c. Place a block of wood between the gear case
and propeller to stop propeller from rotating and
remove propeller nut (Figure 4.3.2).
d. Remove the propeller nut retainer, the thrust hub
and the continuity washer (Figure 4.3.3) and
put them in a secure place. Pull the propeller
straight off the shaft. Remove the thrust washer
that is behind the propeller. If the propeller is
seized to the shaft and cannot be removed
by hand, special tools are needed. Have the
propeller removed by an authorized dealer or
trained mechanic.
e. Coat the propeller shaft with an anti-seize
lubricant (Figure 4.3.4).
CONTINUITY
WASHER
prOpeller
(Fig. 4.3.3)
PROPELLER
NUT
PROPELLER
SHAFT
THRUST HUB
PROPELLER
THRUST
WASHER
PROPELLER
NUT RETAINER
If engine is started during propeller maintenance,
serious personal injury can occur.
Shut off engine, remove key, shift into neutral, and put
tape over ignition switch key slot.
! WARNING
prOpeller
(Fig. 4.3.2) GEAR CASE
WOOD BLOCK
prOpeller
(Fig. 4.3.1)
SECURING TABS
prOpeller
(Fig. 4.3.4)
COAT WITH ANTI-SEIZE
LUBRICANT

4.4
40 Outlaw®
SeCtiOn 4 • Bilge & underwater gear
f. Install the thrust washer, propeller, continuity
washer, thrust hub, propeller nut retainer and
the propeller nut onto the shaft (Figure 4.3.3).
g. Place a block of wood between the gear case
and the propeller (Figure 4.4.1) and torque the
propeller nut to recommended manufacturer’s
specications. The correct propeller nut torque
is given in your Engine Operator’s Manual in
the Owner’s Manual Packet.
h. Secure the propeller nut by bending three (3)
of the tabs of the propeller nut retainer into the
thrust hub grooves (Figure 4.4.2).
prOpeller
(Fig. 4.4.1) GEAR CASE
WOOD BLOCK
prOpeller
(Fig. 4.4.2)
SECURING TABS
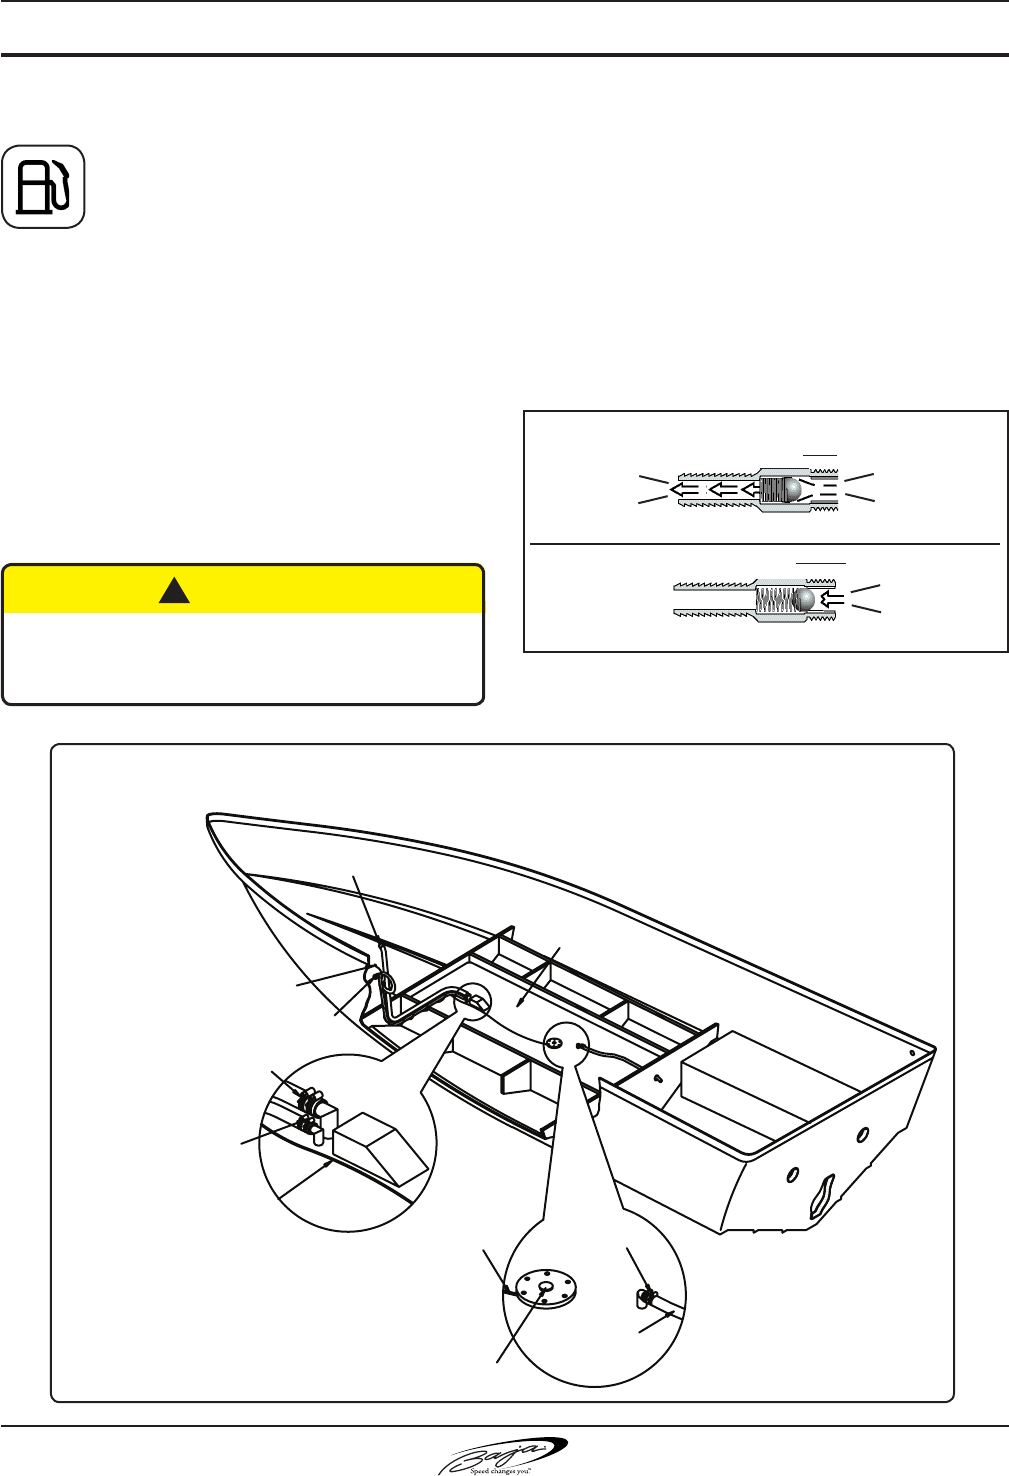
40 Outlaw®5.1
SeCtiOn 5 • Fuel SySteM
1. fuel sYsTeM
Section 3 • Using Your Boat contains
important fueling information. Take time
to read all the fuel related information in
the owner’s manual.
The 40 Outlaw standard gasoline fuel system
consists of a 296 gallon fuel tank, fuel tank vent, an
anti-siphon valve, engine fuel supply line and fuel
ll (See Figure 5.1.1).
The fuel tank vent serves as a pressure/vacuum
release and safety overow. The fuel vent is located
inside the fuel cap on the port side of the hull.
Periodically check the vent to assure that it is not
clogged.
anTi-siphon valve (inboarD/ouTboarD
enGine onlY)
The fuel pick-up at the fuel tank has an anti-siphon
valve to prevent fuel from siphoning out in the event
of line failure (See Figure 5.1.1 and 5.1.2). In an
emergency situation, remove the anti-siphon valve
if the engine is not getting fuel. NOTE: Replace with
new anti-siphon valve or fuel shut off valve as soon
as possible as anti-siphon protection is required by
federal law.
ANTI-SIPHON VALVE OPEN
ANTI-SIPHON VALVE CLOSED
SPRING PRESSURE PUSHES THE SEALING BALL CLOSED
TO ENGINE
FUEL FLOW
FROM FUEL
TANK
FUEL FLOW
FROM FUEL
TANK BLOCKED
NO FUEL
PUMP SUCTION
FUEL PUMP SUCTION PULLS OPEN THE SEALING BALL
anti-SiphOn valve
(Fig. 5.1.2)
Never start an engine until you are certain that fuel
fumes are not present in engine compartment or
elsewhere in the boat.
! CAUTION
STATIC GROUND
WIRE
FUEL VENT
FUEL FILL
#28 CLAMPS
#10 CLAMPS
STATIC GROUND
WIRE
FUEL
TANK
#10 CLAMPS
FUEL SENDING
UNIT
STATIC GROUND
WIRE
FUEL PICK-UP
TO ENGINE
Single engine
gaS Fuel SySteM
(Fig 5.1.1)

40 Outlaw®
5.2
SeCtiOn 5 • Fuel SySteM
2. fuelinG precauTions
Certain precautions must be carefully and completely
observed every time a boat is fueled, even with
diesel fuel. Diesel fuel is nonexplosive but it will
burn.
a. sTaTic elecTriciTY anD The fuel
sYsTeM
There is a danger that static electricity can ignite
gasoline vapors that have not been ventilated
outside an enclosed area. Use extreme caution
when fueling your boat from a source outside the
regular venues.
Your boat has safety features that can be
circumvented by not adhering to standard fueling
practices.
Your boat's bonding system is designed to dissipate
the build-up of static electricity.
Your boat must be in contact with the water or a land
based grounding system. Here are some helpful
suggestions to keep you safe from static electricity
while refueling your boat.
• NEVER fuel your boat in unsafe conditions such
as: suspended on a sling or in a situation that
increases the likelihood of static discharge.
• NEVER use homemade containers to ll your
fuel tank.
• Fuel carried onboard, outside of a xed fuel
system should be stored in an approved
container or in a portable tank, such as provided
for outboard engines, and be stowed safely
outside of the engine or living compartments.
• Shutdown the engine, motors, and fans prior to
taking on fuel. Any ignition sources should be
extinguished before lling the fuel tank.
• Close all ports, window, doors, and hatches to
prevent gas fumes from accumulating in the
cabin.
• Fueling should never be done at night except
in well-lighted areas.
• Always keep the fuel nozzle in contact with the
fuel ll plate or the edge of the fuel tank opening
throughout the lling process.
• Allow areas where gasoline vapors could collect
to be ventilated before starting the engine.
• Wipe any spillage completely and dispose of
rags or waste on shore.
• Secure the ll cap tightly.
• Fuel tank should never be lled to capacity.
Allow for fuel expansion.
• Portable tanks should only be lled while on the
ground; never onboard the boat.
b. General:
• Check ll plate label to ensure fuel is placed only
in fuel tank. Fuel ll plate is located on the port
side of the boat.
• Avoid spills.
• Know your fuel capacity and consumption.
Record the amount of fuel used since your last
ll up, and compute the engine’s hourly fuel
usage. As a fuel gauge backup check, deduct
the average hourly fuel usage from fuel tank
capacity.
• Observe the “Rule of Thirds”: one-third fuel for
trip out, one-third for return and one-third for
reserve.
• Allow an additional 15 percent fuel reserve when
operating in rough seas.
c. before anD DurinG fuelinG –
checklisT:
• Fire extinguisher – close at hand.
• Mooring – boat tied securely to fueling pier.
• Crew – at least one knowledgeable person
present.
• Passengers – unnecessary people off the
boat.
• Engines – stopped.
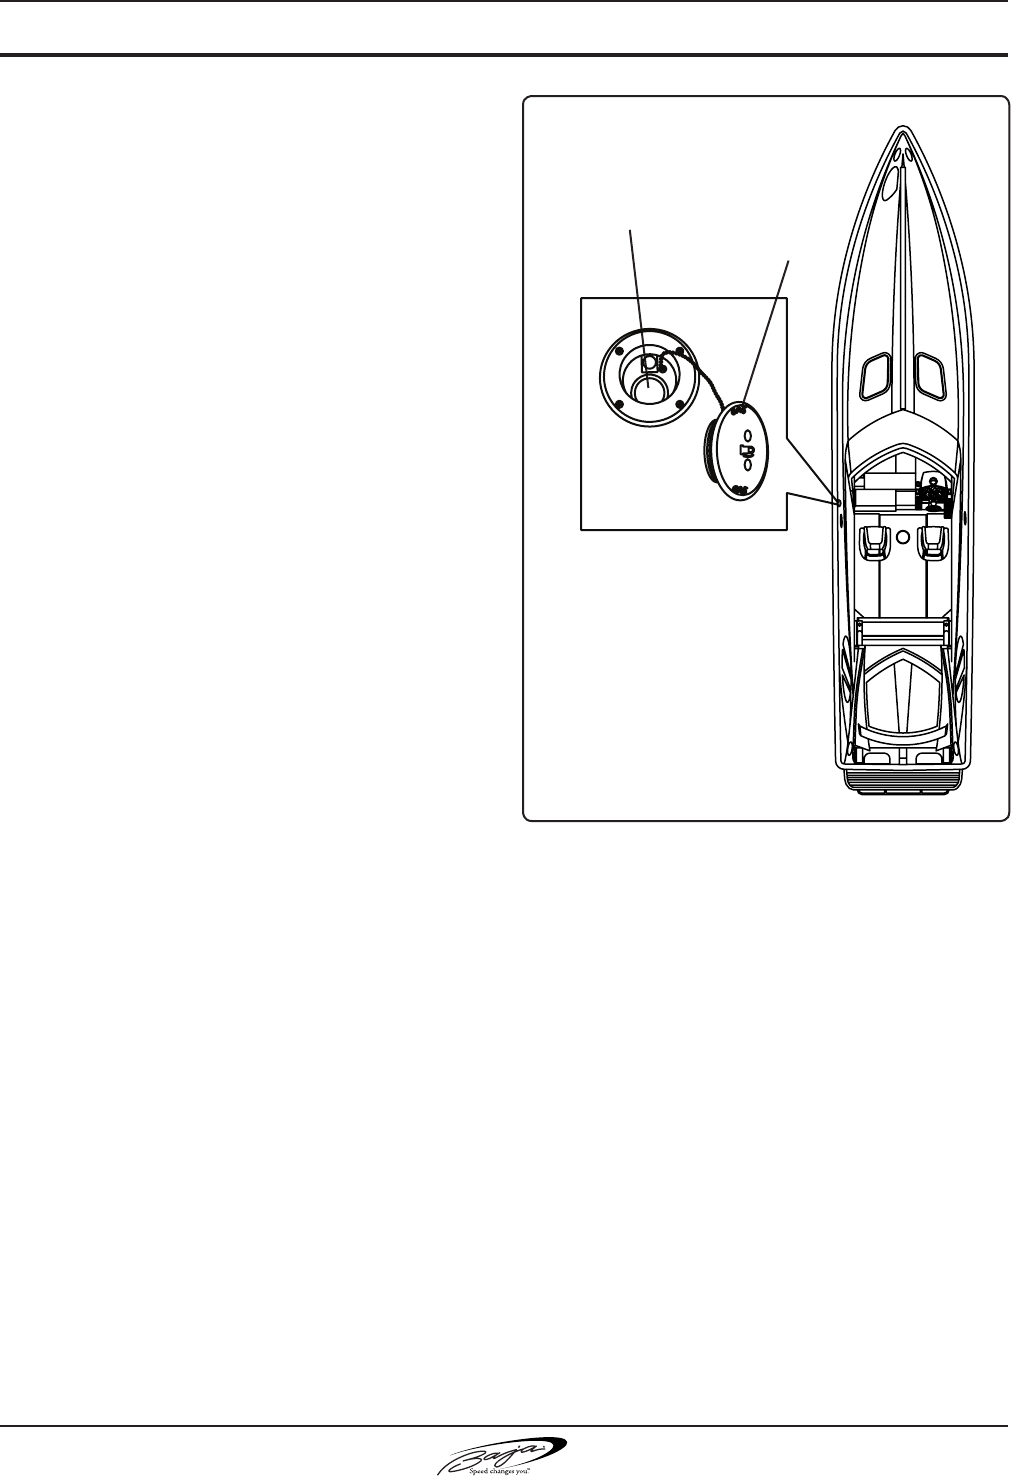
40 Outlaw®5.3
SeCtiOn 5 • Fuel SySteM
• Electrical equipment, including blowers – power
off.
• Doors, hatches – closed.
• Smoking material – extinguished.
• Inboard tanks – grounded.
• Filler pipe – marked GAS or DIESEL.
• Fuel nozzle – in contact with ller pipe to prevent
static sparks.
• Fill level – ll less than rated capacity of tank;
allow for fuel expansion.
• Trim – fuel weight distributed equally.
D. afTer fuelinG – checklisT:
• Doors, hatches – open.
• Sniff test – if fuel fumes remain, operate blowers
until fumes are gone.
• Fuel tank – secure ller cap.
• Spills – wipe; dispose of rags ashore.
Fuel Fill lOCatiOn
(Fig. 5.3.1)
Fuel Tank Opening
Fuel Fill Cap

40 Outlaw®
5.4
SeCtiOn 5 • Fuel SySteM
THIS PAGE INTENTIONALLY LEFT BLANK
40 Outlaw®
6.1
R
Speed changes you. TM.
SeCtiOn 6 • eleCtriCal SySteMS
1. elecTrical sYsTeMs
DirecT currenT (Dc)
The 12 volt direct current (DC) electrical system
(similar to that in your car or truck) derives its power
from the battery. An engine-driven alternator keeps
the battery in a charged condition. The battery
voltage is indicated by the voltmeter on the helm
panel. The negative terminal of the battery is
attached to the grounding studs of the engine.
Ask your dealer for a careful analysis of DC power
needs on your boat. It may be necessary to add
batteries or auxiliary charging methods to supply
adequate power for any additional accessories you
wish to add.
a. baTTeries
The battery installed in your boat has been selected
for its ability to furnish starting power based on
engine starting requirements, as well as its ability to
power the DC accessories attached to the electrical
system. Your Engine Operator's Manual indicates
the recommended battery for the engine installed
in your boat.
To remove the battery cables:
1. Turn off all items drawing power from the
battery.
2. Remove the negative cable first, then the
positive cable. To replace the cables, first
replace the positive cable, then the negative.
Battery Maintenance
• Check the uid level in the cells approximately
every 4 weeks, and weekly in summer and hot
zones.
• The uid level must be between the lower and
upper markings.
• Replenish only with distilled water. Do not use
metal funnels.
• Coat battery terminal clamps with silicone
grease. Keep batteries clean and dry.
Battery life is shortened if it is drained to zero
charge before recharging. It is recommended that
a battery not be discharged more than 50 percent.
If the battery does become run down, recharge it
as soon as possible.
Running the engine to recharge the battery may not
be effective. The alternator only creates charging
power at higher engine speeds, so simply idling or
trolling will not generate enough power to recharge
the battery.
If you need to charge a battery, only use a battery
charger designed to charge automotive/marine
batteries. Use charger only when batteries are
disconnected from the boat's electrical circuit.
Follow the charger instructions.
If your boat will not be used for several weeks
or more, remove the batteries from the boat and
connect them to a charger.
b. iGniTion proTecTion
All electrical components in the engine compartment
must be ignition-protected to avoid the possibility of
creating sparks in a gasoline environment.
DO NOT USE JUMPER CABLES IN THE ENGINE
COMPARTMENT.
They can cause an explosion from sparks.
DANGER
!
! DANGER
A battery will explode if a ame or spark ignites the
free hydrogen given off during charging.
Never use an open ame or strike sparks in the
battery area.
To prevent arcing or damage to the alternator, always
disconnect battery cables before doing any work on
the engine's electrical system.
! CAUTION
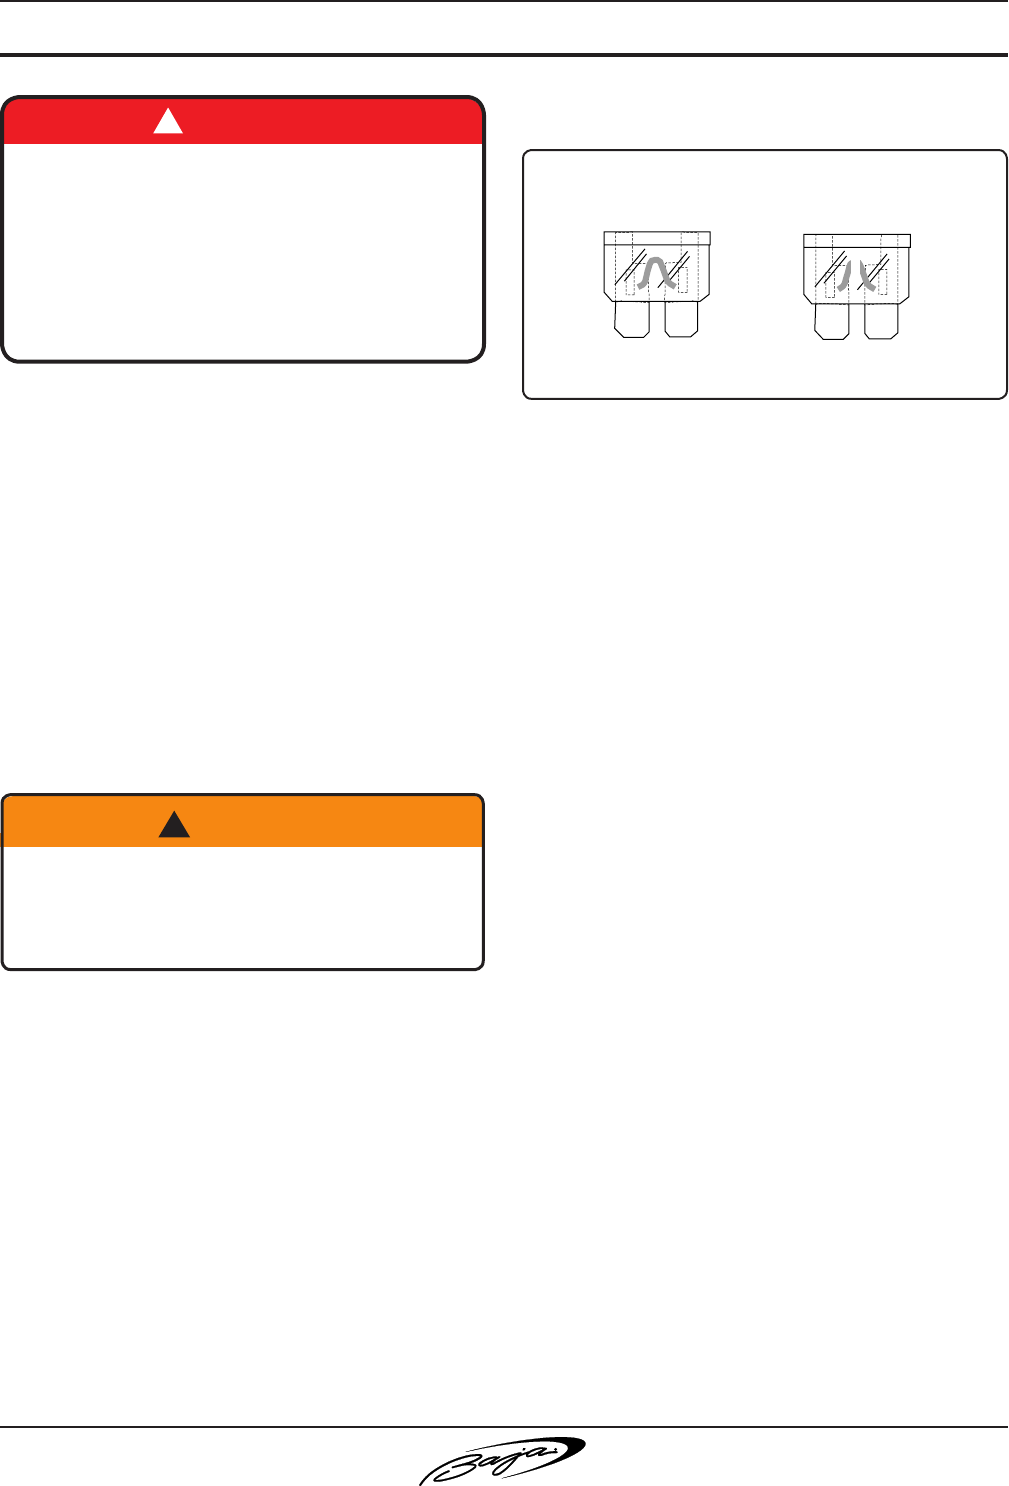
40 Outlaw®
6.2
SeCtiOn 6 • eleCtriCal SySteMS
R
Speed changes you. TM.
Protective terminal covers, such as rubber boots
on electrical connections, must be in place when
engine is operating or when working in the engine
compartment.
Jumper cables are not ignition-protected. DO NOT
USE jumper cables in the engine compartment. The
engine compartment may accumulate dangerous
explosive gasoline fumes/vapors and hydrogen gas
from batteries being charged. A spark produced
when connecting a jumper cable can cause an
explosion.
c. breakers anD/or fuses
If you need to replace a fuse or breaker, use only
the same amperage and type as the original,
and one that is rated for marine use. It is
recommended that you carry spare fuses.
If a fuse or breaker is replaced with one of lower
amperage, it will be insufcient to carry the electrical
load of the equipment it is connected to and will
cause nuisance fuse failure or breaker tripping.
If a breaker or fuse is replaced with a breaker or
fuse of higher amperage, it will not provide adequate
protection against an electrical malfunction and will
create a re hazard.
The fuses are color coded according to the
amperage and the rating is also marked on each
fuse.
D. fuse panel
Your boat has an illuminated waterproof electronic
switch pad to control lights, bilge pump and other
accessories. The switch pad is connected to
the fuse panel located under the dash. The fuse
panel uses automotive type fuses to protect these
accessories.
REPLACE ONLY WITH A FUSE OF THE SAME
AMPERAGE AND TYPE. The amperage is marked
on the side of the fuse.
2. elecTrolYTic corrosion & zinc
anoDes
Electrolytic corrosion of metals on power boats
can result in rapid and serious deterioration of
metal parts. You must set a regular schedule and
look for the possibility of electrolytic corrosion
(the deterioration of metals due to dissimilar
characteristics when placed in salt water). It is
your responsibility to check for and replace parts
damaged due to electrolytic corrosion.
To minimize electrolytic corrosion of the metals on
your boat, zinc anode plates are provided on your
boat to protect underwater hardware. Zinc, being
much less "noble" than the copper-based alloys
and aluminum used in underwater fittings, will
deteriorate rst and protect the other metals.
Stern drives are tted with zinc anodes on their
lower units (refer to your Engine Owner's Manual
for their locations). If your boat is equipped a with
Mercathode® system with the stern drive will not
have zincs.
DANGER
!
GASOLINE VAPORS CAN EXPLODE
Use ONLY Marine-rated parts to replace such items
as starters, distributors, alternators, generators,
etc.
Do not use automotive parts for these components
or any jumper cables because they are not ignition-
protected and could cause a re or explosion.
Use of higher amperage fuses or breakers is a re
hazard.
Use fuses and breakers having the same amperage
rating as the original or as specied.
! WARNING
GOOD FUSE BLOWN FUSE
FUSE CONDITION (ATO TYPE FUSE)
(FIG. 6.2.1)

40 Outlaw®
6.3
SeCtiOn 6 • eleCtriCal SySteMS
R
Speed changes you. TM.
Zinc anodes require replacement about every six
months, if the boat is operated in salt water. In
fresh water, the zinc anodes can be replaced about
once a year.
If the anodes deteriorate more rapidly than this,
there is probably a stray current problem within the
boat or at the slip or mooring.
If the anodes do not deteriorate, they are not
protecting the other metallic parts of your boat. This
can be caused by loose anodes or by low grade zinc
or by not having a solid electrical contact between
the anode and the metal it contacts, or by paint on
the anodes.
If the anodes are deteriorating rapidly, or not at all,
contact your dealer.
3. Marine elecTronic caThoDic
anTi-corrosion sYsTeM
(MercaThoDe®)
The automatically controlled Cathodic Anti-
Corrosion System for marine installation protects
underwater metals from the effects of corrosion
and electrolysis on stern drives. The system
components are designed for marine service. DO
NOT PAINT THE MERCATHODE® SYSTEM.
The anode and reference electrode are attached to
the electrode assembly under each stern drive unit.
The solid state controller is mounted within a plastic
housing on the transom in the bilge.
Maintenance
The Mercathode® system must be tested to
ensure adequate output. The test should be
performed every 100 hours or annually. Contact
your authorized Baja® dealer to arrange for this
test. Refer to the engine operator's manual for more
detailed information.
4. elecTrical sYsTeMs
This owner’s manual contains electrical schematics
and wiring harness illustrations for your boat.
These electrical schematics were generated by
electrical CAD designers at the engineering division
for technical reference and service technicians.
Baja® does not recommend that you attempt to
work on the boat’s electrical system yourself.
Instead, we recommend that you take your boat
to your authorized Baja® dealer for service. Baja®
reserves the right to change or update the electrical
system on any model at any time without notice to
the consumer and is NOT obligated to make any
updates to units built prior to changes.
MerCathOde illuStratiOn (exaMple)
(Fig 6.3.1)
DO NOT PAINT BETWEEN THE ZINC AND THE
METAL IT CONTACTS, AND DO NOT PAINT
OVER THE ZINC.
NOTICE
40 Outlaw®
6.4
SeCtiOn 6 • eleCtriCal SySteMS
R
Speed changes you. TM.
ignitiOn SwitCh
(Fig. 6.4.1)
Note: This drawing contains information proprietary to Baja
Marine Corp. Any unauthorized disclosure, use, or reproduction is
expressly prohibited, unless written permission of Baja
TO ENGINE
RUN CIRCUIT
16 AWG
PURPLE/BLACK
16 AWG
PURPLE/BLACK
LANYARD
STOP SWITCH
B
EXHAUST
12 AWG RED
TO EXHAUST
BREAKER
FROM IGNITION
SWITCH ( I)
16 AWG
PURPLE/BLACK
TO ENGINE
B
RUN
OFF
I
B S START
16 AWG
YEL/RED
TO STARTER
SOLENOID
SHIFTER'S NEUTRAL
SAFETY SWITCH
20A
12 VOLT DC
FROM ENGINE
12 AWG
RED/BLACK
A
6.5
40 Outlaw®
R
Speed changes you. TM.
drive puMp with K-plane triM taBS (Fig 6.5.1)
DIODE
DIODE
BLUE/WHITE
GREEN/WHITE
RED
100
AMP
100
AMP
14 AWG YELLOW
14 AWG WHITE
14 AWG RED
14 AWG GREEN
14 AWG GREEN
14 AWG RED
14 AWG BLUE
14 AWG BLUE
14 AWG RED
14 AWG GREEN
14 AWG PURPLE
14 AWG PURPLE
8 AWG
BLACK
BLOCK
8 AWG
RED
TO 80
AMP BREAKER
STBDPORT
TRAILER STBDPORT
8 AWG
BLACK
8 AWG
RED
TRAILER LIMIT
SWITCH
STBD TRIM PUMP
MERCURY DIODE DRIVE HARNESS
PART NUMBER 1476811
MERCURY DIODE DRIVE HARNESS
PART NUMBER 1476829
TRIM GUAGE
TO STBD TAB
TO PORT TAB
CONTROL MODULE
3-WAY JUNCTION BLOCK
STBD TRIM PUMP
TO RELAY
TO TAB/ACC BREAKER
TO GROUND BLOCK
10A
BLOCK
TO 80
AMP BREAKER
10A
6.6
40 Outlaw®
R
Speed changes you. TM.
SwitCh panel wire inFOrMatiOn – triple (Fig 6.6.1)
HEAT SEALED 14-16 NO. RING TERMINAL
D
D
A
A
A
(.156) SPLASH PROOF CONNECTOR RECEPTACLE
A
A
AA
C
C
C
(.250) 14-16 HEAT SEALED QUICK SLIDE RECEPTACLE
C
LABEL WITH THE LETTER "H"
Plug DT06-12SA
#5 CABIN LIGHTS
#6 PORT BLOWER
#7 STBD BLOWER
#8 BILGE
Secondary Lock W12S
12-Way Deutsch DT Series Plug
#1 COURT LIGHTS
#2 ENGINE LIGHTS
#3 BOW LIGHT
#4 STERN LIGHT
16 AWG DARK BLUE WITH A WHITE STRIPE #1
14 AWG YELLOW WITH A WHITE STRIPE #6
14 AWG GRAY WITH A PINK STRIPE #4
16 AWG DARK BLUE WITH A BLACK STRIPE #2
16 AWG BLUE WITH A RED STRIPE #5
14 AWG GRAY #3
#7 14 AWG YELLOW WITH A GREEN STRIPE
#9 14 AWG YELLOW WITH A BLACK STRIPE
#10 16 AWG RED WITH A BROWN STRIPE
#11 16 AWG RED WITH AN ORANGE STRIPE
#9 CNTR BLOWER
#10 CO MONITOR
#11 FIRE BUOY
#12 GROUND
#12 14 AWG BLACK
#8 14 AWG BROWN
LABEL WITH THE LETTER "H"
PLUG 6
PLUG 6
#1 PORT SEAT
#2 STBD SEAT
#3 MAST LIGHT
#4 EXHAUST
#5 STEREO
#6 POWER STERN
#7 PANEL LIGHTS
#8 MID BILGE
LABEL WITH THE LETTER "G"
PLUG 5
#9 GROUND
#10 EMPTY
#11 EMPTY
#12 EMPTY
#2 14 AWG ORANGE WITH A GREEN STRIPE
#3 14 AWG GRAY WITH A BLUE STRIPE
#6 16 AWG RED WITH A GRAY STRIPE16 AWG BLUE #7
SEALING PIN #11
SEALING PIN #12
14 AWG BROWN WITH AN ORANGE STRIPE #8
SEALING PIN #10
14 AWG BLACK #9
Receptacle DT04-12PA
Secondary Lock W12P
12-Way Deutsch DT Series Receptacle
#1 14 AWG ORANGE WITH A WHITE STRIPE
#4 14 AWG RED
#5 14 AWG RED WITH A YELLOW STRIPE
PLUG 5
LABEL WITH THE LETTER "G"
PLUG 4
LABEL WITH THE LETTER "A"
4"
PLUG 4
LABEL WITH THE LETTER "A"
12-Way Deutsch DT Series Plug
Secondary Lock W12S
Plug DT06-12SA
#5 PORT SEAT
#6 STBD SEAT
#7 FOOTREST
#8 NAV/ANC LTS
14 AWG YELLOW WITH A BLACK STRIPE #2
14 AWG YELLOW WITH A WHITE STRIPE #1
#1 PORT BLOWER
#2 CENTER BLOWER
#3 STBD BLOWER
#4 EXHAUST
14 AWG ORANGE WITH A WHITE STRIPE #5
14 AWG ORANGE WITH A GREEN STRIPE #6
14 AWG YELLOW WITH A GREEN STRIPE #3
14 AWG RED #4
#11 16 AWG WHITE WITH A RED STRIPE
#12 14 AWG BROWN
#10 14 AWG RED WITH A YELLOW STRIPE
#9 14 AWG DARK BLUE WITH A PURPLE STRIPE
#7 14 AWG ORANGE WITH A BLACK STRIPE
#8 14 AWG RED WITHA GRAY STRIPE
#9 LIGHTS
#10 STEREO
#11 ACC/ANC
#12 BILGE
PLUG 3
LABEL WITH THE LETTER "B"
4"
4-Way Deutsch DTP Series Receptacle
Secondary Lock WP-4P
Receptacle DTP04-04P
#3 HORN
#4 EMPTY
#1 BLOWER MAIN (OUT)
#2 BLOWER MAIN (IN)
LABEL WITH THE LETTER "B"
#4 SEALING PIN
#3 10 AWG ORANGE WITH A YELLOW STRIPE
10 AWG YELLOW WITH A PURPLE STRIPE #1
10 AWG YELLOW WITH A PURPLE STRIPE #2
PLUG 3
#1 HATCH (UP)
#2 HATCH (DOWN)
Plug DTP06-4S
4-Way Deutsch DTP Series Plug
12 AWG BROWN WITH A GRAY STRIPE #4
10 AWG BLACK #3
#1 10 AWG LT. BLUE WITH A RED STRIPE
#2 10 AWG LT. GREEN WITH A RED STRIPE
#3 HATCH GROUND
#4 FRESH WATER
LABEL WITH THE LETTER "J"
PLUG 7
LABEL WITH THE LETTER "J"
PLUG 7
4"
LABEL WITH THE LETTER "C"
PLUG 2
#1 FIRE EXTINGUISHER
#2 FUME DETECTOR
#3 CO MONITOR
#4 DEPTH FINDER
Secondary Lock W4S
#1 16 AWG RED WITH AN ORANGE STRIPE
#2 16 AWG RED WITH A PINK STRIPE
16 AWG RED WITH A PURPLE STRIPE #4
16 AWG RED WITH A BROWN STRIPE #3
Receptacle DT06-04S
4-Way Deutsch DT Series Plug
LABEL WITH THE LETTER "C"
PLUG 2
12 AWG ORANGE WITH A RED STRIPE #1 #2 12 AWG ORANGE
Plug DTP06-
#1 DOCKING LIGHTS
Secondary Lock
#2 12 VOLT
LABEL WITH THE LETTER "K"
2-Way Deutsch DTP Series Plug
PLUG 8
LABEL WITH THE LETTER "K"
PLUG 8
LABEL WITH THE LETTER "D"
4"
PLUG 1
#2 12 AWG ORANGE WITH A RED STRIPE10 AWG RED WITH A BLUE STRIPE #3
Plug DTP06-4S
4-Way Deutsch DTP Series Plug
Secondary Lock WS-4S
#1 12 VOLT
#2 DOCKING LIGHTS
#3 HATCH (POWER)
#4 FRESH WATER
12 AWG BROWN WITH A GRAY STRIPE #4
LABEL WITH THE LETTER "D"
#1 12 AWG ORANGE
PLUG 1
WARNING
GASOLINE VAPORS CAN EXPLODE
CHECK ENGINE COMPARTMENT FOR
BEFORE STARTING ENGINE:
RUN BLOWER BELOW CRUISING SPEED.
OPERATE BLOWER FOR 4 MINUTES
GASOLINE OR VAPORS.
ACC
LT
CABIN STEREO
COURT
LT
ENGINE
LT
BILGE
EXHAUST
FINDER
DEPTH
BLOWER
ENGINE
WATER
FRESH
HATCH
HORN
LTS
NAV/ANC
LIGHTS
DOCKING
STEREO REMOTE
16 AWG DARK BLUE
FIRE BUOY
16 AWG RED WITH AN ORANGE STRIPE
FIRE BUOY
16 AWG RED WITH AN ORANGE STRIPE
STEREO REMOTE
16 AWG BLACK
10"
8"
6"
4"
FUME DETECTOR
16 AWG RED WITH A PINK STRIPE
FUME DETECTOR
16 AWG BLACK
2"
2"
8"
2"
9"
9"
9"
30"
HORN
10 AWG ORANGE WITH A YELLOW STRIPE
HORN
10 AWG BLACK
SPLICE INTO HATCH GROUND FOR HORN GROUND
9"
DEPTH FINDER
16 AWG RED WITH A PURPLE STRIPE
DEPTH FINDER
16 AWG DARK BLUE DEPTH FINDER
16 AWG BLACK
6.7
40 Outlaw®
R
Speed changes you. TM.
SwitCh panel wire inFOrMatiOn – twin (Fig 6.7.1)
HEAT SEALED 14-16 NO. RING TERMINAL
D
D
A
A
A
(.156) SPLASH PROOF CONNECTOR RECEPTACLE
A
A
AA
C
C
C
(.250) 14-16 HEAT SEALED QUICK SLIDE RECEPTACLE
C
LABEL WITH THE LETTER "H"
Plug DT06-12SA
#5 CABIN LIGHTS
#6 PORT BLOWER
#7 STBD BLOWER
#8 BILGE
Secondary Lock W12S
12-Way Deutsch DT Series Plug
#1 COURT LIGHTS
#2 ENGINE LIGHTS
#3 BOW LIGHT
#4 STERN LIGHT
16 AWG DARK BLUE WITH A WHITE STRIPE #1
14 AWG YELLOW WITH A WHITE STRIPE #6
14 AWG GRAY WITH A PINK STRIPE #4
16 AWG DARK BLUE WITH A BLACK STRIPE #2
16 AWG BLUE WITH A RED STRIPE #5
14 AWG GRAY #3
#7 14 AWG YELLOW WITH A GREEN STRIPE
#9 14 AWG YELLOW WITH A BLACK STRIPE
#10 16 AWG RED WITH A BROWN STRIPE
#11 16 AWG RED WITH AN ORANGE STRIPE
#9 CNTR BLOWER
#10 CO MONITOR
#11 FIRE BUOY
#12 GROUND
#12 14 AWG BLACK
#8 14 AWG BROWN
LABEL WITH THE LETTER "H"
PLUG 6
PLUG 6
#1 PORT SEAT
#2 STBD SEAT
#3 MAST LIGHT
#4 EXHAUST
#5 STEREO
#6 POWER STERN
#7 PANEL LIGHTS
#8 MID BILGE
LABEL WITH THE LETTER "G"
PLUG 5
#9 GROUND
#10 EMPTY
#11 EMPTY
#12 EMPTY
#2 14 AWG ORANGE WITH A GREEN STRIPE
#3 14 AWG GRAY WITH A BLUE STRIPE
#6 16 AWG RED WITH A GRAY STRIPE16 AWG BLUE #7
SEALING PIN #11
SEALING PIN #12
14 AWG BROWN WITH AN ORANGE STRIPE #8
SEALING PIN #10
14 AWG BLACK #9
Receptacle DT04-12PA
Secondary Lock W12P
12-Way Deutsch DT Series Receptacle
#1 14 AWG ORANGE WITH A WHITE STRIPE
#4 14 AWG RED
#5 14 AWG RED WITH A YELLOW STRIPE
PLUG 5
LABEL WITH THE LETTER "G"
PLUG 4
LABEL WITH THE LETTER "A"
4"
PLUG 4
LABEL WITH THE LETTER "A"
12-Way Deutsch DT Series Plug
Secondary Lock W12S
Plug DT06-12SA
#5 PORT SEAT
#6 STBD SEAT
#7 FOOTREST
#8 NAV/ANC LTS
14 AWG YELLOW WITH A BLACK STRIPE #2
14 AWG YELLOW WITH A WHITE STRIPE #1
#1 PORT BLOWER
#2 CENTER BLOWER
#3 STBD BLOWER
#4 EXHAUST
14 AWG ORANGE WITH A WHITE STRIPE #5
14 AWG ORANGE WITH A GREEN STRIPE #6
14 AWG YELLOW WITH A GREEN STRIPE #3
14 AWG RED #4
#11 16 AWG WHITE WITH A RED STRIPE
#12 14 AWG BROWN
#10 14 AWG RED WITH A YELLOW STRIPE
#9 14 AWG DARK BLUE WITH A PURPLE STRIPE
#7 14 AWG ORANGE WITH A BLACK STRIPE
#8 14 AWG RED WITHA GRAY STRIPE
#9 LIGHTS
#10 STEREO
#11 ACC/ANC
#12 BILGE
PLUG 3
LABEL WITH THE LETTER "B"
4"
4-Way Deutsch DTP Series Receptacle
Secondary Lock WP-4P
Receptacle DTP04-04P
#3 HORN
#4 EMPTY
#1 BLOWER MAIN (OUT)
#2 BLOWER MAIN (IN)
LABEL WITH THE LETTER "B"
#4 SEALING PIN
#3 10 AWG ORANGE WITH A YELLOW STRIPE
10 AWG YELLOW WITH A PURPLE STRIPE #1
10 AWG YELLOW WITH A PURPLE STRIPE #2
PLUG 3
#1 HATCH (UP)
#2 HATCH (DOWN)
Plug DTP06-4S
4-Way Deutsch DTP Series Plug
12 AWG BROWN WITH A GRAY STRIPE #4
10 AWG BLACK #3
#1 10 AWG LT. BLUE WITH A RED STRIPE
#2 10 AWG LT. GREEN WITH A RED STRIPE
#3 HATCH GROUND
#4 FRESH WATER
LABEL WITH THE LETTER "J"
PLUG 7
LABEL WITH THE LETTER "J"
PLUG 7
4"
LABEL WITH THE LETTER "C"
PLUG 2
#1 FIRE EXTINGUISHER
#2 FUME DETECTOR
#3 CO MONITOR
#4 DEPTH FINDER
Secondary Lock W4S
16 AWG RED WITH A PURPLE STRIPE #4
16 AWG RED WITH A BROWN STRIPE #3
Receptacle DT06-04S
4-Way Deutsch DT Series Plug
LABEL WITH THE LETTER "C"
PLUG 2
12 AWG ORANGE WITH A RED STRIPE #1 #2 12 AWG ORANGE
Plug DTP06-
#1 DOCKING LIGHTS
Secondary Lock
#2 12 VOLT
LABEL WITH THE LETTER "K"
2-Way Deutsch DTP Series Plug
PLUG 8
LABEL WITH THE LETTER "K"
PLUG 8
LABEL WITH THE LETTER "D"
4"
PLUG 1
#2 12 AWG ORANGE WITH A RED STRIPE10 AWG RED WITH A BLUE STRIPE #3
Plug DTP06-4S
4-Way Deutsch DTP Series Plug
Secondary Lock WS-4S
#1 12 VOLT
#2 DOCKING LIGHTS
#3 HATCH (POWER)
#4 FRESH WATER
12 AWG BROWN WITH A GRAY STRIPE #4
LABEL WITH THE LETTER "D"
#1 12 AWG ORANGE
PLUG 1
WARNING
GASOLINE VAPORS CAN EXPLODE
CHECK ENGINE COMPARTMENT FOR
BEFORE STARTING ENGINE:
RUN BLOWER BELOW CRUISING SPEED.
OPERATE BLOWER FOR 4 MINUTES
GASOLINE OR VAPORS.
ACC
LT
CABIN STEREO
COURT
LT
ENGINE
LT
BILGE
EXHAUST
FINDER
DEPTH
BLOWER
ENGINE
WATER
FRESH
HATCH
HORN
LTS
NAV/ANC
LIGHTS
DOCKING
STEREO REMOTE
16 AWG DARK BLUE
FIRE BUOY
16 AWG RED WITH AN ORANGE STRIPE
FIRE BUOY
16 AWG RED WITH AN ORANGE STRIPE
STEREO REMOTE
16 AWG BLACK
10"
8"
6"
4"
FUME DETECTOR
16 AWG RED WITH A PINK STRIPE FUME DETECTOR
16 AWG BLACK
2"
2"
8"
2"
9"
9"
9"
30"
HORN
10 AWG ORANGE WITH A YELLOW STRIPE HORN
10 AWG BLACK
SPLICE INTO HATCH GROUND FOR HORN GROUND
9"
DEPTH FINDER
16 AWG RED WITH A PURPLE STRIPE
DEPTH FINDER
16 AWG DARK BLUE DEPTH FINDER
16 AWG BLACK
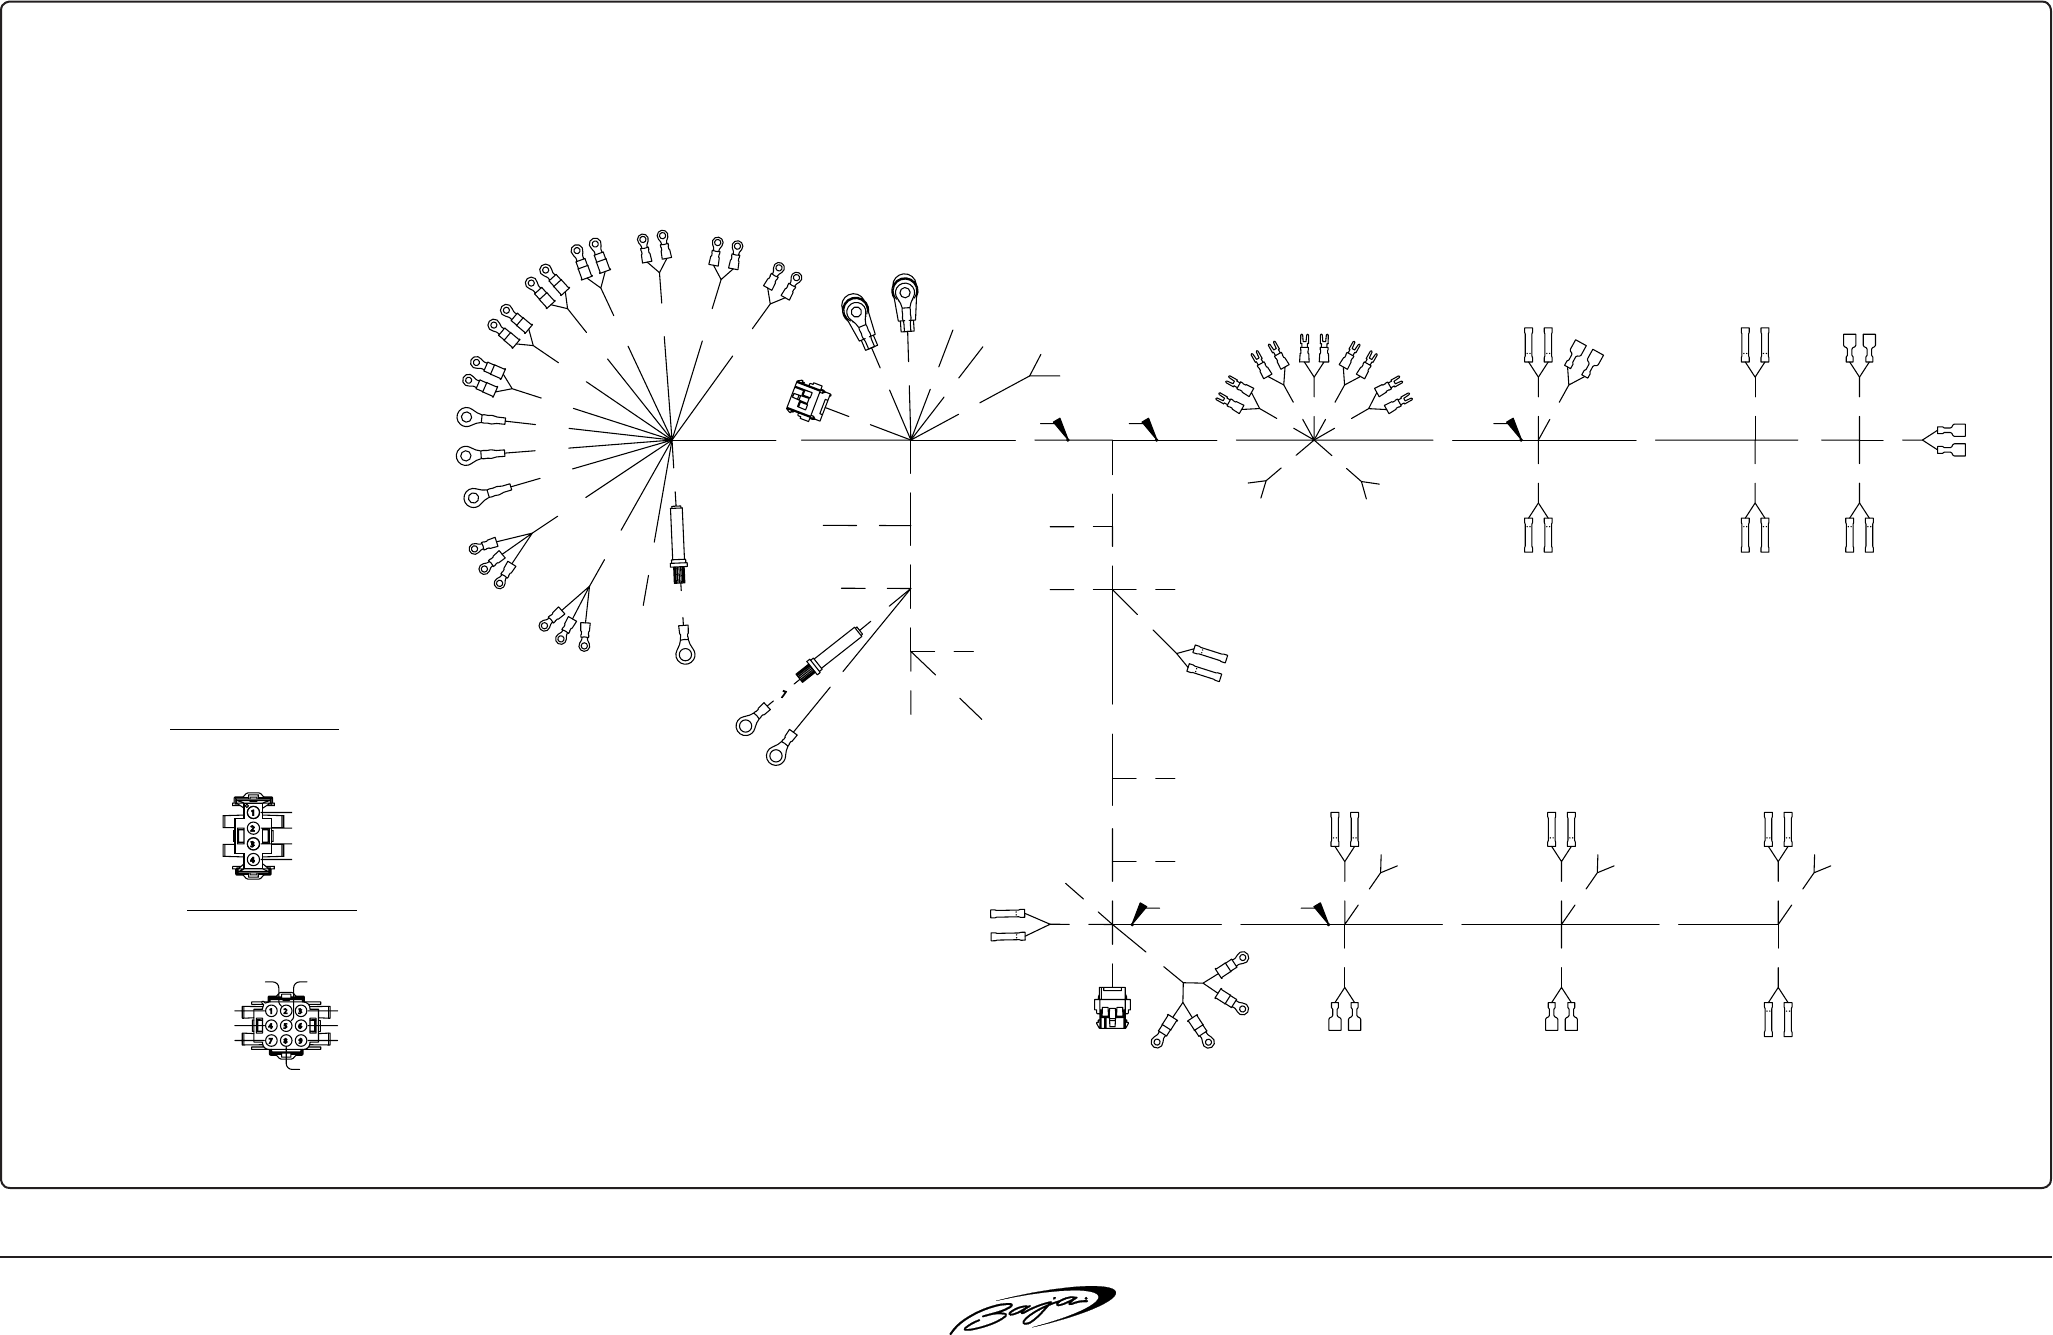
6.8
40 Outlaw®
R
Speed changes you. TM.
wiring harneSS inFOrMatiOn (Fig 6.8.1)
12GA.ORANGE(DOCK.LT.)
12GA.BLACK(DOCK.LT.)
14GA.BLACK(CABIN)
14GA.GRAY(179" MAST FORE)
14GA.GRAY(326" TRANSOM LIGHT)
14GA.GRAY(179" MAST AFT)
12ga BLK/YEL
12ga ORG/WHT
12ga BLACK
12ga ORANGE
14GA.DK.BLUE(CABIN)
54
7 8
1 2
6
9
(LABEL "AIR PUMP")
12/3 BOAT CBL
12/3 BOAT CABLE
AIR COND PUMP
14ga.BLACK (CABIN)
14ga.GRAY
14ga.GRAY
12ga.BLACK
5 AMP
8ga.RED
(LABEL "BATTERY")
#10
12ga.BLACK
14ga.WHITE
16ga.YELLOW (LABEL "STEREO MEM")
9 WAY FEMALE CAP w/PINS #1
54-0901-005 ( 770028-1 )
60-0909-046 ( 770007-1 )
4 WAY FEMALE CAP w/PINS #2
54-0401-017 ( 770026-1 )
60-0909-046 ( 770007-1 )
MID BILGE
16ga BROWN
16ga BLACK
#3/8
16ga.BROWN (LABEL "SUMP PUMP")
#10
12ga.WHITE
(LABEL "AIR")
12ga.DK.GREEN
#3/8
(LABEL "IND LT")
14ga.DK.BLUE
14ga.BLACK
8ga.DK.GREEN "B"
#5/16
7
31
109" 109"
15"
8ga.BLACK
(LABEL "VAC GEN")
(LABEL "REFRIG")
12ga.ORANGE
12ga.BLACK
14ga.DK.GREEN
14ga.BLACK
8ga.BLACK
8ga.RED
8ga.DK.GREEN "A"
(LABEL "WATER PUMP")
(LABEL "AIR")
10ga.BLACK
10ga.ORANGE
#10
14ga.BLACK
14ga.DK.BLUE
14ga.DK.BLUE
14ga.BLACK
12ga.ORANGE
12ga.BLACK
8ga.DK.GREEN "B"
8ga.DK.GREEN "A"
(LABEL "BATTERY")
(LABEL "STEREO MEM")
14/3 BOAT CABLE
#5/16
14/3 BOAT CBL
17"
#10
#10
#10
#10
#5/16 11"
15"
5 AMP
12/3 BOAT CBL
38"
20"
7"
10"
#10
#10
#1/4
#10
21"
13"
12ga.ORANGE
12ga.BLACK
#10
#10
#10
#10
13"
13"
#10 #10
13" 13"
#10
0"48"
16ga.YELLOW
25"
22
26"
12ga.BLACK
14ga.DK.BLUE
(LABEL "CABIN")
26"
51"
14ga.BLACK
(LABEL "12V DC")
12ga.ORANGE
133"
#5/16
#31-0105-027
RED BOOTS
#2
13"
30
19"
#10
#10
#10
300"
105"
300"
21"
SPLICE
IND LT
12/3 BOAT CBL
#5/16
(LABEL "IND. LT")
(LABEL "SWIVEL LT")
(LABEL "TV")
14ga.DK.BLUE
14ga.BLACK
(LABEL "STRIP DECOR")
(LABEL "STRIP DECOR")
(LABEL "IND LT")
12ga.BLACK/YEL SPKR R5SPKR R4
12ga.ORANGE/WHT
(LABEL "SWIVEL LT")
(LABEL "STRIP DECOR")
#10
12ga.ORANGE
12ga.BLACK
#1
19"
#10
30"
160"
28"
8"
SPLICE
CABIN
60"
#10
12ga.BLACK
12ga.ORANGE
#10
.250 .187
41"
61"
SPLICE
SWIVEL 42"
36"
12ga.ORANGE
(LABEL "VAC GEN")
12ga.BLACK
(LABEL "12V DC")
35"
60"
35"
14ga.DK.BLUE
14ga.BLACK
MID BILGE
16ga BROWN
16ga BLACK
14ga.BLACK
14ga.DK.BLUE
14ga.BLACK
14ga.DK.BLUE
.250
77"
.187
45"
28"
36"
21"
(LABEL "SWIVEL LT")
14ga.DK.BLUE
14ga.BLACK
14ga.DK.BLUE
14ga.BLACK
(LABEL "SWIVEL LT")
12ga.ORANGE
12ga.BLACK
75"
112 175"
(LABEL "SWIVEL LT")
(LABEL "DOCK LT")
14ga.BLACK (BOW LT)
14ga.GRAY
(LABEL "REFRIG")
10ga.BLACK
53"
(LABEL "TV")
12ga.BLACK
12ga.ORANGE
(LABEL "SUMP PUMP")
16ga.BROWN
16ga.BLACK
85"
27"
9"
18
104"
14"
61" 136"
(LABEL "WATER PUMP")
12ga.ORANGE
STRIP DECOR
SPLICE
45"
45" 45"
45"
45"
SPEAKERS
72"49"
42"
14ga.BLACK
14ga.DK.BLUE
10ga.ORANGE
(LABEL "SWIVEL LT")
36"
SPLICE
SWIVEL
14ga.BLACK
.187
36"
.250
SPKR L4
14ga.DK.BLUE
SPKR AC2
14"76"
36"
14ga.BLACK
14ga.DK.BLUE
14ga.BLACK
14ga.DK.BLUE
36"
.250
SPKR L5/AC1
14"
.250
28"
(LABEL "IND LT")
14ga.BLACK
14ga.DK.BLUE
.187
.187
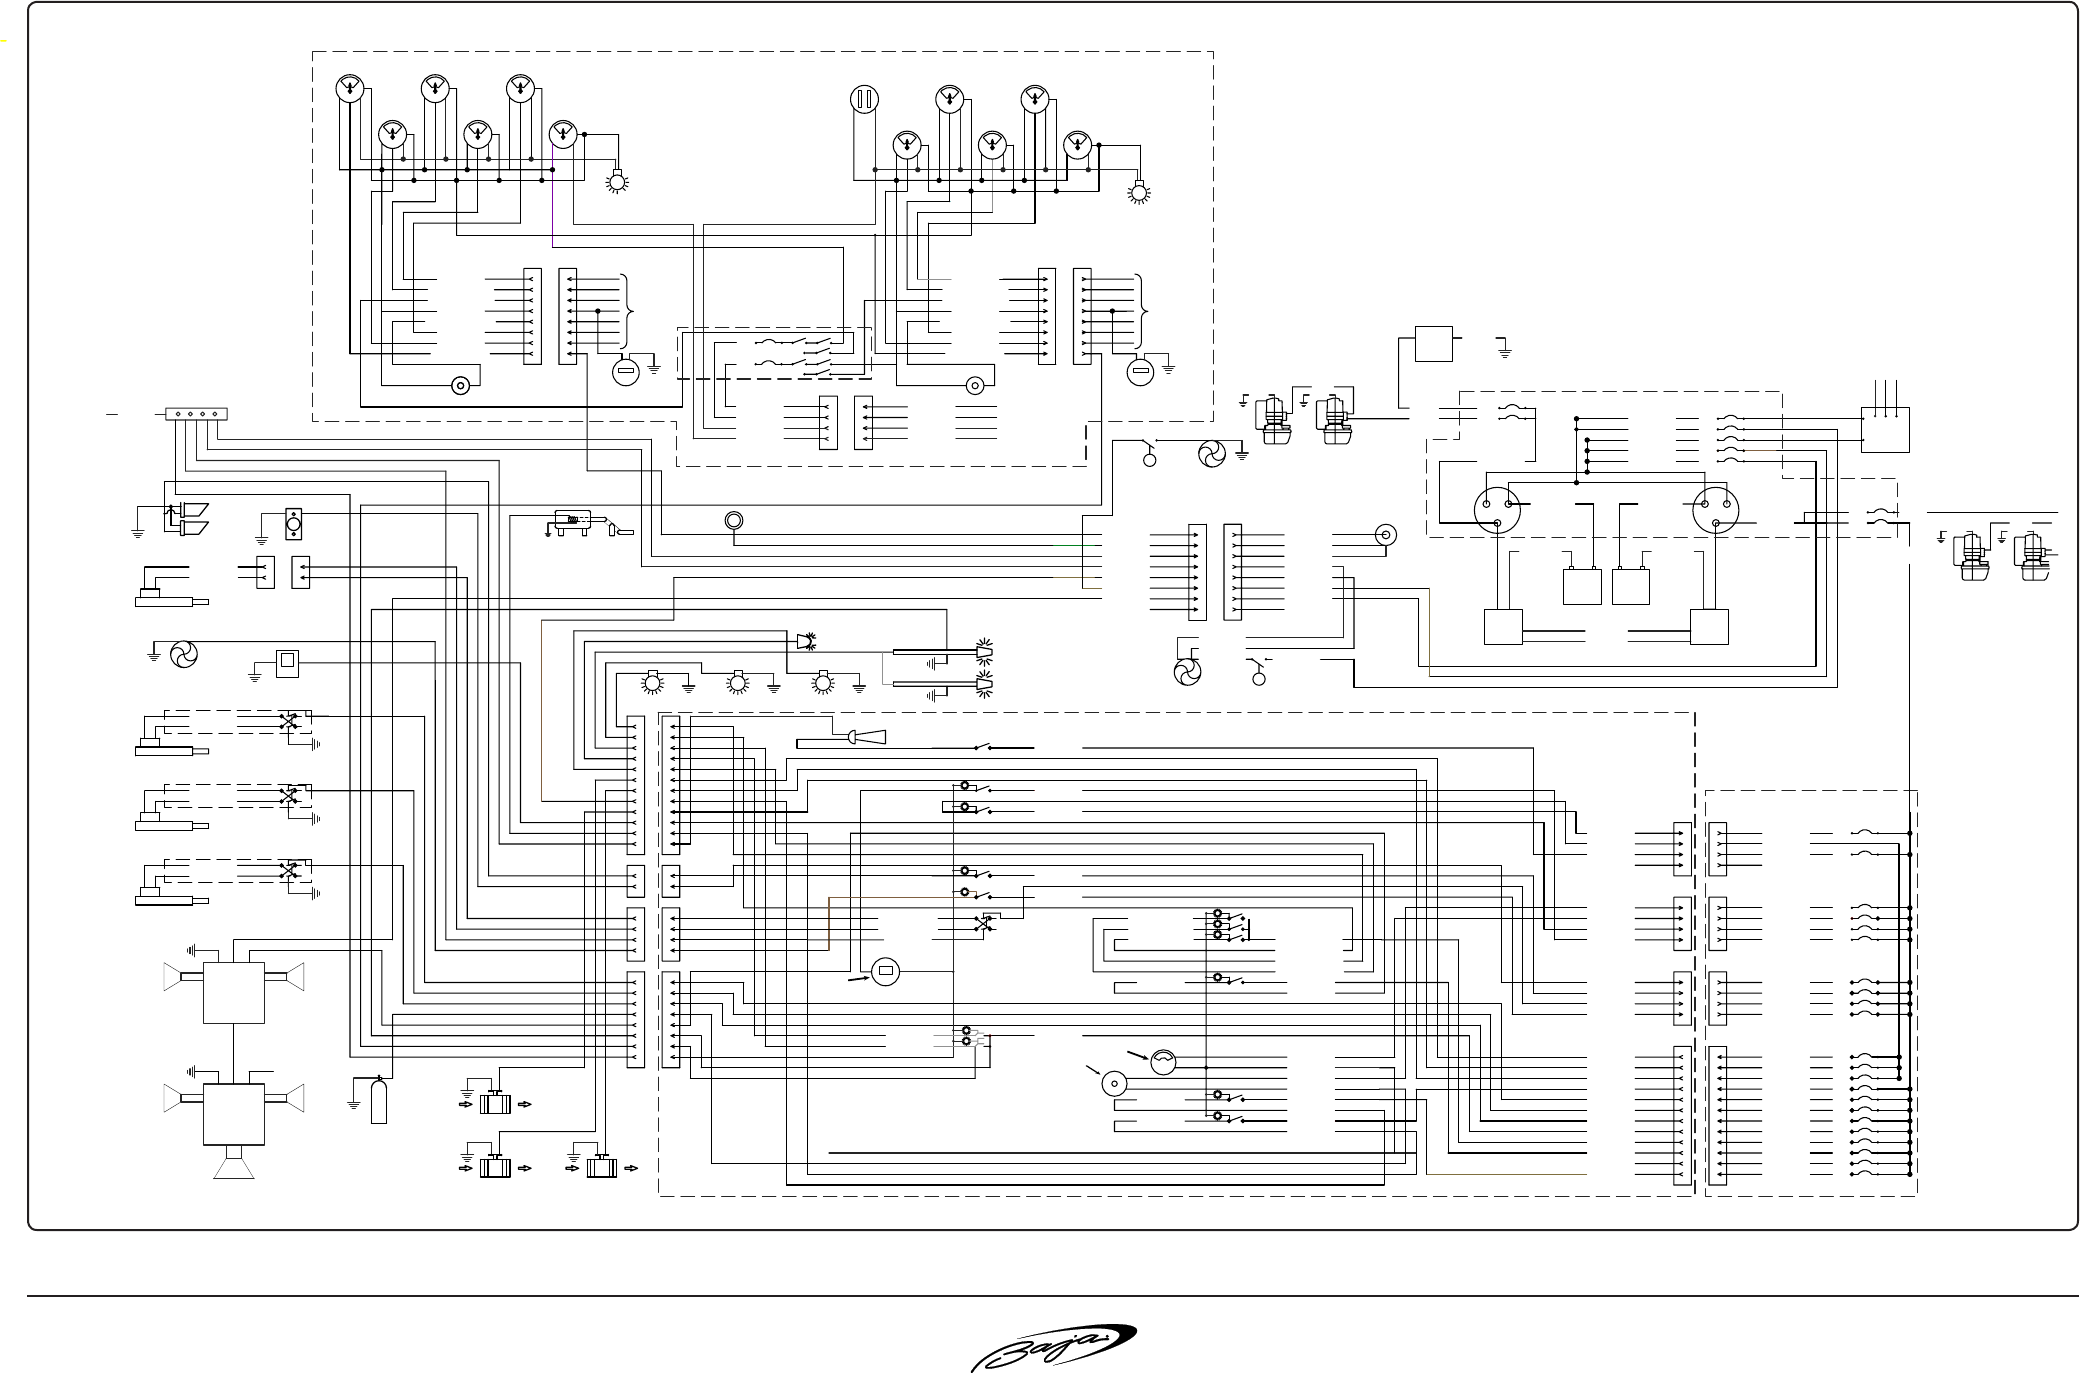
6.9
40 Outlaw®
R
Speed changes you. TM.
dC diStriButiOn wiring inFOrMatiOn (Fig 6.9.1)
STEREO
AMP
16 BRN/GRN
16 DARK BLUE
16 PUR/GRN
16 TAN/BLU-GRN
16 YEL/RED-GRN
16 TAN/GRN
16 LT BLU/GRN
7
8
4
5
6
2
3
16 GRY/GRN 1
FUEL GAUGE
PORT VOLT GAUGEPORT OIL TEMP GAUGE PORT TACH GAUGE
STBD OIL TEMP GAUGE STBD TACH GAUGE STBD VOLT GAUGE
STBD WATER TEMP GAUGESTBD OIL PRESSURE GAUGE
PORT OIL PRESSURE GAUGE PORT WATER TEMP GAUGE
TAB INDICATOR
MECHCANICAL TAB INDICATOR LIGHT
COMPASS LIGHT
TWIN IGNITION SEE REFERENCE DRAWING 4900357
OIL PRESSURE ALARM
INSTRUMENT PANEL TO STBD ENGINE HARNESS CONNECTION
77
88
5
66
5
14 ORN/BLK
14 ORN/WHI
14 ORN/GRN
33
44
1
22
14 YEL/WHI
14 YEL/GRN
14 RED
14 YEL/BLK
25a
10a
10a
5a
10a
15a
4a
10a
2a
2a
10a
10a
4
2
3
1
12 BRN/GRY
10 RED/BLU
12 ORN/RED
12 ORANGE
14 ORN/BRN
14 ORN/BRN
SWITCH LOCATED IN DRIVER SEAT
86 73 45
2
1 119 10 12 78
3 5
4 6
1242
1 31 2
SWITCH PANEL
NEG
2/0 RED
STBD BATTERY
PORT ENGINE
CUDDY MDP
PORT BATTERY
2/0 BLACK
2/0 BLACK
CONVERTER
1
NEG
2/0 BLACK
22/0 RED
POS POS
STBD ENGINE
2/0 BLACK
12
FROM A.C. MDP
EXHAUST SOLENOIDS
PORT HOUR METER (GAFFRIG ONLY)
CABIN LIGHTS (6) COURT LIGHTS (2) ENGINE LIGHTS (2)
BOW LIGHT
POWER STERN LIGHT (OPT)
PORT BLOWER STBD BLOWER
POWER STERN LIGHT
BILGE FLOATBILGE PUMP
16 BROWN 16 BROWN
HORN
CO MONITOR
FIRE EXTINGUISHER
POWER FOOTREST
STBD POWER SEAT
SWITCH LOCATED IN DRIVER SEAT
14 BLACK
14 RED
PORT POWER SEAT
SWITCH LOCATED IN PASSENGER SEAT
14 RED
14 BLACK
FRESH WATER PUMP
MOTOR LID LIFT
14 BLACK
14 ORANGE
12V RECEPTACLE
DOCKING LIGHTS
OIL PRESSURE ALARM
8 BLACK
8 RED
8 BLACK 8 BLACK
8 BLACK
2 RED 75a
14 YELLOW
14 BRO/ORN
14 RED
14 BRN/YEL
14 RED
15a
5a
15a
15a
5a
2 RED 75a
75a
75a
6 RED
6 BLACK
INSTRUMENT PANEL TO PORT ENGINE HARNESS CONNECTION
16 PINK
16 LT BLU/WHI
16 YEL/RED-WHI
16 TAN/BLU-WHI
16 GRY/WHI
16 PUR/WHI
16 TAN/WHI
16 BRN/WHI
8
7
4
5
6
3
1
2
FROM PORT
ENGINE
1
4
3
2
10 BLACK
10 BLACK
10 RED/GRN
10 RED/WHI
15a
15a
FROM PORT ENGINE
FROM STBD ENGINE
FROM PORT ENGINE
FROM STBD ENGINE
STBD HOUR METER (GAFFRIG ONLY)
FROM STBD
ENGINE
8 RED
MAIN DC NEGATIVE
2 BLACK
2
1
16 PINK
14 GREEN
16 BLACK
14 BLACK
14 BROWN
14 ORN/BRN
14 YELLOW
SEALING PIN
3
5
7
6
4
8
1
2
SEALING PIN
16 BLACK
14 YELLOW
14 ORN/BRN
14 BROWN
14 BLACK
14 GREEN
16 PINK
16 BROWN
16 BROWN
FUEL SENSOR
MID BILGE PUMP
TO ENGINE BLOCK
BILGE FLOAT SWITCH
10 BLACK
10 RED/GRN
10 BLACK
10 RED/WHI
LOCATED ON INNER STBD TRANSOM
WALL
SECURED ON REAR SIDE STBD REAR BENCH
WALL
SECURED ON REAR SIDE STBD REAR BENCH
WALL
2 RED
8 RED
2 RED
BATTERY SWITCH PANEL
IGNITION PANEL
TWIN INSTRUMENT PANEL
TWIN INSTRUMENT PANEL
INSTRUMENT PANEL
FUEL FILL
TO CUDDY BREAKER PANEL
9
10
12
11
14 RED/YEL
14 BROWN
16 WHI/RED
14 BLU/PUR
14 GRY/RED
5a
10a
10a
25a
16 WHI/RED
14 BROWN
14 YEL/WHI
14 ORN/GRN
14 ORN/BLK
14 GRY/RED
14 BLU/PUR
14 RED/YEL
14 ORN/WHI
14 YEL/GRN
14 YEL/BLK
14 RED
12 ORANGE
12 BRN/GRY
10 RED/BLU
12 ORN/RED
2a
10a
10 ORN/YEL
10 YEL/PUR
10 YEL/PUR
3
4
1
2
3
4
1
2
EMPTY
12 BRN/GRY
16 RED/PUR
14 ORN/RED
14 YEL/GRN
14 ORN/YEL
14 GRY/RED
FIRE EXTINGUISHER INDICATOR
LIGHT
DASH MOUNTED ITEM
14 GRY/PNK
14 GRAY
DEPTH SOUNDER
10 BLACK
10 LT GRN/RED
10 LT BLU/RED
14 RED
14 BROWN
FUME DETECTOR
14 RED/YEL
DASH MOUNTED ITEMS
16 RED/PNK
14 BLACK
14 RED/ORN
16 RED/ORN
14 BROWN
14 BROWN
14 RED
14 RED
14 RED/YEL
14 RED/YEL
16 DRK BLU/BLK
16 DRK BLU/RED
16 DRK BLU/WHI
16 DRK BLU/WHI
16 DRK BLU/RED
16 DRK BLU/BLK
14 DRK BLU/PUR 16 RED/PUR
16 RED/BRN
16 RED/PNK
14 RED/ORN
EMPTY
10 ORN/YEL
10 YEL/PUR
10 YEL/PUR
16 RED/PUR
16 RED/BRN
16 RED/PNK
2a
10a
2a
14 RED/ORN 10a
PORT BLOWER
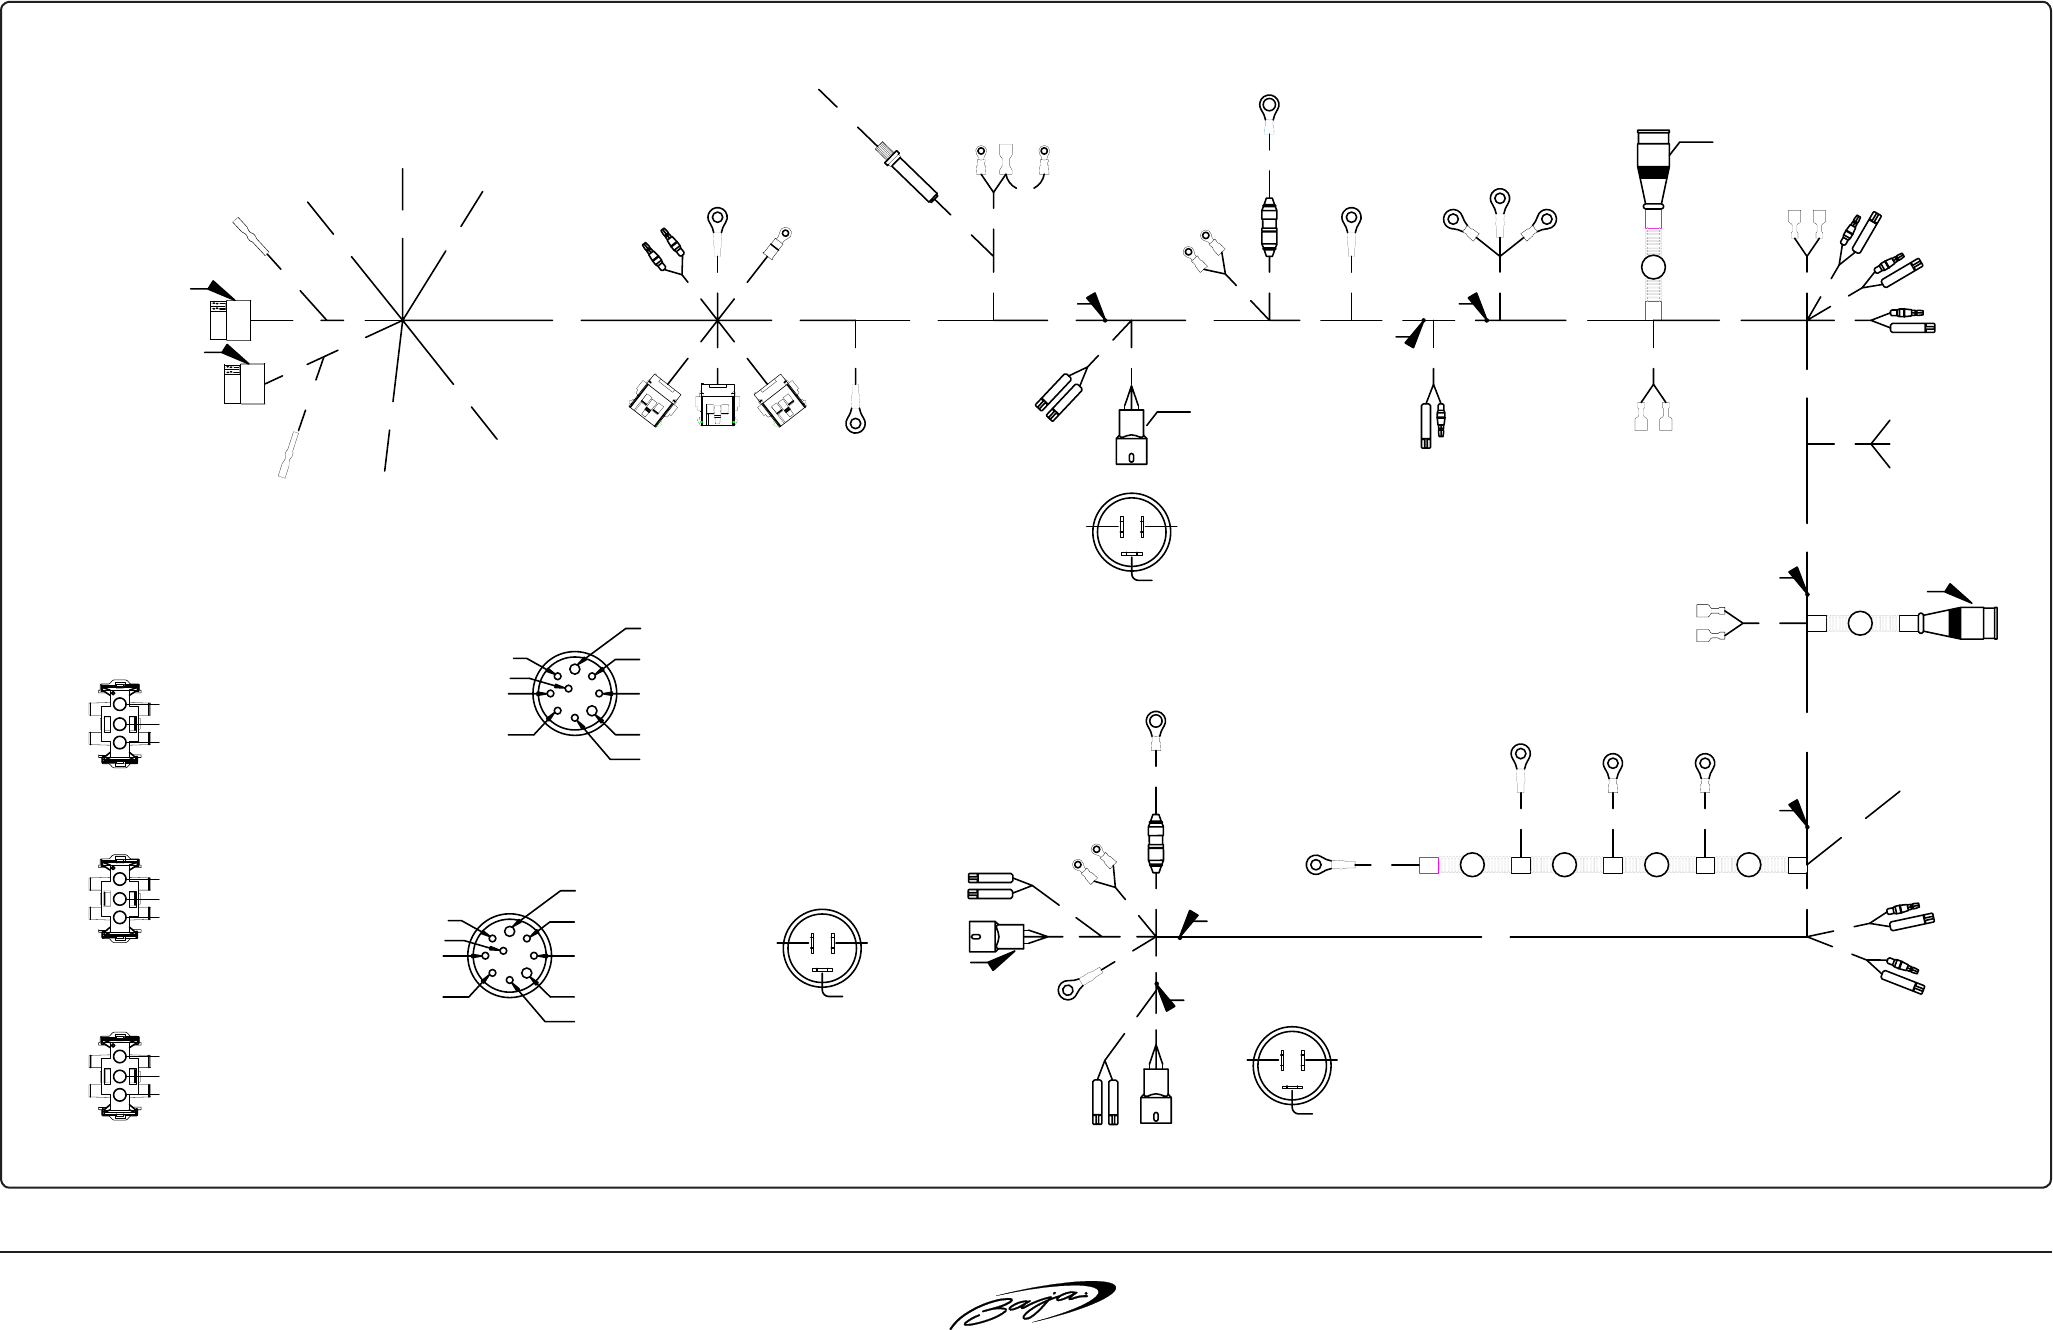
6.10
40 Outlaw®
R
Speed changes you. TM.
2
3
1
2
3
1
2
3
1
29
14 LT.BLUE
14 PURPLE
14 LT.GREEN
GRN TAPE
RED TAPE
8 WAY MOLDED FEMALE (STBD)
16 TAN/BLU
12
13
13
14 RED
TRIM
STBD
20 AMP
8 BLACK (A)
12 BLACK (D)
25
13
29
29
14 RED
19
16 PURPLE
16 PINK
15
15 15
28
29 29
117
#5/16
#10
49
8
24
20 55
TRIM
CENTER
14 PURPLE
14 LT.BLUE
14 LT.GREEN
TRIM
PORT
14 LT.BLUE
14 PURPLE
14 LT.GREEN
14 RED
7
(LABEL "FLOAT")
16 BRN/WHT
16 BLACK (DBL) (E)
16 PINK
#10
16 BLACK (D)
16 BLACK (E)
8 BLACK (B)
8 BLACK (B)
33
14 LT.BLUE
14 LT.GREEN
SPLICE
STBD TRIM
20
13 13
12
#10
33
18
37
10
#10
30 AMP
#5/16
SPLICE
BLK (D)
13
SPLICE
BLK (E)
41 16
20
#5/16
#5/16
5/8 FLEX
8
16
#5/16
38
16 BLACK (E)
#10
14 RED
TAB
STBD
7
#3/8
STBD
16 GRAY
16 BLACK (F)
16 BLACK (E)
(LABEL "C HR/METER")
16 PURPLE
(LABEL "COURTESY")
8
22 14
17
12
8
16 DK.BLUE
16 BLACK (D)
16 PURPLE
16 BLACK (F)
GRN TAPE
BLK (F)
(LABEL "P HR/METER")
16 PURPLE
16 BLACK (G)
2
56
3
1/2 FLEX
2 2
2
8 BLACK (C)
16 BLACK (F)
#5/16
#5/16
16 BLACK (G)
16 YELLOW 3
12
11
11
14
SPLICE
BLK (G)
15
2
16 YELLOW 2
16 BLACK (F)
8 DK.GREEN
33
5/8 FLEX
16 BLACK (G)
#5/16
10
SPLICE
22
RED TAPE
16 YELLOW 1
16 BLACK (E)
(LABEL "S HR/METER")
16 PURPLE
16 BLACK (D)
10
80
(LABEL "FLOAT")
16 BRN/WHT
16 BROWN
16 BLACK (G)
PORT
8 BLACK (C)
REAR VIEW
MOLDED MALE TRIM PLUG
14 LT.BLUE
RED TAPE
PORT
TRIM
14 LT.BLUE
14 PURPLE
14 RED
8 BLACK (A)
#5/16
14 LT.BLUE
14 RED
MOLDED MALE TRIM PLUG
14 LT.BLUE
14 PURPLE
CENTER TRIM
14 LT.GREEN
CENTER
TRIM
12
12
REAR VIEW
SPLICE
7
#10
12
12
12
25
37
33
28
14 LT.GREEN
14 LT.BLUE
4 AMP
#10
SPLICE
PORT TRIM
8 DK.GREEN
#5/16
#3/8
14 LT.BLUE
MOLDED MALE TRIM PLUG
14 RED
PORT
TAB
REAR VIEW
14 LT.GREEN 14 RED
14 PURPLE
14 LT.BLUE
3 WAY FEMALE CAP #2
PIN TERMINALS
#54-0301-015
AMP# 770025-1
16 PURPLE (P HR/METER)
16 PURPLE (C HR/METER)
16 PURPLE (S HR/METER)
PIN TERMINALS
#54-0301-015
AMP# 770025-1
3 WAY FEMALE CAP #1
16 YELLOW 3
16 YELLOW 2
16 YELLOW 1
16 LT.BLUE
10 RED/PUR
16 PURPLE
10 BLACK
16 YEL/RED
ENGINE HARNESS (PORT)
16 GRAY
10 BLACK
16 LT.BLUE
16 BRN/WHT
ENGINE HARNESS (STBD)
16 GRAY
16 TAN/BLU
16 TAN
REAR VIEW
16 TAN/BLU
30
14 LT.BLUE
14 LT.GREEN
STBD
TAB
PORT
14 LT.GREEN
14 LT.BLUE
14 RED
TAB
20
14 RED
20
1
2
3#5/16
STBD
TRIM
GRN TAPE
3 WAY FEMALE CAP #3
PIN TERMINALS
#54-0301-015
AMP# 770025-1
16 DK.BLUE (COURTESY)
16 BROWN
16 GRAY
*CUSTOMER SUPPLIED SAMPLE.
REAR VIEW
16 TAN/BLU 10 RED
16 PURPLE
16 BRN/WHT
16 TAN 16 YEL/RED
14 LT.GREEN
2
hull wiring harneSS inFOrMatiOn (Fig 6.10.1)
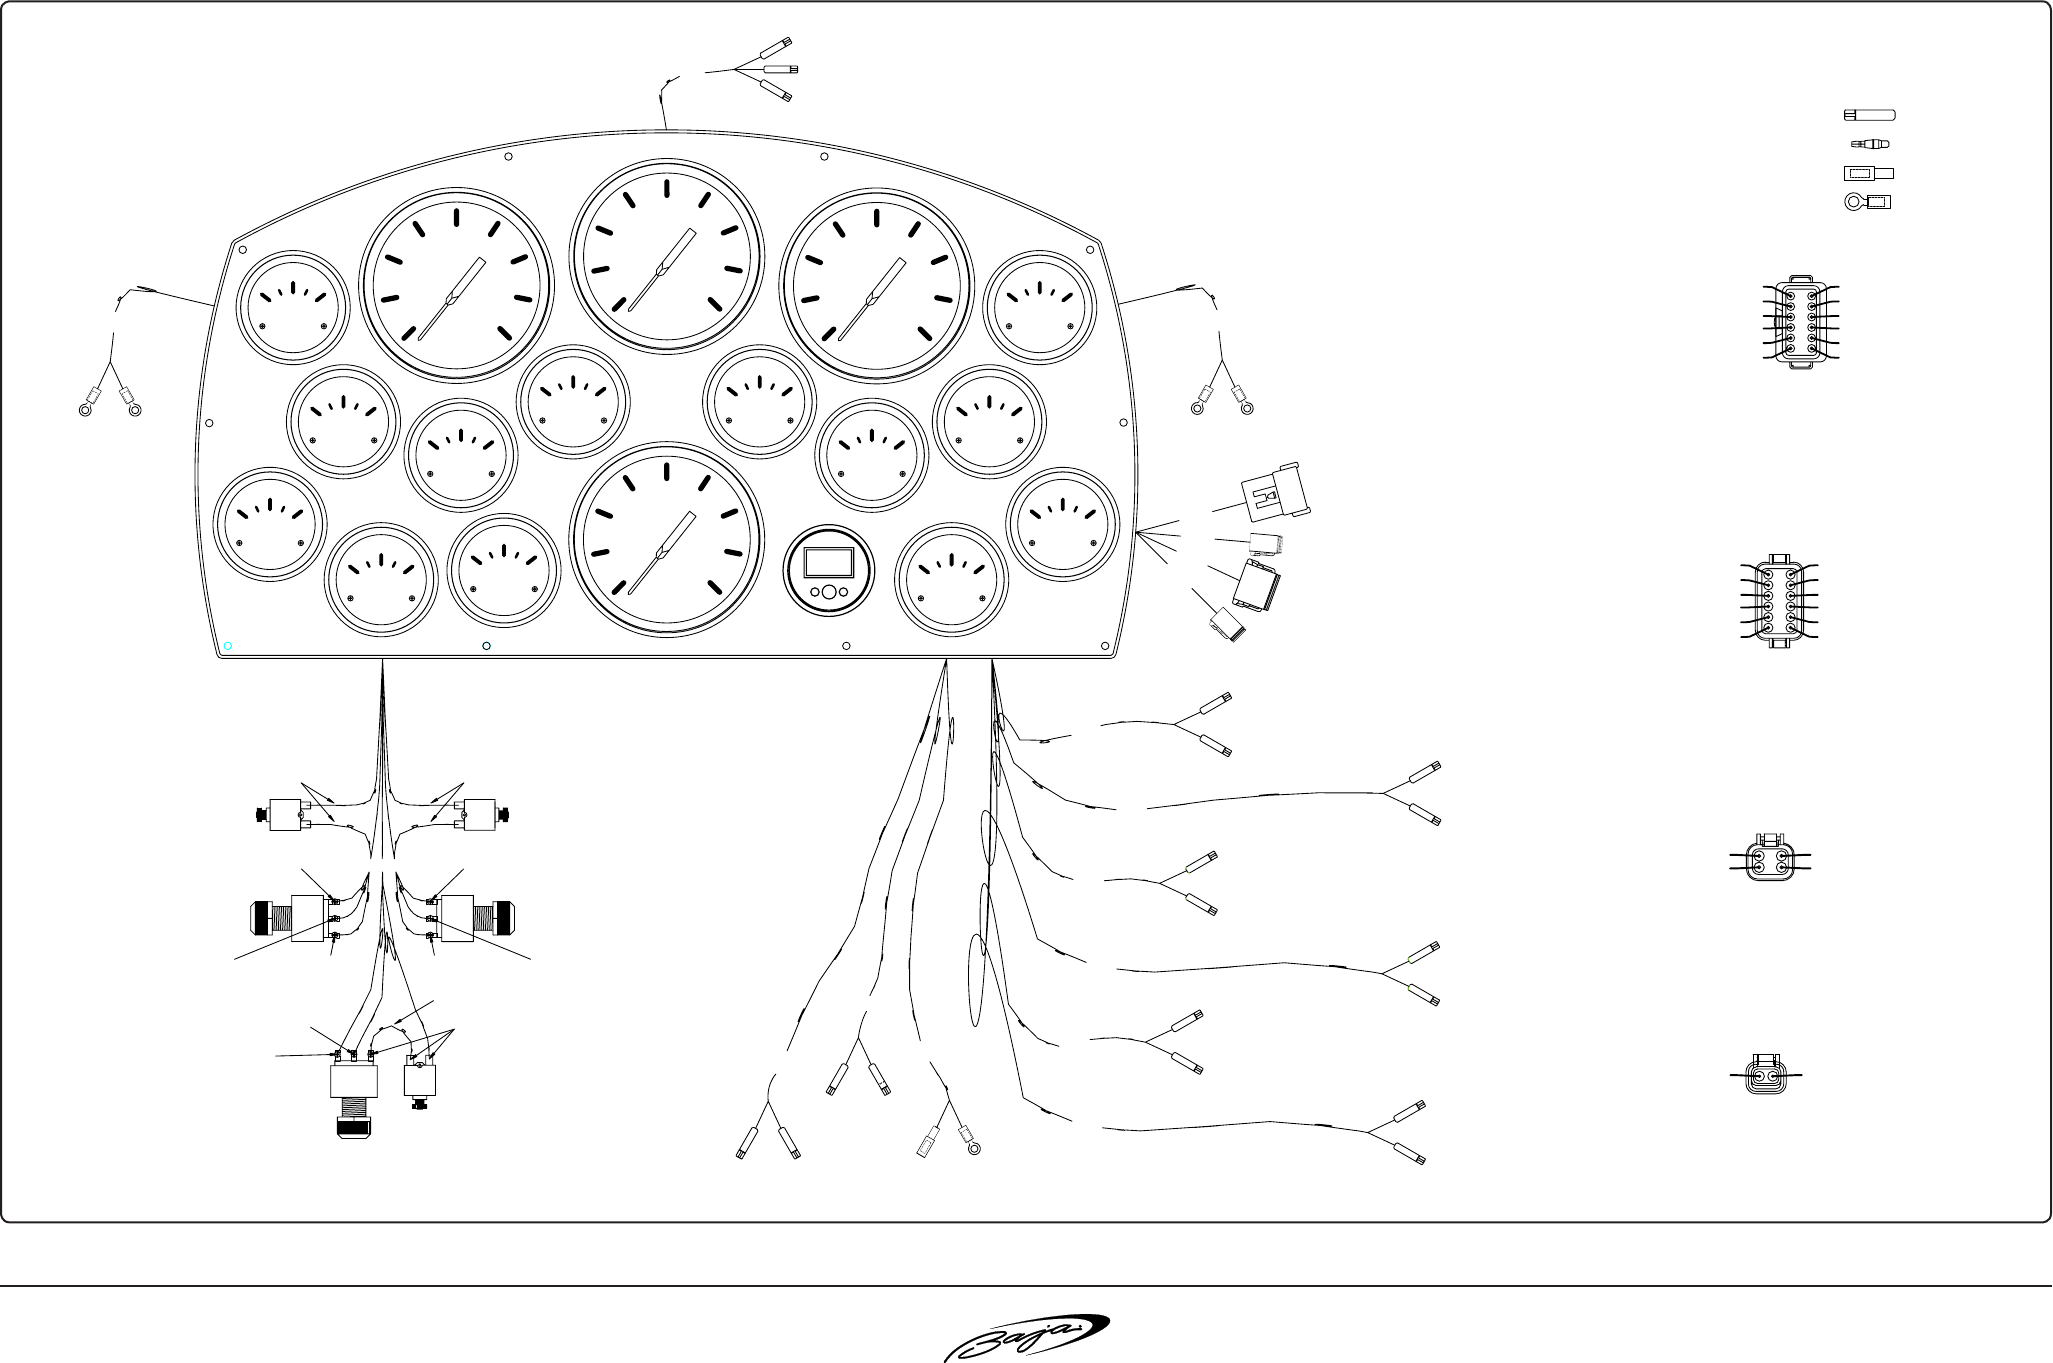
6.11
40 Outlaw®
R
Speed changes you. TM.
gauge panel wiring inFOrMatiOn (Fig 6.11.1)
HEAT SEALED 14-16 NO. RING TERMINAL
D
(.156) SPLASH PROOF CONNECTOR PLUG
B
D
C
(.250) 14-16 HEAT SEALED QUICK SLIDE RECEPTACLE
C
AA
A
A
A
A
A
A
A
A
A
A
A
A
A
A
(.156) SPLASH PROOF CONNECTOR RECEPTACLE
A
A
A
A
LABEL WITH THE LETTER "K"
PLUG 7
#8 16 AWG BROWN WITH A BLACK STRIPE
#12 16 AWG GRAY WITH A GREEN STRIPE
#9 STBD OIL TEMPERATURE
#10 PORT TACHOMETER
#11 CNTR TACHOMETER
#12 STBD TACHOMETER
#11 16 AWG GRAY WITH A BLACK STRIPE
#10 16 AWG GRAY WITH A WHITE STRIPE
#9 16 AWG BROWN WITH A GREEN STRIPE
#7 16 AWG BROWN WITH A WHITE STRIPE16 AWG TAN WITH A GREEN STRIPE #6
4"
16 AWG LT BLUE WITH A GREEN STRIPE #3
#1 PORT OIL PRESSURE
#2 CNTR OIL PRESSURE
#3 STBD OIL PRESSURE
#4 PORT WATER TEMPERATURE
16 AWG TAN WITH A BLACK STRIPE #5
16 AWG LT BLUE WITH A BLACK STRIPE #2
16 AWG TAN WITH A WHITE STRIPE #4
16 AWG LT BLUE WITH A WHITE STRIPE #1
#5 CNTR WATER TEMPERATURE
#6 STBD WATER TEMPERATURE
#7 PORT OIL TEMPERATURE
#8 CNTR OIL TEMPERATURE
12-Way Deutsch DT Series Plug
Secondary Lock W12S
Plug DT06-12SA
PLUG 7
#2 CNTR MAIN "B"
#1 CNTR GROUND
2-Way Deutsch DTP Series Plug
Secondary Lock WS-2S
LABEL WITH THE LETTER "J"
4"
PLUG 6
10 AWG BLACK #1
Plug DTP06-2S
PLUG 6
#2 10 AWG RED WITH A BLACK STRIPE
LABEL WITH THE LETTER "L"
PLUG 8
4"
#3 PORT GROUND
#4 STBD GROUND
#2 10 AWG RED WITH A GREEN STRIPE
#1 10 AWG RED WITH A WHITE STRIPE
4-Way Deutsch DTP Series Plug
10 AWG BLACK #3
10 AWG BLACK #4
#1 PORT MAIN "B"
#2 STBD MAIN "B"
Plug DTP06-4S
PLUG 8
15"
15"
15"
#2 16 AWG PURPLE WITH A BLACK STRIPE
#1 16 AWG PURPLE WITH A WHITE STRIPE
#4 16 AWG YELLOW WITH A RED AND WHITE STRIPE
#6 16 AWG YELLOW WITH A RED AND GREEN STRIPE
#5 16 AWG YELLOW WITH A RED AND BLACK STRIPE
#3 16 AWG PURPLE WITH A GREEN STRIPE
#9 STBD OIL ALARM
#10 FUEL SENSOR
#11 EMPTY
#12 EMPTY
SEALING PIN #11
Receptacle DT04-12PA
Secondary Lock W12P
12-Way Deutsch DT Series Receptacle
#5 CNTR START
#6 STBD START
#7 PORT OIL ALARM
#8 CNTR OIL ALARM
#1 PORT RUN
#2 CNTR RUN
#3 STBD RUN
#4 PORT START
SEALING PIN #12
16 AWG TAN WITH A BLUE AND BLACK STRIPE #8
16 AWG TAN WITH A BLUE AND GREEN STRIPE #9
16 AWG TAN WITH A BLUE AND WHITE STRIPE #7
16 AWG PINK #10
PLUG 5
LABEL WITH THE LETTER "H"
4"
PLUG 5
15"
15"
15"
14"
START CIRCUIT
16 AWG YELLOW WITH A RED AND BLACK
STRIPE
20 AMP
FUME DETECTOR
16 AWG BLACK
STEREO REMOTE
16 AWG DARK BLUE
FIRE BUOY
16 AWG RED WITH AN ORANGE STRIPE FIRE BUOY
16 AWG RED WITH AN ORANGE STRIPE
FUME DETECTOR
16 AWG RED WITH A PINK STRIPE
STEREO REMOTE
16 AWG BLACK
RUN CIRCUIT "I"
16 AWG PURPLE WITH A GREEN STRIPE
MAIN BATTERY "B"
10 AWG RED WITH A WHITE STRIPE
START CIRCUIT
16 AWG YELLOW WITH A RED AND WHITE
STRIPE
RUN CIRCUIT "I"
16 AWG PURPLE WITH A WHITE STRIPE
RUN CIRCUIT "I"
16 AWG PURPLE WITH A BLACK STRIPE
20 AMP
8" OF SLACK FOR INSTALLATION
START CIRCUIT
16 AWG YELLOW WITH A RED AND GREEN
STRIPE
MAIN BATTERY "B"
10 AWG RED WITH A BLACK STRIPE
MAIN BATTERY "B"
10 AWG RED WITH A GREEN STRIPE
14"14" 14"
20 AMP
8" OF SLACK FOR INSTALLATION 8" OF SLACK FOR INSTALLATION
14"
14"
PORT RUN CIRCUIT "I"
16 AWG PURPLE WITH A WHITE STRIPE
PORT RUN CIRCUIT "I"
16 AWG PURPLE WITH A WHITE STRIPE
PORT START CIRCUIT
16 AWG YELLOW WITH A RED AND WHITE STRIPE
CNTR RUN CIRCUIT "I"
16 AWG PURPLE WITH A BLACK STRIPE
CNTR RUN CIRCUIT "I"
16 AWG PURPLE WITH A BLACK STRIPE
PORT RUN CIRCUIT "I"
16 AWG PURPLE WITH A WHITE STRIPE
PORT START CIRCUIT
16 AWG YELLOW WITH A RED AND WHITE STRIPE
CNTR START CIRCUIT
16 AWG YELLOW WITH A RED AND BLACK STRIPE
CNTR START CIRCUIT
16 AWG YELLOW WITH A RED AND BLACK STRIPE
STBD RUN CIRCUIT "I"
16 AWG PURPLE WITH A GREEN STRIPE
STBD START CIRCUIT
16 AWG YELLOW WITH A RED AND GREEN STRIPE
STBD START CIRCUIT
16 AWG YELLOW WITH A RED AND GREEN STRIPE
14"
14"
14"
COMPASS
16 AWG BLACK
COMPASS
16 AWG PURPLE WITH A BLACK STRIPE
COMPASS
16 AWG DARK BLUE
INDICATOR
16 AWG DARK BLUE
INDICATOR
16 AWG BLACK
INDICATOR
16 AWG DARK BLUE
INDICATOR
16 AWG BLACK
TACH/HR
8K
SPEEDO
100MPH
TACH/HR
8K
OIL PRESS
WTR TEMP
FUEL
VOLT
VOLT
OIL TEMP
OIL PRESS
TACH/HR
8K
VOLT
WTR TEMP
DEPTH
OIL TEMP
OIL PRESS
OIL TEMP
WTR TEMP
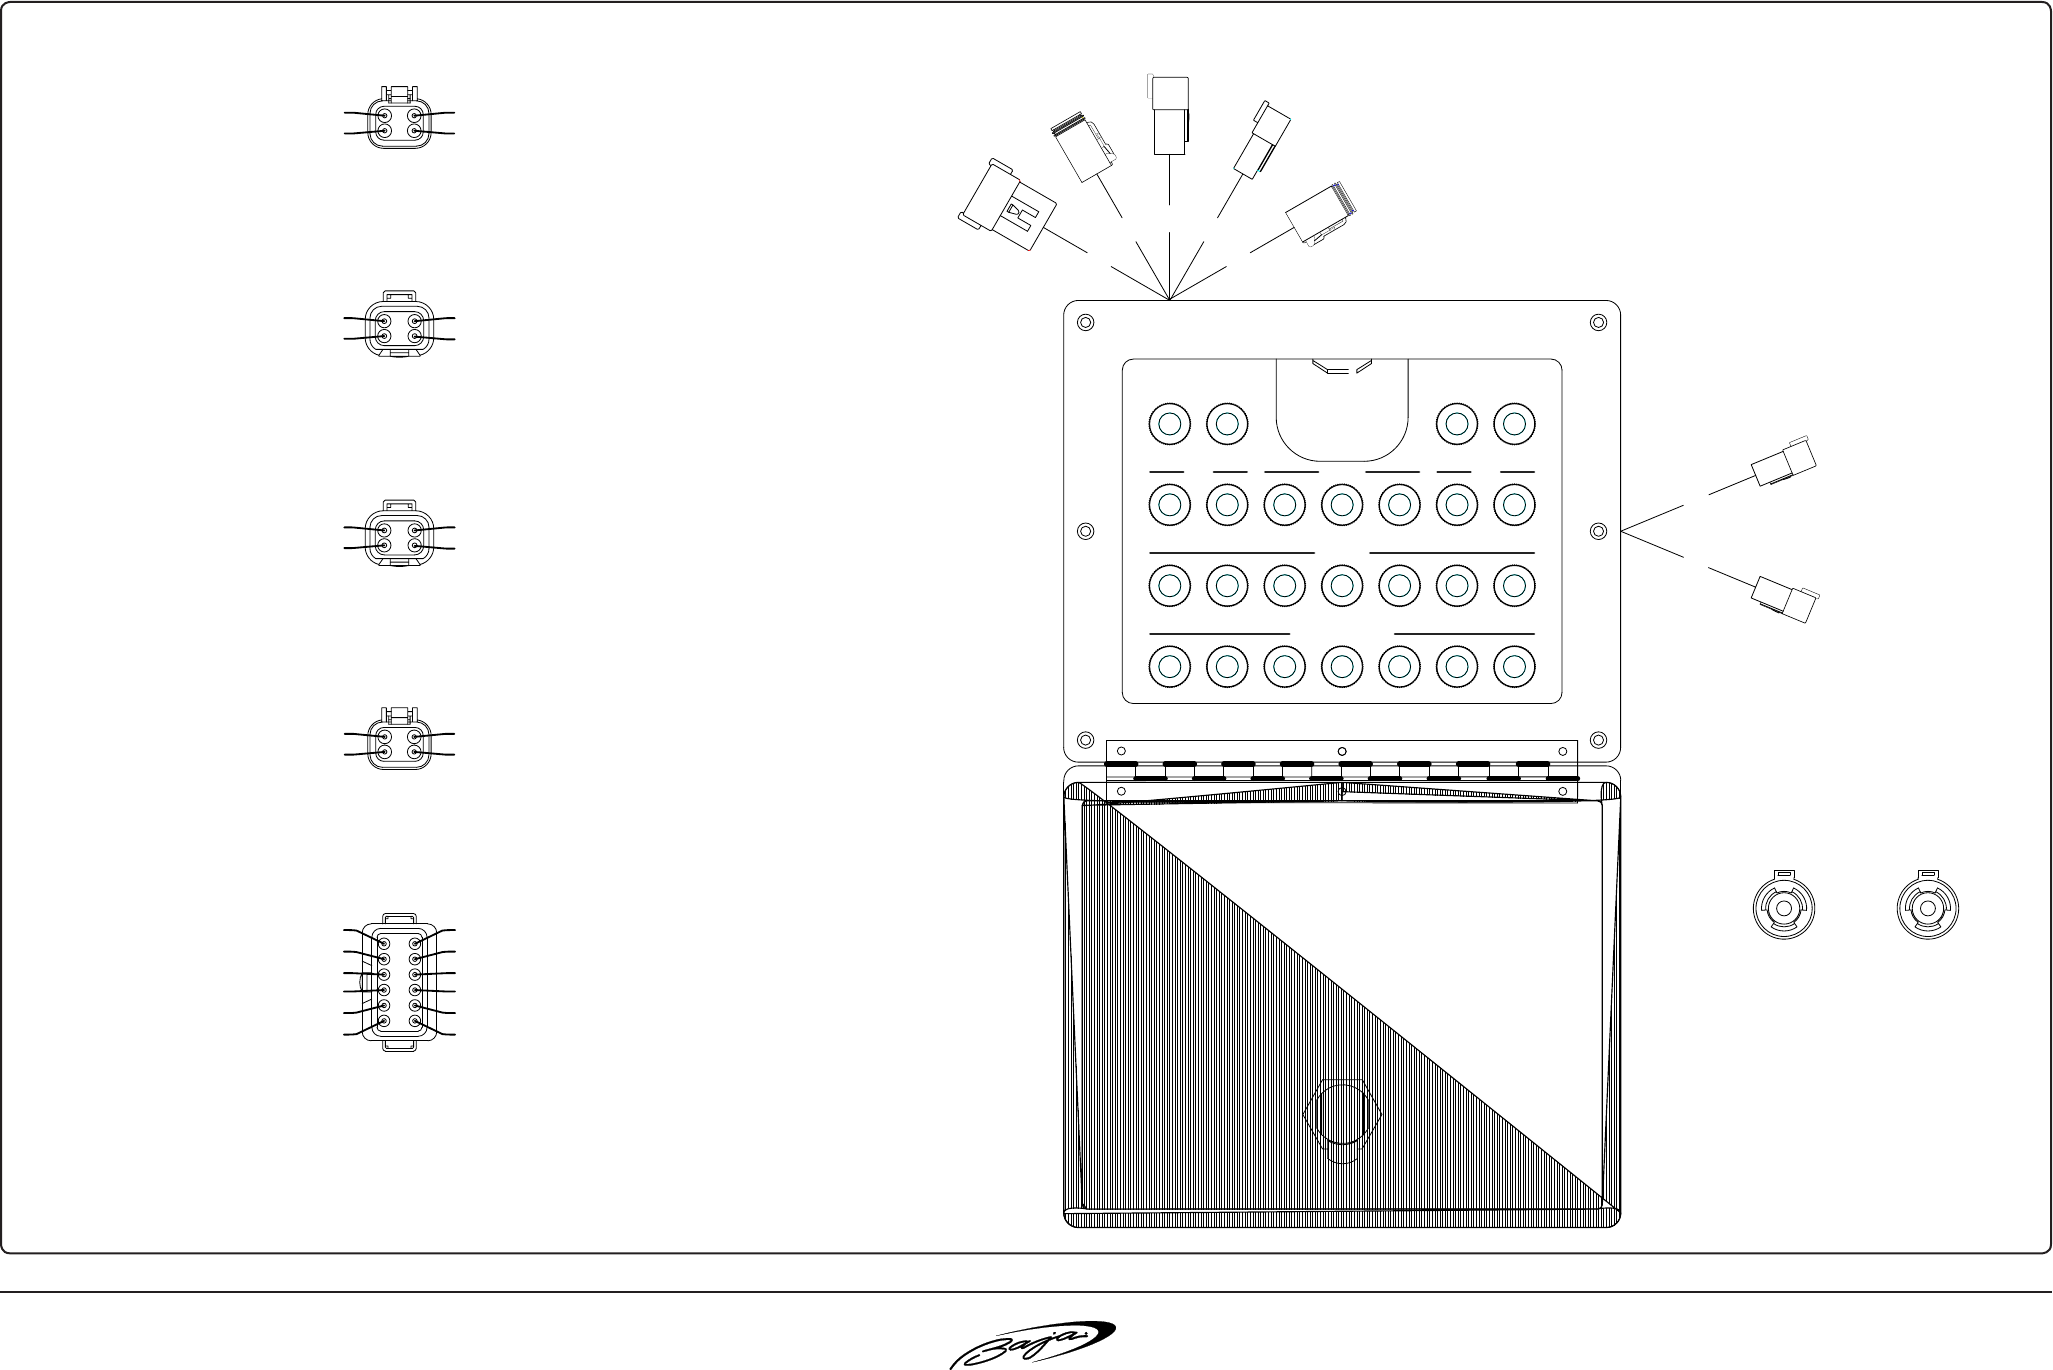
6.12
40 Outlaw®
R
Speed changes you. TM.
LABEL WITH THE LETTER "E"
12"
PLUG 7
Pin 0460-204-0490
Deutsch DTH Series Plug
Receptacle DTH04-1-4-P
#1 4 AWG RED
PLUG 5
DC MAIN
PLUG 6
LABEL WITH THE LETTER "D"
12"
Receptacle DTH04-1-4-P
Deutsch DTH Series Plug
#1 4 AWG RED
Pin 0460-204-0490
DC MAIN
PLUG 4
#3 ACC
#4 EMPTY
#1 ACC/FAN
#2 ACC/NAV
14 AWG ORANGE WITH A BLACK STRIPE #3 #2 14 AWG GRAY WITH YELLOW STRIPE
#1 14 AWG YELLOW WITH A BLUE STRIPE
4-Way Deutsch DT Series Plug
Secondary Lock WS-4S
SEALING PIN #4
Plug DT06-4S
PLUG 5
12"
PLUG 5
LABEL WITH THE LETTER "E"
PLUG 3
PLUG 4
LABEL WITH THE LETTER "D"
12"
PLUG 4
10 AWG ORANGE WITH A YELLOW STRIPE #3 #2 10 AWG YELLOW WITH A PURPLE STRIPE
#1 10 AWG YELLOW WITH A PURPLE STRIPE
#3 HORN
#4 EMPTY
SEALING PIN #4
#1 BLOWER MAIN (OUT)
#2 BLOWER MAIN (IN)
Plug DTP06-4S
4-Way Deutsch DTP Series Plug
Secondary Lock WS-4S
PLUG 2
LABEL WITH THE LETTER "B"
12"
PLUG 2
#1 FIRE EXTINGUISHER
#2 FUME DETECTOR
14 AWG ORANGE WITH A PURPLE STRIPE #7
14 AWG DARK BLUE WITH A PURPLE STRIPE #9
14 AWG RED WITH A YELLOW STRIPE #10
14 AWG RED WITH A GRAY STRIPE #8
14 AWG BROWN #12
16 AWG WHITE WITH A RED STRIPE #11
Receptacle DT04-6P
4-Way Deutsch DTP Series Receptacle
#1 12 VOLT
#2 DOCKING LIGHTS
12 AWG ORANGE #1
12 AWG ORANGE WITH A RED STRIPE #2
#1 PORT BLOWER
#2 CENTER BLOWER
#3 STBD BLOWER
#4 EXHAUST
#4 14 AWG RED
#3 14 AWG YELLOW WITH A GREEN STRIPE
#1 14 AWG YELLOW WITH A WHITE STRIPE
#2 14 AWG YELLOW WITH A BLACK STRIPE
#3 CO MONITOR
#4 DEPTH FINDER
Secondary Lock W6P
#5 PORT SEAT
#6 STBD SEAT
#7 TABS
#8 NAV/ANC LTS
6-Way Deutsch DT Series Receptacle
#9 LIGHTS
#10 RADIO
#11 ANCHOR
#12 BILGE
#6 14 AWG ORANGE WITH A GREEN STRIPE
#5 14 AWG ORANGE WITH A WHITE STRIPE
#4 12 AWG BROWN WITH A GRAY STRIPE
#3 HATCH (POWER)
#4 FRESH WATER
#3 10 AWG RED WITH A BLUE STRIPE
Secondary Lock WP-4P
PLUG 1
Receptacle DTP04-04P
LABEL WITH THE LETTER "A"
PLUG 1
12"
16 AWG RED WITH A PINK STRIPE #2
16 AWG RED WITH AN ORANGE STRIPE #1 #4 16 AWG RED WITH A PURPLE STRIPE
#3 16 AWG RED WITH A BROWN STRIPE
4-Way Deutsch DT Series Receptacle
12"
PLUG 3
LABEL WITH THE LETTER "C"
20 7
10
10 10
25
2 2
5
1015 10
15
2 2
715
25
5
7 72515
1015
CO
MONITOR
FUME
DETECTOR
FIRE
BOUY
DEPTH
FINDER
ENGINE COMPARTMENT
LIGHTING
ACCESSORY
PUMP
SEAT
EXHAUST HATCH MAIN BLWR PORT BLWR CNTR BLWR STBD BLWR
12 VOLTANCHOR
ACC/NAV
NAV/ANC DOCKING LIGHTS
PORT STBD FRESH WTRBILGE
HORN RADIO
TABS
ACC
ACC/FAN
PLUG 7 FEEDER WIRE TO POWER BOTTOM TWO LEVEL
OF BREAKERS
PLUG 4 FEEDER WIRE TO POWER TOP TWO
LEVEL OF BREAKERS
BreaKer panel wiring inFOrMatiOn (Fig 6.12.1)

40 Outlaw®7.1
SeCtiOn 7 • OptiOnS & aCCeSSOrieS
1. opTions & accessories locaTions
Figure 7.1.1 shows the location of some of the components. Take time to walk through your boat, locate
the features, and become familiar with their operation and maintenance.
STANDARD & OPTIONAL EQUIPMENT LOCATIONS
(FIG. 7.1.1)
Item Location
6 - Disc CD Changer Cuddy, Stb Side Under Cabinet
12V Receptacle Under Glove Box – Port Side
Anchor Holder w/ Strap In Bow of Deck
Auto Bilge Pump Engine Compartment - Under Engine
Battery Tray Engine Compartment - Port Side on Floor
Blower Engine Compartment - Port Side on Transom Wall
Courtesy Lights Cockpit - Side Panels
Depth Finder (Opt.) Driver Side (Strb) – Dash Panel
Freshwater Flush (Opt.) Engine Compartment - Strb Side, Under Starter
Fuel Fill & Vent Combo Midship - Port Side
Fuel Tank Cockpit - Under Center Floor
Fume Detector (Opt.) Gauge - Driver Side (Strb) Dash;
Detector - Engine Compartment
Fuse Panel Under Dash - Strb. Side
Garboard Drain Plug Transom - Under Drive Unit
Horn Bow - Strb Side
Hour Meter Dash - Integrated into Tachometer or in Engine
Compartment
Port-A-Pot (Opt.) Cuddy – Strb Side
Safety Switch w/ Lanyard Dash - Below Shifter
Stereo Cuddy - Port Side in Upper Cabinet
Stereo Amp. Cuddy, in Lower Cabinet Port Side
Stereo Remote Driver Side (Strb) Dash
Swimplatform (Opt.) Transom - Above Drive Unit
Switch Panel Dash - Above Shifter
Transom Shower (Opt.) Port Side above Swimplatform
Trim Tab Indicator Driver Side (Strb) Dash

40 Outlaw®
7.2
SeCtiOn 7 • OptiOnS & aCCeSSOrieS
2. auToMaTic fire exTinGuisher
sYsTeM (opTion)
The 40 Outlaw may be
equipped with an automatic
fire extinguisher system
located aft of the engine on
the transom. In the event
of a re, the heat sensitive
automatic head will release
the extinguishant as a vapor,
totally flooding the area in
fire-killing concentrations.
The system indicator light is
wired to the battery and is
constantly on to safeguard
your boat.
The indicator light, located on the dash, indicates to
the helmsman when the unit has discharged. Under
normal circumstances, the charge indicator light is
lit. If the unit discharges, the light will go out.
WHEN DISCHARGE OCCURS, IMMEDIATELY
SHUT DOWN ENGINE, POWERED VENTILATION,
ELECTRICAL SYSTEMS AND EXTINGUISH ALL
SMOKING MATERIALS. DO NOT IMMEDIATELY
OPEN THE ENGINE COMPARTMENT!! THIS
FEEDS OXYGEN TO THE FIRE AND FLASHBACK
COULD OCCUR.
Allow the exinguishant to "soak" the compartment
for at least fteen (15) minutes and for hot metals
or fuels to cool before cautiously inspecting for
cause of damage. Have portable extinguishers at
hand and ready. Do not breathe fumes or vapors
caused by the re.
REFER TO OWNER'S MANUAL PACKET FOR
INSTRUCTIONS AND WARRANTY INFORMATION
ON FIRE EXTINGUISHER SYSTEM.
3. fire exTinGuisher porT
Boats not equipped with the automatic fire
extinguisher option are equipped with a fire
extinguisher discharge port (See Figure 7.2.2).
In the event of a re, a re extinguisher can be
inserted through the port and discharged into the
engine compartment without having to open the
engine box. Do not open the engine compartment
immediately! This feeds oxygen to the re and
ashback could occur.
IF A FIRE OCCURS, IMMEDIATELY SHUT DOWN
ALL ENGINES, POWERED VENTILATION,
ELECTRICAL SYSTEMS AND EXTINGUISH ALL
SMOKING MATERIALS. DO NOT IMMEDIATELY
OPEN THE ENGINE COMPARTMENT!! THIS
FEEDS OXYGEN TO THE FIRE AND FLASHBACK
COULD OCCUR.
4. canvas
autOMatiC Fire
extinguiSher
( Fig. 7.2.1)
In rainy and/or cold weather, fresh air must circulate
through boat to avoid carbon monoxide poisoning.
See Section 1.3, Carbon Monoxide, for more
details.
! DANGER
Exhaust fumes from engines contain deadly carbon
monoxide gas (CO). Boats with canvas or with poor
ventilation are most likely to collect fumes.
CO sickness symptoms include headache, nausea
and dizziness. Do not mistake these symptoms for
sea sickness.
Ventilate boat. See Section 1.3, Carbon Monoxide,
for more details.
! DANGER
FirepOrt lOCatiOn (Fig. 7.2.2)
40 Outlaw®7.3
SeCtiOn 7 • OptiOnS & aCCeSSOrieS
Bimini Top or sunshade must not be used when the
vessel speed exceeds 45 MPH. Damage to boat
or bimini may occur.
Removing or installing canvas on the water can
be difcult since rough water or wakes can cause
you or your passengers to lose their balance while
attempting canvas removal or installation.
For safety and ease of installation and removal of
canvas, use at least two people.
The following canvas options are available for the
40 Outlaw:
• Cockpit Cover
• Mooring Cover
• Trailering Cover
a. canvas care anD MainTenance
See Section 9, page 9.2, for instructions on the care
and maintenance of your canvas.
b. TrailerinG WiTh canvas
To trailer your boat with the cockpit cover installed,
you must install a mooring cover over the cockpit
cover with tie down straps tightened.
5. horn
elecTric horn
The horn is operated by a switch on the dash and
is protected by a fuse under the dash. There is no
maintenance required on the horn itself, although
it is advisable to avoid spraying water directly into
the horn. Check periodically to ensure that horn is
still operational.
6. sWiM plaTforM W/ laDDer
(opTional)
Your 40 Outlaw may have a swim platform installed
with a ladder.
With this option, entering the boat from the water
is more convenient, but there are safety rules that
must be followed.
1. Never sit on the swim platform when boat is
moving.
2. Before using or extending the ladder, make sure
engine is off and prop is stopped.
3. It may be difcult to extend the ladder while in
the water so it important to leave the ladder
down if swimmers are in the water.
4. Always make sure ladder is secure before
starting engine.
7. DepTh finDer (opTional)
The depth nder that may be
installed in your boat is a high-
performance digital sonar (See
Figure 7.3.1). It works only off the
bottom signal and operation is
completely automatic. There are
no sensitivity or noise controls.
All this is made possible by the
computer built inside.
Since the depth nder is an automatic sonar, all
you have to do is turn the power on. It will give
you a water depth reading within seconds. Once
it nds the bottom, the depth nder locks on to it
and automatically adjusts the sensitivity and noise
suppression circuits. It will track the bottom at
speeds over 70 MPH.
Do not rely on the depth der to determine a safe
depth for swimming. The depth nder reads from
the middle of the boat, not the back or front.
DANGER
!
If the cockpit is totally enclosed with canvas covers
and curtains while engine is running or boat is
moving, carbon monoxide will build up and cause
death or permanent injury.
Do not use the rear (aft) curtain or camper top while
engine is running or boat is moving.
MAKE SURE ENGINE IS OFF AND PROPELLER IS
STOPPED BEFORE USING BOARDING LADDER
! DANGER
DEPTH
0.00
depth Finder
(Fig 7.3.1)
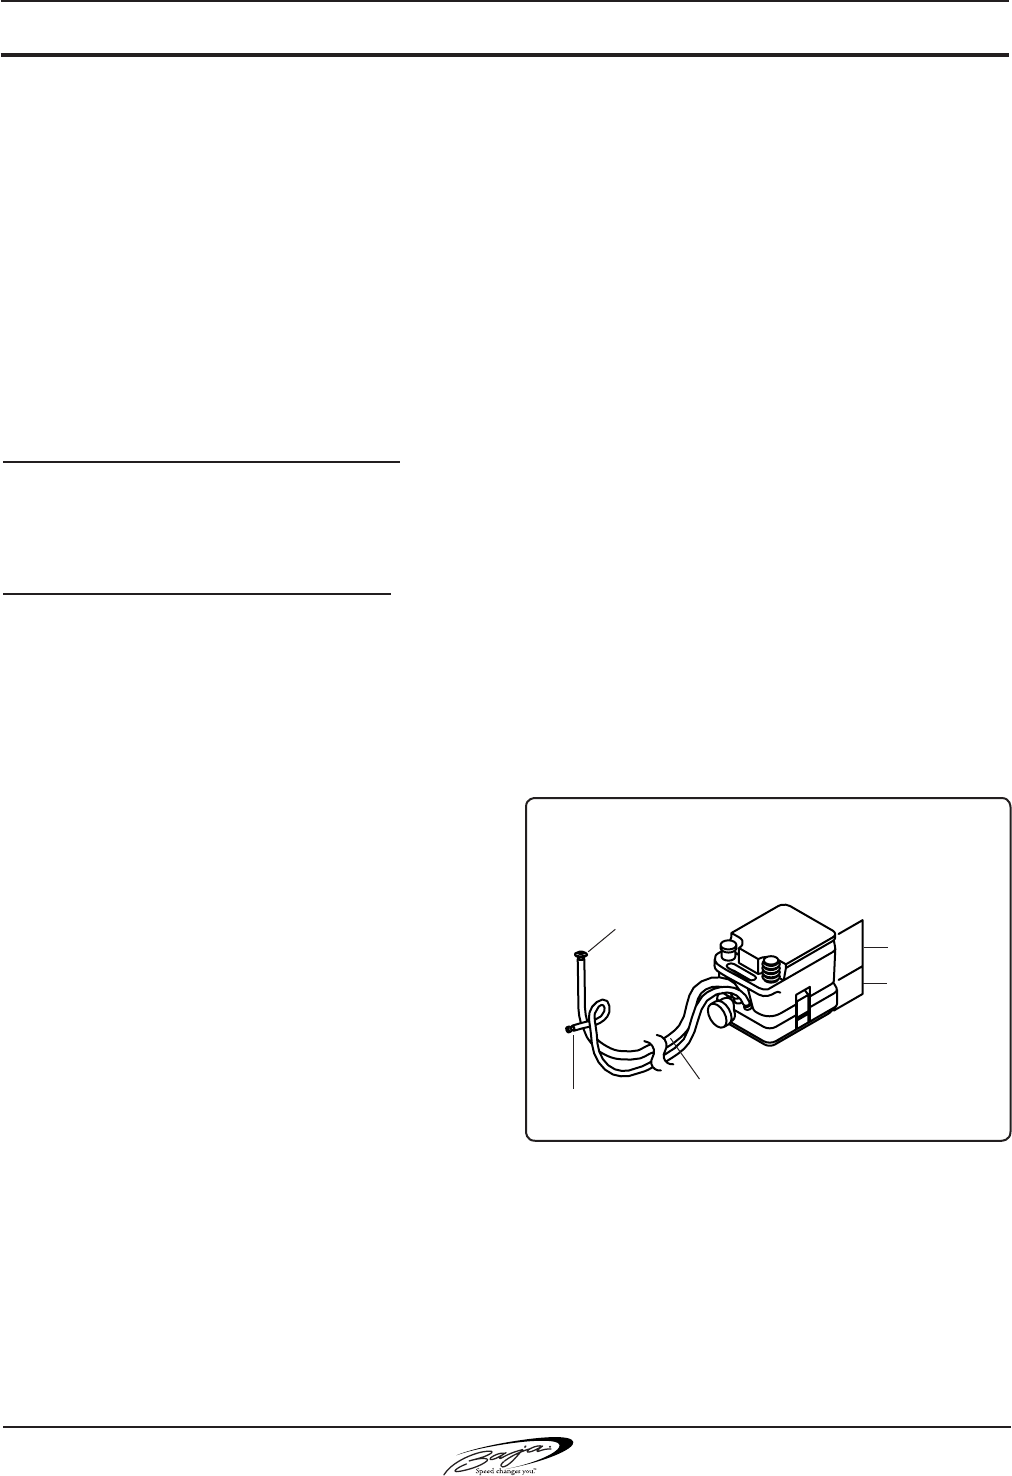
40 Outlaw®
7.4
SeCtiOn 7 • OptiOnS & aCCeSSOrieS
REFER TO OWNER'S MANUAL PACKET FOR
INSTRUCTIONS AND WARRANTY INFORMATION
ON DEPTH FINDER.
8. sTereo sYsTeM
Your 40 Outlaw comes with a Clarion CMD4 AM/
FM stereo package from Marine Audio. Clarion's
CM design eliminates the need for after-market
housing kits or splash covers, while the silicon oil-
dampened suspension ensures smooth tracking
and dependable marine performance.
STANDARD PERFORMANCE SYSTEM
• CMD4 AM/FM CD Stereo
• 8 Marine Speakers
• Amplier–2 Channel (2)
OPTIONAL PERFORMANCE SYSTEM
• CMD4 AM/FM CD Stereo
• 8 Marine Speakers
• Amplier–4 Channel (3)
• Marine Subwoofer (3)
• Remote Control
9. heaD sYsTeMs
Your Baja® is available with different head system
options. Below is a description of each option. You
should be aware of which option(s) your boat is
equipped with and read the sections pertaining to it.
The Owner’s Manual Packet in your boat contains
information pertaining to your head system that
should be carefully read.
a. requireMenTs for operaTors
The Environmental Protection Agency (EPA)
standards state that in freshwater lakes, freshwater
reservoirs or other freshwater impoundments
whose inlets or outlets are such as to prevent the
ingress or egress by vessel trafc subject to this
regulation, or in rivers not capable of navigation by
interstate vessel trafc subject to this regulation,
marine sanitation devices certied by the U.S. Coast
Guard installed on all vessels shall be designed
and operated to prevent the overboard discharge
of sewage, treated or untreated, or of any waste
derived from sewage. The EPA standards further
state that this shall not be construed to prohibit
the carriage of Coast Guard-certied ow-through
treatment devices which have been secured so
as to prevent such discharges. They also state
that waters where a Coast Guard certied marine
sanitation device permitting discharge is allowed
include coastal waters and estuaries, the Great
Lakes and interconnecting waterways, freshwater
lakes and impoundments accessible through
locks, and other owing waters that are navigable
interstate by vessels subject to this regulation (40
CFR 140.3).
b. porTable heaD WiTh puMp-ouT
The portable head unit has two individual holding
tanks. The top tank is tted with a hand pump and
holds fresh water and chemicals. The bottom tank is
for holding waste material (See Figure 7.4.1). There
is an option for a dockside pump-out hose attached
to the waste material (bottom) tank. The pump-out
hose leads to the waste pump-out opening on the
starboard side of the transom. To empty the holding
tank, the services of a dockside pump-out station
are needed. Follow instructions at the station and
make sure the pump-out station hose is inserted
into the deck plate marked “Waste.”
NOTE: Before leaving the dock make sure caps
on top and bottom tanks are tight. Make sure top
tank is lled with chemicals and the bottom tank is
empty.
DETAILED OPERATING INSTRUCTIONS AND
WARRANTY INFORMATION ARE PROVIDED BY
THE EQUIPMENT MANUFACTURER AND CAN
BE FOUND IN THE OWNER’S PACKET.
FRESHWATER
AND CHEMICAL
TANK
WASTE MATERIAL
TANK
HOLDING TANK
PUMP-OUT
DECKPLATE
THRU-HULL
VENT
HOSE TO
PUMP-OUT
DECK FITTING
typiCal pOrtaBle SelF-COntained head with
dOCKSide puMp-Out (Fig. 7.4.1)
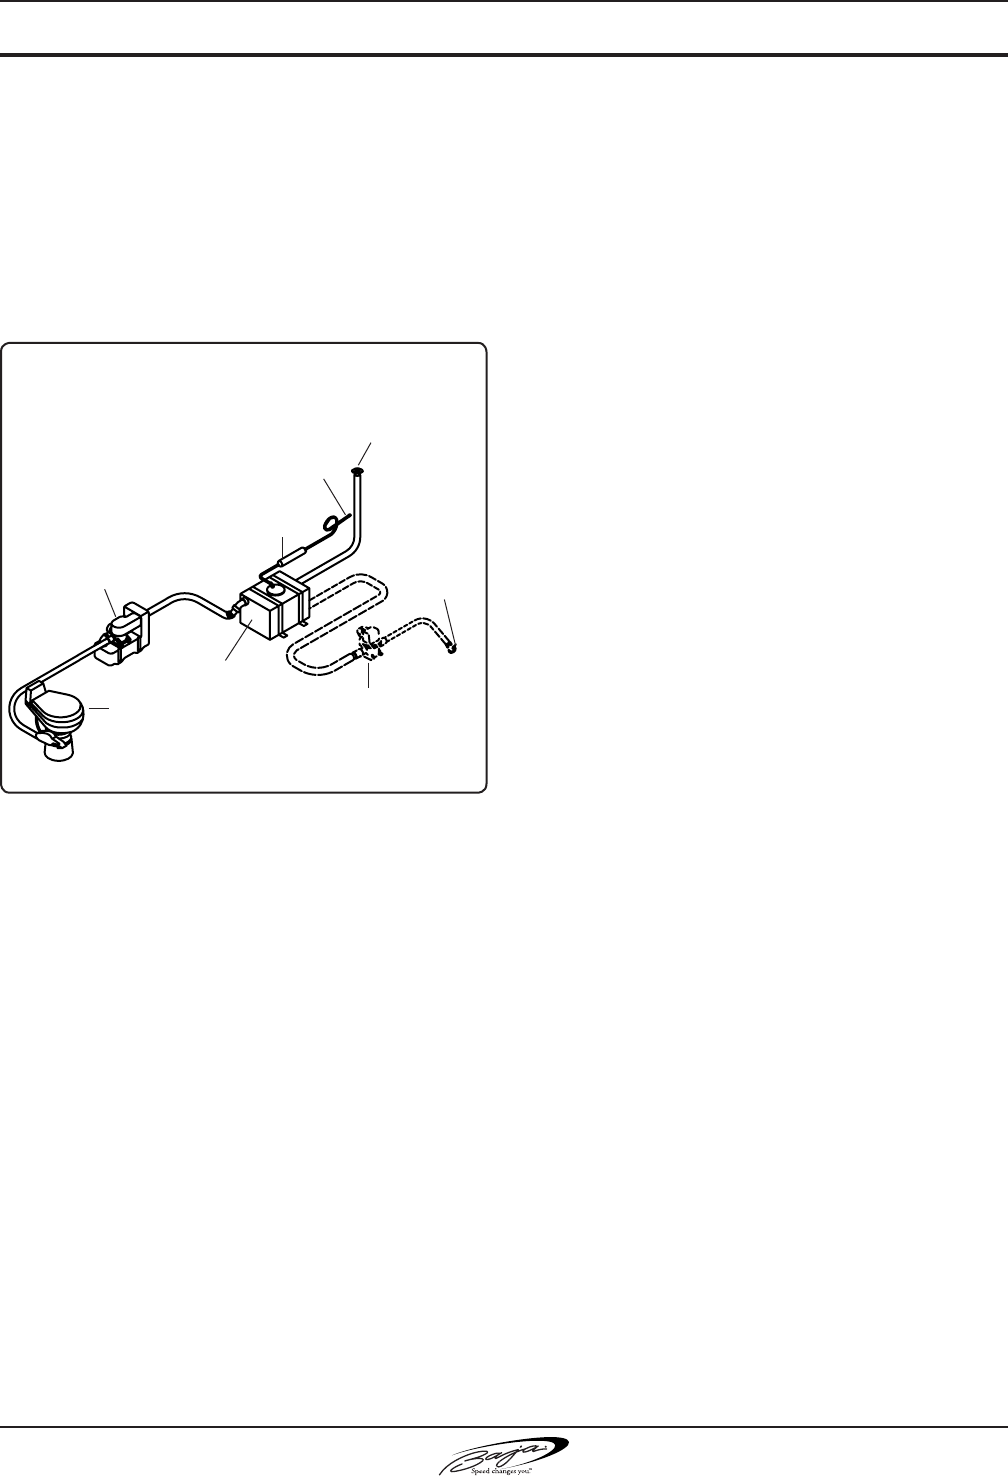
40 Outlaw®7.5
SeCtiOn 7 • OptiOnS & aCCeSSOrieS
c. vacuflush® heaD (opTion)
The VacuFlush® head utilizes a HEAD SYSTEM
breaker on the main distribution panel. The foot
pedal at the base of the toilet opens a mechanical
seal and vacuum forces waste through the opening
in the bowl to an accumulator tank, through the
vacuum pump and then to the holding tank or
treatment tank (See Figure 7.5.1).
To Operate:
1. Turn ON the WATER PUMP breaker.
2. Turn ON the HEAD SYSTEM breaker.
REFER TO OWNER’S MANUAL PACKET FOR
INSTRUCTIONS AND WARRANTY INFORMATION.
D. holDinG Tank operaTion
Waste from the head is directed into the holding tank
located in the engine room. The holding tank uid
level indicator is located on the main distribution
panel or in the head which indicates 3/4 FULL,
FULL and DO NOT FLUSH, or on some models
may read FULL, 1/2, or EMPTY. When the FULL
light is on, the DO NOT FLUSH light will also be on.
When these lights are ON, the holding tank must be
emptied before the head can be reused.
e. venT filTer
The vent lter is designed to control odors associated
with the head system operations. The vent lter
is located on the holding tank. The lter must
be changed at the beginning of each boating
season to be effective. The vent lter is installed
in-line on the holding tank ventilation hose.
Note: Do not over ll the holding tank as this will
ood the vent lter and render it useless. Filter
replacement will then be required. See Parts
Manual for correct replacement lter.
10. exhausT sYsTeMs
Your boat comes with a choice of different exhaust
systems. Below is a description of the standard and
optional systems on your 40 Outlaw.
Thru-Hub Exhaust (standard): Thru-hub exhaust
propellers consist of a round barrel to which the
blades are attached. The exhaust passes through
the barrel and out the back, without making contact
with the blades. This provides a good clean
water ow to the blades, usually resulting in good
acceleration and hole shot.
Corsa™ Performance Quick & Quiet II (option):
A full time, non-switchable, thru-hull exhaust system
that uses patented Silencer Tips with a pair of upper
exhaust splitters connected to the lower wishbone
and the exhaust riser.
Corsa™ Performance Quick & Quiet Plus
(option): An electronically operated exhaust
diverter used in conjunction with the same Silencer
Tips of the Quick & Quiet II system, but with the
added exibility to switch the exhaust ow to fully
silenced, thru-prop operation. The switch is used to
change the exhaust exits, either thru-prop or thru-
hull, which will provide maximum performance or
minimum exhaust sound.
Many areas regulate noise limits. Even if there
are no laws, courtesy demands that boats operate
quietly.
typiCal vaCuFluSh® with hOlding tanK,
dOCKSide puMp-Out & MaCeratOr (Fig. 7.5.1)
THRU-HULL
VENT
HEAD
HOLDING TANK
MACERATOR
(OPTIONAL)
DOCKSIDE
PUMP-OUT
HEAD
DISCHARGE
SEACOCK)
VENT FILTER
VACU-GENERATOR

40 Outlaw®
7.6
SeCtiOn 7 • OptiOnS & aCCeSSOrieS
THIS PAGE INTENTIONALLY LEFT BLANK
8.140 Outlaw®
SeCtiOn 8 • required inSpeCtiOn, ServiCe, &
MaintenanCe
ITEM REQUIRED
MAINTENANCE/SERVICE
REFERENCE
SOURCE
BEFORE
EVERY
USE
AFTER
FIRST
20 HOURS
EVERY
25* OR 50
HOURS
EVERY 50*
OR 100
HOURS
EVERY
6 MOS. OR
ANNUALLY
Battery Check water level Owner’s Manual p. 6.1 • • •
Bilge Area Clean and check Owner’s Manual p 8.4 •
Bilge Blowers Hose connections tight Owner’s Manual p. 4.2 •
Bilge Pump Float switch operates freely Owner’s Manual p. 4.1 •
Canvas Clean Owner’s Manual p. 9.3 As Needed
CO Monitor Check for proper operation Owener’s Manual p. 1.3 Check before each use
Controls
Steering Check for proper operation To be done by Baja dealer every six months
Oil level Engine Manual •
Throttle Lubricate - include all shift Engine Manual • • •
Linkage and pivot points
Electrical
Connections Check for looseness To be done by Baja dealer annually
Engine
Alarm Check Engine Manual •
Cooling System Check for leaks Engine Manual •
Connections with engine running
Crank Case
ventilating system
Clean Engine Manual • •
Drive Belts Check Engine Manual •
Exhaust System Check for leaks Engine Manual • • •
Flame Arrestor Clean Engine Manual • •
Fuel Filter Replace Engine Manual •
Mounts (Fasteners) Tighten Engine Manual • •
Oil and Filter Replace Engine Manual • •
Oil Level Check Engine Manual •
Fuel System
Connections & lines Check for leaks Engine Manual • • •
Tanks Check for leaks Owner’s Manual, Sec. 5 • • •
*Use in salt water or other severe operating conditions requires shorter maintenance/service intervals
**May not be on your boat
Routine inspection, service and maintenance of your
boat’s systems are vital to assure your safety, as well as
for prolonging the life of your boat. You should develop
regular routines for inspecting your boat. The chart
below summarizes inspection, service and maintenance
activities. This section also contains descriptions of some
convenient methods for evaluating the condition of some
of your boat’s systems.
The interval between necessary service or maintenance
is highly variable, depending on the environment your
boat is in, and on the severity of operating conditions.
For example, corrosion of parts on boats operated in
salt water proceeds much faster than the corrosion of
parts on a boat operated in fresh water. The intervals
listed below are recommended maximums, and you must
reduce the time between inspections if your observations
indicate the need.
INTERVAL
1. suMMarY GuiDe for inspecTion, service anD MainTenance
8.2 40 Outlaw®
SeCtiOn 8 • required inSpeCtiOn, ServiCe, &
MaintenanCe
suMMarY GuiDe for inspecTion, service anD MainTenance
*Use in salt water or other severe operating conditions requires shorter maintenance/service intervals
**May not be on your boat
ITEM REQUIRED
MAINTENANCE/SERVICE
REFERENCE
SOURCE
BEFORE
EVERY USE
AFTER
FIRST 20
HOURS
EVERY
25* OR 50
HOURS
EVERY 50*
OR 100
HOURS
EVERY 6
MOS. OR
ANNUALLY
Propeller Inspect for damage Always after striking object
Seaworthiness
Bilge drain plug Installed and tight Owner’s Manual p. 4.1 •
Hull damage
Stern drive
Check for loose, damaged or
missing parts Always after striking object
Stern Drive
Fluid level Check level Engine Manual •
Fluid Replace Engine Manual •
Topside & Supplies Check for loose, damaged or
missing parts Owner’s Manual p. 8.5 •
Trim Tabs
Fluid Check and add as needed Trim Tab Manual •
Zincs (Also see Mercathode System**)
Stern drive Check and replace as needed Owner’s Manual p. 6.3 Every 25 hours of operation
Trim Tabs Check uid level Trim Tab Manual Every 25 Hours of operation
INTERVAL

8.340 Outlaw®
SeCtiOn 8 • required inSpeCtiOn, ServiCe, &
MaintenanCe
2. useful service inforMaTion
OWNER
HOME PORT
BOAT NAME
REGISTRATION NUMBER STATE
HULL SERIAL NUMBER
WARRANTY REGISTRATION DATE
ENGINE MAKE & MODEL
SERIAL NUMBER
GEAR MAKE & REDUCTION RATIO
SERIAL NUMBER
PROPELLER SIZE
PART NUMBER
SHAFT SIZE (DIAMETER X LENGTH) MATERIAL
FUEL CAPACITY
WATER CAPACITY
KEY NUMBER, IGNITION DOOR
SELLING DEALER
CITY & STATE
LENGTH BEAM DRAFT
VERTICAL CLEARANCE
ESTIMATED WEIGHT
8.4 40 Outlaw®
SeCtiOn 8 • required inSpeCtiOn, ServiCe, &
MaintenanCe
3. inspecTion, service anD
MainTenance proTocol
a. bilGe area
Many of your boat’s systems have critical features
located in the bilge area. A thorough and organized
inspection of the bilge area will address many of
these critical features. For example, engine oil
leaks and fuel system leaks will show themselves
as contamination on the surface of the liquid
that remains in the bilge. When you see such
contamination, you should look for its source.
Once or twice a year, pump the bilge areas dry and
remove all loose dirt. Be sure that all the limber
holes are open. Limber holes are the openings in the
stringers that allow water to ow from the outboard
areas of the bilge to the bilge sump.
Check the bilge pump oat switch by moving it
manually. (Figure 4.1.2) The bilge pump should start
when the oat switch is raised and should stop when
lowered. If it does not, have it replaced before using
your boat. The oat switch should also move freely
without sticking, if it does not, have it serviced or
replaced before boating.
1. oil
If there is oil contamination, look for leaks in engine
oil lines and engine gaskets. If parts of the bilge
have been stained by oil, the stain can be removed
using a bilge cleaner available from your dealer or
a marine store.
3. fuel sYsTeM
• Inspect the entire fuel system for evidence of
leakage, including the fuel tank ll lines and
vents. Any stain around a joint could be an
indication of a leak.
• Test all ttings with a wrench to be sure they are
not loose, but do not forcefully overtighten the
ttings.
• Clean fuel lters and vent screens.
2. enGine
Engine failure or malfunction, when away from
shore, can be dangerous. Make certain you do the
following each time you use the boat:
• Wipe off the engine to remove accumulated
dust, grease and oil.
• Check all exposed nuts, bolts and screws for
tightness.
• Inspect the belts for wear. If they do not
require replacement, check and adjust the belt
tension according to the engine manufacturer’s
recommendation.
• Inspect engine wiring, and clean and tighten the
terminals on the engine electrical system.
• Clean and lubricate the battery cables.
• Add distilled water to the battery cells as
needed.
• Refer to your Engine Operator’s Manual for
additional engine maintenance requirements.
DO NOT USE FLAMMABLE SOLVENTS to clean any
part of the bilge.
Fumes can accumulate and can be the source of an
explosion.
! WARNING
Work on electrical wiring can create shock hazards
or sparks.
Always shut off battery switch, breakers and/or
pull fuses before checking electrical wiring or
connectors.
! WARNING

8.540 Outlaw®
SeCtiOn 8 • required inSpeCtiOn, ServiCe, &
MaintenanCe
• Check your rst aid kit, making certain it is
complete and that the items in it have not
passed an expiration date.
• Check the signaling equipment and emergency
flares. Make sure all items are within their
expiration dates.
• Inspect the anchor, mooring, and towing lines.
Repair or replace as required.
• Check re extinguishers for full charge.
4. WinTerizaTion checklisT for
boaTs sToreD on lanD
a. boaT sToraGe
• Store boat in a bow high attitude.
• Remove hull drain plug.
• Pour one (1) pint (half-liter) of 50% water/
antifreeze mixture in each bilge pump sump.
b. enGine
• Flush engine with fresh water.
• Remove engine drain plugs.
REFER TO YOUR ENGINE OPERATOR’S
MANUAL FOR DETAILED INFORMATION ON
PREPARING THE ENGINES FOR STORAGE AND
WINTERIZATION.
c. baTTerY(ies)
• Remove from boat. Remove the negative (-)
cable rst, then the positive (+) cable.
• Remove grease and dirt from top surface.
• Grease terminal bolts.
• Store on wooden pallet or thick plastic in a cool
dry place. Do not store on concrete.
4. WirinG sYsTeM
• Check all wiring for proper support.
• Check all wiring insulation for signs of fraying
or chang.
• Check all terminals for corrosion - corroded
terminals and connectors should be replaced
or thoroughly cleaned.
• Tighten all terminals securely and spray them
with light marine preservative oil.
5. fiTTinGs, hoses anD claMps
• Inspect the entire bilge area for evidence
of damage or deterioration. Evidence of
deterioration will rst appear around hull ttings,
hoses and clamps.
• Straighten or replace kinked hoses.
• Replace any hose that does not feel pliable.
• Check all hose clamps for tightness and
corrosion. Corroded clamps must be replaced.
• Check the nuts, bolts and screws that retain
equipment, hoses, etc. in the bilge for tightness
and corrosion. Corroded fasteners must be
replaced.
b. TopsiDe anD supplies
Once a year, you should undertake a thorough
review of the topside equipment, as well as of the
critical safety supplies on your boat.
• Check cleats, rings, rails, etc. for loose or
corroded fasteners, breaks, sharp edges, or
other conditions that could lead to malfunction or
unsafe use. Repair or replace as necessary.
• Inspect PFDs (life jackets) for tears and
deterioration.
• Make certain you have enough PFDs on board
for the maximum number of persons you can
carry.
8.6 40 Outlaw®
SeCtiOn 8 • required inSpeCtiOn, ServiCe, &
MaintenanCe
5. fiTTinG ouT afTer sToraGe
a. fuel sYsTeM
Check the entire fuel system for loose connections,
worn hoses, leaks, etc. and repair. This is a primary
safety precaution.
Check fuel lines for damage and make sure that they
do not come in contact with any moving parts.
b. baTTerY(ies)
Before installing the batteries, clean the terminal
posts with a wire brush or steel wool and then attach
the cables. After the cable clamps are tightened,
smear the post and clamps with vaseline or grease
to exclude air and acid. Do not apply grease before
attaching and tightening the terminal clamps.
Examine all wiring.
c. Miscellaneous
• Check all thru-hull ttings for unobstructed water
passage. Be alert for any deteriorated hoses
and/or ttings below the water line which might
fail in service and allow water.
• Test the navigation lights.
• Check all wiring for loose connections.
• Check all switches and equipment for proper
operation.
• Check bilge blowers for proper operation. Turn
on blowers and place hand over hull blower vent
to make sure air is coming from vent.
• Anchor lines and gear should be inspected and
replaced if necessary.
• Make sure the hull drain plug is in place and
tight.
• Clean bilge thoroughly if it was not done at
lay-up.
• Check all engine uid levels.
• Keep under a trickle charge.
• When placing battery back into service, remove
excess grease from terminals, recharge as
necessary and reinstall in boat.
D. fuel sYsTeMs
Gasoline:
• Fill fuel tank with gasoline and the recommended
amount of stabilizer and conditioner such as
“Stabil®”.
• Run engine(s) for ten minutes to ensure that
all gasoline in the carburetor and fuel lines are
treated.
Diesel:
• Fill fuel tank with diesel and recommended
amount of biocide, “Biobor®”, which prevents
bacteria and fungi from contaminating diesel
fuel that contains some water.
• Diesel fuel should also get a petroleum distillate
additive, such as “Stabil®” or Racor® RX100”.
This will absorb water in the fuel and prevent
freezing problems.
• Run engine(s) for ten minutes to ensure that all
diesel fuel in injectors and fuel lines is treated.
DETAILED WINTERIZING, OPERATING
INSTRUCTIONS AND WARRANTY INFORMATION
ARE PROVIDED BY THE EQUIPMENT
MANUFACTURER AND CAN BE FOUND IN THE
OWNER’S PACKET.
Do not overll. Filling a tank until the fuel ows from
vents is dangerous. Allow room for expansion.
! CAUTION

8.740 Outlaw®
SeCtiOn 8 • required inSpeCtiOn, ServiCe, &
MaintenanCe
• Check fuel lines for damage and/or leaks. Make
sure that they do not come into contact with
moving parts.
• Check Carbon Monoxide detector to see if
operational
6. securiTY consiDeraTions
Be conscious of the security of your boat. Always
remove the keys from the ignition, lock hatches, lock
the cabin door, remove and stow any removable
electronic gear (fishfinders, LORAN, etc.) and
personal gear (shing poles, etc.) normally left
aboard your boat.
7. poWer sTeerinG sYsTeM
MainTenance
• Lubricate the control valve on the power
steering cylinder through the grease tting with
multipurpose lubricant until grease appears
around the rubber boot.
• Coat power assist steering output shaft and
exposed steering cable end with appropriate
lubricant.
• Lubricate cable end guide pivot point with SAE
30W engine oil.
• Check power steering uid level in the power
steering pump reservoir.
• Inspect all hydraulic hoses for leaks. Keep hoses
from rubbing on moving parts and from contact
with hot engine parts.
• Check all ttings, clamps, and bolts for tightness
every month.
• Check power steering pump drive belt for
wear and proper tension every month. Do
not overtighten belt. This can cause bearing
failure.
REFER TO TH E E NG IN E O PE RATOR ’S
MANUAL FOR PROPER FLUID LEVELS AND
LUBRICANTS.
Baja® Marine recommends that all repairs and/or
replacements to steering systems be made by
qualied dealers authorized by manufacturer of the
steering system of your boat.
DETAILED OPERATING INSTRUCTIONS AND
WARRANTY INFORMATION ARE PROVIDED BY
THE EQUIPMENT MANUFACTURER AND CAN
BE FOUND IN THE OWNER’S PACKET.

8.8 40 Outlaw®
SeCtiOn 8 • required inSpeCtiOn, ServiCe, &
MaintenanCe
8. quick reference checklisT
As the owner/operator of a Baja® Boat, you are responsible for the safe operation of your boat and the
safety of your passengers. Always be sure that required documents, navigational equipment and Coast
Guard required safety equipment is aboard and in proper working order.
*Note: If trailering boat, many of these items should be checked before leaving the house.
a. boarDinG The boaT*
General
1. Weather Conditions ................................................ Is it going to be safe to go out?
2. Transom Drain Plug ................................................ Installed
3. PFDs and all other Coast Guard
required safety equipment ...................................... Available for all children and adults
4. Ignition keys ............................................................ Available
5. Tool Box .................................................................. Stocked with a variety of appropriate tools
4. Fire Exgtinguisher ................................................... Available
5. Cell Phone...............................................................Fully charged
boaT sYsTeMs
1. Bilge Pumps ........................................................... Working. Discharge any appreciable amounts of water
overboard
2. Blowers ................................................................... Working. “Sniff” the bilge/engine compartment for fuel
odor
3. Navigation Lights .................................................... Working. Have spare bulbs (and if applicable fuses)
aboard
4. Radio/Electronics .................................................... Working
5. Horn ........................................................................ Working
6. Trim Tabs ................................................................ Full range of motion. No excessive play or binding
7. Fresh Water Tank .................................................. Filled and sanitized
8. Carbon Monoxide Detector ..................................... Working
enGine
1. Batteries ................................................................. Fully charged (Check water cell levels)
2. Fuel Tank ................................................................ Filled with recommended fuel; not leaking
3. Fuel System ............................................................ Check for leaks
4. Fuel Filters .............................................................. Check that lters are clean and tight
5. Diesel Racor Fuel Filters ........................................ Check that lters are clean, tight and free of water
6. Engine Coolant Drain Plugs ................................... Secured
7. Steering Fluid ......................................................... Full
8. Throttle & Gearshift Controls .................................. Full range of motion
8.940 Outlaw®
SeCtiOn 8 • required inSpeCtiOn, ServiCe, &
MaintenanCe
quick reference checklisT (conT’D)
*If engine fails to start, refer to the Engine Owner’s Manual for further troubleshooting procedures
b. preparinG To DeparT anD afTer launchinG
General
1. Bilge/Engine Compartment ..................................... “Sniff” the bilge/engine compartment for fuel odor.
Run the bilge blowers for at least four (4) minutes.
2. Shore Power Cable ................................................ Disconnected from dockside power inlet
3. Lines, Fenders and Anchor ..................................... Ready for use
4. Passengers/Crew ................................................... Instructed in duties for getting underway and tted for a
correct size PFD
enGine
1. Battery Switches ..................................................... In the ON position
2. Fuel Valves (Diesel Only) ....................................... Open
3. Engine Alarm .......................................................... Test. Should sound after a few seconds
4. Gear Shift & Throttle Controls ................................ In NEUTRAL and IDLE positions
sTarTinG The enGine*
1. Gearshift & Throttle Controls .................................. Shift in NEUTRAL (Refer to your Engine Owner’s
Manual for startup procedures for your specic
engine)
2. Ignition .................................................................... Turn ignition keys on the helm clockwise until engine
starts, then release.
IMPORTANT: Do not continue to operate starter for more than 10 seconds without pausing to allow
starter motor to cool off for 2 minutes. This also will allow the battery to recover between starting
attempts.*
Do not run the engine or generator in an enclosed
area, such as a closed boat house, as there is
the possibility of buildup and inhaling of carbon
monoxide.
! WARNING

8.10 40 Outlaw®
SeCtiOn 8 • required inSpeCtiOn, ServiCe, &
MaintenanCe
c. DeparTinG
General
1. Passengers/Crew ................................................... Safely seated with PFDs on or immediately accessible
2. Lines, Fenders and Anchor ..................................... Stowed
boaT sYsTeMs
1. Trim Tabs ................................................................ Bring boat to “on plane” – Adjust as necessary
2. Navigation Lights .................................................... On at night or in reduced visibility
enGine
1. Tachometers ........................................................... Engines operating in safe RPM range
2. Engine Gauges ....................................................... Continually monitor
3. Engine Operation .................................................... Check idle and shift. Listen for abnormal noises and
visually check the engine compartment.
D. reTurninG To porT
General
1. Passengers/Crew ................................................... Instructed in duties for line handling
2. Lines and Fenders .................................................. Ready for use
boaT sYsTeMs
1. Navigation Lights .................................................... Turned OFF when secured
2. Anchor Light ........................................................... ON if necessary
3. Bilge/Engine Compartment ..................................... “Sniff” the bilge/engine compartment for fuel odor.
Run the bilge blowers if necessary. Check for water in
bilge. Run bilge pumps if necessary
enGine
1. Gearshift & Throttle Controls .................................. Bring to NEUTRAL and IDLE positions
2. Tachometers ........................................................... Idle the engines for ve (5) minutes to cool down
quick reference checklisT (conT’D)

8.1140 Outlaw®
SeCtiOn 8 • required inSpeCtiOn, ServiCe, &
MaintenanCe
quick reference checklisT (conT’D)
3. Ignition .................................................................... Once the motor is cooled down, turn the ignition keys
counter clockwise to stop the engine.
4. Engine Operation .................................................... Check idle and shift. Listen for abnormal noises
e. securinG The boaT
General
Lines and Fenders ........................................................ Fenders in place, lines tied securely to dock
boaT sYsTeMs
1. Helm Switch Panel ................................................. All switches in the OFF position
2. Gearshift & Throttle Controls .................................. In the NEUTRAL and IDLE positions
enGine
1. Ignition .................................................................... Switch is in the OFF position and ignition keys are
removed
2. Battery Switches ..................................................... In the OFF position
3. Fuel Valves (Diesel Only) ....................................... Closed (handle perpendicular to hose)
f. if The enGine Does noT sTarT
no sTarTer MoTor response
1. Check battery switch is in the ON position.
2. Check the main circuit breaker.
3. Check gearshift/throttle control levers in the NEUTRAL positions.
4. Check battery condition for sufcient charge.
5. Check battery cable connections tight and free from corrosion.
6. Check starter motor and solenoid connections.
7. Check ignition switch connections.
8. Consult the engine manual that is located in the owners packet.
sTarTer MoTor responDs, buT no iGniTion
1. Check that fuel tank is not empty.
2. Check that ignition shutdown switch lanyard is installed.
3. Check electrical connections on engine wiring harness and ignition wiring.
4. Check fuel lters and lter/water separators clean
5. Consult the engine maual that is located in the owners packet.

8.12 40 Outlaw®
SeCtiOn 8 • required inSpeCtiOn, ServiCe, &
MaintenanCe
9. afTer MarkeT equipMenT checklisT
Any safety or operational equipment added to your boat after delivery should be checked for seaworthiness
and proper working condition. Use the area below to list any equipment and the proper operating condition
of that equipment before getting underway.
Equipment Proper Operating Condition

8.1340 Outlaw®
SeCtiOn 8 • required inSpeCtiOn, ServiCe, &
MaintenanCe
10. MainTenance loG
Follow the recommended maintenance listed on pages 1 & 2 of this section and keep a record of this and
ALL maintenance performed on your boat.
Date Maintenance Description Engine Hours

8.14 40 Outlaw®
SeCtiOn 8 • required inSpeCtiOn, ServiCe, &
MaintenanCe
MainTenance loG (conT’D)
Date Maintenance Description Engine Hours
9.1
40 Outlaw®
SeCtiOn 9 • Care & reFiniShing
Your new boat has been designed to provide you
with years of enjoyment and satisfaction. In order
to maintain the factory new appearance of your
boat, we recommend the use of Yacht Bright™
products designed specically for pleasure boats.
Following proper berglass maintenance guidelines
will help maintain your boat’s performance, value,
and enjoyment.
1. painT cleaninG aGenTs &
oTher subsTances
Do not use products containing chlorine, phosphates,
perfumes and non-degradable ingredients. Consult
your marine dealer regarding environmental
regulations before painting the hull. Fumes can
last for hours, and chemical ingredients can harm
people, property and the environment. Common
household cleaning agents may cause hazardous
reactions. Read and understand directions on
all paint, cleaning and polishing materials before
using.
2. fiberGlass & GelcoaT
The berglass hull, deck and some interior parts
consist of a molded shell and exterior gelcoat. The
gelcoat is the outer surface, often colored, that
presents the shiny smooth appearance associated
with fiberglass products. This gelcoat surface
is painted or taped in some areas for styling
purposes.
Wash the gelcoat and berglass regularly with clean,
fresh water. Wax gelcoated surfaces to maintain the
luster. In northern climates, a waxing at the start and
end of the boating season may sufce. In southern
climates, an application of wax every three months
will be required for adequate protection.
REFER TO THE YACHT BRIGHT™ PAMPHLET IN YOUR
OWNER’S MANUAL PACKET FOR INSTRUCTIONS
AND WARRANTY INFORMATION.
3. sTains & scraTches
Although gelcoat and painted surfaces are resistant
to deep stains, a need for cleaning will occasionally
arise. But, the use of some common cleaning agents
will permanently discolor or otherwise damage the
nish on your boat.
• Do not use abrasive porcelain-cleaning powders.
These are too abrasive and contain chlorine
and ammonia, either of which will permanently
discolor gelcoat and paint.
• Never use nail polish remover (acetone) or any
ketone solvents.
• Use diluted household detergents to remove
surface soil and stains. Before using a given
brand, check to make sure it contains no
chlorine or ammonia.
• Isopropyl alcohol can be used to remove difcult
stains. But it must be promptly washed off with
mild detergent and water.
Gelcoat surfaces are slippery when wet.
Always wear non-slip footwear securely fastened to
your feet and hold on to rails or the boat structure.
! WARNING
Waxed surfaces are slippery.
Do not wax areas that are usually walked on.
! WARNING
EXPLOSION/FIRE HAZARD
Care and renishing materials may contain
ingredients that are ammable or explosive. Do not
use such materials in the bilge
Shut off electrical power and ventilate when using
such materials anywhere on the boat or in the cabin.
Do not create sparks or use lighted materials.
! WARNING

9.2
SeCtiOn 9 • Care & reFiniShing
40 Outlaw®
• Minor scratches and deeper stains that do not
penetrate the gelcoat may be removed by light
sanding and bufng.
4. perManenTlY MooreD or
DockeD boaTs
If permanently moored in salt water or fresh water,
your boat will collect marine growth on its bottom.
This will detract from the boat’s beauty and greatly
affect its performance. There are two methods of
preventing this:
• Periodically haul the boat out of the water and
scrub the bottom with a bristle brush and a
solution of soap and water.
• Paint the hull below the waterline with a good
grade of antifouling paint. DO NOT paint the
engine drive surfaces.
NOTE: There are EPA regulations regarding bottom
paint application. Consult your Baja® dealer for
proper application methods.
5. TopsiDe areas
a. sTainless sTeel anD alloY fiTTinGs
Stainless steel and alloy ttings should be cleaned
with soap and water or household glass cleaner.
Remove rust spots as soon as possible with a
brass, silver or chrome cleaner. Irreversible pitting
will develop under rust that remains for any period
of time. Never use an abrasive like sandpaper or
steel wool on stainless. These may actually cause
rust. To help protect the stainless, we recommend
the use of a good car wax.
b. salT crYsTals
When instruments are exposed to a saltwater
environment, salt crystals may form on the bezel
and the plastic covers. These salt crystals should
be removed with a soft, damp cloth; never use
abrasives or rough, dirty cloths to wipe plastic parts.
Mild household detergents or plastic cleaners can
be used to keep the instruments bright and clean.
Refer to the Owner’s Manual Packet for instructions
and warranty information.
6. acrYlic plasTic sheeTinG
(plasTic Glass)
Never use a dry cloth or duster or glass cleaning
solutions on acrylic.
To clean acrylic, rst ood it with water to wash off
as much dirt as possible. Next, use your bare hand,
with plenty of water, to feel and dislodge any caked
dirt or mud. A soft, grit-free cloth may then be used
with a nonabrasive soap or detergent. A soft sponge,
kept clean for this purpose, is excellent. Blot dry with
a clean damp chamois.
Grease and oil may be removed from acrylic
with kerosene, hexane, white (not aviation or
ethyl) gasoline or aliphatic naphtha (no aromatic
content).
Do not use solvents such as acetone, silicone
spray, benzine, carbon tetrachloride, fire
extinguisher uid, dry cleaning uid or lacquer
thinner on acrylic, since they attack the
surface.
Remove ne scratches with ne automotive acrylic
rubbing and polishing compounds.
7. canvas anD clear vinYl
Do not fold or store any of the canvas pieces
while wet. All canvas should be rolled or folded
when dry and stored in a clean, dry place. For clear
vinyl pieces, the recommended methods for storage
are rolling or laying down at. The clear vinyl should
never be folded or creased as cracking will result.
To protect the clear vinyl from rubbing against itself
while rolled or stored at, place a piece of very
soft, nonabrasive cloth between the pieces. If the
surface of the clear vinyl becomes scratched, the
canvas manufacturer has provided a canvas care
sheet located in your Owner’s Manual Packet. When
storing the rear (aft) curtain, fold the canvas over
the clear vinyl window (do not fold clear vinyl), then
roll or store at. REFER TO THE CANVAS CARE
INSTRUCTIONS IN THE OWNER’S MANUAL
PACKET.
9.3
40 Outlaw®
SeCtiOn 9 • Care & reFiniShing
The fabric should be cleaned regularly before
substances such as dirt, pollen, etc. are allowed
to accumulate on and become embedded in the
fabric. The fabric can be cleaned without being
removed from the installation. Simply brush off any
loose dirt, particles, etc.; hose down and clean with
a mild solution of a natural soap in lukewarm water
(no more than 100°F, 38°C); rinse thoroughly to
remove soap. DO NOT USE DETERGENTS. Allow
to completely dry.
Wash and clean vinyl windows with a warm soap
solution. Use a soft cloth or sponge and do not
scratch the surface.
If you have stubborn cleaning cases, call your dealer
for proper procedures. Do not try your own cleaning
procedures as they may permanently damage the
canvas.
After each use, especially in salt water areas, rinse
the canvas completely with fresh cold water. Then
let the canvas dry completely before stowing.
DO NOT, at anytime, dry any canvas part in a
conventional dryer, because shrinking may occur.
All metal components of the canvas should be rinsed
with fresh cold water and exposed components
wiped dry to maintain appearance and working
order.
8. exTerior upholsTerY fabric
Exterior fabrics should be cleaned with a sponge
or very soft scrub brush and a mild soap and warm
water solution. After scrubbing, rinse with plenty of
cold, clean water and allow the fabric to air dry in a
well ventilated place, preferably away from direct
sunlight.
Mildew can occur if your boat does not have adequate
ventilation. Heat alone will not prevent mildew; you
must also provide for fresh air circulation.
REFER TO THE OWNER’S MANUAL PACKET FOR
INSTRUCTIONS AND WARRANTY INFORMATION.
9. inTerior upholsTerY fabric
Cleaning and maintenance information, provided
by the material manufacturer, is in your Owner’s
Manual Packet.
REFER TO THE OWNER’S MANUAL PACKET
FOR INSTRUCTIONS AND OTHER CLEANING
INFORMATION.
Always clean spots, stains, etc., immediately.
Test an unseen area of fabric before cleaning stain,
to insure that cleaning material will not cause
damage.
NOTICE

9.4
SeCtiOn 9 • Care & reFiniShing
40 Outlaw®
This Page inTenTionally lefT Blank

index40 ouTlaw®
index
A
Accessories. See Options &
Accessories Locations
B
Bilge 4.1
Blower 4.2
Maintenance 4.2, 8.4
Pump 4.1
Boarding 3.3
Breakers. See Electrical Systems
C
Canvas 7.2, 9.2
Carbon Monoxide 1.2
Certications
CE (Common European) Mark iv
Clearances 2.2
D
Diving 1.10
Docking 2.1
E
Electrical Systems
Batteries 6.1
Breakers and/or Fuses 6.2
Direct Current (DC) 6.1
Electrolytic Corrosion 6.2
Emergency Situations 1.10
Engine
Maintenance 8.4
Maintenance & Service 4.2
Starting 3.4
Stopping 3.5
Engine Alarm System 2.7
Exhaust System 7.5
F
Failure: Propulsion, Control or
Steering 1.12
Fiberglass, Care & Cleaning 9.1
Fire Extinguisher 1.2
Fire Extinguisher Port 7.2
Fire Extinguishing System 1.2, 7.2
Flooding 1.11
Fuel System
Anti-Siphon Valve 5.1
Fuel Gauge 2.8
Fueling 3.2
Maintenance 8.4
Fuses. See Electrical Systems
G
Gear Shift and Throttle Control 2.5
Gelcoat, Care & Cleaning 9.1
H
Head System 7.4
Holding Tank 7.5
Horn 7.3
Hull
Indentication Number (HIN) iv
I
Ignition Shutdown Switch 2.7
L
Layout
Deck 2.4
Lifting 2.1
Lights
Navigation & Anchor 2.8
Load Capacity 1.6
N
Nautical Terms 1.15
O
OEM i
Options & Accessories Locations 7.1
Owner’s Manual Packet i
P
Passengers
Instruction 3.4
Locations 2.1
Personal Flotation Devices (PFDs)
1.2, 1.4, 3.3
Power Capacity 1.6
Power Trim 2.5
Propellers 1.6, 2.3
Removal & Installation 4.3
Propulsion System 2.3
R
Recommended Equipment 1.5
Requirements
International Requirements 1.13
Required Equipment 1.2
S
Safe boating 1.1
Safety Labels 1.1
Security Considerations 8.7
Service, Summary Guide 8.1
Service Information 8.3
Skiing 1.9
Stability 1.7
Stains 9.1
Steering System 3.6
Stern Drive 4.2
Storage 2.1
Swimming 1.9
Swim Platform 7.3
Symbols 1.16
T
Tachometer 2.7
Trailering 2.1
Trailer Launching and Loading 3.2
Trailer Switch 2.6
Trim 2.5
Trim Tabs 2.6
U
U.S. Coast Guard 1.12
V
VacuFlush® Head 7.5
Visual Distress Signals 1.2
W
Warranty iii, v
Water Sports 1.9
Water Temperature 2.8
Weather 1.8
Winterization 8.5
Z
Zinc Anodes 6.2

index 40 ouTlaw®
This Page inTenTionally lefT Blank
