Chamberlain Myq G0201 Garage Users Manual 114A4618
2015-03-09
: Chamberlain Chamberlain-Myq-G0201-Myq-Garage-Users-Manual-590576 chamberlain-myq-g0201-myq-garage-users-manual-590576 chamberlain pdf
Open the PDF directly: View PDF ![]() .
.
Page Count: 16
MyQ Garage
TM
Universal Smartphone
Garage Door Controller
USER’S GUIDE
(affi x serial number label)
Serial Number
2
To reduce the risk of SEVERE INJURY to persons:
• DO NOT enable the Chamberlain Universal Smartphone Garage Door Controller if
operating either one-piece or swinging doors. To be enabled ONLY on a sectional
door.
Read instructions thoroughly BEFORE beginning.
If using this product with residential door openers, this product
must be used only with door openers manufactured after 1993 that
utilize photoelectric sensors. The photoelectric sensors are always
located on or near the bottom of the door track.
STOP
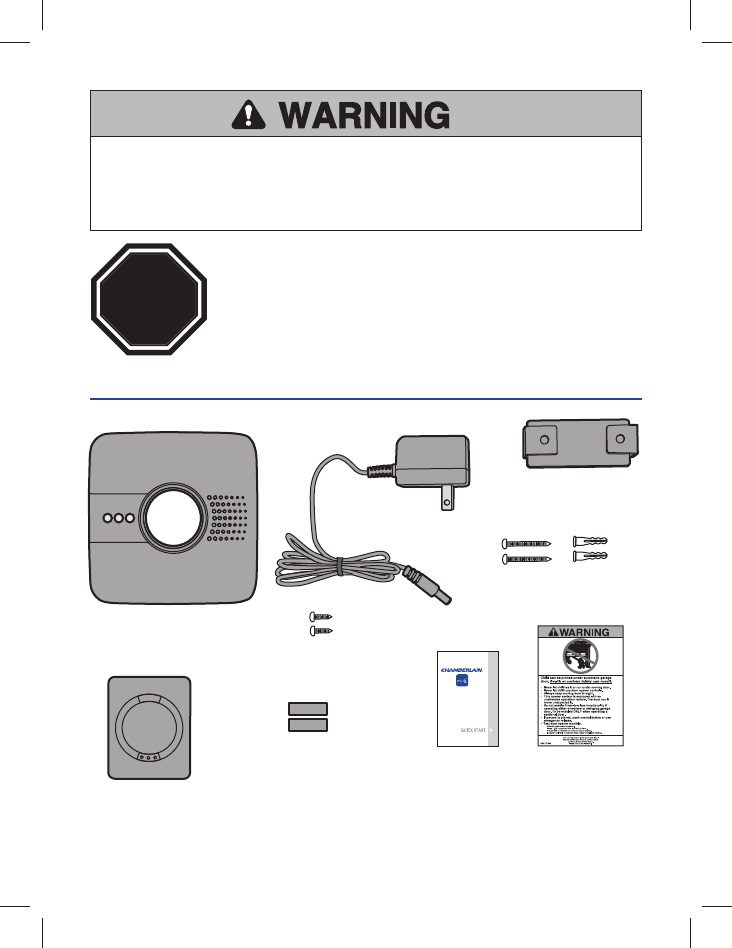
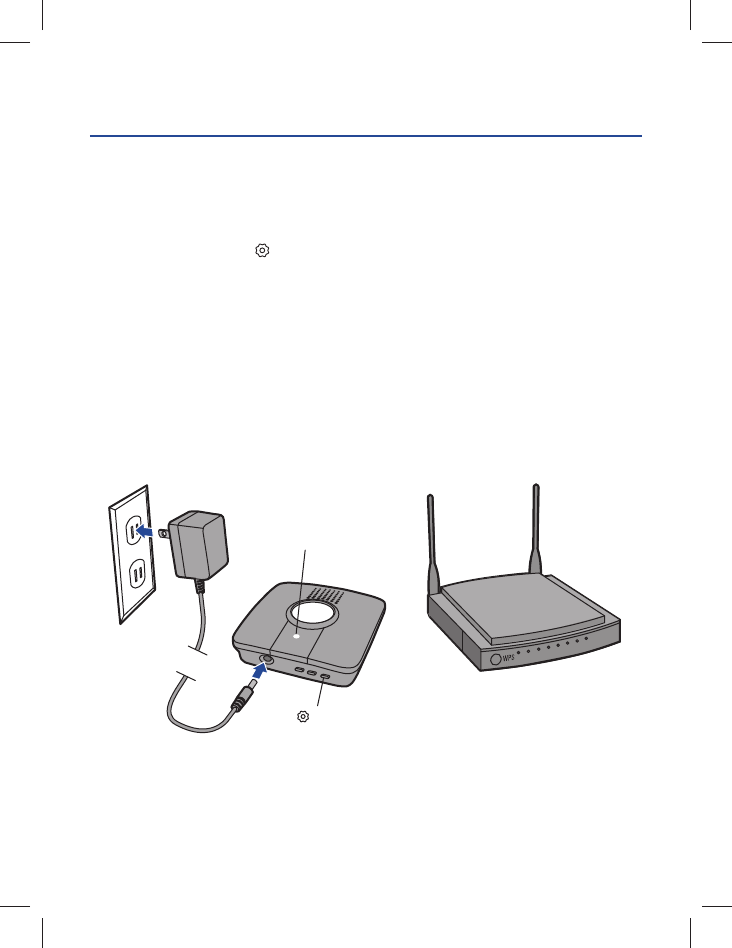
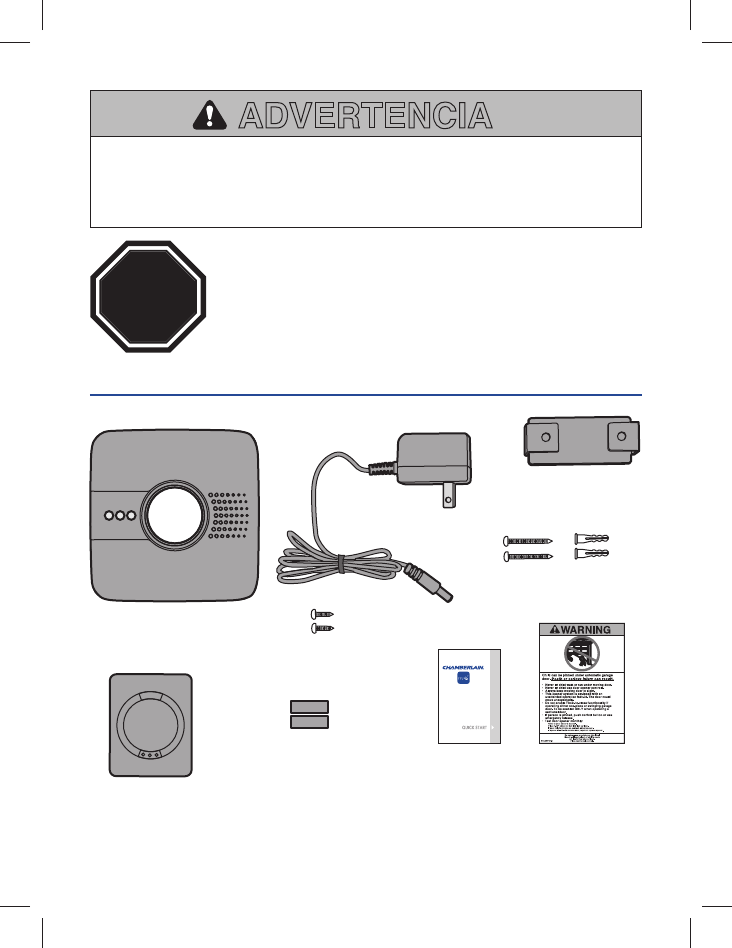
WHAT'S IN THE BOX
Wi-Fi Hub
Door Sensor
Power Supply
Hardware for Wi-Fi Hub
(5/32", long screws)
Bracket for Wi-Fi Hub
Hardware for Door Sensor
(5/32", short screws)
Fastening Strips for
Door Sensor User’s Guide Warning Placard
NOTE: The Wi-Fi hub can control up to 2 garage doors, however an additional door
sensor is required. Follow the instructions included with the new door sensor for
programming instructions.
3
BEFORE STARTING YOU MUST HAVE...
• A mobile device, used during setup
• Router with Wi-Fi®
• Broadband Internet Connection
• Wi-Fi Hub Serial Number (located in this User's Guide and on the Wi-Fi Hub)
• Compatible Garage Door Opener (www.chamberlain.com/MyQGarage)
• Make sure your mobile device is connected to the Wi-Fi network.
• Make sure there is a strong Wi-Fi® signal in the garage where the Wi-Fi Hub will
be mounted. To verify, place your mobile device in the location where the Wi-Fi
Hub will be installed. You mobile device should display two or more bars. If not,
move the router closer to the garage or purchase a Wi-Fi range extender (refer to
the Help section of this User's Guide).
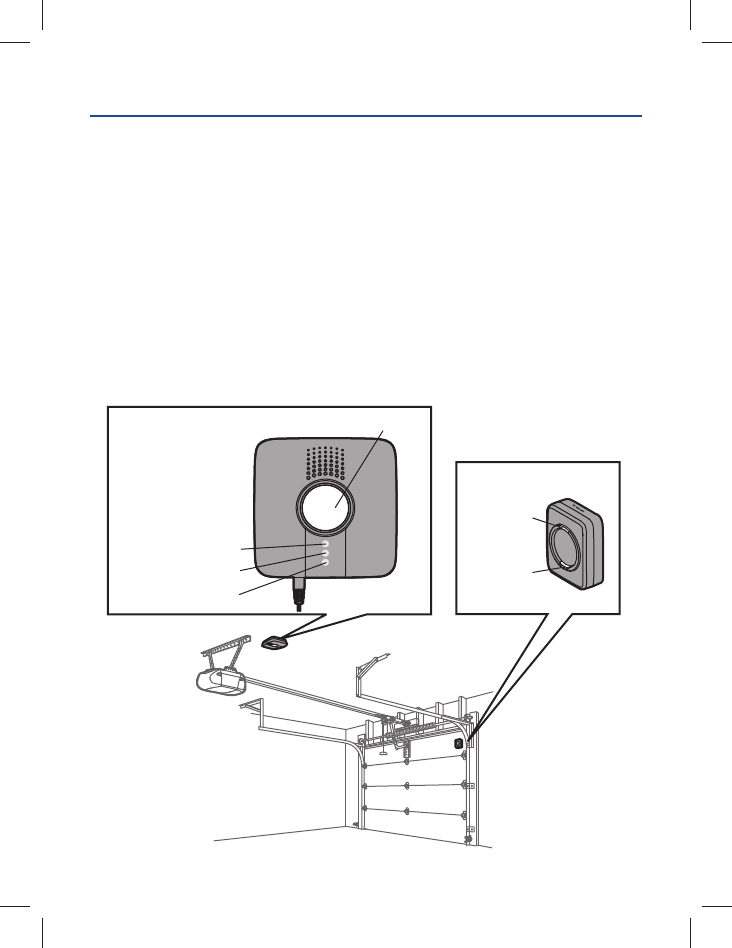
Wi-Fi Hub
Door Sensor
The LEDs are visible
when directly facing
the Wi-Fi Hub.
Light
Blue LED
Green LED
Yellow LED
LED
Test Button
4
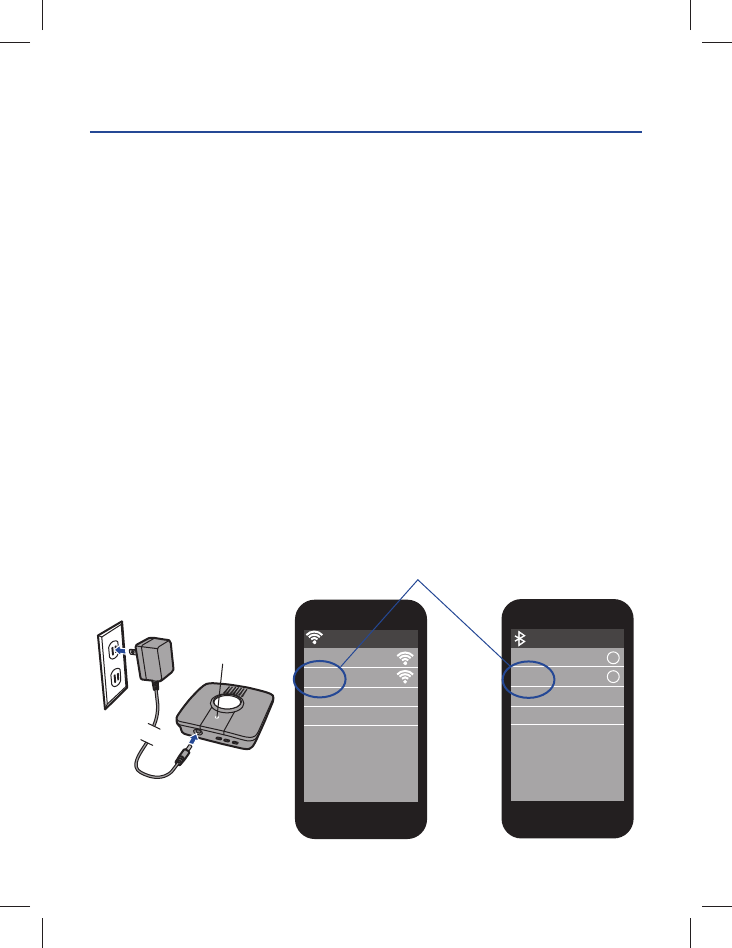
MyQ
Wi-Fi
Home
MyQ
Bluetooth Devices
My Car
i
i
Blue LED
OR
Select MyQ
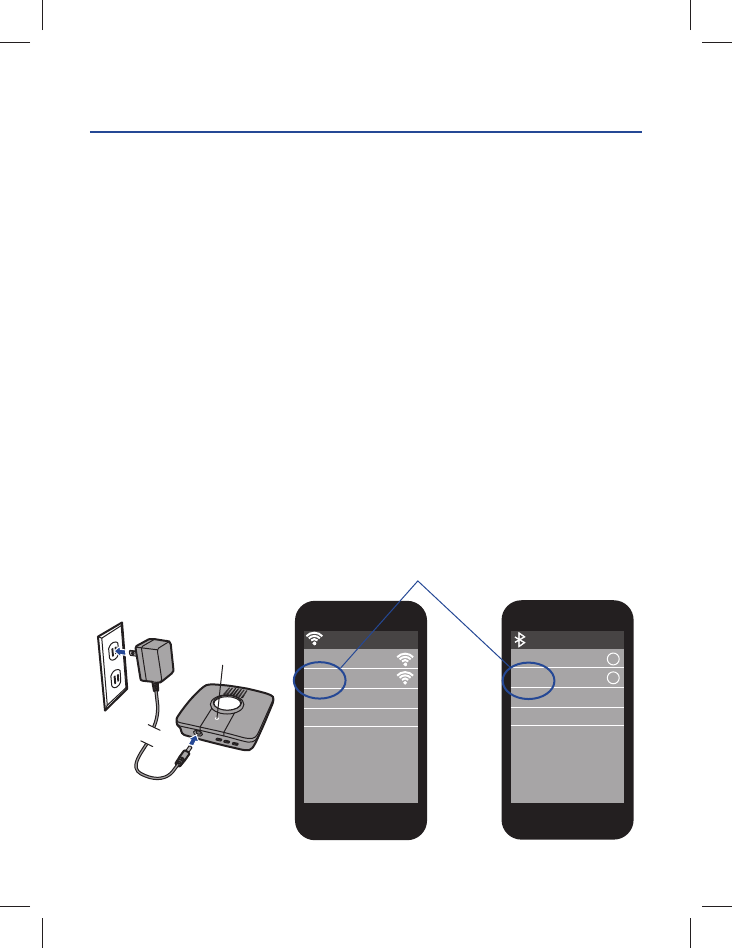
1CONNECT TO NETWORK
Make sure the Wi-Fi signal in the garage is strong and your mobile device is
connected to your home Wi-Fi network.
Connect with mobile device
1. Plug in the Wi-Fi Hub. The blue LED will blink, the Wi-Fi Hub is ready to be
connected to your home Wi-Fi network.
2a. iPhone® or iPod touch®*: Go to Settings > Bluetooth® and turn on Bluetooth.
Select the Bluetooth device with the "MyQ" prefi x. Click "Allow" to share Wi-Fi
settings then proceed to App store to download MyQ App.
OR
2b. All other mobile devices: Go to settings, select Wi-Fi, then select the network with
the “MyQ” prefi x and select connect. Once connected, launch the mobile device's
web browser and go to "setup.myqdevice.com". Follow the on-screen instructions
to connect to your home network and download the App.
NOTE: Do not operate the garage door opener until installation has been completed.
3. If the green LED is glowing solid, proceed to step 2 Installation. If the green LED is
not glowing solid, repeat the steps above or proceed to Alternate Method: Connect
with WPS (Wi-Fi Protected Setup).
*Made for:
iPhone 3GS, iPhone 4, iPhone 4S, and iPhone 5
iPod touch (4th and 5th generation)
5
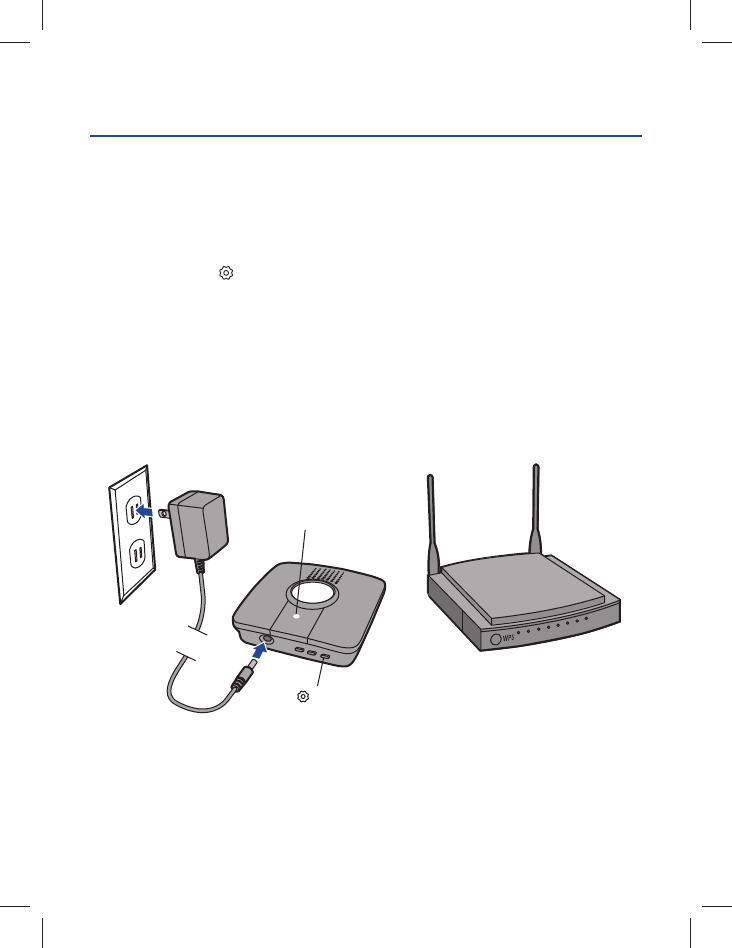
ALTERNATE METHOD: Connect with WPS (Wi-Fi Protected Setup)
If your router is using WEP security setting, change it to WPA or WPA2.
1. Plug in the Wi-Fi Hub. The blue LED will blink, the Wi-Fi Hub is ready to be
connected.
2. Press and release the BUTTON on the Wi-Fi Hub. The blue LED will turn solid.
3. Press the router’s WPS button to activate WPS mode. It may take a few minutes for
the Wi-Fi Hub to connect to the router. The Wi-Fi Hub’s green LED will turn solid
when the Wi-Fi Hub is connected to your network.
4. Download the Chamberlain MyQ® Home Control App from the App Store or Google
Play. NOTE: Do not operate the garage door opener until installation has been
completed.
5. If the green LED is glowing solid, proceed to step 2 Installation.
Blue LED
WPS Mode
BUTTON
6
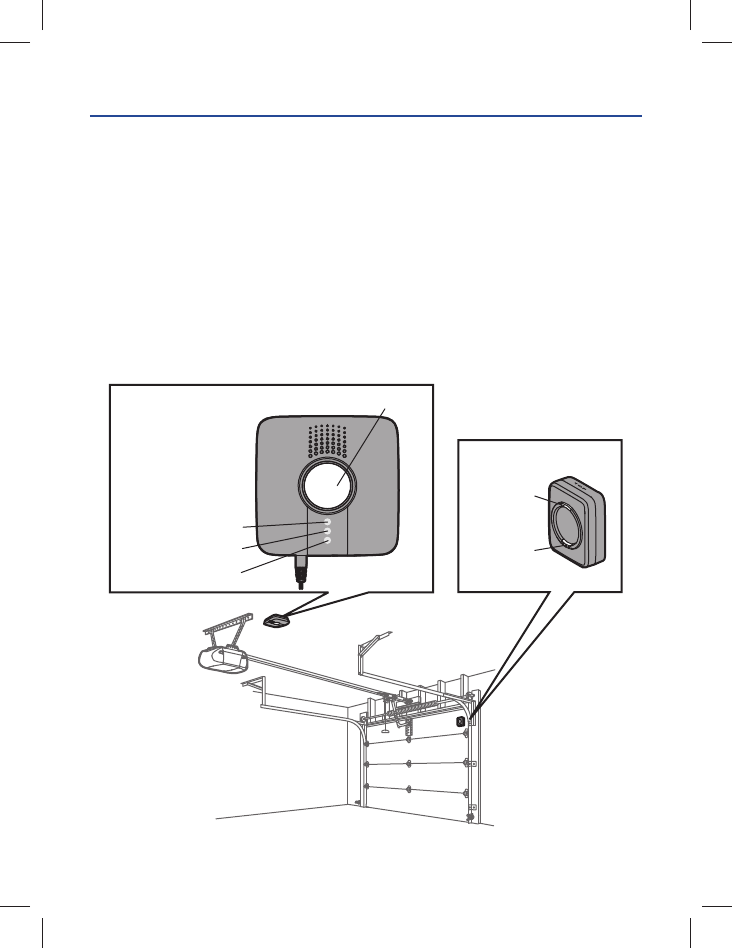
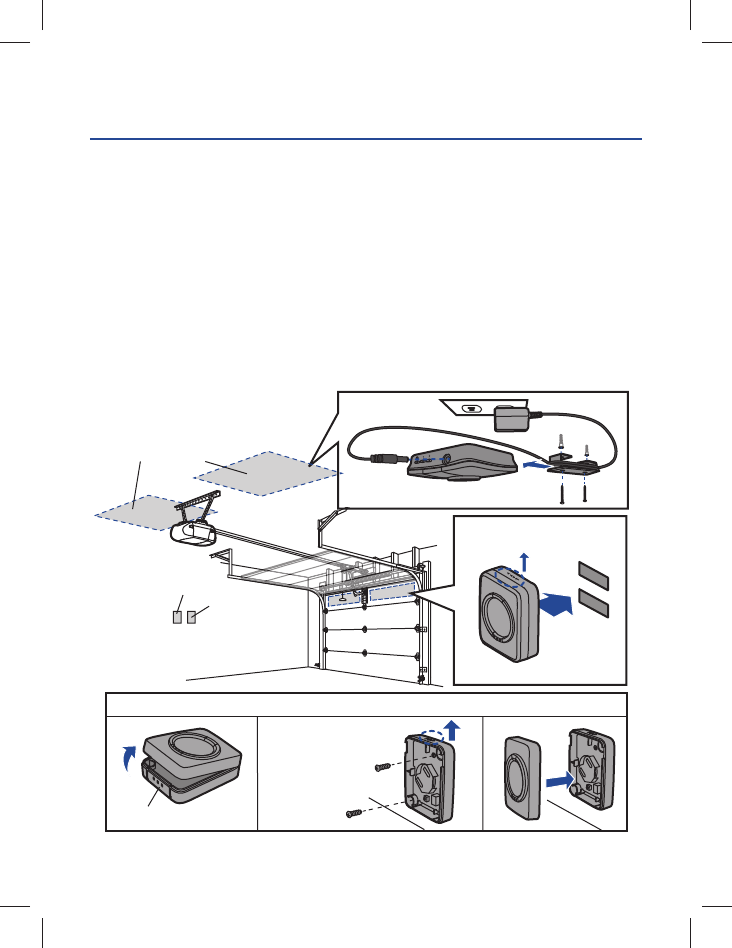
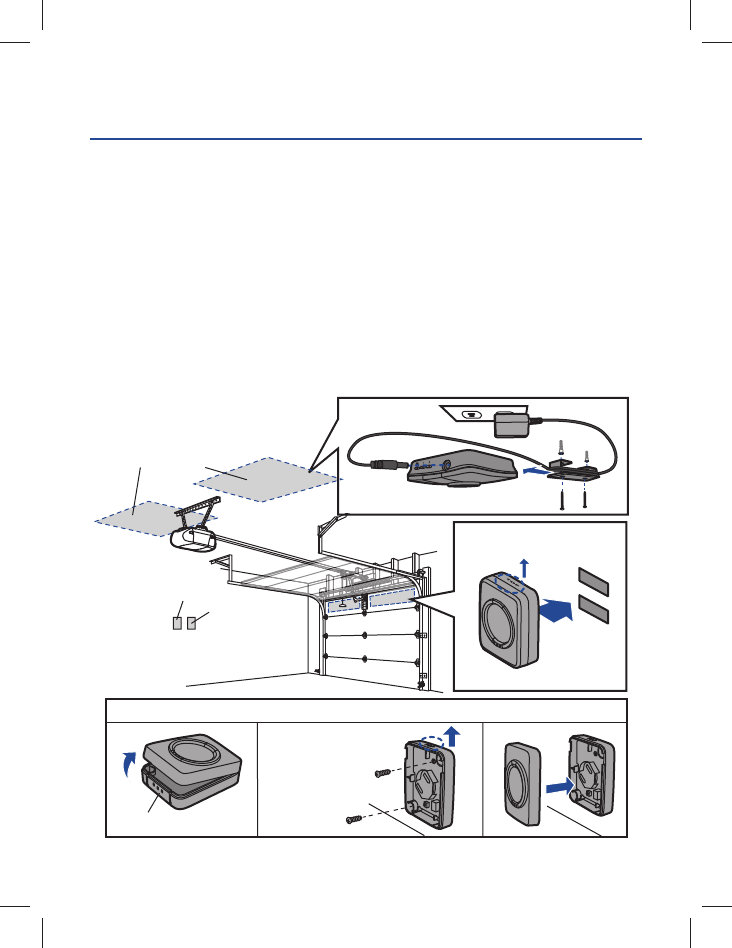
INSTALLATION
2
1. Choose a location to install the Wi-Fi Hub:
• Wi-Fi Hub light MUST be visible if you're standing in the doorway of the garage
• Wi-Fi Hub MUST be a minimum of two feet away from the garage door opener
2. Place the Wi-Fi Hub in its mounting location, plug it in, and verify the Green LED
turns on solid. NOTE: If the Green LED does not turn on solid, move the router
closer to the garage or install a Wi-Fi range extender.
3. Use the Wi-Fi Hub bracket as a template to drill 5/32" pilot holes. Attach the bracket.
Slide the Wi-Fi Hub onto the bracket.
4. Attach the door sensor vertically on the top panel of the garage door using
fastening strips or screws (provided).
5. Attach the warning placard to the wall next to the door control.
Wi-Fi Hub
(ceiling)
(mounting area)
Door Sensor (with screws)
“TOP” MUST always
face UP
Press
Door Sensor
“TOP” MUST always face UP
Fastening
Strips
Warning
Placard
Door Control
7
The Wi-Fi Hub will not connect.
• Use your mobile device to verify there is a strong Wi-Fi signal in the garage near the
Wi-Fi Hub. If the Wi-Fi signal strength is weak, the connection may fail. If there is
weak or no signal, move the router closer to the garage or install a Wi-Fi extender.
• iPhone® or iPod touch®: Go to Settings > Bluetooth® and forget the MyQ® device.
Repeat the steps or try connecting using the alternate method (WPS).
• All other mobile devices: If blue LED is not blinking, reset the Wi-Fi Hub to factory
default then repeat the steps or try connecting using the alternate method (WPS).
• Alternate Method (WPS): If the blue LED on the Wi-Fi Hub is fl ashing, repeat the
alternate method or try connecting with a mobile device. If the blue and green LEDs
are fl ashing, reset the Wi-Fi Hub, then try connecting with a mobile device.
Reset the Wi-Fi Hub to Factory Default
1. Press and hold the BUTTON on the Wi-Fi Hub until the blue LED blinks.
2. While the blue LED is blinking, press and hold the BUTTON again until the blue
LED pauses then blinks. The Wi-Fi Hub is set to factory default.
What are the buttons on the Wi-Fi Hub for?
The BUTTON is used to reset the Wi-Fi Hub to factory default. Button 1 and 2 are
used to program compatible remote controls and other compatible accessories. For
additional information go to the help section in the App.
What do the LEDs on the Wi-Fi Hub mean?
NEED HELP?
LED COLOR LED STATE WI-FI HUB STATUS
Blue Blinking Wi-Fi needs to be setup
Green and Blue Blinking NO router communication
Blue Solid Wi-Fi setup active
Green Blinking Internet connection failed
Yellow and Green Blinking Programming mode
Green Solid Wi-Fi Connected
REGISTER AND TRY IT
3
Open the App and sign up for an account. Follow the on-screen prompts in the App to
complete your setup. Once setup is complete, use the App to control your garage door.
Apple, iPhone, and iPod touch are trademarks of Apple Inc., registered in the U.S. and other countries.
The Bluetooth® word mark and logos are registered trademarks owned by Bluetooth SIG, Inc. and any use of such
marks by The Chamberlain Group, Inc. is under license. Other trademarks and trade names are those of their
respective owners. Wi-Fi® is a registered trademark of Wi-Fi Alliance.
“Made for iPod” and “Made for iPhone” mean that an electronic accessory has been designed to connect specifi cally
to iPod or iPhone respectively, and has been certifi ed by the developer to meet Apple performance standards. Apple
is not responsible for the operation of this device or its compliance with safety and regulatory standards. Please note
that the use of this accessory with iPod or iPhone may affect wireless performance.
NOTICE: To comply with FCC and/or Industry Canada (IC) rules, adjustment or modifi cations of
this transceiver are prohibited. THERE ARE NO USER SERVICEABLE PARTS.
This device complies with Part 15 of the FCC rules and IC RSS-210. Operation is subject to
the following two conditions: (1) this device may not cause harmful interference, and (2) this
device must accept any interference received, including interference that may cause undesired
operation. This device must be installed in a way where a minimum 8" (20 cm) distance is
maintained between users/bystanders and device.
ONE YEAR LIMITED WARRANTY
The Chamberlain Group, Inc. warrants to the fi rst retail purchaser of this product that is
free from defect in materials and/or workmanship for a period of 1 year from the date of
purchase.
REPLACEMENT PARTS
Description Part Number
Door Sensor 041D7924
Power Supply 041D0270
SOFTWARE AGREEMENT
Use of this product and the software embedded within the product is subject to the
copyright notices, terms, and conditions available at:
http://www.mychamberlain.com/agreement
Need more help?
Go to the Help section at www.mychamberlain.com,
or call 1-800-528-9131.

MyQ Garage
TM
Controlador telefónico
universal para puertas
de garaje
GUÍA DEL USUARIO
(aplicar etiqueta de número de serie)
Número de serie
2
CONTENIDO DE LA CAJA
Distribuidor de Wi-Fi
Sensor de puerta
Ménsula para el
distribuidor de Wi-Fi
Correas de fijación para
el sensor de puerta Guía del usuario Cartel de advertencia
Fuente de alimentación
Tornillos largos de 5/32”
para el distribuidor de Wi-Fi
Tornillos cortos de 5/32”
para el sensor de puerta
NOTA: El distribuidor de Wi-Fi puede controlar hasta dos puertas de garaje, pero es
necesario usar un sensor adicional. Siga las instrucciones incluidas con el nuevo sensor para
programarlo.
ADVERTENCIA
Para reducir el riesgo de accidentes LESIÓNES GRAVES:
• NO usar el controlador universal de puertas de garaje para teléfono inteligente
con puertas de una pieza ni puertas giratorias. Activarlo ÚNICAMENTE en puertas
seccionales.
Leer las instrucciones ANTES de comenzar.
Para usar este producto en instalaciones residenciales, el abre-
puerta debe ser un modelo posterior a 1993, ya que utilizan sensores
fotoeléctricos. Los sensores fotoeléctricos se encuentran siempre
cerca de la parte inferior de la guía de la puerta.
ALTO
3
ANTES DE EMPEZAR, DEBE TENER:
• Un dispositivo móvil que se usa durante la instalación
• Router con Wi-Fi®
• Conexión a Internet de banda ancha
• Número de serie del distribuidor de Wi-Fi (se encuentra en estas instrucciones y en el
distribuidor de Wi-Fi)
• Abre-puertas de garaje compatibles (www.chamberlain.com/MyQGarage)
• Verifi que que el dispositivo móvil esté conectado a la red de Wi-Fi.
• Verifi que que llegue una buena señal de Wi-Fi® al lugar del garaje adonde se
instalará el distribuidor de Wi-Fi. Para ello, coloque el dispositivo móvil en el lugar
adonde se instalará el distribuidor de Wi-Fi. La intensidad de señal debería indicar al
menos dos barras. Si así no fuera, mover el router más cerca del garaje o adquirir un
prolongador de alcance de señal (véase la sección de Ayuda de estas instrucciones).
Sensor de Puerta
Los LED son
visibles mirando
directamente de
frente al distribuidor
de Wi-Fi.
Luz
LED azul
LED verde
LED amarillo
LED
Botón de
prueba
Distribuidor de Wi-Fi
4
MyQ
Wi-Fi
Home
MyQ
Bluetooth Devices
My Car
i
i
LED azul
O
Seleccione MyQ
1 CONECTARSE A LA RED
Verifi que que la señal de Wi-Fi sea fuerte en el garaje y que el dispositivo móvil esté
conectado a la red Wi-Fi de su casa.
Conéctese con el dispositivo móvil
1. Enchufe el distribuidor de Wi-Fi. El LED azul parpadeará y el distribuidor de Wi-Fi está
listo para conectarse a la red de su casa.
2a. iPhone® o iPod touch®*: Vaya a Settings > Bluetooth® y active Bluetooth. Seleccione
el dispositivo Bluetooth con el prefi jo “MyQ”. Clic en “Allow” para compartir la
confi guración de Wi-Fi y luego descargue MyQ App del App store.
O
2b. Para otros dispositivos móviles: Vaya a Settings, seleccione Wi-Fi, luego seleccione la
red con el prefi jo “MyQ” y conéctese. Abra el navegador de Internet del dispositivo móvil
y conéctese a “setup.myqdevice.com”. Siga las instrucciones en pantalla para conectarse
a la red de su casa y descargue la aplicación.
NOTA: No haga funcionar el abre-puertas antes de fi nalizar la instalación.
3. Si el LED verde queda encendido, siga con el paso 2 de instalación. Si el LED verde
no queda encendido, repita los pasos anteriores o aplique un Método de alternativa:
Conéctese con WPS (protocolo de seguridad de Wi-Fi).
*Hecho para:
iPhone 3GS, iPhone 4, iPhone 4S y iPhone 5
iPod touch (4ta y 5ta generación)
5
MÉTODO DE ALTERNATIVA: Conéctese con WPS (protocolo de seguridad de
Wi-Fi)
Si el router usa protocolo de seguridad WEP, cámbielo a WPA o WPA2.
1. Enchufe el distribuidor de Wi-Fi. El LED azul parpadeará y el distribuidor de Wi-Fi está
listo para conectarse.
2. Pulsar y soltar el BOTÓN en el distribuidor de Wi-Fi. El LED azul quedará encendido.
3. Pulse el botón WPS en el router para activar el modo WPS. La conexión del distribuidor
de Wi-Fi al router podría llevar algunos minutos. El LED verde del distribuidor quedará
encendido cuando quede establecida la conexión a la red.
4. Descargue la aplicación MyQ® Home Control de Chamberlain en App Store o en Google
Play. NOTA: No haga funcionar el abre-puertas antes de fi nalizar la instalación.
5. Si el LED verde queda encendido, siga con el paso 2 de instalación.
LED azul
Modo WPS
BOTÓN
6
INSTALACIÓN
2
1. Seleccione un lugar para instalar el distribuidor de Wi-Fi:
• La luz del distribuidor de Wi-Fi DEBE quedar a la vista si usted está parado en la entrada
del garaje.
• El distribuidor DEBE instalarse a un distancia mínima de dos pies del abre-puertas.
2. Coloque el distribuidor de Wi-Fi en el lugar elegido, enchúfelo y verifi que que el LED verde
quede encendido. NOTA: Si el LED verde no queda encendido, mover el router a un lugar
más cerca del garaje o instalar un prolongador de alcance de Wi-Fi.
3. Use el soporte del distribuidor como plantilla para hacer los agujeros guía de 5/32”. Fije el
soporte. Introduzca el distribuidor de Wi-Fi en el soporte.
4. Instale el sensor de puerta verticalmente en el panel superior de la puerta usando cinta o
tornillos (suministrados).
5. Coloque el cartel de advertencia en la pared al lado del control de la puerta.
Distribuidor de Wi-Fi
(techo)
(área de montaje)
Sensor de Puerta (con tornillos)
Cartel de
advertencia
Control de la puerta
Bandas de
Fjación
Pulsar
Sensor de Puerta
El lado marcado con “TOP”
DEBE quedar siempre hacia
ARRIBA
El lado marcado con
“TOP” DEBE quedar
siempre hacia
ARRIBA
7
El distribuidor de Wi-Fi no se conecta.
• Use el dispositivo móvil para verifi car el nivel de la señal de Wi-Fi cerca del distribuidor. Si
la señal de Wi-Fi fuera débil, la conexión no se establecerá. Si la señal es débil o no llega,
mueva el router más cerca del garaje o instale un prolongador de alcance de señal.
• iPhone® o iPod touch®: Vaya a Settings > Bluetooth® y cancele el dispositivo MyQ®.
Repita los pasos de programación o utilice el método de alternativa (WPS).
• Para otros dispositivos móviles: Si el LED azul no parpadea, restituya la programación
de fábrica del distribuidor de Wi-Fi y repita los pasos de programación o utilice el método
de alternativa (WPS).
• Método de alternativa (WPS): Si el LED azul del distribuidor parpadea, repita los pasos
del método de alternativa o intente conectarse con un dispositivo móvil. Si los LED azul y
verde parpadean, restituya la programación de fábrica del distribuidor e intente conectarse
con un dispositivo móvil.
Restituya la programación de fábrica del distribuidor de Wi-Fi
1. Pulse y mantenga pulsado el BOTÓN en el distribuidor de Wi-Fi hasta que el LED azul
quede parpadeando.
2. Con el LED azul parpadeando, pulse y mantenga pulsado el BOTÓN de Wi-Fi hasta que
el LED azul se apague y vuelva a parpadear. El distribuidor de Wi-Fi está reconfi gurado
con parámetros de fábrica.
¿Para qué son los botones del distribuidor de Wi-Fi?
El BOTÓN se usa para restituir la programación de fábrica del distribuidor. Los botones
1 y 2 se usan para programar los controles remotos compatibles y otros accesorios. En la
sección de Ayuda de la aplicación hay más información.
¿Qué indican los LED del distribuidor de Wi-Fi?
¿NECESITA AYUDA?
REGÍSTRESE Y PRUEBE
3
Abra la aplicación y establezca una cuenta. Siga las indicaciones en pantalla para fi nalizar la
confi guración de la aplicación. Una vez confi gurada, puede usar la aplicación para controlar
la puerta del garaje.
COLOR DE LED ESTADO DE LED ESTADO DEL DISTRIBUIDOR DE WI-FI
Azul Parpadea Confi gurar Wi-Fi
Verde y azul Parpadea NO hay comunicación con el router
Azul Encendido Wi-Fi en confi guración
Verde Parpadea No se estableció conexión a Internet
Amarillo y verde Parpadea Modo de programación
Verde Encendido Wi-Fi conectado
©2014 The Chamberlain Group, Inc.
All Rights Reserved
Todos los Derechos Reservados
114A4618C
Apple, iPhone y iPod touch son marcas registradas de Apple Inc. en EE.UU. y en otros países. La marca y los
logotipos de Bluetooth® son marcas registradas de Bluetooth SIG, Inc. El uso de dichas marcas por parte de The
Chamberlain Group, Inc. se efectúa con la licencia correspondiente. Otras marcas y nombres comerciales citados
pertenecen a sus respectivos propietarios. Wi-Fi® es una marca registrada de Wi-Fi Alliance.
Las frases “Made for iPod” y “Made for iPhone” signifi can que un equipo electrónico está diseñado para conectarse
específi camente a un iPod o iPhone, y que ha sido certifi cado según las normas de tecnología y calidad de Apple.
Apple no se responsabiliza por el funcionamiento de este dispositivo ni por su cumplimiento de las normas de
seguridad y de los reglamentos vigentes. Tome en cuenta que el uso de este accesorio con iPod o iPhone podría
afectar la transmisión inalámbrica.
The Chamberlain Group, Inc.
845 Larch Avenue
Elmhurst, Illinois 60126-1196
GARANTÍA LIMITADA DE UN AÑO
The Chamberlain Group, Inc. garantiza al primer comprador minorista de este producto, que
el mismo está libre de defectos de materiales y de mano de obra por un período de un año a
partir de la fecha de compra.
PARTES DE REPUESTO
Descripción Número de parte
Sensor de puerta 041D7924
Fuente de alimentación 041D0270
TÉRMINOS Y CONDICIONES DEL SOFTWARE
El uso de este producto y del software en él contenido están sujetos a los derechos
intelectuales, los términos y las condiciones que se encuentran en:
http://www.mychamberlain.com/agreement
¿Necesita más ayuda?
Entre a la sección de Ayuda en www.mychamberlain.com
o llame 1-800-528-9131.
AVISO: Las normas de la FCC de EE.UU; y las normas IC de Canadá prohíben la modifi cación de este
transceptor. NO HAY PARTES QUE PUEDA REPARAR EL USUARIO.
Este dispositivo cumple con la parte 15 de las Reglamentaciones de la FCC de EE.UU. y con las normas
IC RSS-210 El uso está sujeto a las siguientes condiciones: (1) Este dispositivo no debe causar
interferencia perjudicial, y (2) este dispositivo debe poder recibir interferencia, incluso interferencia que
pueda afectar su funcionamiento. Instalar este dispositivo de manera que quede una distancia mínima
de 8 pulg. (20 cm) entre el dispositivo y los usuarios/transeúntes.
