Chaney Instrument 75110W Full Weather Station User Manual
Chaney Instrument Co. Full Weather Station
Users manual

Model No. 75114
Model Name Deluxe Wireless Weather
Station
Design Summary
Deluxe Wireless Weather Station
Model No.: 75110
DESIGN SUMMARY
Version 03
Prepared By:
2007-12-12
Model No. 75114
Model Name Deluxe Wireless Weather
Station
Version 03
Design Summary
Effective Date 7/14/2008
Copyright © 2007 Primex of Companies - All rights reserved
Page 1 of16
●1 Product Specification
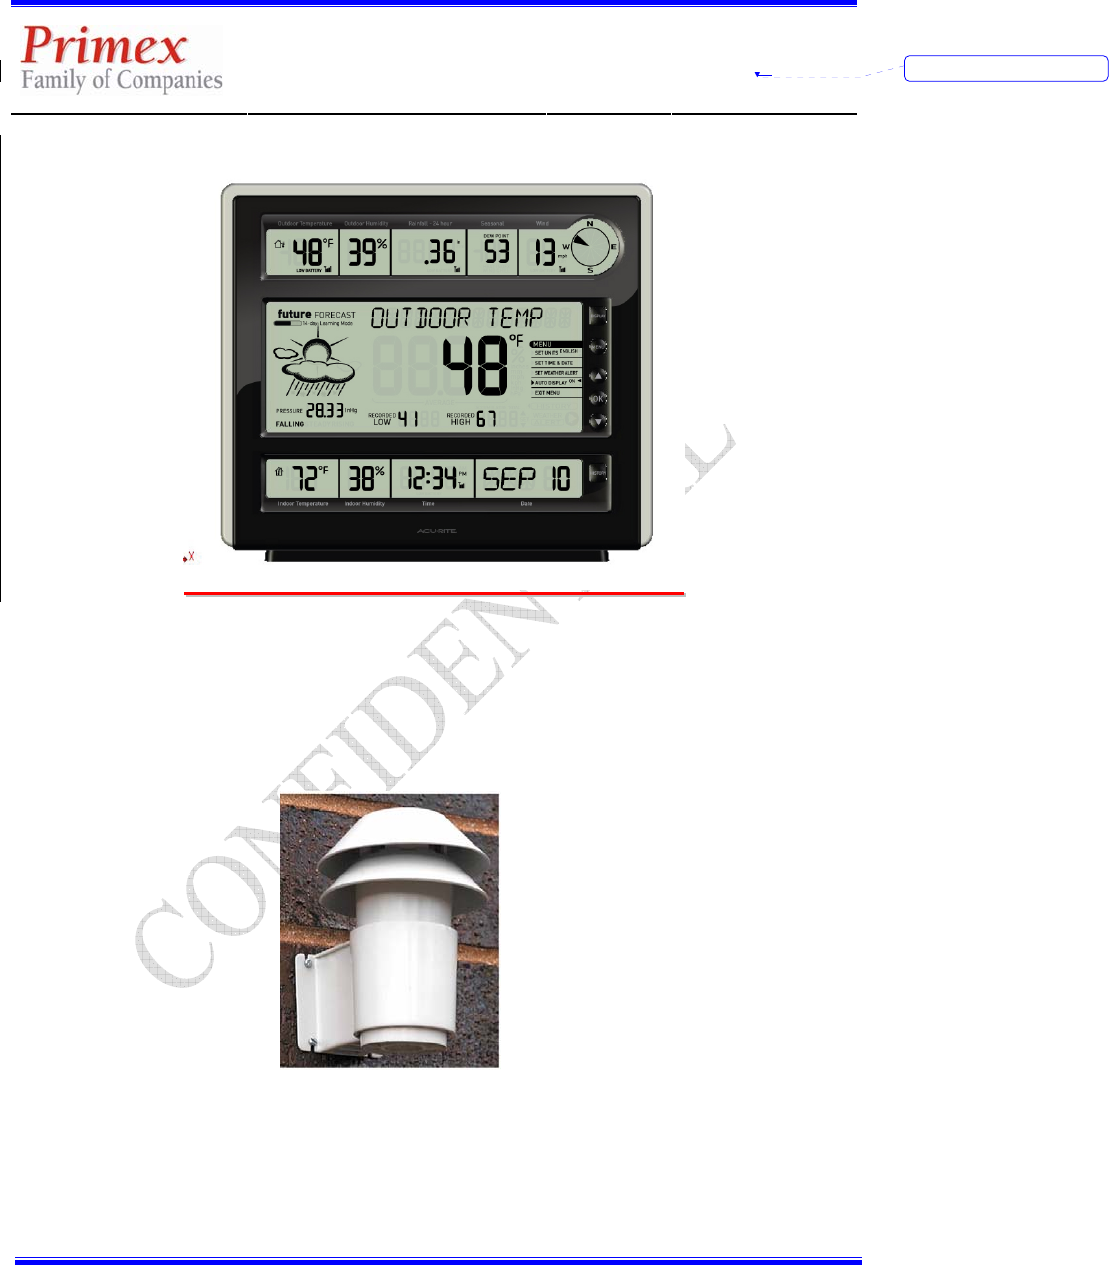
A good quality deluxe weather station that measures and tracks weather information with the use of outdoor sensors.
The weather station consist of a indoor main unit (receiver) which can be wall mounted or placed on a desk top; and a
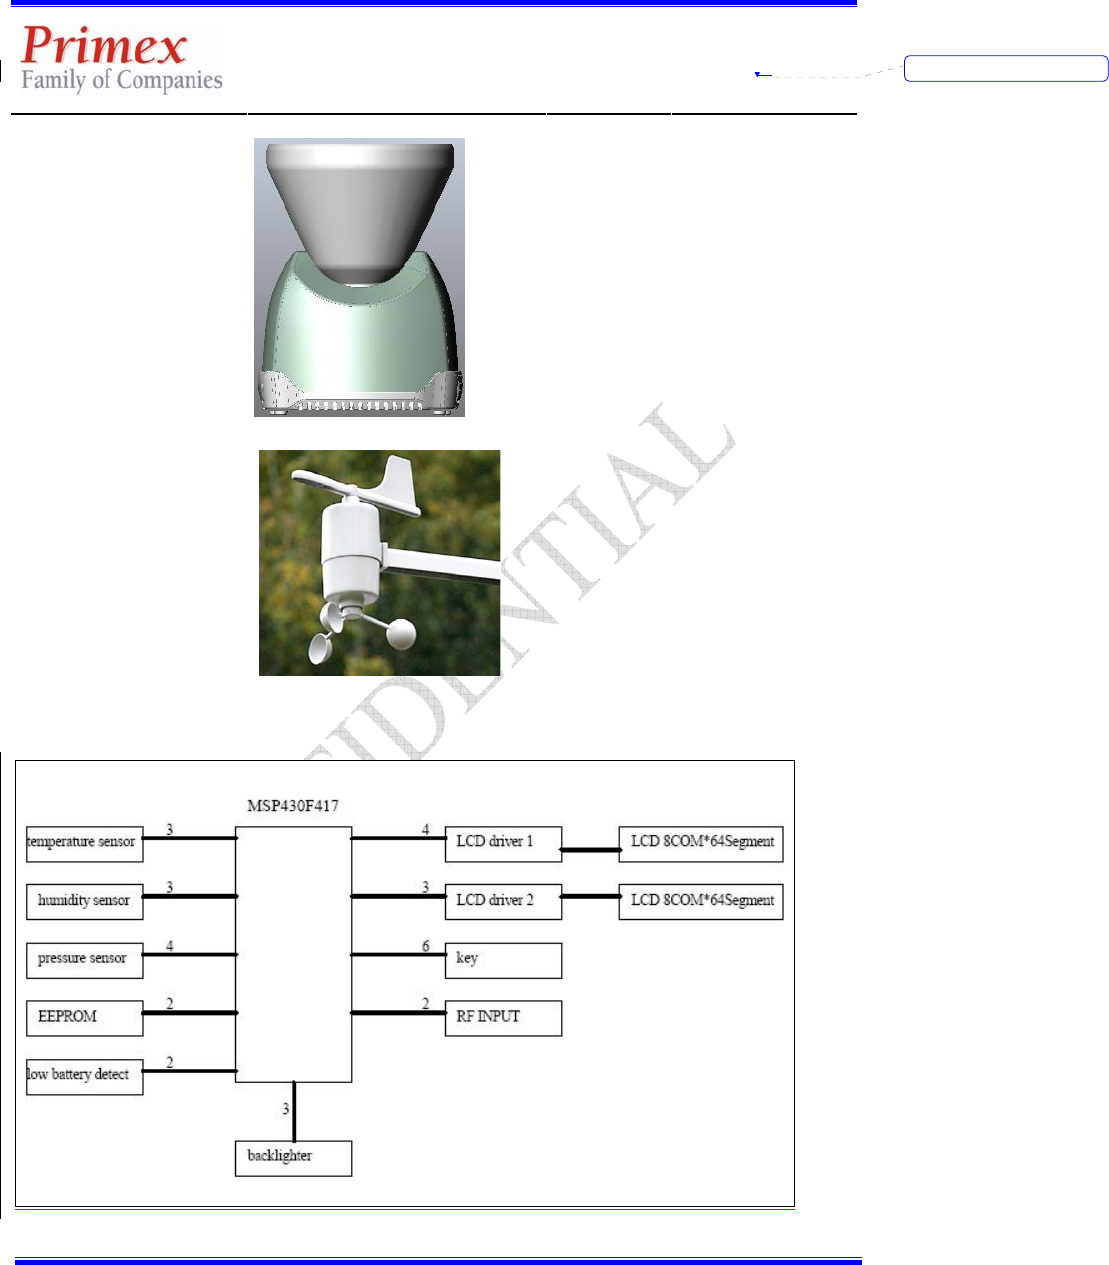
set of three (3) outdoor sensors (transmitters) which consist of:
• Thermo-hygrometer with RCC (Temperature, humidity and RCC signal)
• Tipping bucket rain gauge collector
删除的内容: 01
Model No. 75114
Model Name Deluxe Wireless Weather
Station
Version 03
Design Summary
Effective Date 7/14/2008
Copyright © 2007 Primex of Companies - All rights reserved
Page 2 of16
• 3-cup anemometer ( wind speed and wind direction
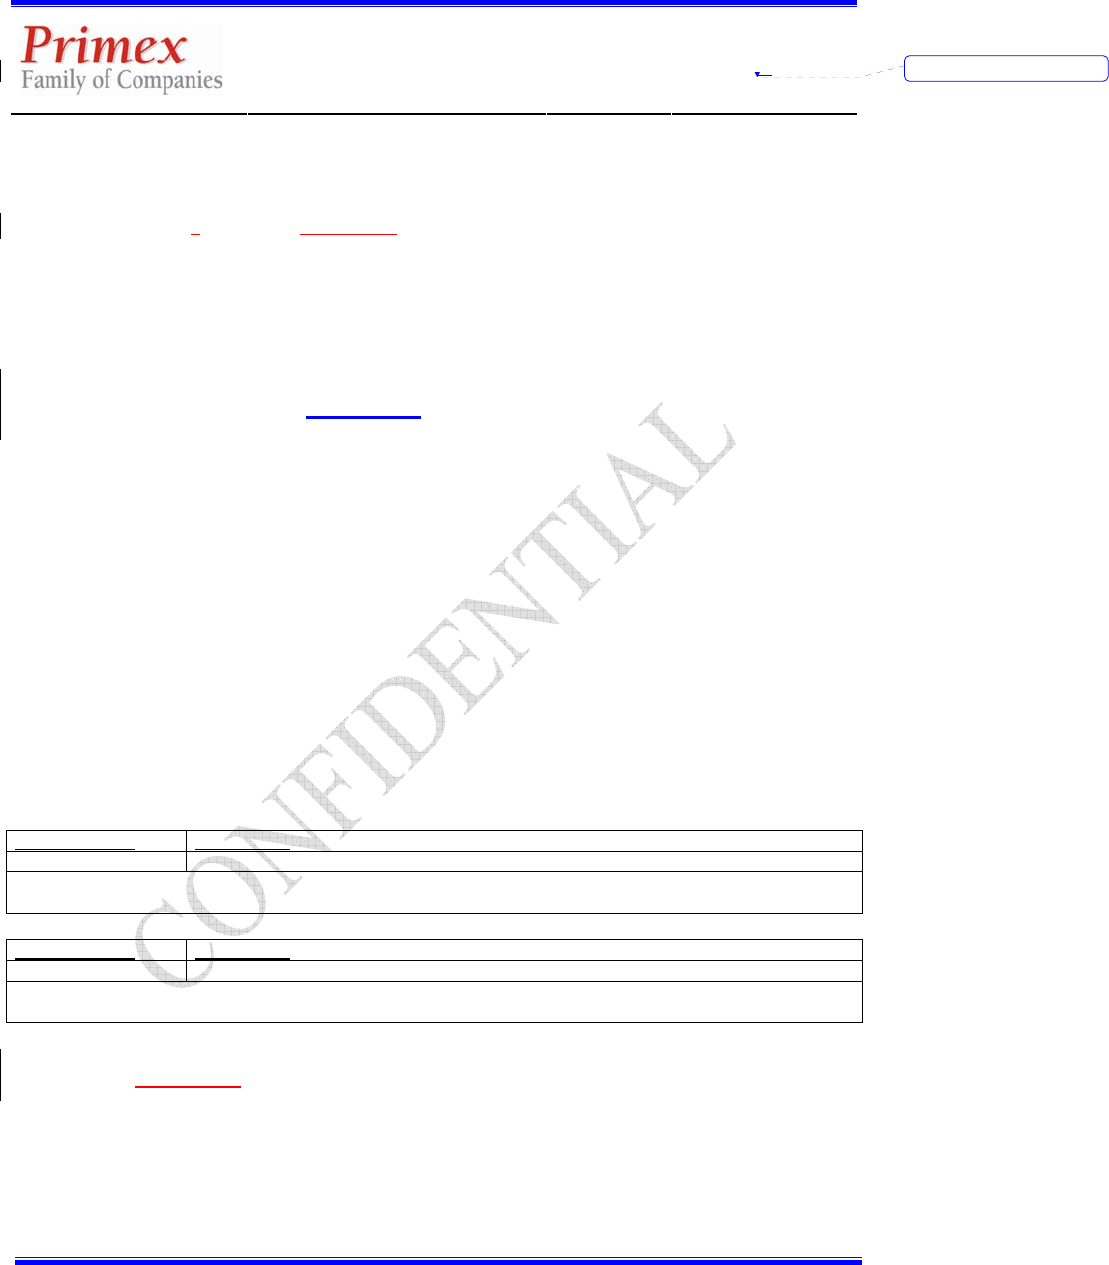
●3 Block Diagram
6.1 Receiver
删除的内容: 01
Model No. 75114
Model Name Deluxe Wireless Weather
Station
Version 03
Design Summary
Effective Date 7/14/2008
Copyright © 2007 Primex of Companies - All rights reserved
Page 3 of16
6.1.1 Use 3 AA alkaline batteries to supply the main power. The available discharge will be 1800mAh.
6.1.2 NTC : Temperature Sensor: ERTJOEG103FA Panasonic
6.1.3 Humidity Sensor: SYH-1S
6.1.4 MCU: 6*EMC78P468 + ATMEL 32
6.2 Transmitter (3 transmitter)
6.2.1 Use 2 AA alkaline batteries to supply the main power. The available discharge will be 1800mAh.
6.2.2 NTC Temperature Sensor: ERTJOEG103FA Panasonic
6.2.3 Humidity Sensor : SYH-1C
6.2.4 MCU: EM78P468
●4 Product Operation (Rev MR)
7.1 Human Interface:
7.1.1 On the right side of the device there should be 7 buttons:
• Display
• MENU
• Up symbol (▲)
• OK
• Down symbol (▼)
• HISTORY
• Backlight
• The descriptors of the digits (example: “Outdoor Temperature”) should be silk
screened near the digits on the curved space designed for these labels.
• Battery compartment should be labeled, showing clearly the polarity and
direction of the batteries. A, B, C switch for synchronization with outdoor sensor,
should be on the inside of battery compartment.
Requirement #4 Description
Buttons Labeling and positioning
Buttons should be clearly labeled and serve very intuitive purposes. They should be at least ½” diameter. Enough space
should be allocated between buttons to minimize error and allow users with bigger fingers. .
Requirement #5 Description
Buttons Clicking
Pressing the button should not create any clicking sound. The feeling of the button when being pressed should be soft,
smooth and not hard.
7.2 MMI(Rev MR)
7.2.1 Once user installs 4 AA batteries, operation will start.
7.2.2 For initial setting none of the segments will lid with the exception of the Setup MENU. The following
options will be given to users for setup:
7.2.2.1 SET UNITS : ENGLISH / METRIC
7.2.2.2 SET TIME & DATE
7.2.2.3 EXIT MENU
删除的内容: 01

Model No. 75114
Model Name Deluxe Wireless Weather
Station
Version 03
Design Summary
Effective Date 7/14/2008
Copyright © 2007 Primex of Companies - All rights reserved
Page 4 of16
The two additional options: “SET WEATHER ALERT” and “AUTO DISPLAY: ON / OFF” should not be lid
at this point as these are advance settings that should appear only after initial setting.
7.2.3 An arrow “►” will appear on the SET UNITS line to inform the user that the arrow will determine the
option they select.
7.2.4 Moving the “▼” and “▲” buttons will move the arrow up and down giving the user the possibility of
selecting between changing the units, setting the time and date and allowing the automatic display.
7.2.5 If user presses the OK button in the SET UNIT option the word ENGLISH will tilt and all the English
metrics around the display will tilt. The digits will not lid up, only the units. So all the ºF, mph,
Inches, inHg will be flashing along with the word ENGLISH. If user moves the “▼” and “▲” the
word ENGLISH will stop tilting and the word METRIC will start tilting. All the ºC, kph, mm, hPa will
be flashing along with the word METRIC. User should select between ENGLISH or METRIC and
hit the OK button to finalize its selection. Once made the selection the “►” will go to the next
variable that requires input, which will be the SET TIME & DATE.
7.2.6 If user presses the OK button on the SET TIME & DATE option the word SET TIME & DATE will
start tilting. All other segments on the display will remain unlit, with the exception of SET TIME &
DATE and the three (3) alphanumerical digits on the DATE box on the bottom right side. These digits
will tilt with the word EST signaling the user that the time zone needs to be selected. The word TIME
ZONE will be lid (all-time) below the EST, while this one is tilting. Moving the “▼” and “▲”
buttons will change the three letter initials among EST, CST, MST, PST, ATL Eastern Standard Time
(EST); Central Standard Time (CST); Mountain Standard Time (MST); Pacific Standard Time (PST);
Alaska Standard Time (AST); Hawaiian Standard Time (HAW); and Atlantic Standard Time (ATL).
These initials (i.e.: EST) will be displayed in the alphanumerical digits. After going through the 7 US
zones, if user has not selected any zone by pressing OK, then user will go into GMT mode. This mode
will go from selecting a number between -12 and 12, including zero (0). The word GMT (Greenwich
Mean Time) will appear on the screen, signaling that the user is setting TIME ZONE (lid) and GMT
(Greenwich mode). User should select among the GMT time zones and press OK. If user selects a
GMT time zone, skip step 7 and go directly to step 8.
7.2.7 If user selects among the 7 US zones, once user presses OK the word DST will tilt on the same three
(3) alphanumerical digits. Moving the “▼” and “▲” buttons will change the values between ON and
OFF signaling the Daylight-saving ON and OFF.
7.2.8 Next setting is time. The four digits on the TIME box will be lid with the two initial digits (hours)
flicking with default being 12. User will navigate by increasing the number by pressing the “▲”
button or decreasing by pressing the “▼” button. The initial 12 will be PM and then the as the user
increases the number it will go to 12 AM and switch the AM – PM segment. Once user selects the
right hour it will press OK.
7.2.9 The next setting will be minutes. The selected hours will remain in the display but the two digits after
hours will tilt. User will navigate by increasing the number by pressing the “▲” button or decreasing
by pressing the “▼” button. The default is 00. Decreasing this value will take the count to 59. Once
user selects the minutes it should press OK. By holding the “▼” and “▲” buttons for 2 seconds the
quantities should increase or decrease faster.
7.2.10 The next setting will be year, and because it is not displayed in the screen it will use the four digits of
the TIME box, using the two digits of month for the 20 (of 2008) and the two digits of date for the 08
0f 2008. The default will be 2008. . User will navigate by increasing the number by pressing the
删除的内容: 01

Model No. 75114
Model Name Deluxe Wireless Weather
Station
Version 03
Design Summary
Effective Date 7/14/2008
Copyright © 2007 Primex of Companies - All rights reserved
Page 5 of16
“▲” button or decreasing by pressing the “▼” button. User selects and presses OK.
7.2.11 Next setting will be Month. The word JAN (of January) will tilt on the three alphanumerical digits on
the DATE box. . Moving the “▼” and “▲” buttons will change the values between JAN, FEB, MAR,
APR, MAY, JUN, JUL, AUG, SEP, AUG, SEP, OCT, NOV, DEC. Once user selects will press OK.
7.2.12 Next selection will be the Date. Using the two digits on the DATE box, user will select the date among
the range from 1 to 31. User will navigate by increasing the number by pressing the “▲” button or
decreasing by pressing the “▼” button. Once user makes the selection it will press OK.
7.2.13 Once user selects the time & date then the arrow “►” should go to EXIT MENU. User should press
OK to determine that the initial setup is completed.
7.2.14 By completing the setup then all MENU items should disappear and all the information should appear
on the display with the units selected by the user and with the proper date. Outdoor temperature will
be the default information on the main display area. The forecast should display the sun and two
clouds, the 14-day learning icon and STEADY. The Seasonal box should display the information based
on the outdoor temperature reading.
7.2.15 If there is missing information, or no readings for the outdoor sensors, then the unit will display
“dancing ants” on those digits. Dancing Ants refers to the animation created by cycling the outer
segments of the digits in circles signaling that the device is thinking.
7.2.16 CUSTOMIZABLE MAIN DISPLAY AREA: If user wishes to change the information to be displayed
on the main display area, user should hit the button DISPLAY. Default is Outdoor Temperature. If user
hits DISPLAY once, the Outdoor Humidity will move to the main display area. Hitting once again the
DISPLAY button will bring Rainfall into the main display. The next time user presses DISPLAY it will
bring the Seasonal information (Dew Point, Heat Index or Wind Chill). Following Seasonal, next
button pressing will bring Wind; next will be Pressure then Indoor Temperature and, the last one will
be Indoor Humidity.
7.2.16.1 Sequence: Outdoor Temperature → Outdoor Humidity → Rainfall → Seasonal → Wind →
Pressure → Indoor Temperature → Indoor Humidity → START AGAIN with Outdoor
Temperature
7.2.16.2 Outdoor and Indoor Temperature and Humidity, barometric pressure, wind and the seasonal
information will display Recorded High and Recorded Low information (high’ and Low’s). The
high and low are for the 24 hour period starting at 12.00 am. As the main display area will have
the unit (English or Metric) then the Recorded high and Recorded Low should not have any
units, only the numbers should be displayed.
7.2.16.3 Rainfall will not display any recorded highs and lows, instead the word Accumulative should
lid and only one section of the four digits should show the accumulative rainfall history since
the unit has been on. The user can erase and reset the accumulative count by pressing and
holding the HISTORY button.
7.2.17 SET WEATHER ALERTS: For setting the weather alerts, one requirement is for the user to have the
weather parameter for which the alert is to be programmed, in the main display area. Once the
parameter is in the main display area, user should press the button MENU. The following options will
appear in the MENU
7.2.17.1 SET UNITS : ENGLISH / METRIC
7.2.17.2 SET TIME & DATE
7.2.17.3 SET WEATHER ALERT
删除的内容: 01

Model No. 75114
Model Name Deluxe Wireless Weather
Station
Version 03
Design Summary
Effective Date 7/14/2008
Copyright © 2007 Primex of Companies - All rights reserved
Page 6 of16
7.2.17.4 AUTO DISPLAY: ON/OFF
7.2.17.5 EXIT MENU
User should move the arrow “►” by moving the “▼” and “▲” buttons until they get to the line that is
for SET WEATHER ALERT. Once the user is in this line, it should press OK. All segments in the
weather station should disappear (unlit) with the exception of the information on the main display area
and in the menu. The word WEATHER ALERT should lid on the bottom right side of the main display,
and the four digits should lid flashing to signal that the input should occur in these digits. Check
weather alert value range to determine the values to allow for the weather alerts.
7.2.18 AUTOMATIC DISPLAY: User can select the information to be placed in the main display area from
all the weather parameters in the product. During times of extreme weather events, there is a feature
that automatically will bring the most relevant weather information to the main display area. The
Automatic Display will change whatever information is on the main display area if the extreme
parameters are met. For example, if Outdoor Temperature is being displayed on the main display and
suddenly winds of above 20 mph happen, the wind will automatically appear on the main display area.
If wind goes below the threshold then Outdoor Temperature or the customized parameter will return to
the main display area.
7.2.19 User can disable the Automatic Display by pressing the MENU button and selecting the AUTO
DISPLAY option by placing the arrow “►” by moving the “▼” and “▲” buttons. Once in the AUTO
DISPLAY line user should press the OK button. This will start the ON tilting which indicates that the
feature is ON. By moving the “▼” and “▲” buttons user can toggle between the ON and OFF of this
function. Once OFF is selected to disable the function, user should press OK. Disabling this function
means that the only weather parameter that will be displayed on the main area will be those selected
by the user.
7.2.20 HISTORY: Users can review the history of any of the selected weather parameters that are set on the
main display area. Once the desired parameter is set on the main display area, user can hit the
HISTORY button. By pressing HISTORY, all segments in the display will disappear (unlit) with the
exception of the main display area, the recorded high and low (or accumulative in case that rainfall is
the one selected) and the word HISTORY in the middle display. On the bottom display the Date box
will remain lid, to show the starting date for the history (the date will remain the same). By pressing
the HISTORY button consecutively the day of the month will be reduced by one, showing the Average
reading of that day on the main digits and the recorded high and low for that weather parameter.
Rainfall will show the daily on the main display and the accumulative up to that day on the four (4)
smaller digits. Indoor temperature, Outdoor Humidity, Rainfall, seasonal, Wind, Indoor temperature
and indoor humidity will display seven (7) day history. Pressing the HISTORY button for the eight
times will bring the full display on, going back to normal operation. Starting the history sequence and
leaving idle the HISTORY button for more than 15 seconds, will terminate the HISTORY sequence
and go back into normal operation.
7.2.21 Pressure has a different history sequence. All segments should unlit, same as with the other parameters,
but in the bottom LCD instead of the Date showing the daily regression (JUN 10 to JUN 9) , it would
be the Time the one that will lid and do an hourly regression (12.30pm to 11.30pm). The hourly
regression will include 12 hours and then go back to the normal operation. Idle activity on the
HISTORY button for more than 15 seconds will return device to normal operation.
删除的内容: 01
Model No. 75114
Model Name Deluxe Wireless Weather
Station
Version 03
Design Summary
Effective Date 7/14/2008
Copyright © 2007 Primex of Companies - All rights reserved
Page 7 of16
●5 Factory Default settings: (Rev MR)
Variable Default Setting
Time 12:00 am
Date 01/01/2008
Time Zone EST
Barometric Pressure Trend Steady
Units default English (US) = ºF, mph, Inches
DST On
1) All weather values that come from the outdoor sensor should display “dancing ants” which means that the outer
segments of the digits will cycle until the signal is received. If no signal is received, the
Power requirements (Rev MR)
Requirement #10 Description
Power/ battery Weather Station indoor unit should run without changing batteries for 24 months
Customers would rather increase the number of batteries rather than change the batteries more frequently. Therefore,
the requirement is to minimize the frequency of changing batteries by leveraging the space on the back of the device for
the amount of batteries. The ideal is to use 3AA batteries for the indoor unit.
Backlight (Rev MR)
1) Backlight will be activated by a button that will be clearly marked with a bulb icon.
2) When user selects the backlight, the LED illumination should last 8 seconds before turning off again.
Requirement #11 Description
Backlight LED Backlight
A good backlight (amber) diffused evenly, with no hot spots, over all three LCD areas. An optical diffuser that will
distribute the light evenly across the LCD is required. A reflective sheet (or mirror) is required behind the diffuser tom
minimize the leakage of light.
删除的内容: 01

Model No. 75114
Model Name Deluxe Wireless Weather
Station
Version 03
Design Summary
Effective Date 7/14/2008
Copyright © 2007 Primex of Companies - All rights reserved
Page 8 of16
FCC statement
This equipment has been tested and found to comply with the limits for a Class B digital device, pursuant to Part 15 of
the FCC Rules. These limits are designed to provide reasonable protection against harmful interference in a residential
installation.
This equipment generates, uses and can radiate radio frequency energy and if not installed and used in accordance with
the instructions, may cause harmful interference to radio communications. However, there is no guarantee that
interference will not occur in a particular installation. If this equipment does cause harmful interference to radio or
television reception, which can be determined by turning the equipment off and on. The user is encouraged to try to
correct the interference by one of the following measures:
Reorient or relocate the receiving antenna.
Increase the separation between the equipment and receiver.
Connect the equipment into an outlet on a circuit different from that to which the receiver is connected.
Consult the dealer or an experienced radio/TV technician for help.
To assure continued compliance, any changes or modifications not expressly approved by the party responsible for
compliance could void the user’s authority to operate this equipment. (Example- use only shielded interface cables
when connecting to computer or peripheral devices).
FCC Radiation Exposure Statement
This equipment complies with Part 15 of the FCC Rules.Operation is subject to the following two conditions:
(1) This device may not cause harmful interference, and
(2) This device must accept any interference received, including interference that may cause undesired operation.
删除的内容: 01