Changzhou Smoothies Electronics JP4IN1 MULTIPROTOCOL TX User Manual
Changzhou Smoothies Electronics Co., Ltd. MULTIPROTOCOL TX
User Manual
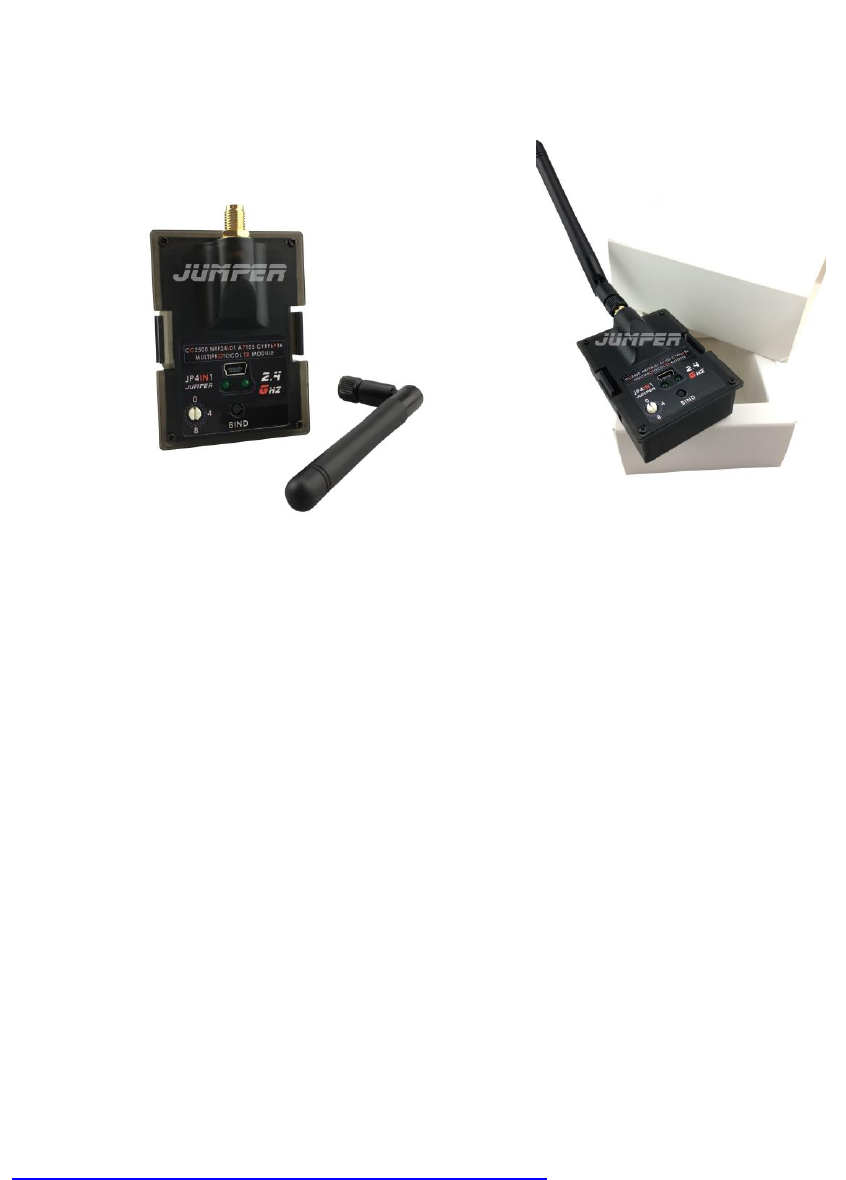
JUMPER JP4IN1 Multiprotocol Module
Brief Introduction:
The JP4IN1 integrates the CC2500,chips into one PCB. The JP4IN1 is an OpenTX original
accessory which can do serial digital signal communication with the Frsky series radios.
Recognizing PPM signal from radio output, then converted to the corresponding radio protocol
to achieve control of the fixed wing and drone aircraft. Supported protocols such as: Walkera
DEVO, Spectrum DSM2/DSMX, Flysky, Esky, Frsky, WLtoys, Hubsan, Hisky, Futaba SFHSS Assan
etc are built in..
The JP4IN1 module offers greater flexibility with the ability to control most protocals and
popular brands in the market today. It also gives the user the ability to use a real RC radio for
more precise control and a better flying experience than the small radios often included with
ready to fly products.
Note: due to the copyright of the protocol, JP4IN1 only provides hardware, please refer
following link to download the firmware:
https://github.com/pascallanger/DIY-Multiprotocol-TX-Module
How to install firmware with USB port? Need some clear and simple instructions.
Instructions at the link above are very complicated and needs USBAVR etc.

Parameters:
Weight: 42g (include antenna)
Dimension: 61.1*48.9*32.8mm (exclude antenna)
Shell shape compatible with: Frsky, JR radio etc.
MCU: STM32F103CBT6 (128K ROM, 20K RAM) Working
voltage:6-9 V
Working current: <=100mA
Working frequency: 2.4G ISM band
Two working modes: Serial Port mode & PPM mode.
1. Normal operation in Serial Port mode (Bi-directional digital signal
communication between radio and JP4IN1.)
Rotate the encoder knob to"0" to enter the serial port mode, all existing protocols can be used
in this mode, the protocol switching and bind operation can be achieved by the radio menu, but
only radio using er9X/erSky9X or OpenTX open source firmware can use serial port mode, Frsky
all series radio are compatible with this mode. In addition, radio firmware also needs to be
upgraded to the newest version V2.2 and above.
Let’s take Frsky X9D as an example:
Download V2.2 and above version firmware from official website, Copy firmware to a SD card,
insert to Frsky X9D radio SD card slot, push the roll trim button and yaw trim button to the
center, then power on the radio, radio will upgrade the firmware automatically. (If you have
already finished upgrade, Please ignore this operation.)
Once X9D finished upgrade: power off radio, insert JP4IN1 module, then power on again. (Note:
please make sure JP4IN1 antenna is assembled before powering on radio).
As shown in below Fig:
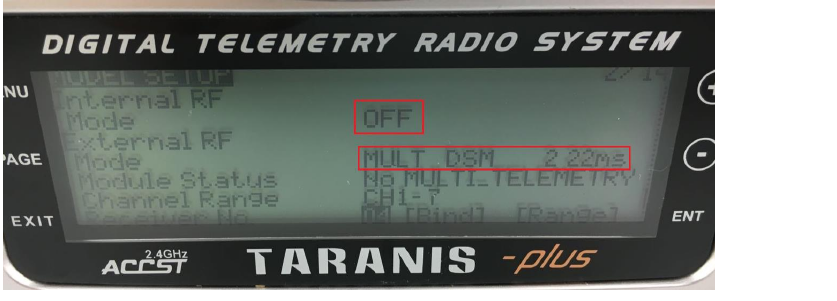
Enter the “MOEL SET UP” menu, close Internal RF and open External RF, the red and green led
both are on. Select the protocols and sub protocols you need for bind in External RF menu, and
then "bind".

Support Protocol List
Protocol
Sub protocol or
Option
Supplementary Specification
FLYSKY
Nil
Flysky first generation
protocol
HUBSAN
Nil
Hubsan
FRSKYD
Nil
Frsky D series protocol
HISKY
Hisky
Hisky
HK310
Hisky
V2X2
Nil
DSM
DSM2_22
DSM2 protocol, frame rate
22mS
DSM2_11
DSM2 protocol, frame rate
11mS
DSMX_22
DSMX protocol, frame rate
22mS
DSMX_11
DSMX protocol, frame rate
11mS
DEVO
None
Walkera DEVO
YD717
YD717
YD717
SKYWLKR
SYMAX4
SymaX4
XINXUN
NIHUI
Nihui
KN
WLTOYS
Wltoys V977 series protocol
FEILUN
Feilun
SYMAX
SYMAX
Symax
SYMAX5C
Symax 5C
SLT
Nil
CX10
CX10_GREEN
Cheerson series protocol
CX10_BLUE
DM007
Q282
JC3015_1
JC3015_2
MK33041
Q242

CG023
CG023
YD829
H8_3D
BAYANG
Nil
Jumper X68T
FRSKYX
CH_16
Frsky protocol, D16 mode
CH_8
Frsky protocol, D8 mode
ESKY
Nil
Esky protocol
MT99XX
MT99
H7
YZ
LS
MJXQ
WLH08
X600
X800
MJX series protocol
H26D
E010
E010 and JJR H36 protocol
SHENQI
Nil
FY326
Nil
S-FHSS
Nil
Futaba S-FHSS
protocol(updating)
J6PRO
Nil
Nine Eagle J6PRO protocol
FQ777
Nil
ASSAN
Nil
FRSKYV
Nil
Frsky V series protocol
HONTAI
FORMAT_HONTAI
FORMAT_JJRCX1
FORMAT_X5C1
More details, please refer to::
https://github.com/pascallanger/DIY-Multiprotocol-TX-Module
2. Normal operation in PPM mode (JP4IN1 only receives one-way analog coded
signal from radio.)
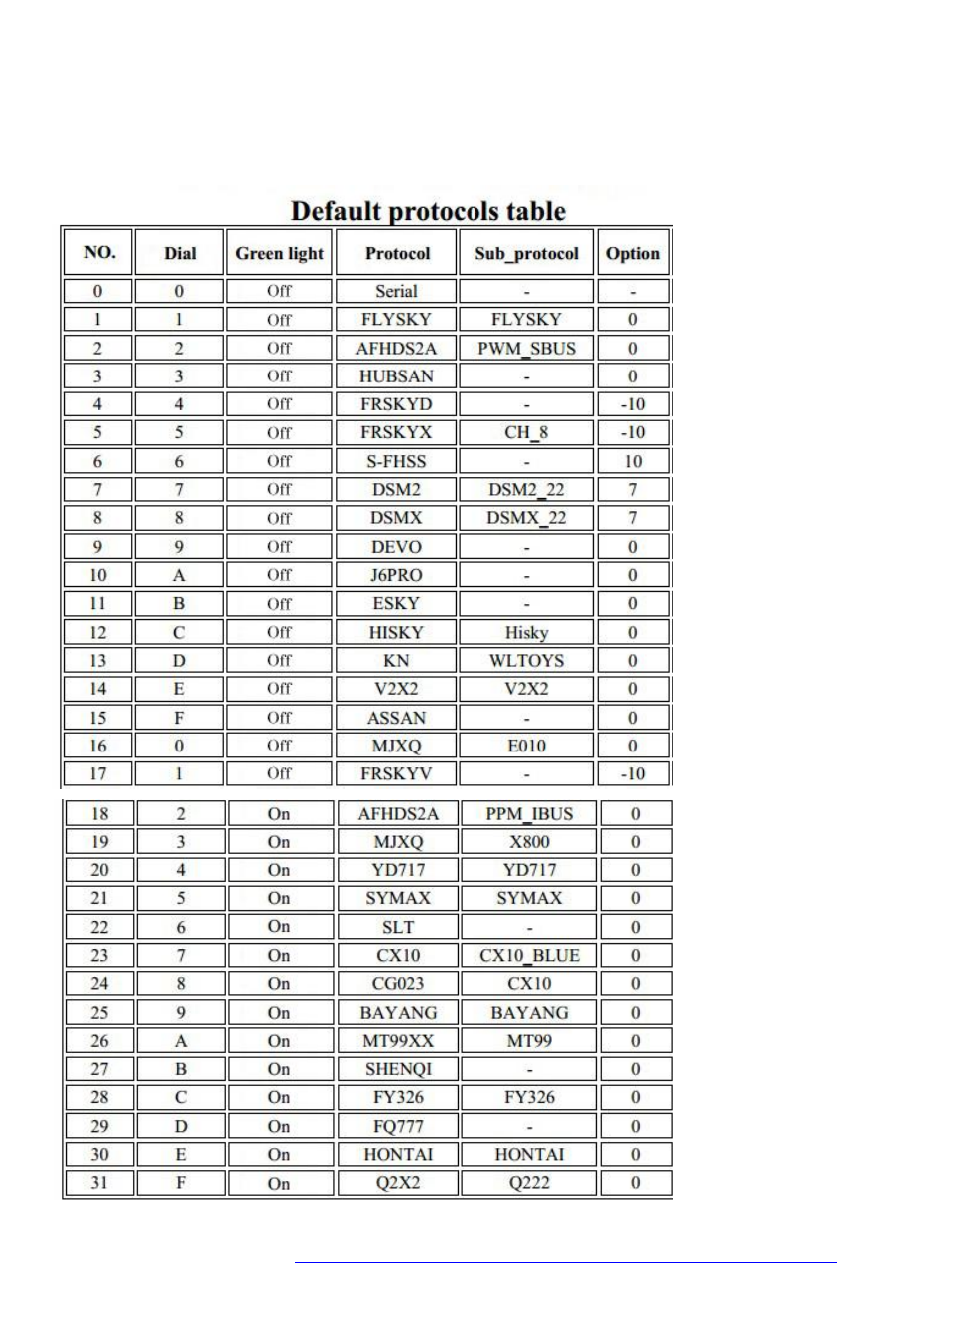
PPM mode is used for PPM signal output, and the mounting slot of radio is compatible with
JP4IN1 (F.E. JR). There are total 31 different protocols that correspond to the 16 positions of the
encoder knob in the PPM mode (“0” position is reserved for serial mode). Check the list on the
last page of the manual for corresponding relationship between them.
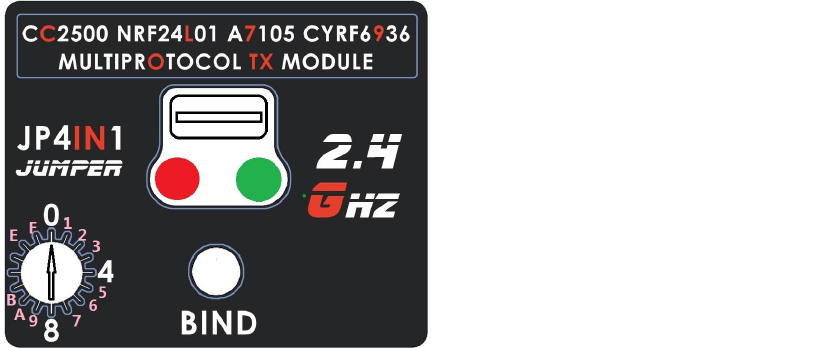
Turn on or turn off the green light procedures are as following:
Turn off radio, rotate the encoder knob switch to "0" position, then press and hold the black
bind button, power on the radio meanwhile, release the button after 3 seconds, the green light
will flash, optional protocols switch simultaneously.
Normal use and operation in PPM mode:
1. Fix JP4IN1 with antenna on the radio, open PPM signal output of radio.
2. Turn the encoder knob (The current position i.e. encoder knob slot direction) to the
corresponding position according to the default protocol list and your receiver type.
3. The JP4IN1 red light will be on when turn on the radio in the condition of completing bind
before, the JP4IN1 works properly now, then power on your drone or fixed wing.
4. Do not switch protocol when it is in use, if need to switch protocol, please power off radio,
then rotate the encoder knob and choose the protocol and power on radio again.
5. The red light flashes slowly when there is no available PPM signal input.
Bind operation in PPM mode:
1. Power on your fixed wing or drone, then enter the receiver bind mode according to receiver
manual.
2. Press and hold the bind button, power on the radio until system working, release the button
after 3 seconds, the red light flashes quickly, means JP4IN1 is in bind mode, JP4IN1 red light will
be on after completion of bind.
3.Partial protocols are already bound and no need to bind again (F.E. S-FHSS protocol), some
other protocols (F.E. Hubsan, e010), the bind operation will be automatically processed when
power on radio.
Please set the encoder knob according to PPM bind sheet.
Note: JP4IN1 knob dial only shows “0”, “4”, “8”, user need to calculate the other scale.
Firmware update, please refer to: https://github.com/pascallanger/DIY-Multiprotocol-TX-Module
FCC Statement
Any Changes or modifications not expressly approved by the party responsible for compliance could
void the user’s authority to operate the equipment.
This device complies with part 15 of the FCC Rules. Operation is subject to the following two
conditions:
(1) This device may not cause harmful interference, and
(2) This device must accept any interference received, including interference that may cause undesired
operation.