Char Broil 4639071 User Manual GAS GRILL Manuals And Guides L0803637
CHAR-BROIL Grill, Gas Manual L0803637 CHAR-BROIL Grill, Gas Owner's Manual, CHAR-BROIL Grill, Gas installation guides
User Manual: Char-Broil 4639071 4639071 CHAR-BROIL GAS GRILL - Manuals and Guides View the owners manual for your CHAR-BROIL GAS GRILL #4639071. Home:Lawn & Garden Parts:Char-Broil Parts:Char-Broil GAS GRILL Manual
Open the PDF directly: View PDF ![]() .
.
Page Count: 46
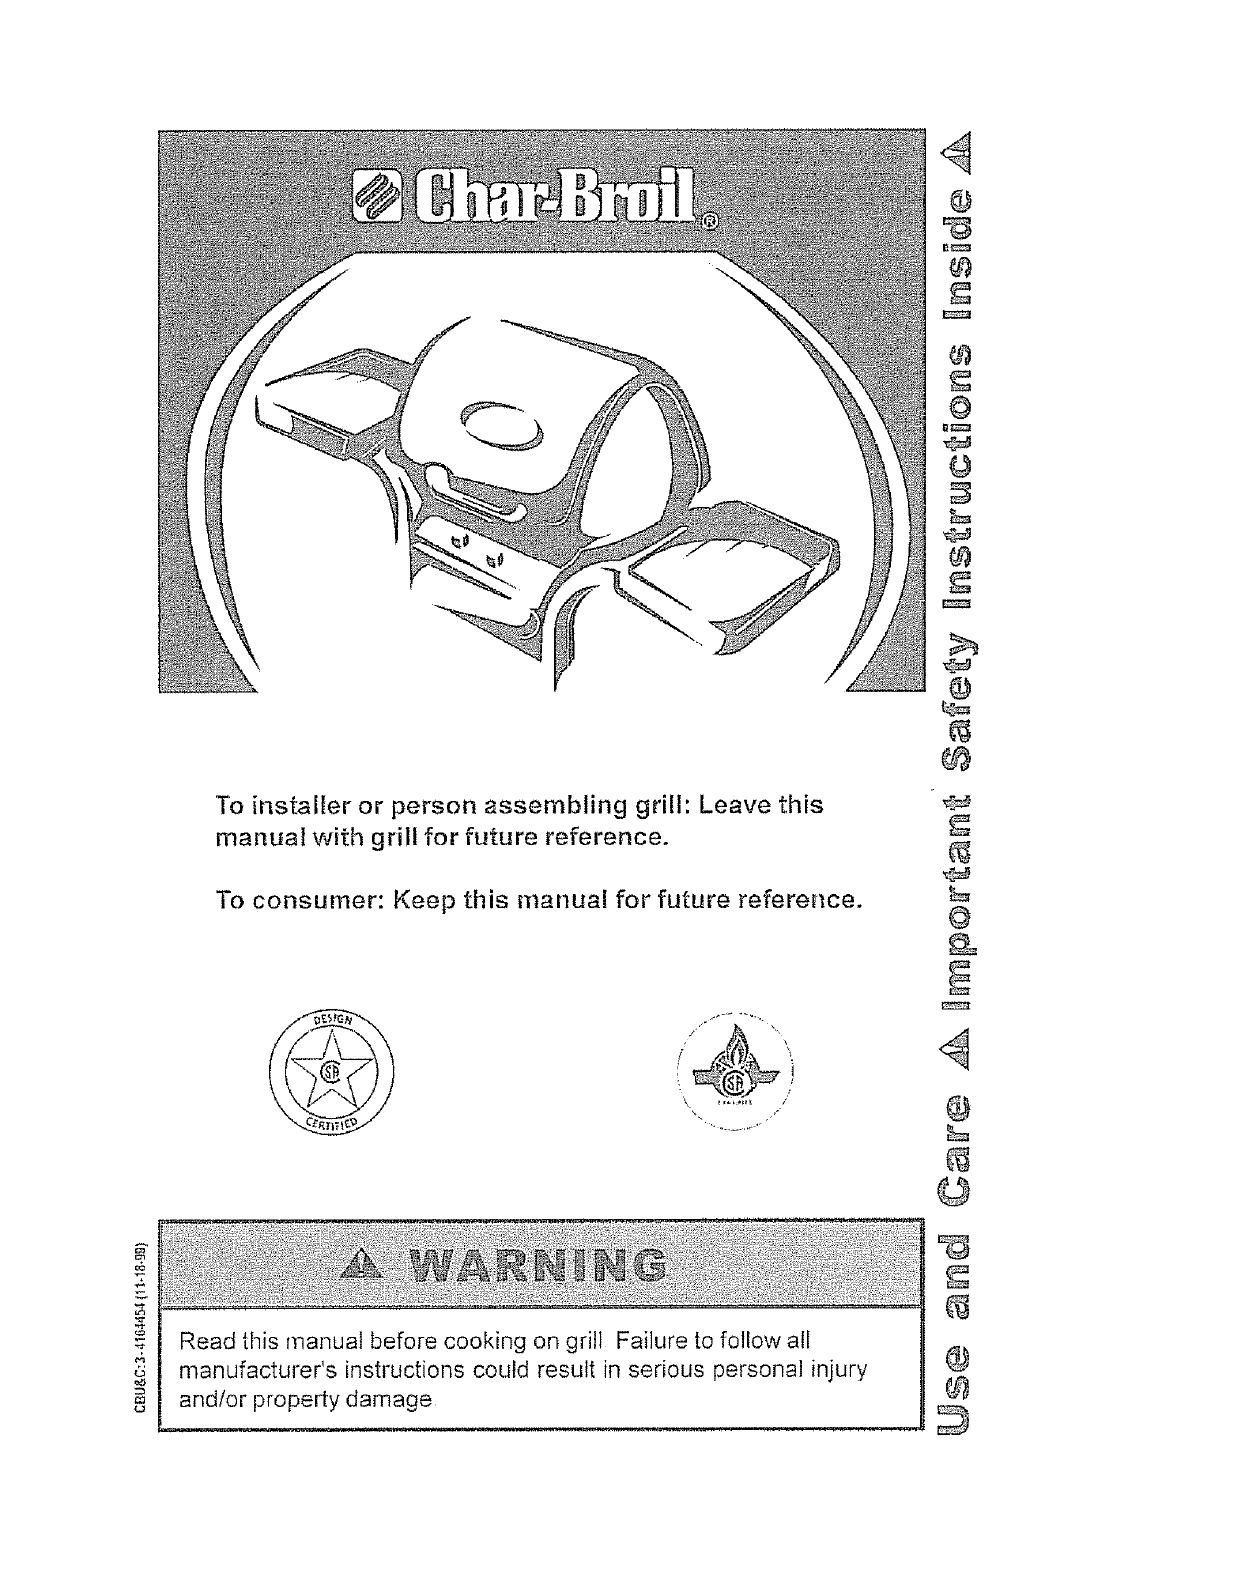
To installer or person assembling grill: Leave this
manual with grill for future reference.
To consumer: Keep this manual for future reference.
f
4
_J
O
8_
O
#
@
4
@
©
ml
_5 L__
Read this manual before cooking on grill Failure to follow all
S manufacturer's instructions could result in serious personal injury
_= and/or property damage
E
®
®

FOR YOUR SAFETY
t. Do not store or use gasoline or other flarnmablevapors
and liquids in the vicinity of this or any other appliance.
2. An LP Tank not connected for use shali not be stored in
the vicinity of this or any other appJiance.
FOR YOUR SAFETY
If you smell gas:
1. Shut off gas to the appliance.
2. Extinguish any open flame.
3. Open lid.
4. If odor continues, immediately call your gas supplier or
your fire department.
Call Grill Service Center For Help And Parts
• if you need help or warranty parts call _1-800-241.7548 or send a FAX to
1-706-576-6355
Business hours Open 24 hours- Seven days a week
, To order non-warranty replacement parts or accessories (grill cover, cleaners,
paint) call 1-800-993-2677or send a FAX to 1-706-565-2t21
Important: Fit! out Warranty Information below
Warranty Information
Model Number
UPC (oncarton) Label Lot # GG
Serial Number
DatePurchased
:_ _._,_
oFor residential use only Do not use for commercial cooking
Installation Safety Precautions
, This grill is designed for use with LP (propane) gas using the regulator/valve
assembly supplied
°Grill installation must conform with local codes, or in their absence with National
Fuel Gas Code, NFPA 54 /ANSI Z223,1 or CANICGA-B149.2 Propane
Installation Code. Handling and storage of LP cylinders must conform to LP Gas
Code NFPA/ANSI 5& Grill is not for use in or on recreational vehicles andlor boats
, All electrical accessories (such as rotisserie) must be electrically grounded in
accordance with local codes, or National Electrical Code, ANSI /NFPA 70 or
Canadian Electrical Code, CSA C22.!, Keep any electrical cords andlor fuel
supply hoses away from.any hot surfaces
• This grill is safety certified for use in the United States and CanadaonIy Do not
modify for use in any other location Modification will result in a safety hazard.
Safety Symbols
•The symbols and boxes shown below explain what each heading means Read and
follow all of the messages found throughout the manual,
o WARNING: Be alert to the possibility of serious bodily injury .if the i
instructions are not followed Be sure to read and carefuly follow all of I
z......................... J
.......... _-,,,,_,, ,,,, , , ,lu, I ....i,l,,,_,,,ii r,_
A CAUTI©II
o CAUTION: Indicates a potentialy hazardous situation which, if not
avoided, may result in minor or moderate injury
CHAR-BROILe,FLAVORMASTER%MASTERFLAME2_,HeatWave'_,CoolingZone1000", SabeP,Pafo
Caddie"_,Sierra"-'_,SignatureSeries_,SwingAway_;,H20 Smo_e_,andPatoKtchen`_areregisteredtrademarks
of W C BradteyCo PrecisionFlame",SureFire",StackRack'",FastStart's,Tit Tank",WideBody",andPatio
Bisl;d', arelradernarksof WC BradieyCoGrils protectedforWC.BradteyCo.underoneormoreoflhese
US Paenls:4,989,579;4,955,358;5,220,764;5,42t,319;5.441,226;5,566,606;5,931,t49;D291,768;
D341,292Assemblt,[nstructons© 1999WC BradleyCo,All RightsResewed
3
Table of Contents
ForYourSafety...............................................................................................................2
CallGfi!lServiceCenterForHelpAndParts..............................................................2
Warrantylnforrnation..................................................................................................2
InstallationSafetyPrecautions...................................................................................3
SafetySymbols............................................................................................................3
TableofContents.......................................................................................................4
Warranty's.............................................................................................................5
ConnectlngTheRegulatorToTheLPTank ..............................................................6,7
LeakTest ............................................................................................................8, 9
ForSafeUseOfYourGrill ..........................................................................................10
Safety]qps...............................................................................................................!!
BeforeYourFirstCookout.........................................................................................11
IgnitorLightingForFrontControlGrills..........................................................................11
MatchLighting...........................................................................................................12
IgnitorLightingForSideControIGrilis........................................................................12
IgnitorLightingForHeatWaveRotisserieGrills-MainBurners...................................12
MatchLighting..........................................................................................................12
IgnitorLightingforHeatWaveRotisserieBurner.........................................................13
MatchLighting..........................................................................................................13
IgnitorLightingTheSidebumer...............................................................................13
MatchLighting............................................................................................................13
BurnerFlameCheck................................................................................................ 13
TurningGriltOff.............................................................................................................13
IgnitorCheck.............................................................................................................14
ValveCheck.............................................................................................................14
HoseCheck..............................................................................................................14
LPTankFitling............................................................................................................14
LPTankRemovat,TransportAndStorage...............................................................15
LPTank ...................................................................................................................16
LP(LiquefiedPetroleumGas)....................................................................................16
GeneralGrillCleaning.........................................................................................16,17
CleaningTheFrontControlBurnerAssembly.....................................................18,19
CleaningTheSideControtBumerAssembly..........................................................20,21
CleaningTheHeatWaveRotisserieBurner ..........................................................22,23
SeasoningAndUsingCastIronCookingGrates.....................................................24
RepaintingYourGrill..................................................................................................24
CareOfWood ............................................................................................................24
HeatWaveRotisserieBurnerUse ............................:,............................................25
CookingChartForHeatWaveRotisserieBurner......................................................25
CookingTips ...........................................................................................................25
CookingChart........................................................................................................26,27
FoodSafety..............................................................................................................27
HowToTeUIfMeatIsGrilledThoroughly................................................................27
TroubleshooUng-General......................................................................................28,29
Troubleshooting-ElectronicIgnitionSystem...........................................................30,31
StoringYourGrill ........................................................................................................3!
4
Wa rra nty's
Char-Broilwarrants 1othe originalconsumer-purchaserthat [hisproductshelfbeflee from
defecls ill workmanshipandmaterials undernormal andreasonableuse andcorrect assembIy
(if assembledbyconsumer-purchaser),asfollows.
(1) The aDrninumlopandbottom castingsfor lhe lifeoforiginal purchase,excludingthe
paintfinisll;
(2) The burnerlventuri assemblyfor aperiodof three (3) yearsfrom the dateof purchase;
and
(3) All olher paris for aperiod done (I) year from the date of purchase
Char-Broil will,al its option,refinishor replace any productorpart found to bedefective
duringthe warranly period Char-Broilwilt require you to return the parti s) claimed to be
defective,for itsinspection,freightorpostageprepaid
Ifyou wish toobtain 3erformanceof anyobligation underthis limitedwarranty,you should
wrileto:
CHAR.BROIL
Consumer Warranty /P,,O Box 1240
Columbus, GA 3t902-1240
Char-Broil may requirereasonable proofof purchase and we suggest you keep your
receipt In theslate of Oaliforniaonly,ifrefinishing or replacementofthe producfis not
commerciallypraclicable, tile retaiier sellingtllis productorChar..Broilwill refundtile purci_ase
price paidfor tile product, lesslhe amountdirectly attributable touse by theoriginalconsumeF
purchaserpriorto discoveryof thenonconformity Inaddition_in the stateof Californiaonly. you
maytakethe productto tt_eretailestablishmentfromwhichit waspurchasedorto ally retail
establishmentselling thisproductinorderto oblain performanceunderthiswarranty
This warranly does nol inchlde the cost on any inconvenience orproperly damage due !o
faifureof the productanddoes notcoverdamage dueto misuse,abuse,accident,damage
arisingoulof transportationof theproduct, ordamageincurred througll commercia! useof the
product,This express warranty is the solewarranty given by ihe manufacturerand is in lieuof
allotherwarranties,expressor implied,inc}udingimpliedwarranty of merchanlabilityorillness
foraparticularpurpose NeitherChar-BroiIdealers norDe retail establishmen_sellinglhis
producthas any authority to makeanywarranties or to promise remediesinaddition 1oor
incensistentwilh thosestatedabove Char-Broil'smaxirnumliability,in any event,shallnol
exceed thepurchase priceofthe produc[paid bythe originalconsumeFpurchaser Some stales
donot altowtheexclusion orlimitation ofincidental or consequenlialdamages Sotheabove
limitationsorexclusions maynot apply to you Thiswarranty givesyou specificlegalrighls and
mayalso have other rightswhichvary fromstate 1ostate
Electronic Ignition System !0 Year Limited Warranty
Char-Broilguaranlees this ElectronicIgnitionSystem(battery excluded)in both
malerials andworkmanshipfor aten (10)year periodfrom date of purchaseto the original
purchaserifused for home use,lithe productfails tooperate dueto a manufacturingdefect,the
defectivepart will be repairedor reptacedatCHAR-BROIL'Soption. The producl, alongwith
proof of purchase,must bereturned poslageprepaid
Ifyouwish toobtain performance of any obligationunder thislimitedwarranty,you should
write to CHAR-BROIL. Consumer Warranty. P,O, Box 1240. Columbus, GA 31902-
1240
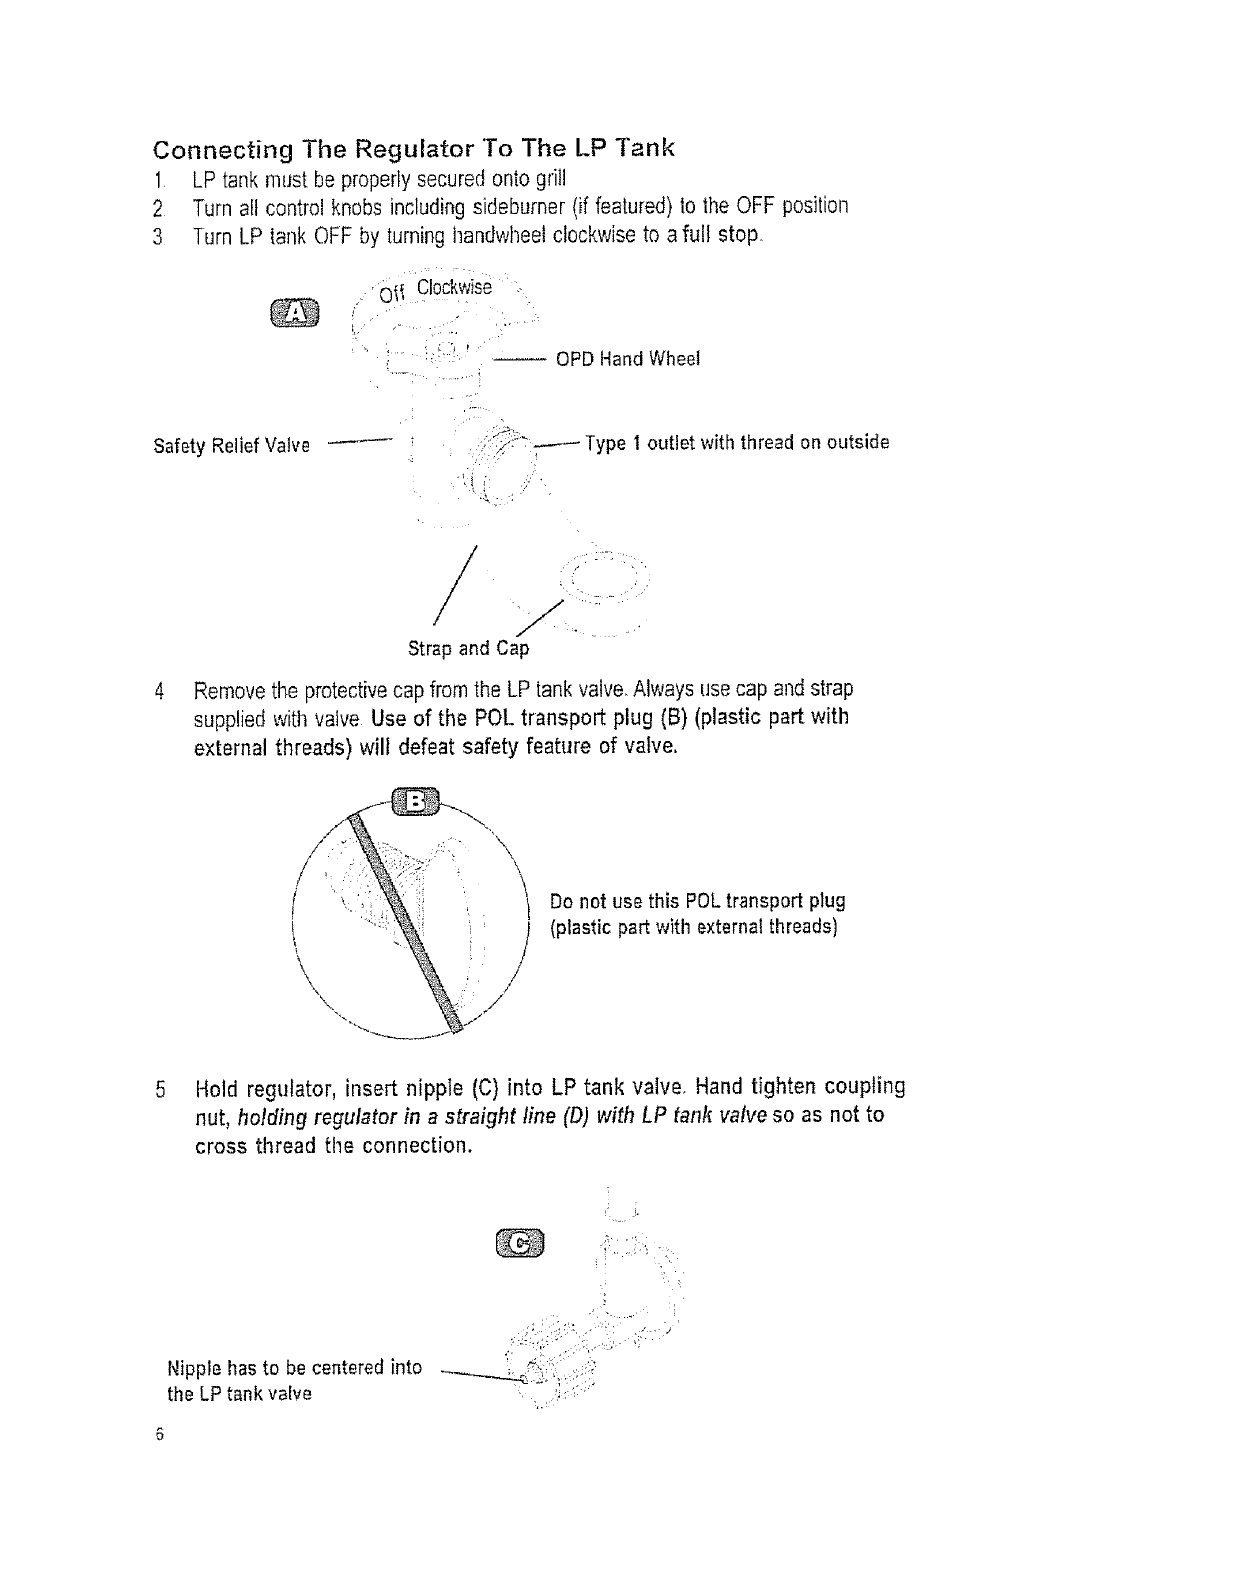
Connecting The Regulator To The LP Tank
1 LP tank must be properly secured onto grill
2 Turn all control knobs including sidebumer (if featured) to the OFF position
3 Turn LP tank OFF by turning handwheel clockwise to aful! stop,
OI_ Clockwise
, OPD Hand Wheel
Safety Relief Valve "-4-,_----- Type I outlet with thread on outside
f
/
/i-"
I../
Strap and Cap
Remove the protective cap from the LP tank valve. Always use cap and strap
supplied with valve Use of the POL transport plug (B) (plastic part with
external threads) will defeat safety feature of valve.
Do not use this POLtransport plug
(plastic part with external threads)
5 Hold regulator, insert nipple (C) into LP tank valve, Hand tighten coupling
nut, holding regulator in a straight line (D) with LP tank valve so as not to
cross thread the connection.
Nipple has to be centered into ..._..._.
the LP tank valve
i,
% ,
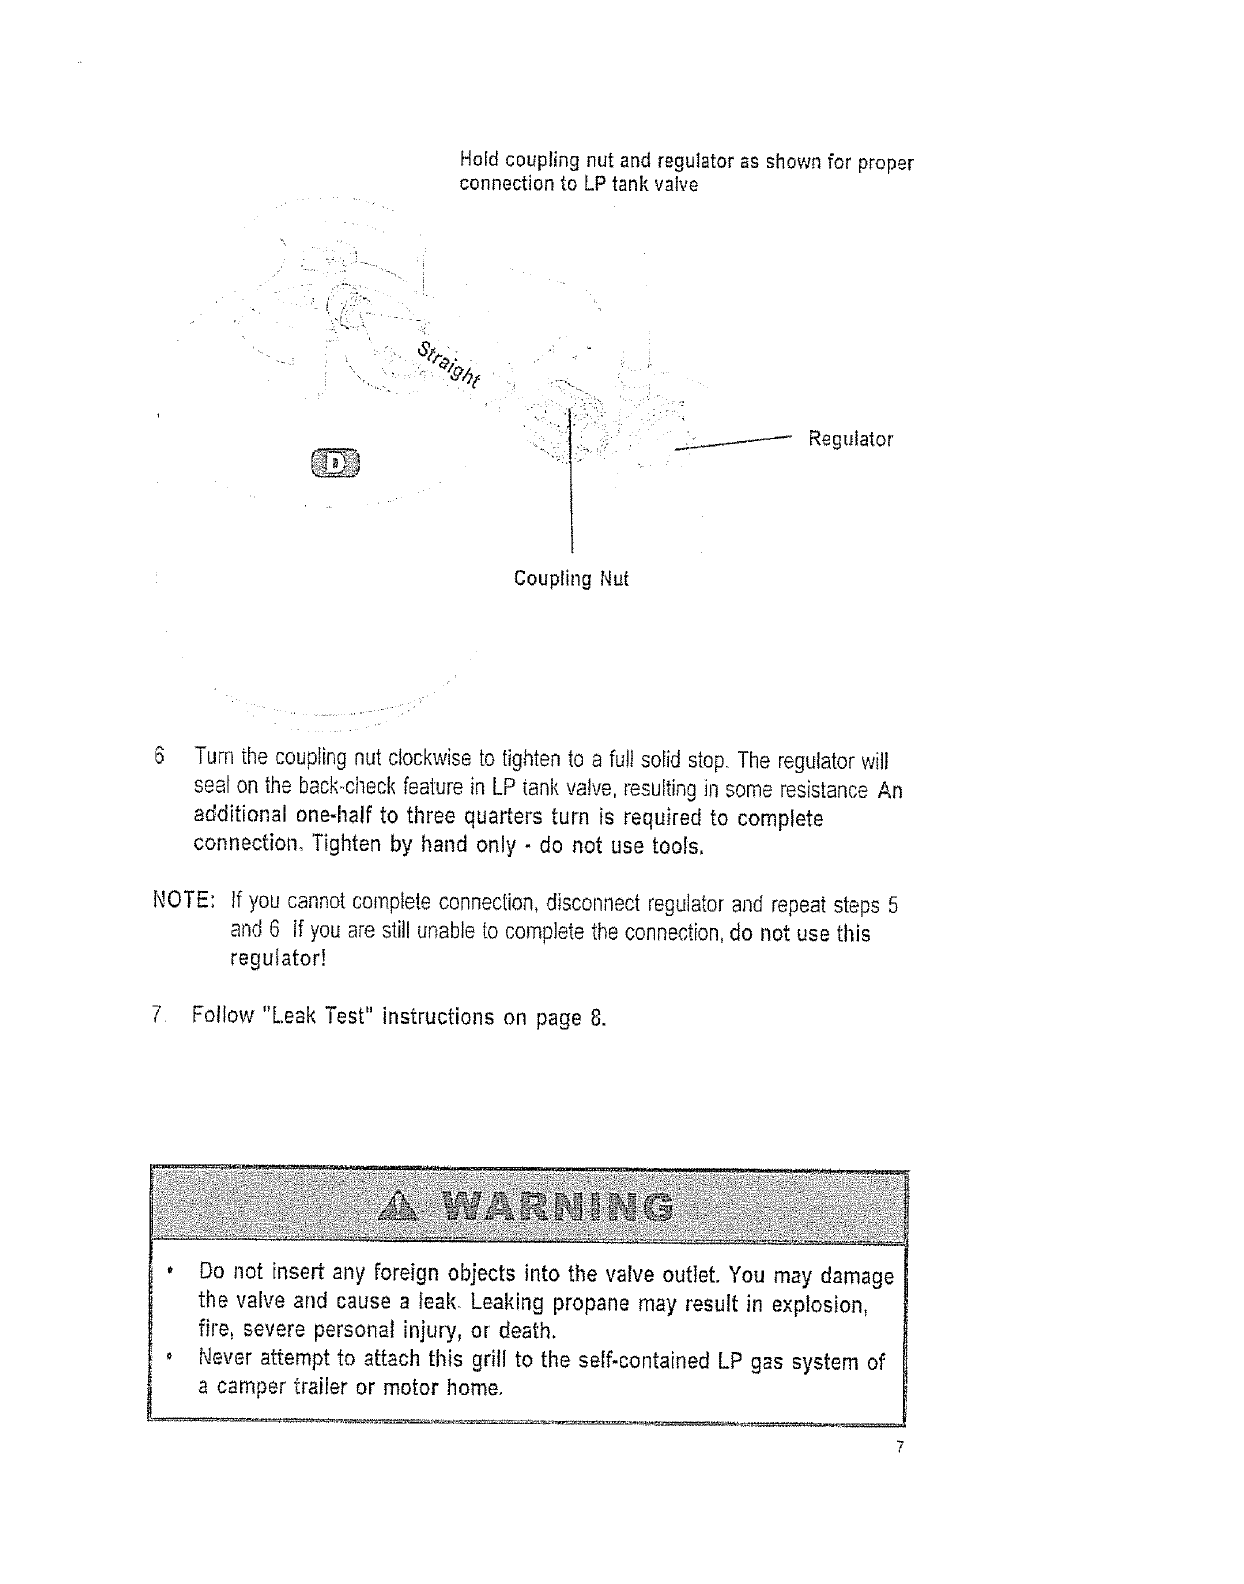
Hold coupling nut and regulator as shown for proper
connection to LP tank valve
?.
E i"
J. - Regulator
CouplingNut
Turn the coupling nut clockwise to tighten to a ful! solid stop The regulator wilt
seat on the back check feature in LP tank valve, resulting in some resistance An
additional one-half to three quarters turn is required to complete
connectiom Tighten by hand only -do not use tools,
NOTE: tf you cannot complete connection, disconnect regulator and repeat steps 5
and 6 If you are still unable to complete the connection,do not use this
regulator!
7 Follow "Leak Test" instructions on page 8,
*Do not insert any foreign objects into the valve outtet. You may damage
the valve and cause aleak. Leaking propane may result in explosion,
fire, severe personal injury, or death,
, Never attempt to attach this grill to the self-contained LP gas system of
a camper trailer or motor )lome.
7
• Do not use grill until leak checked.
• If leak is detected at any time, STOP and correct before using grill
fu rther.
, If you cannot stop a gas leak, immediately close LP tank valve and call
LP gas supplier or your fire department!
Leak Test
For your safety
o Leak test must be repeated each time LP tank is connected or reconnected
. Do not smoke during leak test
. Do not use an open flame to check for gas leaks
o Grill must be leak checked outdoors in well-ventilated area, away from ignition
sources such as gas fired or electrical appliances During leak test, keep grill away
from open flames or sparks
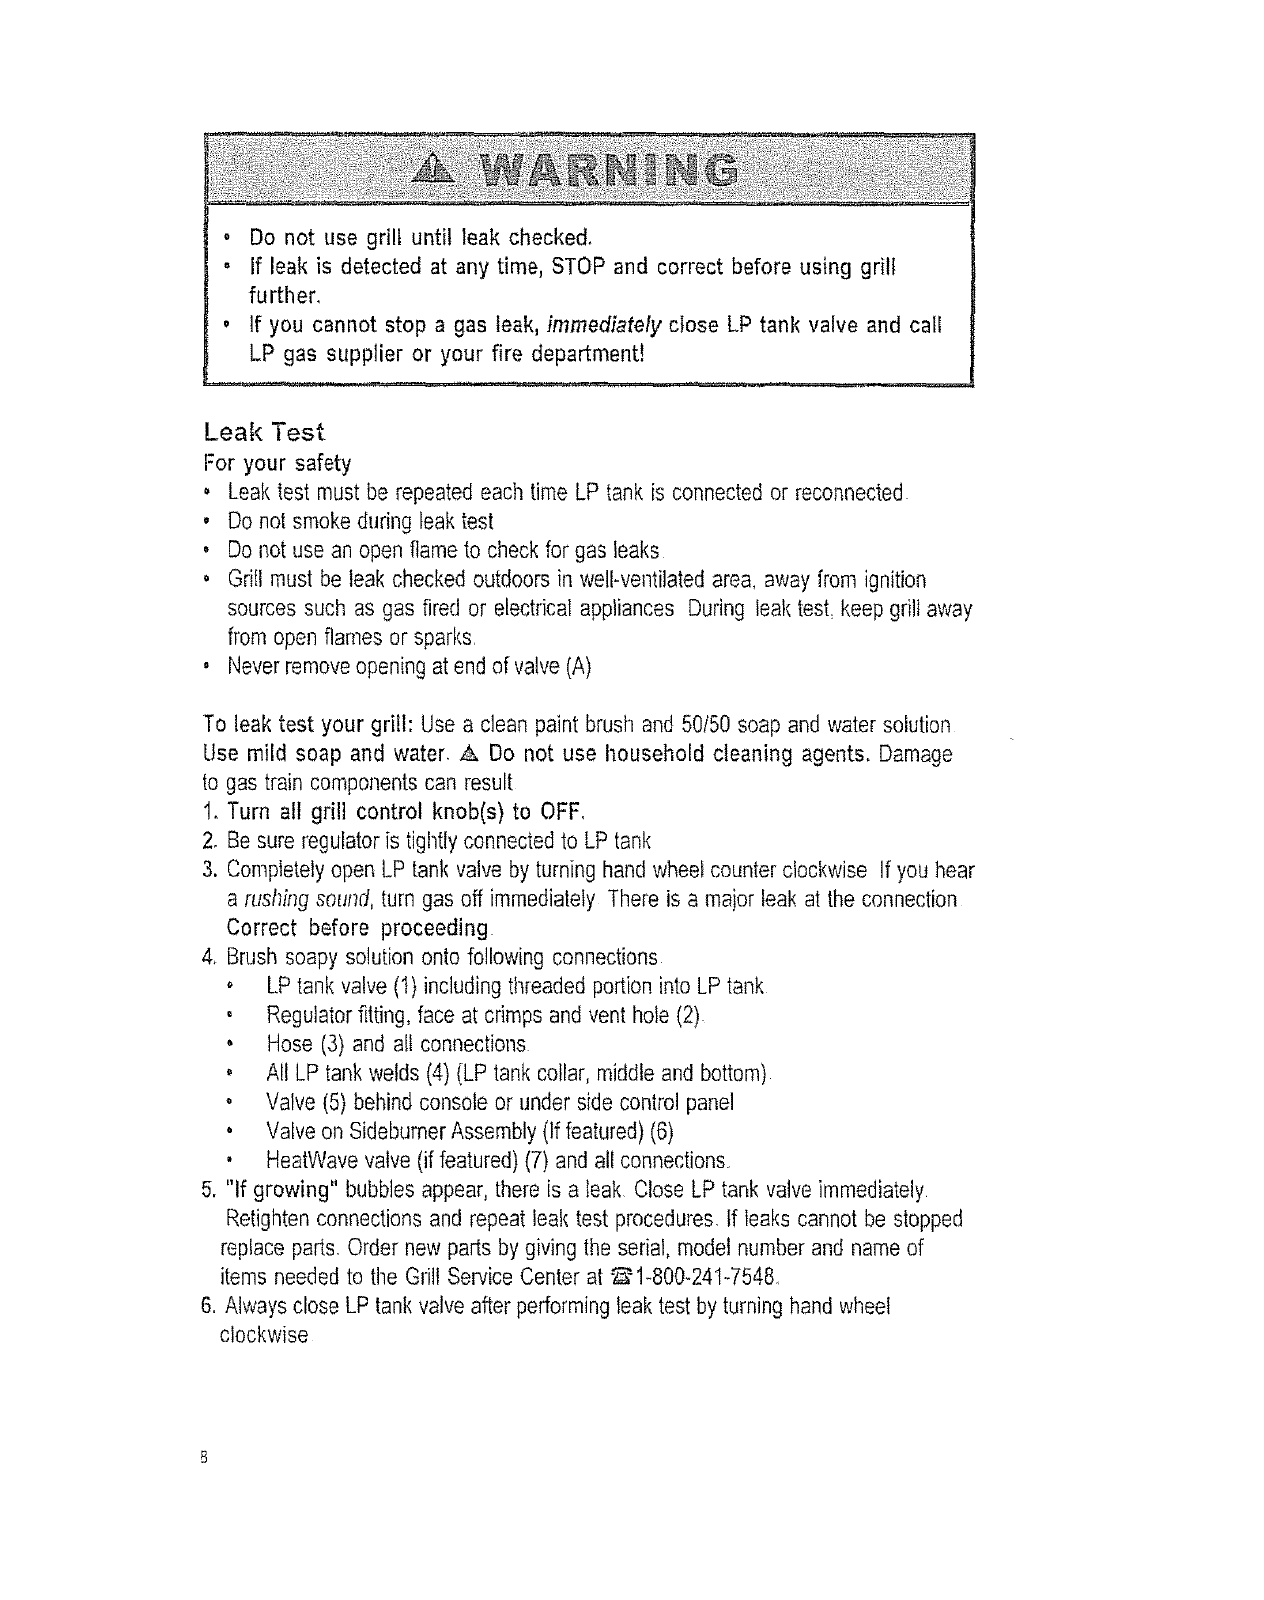
o Neverremove opening at end of valve (A)
To leak test your grill: Use a clean paint brush and 50/50 soap and water solution
Use mild soap and water, A Do not use household cleaning agents, Damage
to gas train components can result
1. Turn all grill control knob(s) to OFF,
2. Be sure regulator is tightly connected to LP tank
3. Completely open LP tank valve by turning hand wheel counter clockwise If you hear
arushing sound, turn gas off immediately There is a major leak at the connection
Correct before proceeding
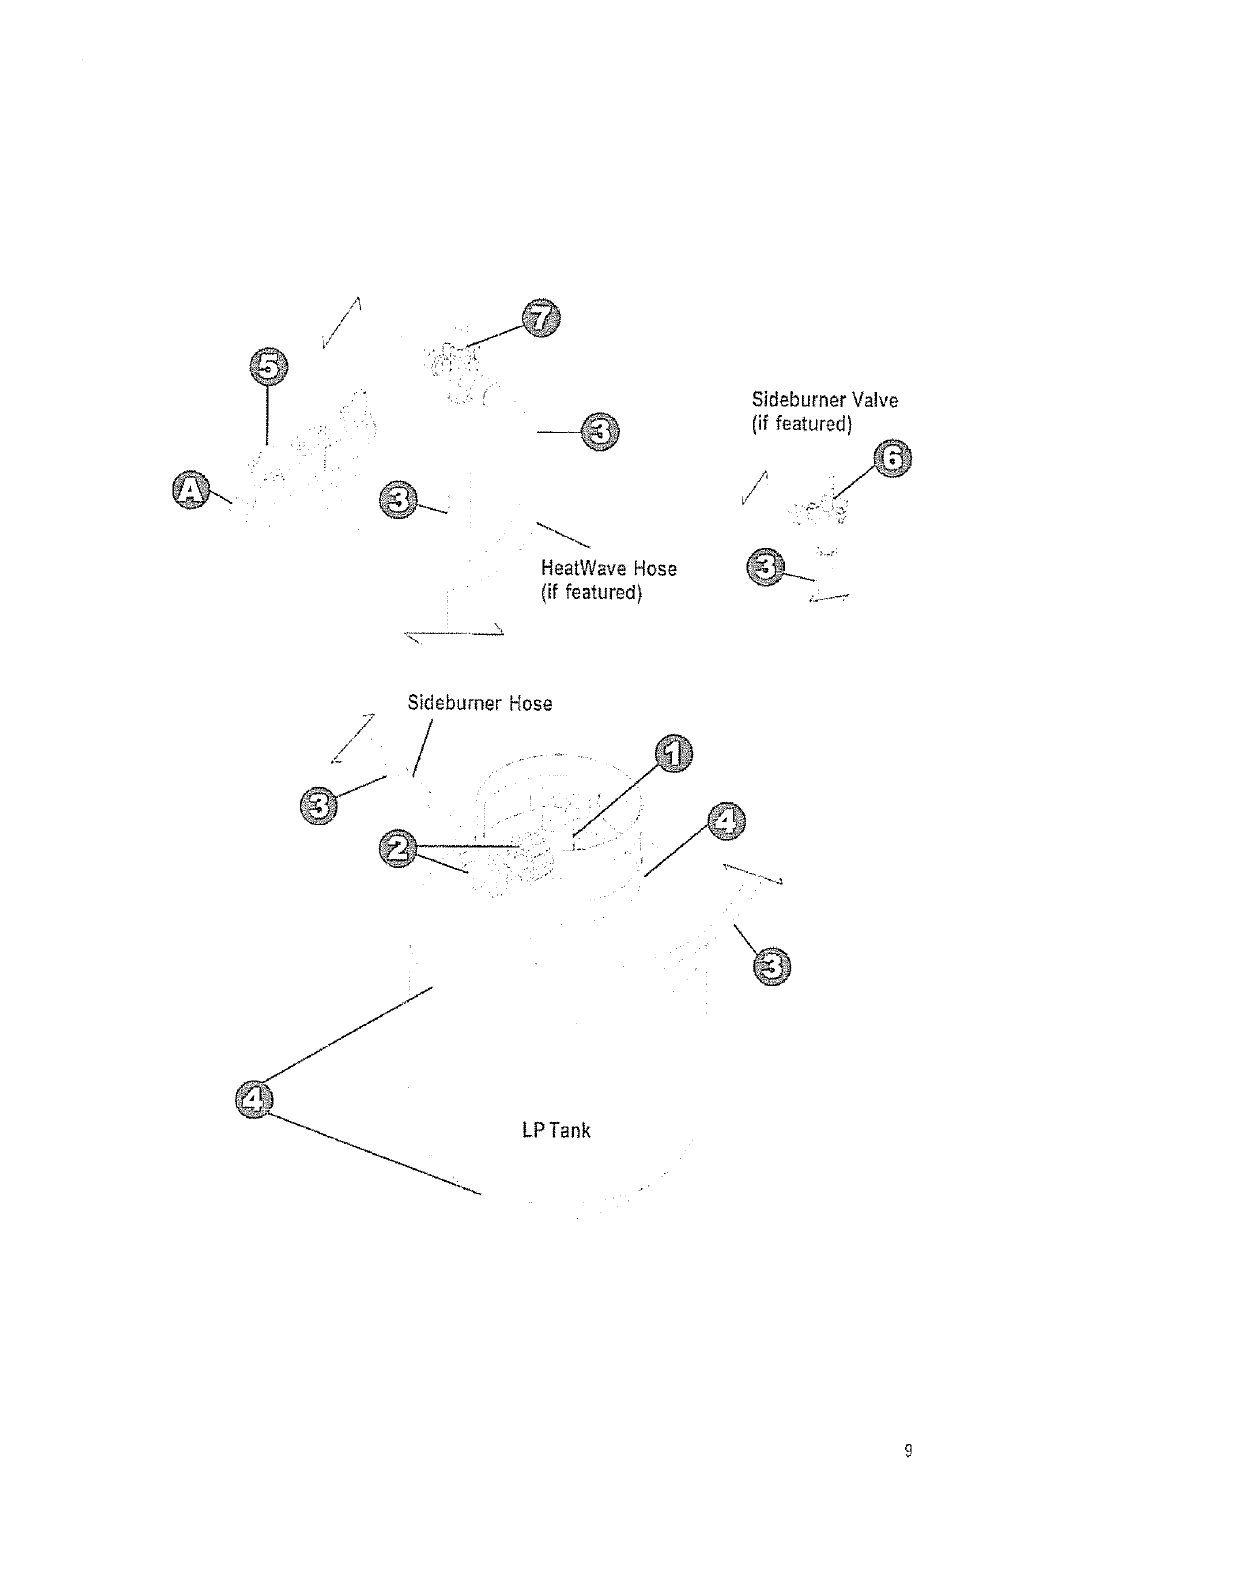
4. Brush soapy solution onto following connections
o LP tank valve (1) including th_eadedportion into LP tank
, Regulator fitting, face at crimps and vent hole (2).
. Hose (3) and all connections
, All LP tank welds (4) (LP tank collar, middle and bottom)
• Valve (5) behind console or under side control panel
• Valve on Sidebumer Assembly (If featured) (6)
• HeatWave valve (if featured) (7) and all connections
5. "If growing" bubbles appear, there is a leak Close LP tank valve immediately
Retighten connections and repeat leak test procedures If leaks cannot be stopped
replace parts. Order new parts by giving the serial, model number and name of
items needed to the Grill Service Center at _ 1-800-241-7548
6, Always close LP tank valve after performing leak test by turning hand wheel
clockwise
/
i./
:i
HeatW_ve Hose
(if featured)
Sideburner Valve
(if featured)
7
/
J
Sidebumer Hose
/
i "¸¸. ,_L jj
J
J
LPTank
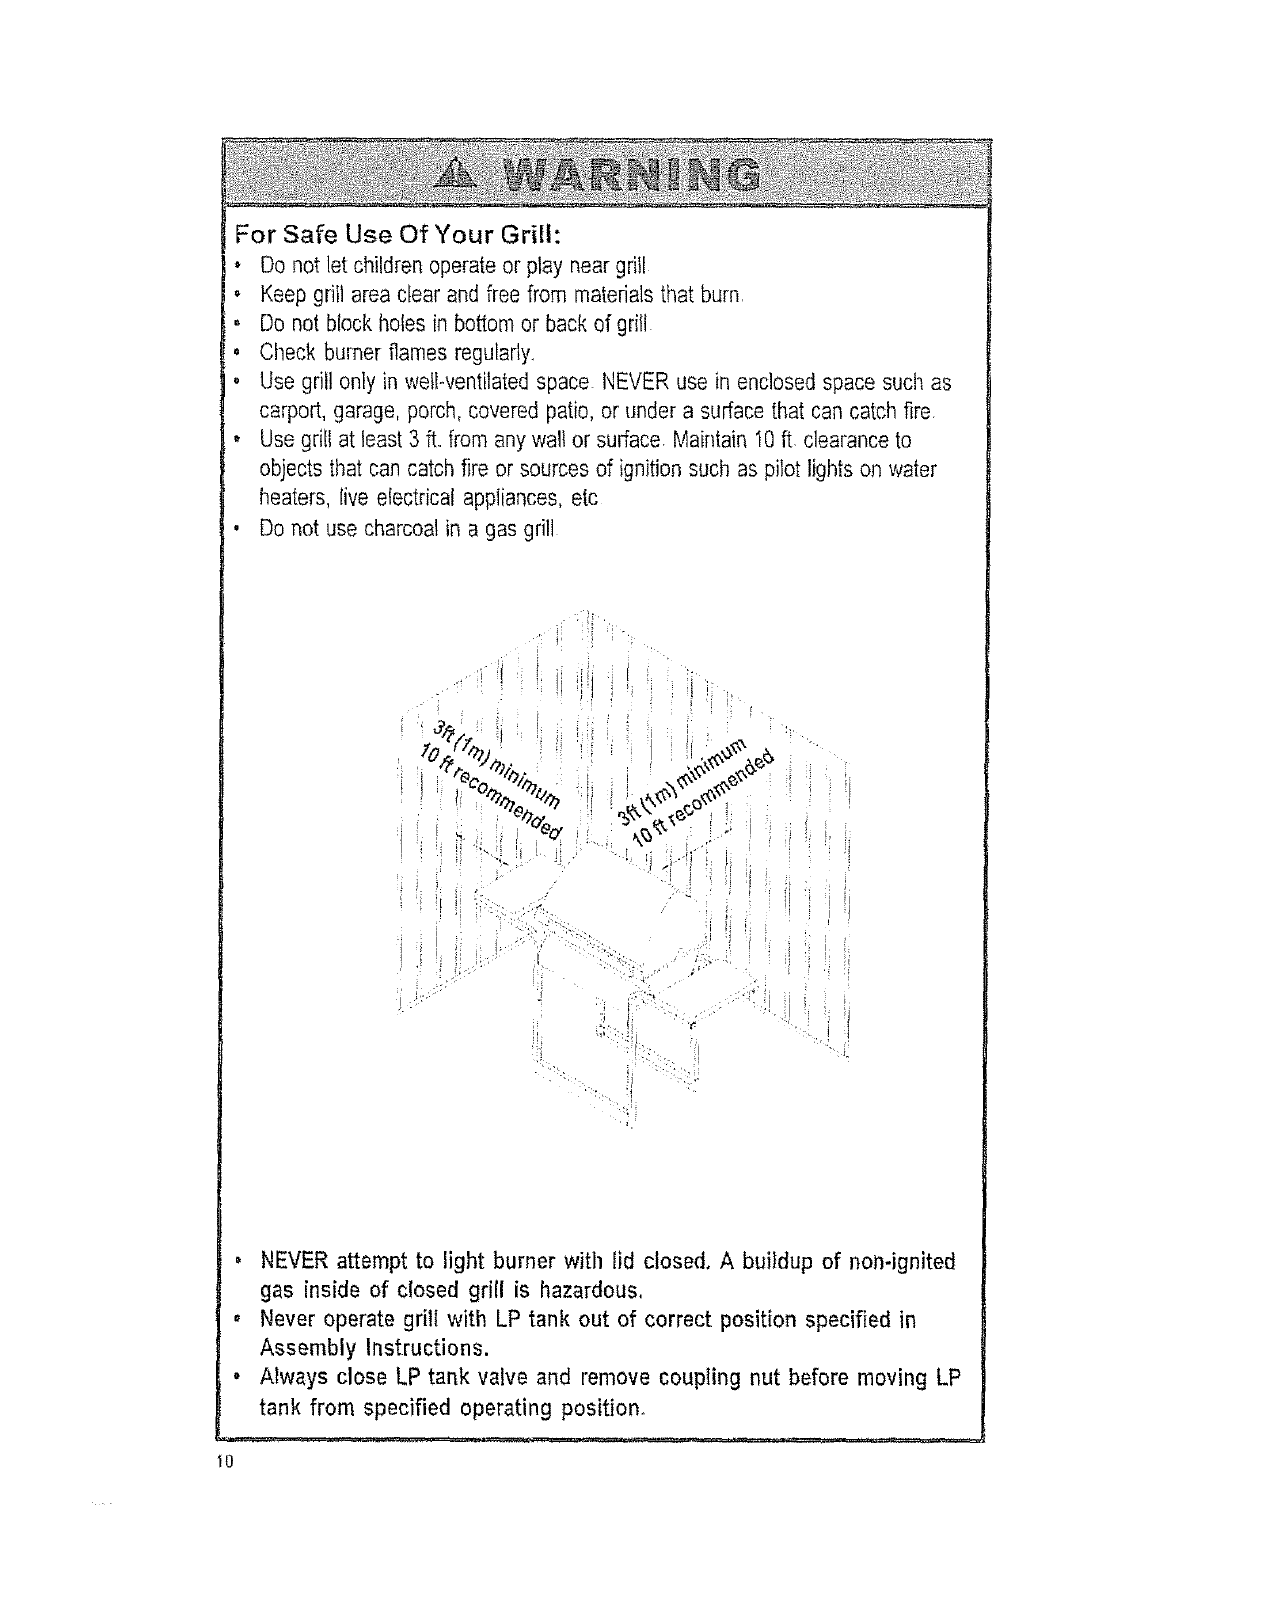
For Safe Use Of Your Grill:
• Do not let children operate or play near grill
• Keep grill area clear and free from materials that burn.
, Do not block holes in bottom or back of grill
, Cheek burner flames regularly.
o Use grill only in well-ventilated space NEVER use in enclosed space such as
carport, garage, porch, covered patio, or under a surface that can catch fire.
, Use grill at least 3 ft. from any wall or surface. Maintain I0 ft clearance to
objects that can catch fire or sources of ignition such as pilot lights on water
t_eaters,live electrical appliances, etc
, Do not use charcoal in a gas grill
, NEVER attempt to light burner with lid closed. A buildup of non-ignited
gas inside of closed grill is hazardous,
oNever operate grill with LP tank out of correct position specified in
Assembly Instructions.
o Always close LP tank valve and remove coupling nut before moving LP
tank from specified operating position.
10
Safety Tips
Before openingLP tank valve, check the coupling nut for tightness
,& When grill is not in use, turn off all control knobs and LP tank valve.
A Never move grill while in operation or still hot.
A Use long-handledbarbecueutensils to avoid bums and spralters
,&. Maximum load for sidebumer,side shelf and front shelf is 10 lb.
,& A soup can must be attached to grease clip and emptied after each use. Do not
remove soup can until grill has completely cooled
,& If you notice grease or other hot matedaldripping from grill onto valve, hose or
regulatorturn off gas supply at once Determine the cause, correct, and clean
valve, hose and regulator beforecontinuing Performa leak test
,& The regulator may make a humming or whistling noise during operation This will
not affect safety or use of grill
A If you have a grill problem see the TroubleshootingSectbn
A CAUTION
ml, ,rlnl i i, ilU ,,, ii ' '_' z _;, i,n,lUll ii i
, Putting out grease fires by closing the lid is not possible. Grills are well
ventilated for safety reasons.
• Do not use water on a grease fire. Personal injury may result. If a grease
fire develops turn knobs and L.Ptank off.
• Do not leave grill unattended while preheating or burning off on high. If
grill has not been regularly cleaned a grease fire can occur that may
damage the product,
Before Your First Cookout
• Lightburners, check to make sure they are lit, close the lid and warm up gill on
HIGH for 15 minutes Curing of paint and parts will producean odor only on first
lighting
Ignitor Lighting For Front Control Grills
A
1
2
3
,
5
f,
Do not lean over grill while lighting, & --<_
Open lid. Turn on gas at LP tank _:/_._i_ :::_....
Turnone knobto _ IGNITE __....z
Push IGNITORButton ,._r:_. or Switch C_'i:#rapidly to light Be sure burner lights
and stays lit,
Turn other knob (if featured)to _ IGNITEto light otherside
If IGNITORdoes not work, follow match lighting instructions.
After Lighting:Turn knob(s)to HIGH for warm-up.
II
Match Lighting
A Do not lean over gr[ti while lighting,
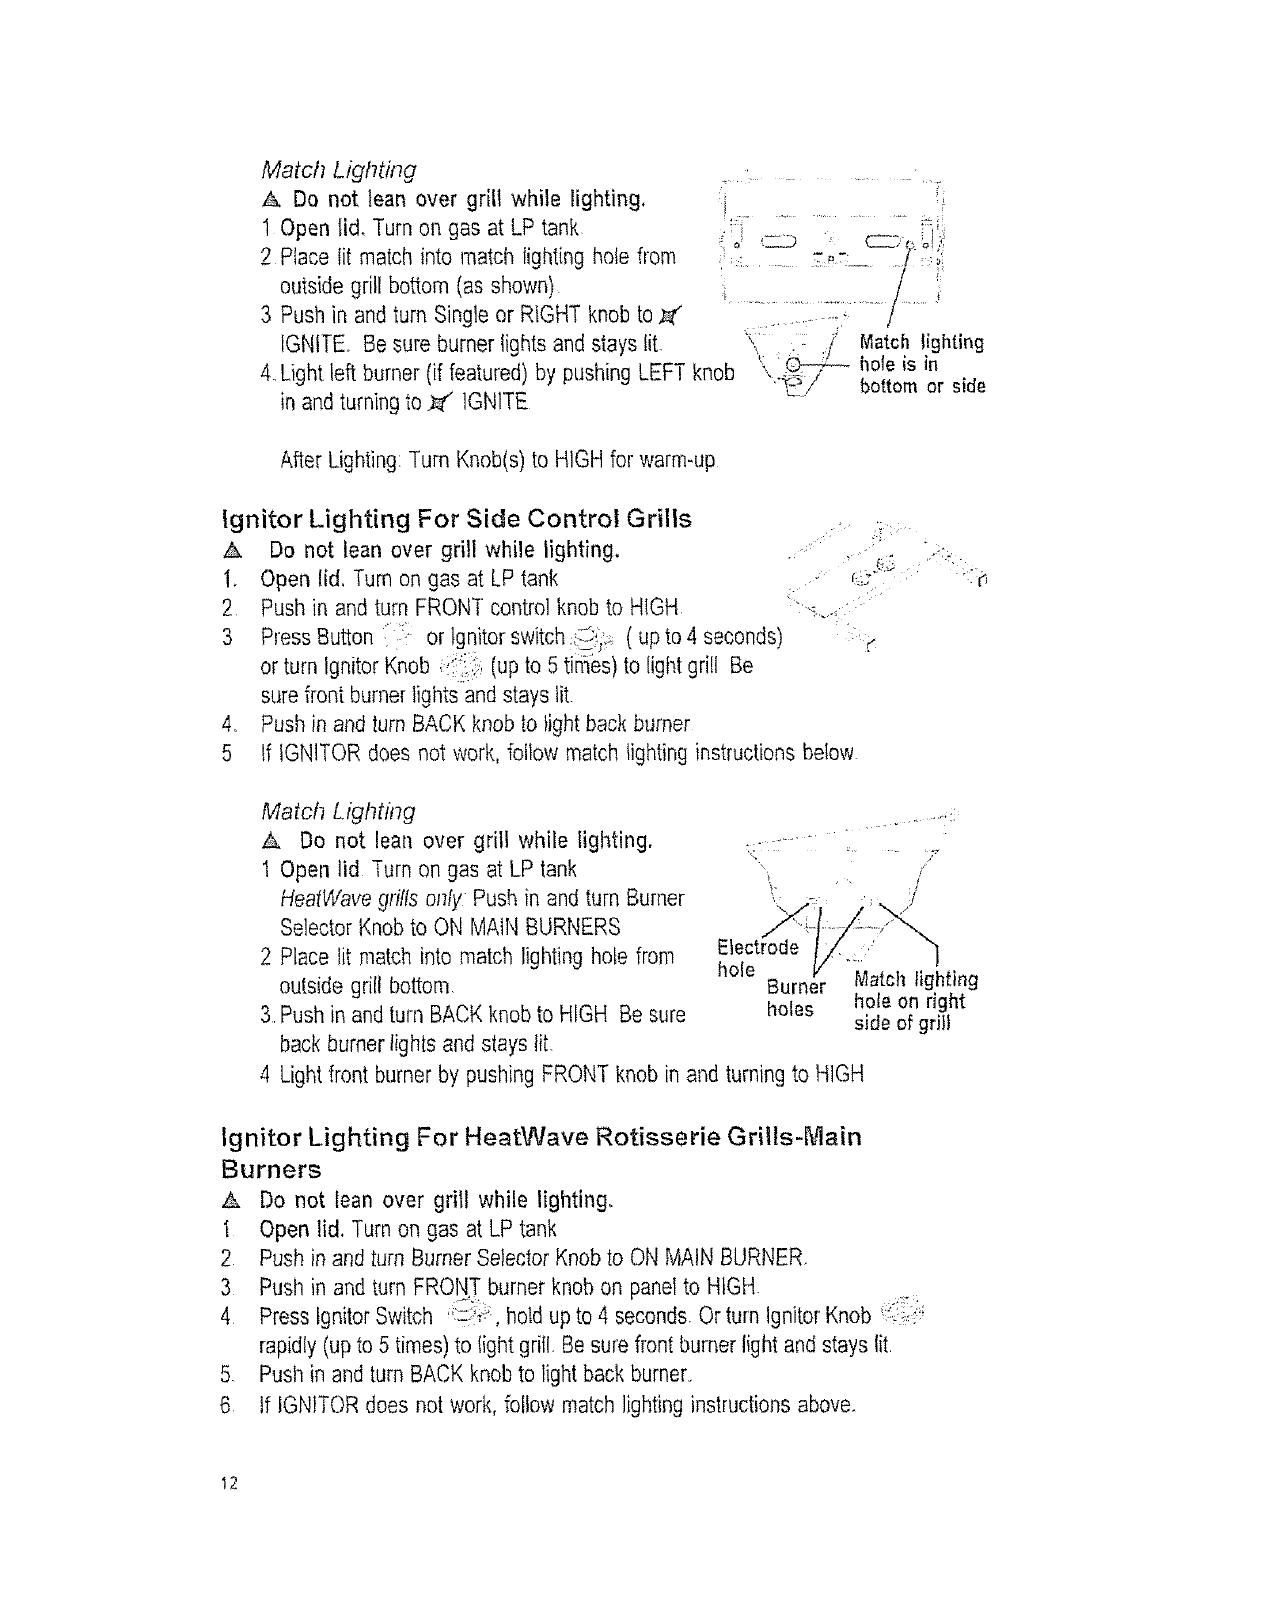
1 Open lid, Turn on gas at LP tank
2 Piace fit match into match lighting hole from
outside grill bottom (as shown)
3 Push in and turn Single or RIGHT knob to
,
I
IGNITE.. Be sure burner lights and stays lit. ",: ,q! holeMatChistlghtingin
Light left burner (if featured) by pushing LEFT knob ',"1= /bottom or side
in and turningto _ 1GN1TE
After Lighting: Turn Knob(s) to HIGH for warm-up
Ignitor Lighting For Side Control Grills •
A Do not lean over grill while lighting. _• _; . ,,
1. Open lid, Turn on gas at LP tank _ ;:_
2 Push in and turn FRONT control knob to HIGH ::"
3 Press Button : or ignitor switch; :_i}_ ( up to 4 seconds) _.
or turn ignitor Knob ,,;:';":,..,,(up to 5 tin:_es)to light grill Be
sure front burner lights and stays tit.
Push in and turn BACK knob to tight back burner
tf iGNiTOR does not work, fotlow match lighting instructions below
4_
5
Match LighthTg
A 13onot lean over grill while lighting,
1 Open lid Turn on gas at LP tank
HeatWave grifls only Push in and turn Burner
Selector Knob to ON MAIN BURNERS
2 Place lit match into match lighting hole from
outside grill bottom.
3, Push in and turn BACK knob to HIGH Be sure
back burner lights and stays tit.
4
hole Burner
holes
Match lighting
hole on right
side of grill
Light front burner by pushing FRONT knob in and turning to HIGH
Ignitor Lighting For HeatWave Rotisserie Grills-_rlain
Burners
A Do not lean over grill while lighting,
1 Open lid, Turn on gas at LP tank
2 Push in and turn Burner Selector Knob to ON MAIN BURNER
3 Push in and turn FRONT burner knob on panel to HIGH.
4 Press Ignitor Switch ..c:C_,.,._,,hold up to 4 seconds Or turn Ignitor Knob _:!_iii_
rapidly (up to 5 times) to light grill. Be sure front burner light and stays lit.
5 Push in and turn BACK knob to light back burner,,
6 if IGNITOR does not work, follow match lighting instructions above.
I2
Ignitor Lighting For HeatWave Rotisserie Burner
1 Turn all knobs to OFF
2 Open lid during lighting, Turn gas on at LP tank.
3 Push in and turn Burner Selector Knob to ON ROTISSERIE BURNER
4 Press Ignitor Switch, hotd up to 4 seconds Or turn Ignitor Knob rapidly (upto 5
times) Be sure burner lights and stays lit.
5 If IGNITOR does not work, follow match lighting instructions
Match Lighting
1. Open lid Turn on gas at LP tank
2. Place lit match near porthole of burner.
3.. Push in and turn Burner Selector Knob to
ON ROTISSERIE BURNER Be sure burner lights and stays lit
Note: It is not possible to use the HeatWave
rotisserie burner and main burner at same time To match light use first
opening on burner
Ignitor Lighting The Sideburner
I Turn gas on at LP tank
2 Push in and turn knob to HIGH
3 Turn or push "_:_,_:..,(up to 5 times to light burner) Be sure burner
lights and stays fit
Match Lighting
1 Turn gas on at LP tank
2 To light use any hole on sideburner. Push in and turn knob to
HIGH Be sure burner lights and stays lit
Burner Flame Check
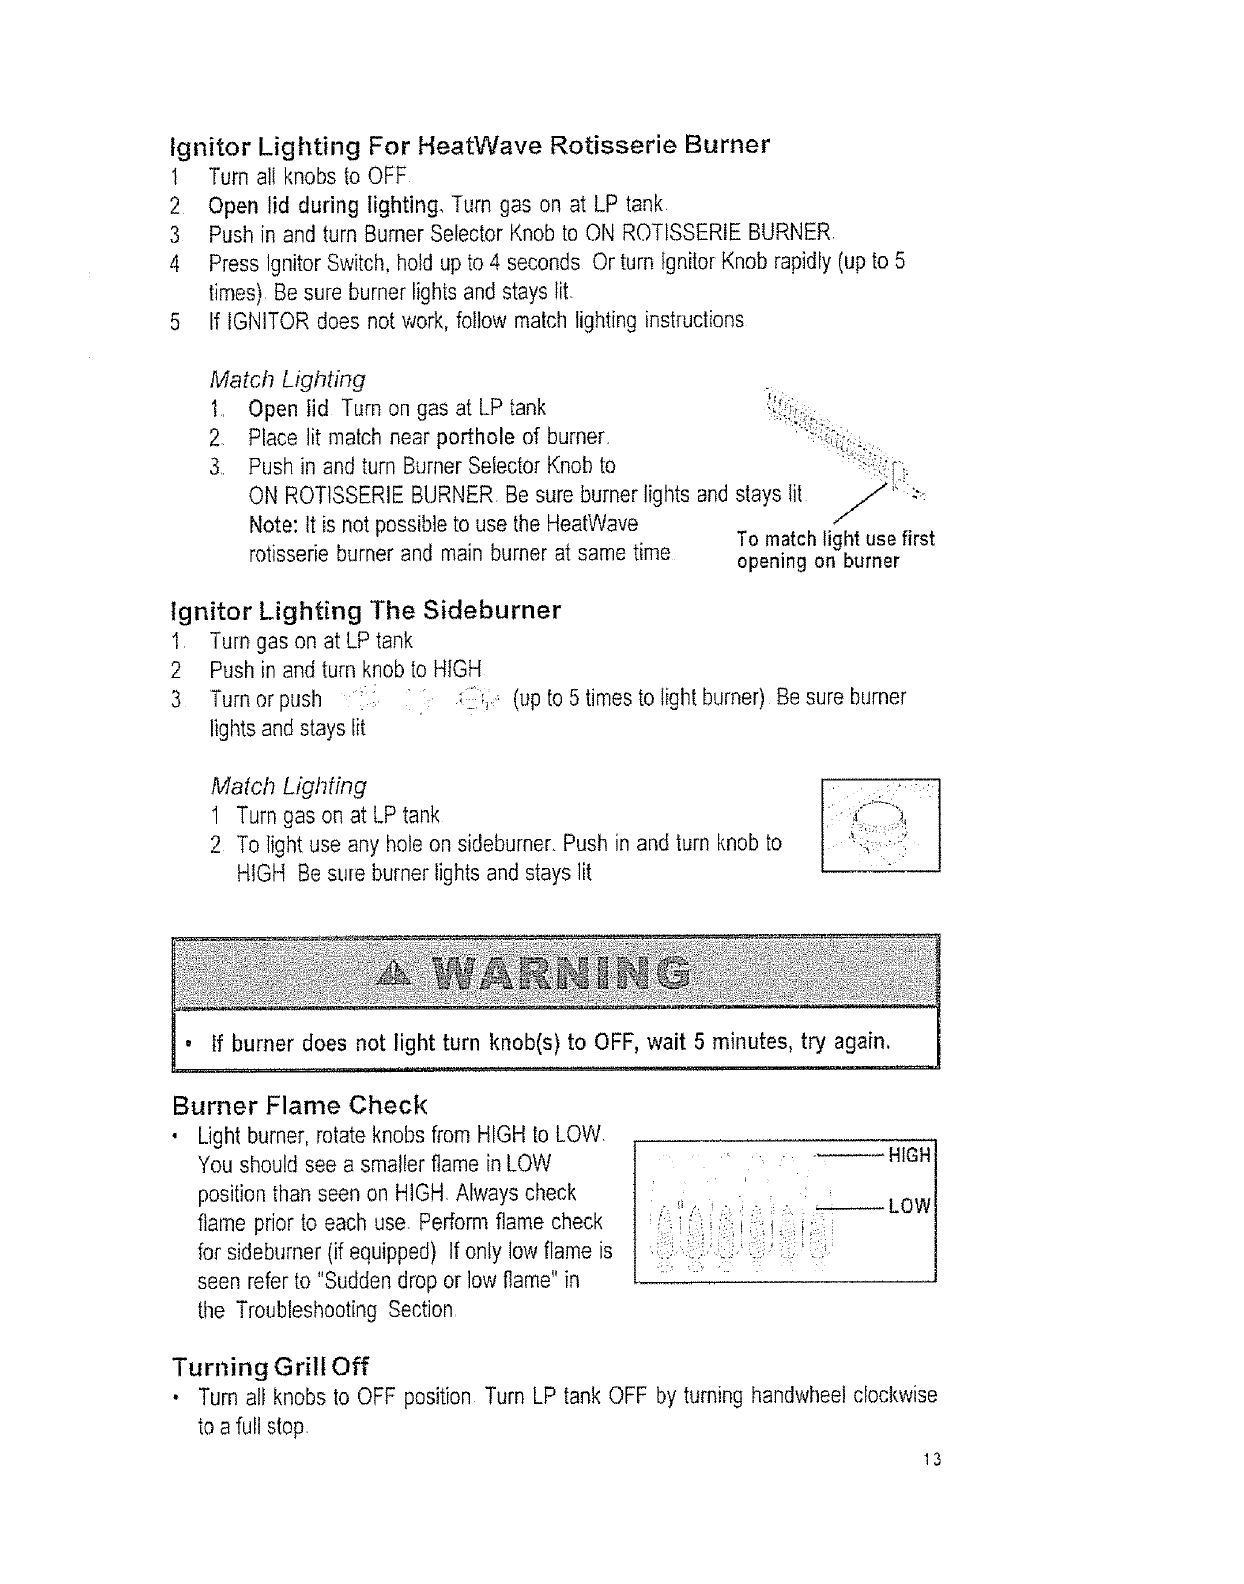
, Light burner, rotate knobs from HIGH to LOW
You should see a smalier flame in LOW
position than seen on HIGH. Always check
flame prior to each use. Perform flame check
for sideburner (if equipped) tf only low flame is
seen refer to "Sudden drop or low flame" in
the Troubleshooting Section
.... ..... HIGH
LOW
Turning Grill Off
• Turn all knobs to OFF position Turn LP tank OFF by turning handwheel clockwise
to afull stop,
13

Ignitor Check
, Turn gas off at LP tank. Press ignitor button or turn ignitor knob rapidly "Click"
should be heard and spark seen each time between collector box or burner and
electrode See Troubleshooting if no click or spark.
Valve Check
o important', Make sure gas is OFF at LP tank before checking valves. Knobs
lock in OFF position To check valves, first push in knobs and release, knobs
should spring back If knobs do not spring back, replace valve assembly before
using grill Turn knobs to LOW position then turn back to OFF position Valves
should turn smoothly.
Hose Check
° Before each use, check to see if hoses are cut or worn Replacedamaged hoses
before using grill Use only valveihosefregulator specified by manufacturer
LP Tank Filling
o Use only licensedand experienceddealers
,LP tank must be purged before filling
° Dealer should NEVERfill LP tank more than 80% of LP tank volume, Volume of
propane in tank wilt vary by temperature.
• A frosty regulatorindicates gas overfill Immediatelyclose LP tank valve and call
local LP gas dealer for assistance.
• Do not release liquid propane (LP) gas into the atmosphere. This is a hazardous
practice.
• To remove gas from LP tank, contact an LP dealer or call a local fire department
for assistance. Oheckthe telephone directory under "Gas companies" for nearest
certified LP dealers_
LP tank Exchange:You may choose to replace your empty LP tank through an
exchange service. Use only those reputable exchange companies that inspect,
precision fill, test and certify their cylinders. Exchange for OPD safety feature
equipped tank as described in LP Tank
• Always keep LP tank in upright position during use, transit or storage_
14
° NEVER store a spare LP tank under or near grill or in enclosed areas°
° An oveffifled spare LP tank is hazardous due to possible gas released
from the safety relief valve. The safety relief valve on a LP tank could
activate releasing gas and causing a fire.
, If you see, smell or hear escaping gas, immediately get away from the
LP tank/grill and call your fire department.
, All spare LP tanks must have safety caps installed on the LP tank
outlet.
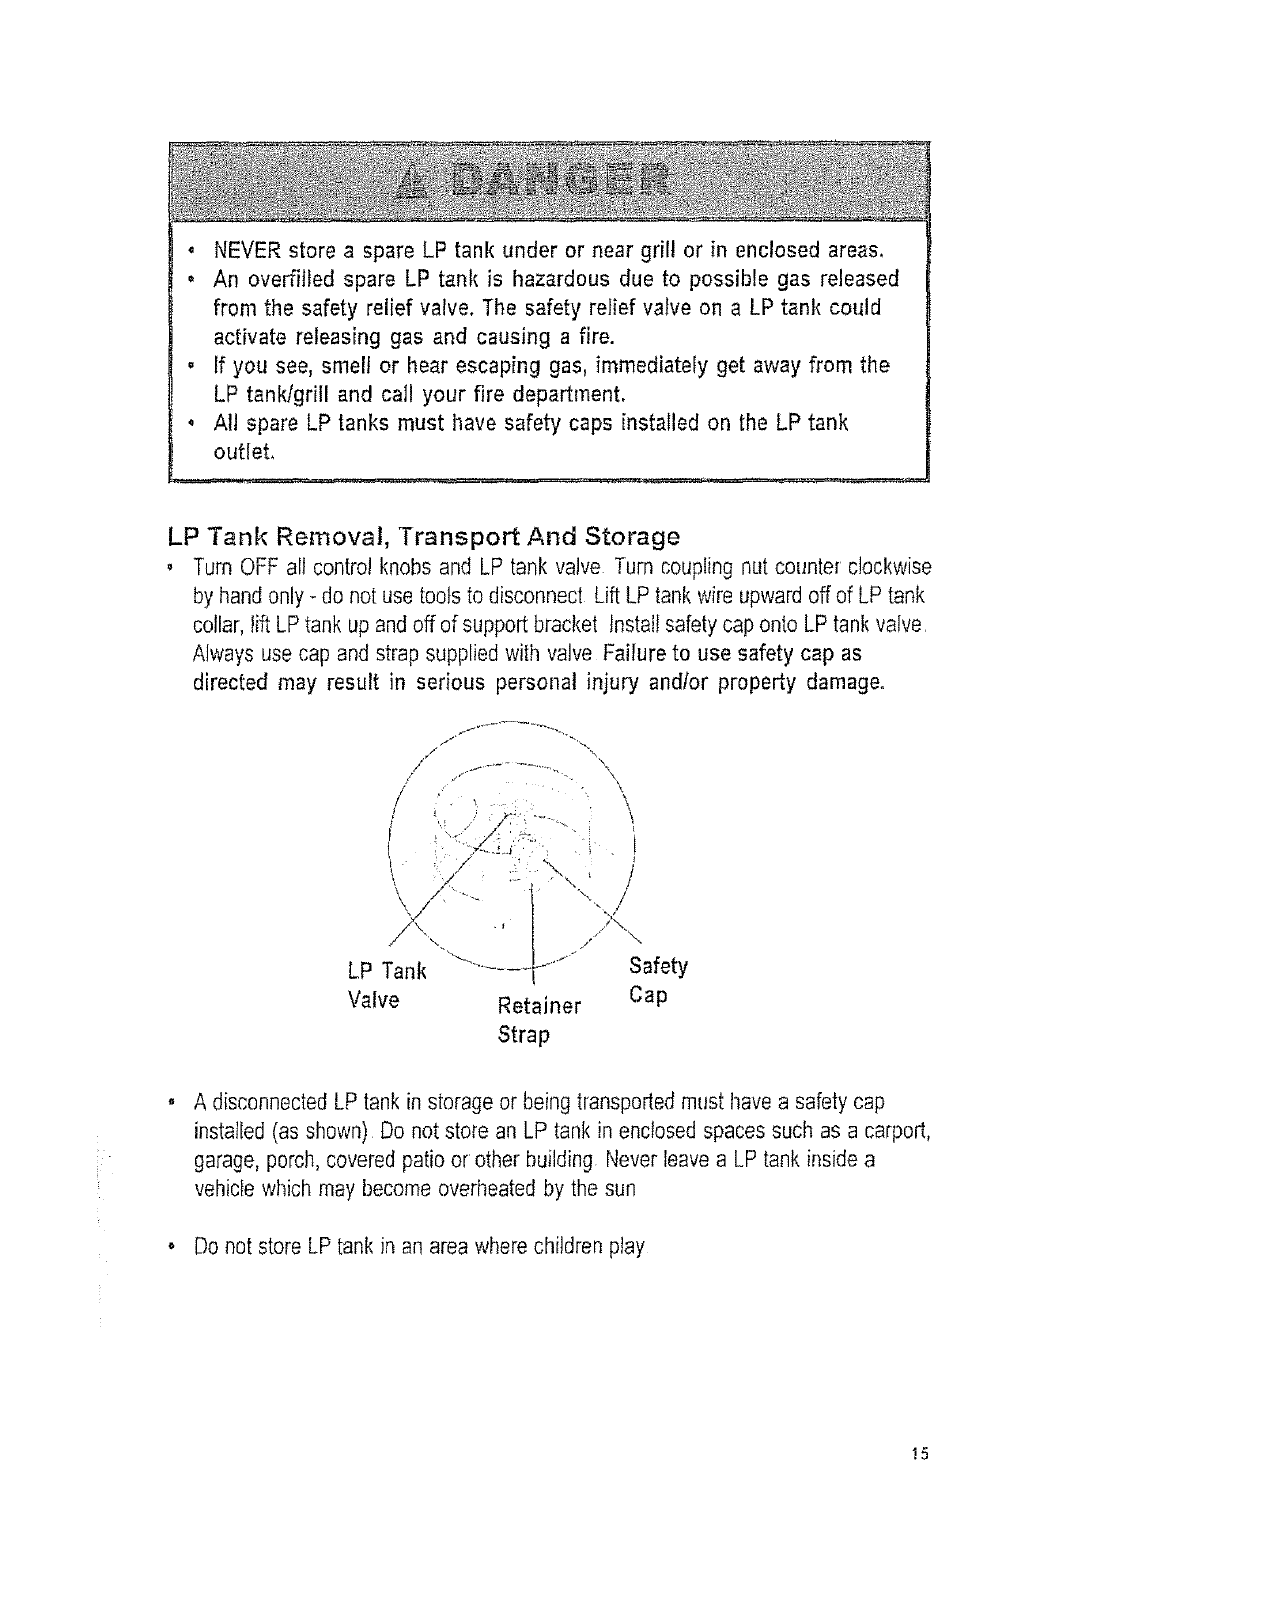
LP Tank Removal, Transport And Storage
o Turn OFF all control knobs and LP tank valve Turn coupling nut counte_clockwise
by hand only - do not use tools to disconnect Lift LP tank wire upward off of LP tank
collar, lift LP tank up and off of support bracket Install safety cap onto LP tank valve.
Always use cap and strap supplied with valve Failure to use safety cap as
directed may result in serious personal injury andlor property damage.
t "z--L,.J' " _ , I
<
LP Tank _" ..... @J Safety
Valve Retainer Cap
Strap
A disconnected LPtank in storage or being transportedmust have a safety cap
installed (as shown) Do not store an LP tank in enclosed spaces such as a carport,
garage, porch, covered patio or other building Never leavea LP tank inside a
vehicle which may become overheated by the sun
Do not store LP tank in an area where children play
!5
LP Tank
, The LP tank used with your grill must meetthe following requirements.
o Purchase LP tanks only with these required measurements: 12" (30.5cm)
(diameter) x 18" (45 7 cm) ([all) with 20 lb (9 kg ) capacity maximum
• Be constructed and marked in accordance with specifications for LP tank of the
U S Department of Transportation (DOT) or for Canada, Transport Canada (TC)
See LP tank collar for marking
LP tank valve musthave
• Type 1 outlet compatible with regulator or grill
• Safety reliefvalve
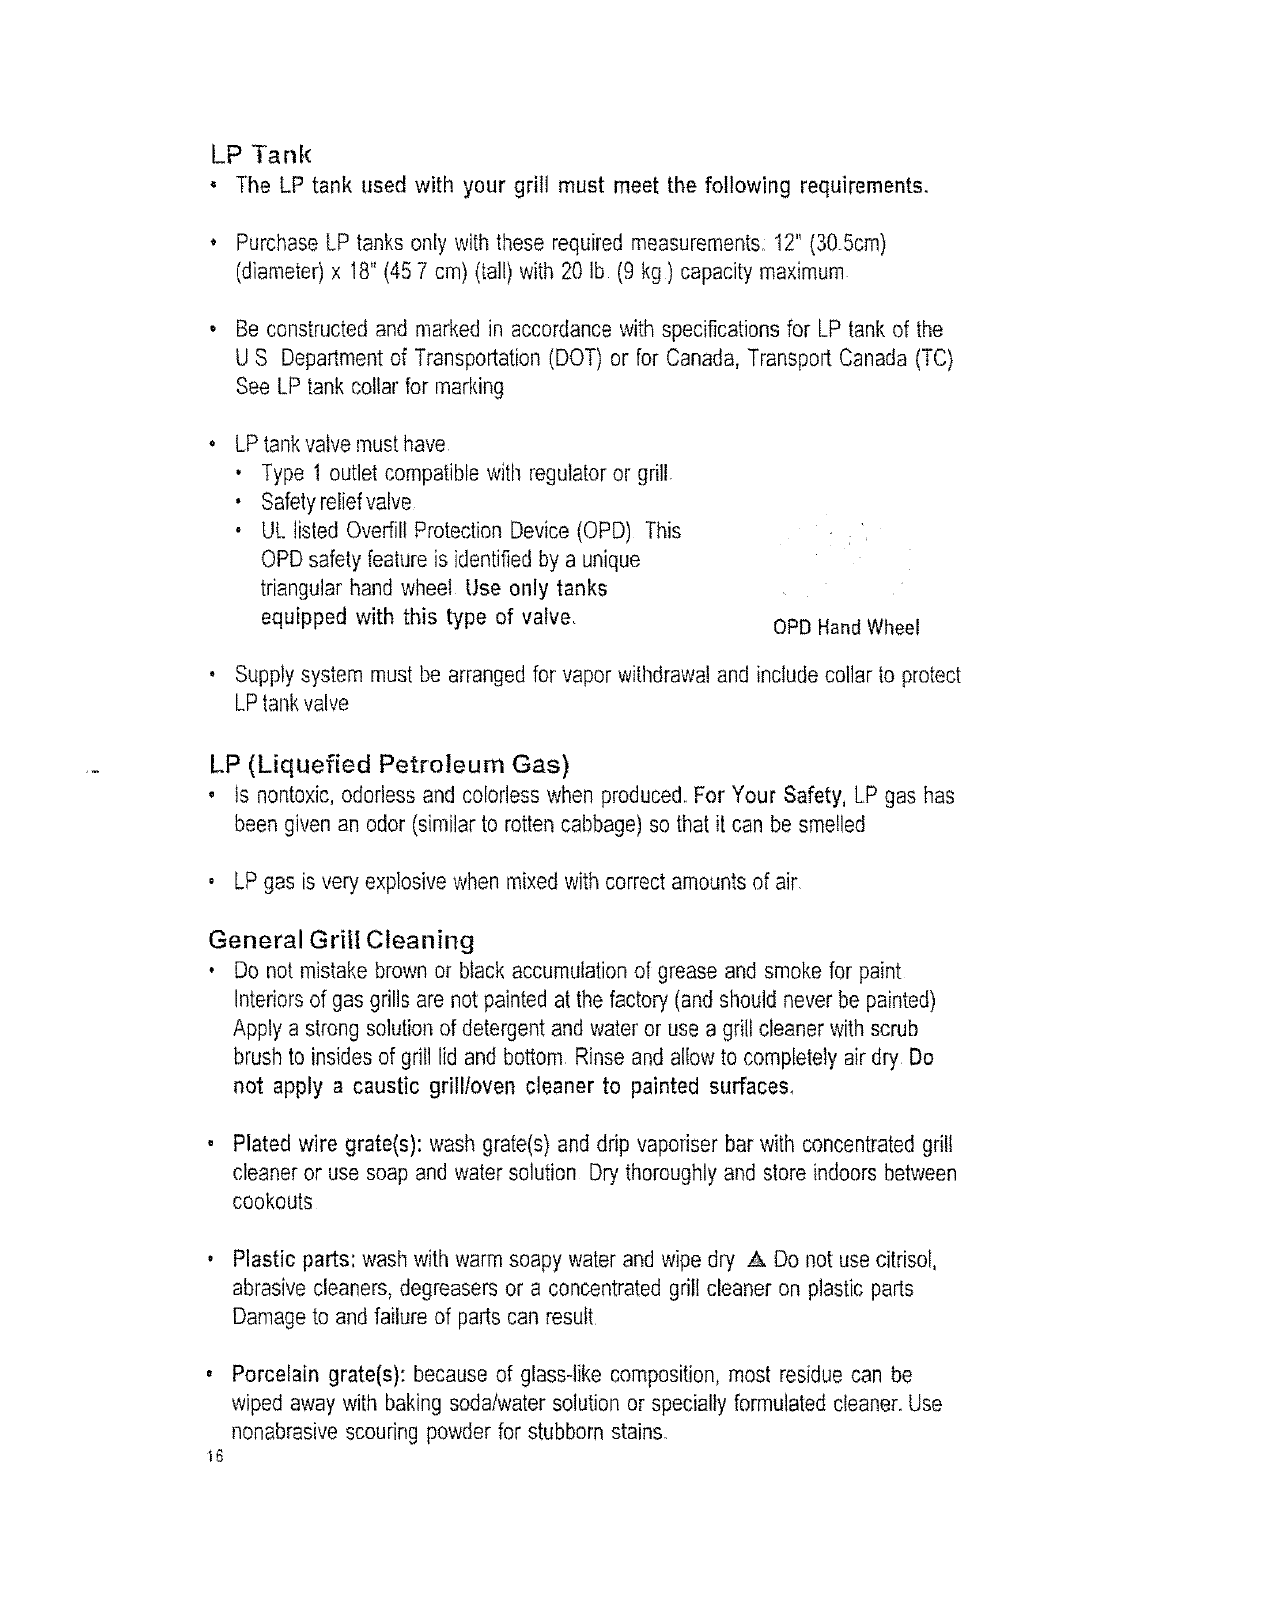
• UL listed Overfill Protection Device (OPD) This
OPD safety feature is identified by a unique
triangular hand wheel Use only tanks
equipped with this type of valve, OPD Hand Wheel
• Supply system must be arranged for vapor withdrawal and include collar to protect
LP tank valve
LP (Liquefied Petroleum Gas)
• ts nontoxic, odorless and colorless when produced. For Your Safety, LP gas has
been given an odor (similar to rotten cabbage) so that it can be smelled
o LP gas is very explosive when mixed with correct amounts of air
General Grill Cleaning
• Do not mistake brown or black accumulation of grease and smoke for paint
Interiorsof gas grills are not painted at the factory (and should never be painted)
Apply a strong solutionof detergent and water or use a grill cleaner with scrub
brush to insides of grill lid and bottom Rinse and allow to completely air dry Do
not apply a caustic grilltoven cleaner to painted surfaces,
• Plated wire grate(s): wash grate(s) and drip vapofiser bar with concentrated grill
cleaner or use soap and water solution Dry thoroughly and store indoors between
cookouts
I6
Plastic parts: wash with warm soapy water and wipe dry A Do not use citrisol,
abrasive cleaners, degreasers or a concentrated grill cleaner on plastic parts
Damage to and failure of parts can result
Porcelain grate(s): because of glass-like composition, most residue can be
wiped away with baking soda/water solution or specially formulated cleaner, Use
nonabrasivescouring powder for stubborn stains,
StainlessSteel:Washwithmilddetergentor nonabrasivecleanerandwarm
soapywater,wipedrywitha softnonabrasivecloth
ExteriorStainlessSteelParts:Usenonabrasivestainlessorglasscleanersora
spraylubricantWipedrywitha softnonabrasiveclothNote:Spraylubricantis
excellentfor removingfingerprints
BriquetandFiregrates:willeventuallydecomposeandweakenwithuse
Removegratefromgrillandtapto loosenanyscalingBlushgratevigorouslywitha
wirebrushto removeanyadditionalscaling,rustor residue
CAUT ©H
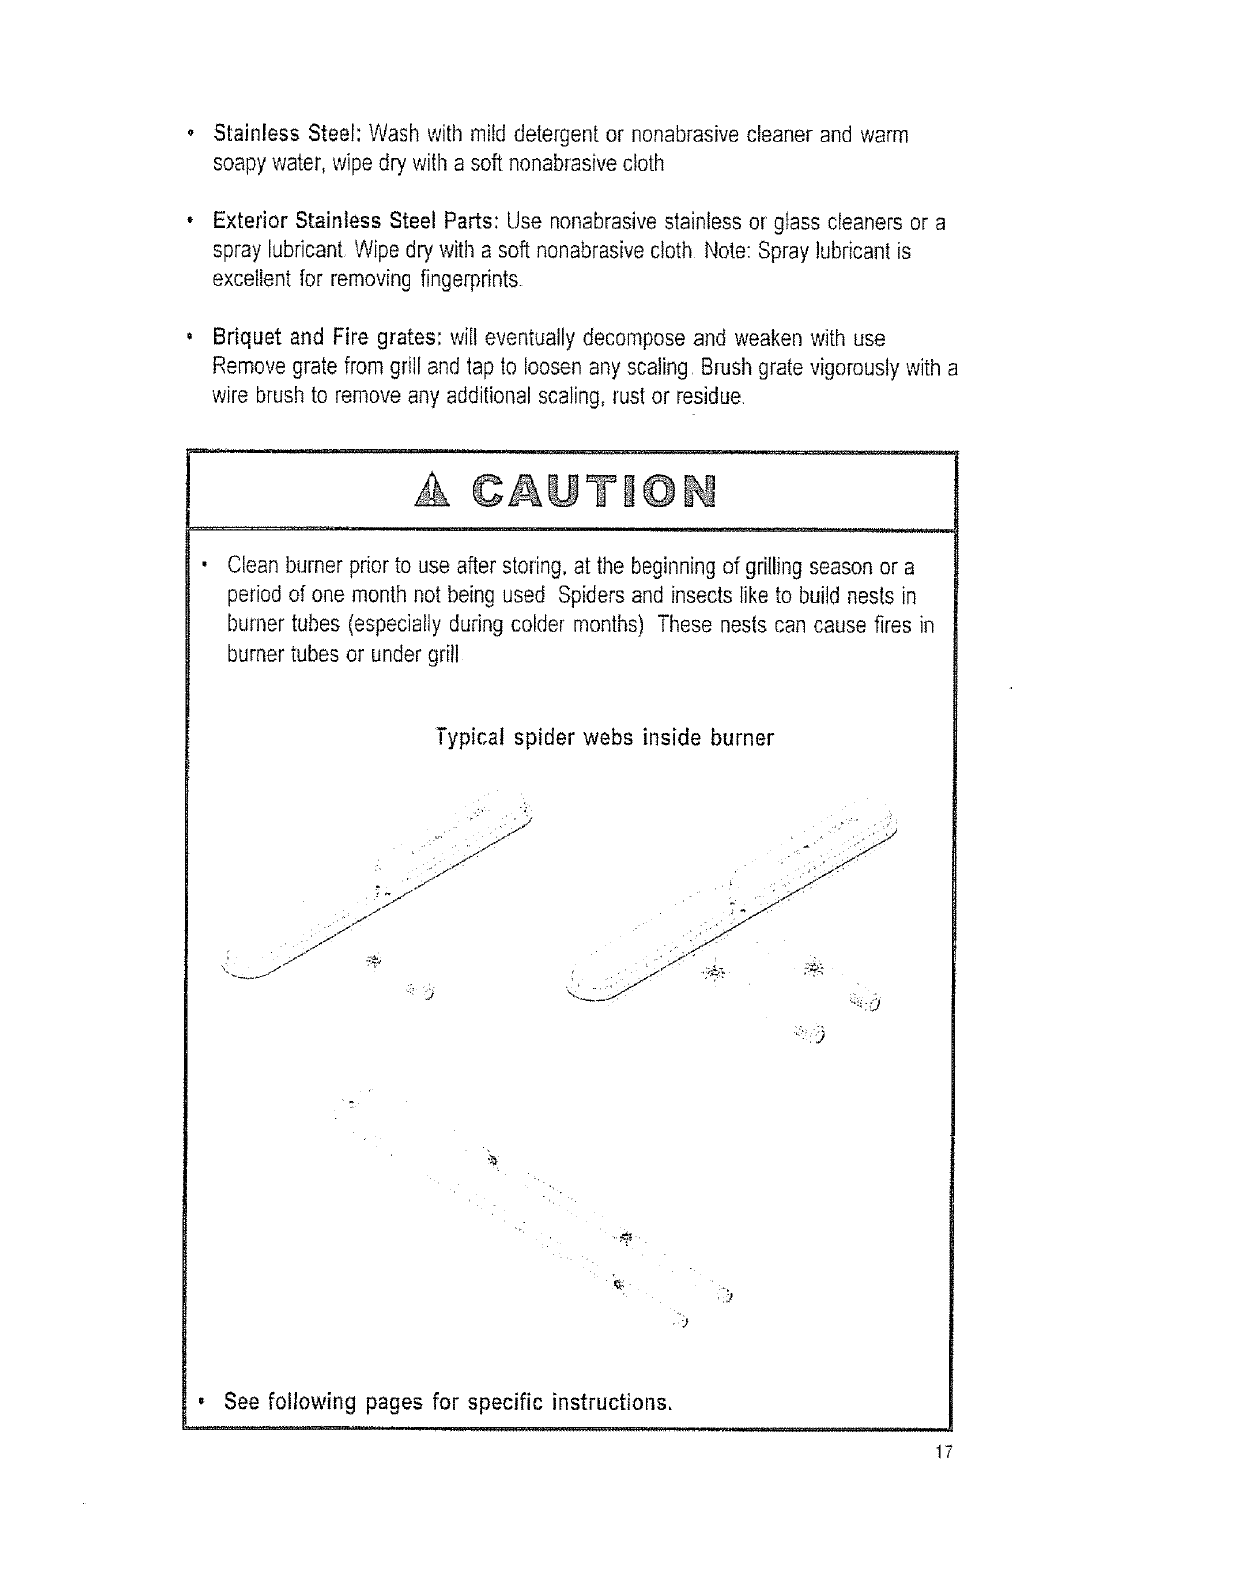
.................... u i ......... --
• Clean burner prior to use after storing, at the beginning of grilling season or a
period of one month not being used Spiders and insects like to build nests in
burner tubes (especially during colder months) These nests can cause fires in
burner tubes or under grill
Typical spider webs inside burner
/
ff
/
r 7_-i"J" _,j..<"
/
f
-,iT •
, See following pages for specific instructions.
Cleaning The Front Control Burner Assembly
Followtheseinstructionsto clean and/orreplaceparts of bumer assemblyor if you have
troubleignilJnggrill
t, "rumgas off at control knobs and LP tank.
2, Removecookinggrateand drip vaporiserbar.
3, Discardbriquetsbefore removingburnerand briquetgrate.
4. Removecan from greaseclip.
5. Beneathconsoledisconnectshort ignitor wire from ignitor(A).
6, Removescrew holding collectorbox (B). Note whichhole on collector box used for
attachingto bumer. Remove coflectorbox, clean ceramicportionof electrode wiIfi
rubbingalcohol and cloth.
7. Under console disengagebumer spring from burnertube (C). Do not remove
spring from valve.
8. Removebriquetgrateand burnertagether,slidebackwards,lift upandoutofgrill(D),
Separateburnerandbriquetgrate.Removescalefrom briquetgrate,replaceif
necessary.
9. Clean outsideof burnerwithsoap andwater. Layburnerupsidedownon flat surface,
insert gardenhose to force waterthroughtubes.Makesure watercomes out of all
burner holes.Open cloggedholes with a thin wire. Shakeout excess waterand
examine holes,Due to normal wear and corrosionsome holes may become
enlarged.If any large cracksor holesare found replacebumero
10. Ifgrill isto be stored,coatburnerlighUywithcookingoi!.Wrap inprotectivecover to
keepinsectsout. If notstoringgrill, hold briquetgrate andbumer together,angle into
grill bottom (D).
11. Nter cleaning,insert wire and electrode into hole in grill bottom(A). Reattachcollector
box to bumer with screw (B). Be sureto use correct hole.
12. Place endof springinto holeon undersideof burnertube as before(C) to secure
burner°
VERY IMPORTANT:Burner tube(s) must engagevalve opening(s)as shown (E).
13. Reattachroundconnectorof ignitorwire to ignitor.
14. Do notuse morethan 16 newbriquetson briquetgratearoundburner.Do not let
briquetscover burner holes.
!5. Repesitiondrip vaporiserbar and cooking grate(s).Reattachclean can to grease clip.
16. Beforecookingagain on grilt,follow BurnerFlame Check.
!8

Single Valve
Burner
attact
to Valve /r, x
Spring
-, Grate
...... Round
•i "_" end to
"'_ ignitor
Spring
19
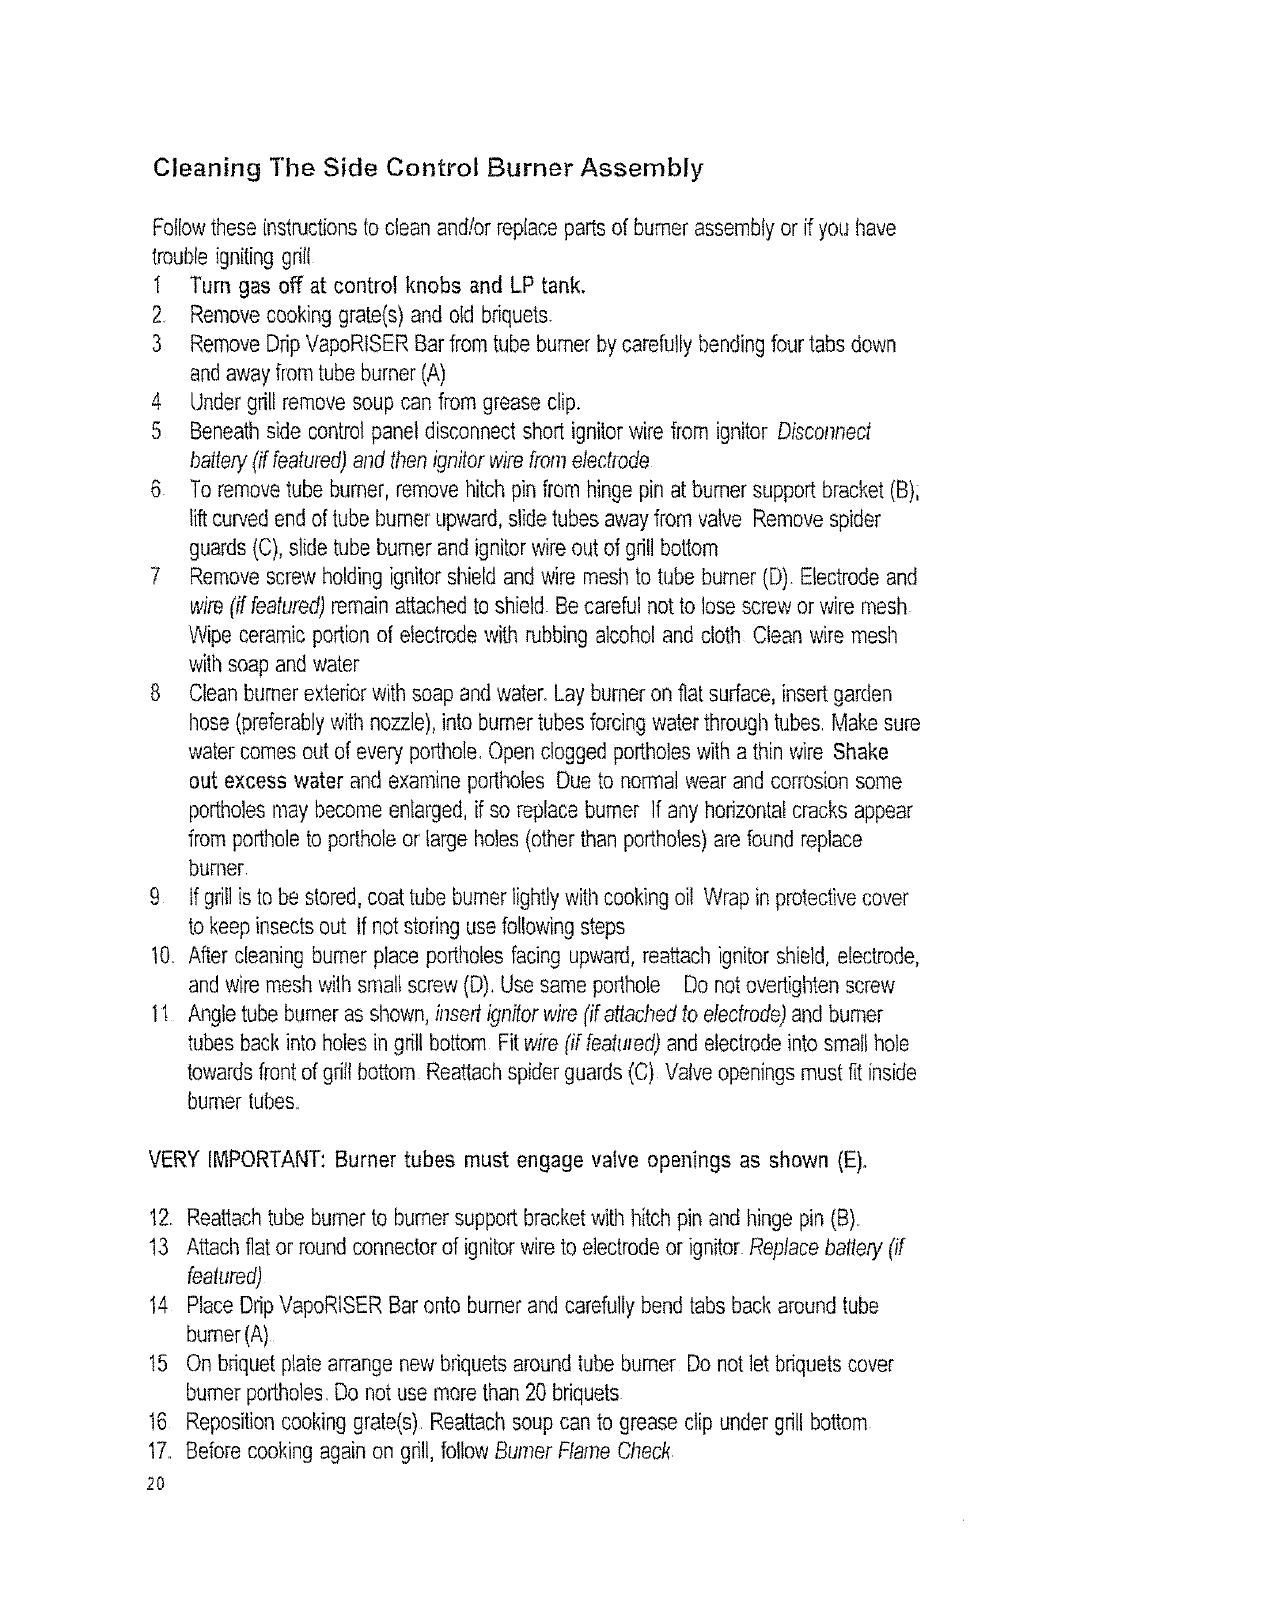
Cleaning The Side Control Burner Assembly
Followthese instructionsto clean and!or replace partsof burnerassemblyor if you have
Iroubleignitinggdll
I Turn gas off at control knobs and LP tank.
2 Removecooking grate(s) and otd briquets.
3 RemoveDripVapoRtSERBar from tube burnerby carefullybendingfour tabs down
andawayfrom tubeburner(A)
4 Undergrill remove soup can from grease clip.
5 Beneathside controlpanel disconnectshort ignitor wire from ignitor Discop_nect
battery(if featured)and then ignitorwire fromelectrode
6 To removetube burner,removehitch pin from hinge pin at burnersupport bracket(B);
lift curvedendof tube burner upward,slidetubes awayfrom valve Removespider
guards (C),slide tube burnerand ignitorwire out dgrill bottom
7 Removescrew holdingignitor shield and wire mesh to tube burner(D). Electrodeand
wire (if featured)remainattachedto shield. Be carefulnot to lose screw or wire mesh
Wipe ceramic portionof electrodewith rubbing alcoholand cloth Clean wire mesh
with soapand water
8 Clean burnerexlefior with soap andwater. Lay burneron flat surface,insert garden
hose(preferablywith nozzle),into burnertubes forcing waterthrough tubes Make sure
water comes out of every porthole.Open clogged portholeswith a thin wire Shake
out excess water and examineportholes Due to normalwear and corrosionsome
portholesmay becomeenlarged,if so replaceburner If any horizontalcracks appear
from portholeto per[holeor' large holes(other than portholes)are found replace
burner
9 tfgrill is to be stored,coat tube burnerlightlywittl cookingoil Wrap in protectivecover
to keepinsectsout If not storingusefollowingsteps
t0.. After cleaning burnerplace portholesfacing upward,reattach ignitor shield,electrode,
and wire mesh with small screw(D). Use same porthole Do notovertighten screw
11 Angletube burnerasshown,insert ignitorwire (ffattad_edto electrode)and burner
tubesback into holesin grill bottom Fit wire(if batu_ed)and electrodeinto small hole
towardsfrontof grillbottom Reattachspider guards(C) Valve openingsmust fit inside
burnertubes..
VERY IMPORTANT:Burner tubes must engage valve openings as shown (E),
12. Reattachtube burnerto burnersupport bracketwith hitch pin and hinge pin(B)
13 Attachflat or roundconnectorof ignitorwire to electrodeor ignitor Replacebattery (if
featured)
14 Place DripVapoRtSERBaronto bumer and carefullybend tabs back aroundtube
humor(A)
15 On briquetplatearrangenew briquetsaround tube burner Do not let briquetscover
burnerportholes.Do not use merethan 20 briquets
t6 Repositioncookinggrate(s). Reattachsoupcan to grease clip under grill bottom
17. Before cookingagain on grill, foltowBurner Flame Check
20
Drip VapoRISER Bar
Burner Support Bracket
\
P
Burner '
Tab
/
't " '
/
/
Hinge Pin
_Wire
Ignitor..i_l_..... Mesh -_.
Shield..... . :....
aurner_ - _
Screw _ /,,
\//
Electrode ___..:Z_.. 0% '_'_
\
_J Hitch Pin /
_J Control ,anel
\\
\\\\
\ \
\
\ Match-
ube Burner fighting hole
/
/
\
Non-Electronic Ignition Grills:
End of Ignitor Wire with round
connection goes to Ignitor
under Side Control Panel
2I
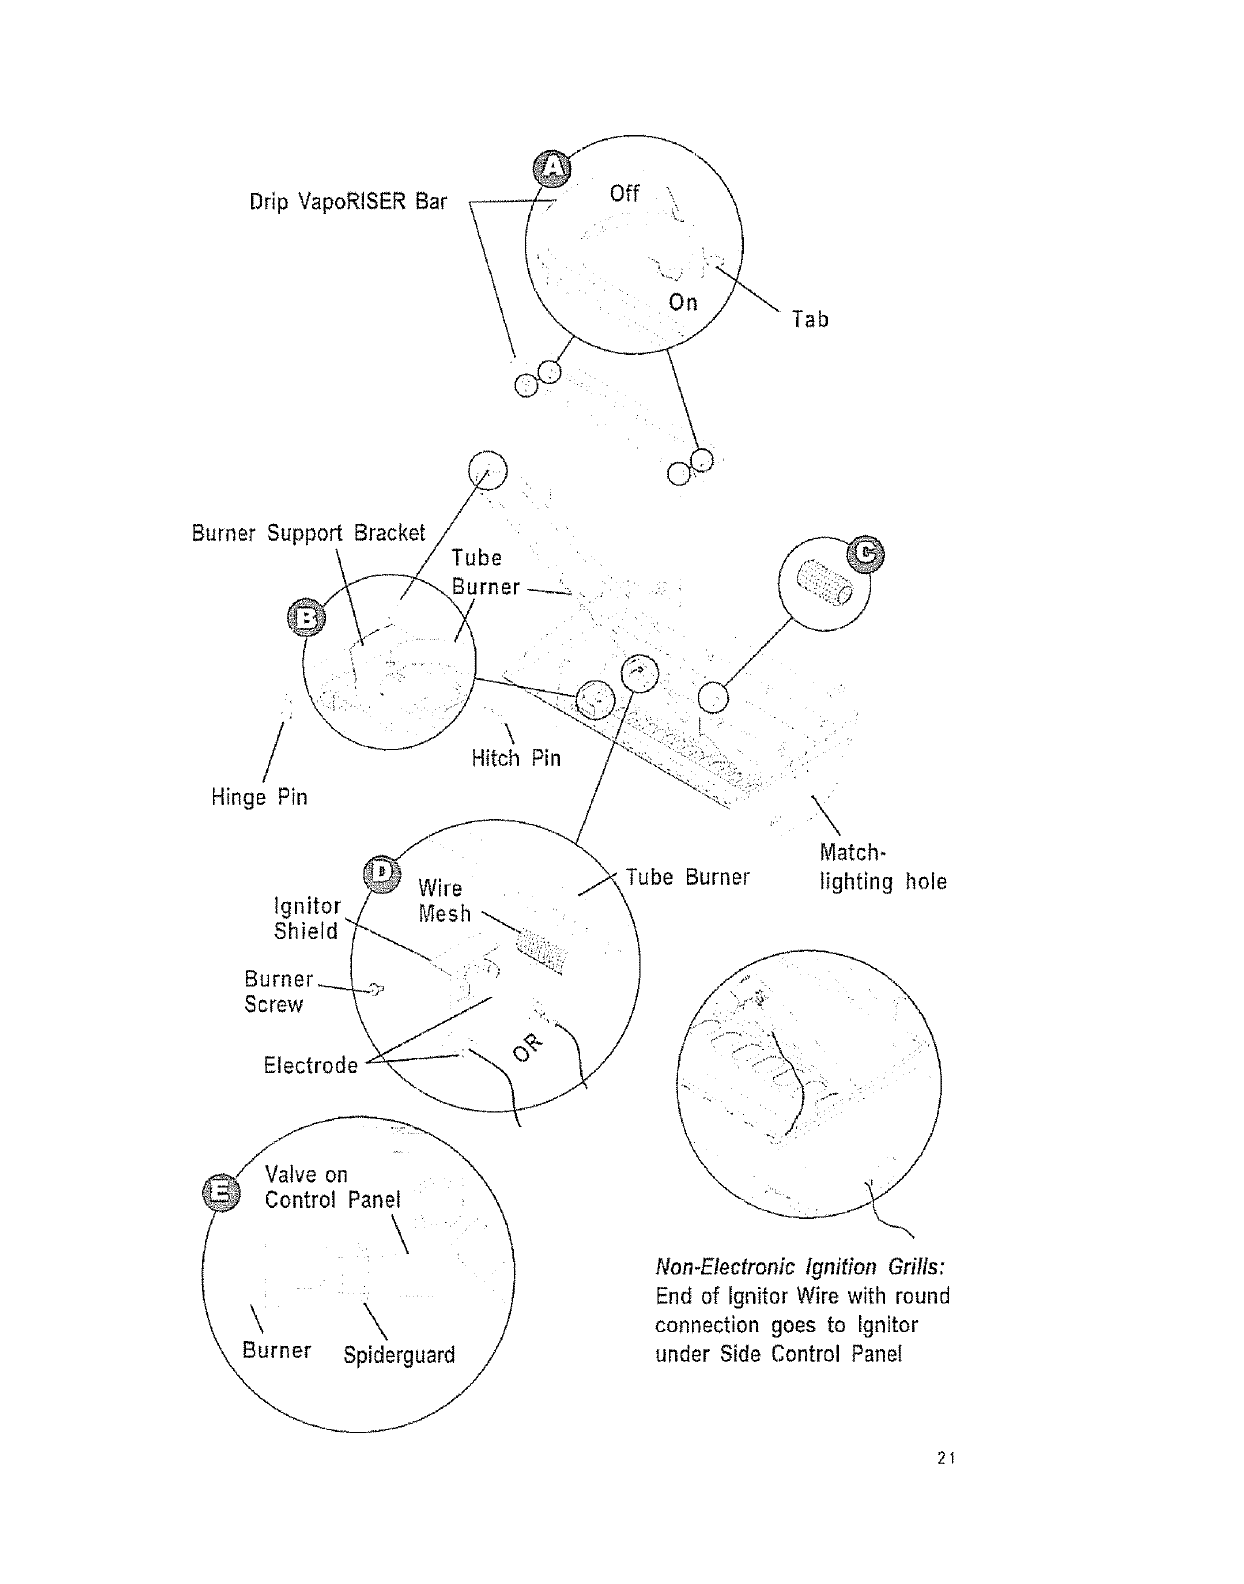
Cleaning The HeatWave Rotisserie Burner
Follow these instnJctionsto clean andtor replace parts or if you have trouble igniting
the HeatWave burner
1 Turn gas off at control knobs and LP tank,
2 Disconnectignitor wire from electrode(A)
3. Removescrew from shield (B), removeshield and clean any accumulationof grease
withsoap and water
4. Usingscrewdnver,pryclamp (C)off dgrill bottom,pry the otherclampoff Remove
HeatVVaveburnerfrom grill
5 Using gardenhose(preferablywith nozzle),force water throughburnertube. Make
sure watercomes out of every burnerporthole Open clogged portholeswith thin wire
6_ ExamineHeatWavehousingand burnerclosely(D). If any cracksor largeholes (other
than portholes)are found replace HeatWave burner.
7 Wipeceramic portion of electrode (A) with rubbing alcohol and cloth.
8 if grill is to be stored,coatburnerlightly with cooking oil Wrap withprotectivecover to
keepinsects out.
9 After burnerhas beencleaned,it may be necessaryto reshapeclampsby squeezing
themwith pliers,(justenoughto promotesnug fit)
10 Angle burnertube over gastube (E).Gas tube mustfit insideburnertube. With
electrodeon outside of grill bottom,lightly tap clampsonto grill with hammer
VERY IMPORTANT:Do NOT hit ceramic electrode while tapping clamp onto
grill bottom. A cracked electrode will not operate!
VERY IMPORTANT:Burner tube must engage gas tube as shown (F).
1t Attachflat end of ignitorwire (A) to electrode.Make surewire runsundemeathcasting
seat
12. Positionshieldover burnertube (B) and attachwith screw.
22
Gas Tube
Housing
"?. " /
'L
.. _l_:t" ] :
Burner Portholes _ i.>
Burner Tube
/
Gas Tube , /
i
\ i =u=erTo_e
i i
i ..................
i!
..........................................................................i:....
23
Seasoning And Using Cast Iron Cooking Grates
Before using cast iron grates wash with dish washing liquid to remove a waxed
coating used for protection in shipping. Rinse with hot water and dry complete!y
Never allow to drain dry, or wash in a dishwasher. Tt}is can cause rust and cause
food io have a metallic taste or discolor foods After drying grates, coat entire surfaces
with a thin coat of solid vegetable shortening, Do not use salted fat such as margarine
or butter
Place grates into grill, light grill and turn to tow for one (1) hour Turn off all control
knobs Leave grates in grinto cool Your cast iron grates are ready to use Repeat if
necessary
You may also season cast iron grates in the oven Follow instructions above to
wash, dry and coat entire surface with solid vegetable shortening Put grates on top
rack of a clean oven Place alum!nun1foil on lower oven rack to catch any drippings,
Bake in a 300 degree oven for I hour. Turn oven off, teave grate(s) in oven to cool to
room temperature If oven is to be used immedialely after seasoning use hea! resistant
barbecue mitts or pads to remove grates horn oven while HOT Place grates on a heat
resistant surface and aflow to cool to room temperature
Always clean grates immediately after each use Rinse and dry thoroughly If there
is a lot of food sticking to the grates clean with a steel wool scouring pad Rinse well
with hot water and re-season in grill or oven per instructions
Prior to storing, grease very lightly with a solid vegetable shortening or a vegetable
cooking spray, wipe dry with a papertowel Store in a dry place.
Cast iron grates will turn black with use The pores of the iron will be sealed,
providing a durable coating that helps to prevent foods from sticking and reduces
corrosion. Grates will further season with use Regular'applications of a thin coat of
solid vegetaNe shortening or vegetable cooking spray will improve its resistance to
rust
Cast iron holds heat wel!, you will not need to use extremely high cooking
temperatures when grilling A Do not drop cast iron gtates, they will break
Repainting Your Grill
. After extended use and exposure to weather, paint on grill may deteriorate or
become spotted Although this detracts from grill's appearance, it will not impair its
performance
To refinish your grill brush outside of grill lid and bottom with wire brush and lightly
sand with fine grit sandpaper Sandingallows new paint to adhere more easily
Wash grill lid and bottom with soap and water to remove dust and grease. Do not
use a grill cleaner on outside of grill Wipe with vinegar Refinish outside with heat-
resistant paint, Do not paint inside of grill.
Care Of Wood
.Wood items can be sanded lightly with fine grit sandpaper Refinish with stain, paint
or water sealant
24
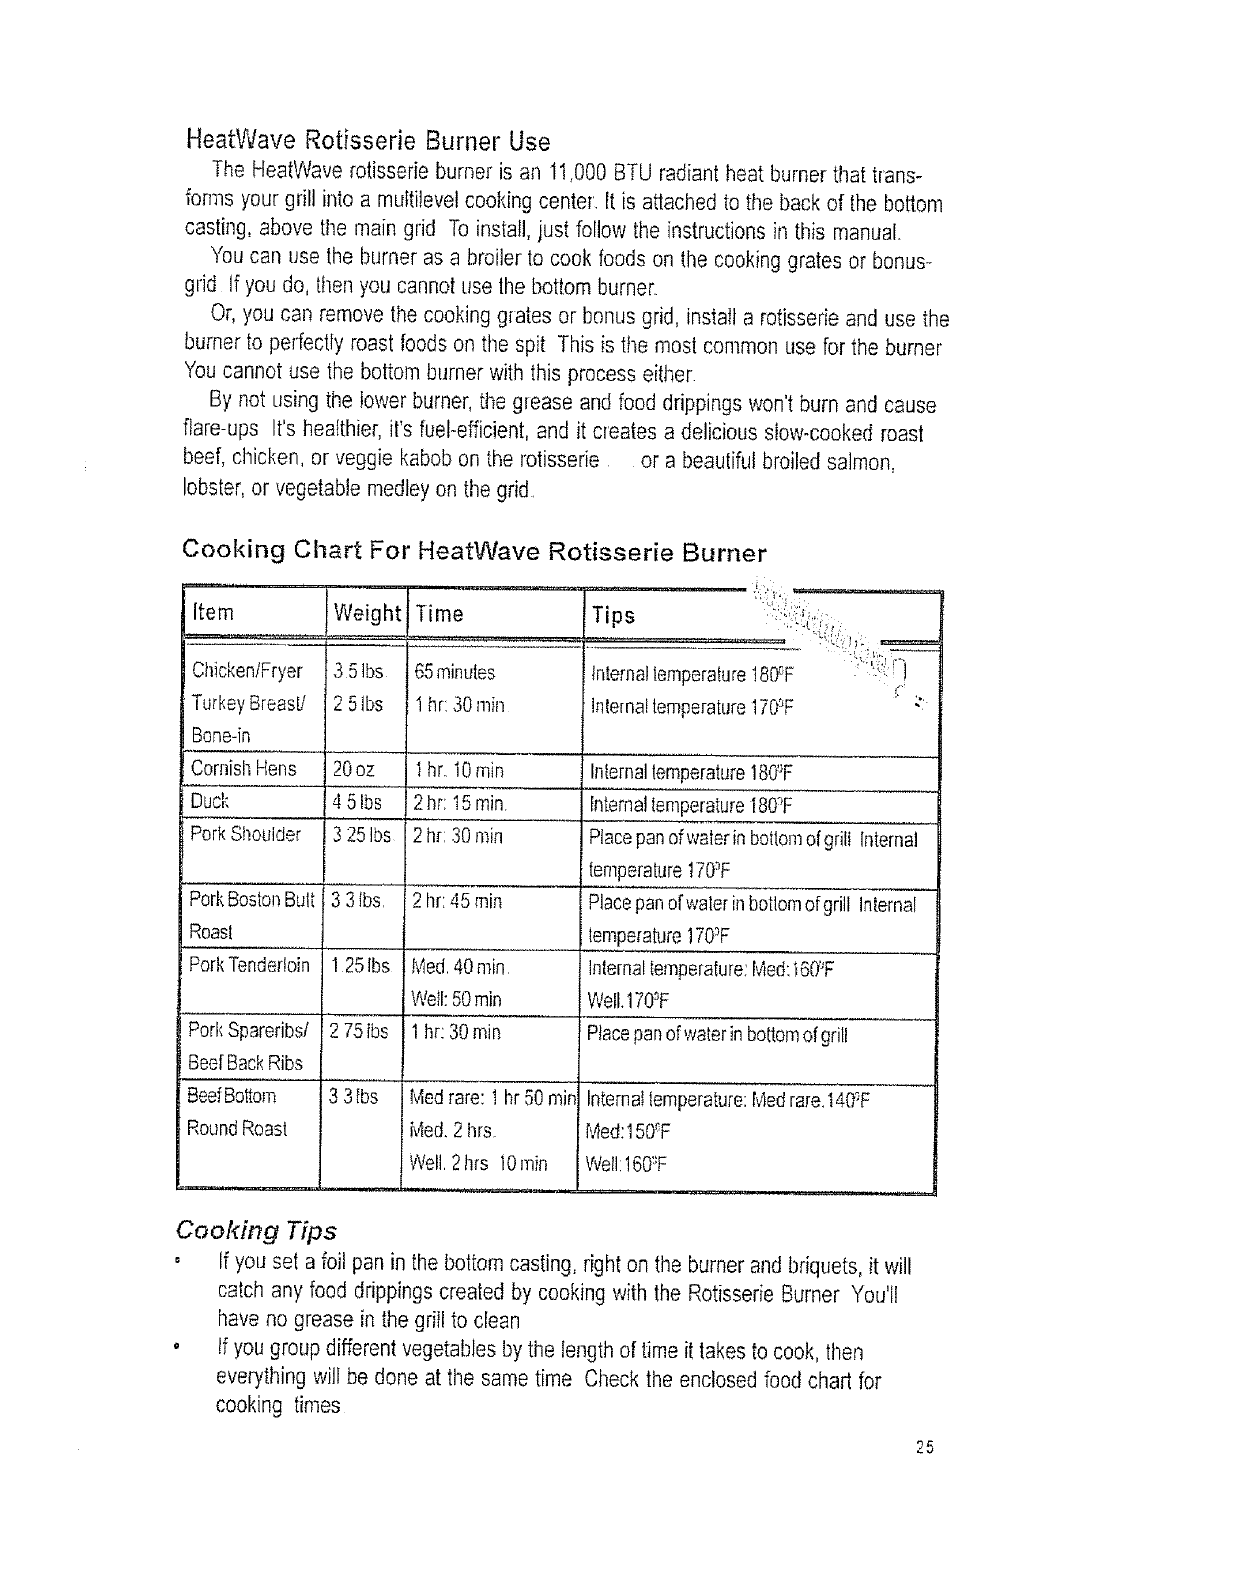
HeatWave Rotisserie Burner Use
The HeatWaverotisserie burner is an 11,000BTU radiant heat burner that trans-
forms your grill into a multilevel cooking center It is attached to the back of the bottom
casting, above the main grid To install, just follow the instructions in this manual.
Youcan use the burner as a broiler to cook foods on the cooking grates or bonus-
grid If you do, then you cannot use tile bottom burner
Or, you can remove the cooking grates or bonus grid, install a rotisserieand use the
burner to perfectly roast foodson the spit This is the most common use for the burner
Youcannot use the bottom burner with this process either
By not using the lower burner, the grease and food drippings won't burn and cause
flare-ups It's healthier, it's fuel-efficient, and it creates a delicious slow-cooked roast
beef, chicken, or veggie kabob on the rotisserie or a beautiful broiled salmon,
lobster,or vegetable medley on the grid.
Cooking Chart For HeatWave Rotisserie Burner
}
Weight Time ips
........ t _2!t,_r--
351bs 65minutes Interna!lemperalure 180C'F :':, ]
!2 ;:,
Item
ChickenlFryer
Turkey Breast!
Bone-in
CornishHens
Duck
PorkShoulder
PorkBostonBult
Roasl
Pork Tenderloin
i Pork Spareribs/
iB -_ '
, ee_uacKRibs
BeefBottom
RoundRoast
2 5tbs 1hr: 30 rain
20oz I hL 10min
!
45 Ibs 2 hr:15rain
"3'25ibs 2hr:30rain
33Ibs, 2hr:45min
251bs Med,40min
We_l:50min
2 751bs 1 hr: 30 rain
3 3Ibs Med rare: 1 hr 50rain
IMed. 2 hrs
.... [!Veil, 2hrs ,Omin
Inlemal temperature170_F
Inlernaltemperature 180'_F
InternalIemperature t 80"F
Placepan of waler inbotlomof grill Internal
temperaturet 70_F
Placepanof water in bot!omof grill Internal
temperature 170_F
Inlerna!temperature:Med:i60"F
Well.170_F
Placepanof waterin bottomof grill
Internat lemperature:Med rare.I40;F
Med:150_F
Wetl:160_F
Cooking Tips
, If you set a foil pan in the bottom casting, right on the burnerand briquets, it will
catch any food drippings created by cooking with the Rotisserie Burner You'll
have no grease in the grill to clean
• tfyou group different vegetaNes by the length of time it takes to cook, then
everything will be done at the same time Check the enclosed food chart for
cooking times
25
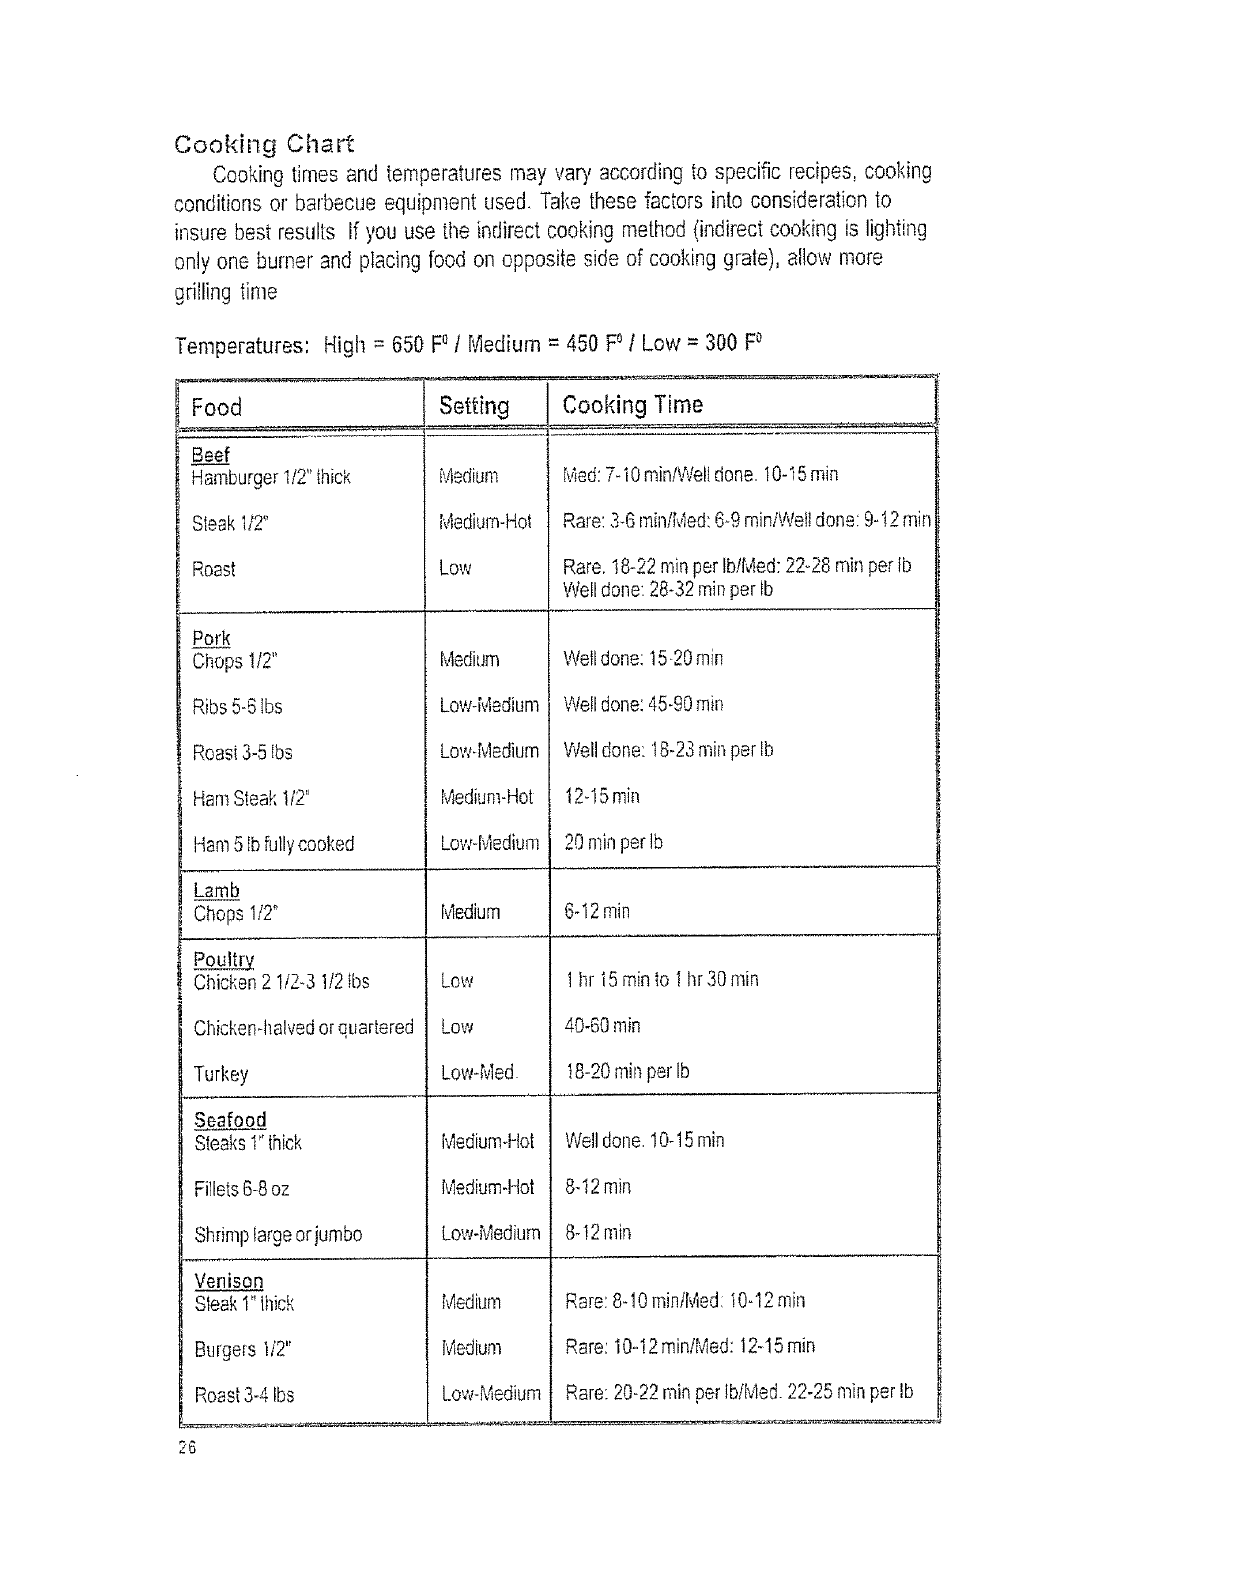
Cooking Chart
Cooking times and temperatures rnay vary according to specific recipes, cooking
conditions or barbecue equipment used, Take these factors into consideration to
insure best results If you use tile indirect cooking method (indirect cooking is lighting
only one burner and placing food on opposite side of cooking grate), allow more
grilling time
Temperatures: High = 650 F_IMedium =450 F° 1Low =300 F°
Food
Beef
Hamburger1f2" _hick
SteakII2"
Roast
Pork
Chops 112"
Ribs 5-6Ibs
Roast3-5 Ibs
HamSteak 1t2"
Ham5 Ib fullycooked
Lamb
ChopsI12"
Chicken 2 !12-3 ti2 fbs
Chicken-halvedor quartered
Turkey
Seafood
Steaks1"thick
FFlets6-8oz
Shrimplarge orjumbo
Venison
Steak1"lhick
Burgers 112"
Roast 3-4Ibs
26
Setting
Medium
Medium-Hoi
Low
Medium
Low-Medium
Low-Medium
Medium-Hot
Low-Medium
Medium
LOW
Low
Low-Nled
Medium-Hot
Mediumdqot
Low-Medium
Medium
Medium
Low-Medium
Cooking Time
Med:7-i 0min!Weltdone. 10-t5 rain
Rare:b6 rninlMed:G9 minlWeil done: 9-12 rnin
Rare. t8-22 rainper IbiMed: 22-28 rain pertb
Well done: 28-32 rainper fb
Well done: 15-20rain
Well done: 45-90rain
Well done: 18-23rainper Ib
t 2-15nTin
20 rainperIb
G12min
1hr I5 rainto 1hr 30 rain
40-60rain
t8-20 rainper Ib
Well done. 10-15min
8-I2 rain
8d2min
Rare: 8-10minfl_l_d: t0-12 rain
Rare: IGI2 minlMed: 12-15rain
Rare: 20-22 rainper IblMed. 22-25 rainper Ib

Food
_Vfigetables
Wrap vegetablesinfoil
Bakingpolato, whole
Onions,whole
Tomaloes,half
Corn,whole
Mushrooms
Food Safety
Setting
Low
Low
Medium
Low
Medium
i-
Cooking Time
55-60rain
45rain
3040 rain
35-45rain
t5-20 min
• Food safety is a very important part of enjoying the outdoor cooking experience.
To keep food safe from harmful bacteria, follow these four basic steps:
Clean: Wash hands, utensils, and surfaces with hot soapy water before and after
handling raw meat and poultry.
Separate: Separate raw meats and poultry from ready-to-eatfoods to avoid cross
contamination. Use a clean platter and utensils when removing cooked
foods.
Cook: Cook meat and poultry thoroughly to kil! bacteria. Use a thermometer to
ensure proper internal food temperatures,
Chill: Refrigeratepreparedfoods and leftovers promptly.
For more information call: USDA Meat and Poultry Hotline at
1-800-535-4555 In Washington, DO (202) 720-3333, 10:00 am-4:00 pm EST
How To Tell If Meat Is Grilled Thoroughly
. Meat and poultry cooked on a grill often browns very fast on the outside Use a
meat thermometer to be sure food has reached a safe internal temperature,and
cut into food to check for visual signs of doneness.
. Whole poultry should reach 180:' F; breasts, 170_F Juices should run clear and
flesh s!_ouldnot be pink,,
. Hamburgersmade of any ground meat or poultry should reach 160_F,and be
brown in the middle with no pink juices. Beef, veal and lamb steaks, roasts and
chops can be cooked to 1450F All cuts of pork should reach 160o F
o NEVER partially grill meat or poultry and finish cooking later. Cook food
completely to destroy harmful bacteria
• When reheating takeout foods or fully cooked meats like hot dogs, grill to 165_ F,
or until steaming hot,
27
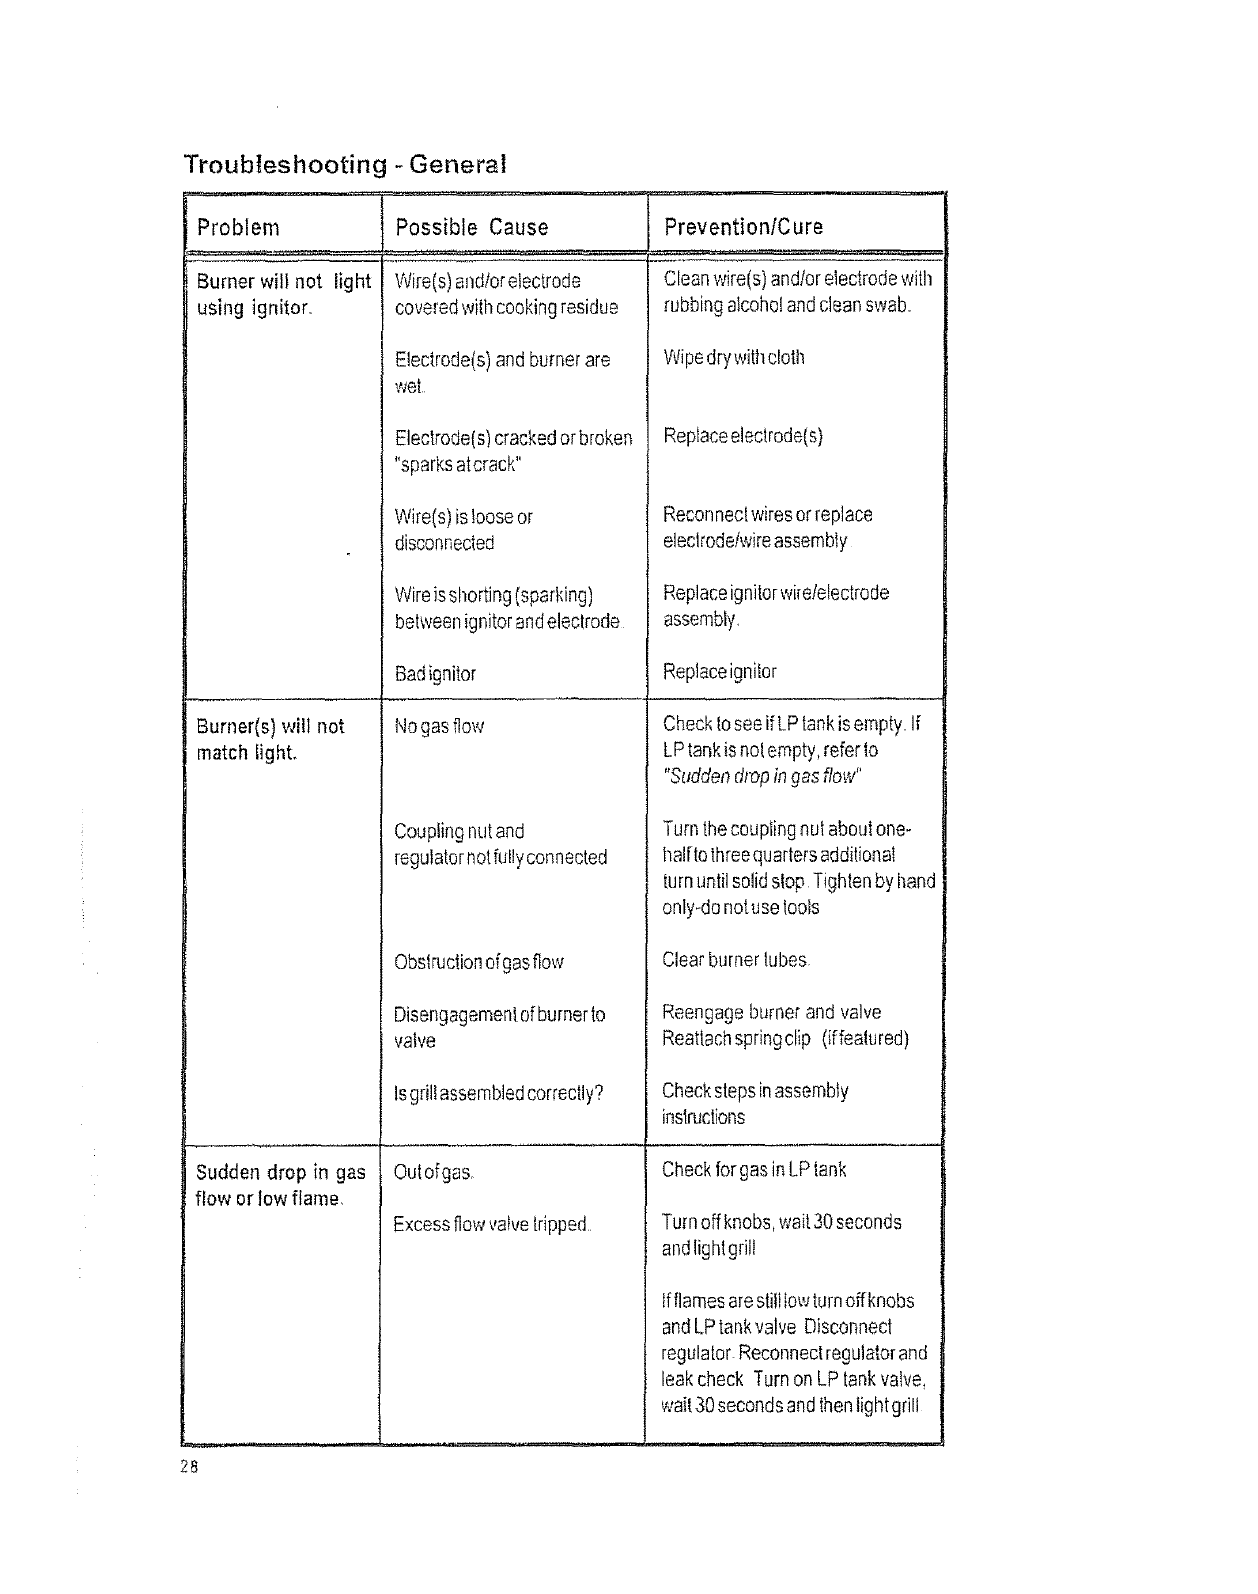
Problem
Burner will not light
using ignitor.
Troubleshooting - General
Possible Cause
Wire(s)and/or electrode
coveredwith cookingresidue
Electrode(s) and burner are
wet
Electrode(s) crackedor broken
"sparksatcrack"
Wire(s) isloose or
disconnected
Wireis shorting(sparking)
Burner(s) will not
match light°
Sudden drop in gas
flow or low flame,
PreventiontCure
Cleanwire(s) and/or electrodewith
rubbingalcohol anddean swab.
Wipe drywithclofl_
Replaceelectrode(s)
betweenignitor andelectrode
Badignitor
No gas flow
Reconnectwires orreplace
eleclrodelwireassembly
Replaceignitorwire/electrode
28
Coupling nutand
regulatornotfullyconnected
Obsiructionof gasflow
Disengagemen!ofburnerto
valve
Isgril! assembledcorrectly?
Outofgas.
Excessflow vaivelripped
assembly,
Replaceignitor
Check tosee if LPtank isempty. If
LPtank is nolempty,refer to
"Suddendropin gas flow"
Turn the coupiing nut aboutone-
halfto threequartersadditional
turn until solidstop Tightenby I_and
only-do notuse toois
Clear burnertubes
Reengage burner and valve
Reatlachspringclip (iffealured)
Checkstepsinassembfy
inslructions
Check for gas in LPtank
Turn off knobs,wait30seconds
andlighi grill
Ifflames arestilltowturn offknobs
andLPtankvalve Disconnecl
regulator Reconnectregulator and
leak check Turn on LP tank valve,
wait30seconds andthenlight grill
Problem
Flames blow out
Flare-up
Persistent grease
fire (can damage
the appearance of
steel panels and
aluminum castings
on the grill),
Possible Cause
Highorgustingwinds
Low on LPgas
Excessflow valvetripped
Greasebuildup
Excessivefafin meat
Excessivecooking
tempera[ure
Grease trapped byfood
buildup around burner
system
Greasesoakedinto briquets
PreventienlCure
Turn frontof gril! to facewind or
increaseflameheight
RefillLPtank
Refer to "Suddendropin gas flow"
above
Cleangrill
Trimfatfrommeatbeforegrilling
Adjust(lower)temperature
according}y
Turn knobs1oOFF Turn gas offat
LPlank Leavelidin positionandlet
fire burnout Aflergnl! cools,
lemoveand de anallparts
Replacebriquets Ifcookingwithfatly
mealsremovebriquels.
Flashback -Burner and/or burner tubes Clean burnerand/or burner tubes
(fire in burner Iube(s) areblocked
Unable to fill LP
tank
Somedealers haveolder fifl
nozzleswithworn threads
The worn t]ozzles don't have
enough"bile" toengage the valve
Try a second LPdealer
29
Troubleshooting - Electronic
Problem Possible Cause Check
Procedure
No sparks Batterynotinsta!led Doesbattery stideout
completely of modulewithlittle
effort?
appear at any
electrodes when
ignition switch
is pushed; no
noise can be
heard from spark
module_
Dead battery or
incompleteswilch
connections
FaultyswiIch
No sparks
appear at any
electrodes when
ignition switch
is pushed; noise
can be heard
from spark
module.
Faulty sparkmodule
Outpuflead
connectionsnot
complete
lncompleteground
connection,
Ignition System
Solution
Hasbattery been
used previously?
Are ignitorswitch
wiressecurely
relainedin spark
module?
Withanew battery
installed,insertthe
endsdan unfolded
paperclip into each
ofthe openingsonthe
switchreceptacle If
sparksare generated
atlheelectrodes,
switchis faulty.Note:
Remove paperdip
aflerlest
If nosparks are
generatedincheck
forfadty switch,
moduleisfaully.
Areoutput
conneclionson and
tight?
is ground ring
terminal loose on
mountingscrew?
(If'featured)
Installbattery (makesure
hat"+" and %"connectors
areoriented correctly);
battery should snap when
completelyinstalled
Replacebattery with new 9-
voltalkaline battery Push
ignitorswitchwiresinto
sparkmodule
Replaceignitionswitch
Replacesparkmodule
assembly
Remove andreconnect all
outputconnectionsatmodule
andelectrodes
Tightenmountingscrew with
ground ring securely to leg
assembly
3O
1
Possible Cause 1Cileck
l
I Procedure
Outputfead Areoutput
connectionsnot cormecfionsonand
complete [igii?
Incompleteground Is ground ring
conneciion terminalIooseon
mountingscrew?
(Iffealured)
Problem
Sparks are
3resent but not
at all electrodes
andlor not at full
strength.
Arcing to grill away
from burner(s)
Weakbaltery
Electrodesarewet
Electrodescrackedor
broken "sparks a!
crack"
Ifpossible,observe
gri/till darklocation
Operateignition
system andIookfor
arcingbekveenoutpul
wiresand grillframe
Ailsparks presentbut
weakor a( slow
rate
Hasrnoisture
accumlJlatedon
electrodeandlor in
burnerporls?
lnspec[efeclrodesfor
cracks
Solution
Remove andreconnectall
outputconneclionsatmodule
andelectrodes
Tightenmounlingscrewwith
ground ring securely Io leg
assembly
If sparks areobserved olher
lhan from burner(s),wire
insulationmaybedamaged
Replacewires
Replacebatlery witha new
9-voll all<alinebatlery.
Usepaper loweI toremove
moisture
Replace cracked or broken
electrodes
Storing Your Grill
, Clean cooking grate(s) and discard old briquets or lava rock.
• Store in dry iocation
•When LP tank is connected to grill, store outdoors in well-ventilated space and out
of reach of children.
• Covergrill if stored outdoors Choosefrom a variety of grill covers offered by Char-
Broil
,Store grill indoors ONLY if LP tank is turned off and disconnected, removed from
grill and stored outdoors
, When removing grill from storage follow Cleaning Bulner Assembly instructions
before starting grill
3_
4639071
Ifyouhavequestionsorneedassistanceduringassembly,
ple_s_ ca)} 1-800-241-7548o
ASSEMBLY
MANUAL
This Grill is for
Outdoor Use Only
Caution:
Read and foflow all
Safety Statements,
Assembly
Instructions, and Use
and Care Directions
before attempting to
assemble and cook.
Installer Iassembler:
Leave these
instructions with
consumer.
To Consumer: Keep
this manual for future
reference.
WARNeNG
• Failure to follow all
manufacturer's
instructions could result
in serious personal
injury andlor property
damage.
CAUTHON
, Some parts may contain
sharp edges -especially
as noted in the manual!
Wear protective gloves if
necessary.
_ 4_3g_J7_t0-41_t6_0 (3-1_Q)
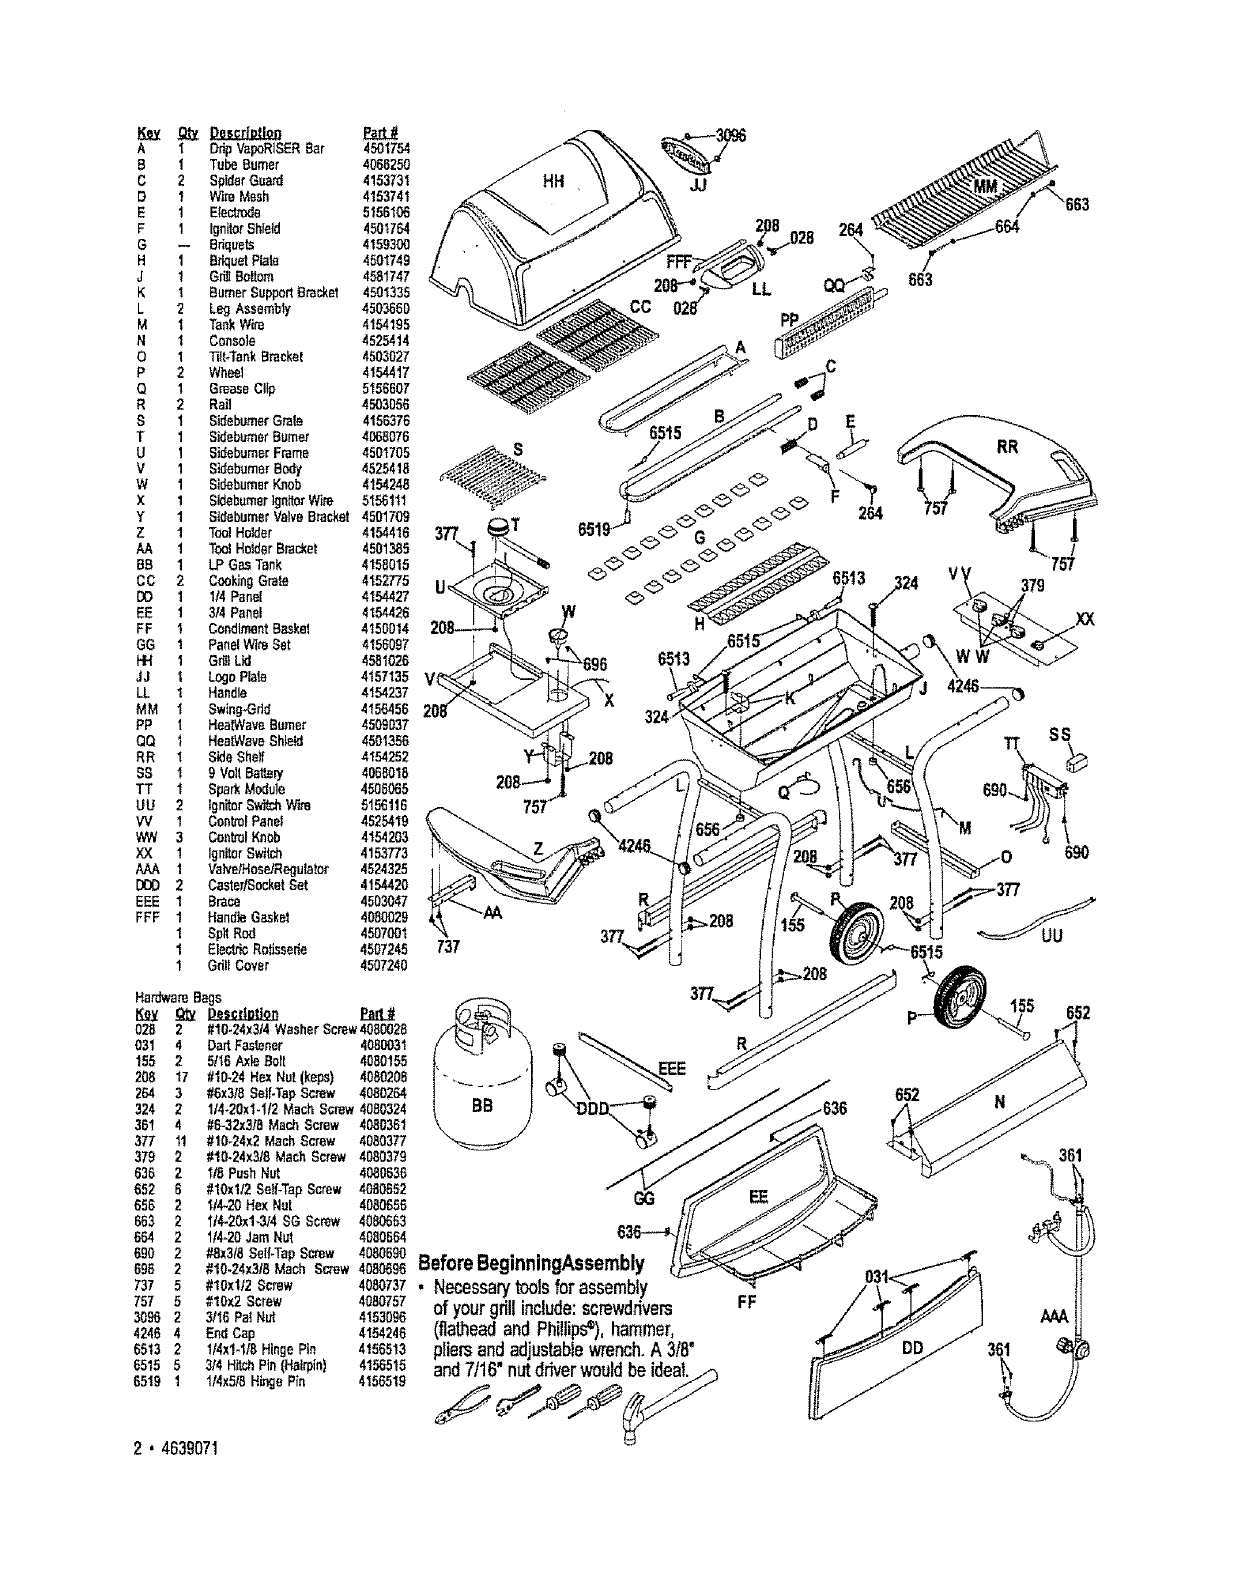
AIDdpVapoRISERBar 4501754
S 1 TubeBurner 4068250
C 2 SpiderGuard 4153731
D1WireMesh 4153741
E I E_ecttode 5150106
F1 IgnitorShield 4501764
G-- Briquets 4159300
H 1 BriquetRale 4501749
J1GCkBoitore 4581747
KI BurnerSupportBracket 4501335
L 2 LegAsserebly 4503650
M 1 TankWire 4154195
N 1 Console 4525414
O 1 31it*TankBracket 4503027
P 2 Wheel 4154417
Q 1 GreaseCltp 5156007
R2Rat] 4503056
S 1 SidebL_'nerGrate 4156376
T1SidebumerBurner 4068076
U1SidebumerFrame 4501705
V1 SidebumerBody 4525418
W 1 SideburmerKnob 4154248
X 1 SIdebureer]gnito_"Wire 5156111
Y 1 SidebumerValveBracket 4501709
Z 1 TootHolder 4154418
AA 1 ToolHoSderBracket 4501385
BS 1 LP GasTank 4158015
CC 2CookingGrate 4152775
DO 11/4Panel 4154427
EE 1 3t4Panel 4154426
FF 1CondimentBaskel 4150014
GG !PanelWireSet 4158097
PH 1G_ Lid 4581026
JJ 1LogoPlal_ 4157135
LL 1 Handle 4154237
MM 1 Swleg-Gdd 4156456
PP I HeatWaveBemet 4509037
QQ 1 HaatWaveSh_e_ 4501355
RR 1 SideShetf 4154252
SS 19VoltSat_ 4068018
TT 1Span Module 4508065
UU 2 IgnitorSwit_ Wire 5156116
W1CentrofPanel 4525410
WW 3 ControlKnob 4154203
XX 1IgnitorSwitch 4153773
AAA 1 Vah/e/Hos_dRegu]ator 4524325
DDO 2 Caster/SocketSet 4154420
EEE 1Brace 4503047
FFF 1HanitieGasket 4080029
1SpltRod 4507O01
IElectricRo_ser_e 4507248
1GrtllCover 4507240
HardwareBags
028 2#10-24x314WasherScrew4080025
031 4 DartFastener 4080031
155 2 5116AxleBolt 4080155
208 "17 #1024 Hax Nut (keps) 4880208
264 3 #5x318Seif-TepScrew 4080264
324 2 114.20x1.II2MachScrew4080324
36t 4 #0-32x3/8MschScrew 4080361
377 11 #I0-24x2 MachScrew 4080377
379 2 #10-24x3/8Mach Screw 4080379
636 21t8 PushNut 4080636
652 6 #10xi12Self-TapScrew 40it0652
650 21/4,-20Hex Nat 4080650
663 2 1t4.20xl-314SGScrew 4080653
664 2 1/4-20JamNut 4080564
690 2#8x3/8Self-TapScrew 4080690
695 2 #10-24x3/8Mech Screw 4080696
737 5 #10x112Screw 4080737
757 5 #10x2 Screw 4050757
3096 2 3115PatNut 4153096
4246 4 End Cap 4154246
6513 2114x1-118HingePin 4156513
6515 5 3/4 HitchPin(Hairpin) 4156515
6519 1l14xSf8HiegeP{n 4156519
2. 4639071
JJ
LL 663
o:C
6513
69O
737
GG
.636
652
BeforeBeginningAssembly
,Necessarytoolsfor assembly
of yourgrillinclude:screwdrivers
(flatheadand Phillips=),hammer,
pliersandadjustablewrench.A3f8"
and7/16"nutdriverwouldbe ideal..._
FF
@
2O8
Qty.4
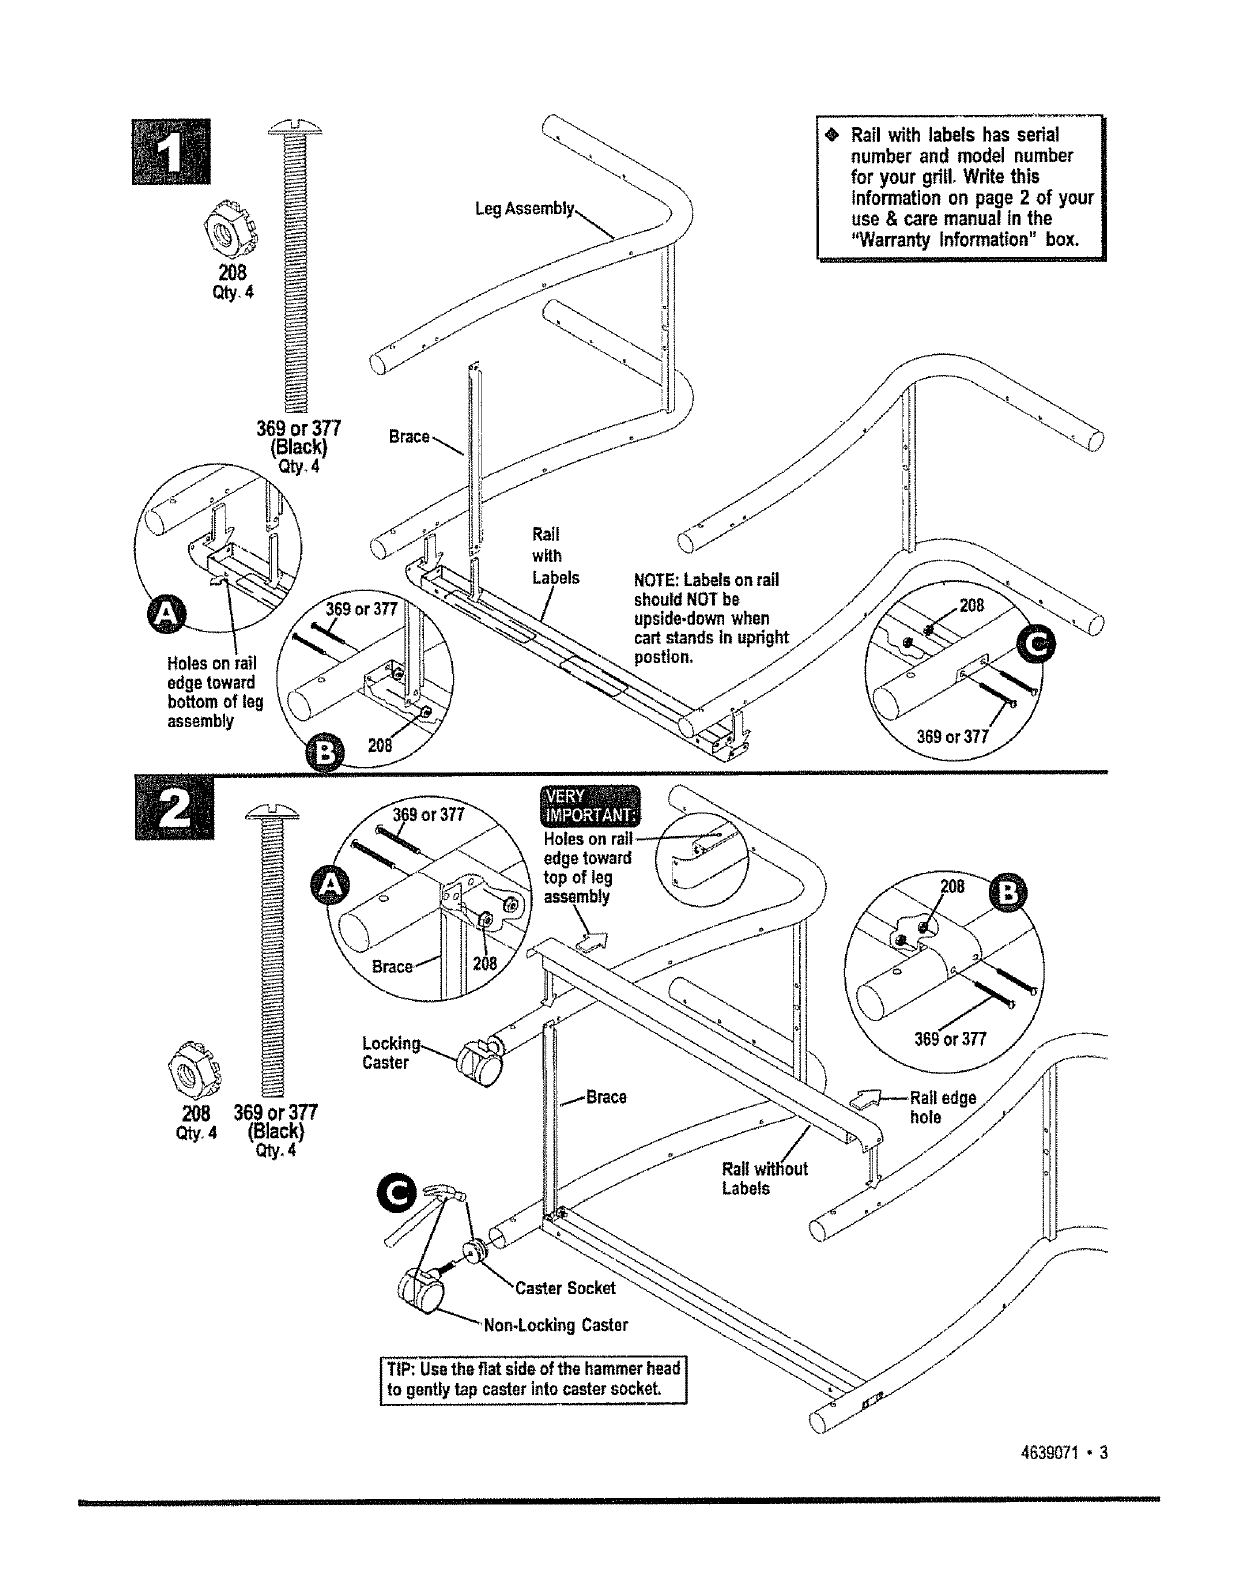
Le
,I, Rail with labels has serial
number and model number
for your grill,Write this
information on page 2 of your
use & care manual in the
"Warranty Information" box.
,,u,i
369 or 377
Holesonrai
edgetoward
bottomof leg
assembly
or377
Rail
w_h
Labels NOTE:Labelsonrail
shouldNOTbe
upside.downwhen
cartstandsIn upright
postlon.
369or377
@
2O8
Qty,4
369 or 377
(Black)
Qty.4
Lockin
Caster
edge toward
top of leg
Labels
hole
Socket
Non-Locking Caster
TIP: Usethe fiatside the head]
of hammer
to gentlytap casterinto castersocket. 1
4639071 • 3
ii_lll i i i, i lU lUU I I I I IIII IIII IIIIIIIIIIII
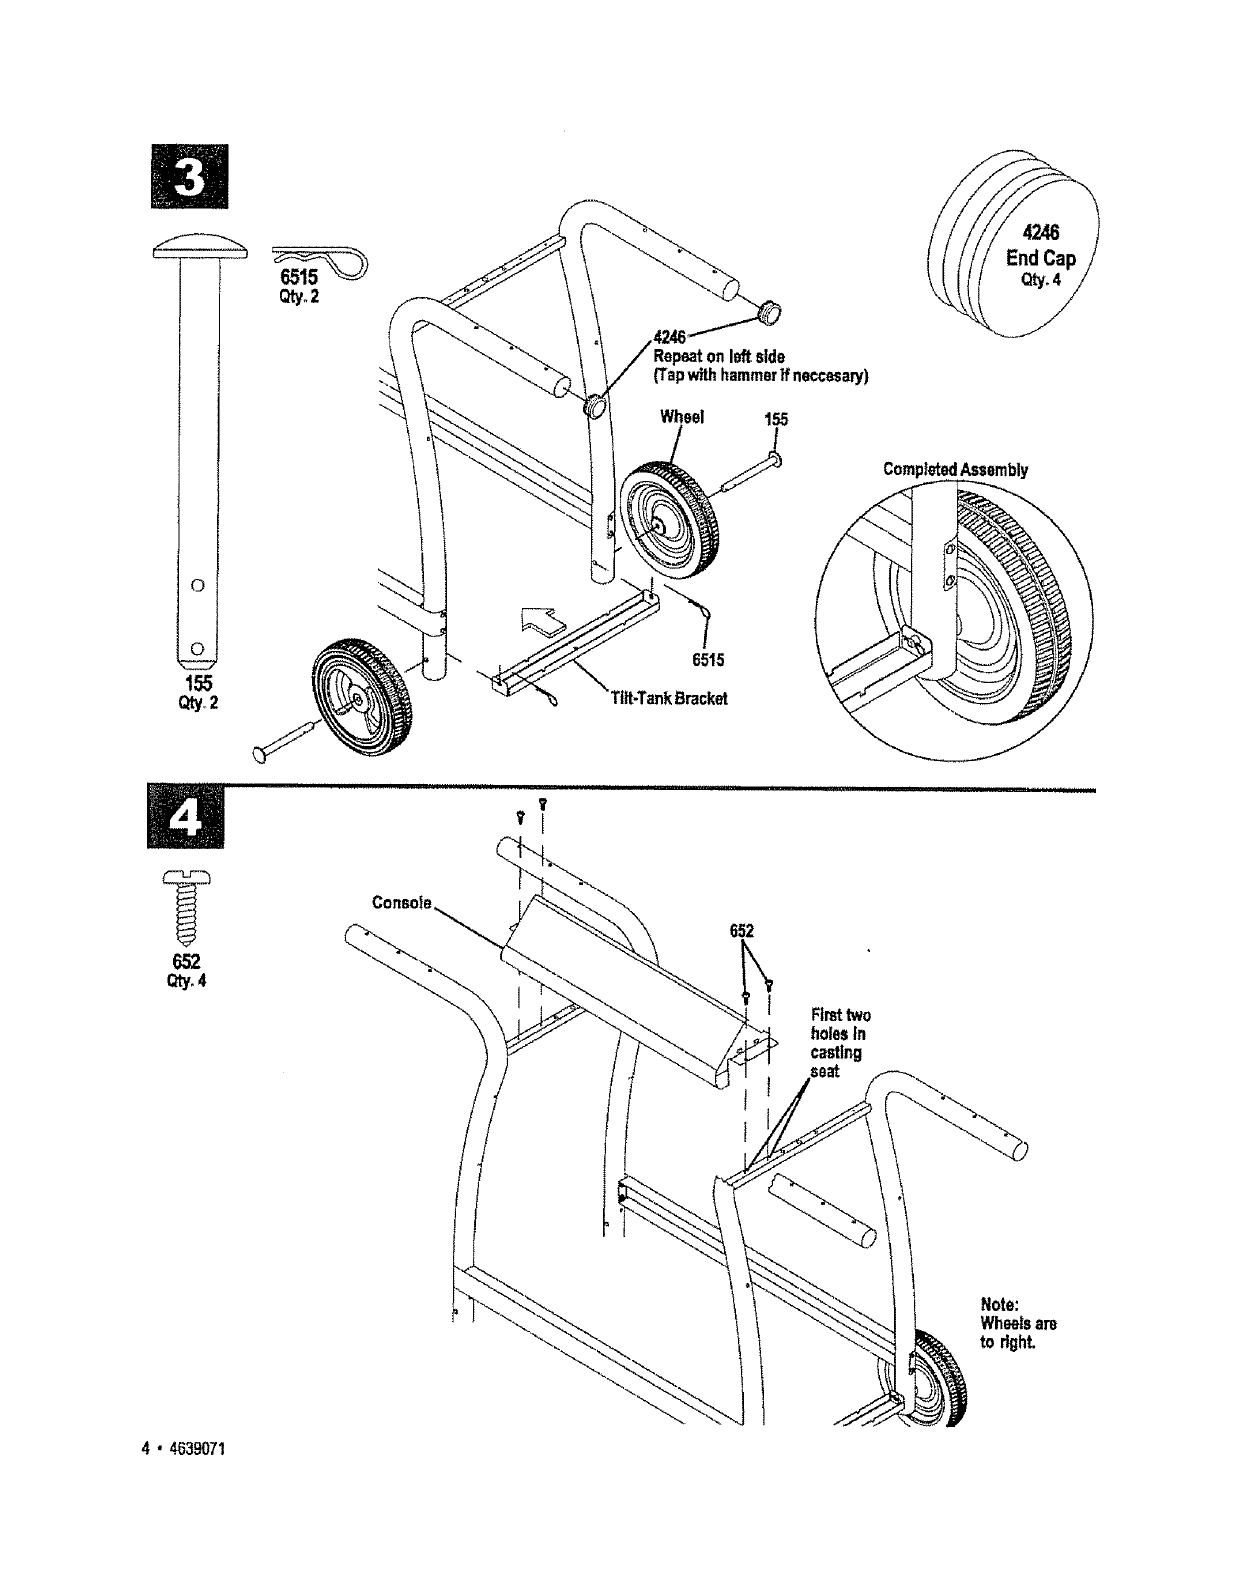
155
Qty,2
leftside
(Tapwithhammerif neccesanj)
Wheel 155
CompletedAssembly
t
652
Qty.4
Vl
652
Firsttwo
holesIn
casting
Note:
Wheelsare
to right.
4.4639071
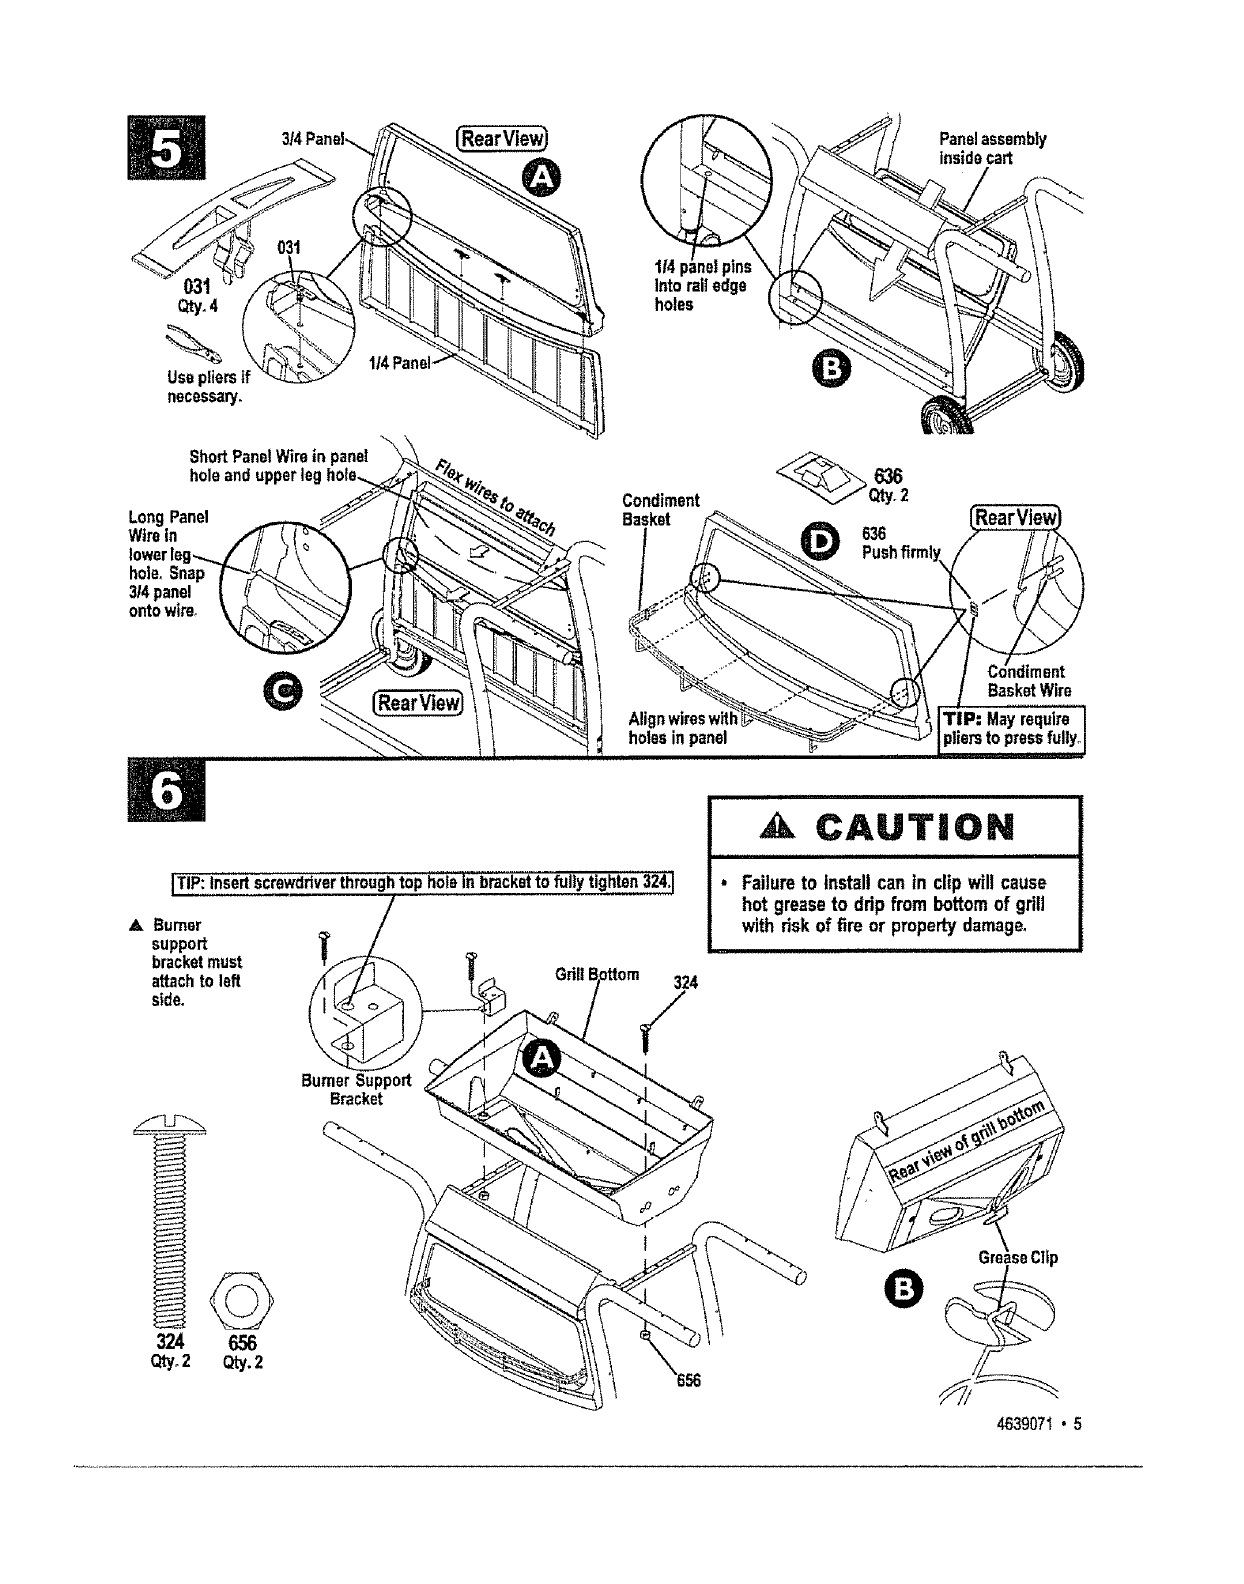
Qty.4
Usepliersif
necessary.
ShortPanelWireinpanei
holeandupperleghole,.,
LongPanel
Wirein
hole.Snap
3/4panel
ontowire.
RearView)
1/4
Into r_iiedge
holes
Condiment
Basket
Panelassembly
insidecart
636
Pushfirmlyx
BasketWire
]TIP: Insertscrewdriverthroughtop holein brscl_etto fully tighte,n,,324;.
ABurner
support
bracketmust
attachto left
s_de.
324 656
Qtyo2 Qty.2
BurnerSupport
Bracket
324
CAUTION
• Failureto installcan in clip will cause
hot greaseto ddp from bottomof grill
with riskof fire or propertydamage°
O
4639071*5

PlateRest
264
Withburnerholesfacingupward,usefirst
holeIn bumero
Center
of tube
Correct
ATightento snugf'_.
Ovedighteninl;
hole onburner,
Incorrect
APushelectrodeto right,
into slot.
6 • 4639071
CorrectJyattachedignitor
shleld/etoctrodeaesembly
Qty.1
Qtyol
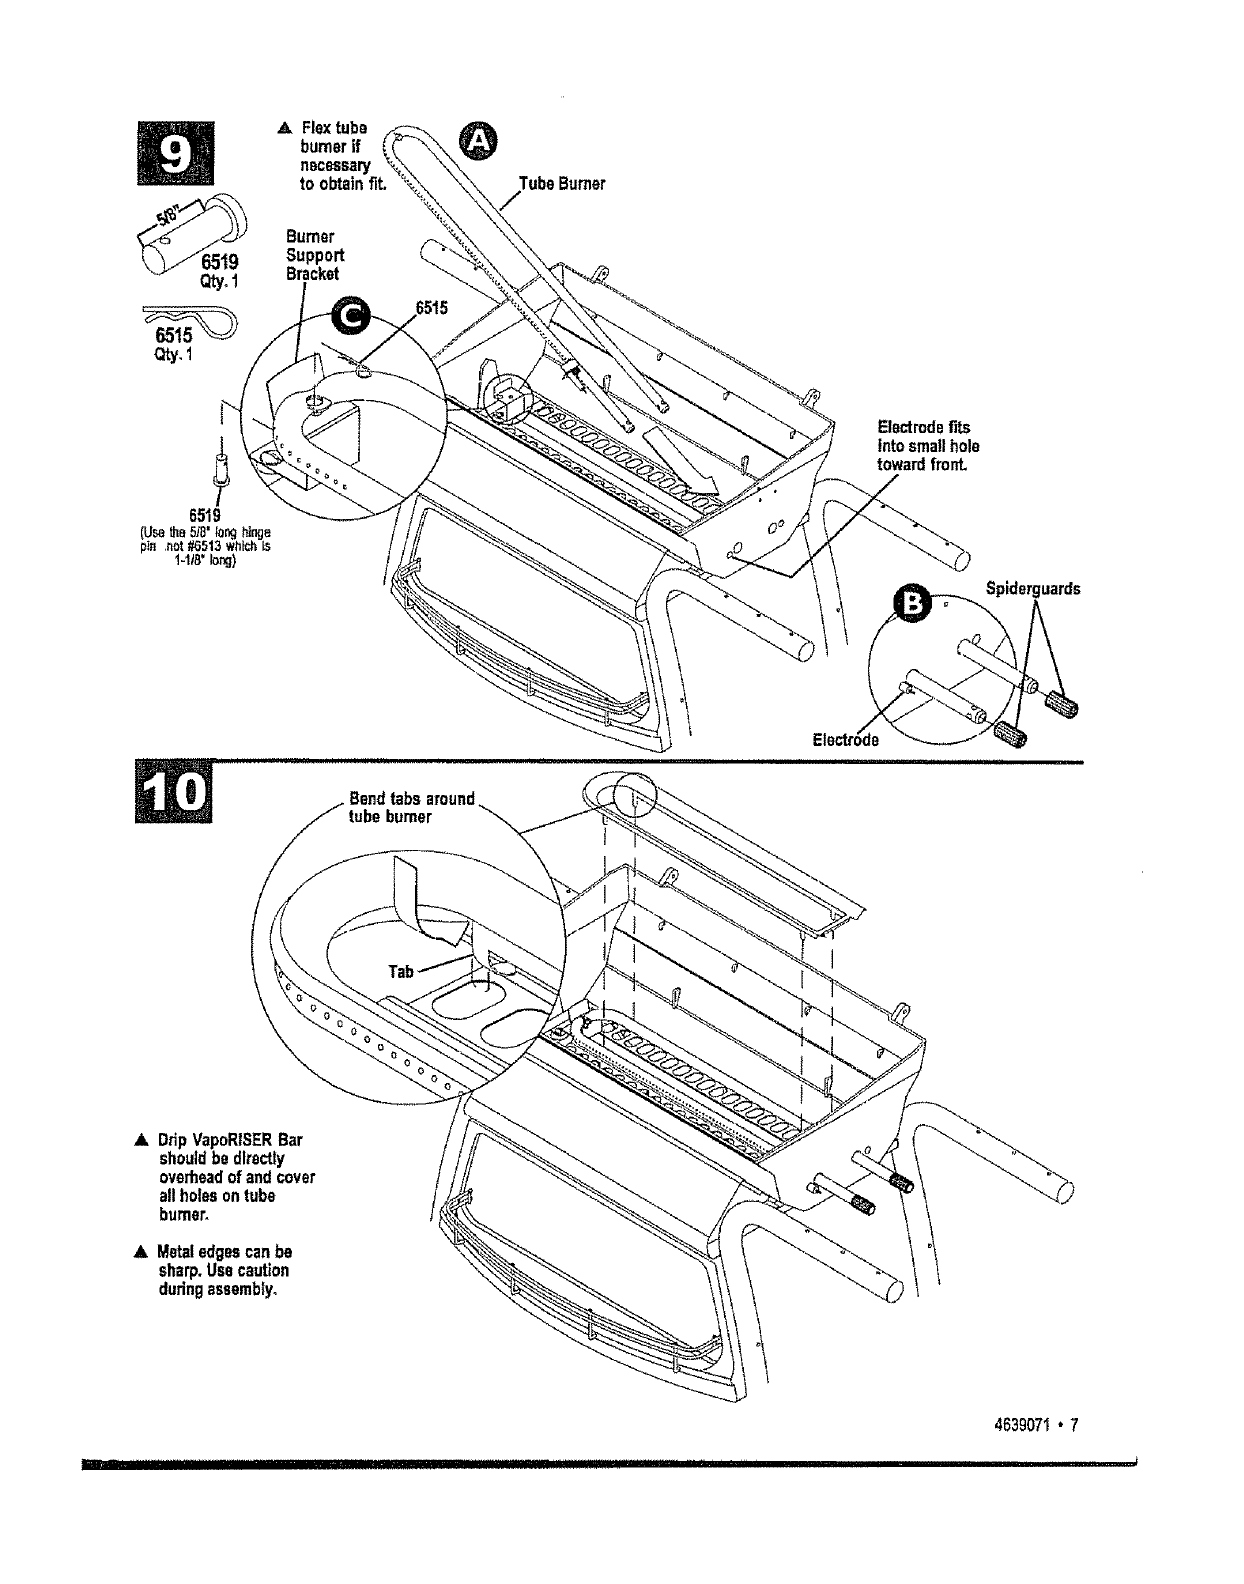
A Flextube
burnerif
necessary
to obtainfit.
Burner
Support
Bracket
TubeBurner
Electrodefits
into smallhole
towardfront.
Spiderguards
tubeburner
A, DripVapoRISERBar
shouldba directly
overheadof and cover
allholeson tube
burner,
,L Metaledgescanbe
sharp.Usecaution
duringassembly,
4639071* 7
379
_y. 2
361
aty,2
36t
Threadhalfway
into HestWave
valve,Rest
valvein cutout
of control
panel,add
remaining361,
bghten both,
361
I
I
l
t
PositionControl
Panelasshown
I I
__Valve openings
facingto right
Control
HeatWaveGas
Panel
Control
HeatWave Control
Panel_,
A Noteillustrationof
correctengagementD
betweenvalveand
burnertube,
IMPORTANT:
Valvemustengage
burnertube D,
plderguard
Burner
Tube
8 * 463907_

69O
Qty.2
Attachignitor
to sparkmodule
69O
(Thissideof shelf)
Side
(StylemayvanJ)
757
SideShelf
withspark
module
(Shelfstyle
mayvary)
Stem
,z SeeUSE&CARE
manualforValve
Check,
AMaximumloadfor side
shelf is 10 ]bs.
ADo not overtlghten
scrsws_
757 Ring_
4639071. 9
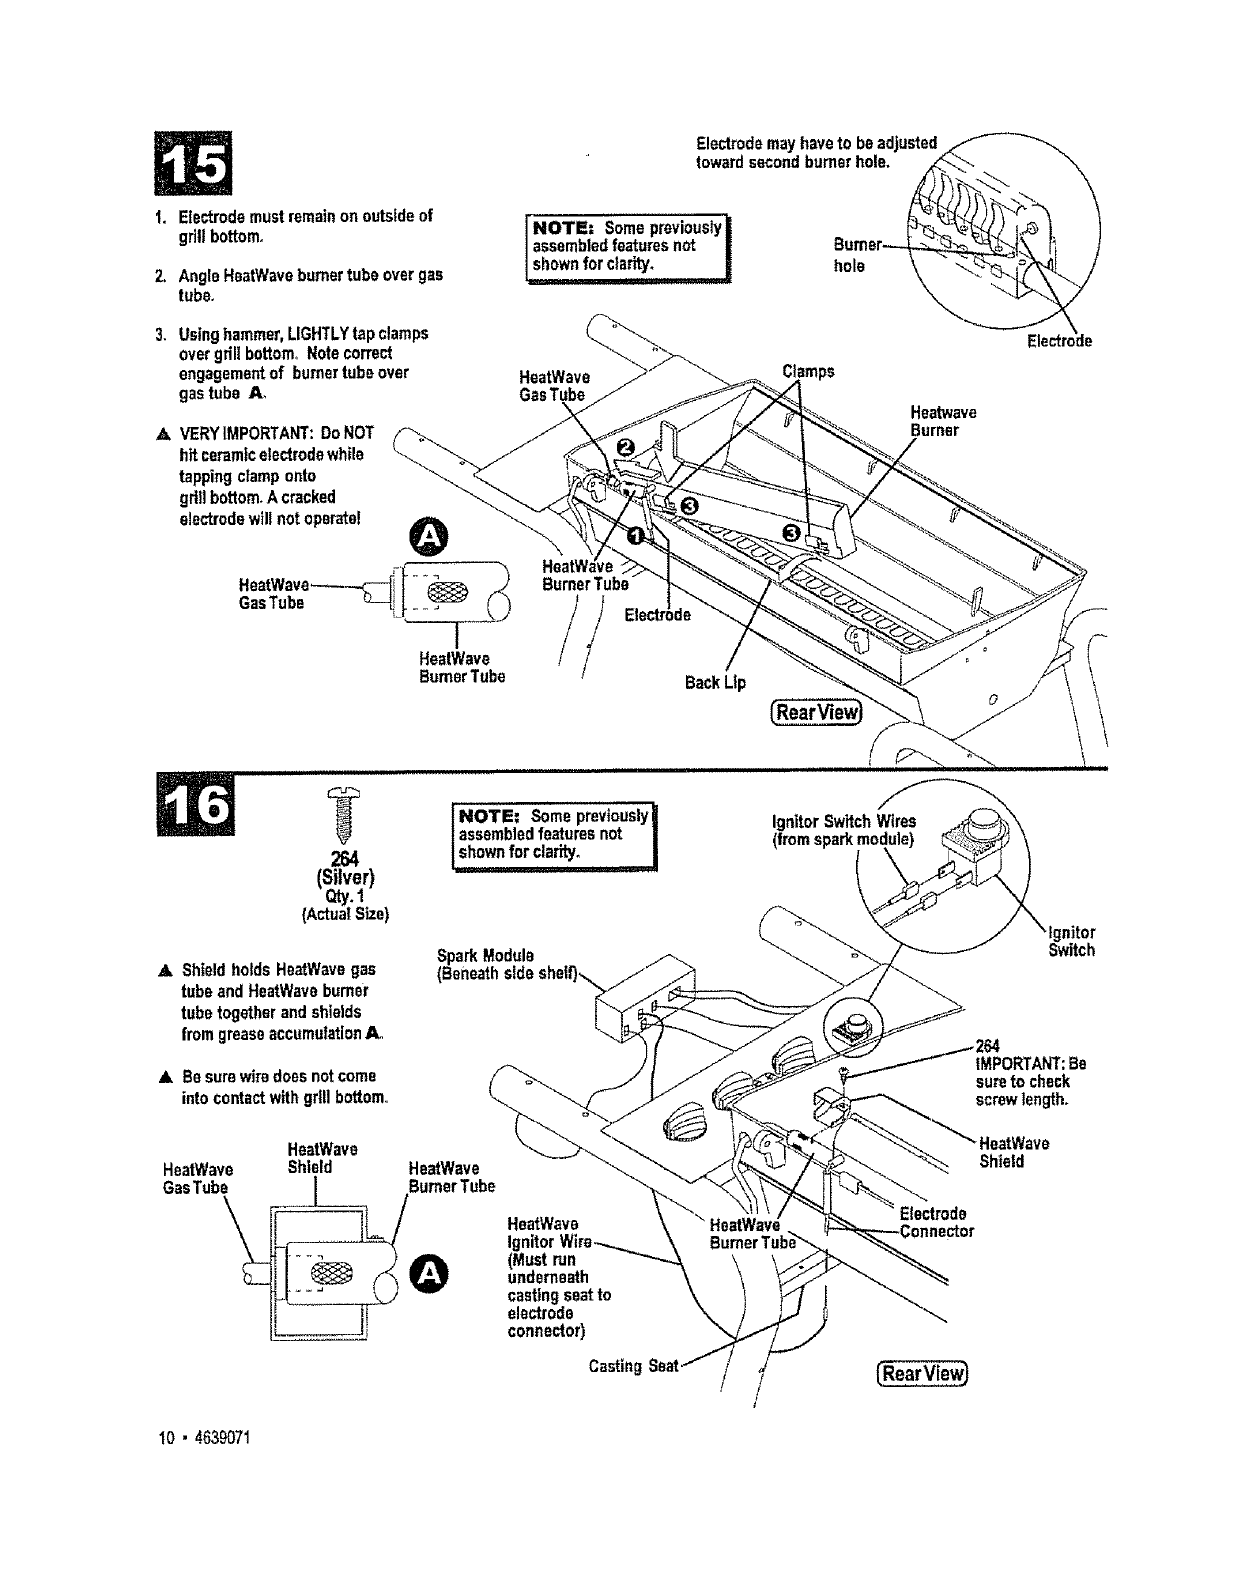
1. Electrodemustremainonoutsideof
grillbottom,
2. AngleHeatWaveburnertubsovergas
tubs.
3. Usinghammer,LIGHTLYtapclamps
overgrillbottom_Notecorrect
engagementof burnertubeover
gastubs A
AVERYIMPORTANT:DoNOT
hitceramicelectrodewhile
tappingclamponto
grill bottomA cracked
electrodewillnot operatel
Electrodemayhaveto be adjusted
/assembledfeaturesnot iBumer_L \ [_ /
,shown for C'_arity_ _ hole _"__
HsatWave
GasTube Heatwave
Burner
HeatWave
BurnerTube
BurnerTube
BackLip
264
(Silver)
Qty.1
(ActualSize)
AShieldholds He,Wave gas
tubeand HeatWaveburner
tubetogetherandshields
from greaseaccumulation
A Besurewiredoesnotcome
intocontactwithgrill bottom,=
'NOTE: Someprevtously|
tassembledfeatures not I
SparkModule
(Beneath
ignitorSwitch Wires
Switch
...._264
/IMPORTANT:Be
sureto cheek
screwlength.
HsatWavs
HeatWave Shield HeatWave
GasTube I BurnerTube
HeatWavs
Igmro
(Must run
underneath
castingseatto
electrode
connector)
Casting
Electrode
{RearView)
Shield
10 •4639071
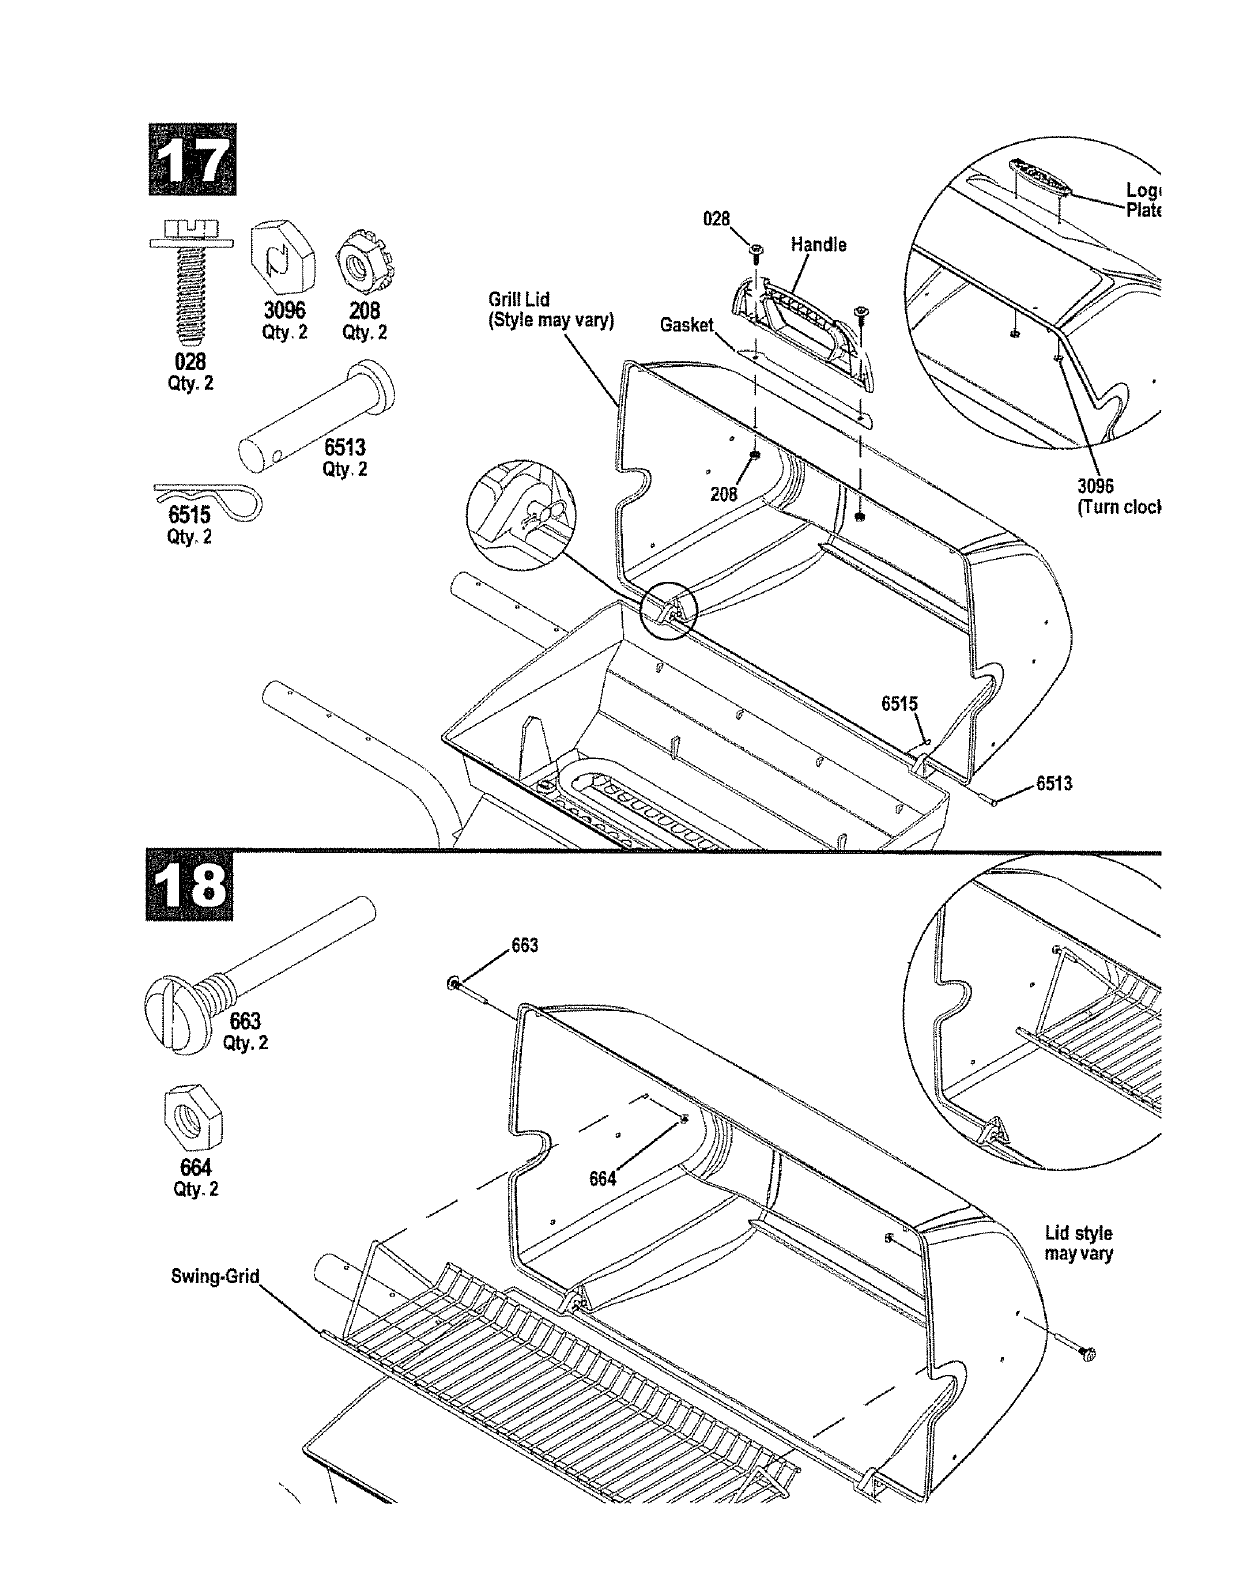
028
Qty°2
3096
Qty,2
Qty.2
G
208
Qty.2
L513
Qty,2
GrillLid
(Stylemayvary)
028
Gasket
X
2O8
Handle
Log,
3096
(Turncloc)
6515
664
Qty,2
663
Swing.Grid
-\
Lid style
mayvary
\
737
Qty.2
208 or
377
Ti
757
HolderBracket
Sldebumer
Body
369or 377
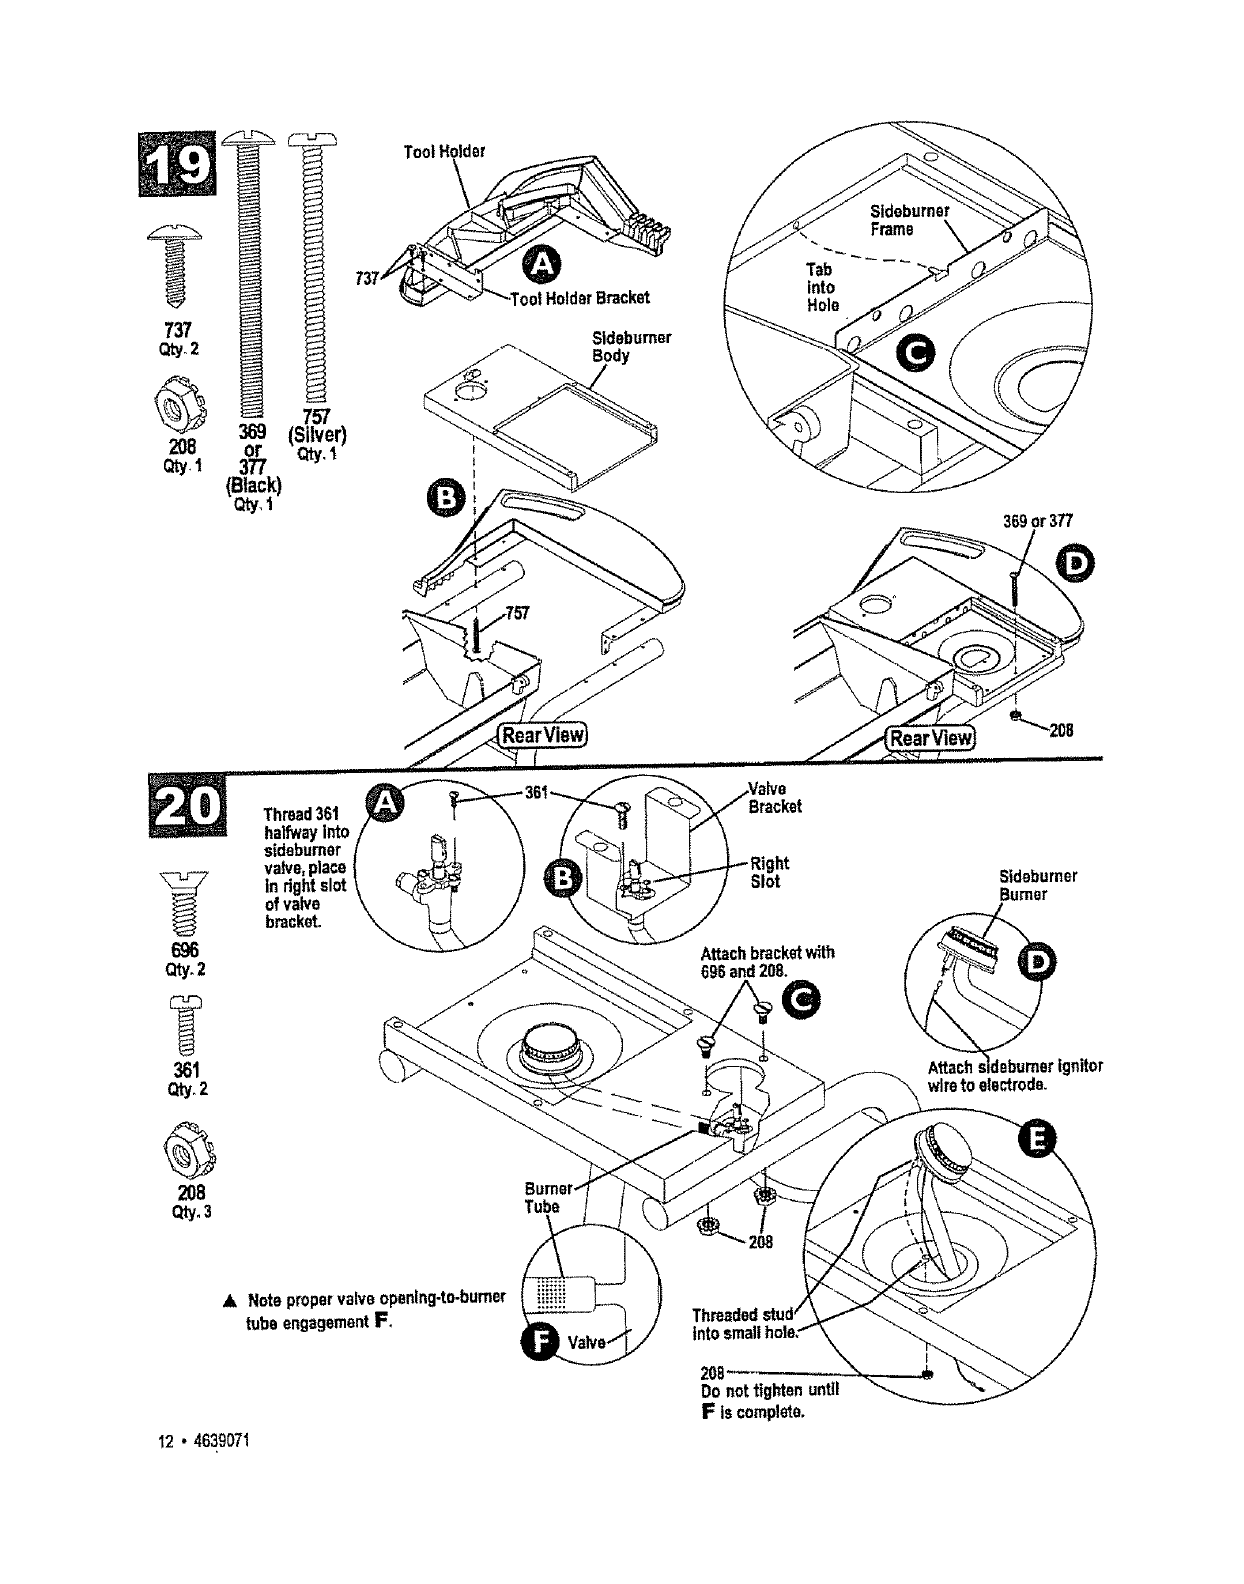
696
Qty.2
361
Qty.2
G
208
Qty.3
Thread36t
halfwayinto
sidebumer
valve,place
in r_
bracket.
Tube
Slot
Attachbracketwith
208.
Sideburner
Burner
/
Attach lebumer ignitor
wire to electrode.
A Note propervalveopening-to.burner
tube engagementIFo
I2 • 4639071
208
Donot tightenuntil
F iscomplete.
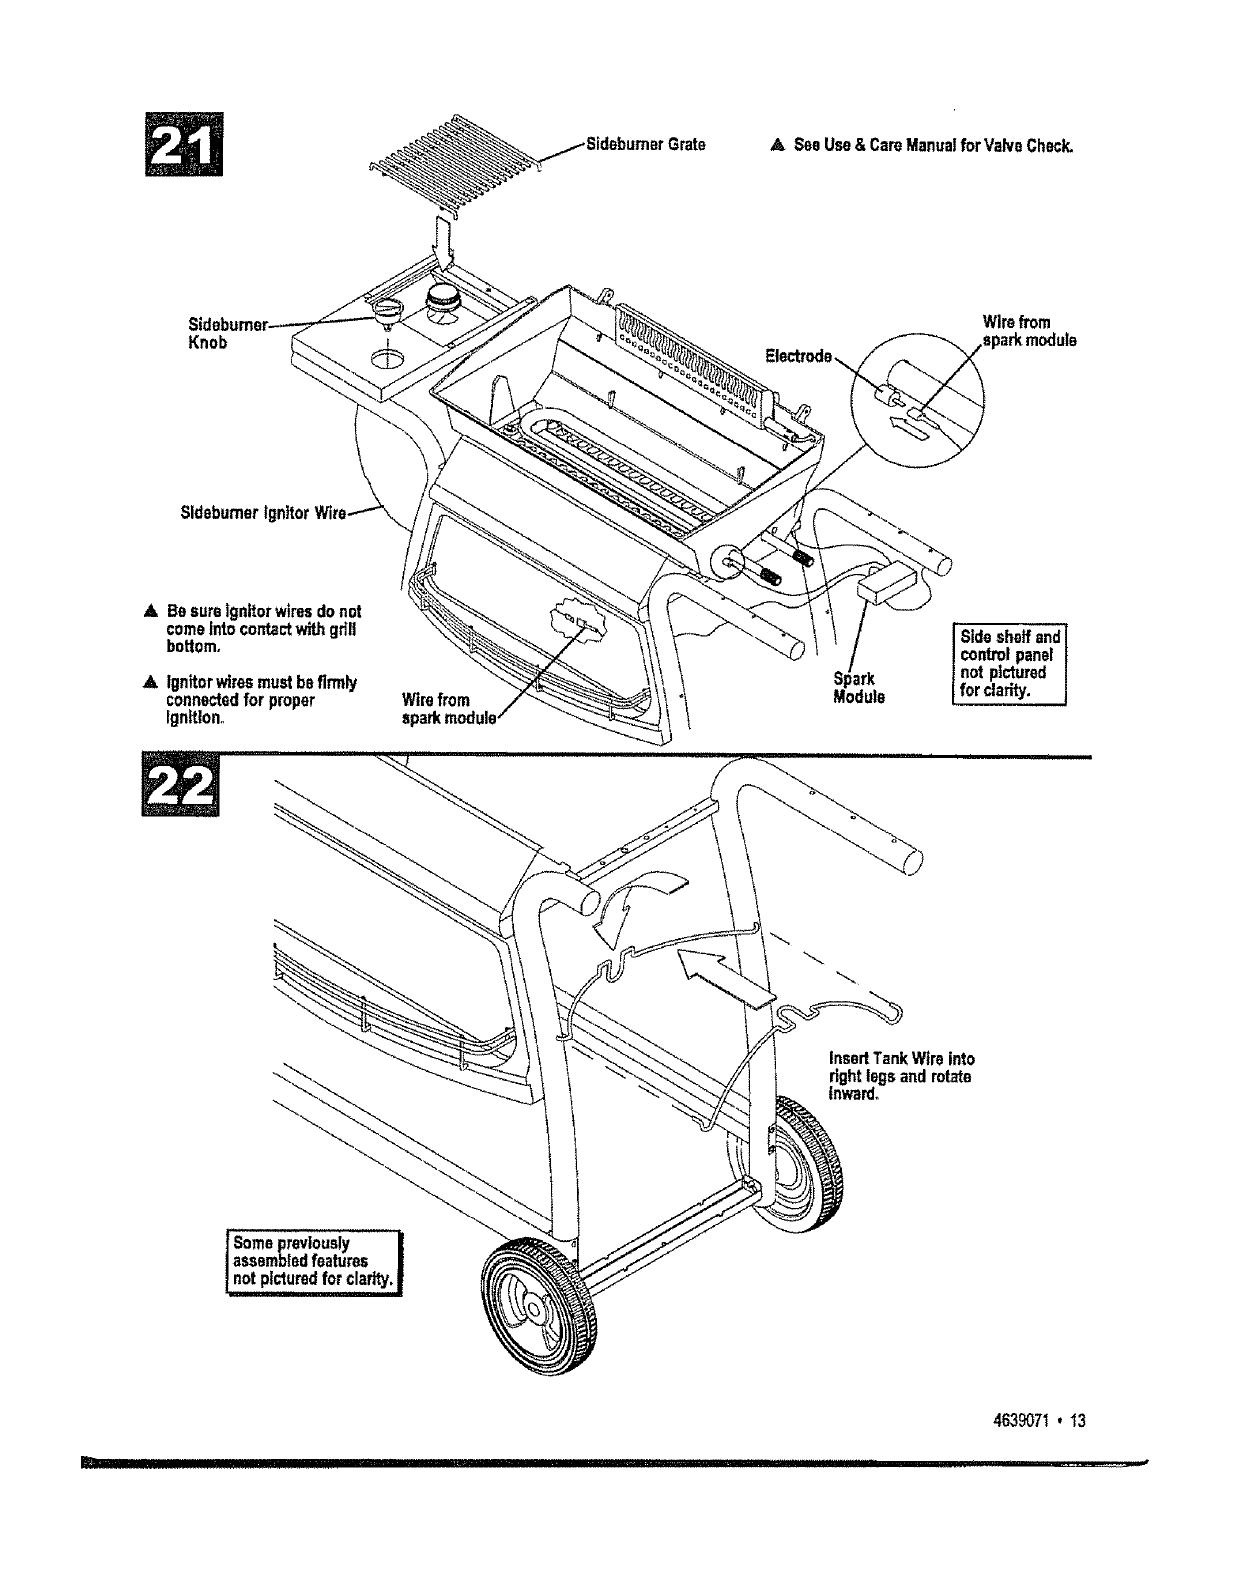
ASee Use& CareManualfor ValveCheck,
Knob W]refrom
epa_modu|e
SldebumerIgnitor
ABe sureignitorWiresdonot
comeintocontactwithgflll
bottom=
AIgnitorwiresmust befirmly
connectedfor proper
Ignition°
Sideshelf andj
controlpanel ]
not pictured
for c arity, t
InsedTankWire into
rightlegsand rotate
inward,
ISomepreviously I
assembledfeatures i
not picturedfor clarity.|
4639071, 13
_] ! ! ! 'l IIIIIIIHIIIIII IIPI''1_I II I' '1 ' '1 III ' IIMIIqlllqlllllll'lll
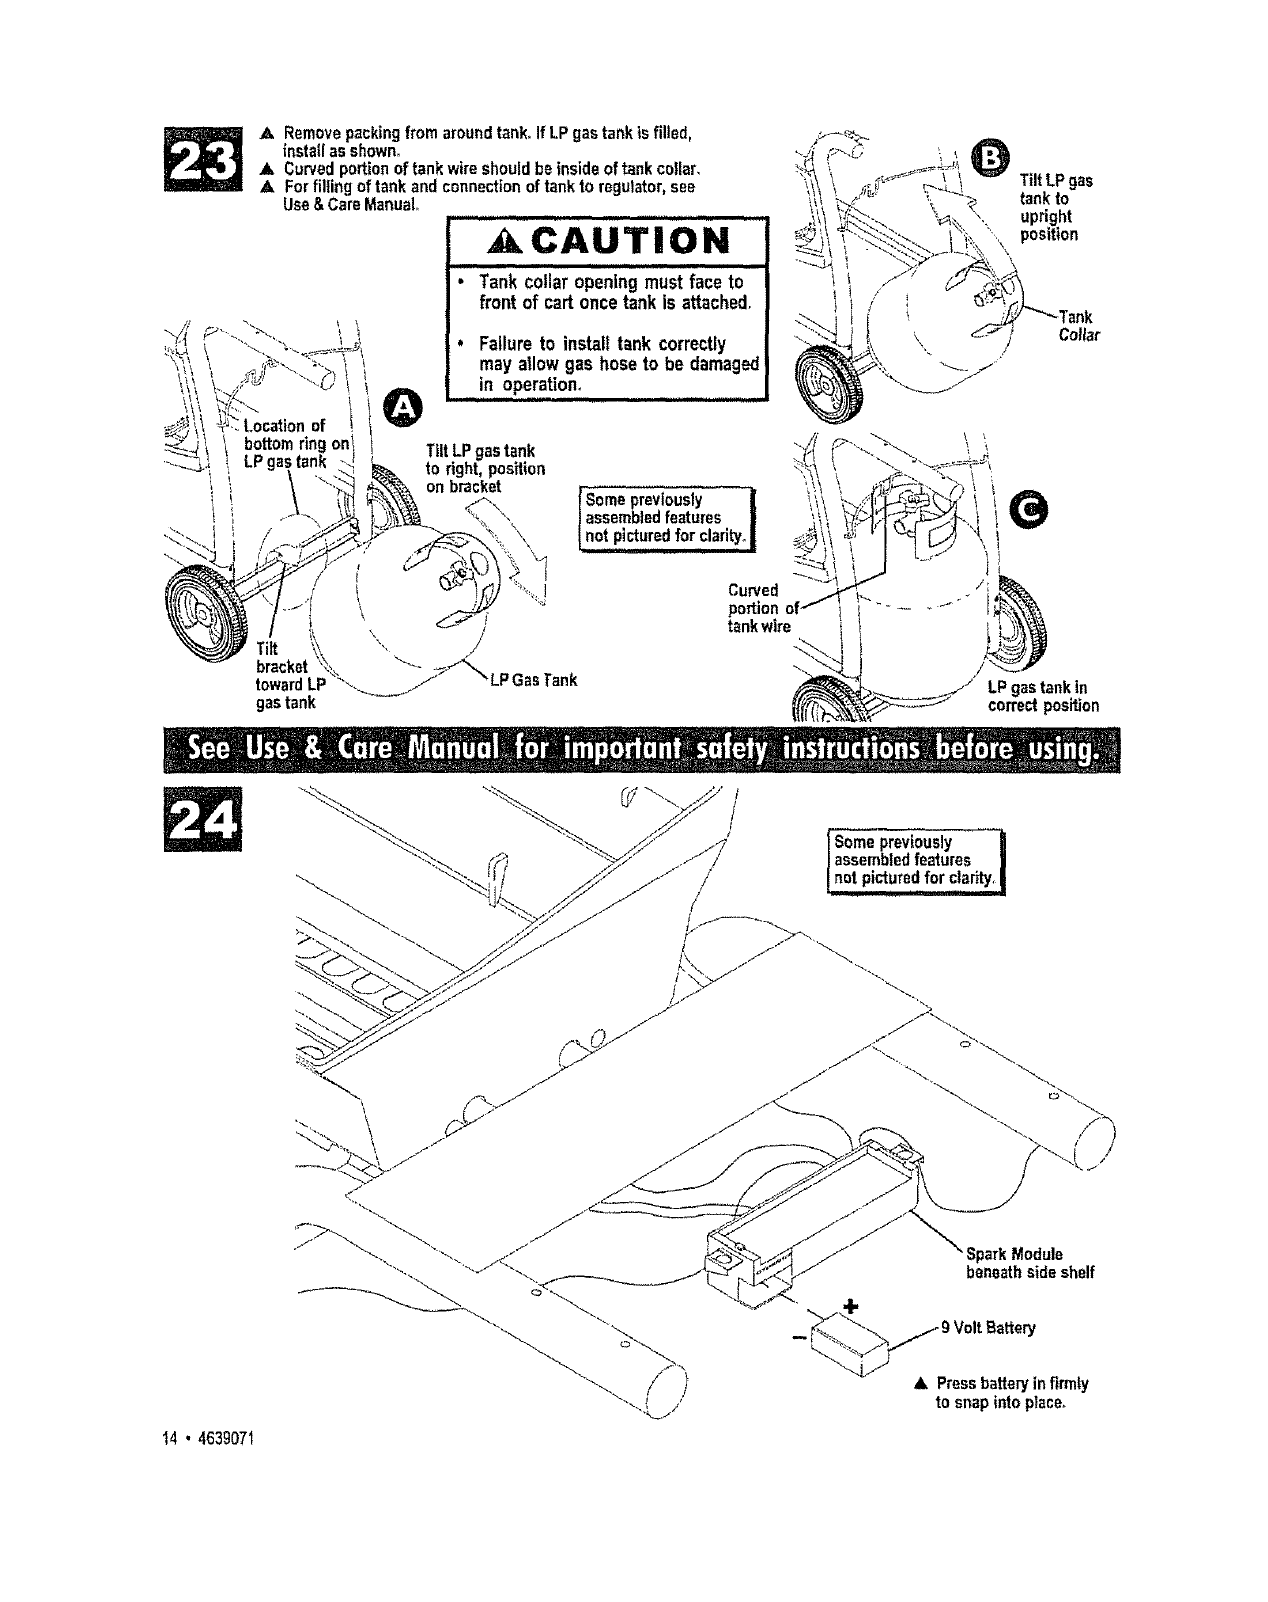
Removepackingfrom aroundtank. IfLP gastank ts filled,
installas shown.
ACurvedportionof tank wireshouldbe insideof tank coilar.
,& Forfilling of tank and connectionof tank to regulator,see
Use&Care Manual ................... ill iiiiii1,11, Ulll
CAUTION
:::::::::::::::::::::::
•Tank collar opening must face to
front of cart once tank is attached.
. Failureto install tank correctly
mayatlowgas hoseto be damaged
in operation° ....
of
bottomringont
LPgas tank -_
gastank
T_ltLPgas
tank to
upright
position
Tilt LPgastank
to right,position
onbracket
X)
/LPGasTank
14 •4639071
/Somepreviously
/assembtedfeatures I
notpicture,d,,,forc!arity.I
/
Y
•SparkModule
beneathsideshelf
9 Volt
& Pressbatteryinfirmly
to snapinto ptace.
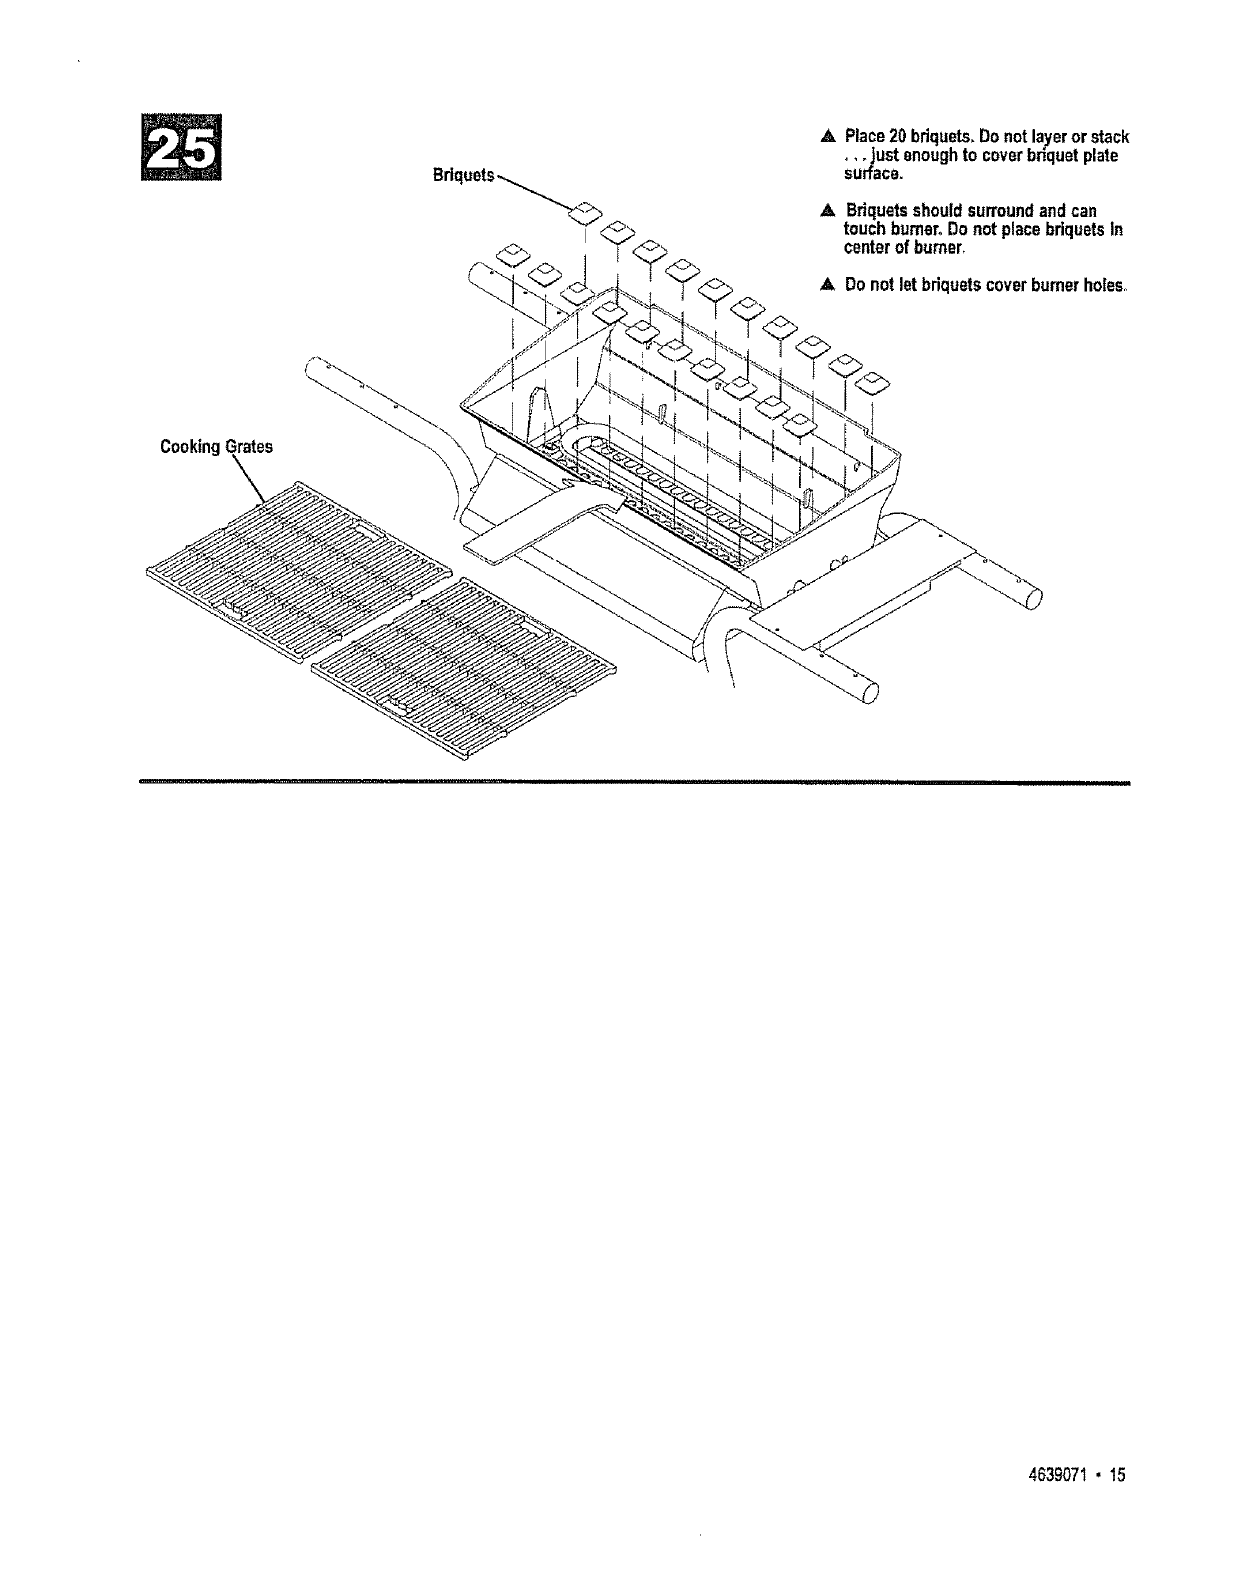
CookingGrates
Bdquets_
I
A. Place 20 briquets,Do not layer orstack
°,. Justenoughto coverbriquetplate
surface.
ABriquetsshouldsurroundand can
touch burner,Do not place briquetsin
centerof burner,
A Do not let briquetscover burnerholes,,
4639071• 15
