Charles Machine Works The 752TKR 752 Tracker User Manual 750tkrpr
Charles Machine Works Inc, The 752 Tracker 750tkrpr
user manual

750/752 Tracker - SUPPORT 1
SERIAL NUMBER RECORD
750/752 Tracker - SUPPORT 1
SERIAL NUMBER RECORD
SUPPORT
SERIAL NUMBER RECORD
Record the serial numbers and date of purchase of your Ditch
Witch components in the spaces below.
Date of purchase:
Tracker serial number:
SUPPORT
SERIAL NUMBER RECORD
Record the serial numbers and date of purchase of your Ditch
Witch components in the spaces below.
Date of purchase:
Tracker serial number:

2750/752 Tracker - SUPPORT
SERVICE PROCEDURE 2750/752 Tracker - SUPPORT
SERVICE PROCEDURE
SERVICE PROCEDURE
Notify your authorized Ditch Witch dealer immediately of any
malfunction of Ditch Witch equipment.
Always give model, serial number, and approximate date of
purchase. This information should be recorded and placed on file
by owner at time of purchase. Give detailed explanation of
malfunction.
Return damaged parts to an authorized Ditch Witch dealer for
inspection and warranty consideration.
Order genuine Ditch Witch replacement or repair parts from your
Ditch Witch dealer. Use of another manufacturer’s parts may void
warranty.

750/752 Tracker - FOREWORD 3
FCC Statement -- Internal Transmitter
750/752 Tracker - FOREWORD 3
FCC Statement -- Internal Transmitter
FOREWORD
This manual is an important part of your equipment. It provides
safety information and operation instructions to help you use and
maintain your Ditch Witch equipment.
Read this manual before using your equipment. Keep it with the
equipment at all times for future reference. If you sell your
equipment, be sure to give this manual to the new owner.
If you need a replacement copy, contact your Ditch Witch dealer.
The descriptions and specifications in this manual are subject to
change. The Charles Machine Works, Inc. reserves the right to
improve equipment. Some product improvements may have
taken place after this manual was published.
Thank you for buying and using Ditch Witch equipment.
FCC Statement -- Internal Transmitter
FCC ID: ITQ-CMW-R-75T
FCC ID: ITQ-752TKR
This device complies with Part 15 of the FCC rules. Operation is
subject to the following two conditions: (1) this device may not
cause harmful interference, and (2) this device must accept any
interference received, including interference that may cause
undesired operation.
Changes or modifications to the device not expressly approved
by The Charles Machine Works, Inc. could void the user’s
authority to operate the equipment.

4750/752 Tracker - FOREWORD
FCC Statement -- Internal Transmitter 4750/752 Tracker - FOREWORD
FCC Statement -- Internal Transmitter
Operator's Manual
750 Tracker/752 Tracker
Issue No. 3.1/OP-3/07
Part Number 054-080
Copyright 1999, 2000, 2001, 2005, 2007
by The Charles Machine Works, Inc.,
Perry, Oklahoma
, Ditch Witch, CMW, AutoCrowd,
Modularmatic, Jet Trac, Roto Witch, Subsite, Fluid Miser, Perma-
Soil, Power Pipe, Super Witch, Super Witch II, Pierce Airrow, The
Underground, and The Underground Authority Worldwide are
registered trademarks of The Charles Machine Works, Inc.
U.S. Patent No. 5,065,098; 4,881,083. Other U.S. and foreign patents
pending.

750/752 Tracker - CONTENTS 5
FCC Statement -- Internal Transmitter
750/752 Tracker - CONTENTS 5
FCC Statement -- Internal Transmitter
CONTENTS
SUPPORT . . . . . . . . . . . . . . . . . . . . . . . . . . . . . . . . . . . . . . 1
Serial Number Record . . . . . . . . . . . . . . . . . . . . . . . . . 1
Service Procedure . . . . . . . . . . . . . . . . . . . . . . . . . . . . 2
FOREWORD . . . . . . . . . . . . . . . . . . . . . . . . . . . . . . . . . . . . 3
CONTROLS . . . . . . . . . . . . . . . . . . . . . . . . . . . . . . . . . . . . . 7
Overview . . . . . . . . . . . . . . . . . . . . . . . . . . . . . . . . . . . 7
Controls . . . . . . . . . . . . . . . . . . . . . . . . . . . . . . . . . . . . 8
Setup . . . . . . . . . . . . . . . . . . . . . . . . . . . . . . . . . . . . . 11
Display . . . . . . . . . . . . . . . . . . . . . . . . . . . . . . . . . . . . 12
SAFETY . . . . . . . . . . . . . . . . . . . . . . . . . . . . . . . . . . . . . . . 17
Classifications . . . . . . . . . . . . . . . . . . . . . . . . . . . . . . 18
Alerts . . . . . . . . . . . . . . . . . . . . . . . . . . . . . . . . . . . . . 19
OPERATION . . . . . . . . . . . . . . . . . . . . . . . . . . . . . . . . . . . 21
Beacon Tracking Modes . . . . . . . . . . . . . . . . . . . . . . . 21
Line Locating Mode . . . . . . . . . . . . . . . . . . . . . . . . . . 32
MAINTENANCE . . . . . . . . . . . . . . . . . . . . . . . . . . . . . . . . 35
General Care . . . . . . . . . . . . . . . . . . . . . . . . . . . . . . . 35
SPECIFICATIONS . . . . . . . . . . . . . . . . . . . . . . . . . . . . . . . 37
WARRANTY . . . . . . . . . . . . . . . . . . . . . . . . . . . . . . . . . . . 39
CONTENTS
SUPPORT . . . . . . . . . . . . . . . . . . . . . . . . . . . . . . . . . . . . . . 1
Serial Number Record . . . . . . . . . . . . . . . . . . . . . . . . . 1
Service Procedure . . . . . . . . . . . . . . . . . . . . . . . . . . . . 2
FOREWORD . . . . . . . . . . . . . . . . . . . . . . . . . . . . . . . . . . . . 3
CONTROLS . . . . . . . . . . . . . . . . . . . . . . . . . . . . . . . . . . . . 7
Overview . . . . . . . . . . . . . . . . . . . . . . . . . . . . . . . . . . . 7
Controls . . . . . . . . . . . . . . . . . . . . . . . . . . . . . . . . . . . . 8
Setup . . . . . . . . . . . . . . . . . . . . . . . . . . . . . . . . . . . . . 11
Display . . . . . . . . . . . . . . . . . . . . . . . . . . . . . . . . . . . . 12
SAFETY . . . . . . . . . . . . . . . . . . . . . . . . . . . . . . . . . . . . . . 17
Classifications . . . . . . . . . . . . . . . . . . . . . . . . . . . . . . 18
Alerts . . . . . . . . . . . . . . . . . . . . . . . . . . . . . . . . . . . . . 19
OPERATION . . . . . . . . . . . . . . . . . . . . . . . . . . . . . . . . . . . 21
Beacon Tracking Modes . . . . . . . . . . . . . . . . . . . . . . 21
Line Locating Mode . . . . . . . . . . . . . . . . . . . . . . . . . . 32
MAINTENANCE . . . . . . . . . . . . . . . . . . . . . . . . . . . . . . . . 35
General Care . . . . . . . . . . . . . . . . . . . . . . . . . . . . . . . 35
SPECIFICATIONS . . . . . . . . . . . . . . . . . . . . . . . . . . . . . . 37
WARRANTY . . . . . . . . . . . . . . . . . . . . . . . . . . . . . . . . . . . 39

6750/752 Tracker - CONTENTS
FCC Statement -- Internal Transmitter 6750/752 Tracker - CONTENTS
FCC Statement -- Internal Transmitter
750/752 Tracker - CONTROLS 7
OVERVIEW
750/752 Tracker - CONTROLS 7
OVERVIEW
CONTROLS
OVERVIEW
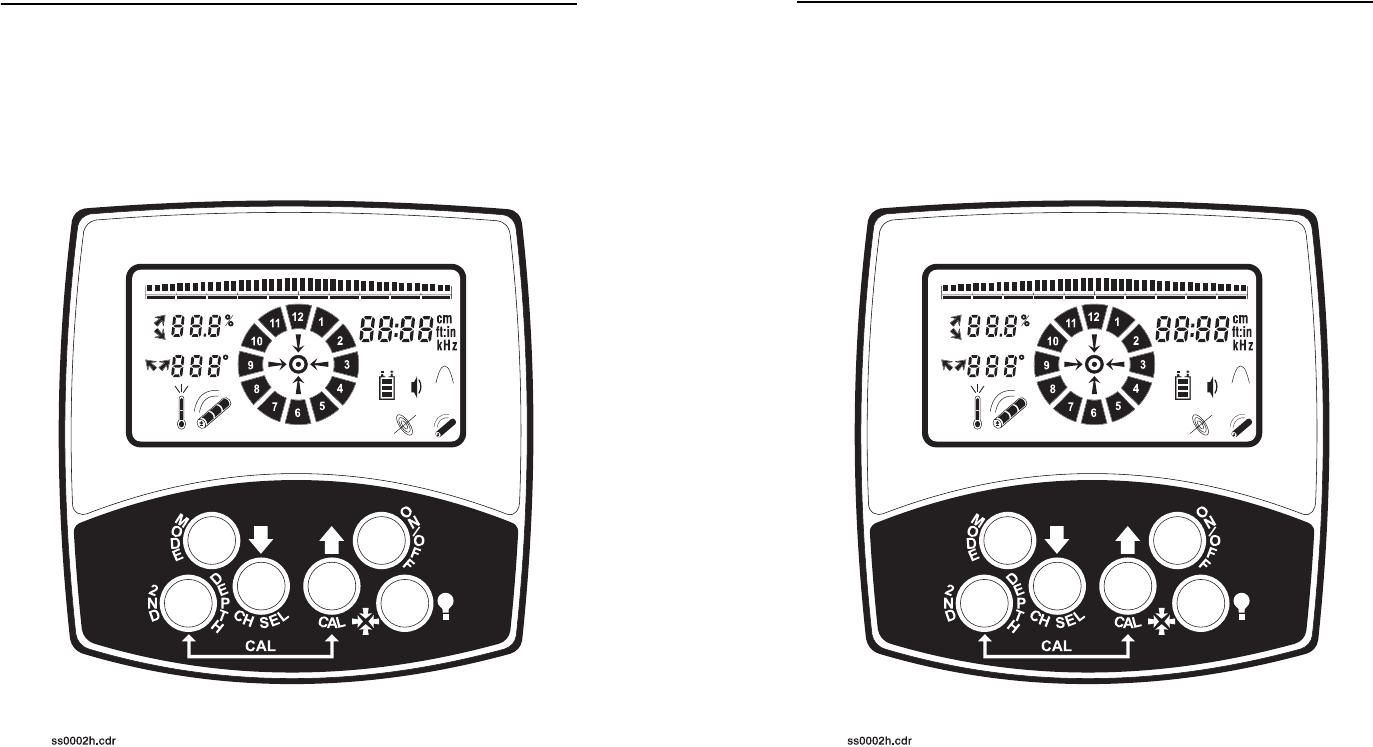
The 750/752 Tracker performs well with a variety of beacons and
can track shallow or deep bores. It can track both 12K and 29K
beacons and send beacon information to a display mounted on
the drilling unit operator’s station. The 750/752 Tracker can also
locate lines and cables. Available modes are 8 kHz active (when
used with transmitter) and 60 or 50 Hz passive (for locating power
cables).
A brief description of the buttons and display on the 750/752
Tracker follows.
8750/752 Tracker - CONTROLS
CONTROLS 8750/752 Tracker - CONTROLS
CONTROLS
CONTROLS
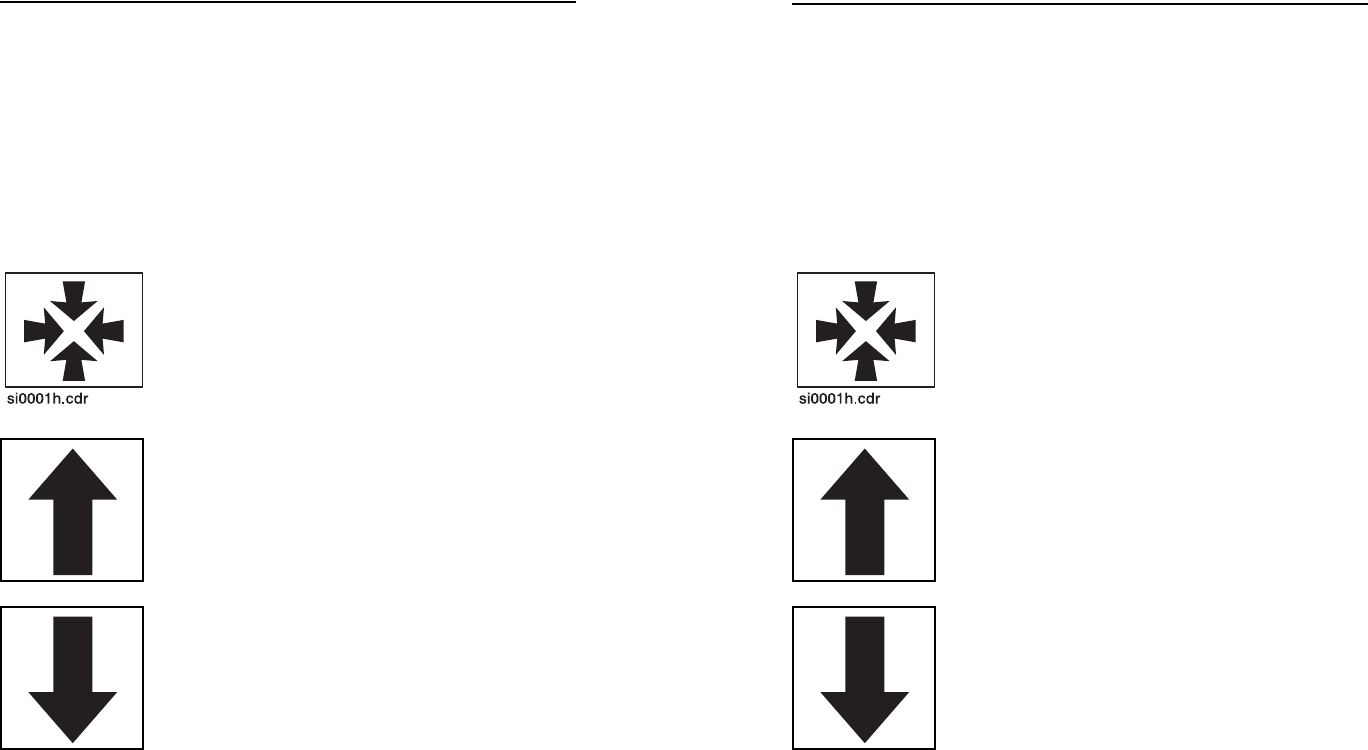
On/Off
Pressing this button turns unit on and off.
Fore/Aft/Left/Right
Pressing this button while in walkover tracking
mode switches from fore/aft to left/right arrows.
Only one set of arrows will show at a time. See
OPERATION for further information.
Up
Pressing this button raises gain (increases
signal).
Down
Pressing this button reduces gain (decreases
signal).
Depth
This button estimates depth of properly located signal source
when pressed. See OPERATION for information on locating
signals.
Mode
Pressing this button changes location mode and operating
frequency.

750/752 Tracker - CONTROLS 9
CONTROLS
750/752 Tracker - CONTROLS 9
CONTROLS
Depth + On/Off
Pressing these buttons when tracker is on cycles volume from
low to high to off. Pressing and holding depth button before
turning tracker on changes signal strength display. See “Signal
Strength” section later in this chapter for more information.
Depth + Fore/Aft/Left/Right
Pressing these buttons switches LCD backlight off and on.
Depth + Up
Pressing these buttons enters tracker into calibration mode. See
OPERATION for further information.
Depth + Down
Pressing these buttons selects radio channel. 750 - Off, CH1,
CH2 will appear in display. 752 - Off, CH1, CH2, CH3, CH4, CH5,
CH6, CH7, CH8, CH9 will appear in display.
Depth + Mode
Pressing these buttons changes depth units from default setting
of feet•inches to inches, centimeters, or meters.
Down + On
Holding down button while turning unit on toggles gain control
from auto to manual. Display will show “Auto” if in automatic gain
mode, and will be blank if in manual gain mode.

10 750/752 Tracker - CONTROLS
CONTROLS 10 750/752 Tracker - CONTROLS
CONTROLS
Fore/Aft/Left/Right + Mode
Pressing these buttons enters tracker control mode and starts
tracker control code transmission (see OPERATION).
Fore/Aft/Left/Right + Depth
Pressing and holding these buttons for three seconds calibrates
roll (see OPERATION).
Fore/Aft/Left/Right + Up
Pressing and holding these buttons calibrates pitch (see
OPERATION).

750/752 Tracker - CONTROLS 11
SETUP
750/752 Tracker - CONTROLS 11
SETUP
SETUP
Install batteries
Use 6 C-cell alkaline batteries in
tracker. To install:
• unscrew battery cover
• insert batteries as indicated
• close cover and tighten screw
• check operation
Check Operation
Always check that tracker operates before leaving for jobsite and
after every battery change. To check operation:
• turn on tracker
• entire display will light briefly
• battery level will be shown graphically
• unit defaults to most recently used tracking mode
12 750/752 Tracker - CONTROLS
DISPLAY 12 750/752 Tracker - CONTROLS
DISPLAY
DISPLAY
Mode
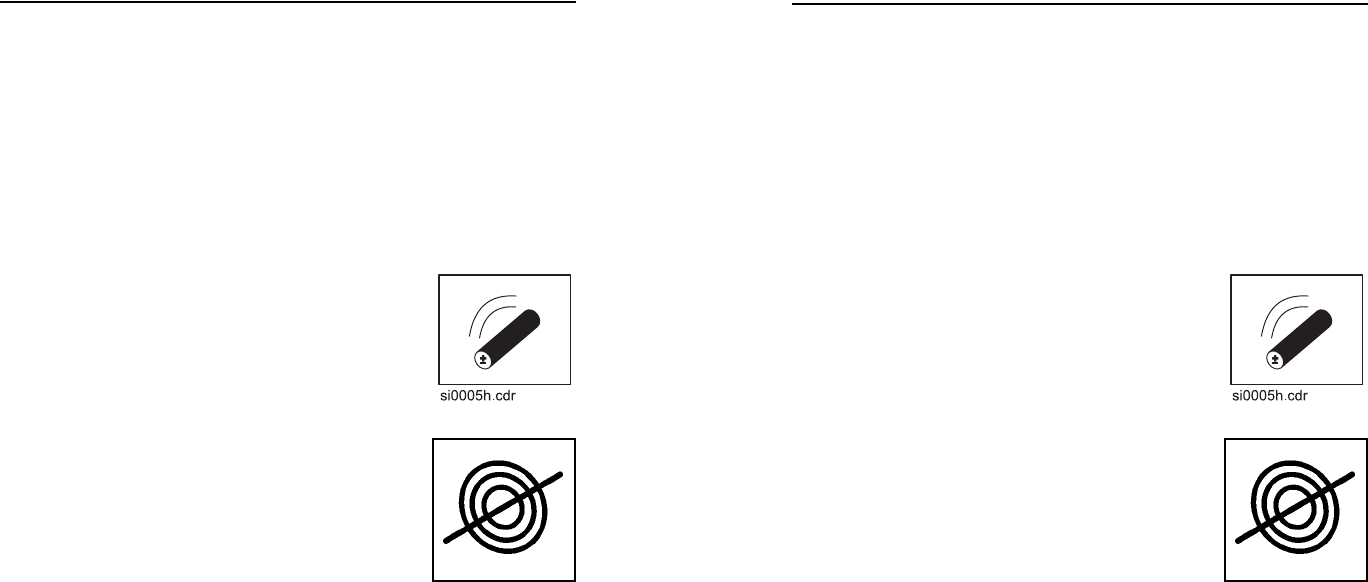
Tracker can track beacons and locate lines. Switch between
modes by pressing mode button.
Beacon Mode Indicator
Line Mode Indicator
DISPLAY
Mode
Tracker can track beacons and locate lines. Switch between
modes by pressing mode button.
Beacon Mode Indicator
Line Mode Indicator
750/752 Tracker - CONTROLS 13
DISPLAY
750/752 Tracker - CONTROLS 13
DISPLAY
Tracker Information
A variety of tracker information can be monitored in the display
window. Additionally, several tracker display settings can be
changed.
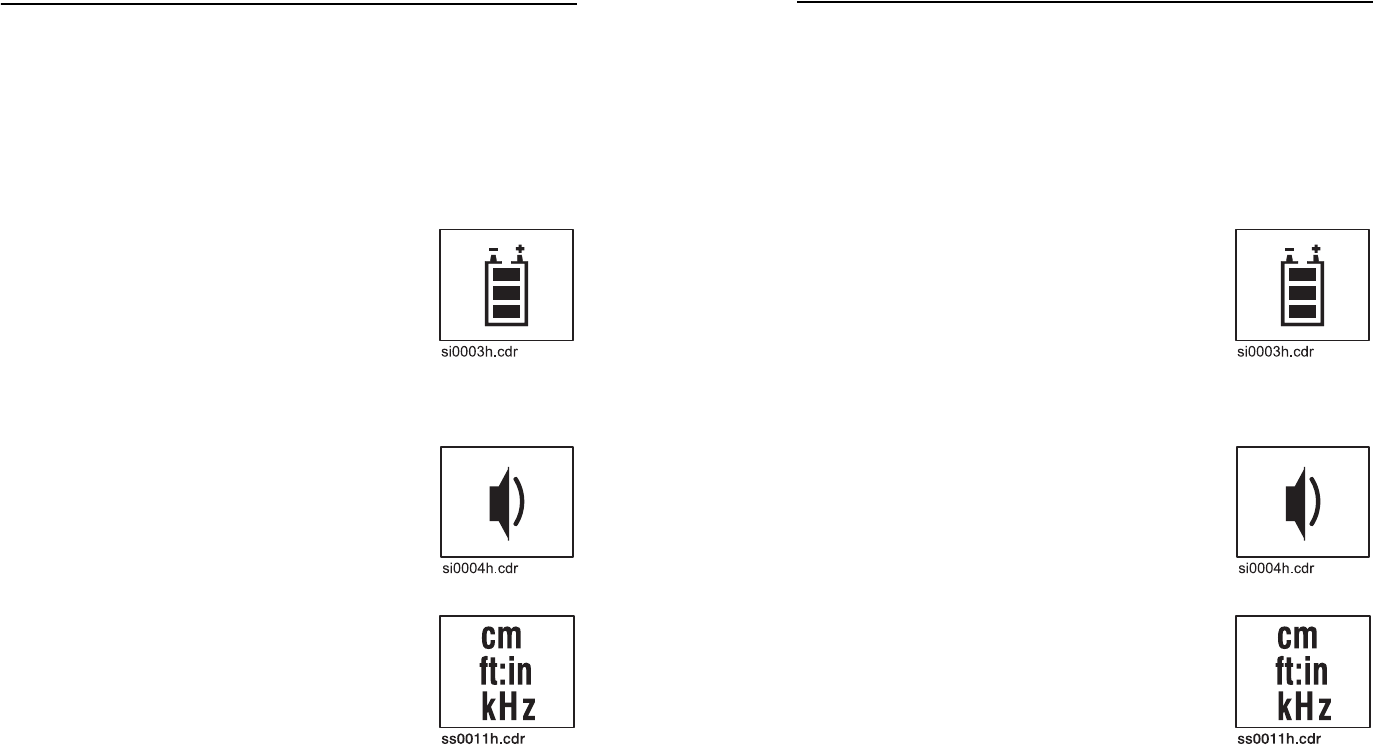
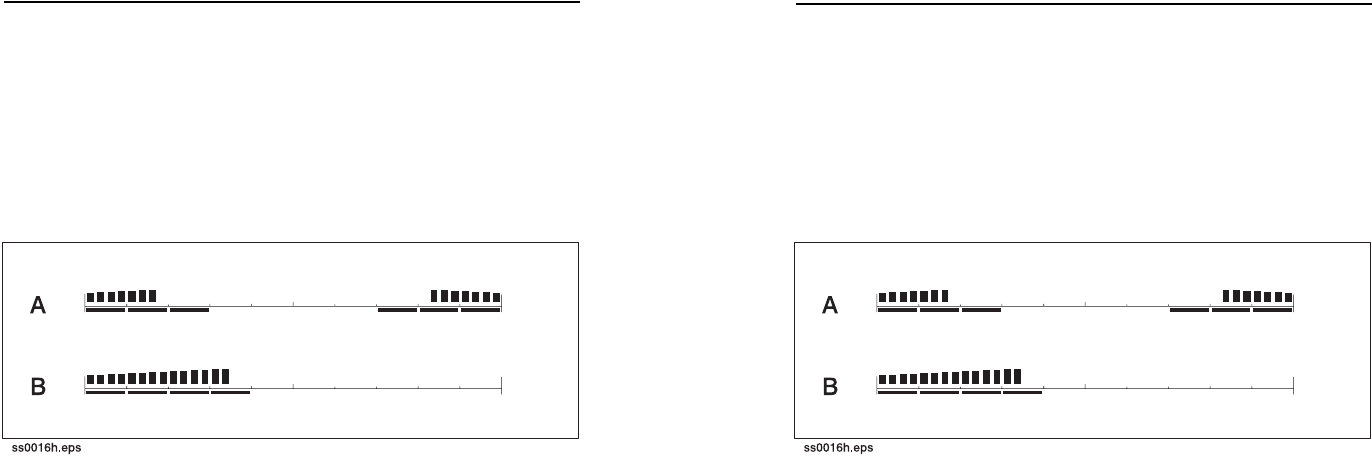
Battery Level
Tracker battery level is shown graphically.
Display shows battery status in 33% steps.
When tracker battery drops below 10%, tracker
battery symbol outline flashes. Replace
batteries immediately.
Volume Level
Speaker volume can be adjusted by pressing
the depth and on/off buttons. Available settings
are low, high and off.
Depth Units
Depth estimates can be displayed in four ways:
feet•inches, inches, centimeters, or meters. To
change depth units, press depth and mode
buttons.
14 750/752 Tracker - CONTROLS
DISPLAY 14 750/752 Tracker - CONTROLS
DISPLAY
Signal Strength
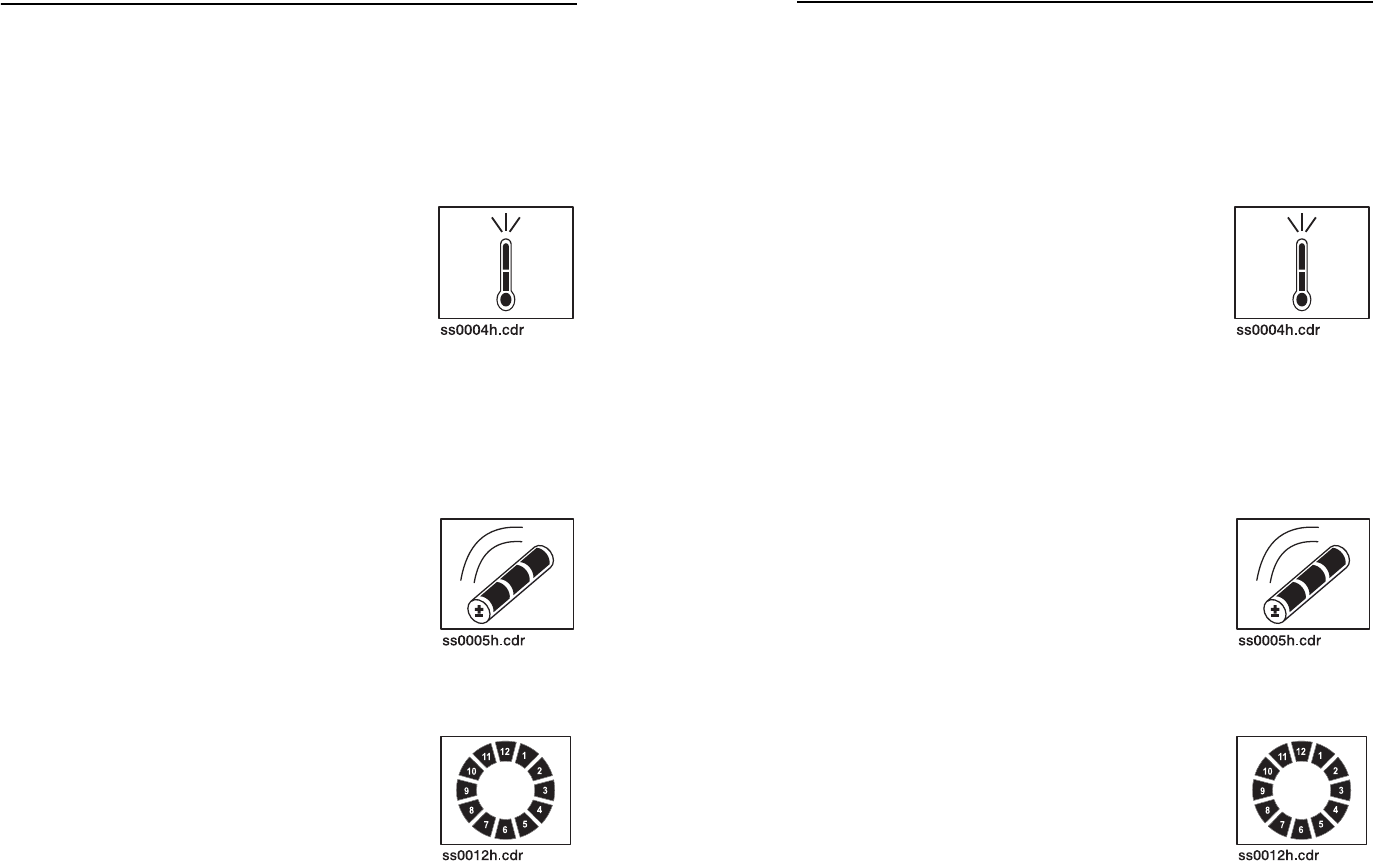
Signal strength is shown graphically on bars at top of display and
in numeric display. It can be displayed two ways: building from
both sides into the middle (a) or building from left to right (b). To
change signal strength display, turn unit off. Then press and hold
depth button while turning unit on.
Gain
Gain (amount of signal amplification) is shown on bars below
signal strength indicator. Gain increases to the right.
750/752 Tracker - CONTROLS 15
DISPLAY
750/752 Tracker - CONTROLS 15
DISPLAY
Beacon Information
Tracker displays a variety of information sent from the beacon.
Actual information sent depends on beacon used.
Temperature
Beacon temperature is continuously displayed
numerically in °C and °F, as well as in 33%
segments on the temperature icon (shown).
Operator should monitor beacon temperature
throughout bore. Temperature icon will flash
after third segment is lit, or when temperature reads 156°F
(69°C), and an audible alert will sound. Watch for rapid changes
in beacon temperature and cool beacon by pulling back a few
inches and pumping fluid downhole.
Battery Level
Beacon battery level is continuously shown.
When beacon battery is below 10%, beacon
battery outline will flash. Replace battery as
soon as possible. Each segment represents
33% of battery life.
Roll
Beacon roll is shown in a twelve segment roll
indicator for all beacons. The sections of the roll
indicator light to indicate beacon roll position.

16 750/752 Tracker - CONTROLS
DISPLAY 16 750/752 Tracker - CONTROLS
DISPLAY
Depth
In walkover tracking and line locating modes, estimated depth is
shown in numeric display when depth button is pressed after
beacon has been properly located.
In remote guidance mode, approximate distance from beacon to
tracker is shown in numeric display every 5 seconds.
Depth
In walkover tracking and line locating modes, estimated depth is
shown in numeric display when depth button is pressed after
beacon has been properly located.
In remote guidance mode, approximate distance from beacon to
tracker is shown in numeric display every 5 seconds.

750/752 Tracker - SAFETY 17
750/752 Tracker - SAFETY 17
SAFETY
Follow these guidelines before operating any jobsite equipment:
• Read and follow all safety precautions.
• Do not operate equipment unless you have completed proper
training and read the operator’s manual.
• Use equipment only as directed.
• Wear personal protective gear.
• Check that equipment is clean and in good condition.
Contact your Ditch Witch dealer if you have any question about
operation, maintenance, or equipment use.

18 750/752 Tracker - SAFETY
CLASSIFICATIONS 18 750/752 Tracker - SAFETY
CLASSIFICATIONS
CLASSIFICATIONS
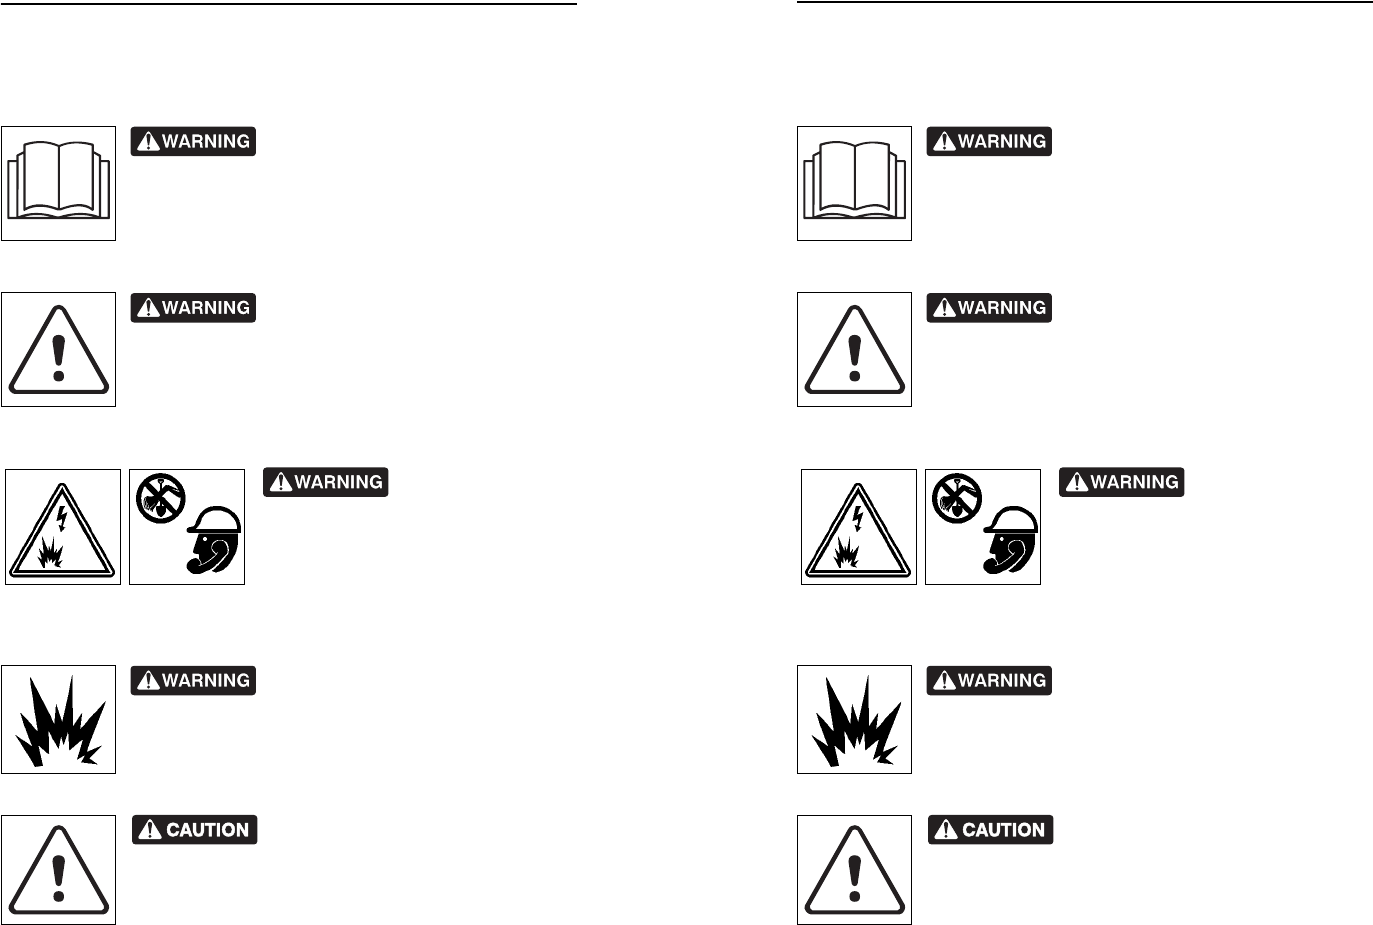
Watch for the three safety alert levels: DANGER, WARNING and
CAUTION. Learn what each level means.
indicates an imminently hazardous situation
which, if not avoided, will result in death or serious injury.
indicates a potentially hazardous situation which,
if not avoided, could result in death or serious injury.
indicates a potentially hazardous situation which,
if not avoided, may result in minor or moderate injury.
Watch for two other words: NOTICE and IMPORTANT.
NOTICE can keep you from doing something that might damage
the machine or someone's property. It can also alert you against
unsafe practices.
IMPORTANT can help you do a better job or make your job
easier in some way.
750/752 Tracker - SAFETY 19
ALERTS
750/752 Tracker - SAFETY 19
ALERTS
ALERTS
Incorrect procedures could result
in death, injury, or property damage. Learn to use
equipment correctly.
Moving traffic - hazardous
situation. Death or serious injury could result.
Avoid moving vehicles, wear high visibility clothing,
post appropriate warning signs.
Jobsite hazards
could cause death or serious injury.
Use correct equipment and work
methods. Use and maintain proper
safety equipment.
Explosion possible. Do not
operate transmitter near explosive devices or
blasting operations.
Potential radio frequency (RF)
hazard. Operating this device within 8 in (20 cm) of
your body may cause RF exposure levels to
exceed FCC RF exposure limits and should be
avoided.

20 750/752 Tracker - SAFETY
ALERTS 20 750/752 Tracker - SAFETY
ALERTS

750/752 Tracker - OPERATION 21
BEACON TRACKING MODES
750/752 Tracker - OPERATION 21
BEACON TRACKING MODES
OPERATION
The 750/752 tracker has four operation modes: tracker control,
walkover beacon tracking, remote guidance, and line locating.
Tracker control, walkover beacon tracking and remote guidance
work with 12K and 29K beacons.
Potential radio frequency (RF)
hazard. Operating this device within 8” (20 cm) of
your body may cause RF exposure levels to
exceed FCC RF exposure limits and should be
avoided. This device must not be co-located with
any other radio transmitter. The maximum antenna gain is 8 dBl.
IMPORTANT: Large metal objects, rebar, power lines and any
other kinds of interference can adversely affect depth estimates.
BEACON TRACKING MODES
Set-up
You must calibrate tracker to each beacon frequency before
beginning a beacon tracking job. After calibration, tracker can
estimate depths from approximately 9” (0.2 m) to 100’ (30.5 m)
depending on beacon used. Keep the following in mind when
calibrating system:
• Beacon and tracker should not be moved or rotated until
calibration is complete.
• Only depth estimation is affected by calibration. Roll, pitch,
left/right deviation, temperature, and battery status are not
affected.
• Large metal objects, rebar, power lines, and any other kinds of
interference will adversely affect calibration.

22 750/752 Tracker - OPERATION
BEACON TRACKING MODES 22 750/752 Tracker - OPERATION
BEACON TRACKING MODES
Calibration Procedure
1. Select beacon frequency,
if necessary.
2. Install beacon into drill
head and place on
ground exactly 10’ (3 m)
away from tracker. Make
sure no metal objects
including drilling unit and
drill pipe are within 20’ (6
m) of tracker and
toolhead.
3. Position tracker parallel
to center of drill head.
4. Turn tracker on and press and hold depth and up arrow keys
until calibration mode is entered. Release keys.
5. Verify calibration by moving tracker 15’ (4.5 m) away from
toolhead. Check depth. If reading is not 15’ (4.5 m),
recalibrate tracker.
6. Repeat for other frequency, if needed.
IMPORTANT: Some beacons transmit more than one frequency.
Calibrate tracker for each frequency separately.

750/752 Tracker - OPERATION 23
BEACON TRACKING MODES
750/752 Tracker - OPERATION 23
BEACON TRACKING MODES
Grade Beacon Pitch Calibration
1. Place 86BG beacon into the housing and put the lid on the
housing.
2. Use the Smart tool according to the instructions included with
the level.
3. Use the Smart tool to level the housing to 0.
4. Using the tracker, check the pitch of the 86BG and make sure
that it is ± 1% or lower. If the pitch is more than ± 1%, remove
housing lid and adjust the beacon inside the housing to ± 1%
or less and repeat steps 3 and 4.
IMPORTANT: If the 86GB is not within ± 1% of zero, the
tracker pitch will not calibrate.
5. Once the housing is level and the 86BG is within ± 1%, push
and hold the F/A/L/R button and press the down arrow key.
This will reset the pitch shown on the tracker to zero.
6. To revert to actual/pitch display, press and hold the F/A/L/R
button and press the down arrow key, then press the up
arrow key. This will reset the pitch display to show actual
pitch rather than calibrated pitch.

24 750/752 Tracker - OPERATION
BEACON TRACKING MODES 24 750/752 Tracker - OPERATION
BEACON TRACKING MODES
Roll Calibration
Calibrate roll display to 12:00 for use with mud motors or similar
tools:
1. Place beacon in housing. Place housing at the 12:00
position.
IMPORTANT: Depending on beacon insertion, tracker may
not show 12:00 roll.
2. Push and hold F/A/L/R key and press depth key for 3
seconds.
3. Continue pressing F/A/L/R key and roll will set to 12:00.
Reset to actual roll:
1. Push and hold F/A/L/R key and press depth key for 3
seconds.
2. Continue pressing F/A/L/R key and press down arrow key
once.

750/752 Tracker - OPERATION 25
BEACON TRACKING MODES
750/752 Tracker - OPERATION 25
BEACON TRACKING MODES
Troubleshooting
If four dashes appear in the display, unit has not been calibrated
or has been calibrated incorrectly, beacon is too close for depth
estimate, or beacon is too far away for depth estimate.
Troubleshooting
If four dashes appear in the display, unit has not been calibrated
or has been calibrated incorrectly, beacon is too close for depth
estimate, or beacon is too far away for depth estimate.

26 750/752 Tracker - OPERATION
BEACON TRACKING MODES 26 750/752 Tracker - OPERATION
BEACON TRACKING MODES
Tracker Control Mode
Overview
Incorrect procedures could result
in death, injury, or property damage. Learn to use
equipment correctly.
This mode allows 750/752 Tracker operator to disable hydraulic
power to drilling unit thrust and rotation within 16 seconds. This
mode will not stop thrust and rotation immediately.
When tracker and display communications cease, green tracker
control light on drilling unit will come on and thrust and rotation
will be disabled.
Troubleshooting tip: If thrust and rotation do not work, check
whether tracker control light on drilling unit is on. If it is,
communication has probably stopped between tracker and
display or tracker is set to incorrect code. If communication
cannot be restored, install tracker control key on drilling unit.
Tracker control light will go off and thrust and rotation will
function.
IMPORTANT:
• Tracker operator cannot stop thrust and rotation from tracker
with tracker control key installed in drilling unit and turned to
disable position.
• Tracker control mode is available on units with “TC” or “DF” at
the end of their model descriptions.
750/752 Tracker - OPERATION 27
BEACON TRACKING MODES
750/752 Tracker - OPERATION 27
BEACON TRACKING MODES
Operation
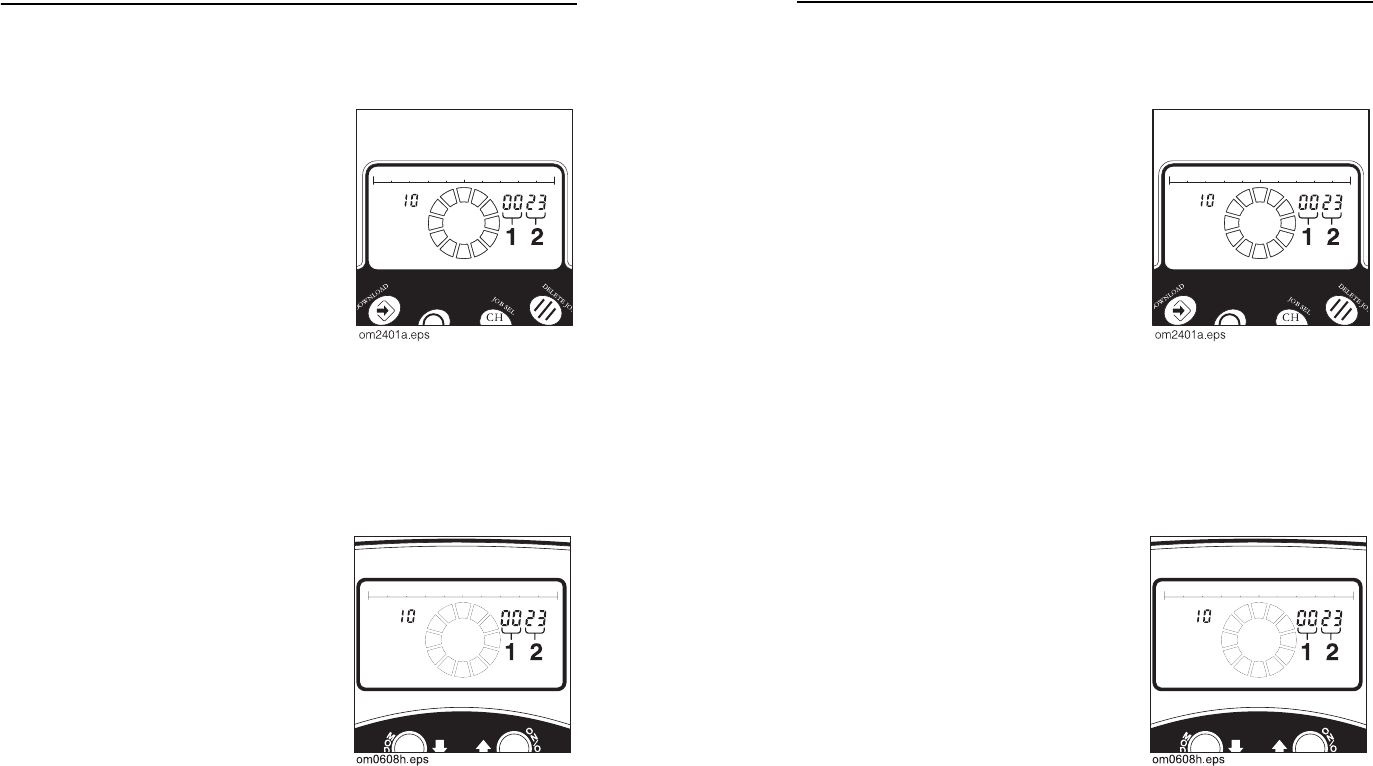
1. Turn on drilling unit. Press and
hold download button to display
serial number on 750/752
Display.
2. Turn on 750/752 Tracker and check four-digit display code.
• Hold fore/aft/left/right button and press mode to review and
start sending code.
IMPORTANT: Continue to hold down fore/aft/left/right button
to adjust code.
• Use on/off button to advance
first two digits (1) and use
depth button to lower first two
digits.
• Use up arrow button to
advance last two digits (2) and
use down arrow to lower last
two digits.
• Press and hold button to
advance or lower value
quickly.

28 750/752 Tracker - OPERATION
BEACON TRACKING MODES 28 750/752 Tracker - OPERATION
BEACON TRACKING MODES
3. Remove tracker control key from drilling unit and keep in
tracker operator’s possession.
4. Drill and track bore until drill head enters target pit or exits
ground.
5. Turn off tracker. After 8-16 seconds, tracker control light on
drilling unit will come on and hydraulic power to thrust and
rotation will be disabled.
6. Change downhole tools.
7. If you are tracking backreamer’s path, turn on tracker and
enable code transmission. After 8-16 seconds, tracker control
light on drilling unit will go off and thrust and rotation will
function.
If you are not tracking backreamer’s path, install tracker
control key on drilling unit. Tracker control light on drilling unit
will go off and thrust and rotation will function.
750/752 Tracker - OPERATION 29
BEACON TRACKING MODES
750/752 Tracker - OPERATION 29
BEACON TRACKING MODES
Walkover Tracking Mode
Location
1. Turn on tracker. Make sure you can see fore/aft arrows in
center of display. If you see left/right arrows, press fore/aft/
left/right key.
2. Walk bore path with bottom of tracker parallel to beacon. Do
not hold tracker at right angle to beacon.
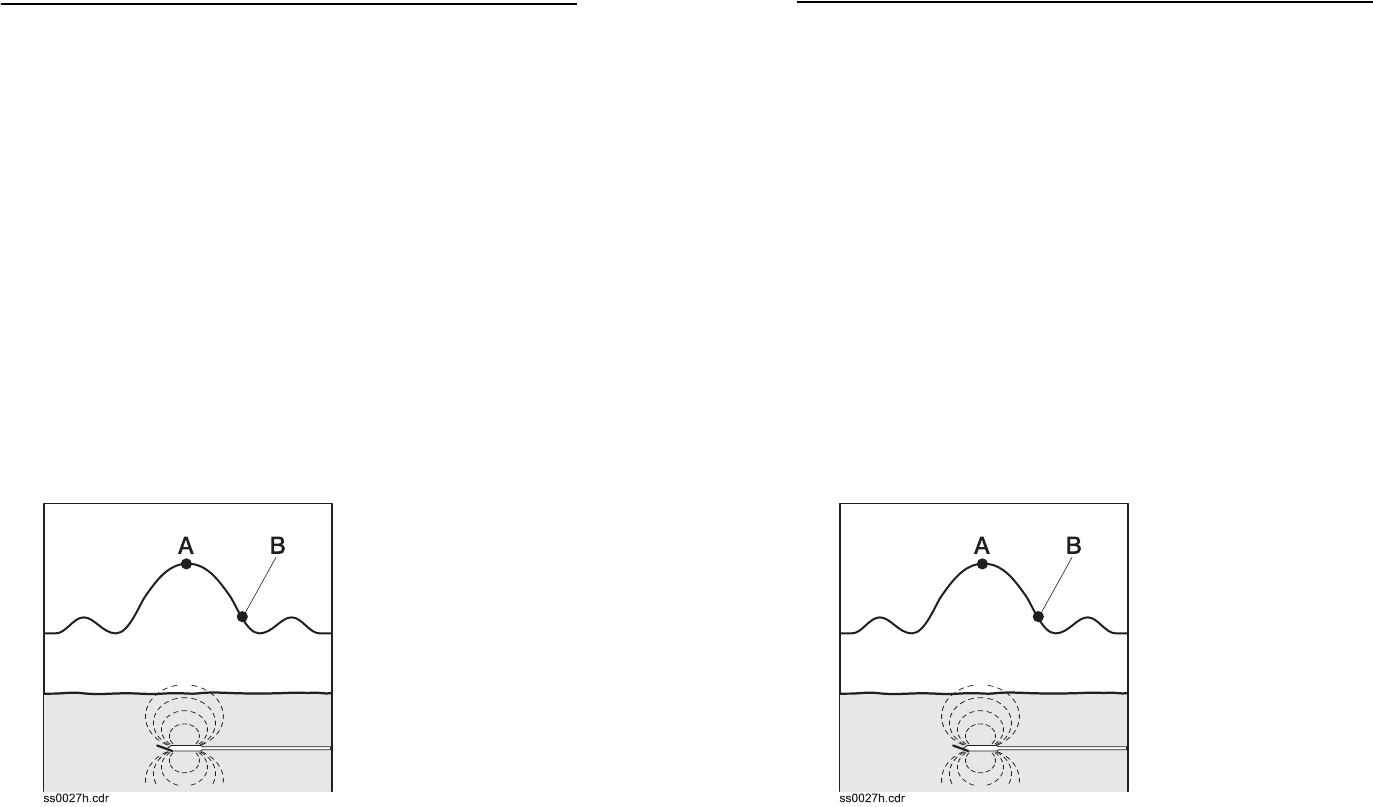
IMPORTANT: A common problem when locating a beacon is
secondary or ghost signals. A typical beacon signal pattern
shows a main signal and two weaker secondary signals.
Track beacon at main signal. Familiarity with beacon signal
pattern will lessen the effect of secondary signals. Also, the
beacon tracking arrows will disappear when tracker is over
secondary signal.
3.When both fore/aft
arrows are on, sweep
tracker from side to side
and use signal strength
display to find lateral
location of beacon (point
A).
4.Step back until ghost is
located (no arrows in
center of clock face and
low signal strength) and
then move slightly forward
until only one arrow is lit
(point B).
5. Press fore/aft/left/right button to switch to left/right arrows and
sweep tracker back and forth until both left/right arrows are
on.
6. Switch back to fore/aft arrows and move forward until both
fore/aft arrows and target is lit.
7. Take depth estimate and mark spot.
30 750/752 Tracker - OPERATION
BEACON TRACKING MODES 30 750/752 Tracker - OPERATION
BEACON TRACKING MODES
Remote Guidance Mode
Information is transmitted directly to display at drilling unit when
tracker is in remote guidance mode. Approximate distance from
tracker to beacon (not the estimated depth of the drill head) is
shown every 5 seconds.
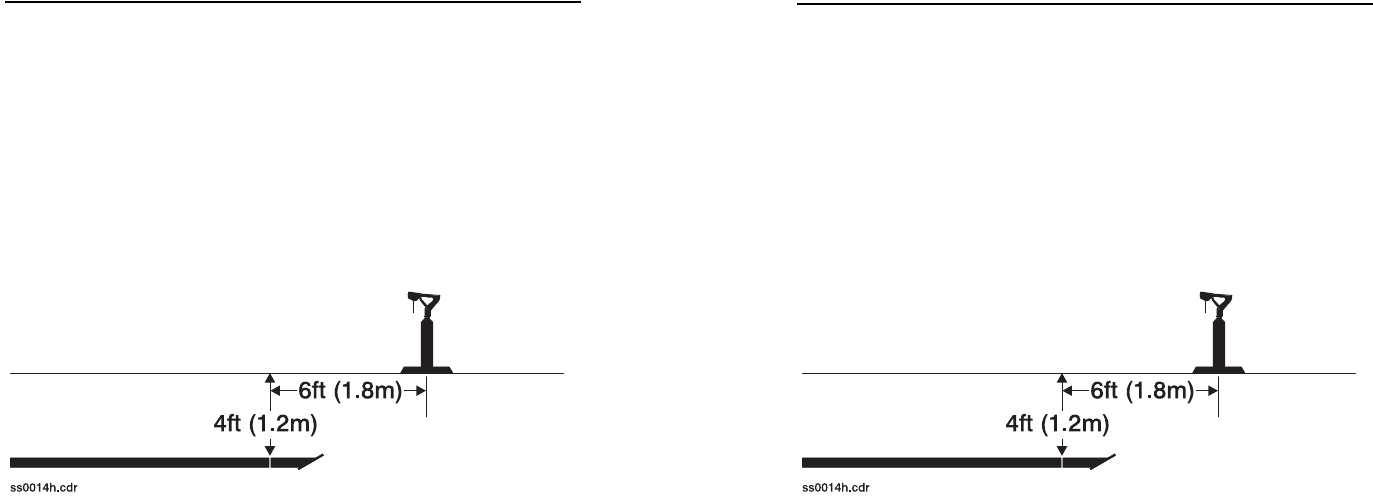
Distance will not be correct within one and a half times the drill
head depth. For example, if you are drilling at 4’(1.2 m), you will
be able to drill within 6’ (1.8 m) of tracker.
To operate in remote guidance mode, place unit in stand while it
is turned off. Press and hold mode button while pressing on/off
button.
Tracker and drill head can be up to 60’ (18.3 m) apart when in
remote guidance mode. IMPORTANT: Do not drill past tracker.
750/752 Tracker - OPERATION 31
BEACON TRACKING MODES
750/752 Tracker - OPERATION 31
BEACON TRACKING MODES
Displayed Information
Beacons send a variety of information to tracker. All Ditch Witch
beacons send pitch, roll, temperature and battery information.
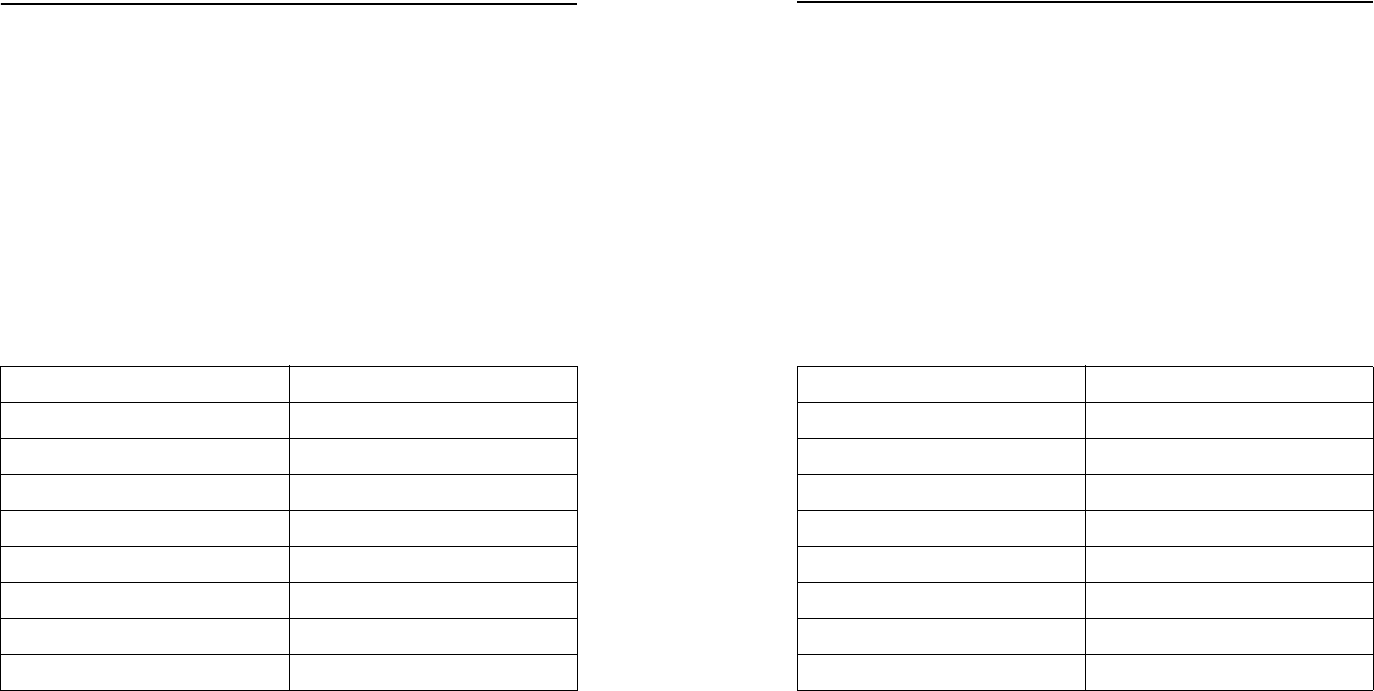
Roll
Beacon roll information is useful in determining the direction that
the drilling tool will tend to travel when pushed without rotation.
The following chart shows typical tool face roll indications for
directional drilling.
Depth
To estimate beacon depth, press depth button. Estimated depth
to beacon will be displayed. To change depth units, press depth
and mode buttons.
All tracking and locating systems are subject to interference. To
quickly check for interference, raise tracker 1’ (0.3 m) and make
second depth estimate. If the difference between the two
estimates is not 1’ (0.3 m), there is interference.
When beacon roll shows . . . Drilling tool will move . . .
1 or 2 o’clock up and right
3 o’clock right
4 or 5 o’clock down and right
6 o’clock down
7 or 8 o’clock down and left
9 o’clock left
10 or 11 o’clock up and left
12 o’clock up

32 750/752 Tracker - OPERATION
BEACON TRACKING MODES 32 750/752 Tracker - OPERATION
BEACON TRACKING MODES
Pitch
Tracker shows pitch (% grade) when used with beacons that
provide this information (see specific beacon literature).
Pitch shows beacon grade in percentages from down arrow 99%
(45 degrees down) to up arrow 99% (45 degrees up). Tracker
displays this information to the left of roll display.
Grade beacons will send pitch in 0.1% increments from 1-45%
and in 1% increments from 45-90%.
% of
grade Rise/drop
US (metric) % of
grade Rise/drop
US (metric) % of
grade Rise/drop
US (metric)
1 1” (25 mm) 12 1’ 2”
(356 mm) 45 4’ 1”
(1.24 m)
2 2” (51 mm) 14 1’ 5”
(432 mm) 50 4’ 6”
(1.37 m)
34”
(102 mm) 16 1’ 7”
(483 mm) 55 4’ 10”
(1.47 m)
45”
(127 mm) 18 1’ 9”
(533 mm) 60 5’ 2”
(1.57 m)
56”
(152 mm) 20 2’ (610 mm) 65 5’ 5”
(1.65 m)
67”
(178 mm) 24 2’ 4”
(711 mm) 70 5’ 9”
(1.75 m)
78”
(203 mm) 28 2’ 8”
(813 mm) 75 6’ (1.83 m)
810”
(254 mm) 32 3’ 1”
(940 mm) 80 6’ 3”
(1.91 m)
911”
(279 mm) 36 3’ 5”
(1.04 m) 90 6’ 8”
(2.03 m)
10 1’ (305 mm) 40 3’ 9”
(1.14 m) 99 7’ (2.13 m)
Pitch
Tracker shows pitch (% grade) when used with beacons that
provide this information (see specific beacon literature).
Pitch shows beacon grade in percentages from down arrow 99%
(45 degrees down) to up arrow 99% (45 degrees up). Tracker
displays this information to the left of roll display.
Grade beacons will send pitch in 0.1% increments from 1-45%
and in 1% increments from 45-90%.
% of
grade Rise/drop
US (metric) % of
grade Rise/drop
US (metric) % of
grade Rise/drop
US (metric)
1 1” (25 mm) 12 1’ 2”
(356 mm) 45 4’ 1”
(1.24 m)
2 2” (51 mm) 14 1’ 5”
(432 mm) 50 4’ 6”
(1.37 m)
34”
(102 mm) 16 1’ 7”
(483 mm) 55 4’ 10”
(1.47 m)
45”
(127 mm) 18 1’ 9”
(533 mm) 60 5’ 2”
(1.57 m)
56”
(152 mm) 20 2’ (610 mm) 65 5’ 5”
(1.65 m)
67”
(178 mm) 24 2’ 4”
(711 mm) 70 5’ 9”
(1.75 m)
78”
(203 mm) 28 2’ 8”
(813 mm) 75 6’ (1.83 m)
8 10”
(254 mm) 32 3’ 1”
(940 mm) 80 6’ 3”
(1.91 m)
911”
(279 mm) 36 3’ 5”
(1.04 m) 90 6’ 8”
(2.03 m)
10 1’ (305 mm) 40 3’ 9”
(1.14 m) 99 7’ (2.13 m)

750/752 Tracker - OPERATION 33
LINE LOCATING MODE
750/752 Tracker - OPERATION 33
LINE LOCATING MODE
LINE LOCATING MODE
To locate power lines, select the following:
• line locating mode
• frequency (50 Hz power, 60 Hz power, or 8 kHz active)
IMPORTANT: Transmitter is required to locate 8 kHz.
Setup
If you are locating a line with the help of a transmitter, connect
transmitter as directed in transmitter operator’s manual. Select
frequency at transmitter to match tracker frequency.
Location
To locate a line:
1. Sweep suspected area of line location.
2. Strongest signal indicates location of line.
3. Take depth reading.

34 750/752 Tracker - OPERATION
LINE LOCATING MODE 34 750/752 Tracker - OPERATION
LINE LOCATING MODE
Troubleshooting
If four dashes appear in the display, signal appears to be above
receiver and unit cannot estimate depth. This message is usually
caused by interfering signals. Try relocating target signal.
Troubleshooting
If four dashes appear in the display, signal appears to be above
receiver and unit cannot estimate depth. This message is usually
caused by interfering signals. Try relocating target signal.

750/752 Tracker - MAINTENANCE 35
GENERAL CARE
750/752 Tracker - MAINTENANCE 35
GENERAL CARE
MAINTENANCE
GENERAL CARE
The 750/752 tracker needs only minor maintenance under normal
operating conditions. Following these care instructions can
ensure longer equipment life.
• Do not drop the equipment.
• Do not expose the equipment to high heat (such as in the rear
window of a car).
• Clean equipment with a damp cloth and mild soap. Never use
scouring powder.
• Do not immerse in any liquid.
• Inspect housing daily for cracks or other damage. If housing is
damaged, contact your Ditch Witch dealer for replacement.
• Protect LCD from sharp blows from hard objects.

36 750/752 Tracker - MAINTENANCE 36 750/752 Tracker - MAINTENANCE
750/752 Tracker - SPECIFICATIONS 37
750/752 Tracker - SPECIFICATIONS 37
SPECIFICATIONS
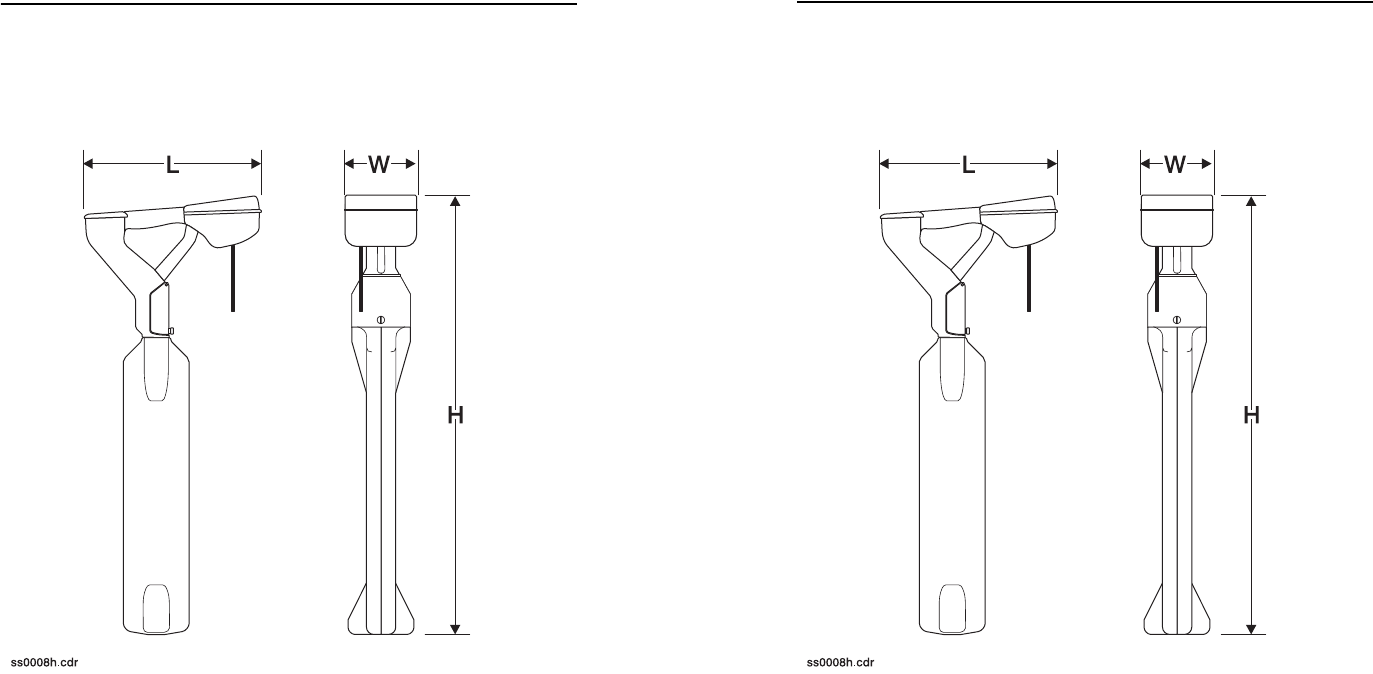
Dimensions:
Length: 12.75 in (32.4 cm)
Height: 31.5 in (80 cm)
Width: 6 in (15.2 cm)
Operating Weight: 5.5 lb (2.5 kg)
Operating Temperature Range: -4°F to 122°F (-20°C to 50°C)
SPECIFICATIONS
Dimensions:
Length: 12.75 in (32.4 cm)
Height: 31.5 in (80 cm)
Width: 6 in (15.2 cm)
Operating Weight: 5.5 lb (2.5 kg)
Operating Temperature Range: -4°F to 122°F (-20°C to 50°C)

38 750/752 Tracker - SPECIFICATIONS 38 750/752 Tracker - SPECIFICATIONS
Antenna Configuration: peak
Operating Modes:
12K beacon
29K beacon
60 Hz power
50 Hz power
8 kHz line (active)
Radio Frequencies
750 - 2
752 - 9
Maximum Locating Range:
Beacon: 0.75 ft - 99 ft 11 in (22.9 cm - 30 m)
Line: 0-10 ft (0-3 m)
Depth Calibration Tolerances * :
±4 in (10 cm) at 10 ft (3 m)
±5% from 10-20 ft (3-6.1 m)
±10% beyond 20 ft (6.1 m)
Line Location Tolerances:
Active mode: ±3% at 10 ft (3 m)
Passive mode: ±5% at 6 ft (1.8 m); ±10% at 10 ft (3 m)
Batteries: 6 C cell alkaline
Battery Life ** : approximately 20 hours
Battery Saver: unit shuts off after 5 minutes if no key is pressed
* Units are calibrated to these tolerances under test field conditions. Actual field
conditions may cause signal distortions or may contain noise sources which result
in depth estimates that vary from these figures.
** continuous use at 70°F (21°C)

750/752 Tracker - WARRANTY 39
750/752 Tracker - WARRANTY 39
WARRANTY
Limited Product Warranty Policy
Warranty Periods
New Product
A twelve-month period starts on the date of delivery to the end user:
trackers, remote displays, receivers, transmitters, radars, fault finders
A six-month period starts on the date of delivery to the end user:
directional and locate beacons
A three-month period starts on the date of delivery to the end user:
accessories: cables, clamps, canoes, bags, and adapters
Used Product (Cosmetics)
A three-month warranty starts on the date of delivery to the end user on used and
refurbished products sold from Ditch Witch dealers. Used products are non-
returnable.
Service and Repair
A one-month warranty on labor starts on the date the unit is repaired, and a three-
month warranty on parts starts on the date the unit is repaired for all products.
Extended Warranty
The extended warranty may be purchased at the time the equipment is sold or
anytime within the original warranty period. The extension is for an additional
twelve or twenty-four months, for a total coverage of twenty-four to thirty-six
months. Exclusions: All beacons and accessories.

40 750/752 Tracker - WARRANTY 40 750/752 Tracker - WARRANTY
Details and Exclusions
• The warranty includes only Ditch Witch products and accessories that are
manufactured and distributed by Ditch Witch. The warranty compensates on
defects in material or workmanship.
• Defects will be determined through inspection by Ditch Witch or authorized
repair centers. Original purchaser must make the defective item available for
inspection within 30 days of the date the part fails.
• The warranty is limited to replacement of the defective part. The replacement
part may be new or remanufactured. Repair and installation of defective part
will be at no charge when product or item is delivered to Ditch Witch or an
authorized repair center. The product or item will be returned at no charge for
return freight.
• The warranty periods do not represent the useful life of Ditch Witch products
and accessories.
• If Ditch Witch products are purchased for commercial purposes, as defined by
the Commerical Code, no warranties extend beyond the specific terms set forth
in this limited warranty. All other provisions of this limited warranty apply,
including duties imposed.
• Ditch Witch products have been tested to deliver acceptable performance in
most conditions.
• This limited warranty applies to the original purchaser only. Some states or
jurisdictions do not allow exclusion or limitation of incidental or consequential
damages, so above limitation may not apply. This limited warranty gives
original purchaser specific rights that vary from state to state or jurisdiction to
jurisdiction.
• Each serial numbered piece of equipment must be registered by the selling
dealer to establish the warranty start date.

750/752 Tracker - 41
750/752 Tracker - 41
• When a registration is not received, the Ditch Witch shipping date is used to
establish the warranty period start date.
• Product inspection and estimates may require that the unit be disassembled
and tested.
• Out-of-warranty inspection costs include labor accrued at the full labor rate plus
return freight.
• Approved out-of-warranty repair costs include parts, labor accrued at full labor
rate, plus return freight.
Revision F, September 2006