Charles Machine Works The TK TK Tracking System User Manual
Charles Machine Works Inc, The TK Tracking System
Uses Manual
TK/TKD/TKQ Quick Start
FCCID: ITQ-TK
IC: 3598A-TK
IMPORTANT: See Operator’s Manual for detailed safety and operating instructions.
P/N 790-XXXXA
Getting to Know Your TK/TKD/TKQ Tracking System
TK Controls Overview
Select/Log: Press to take a depth
and log the locate point.
Down Arrow: Press to scroll down
in menu. Also use to decrement
values in settings.
Up Arrow: Press to scroll up in
menu. Also use to increment values
in settings.
Menu/On/OFF: Press to enter and
exit menus. Press once to turn unit
on. Press and hold to turn unit off.
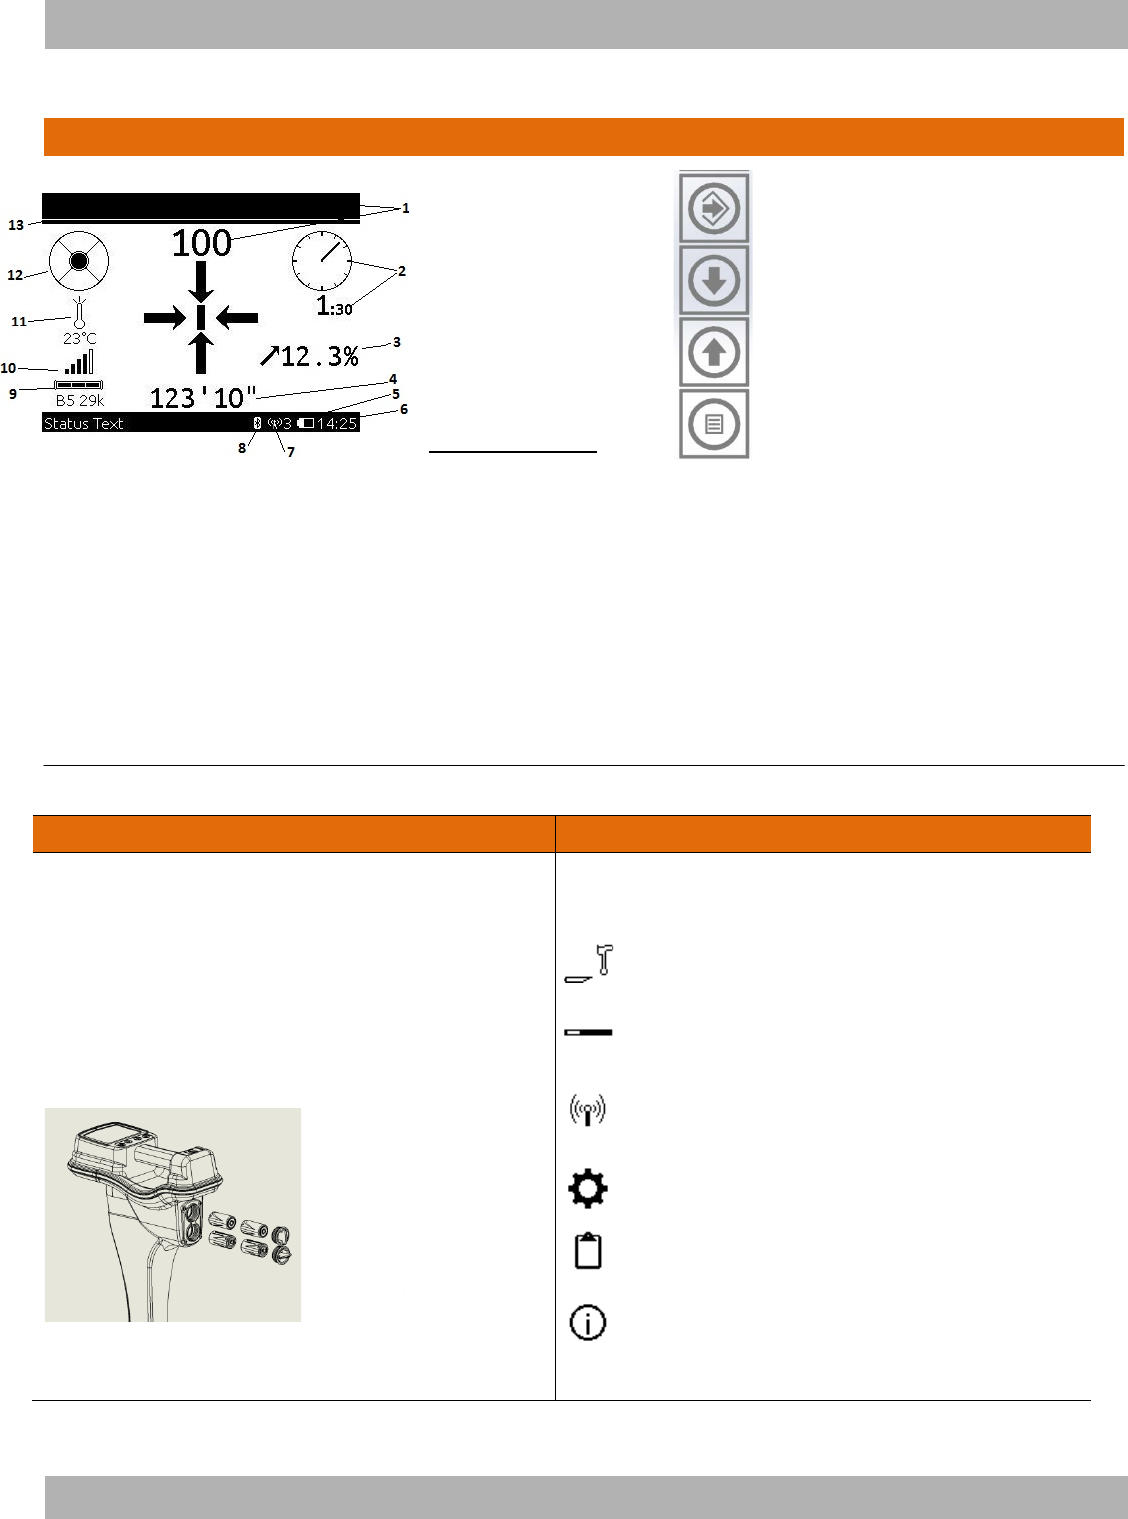
Screen Item Descriptions
1. Signal Strength: Signal strength is shown by
bars at top of display and in numeric display.
2. Roll Position: Roll angle is displayed
graphically by pointer on the clock and
numerically by the time.
3. Pitch: Direction and amount of pitch up and
down displayed in the units selected in the set
up.
4. Depth: Displays the distance from the
tracker to the beacon. This value is displayed
in the units selected in the set up.
5. Tracker Battery Status: Indicates the level of the
batteries currently installed in the tracker.
6. Time: Displays current time in 24
hour clock format.
7. Telemetry Radio: Tower indicates radio is on and
numeric value indicates the channel.
8. Bluetooth Status: Indicates that Bluetooth is
enabled and is currently in use with another device.
9. Beacon Battery Status/Beacon Type: Indicates
the status of the battery level in the beacon. Text below
indicates the type of beacon currently set in the tracker.
10. Communication Quality Graph: Indicates the
quality of signal required for good communication. Full
graph indicates excellent signal quality, while one bar
indicates poor quality as it relates to communication.
11. Beacon Temperature: Indicates the status of the
temperature graphically and numerically according to
the units setting in the menu.
12. Bubble Level: Indicates the plumb and level of the
tracker. The more level the unit the more accurate the
depth measurement.
13. Gain Status: This bar indicates the amount of gain
set in the tracker to get the signal currently displayed.
Startup Tips
Installing The Batteries TK Menus
TK/TKD/TKQ
Use four C-cell alkaline or NiMH batteries in
tracker.
To install
1. Remove battery caps.
2. Remove batteries.
3. Insert batteries as shown.
4. Install battery caps.
5. Check operation. The unit will not come on if a battery is installed
backwards.
• Press the Menu key to enter menus.
• Scroll through menu selections with arrow keys.
• Press Menu key again to go back to previous menu or exit menus mode.
Drill-To/Walkover: Toggles unit between walkover and drill-to modes.
Beacon: Handles beacon calibration, frequency settings, roll
and pitch calibration, beacon information, and the
bore-path analyzer.
Wireless: Handles the settings for telemetry radio, channel
settings, Bluetooth, tracker control, and tracker
control codes.
Settings: Set up for language, units, backlight, clock, volume,
and auto-power settings.
Logging: Settings for auto-log, creating new log, log manager,
deletion of logs, and deletion of last pipe.
System: Access to functions such as information about the
tracker, diagnostics and software updates.

TK/TKD/TKQ Quick Start
FCCID: ITQ-TK
IC: 3598A-TK
IMPORTANT: See Operator’s Manual for detailed safety and operating instructions.
P/N 790-XXXXA
Changes or modifications not expressly approved by the party responsible for compliance could void the user’s authority to
operate the equipment.
Les changements ou modifications non expressément approuvés par la partie responsable de la conformité pourraient
annuler l'autorité de l'utilisateur à utiliser cet équipement.
RF Exposure Statement
In order to comply with RF exposure requirements during normal operation, this device must be held in
front of the body horizontally. The antenna must be vertical in line with the body with at least 8” (20 cm)
separation distance from the body.
This equipment has been tested for RF exposure according to FCC rules for body-worn
equipment. The equipment must be operated in accordance with manufacturer expectations to insure
RF exposure compliance.
Note: This equipment has been tested and found to comply with the limits for a Class B digital device,
pursuant to Part 15 of the FCC rules. These limits are designed to provide reasonable protection against
harmful interference in a residential installation. This equipment generates, uses and can radiate radio
frequency energy and, if not installed and used in accordance with the instructions, may cause harmful
interference to radio communications. However, there is no guarantee that interference will not occur in a
particular installation. If this equipment does cause harmful interference to radio or television reception,
which can be determined by turning the equipment off and on, the user is encouraged to try to correct the
interference by one or more of the following measures:
• Reorient or relocate the receiving antenna.
• Increase the separation between the equipment and receiver.
• Connect the equipment into an outlet on a circuit different from that to which the receiver is connected.
• Consult the dealer or an experienced radio/TV technician for help.
This device complies with Health Canada’s Safety Code. The installer of this device should
ensure that RF radiation is not emitted in excess of the Health Canada’s requirement. Information
can be obtained at http://www.hc-sc.gc.ca/ewh-sem/pubs/radiation/radio_guide-lignes_direct-eng.php
Cet appareil est conforme avec Santé Canada Code de sécurité 6. Le
programme d ’installation de cet appareil doit s’ assurer que les rayonnements
RF n’est pas émis au-delà de I’exigence de Santé Canada. Les informations
peuvent être obtenues:
http://www.hc-sc.gc.ca/ewhsemt/pubs/radiation/radio_ guide-lignes_direct-eng.php