Checkpoint Systems EVOLVEM ELECTRONIC ARTICLE SURVEILLANCE (EAS) User Manual CheckpointUsersGuide
Checkpoint Systems Inc ELECTRONIC ARTICLE SURVEILLANCE (EAS) CheckpointUsersGuide
Contents
- 1. USERS MANUAL 1
- 2. USERS MANUAL 2
USERS MANUAL 1

Checkpoint Systems, Inc.
101 Wolf Drive, P.O. Box 188
Thorofare, New Jersey 08086
800 257 5540 Toll Free
856 848 1800 Phone
856 848 0937 Fax
www.checkpointsystems.com

RF-EAS System User’s Guide

INSIDE FRONT

INSIDE BACK

FCC Regulatory Compliance Statement
Checkpoint Systems, Inc. offers certain Electronic Article Surveillance (EAS) products that have been FCC
certified or verified to 47 CFR Part 15, Subparts B/C and/or 47 CFR Part 18. Appropriately, one of the following
labels will apply to the approval:
Equipment Safety Compliance Statement
Checkpoint’s Electronic Article Surveillance (EAS) products have been designed for safeness during normal
use and, where applicable, certain components of the system or accessory sub-assemblies have been
certified, listed, or recognized in accordance with one or more of the following safety standards; UL 1012,
UL 1037, UL 1310, UL 1950, CSA C22.2 No. 205, CSA C22.2 No. 220, CSA C22.2 No. 223, CSA C22.2 No. 950.
Additional approvals may be pending.
WARNING: Changes or modifications to Checkpoint’s EAS equipment not expressly approved by the party
responsible for assuring compliance could void the user’s authority to operate the equipment in a safe or
otherwise regulatory compliant manner.
NOTE: This equipment has been tested and found to comply with the limits for a Class A digital
device, pursuant to part 15 of the FCC Rules. These limits are designed to provide reasonable
protection against harmful interference when the equipment is operated in a commercial environment.
This equipment generates, uses, and can radiate radio frequency energy and, if not installed and used
in accordance with the instruction manual, may cause harmful interference to radio communications.
Operation of this equipment in a residential area is likely to cause harmful interference in which
case the user will be required to correct the interference at his own expense.
- OR -
This device complies with part 15 of the FCC Rules. Operation is subject to the following two
conditions: (1) This device may not cause harmful interference, and (2) this device must accept any
interference received, including interference that may cause undesired operation.
- OR -
NOTE: This equipment has been tested and found to comply with the limits for a miscellaneous type
ISM device, pursuant to part 18 of the FCC Rules. This equipment generates, uses, and can radiate
radio frequency energy and, if not installed and used in accordance with the instruction manual,
may cause harmful interference to radio communications. However, there is no guarantee that
interference will not occur in a particular installation. If this equipment does cause harmful interference
to radio communications reception, which can be determined by turning the equipment off and on,
please contact Checkpoint Systems, Inc. at (800) 257-5540 for further assistance.
Important Information To Our Users in North America
101 Wolf Drive, P.O. Box 188, Thorofare, New Jersey 08086
Telephone: (800) 257-5540 • (856) 848-1800

CE Compliance Statement
Where applicable, Checkpoint Systems, Inc. offers certain Electronic Article Surveillance (EAS) products
that have CE Declarations of Conformity to Council Directive(s) EMC 89/336/EEC and LVD 73/23/EEC, as
amended by 92/31/EEC and 93/68/EEC.
System Electromagnetic Compatibility (EMC), has been tested and, in most cases, EC type examination
certified through a Notified Body using Competent Body laboratories in Europe, whereby, conformity is
declared to voluntary accepted European Telecommunications Standards Institute (ETSI) standards prETS
300 683 and I-ETS 300 330. In other cases, conformity is declared to the generic emission and immunity
standards EN 50081-1 / EN 55022 and EN 50082-1.
In some countries, national type approval licensing may be required in addition to CE compliance; hence
certain countries have voluntarily accepted the I-ETS 300 330 as the test method standard until further
regulatory harmonization develops within Europe. Additional type approvals may be pending.
Equipment Safety Compliance Statement
Checkpoint’s Electronic Article Surveillance (EAS) products have been designed for safeness during
normal use and, where applicable, certain components of the system or accessory sub-assemblies have
been declared safe according to the European Low Voltage Directive (LVD) by being certified, listed, or
recognized in accordance with one or more of the following European safety standards; EN 60950
(Amendments 1 & 2), EN60742. Additional approvals may be pending.
WARNING: Changes or modifications to Checkpoint’s EAS equipment not expressly approved by the party
responsible for assuring compliance could void the user’s authority to operate the equipment in a safe or
otherwise regulatory compliant manner.
NOTE: Certain Checkpoint EAS equipment has been tested and found to conform with the CE emission
and immunity requirements in Europe. This equipment generates, uses, and can radiate radio
frequency energy and, if not installed and used in accordance with the instruction manual, may
cause harmful interference to radio communications. Under unusual circumstances, interference
from external sources may temporarily degrade the system performance. However, there is no
guarantee that interference will not occur in a particular installation. If this equipment experiences
frequent interference from external sources or does cause harmful interference to radio
communications reception, which can be determined by turning the equipment off and on, please
contact a Checkpoint representative for further assistance.
Important Information To Our Users in Europe

RF-EAS SYSTEM USER’S GUIDE
Introduction to Radio Frequency Electronic Article Surveillance ........................................................1
System Components..................................................................................................................................2-4
Tagging ......................................................................................................................................................5-11
Checkout Procedures ...........................................................................................................................12-13
Testing Procedures.....................................................................................................................................14
Troubleshooting .....................................................................................................................................15-16
Equipment Care ...........................................................................................................................................17
Customer Service Procedures ............................................................................................................18-19
Alarm Log......................................................................................................................................................20
Points to Remember....................................................................................................................................21
Ordering Tags/Customer Returns .............................................................................................................22
TABLE OF CONTENTS


INTRODUCTION
1
The Checkpoint system is composed of sensing pedestals, some that transmit a frequency signal and others that
receive the signal. When a Checkpoint tag passes between the transmitter and receiver, an alarm sounds. This
alerts store personnel that store items are leaving the premises with a live Checkpoint tag. Often, the very
presence of the pedestals will be enough to deter a potential shoplifter.
Merchandise in the store is tagged with Checkpoint tags or labels. During a normal transaction, the cashier will
pass the merchandise over a deactivation field, usually a Counterpoint®Pad or scanner integrated with deactivation
electronics. This deactivation field turns off the signal contained in the tag. Customers may now exit the store
without causing the system to alarm. For those stores using hard tags to protect clothing or other soft goods, the
tag is removed at the point of sale so that the customer may exit the store without alarming the system.
Checkpoint minimizes the opportunity for shoplifters to successfully steal merchandise. In addition to the physical
deterrence the sensing pedestals provide, Checkpoint tags and labels offer hidden protection. Because
Checkpoint offers such a wide variety of tags, shoppers are often unaware that merchandise is protected
against shoplifting. This way, shoplifters cannot leave the store premises with merchandise that has not been
properly paid for. In conclusion, the Checkpoint systems provide:
• Deterrence - the pedestals’ presence discourages shoplifting attempts by customers,
vendors, and employees
• Protection - provided by the Checkpoint system, tags, and program
• Detection - reinforces the risk of shoplifting while searching for non-deactivated/
non-detuned “live” disposable tags or non-removed hard tags
INTRODUCTION TO RADIO FREQUENCY ELECTRONIC ARTICLE SURVEILLANCE (RF-EAS)
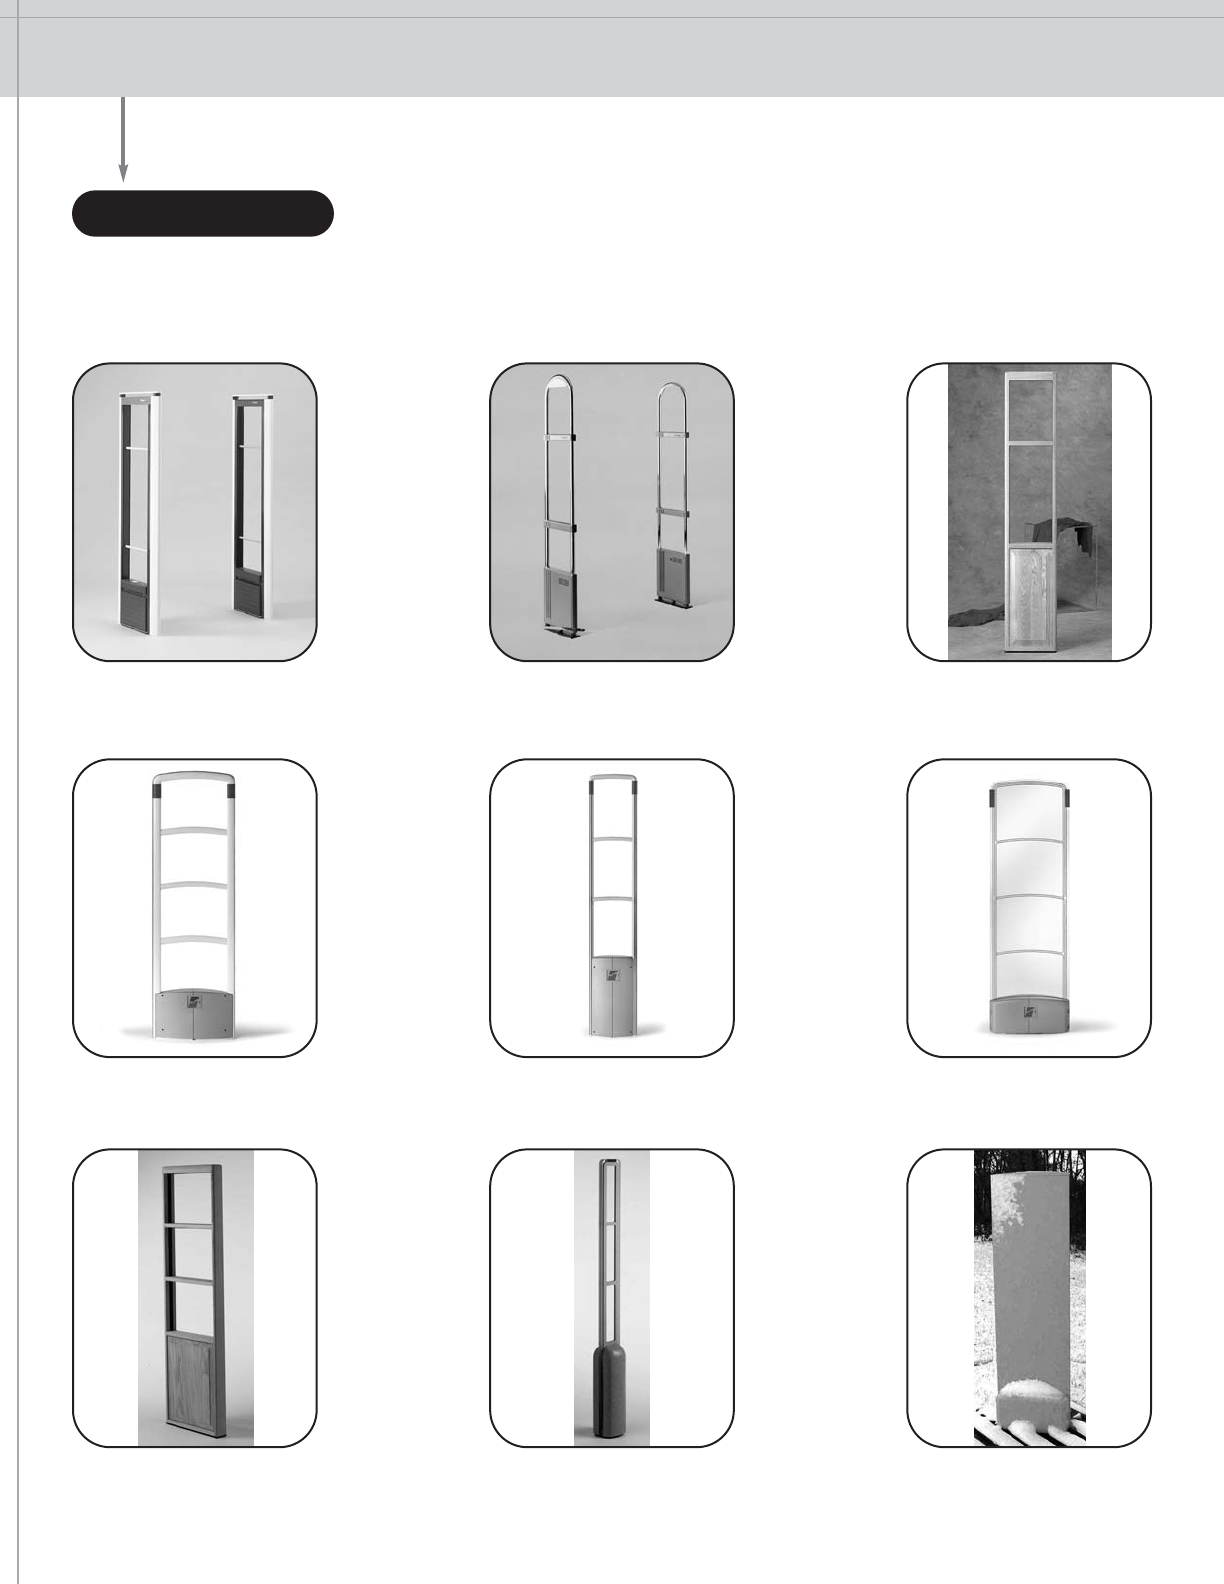
SYSTEM COMPONENTS SENSING PEDESTALS |DEACTIVATION |TAGS & LABELS |ACCESSORIES
QS4000XTTM
ABS plastic frames
QS2000®
Chrome with thermoplastic
base and crossovers
Liberty QXTM
Plastic frame with
stainless steel endcaps
Liberty PXTM
Fiber-enforced
plastic frame
Signature®
Wood frames
Liberty GXTM
Clear acrylic with
textured gray inlay
Strata EX®
Wood frames
Strata SX®
Clear acrylic with
textured gray inlay
Strata WX®
Weatherized design for
garden and home centers
SENSING PEDESTALS
The EAS Pedestal sends a radio signal into the intended detection area. If that signal detects a Checkpoint tag, an
alarm will sound.
2
Deactivation of the Checkpoint tag may be
completed in two ways. One way is by using a
Counterpoint Pad, another is by installing
deactivation electronics into the scanner at the
point of sale. Checkpoint tags are deactivated
without interrupting the normal transaction flow.
Checkpoint’s deactivation will not de-magnetize
credit cards or affect magnetic media.
Checkpoint equipment operates at radio
frequencies and levels authorized by the
Federal Communications Commission. To
the company’s knowledge, the system
has not caused any adverse health
effects. Even heart pacemakers, hearing
aids, and other health-related acces-
sories, when tested with the Checkpoint
system, were not adversely affected.
Counter Mounted Scanner Hand-Held Scanner
Counterpoint Pad Counterpoint Chassis
Checkpoint offers a variety of tags and labels which are compatible with
Checkpoint systems. Check with your sales representative to make sure the tag
you use is compatible with your system.
DEACTIVATION
REUSABLE TAGS
Hard Tags offer protection for high ticket items such as furs, leathers, or luggage.
Clothing, shoes, and select hard goods such as headphones, tennis racquets, or
baseball gloves may also be tagged. Designer Tags, which offer protection for the
same types of merchandise, are available with custom printing and color. Flex
Tags may be used in conjunction with standard price tags to protect soft goods.
ChekInk IITM Tags protect a variety of soft goods. Durable vials, contained in the plastic housing, will break open
and release ink when subjected to excessive force. These tags may be used alone or with a hard tag to provide
maximum protection against shoplifting.
DISPOSABLE TAGS
Available in pressure sensitive or hang tag styles, these tags are deactivated or detuned at the point of sale. A
variety of styles are offered to address specific market applications. ChekInktags may be used in conjunction
with several popular label printers. Please check with your sales representative for tag styles and printer
compatibility.
SYSTEM COMPONENTS
3
TAGS & LABELS
SYSTEM COMPONENTS
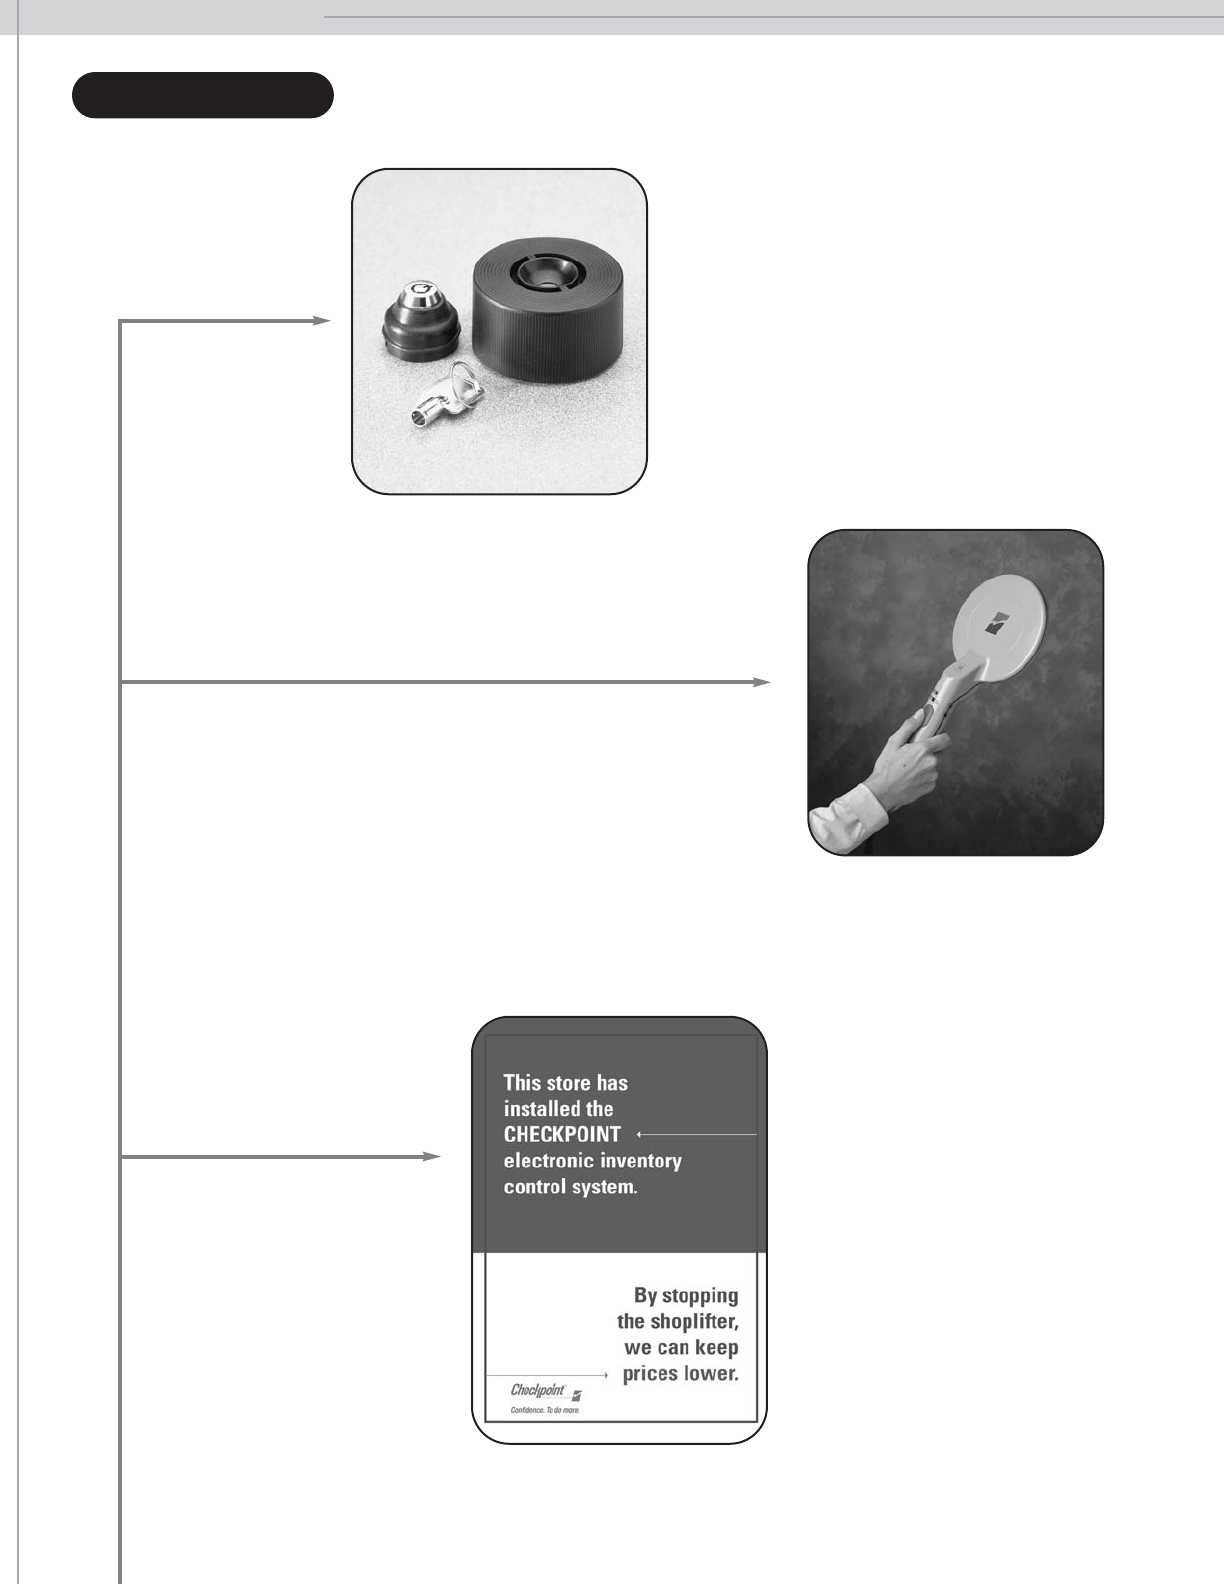
ACCESSORIES
Checkpoint’s universal detacher releases Hard
Tags, Designer Tags, and ChekInk II Tags from
merchandise at the point of sale.
The Communications Package
includes numerous leaflets and
posters which may be posted
throughout the store. This signage
increases the deterrent effect of the
Checkpoint system.
The hand held OMNI tool combines the functionality of the
Personal Tag Verifier, the Deactivation Verifier and the
Portable Deactivator into an easy-to-use RF-EAS tool. The
self-contained unit automatically recharges when placed in
its docking cradle.
4

TAGGING
WHAT TO TAG |USING DISPOSABLE TAGS |TAGS & LABELS |APPLYING DISPOSABLE TAGS
APPLYING REUSABLE TAGS |WHERE TO PLACE REUSABLE TAGS
5
WHAT TO TAG
To maximize the effectiveness of the Checkpoint system, it is important to follow tagging and placement
procedures. What you tag depends not only on the merchandise you carry, but your store’s size, location, layout,
and customers.
Listed below are a few guidelines:
•Protect frequently stolen items. Your sales and shrink patterns will tell you which merchandise
shoplifters take most often.
•Protect popular merchandise. “Trendy” and seasonal merchandise that sells well particularly
attracts shoplifters. Change tagging patterns as trends change.
•Protect expensive inventory. Your company may decide to tag all items above a certain price point.
•Protect “brand-name” goods. Protecting national brands and designer clothing works well,
particularly for specialty stores.
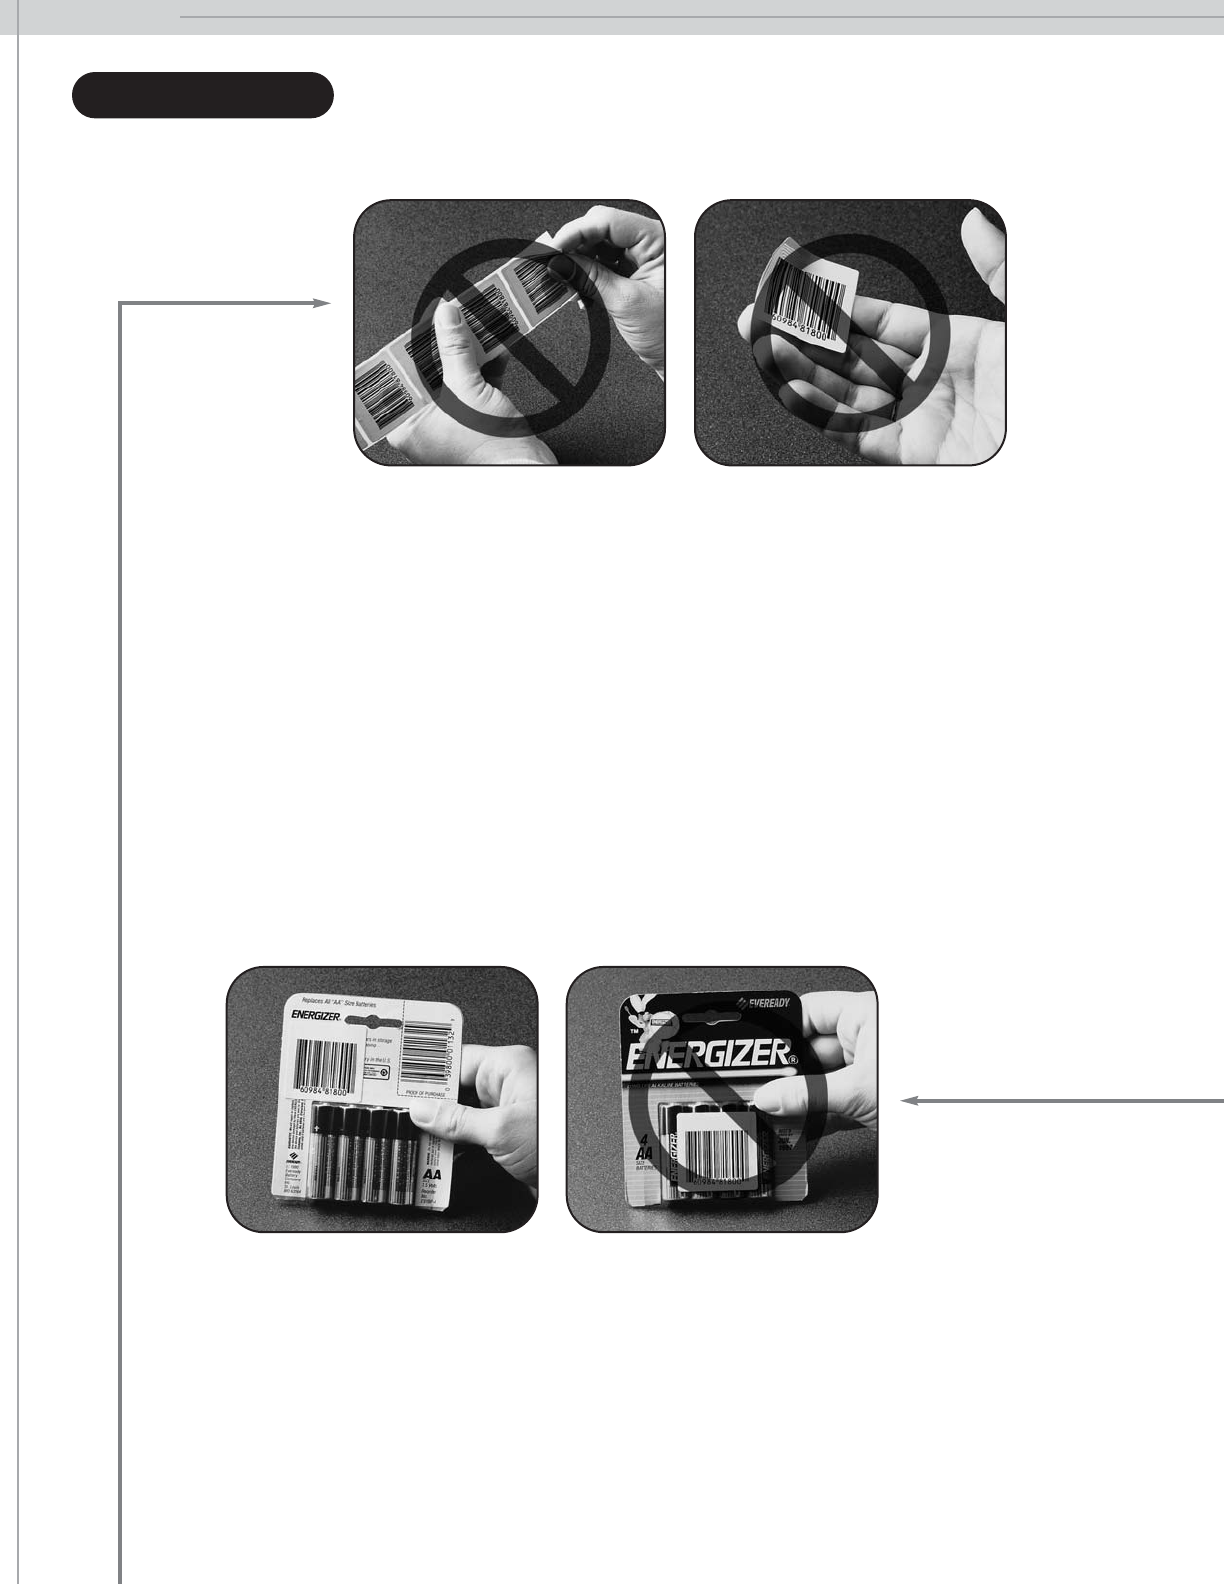
Handling and placement of the tag is very important. Keep the
following items in mind when tagging merchandise:
• Make the tags look natural and inconspicuous on
products. Place labels on the back or side of products.
• Do not cover up important instructions, contents,
or date/lot information.
• Apply the tag to a flat surface of the product. Try not to
bend the tag. If you must, bend the tag 1/4” on one side
only and no more than 90 degrees. Note that bending
the tag may hinder detection.
USING DISPOSABLE TAGS
TAGGING
6
• Do not place the tag over the existing UPC code. However, when recreating actual, live UPC bar
codes, the tag may be placed over the existing bar code.
• Apply tags neatly, lining up corners/sides with those of the product.
• Do not tag directly against metal or foil lined products such as cigarettes, cigarette cartons, certain
brands of film, etc. If you are in doubt, test the tagged product by walking through the system.
• Roll tags off backing paper. Do not handle the adhesive side.
• On merchandise that is placed in stacks, such as videotapes, DVDs and CDs, stagger tags so that
no two are back to back.
• In supermarket applications, use only the 2010 series meat labels with the warning “Remove Label
Before Microwaving” or “Remove Prior to Microwave” when tagging meat, fish, poultry or other
foods. This warning is important for consumers to avoid any possibility of certain microwaves
(mostly older models) from arcing or even potentially posing a fire hazard. While tagging meats,
place the tag in the corner of the meat boat, trying to cover as little of the meat as possible.
• Do not place tags directly on leather or vinyl merchandise. The adhesive may damage the product.
• Store tags at normal room temperature and humidity.
• Do not use “Inspected By” tags on over-the-counter drugs or food.
TAGS & LABELS

TAGGING
7
APPLYING DISPOSABLE TAGS
A pressure-sensitive tag is meant to blend with existing packaging and price stickers as much as possible. The
following guidelines should assist you when tagging merchandise:
Merchandise Recommended “Tag Spots”
Film On the back of paper hanging flap
For 35 mm film, on the back of the carton
Batteries On the back of the package, away from metal contents
Books Inside back cover
Toys, Software On box or package
Hardware Blister pack or box
Wooden handles
Health and Beauty Care Items Any flat non-metallic surface
Either end of box containing tubed items, such as toothpaste.
Plastic caps, as on aerosol cans
Underside of carton or box
Appliances On carton or box
Phones Any non-metallic surface
Shoes Sole, near ball of foot
CDs, DVDs, Tapes On shrinkwrap
Plastic or cardboard packaging
Billfolds, Wallets Card insert (remove at POS)
Clothing Back of pricing hang tag
Videos Place “Be Kind Please Rewind” on right hand side
window of cassette
For specific market applications, contact your sales representative or Training Support Specialist to determine
how and where the tag should be placed.

TAGGING
8
1. Tear a workable amount of tags from the roll.
Each tag on every roll is subjected to Checkpoint’s quality control measures. Sometimes, Checkpoint
tags are produced which do not meet these standards. These tags, which are distributed throughout
the entire roll, are marked with a red ink spot. Customers should keep in mind that these tags may
not alarm the system. Simply discard the tags if you choose not to use them. Please note that each
tray contains 2000 quality tags.
2. Remove the backing paper with thumb and forefinger as
shown.
APPLYING DISPOSABLE TAGS
continued
4. Smooth the edges of the tag with your finger to ensure
that the tag is applied firmly.
3. Place the sticky edge of the tag against a
flat, smooth surface on the item. Guide the
tag onto the item with your thumb.
TAGGING
9
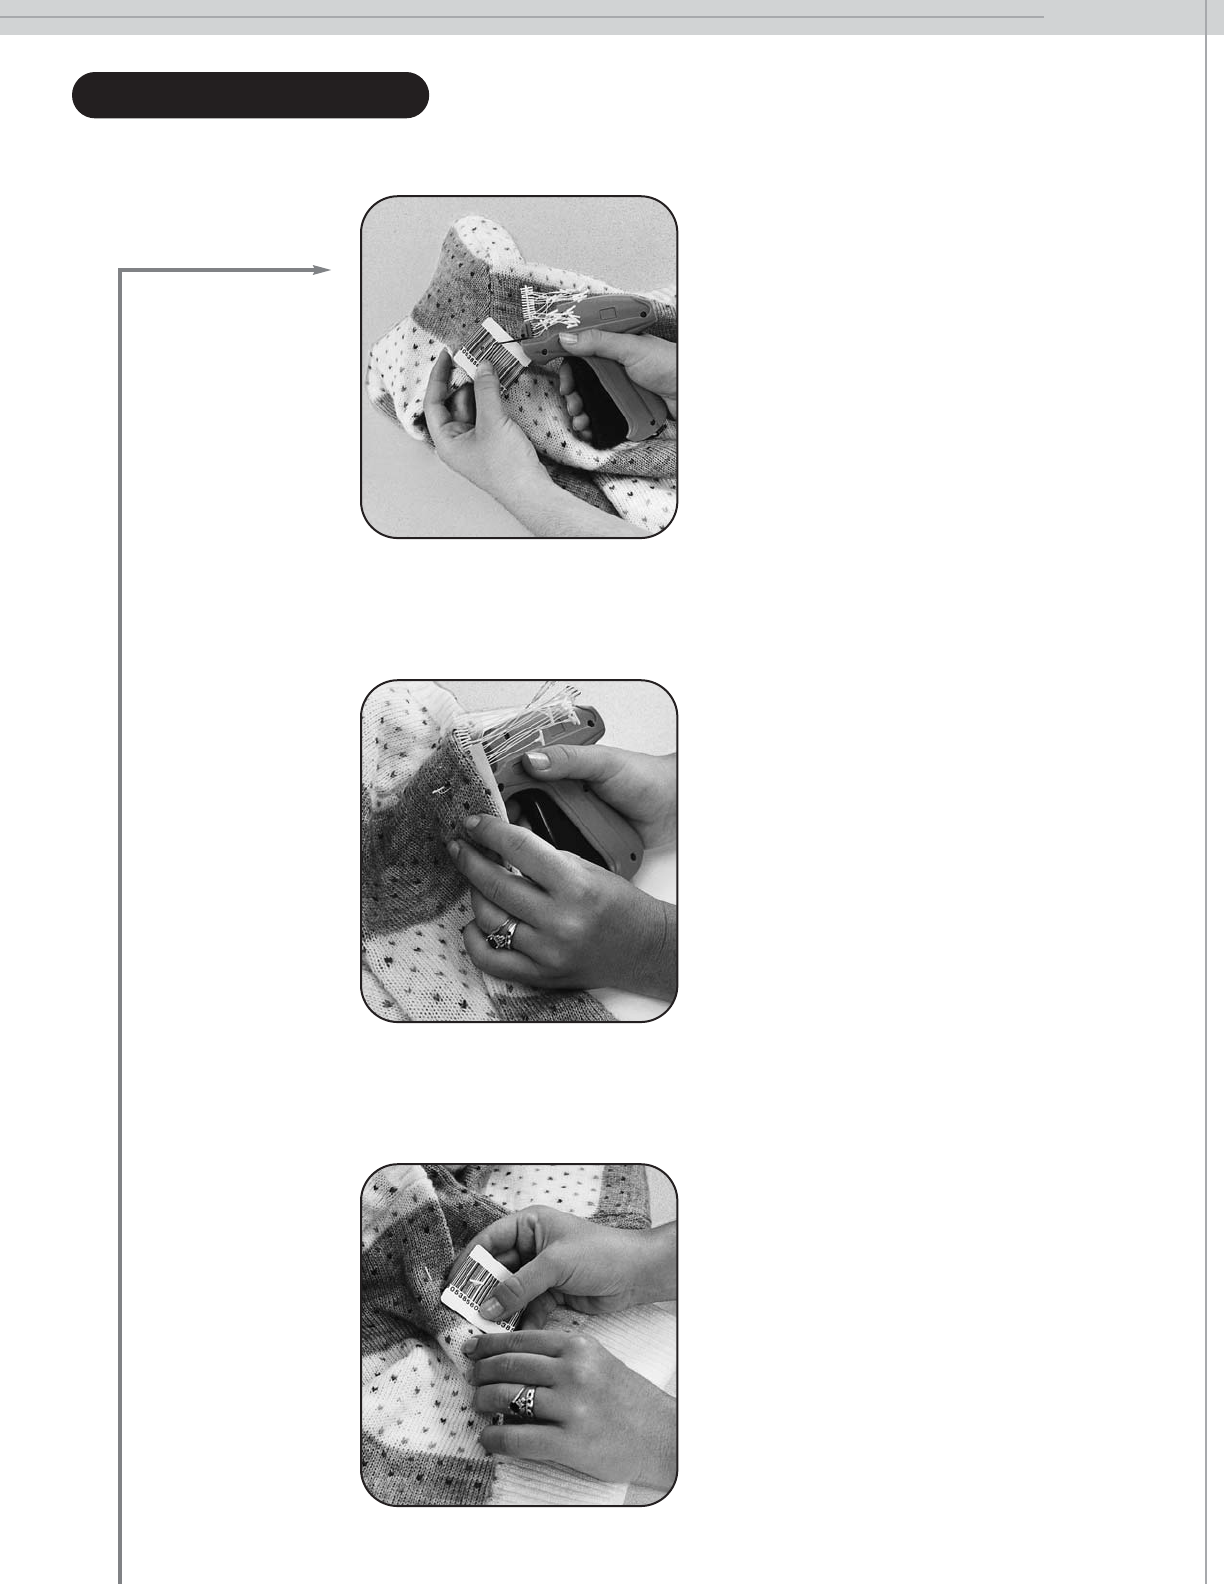
APPLYING REUSABLE TAGS
FLEX TAGS
1. Attach the Flex Tag or hang tag with a
Tagger, Mini Tach-It, Swiftach, Dennison
Loop, or similar device, just as you do
with pricing hang tags. Lay the Flex Tag
flat against the item, with the hole where
you want to attach the tag.
2. Line up the fastener gun needle with the
hole. Push the needle through the fabric
and the hole. Squeeze the trigger.
3. Tug gently on the tag to be sure it is
secure.

TAGGING
10
APPLYING REUSABLE TAGS
HARD TAGS
1. Holding the pin at its base, push it through
the item until the stem of the pin may be
seen on the outside of the garment.
2. Line up the pin with the hole in the hard
tag or fastener. Push the pin straight in,
as far as it will go. The pin should slide in
easily. If not, try a new tag or pin. DO NOT
FORCE IT.
3. To be sure the pin is locked, gently tug
upward on it.
continued

1. Holding the tag, push the pin through the item until it can be seen through the other side.
2. Line up the pin with the hole in the fastener. Push the tag straight in, as far as it will go. The pin should slide
in easily. If not, try using another fastener. DO NOT FORCE IT.
3. To be sure the pin is locked into the fastener, gently tug upward on the tag.
4. If using ChekInk II tags in conjunction with hard tags, follow the same procedure as described above,
substituting the hole in the hard tag for the hole in the fastener.
5. Be sure to tag merchandise in a visible area where ink stains would render the garment useless.
TAGGING
11
CHEKINK II TAGS
APPLYING REUSABLE TAGS
continued
Merchandise Recommended “Tag Spots”
Shirts, Blouses, Blazers Back of collar or lapel
Use side seams only if material is leather, suede, nylon or silk
Pants, Jeans Through material below the waistband on back of pants or above
back pockets
Skirts Through waistband
Material below waistband on the back of the skirt
Furs Collar
Inside pocket
Lining (if fur is too bulky)
Leather Through stitch hole
Collar or lapel
Through sleeve
Never tag through leather – pin holes cannot be removed
Down Jackets Seam stitching at collar or lapel
Seam stitching at sleeve
Fabric webbing on sleeves (if any)
Shoes, Boots Through eyelets
Seam
HINT: Never tag the hem or seams, unless the material is leather, suede, nylon, silk or any other fabric that may
be damaged with pin holes. It is easy for shoplifters to shorten garments or repair damage from ripped seams
or torn hems.
WHERE TO PLACE REUSABLE TAGS
CHECKOUT PROCEDURES REMOVING HARD TAGS, DESIGNER TAGS & CHEKINK II TAGS
REMOVING FLEX TAGS |DEACTIVATION OF PRESSURE SENSITIVE
TAGS AND HANG TAGS
12
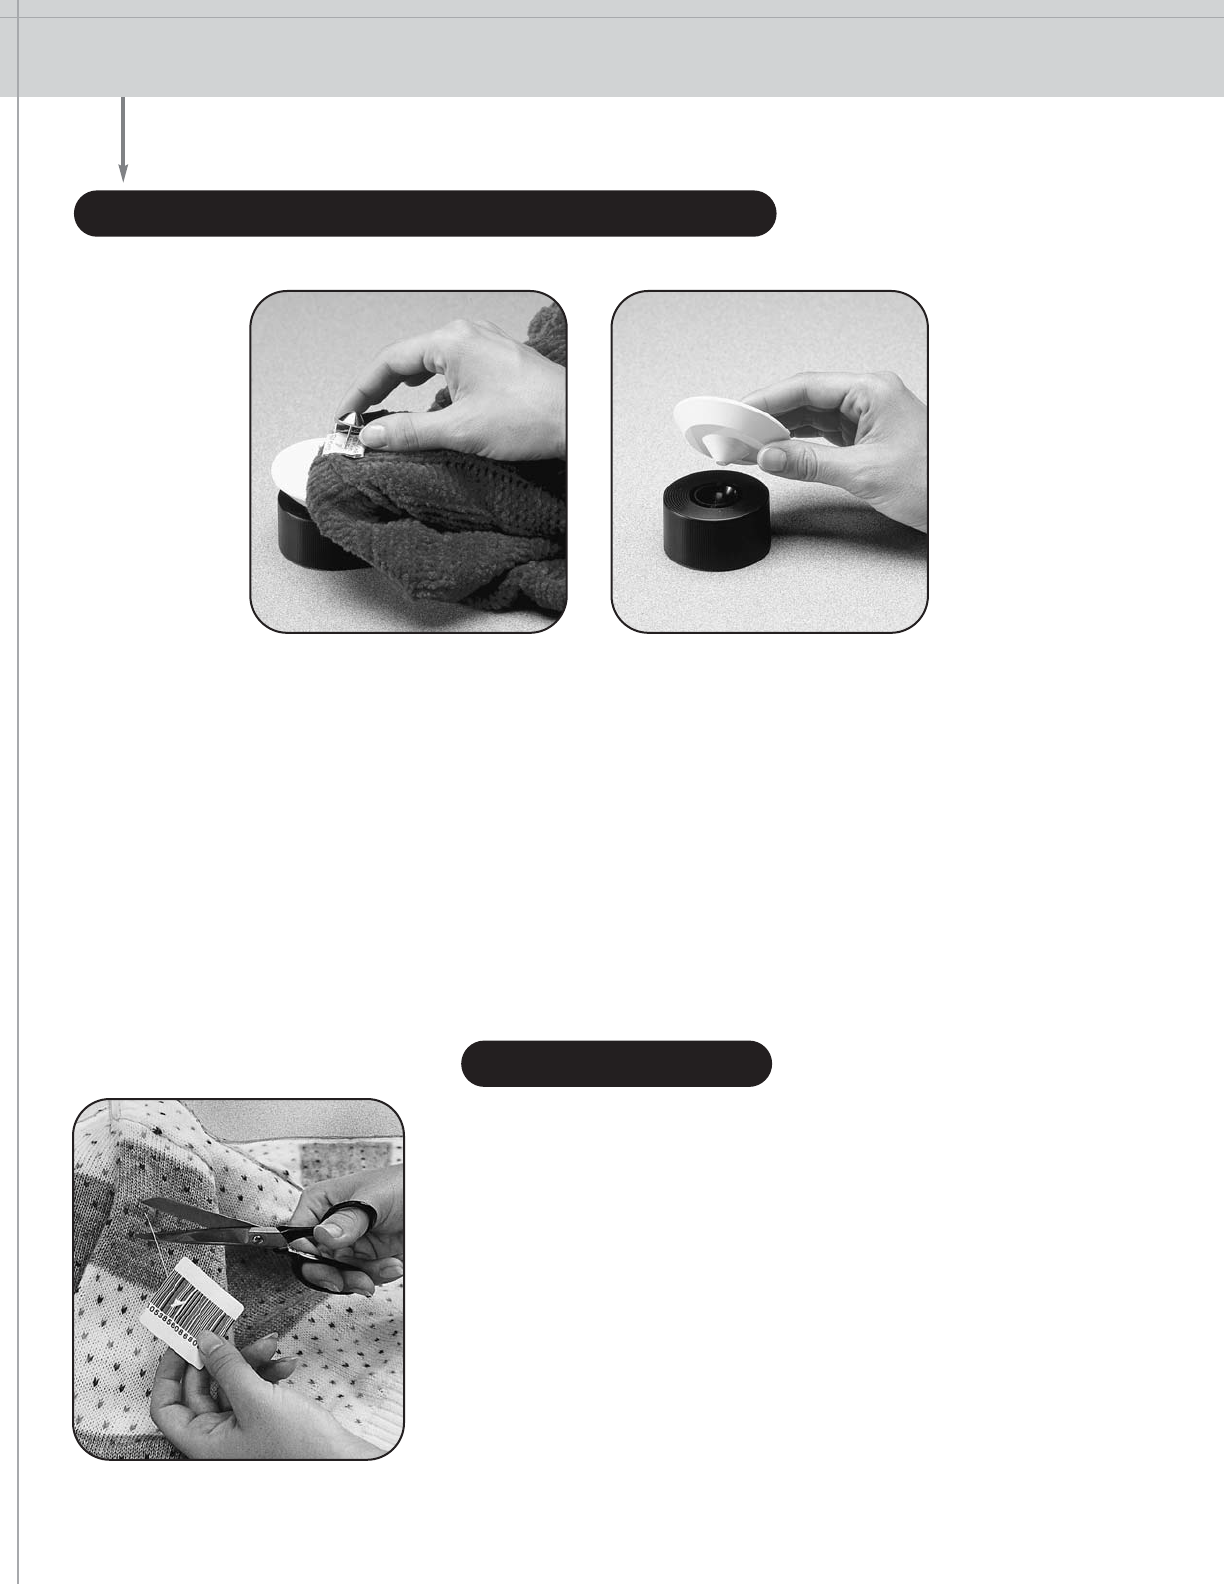
REMOVING HARD TAGS, DESIGNER TAGS & CHEKINK II TAGS
1. Place the plastic dome of the hard tag in the detacher well and push down on the pin, then gently lift the pin
away from the detacher. For Designer and ChekInk II tags, place the fastener in the detacher well.
2. Store reusable tags in a box at the checkout counter and store pins in another. Keeping these items separate
will make it easier to use them in the future.
3. Store tags at least three feet away from system pedestals, power supplies, and deactivation units.
4. Store the detacher at least three feet away from electronic cash registers that use a computer diskette or
digital tape.
1. Snip the plastic thread or loop used to attach the tag to the item. Be
careful not to cut the tag. If using a pin and fastener to secure the
tag to merchandise, follow the procedure for hard tag removal.
2. Store Flex Tags in a box at the checkout counter until they are
needed to tag additional merchandise. Store pins and fasteners in
separate boxes.
3. Keep Flex Tags at least three feet away from the system pedestals,
power supplies, and deactivation units.
REMOVING FLEX TAGS
CHECKOUT PROCEDURES
13
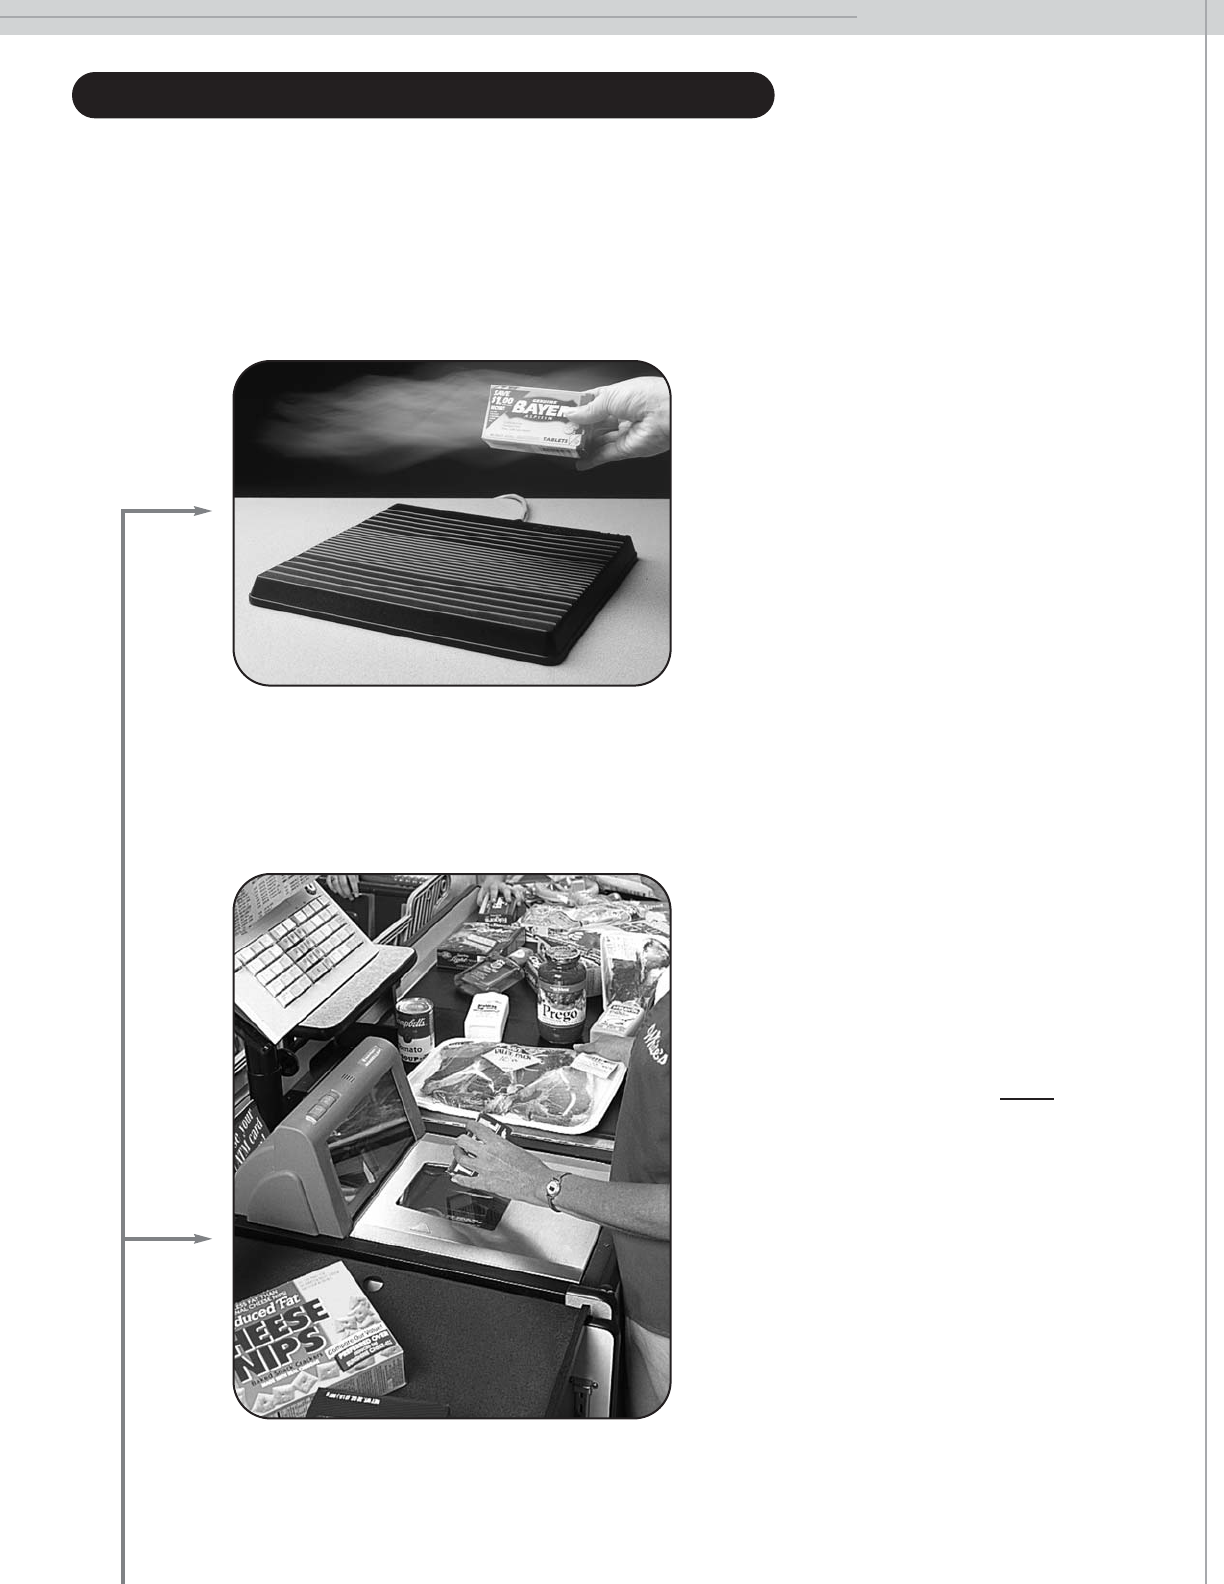
DEACTIVATION OF PRESSURE SENSITIVE TAGS AND HANG TAGS
Pressure sensitive tags and hang tags may be deactivated at the point at the sale by using a Counterpoint Pad or
integrated scanner. Please refer to the directions below to determine the optimum procedure for deactivating
Checkpoint tags.
COUNTERPOINT DEACTIVATION
1. While ringing up purchases, cashiers
should pass each product across the
full width of the Counterpoint Pad. Items
should be held low and horizontally to
make sure that the target is within the
deactivation field.
2. As a final check, place purchased
merchandise on top of the deactivation
pad.
SCANNER DEACTIVATION
1. Tagged areas/bar codes should be held
as low as possible above the scanner
(without disrupting throughput) to
ensure tag deactivation. Every item
must be scanned; cashiers should avoid
using the ”quantity” key on the cash
register.
2. At the point of sale, items should be
scanned for bar code information as
usual. Checkpoint tags placed on
merchandise are deactivated at the
same time.

TESTING PROCEDURES
14
To maximize the system’s performance, it is important to test it at the start of each business day. For best results,
use the same test procedure each day.
To test the system properly, walk completely through the pedestals while holding a test tag at waist level. (The
test tag is included inside your Checkpoint Welcome Package). Waving the test tag alone between the pedestals
will not provide a true reading.
If you are experiencing detection problems when using the test tag with the sensing system, please
check the following before placing a service call:
1. Is the power supply (the silver box mounted near or below the cash register) plugged in and
turned to the “on” position?
2. Is the power supply light on?
3. Did you check the circuit breaker? This is located on the back of the power supply opposite the
black power cord. If the small button is sticking out, hold it in for three to five seconds, then check
the system again with the test tag.
If problems persist, contact Checkpoint’s Service Department at (800) 253-7580 to place a service call.
When placing a service call, please give store name and customer number (if available), along with a
brief description of the problem you are experiencing.
*
For testing your deactivation unit, please refer to your store management or Checkpoint sales
representative for proper procedures.

TROUBLESHOOTING
15
If you are experiencing phantom alarms (if the alarm
sounds when no one is walking through the system),
check the following:
1. Is someone carrying tagged merchandise
near the system? Are there tags or tagged
merchandise within three feet of the system?
Check behind checkout counters, inside
boxes, etc.
2. Look for coiled wire or cords near the
system (carpet shampooers, extension
cords, etc.).
3. Check all handrails and display racks in the
vicinity to ensure that they are not loose, or
touching the pedestals. Replace or tighten as
necessary. Door handles and cart guards should be insulated from the door frame by inserting rubber
gaskets. If there is an excessively loose or rickety display nearby, move it away from the system.
4. If phantoms continue, turn the system off for up to one hour and then turn it on again. This should allow
any interference to clear.
5. Look to see if another appliance is plugged into the same outlet as the sensing system. If so, unplug the
appliance.
PHANTOM ALARMS |DEACTIVATION UNITS |POS AREA |OMNI TOOL
PHANTOM ALARMS
DEACTIVATION UNITS
If you are experiencing problems when testing deactivation units, check
the following before calling for service:
1. Make sure the deactivation unit is plugged in.
2. Look to see if any items are placed on top of the chassis (box that
supplies power for the deactivation unit). This unit requires a
minimum of three inches of clearance to maintain air flow for
ventilation.
3. Check for tags or tagged merchandise that may be placed within
three feet of the deactivation unit.
4. Scan the area between the Counterpoint Pad or scanner and
counter top for metal items such as paper clips or coins.

TROUBLESHOOTING
16
If you experience system failure or have new equipment installed near or
around the point of sale or sensing system, contact Checkpoint’s Service
Department.
The detacher unit should be kept at least three feet away from any electric
register that uses a computer diskette or digital tape. If you have difficulty
removing a hard tag from a garment, lightly rap the dome of the tag on the
counter and try to remove the tag again.
POS AREA
OMNI TOOL
If you are experiencing problems when using the OMNI tool, check the
following:
1. If the portable verifier gives off an erratic alarm, move at least three
feet from the sensing pedestals and try again. Replace the battery if the
erratic alarm continues.
2. If the unit does not give off any alarm, recharge the battery by returning
the OMNI to its charging cradle.
If problems persist, contact Checkpoint’s Customer Service Department at (800) 253-7580.

EQUIPMENT CARE
17
• Do not decorate sensing pedestals with foil or lights (e.g. Christmas lights). These will interfere with the system.
• Do not spray the sensing pedestals with cleaning solution. Instead, spray the cleaner on a towel and wipe
down the antennas.
• Do not place anything on the deactivation unit’s electronic housing that would interfere with air circulation.
• Do not place liquids in an area where they would spill and short-circuit deactivation units.
• Call Checkpoint’s Service Department before installing new carpeting to avoid cutting the system cable.
• Turn the system off if there is remodeling or electrical work being done in your store. Otherwise, the system
may alarm for no apparent reason.

CUSTOMER SERVICE PROCEDURES
18
The Checkpoint program is designed to deter shoplifters. Occasionally, the determined amateur or impulse thief
will try to challenge the system. When this happens, you can rely on the sensing pedestals to alert you to a
potential shoplifter. The success of the program depends on the way you react to the alarm once it has sounded.
When the alarm sounds, one of the following has probably happened:
• An employee has forgotten to remove, detune, or deactivate a tag
• An automatic door opening card (carried by a customer) or a Checkpoint tag that has not been detuned
or deactivated from another store has triggered the alarm unintentionally
• Someone has tried to remove merchandise from the store without paying for it
POSSIBLE ALARM CAUSES
WHAT TO DO WHEN THE ALARM SOUNDS
POSSIBLE ALARM CAUSES
Store management should develop a procedure for handling alarm situations. Always follow established store
procedures during these situations.
When the alarm is set off, the person designated to handle alarms should approach the customer courteously
and confidently, and follow store guidelines.
Never threaten or accuse the customer. Instead, try to get his cooperation by asking the types of questions listed
below:
Excuse me, Sir/Ma’am. I’m sorry. We must not have checked out your purchases properly. May I correct
this for you?
If necessary and possible, guide the customer away from the busy exit area. After the customer hands
you his/her package, check the contents against the store receipt. If the contents and the sales slip
match, deactivate any tags that may have been overlooked and thank the customer for his/her cooperation.
A Portable Verifier is often helpful in locating hidden tags. By passing the unit close to a customer or his/her pur-
chases, a sound will confirm a tag’s presence. Store personnel may now determine if the merchandise has not
been paid for, or if a tag was not deactivated or removed.
WHAT TO DO WHEN THE ALARM SOUNDS

CUSTOMER SERVICE PROCEDURES
19
If you are unable to find a tag that the cashier has forgotten to remove, detune, or deactivate, try asking the
customer the following:
Are you carrying an electronic door opening card for entrance to your office or apartment building?
Some electronic door openers operate on the same frequency as the Checkpoint system. These access
cards often resemble thick credit cards and are used in place of keys to gain access to office buildings
or apartment complexes. Credit cards or bank machine cards will not set off the system alarm. If the
customer is carrying an access card, walk it through the system to determine if it is causing an alarm.
If the customer is not carrying a card, or if the card does not appear to be causing the alarm, ask the following:
Have you purchased something in another store with a system like this?
If a retailer in your area by-passes the detuning/deactivation process, tags that have not been disabled
could enter your store. If the alarm is set off at your “In” door, place a detuner over the Checkpoint tag. If
the alarm sounds as the customer leaves, and your store does not carry the merchandise in question,
remove the tag. If the item is something your store carries, and it looks new and unused, you may want to
ask for a sales receipt.
If you have ruled out the possibility of an automatic door opening card and checked out the customer’s purchase
properly, you may want to ask:
Are you returning merchandise to this store for an exchange or refund?
It is possible that a tag was not detuned, deactivated, or removed from an item that the customer may be
returning for credit, exchange, or refund. If this is not the case, you may want to ask:
Is there something we may have forgotten to ring up at the register?
At this point, follow your store’s policy regarding shoplifters and alert the appropriate personnel.
WHAT TO DO WHEN THE ALARM SOUNDS
continued
It is important to remember that these questions are to be used as a guideline on how to handle alarm
situations. When approaching customers, be courteous at all times, and never make accusations or
threaten the customer in any way. Always defer to store policies and procedures for responding to
system alarms.
It is also important to be consistent in the manner in which alarm situations are handled. If there is no
response to alarms, shoplifters will observe this and return to the store with the hopes of challenging
both the system and store personnel.

ALARM LOG
20
RECORDING ALARMS |USING THE ALARM LOG |WHAT TO RECORD
• Choose a log sheet format that serves your needs. Alarm log sample master sheets are provided in the
Checkpoint welcome package. You may use these to make copies of the preferred alarm log format. These
formats may be adapted to suit the needs of your store.
• Record every alarm, completing all information
RECORDING ALARMS
Users should keep a written record of every alarm, regardless of its cause. Alarms may be caused by interference
within the system (phantoms), tags that have not been detuned, deactivated, or removed, or when a shoplifter is
attempting to remove merchandise. The Alarm Log Sheets demonstrate how well the system is working, in addition
to providing alarm patterns that help management design the most beneficial inventory control program for your
store. Store management will decide whether to keep the log, and what information is to be listed.
USING THE ALARM LOG
Store management will probably decide what to record. Listed below are a few suggestions:
• Results of test
• Date of alarm
• Time of alarm
• Type of alarm (R/U/P):
R: Real alarm (shoplifting attempt)
U: Unintentional alarm (electronic door opening card, failure of cashier to remove, detune, or
deactivate tag)
P: Phantom alarm for no apparent reason. If so, record if system was turned off afterward
• Merchandise recovered, if applicable
• Value of merchandise recovered, if applicable
• Name of store employee who handled alarm situation
• Description of alarm response, additional comments
• Date and reason Checkpoint Service Department was called
WHAT TO RECORD

POINTS TO REMEMBER
21
• Test all components of the Checkpoint System each morning and record results in the Alarm Log
• If using bar code scanners, scan each item for price
• Record all alarms in the log
• Review alarm response guidelines periodically with employees responsible for handling alarms
• Familiarize all new employees with the system, and make sure they review User’s Guide
• Make sure that employees do not give customers any information about the system or tags
• Verify that all merchandise scheduled for tagging has been tagged
• Watch tagging procedures to make sure merchandise is tagged correctly
• Store reusable tags near cash desk for future use
• Call your Checkpoint representative if you have any questions regarding the use of the system, tags, or
accessories
• If you need service for your equipment, call (800) 253-7580

ORDERING TAGS/CUSTOMER RETURNS
22
Be sure to keep a close watch on your tag inventory so that you do not run out of tags. When you need to order
tags, contact Checkpoint’s Customer Service Department at (800) 548-8344. If you need to return merchandise,
call (800) 257-5540, extension 3228. To speed up your transaction, have your customer account number readily
available. A Customer Service Representative will be happy to assist you.
