Cheng Uei Precision Industry QM03YB3 GSM 850/1900 Terminal Device User Manual
Cheng Uei Precision Industry Co., Ltd. GSM 850/1900 Terminal Device
UserManual.wiki
>
Cheng Uei Precision Industry
>
QM03YB3 User Manual
user manual
Navigation menu
Upload a User Manual
Namespaces
Wiki Guide
HTML
PDF
Info
Views
User Manual
Discussion / Help
Navigation


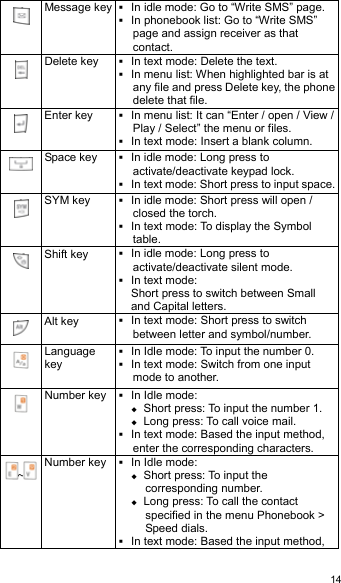
![13Key Function List Send key Answer key Dials a phone number and answer a call. In idle mode: it shows the most recently called. Multimedia key In idle mode: Access to the multimedia menu. End key Power key In idle mode: Switch phone on and off. In call context: End Call. In menu: Back to idle mode. Navigation key In idle mode: Use for quick access to phone functions in idle mode. ♦ Up: Access to the Sound profiles. ♦ Down: Access to the Messaging. ♦ Left: Access to the Photo album. ♦ Right: Access to the Internet service.♦ Center: Short press will access to the Main menu. [Note]: Navigation shortcut maybe different depends on personal setting in “Phone setup/Dedicated key”. In the menu list: Use Up/Down/Left/Right to move through selections on the list. In call mode: Briefly press the up or down key to increase or reduce the volume. Camera key Enter to Camera function. Left softkey In idle mode: Access to the Main menu. In other screens: Choose the function shown directly above the soft key, usually Select, OK or Save. Right softkey In idle mode: Access to the Contacts. In other screens: Choose the function shown directly above the soft key, usually Back, Delete or Cancel. TV key Enter to TV function.](https://usermanual.wiki/Cheng-Uei-Precision-Industry/QM03YB3/User-Guide-1383577-Page-14.png)
![29• For each number or text item you can choose: Name / Number / Home number / Company name / Email address / Office number / Fax number / Birthday / Image / Video call / Tone / Caller group [Note]: Tone support MP3, Midi, AMR, and WAV files. [Note]: Image support JPEG, GIF format. The JPEG /GIF images size should be less than 200k. [Note]: Video support motion JPEG files * When users select Ring tone, Image, Video, you can go to File manager page to choose from every folder. When users use these functions, if there is an incoming call, the Video function will only be performed by Image, the ring tone will not work. The Video function can be on or off. When the Video sound is off, the Ring tone can be used. ♦ To store a number in the SIM card: In main menu, select Phonebook, and select Add new entry. You can store 500 entries (Maximum) in your SIM card for name, telephone number and image. • Then select Add to SIM card, press OK. • Enter the name, number, caller group and image, press OK. [Note]: Image support JPEG, GIF format. The JPEG /GIF images size should be less than 200k. [Note]: The number of store entries in SIM card, it may be different depend on your SIM card service provider. Smart Search You can search contacts by first number of number you key, user can put number search in the editor line, the matched record will be shown, then press Name you send key. Caller groups ♦ You can set the phone to sound a specific ring tone and flash a selected graphic on the display when you receive a call from a particular name and phone number. To do this, first include a name and number in a caller group. Then](https://usermanual.wiki/Cheng-Uei-Precision-Industry/QM03YB3/User-Guide-1383577-Page-30.png)
![40Multimedia Camera Your phone has a digital camera and digital video recorder. You can take pictures, record video clips, view them and send them in MMS. For details, please refer to "Camera" chapter. Photo album Photo album is a folder under Multimedia; it is a folder to save the photo images. You can view image in this folder. Press Options and choice one of the following functions that may be available for the selected files: ♦ View: To view the photo. When you viewing the photo, press navigation to the image, and press navigation key up/down can change the image. [Note]: Press can rotate image. ♦ Image info: To display image detail information. ♦ View mode: To select image display style. ♦ Set as: You can use the photo to Wallpaper and Caller picture. ♦ Send: You can use MMS or Bluetooth function send this picture ♦ Rename: Change the name of photo. ♦ Delete: Delete selected photo. ♦ Delete all: selected delete all photo. ♦ Sort: To sort the file by File name, File type, Time, File size and None. ♦ Storage: Select storage place in phone and memory card. ♦ Mark: You can mark several or mark all many photos to delete, copy or move. Entertainment Your phone software includes some games specially designed for this handset. For details, please refer to "Entertainmen" chapter.](https://usermanual.wiki/Cheng-Uei-Precision-Industry/QM03YB3/User-Guide-1383577-Page-41.png)
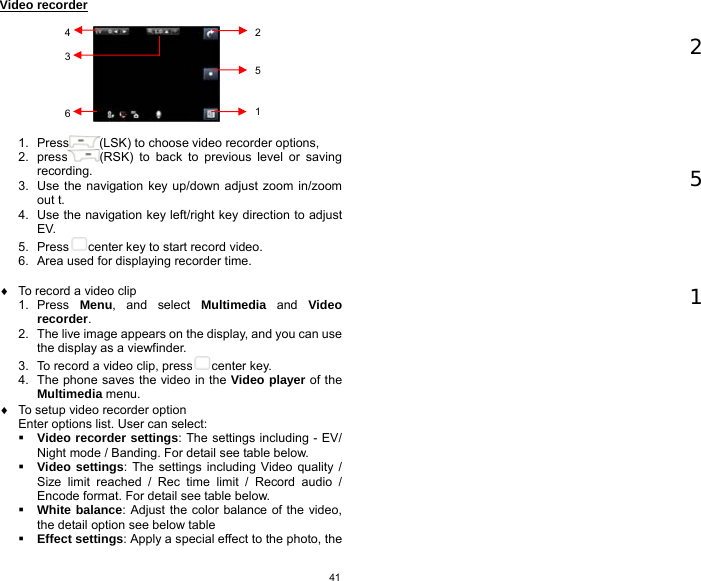
![43Video player is a folder under Multimedia, the folder name Video player. It is a folder to save the video. You can view video in this folder. Press Options and choice one of the following functions that may be available for the selected files: ♦ Play: play the video. ♦ Set as: Set the video to Caller video. ♦ Send: You can use MMS or Bluetooth function send this Video ♦ Rename: Change the name of the file. ♦ Delete: Delete the file. ♦ Delete all: Delete all the recorder files. ♦ Sort: To sort the file by File name, File type, Time, File size and None. ♦ Storage: Select storage place in phone and memory card. ♦ Mark: You can choose many photos to delete or copy. Music Player Your phone includes a Music player for listening to music tracks. MP3 files stored in the Audio folder (Default setting) will automatically be detected and added to the default play list. You can listen to the sound files via a compatible headset, or the phone’s loudspeaker. You can make or answer a call while using the music player. During a call, the playback is paused. [Note]: Because of the small dimension of the speaker, in some cases the audio could be distorted, especially at maximum volume and when there are lots of bass sounds. Therefore, we recommend you to use the stereo headset in order to appreciate the high quality of your music. The Music Player supports: AAC, AAC+, MP3, AMR, WAV, MIDI, iMelody formats. ♦ Playing the audio User can listen to music on the loudspeaker or with headphone. MP3 headphones jack: Only for playing MP3 file. It provides the other user can also listen to the music or sound from MP3 file by his headphones.](https://usermanual.wiki/Cheng-Uei-Precision-Industry/QM03YB3/User-Guide-1383577-Page-44.png)
![45can refresh the track list (for example after adding new tracks to the list) and change the track list that is shown. When List auto generate functions turns off, user can add tracks from the different folder in File manager. • Repeat: To play the current track or the enter track list repeatedly. • Shuffle: Turn On/Off Shuffle function. • Background play: Turn On/Off Background plays function. On: Allow music continuing playing when left music player. Off: When user left music player, music will stop. Add / Delete Music to play list • Please turn off the handset before Add/Delete music. • Plug in cable (USB) to handset and PC, screen show three options: Mass storage mode: For add / remove music or image. In the Mass Storage mode, user can add / remove music to handset via PC. COM port: as USB charger. [Note]: When you plug in USB cable, can select Mass storage, the handset will remain power on status. The handset will automatically connect to memory card only. If you want connect to the phone, please power off the handset. Sound Recorder Sound Recorder is a simple voice recording application, which provides functionalities for the user to manage voice files. Within Recorder/List submenu, press Options you can select: ♦ New record: To record new sound. ♦ Play: Play the selected sound. ♦ Append: To append the new sound with the already](https://usermanual.wiki/Cheng-Uei-Precision-Industry/QM03YB3/User-Guide-1383577-Page-46.png)
![51♦ With the screen showing a “0”, enter the first number in the calculation. ♦ Use Navigation key to select add, subtract, multiply, and divide then press OK or center key to continue operation. ♦ Press Clear to start the new calculation. Unit converter ♦ To convert measures such as Weight from one unit (Pound) to another (Kg), press the Menu, and select Extra then Unit converter. ♦ In the Unit converter submenu, press Options to select converter options, option in Set weight converter is Reverse converter and Set converter. [Note]: the Converter option display is depending on user settings ♦ In the first amount field, and enter the value you want to convert, the other amount field automatically shows the converted value. For example, in weight converter, pound units expressed in kg units, enter 110 and 49.895164 automatically show in kg field. ♦ Press Navigation key up/down to reverse converter, or press Options to select reverse converter option. ♦ If you want to select other converter types, press Options and select Set converter to open a list of measures. Choose the measure you want to use and press OK to enter converter unit list. ♦ Choose the converter unit from which you want to converter and press Options\Activate. Memo ♦ In this function, you can Add the memo, View the memo, Edit, Send Note, Delete, and Mark the list of memo. You can also select and view a single memo. ♦ The memo view allows you to view the details of the select memo. You can remember through the memo. ♦ When view this memo, you can press options to Edit, Send Note or Delete.](https://usermanual.wiki/Cheng-Uei-Precision-Industry/QM03YB3/User-Guide-1383577-Page-52.png)
![54 Record: Beginning record FM radio. Append: To append new radio with the already existing file. File list: Show amount of record files. [Note]:Before use FM radio option, please turn on the radio first. [Note]:You can normally make a call or answer an incoming call while listening to the radio. The volume of the radio is muted. When you end the call, the radio volume will automatically be turned up again. Also, when an application using GPRS or HSCSD connection is sending or receiving data, it may interfere with the radio. Camera [Note]: Please obey all local laws governing the taking of picture. Your phone has a digital camera and digital video recorder. You can take pictures, record video clips, view them and send them in MMS. To do this, you must subscribe to these services. Please check with your network operator. The camera lens is on the back of the handset and the display of the handset works as viewfinder. The camera produces pictures in JPEG format and the video clips in motion JPEG format. Please pay attention; if handset is not enough memory to take a new photo, you need to free some by deleting old photos or other files in the File manager. To access this menu, and select Camera. 1 3 1 2 3 4](https://usermanual.wiki/Cheng-Uei-Precision-Industry/QM03YB3/User-Guide-1383577-Page-55.png)
![551. Press “Back” to go back previous level. 2. To select option displayed in the areas, press the Options to choose camera options. 3. Press center key to snapshoot this screen. 4. Camera’s options menu. ♦ Taking a Photo • The live image appears on the display, and you can use the display as a viewfinder. • To take a photo press center key to capture. When taking a photo a shutter sound is heard. The phone saves the photo in the Photo album of the Multimedia menu. ♦ To setup camera option Press Options enter options bar. User can select: • Self timer: Set a time delay before the camera takes a photo, the detail option see below table. [Note]: To switch/adjust camera Self timer setting, by pressing the corresponding number key . • Image size: Select an image size, for detail see table below. [Note]: To switch/adjust camera Image size setting, by pressing the corresponding number key . • Image quality: To define how much the photo file will be compressed when saving the image, the detail option see below table. [Note]: To switch/adjust camera Image quality setting, by pressing the corresponding number key . • Effect settings: Apply a special effect to the photo, the detail option see below table. [Note]: To switch/adjust camera effect setting, by pressing the corresponding number key . • Shutter sound: Select the sound that you hear when you take photo. • EV: Select the value of EV to the photo, for detail see table below.](https://usermanual.wiki/Cheng-Uei-Precision-Industry/QM03YB3/User-Guide-1383577-Page-56.png)
![56• Banding: Adjust screen backlight flicker, the detail option see below table. • White balance: Adjust the color balance of the photo, the detail option see below table. [Note]: To switch/adjust camera White balance setting, by pressing the corresponding number key . • Storage: Storage place in phone and memory card. • Restore default: Restore camera setting to default. • Help: Reveal the swift function of each button. • Capture mode: Take a photo in the following mode. Single: Take a photo in the normal mode. [Note]: When user set camera capture mode to “Single”, and then all camera options available except “Mode setting” Burst shot: Take a series of photos. Note]: To switch/adjust camera Burst shot setting, by pressing the corresponding number key . • Save mode: There are Manual Save and Auto Save that you can choose. • Mode setting: The option might change depend on Capture mode, for detail see table below. Camera options Capture mode Single / Burst Mode setting 1.If capture mode set to Burst shot, the mode setting have options are: 4 shots / 6 shots 2.If capture mode set to single shot, the mode setting will be disabling. Save Mode Take and save / Automatic save Scene mode Auto / Night Self timer Off / 5 sec / 10 sec / 15 sec Image size 160*120 / 240*320 / 320*240 / 640*480 Image quality Low / Normal / High Effect settings Normal / Gray scale / Sepia / Sepia green / Sepia blue / Color invert](https://usermanual.wiki/Cheng-Uei-Precision-Industry/QM03YB3/User-Guide-1383577-Page-57.png)
![61options are: Ring /Vibration only / Vibrate and ring / Vibrate then ring / Beep once. • Ring type: To set the ring type, the options have Repeat, Single and Ascending. • Answer mode: To set the phone answer incoming voices call by press any key. Only when user chooses Headset mode, the answer mode have two options Send key, Any key and Auto (for Headset mode only) options • Extra tone: To set the Warning tone, Error tone, Camp-on tone, Connect tone, Miss Calls and Unread Messages On or Off. For example, when set Extra tone function to on, the phone sounds a warning tone when the battery is running out of powe. ♦ Rename Yon can change the name of selected profiles. Display setup ♦ Wallpaper You can set your phone to display a background picture, wallpaper, when the phone is in idle mode. You can also download wallpaper from WAP and MMS and then save them in My folder under File manager. Your phone supports JPEG, GIF formats. [NOTE]: The wallpaper and screen saver should be less than 1280x1024(for JPG) and 320x240(for GIF). In addition, the file size can’t be over 300kb. [NOTE]: If image size is over size, the image displays speed might get slow and please wait for more time to show up. To select a wallpaper picture. • Press Menu, and select Settings, Display Setup and Wallpaper. • Select Default and image list will be shown. Use navigation key Left ◄ and Right ►direction to select the image and press OK to choose the desired picture then press OK](https://usermanual.wiki/Cheng-Uei-Precision-Industry/QM03YB3/User-Guide-1383577-Page-62.png)
![66Phonebook Setup ♦ Move You can move names and phones number from the phone’s memory to SIM card’s memory or from SIM card’s memory to Phone’s memory. The copy options have: One by one, All from SIM to phone, All from phone to SIM. You can view and edit personal name and phone number. To display my number on idle screen. ♦ Delete You can remove name and phone numbers from selected contacts all at once. • In the Phonebook Menu, select Delete then press OK. • Choose All from phone, All from SIM or One by one press OK. User needs to enter phone code to confirmed delete then press OK. [Note]: The default phone code is 0000 ♦ Copy You can copy names and phones number from the phone’s memory to SIM card’s memory or from SIM card’s memory to Phone’s memory. The copy options have: • All from SIM to phone • All from phone to SIM Copy entry records will both save in SIM and Phone’s memory. ♦ Memory status You can check what percentage of the phone’s internal memory is occupied and how many name and number entries can still be stored in SIM card’s and Phone’s memory. ♦ Prefer storage You can choose where you want to save the name and phone number. You can select SIM, Phone or All. ♦ Phonebook backup • You can backup your phonebook to memory card or restore the phonebook. • Selected the card, and the phonebook will be backup or restore to Phone or SIM Card memory.](https://usermanual.wiki/Cheng-Uei-Precision-Industry/QM03YB3/User-Guide-1383577-Page-67.png)

![70♦ Time format This function allows you select the format of the time display, 12 or 24. Use navigation key to change it and press OK. [Note]: The time and date format display is depending on user settings. ♦ Set the date This function allows you to set the date. ♦ Date format This function allows you select format of the date display, use navigation key to change it press OK. ♦ Auto-update of date / time Within Settings menu, select Auto-update of date / time (network service) to set the phone to automatically update the time and date according to the current time zone, select On. Automatic update of date and time does not change the time you have set for the alarm clock, calendar or the alarm notes. They are in local time. Updating may cause some alarms you have set to expire. Connectivity setup The function allows you to set network related settings. ♦ Network selection • The phone automatically selects one of the cellular networks available in you area, when auto mode is selected. • In manual mode the phone will show a list of available networks that you can choose from. Only networks that have a roaming agreement with your home network operator are allow to be selected. ♦ Prefer networks The network list is used when the mode is set to automatic. The order of the prefer network list indicates the search priority. Press Options key to edit prefer networks: “Add from list”, “Create new”, “Change priority” and “Delete”. ♦ Band selection The wireless phone described in this guide is approved for](https://usermanual.wiki/Cheng-Uei-Precision-Industry/QM03YB3/User-Guide-1383577-Page-71.png)
![71use on 850MHz, 1900MHz, and Auto. You can choose the band from the list. ♦ Data account Connect way while choosing the mobile phone to browse through the WAP. Detailed materials setting up value, please arrange with a network supplier. Security setup ♦ Pin lock This function allows you to lock the phone with a specific SIM card. The feature is designed to prevent the use of your phone by means of another person’s SIM cards if your phone becomes lost. You can switch on or off to activate the PIN lock function. If you switch PIN Lock on, every time you turn phone on, you need to enter the PIN number to set the request on. ♦ Fixed dialing You can switch mode on and off. This function dials only the numbers in the fixed dialing number (FDN). To save and edit numbers on the list, you need the PIN2 code. ♦ Barred dialing You can switch mode on and off. ♦ Change PIN code Change PIN cod This allows you to change the PIN number. Change PIN2 code This allows you to change the PIN2 number. ♦ Phone lock You can switch When switch on / Off the Phone lock function to protect your phone. If you select When switch on, you need enter the password to set the request on. [Note]: the default password is 0000. ♦ Auto keypad lock This allows you to lock the phone’s keypad to prevent accidental key presses. In submenu, select the time that after the last key press](https://usermanual.wiki/Cheng-Uei-Precision-Industry/QM03YB3/User-Guide-1383577-Page-72.png)
![72will be disabled, then press OK. Mobile Tracker You can switch mode to Activate or Deactivate. After mobile tracker function active, the mobile will remember the IMSI of the SIM. If mobile phone lost and insert the new SIM, then it will send new SIM card's IMSI automatically for the number set up. [Note]: The default password is 0000. ♦ Change security code This allows you to change the password. ♦ Mobile tracker When this function is active, the mobile device will send an SMS to a predetermined number when a different SIM card has been inserted. This enables a lost mobile phone to be located. To enter the tracker submenu a password (Phone code) is needed. Bluetooth You can utilize wireless technology of Bluetooth to connect other inclusive devices. The inclusive device may include the mobile phone, the computer and earphone, etc. You can utilize Bluetooth technology transfer image, the film, music and sound file. [Note]: After opening the Bluetooth function, will increase the power consumption of the battery. Power Turn on or off the Bluetooth function. After turn on the Bluetooth function, will reveal in top screen Inquiry audio device Search the new Bluetooth device in the range and pair it. Before pairing, please set up the password, and reach an agreement to use the same password with another device user. My device Pair the old Bluetooth device. Active device To Active the Bluetooth device that has.](https://usermanual.wiki/Cheng-Uei-Precision-Industry/QM03YB3/User-Guide-1383577-Page-73.png)
![74♦ Game vibration Turn On / Off vibration of game. ♦ Volume Adjust the volume level. Factory reset ♦ Within this menu you can reset the menu settings to their original values. The security code is needed for this function. [Note]: The default password is 0000. ♦ After you select restore factory, setting values are returned default value. Those value including Profile, Ring tone, Call log, Caller group, Time format, Wallpaper, Screen saver, Themes, WAP setting etc.](https://usermanual.wiki/Cheng-Uei-Precision-Industry/QM03YB3/User-Guide-1383577-Page-75.png)
![75To Use Mass storage (USB cable) [NOTE]: System default requirement: PC hardware and software for Windows 2000/XP/Vista/7 and above. For more information, please see below “Install USB Software” [NOTE]: Please use USB according to the standard steps as below; otherwise the data may lose or cause damage. If you want to add/remove music and images to the Handset, connect it to a PC with USB cable. ♦ Plug in cable (USB) to handset and PC, screen show three options: Mass storage mode: for add / remove music or image files. Webcam: for connecting with PC as webcam. COM port: as USB charger. Java connection: as a modem to connect internet. ♦ Connecting the handset to PC After connected the handset and PC, choice “Mass Storage” handsets will automatic turn off. The OS will automatically generate two “Removable Disk” in My Computer, one for handset, one for memory card. You can enter the disk to access the data](https://usermanual.wiki/Cheng-Uei-Precision-Industry/QM03YB3/User-Guide-1383577-Page-76.png)