Cherry Europe 219XX Wireless Keyboard User Manual CyMotion Solar
ZF Friedrichshafen AG Wireless Keyboard CyMotion Solar
Users Manual
1
CyMotion Master
Solar
M86-21950
1 Information available as
hardcopy, direct help and on CD
Information on setup, operation and configuration
can be obtained in these quick-start instructions,
as direct help and as additional information for the
KeyM@n software. Please observe the general
user information and the license agreements.
The information is split up based on the following
criteria:
• The quick-start instructions essentially describe
connection of the device and software
installation.
• The direct help is a component of the software
included on the CD. It provides you with
information on operation where you need it. It is
called up via F1.
• Additional information on operation and
configuration of the KeyM@n software is
available on the included CD (CD-ROM/
Manuals). You can read the desired content on
the screen or print it out here.
By supplying only the most essential information as
a printout, we are reducing the unnecessary use of
paper and thus making our contribution towards
environmental protection.
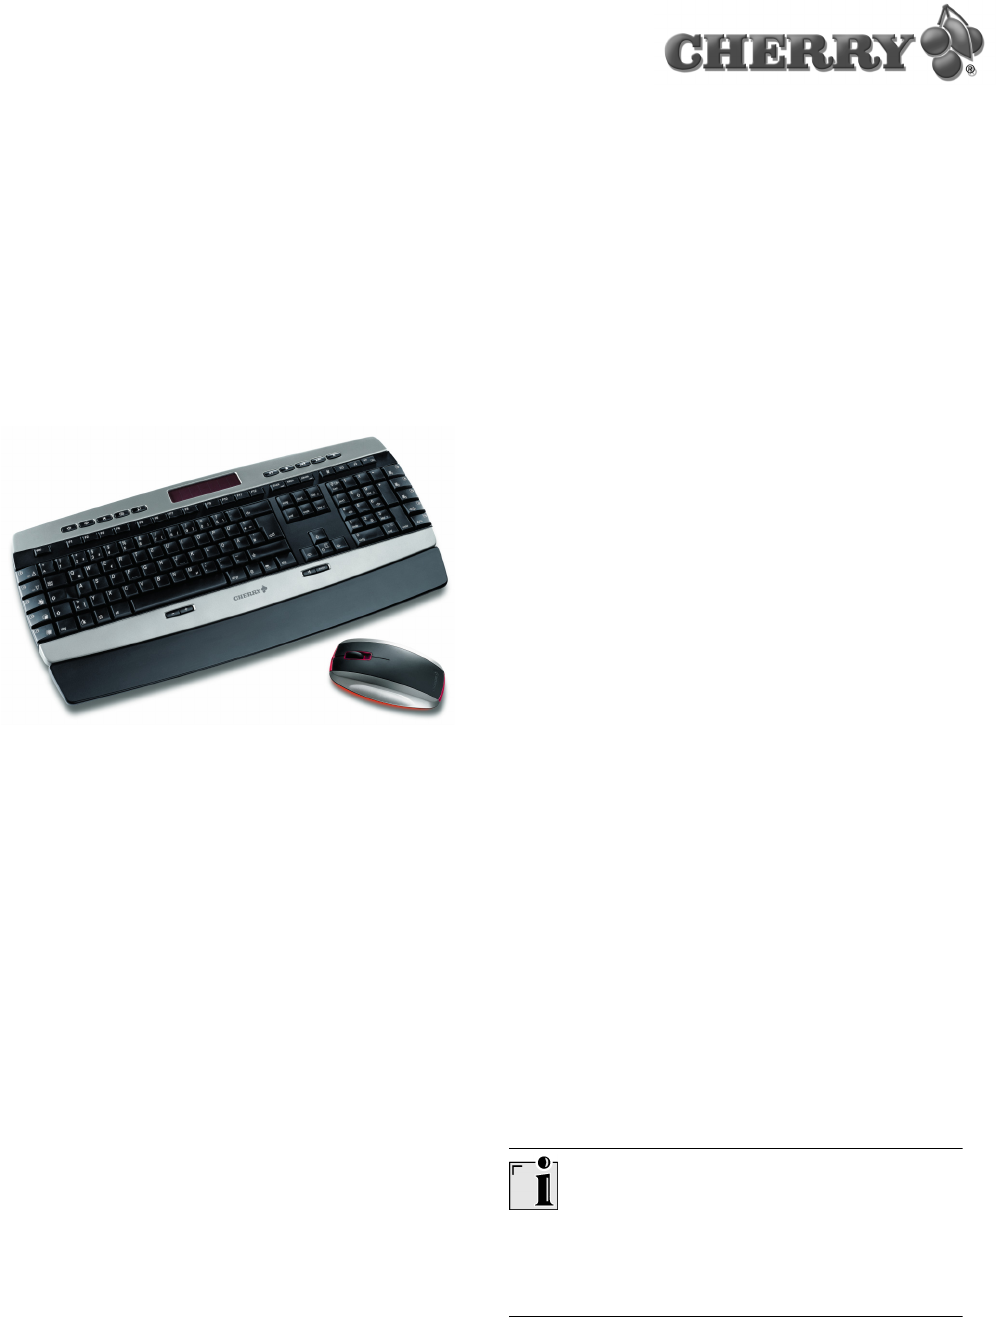
2 Features of the
CyMotion Master Solar
The CyMotion Master Solar consists of the
keyboard, the mouse and the wireless receiver for
both devices. There are no annoying cables in the
way. Depending on your workplace conditions, you
can operate your PC up to approx. 2 m away from
the receiver.
2.1 The keyboard
In addition to the functions of a standard keyboard,
this keyboard offers the following additional
functions:
• integrated solar cell for charging the batteries in
the keyboard
• encryption of the wireless transmission
• 5 additional keys for the operation of the
Internet browser
• 5 additional keys for the operation of multimedia
programs
• 4 additional keys for calling up the Windows
Calculator, E-mail program, web browser and
Standby key
• 4 central additional keys for volume control and
multimedia program selection
• 10 unique XPress keys, positioned at the sides
•@ key
• KeyM@n key
• all mouse functions can be executed via the
keyboard
• num key can be set as currency key
• period key of the keypad can be set as a
comma key
Standby key
Older PCs do not support Standby Mode. Pressing
the Standby key may cause the PC to crash.
Quick-Start Instructions
644-0334.01 US Sep 2003
2
Additional functions
The full range of functions is not available until the
Cherry KeyM@n software is installed.
Using the Cherry KeyM@n software, you can
assign other functions to the additional keys.
2.2 The mouse
The following features and functions make working
with the mouse efficient and comfortable:
• power-save function for long battery life
• charge cable for charging the mouse batteries
while in operation
• resolution of 800 dpi allows precise movement
• optical sensor which replaces the ball and
eliminates the need to clean the mouse
Prerequisite for optimal use
Using the mouse on a bright, textured surface
increases its effectiveness:
• optimum movement detection
• longer battery life
Reflective surfaces are not suitable for use with the
mouse.
2.3 The receiver
Prerequisite for optimal use
Place the receiver on a non-metallic surface.
Placing the receiver on a metal surface can limit its
functionality.
3 Installation of the Cherry
KeyM@n software
Install the software first and then connect the
device.
Connection via monitor/keyboard/mouse switch
box
If you connect the device via an electronic monitor/
keyboard/mouse switch box, the KeyM@n
software may not function properly.
3.1 Is software for a keyboard/mouse
already installed on the PC?
If software for a keyboard/mouse from Cherry or
another manufacturer is already installed on the
PC, it should first be uninstalled for safety
purposes.
➤Uninstall the software. (Usually via Windows
Start menu/Settings/Control Panel/Software.)
3.2 Installing KeyM@n software under
Windows 98/ME/2000/XP/
NT 4.0 SP6
Current Cherry KeyM@n software on the
Internet
The Cherry KeyM@n software is constantly being
developed and updated. The current version can
be downloaded from CHERRY via the Internet:
http://support.cherry.de
1 Place the Cherry CD in your CD-ROM drive.
The CD-ROM starts automatically. The page
Installation is opened.
3
2 If the CD-ROM does not start automatically,
double-click the CD-ROM drive in Windows
Explorer and then the Start.exe start file.
The page Installation is opened.
3 Click on the Cherry product for which you would
like to install the software.
The installation begins.
4 Follow the installation instructions on the screen.
The Cherry KeyM@n software is installed.
4 Connecting the devices
4.1 Connecting the receiver to the PC via
the USB connection
Windows NT?
Windows NT does not support USB. If the PC has
a USB port, USB Keyboard Support or USB
Legacy Mode must be set to enabled in the BIOS
of the PC. The standard keys will now function, but
the additional keys are not supported.
➤Insert the USB plug of the receiver into any USB
port on your PC. You can also use the USB port
of a device which is connected to the PC.
4.2 Connecting the receiver to the PC via
the PS/2 port
1 Switch off the PC.
2 Insert the USB receiver plug into the
accompanying USB-PS/2 adapter.
3 Insert the purple plug of the receiver at the PC
into the 6-pin PS/2 socket for the keyboard,
which may be purple.
4 Insert the USB-PS/2 adapter of the receiver at
the PC into the 6-pin PS/2 socket for the mouse,
which may be green.
5 Switch on the PC.
4.3 Inserting batteries into the keyboard
and mouse
1 Open the battery compartment on the underside
of the wireless keyboard/mouse.
2 Insert both accompanying rechargeable alkaline
AA (LR6) batteries.
Charge level of alkaline batteries
The alkaline batteries are ready for operation right
away and do not need to be charged before the
initial use. When the LED on the receiver
flashes slowly, the batteries must be charged. LED
green = keyboard batteries, LED red = mouse
batteries.
3 Close the battery compartment.
5 Recharging the batteries
Usable battery type
The charging electronics only function with
rechargeable alkaline batteries (example: AccuCell
AC 1800, see technical data). No other batteries
can be charged in the keyboard and mouse. The
batteries of the keyboard are constantly charged
by the solar cells.
Rechargeable alkaline batteries have the following
advantages:
• high capacity (1800 mAh)
• minimal self-discharge
• can be recharged at any time without the
memory effect
• rechargeable several hundred times
• high output voltage (1.5 V)
• environmentally friendly due to less waste
4
5.1 Connecting the charging cable to the
PC
Charging cable
Use only the accompanying charging cable.
1 Switch off the PC.
If the PS/2 port of the PC is occupied by the
receiver: Insert the PS/2 plug of the receiver into
the PS/2 port of the charging cable. The data is
then transferred via the charging cable.
2 Insert the charging cable PS/2 plug into a PS/2
port on the PC.
3 Switch on the PC.
5.2 Charging the mouse batteries
➤Insert the hollow connector of the charging cable
into the socket on the front of the mouse. It does
not matter whether the PC is switched on or off.
The mouse is charged as long as the PC is
switched on. You can continue working while
charging is taking place.
Tips for charging the alkaline batteries
• Charge the alkaline batteries in the mouse as
soon as the LED on the receiver flashes red.
A total discharge can damage the inner
structure and chemical components of the
alkaline batteries.
• A complete charge of the alkaline batteries lasts
12 to 18 hours. The charging circuit prevents
overcharging. As the rechargeable alkaline
batteries do not exhibit the so-called memory
effect, the charging procedure can be
interrupted several times.
• The PC must be switched on to charge the
alkaline batteries.
• The charging cable can remain connected to
the PC even if the mouse is not being charged.
6 Using the power-save function of
the mouse
The power-save function switches the mouse to
power-save mode after 15 minutes of non-use.
• In sleep mode, the surface on which the mouse
is used is scanned only once per second.
Moving the mouse or pressing a button exits
sleep mode. Sleep mode is preset.
• The mouse switches off in deep-sleep mode.
The battery life is notably lengthened by this.
Pressing a mouse button switches it back on.
Deep-sleep mode must be activated manually.
6.1 Activating deep-sleep mode
1 Remove the batteries from the mouse.
2 Keep the left and right mouse buttons pressed
simultaneously and reinsert the batteries.
The setting is confirmed by 10 flashes of the
optical sensor of the mouse.
Automatic deactivation of deep-sleep mode
When you remove the batteries from the mouse,
deep-sleep mode is deactivated and the mouse
returns to sleep mode. For this reason, the deep-
sleep mode must be reactivated each time after
the batteries are removed.
7 Setting channels
The channels of the keyboard and the mouse are
selected at random from 4,095 channels. The
channels of the keyboard and mouse must be
selected together.
Channel setting is necessary in the following
cases:
• battery change
• malfunctions during operation of several
devices in the 27 MHz frequency range
5
1 Bring the keyboard and mouse into range of the
receiver, max. 2 m.
2 Press the CONNECT button on the top of the
receiver until the LED quickly flashes green
and red.
3 Press the CONNECT button on the bottom of
the keyboard on the cover of the battery
compartment until the LED quickly flashes
red.
A new channel is saved in the keyboard and
receiver.
4 Press the CONNECT button on the bottom of
the mouse until the LED goes out.
A new channel is saved in the mouse and
receiver.
8 Installing the palm rest
1 Turn the keyboard and the palm rest so that the
bottoms point upward.
2 Press both clips of the palm rest onto the round
receivers in the cutouts of the keyboard.
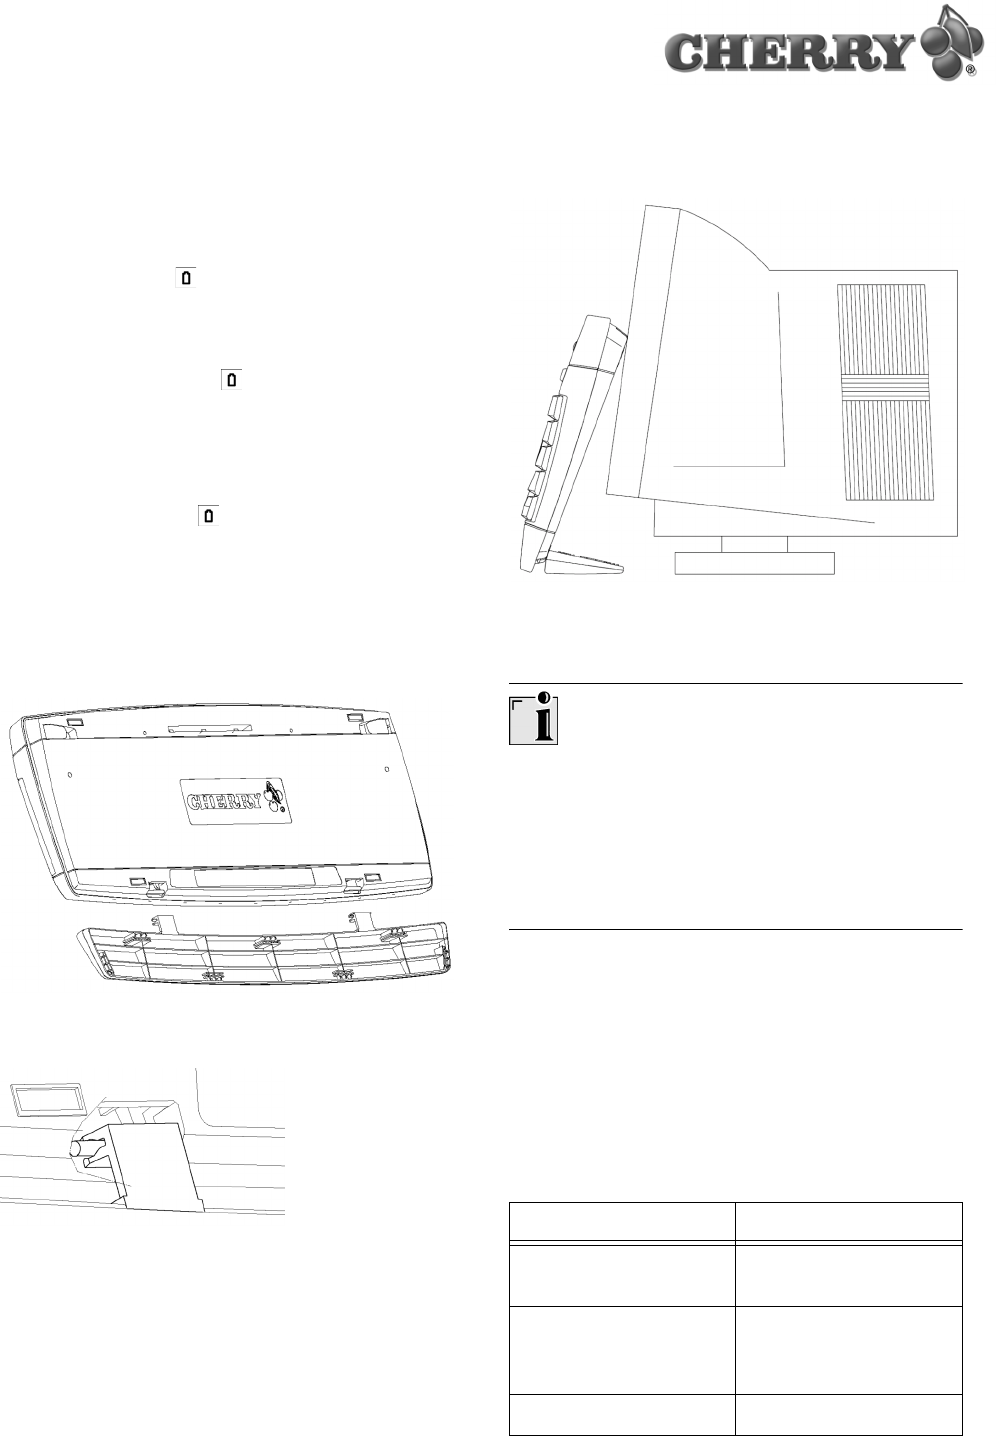
The palm rest can be folded back like a hinge.
You can lean the keyboard in this storage
position.
Damage to the palm rest and keyboard
Do not let the keyboard stand freely, but rather
lean it up against something else. Example: a
monitor.
Do not use or press the keyboard while it is in the
storage position.
9 Mounting mouse design covers
➤Press the cover into the cut-outs with the pins
straight.
10 Wireless keyboard (G86-21950)
Designation Value
Keyboard type 104/105 key keyboard
with 29 additional keys
Battery type
(power supply)
2 rechargeable
alkaline batteries,
type AA (LR6)
Supply voltage 2.0 to 3.3 V SELV

6
11 Wireless mouse (F-8900)
Transmit frequency 27.145 MHz
Channels 4095
Transmission output −4 dBm
Storage temperature
range
−20 °C to +60 °C
Operating temperature
range
0 °C to +50 °C
Weight approx. 1,190 g
(with palm rest:
approx. 1,280 g)
Dimensions
(L x W x H)
495 x 195 x 37 mm
(with palm rest:
495 x 245 x 37 mm)
Designation Value
Mouse type optical 2-button wheel
mouse, charging cable
Resolution 800 dpi
Battery type
(power supply)
2 rechargeable
alkaline batteries,
type AA (LR6)
Supply voltage 2.2 to 3.3 V SELV
Operating duration
with charged batteries
approx. 3 months of
normal use in an office
setting
Transmit frequency 27.045 MHz
Channels 255
Transmission output −6 dBm
Storage temperature
range
−20 °C to +60 °C
Operating temperature
range
0 °C to +50 °C
Dimensions
(L x W x H)
127 x 72 x 36 mm
Designation Value 12 Wireless receiver (R-8900)
13 Support
To help you with any problems you may encounter
in the installation of the keyboard or the software,
we provide you with a free support service.
Cherry Support can be contacted at
http://support.cherry.de. There you can submit
your questions to us directly around the clock and
seven days a week.
If you do not have an Internet connection, please
contact us at the following address:
Cherry GmbH
Cherrystraße
D-91275 Auerbach
Germany
Hotline:
Tel.: +49(0)9643-18-206
Fax: +49(0)9643-18-1545
Designation Value
Interfaces USB port for
simultaneous
operation of keyboard
and mouse. For PCs
with no USB port:
PS/2 port for operation
of the keyboard and
USB-PS/2 adapter for
operation of the
mouse
Receive frequency Keyboard:
27.145 MHz,
Mouse: 27.045 MHz
Channels Keyboard: 4,095,
Mouse: 255
Sensitivity −70 dBm
Storage temperature
range
−20 °C to +60 °C
Operating temperature
range
0 °C to +50 °C
Dimensions
(L x W x H)
130 x 48 x 31 mm

7
We are available to help you Monday to Thursday
from 7:15 a.m. to 4:00 p.m. and Friday from
7:15 p.m. to 1:30 p.m. (GMT + 1 h).
14 General advice
Cherry continuously optimizes products as new
technologies are developed. For this reason we
reserve the right to make technical alterations. The
evaluation of product reliability and the definition of
the product’s technical performance are carried out
according to Cherry’s own requirements in order to
meet internationally recognized regulations and
standards. Requirements in addition to these can
be met through mutual cooperation. Improper
usage, handling, storage and external influences
could lead to faults and defects during use.
We do not accept warranty for defects caused by
alterations to our product by the user and shall not
be held liable for unauthorized modifications. All
repairs must be made by Cherry or an officially
appointed organization or persons. There is a
danger of explosion if the optional lithium battery is
not exchanged in the correct manner! Possible
compensation claims against Cherry or its
nominated officers − whatever the legal justification
including physical or stress related injuries − are
excluded. Exceptions to this exist in the case of
intent or gross negligence on the part of Cherry,
infringements of Product Liability Law or in cases
of injury, bodily harm or risk to health. These
operating instructions only apply to the
accompanying product.
Full details can be obtained from your local Cherry
dealer or direct from Cherry GmbH.
15 Certification
15.1 Federal Communications
Commission (FCC) Radio Frequency
Interface Statement
Information to the user: This equipment has been
tested and found to comply with the limits for
Class B digital device, pursuant to Part 15 of the
FCC Rules. These limits are designed to provide
reasonable protection against harmful interference
in a residential installation. This equipment
generates, uses and can radiate radio frequency
energy and, if not installed and used in accordance
with the instructions, may cause harmful
interference to radio communications. However,
there is no guarantee that interference will not
occur in a particular installation. If this equipment
does cause harmful interference to radio or
television reception, which can be determined by
turning the equipment off and on, the user is
encouraged to try to correct the interference by
one or more of the following measures:
• Reorientate or relocate the receiving antenna.
• Increase the separation between the equipment
and receiver.
• Connect the equipment into an outlet on a
circuit different from that to which the receiver is
connected.
• Consult the dealer or an experienced radio/TV
technician for help.
Caution: Unauthorized changes or modifications
could void the authority to operate the equipment.
This device complies with Part 15 of the FCC
Rules. Operation is subject to the following two
conditions:
• This device may not cause harmful
interference.
• This device must accept any interference
received, including interference that may cause
undesired operation.
15.2 Canadian Radio Interference
Regulations
Notice of CSA C 108.8 (DOC Jan. 1989)
This digital apparatus does not exceed the Class B
limits for radio noise emissions from digital
apparatus set out in the Radio Interference
Regulations of the Canadian Department of
Communications.
Le présent appareil numérique n’émet pas de
bruits radioélectriques dépassant les limites
applicables aux appareils numériques de la
classe B prescrites dans le Règlement sur le
brouillage radioélectrique édicté par le ministère
des Communications du Canada.
8