Chi Mei Communication Systems 0208MZT01 PCS Handset with GPRS User Manual Mozart
Chi Mei Communication Systems, Inc. PCS Handset with GPRS Mozart
Contents
- 1. Users Manual Part I
- 2. Users Manual Part II
- 3. Revised Users Manual Part I
- 4. Revised Users Manual Part II
Revised Users Manual Part I
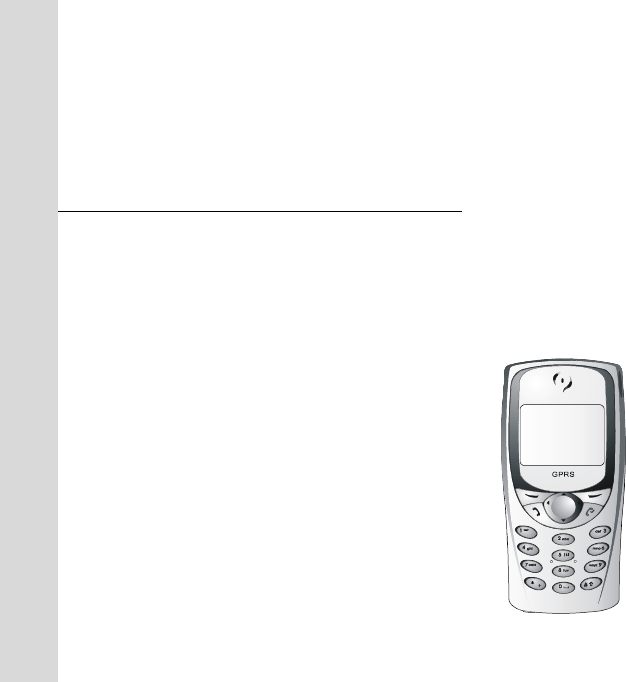
Mozart
User Guide
CMCS GSM/GPRS Phone

Copyright Statement
Copyright 2002 by CMCS. All rights reserved. No part of this publication may be reproduced, trans-
mitted, transcribed, stored in a retrieval system or translated into any language or computer language,
in any form or by any means, electronic, mechanical, magnetic, optical, chemical, manual or other-
wise, without the prior written permission of CMCS.
Disclaimer
CMCS makes no representations or warranties, either expressed or implied, with respect to the con-
tents hereof and specifically disclaims any warranties, merchantability or fitness for any particular pur-
pose. Further, CMCS reserves the right to revise this publication and to make changes from time to
time in the contents hereof without obligation of CMCS to notify any person of such revision or
changes.
ALL INFORMATION IS PROVIDED BY CMCS ON AN "AS IS" BASIS ONLY. CMCS PRO-
VIDES NO REPRESENTATIONS AND WARRANTIES, EXPRESS OR IMPLIED, INCLUD-
ING THE IMPLIED WARRANTIES OF FITNESS FOR A PARTICULAR PURPOSE,
MERCHANTABILITY AND NONINFRINGEMENT.
Important Safety Precautions
When using this product, the safety precautions below must be taken against possible legal issues and
damages.
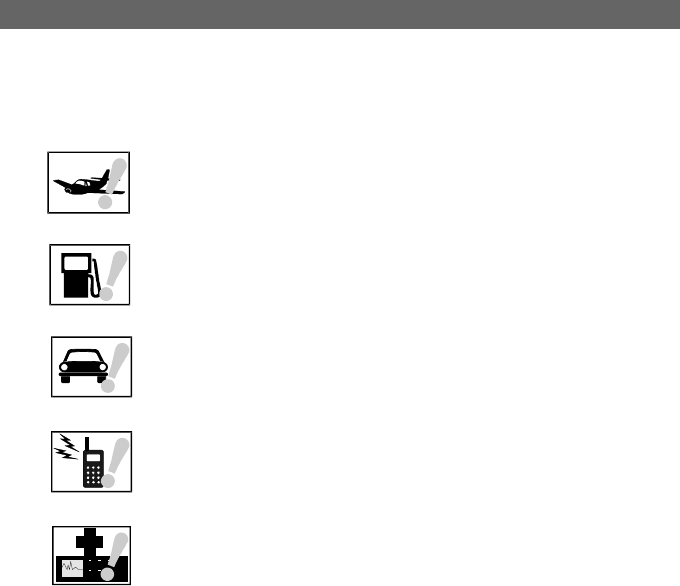
SAFETY IN AIRCRAFT
The interference would be caused by this product to an aircraft's navigation system
and its network. In most countries, using this product on board an airplane is
against the law.
SAFETY FOR ENVIRONMENTS
Do not use this product in gas stations. Also the use of this product is prohibited
in fuel storehouse, chemical plants and locations containing explosives.
SAFETY ON THE ROAD
Vehicle drivers in motion are not permitted to use telephony services with the
handheld device, except in the case of emergency. In some countries, using hand-
free devices as an alternative is allowed.
SAFETY ABOUT RADIATION
This product should be operated in the suggested normal condition only to ensure
the radiative performance and safety of the interference. When using the product,
keep a distance of 5 mm from your body to eliminate possible electromagnatic
effects.
SAFETY FOR MEDICAL EQUIPMENTS
This product may cause malfunctions of medical equipments. In most hospital or
medical centers, the use of this product is forbidden.

Attention
Tips When Using
• Avoid using the product near metal structures (for example, large metal furniture or steel frames of a
building). The transmission and reception of signal can be effected by these objects.
• Avoid using the product near strong electromagnetic sources, such as microwave ovens, sound
speakers, TV and radio.
• Avoid using the product right after dramatic change of temperature.
There are no user serviceable parts inside this product. If this product appears to be
broken, call a qualified service personnel or send this product to your original dealer.
Do not attempt to disassemble or repair this product as it may result in electric shock
or unrecoverable damage to the product itself.
Keep this product out of reach of small children.
Store this product in its protective case in a cool dry place.

FCC Compliance Statement
This device complies with Part 15 of the FCC Rules. Operation is subject to the following two condi-
tions: (1) this device may not cause harmful interference, and (2) this device must accept any interfer-
ence received, including interference that may cause undesired operation.
FCC ID: QDJ-0208MZT01
Statement according FCC part 15.21
Modifications not expressly approved by CMCS could void the user's authority to operate the equip-
ment.
Statement according FCC part 15.105
NOTE: This equipment has been tested and found to comply with the limits for a Class B digital
device, pursuant to Part 15 of the FCC Rules. These limits are designed to provide reasonable protec-
tion against harmful interference in a residential installation. This equipment generates, uses and can
radiate radio frequency energy and, if not installed and used in accordance with the instructions, may
cause harmful interference to radio communications. However, there is no guarantee that interference
will not occur in a particular installation. If this equipment does cause harmful interference to radio or
television reception, which can be determined by turning the equipment off and on, the user is
encouraged to try to correct the interference by one or more of the following measures:
• Reorient or relocate the receiving antenna.
• Increase the separation between the equipment and receiver.
• Connect the equipment into an outlet on a circuit different from that to which the receiver is con-
nected.
• Consult the dealer or an experienced radio/TV technician for help.
RF exposure
Tests for SAR are conducted using standard operating positions specified by the FCC with the phone
transmitting at its highest certified power level in all tested frequency bands. Although the SAR is
determined at the highest certified power level, the actual SAR level of the phone while operation can
be well below the maximum value. This is because the phone is designed to operate at multiple power
levels so as to use only the power required to reach the network. In general, the closer you are to a
wireless base station antenna, the lower the power output.
Before a phone model is available for sale to the public, it must be tested and certified to the FCC that
it does not exceed the limit established by the government-adopted requirement for safe exposure. The
tests are performed in positions and locations (e.g., at the ear and worn on the body) as required by
the FCC for each model. (Body-worn measurements may differ among phone models, depending
upon available accessories and FCC requirements). While there may be differences between the SAR

levels of various phones and at various positions, they all meet the government requirement for safe
exposure.
For body worn operation, to maintain compliance with FCC RF exposure guidelines, use only acces-
sories that contain no metallic components and provide a separation distance of 15mm (0.6 inches) to
the body. Use of other accessories may violate FCC RF exposure guidelines and should be avoided.
Health and Safety Information
Exposure to Radio Frequency (RF) Signals
Your wireless phone is a radio transmitter and receiver. It is designed and manufactured not to exceed
the emission limits for exposure to radio frequency (RF) energy set by the Federal Communications
Commission of the U.S. Government. These limits are part of comprehensive guidelines and establish
permitted levels of RF energy for the general population. The guidelines are based on the safety stan-
dards previously set by both U.S. and international standards bodies:
* American National Standards Institute (ANSI) IEEE. C95.1-1992
* National Council on Radiation Protection and Measurement (NCRP). Report 86. 1986
* International Commission on Non-Ionizing Radiation Protection (ICNIRP) 1996
* Ministry of Health (Canada), Safety Code 6. The standards include a substantial safety margin
designed to assure the safety of all persons, regardless of age and health.
The exposure standard for wireless mobile phones employs a unit of measurement known as the Spe-
cific Absorption Rate, or SAR. The SAR limit set by the FCC is 1.6W/kg *.
* In the U.S. and Canada, the SAR limit for mobile phones used by the public is 1.6 watts/kg (W/kg) averaged over
one gram of tissue. The standard incorporates a substantial margin of safety to give additional protection for the public
and to account for any variations in.

<Blank Page>

i
Table of Contents
Making Your First Call ............................................1
Installing SIM card ................................................ 2
Installing and charging the battery ....................... 3
Turning on the phone .......................................... 5
Dialing the number .............................................. 6
Ending the call ..................................................... 6
Introduction to Your Phone ....................................7
Parts of your phone and their names ....................8
Front view ............................................................ 8
Top view .............................................................. 9
Bottom view ......................................................... 9
Rear view ............................................................. 9
Icons on the screen .............................................. 10
The keys on the phone ......................................... 12
Function keys
Alphanumeric keys ........................................ 13
Basic Operations ....................................................14
Turning on the phone ...........................................15
Turning off the phone ...........................................15
Making a call ........................................................ 15
Making an emergency call .....................................16
Answering a call ................................................... 17
Ending a call ......................................................... 17
Missed call message ............................................. 17
Adjusting earpiece volume ....................................17

ii
Selecting sound profile .........................................17
Options during a call .............................................17
Making a new call .................................................18
Answering a new incoming call .............................18
Transmitting DTMF tones ......................................18
Ending calls ..........................................................18
Consulting Phone Book .........................................19
Accessing Main Menu ...........................................19
Muting/unmuting the microphone ........................19
Holding/unholding a call ......................................19
Listening to your voice mail ..................................20
Reading messages ................................................20
Entering Text ........................................................20
Selecting an input mode .......................................21
Entering text .........................................................21
Erasing text ..........................................................22
Using key lock ......................................................22
Phone Book ........................................................... 23
Adding a Phone Book entry ...................................24
Method 1 ........................................................24
Method 2 ........................................................24
Method 3 ........................................................24
Searching for a Phone Book entry ..........................24
Editing a Phone Book entry ...................................24
Editing name ........................................................24
Editing number .....................................................25
Adding new phone number to existing entries ......25
Changing caller group ..........................................25
Sending a entry as business card ..........................25
Assigning default phone number ..........................26

iii
Changing the type of number ............................... 26
Sending messages from Phone Book ..................... 26
Erasing Phone Book entry ..................................... 26
Method 1 ....................................................... 26
Method 2 ....................................................... 27
Copying Phone Book entry ....................................27
Method 1 ....................................................... 27
Method 2 ....................................................... 27
Setting up Speed Dial ............................................27
Method 1 ....................................................... 28
Method 2 ....................................................... 28
Viewing speed dial number .................................. 28
Changing speed dial number ................................ 28
Erasing speed dial number ................................... 28
Setting up Caller Group ......................................... 28
Creating a new Caller Group ................................. 29
Renaming a Caller Group ...................................... 29
Miscellaneous settings .......................................... 29
Personal number .................................................. 29
Adding a personal number ............................. 29
Editing personal number ................................ 29
Erasing personal number ............................... 30
Your own business card ....................................... 30
Creating your own business card ................... 30
Viewing your business card ........................... 30
Sending your business card ........................... 30
Editing your business card ............................. 30
Erasing your business card ............................ 31
Fixed dial number ................................................ 31

iv
Activating Fixed dial .......................................31
Adding new Fixed dial number .......................31
Viewing Fixed dial number .............................31
Editing Fixed dial number ...............................31
Erasing Fix dial number ..................................31
Phone Book memory setting .................................32
Selecting Phone Book memory ........................32
Checking Phone Book memory status .............32
The Main Menu ...................................................... 33
Overview ....................................................................34
Message .....................................................................35
Writing and sending new messages .......................35
Viewing sent messages .........................................36
Receiving messages ..............................................36
Viewing received messages ...................................36
Chatroom .............................................................37
Opening a new chat session ..................................38
Options during a chat session ...............................38
Customizing templates .........................................38
Customizing message template ............................38
Erasing customized message template ..................39
Sending a message from templates .......................39
Erasing all messages .............................................39
Message settings ..................................................39
Configuring message setting profiles ....................39
Using the profile on your SIM card ..................39
Configuring a new profile ...............................39

v
Using a configured profile ............................. 40
Configuring voice mailbox number ...................... 40
Message options .................................................. 40
Message status report ................................... 40
Reply path ..................................................... 41
Send by GSM or GPRS ..................................... 41
Checking message memory status ................. 41
Cell broadcast options ......................................... 42
Turning on or off cell broadcast ..................... 42
Setting up cell broadcast topics ..................... 42
Sending message service commands .................... 42
Call Meter ...................................................................43
Viewing missed call records .................................. 43
Viewing received call records ................................ 43
Viewing dialed call records ................................... 43
Erasing all call records .......................................... 43
Viewing call time information ...............................44
Clearing call timer ................................................ 44
Viewing call cost information ................................44
Viewing call cost .................................................. 44
Clearing call cost .................................................. 44
Viewing remaining call cost credit ........................ 45
Configuring call cost settings ............................... 45
Viewing GPRS related information.......................... 45
GPRS data ............................................................ 45
GPRS data counter ......................................... 45
Clearing GPRS data counter ............................ 46
GPRS connection time .......................................... 46
GPRS timer ..................................................... 46

vi
Clearing GPRS timer .......................................46
Incall count ...........................................................46
Session information ..............................................47
Call Feature ................................................................48
Call divert .............................................................48
Diverting voice calls ..............................................48
Deactivating voice call divert function ............48
Inquiring status ..............................................48
Diverting data or fax calls .....................................49
Deactivating data or fax call divert function ....49
Inquiring status ..............................................49
Deactivating all call divert functions ......................49
Call waiting ...........................................................49
Deactivating call waiting .......................................49
Inquiring status ....................................................50
Call barring ...........................................................50
Barring outgoing calls ...........................................50
Cancel barring of outgoing calls .....................50
Inquiring status ..............................................50
Barring incoming calls ..........................................50
Cancel barring of incoming calls .....................51
Inquiring status ..............................................51
Cancel all call barring functions ............................51
Changing network code ........................................51
Showing/hiding your number ................................51
Selecting a phone line to use ................................52
Anykey answer ......................................................52
Auto redial ............................................................52

vii
Speed dialing ........................................................52
Receiving a fax or data call ...................................53
Talk and Fax .........................................................53
Sound .........................................................................54
Sound profiles ......................................................54
Selecting a sound profile ............................... 54
Customizing a sound profile .......................... 54
Renaming a sound profile .................................... 55
Composing your ringing tones .............................. 55
Minute reminder ................................................... 57
Phone setup ...............................................................58
Changing menu language ..................................... 58
Adjusting backlight ............................................... 58
Adjusting backlight duration ................................ 58
Changing backlight color ..................................... 58
Adjusting screen contrast ..................................... 58
Clock ....................................................................59
Showing/hiding clock on the screen ..................... 59
Setting up current time and date .......................... 59
Selecting time zone ....................................... 59
Setting up current time and date .................... 59
Setting up date format ......................................... 59
World clock .......................................................... 60
Auto power off .....................................................60
Activating Auto power off ..................................... 60
Deactivating Auto power off ................................. 60
Idle screen display ................................................ 60

viii
Screen saver .........................................................60
Activating screen saver ...................................61
Deactivating Screen saver ...............................61
Setting up timeout period ...............................61
Standby logo .........................................................61
Showing/hiding standby logo .........................61
Selecting standby logo ...................................61
Key lock ................................................................62
Activating Key lock .........................................62
Deactivating Key lock .....................................62
Selecting default input mode ................................62
Restoring factory settings .....................................62
Phone security settings .........................................63
Activating/deactivating security codes ..................63
Activating/deactivating PIN code ....................63
Activating/deactivating phone code ................63
Activating/deactivating SIM lock .....................64
Changing security codes .......................................64
Changing PIN code .........................................64
Changing PIN2 code .......................................64
Changing phone code ....................................64
Changing SIM lock code .................................65
Closed user group ................................................65
Network settings ...................................................65
Network selection .................................................65
Band selection ......................................................66
Extras .........................................................................67
My Picture .............................................................67

ix
Creating My Picture .............................................. 67
Editing My Picture ................................................ 68
Erasing My Picture ................................................ 68
Sending My Picture ............................................... 68
Alarm clock ..........................................................69
Activating alarm clock .......................................... 69
Activating alarm clock .......................................... 69
Calendar ...............................................................69
Writing note ......................................................... 69
Viewing note ........................................................ 70
Viewing today’s note ..................................... 70
Viewing notes on a specific date .................... 70
View all notes ................................................ 70
Editing note ......................................................... 70
Erasing note ......................................................... 71
Method 1 ....................................................... 71
Method 2 ....................................................... 71
Moving a note to another date ............................. 71
Copying a note to another date ............................ 71
Sending a note ..................................................... 71
Viewing calendar in month mode ......................... 72
Jumping to a specific day ..................................... 72
Account book ....................................................... 72
Creating an accounting record ............................. 72
Viewing accounting records ................................. 73
Viewing results of accounting records .................. 73
Editing accounting record .................................... 74
Erasing accounting record .................................... 74
Method 1 ....................................................... 74
Method 2 ....................................................... 74
Playing Games ......................................................74

x
Ping Pong .............................................................75
Bingo ....................................................................75
Insect shooting .....................................................76
Tank destroyer .....................................................76
Thirteen ................................................................77
Calculator .............................................................77
Using calculator ....................................................77
Converting currencies ...........................................78
Setting up exchange rate ................................78
Performing currency exchange .......................78
Stopwatch .............................................................78
Split timing ...........................................................78
Lap timing ............................................................79
Viewing timing records .........................................79
Erasing timing records ..........................................79
Operator services ..................................................80
WAP Service ................................................................81
Browsing the Internet ............................................81
Going to your homepage ......................................81
Going to your bookmarked pages .........................81
Navigating the Internet using the options menu ....81
Configuring WAP profiles ......................................83
Setting up a WAP profile .......................................83
Selecting and activating a WAP profile ...................84
Editing a WAP profile ............................................84
Renaming a WAP profile ........................................84
My shortcut ................................................................85
Using My shortcut .................................................85
Customizing My shortcut ......................................85

1
Making Your First Call
Making Your First Call
2
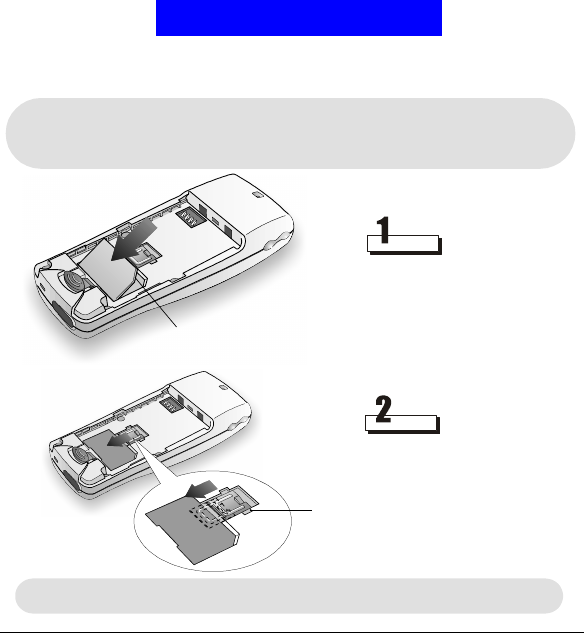
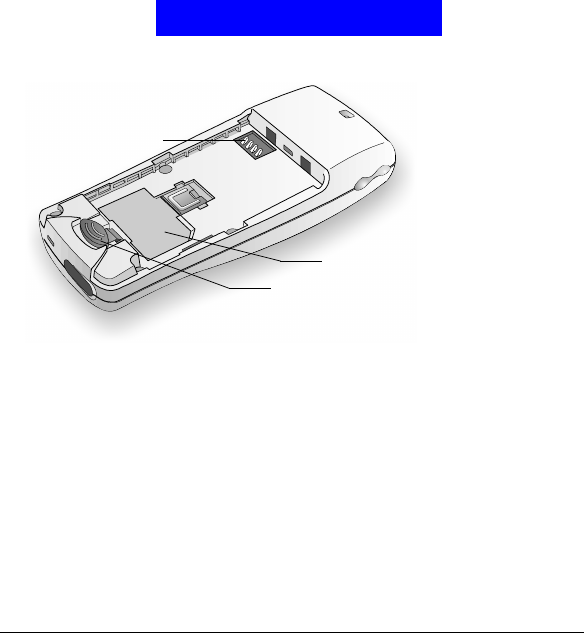
Installing SIM card
The SIM (Subscriber Identification Module) card is a small plastic card with metal contact on
it. You get this card after you subscribe to your operator. Your personal subscriber informa-
tion is stored in the SIM card and you need to use this card in the phone to make/receive calls
and access services provided by your operator.
What is a SIM card?
• Turn the phone face down.
• Place the SIM card in the SIM card
socket with the metal contact on the
card facing down and the bevelled cor-
ner to the direction shown.
• Push the SIM card completely into the
socket.
• Slide the SIM card retainer to the
direction shown to secure the SIM
card.
The bevelled corner
SIM card retainer
Pay special attention to the SIM card when you install. The metal contacts can be dam-
aged easily by scratches.
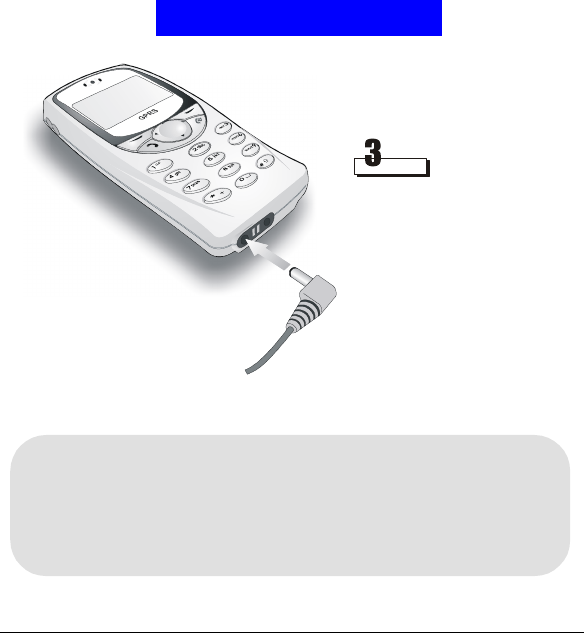
3
Making Your First Call
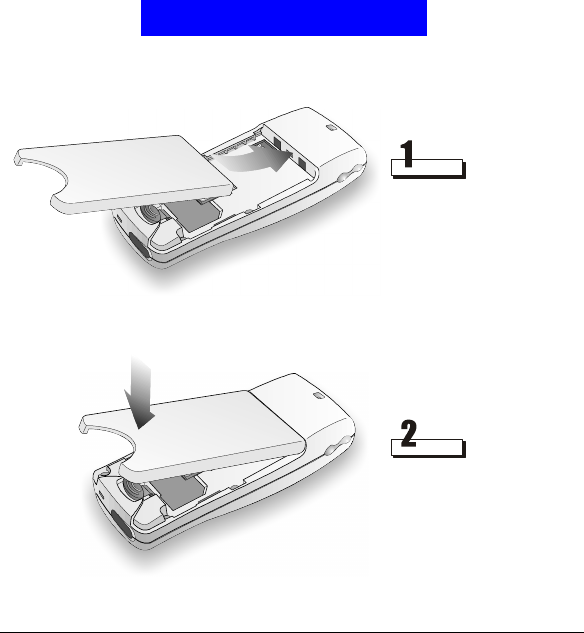
Installing and charging the battery
Place the top end of the battery on
the back of the phone, then push the
bottom end into the phone until you
hear a click.
Install the battery cover as shown.
Making Your First Call
4
• Charge the new battery for 24 hours for first time use. When the battery is being charged,
the bars of the charging status icon on phone screen scrolls. When charging is completed,
the bars will stop scrolling.
• You can use the phone while charging, however, it will take longer to charge the battery.
• For future use of the battery, it takes approximately 3 hours to complete the recharging
process.
• When battery power is low, a low battery message will appear on the screen. Charge the
battery immediately. If battery power runs out, the power of phone will be turned off
automatically.
Note
Insert the battery charger connector into the
battery charging socket located at the bot-
tom of the phone.
5
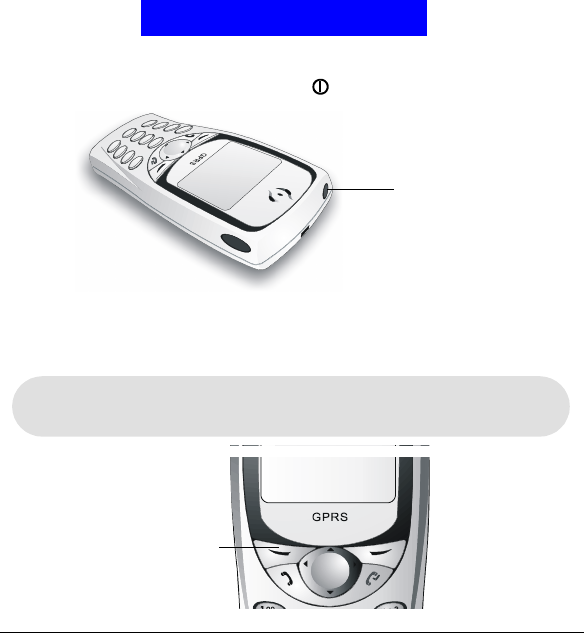
Making Your First Call
Turning on the phone
Press and hold the Power key located on the top of the phone.
A welcome screen appears and you probably will be asked to enter your PIN
code. Enter the PIN code and press OK. If you accidentally typed a wrong
number, press Clear to erase it.
Power key
For convenience of operation, your phone is equipped with two soft keys. You can press a
softkey to execute the function that is indicated on the screen. In this manual, “press OK”
refers to “press the softkey under OK that is displayed on the screen”.
Note
OK
Press this soft key to
confirm the PIN code
you entered.
Clear

Making Your First Call
6
After the PIN code is verified, the phone will start searching for the network
to use. If network is available, the operator name, signal strength and some
other icons will appear on the screen (see "Icons on the screen"on page 10 for
details). This is called the standby mode of the phone.
Dialing the number
Enter the number you want to dial (including the area code) and press
key. If the phone number you entered is wrong, press Clear to erase a wrong
number, or press and hold Clear to clear a whole line.
Ending the call
When you want to end the call, press key (or press End). The call will be
terminated.

7
Introduction to Your Phone
Introduction to Your Phone
8
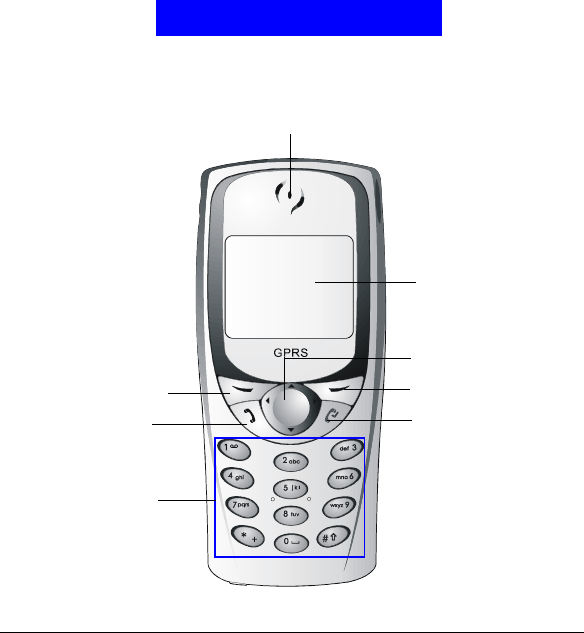
Parts of your phone and their names
Front view
Screen
Right soft key
Left soft key
End key
Send key
Navigation key
Earpiece
Alphanumeric keys
9
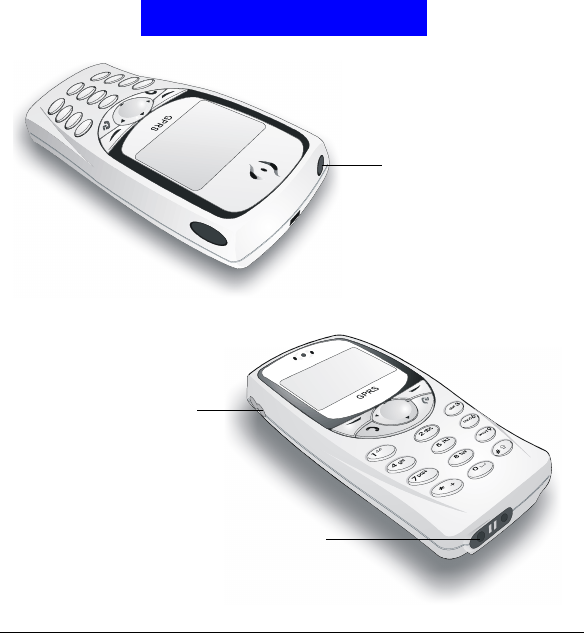
Introduction to Your Phone
Volume adjustment key
Top view
Battery charger socket & Data cable connector
Bottom view
Power key
Introduction to Your Phone
10
SIM card socket
Battery latch
Battery terminals
Rear view
11
Introduction to Your Phone
Icons on the screen
Please refer to the table below for the icons that appear on the screen and their
meanings.
Status icons
Signal strength Battery power level
Current time
Operator name
Soft key items
Current operation
profile
Icon Name Description
Signal strength Shows the condition of signal reception. The more the num-
ber of vertical bars, the better the reception of signal (Appear-
ance of 4 bars indicates the best signal reception).
Battery power level
Shows remaining battery power. The more the number of
vertical bars, the more the battery power (Appearance of 4
bars indicates that the battery is full).
If battery power is near empty, the battery icon flashes. At this
time, charge the battery immediately. When charging, the ver-
tical bars scroll until the battery is fully charged.
Current time Shows current time. See "Setting up current time and date"on
page 59 for how to set up current time.
Status
icons
New message Appearance of this icon indicates that you have new unread
message(s).
Message full This icon appears when the message storage is full. You need
to delete some messages.
New voicemail
message Appearance of this icon indicates that you have new voicemail
messages.
Status
icons Roaming This icon appears when you are roaming under another net-
work.
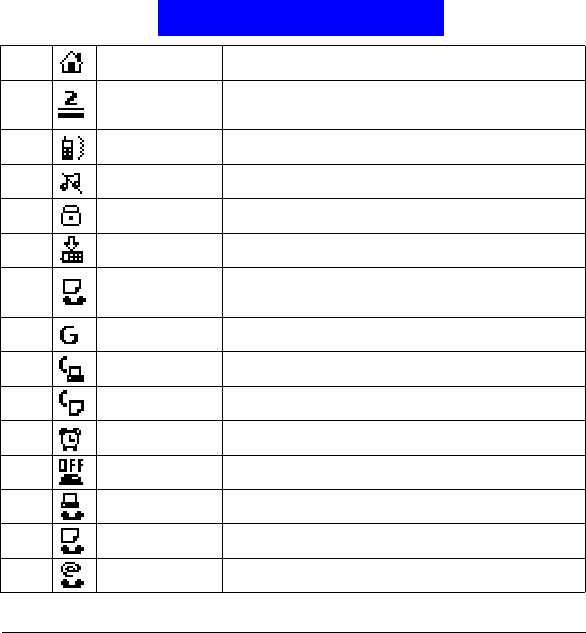
Introduction to Your Phone
12
Home zone Appearance of this icon indicates that you are currently under
your home network zone.
Line 2 If you speak with the second telephone line, this icon will
appear. (See "Selecting a phone line to use"on page 52 for
details)
Vibrator on This icon appears when the vibrator function is turned on.
Silent This icon appears when you turn off all sounds of your phone.
Key lock This icon indicates that the key lock is ON. (See "Key lock"on
page 62 for details)
Call divert This icon shows that the call divert function is turned ON.
(See "Call divert"on page 48 for details)
Call divert to voice-
mail box
This icon indicates that the Call divert to voicemail box func-
tion is enabled and your calls will be diverted to your voice-
mail box automatically.
GPRS mode When your phone is working in the GPRS mode, this con
will appear.
Next call is set as fax
call This icon appears when you have set your phone ready to
receive the next incoming call as fax call.
Next call is set as
data call This icon appears when you have set your phone ready to
receive the next incoming call as data call.
Alarm If you have activated the Alarm function, this icon will
appear.
Auto power off If you have activated the Auto Power Off function, this icon
will appear.
New fax message This icon appears when you have received a new fax message.
New data message This icon appears when you have received a new data mes-
sage.
New e-mail This icon appears when you have received a new e-mail.
13
Introduction to Your Phone
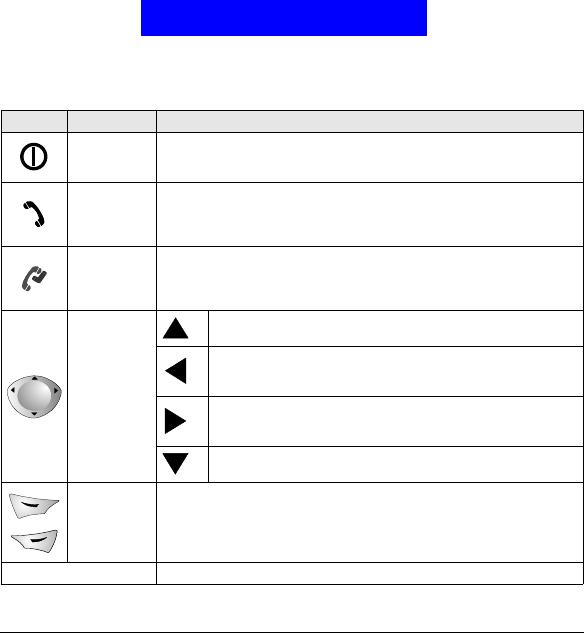
The keys on the phone
Function keys
Key Name Description
Power key • Long press this key to turn phone power on or off.
• When phone power is on, press this key to open the Profile Selection
menu. (See "Selecting sound profile"on page 17 for details)
Call key • When there is an incoming call, press this key to answer the call.
• After phone number is entered using alphanumeric keys, press this key
to dial.
• In standby mode, press to view the last dialed calls.
Cancel key • Press to return to standby mode from the Main Menu.
• If there is an incoming call, press to reject the call.
• Long press to return to standby mode from Browser mode (See for
details), or enter Browser mode from standby mode.
Navigation
key
• In standby mode, press to access Phone Book.
• In Main Menu, press to scroll items up.
• In standby mode, press to view miss calls.
• In Main Menu, press to return to the previous menu level.
• When entering text, press to move the cursor to the left.
• In standby mode, press to view answered calls.
• In Main Menu, press to go to the submenus.
• When entering text, move the cursor to the right.
• In standby mode, press to access Phone Book.
• In Main Menu, press this arrow to scroll items down.
Left/Right
Soft keys Press these soft keys to execute corresponding commands that appear
above them on the screen.
Volume adjustment key Press the key to adjust earpiece volume.

Introduction to Your Phone
14
Alphanumeric keys
The alphanumeric keys on the phone can be used to enter numbers and letters.
To enter phone numbers, press corresponding number keys directly. To enter
letters, please see "Entering text"on page 21 for details.

15
Basic Operations
Basic Operations
16
Turning on the phone
When phone power is off, press and hold the power key located on the
top of the phone to switch it on.
You will probably be asked to enter your PIN code. Enter PIN code and press
OK. You can also choose to turn off the PIN code protection. Please see "Acti-
vating/deactivating PIN code"on page 63 for details.
A welcome screen will appear and the phone will start searching for its home
network automatically. If the network is found, the operator and phone pro-
file name, battery level icon and signal strength icon (and other icons if avail-
able) will appear on the screen.
Now the phone enters its standby mode. In this mode, you can:
• Press Names to enter Phone Book.
• Press Menu to access Main Menu.
• Press or to browse your Phone Book records.
• Press to view missed call records.
• Press to view answered call records.
Turning off the phone
When hone power is on, long press the power key located on the top of
the phone to switch it off.
Making a call
In standby mode, you can make an outgoing call in the following ways:
• Enter phone number using alphanumeric keys and press key.
• Press key two times to redial the last dialed call.
• Press key to view last dialed call records.
Scroll to the one you want to call.
Press key to dial.
17
Basic Operations
• Press to view missed call records.
Scroll to the one you want to call.
Press key to dial.
• Press to view answered call records.
Scroll to the one you want to call.
Press key to dial.
• Find a phone number in the Phone Book and press key to dial.
• Long press alphanumeric keys ~ to dial the phone number
located #2 ~#9 in the Phone Book. (You must set up Speed Dial and acti-
vate such function first. Please see "Setting up Speed Dial"on page 27 and
"Speed dialing"on page 52 for details)
During a call, the call time counter will appear on the screen, letting you know
the time you spent on the call.
Inserting pause To insert a pause after phone number (used when there is an extension
number following the phone number), long press key until P
appears.
For example, to call extension number 234 after the number 1234567,
enter 1234567 and then long press key to insert a P, then enter
the extension number 234.
Making an
international call To make an international call:
1. Long press key to insert a + (international dialing prefix).
2. Enter the recipient’s country code and area code (omit the starting 0).
3. Enter the recipient’s phone number.
Note
Basic Operations
18
Making an emergency call
Press (or any other emergency number specified by your
operator) and then key. Depending on your operator, the emergency call
can be made even when there is no SIM card in the phone.
Answering a call
Your phone rings or vibrates (or remains silent, according to your setting of
sound profile) when an incoming call is received. Meanwhile, the caller’s name
(if the caller’s name can be found in your Phone Book) or number will appear
on the screen. Otherwise, “Unknown” will appear. You can:
• Press key (or any key on the phone except key, if the AnyKey
Answer function has been turned on) to answer the call.
• Press key to reject the call.
Ending a call
Press key to end a call. Depending on your setup in Session information
(see "Session information"on page 47 for details), the session information may
appear on the screen.
Missed call message
If you have missed calls, the number of missed calls will appear on the screen.
You can press Detail to view detailed missed call records, or Exit to clear the
screen and return to standby mode.
Adjusting earpiece volume
During a phone call, press the volume adjustment key to increase/decrease ear-
piece volume.
Selecting sound profile
1. Press the power key in standby mode. The sound profiles will appear
on the screen.

19
Basic Operations
2. Scroll to desired profile and press Select.
You can also customize these profiles. See "Customizing a sound profile"on
page 54 for details.
Options during a call
During a call, you have the choice to access several in-call options.
To access these options:
1. Press Options during a call.
2. Scroll to a desired item in the In Call Option menu that appears.
3. Press Select to select it.
Making a new call
To make a new call during a call:
1. Highlight Dial new call in the In Call Option menu and press Select.
2. Enter the phone number of the second call and press key.
Answering a new incoming call
If you have a new incoming call when you are already on a call, new incoming
call message will appear on the screen. Press key to put current call on
hold and answer the new call. Press key to end (or reject) the new incom-
ing call and you will be connected to the old call automatically.
Transmitting DTMF tones
This feature allows you to send DTMF tones during a call. For example, when
you are asked to enter your bank account number during a telephone banking
service call.
To transmit DTMF tones:
1. Highlight Send DTMF in the In Call Option menu and press Select.
2. Enter the number you are asked to.
Ending calls

Basic Operations
20
This feature allows you to end current call or end one of the calls on progress
on a multi-party call.
To end current call:
Highlight End Calls in the In Call Option menu and press Select.
• To end one call on a multi-party call, highlight the call party you want to
end and press Select.
• To end all calls, highlight All and press Select.

21
Phone Book

Phone Book
22
Consulting Phone Book
During a call, you can use this function to consult names and numbers in the
Phone Book. For details about Phone Book, please refer to "Phone Book"on
page 23.
To consult Phone Book during a call:
1. Highlight Phone Book in the In Call Option menu and press Select.
2. You will enter the Phone Book menu. You can search for a name and num-
ber or add a new number..., etc.
Accessing Main Menu
During a call, you can use this function to access the Main Menu. For details
about Main Menu, please refer to "The Main Menu"on page 33.
To access Main Menu during a call:
1. Highlight Main Menu in the In Call Option menu and press Select.
2. The Main Menu will appear on the screen.
Muting/unmuting the microphone
If you don’t want the calling party to hear your voice, you can use this func-
tion to mute the microphone.
To mute the microphone during a call:
Highlight Mute in the In Call Option menu and press Select.
To unmute the microphone:
Highlight unmute in the In Call Option menu and press Select.
Holding/unholding a call
If you have multiple calls in progress, you can use this function to hold one of
the calls.
To hold a call:
1. Highlight Hold in the In Call Option menu and press Select.
2. Select the call you want to hold in the menu that appears.
3. Press Select.
To unhold calls:
1. Highlight Unhold in the In Call Option menu and press Select.
2. Select the call you want to unhold in the menu that appears.
3. Press Select.
23
Phone Book
Listening to your voice mail
When a new voice mail is received, the icon appears on the screen. To lis-
ten to the new voice mail, long press key in standby mode and connect
to your voice mailbox.
Depending on your operator, you may need to configure your voice mailbox
before you can use this function. Please refer to "Configuring voice mailbox
number"on page 40 for how to setup your voice mailbox.
Reading messages
When a new message is received, new message alert will be generated
(depending on your sound profile setting) and the new message prompt will
appear on the screen.
To read the new message:
1. Press Detail to go to the list of received messages.
2. Scroll to the message you want to read and press Select.
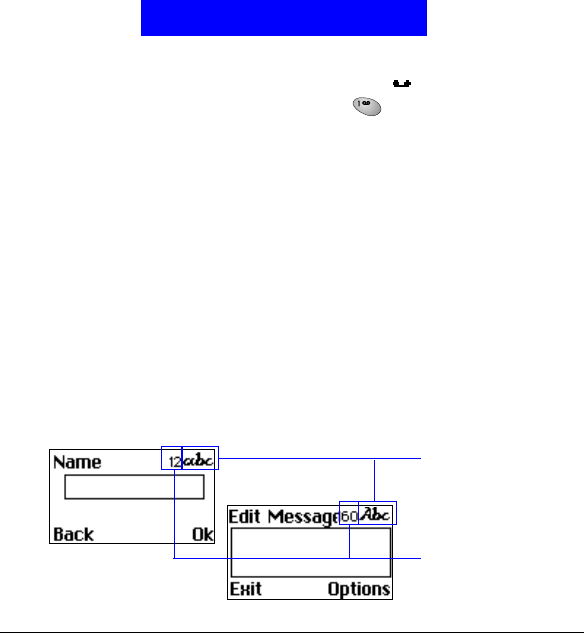
Entering Text
The phone provides several input methods that enable you to enter text in
Phone Book, write a message..., etc. You can also switch among these input
methods easily.
When you add a new entry to your Phone Book (see "Adding a Phone Book
entry"on page 24) or write a new message (see page), the following text editor
screen appears:
Phone Book
editor screen
Message editor screen
Remaining number of
characters available for
input
Current input mode
Phone Book
24
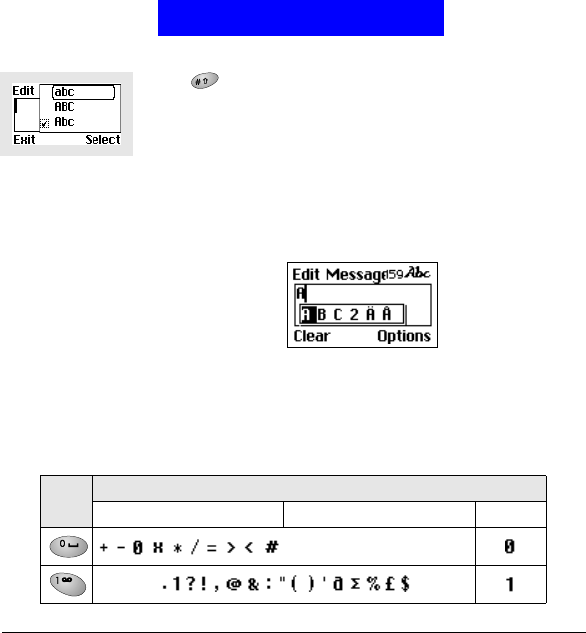
Selecting an input mode
1. Press key. Available input modes will appear on the screen.
2. Scroll to the desired input method and press Select. The selected mode will
appear on the upper right corner of the screen.
• abc mode: Allows you to enter lower case letters.
• ABC mode: Allows you to enter upper case letters.
• Abc mode: The first letter entered is automatically capitalized.
• 123 mode: Allows you to enter numbers.
• Punctuation (,.!?:;) mode: Enter punctuation marks.
Entering text
• Press a key and the corresponding letters will appear in a bar on the lower
part of the screen.
• Press the key several times to highlight the desired letter (or number) and it
will be entered when the bar disappears. You can also proceed to enter the
next letter when the desired letter (or number) is highlighted. The remain-
ing number of letters you can enter is shown on the upper right corner of
the screen.
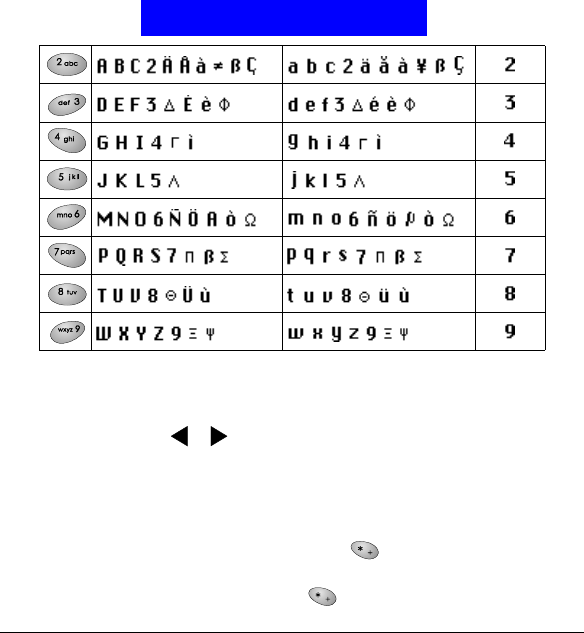
The table below shows the mapping of each key and the corresponding letter
in different input modes.
Keys Input Modes
ABC abc 123
(Space)
25
Phone Book
Erasing textIf you have entered a wrong character or number, press Clear to erase. Press-
ing and holding Clear will clear a whole line.
Press or to move the cursor backward/forward.
Using key lock
The key lock helps to prevent unwanted key operations when you carry your
phone.
To enable key lock:
In standby mode, press Menu, then key.
To unlock:
Press Unlock, and then press key.

Phone Book
26
Adding a Phone Book entry
You can add a new entry to Phone Book in the following ways:
Method 1 1. Enter Phone Book by pressing Names in standby mode.
2. Scroll to Add and press Select.
3. You will be prompted to enter the name of the entry. Enter the name and
press OK.
4. Enter the phone number and press OK.
Method 2 1. In standby mode, enter the number using the alphanumeric keys.
2. Press Save. You will be prompted to enter the name of the entry. Enter the
name and press OK.
Method 3 1. During a call, enter the number using the alphanumeric keys.
2. Press Save. You will be prompted to enter the name of the entry. Enter the
name and press OK.
Searching for a Phone Book entry
To search for a Phone Book entry:
1. Enter Phone Book by pressing Names in standby mode.
2. Scroll to Search and press Select.
3. Enter the name of the Phone Book entry you want to look for. You can also
enter only the beginning few letters of the name.
4. The entries that match the name (or contain the letters) you entered will
appear on the screen.
Editing a Phone Book entry
Editing name
1. Scroll to a Phone Book entry.
2. Press Detail.
3. Scroll to the name (or number) and press Options.

27
Phone Book
4. Scroll to Edit (or Edit name if you scrolled to the number in step 1) and
press Select.
5. Edit the name and when finished, press OK.
Editing number
1. Scroll to a Phone Book entry.
2. Press Detail.
3. Scroll to the number and press Options.
4. Scroll to Edit in the menu that appears and press Select.
5. Edit the number and when finished, press OK.
Adding new phone number to existing entries
You can record up to 4 different phone numbers under a Phone Book entry.
1. Scroll to a Phone Book entry.
2. Press Detail.
3. Scroll to the name (or number) and press Options.
4. Scroll to Add Number and press Select.
5. Enter the new number and when finished, press OK.
6. You will be prompted to select a type for the new number. Scroll to an
appropriate type and press Select.
Changing caller group
The Caller group function allows you to separate your Phone Book entries in
different groups. For details about the Caller group function, please refer to
"Setting up Caller Group"on page 28.
1. Scroll to a Phone Book entry.
2. Press Detail.
3. Scroll to the name (or number) press Options.
4. Scroll to a desired caller group and press Select.
Sending a entry as business card
With this function, you can send the details of a Phone Book entry to another
person as a business card.
1. Scroll to a Phone Book entry.
2. Press Detail.
3. Scroll to the name (or number) and press Options.
4. Scroll to Send business card and press Select.

Phone Book
28
5. If you want to send the business card as a new message immediately, scroll
to Send as SMS and press Select. Enter the number of the recipient (or pick
up a recipient from Phone Book by pressing Names) and press Send.
If you want to edit the business card before sending it, scroll to Send as text
and press Select.
Assigning default phone number
If you have multiple phone numbers in a Phone Book entry, you can assign
one of these numbers as default number. This default number is dialed when
you make a call from the Phone Book or using the Speed Dial function.
1. Scroll to a Phone Book entry.
2. Press Detail.
3. Scroll to the number you want to set as default and press Options.
4. Scroll to Set as default and press Select.
Changing the type of number
1. Scroll to a Phone Book entry.
2. Press Detail.
3. Scroll to the number and press Options.
4. Scroll to Change Type and press Select.
5. Scroll to a desired type for the number and press OK.
Sending messages from Phone Book
To send a new message from Phone Book:
1. Scroll to a Phone Book entry.
2. Press Detail.
3. Scroll to the number and press Options.
4. Scroll to Send message and press Select.
5. Compose the message. When finished, press Options and then Send to send
the message.
Erasing Phone Book entry
Method 1 1. Enter Phone Book by pressing Names in standby mode.
2. Scroll to Erase and press Select.
To erase Phone Book entries one by one:

29
Phone Book
1. Scroll to One by one and press Select.
2. Scroll to select the Phone Book entry you want to erase and press OK.
3. Press OK.
To erase all Phone Book entries:
1. Scroll to All.
2. To delete all Phone Book entries stored in phone memory, scroll to Phone.
To delete entries on the SIM card, scroll to SIM.
3. Press Select.
Method 2 1. In Phone Book, scroll to the entry you want to erase and press Detail.
2. Scroll to the name (or number) and press Options.
3. Scroll to Erase and press Select.
Copying Phone Book entry
Method 1 With the copy function, you can copy Phone Book entries in the phone mem-
ory to SIM card memory and vise versa.
1. Enter Phone Book by pressing Names in standby mode.
2. Scroll to Copy and press Select.
To copy Phone Book entries from phone to SIM card:
Scroll to Phone to SIM and press Select. You can choose to copy Phone Book
entries one by one or all at once.
To copy Phone Book entries from SIM card to phone:
Scroll to SIM to Phone and press Select. You can choose to copy Phone Book
entries one by one or all at once.
Method 2 1. In Phone Book, scroll to the entry you want to copy and press Detail.
2. Scroll to the name (or number) and press Options.
3. Scroll to Copy and press Select.
4. If you want to keep the original and make a copy to another location (i.e, if
your Phone Book is using SIM card memory, it will be copied to the phone
memory and vise versa), scroll to Keep original. To move the entry to
another location, scroll to Move original.

Phone Book
30
5. Press Select.
Setting up Speed Dial
Speed Dial is a shortcut that allows you to make a call simply by long pressing
alphanumeric keys ~ .
To set up speed dial:
Method 1 1. Enter Phone Book by pressing Names in standby mode.
2. Scroll to Speed Dial and press Select.
3. Choose an empty speed dial key and press Select.
4. Your Phone Book entries will appear on the screen. Pick up a number by
pressing Select.
Method 2 1. Long press a key that has not been assigned a speed dial number.
2. The screen will prompt you to assign the speed dial key. Press OK.
3. Your Phone Book entries will appear on the screen. Pick up a number by
pressing Select.
Viewing speed dial number
1. Enter Phone Book by pressing Names in standby mode.
2. Scroll to Speed Dial and press Select.
3. On the speed dial list that appears, scroll to choose a number to view.
4. Press Options and select View.
Changing speed dial number
1. Enter Phone Book by pressing Names in standby mode.
2. Scroll to Speed Dial and press Select.
3. On the speed dial list that appears, scroll to choose a number to change.
4. Press Options and select Change.
5. Your Phone Book numbers will appear on the screen. Pick up a new num-
ber by pressing Select.
Erasing speed dial number

31
Phone Book
1. Enter Phone Book by pressing Names in standby mode.
2. Scroll to Speed Dial and press Select.
3. On the speed dial list that appears, scroll to choose a number to view.
4. Press Options and select Erase.
Setting up Caller Group
You can place your Phone Book entries under different Caller Groups and
give each Caller Group different ringtone, backlight and screen graphic. When
you have an incoming call, you can judge the caller by its specific Caller
Group.
Creating a new Caller Group
1. Enter Phone Book by pressing Names in standby mode.
2. Scroll to Caller Group and press Select.
3. The Caller Group list will appear on the screen. Scroll to an empty caller
group and press Select.
4. Scroll to Rename and press Select. Enter the name of the Caller Group.
When finished, press OK.
5. Scroll to Ring Tone and press Select. Scroll to a desired ring tone and press
OK.
6. Scroll to Graphic and press Select. If you want to choose a screen graphic
for the Caller Group, Scroll to On and press OK. Scroll to View and press
Select to choose a graphic. Otherwise, select Off. Press Back to return to
the previous menu.
7. Scroll to Backlight and press Select. Scroll to a desired backlight color from
the list that appears and then press OK.
Renaming a Caller Group
1. Enter Phone Book by pressing Names in standby mode.
2. Scroll to Caller Group and press Select.
3. The Caller Group list will appear on the screen. Scroll to an empty caller
group and press Select.
4. Scroll to Rename and press Select. Enter a new name of the Caller Group.
When finished, press OK.

Phone Book
32
Miscellaneous settings
Personal number
You can store your own phone number here. Up to two personal numbers can
be saved.
Adding a personal number
1. Enter Phone Book by pressing Names in standby mode.
2. Scroll to Personal Number and press Select.
3. Press Options and select Add.
4. Enter your name and number.
5 Press OK.
Editing personal number
1. Enter Phone Book by pressing Names in standby mode.
2. Scroll to Personal Number and press Select.
3. Scroll to the number you want to edit and press Options.
4. Scroll to Edit and press Select.
5. Edit the name and number. When finished, press OK.
Erasing personal number
1. Enter Phone Book by pressing Names in standby mode.
2. Scroll to Personal Number and press Select.
3. Scroll to the number you want to erase and press Options.
4. Scroll to Erase and press Select.
Your own business card
You can create your own business card and send it to other person.
Creating your own business card
1. Enter Phone Book by pressing Names in standby mode.
2. Scroll to My Own Card and press Select.
3. Scroll to Edit and press OK.
4. Enter all necessary information. When finished, press Save.
Viewing your business card

33
Phone Book
1. Enter Phone Book by pressing Names in standby mode.
2. Scroll to My Own Card and press Select.
3. Scroll to View and press Select.
Sending your business card
1. Enter Phone Book by pressing Names in standby mode.
2. Scroll to My Own Card and press Select.
3. Scroll to Send My Own Card and press Select.
4. If you want to send the business card as a new message immediately, scroll
to Send as SMS and press Select. Enter the number of the recipient (or pick
up a recipient from Phone Book by pressing Names) and press Send.
If you want to edit the business card before sending it, scroll to Send as text
and press Select.
Editing your business card
1. Enter Phone Book by pressing Names in standby mode.
2. Scroll to My Own Card and press Select.
3. Scroll to Edit and press OK.
4. Edit the contents of your business card. When finished, press Save.
Erasing your business card
1. Enter Phone Book by pressing Names in standby mode.
2. Scroll to My Own Card and press Select.
3. Scroll to Erase and press Select.
Fixed dial number
If your SIM card supports, you can use this function to restrict outgoing calls
only to the numbers (or the numbers that begin with the same digit(s)) on the
fixed dial list.
Activating Fixed dial
1. Enter Phone Book by pressing Names in standby mode.
2. Scroll to Fixed dial number and press Select.
3. Scroll to On and press OK.
4. Enter your PIN 2 code and press OK.
Adding new Fixed dial number
You need to activate Fixed dial before adding new Fixed dial number.

Phone Book
34
1. Enter Phone Book by pressing Names in standby mode.
2. Scroll to Fixed dial number and press Select.
3. Scroll to View and press Select.
4. Press Options.
5. Scroll to Add and press Select.
6. Enter your PIN 2 code and press OK.
7. Enter the name of the fixed dial number. Press OK.
8. Enter the number. Press OK.
Viewing Fixed dial number
1. Enter Phone Book by pressing Names in standby mode.
2. Scroll to Fixed dial number and press Select.
3. Scroll to View and press Select.
Editing Fixed dial number
1. Enter Phone Book by pressing Names in standby mode.
2. Scroll to Fixed dial number and press Select.
3. Scroll to View and press Select.
4. Scroll to a Fixed dial number and press Options.
5. Scroll to Edit and press Select.
6. Enter your PIN2 code and press OK.
7. Edit the name and number. When finished, press OK.
Erasing Fix dial number
1. Enter Phone Book by pressing Names in standby mode.
2. Scroll to Fixed dial number and press Select.
3. Scroll to View and press Select.
4. Scroll to a Fixed dial number and press Options.
5. Scroll to Erase if you want to erase selected Fixed dial number. If you want
to erase all fixed dial numbers, scroll to Erase all. Press Select.
6. Enter your PIN2 code and press OK.
7. Press OK to confirm.
Phone Book memory setting
Selecting Phone Book memory
You can select the memory to use for your Phone Book.
1. Enter Phone Book by pressing Names in standby mode.

35
Phone Book
2. Scroll to Option and press Select.
3. Scroll to Memory and press Select.
4. Scroll to SIM if you want to use SIM memory, or Phone if you want to use
phone memory.
5. Press OK.
Checking Phone Book memory status
1. Enter Phone Book by pressing Names in standby mode.
2. Scroll to Option and press Select.
3. Scroll to Memory status and press Select.
4. Scroll to SIM if you want to check the status of SIM memory, or Phone if
you want to check the status of phone memory.
5. Press OK. The status of selected memory will appear on the screen.