Chi Mei Communication Systems GOXW Tablet PC User Manual GOX UM EN
Chi Mei Communication Systems, Inc. Tablet PC GOX UM EN
user manual
GOX
User's Manual

Table of Contents
i
Chapter 1: Getting Started.................................................................... 1
1.1 Your Device.................................................................................................. 1
Front ........................................................................................................................ 1
Back......................................................................................................................... 1
Top........................................................................................................................... 2
Side.......................................................................................................................... 2
1.2 Accessories ................................................................................................. 2
1.3 Installing Memory Card............................................................................... 3
1.4 Charging Battery ......................................................................................... 3
1.5 Using Headsets ........................................................................................... 4
1.6 Turning the Device On or Off ..................................................................... 4
1.7 Unlocking the Screen.................................................................................. 5
Chapter 2: The Basics........................................................................... 6
2.1 Home Screen ............................................................................................... 6
Extended Home screen............................................................................................ 6
Status Bar Icons....................................................................................................... 7
Shortcut menu.......................................................................................................... 8
Using widgets.......................................................................................................... 9
Applications........................................................................................................... 10
Setting wallpaper................................................................................................... 10
2.2 Adjusting Volume...................................................................................... 12
2.3 Setting up Wi-Fi......................................................................................... 13
2.4 People......................................................................................................... 16
Adding contacts..................................................................................................... 16
Importing contacts................................................................................................. 17
Backing up contacts............................................................................................... 17
Favorite contacts.................................................................................................... 18
Chapter 3: Entering Information........................................................ 19
3.1 On-Screen Keyboard................................................................................. 19
Using the on-screen keyboard ............................................................................... 19
Setting input method.............................................................................................. 20
3.2 Configuring Keyboard Settings ............................................................... 20
Chapter 4: Email.................................................................................. 21
4.1 Email Accounts ......................................................................................... 21
Setting up an Internet email account ..................................................................... 21
Viewing email accounts ........................................................................................ 22
4.2 Using Email................................................................................................ 23
Composing and sending emails............................................................................. 23
Receiving emails ................................................................................................... 24
Reading and replying to emails............................................................................. 24
Managing email folders......................................................................................... 25
Customizing email settings.................................................................................... 26

Table of Contents
ii
Chapter 5: Using Internet ................................................................... 28
5.1 Browsing Web Pages................................................................................ 28
Managing web pages............................................................................................. 29
Chapter 6: Google Applications......................................................... 30
6.1 Gmail .......................................................................................................... 30
Signing in to Gmail ............................................................................................... 30
Refreshing Gmail................................................................................................... 30
Creating and sending emails.................................................................................. 31
Reading and replying to emails............................................................................. 32
Forwarding emails................................................................................................. 32
Managing emails ................................................................................................... 33
Configuring Gmail settings ................................................................................... 34
6.2 Google+...................................................................................................... 35
Signing in to Google+ ........................................................................................... 35
Using Google+....................................................................................................... 35
Create a post .......................................................................................................... 36
Configuring Google+ settings ............................................................................... 37
6.3 Talk ............................................................................................................. 38
Signing in to Talk.................................................................................................. 38
Talk options........................................................................................................... 38
Starting chat........................................................................................................... 39
Configuring Talk settings...................................................................................... 40
6.4 Messenger.................................................................................................. 41
Starting chat........................................................................................................... 41
6.5 Maps ........................................................................................................... 42
Viewing Map......................................................................................................... 43
Finding places........................................................................................................ 44
6.6 Navigation.................................................................................................. 44
Getting directions .................................................................................................. 45
Finding your current location................................................................................ 46
6.7 Latitude ...................................................................................................... 47
Starting Latitude.................................................................................................... 47
Configuring privacy settings ................................................................................. 48
6.8 Market......................................................................................................... 48
Searching for applications..................................................................................... 49
Downloading applications..................................................................................... 49
Removing applications.......................................................................................... 49
6.9 Places......................................................................................................... 50
6.10 Search ...................................................................................................... 51
Searching information by entering text................................................................. 51
6.11 YouTube................................................................................................... 52
Watching videos.................................................................................................... 52
Uploading videos................................................................................................... 52
Searching videos.................................................................................................... 52
6.12 Movie Studio............................................................................................ 53
Creating new movies............................................................................................. 53
Viewing movies..................................................................................................... 54
Sharing movies...................................................................................................... 54

Table of Contents
iii
Chapter 7: Using Bluetooth................................................................ 55
7.1 Connecting to Bluetooth Devices............................................................ 55
Chapter 8: Multimedia Applications .................................................. 56
8.1 Photos and Videos.................................................................................... 56
Taking a photo....................................................................................................... 56
Recording a video.................................................................................................. 57
Reviewing a photo................................................................................................. 57
Reviewing a video................................................................................................. 58
Configuring camera settings.................................................................................. 58
8.2 Viewing Photos & Videos ......................................................................... 60
Viewing photos...................................................................................................... 60
Playing videos ....................................................................................................... 61
8.3 Using Music Player ................................................................................... 62
Music screen.......................................................................................................... 62
Playing music ........................................................................................................ 63
Managing playlists................................................................................................. 63
Chapter 9: Applications...................................................................... 65
9.1 Books ......................................................................................................... 67
9.2 Browser...................................................................................................... 67
9.3 Calculator................................................................................................... 68
9.4 Calendar..................................................................................................... 68
9.5 Camera ....................................................................................................... 69
9.6 Clock........................................................................................................... 69
9.7 Documents To Go ..................................................................................... 69
9.8 Downloads ................................................................................................. 70
Managing files....................................................................................................... 70
9.9 Email........................................................................................................... 71
9.10 File Browser............................................................................................. 71
Managing files and folders.................................................................................... 71
9.11 FM Radio .................................................................................................. 72
9.12 Gallery ...................................................................................................... 73
9.13 Gmail ........................................................................................................ 73
9.14 Google+.................................................................................................... 73
9.15 Latitude .................................................................................................... 73
9.16 Maps ......................................................................................................... 73
9.17 Market....................................................................................................... 74
9.18 Messenger................................................................................................ 74
9.19 Movie Studio............................................................................................ 74
9.20 Music ........................................................................................................ 74
9.21 Navigation................................................................................................ 74
9.22 News & Weather ...................................................................................... 74
9.23 People....................................................................................................... 75
9.24 Places....................................................................................................... 75
9.25 Search ...................................................................................................... 75
9.26 Settings .................................................................................................... 75
9.27 Talk ........................................................................................................... 75
9.28 TouchPal Keyboard................................................................................. 75

Table of Contents
iv
9.29 Voice Note................................................................................................ 76
9.30 YouTube................................................................................................... 76
Chapter 10: Managing Your Device................................................... 77
10.1 Device Settings........................................................................................ 77
WIRELESS & NETWORKS ................................................................................ 77
DEVICE ................................................................................................................ 77
PERSONAL .......................................................................................................... 78
SYSTEM ............................................................................................................... 79
10.2 Changing Basic Settings........................................................................ 81
Date and time settings ........................................................................................... 81
Alarms settings...................................................................................................... 82
Display settings ..................................................................................................... 83
Ringtone settings ................................................................................................... 83
10.3 Using Wireless & networks .................................................................... 84
10.4 Protecting Your Device........................................................................... 84
Screen lock protection settings.............................................................................. 84
10.5 Resetting the Device............................................................................... 84
Safety Information .................................................................................................. 85
Specifications ......................................................................................................... 89
Chapter 1: Getting Started
1
Chapter 1: Getting Started
1.1 Your Device
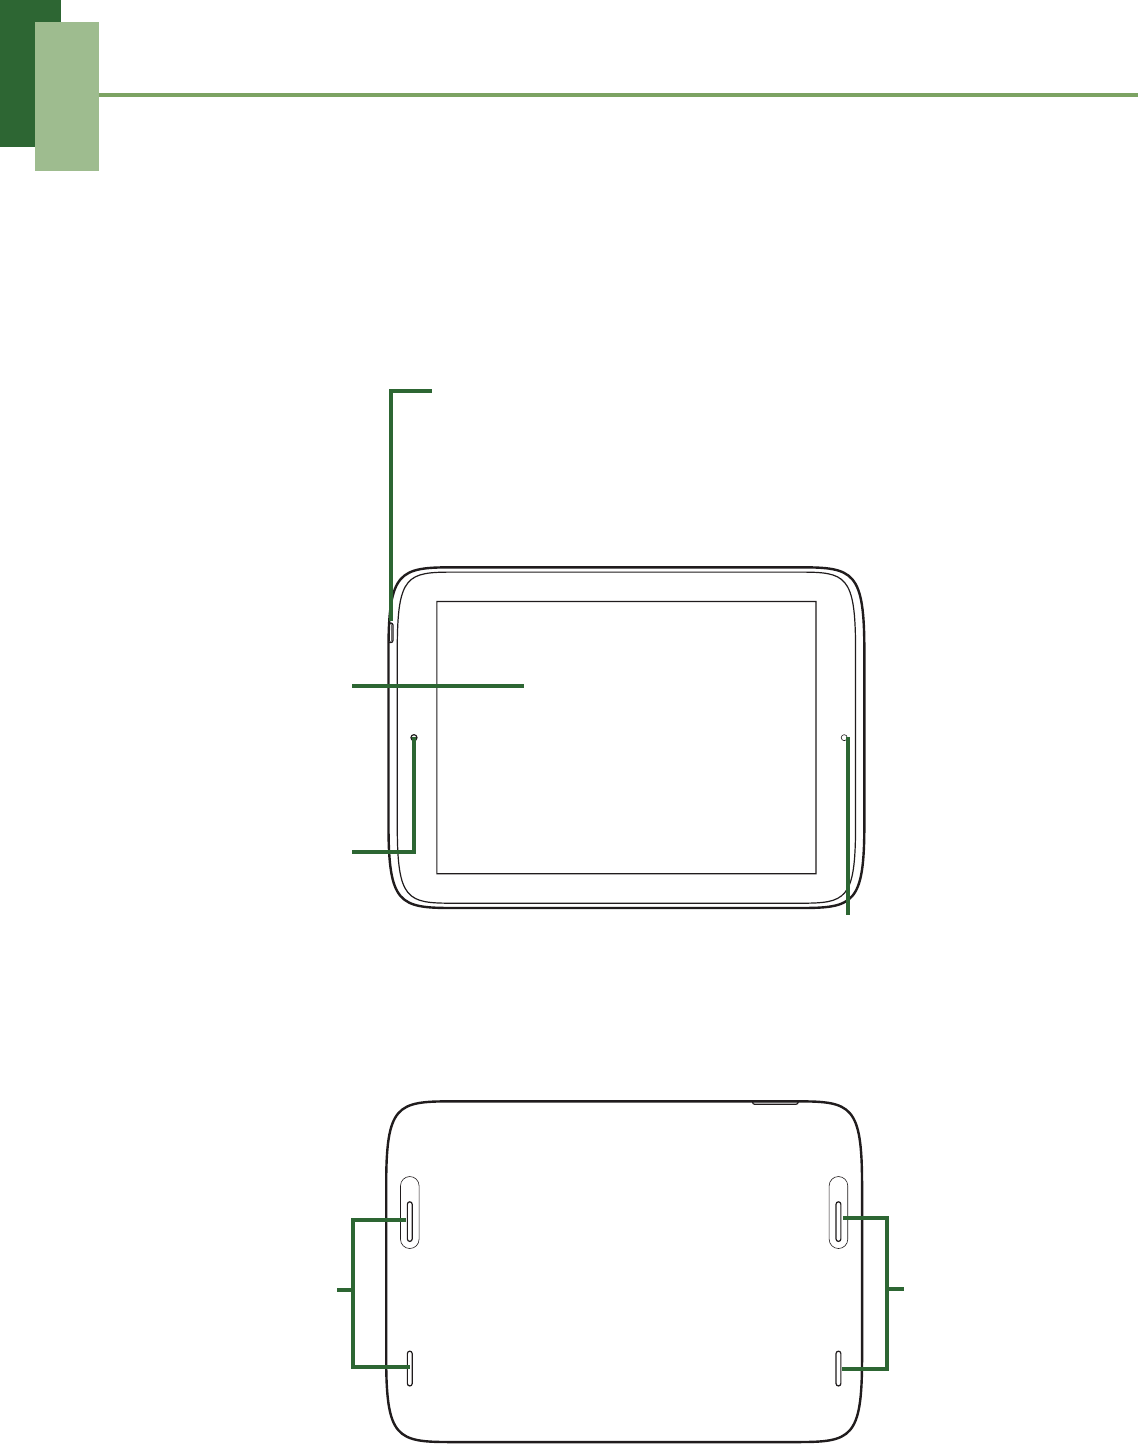
Front
Back
Touch screen
Camera
Light
sensor
Power:
• Press and hold for 5 seconds to turn the device on
or off.
• To save battery, press to temporarily turn the
screen on or off.
Speakers Speakers
Chapter 1: Getting Started
2
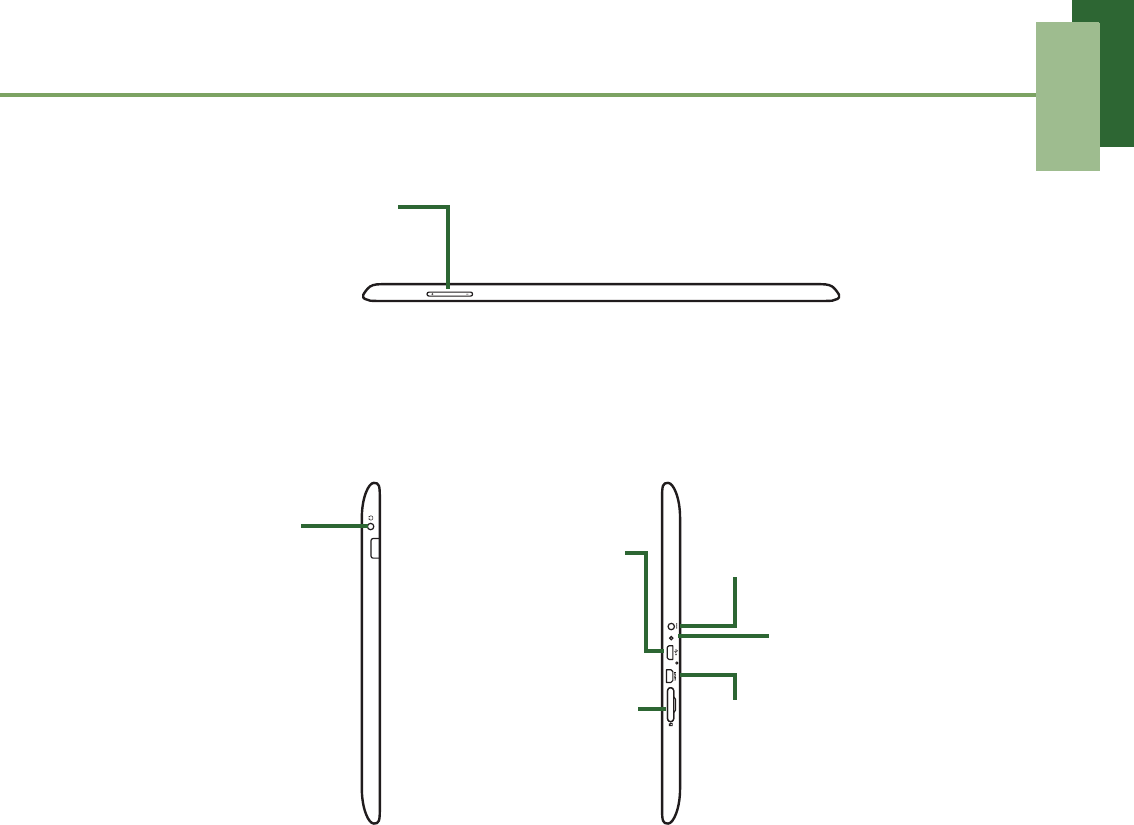
Top
Side
1.2 Accessories
Your package comes with the following items. If any of them is missing, please
contact your retailer.
• Tablet
• AC adapter
• Micro USB cable
• Headset
• Quick Start Guide
Volume:
• Press to adjust
the volume.
Microphone
Micro USB
connector:
• Connect USB
cable to PC as
MTP.
micro HDMI connector
microSD slot
Headset jack:
• Use a
headset for
hands-free
conversation or
listening to
music. micro HDMI connector
DC jack
Chapter 1: Getting Started
3
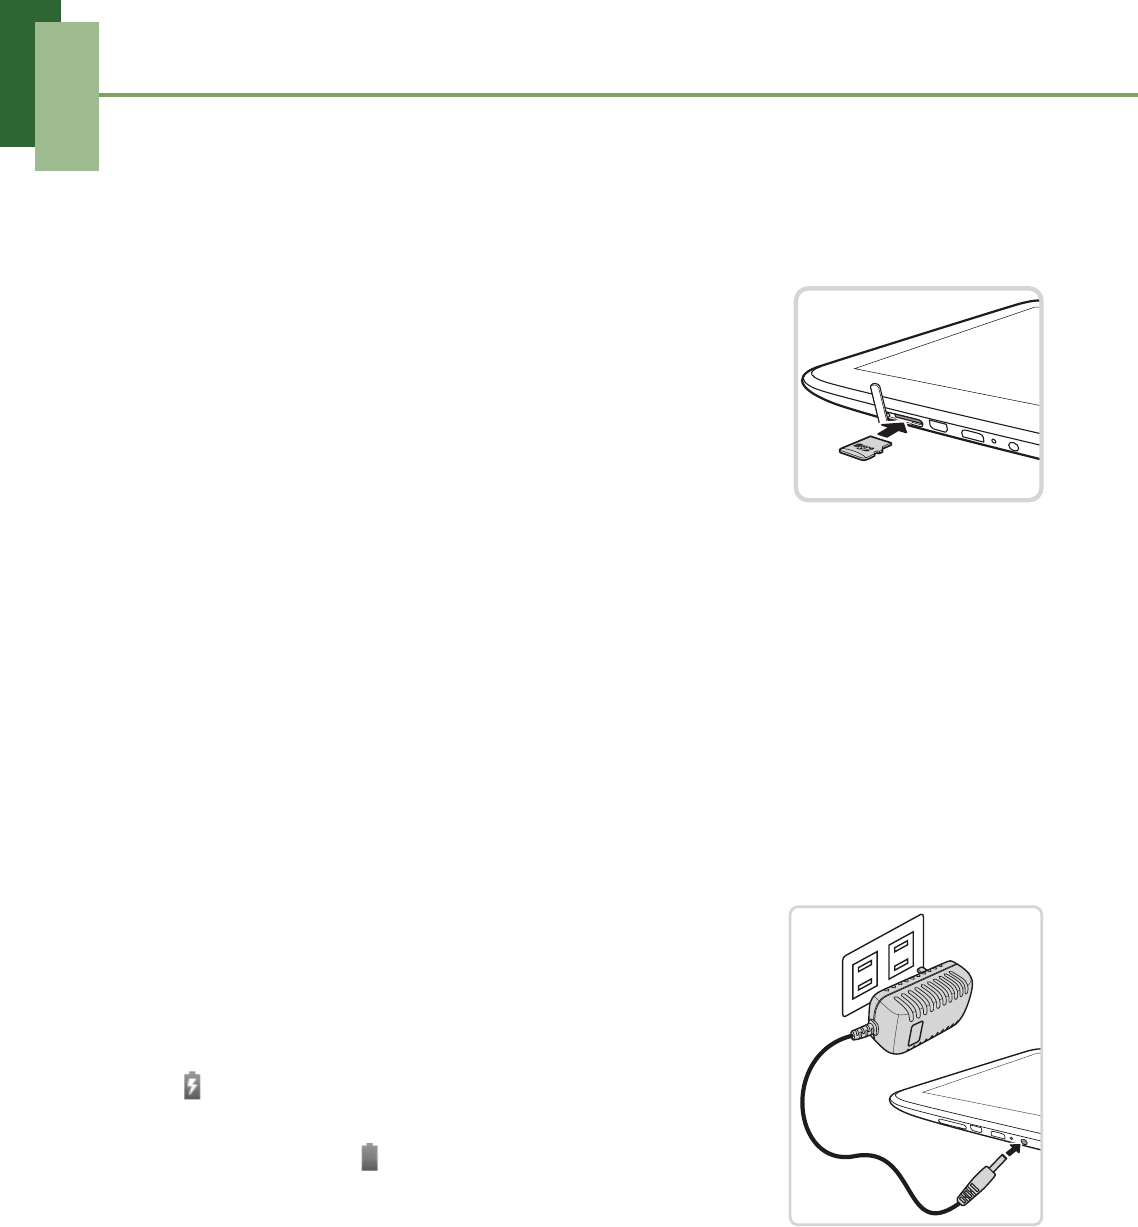
1.3 Installing Memory Card
You need a microSD® card to store photos, music, videos, and other data.
To install the memory card
1. Open the card cover.
2. Insert the microSD card as shown. Make sure the gold
contacts are facing down.
To remove the memory card
1. Open the card cover.
2. Push to eject the microSD card from the slot.
NOTE: Do not remove the memory card while the device is turned on. Sudden
removal of the memory card may cause data loss or unpredictable system hang up.
1.4 Charging Battery
The battery is only partially charged. To fully charge the battery, charge it for 5 hours.
Charge the battery
1. Connect one end of the AC adapter to the DC jack of
the device.
2. Plug the other end of the AC adapter to the wall outlet
to start charging.
When the battery is charging and the device is turned on,
the icon is displayed on the status bar. When the
battery is fully charged and the AC adapter is removed
from the device, the icon is displayed on the status bar.
NOTE: Battery can also be charged when the device is connected to a computer
using the micro USB cable.
8VHUVKDYHWRXVHWKHFRQQHFWLRQWR86%LQWHUIDFHVZLWK86%YHUVLRQRUKLJKHU
Chapter 1: Getting Started
4
1.5 Using Headsets
For hands-free conversation or listening to music, plug a headset to the headset jack.
NOTE:
• When using a headset, your ability to hear outside sounds may be limited.
Do not use headset if it will endanger you.
• When using a headset, do not set the volume to its maximum as it may
damage your hearing.
1.6 Turning the Device On or Off
After installing the memory card and charging the battery, the device is ready to be
turned on.
To turn on your device
Press and hold the Power button until the device vibrates.
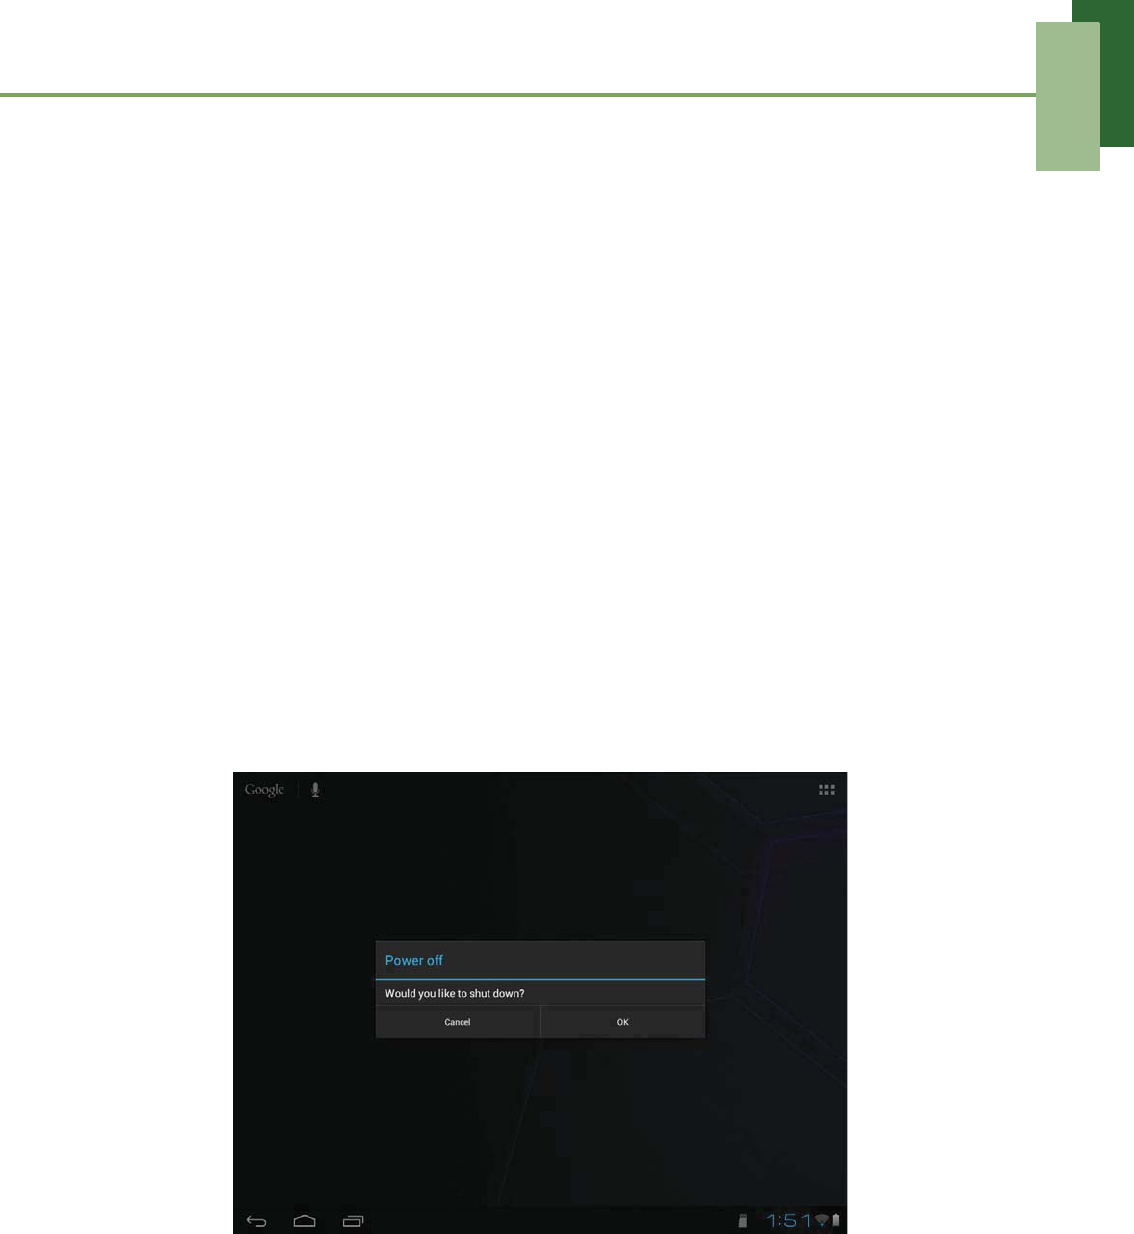
To turn off your device
1. Press and hold the Power button for 1 second.
2. A pop-up window appears, tap OK to confirm.
To set your device to Sleep mode
To set the device to sleep mode, press the Power button. This will turn the display off.
To turn the display on, press the Power button again.
Chapter 1: Getting Started
5
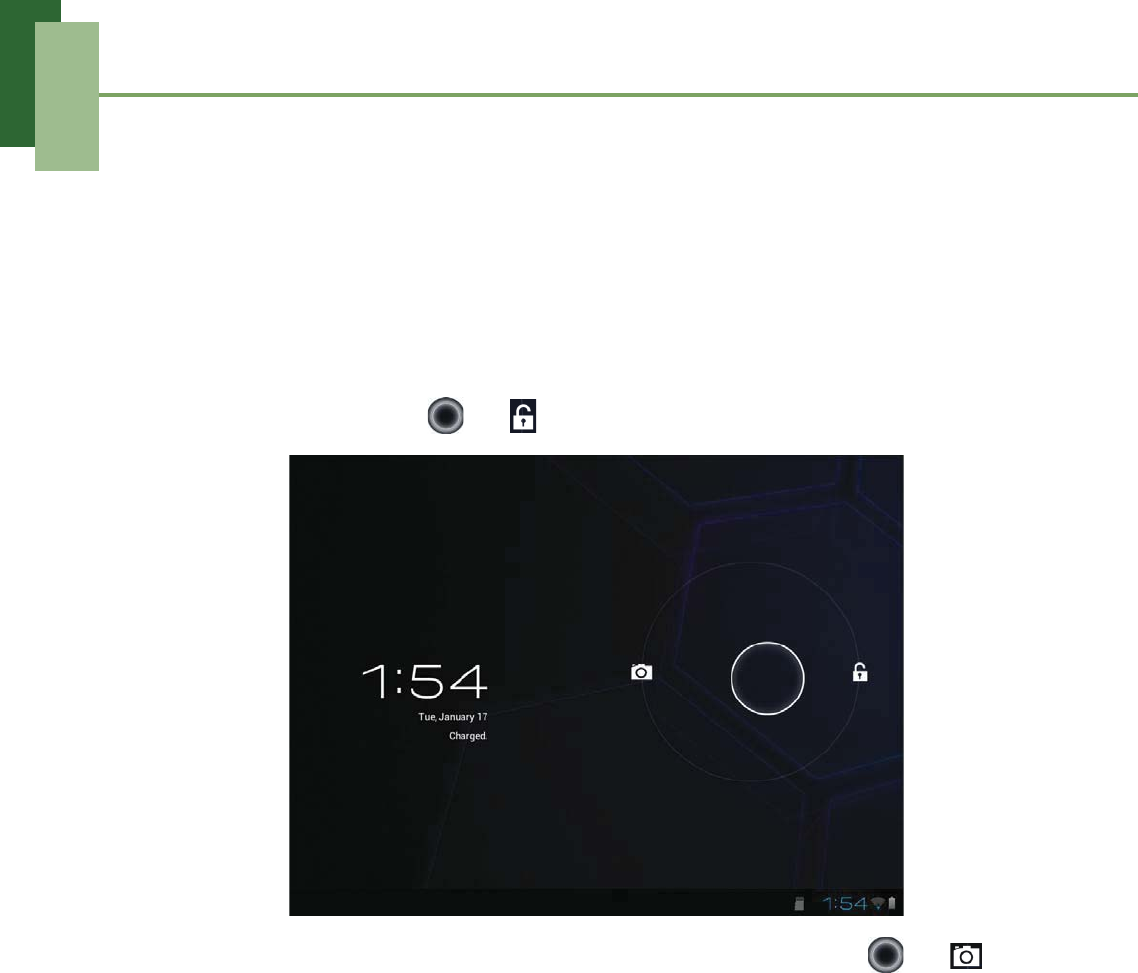
1.7 Unlocking the Screen
By default, the screen automatically locks after a period of inactivity. You can set the
length of time until the screen locks, see “To turn off backlight when the device is idle”
on page 83.
To unlock the screen
1. Press the Power button to turn on the display from Sleep mode.
2. Drag the middle circle ( ) to to unlock the screen.
NOTE: To directly use the camera function, drag the middle circle ( ) to .
Chapter 2: The Basics
6
Chapter 2: The Basics
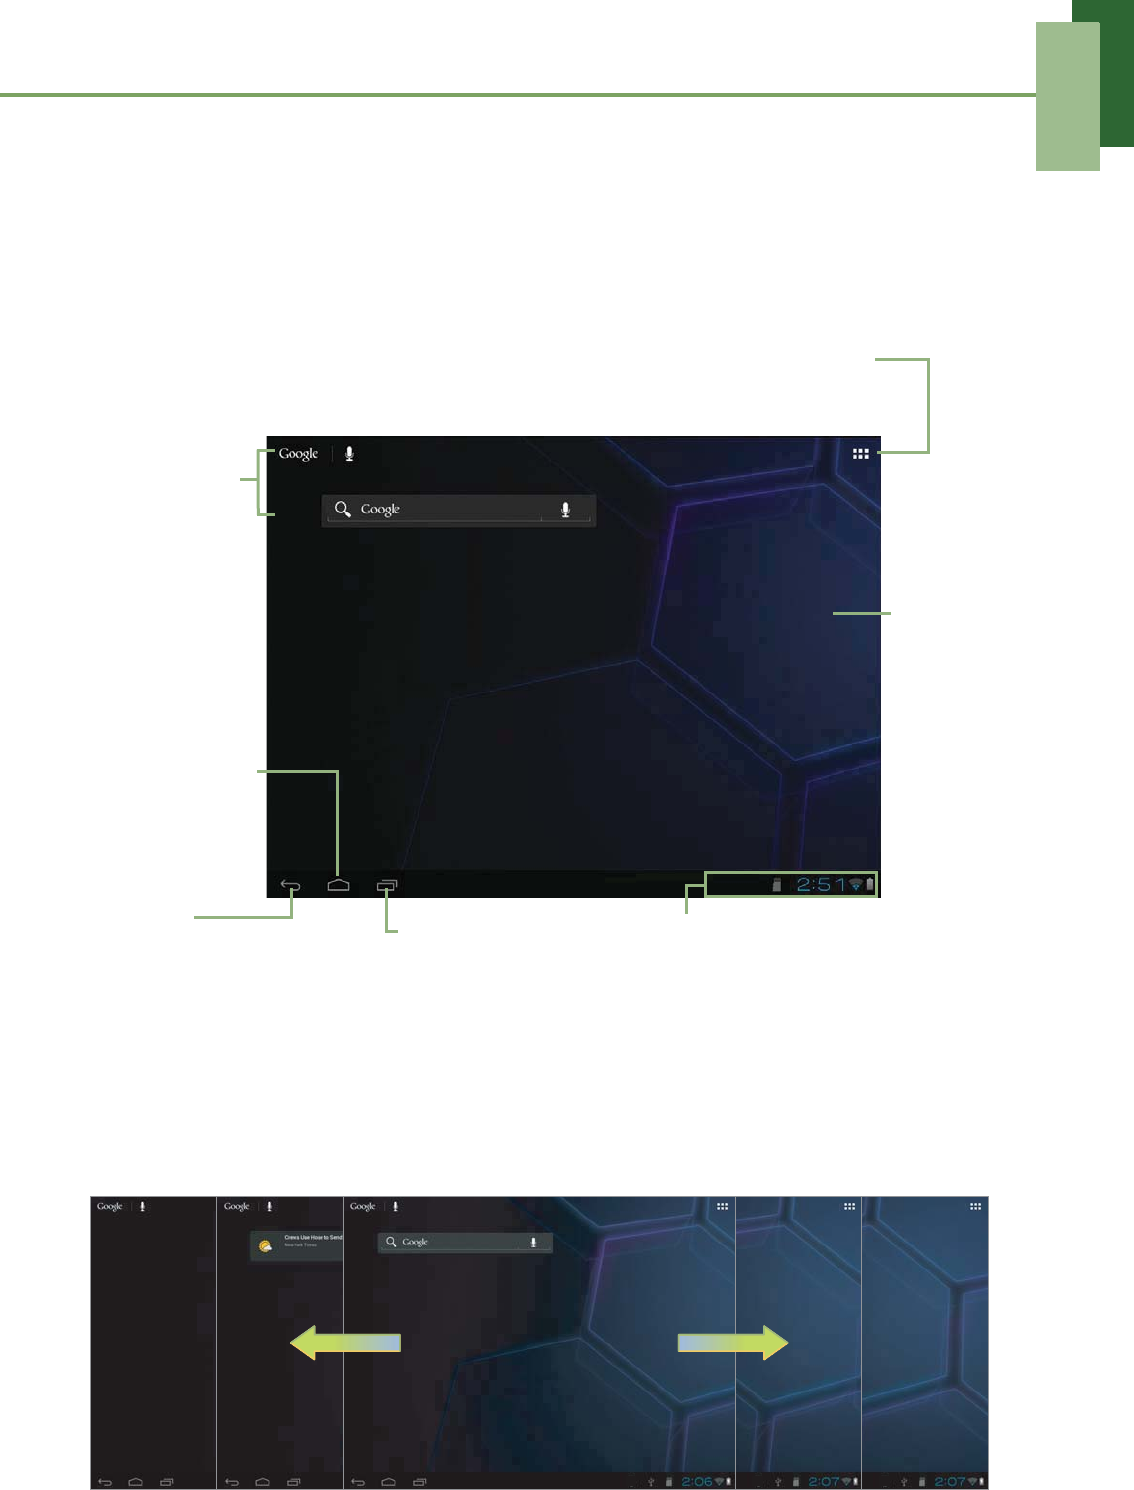
2.1 Home Screen
From the Home screen, you can quickly access common features and view
notifications of received messages, battery and connection status.
Extended Home screen
Swipe your finger to the left or right across the Home screen.
The two extensions to the left and to the right of the Home screen provide more space
for icons, widgets, shortcuts, and other items.
Recent Apps
Tap to view the recent
applications.
Launcher icon
Tap to view the applications
and settings of the device.
Google
Search
Enter the text
you want to
search in the
box. Swipe left/
right to
view the
extended
Home
screen.
Return
Tap to return to the
previous screen.
Status bar
Displays status and
notification icons and clock.
Home
Tap to return
to Home.
Chapter 2: The Basics
7
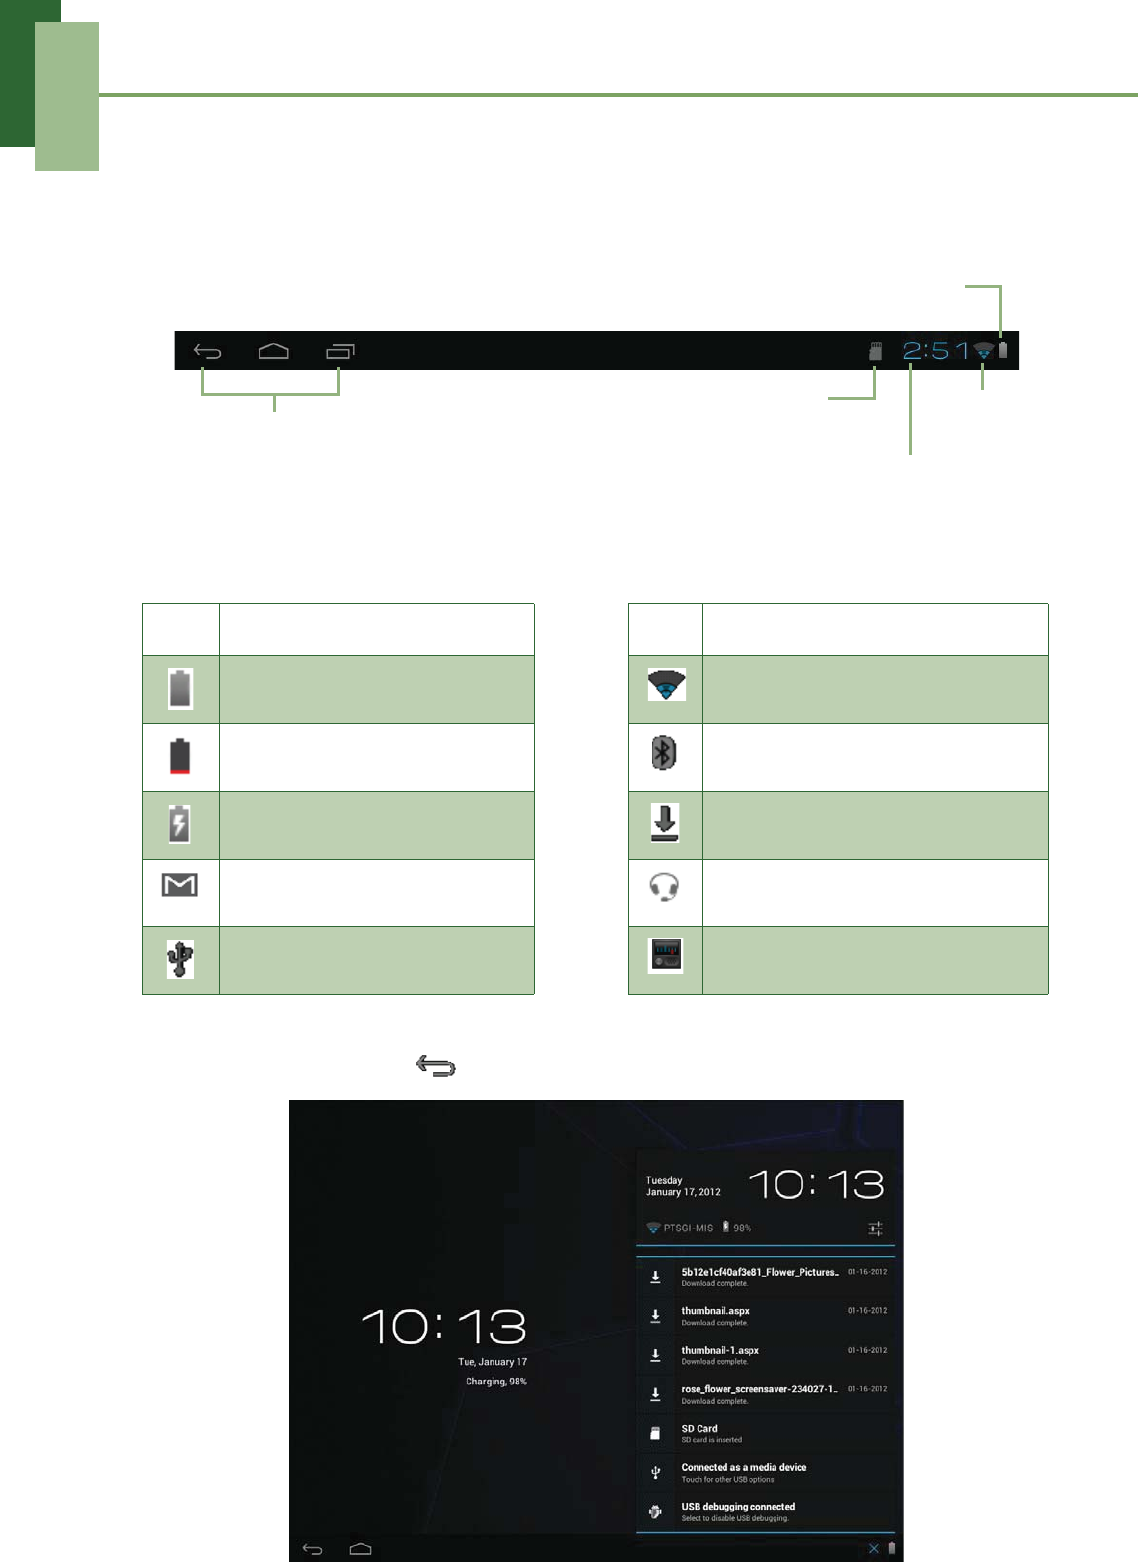
Status Bar Icons
Status bar icons indicate different types of information.
The icons on the status bar indicate the following information:
Tap the status bar and scroll up to view notifications or view system information easily.
To close the window, tap .
Icon Description Icon Description
Battery is full. Wi-Fi is connected.
Battery is low. Bluetooth connection is active.
Battery is charging. File downloading in progress.
New Gmail notification. A headset is connected.
Device is connected to PC via
USB connector. FM Radio is turned on.
Operation icons
(Return/Home/History)
See “Home Screen” on page 6.
Battery icon
Network
icon
Current time
Memory card icon
Chapter 2: The Basics
8
Shortcut menu
The shortcut menu allows you to easily access an application from the Home screen.
To open an application, tap an icon.
Customizing shortcut menu
To add a shortcut:
1. Tap .
2. Tap APPS to display the applications.
3. To add an item, drag the application icon to the specific Home screen.
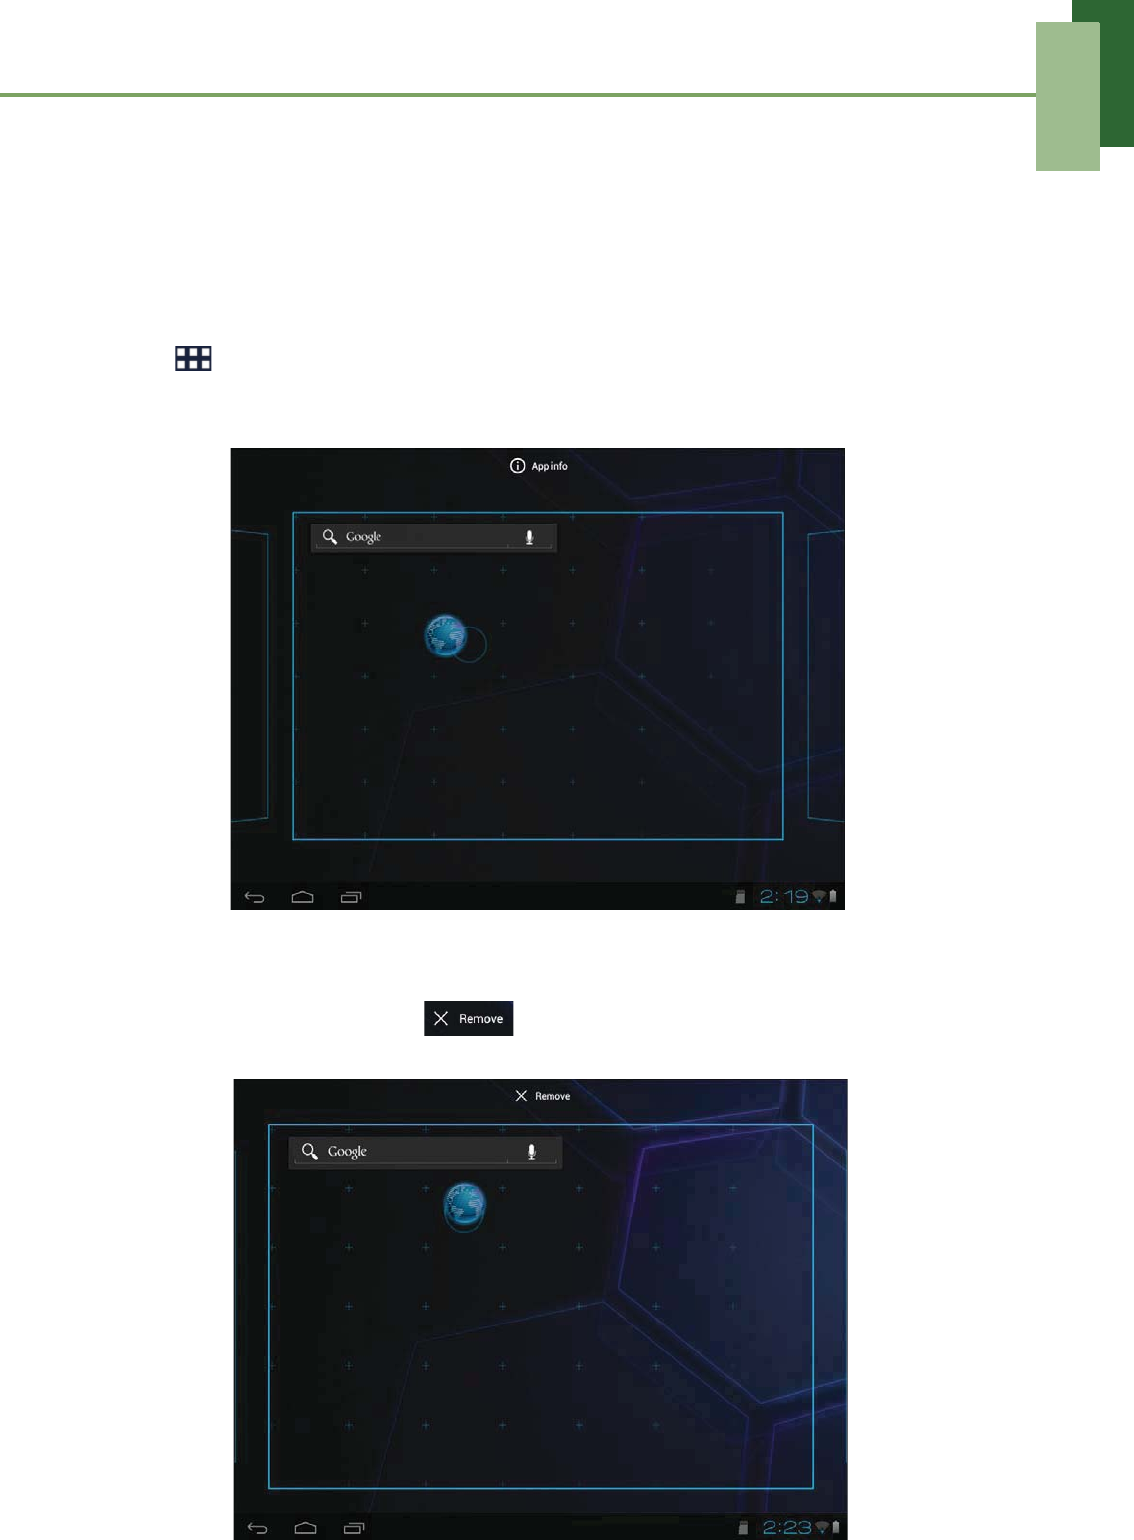
To remove shortcut:
1. Tap and hold an application icon.
2. Drag the application icon to icon to delete. The application icon is
removed from the Home screen.
Chapter 2: The Basics
9
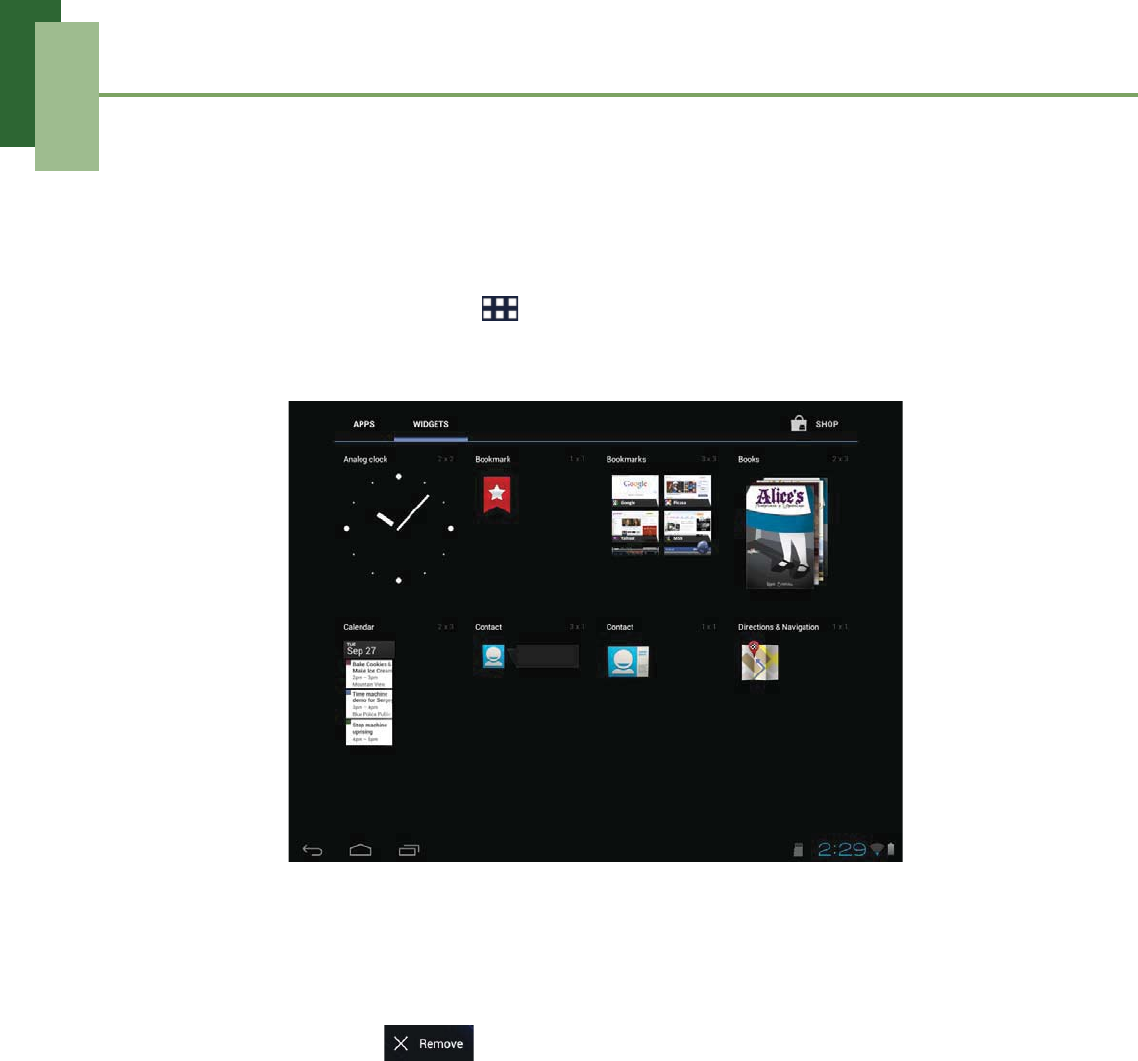
Using widgets
Save time with live updates right on the Home screen and get all your personalized
updates in one place.
You may add and customize the Widgets on the Home screen as you like.
1. From the Home screen, tap .
2. Tap WIDGETS to display the applications.
All available widgets are displayed.
3. To add a widget, drag the widget icon to the specific Home screen.
To remove widgets:
1. From the Home screen, tap and hold the desired widget.
2. Drag the widget to icon to delete it from the Home screen.
Chapter 2: The Basics
10
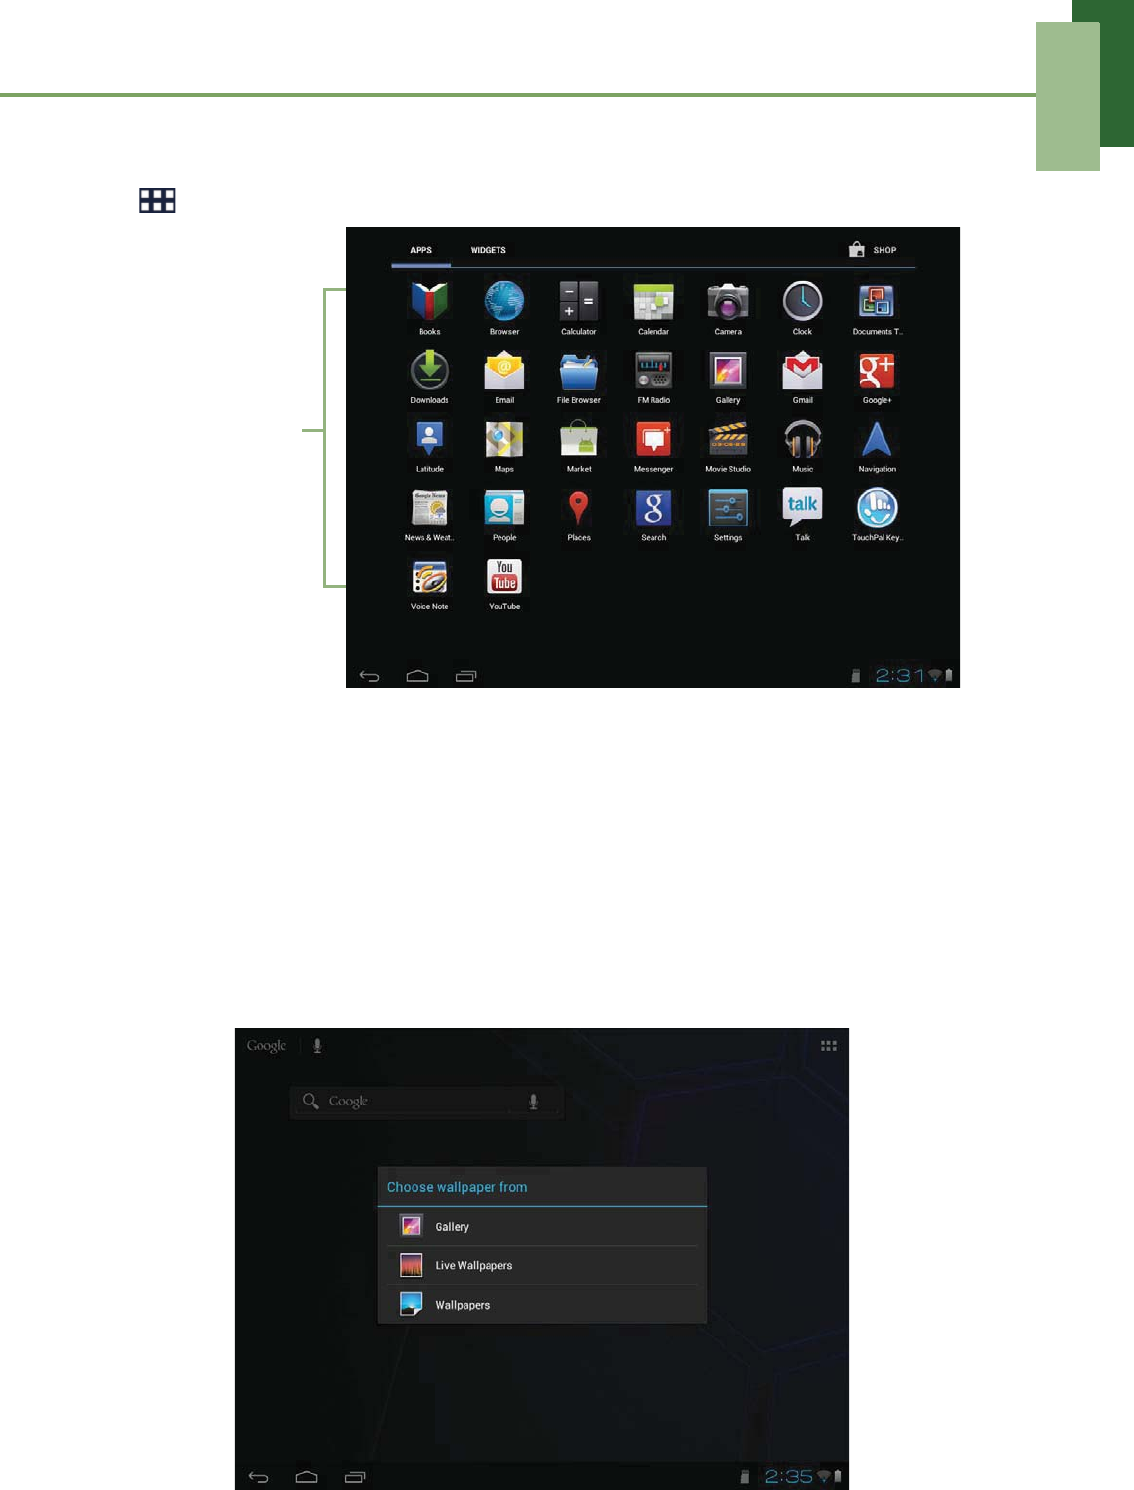
Applications
Tap to view the applications and settings of the device.
Setting wallpaper
You can customize the wallpaper of your Home screen with a default wallpaper or with
pictures taken with your device.
Set wallpaper from My Gallery
1. From the Home screen, tap and hold the screen.
2. Tap Gallery.
3. Browse the files. Tap to select the picture you want to use as wallpaper.
Tap an icon
to access the
application.
Chapter 2: The Basics
11
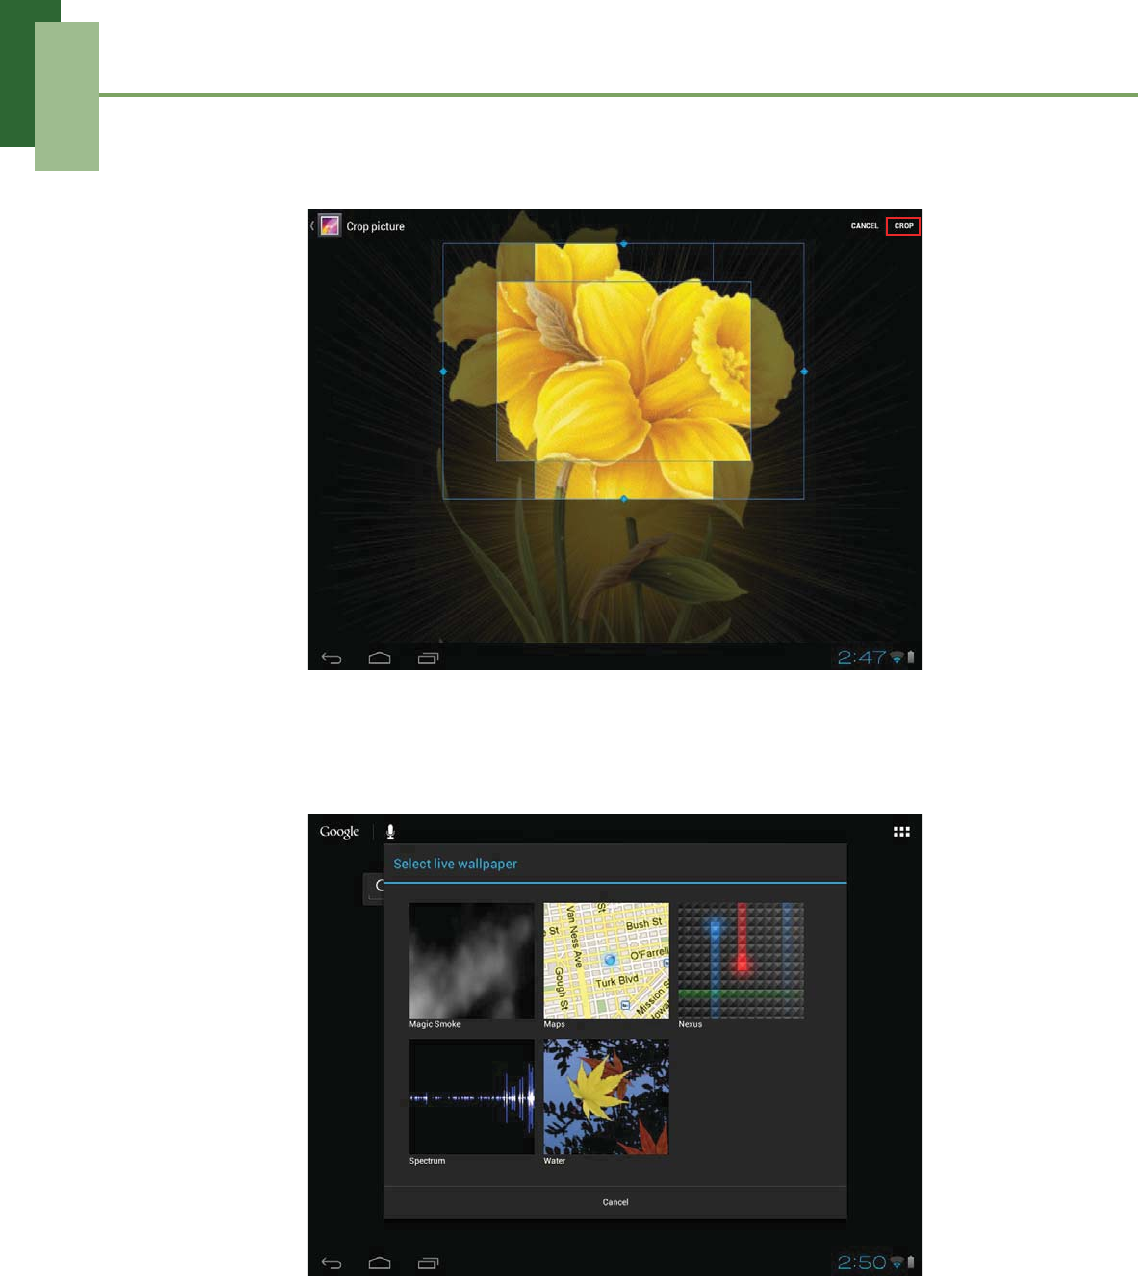
4. Drag your finger to select the crop area.
5. Tap CROP to set the cropped photo as wallpaper.
Set wallpaper from Live Wallpaper gallery
1. From the Home screen, tap and hold the screen.
2. Tap Live Wallpapers.
3. Tap to browse the desired live wallpaper.
4. Tap Set wallpaper to set the desired live wallpaper to set as Home screen
wallpaper.
Set wallpaper from Wallpaper gallery
1. From the Home screen, tap and hold the screen.
2. Tap Wallpapers.
3. Browse the available wallpapers.
Chapter 2: The Basics
12
4. Tap Set wallpaper to set the desired wallpaper to set as Home screen wallpaper.
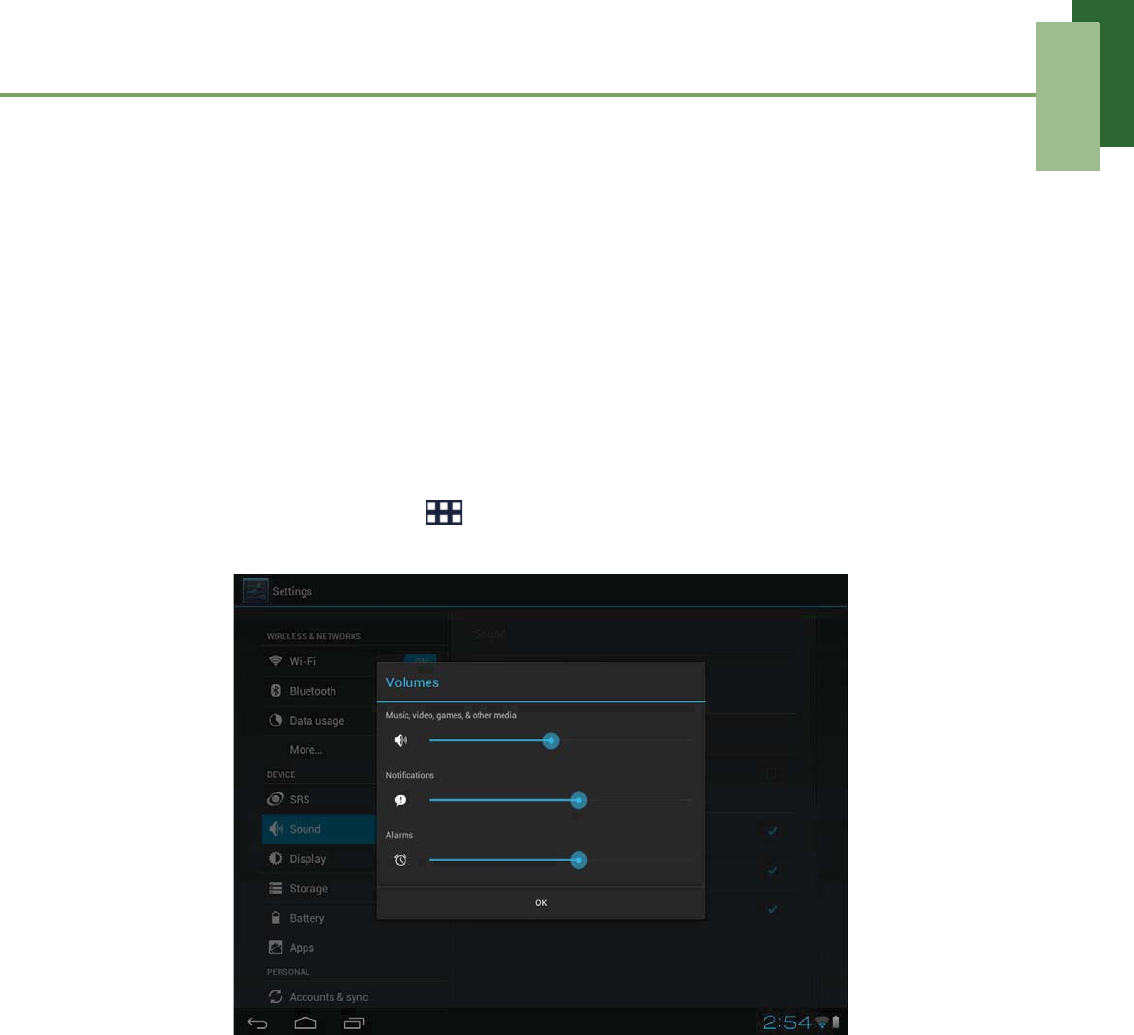
2.2 Adjusting Volume
This device features three types of volume which can be adjusted separately:
•Media volume: Set the volume for music, videos, games and other media.
•Notification volume: Set the volume for notifications.
•Alarm volume: Set the volume for alarms.
To adjust the volume
1. From the Home screen, tap > Settings.
2. On DEVICE, tap Sound > Volumes.
3. To adjust the volume, drag the respective volume slider to adjust the volume.
4. Tap OK to save your settings.
Chapter 2: The Basics
13
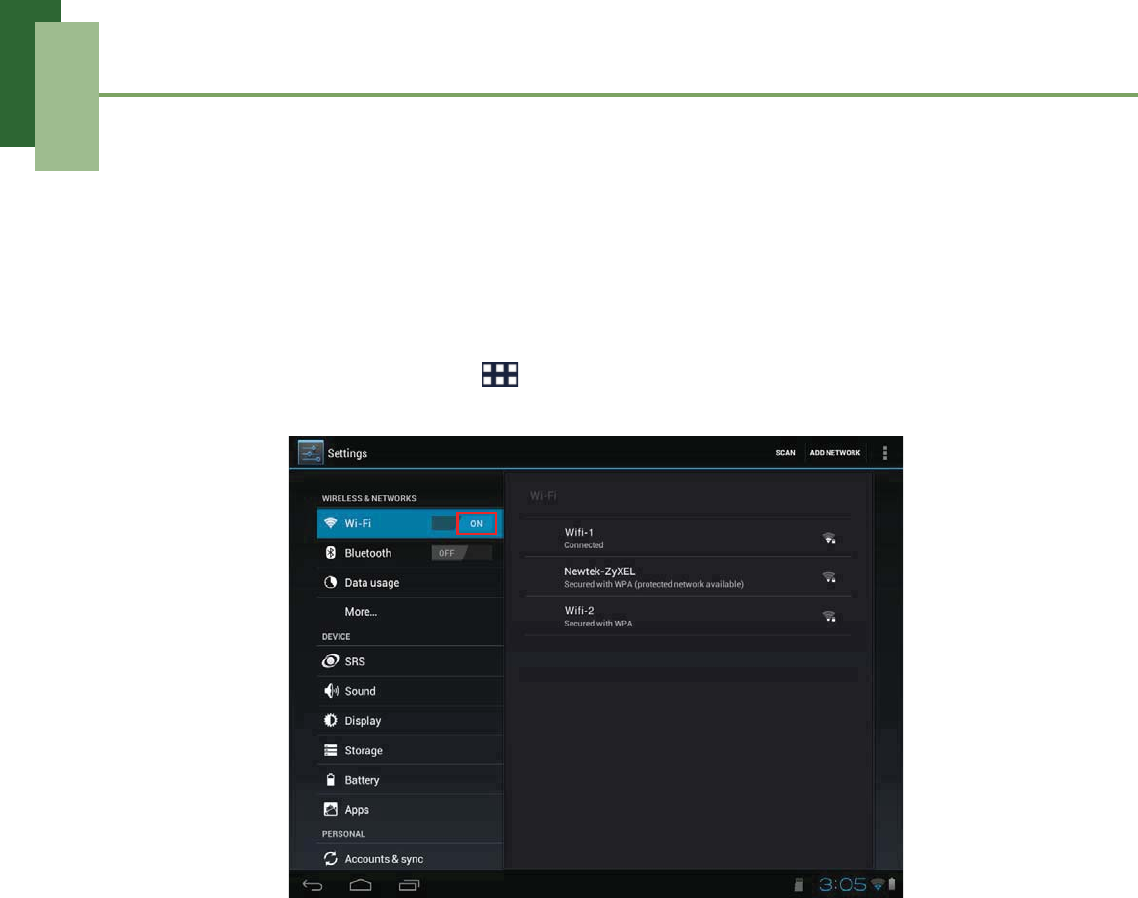
2.3 Setting up Wi-Fi
This device only supports Wi-Fi connection for Internet access. You need to connect
to a wireless network before surfing the Internet or using the related applications that
require Internet connection.
To turn Wi-Fi on
1. From the Home screen, tap > Settings.
2. On WIRELESS & NETWORKS, tap Wi-Fi and set the setting to ON.
To connect to a Wi-Fi network
1. Turn Wi-Fi on.
2. The available networks are listed. Tap a network to connect to.
NOTE: You also can tap ADD NETWORK to manually add a connection.
See “To add Wi-Fi network” on page 14.
3. If you select an unsecured network, the connection is automatically established.
Otherwise, proceed to the next step.
Chapter 2: The Basics
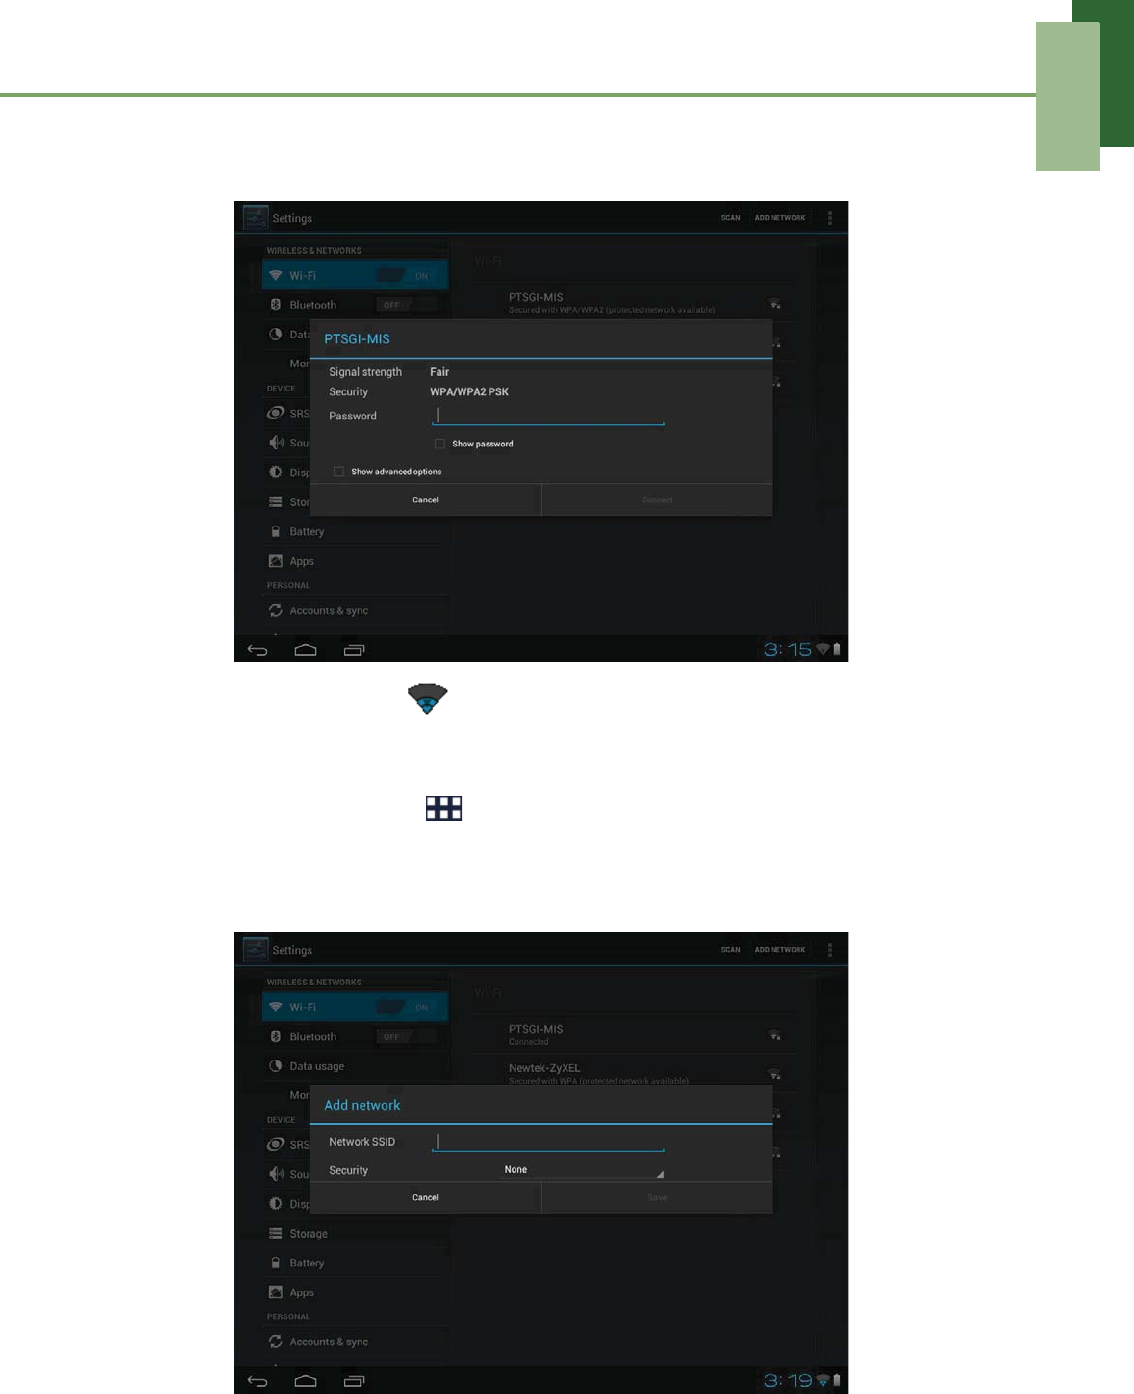
14
4. When connecting to a secured network, you will be prompted for the password.
Enter the password, then tap Connect.
When Wi-Fi is connected, the connection icon is displayed on the status bar.
To add Wi-Fi network
1. From the Home screen, tap > Settings.
2. In Wi-Fi networks, tap ADD NETWORK. A new window is displayed.
3. Follow the on-screen instructions and enter the necessary information, then tap
Save to save the settings.
Chapter 2: The Basics
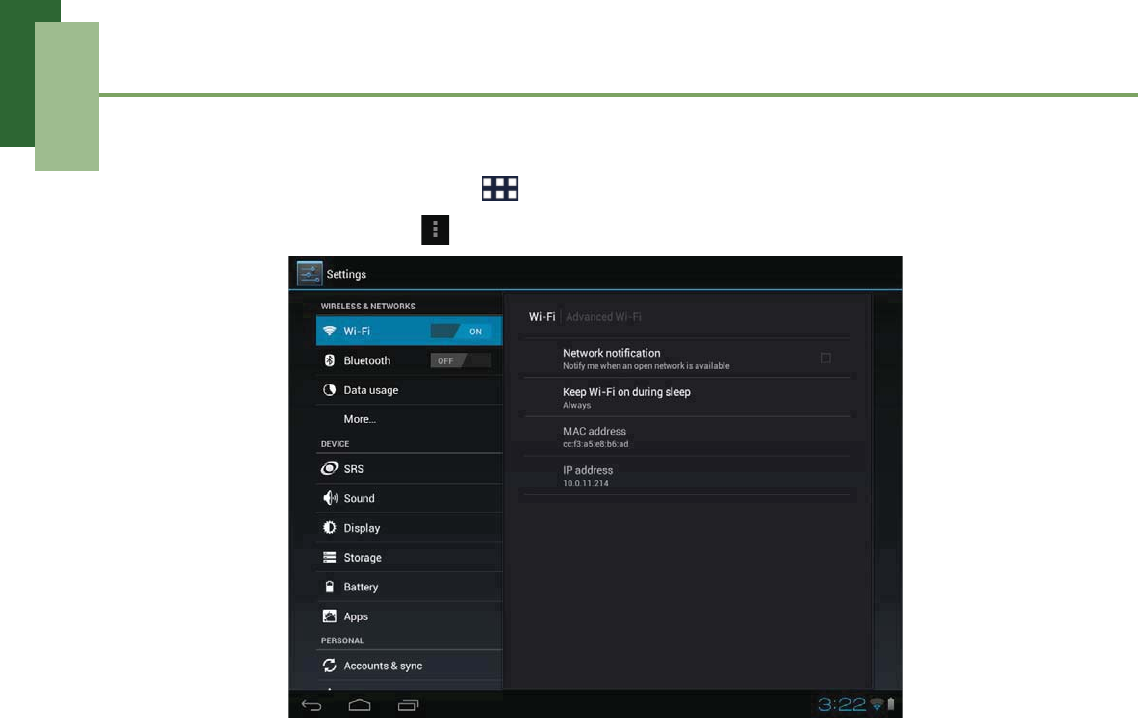
15
To view Wi-Fi settings
1. From the Home screen, tap > Settings.
2. In Wi-Fi networks, tap > Advanced.
Network information appears on the screen.
Chapter 2: The Basics
16
2.4 People
People lets you store names, phone numbers, email, and other information. You can
also add the frequently used contacts to the Favorites list. See “Favorite contacts” on
page 18.
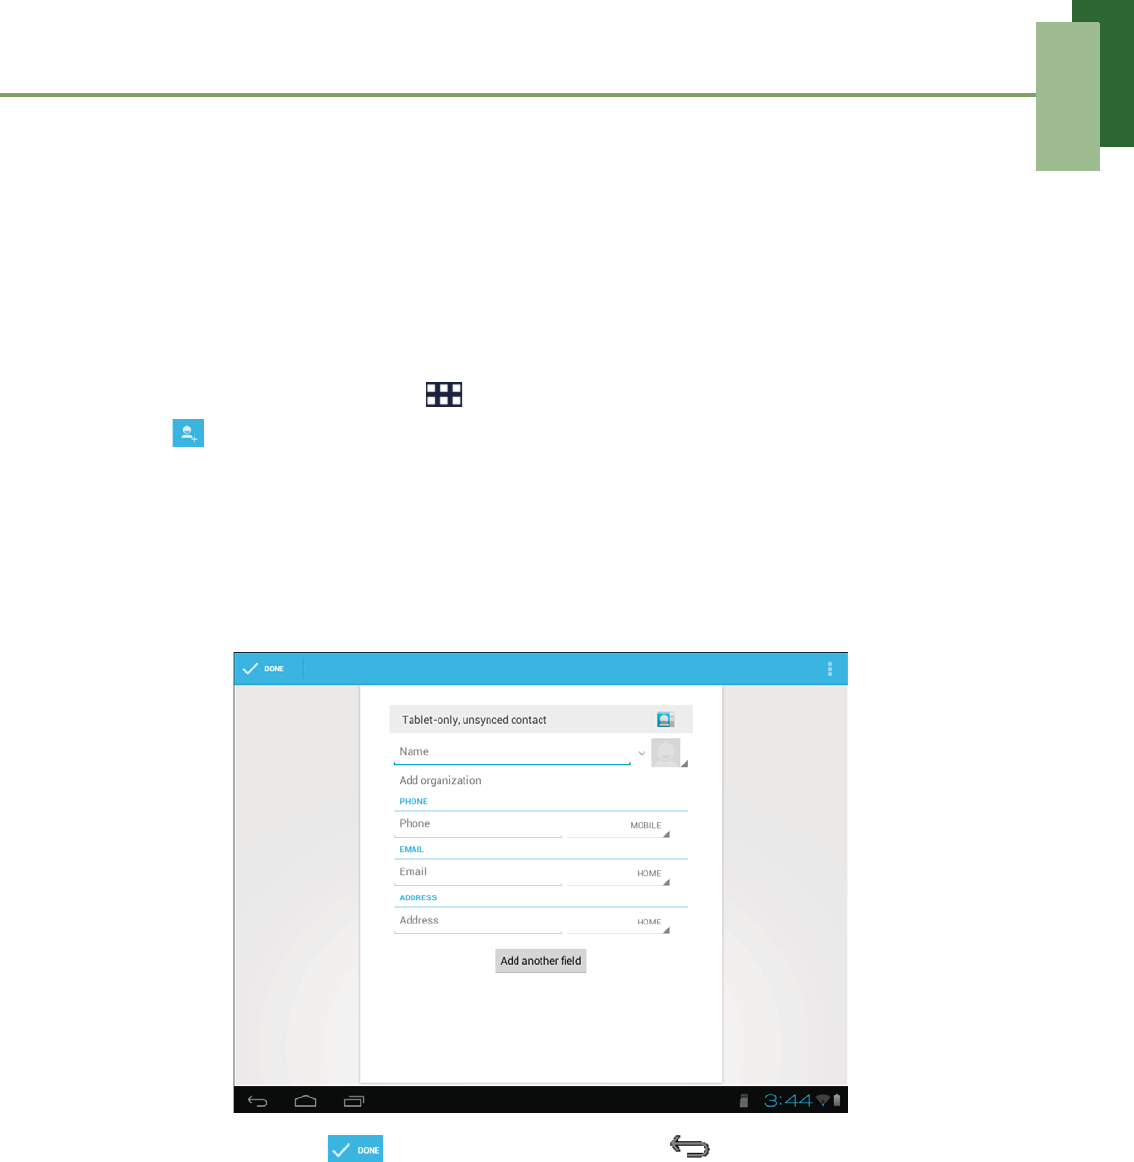
Adding contacts
1. From the Home screen, tap > People.
2. Tap to add a contact.
NOTE: If the contact list is empty, tap one of the following:
• Create a new contact: to save the contact to the device memory.
• Sign in to an account: to retrieve the contacts stored on a corporate or
Google account.
• Import/export contacts: to import/export contacts from/to the storage.
3. Enter contact information such as name, phone number, email address, etc.
4. When finished, tap to save the contact or tap to exit without saving any
changes.
Chapter 2: The Basics
17
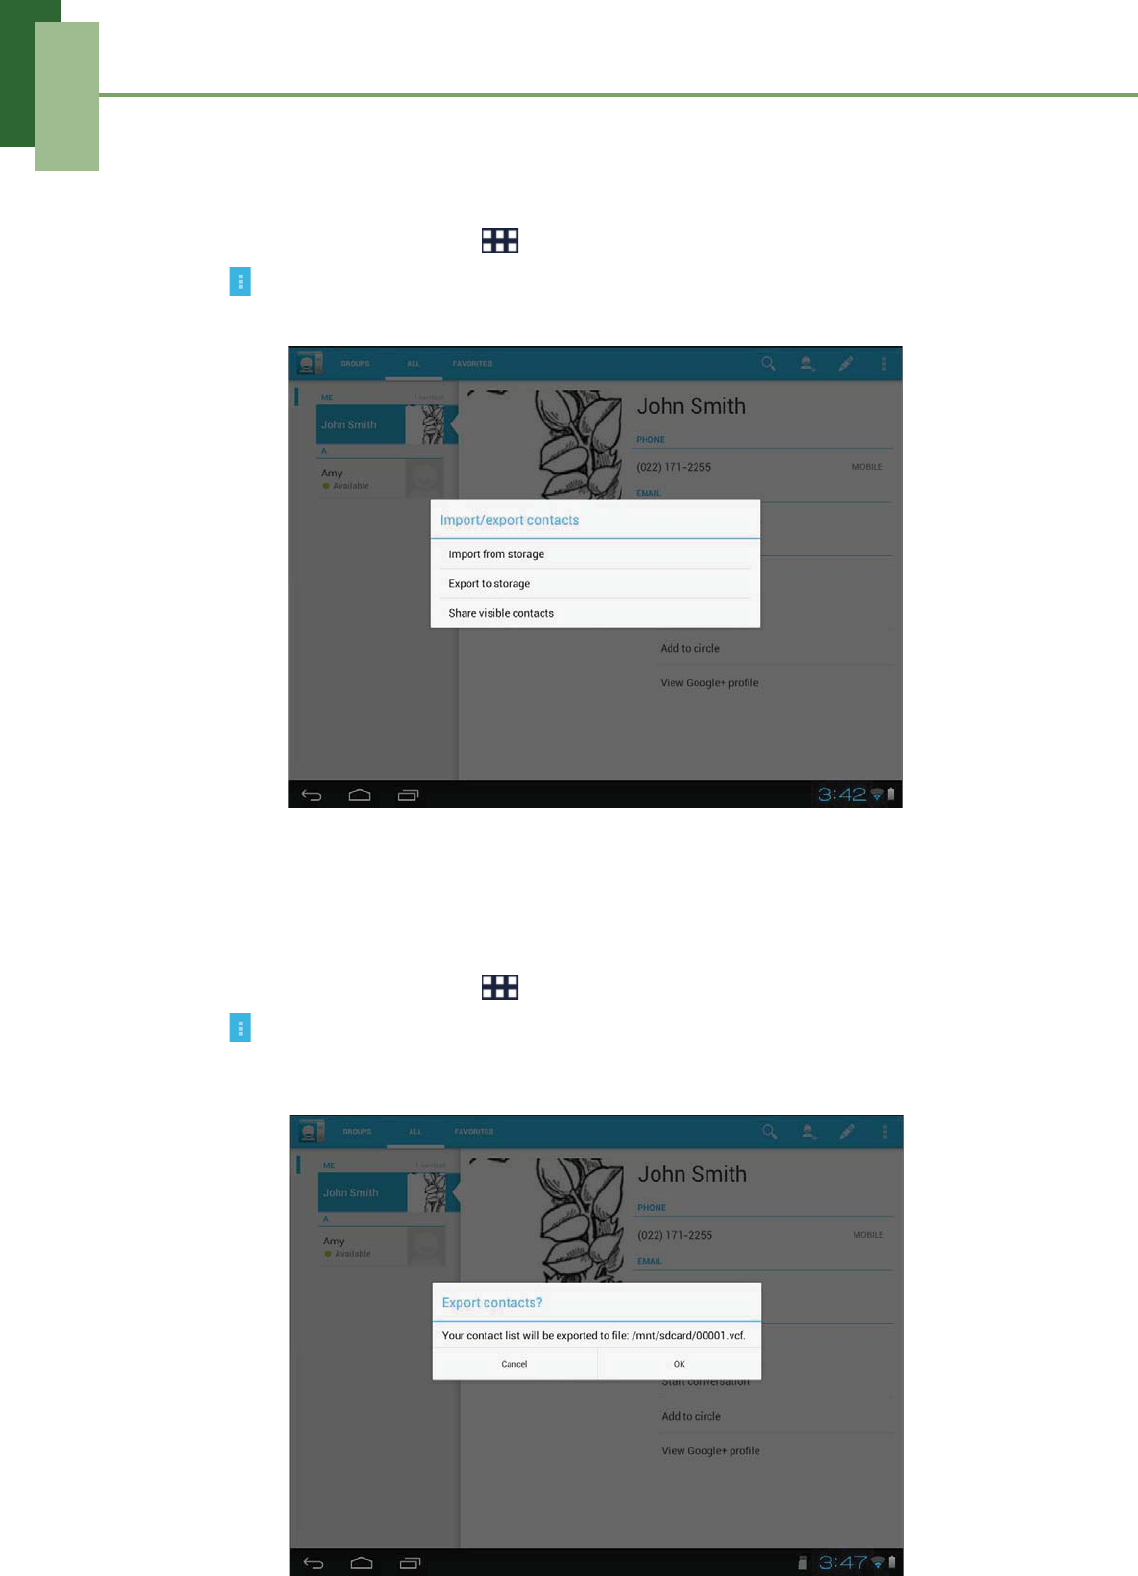
Importing contacts
You can import contacts from the memory card to your device.
1. From the Home screen, tap > People.
2. Tap > Import/export.
3. Select Import from storage.
4. Select the vCard files to import and tap OK.
Backing up contacts
You can copy contacts to the memory card to back up your contacts information.
1. From the Home screen, tap > People.
2. Tap > Import/export > Export to storage.
3. A warning message pops up, tap OK to proceed. All contacts are copied to the
memory card.
Chapter 2: The Basics
18
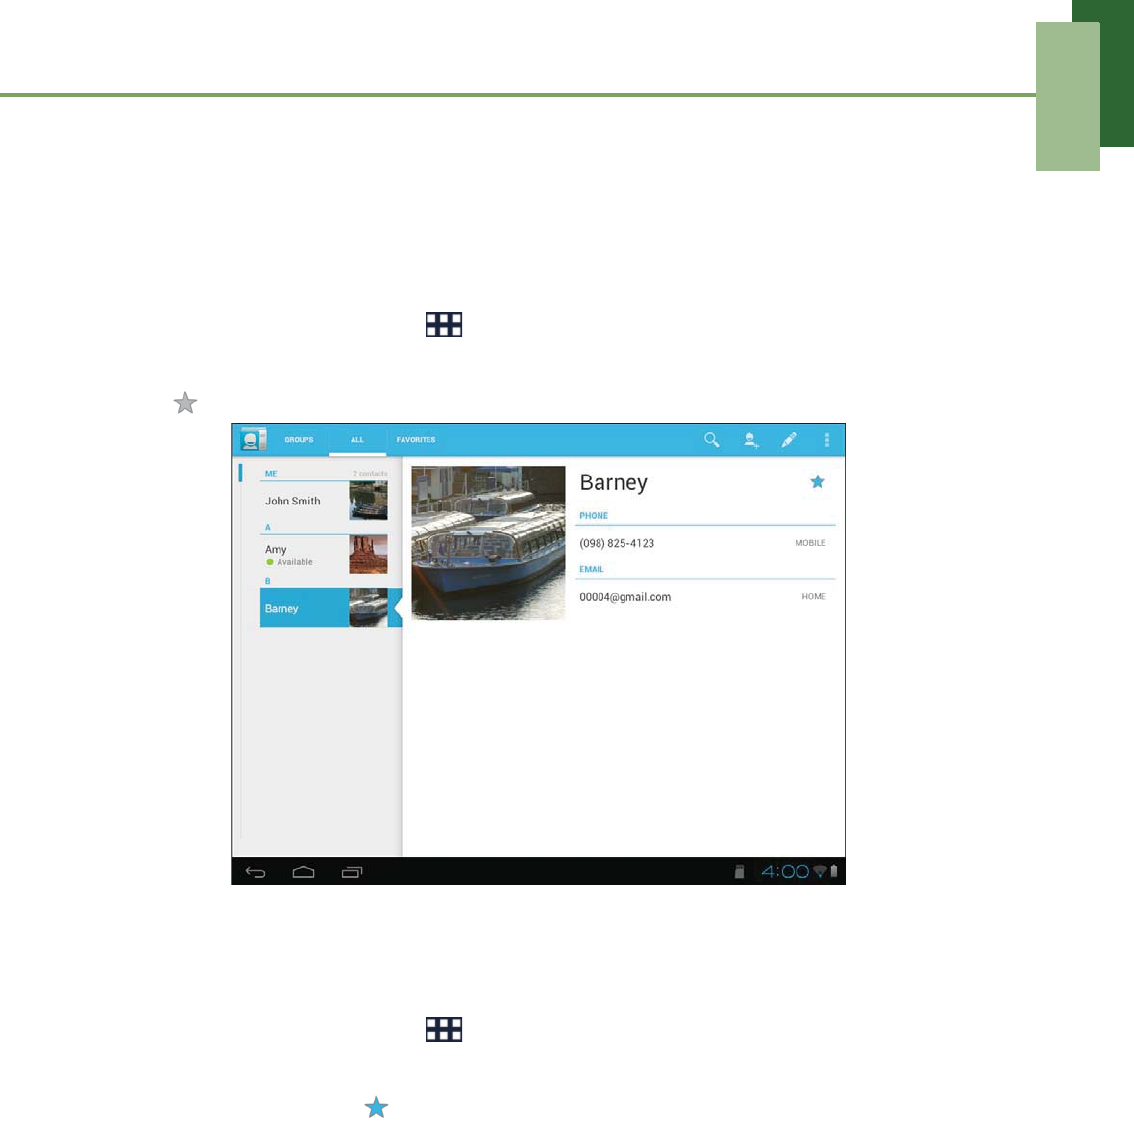
Favorite contacts
Add the most frequently called contacts to the FAVORITES list to help you access
contacts quickly and easily.
Add to Favorites List
1. From the Home screen, tap > People.
2. Tap ALL tab and select a contact.
3. Tap and the icon turns blue.
The contact is now displayed in the FAVORITES list.
Remove from Favorites List
1. From the Home screen, tap > People.
2. Tap ALL tab and select a contact.
3. Tap a contact and tap .
The contact is removed from the FAVORITES list.
Chapter 3: Entering Information
19
Chapter 3: Entering Information
3.1 On-Screen Keyboard
The on-screen keyboard appears when an application requires text input, such as
messaging and writing emails. The keyboard input method is activated by default.
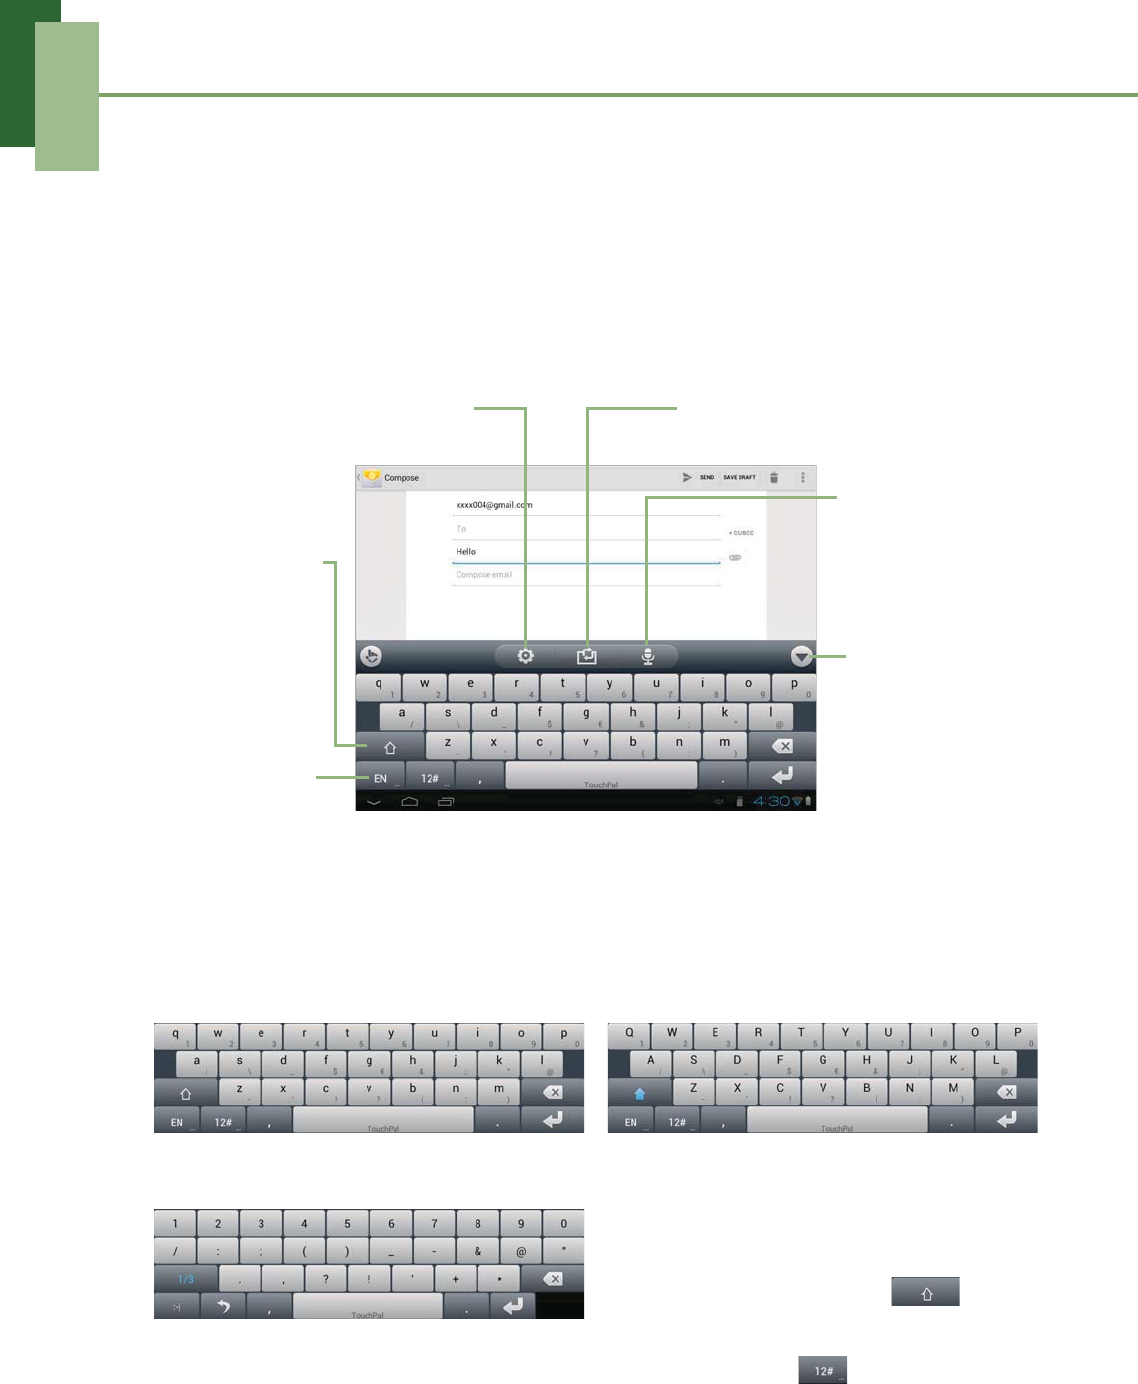
Using the on-screen keyboard
Tap the screen to display the on-screen keyboard.
Lowercase keyboard Uppercase keyboard
• Tap the keys to enter the characters.
• To toggle between upper and lower
case letter display, tap .
• To display the numeric and symbols
keyboard, tap .
Numbers and symbols
CAPs Lock
selector:
Tap to toggle
between upper
case or lower
case text input
method.
Voice input:
Tap for voice
input.
Tap to hide
the on-screen
keyboard.
Language
selector:
Tap to switch
language.
Tap to switch keyboard layout.
Tap to access
keyboard settings.
Chapter 3: Entering Information
20
Setting input method
1. On the on-screen keyboard, tap .
2. Change the necessary keyboard settings.
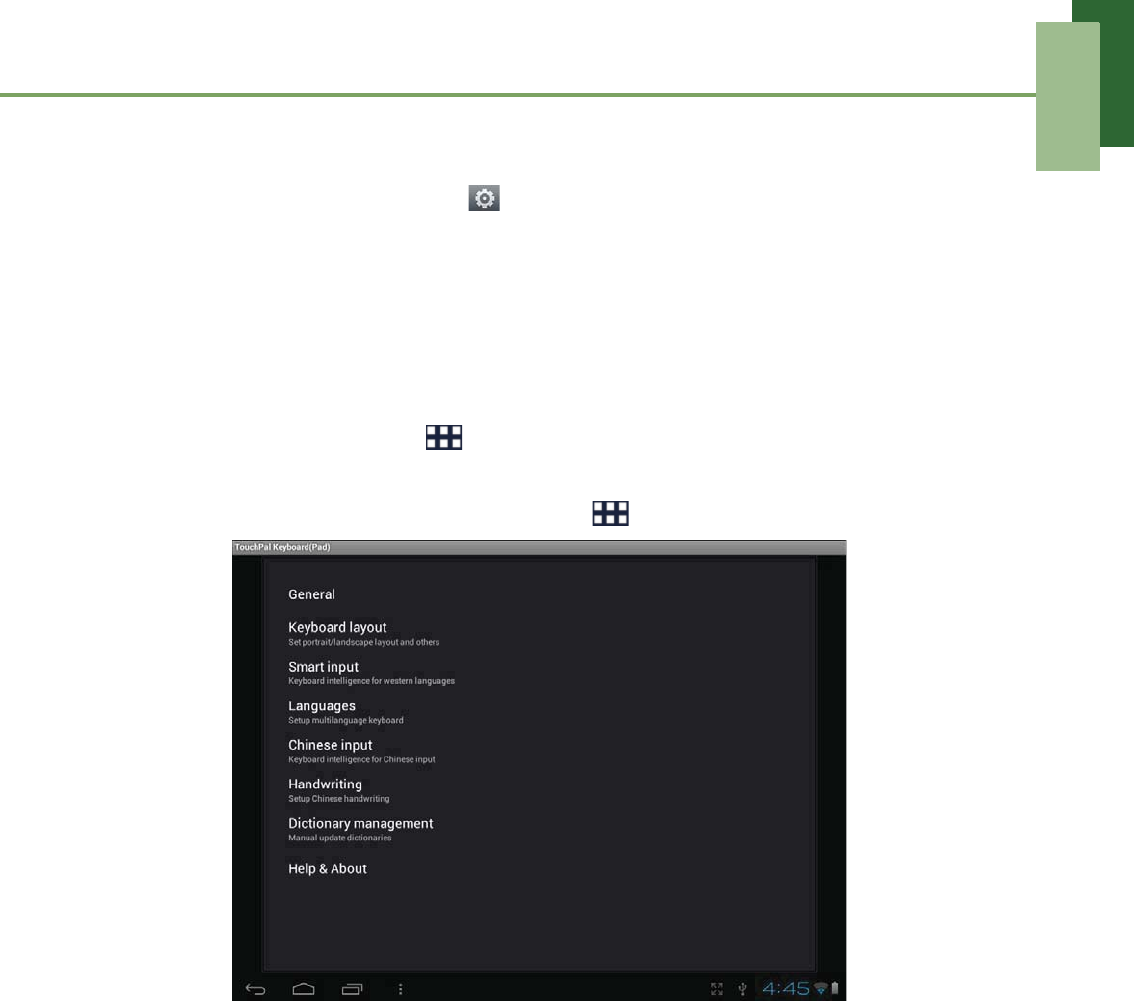
3.2 Configuring Keyboard Settings
Use keyboard aids to set up various input settings.
1. From the Home screen, tap > Settings.
2. On PERSONAL, tap Language & Input > TouchPal Keyboard(Pad).
You can also access this setting by tapping > TouchPal Keyboard.
3. Select the applicable options from the following keyboard settings:
• General: Select to adjust the volume level of the clicking sound or the
vibration amplitude level when a key is touched, enable popup effect when a
key is touched, show alternative symbol on buttons, or adjust the keyboard
height.
• Keyboard layout: Select to configure the portrait/landscape layout and other
keyboard layout settings.
• Smart input: Select to enable word prediction, predict new word, correct
mistyping, spell check, adaptive learning, and context prediction.
• Languages: Select to set the keyboard language.
• Chinese input: Select to enable large Chinese charset, input next word by
space, stroke filtering, Traditional Chinese mode, and configure fuzzy PinYin.
•Handwriting: Select to configure Chinese handwriting.
• Dictionary management: Select to manage user dictionary.
Chapter 4: Email
21
Chapter 4: Email
Use Email to send and receive email messages via your internet email accounts.
4.1 Email Accounts
Your device can send and receive emails just as you do with a computer. Your device
supports email accounts provided by an Internet Service Provider (ISP) or web-based
email, such as Hotmail, Yahoo! Mail, etc.
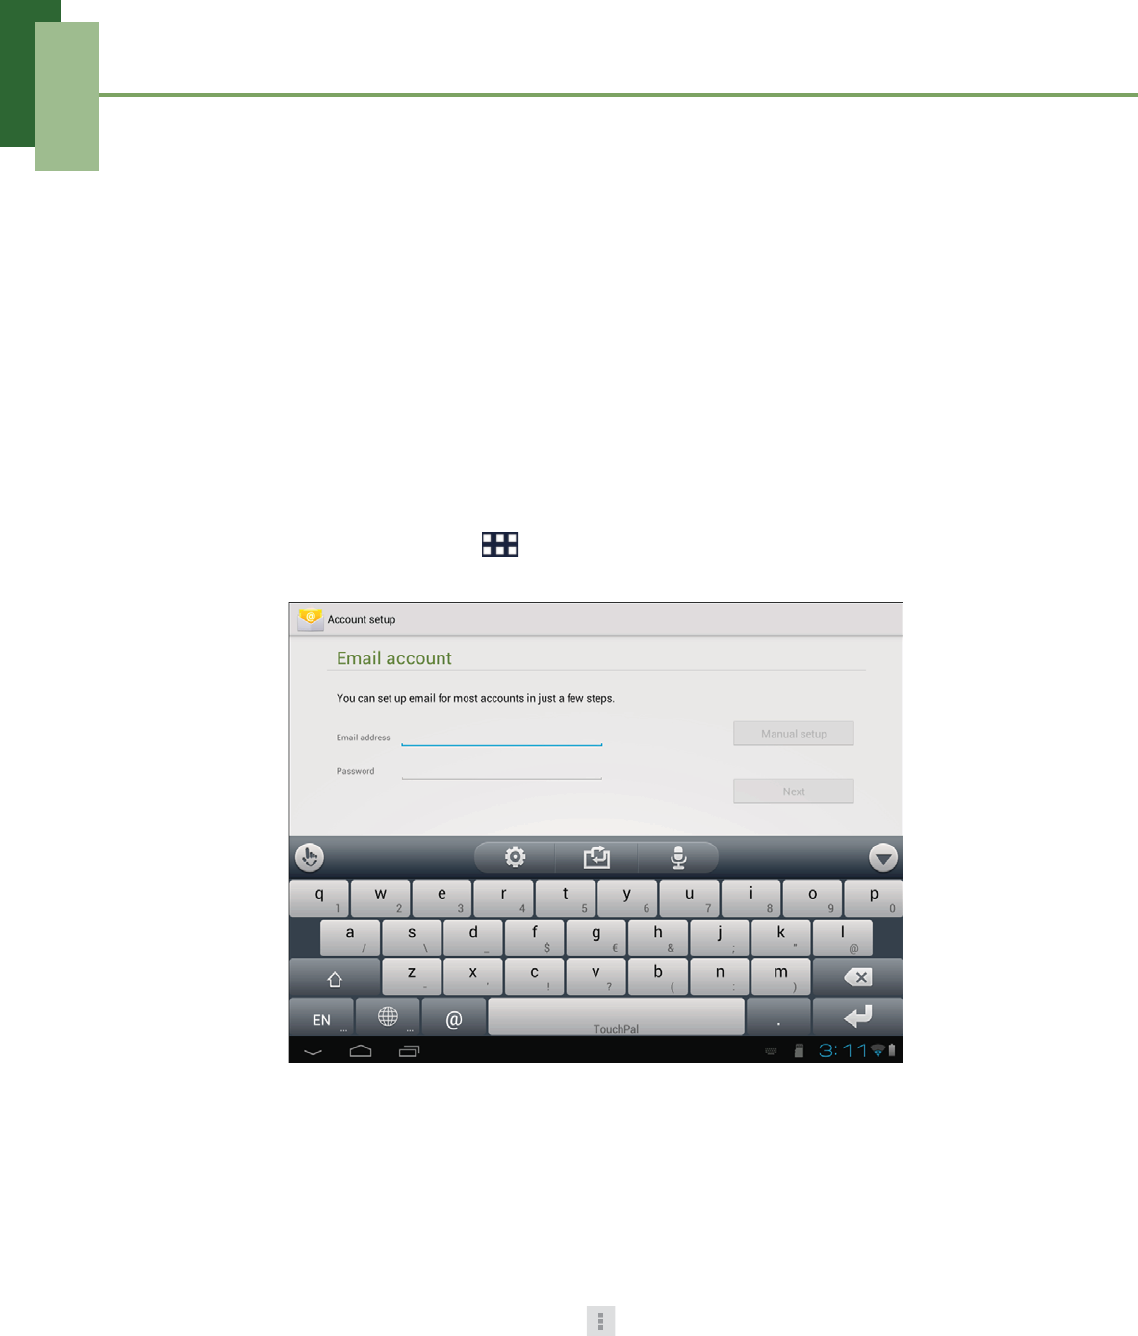
Setting up an Internet email account
1. From the Home screen, tap > Email.
2. Enter your Email address and Password.
3. Tap Next. The device will automatically retrieve the email settings.
4. Set your account options and tap Next.
5. Enter Your Name and Account display name.
NOTE: The Account display name is the name shown to the recipients of your
emails.
6. Tap Next. Once the account set up is completed, the device will automatically
retrieve your emails.
• To add another email account, tap > Settings > ADD ACCOUNT.
Chapter 4: Email
22
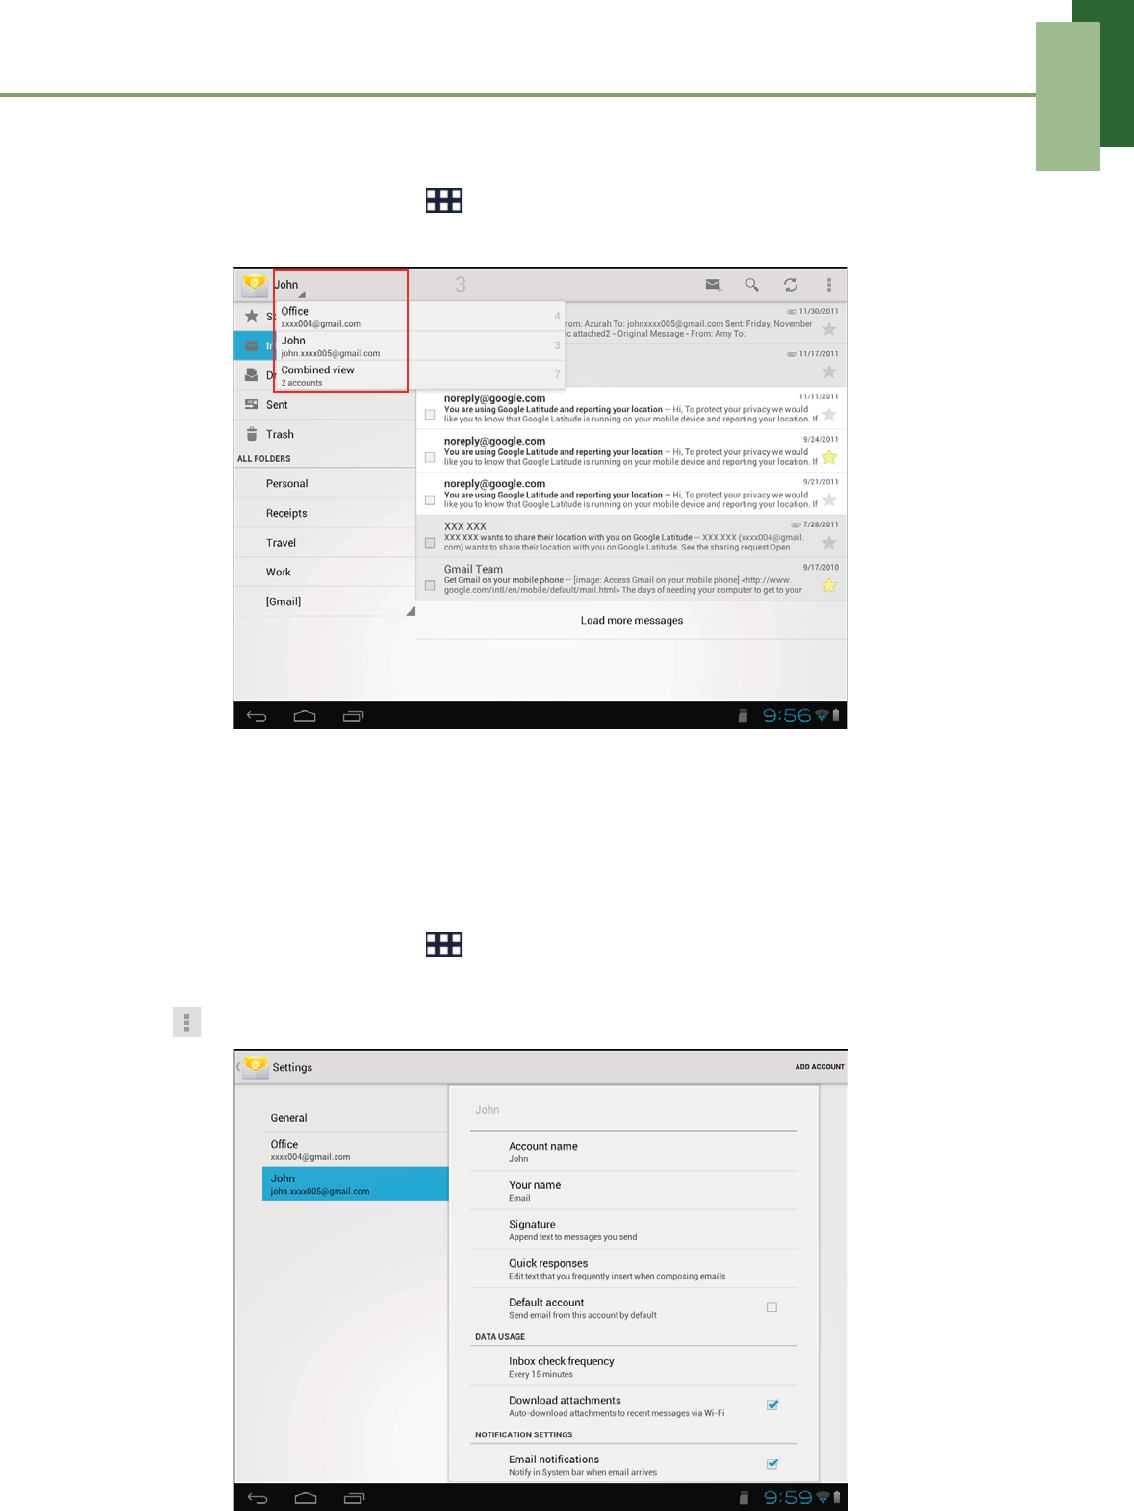
Viewing email accounts
1. From the Home screen, tap > Email.
2. Tap the account picker box at the top left of the screen.
3. Tap the account you want to access from the available email accounts.
Customizing email settings
Configure message settings using the Account settings menu.
1. From the Home screen, tap > Email.
2. Tap the account you want to access.
3. Tap > Settings to open the email setting menu.
Chapter 4: Email
23
4.2 Using Email
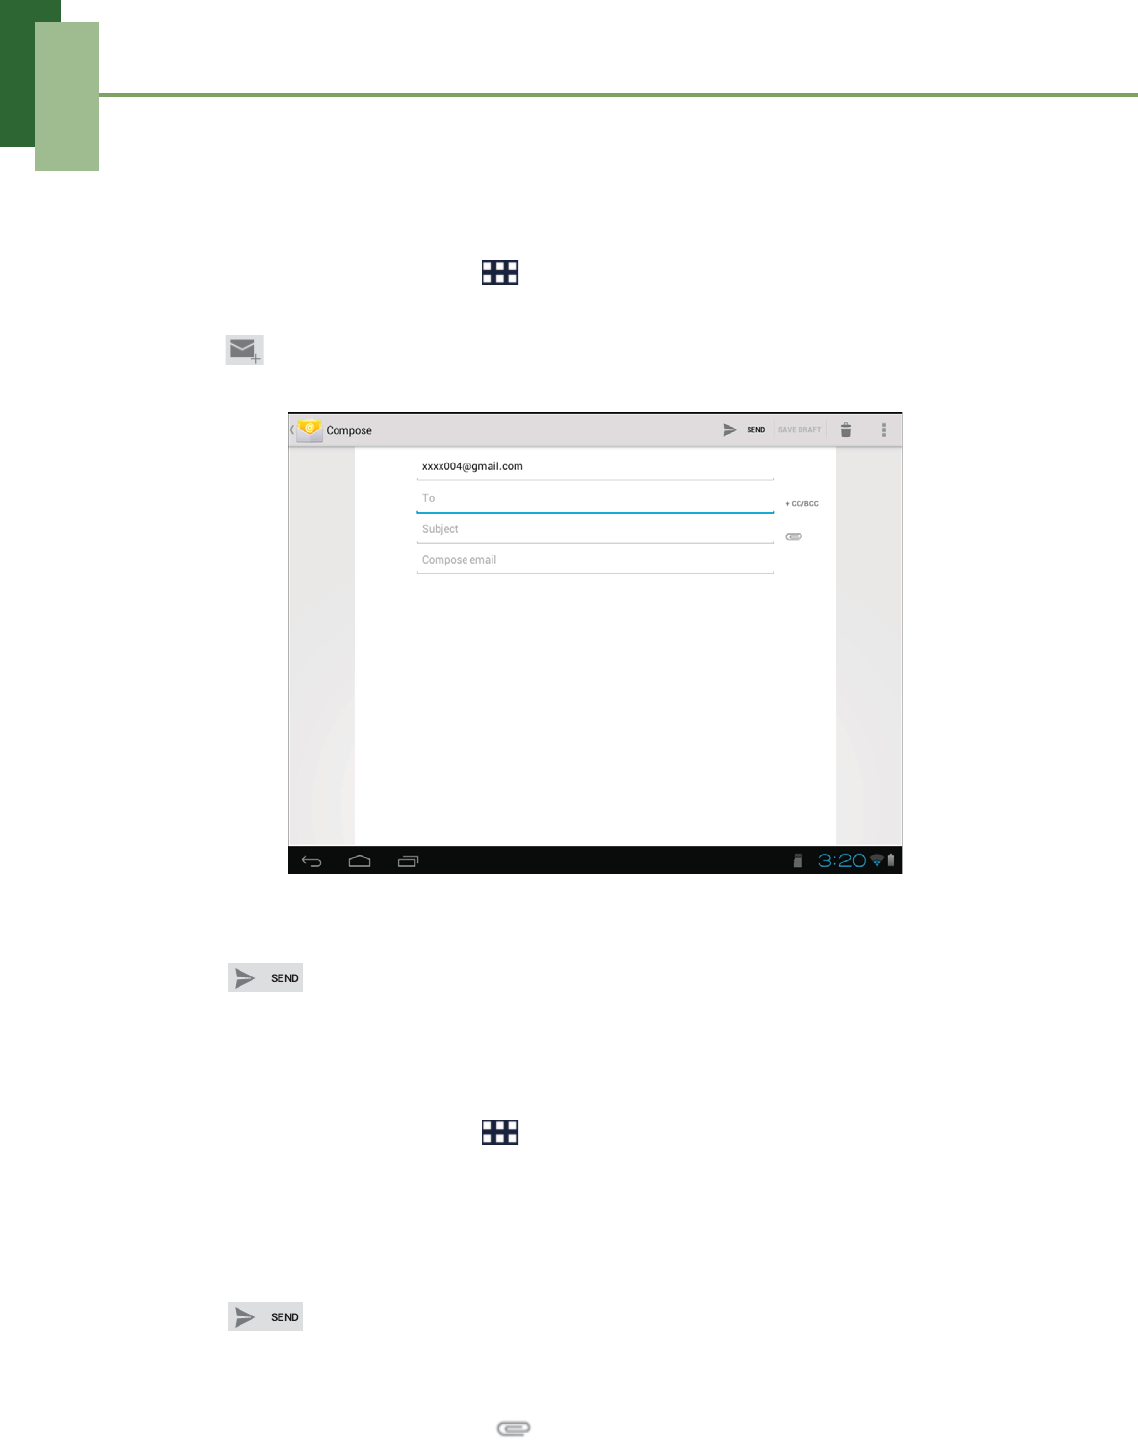
Composing and sending emails
1. From the Home screen, tap > Email.
2. Tap an email account.
3. Tap .
4. In the To field, enter the recipient’s email address.
5. Enter a Subject.
6. Compose your email.
7. Tap .
Sending an email from People
You can send an email to a contact with an email address stored in People.
1. From the Home screen, tap > People.
2. Tap a name to open contact.
3. On EMAIL, select the email address that you want to send an email to.
4. Enter a Subject.
5. Compose your email.
6. Tap .
Adding attachments to an email message
1. On the Compose screen, tap .
2. Select the file that you want to attach.
Chapter 4: Email
24
Receiving emails
Emails are automatically received in your Inbox when the device connects to a
wireless network.
To manually receive emails
1. From the Home screen, tap > Email.
2. Tap an email account.
3. Tap .
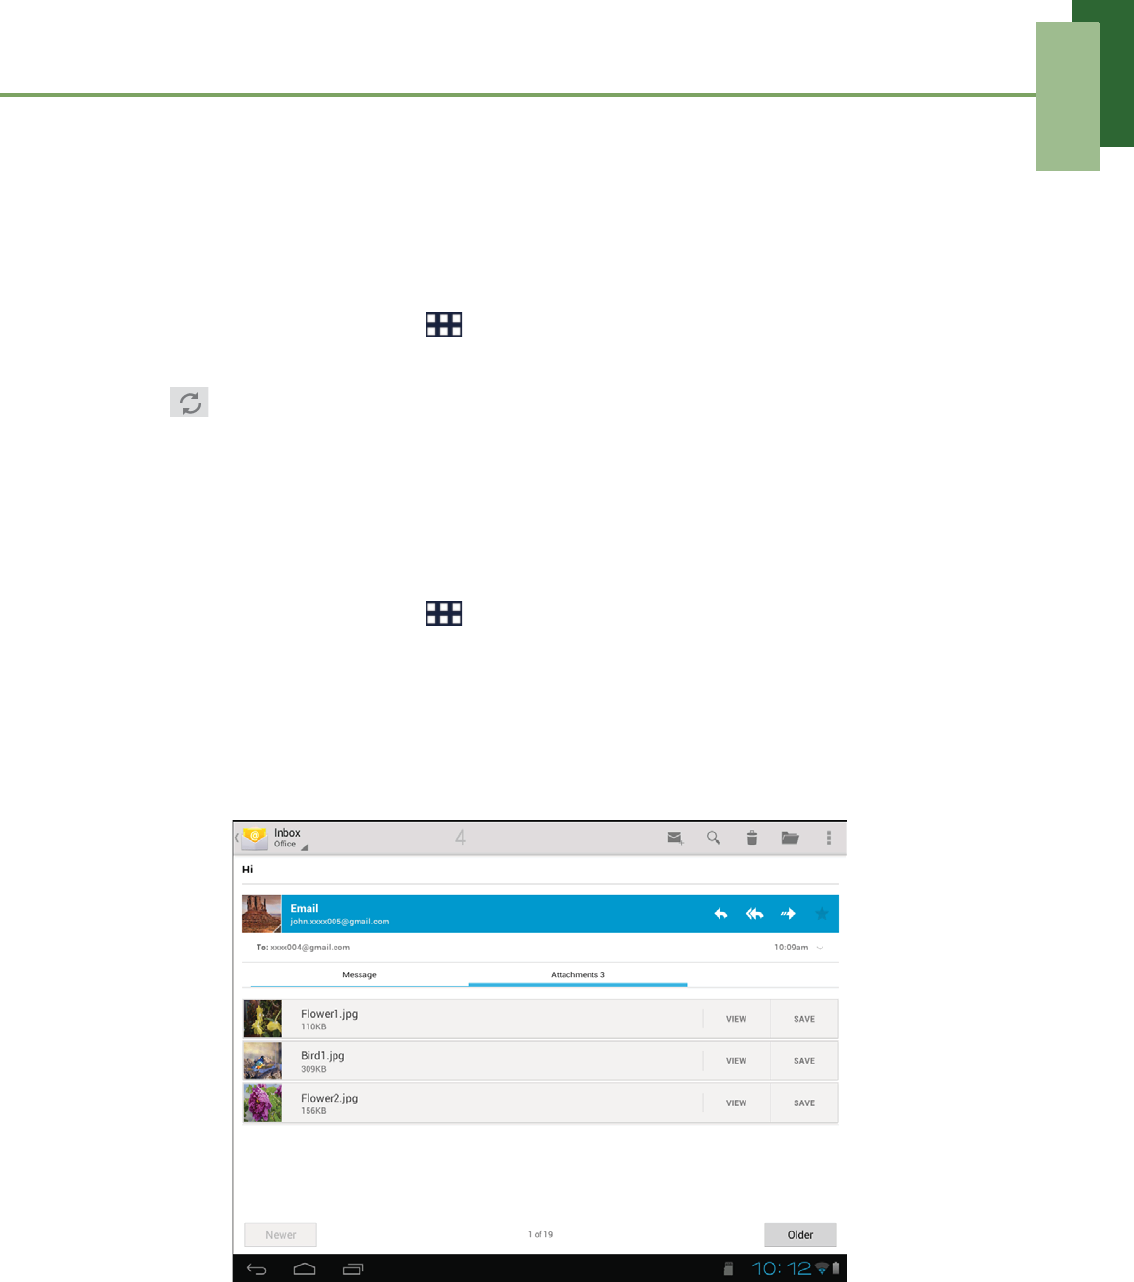
Reading and replying to emails
Inbox displays email headers. Download the email to view the complete content.
To download attachments
1. From the Home screen, tap > Email.
2. Tap an email account.
3. Tap a message to open.
4. Tap the Attachment tab and do any of the following:
• Tap VIEW to view the attachment.
• Tap SAVE to save the attachment.
NOTE: Only supported file types can be opened on the device.
Chapter 4: Email
25
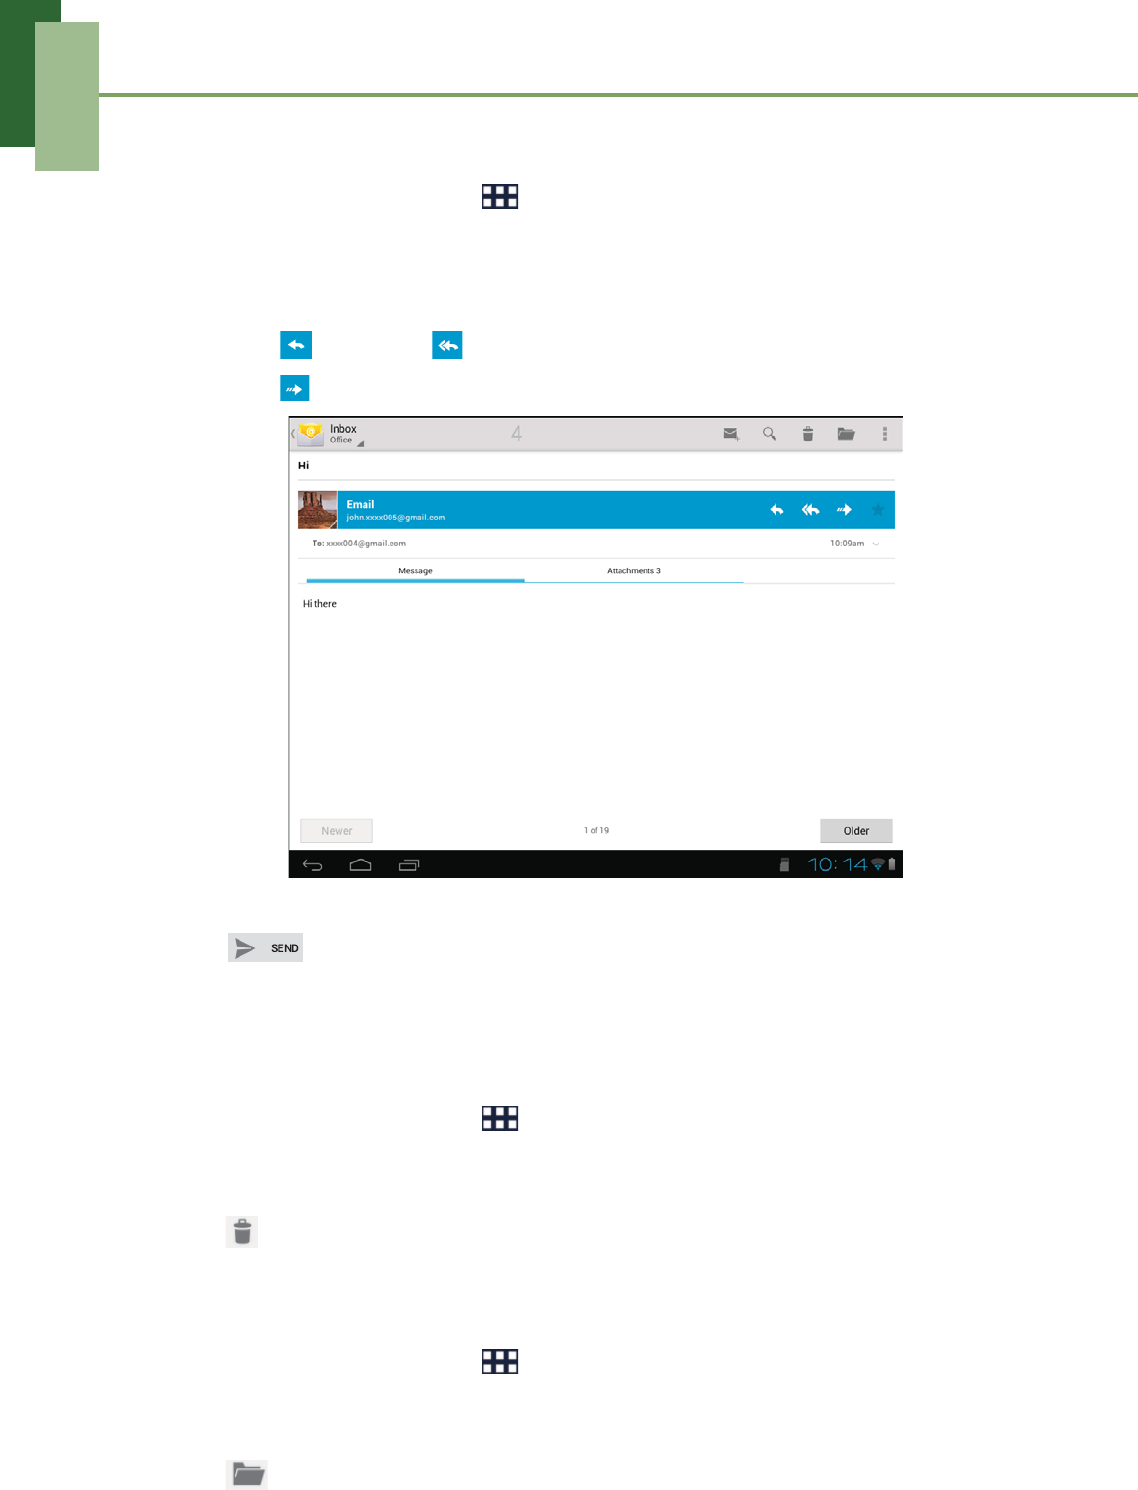
To reply or forward an email
1. From the Home screen, tap > Email.
2. Tap an email account.
3. Tap a message to open.
4. Do any of the following:
• Tap (Reply) or (Reply all) to reply the email.
• Tap (Forward). Then enter the recipient in the To field.
5. Compose your message.
6. Tap .
Managing email folders
To delete an email
1. From the Home screen, tap > Email.
2. Tap an email account.
3. Tap a message to open.
4. Tap to delete an email.
To move an email to a folder
1. From the Home screen, tap > Email.
2. Tap an email account.
3. Tap a message to open.
4. Tap and tap the desired folder to move the current email to the selected
folder.
Chapter 4: Email
26
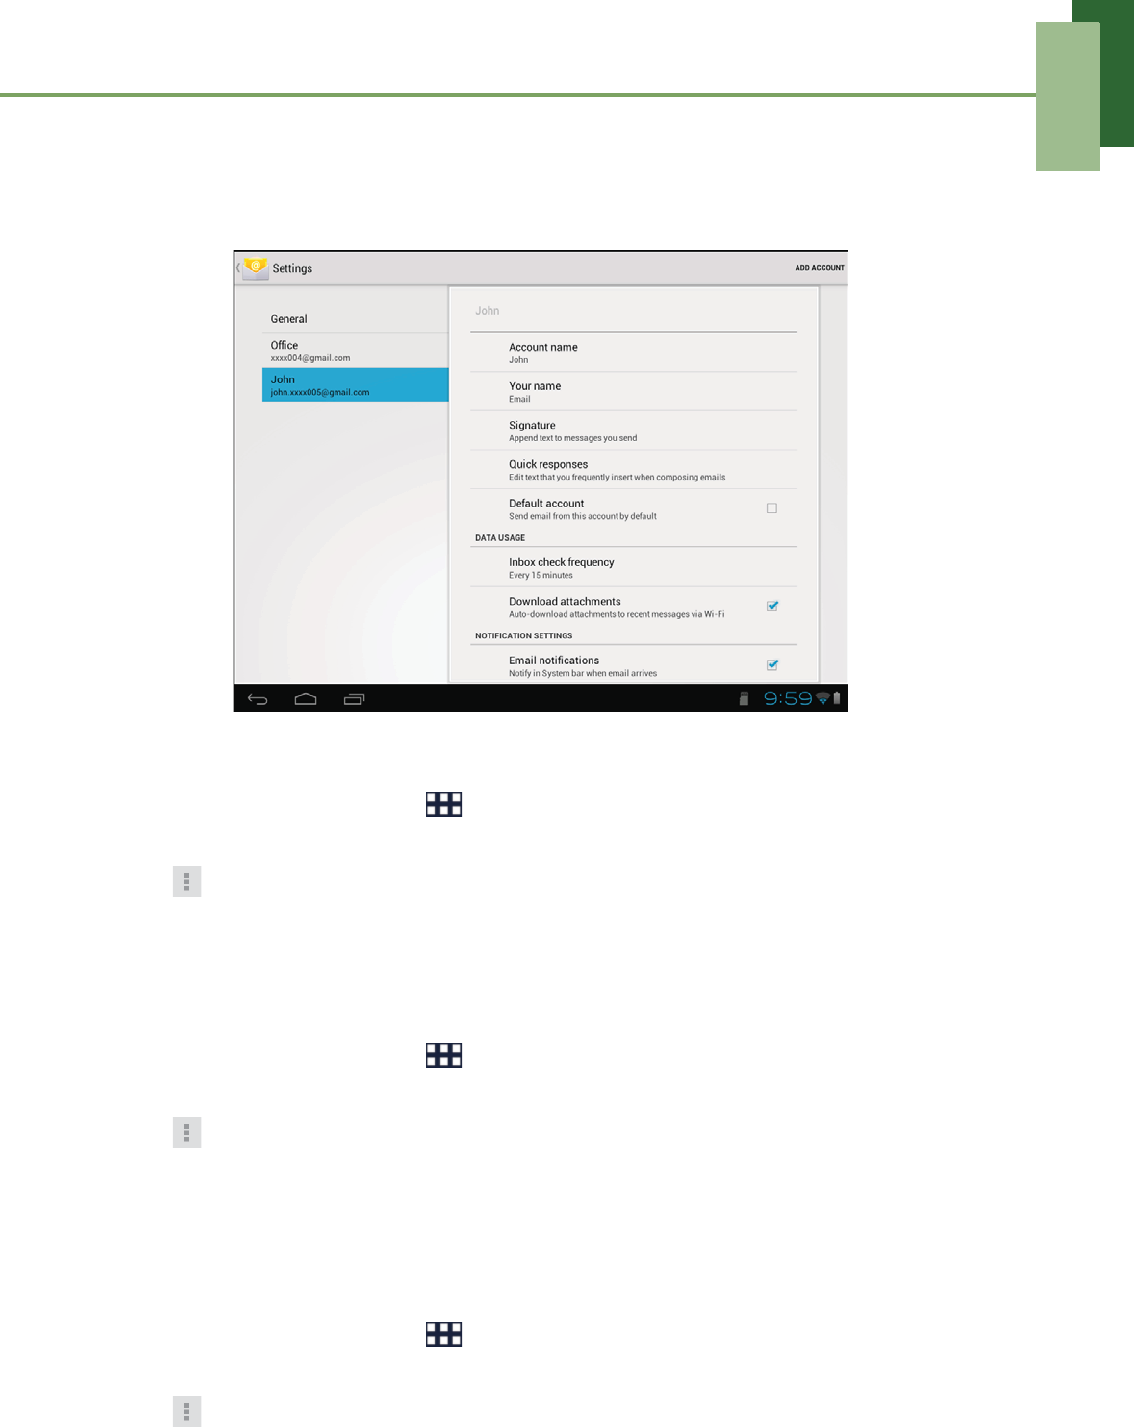
Customizing email settings
You can configure the general settings of your email account such as account name,
email checking frequency, default account, notifications, and server settings.
To set up your account name
1. From the Home screen, tap > Email.
2. Tap an email account.
3. Tap > Settings to view the email account settings.
4. Tap Account name to change the account name.
5. Tap OK to confirm.
To set up email checking frequency
1. From the Home screen, tap > Email.
2. Tap an email account.
3. Tap > Settings to view the email account settings.
4. Tap Inbox check frequency.
You can set the device to automatically check for new email every 5 minutes,
every 10 minutes, every 15 minutes, every 30 minutes, every hour, or never.
To set up default account
1. From the Home screen, tap > Email.
2. Tap an email account.
3. Tap > Settings to view the email account settings.
4. Tap Default account to send email from this account by default.
Chapter 4: Email
27
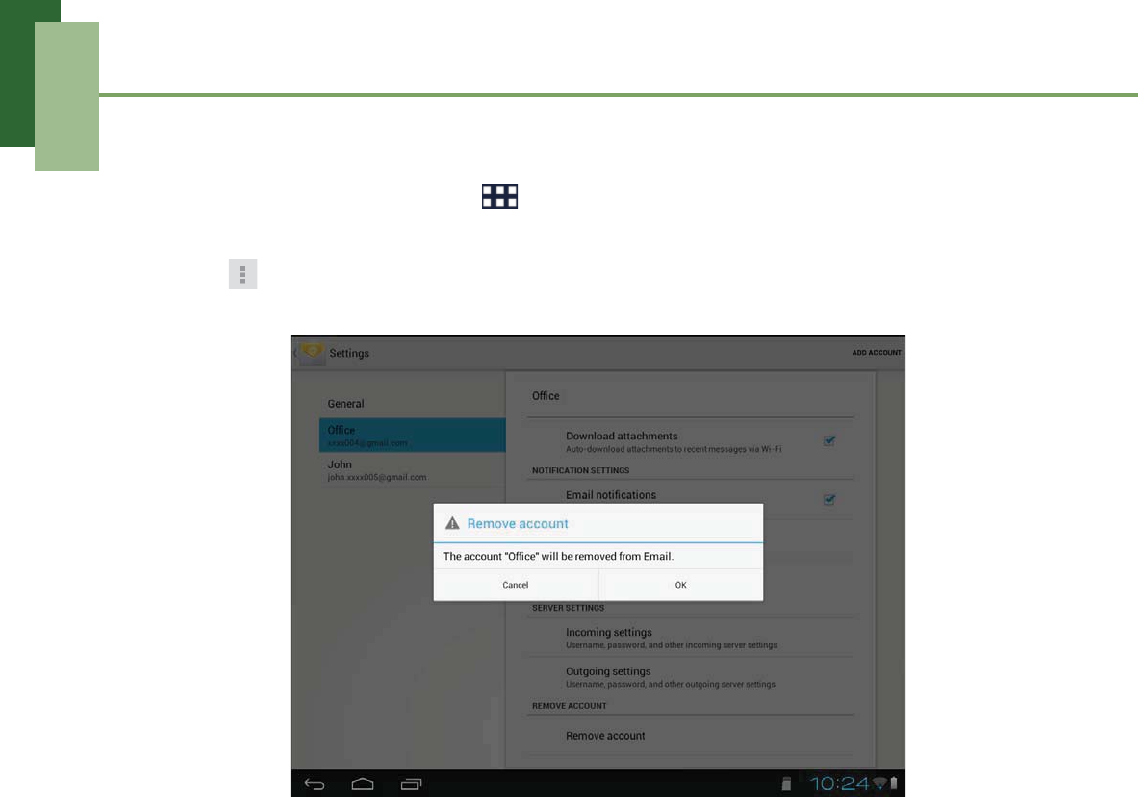
To delete an email account
1. From the Home screen, tap > Email.
2. Tap the email account to delete.
3. Tap > Settings > Remove account.
4. Tap OK to confirm.
Chapter 5: Using Internet
28
Chapter 5: Using Internet
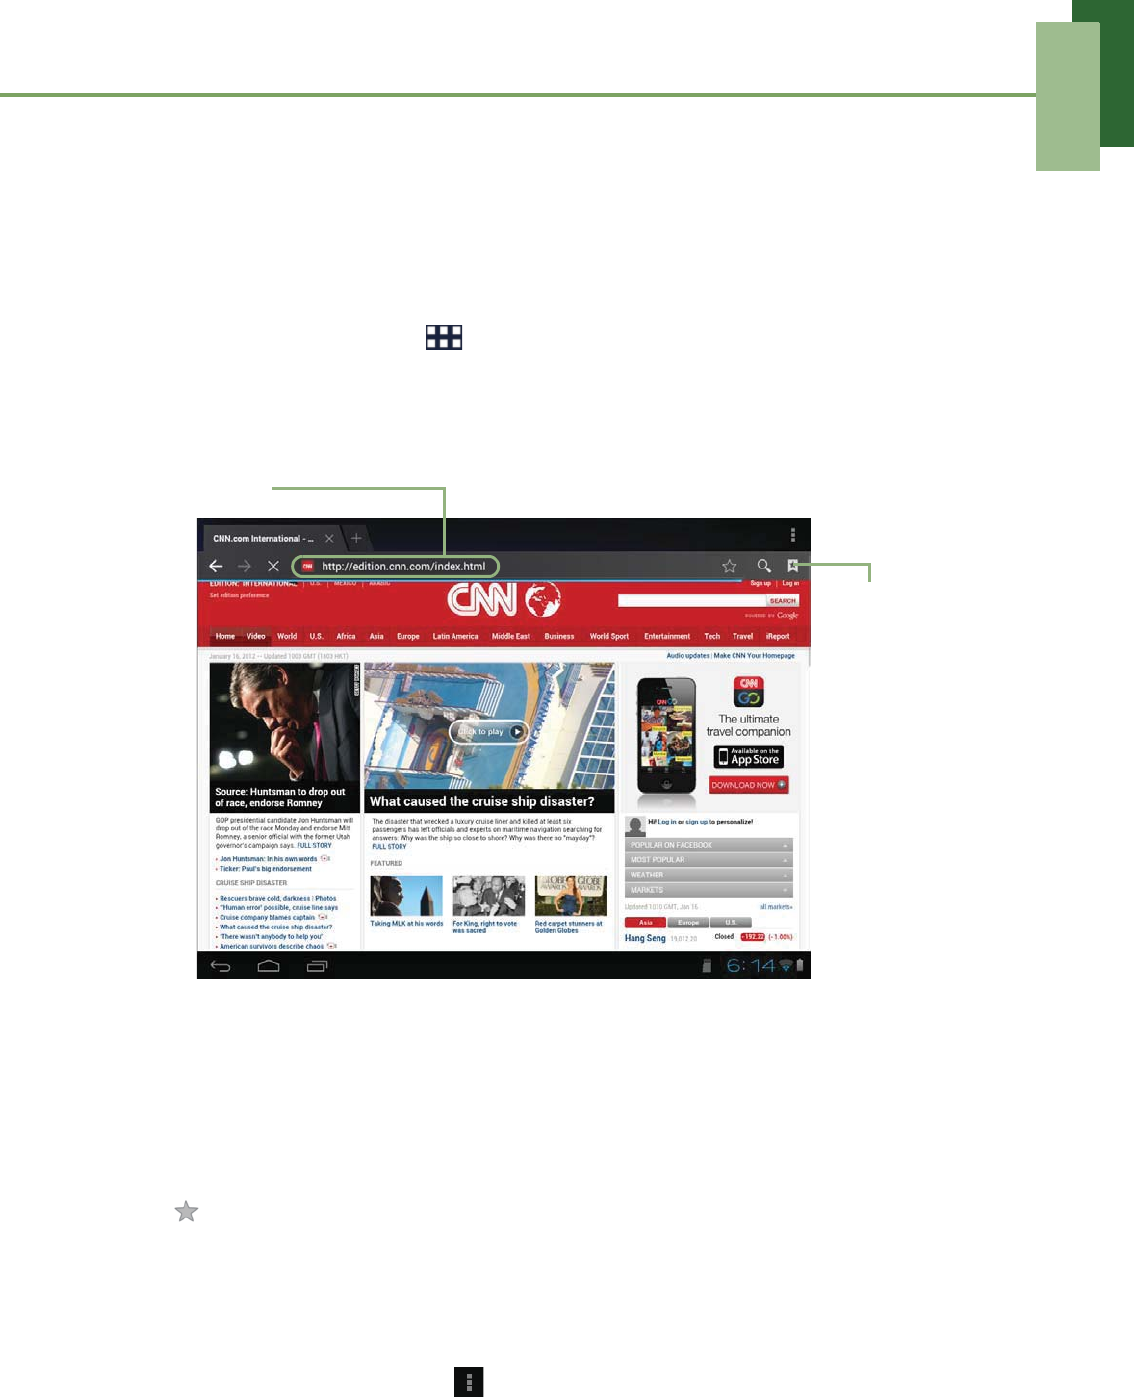
5.1 Browsing Web Pages
1. From the Home screen, tap > Browser.
2. Tap the address bar.
3. Type the URL. As you type, a list of URL suggestions appears on the screen.
4. Tap a match item in the list.
To scroll the page
To scroll up or down, swipe your finger down or up. To scroll left or right, tap and
swipe your finger to the right or left.
To bookmark the page
1. Tap .
2. Enter the label and change other default settings (if necessary).
3. Tap OK to save your settings.
To set Home page
1. While viewing a web page, tap > Settings > Set homepage.
2. Select the page that you want to set as home page.
• Tap OK to save your settings.
• If “Other” is selected, enter the URL of the page that you want to set as home
page.
Address bar
Tap to
browse
bookmarks,
history, and
saved pages.
Chapter 5: Using Internet
29
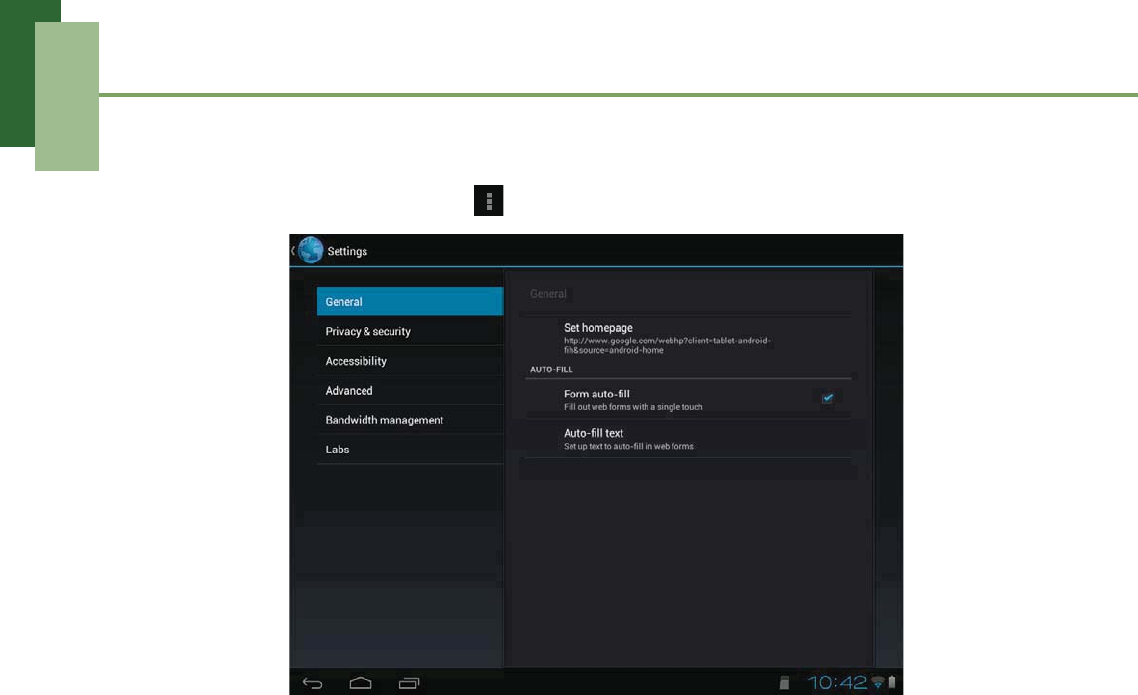
Managing web pages
While viewing a web page, tap to configure the browser settings:
•General: Select to set home page, and configure sync data and autofill settings.
•Privacy & security: Select to configure privacy and security settings including
cache, history, cookies, form data, location, and password.
•Accessibility: Select to configure text size, zoom, and inverted screen rendering
settings.
•Advanced: Select to set search engine, open in background, enable JavaScript,
enable plug-ins, advanced settings for individual website, page content settings,
and reset all settings to the factory default.
•Bandwidth management: Select to allow browser to preload high confidence
search results in the background and display images on the web pages.
•Labs: Select to set quick control access.
Chapter 6: Google Applications
30
Chapter 6: Google Applications
The following sections cover Android and Google applications that come pre-installed
on your device.
6.1 Gmail
Gmail is the email service provided by Google.
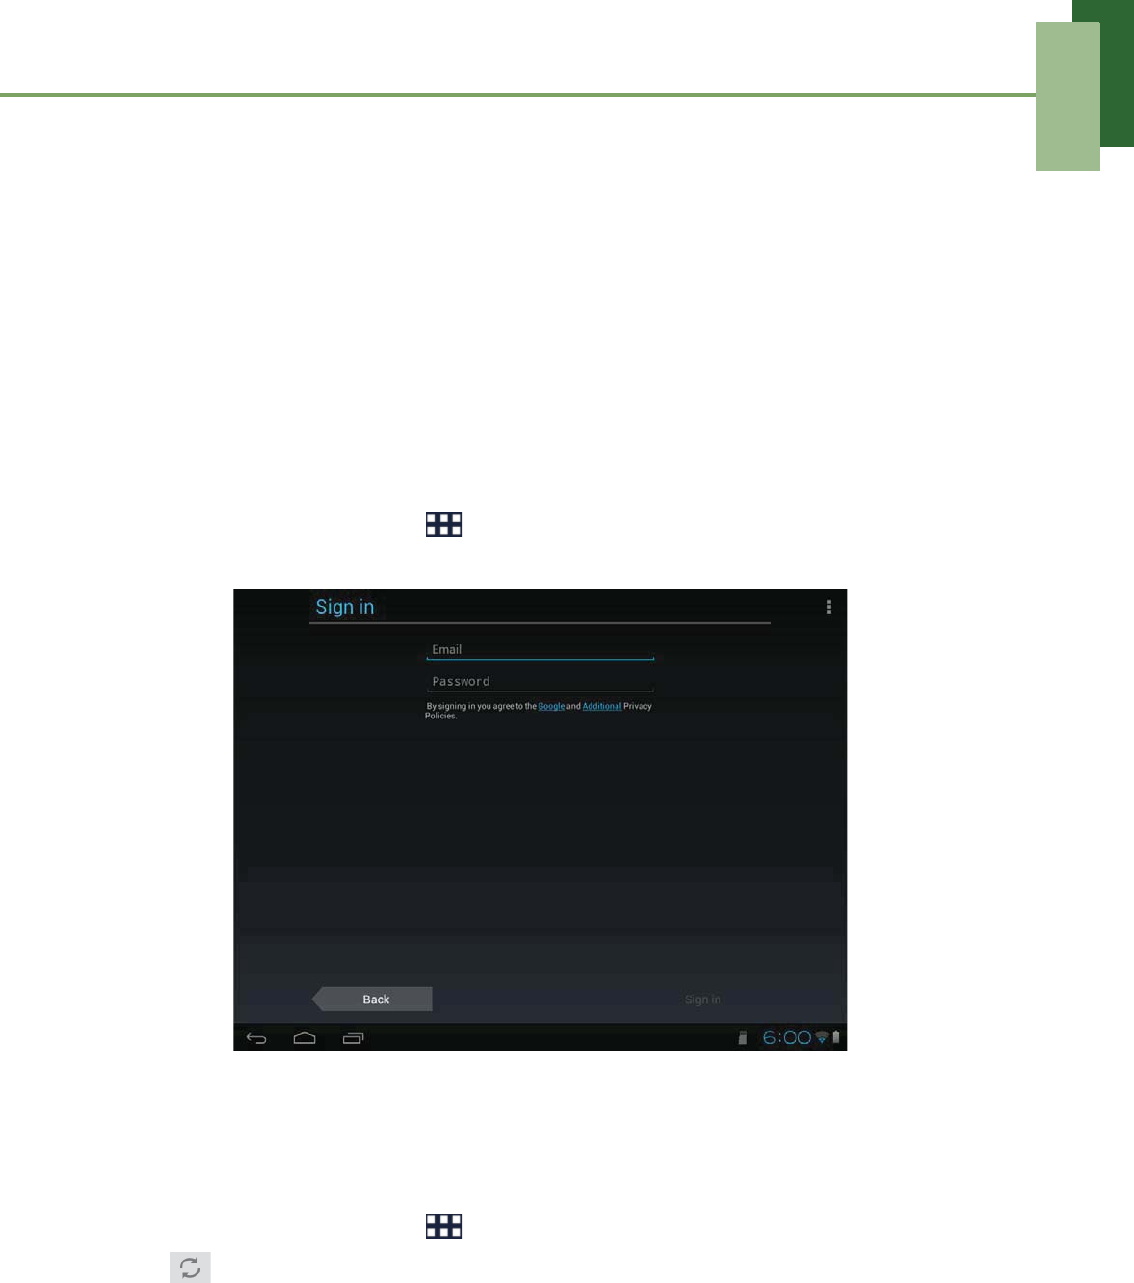
Signing in to Gmail
1. From the Home screen, tap > Gmail.
2. Follow the on-screen instructions to login or create your Gmail account.
3. Once logged in, you can begin reading and sending emails from your Gmail
account.
Refreshing Gmail
1. From the Home screen, tap > Gmail.
2. Tap .
Chapter 6: Google Applications
31
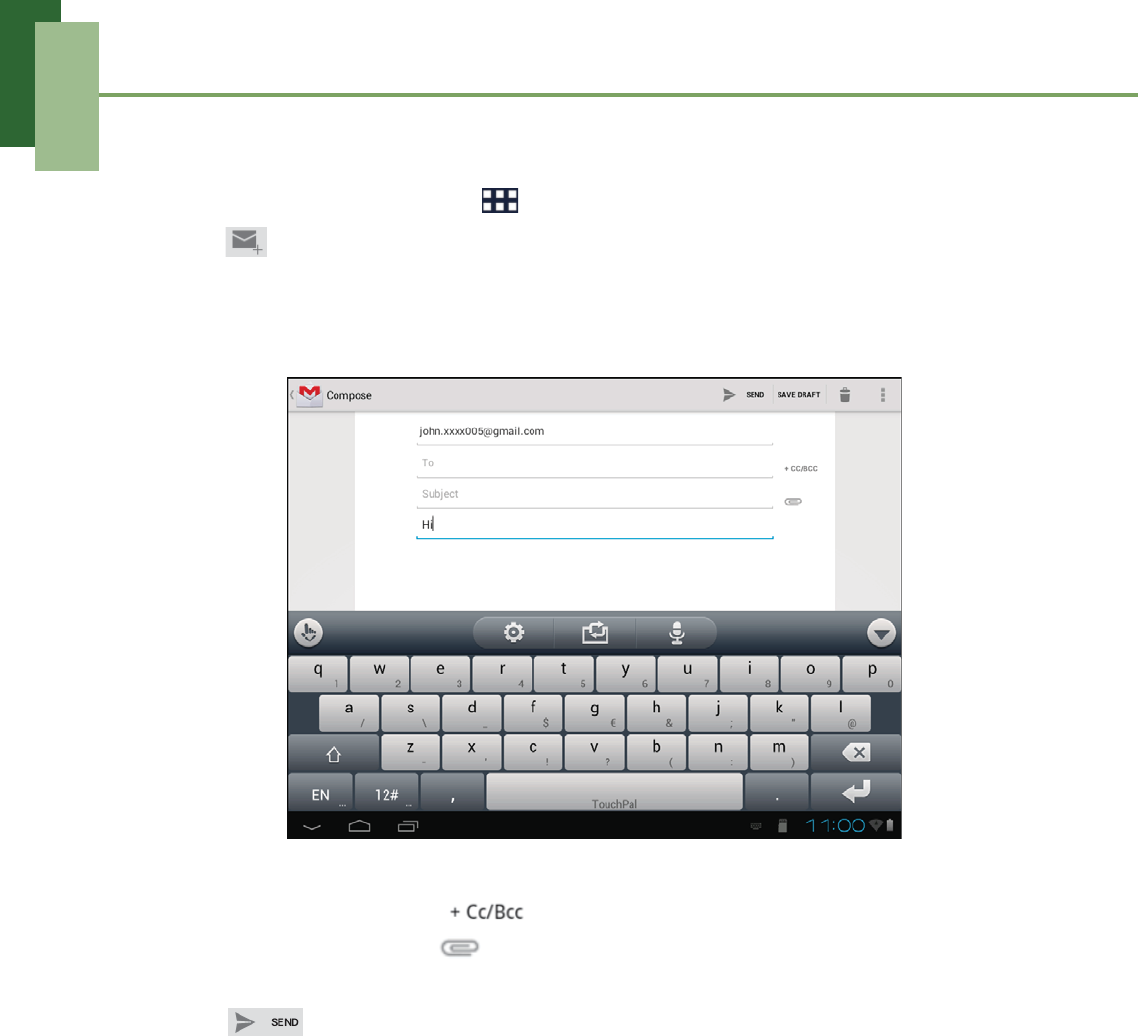
Creating and sending emails
1. From the Home screen, tap > Gmail.
2. Tap .
3. In the To field, enter the recipient’s email address.
4. Enter a Subject.
5. Compose your email.
6. If necessary, do any of the following:
• To add Cc/Bcc, tap .
• To attach files, tap .
• To save as draft, SAVE DRAFT.
7. Tap to send the email.
Chapter 6: Google Applications
32
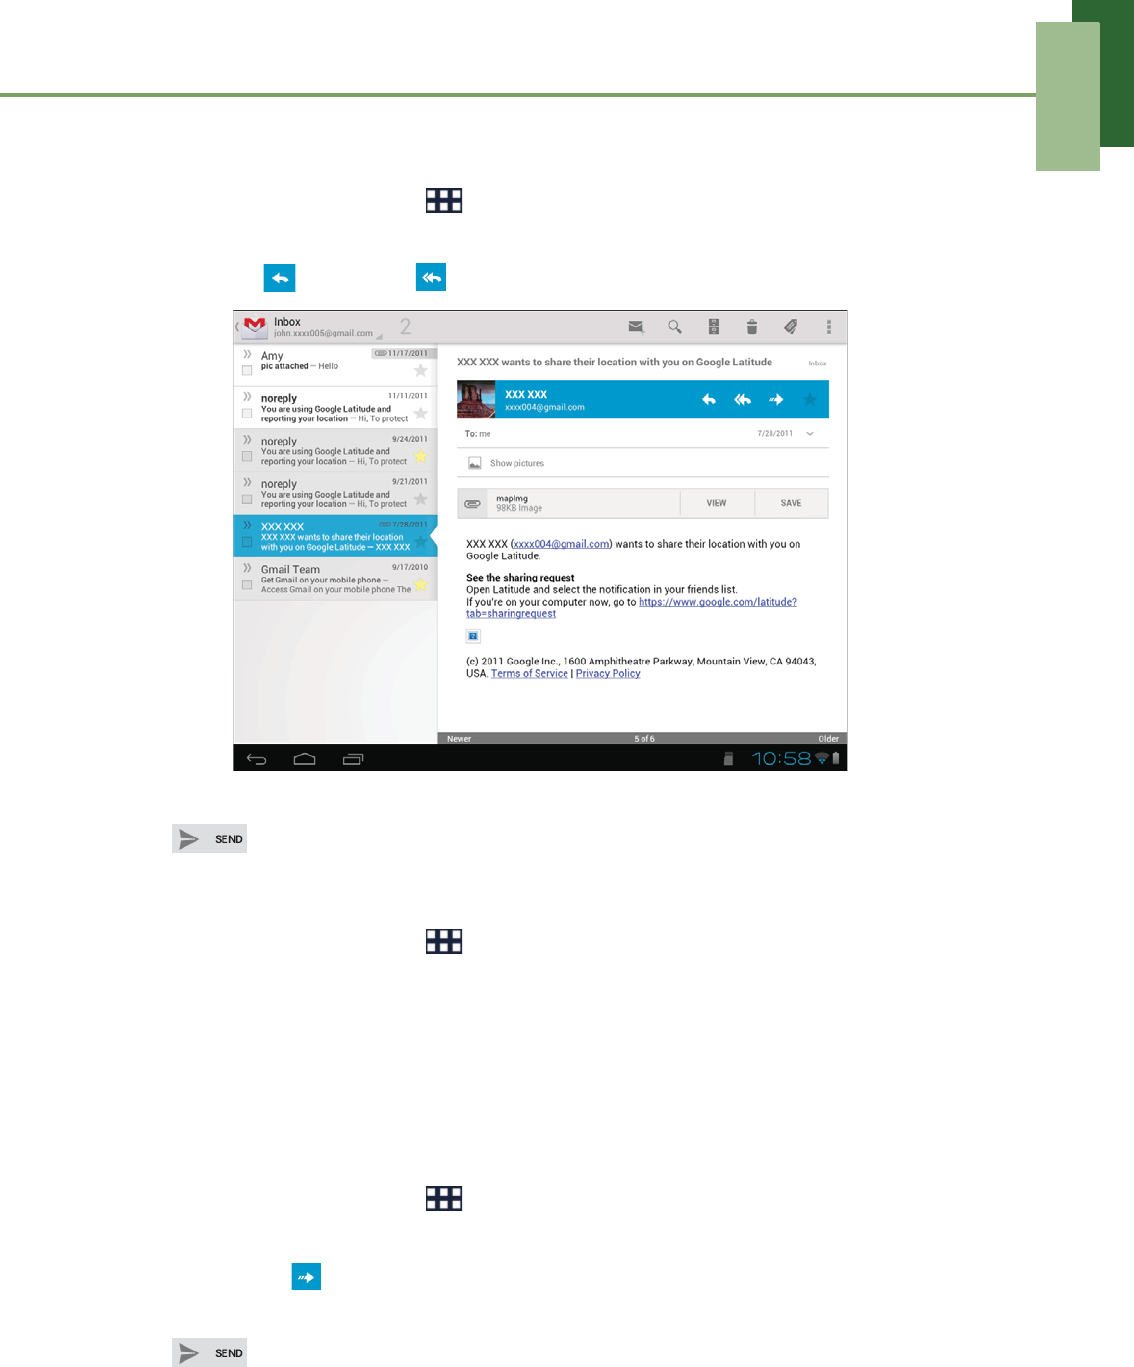
Reading and replying to emails
1. From the Home screen, tap > Gmail.
2. Tap an email to read.
3. To reply, tap (Reply) or (Reply all).
4. Compose your message.
5. Tap to send the email.
To preview and download attachments
1. From the Home screen, tap > Gmail.
2. Tap an email to read.
3. Scroll to the end of the email and do any of the following:
• To preview an attachment, tap VIEW.
• To download an attachment, tap SAVE.
Forwarding emails
1. From the Home screen, tap > Gmail.
2. Tap an email to open.
3. To forward, tap (Forward).
4. Enter the recipient.
5. Tap to send the email.
Chapter 6: Google Applications
33
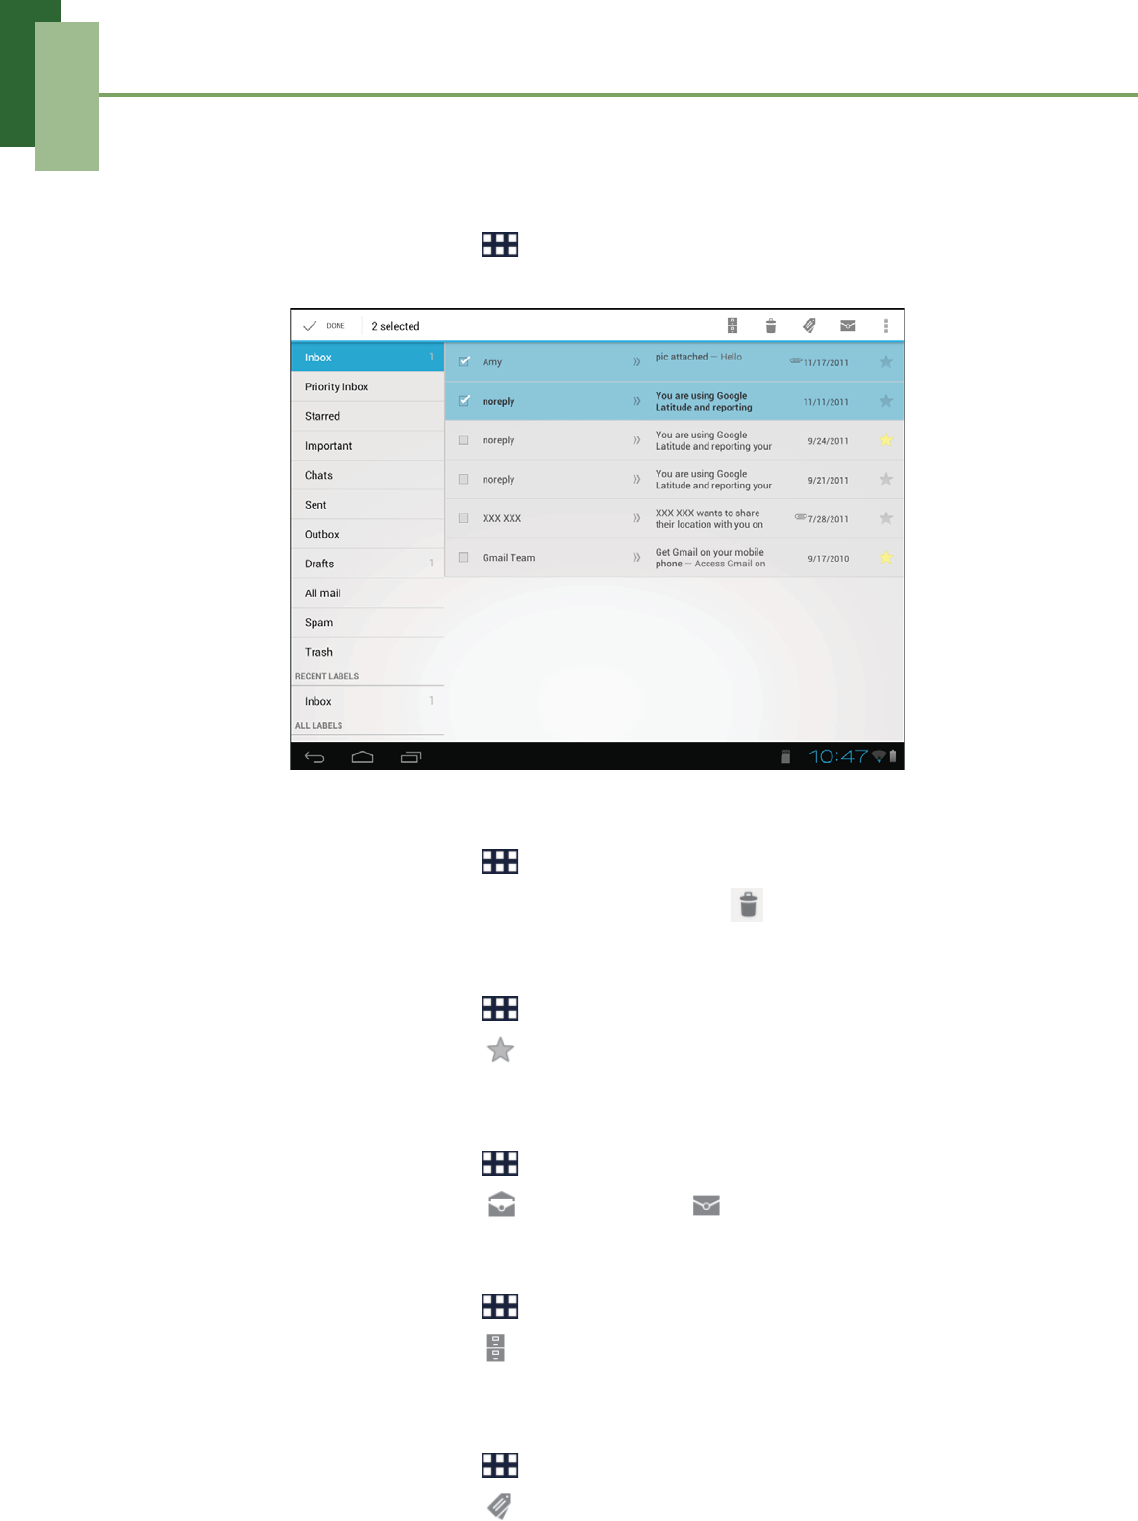
Managing emails
To select emails
1. From the Home screen, tap > Gmail.
2. Tap the check box.
To delete emails
1. From the Home screen, tap > Gmail.
2. Select the email(s) that you want to delete, then tap .
To add a star to emails
1. From the Home screen, tap > Gmail.
2. Select the email(s), then tap .
To mark emails as read or unread
1. From the Home screen, tap > Gmail.
2. Select the email(s), then tap (Mark read) or (Mark unread).
To place emails in archive
1. From the Home screen, tap > Gmail.
2. Select the email(s), then tap (Archive).
To change labels of emails
1. From the Home screen, tap > Gmail.
2. Select the email(s), then tap (Labels).
3. Tap the desired label(s), then tap OK.
Chapter 6: Google Applications
34
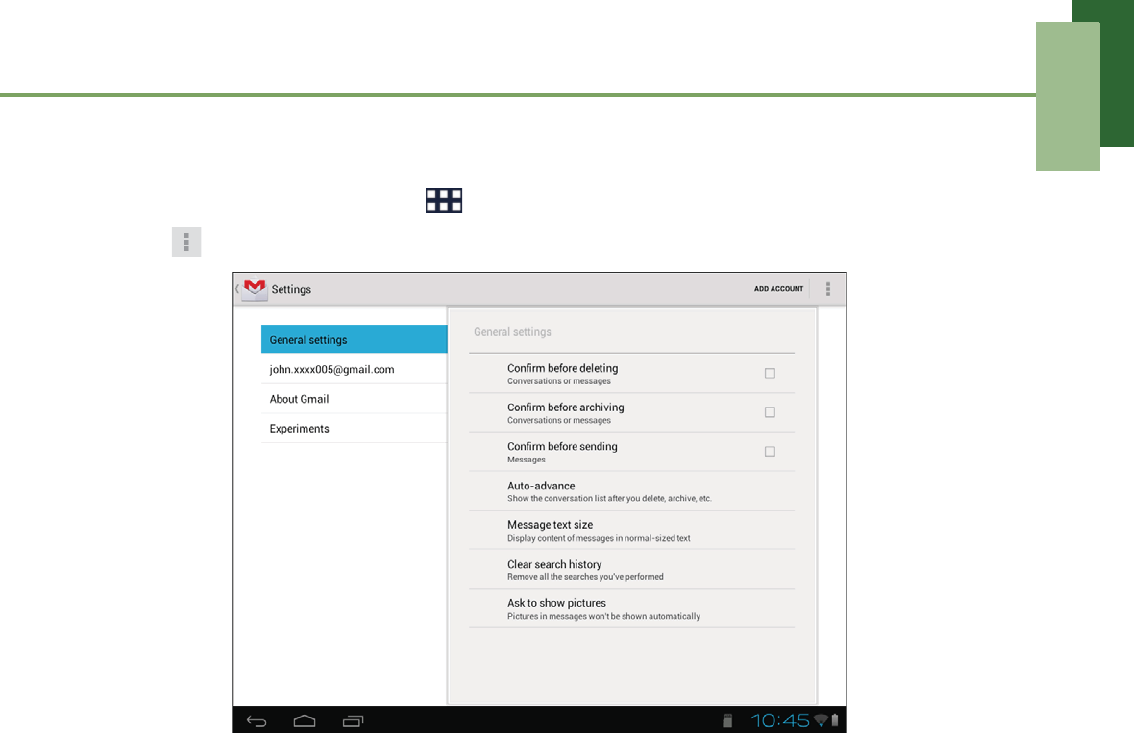
Configuring Gmail settings
1. From the Home screen, tap > Gmail.
2. Tap > Settings > General settings or email account.
3. Tap one of the following settings:
• Confirm before deleting: Select to prompt for confirmation before deleting
the conversations or messages.
• Confirm before archiving: Select to prompt for confirmation before archiving
the conversations or messages.
• Confirm before sending: Select to prompt for confirmation before sending
the messages.
• Auto-advance: Select which screen to show after you delete or archive a
conversation.
• Message text size: Set the font size used in emails.
• Clear search history: Remove all the searches you have performed.
• Ask to show pictures: Restore default for all senders (not to show pictures
automatically).
• Priority Inbox: Select to set Inbox as your Priority Inbox for this account.
•Email notifications: Displays a notification icon on the status bar when an
email is received.
•Ringtone & vibrate: Select email notification ringtone and enable the device
to vibrate when an email is received.
•Signature: Add a text signature to your outgoing emails.
•Gmail sync: Change sync settings or remove this account.
•Days of mail to sync: Set the number of days of mail to sync.
•Manage labels: Choose which labels are synced and trigger notifications.
•Download attachments: Select to auto-download attachments to recent
messages via Wi-Fi.

Chapter 6: Google Applications
35
6.2 Google+
Google+ directly links to your Gmail account and allows you to share your thoughts,
links, and photos with your friends.
Signing in to Google+
1. From the Home screen, tap > Google+.
2. Sign in with your Gmail account.
3. Once logged in, you can begin interacting with your friends.
Using Google+
Once logged in, you can do any of the following:
• To view news feeds page, tap Stream.
• To start chatting with your friends/contacts, tap Messenger.
• To view photos of you and your circles (a group of contacts of Google+), or
view photo stored on your device, tap Photos.
• To view your profile, posts, and photos, tap Profile.
• To view the subgroups within all of your contacts, tap Circles.
• To search for posts or people, tap . On the POSTS/PEOPLE tab, enter the
keyword that you want to search.
• To view new notification, tap . If the number is 0, this indicates no new
notification.

Chapter 6: Google Applications
36
Create a post
1. From the Home screen, tap > Google+.
2. Tap .
3. Enter the recipient (a name, email, or circle).
4. Compose your message.
5. If necessary, do any of the following:
• To attach your current location, tap .
• To attach a photo capture using the device camera, tap .
• To attach a photo from Gallery, tap .
6. Tap to send the post.
Chapter 6: Google Applications
37
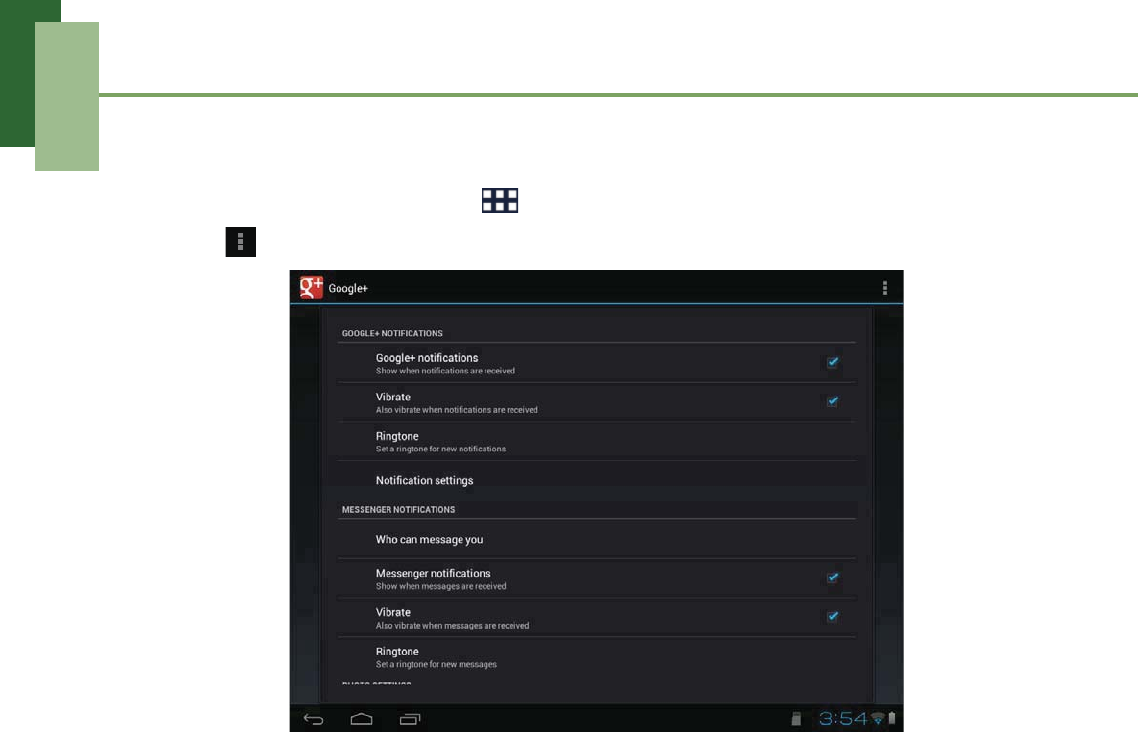
Configuring Google+ settings
1. From the Home screen, tap > Google+.
2. Tap > Settings.
3. Tap one of the following settings:
• Google+ notifications: Enable to show when notifications are received.
•Vibrate: Enable to vibrate when notifications are received.
• Ringtone: Select the ringtone to use for new notifications.
• Notification settings: Select the configure notification advanced settings.
• Who can message you: Select who can send message to you.
•Messenger notifications: Enable to show when messages are received.
•Vibrate: Enable to vibrate when messages are received.
•Ringtone: Select the ringtone to use for new messages.
•Turn on Instant Upload: Enable to automatically upload new photos and
videos to a private web album.
•When to upload photos: Select the connection method to use to upload
photos.
•When to upload videos: Select the connection method to use to upload
videos.
•Roaming uploads: Enable to upload new photos and videos when roaming
on a data network.
•Battery uploads: Enable to upload new photos and videos when on battery
power.
• Upload now: Enable to immediately upload all photos and videos that are
stored on the device.
•Sync contacts: Enable to sync Google+ people and circles to your device
contacts.
Chapter 6: Google Applications
38
6.3 Talk
Use Talk to chat with your friends who also have Google accounts.
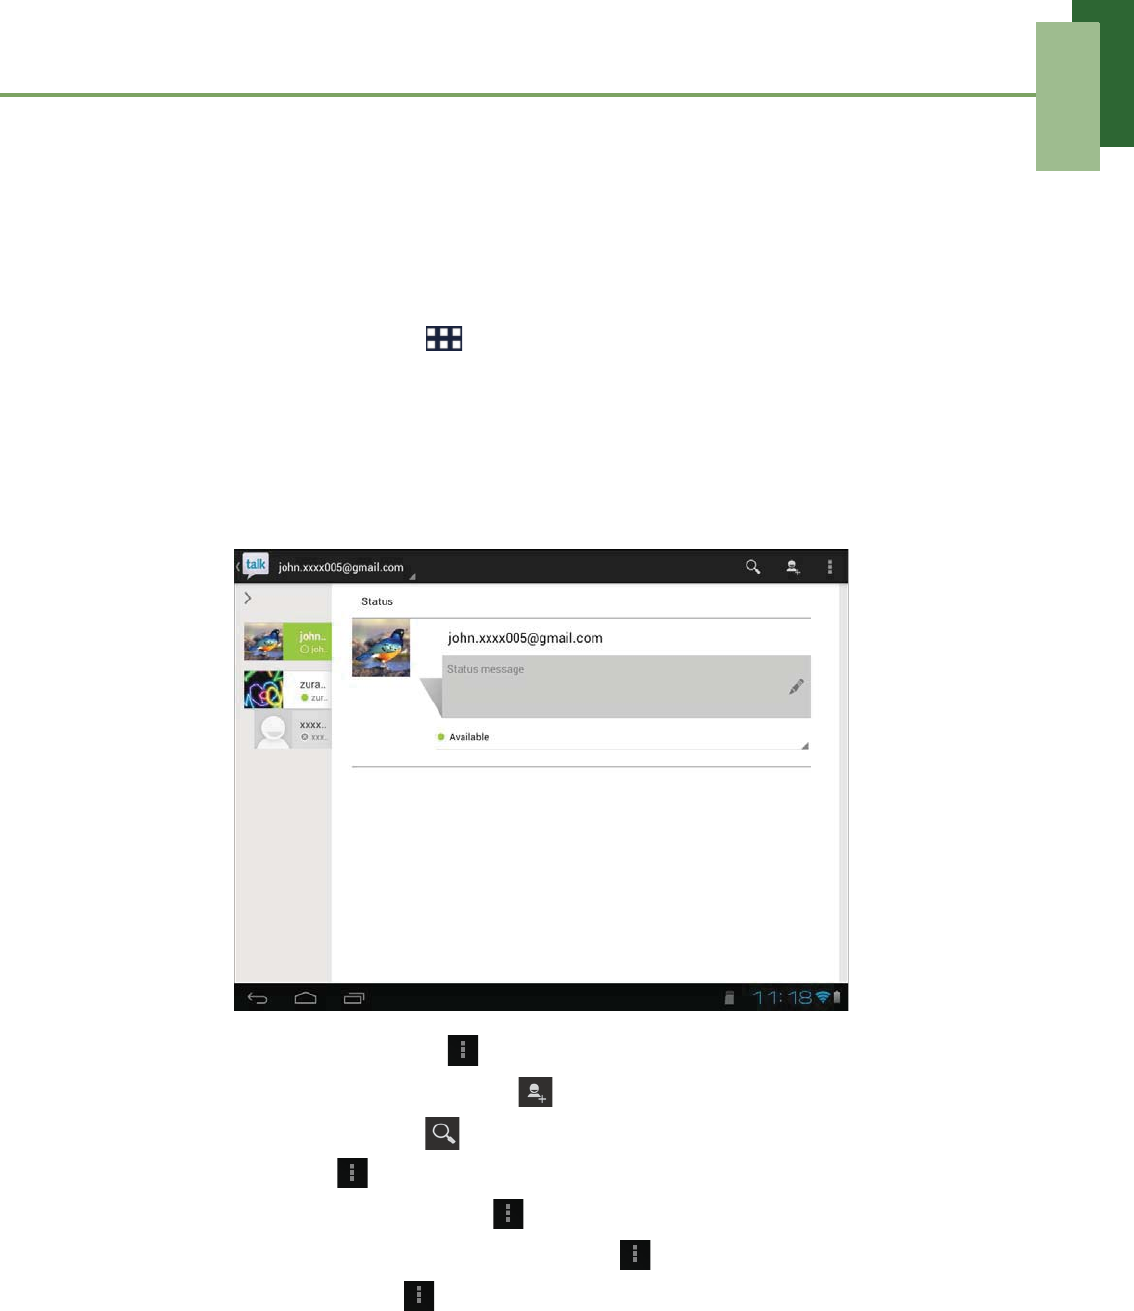
Signing in to Talk
1. From the Home screen, tap > Talk.
2. Select an account to sign in.
3. If you log in for the first time, enter your username and password, then tap Sign in.
Talk options
Once logged in, you can begin using Talk and do any of the following:
• To sort the friends list, tap > Display options > select sort type.
• To add friends to friend’s list, tap .
• To search a person, tap .
• To sign out, tap > Sign out.
• To configure Talk settings, tap > Settings.
• To block a person, tap an account and tap > Friend info > BLOCK.
• To close all chats, tap > End all chats.
Chapter 6: Google Applications
39
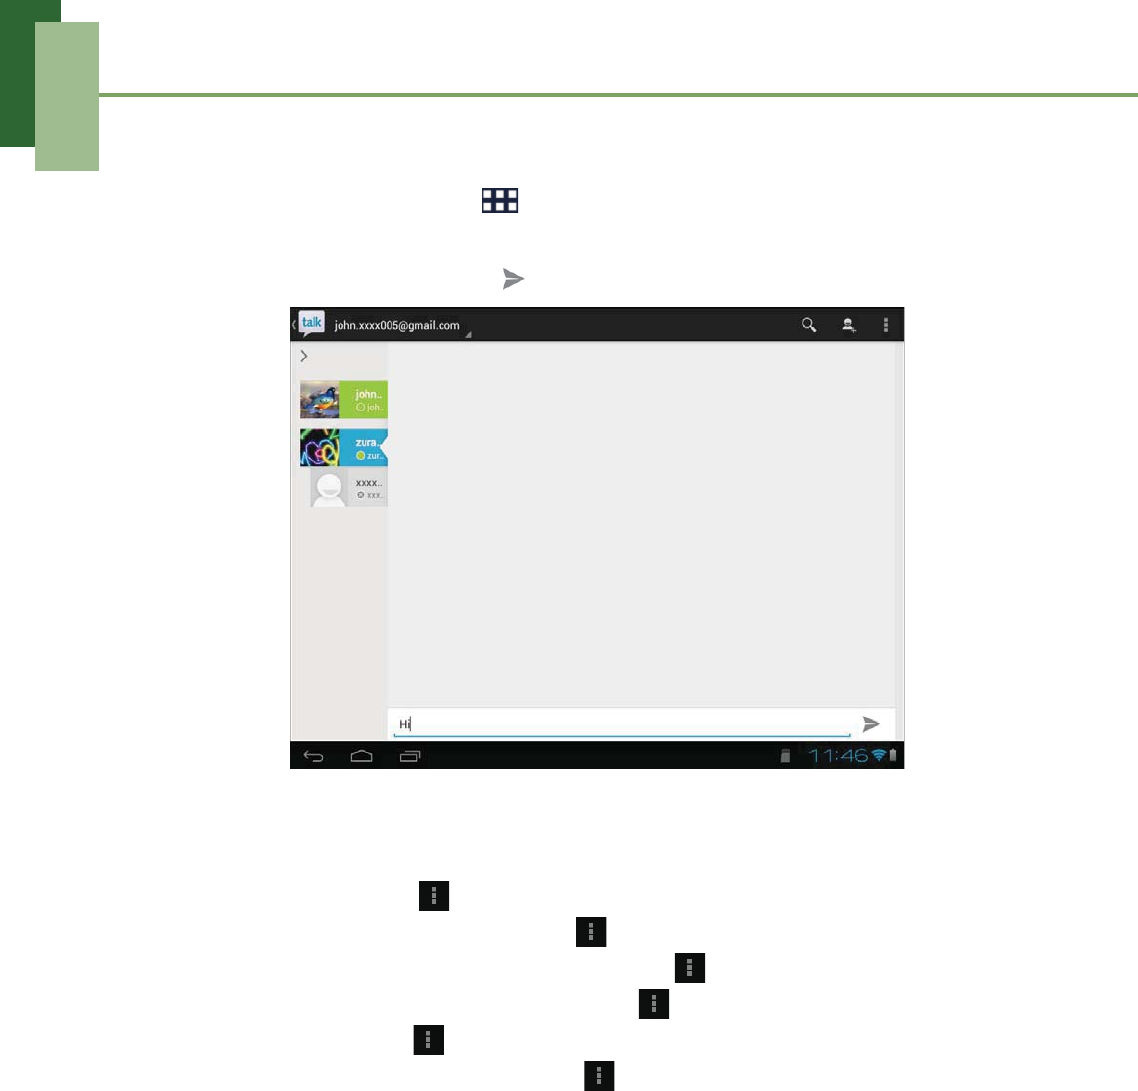
Starting chat
1. From the Home screen, tap > Talk.
2. Tap a friend on your friends list.
3. Type your message, then tap .
Chatting Options
The following options can be accessed when a chat window is opened:
• To chat off record, tap > Go off the record.
• To view your friend’s information, tap > Friend info.
• To remove your friend from the friends list, tap > Friend info > REMOVE.
• To invite another friend to join the chat, tap > Add to chat.
• To close the chat, tap > End chat.
• To clear the previous chat history, tap > Clear chat history.
Chapter 6: Google Applications
40
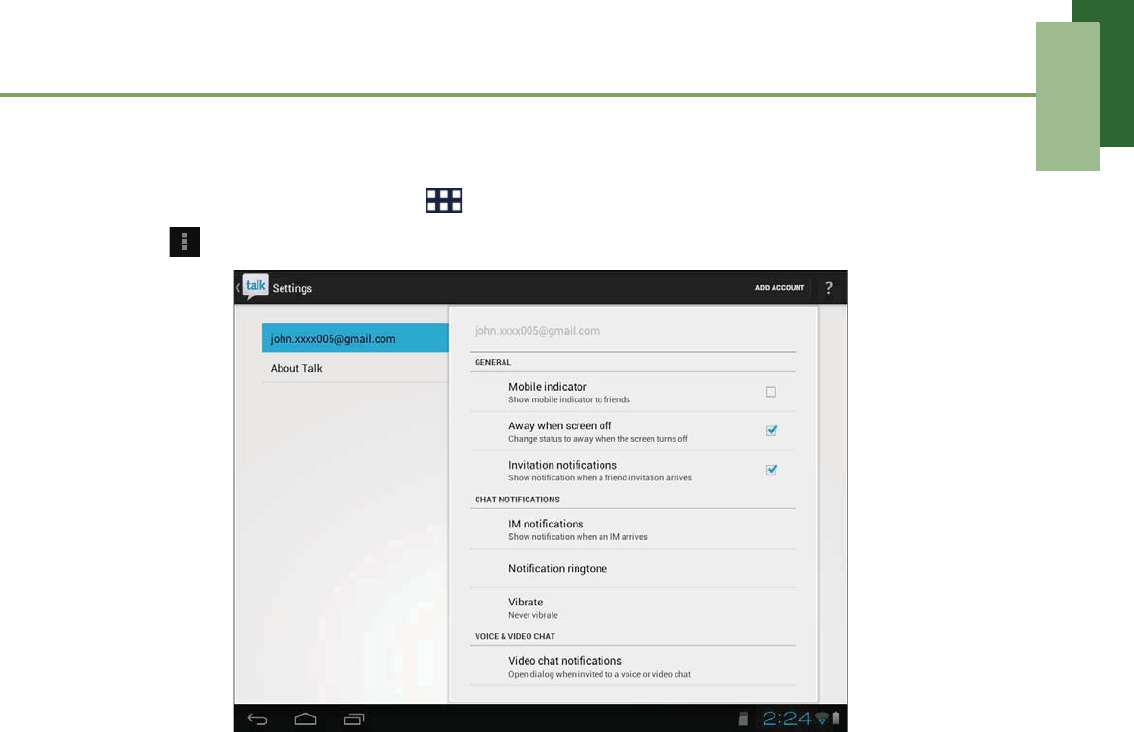
Configuring Talk settings
1. From the Home screen, tap > Talk.
2. Tap > Settings.
3. Tap one of the following settings:
•Mobile indicator: Enable to show mobile indicator to your friends.
•Away when screen off: Enable to set status to away when the screen is
turned off.
•Invitation notifications: Enable to display a notification icon when friends
invitations are received.
•IM notifications: Enable to display a notification icon when an instant
message is received.
•Notification ringtone: Select the ringtone to use when an instant message is
received.
•Vibrate: Enable to vibrate when an instant message is received.
• Video chat notifications: Enable to display a notification icon when a video
chat invitation is received.
• Video chat ringtone: Select the ringtone to use when a video chat invitation
is received.
•Vibrate: Enable to vibrate when a video chat invitation is received.
•Default video effect: Set the image stabilization settings.
• Blocked friends: View the blocked friends list.
•Clear search history: Clear previous Google Talk chat searches from
showing up in the Search box.
•Manage account: Set the general sync settings and manage accounts.
Chapter 6: Google Applications
41
6.4 Messenger
With Messenger, you can communicate with your friends via Google+’s Messenger
application.
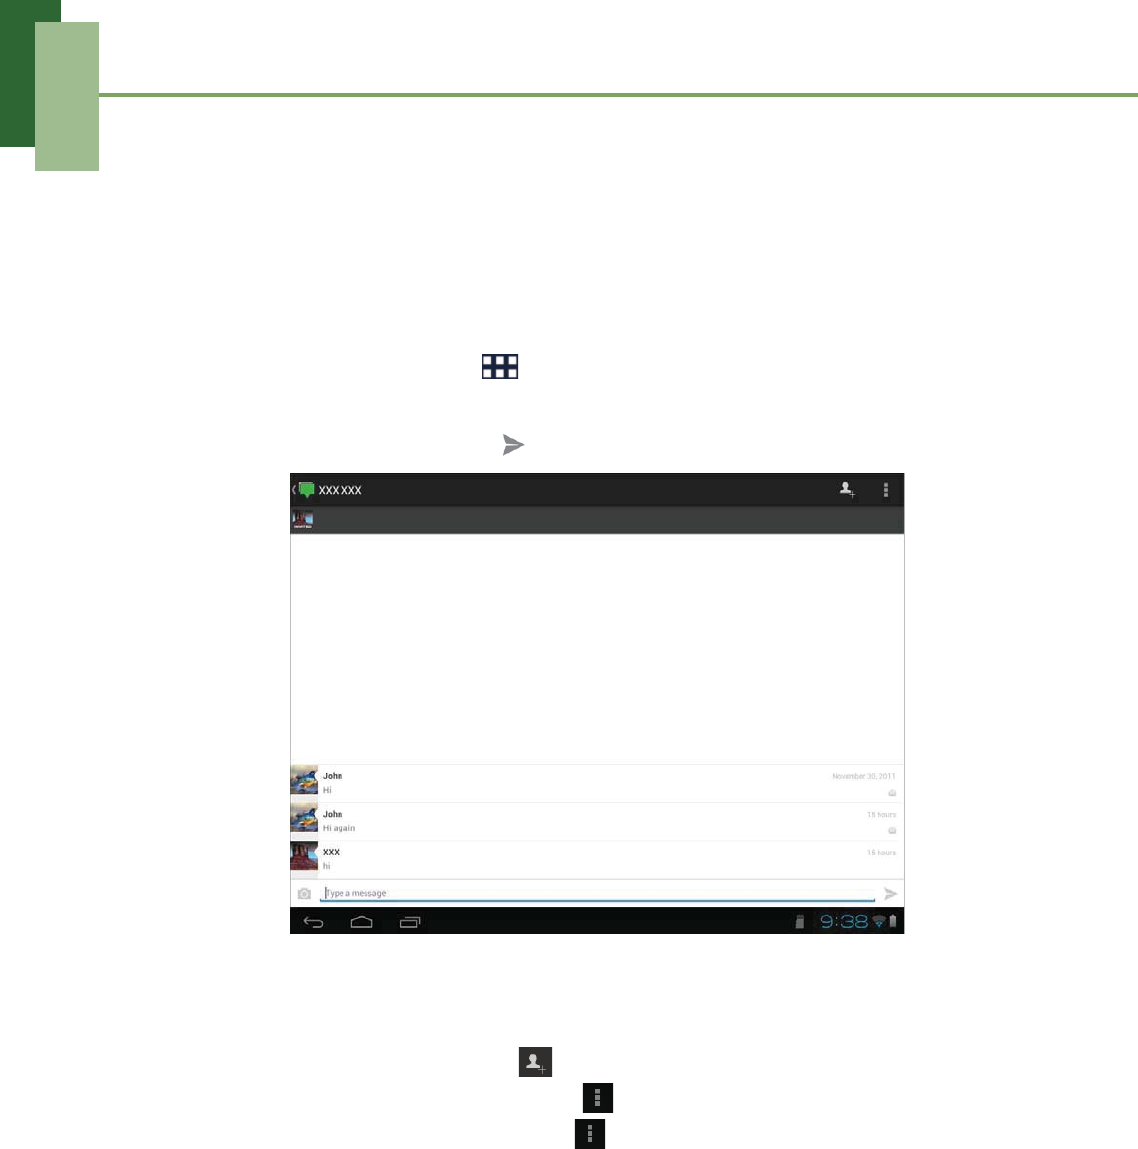
Starting chat
1. From the Home screen, tap > Messenger.
2. Tap a friend on your friends list.
3. Type your message, then tap .
Chatting Options
The following options can be accessed when a chat window is opened:
• To add a new conversation, tap .
• To mute the current conversation, tap > Mute.
• To hide the current conversation, tap > Hide.
Chapter 6: Google Applications
42
6.5 Maps
Use Maps to find places, view traffic and direction information, and find your friends’
location.
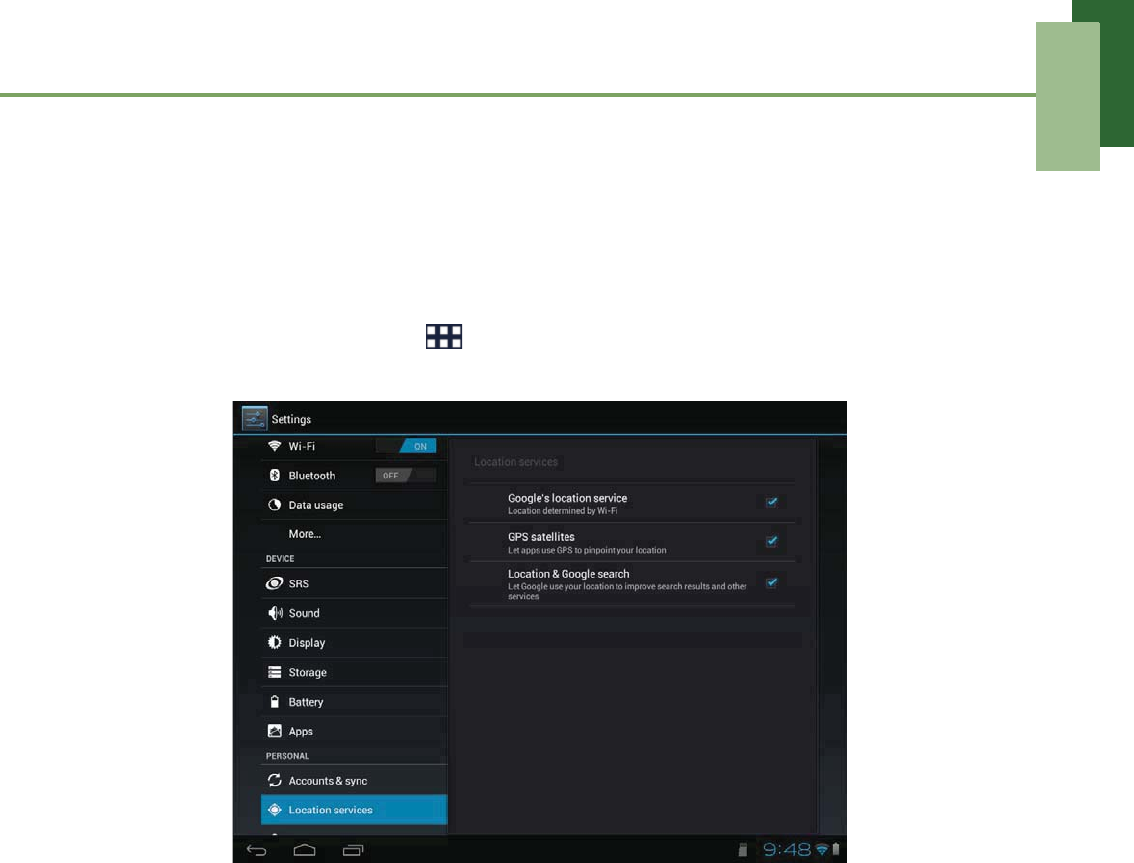
Before starting Maps, do the following:
1. From the Home screen, tap > Settings.
2. On PERSONAL, tap Location services.
3. Tap to enable Google’s location service.
4. Tap to enable GPS satellites.
Chapter 6: Google Applications
43
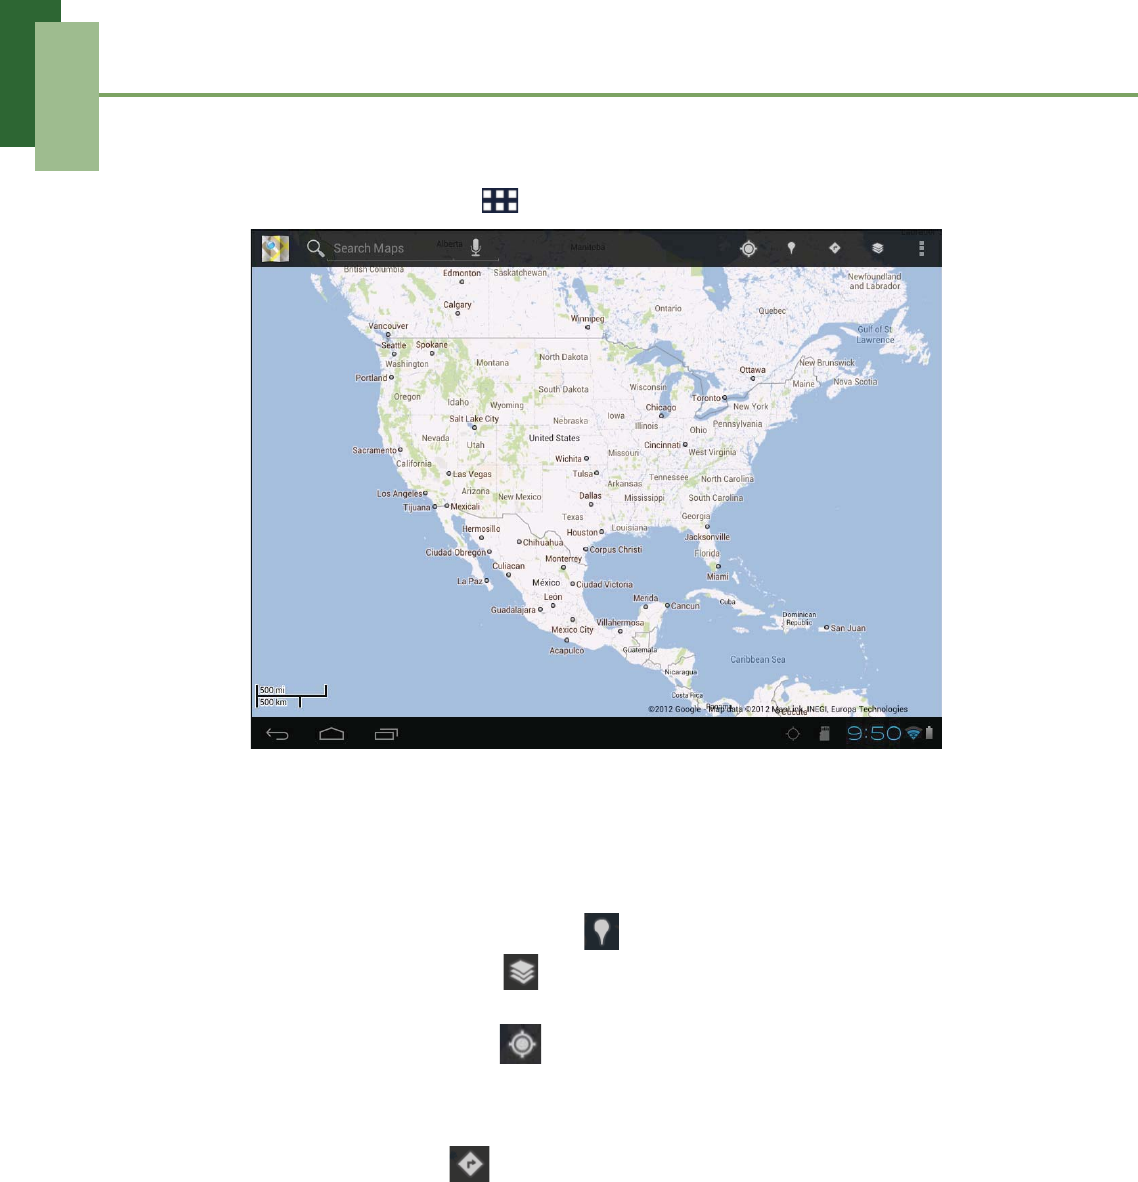
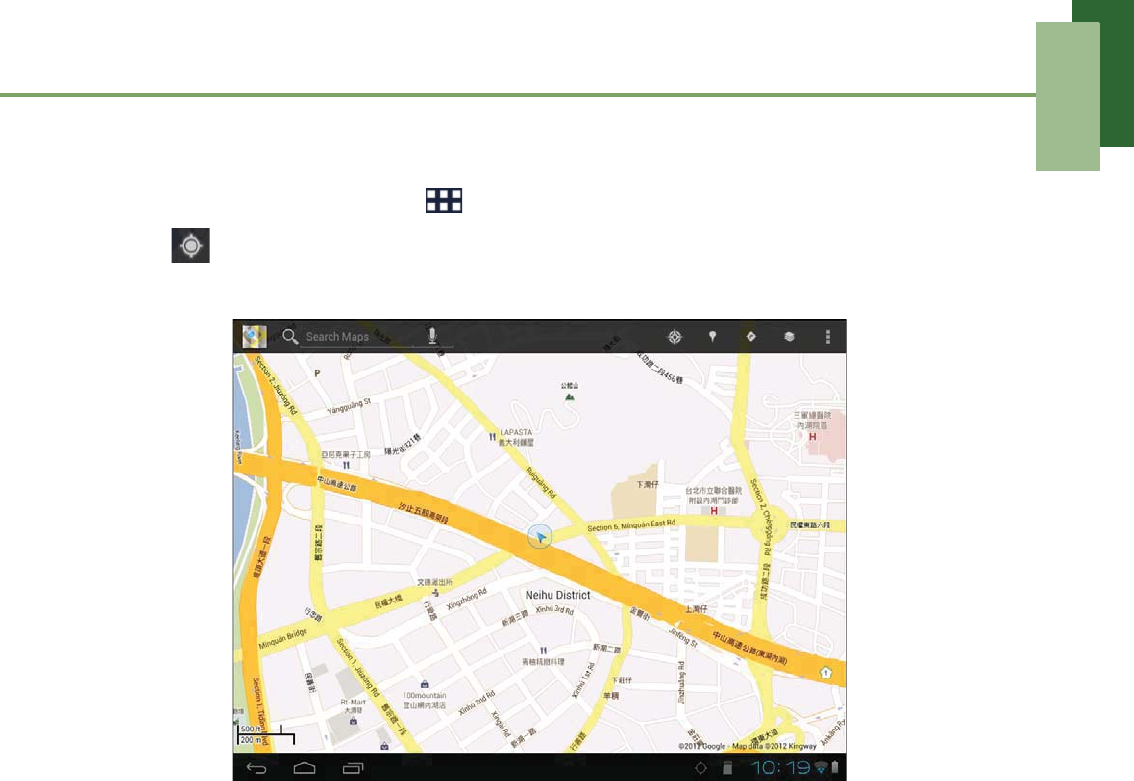
Viewing Map
1. From the Home screen, tap > Maps.
2. Do any of the following:
• Tap and hold an area on the map to view the address.
• Slide your finger on the screen to scroll the map.
• Pinch on the screen to zoom in or out.
• To select nearby attractions, tap then tap the desired category.
• To select Map mode, tap then tap Traffic, Satellite, Terrain, Transit
Lines, Latitude, My Maps, or Wikipedia.
• To find your location, tap .
• To search for a place of interest, tap the Search Maps box then type in a
keyword to begin search.
• To get direction, tap and specify the location.
Chapter 6: Google Applications
44
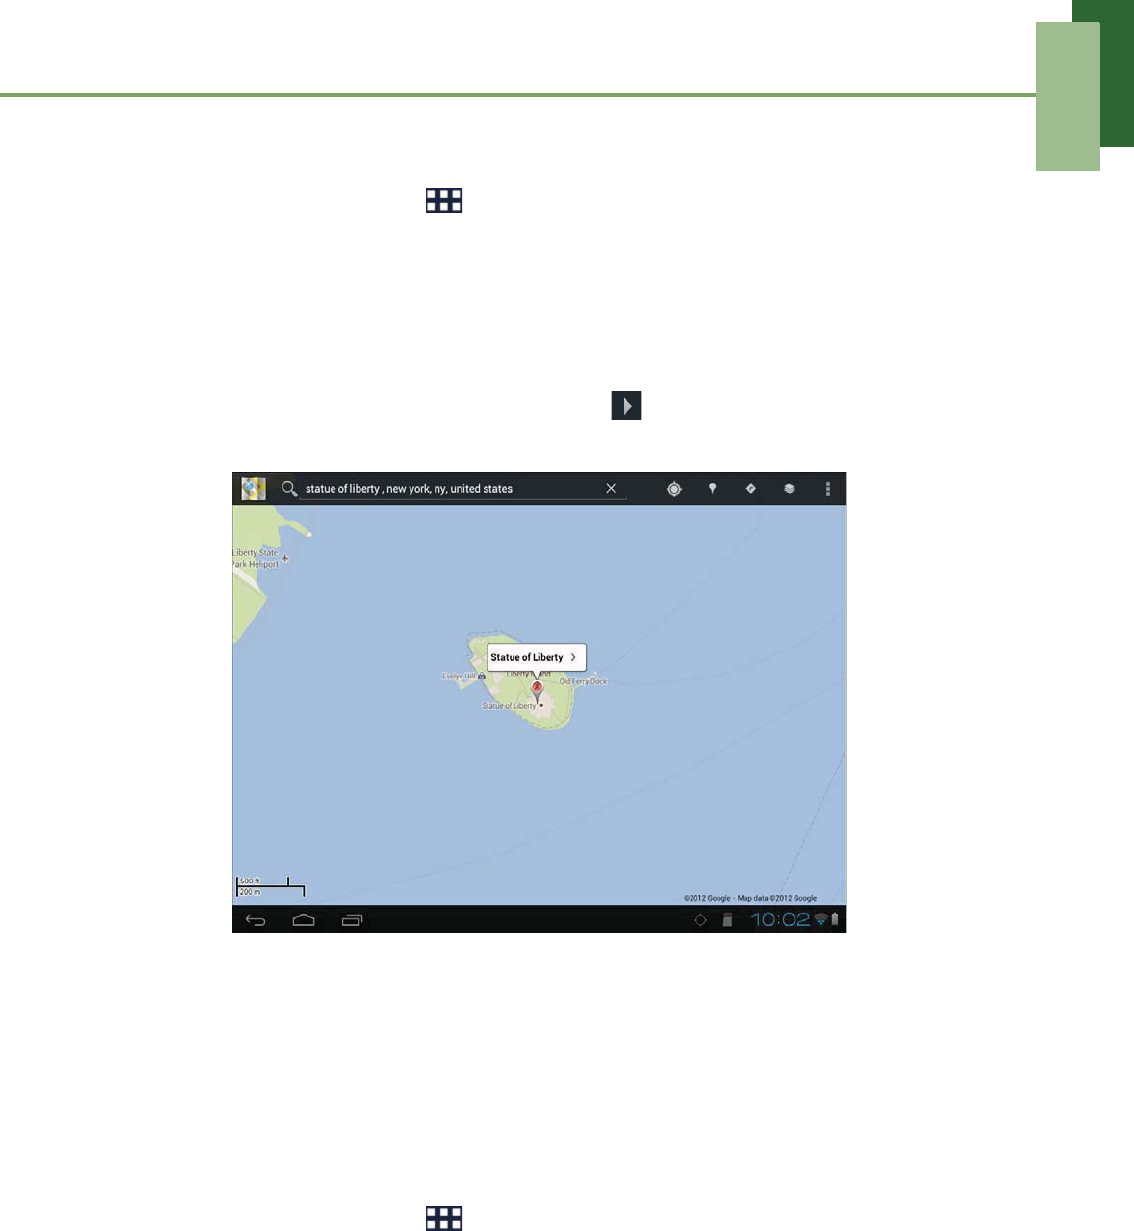
Finding places
1. From the Home screen, tap > Maps.
2. Tap the Search Maps box.
3. Type the place to search on the text field.
4. As you type, matching items on your device and suggestions from Google web
search are added to the list of previously chosen search results.
Tap a match item in the list.
5. If what you are searching is not in the list, tap .
6. A callout appears to indicate the location of the searched place.
6.6 Navigation
Navigation allows you to say the destination and get voice directions.
NOTE: Not available in all locations.
Before starting Navigation, do the following:
1. From the Home screen, tap > Settings.
2. On PERSONAL, tap Location services.
3. Tap to enable Google’s location service.
4. Tap to enable GPS satellites.
Chapter 6: Google Applications
45
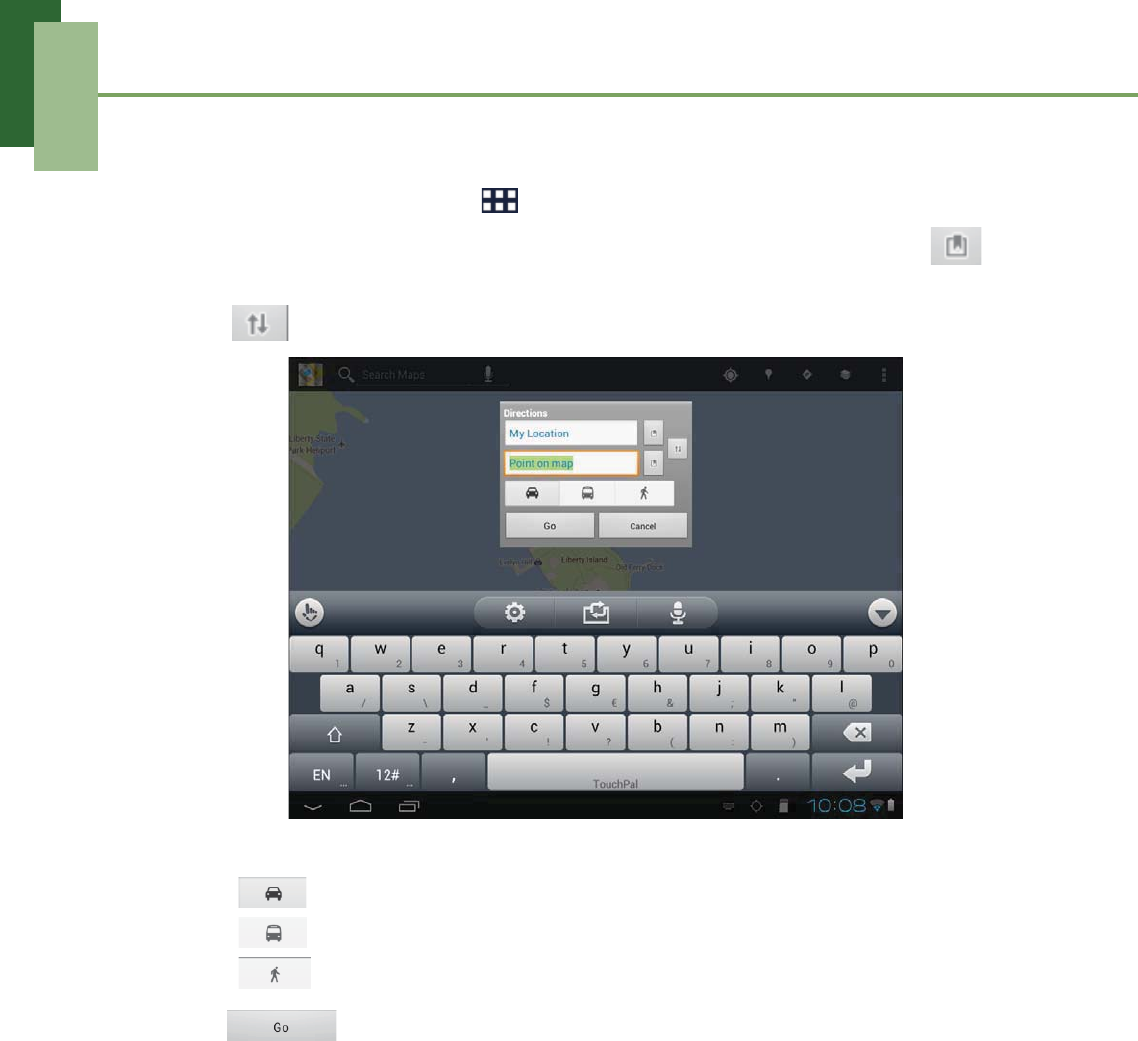
Getting directions
1. From the Home screen, tap > Navigation.
2. Enter the starting point and the ending point, or tap the corresponding and
select an option.
3. Tap to reverse the starting and ending points direction.
4. Select a direction icon.
• : Driving directions
• : Transit directions
• : Walking directions
5. Tap to view the directions.
Chapter 6: Google Applications
46
Finding your current location
1. From the Home screen, tap > Navigation.
2. Tap to view your location on the map.
3. A blue blinking arrow indicates your current location on the map.
Chapter 6: Google Applications
47
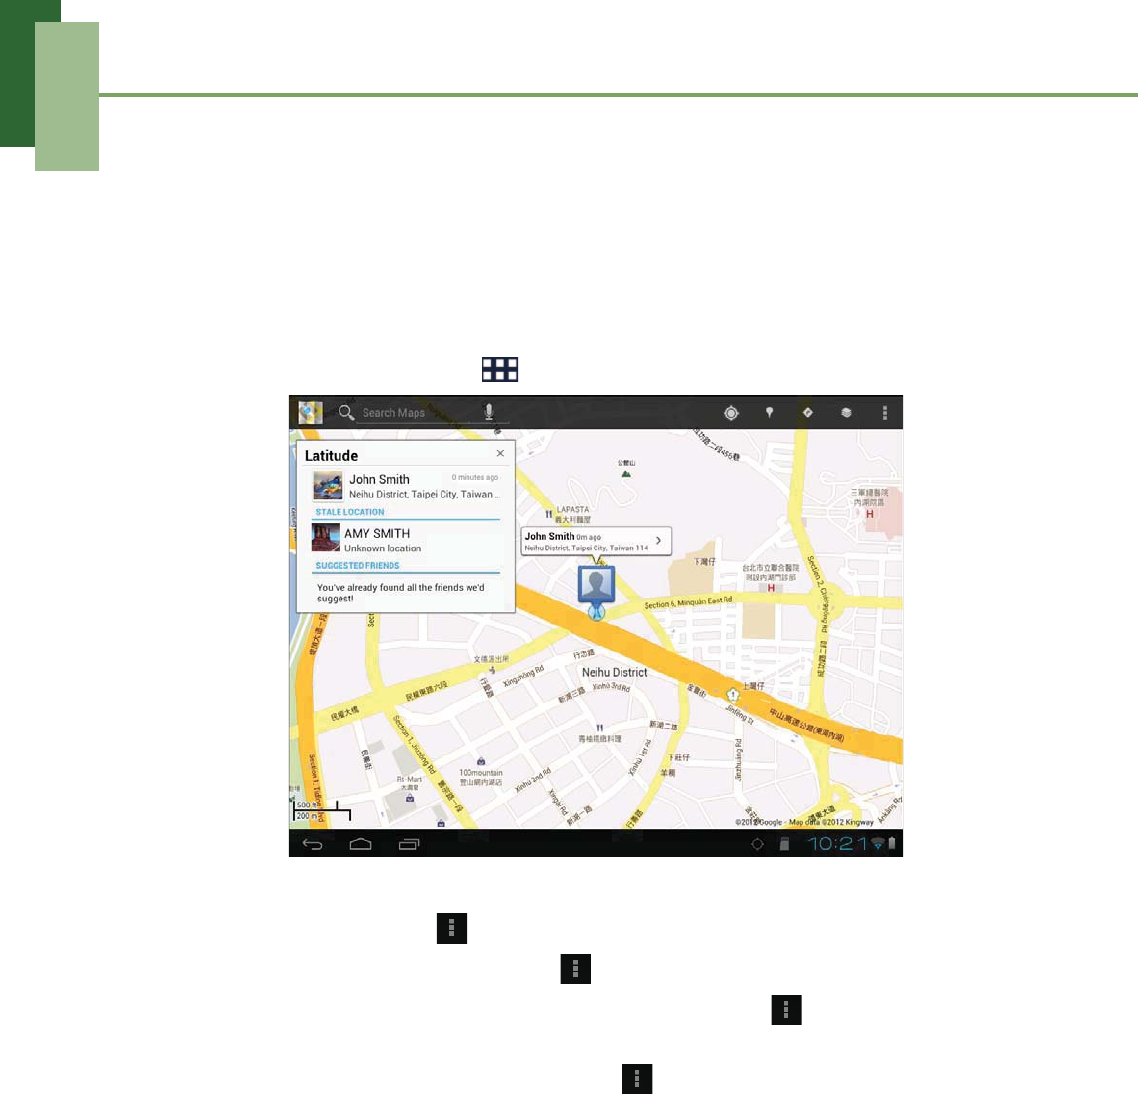
6.7 Latitude
With Latitude, you can view your friends’ location and share your location to them on
Google MapsTM.
Starting Latitude
1. From the Home screen, tap > Latitude.
2. Do any of the following:
• To add friends, tap > Add friends.
• To refresh your friends list, tap > Refresh friends.
• To share your current location with your friends, tap > Check in and select
a place from the available list.
• To change your privacy settings, tap > Settings.
Chapter 6: Google Applications
48
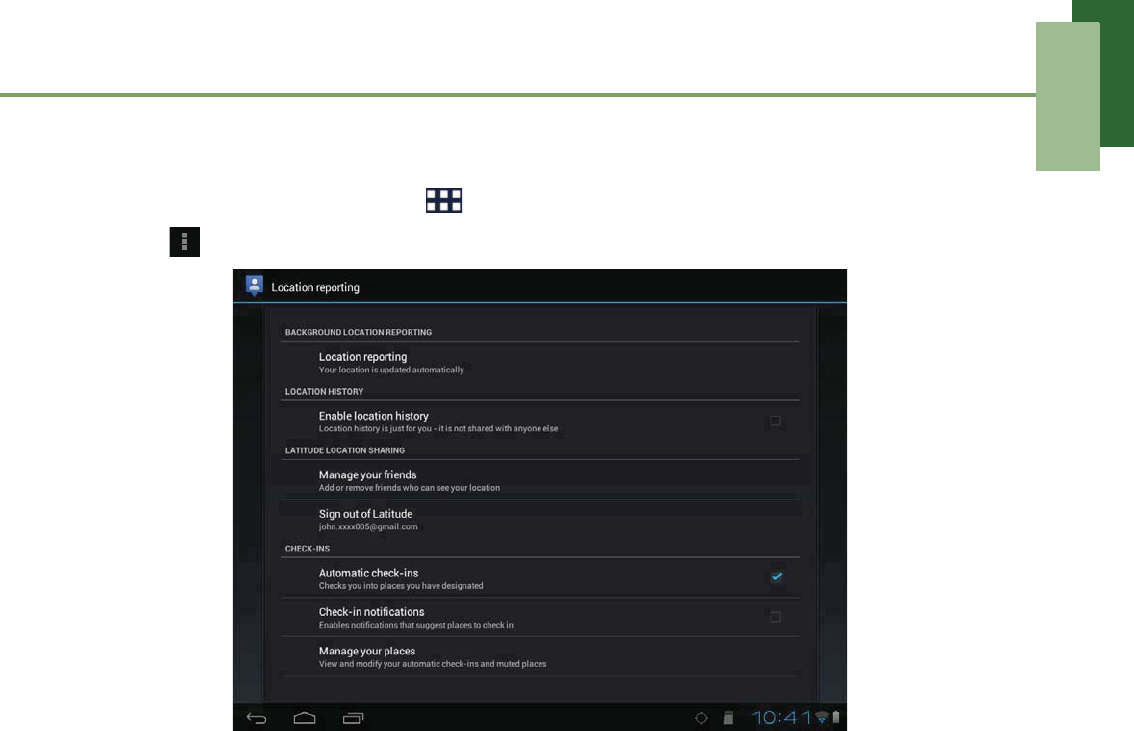
Configuring privacy settings
1. From the Home screen, tap > Latitude.
2. Tap > Settings > Location reporting.
3. Tap one of the following:
•Location reporting: Select to automatically update your location.
•Enable location history: Select to store your previous locations and
visualize them on the Latitude website.
•Manage your friends: Select to add or remove friends who can see your
location.
•Sign out of Latitude: Tap to sign out from Latitude.
•Automatic check-ins: Select to enable you to check in at places that you
chose.
•Check-in notifications: Select to enable notifications that suggest places to
check in.
•Manage your places: Select to manage and modify your automatic check-ins
and muted places.
6.8 Market
Android MarketTM allows you to purchase and download games and other
applications to your device.
When opening Android Market for the first time, the Terms of Service is displayed on
screen. Tap Accept to accept the terms and continue.
NOTE: Android Market may not be supported in some countries.

Chapter 6: Google Applications
49
Searching for applications
1. From the Home screen, tap > Market.
2. To browse for an application, tap a category to view available applications.
3. To search, tap .
4. Type the application name.
5. As you type, matching items on your device and suggestions from Google web
search are added to the list of previously chosen search results.
6. Tap a match item in the list.
Downloading applications
1. From the Home screen, tap > Market.
2. Tap the desired category.
3. Tap the application that you want to download.
4. Tap Download > Accept & download.
Removing applications
1. From the Home screen, tap > Market.
2. Tap . The list of downloaded applications are displayed on screen.
3. Tap the application that you want to remove.
4. Tap Uninstall > OK.
Chapter 6: Google Applications
50
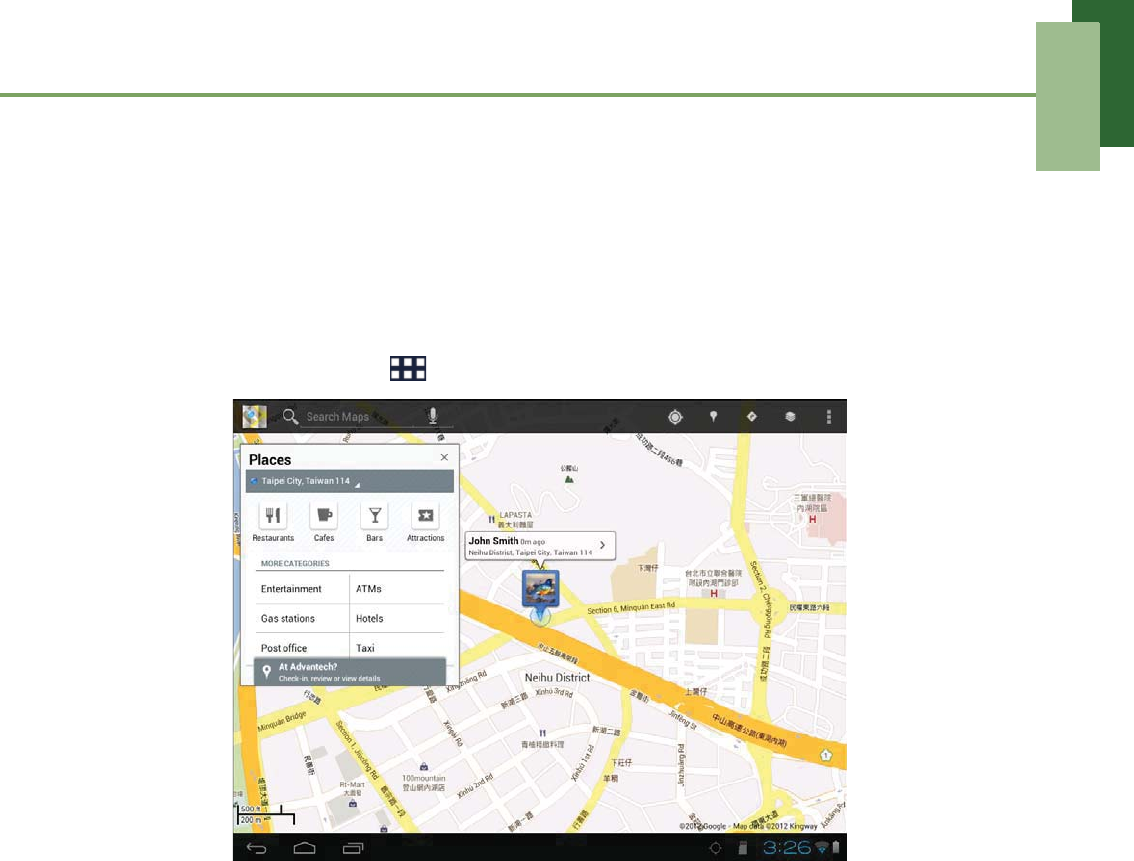
6.9 Places
Places is a location-based application that helps you find the places and things
around you. Local information available includes restaurants, cafes, bars, attractions,
entertainment, gas stations, post office, ATMs, hotels, taxi, and more. This application
also helps you get where you are going with maps and directions.
From the Home screen, tap > Places.
Chapter 6: Google Applications
51
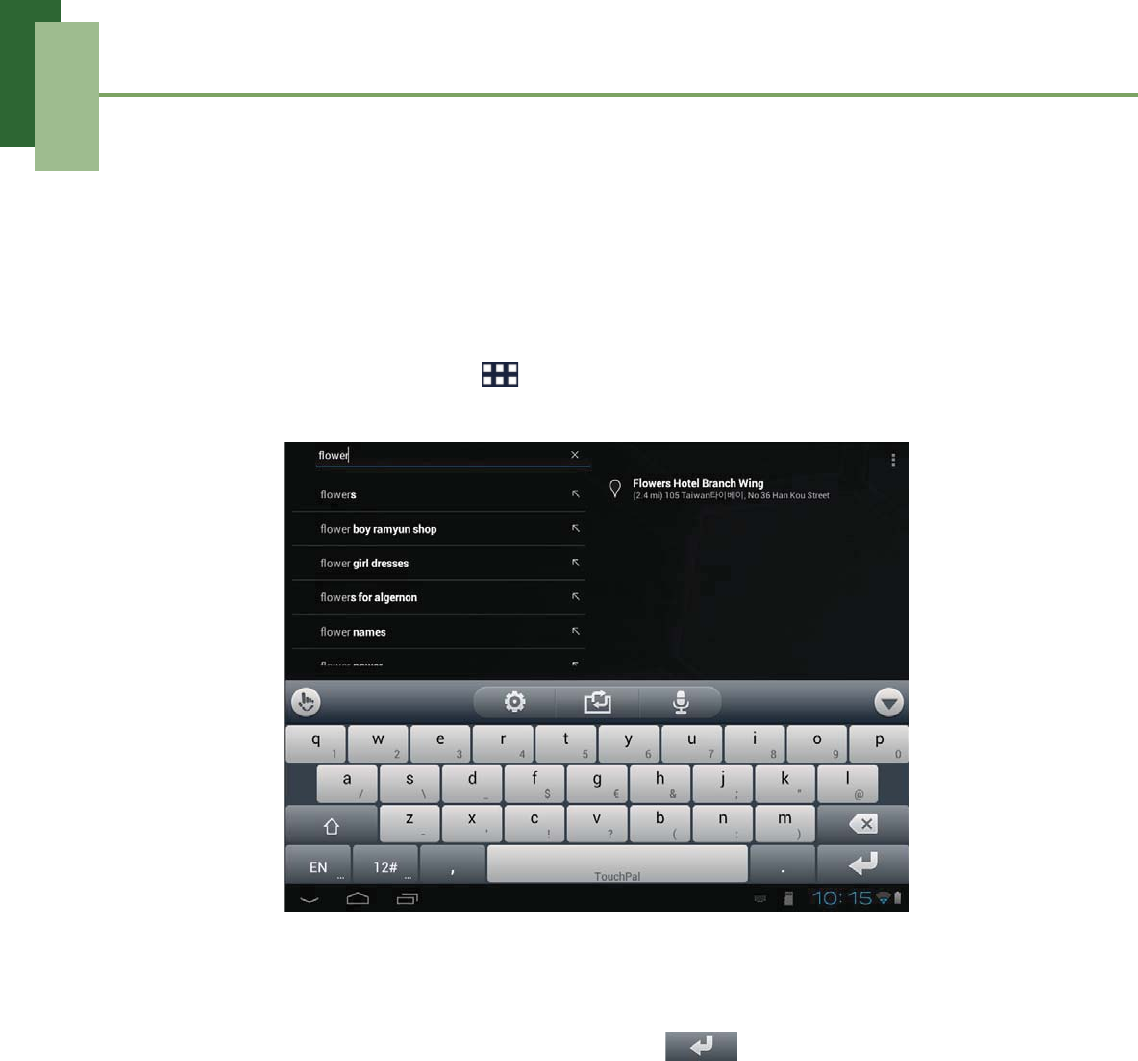
6.10 Search
From the Home Screen, you can search information on your device and on the web
with Search right away.
Searching information by entering text
1. From the Home screen, tap > Search or tap Search widget.
2. Enter the text you are searching in the Quick Search box.
3. As you type, matching items on your device and suggestions from Google web
search are added to the list of previously chosen search results.
Tap a match item in the list.
4. If what you are searching is not in the list, tap . The Browser opens,
displaying results of a Google search on the web.
Chapter 6: Google Applications
52
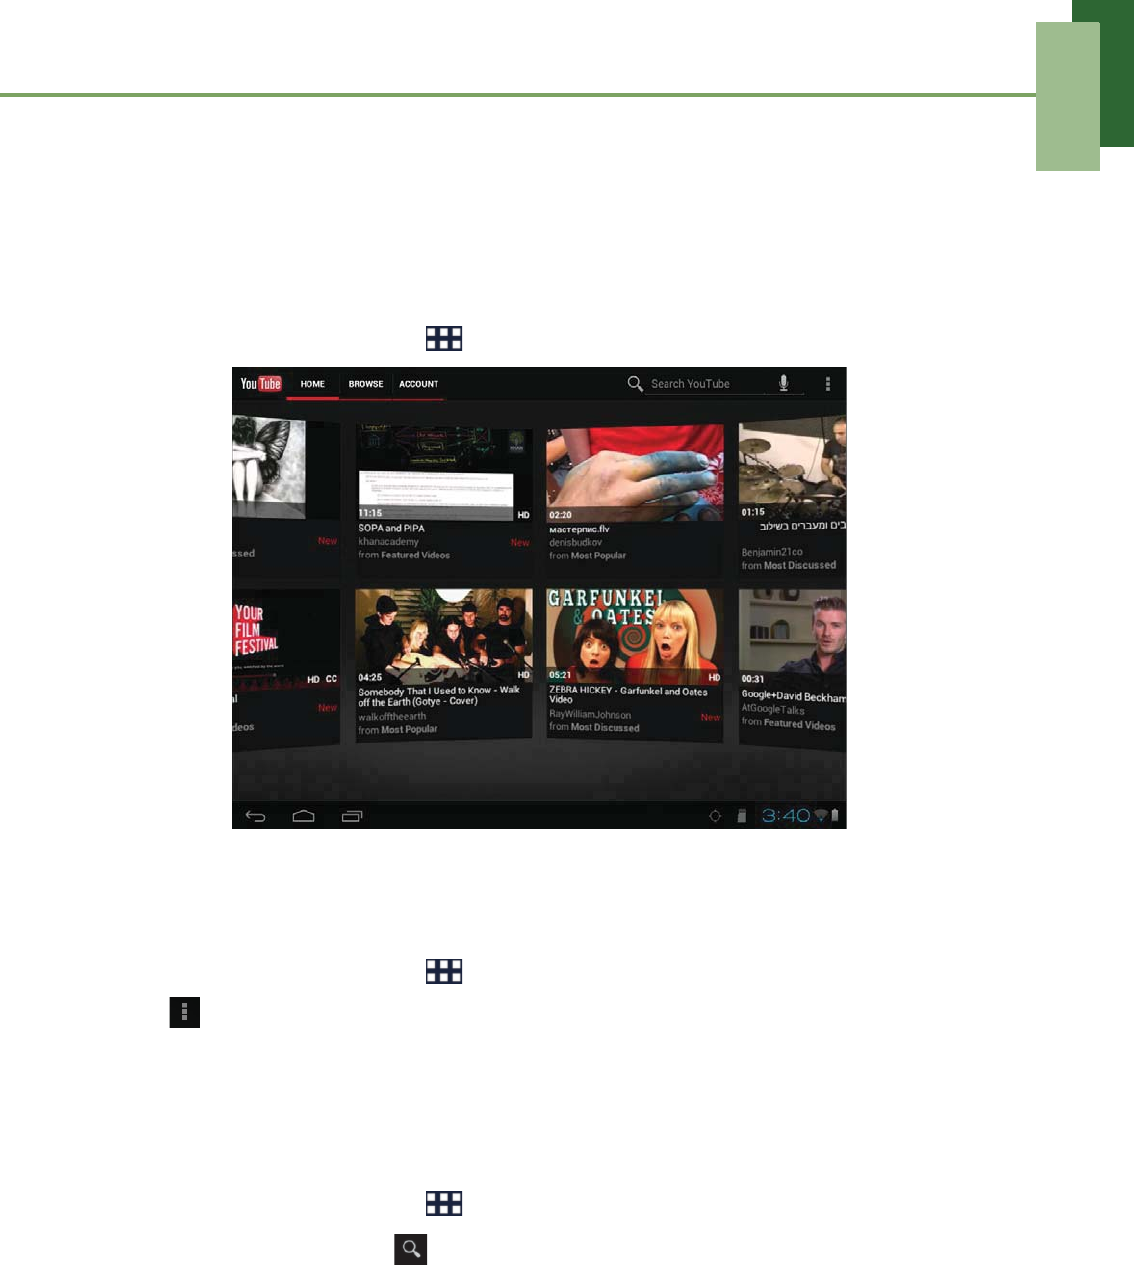
6.11 YouTube
YouTube allows you to watch, upload, and download videos to your device.
Watching videos
1. From the Home screen, tap > YouTube.
2. Tap a video to start playback.
Uploading videos
1. From the Home screen, tap > YouTube.
2. Tap > Sign in to sign in to your YouTube account.
3. Tap UPLOAD and select the video that you want to upload.
4. Follow the on-screen instructions to upload your video.
Searching videos
1. From the Home screen, tap > YouTube.
2. To search for videos, tap .
3. Type the keyword to search.
4. As you type, matching items on your device and suggestions from YouTube
search are added to the list of previously chosen search results.
5. Tap a match item in the list.
Chapter 6: Google Applications
53
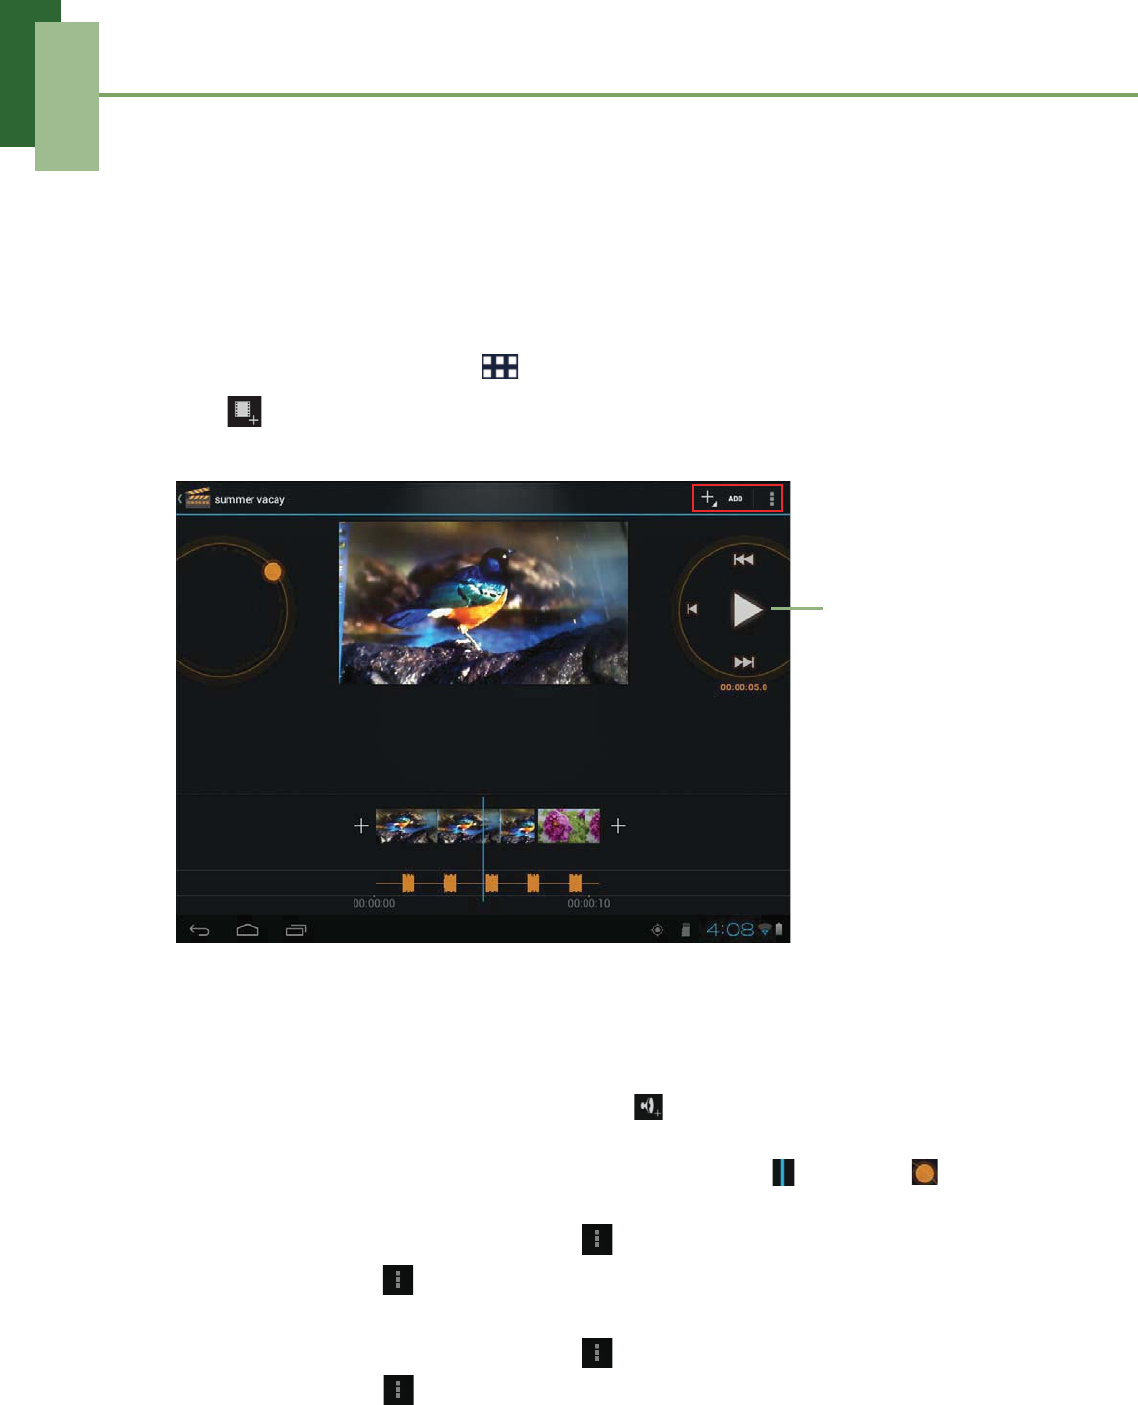
6.12 Movie Studio
Movie Studio allows you to create or edit movies on your device before sharing with
your friends or uploading to website (i.e. YouTube).
Creating new movies
1. From the Home screen, tap > Movie Studio.
2. Tap to create a new project. Enter a project name and tap OK.
3. To add/edit items on your project, do any of the following:
• To add a video clip, tap ADD > Import video clip.
• To add a photo, tap ADD > Import image.
• To record a new video clip, tap ADD > Record a video.
• To capture a photo, tap ADD > Take a photo.
• To add music on the background, tap or ADD > Import music. Select a
song and tap OK.
• To adjust the video elapsed time, tap the time line ( ) and drag to the
desired time duration.
• To change the video display, tap > Change aspect ratio.
4. When finished, tap > Export movie. Set the movie size and quality, and tap
Export.
• To change the project name, tap > Change project name.
• To delete, tap > Delete project.
Playback control

Chapter 6: Google Applications
54
Viewing movies
1. From the Home screen, tap > Movie Studio.
2. Tap the desired project.
3. Tap or > Play exported movie to start movie playback.
• To change the project name, tap > Change project name.
• To delete, tap > Delete project.
Sharing movies
1. From the Home screen, tap > Movie Studio.
2. Tap the desired project.
3. Tap > Share movie to share your movies via Bluetooth, Email, Gmail, or
YouTube.
Chapter 7: Using Bluetooth
55
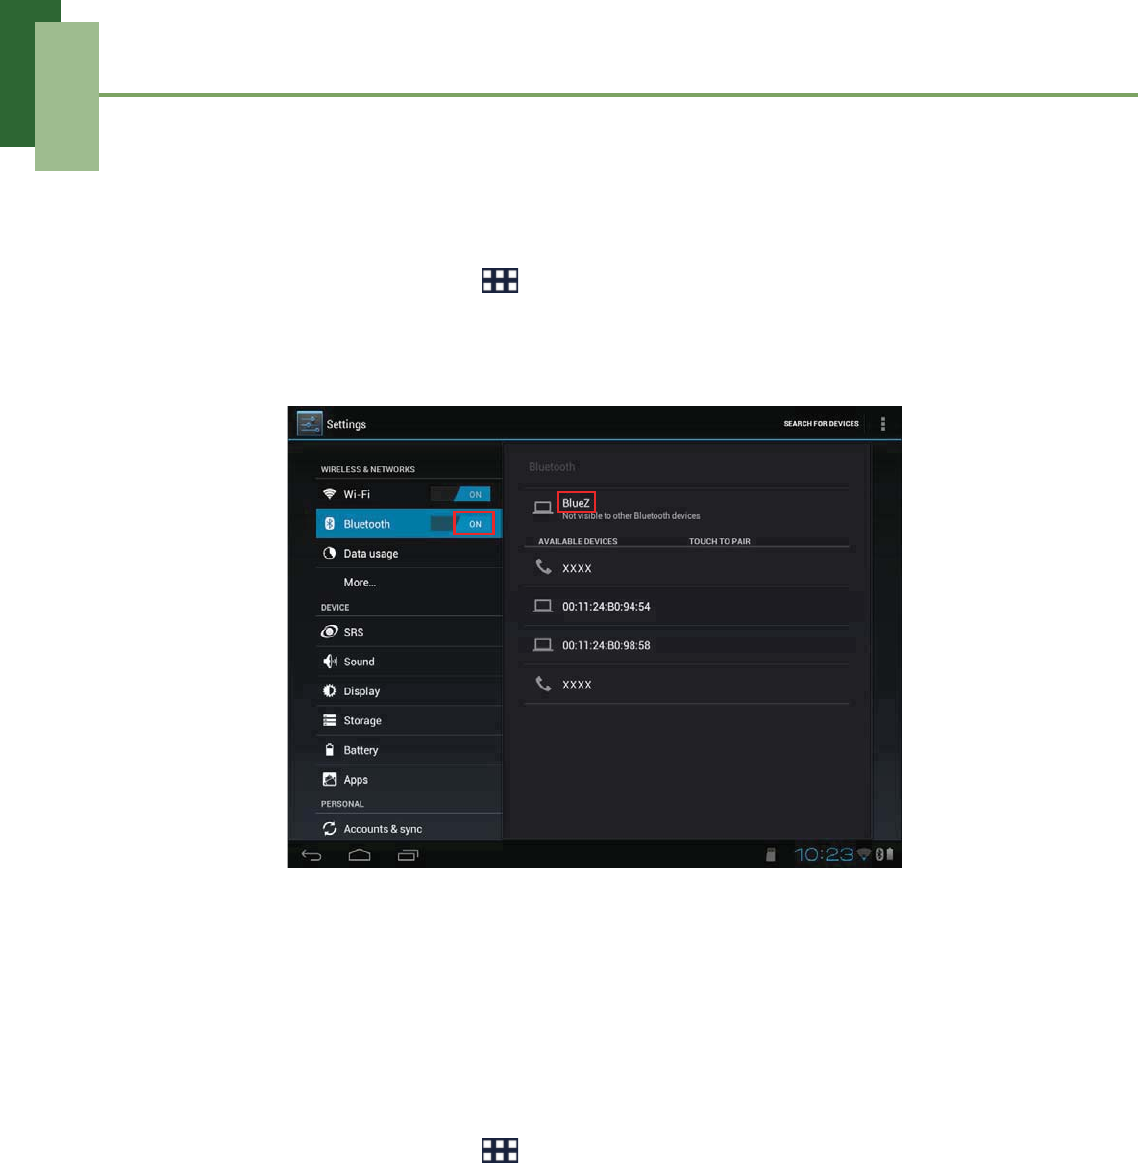
Chapter 7: Using Bluetooth
To turn Bluetooth on
1. From the Home screen, tap > Settings.
2. On WIRELESS & NETWORKS, tap Bluetooth and set the setting to ON.
NOTE: When the Bluetooth is turned on, your device detects other Bluetooth
devices, but your device is not visible to others.
3. To make your device visible to others, tap BlueZ once to make this device visible
to other devices.
7.1 Connecting to Bluetooth Devices
A connection to a Bluetooth device is called a partnership. You need to pair and
create a partnership with a Bluetooth device to exchange information.
1. From the Home screen, tap > Settings.
2. On WIRELESS & NETWORKS, tap Bluetooth and set the setting to ON.
3. To search for a new device, tap SEARCH FOR DEVICES.
4. Tap a detected device.
5. To start pairing, enter the PIN and tap OK.
NOTE:
• The PIN of the device must be the same PIN on the other bluetooth device.
• On some devices, tap Pair to start pairing.
6. The paired bluetooth device name is displayed.
NOTE: Once a partnership has been created, connecting to that device again will
no longer require entering the PIN.
Chapter 8: Multimedia Applications
56
Chapter 8:
Multimedia Applications
8.1 Photos and Videos
This device is equipped with a front camera to take photos and videos.
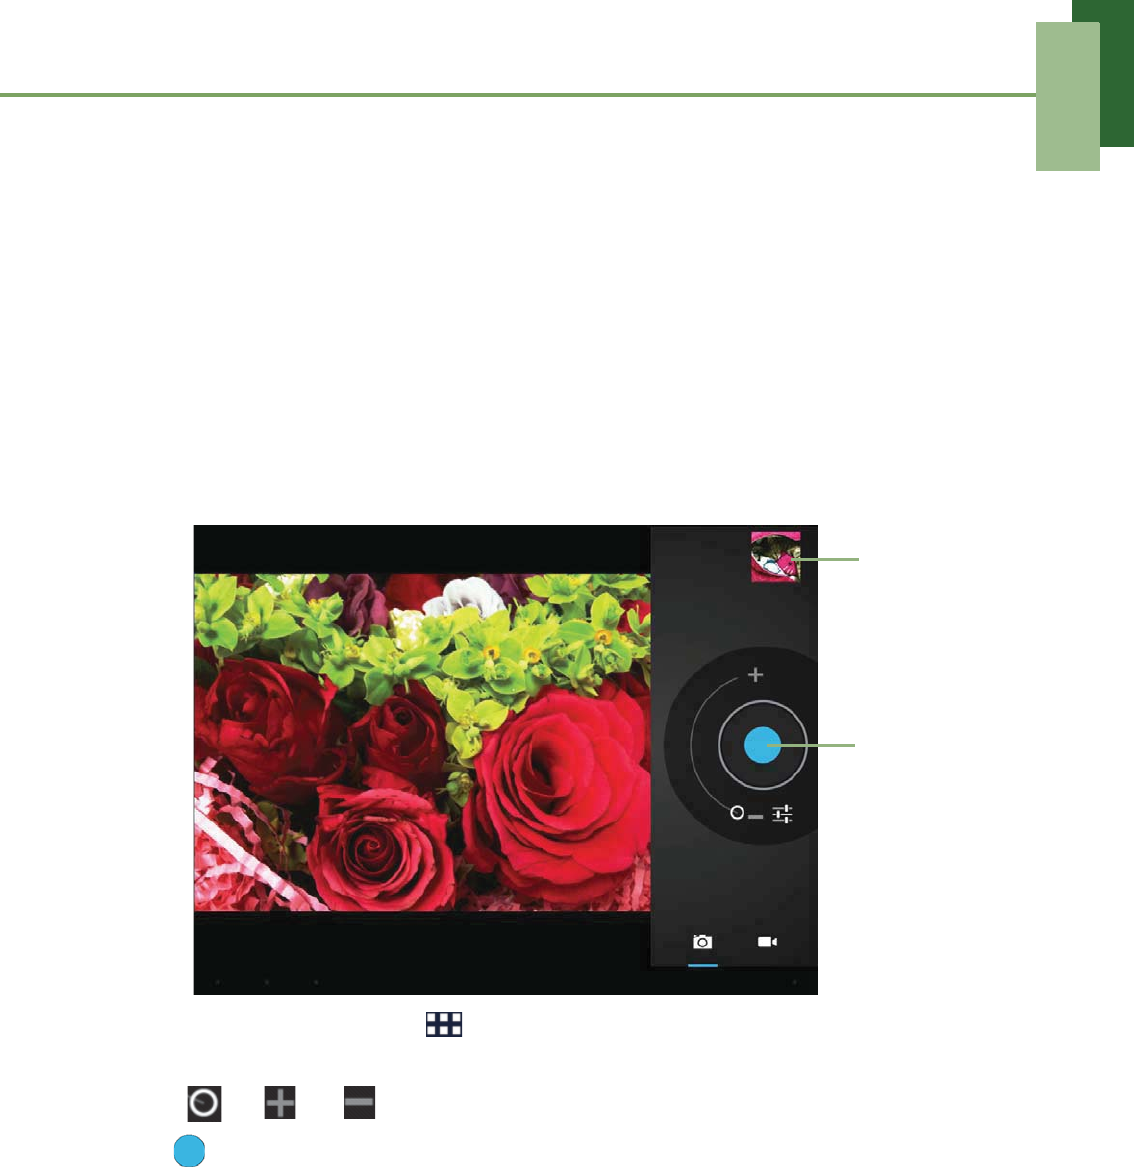
Taking a photo
1. From the Home screen, tap > Camera.
2. Aim the device at the subject.
Slide to or to zoom in/out on the subject.
3. Tap to take the shot.
The latest photo will be displayed on the top right of the screen. Tap the thumbnail
to view it in full screen.
Tap to take a
photo.
Tap to
preview the
latest
captured
photo.
Chapter 8: Multimedia Applications
57
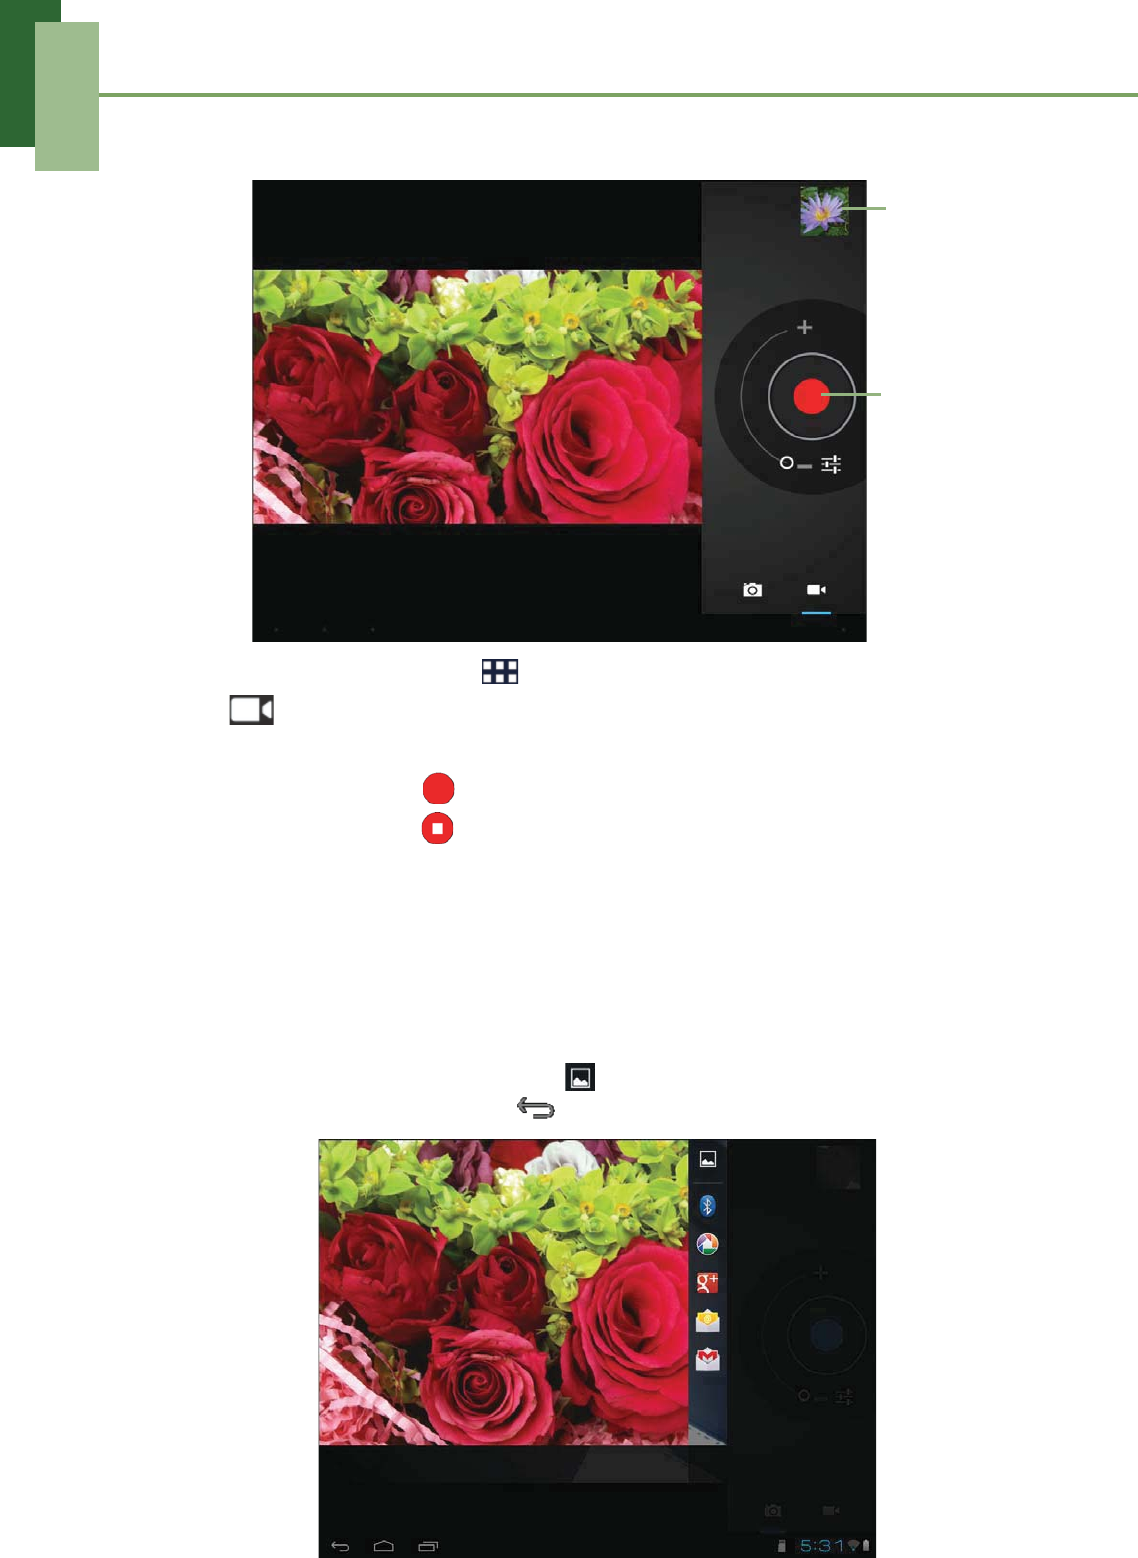
Recording a video
1. From the Home screen, tap > Camera.
2. Tap to switch to Camcorder mode.
3. Aim the device at the subject.
4. To start recording, tap .
To stop recording, tap .
Reviewing a photo
After taking a photo, tap the window located at top right corner to preview the latest
captured photo on the screen.
• To share the photo via Bluetooth, Picasa, Google+, Email, or Gmail, tap the
respective icon.
• To view other photos in Gallery, tap .
• To return to Camera mode, tap .
Tap to record
video.
Tap to preview
the latest
recorded video.
Chapter 8: Multimedia Applications
58
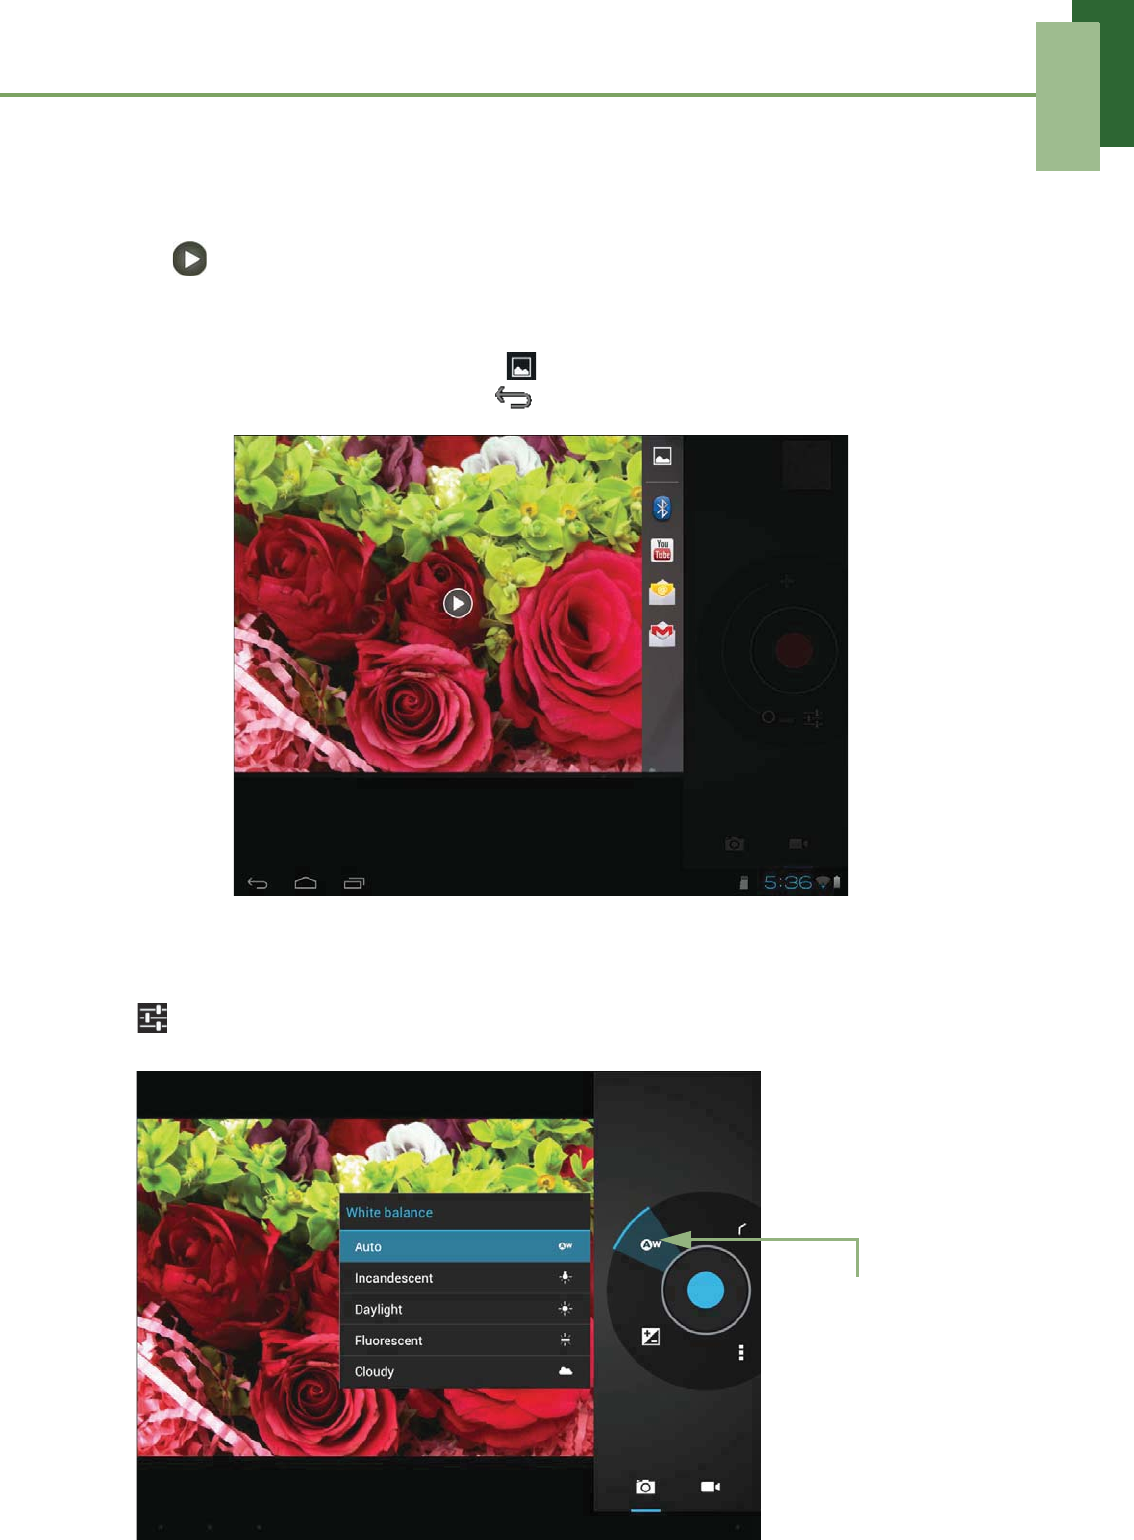
Reviewing a video
After recording a video, tap the window located at top right corner to preview the latest
recorded video on the screen.
• Tap to play the video.
• To share the photo via Bluetooth, YouTube, Email, or Gmail, tap the respective
icon.
• To view other videos in Gallery, tap .
• To return to Camcorder mode, tap .
Configuring camera settings
Tap to access the camera/camcorder menu. Tap the menu item icon to open the
respective menu and select the desired setting.
Tap an option to
configure camera
settings.
Chapter 8: Multimedia Applications
59
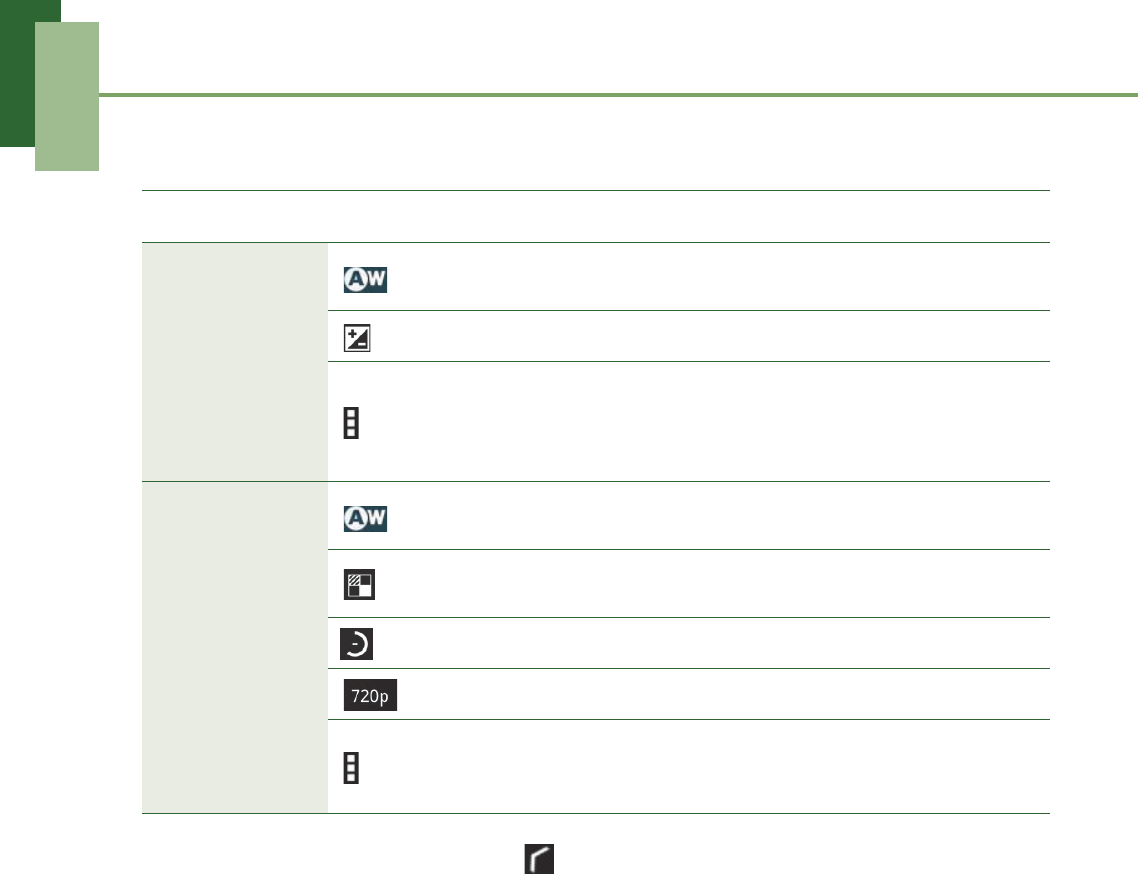
Tap to view and adjust the general settings of your camera:
NOTE: To exit the menu mode, tap .
Mode Setting Available options
Camera mode
(White balance) Auto, Incandescent, Daylight, Fluorescent,
Cloudy
(Exposure) -3, -2, -1, 0, +1, +2, +3
(Camera settings)
Store location (On, Off), Picture quality
(Super fine, Fine, Normal), Shutter sound
(On, Off), Picture size (1.3M pixels, VGA,
QVGA), Restore defaults (OK, Cancel)
Camcorder
mode
(White balance) Auto, Incandescent, Daylight, Fluorescent,
Cloudy
(Effect) SILLY FACES (Squeeze, Big eyes, Big
mouth, Small mouth, Big nose, Small eyes)
(Time lapse interval) Off, 1s, 1.5s, 2s, 2.5s, 3s, 5s, 10s
(Video quality) HD (720p), SD (480p)
(Camera settings)
Video duration (30 minutes, 10 minutes, 30
seconds), Store location (On, Off), Restore
defaults (OK, Cancel)
Chapter 8: Multimedia Applications
60
8.2 Viewing Photos & Videos
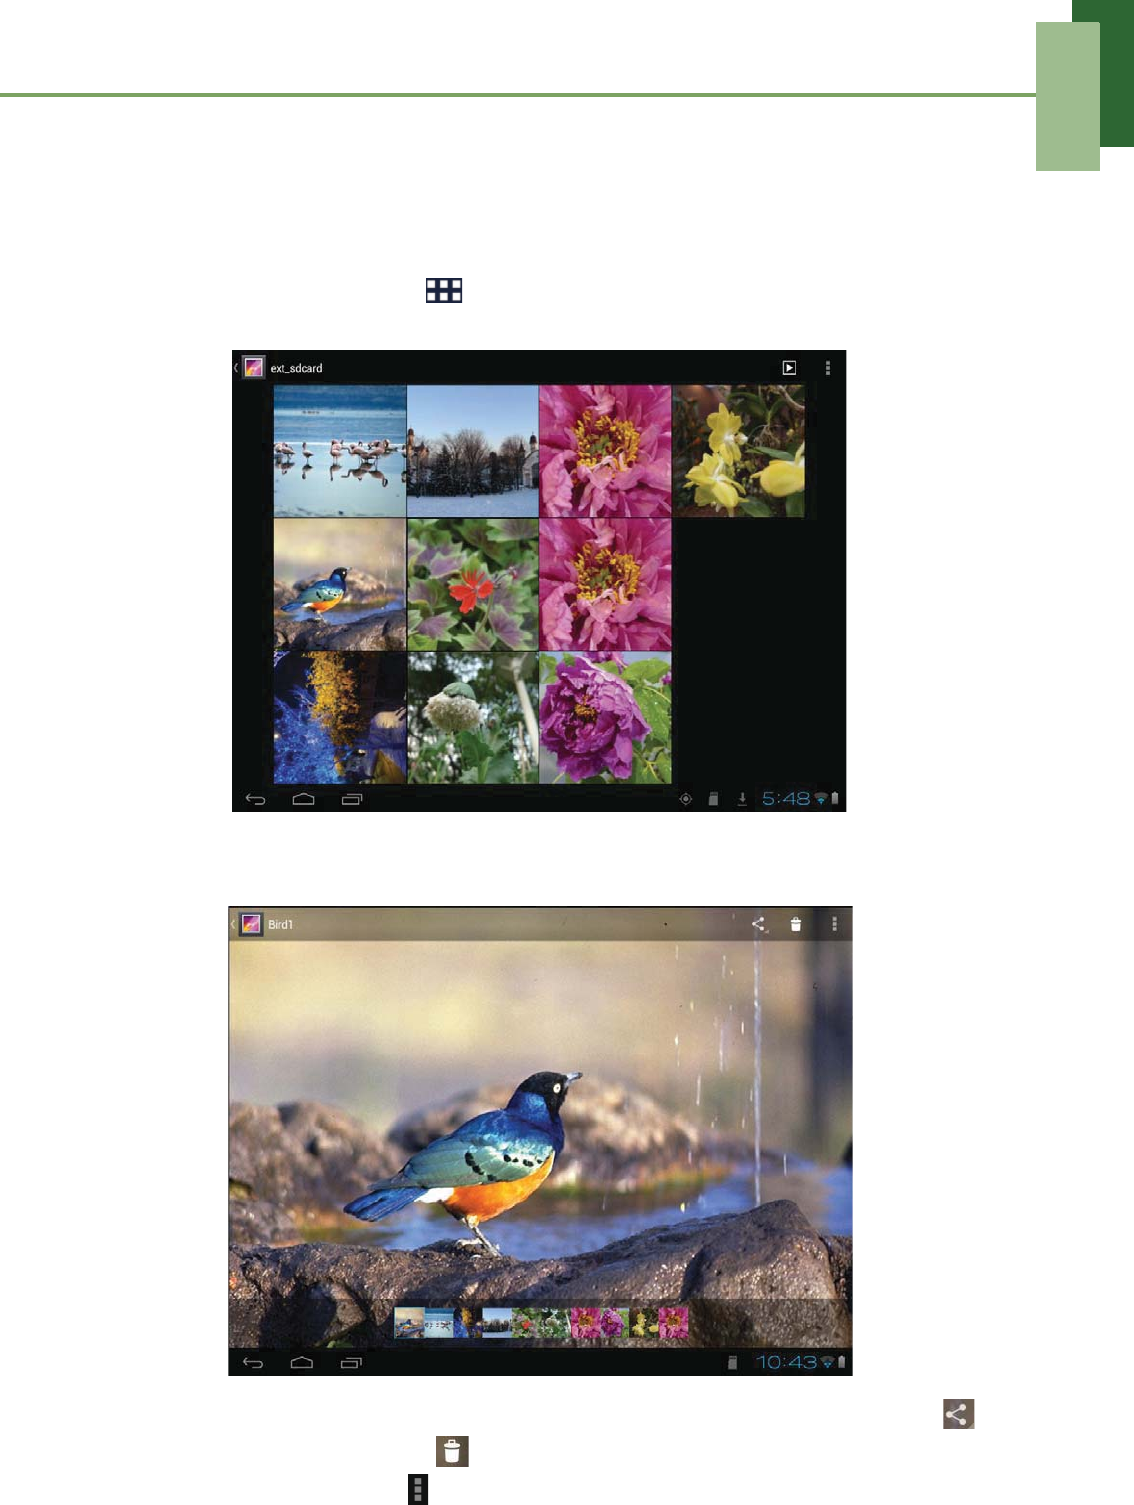
Viewing photos
1. From the Home screen, tap > Gallery.
2. Tap the desired folder to view the images in thumbnails.
3. Tap an image to view.
4. Swipe your finger to the left/right to view the previous/next image.
• To share the photo via Bluetooth, Picasa, Google+, Email, or Gmail, tap .
• To delete the photo, tap . Then, tap Delete to confirm file deletion.
• To edit the photo, tap to show more options.
Chapter 8: Multimedia Applications
61
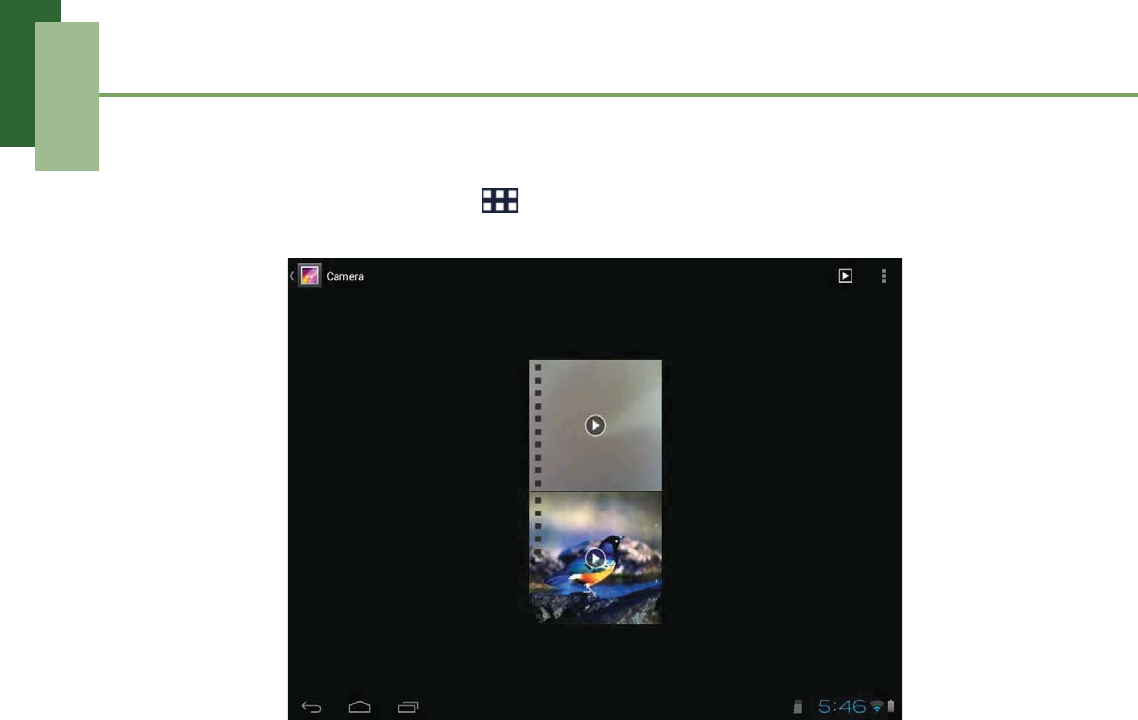
Playing videos
1. From the Home screen, tap > Gallery.
2. Tap the desired folder to view the videos in thumbnails.
3. Tap the video to playback.
Chapter 8: Multimedia Applications
62
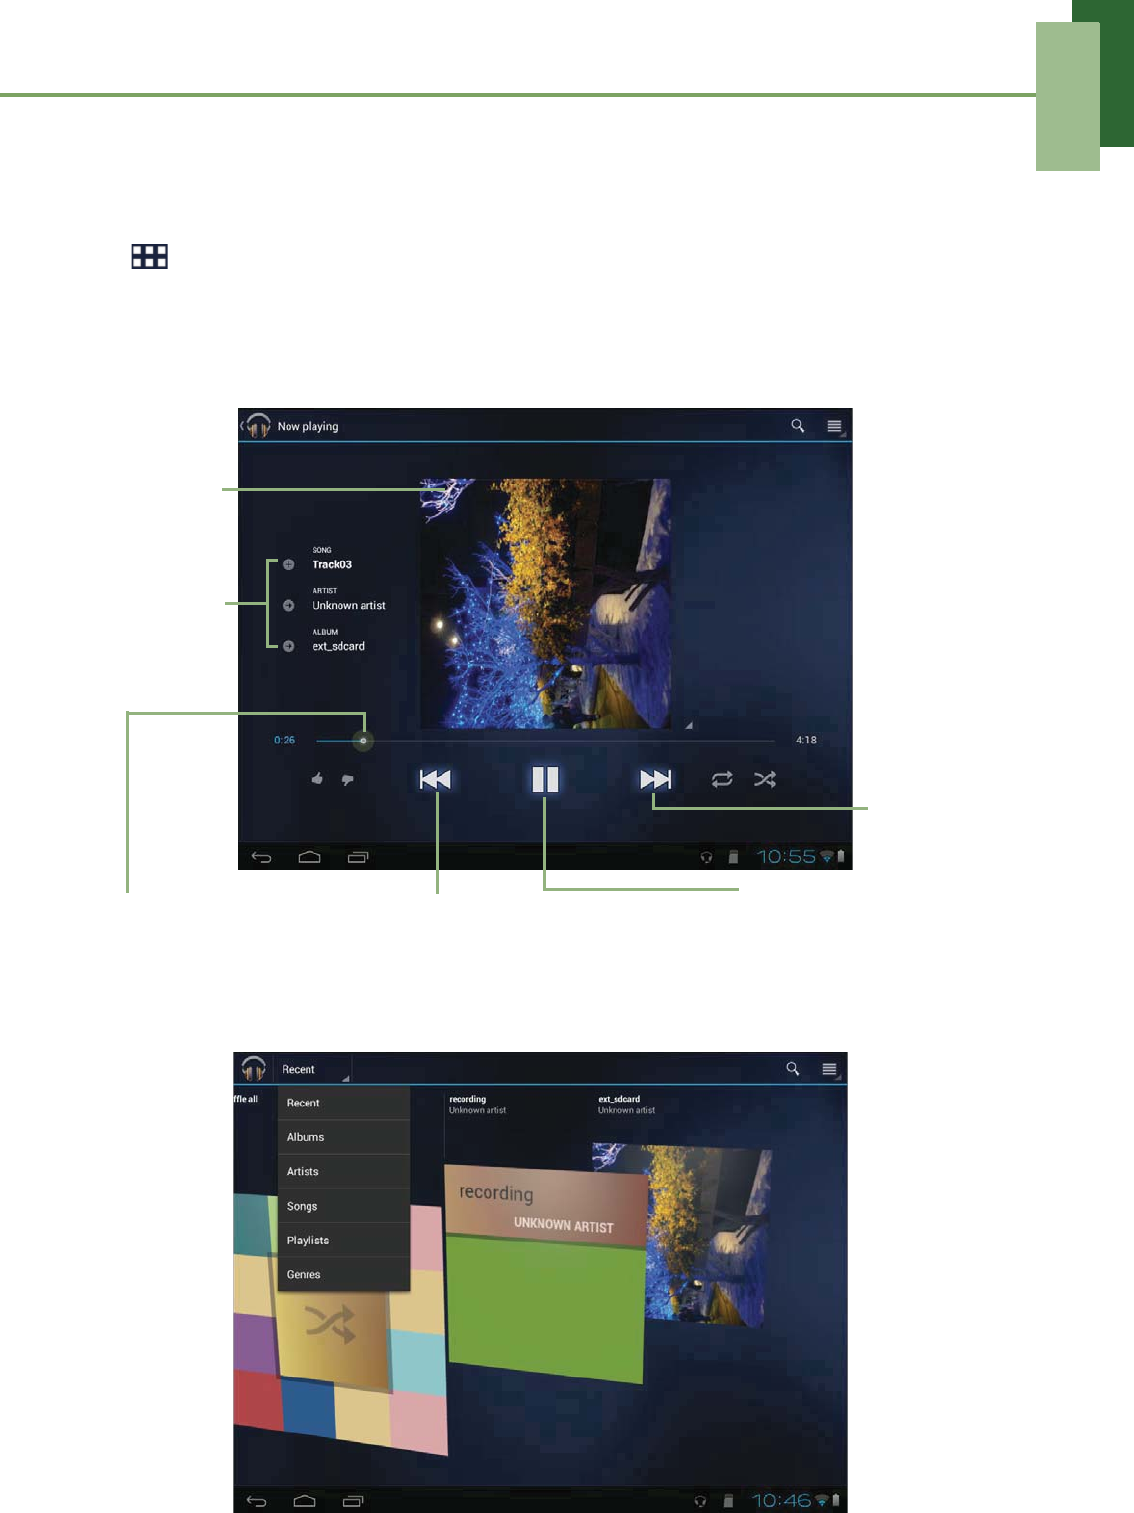
8.3 Using Music Player
You can transfer music to the device from the computer. From the Home screen,
tap > Music.
Music screen
•Playback screen: Displays the playback area with the playback controls.
•Library screen: Displays folder categories to search for media files. It contains the
following categories: Recent, Albums, Artists, Songs, Playlists,and Genres.
Drag the slider left/right to go
forward or backward.
Play or pause the song.
Go to next
song.
Audio
information
display area.
Go to previous song.
Album art
picture or
animation.
Chapter 8: Multimedia Applications
63
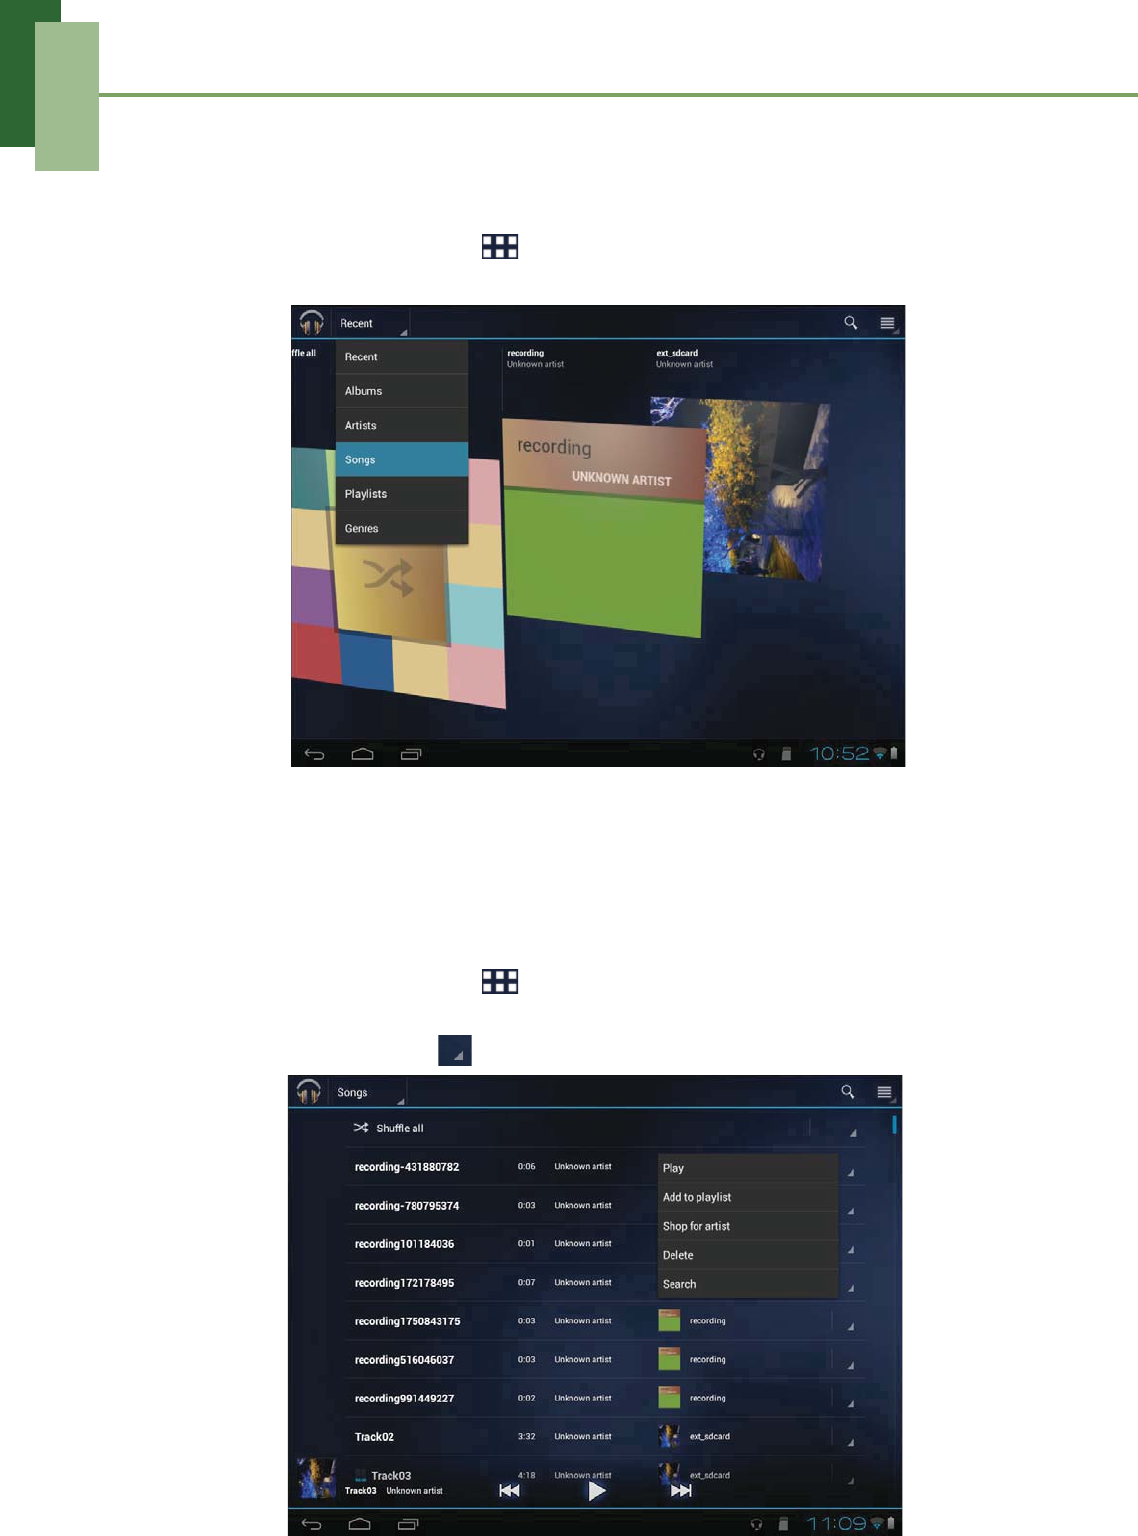
Playing music
To play music
1. From the Home screen, tap > Music.
2. Tap Songs to view the list of songs.
3. Tap a song to play.
Managing playlists
To add a music file to playlist
Add songs to a specific playlist or create a playlist.
1. From the Home screen, tap > Music.
2. Browse for the song that you want to add in a playlist.
3. Select the song and tap > Add to playlist.

Chapter 8: Multimedia Applications
64
4. Select from the current playlist or tap New playlist to create a new playlist. The
song is added to the playlist.
NOTE: If you create a new playlist, enter the playlist name, then tap OK.
To remove a music file from playlist
1. From the Home screen, tap > Music.
2. Tap Playlists and browse for the playlist.
3. Select the song and tap > Remove from playlist.
Chapter 9: Applications
65
Chapter 9: Applications
Your device comes with the following pre-installed applications.
Application Description
Books Download ebooks from online catalog for viewing on your
device. See page 67.
Browser Browse the web and download files from the Internet. See
page 28.
Calculator Perform basic arithmetic functions, such as addition,
subtraction, multiplication, and division. See page 68.
Calendar Create and track schedule or appointments. See page 68.
Camera Capture photos and record videos. See page 56.
Clock Set up alarms. See page 82.
Documents To Go View Microsoft® Office and Adobe file formats. See page 69.
Downloads View or delete the files that you have downloaded in
Browser. See page 70.
Email Send and receive email messages. See page 23.
File Browser Manage audio, video, photo, and other files. See page 71.
FM Radio Tune and listen to the radio. See page 72.
Gallery View and edit photos and videos. See page 60.
Gmail Access your Gmail account on your device. See page 30.
Google+ Log in with your Google account and use Google+ (Google
Plus) application on your device. See page 35.
Latitude See your friends’ locations and share yours with them. You
need to sign in with your Google account to use this feature.
See page 47.
Chapter 9: Applications
66
Maps View the map and get directions to your destination. See
page 42.
Market Purchase games and other applications from Android
Market and download them to your device. See page 48.
Messenger Connect with your friends via Google+ Messenger
application. See page 41.
Movie Studio Create or edit movies on your device. See page 53.
Music Play and manage music and audio files on your device. See
page 62.
Navigation Use to track your location, find places, and get driving
directions to your destination. See page 44.
News & Weather View the weather forecast and read the latest news. See
page 74.
People Store names, numbers, email, and other information. See
page 16.
Places
Help you to find the places around you. Local information
available includes restaurants, cafes, bars, hotels,
attractions, entertainment, gas stations, post office, ATMs,
hotel, and more. See page 50.
Search Search applications and contacts on your device, and the
Internet using Search. See page 51.
Settings Configure wireless settings and other general settings of
your device. See page 77.
Talk Log in and chat with friends using Talk. See page 38.
TouchPal
Keyboard Configure the keyboard settings. See page 20.
Voice Note Record voice notes. See page 76.
YouTube Watch videos from YouTube on your device. See page 52.
Application Description
Chapter 9: Applications
67
9.1 Books
With Books, you can download or purchase ebooks from online store, and view them
on your device.
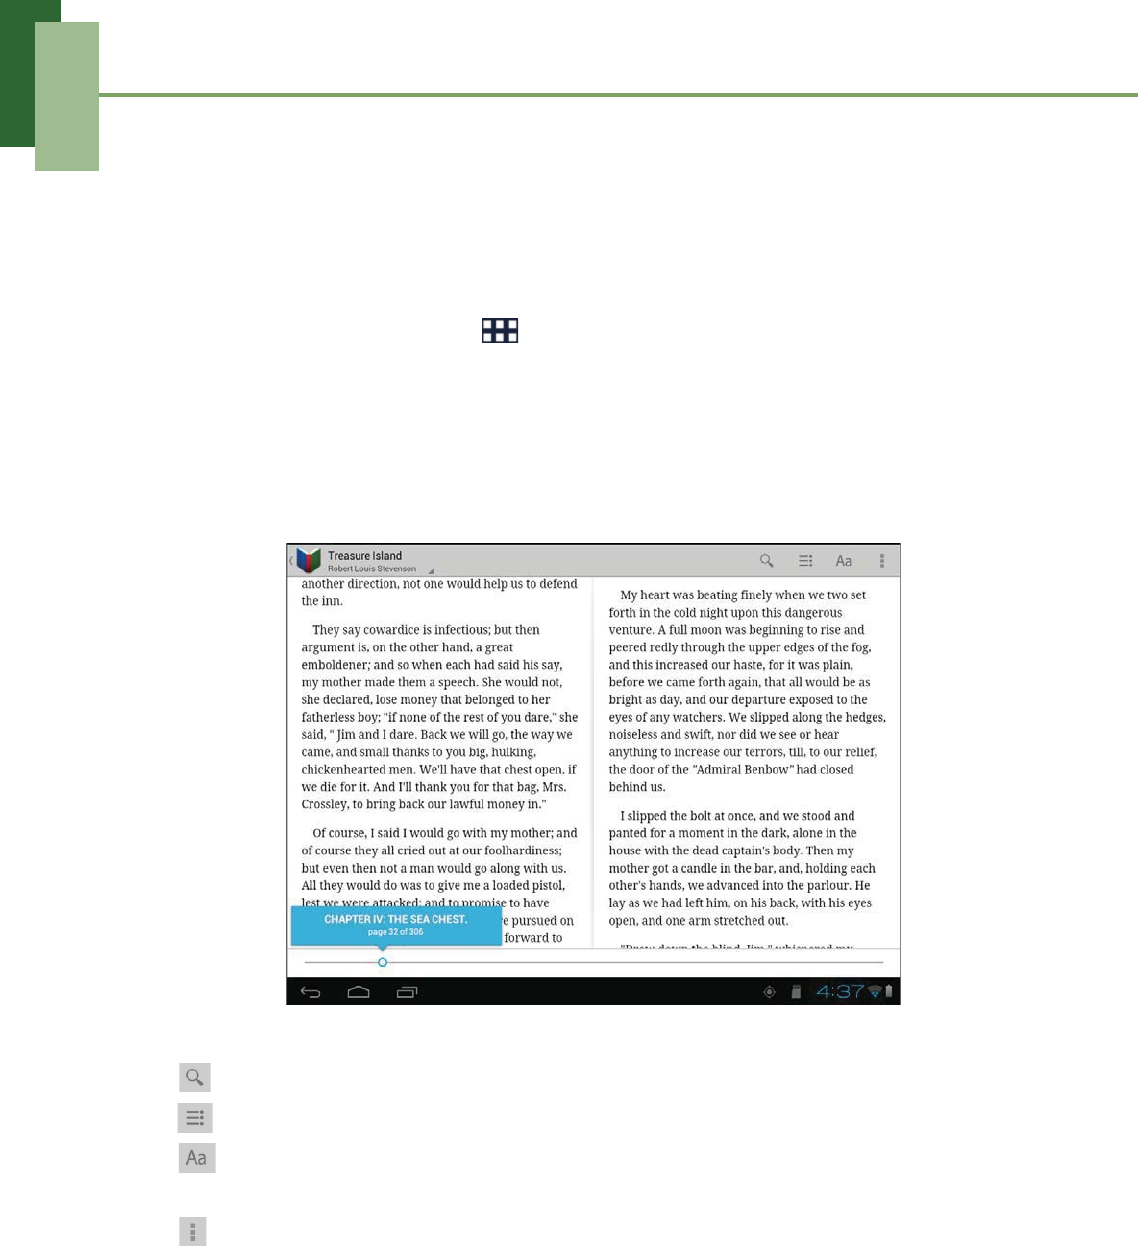
Browsing an EBook
1. From the Home screen, tap > Books.
2. Select an ebook from your bookshelf and tap to open the book.
3. Swipe your fingers right and left to flip to the previous and the next page.
Customizing the Viewing Settings
On any page, touch the screen.
Select one of the following options that you want to adjust:
• : Tap to search the desired content in the book.
• : Tap to jump to the desired chapter.
• : Tap to toggle night or daylight reading mode, configure the font type and size,
brightness level, text alignment, and line height.
• : Tap to view the book information, share the book information with others,
make it available offline, and read the content aloud.
9.2 Browser
Open Browser to view web pages. See “Browsing Web Pages” on page 28.
Chapter 9: Applications
68
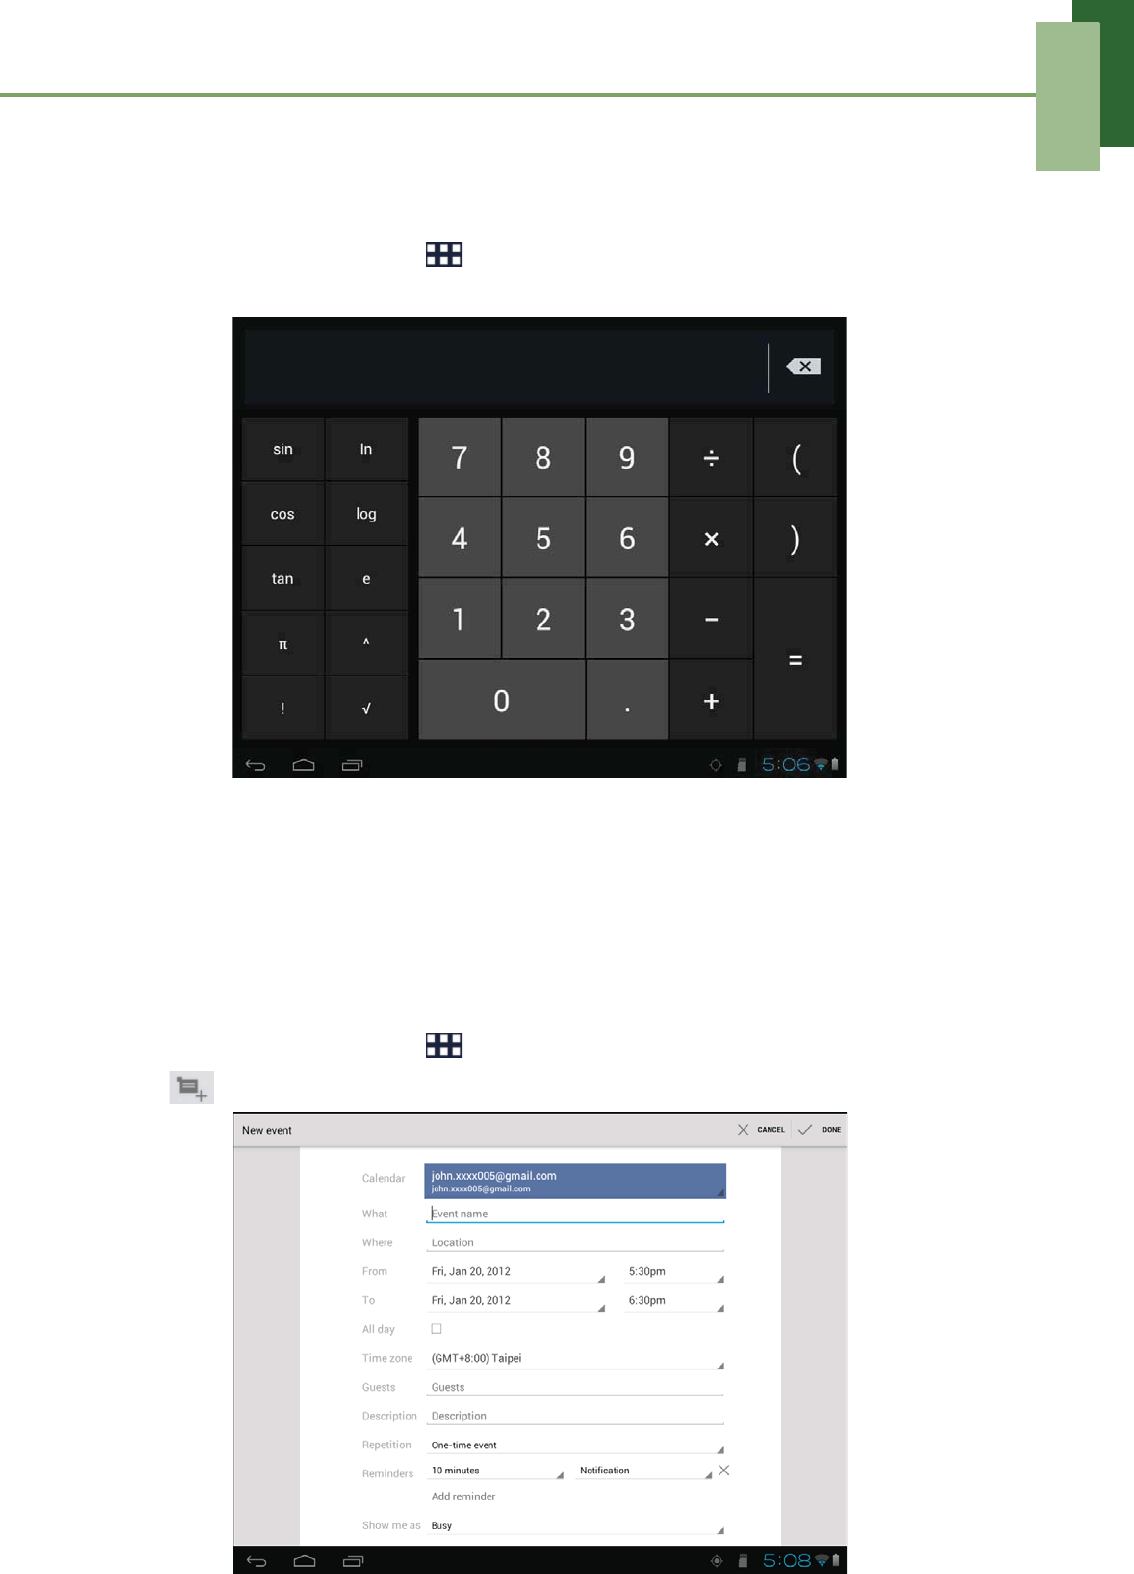
9.3 Calculator
With Calculator, you can perform basic arithmetic functions on your device.
1. From the Home screen, tap > Calculator.
2. Use the on-screen calculator keypad to perform arithmetic calculation.
9.4 Calendar
The Calendar lets you schedule and sound alarms for appointments, meetings and
other events. Scheduled appointments for the day can be displayed on the Home
screen.
To schedule an event
1. From the Home screen, tap > Calendar.
2. Tap .
Chapter 9: Applications
69
3. Enter the event details.
4. Select the date and time for From and To fields.
NOTE: For an all-day event, check All day.
5. To set repetition, select the repetition from the list.
6. To set a reminder, select the time from the list.
7. When finished, tap .
TIP: From the Calendar screen, tap and hold a day or a time slot then set a new
appointment on the tapped date or time.
9.5 Camera
Capture photos and record videos with this device. See “Photos and Videos” on
page 56.
9.6 Clock
Set alarms with this device. See “Alarms settings” on page 82.
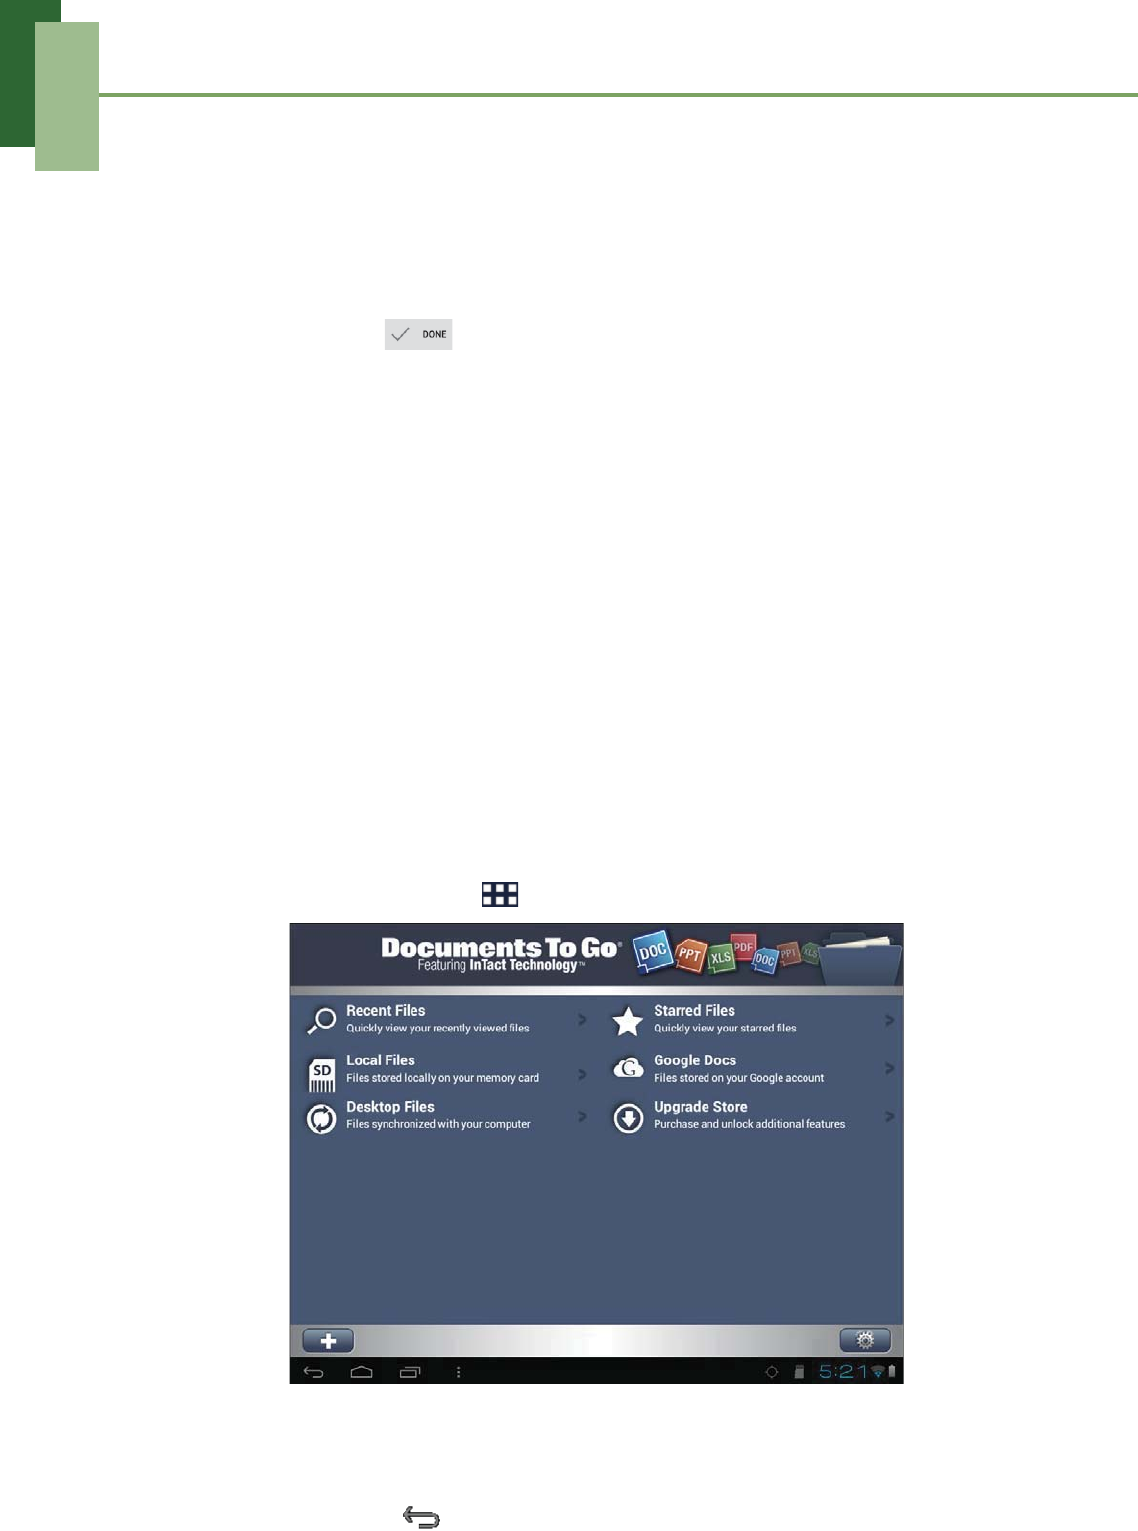
9.7 Documents To Go
Documents To Go allows you to open Microsoft® Office and Adobe file formats.
1. From the Home screen, tap > Documents To Go.
2. Tap the document category that you want to view.
3. Tap the file you want to open.
• Swipe your finger on the screen to pan or go through other pages.
4. To close the file, tap .
Chapter 9: Applications
70
NOTE: To create a new document or edit an existing document, purchase the full
version of Documents To Go.
Purchase Documents To Go
To get the full version of Documents To Go:
1. Tap Upgrade Store.
2. Tap More. Browser is launched and you will be redirected to www.dataviz.com.
3. Follow the on-screen instructions to complete purchase.
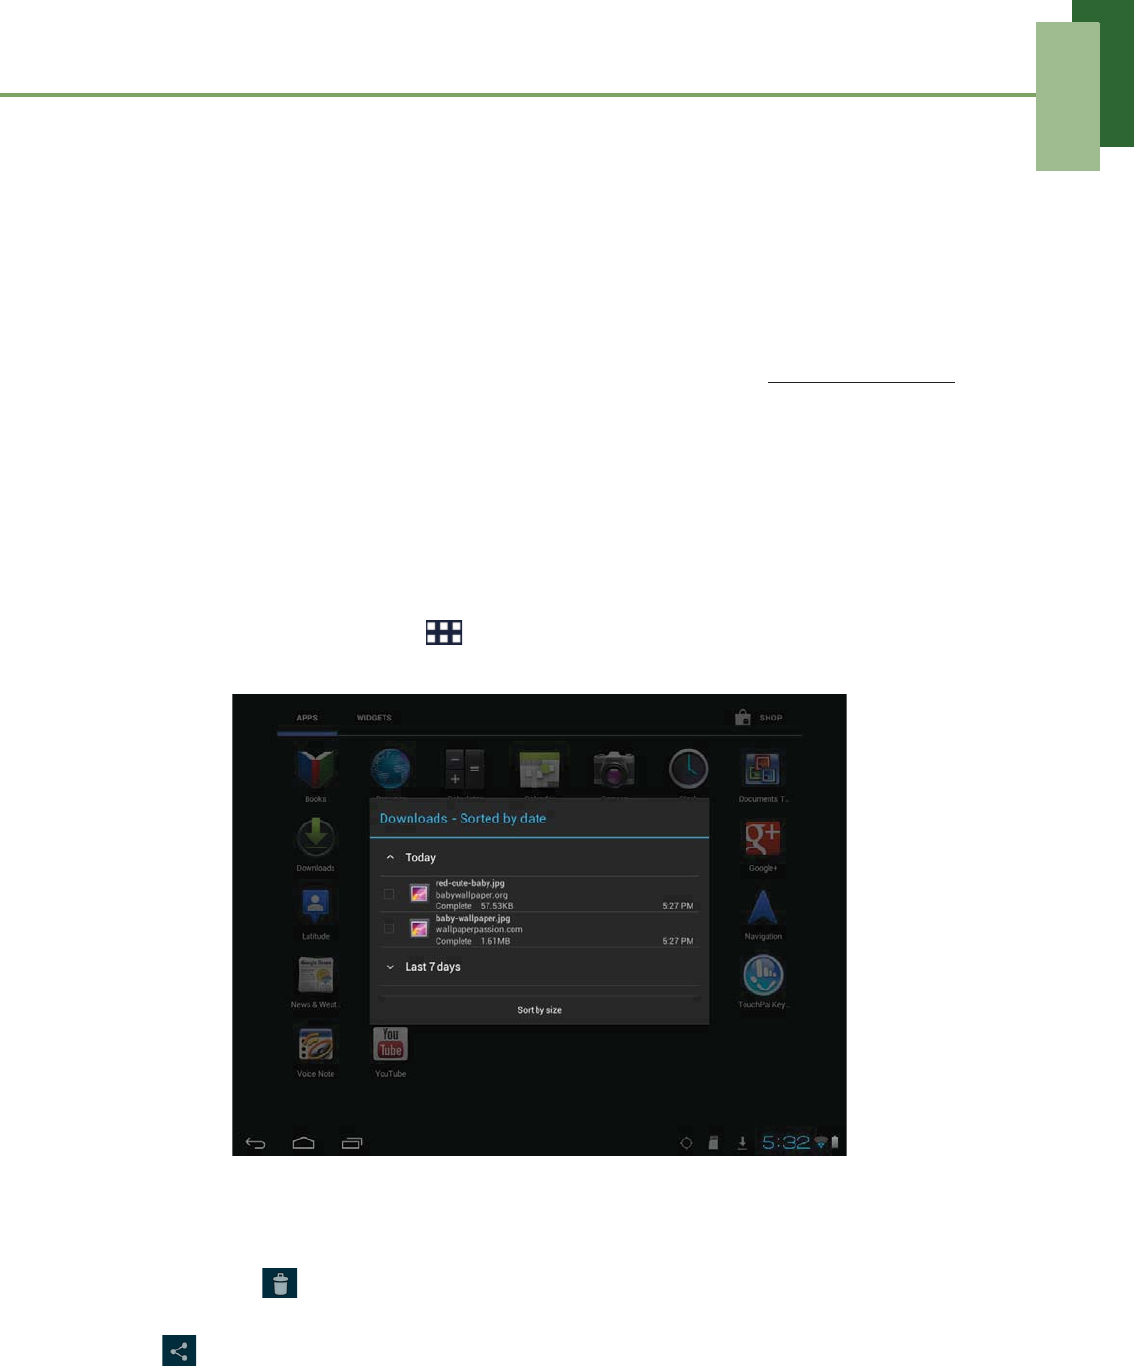
9.8 Downloads
Use Downloads to view or delete what you have downloaded in Browser.
NOTE: The downloaded files are stored in the “Download” folder in your memory card.
1. From the Home screen, tap > Downloads.
2. Tap an item to view.
Managing files
• To delete a file, tap the check box on the left side of the image. A blue tick
appears, tap .
• To share a file, tap the check box on the left side of the image. A blue tick appears,
tap .
• To sort the file by size, tap Sort by size.
• To sort the file by time, tap Sort by date.
• To view files that have been downloaded earlier, tap the headings.
Chapter 9: Applications
71
9.9 Email
Use Email to connect to your remote mailbox and retrieve your email messages from
your device. See “Using Email” on page 23.
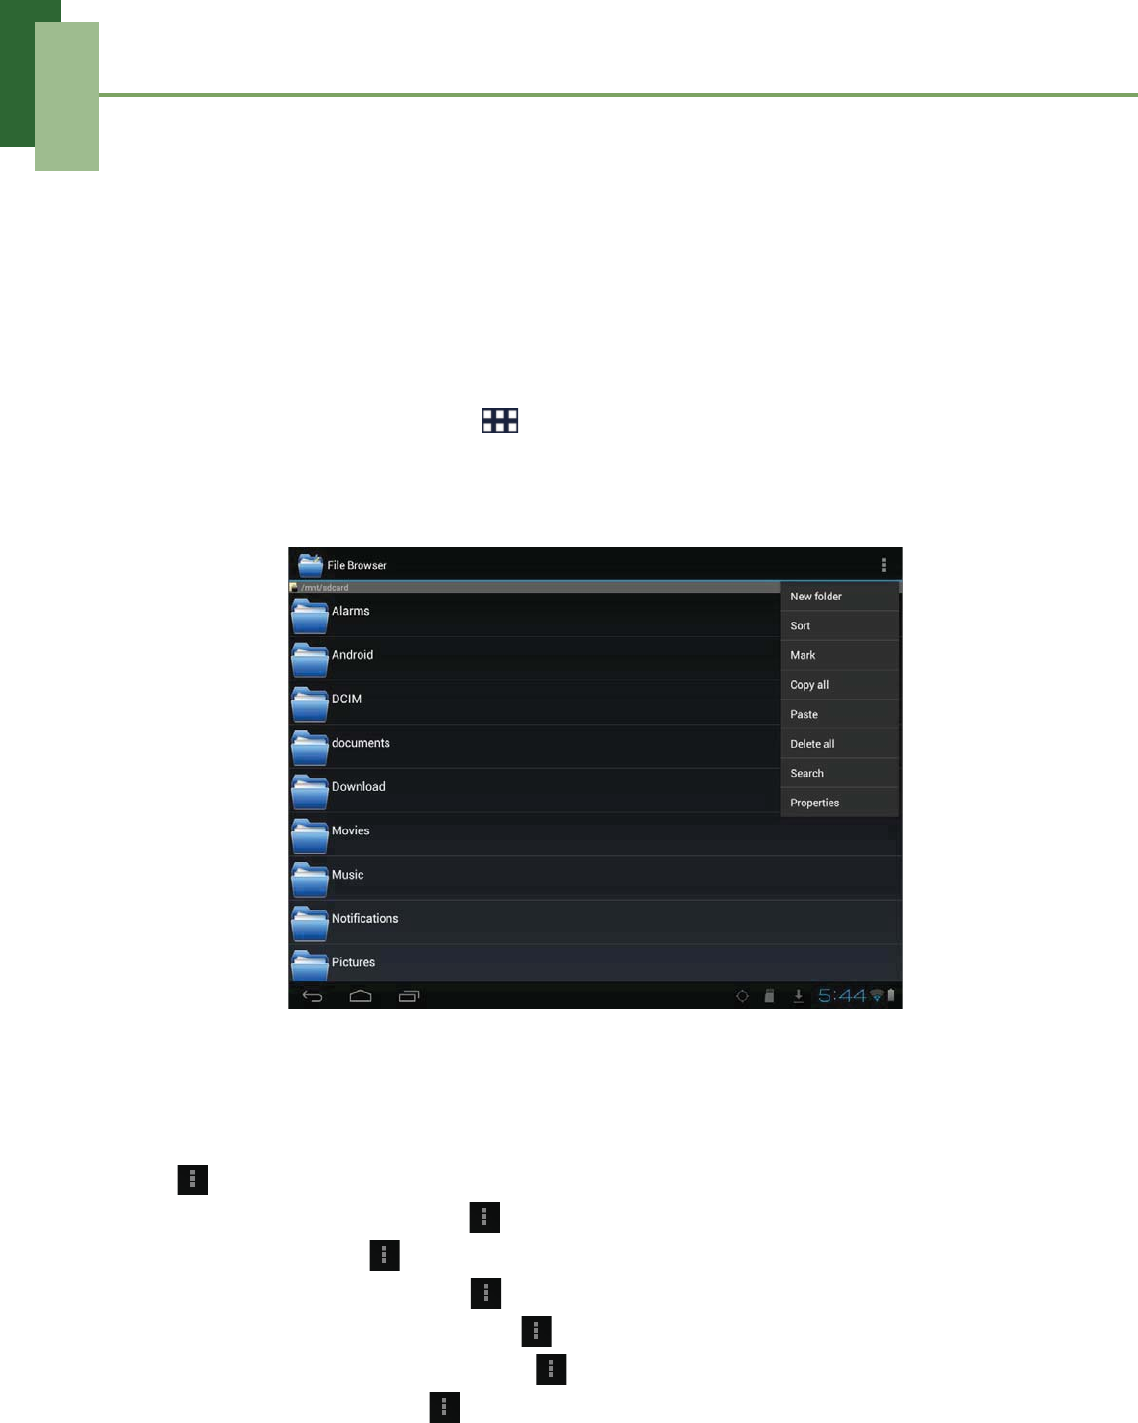
9.10 File Browser
File Browser lets you browse the contents of your device and the memory card.
1. From the Home screen, tap > File Browser.
2. Tap the folder list and tap the folder you want to explore.
Managing files and folders
• To open a folder or file, tap the file or folder.
• To move, delete, rename or view file or folder details, tap and hold to view the
options. Then tap a desired option.
• To copy, tap and hold a file or folder, then tap Copy. To paste a file or folder, tap
> Paste.
• To create a new folder, tap > New folder.
• To sort items, tap > Sort, then tap a sorting option.
• To mark a file or folder, tap > Mark.
• To copy all files and folders, tap > Copy all.
• To delete all files and folders, tap > Delete all.
• To search for a file, tap > Search.
Chapter 9: Applications
72
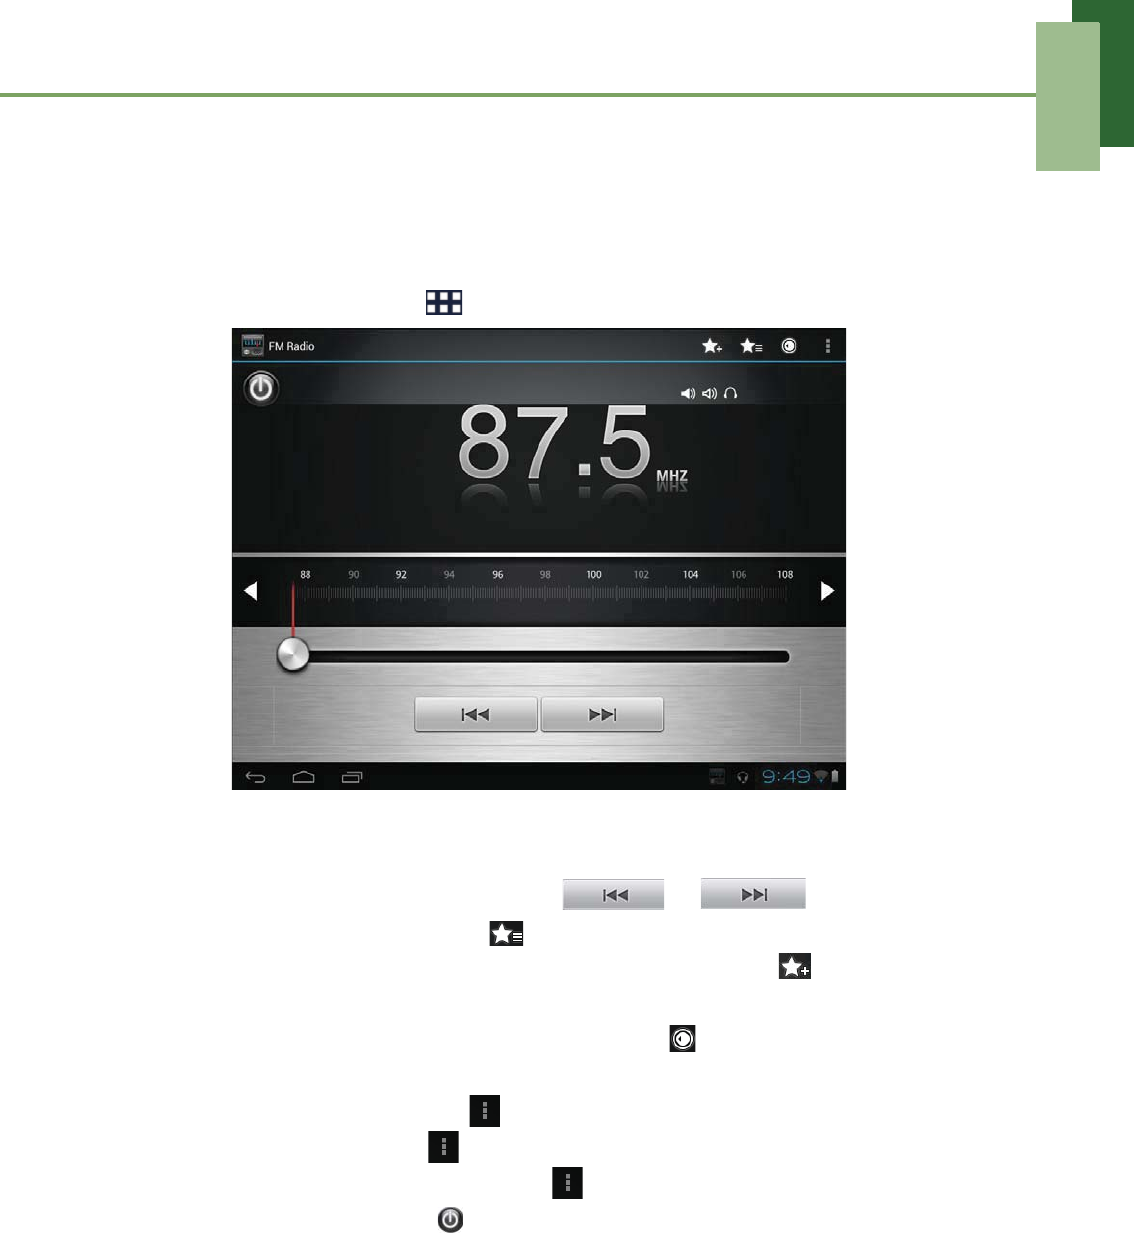
9.11 FM Radio
FM Radio lets you listen to the FM radio.
NOTE: You must connect a headset or an earphone to use this function.
1. From the Home screen, tap > FM Radio.
2. Do any of the following:
• To manually tune to a frequency, tap on a desired frequency.
• To tune to another radio station, tap or .
• To view the Favorite List, tap .
• To add the current radio station into the Favorite list, tap , and then enter
the station name and tap OK.
• To set the desired radio station frequency, tap . Enter the radio frequency
and tap OK.
• To turn on the speaker, tap > Speaker on.
• To mute the sound, tap > Mute.
• To change other radio settings, tap > Settings.
• To turn off the radio, tap .
Chapter 9: Applications
73
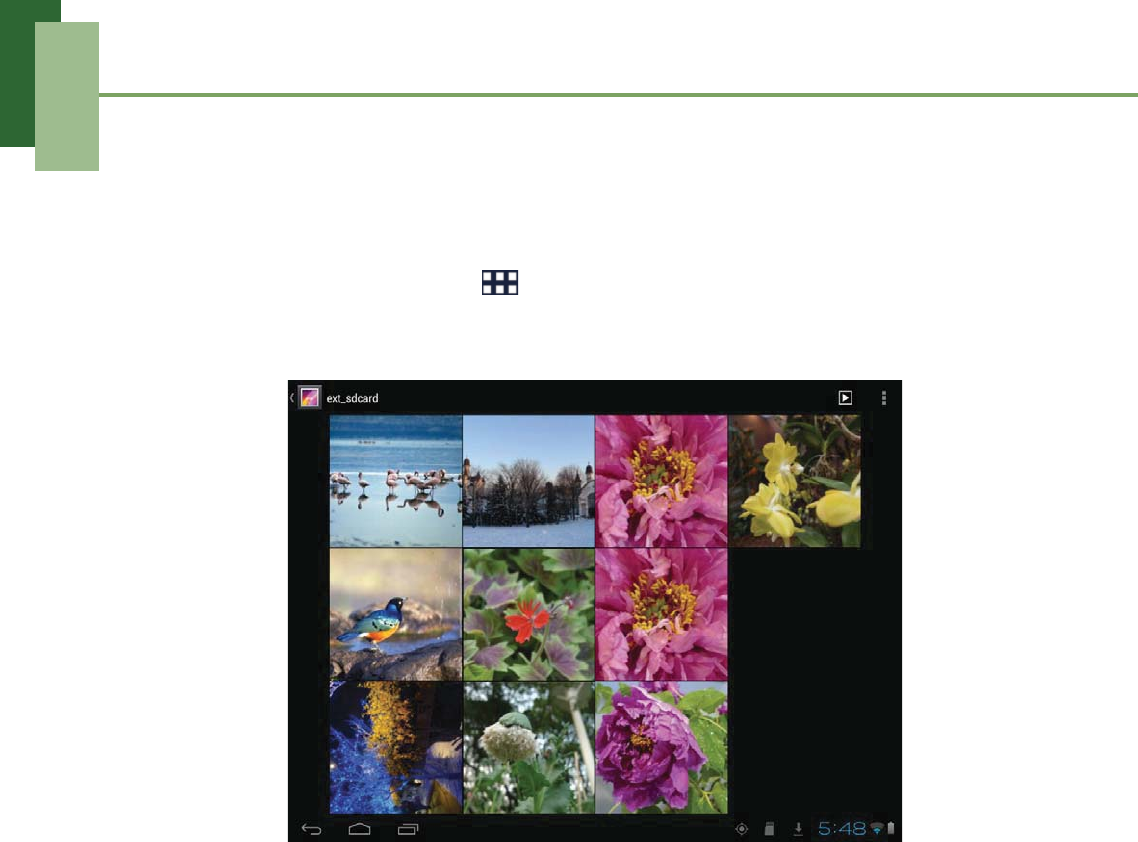
9.12 Gallery
You can view your captured images, recorded video clips, and downloaded images in
Gallery.
1. From the Home screen, tap > Gallery.
2. Tap the desired folder to view the camera pictures or camera videos.
3. The images or videos are displayed in thumbnails.
4. To view photos or videos, see “Viewing Photos & Videos” on page 60.
9.13 Gmail
Use Gmail to send and receive emails using your Google email account. See “Gmail”
on page 30.
9.14 Google+
With Google+, you can share your thoughts, links, and photos with your friends on the
web. See “Google+” on page 35.
9.15 Latitude
Latitude allows you to keep track of your friends’ location and share your location to
them. See “Latitude” on page 47.
9.16 Maps
Use Maps to view the map and get directions to your destination. See “Maps” on
page 42.
Chapter 9: Applications
74
9.17 Market
Use Market to purchase and download games and other applications to your device.
See “Market” on page 48.
9.18 Messenger
With Messenger, you can communicate with your friends via Google+’s Messenger
application. See “Messenger” on page 41.
9.19 Movie Studio
Use Movie Studio to create your own movies. See “Movie Studio” on page 53.
9.20 Music
Use Music to play music files or recorded voice files. See “Using Music Player” on
page 62.
9.21 Navigation
Use Navigation to locate your location and provide a real time turn by turn direction to
your chosen destination. See “Navigation” on page 44.
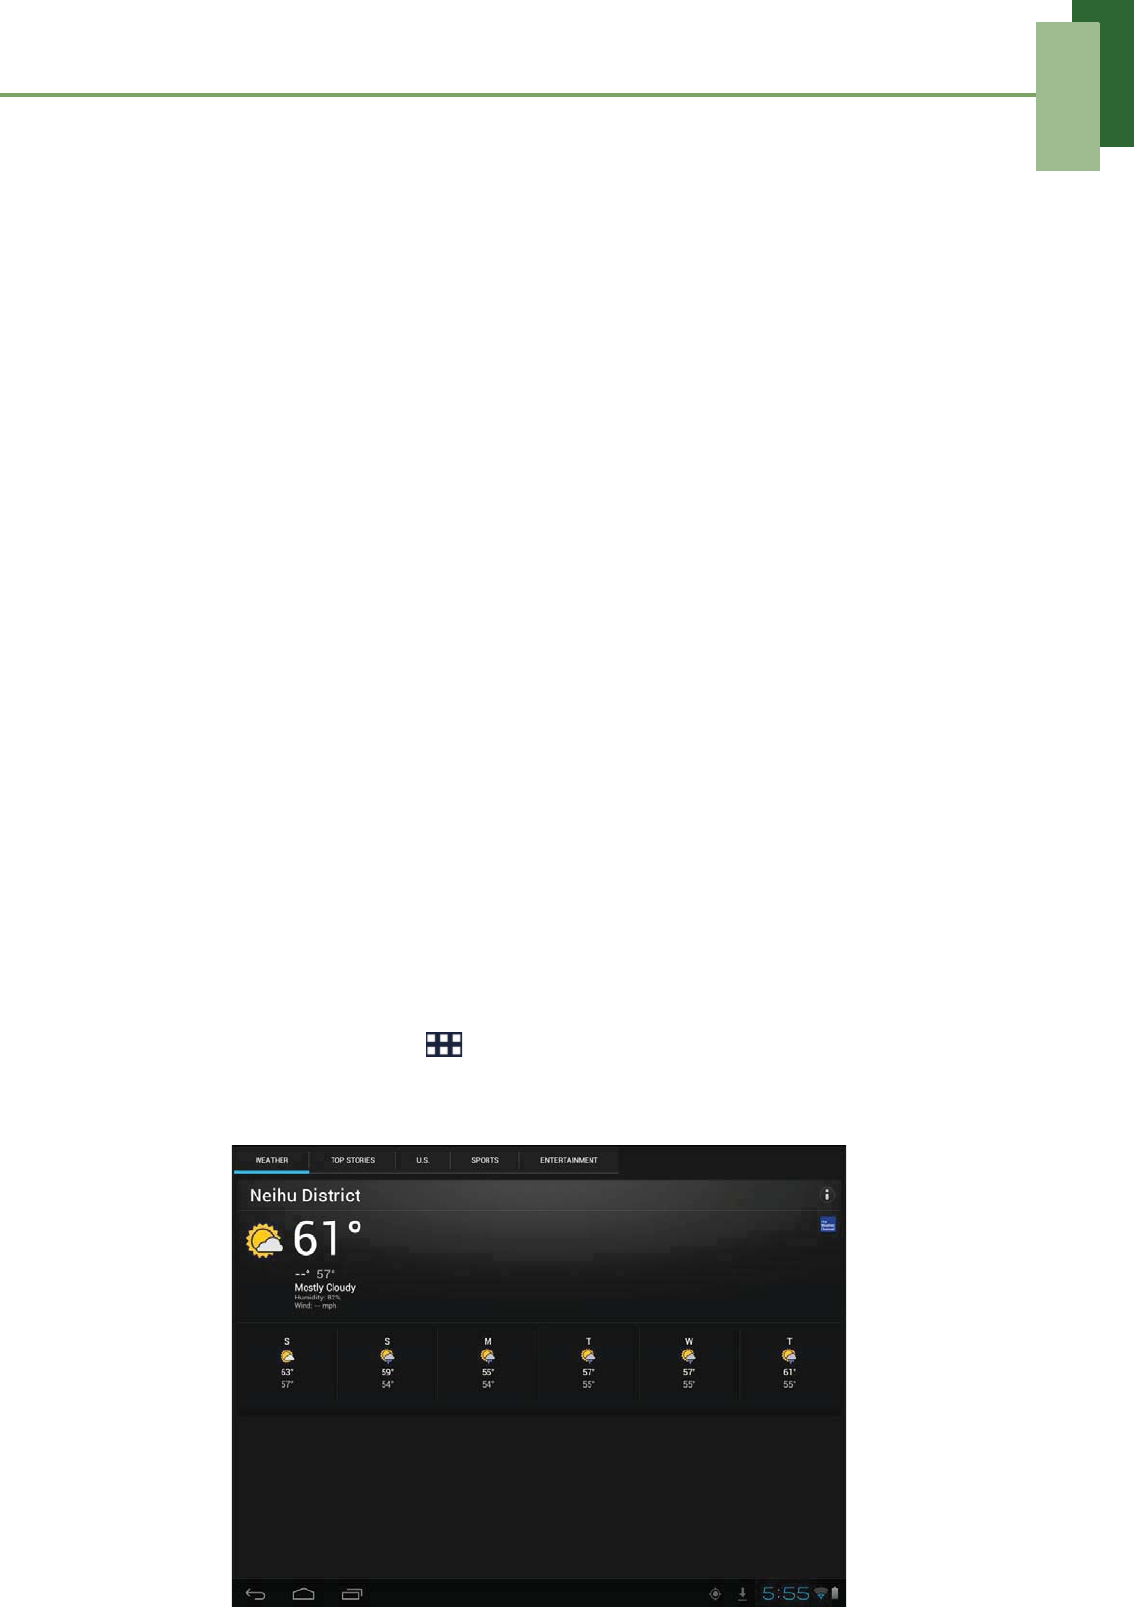
9.22 News & Weather
News & Weather allows you to view the weather in your location and read the latest
stories, sports, and entertainment news headlines on your device.
1. From the Home screen, tap > News & Weather.
2. Swipe your finger to the right or left to browse the categories.
3. Touch a headline to open Browser and view the complete story.

Chapter 9: Applications
75
9.23 People
View or manage your contact list. See “People” on page 16.
9.24 Places
Places is a location-based application that helps you find the places and things
around you. See “Places” on page 50.
9.25 Search
Search information on your device and on the web with Search. See “Search” on
page 51.
9.26 Settings
In the Settings menu, you can view and make adjustments for wireless & network
settings and the general and security settings of your device. See “Device Settings”
on page 77.
9.27 Talk
Use Talk to chat with your friends. See “Talk” on page 38.
9.28 TouchPal Keyboard
Use TouchPal Keyboard to configure the keyboard settings. See “Configuring
Keyboard Settings” on page 20.
Chapter 9: Applications
76
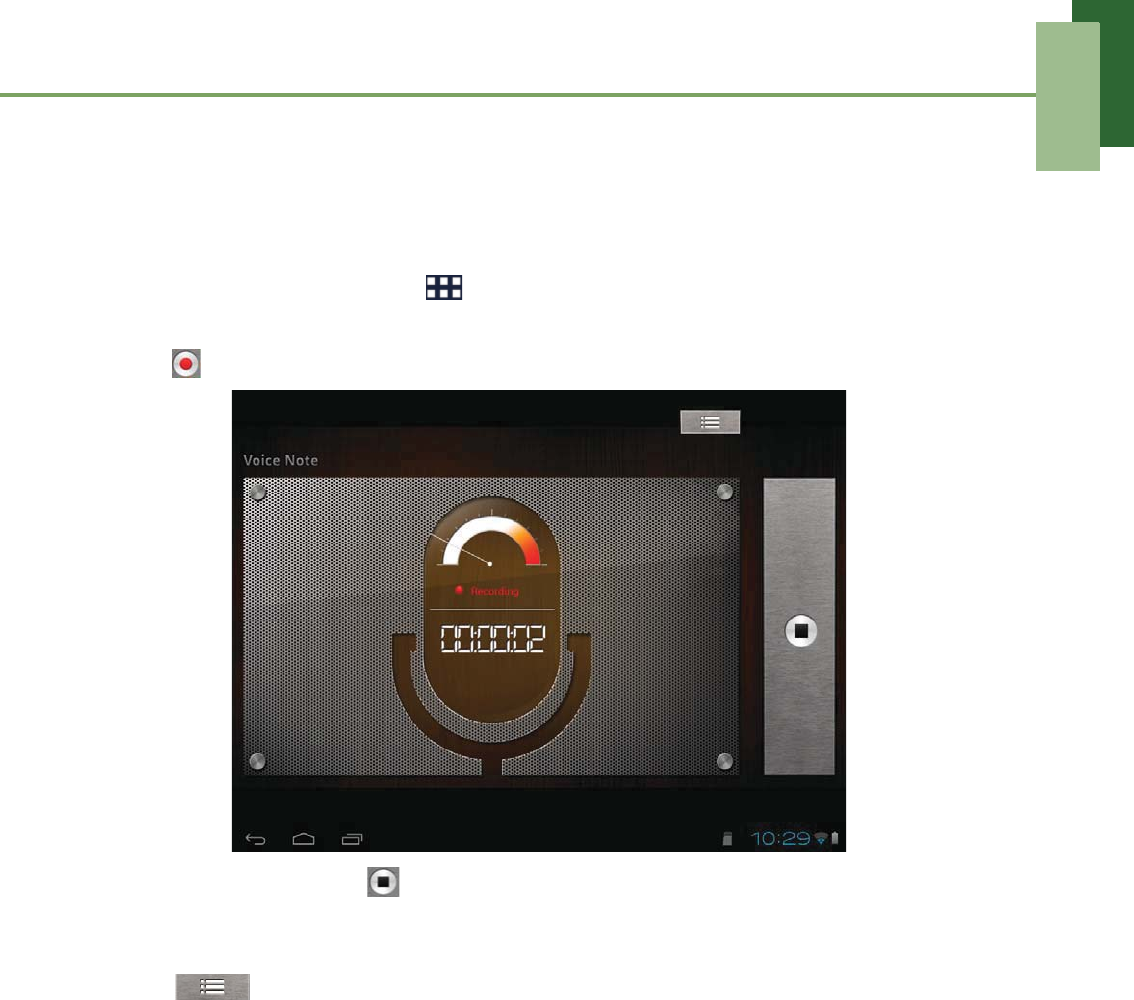
9.29 Voice Note
Use Voice Note to record a voice memo.
To record a voice note
1. From the Home screen, tap > Voice Note.
2. The recording screen is displayed.
3. Tap to record your voice.
4. To stop recording, tap .
To play a voice note
1. Tap .
2. A list of voice notes is displayed.
3. Tap the voice note you want to listen to.
9.30 YouTube
Use YouTube to watch, upload, and view videos from YouTube using your device.
See “YouTube” on page 52.
Chapter 10: Managing Your Device
77
Chapter 10: Managing Your
Device
10.1 Device Settings
From the Home screen, tap > Settings to view and adjust the settings of your
device. Settings menu is categorized into: WIRELESS & NETWORKS, DEVICE,
PERSONAL, and SYSTEM.
WIRELESS & NETWORKS
DEVICE
Application Description
Wi-Fi Manage Wi-Fi connections, scan and connect to available Wi-Fi
networks.
Bluetooth settings Manage Bluetooth connections, set device name, and
discoverability of the device.
Data usage View data usage used by the applications.
Airplane mode Disable all wireless connections.
VPN Set up and manage Virtual Private Networks (VPNs).
Tethering Share your tablet’s data connection via USB or Bluetooth.
Item Description
SRS Enable SRS TruMedia sound system.
Sound
Volume Adjust the volume for media, notification, and
alarms.
Default notification Set your default notification ringtone.
Vibrate and ring Device vibrates and rings for new
notifications.
Touch sounds Enable/disable sound when selecting items on
the screen.
Screen lock sound Play sounds when locking or unlocking the
screen.
Vibrate on touch Enable/disable vibration when selecting items
on the screen.

Chapter 10: Managing Your Device
78
PERSONAL
Display
Brightness Adjust the brightness of the screen.
Wallpaper Customize the device wallpaper.
Auto-rotate screen Switch orientation automatically when rotating
the device.
Sleep Adjust delay before the screen automatically
goes off.
Font size Set the font size.
Storage
Internal storage Show total space, currently used by
applications, and remaining device storage.
SD card Show total and available memory card
storage.
Unmount SD card Unmount the SD card to safely remove the
card.
Battery View the battery usage on currently running applications and battery
charging status.
Apps View and control downloaded and currently running services.
Application Description
Account & sync Manage data synchronization. Tap ADD ACCOUNT to add an
account to configure synchronization settings for Calendar, People,
and Gmail.
Location services
Google’s location
service Allow location to be determined by Wi-Fi.
GPS satellites Enable GPS satellites.
Location & Google
search
Use location to improve Google Search results
and other Google services.
Security
Screen lock Set the lock screen by sliding the screen or
with a pattern, PIN, or password.
Owner info Show owner information on the lock screen.
Encrypt tablet Require a numeric PIN or password to decrypt
your tablet each time you power on the device.
Make passwords
visible Show passwords as you type.
Device
administrators View or deactivate device administrators.
Unknown sources Allow installation of non-Market applications.
Item Description
Chapter 10: Managing Your Device
79
SYSTEM
Security
Trusted credentials Display trusted CA certificates.
Install from SD card Install encrypted certificates from SD card.
Clear credentials Clear credential storage of all contents and
reset its password.
Language & input
Language Set the on-screen display language for your
device.
Spelling correction Enable/disable spell check function.
Personal dictionary Add or edit user preset words to the dictionary.
Default Set the default keyboard input method.
Google voice
typing Configure Google voice typing settings.
TouchPal
Keyboard(Pad) Configure on-screen keyboard settings.
Voice Search Configure Voice Search settings.
Text-to-speech
output Set the text-to-speech settings.
Pointer speed Configure pointer speed.
Backup & reset
Back up my data Back up the current settings and other
application data.
Backup account Back up the account data for debugging
purpose.
Automatic restore Automatically restore backed up settings and
other data after reinstalling an application.
Factory data reset Delete all data on the device and restore to
factory default settings.
Application Description
Date & time
Automatic date &
time Check to use network provided time.
Set date Set the date.
Set time Set the time.
Select time zone Select the time zone of your current location.
Use 24-hour format Set the clock to 24-hour format.
Select date format Set the preferred date format.
Application Description
Chapter 10: Managing Your Device
80
Accessibility
TalkBack Enable/disable TalkBack function and
customize its settings.
Large text Change to a larger font size.
Auto-rotate screen Switch orientation automatically when rotating
the device.
Speak passwords Read aloud passwords as you type.
Touch & hold delay Set the delay until a touch is interpreted as a
touch & hold.
Install web scripts
Allow applications to install scripts from
Google that make their web content more
accessible.
Developer options
USB debugging Enable/disable debug mode when a USB is
connected.
Development
device ID View development device ID.
Stay awake Set the screen to never sleep while charging.
Allow mock
locations Allow mock location.
Desktop backup
password Set desktop backup password.
Strict mode
enabled
Screen flashes when applications do long
operations on main thread.
Pointer location Screen overlays to show the current touch
data.
Show touches Show visual feedback for touches.
Show screen
updates
The updated screen flashes when it is being
updated.
Show CPU usage Screen overlays to show the current CPU
usage.
Force GPU
rendering Use 2D hardware acceleration in applications.
Window animation
scale Set the window animation scale ratio.
Transition
animation scale Set the transition animation scale ratio.
Don’t keep
activities
Destroy every activity as soon as the user
leaves it idle.
Background
process limit Set the background process limit.
Application Description
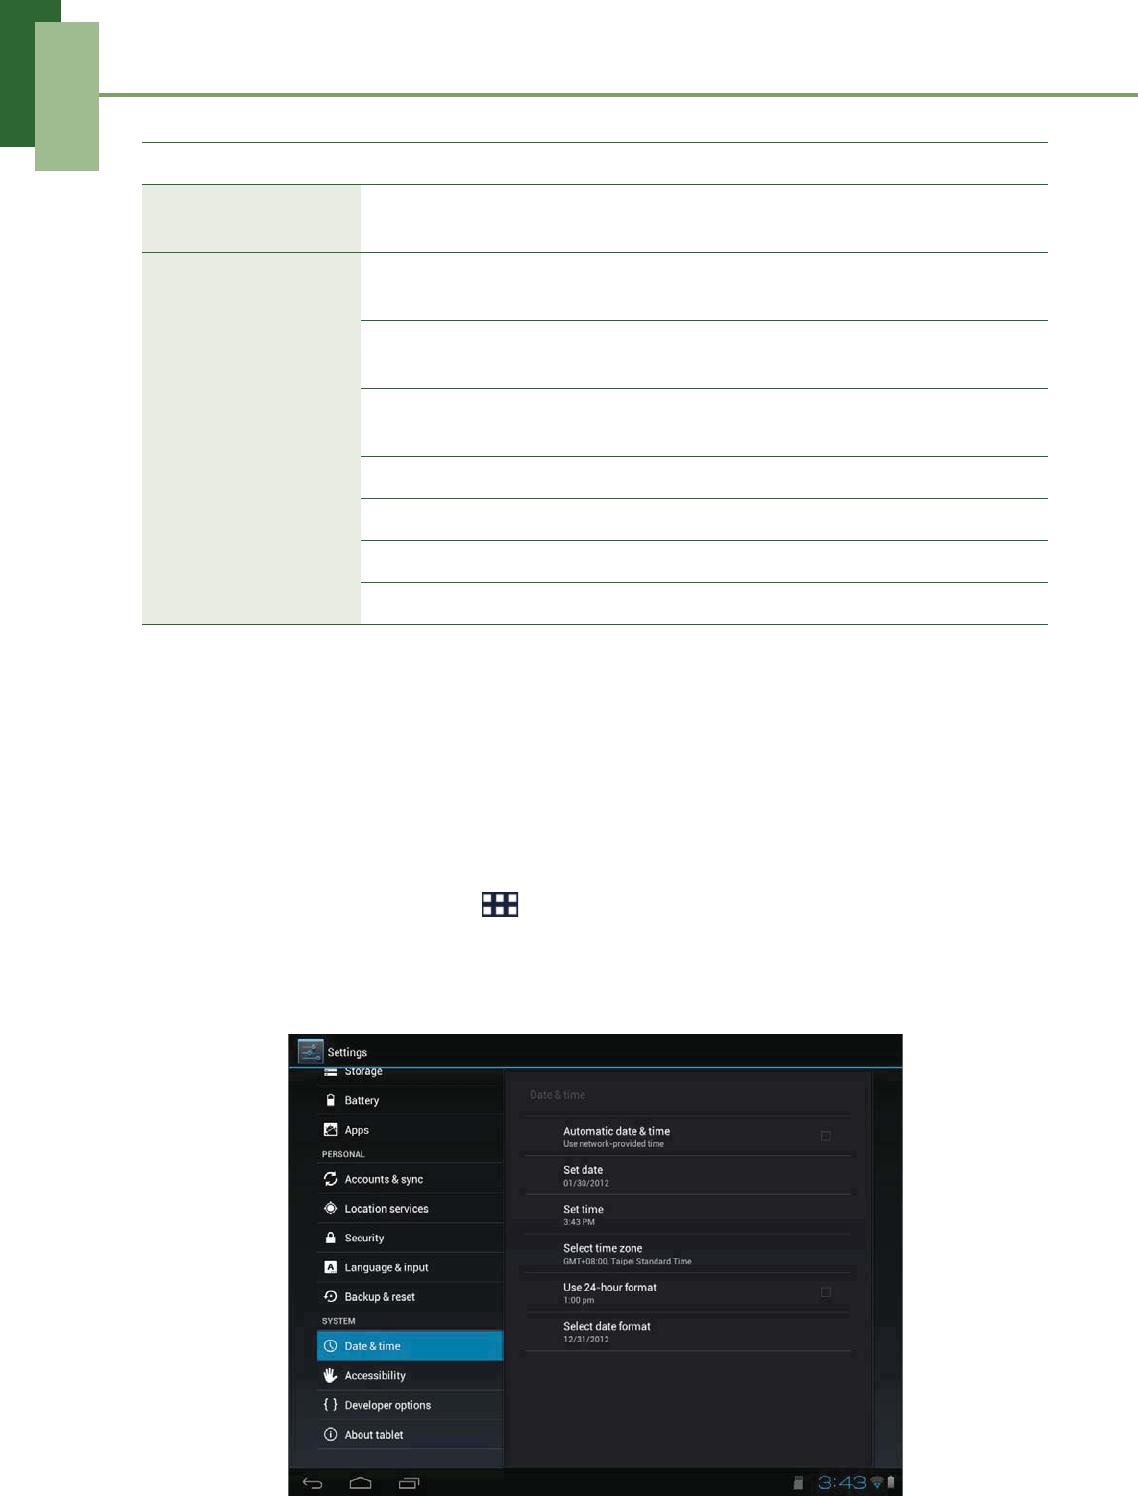
Chapter 10: Managing Your Device
81
10.2 Changing Basic Settings
Date and time settings
To automatically set the date and time
1. From the Home screen, tap > Settings.
2. On SYSTEM, tap Date & time.
3. Tap Automatic date & time to automatically set the date and time according to
the network.
Developer options Show all ANRs Show all applications which are not
responding to background applications.
About tablet
System update Configure the system update settings and
view the last check status.
Status View the status of battery, network, and other
information.
Legal information View Open source licenses and Google legal
information.
Model number View the device model number.
Android version View Android version.
Kernel number View Kernel version.
Build number View Build number
Application Description
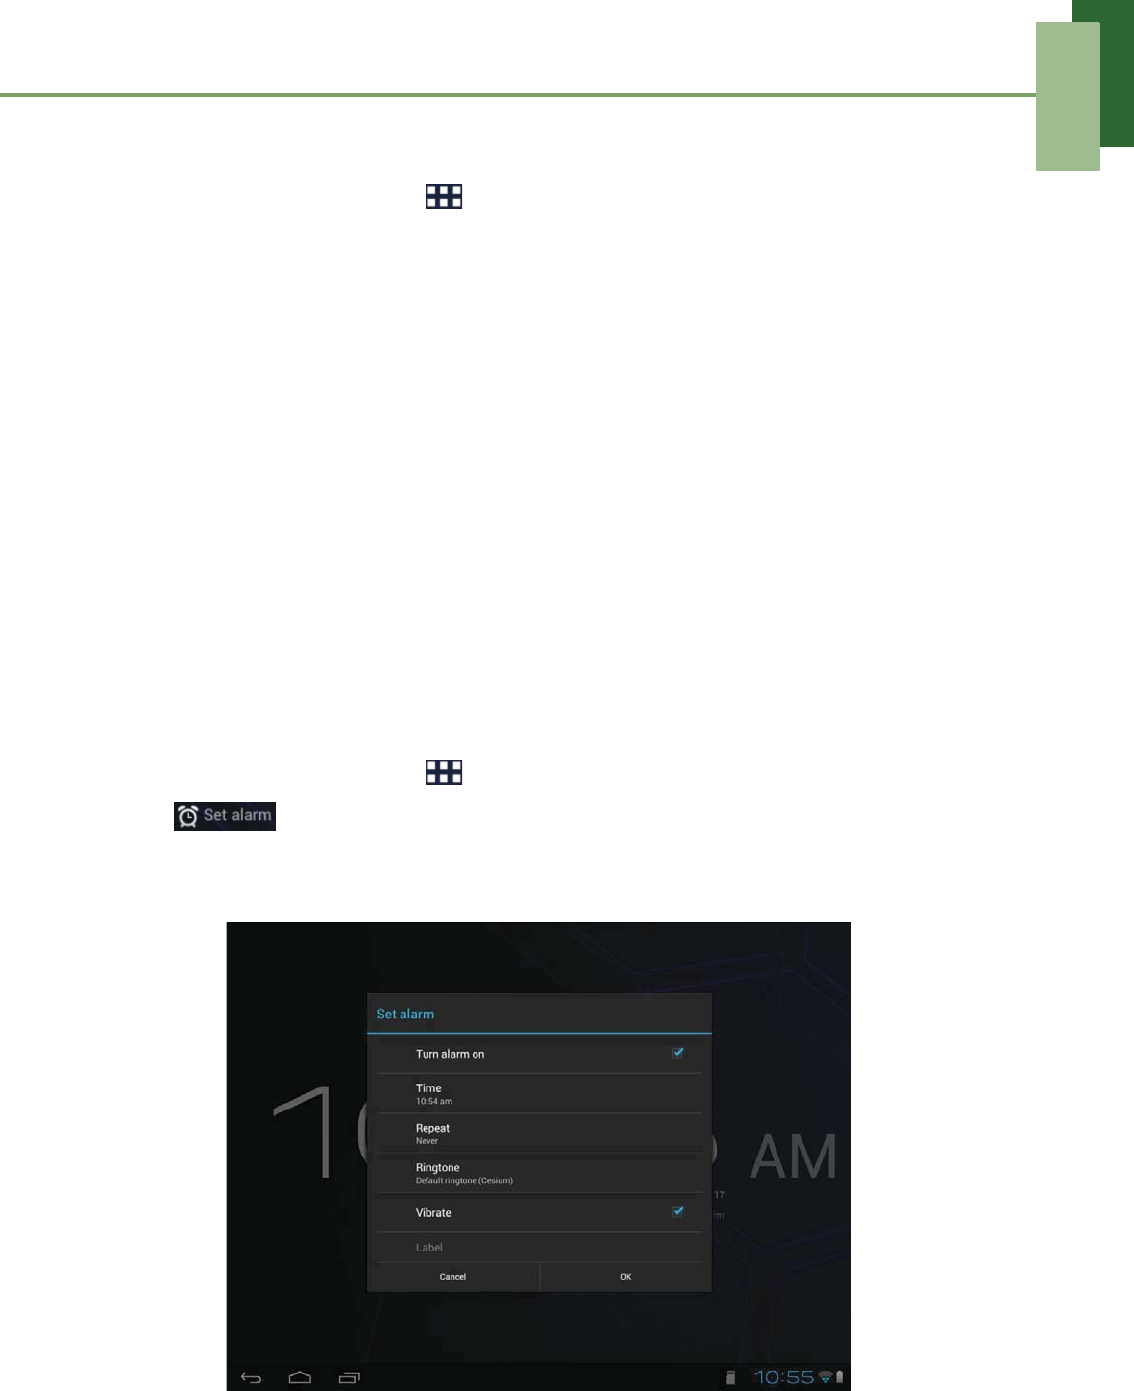
Chapter 10: Managing Your Device
82
To manually set the date and time
1. From the Home screen, tap > Settings.
2. On SYSTEM, tap Date & time.
3. Tap Set date to set the date.
• To adjust the date, tap the month, day, or year field, and tap S or Tto increase
or decrease the value. Tap Set to apply the values.
• To change the date format, tap Select date format, and select the date format
from the list.
4. Tap Select time zone to select the time zone from the list.
5. Tap Set time to set the time.
• To adjust the time, tap the hour, minute, second or AM/PM field, and tap + or -
to increase or decrease the value. Tap Set to apply the values.
• To use a 24-hour format, tap Use 24-hour format.
Alarms settings
You can set up alarms on this device.
To set the alarm
1. From the Home screen, tap > Clock.
2. Tap .
3. To add an alarm, tap Add alarm.
4. Tap the S or T to set the alarm time, and tap Set.
5. To set repeat mode, tap Repeat. Tap one or more options, then tap OK.
6. To set the ringtone, tap Ringtone. Tap an option, then tap OK.
7. To vibrate when alarm sounds, check Vibrate.
8. To add an alarm label, tap Label.
9. After all settings are complete, tap OK.

Chapter 10: Managing Your Device
83
Display settings
The display settings of this device affect the battery and external power level.
To turn off backlight when the device is idle
1. From the Home screen, tap > Settings.
2. On DEVICE, tap Display.
3. Tap Sleep.
4. Select the desired length of time.
Your setting is automatically saved.
To adjust brightness
1. From the Home screen, tap > Settings.
2. On DEVICE, tap Display.
3. Tap Brightness.
4. Drag the Brightness slider to adjust brightness settings.
5. Tap OK when finished.
To change the screen orientation
1. From the Home screen, tap > Settings.
2. On DEVICE, tap Display.
3. Tap Auto-rotate screen to automatically switch the screen orientation when
rotating the device.
Ringtone settings
You can assign a default ringtone whenever a new notification is received.
To change the notification ringtone
1. From the Home screen, tap > Settings.
2. On DEVICE, tap Sound.
3. Tap Default notification.
4. Tap the preferred ringtone from the list.
5. Tap OK to confirm.

Chapter 10: Managing Your Device
84
10.3 Using Wireless & networks
Wireless & networks allows you to manage Wi-Fi, Bluetooth, Tethering, and Virtual
Private Networks (VPNs).
1. From the Home screen, tap > Settings.
2. On WIRELESS & NETWORKS, do any of the following (if necessary):
• To enable/disable or configure Wi-Fi settings, tap Wi-Fi.
• To enable/disable or configure Bluetooth settings, tap Bluetooth.
• To enable/disable Airplane mode, tap More > Airplane mode.
• To set up and manage Virtual Private Networks (VPNs), tap More > VPN.
• To share your device mobile data connection via USB or Bluetooth,
tap More > Tethering.
10.4 Protecting Your Device
You can protect your device from unauthorized users by requiring the PIN code or
entering a password.
Screen lock protection settings
You can increase your device security by creating a screen unlock pattern (disabled
by default). When enabled, you must draw the correct unlock pattern on the screen to
unlock and regain access to the device.
1. From the Home screen, tap > Settings.
2. On PERSONAL, tap Security.
3. Tap Screen lock.
4. Tap Pattern to draw the pattern to unlock screen.
5. Follow the on-screen instructions to draw your own personal unlock pattern and
tap Continue.
6. Redraw your unlock pattern again and tap Confirm.
10.5 Resetting the Device
You can reset your device to its factory defaults.
1. From the Home screen, tap > Settings.
2. On PERSONAL, tap Backup & reset.
3. Tap Factory data reset.
4. Tap Reset tablet to reset.

Safety Information
85
Safety Information
Please read before proceeding
• Following all precautions and instructions will increase the life of device.
• Use only the battery and the power adapter provided by the manufacturer. Use of
unauthorized accessories may void your warranty.
• Avoid using the device near electromagnetic sources such as TVs, radios, and
microwave ovens.
• Unplug the power adapter from the wall outlet during lightning storms to avoid
electric shock or fire.
• Do not expose the device or the battery to direct sunlight.
• Do not store your device in temperatures higher than 55ºC.
• Do not use harsh chemicals or detergents to clean your device.
• Do not handle the device with wet hands while it is being charged. This may cause
an electric shock or serious damage to the device.
• The operating temperature for this device is from -10ºC to 55ºC.
SAFETY PRECAUTIONS FOR BATTERY USE
• The battery is not removable.
• End users shall not remove the embedded battery by themselves.
• Use only approved battery.
• Keep the battery dry and away from any liquid since this may cause a short circuit.
• Keep the battery away from metal objects since this may cause a short circuit.
• Do not use damaged or deformed batteries.
• If the battery emits a foul odor, discontinue use.
• Keep the battery away from babies and small children.
If the battery leaks:
• Do not allow the leaking fluid to come in contact with your skin, eyes or clothing. If
already in contact, rinse with clean water immediately and seek medical advice.
• Keep the battery away from fire since this may cause the battery to explode.
• Do not attempt to open or service the battery yourself.
• Do not dispose battery in fire or water.
• Recycle or dispose used batteries according to the local regulations.
ROAD AND ENVIRONMENTAL SAFETY
• Turn off the device in areas with a potentially explosive atmosphere or where
flammable objects exist such as gas stations, fuel depots, and chemical plants
among others. Sparks from these areas could cause explosion or fire and result in
injury or even death.
• Do not use device while driving a vehicle.

Safety Information
86
SAFETY IN AIRCRAFT
Do not use the device on board an aircraft. The device’s network signals may
cause interference to the navigation system. As a safety measurement, it is against
the law in most countries to use the device on board an aircraft.
Copyright© 2012. All Rights Reserved.
Android is a trademark of Google Inc. Use of this trademark is subject to Google
Permissions.
This product has an Android™ platform based on Linux, which can be expanded by a
variety of JME-based application SW.
All products use in this device and trademarkes mentioned herein are trademarks or
registered trademarks of their respective owners.
Google™, the Google logo, Android™, the Android logo and Gmail™ are trademarks
of Google Inc. Use of this trademark is subject to Google Permissions.
Wi-Fi and the Wi-Fi CERTIFIED logo are registered trademarkes of the Wireless
Fidelity Alliance.
microSD™ is a trademark of SD Card Association.
Bluetooth and the Bluetooth logo are trademarks owned by Bluetooth SIG, Inc.
Java, JME and all other Java-based marks are trademarks or registered trademarks
of Sun Microsystems, Inc. in the United States and other countries.
The prediction engine of the input method is TOUCHPAL, provided by COOTEK.
SAR Information
THIS MOBILE DEVICE MEETS GUIDELINES FOR EXPOSURE TO RADIO WAVES.
Your mobile device is a radio transmitter and receiver. It is designed not to exceed the
limits for exposure to radio waves recommended by international guidelines. These
guidelines were developed by the independent scientific organization ICNIRP and
include safety margins designed to assure the protection of all persons, regardless of
age and health.
The exposure guidelines for mobile devices employ a unit of measurement known as
the Specific Absorption Rate or SAR. The SAR limit stated in the ICNIRP guidelines is
2.0 W/kg averaged over 10 grams of tissue. Tests for SAR are conducted using
standard operating positions with the device transmitting at its highest certified power
level in all tested frequency bands. The actual SAR level of an operating device can
be below the maximum value because the device is designed to use only the power
required to reach the network. That amount changes depending on a number of
factors such as how close you are to a network base station. The highest SAR value
under the ICNIRP guidelines for use of the device at the body is 0. W/kg. Use of
device accessories and enhancements may result in different SAR values. SAR
values may vary depending on national reporting and testing requirements and the
network band. The device could be used with a separation distance of 0 cm to the
human body.

Safety Information
67
FCC Regulations:
- Reorient or relocate the receiving antenna.
- Increase the separation between the equipment and receiver.
- Connect the equipment into an outlet on a circuit different from that to
which the receiver connected.
- Consult the dealer or an experienced radio/TV technician for help.
Changes or modifications not expressly approved by the party responsible for compliance
could void the user‘s authority to operate the equipment.
following two conditions: (1) This device may not cause harmful interference,
and (2) this device must accept any interference received, including interference that
may cause undesired operation.
This device complies with part 15 of the FCC Rules. Operation is subject to the
This device has been tested and found to comply with the limits for a Class B
The antenna(s) used for this transmitter must not be co-located or operating in conjunction
wit
digital device, pursuant to Part 15 of the FCC Rules.These limits are designed
to provide reasonable protection against harmful interference in a residential installation .
This equipment generates,uses and can radiated radio frequency energy and ,
if not installed and used in accordance with the instructions, may cause harmful interference
to radio communications. However, there is no guarantee that interference will not occur
in a particular installation If this equipment does cause harmful interference to radio or
television reception, which can be determined by turning the equipment off and on,
the user is encouraged to try to correct the interference by one or more of
the following measures:
5)([SRVXUH,QIRUPDWLRQ6$5
OLPLWVLQ$16,,(((&DQGKDGEHHQWHVWHGLQDFFRUGDQFHZLWKWKHPHDVXUHPHQW
PHWKRGVDQGSURFHGXUHVVSHFLILHGLQ2(7%XOOHWLQ6XSSOHPHQW&
7KLVHTXLSPHQWFRPSOLHVZLWK)&&5)UDGLDWLRQH[SRVXUHOLPLWVVHWIRUWKIRUDQXQFRQWUROOHG
7KLVGHYLFHLVFRPSOLDQFHZLWK6$5IRUJHQHUDOSRSXODWLRQXQFRQWUROOHGH[SRVXUH
7KLVGHYLFHLVFRPSOLDQFHZLWK6$5IRUJHQHUDOSRSXODWLRQXQFRQWUROOHGH[SRVXUH
OLPLWVLQ$16,,(((&DQGKDGEHHQWHVWHGLQDFFRUGDQFHZLWKWKHPHDVXUHPHQW
PHWKRGVDQGSURFHGXUHVVSHFLILHGLQ2(7%XOOHWLQ6XSSOHPHQW&
7KLVHTXLSPHQWFRPSOLHVZLWK)&&5)UDGLDWLRQH[SRVXUHOLPLWVVHWIRUWKIRUDQXQFRQWUROOHG
HQYLURQPHQW7KLVGHYLFHZDVWHVWHGIRURSHUDWLRQVZLWKWKHGHYLFHFRQWDFWHGGLUHFWO\WR
WKHKXPDQERG\WRWKHEDFNVLGHRIWKH(877RPDLQWDLQFRPSOLDQFHZLWK)&&5)H[SRVXUH
FRPSOLDQFHUHTXLUHPHQWVDYRLGGLUHFWFRQWDFWWRWKHWUDQVPLWWHGDQWHQQDGXULQJWUDQVPLWWLQJ
7KHKLJKHVW6$5YDOXHIRUWKHGHYLFHDVUHSRUWHGWRWKH)&&ZKHQZRUQRQWKHERG\DV
GHVFULEHGLQWKLVXVHUJXLGHLV09:NJ%RG\ZRUQPHDVXUHPHQWVGLIIHUDPRQJGHYLFH
PRGHOVGHSHQGLQJXSRQDYDLODEOHHQKDQFHPHQWVDQG)&&UHTXLUHPHQWV

IC Regulations:
This device complies with Industry Canada license-exempt RSS standard(s). Operation is
subject to the following two conditions:
(1) this device may not cause interference, and
(2) this device must accept any interference, including interference that may cause undesired
operation of the device.
Le présent appareil est conforme aux CNR d'Industrie Canada applicables aux appareils radio
exempts de licence. L'exploitation est autorisée aux deux conditions suivantes:
(1) l'appareil ne doit pas produire de brouillage, et
(2) l'utilisateur de l'appareil doit accepter tout brouillage radioélectrique subi, même si le
brouillage est susceptible d'en compromettre le fonctionnement."
This Class B digital apparatus complies with Canadian ICES-003.
Cet appareil numérique de la classe B est conforme à la norme NMB-003 du Canada.
The County Code Selection feature is disabled for products marketed in the US/Canada.
For product available in the USA/ Canada markets, only channel 1~11 can be operated.
Selection of other channels is not possible.
IMPORTANT NOTE:
IC Radiation Exposure Statement
This EUT is compliance with SAR for general population/uncontrolled exposure limits in IC
RSS-102 and had been tested in accordance with the measurement methods and procedures
specified in IEEE 1528. This equipment should be installed and operated with minimum
distance 0 cm between the radiator & your body.
Safety Information
87
WEEE Notice
The WEEE logo on the product or on its box indicates that this product must not be
disposed of or dumped with your other household waste. You are liable to dispose of
all your electronic or electrical waste equipment by relocating over to the specified
collection point for recycling of such hazardous waste. Isolated collection and proper
recovery of your electronic and electrical waste equipment at the time of disposal will
allow us to help conserve natural resources. Moreover, proper recycling of the
electronic and electrical waste equipment will ensure safety of human health and
environment. For more information about electronic and electrical waste equipment
disposal, recovery, and collection points, please contact your local city center,
household waste disposal service, shop from where you purchased the equipment, or
manufacturer of the equipment.
RoHS Compliance
This product is in compliance with Directive 2002/95/EC of the European Parliament
and of the Council of 27 January 2003, on the restriction of the use of certain
hazardous substances in electrical and electronic equipment (RoHS) and its
amendments.
European Union Regulatory Conformance
The equipment complies with the RF Exposure Requirement 1999/519/EC, Council
Recommendation of 12 July 1999 on the limitation of exposure of the general public to
electromagnetic fields (0–300 GHz). This equipment meets the following conformance
standards: (1,(1,(1 (1, EN 55022, EN55024
(1(1 (1(1,(1.
For the device which tests accordance to EN60950-1:2006, it is mandatory to perform
audio tests for EN50332. This device have been tested to comply with the Sound
Pressure Level requirement laid down in the applicable EN 50332-1 and EN 50332-2
standards. Permanent hearing loss may occur if earphones or headphones are used
at high volume for prolonged periods of time.
A pleine puissance, l’écoute prolongée du baladeur peut endommager l’oreille de
l’utilisateur.
Changes or modifications to this product not authorized by the manufacturer could
void the EMC compliance and negate your authority to operate the product. This
product has demonstrated EMC compliance under conditions that included the use of
compliant peripheral devices and shielded cables between system components. It is
important that you use compliant peripheral devices and shielded cables between system components
to reduce the possibility of causing interference to radios, televisions, and other electronic devices.
Safety Information
88
We, hereby, declare that this cellular, Wi-Fi, & Bluetooth radio is in compliance with
the essential requirements and other relevant provisions of Directive 1999/5/EC.
Power saving reminder:
CE Energy-Related Products Directive 2009/125/EC Information
Please ask the local distributor, supplier or importer below information:
• The related information of recycle or dispose.
• The related information of spare parts issue.
• Maintenance service.
• When you don’t use this device for a long period, please turn off this device and
you can save more electric power.
Intellectual Property Right Information
Right to all technologies and products that comprise this device are the property of
their respective owners:
This product has an Android platform based on Linux, which can be expanded by a
variety of Java-Script-based application SW.
Google, the Google logo, Android, the Android logo, Gmail, and YouTube are
trademarks of Google Inc.
Bluetooth and the Bluetooth logo are trademarks owned by Bluetooth SIG, Inc.
Java, JME and all other Java-based marks are trademarks or registered trademarks
of Sun Microsystems, Inc. in the United States and other countries.
microSD is a trademark of SD Card Association.
The prediction engine of the input method is TOUCHPAL, provided by COOTEK.
Products with 2.4-GHz Wireless LAN Devices France
For 2.4-GHz wireless LAN operation of this product, certain restrictions apply. This
equipment may use the entire-2400-MHz to 2483.5-MHz frequency band (channels 1
through 13) for indoor applications. For outdoor use, only 2400-2454 MHz frequency
band (channels 1-9) may be used. For the latest requirements, see http://www.art-
telecom.fr.
This equipment may be operated in:
AT BE BG CH CY CZ DE DK
EE ES FI FR GB GR HU IE
IT IS LI LT LU LV MT NL
NO PL PT RO SE SI SK TR
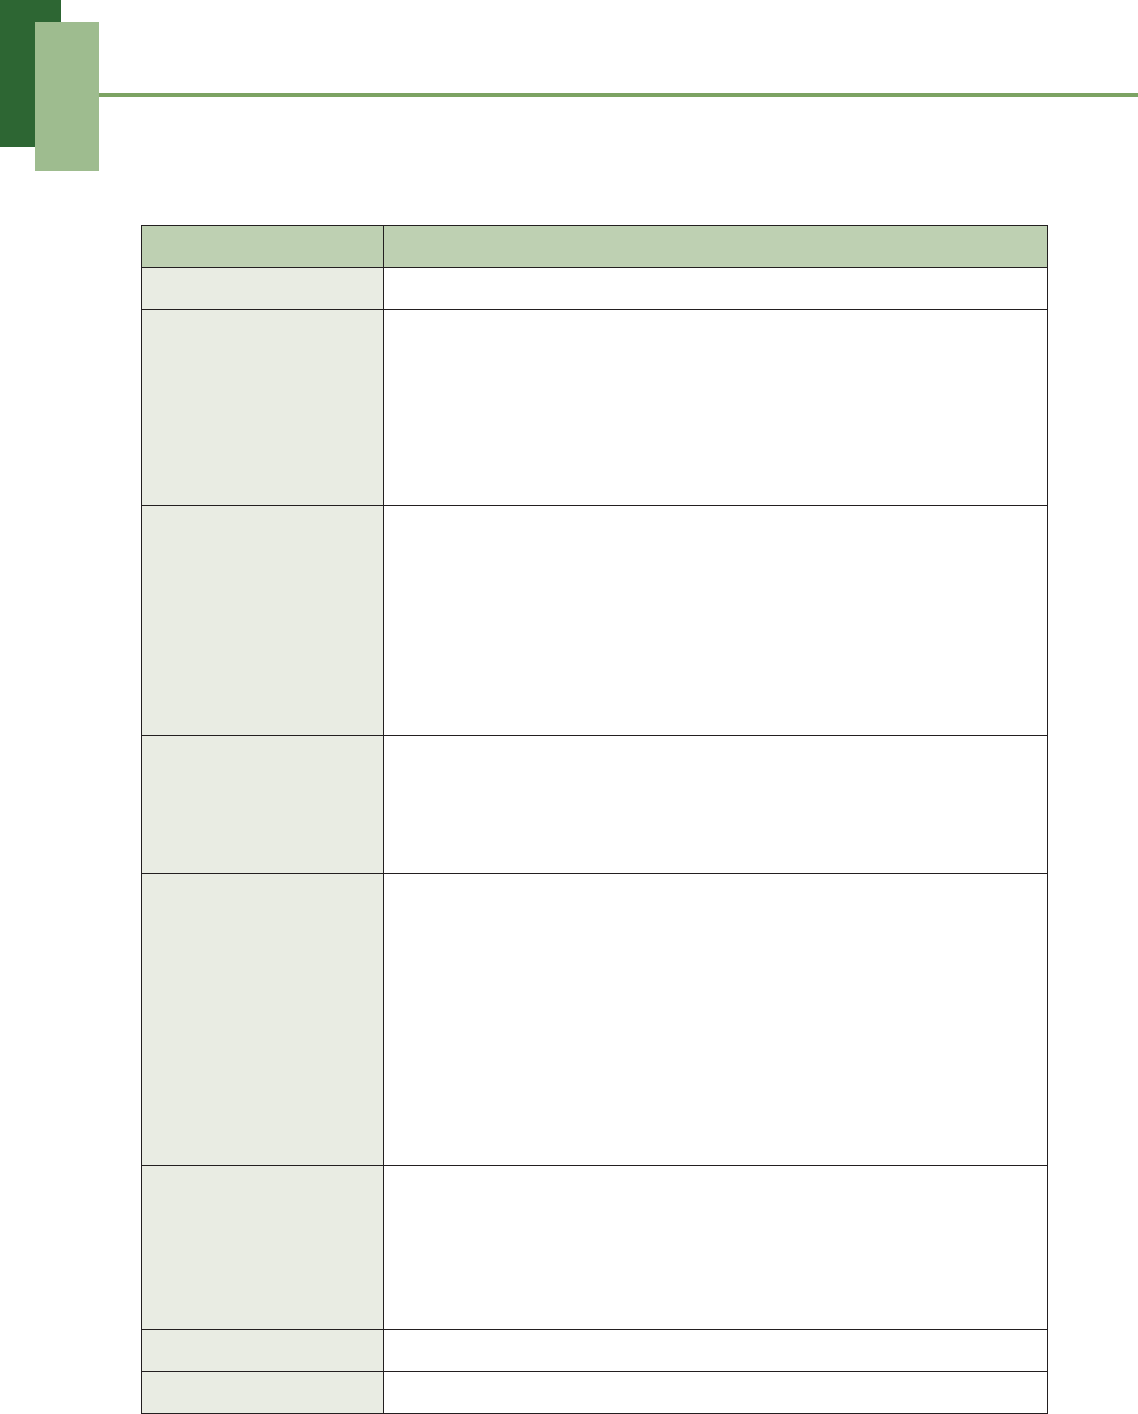
Specifications
89
Specifications
Item Descriptions
Operating System Android Ice Cream Sandwich 4.x
Display Size: 9.7”
Type: TFT transmissive LCD, IPS panel
Resolution: 1024 x 768, XGA
Color: 18bit, 262K
Touch panel: Capacitive-type multi-touch lens with 5 points in
operation
Connectivity GPS, the average time to locate the position:
• Cold start: 40 sec.
• Warm start: 10 sec. (depends on test environment)
Wi-Fi: 802.11 b/g/n
Bluetooth 3.0
USB 2.0 High-Speed client, support USB OTG
WAPI (Optional for China Market)
Interface DC jack power
HDMI D type
micro-B USB connector with data sync features
microSD card slot
Power Battery:
• 3 cell battery pack in parallel (3.7V, 24.8Wh), irremovable
• Standby time: Up to 700 hours
• Operation time: Up to 10 hours
AC adapter:
• AC input voltage: 100~240 Vac, 50/60Hz
• AC input current: 400mA max.
• DC output voltage: 5Vdc (typical)
• DC output current: 2.5A (typical)
Environmental
Condition
Operation temperature: -10°C to +55°C
Storage temperature: -20°C to +55°C
Charging temperature: 0°C to +55°C
Humidity 65% ± 20% RH at +55°C for Operation/Storage/
Charging temperature
Dimensions 247mm (H) x 185.3mm (W) x 8.9mm (T)
Weight Approx. 595g with battery pack

INDEX
i
A
Address bar 28
Adjust
brightness 83
date and time 81
Applications 65
Assign
notification ringtone 83
B
Battery
Charge 3
Bluetooth 55
connecting 55
Browser
home page 28
settings 29
C
Calculator 68
Camera
recording videos 57
settings 58
taking photos 56
Clock 69
setting alarm 82
D
Device
protect 84
reset 84
settings 77
Display
backlight 83
brightness 83
orientation 83
Downloads 70
E
Email 21
accounts set up 21
add attachments 23
composing 23
managing 25
reading and replying 24
receiving 24
sending 23
F
File Browser 71
FM Radio 72
G
Gallery 73
Gmail 30
configuring settings 34
creating and sending emails 31
forwarding emails 32
managing emails 33
reading and replying to emails 32
Google+ 35
configuring settings 37
creating a post 36
H
Headset 4
Home screen 6
I
Icons
Status Bar 7
Internet 28
browsing 28
K
Keyboard
on-screen 19
L
Latitude 47
M
Maps 42
Market 48
downloading applications 49
removing applications 49
searching applications 49
Messenger 41
starting chat 41
Micro USB port 2
Movie Studio 53
creating new movies 53
sharing movies 54
viewing movies 54
Music
music player 62

INDEX
ii
N
Navigation 44
P
People 16
adding contacts 16
backing up contacts 17
importing contacts 17
Photo
taking photos 56
viewing photos 57
Places 50
Power
button 1
turn on and off 4
S
Screen
orientation 83
Search 51
Settings
alarms 82
basic 81
date and time 81
display 83
keyboard 20
ringtone 83
T
Talk 38
Text
entering 19
TouchPal keyboard 75
U
Unlock screen 5
V
Video
recording videos 57
viewing videos 58
Volume
adjusting 12
W
Wireless & networks 84
Bluetooth 55
tethering 84
VPN settings 84
Wi-Fi 13
Y
YouTube 52
searching videos 52
uploading videos 52
watching videos 52