Chiayo Electronics Co SQ-1016 Wireless Microphone User Manual
Chiayo Electronics Co Ltd Wireless Microphone Users Manual
Users Manual
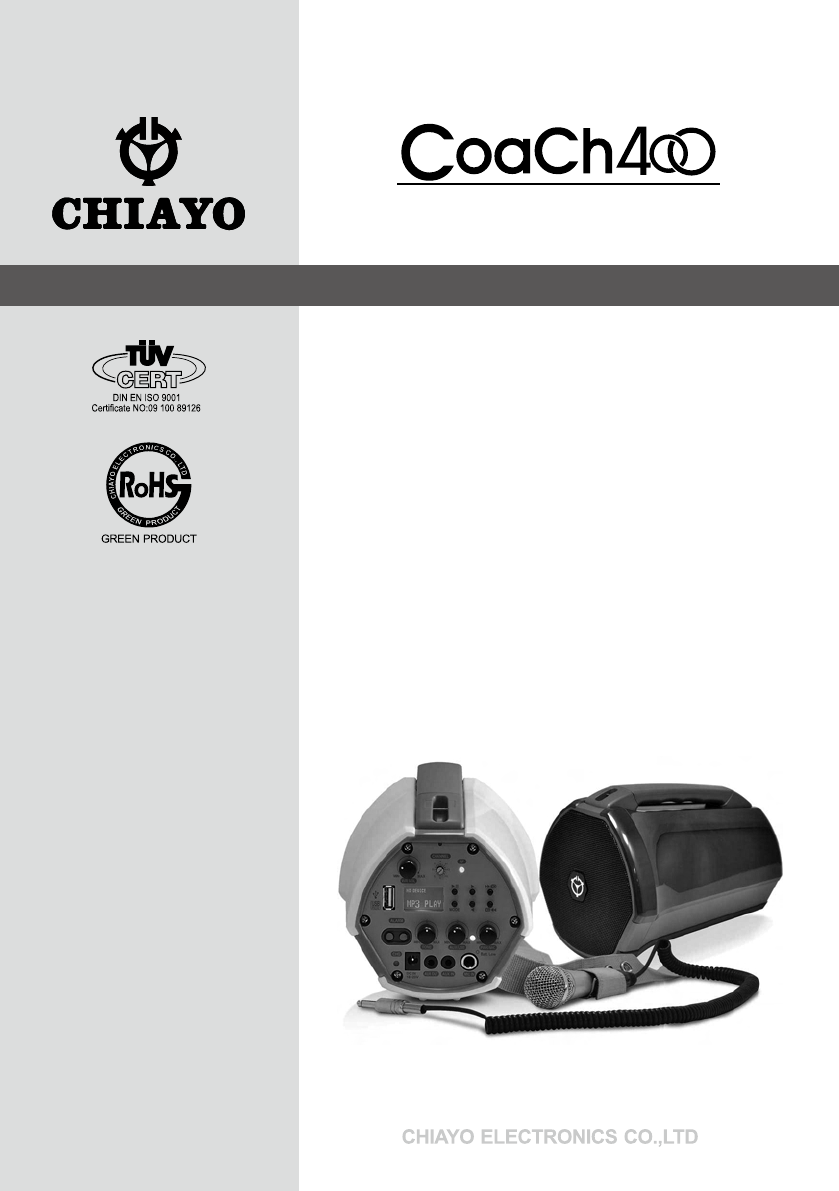
Personal Wireless Portable Ampler
Operation Manual
CHIAYO
IC:3563A-COACH400
FCC ID:CINSQ-1016
FCC ID:CINSM-1016

-1-
● Coach 400 operating instruction
Congratulation and thank you for the purchase of this all-in-one ultra compact portable
sound system. To ensure a trouble-free operation, please read this manual thoroughly to
fully understand its controls and functions.
The main features of Coach 400 are as below:
◎ High eciency output power with inbuilt 25W class-D power amplier.
◎ Truly wireless! Battery operation eliminates all cables so you can take it anywhere.
◎ 4” full range speaker system with maximum output of 40W
◎ USB 2.0 port for reading MP3 les with LCD display of track information
◎ Band selection of wireless microphone system:UHF (16 CH. switchable) or UHF/ VHF (xed
frequency)
◎ Input:Wired microphone, Aux In, USB 2.0
◎ Output:Aux Out
◎ 2 alarm sounds for emergency broadcasting
◎ Lithium battery oers extended operation time and minimizes the weight and size
◎Φ 3.5mm stereo Aux In/Aux Out connectors
◎ Can be worn over the shoulder or mounted on ST-30 tripod stand.
◎ Suitable for outdoor/indoor applications such as lectures, trade fairs, tours and election events etc.
Coach 400 can be equipped with 1 wireless receiver module. This receiver module can be
either VHF or UHF. The VHF module is a xed crystal single frequency type whereas the
UHF module is a PLL synthesized type with 16 preset frequencies (identied by external 16
channel rotary switch(s)) or xed crystal single frequency.
● Conguration:
All versions of Coach 400 series comes equipped with the following:
1. Mini wired microphone (DM-556)
2. Shoulder strap
3. Switch mode power supply
4. Operation manual
● Optional accessories:
1. Wireless handheld or beltpack transmitter
2. Charger for UHF transmitter
3. Tripod stand (ST-30)
4. Storage bag (SB-41)
5. Waist pocket (DC-20)
● Matching transmitter
band handheld transmitter beltpack transmitter
UHF SQ-1016(16 freq.)
Q-815(xed freq.)
SM-1016(16 freq.)
M-815(xed freq.)
VHF Q-1005 M-1005
Remark: Manufacturer reserves the rights to change the above combinations without prior
notice.
-2-
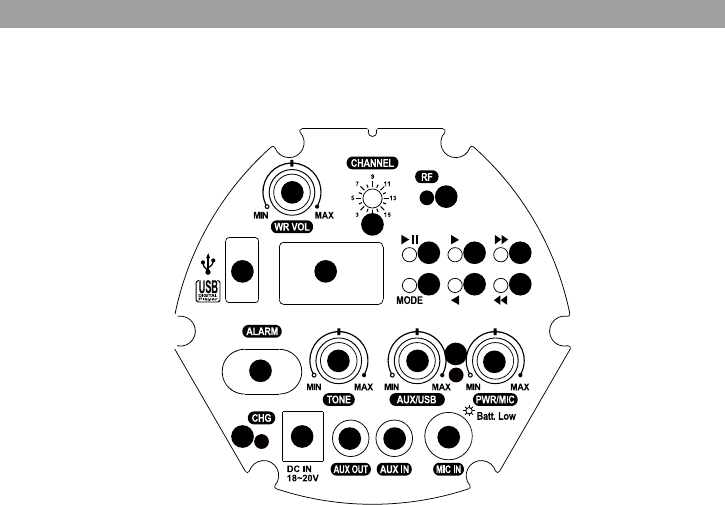
Coach 400 Rear control panel
● Parts and function
1. Power and volume control of wireless microphone
2. Channel selector
3. RF signal indicator
4. USB port
5. LCD display
6. Play / Pause
7. Skip forward
8. Folder forward
9. Play mode: Short press to switch between "repeat all", "repeat single" and "play
random". Press for 1-2 seconds to change "EQ" modes.
10. Skip backward
11. Folder backward
12. Emergency alarm(2 sounds for selection)
13. Tone control
14. Volume control of audio input/USB
15. Power/Battery low indicator: Normal(GREEN)/battery low(RED)
16. Volume control of wired microphone
17. Charging indicator: During charging(RED)/Charging nished(GREEN)
18. DC in
19. Aux output
20. Aux input
21. Wired microphone input
1
2
3
4 5
678
910 11
12 13 14 15 16
19 20 21
17 18

-3-
● Recharge its inbuilt Lithium battery before rst use
After unpacking the unit for the rst time, please charge the unit for about 4~5 hours before
any operation. This is absolutely necessary as the built-in rechargeable battery might have
been discharged naturally due to long shipment and storage time, even though it has been
fully charged in the factory prior to shipment.
To charge the battery, just plug in the DC end of the switch mode power supply into the
DC IN of the unit and charging will start automatically. During the charging process, the
charging indicator LED will be RED. When this LED turns GREEN, this battery is then fully
charged.
● Operating procedures
To operate this portable sound unit, switch on the main POWER switch, which will be
GREEN. If it turns RED, its battery power might be too low and recharging is necessary.
The main power switch does not switch on the wireless microphone and USB digital player
as each of them has dedicated Power / Volume control.
● Operating the built-in wireless microphone system
To use the wireless microphone, rst switch on the main power switch, then switch on the
WR power/volume control switch. Switch on the corresponding transmitter and set this
system to the same frequency and RF signal LED will grow.
● Operating the dynamic wired microphone
There is a MIC IN jack with dedicated volume control for this portable sound unit. To use
a cable microphone (dynamic only), just plug the end with a phone jack plug into MIC IN .
Switch on the Power / volume control knob MIC and rotate it to adjust the volume.
● Operating the USB Digital Player
To use the wireless microphone, rst switch on the main power switch, then switch on the
AUX/USB power/volume control switchand rotate it to adjust the volume. Plug USB into the
port and begin your misic playing and setting.
How to use each buttons of this digital player:
▲
II: Press to play/pause the music.
▲
: Press to skip forward.
▲
: Press to skip backward.
▲
▲
: Press to skip folders forward.
▲
▲
: Press to skip folders backward.
MODE: Short press to switch between "repeat all", "repeat single" and "play random".
Press for 1-2 seconds to change "EQ" modes.
-4-
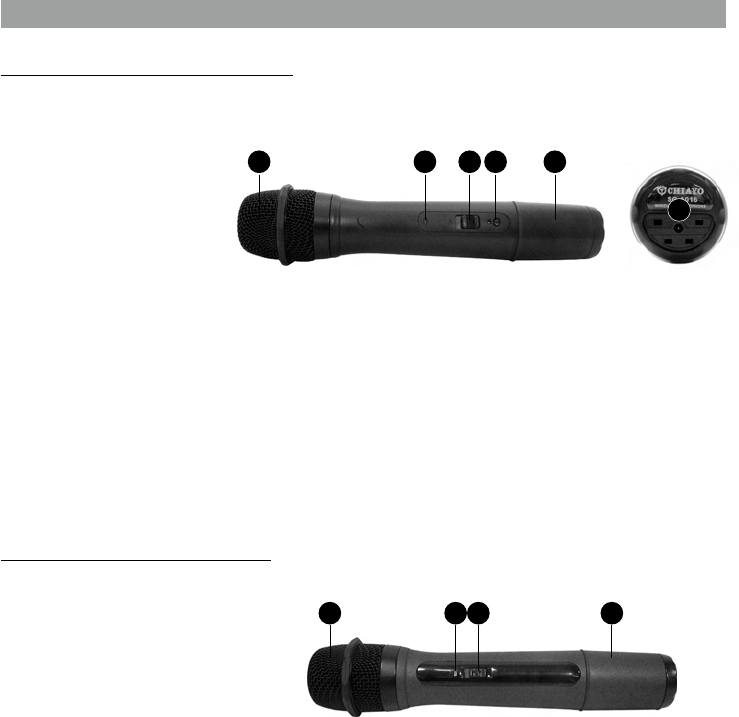
UHF handheld microphone Q-815
● Parts and functions
1. Microphone module and ballscreen
2. Power/Battery low indicator
3. Power switch
4. Battery cover
● Battery installation
Q-815 microphone requires 2 AA-size batteries to operate. Please insert the batteries
according to the correct polarity. Many batteries are known to have leakage problem of
conductive and corrosive liquid. Please observe the rule to remove the batteries if they are
not to be used for a longer period.
1 2 3 4
UHF handheld microphone SQ-1016
● Parts and functions
1. Microphone module and ballscreen
2. Power/Battery low indicator
3. Power switch
4. Channel selector
5. Battery cover
6. charging port
● Battery installation
SQ-1016 microphone requires 2 AA-size batteries to operate. Please insert the batteries
according to the correct polarity. Many batteries are known to have leakage problem of
conductive and corrosive liquid. Please observe the rule to remove the batteries if they are
not to be used for a longer period.
● Channel setting
Use the attached small screw driver to set the channel and the channel number will show
on the window above it.
1 2 3 4 5
6
-5-
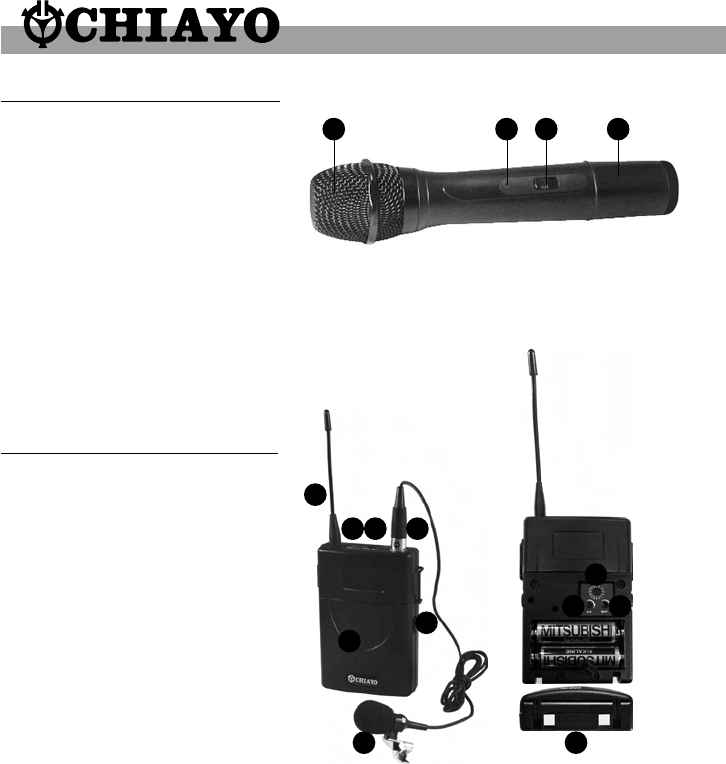
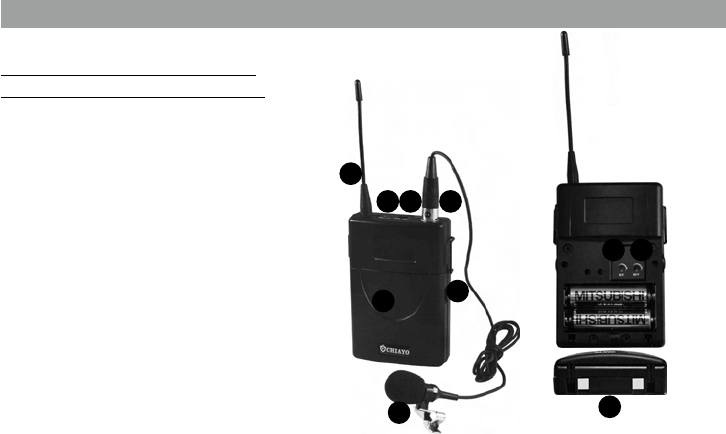
UHF beltpack transmitter SM-1016
● Parts and functions
1. Antenna
2. Power/Battery low indicator
3. Power switch
4. Mini XLR connector
5. Release buttons of battery compartment
6. Battery cover
7. Lavalier microphone
8. Charging contacts
9. Channel selector
10. Gain control (GT, hign impedance)
11. Gain control (MT, low impedance)
● Battery installation
SM-1016 microphone requires 2 AA-size batteries to operate. Please insert the batteries
according to the correct polarity. Many batteries are known to have leakage problem of
conductive and corrosive liquid. Please observe the rule to remove the batteries if they are
not to be used for a longer period.
● Channel and sensitivity setting
Use the attached small screw driver to set the channel and the channel number will show
on the window above it.
Gain control is an adjustable design that enables user to set dierent output levels. GT is
for the use of instrument with high impedance, such as guitar while MT is for the use of low
impedance such as lavalier or headset microphone. To adjust the audio input levels, simply
use a small screw driver to rotate to a desired level.
1
2 3 4
5
6
7 8
9
10 11
VHF handheld microphone Q-1005
● Parts and functions
1. Microphone module and ballscreen
2. Power/Battery low indicator
3. Power switch
4. Battery cover
● Battery installation
Q-1005 microphone requires 2 AA-size batteries to operate. Please insert the battery
according to the correct polarity. Many batteries are known to have leakage problem of
conductive and corrosive liquid. Please observe the rule to remove the battery if it's not to
be used for a longer period.
1 2 3 4
-6-
UHF beltpack transmitter M-815
VHF beltpack transmitter M-1005
● Parts and functions
1. Antenna
2. Power/Battery low indicator
3. Power switch
4. Mini XLR connector
5. Release buttons of battery compartment
6. Battery cover
7. Lavalier microphone
8. Charging contacts
9. Gain control (GT, hign impedance)
10. Gain control (MT, low impedance)
● Battery installation
M-815/M-1005 microphone requires 2 AA-size batteries to operate. Please insert the
batteries according to the correct polarity. Many batteries are known to have leakage
problem of conductive and corrosive liquid. Please observe the rule to remove the batteries
if they are not to be used for a longer period.
● Sensitivity setting
Gain control is an adjustable design that enables user to set dierent output levels. GT is
for the use of instrument with high impedance, such as guitar while MT is for the use of low
impedance such as lavalier or headset microphone. To adjust the audio input levels, simply
use a small screw driver to rotate to a desired level.
1
2 3 4
5
6
78
910

12I1220
FCC Caution
This device complies with Part 15 of the FCC Rules.
Operation is subject to the following two conditions:
(1) This device may not cause harmful interference, and
(2) This device must accept any interference received, including interference that may
cause undesired operation.
To assure continued compliance, any changes or modications not expressly approved
by the party responsible for compliance could void the user's authority to operate this
equipment. (Example - use only shielded interface cables when connecting to computer or
peripheral devices).
IC ID Caution
This device complies with Industry Canada licence-exempt RSS-123 standard.
Operation is subject to the following two conditions: (1) this device may not cause
interference,
and (2) this device must accept any interference, including interference that may cause
undesired operation of the device.
THIS DEVICE COMPLIES WITH PART 74 OF THE FCC RULES. This equipment complies
with FCC RF radiation exposure limits set forth for an uncontrolled environment.