China Etech Groups VR290 3D VR GLASSES WITH BLUETOOTH AUDIO User Manual VIV CFS 80
China Etech Groups Ltd 3D VR GLASSES WITH BLUETOOTH AUDIO VIV CFS 80
User Manual
DREAM ON
VIRTUAL REALITY HEADSET
WITH BLUETOOTH STEREO HEADPHONES
FITS ANY
SMARTPHONE
3D VIDEO
EXPERIENCE
ADJUSTABLE
FOCUS
HEADPHONES
FOR ENHANCED
SOUND
VR290
USER’S MANUAL

-1-
Important Health & Safety Precautions
When using your headset, basic health and safety precautions should always be followed, including the following:
1. READ ALL INSTRUCTIONS BEFORE USING YOUR VIRTUAL REALITY HEADSET.
2. Your headset is not to be used by children under the age of 14 years old. For children older than 14 or the infirm your headset
should only be used with adult supervision.
3. If you suffer from irregular vision, or are prone to headaches or earaches, consult a doctor before using your headset.
4. If you have any history with epilepsy, seizures or have experienced symptoms linked to an epileptic condition, consult your doctor
before using your headset. Please note that approximately 1 in 4000 people may experience seizures triggered by flashing lights or
patterns seen while watching video content even if they have had no prior history of epilepsy or seizures.
5. Avoid using your headset if you are under the influence of drugs or alcohol, suffering from illness, or under intense emotional
distress.
6. If you frequently suffer from motion sickness take extra precaution when using your headset, and take frequent breaks.

DO NOT USE FOR EXTENDED PERIODS OF TIME
If this is your first time using a virtual reality headset, only use your headset for a short period of
time (3-4 minutes maximum) so that you can get accustomed to the virtual reality experience.
CAUTION
DISCONTINUE USE IF YOU EXPERIENCE DISCOMFORT
If you experience seizures, dizziness, eye strain, disorientation, or any general illness or discomfort
while using your headset, stop using it immediately. Do not drive a car, use heavy machinery or
CAUTION
ONLY USE IN A SAFE, STABLE ENVIRONMENT
Only use your virtual reality headset in an environment where you are secure. Never use your
headset near windows, stairs or steep heights. Never use your headset in a moving vehicle or in
CAUTION
-2-
Important Health & Safety Precautions (continued)
As you become more experienced, you can use your headset for longer periods of time. It is recommended to take frequent
breaks when using your headset. All users, no matter how experienced shout take a break after using their headset for thirty
minutes. In addition, take an immediate break if you are feeling and discomfort or strain.
participate in any activities that require balance or dexterity until you have recovered. Contact a doctor if these symptoms
persist.
an environment where there are moving people or objects which can put you in danger if you are not properly focused on your
surroundings.

-3-
Introduction
Package Contents
Specifications
-Virtual Reality Headset
-USB Charging Cable
-User’s Manual with Warranty Information
Thank you for purchasing the Vivitar Virtual Reality Headset, item VR290. By inserting your iPhone or Android
phone into the headset, you can enjoy a wide variety of exciting and immersive video content. For the best
results, please read this user’s manual first before using your headset.
Bluetooth Specification: V4.2
Bluetooth Range: Up to 33 feet (10 meters)
Power Supply: DC 5V
Dimensions: 220 x 195 x 120mm
Weight: 420g
Headset Sensitivity: 98dB, 20-20Khz
Compatible Smartphones: Compatible with Most Phones
with Minimum 3.5/Maximum 6 Inch Display Screens
Battery Type: 280mAh Lithium Ion Battery
Charge Time: Approximately 2-3 Hours
Play Time: Approximately 6 Hours
-4-
-31.5” Portable Slider
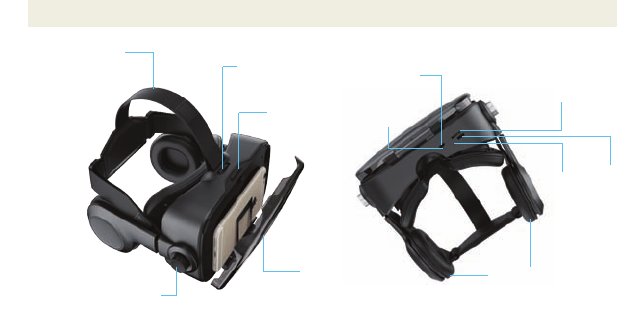
A Quick Look at Your Device
TOP VIEW BOTTOM VIEW
Front Cover
OPEN Button
Power
Button
Microphone
Volume Dial
Headphones
Charging
Port
LED Indicator
Light
Diopter Adjustment Knob
Interpupillary Distance
Adjustment Dial
Adjustable Head Strap

-31.5” Portable Slider
-5-
Downloading VR Content Onto Your Smartphone
You can use your headset to play games or watch exciting video content. Before doing so, you need to download
suitable content onto your smartphone. You can download VR content from either the Google Play store on
Android phones or the App Store on Apple iPhones. A quick search for VR or Virtual Reality games, movies, or
videos should yield a number of results. Below are a few examples of popular free VR applications.
Disclaimer: This list of apps is only meant to highlight some of the selections available in the Google Play or App Store. Sakar
International is not the developer of any of these apps and does not vouch for the content or performance of these apps. Some of
these apps may have in store purchases. For any app issues please contact the app development team directly.
GOOGLE CARDBOARD
FLY ALONGSIDE ARCTIC TERNS,
RELAX UNDER A SKY FULL OF
STARS AND MORE.
SOCCER VR
GET YOUR HEAD IN THE GAME
WIZARD ACADEMY
TEST YOUR SKILLS & KNOWLEDGE
CEDAR POINT VR
RIDE THE NEW VALRAVN
ROLLER COASTER AT CEDAR POINT
GERM BUSTER
KILL NASTY GERMS WITH ART BUBBLE GUN
DINOTREK VR
LIVE DURING THE TIME OF THE DINOSAURS
VRSE
EXPERIENCE ENDLESS STORIES WITH
EXPANDING UNIVERSE OF VIRTUAL
REALITY VIDEOS
BELOOLA
CREATE A VIRTUAL ROOM AND HANG OUT
WITH PASSIONATE PEOPLE LIKE YOU
YOUVISIT VR
EXPERIENCE VR VIDEOS ABOUT ART, TRAVEL,
EDUCATION, BUSINESS, REAL ESTATE AND MORE
DISCOVERY VR
TRANSPORT YOURSELF TO PLACES
YOU DIDN'T KNOW EXISTED
JAUNT VR
EXPERIENCE THE WIDEST ARRAY OF
PREMIUM CINEMATIC VR
VRIDEO
PREMIER PLATFORM OF IMMERSIVE VIDEOS

-6-
Charging Your Headset
Your headset has a built-in, rechargeable lithium Ion battery. To avoid damage, do not attempt to remove the
battery. The full performance of the battery is only achieved after a few charging-discharging cycles. Charge the
battery fully before first use. To do so, follow the steps below:
1. Connect one end of the included USB charging cable to the charging port on your headset. Then plug the other
end of the USB charging cable into a USB port on your computer or a suitable power adapter in order to recharge
the internal rechargeable battery.
NOTE: The internal battery of your headset takes approximately 2-3 hours to charge when completely drained.
2. When the battery is charging, the LED indicator light will turn red. The LED indicator light will turn off when the
battery is fully charged. Unplug when charging is complete.
NOTE: Overcharging could reduce the life of the battery. A charged battery will lose its capacity if it is not used on
a regular basis.
Important!
To avoid a complete discharge of the battery, charge your speaker at least once every six months.
-31.5” Portable Slider

-7-
Pairing Your Headset with Your Smartphone
In order to use the headphones attached to your headset to hear sound, you must pair your headset with your
smartphone. Your headset can be paired with most iPhones and Android phones that have Bluetooth capabilities.
In order to pair your headset with a smartphone, follow the steps below:
1. Press and hold the power button in order to power on your headset. The LED indicator light on your headset
will alternately flash red and blue. This indicates that your headset is in pairing mode.
2. Go to the Bluetooth Manager on your smartphone.
3. Search Bluetooth devices and select your headset (most frequently listed as “VIVITAR HEADSET”) to start
connecting.
4. Enter “0000” if your device asks for the PIN code.
5. Once paired, the LED indicator light will slowly blink blue every few seconds.
-8-
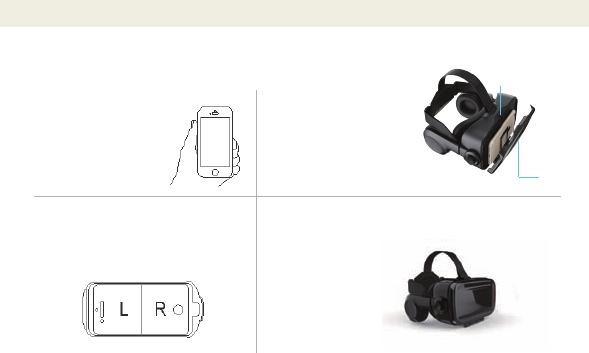
Inserting Your Smartphone Into Your Headset
Once you’ve downloaded suitable video content onto your smartphone and paired your headset with your
smartphone, you can insert your smartphone into your headset. To do so, follow the steps below.
1. On your smartphone, open
up the VR video content which
you want to watch so that it is
ready to play.
3. Insert your smartphone inside of your headset.
Align the center line on your smartphone’s screen
to the midpoint mark of the Front Cover.
2. On your headset, press the
OPEN button to flip out the front
cover.
4. Flip the front cover back up
so it fits securely in place.
Open
Front Cover

-9-
Viewing VR Content On Your Headset
Once you’ve downloaded VR content onto your smartphone and inserted your smartphone into your headset, you
can start watching exciting immersive video. To do so follow the steps below:
1. Use the Adjustable Strap to secure your headset to your head. Make sure that it is tight enough so that it does
not fall off, but not so tight that it is uncomfortable.
NOTE: It is not advised to use your headset while wearing glasses or other eye wear. Please take off your glasses
before putting your headset on. If possible wear contact lenses instead.
2. Rotate the diopter adjustment knobs on the sides of your headset to adjust the sharpness of the image to best
compliment your own eyesight.
3. Turn the interpupillary distance adjustment dial on the top of your headset to adjust the distance between the
lenses in your headset. For best results make sure to account for the distance between the pupils of your eyes.
4. While viewing video, you can tilt your head left and right to enhance your viewing angles, utilizing the motion
sensor of your phone.

-10-
Powering Your Headset On and OFF
1. Press and hold the power button in order to power on your headset. If you have already paired your headset to
your smartphone, they will automatically remain paired each time you power on your headset.
2. To power off your headset, press and hold the power button until your headset powers off.
Adjusting the Volume
1. While watching a video, you can turn the volume dial to the left or right to increase or decrease volume.
Answering Incoming Calls
1. If you receive a phone call while using your headset, tap the power button to accept the call. Your headset has
a built-in microphone which will allow the person calling to hear you when you speak.
2. If you want to reject an incoming call, press and hold the power button.
3. When you are finished your phone conversation, tap the power button to end the call.
Listening to Audio Using Your Headset
In order to listen to audio using your headset’s attached headphones, you must first make sure that your headset is
powered on.

Troubleshooting
-11-
Technical Support
For technical support issues please visit our website at www.vivitar.com. You can find manuals, software and
FAQ’s at the website. Can’t find what you are looking for? Fill out an online ticket and one of our technical
support team members will answer questions or call 1-800-592-9541 in the U.S. or 0-800-917-4831 in the UK
to access our technical support information on the phone.
PROBLEM:
Video is Not Displaying Properly When Viewed Through the Headset
POSSIBLE SOLUTIONS:
1. Make sure that the content you are viewing on your smartphone is actual VR content and not just a standard
video file. You can download VR content from either the Google Play store on Android phones or the App Store on
Apple iPhones. A quick search for VR or Virtual Reality games, movies, or videos should yield a number of results.
2. When inserting your phone into the headset, make sure it is aligned properly.
3. Make sure the front cover is properly attached.

Changes or modifications not expressly approved by the party responsible for compliance could void the user’s
authority to operate the equipment.
This device complies with Part 15 of the FCC Rules. Operation is subject to the following two conditions: (1) this device
may not cause harmful interference, and (2) this device must accept any interference received, including interference
that may cause undesired operation.
This equipment has been tested and found to comply with the limits for a Class B digital device, pursuant to Part 15 of
the FCC Rules. These limits are designed to provide reasonable protection against harmful interference in a residential
installation. This equipment generates, uses and can radiate radio frequency energy and, if not installed and used in
accordance with the instructions, may cause harmful interference to radio communications. However, there is no
guarantee that interference will not occur in a particular installation.
If this equipment does cause harmful interference to radio or television reception, which can be determined by turning
the equipment off and on, the user is encouraged to try to correct the interference by one or more of the following
measures:
-- Reorient or relocate the receiving antenna.
-- Increase the separation between the equipment and receiver.
-- Connect the equipment into an outlet on a circuit different from that to which the receiver is connected.
-- Consult the dealer or an experienced radio/TV technician for help.
FCC Compliance Statement

Vivitar One Year Warranty
This warranty covers the original consumer purchaser only and is not transferable.
This warranty covers products that fail to function properly UNDER NORMAL USAGE, due to defects in
material or workmanship. Your product will be repaired or replaced at no charge for parts or labor for a period
of one year.
What Is Not Covered by Warranty
Damages or malfunctions not resulting from defects in material or workmanship and damages or malfunctions
from other than normal use, including but limited to, repair by unauthorized parties, tampering, modification or
accident.
To Obtain Warranty Service and Troubleshooting Information:
Call 1-800-592-9541 in the U.S. or 0-800-917-4831 in the UK or Visit our website at www.vivitar.com.
To receive Warranty service along with the name and address of an authorized product service center, the
original consumer purchaser must contact us for problem determination and service procedures. Proof of
purchase in the form of a bill of sale or receipted invoice, evidencing that the Product is within the applicable
Warranty period(s), MUST be presented in order to obtain the requested service. It is your responsibility to
properly package and send any defective products along with a dated copy of proof of purchase, a written
explanation of the problem, and a valid return address to the authorized service center at your expense. Do
not include any other items or accessories with the defective product. Any products received by the authorized
service center that are not covered by warranty will be returned unrepaired.

Vivitar One Year Warranty (continued)
NO WARRANTIES, WHETHER EXPRESS OR IMPLIED, INCLUDING, BUT NOT LIMITED TO, ANY
IMPLIED WARRANTIES OF MERCHANTABILITY OR FITNESS FOR A PARTICULAR PURPOSE, OTHER
THAN THOSE EXPRESSLY DESCRIBED ABOVE SHALL APPLY. DISTRIBUTOR FURTHER DISCLAIMS
ALL WARRANTIES AFTER THE EXPRESS WARRANTY PERIOD STATED ABOVE. NO OTHER
EXPRESS WARRANTY OR GUARANTY GIVEN BY ANY PERSON, FIRM OR ENTITY WITH RESPECT TO
THE PRODUCT SHALL BE BINDING ON DISTRIBUTOR. REPAIR, REPLACEMENT, OR REFUND OF
THE ORIGINAL PURCHASE PRICE - AT DISTRIBUTOR’S SOLE DISCRETION - ARE THE EXCLUSIVE
REMEDIES OF THE CONSUMER. IN NO EVENT WILL DISTRIBUTOR, ITS MANUFACTURERS, OR
SAKAR INT. BE LIABLE FOR ANY INCIDENTAL, DIRECT, INDIRECT, SPECIAL, PUNITIVE OR
CONSEQUENTIAL DAMAGES (SUCH AS, BUT NOT LIMITED TO, DAMAGES FOR LOSS OF PROFITS,
BUSINESS, SAVINGS, DATA OR RECORDS) CAUSED BY THE USE, MISUSE OR INABILITY TO USE
THE PRODUCT. EXCEPT AS STATED HEREIN, NO OTHER WARRANTIES SHALL APPLY NOT WITH--
STANDING THE FOREGOING, CONSUMER’S RECOVERY AGAINST DISTRIBUTOR SHALL NOT
EXCEED THE PURCHASE PRICE OF THE PRODUCT SOLD BY DISTRIBUTOR. THIS WARRANTY
SHALL NOT EXTEND TO ANYONE OTHER THAN THE ORIGINAL CONSUMER WHO PURCHASED THE
PRODUCT AND IS NOT TRANSFERABLE.
Some countries, states or provinces do not allow the exclusion or limitation of incidental or
consequential damages or allow limitations on warranties, so limitation or exclusions may not apply
to you. This warranty gives you specific legal rights, and you may have other rights that vary from
state to state or province to province. Contact your authorized retailer to determine if another
warranty applies. This product is manufactured, distributed and sold by SAKAR International, Inc. All
other trademarks are the property of the respective owner, who has not sponsored, endorsed or
approved this product.