China Great Wall Computer D8XXXXX Digital Frame (Wi-Fi) User Manual Manual
China Great-Wall Computer Shenzhen Co. Ltd. Digital Frame (Wi-Fi) Manual
User Manual
eStarling Photo Frame setup and user guide
Thank you for choosing the eStarling Digital Photo Frame. Please follow this guide to setup
and use your new eStarling frame.
*** Before setting up your eStarling frame ***
Please prepare the following items before you go begin the following set up of your eStarling frame.
- your eStarling frame, along with the power supply and USB cable
- a powered on PC with Internet connection
- Internet connected WiFi network with known SSID (network name), authentication type and the corresponding
encryption key ( WEP ) or Pre-Shared Key, PSK ( WPA ), if using encryption
Setting up your eStarling Digital Photo Frame
Use your PC to visit “ www.seeframe.com ” and click “Setup Now!” and follow the installation
steps below:
Step1:
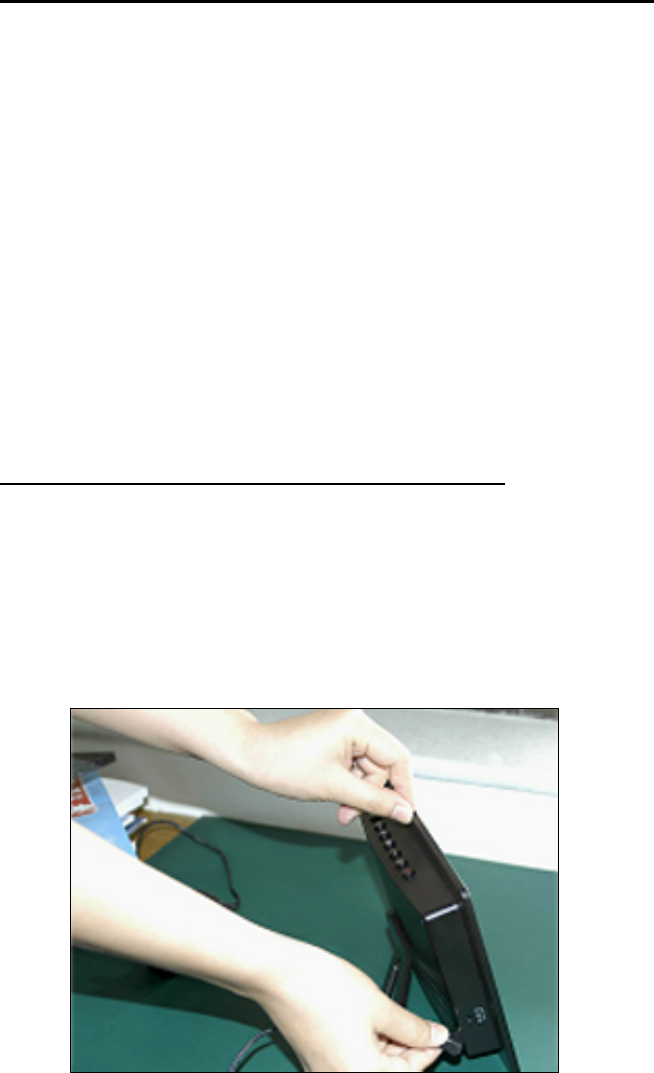
Power up your eStarling™ frame by plugging in the power cord. A message will
appear on the frame “Wi-Fi Connecting” Indicating that the frame is searching for an
available WiFi signal.
(Please Note: Some models of eStarling frame include an EXTERNAL USB WiFi Adaptoe.
If your frame includes the external adaptor, please insert the adaptor into the USB port
on the frame before powering up the frame.
Step2:
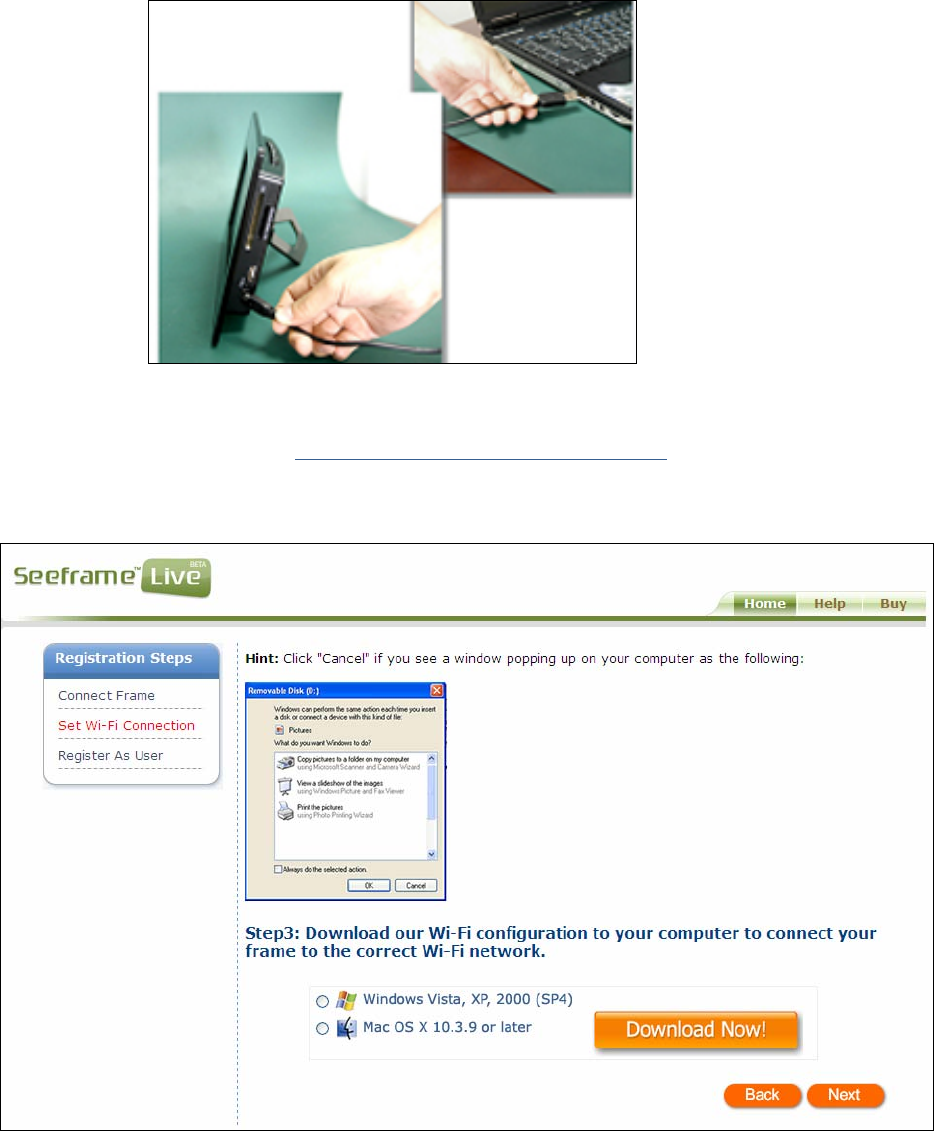
Use the included USB cable to connect your eStarling™ frame to your Mac or PC (then
click “Next”)
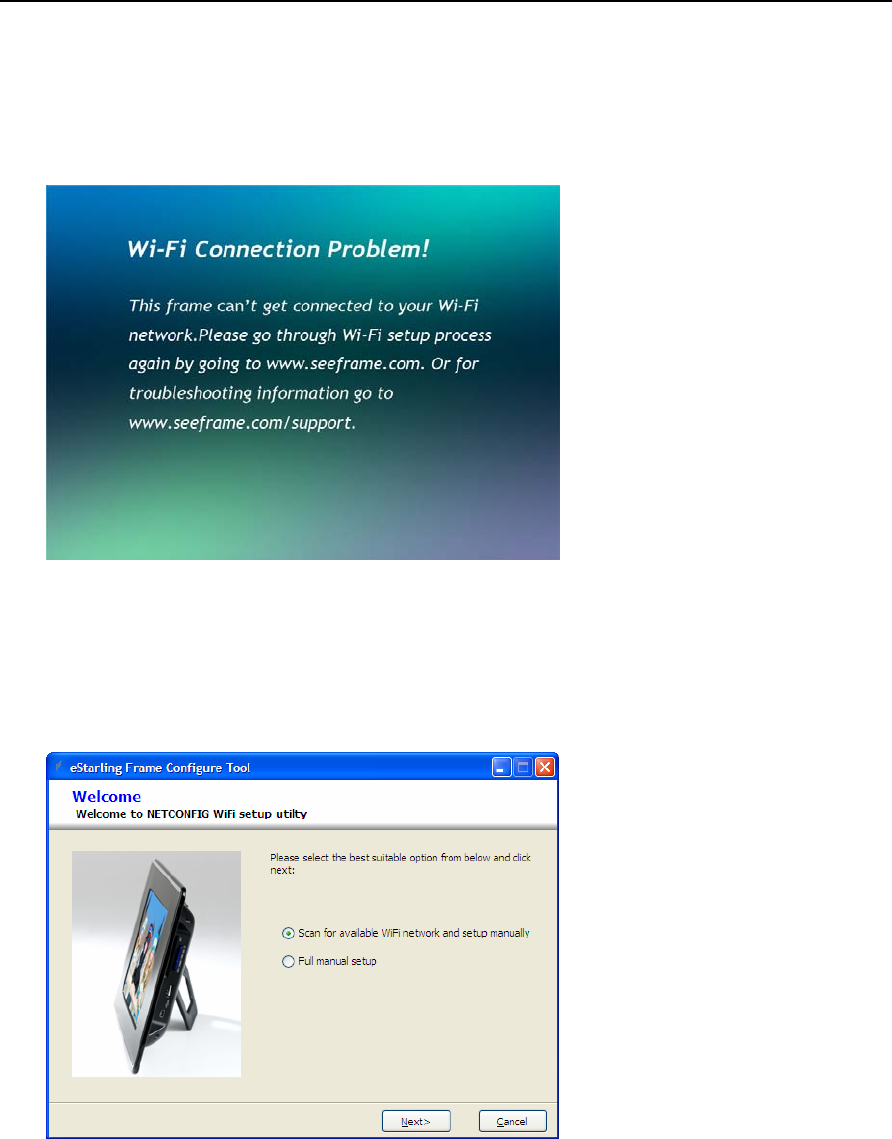
Step3:
You will reach the page “ www.seeframe.com/inside2.html “ for downloading the WiFi
connection setup utility – NETCONFIG
Choose the correct Operating System (Windows or Mac) and click “Download Now!”
to start downloading NETCONFIG. Leave this webpage open after download of
NETCONFIG has been completed. Run NETCONFIG and follow the steps below to
setup the connection of your eStarling frame to the WiFi network.
Setting up the WiFi connection between your WiFi router/AP and eStarling frame
I. After you powered up your eStarling frame at Step1: above, you will see the eStarling
logo and the frame will start to search for the WiFi network.
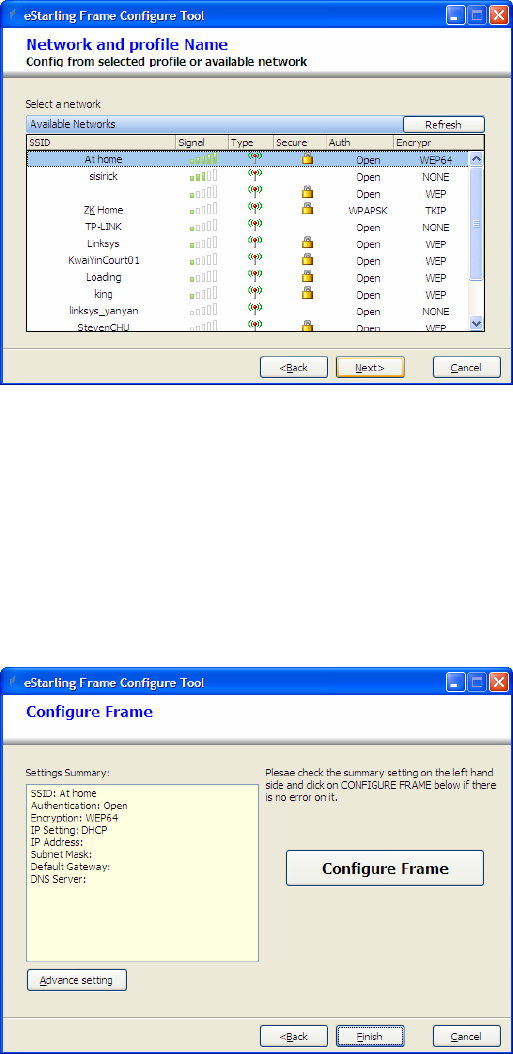
II. For the first time setup of your eStarling frame, the following message may show up (this
step may takes as long as 2min.)
III. Run the NETCONFIG utility downloaded from Step3 above. Choose “Scan for available
WiFi network and setup manually” if you are running the NETCONFIG utility from a
desktop or laptop PC which have WiFi enabled.
(Re. : it is NOT recommended to use the “Full manual setup” mode unless you know all
the details about your WiFi network)
IV. The PC will scan for available WiFi network. Highlight your WiFi network and click “Next”.
**************************************************************************************
NETCONFIG will jump to the last step directly if :
1) your PC had been connected/is connecting to the WEP encrypted network,
NETCONFIG will automatically extract the encryption key from your PC
2) the selected network is of OPEN type, no encryption is implemented
Click “Configure Frame” to send the configuration data to your eStarling frame and go
to step VI. To continue the setup process
************************************************************************************
V. NETCONFIG will detect the authentication mode (WEP or WPA) of your selected WiFi
network and jump to the corresponding setup page accordingly.
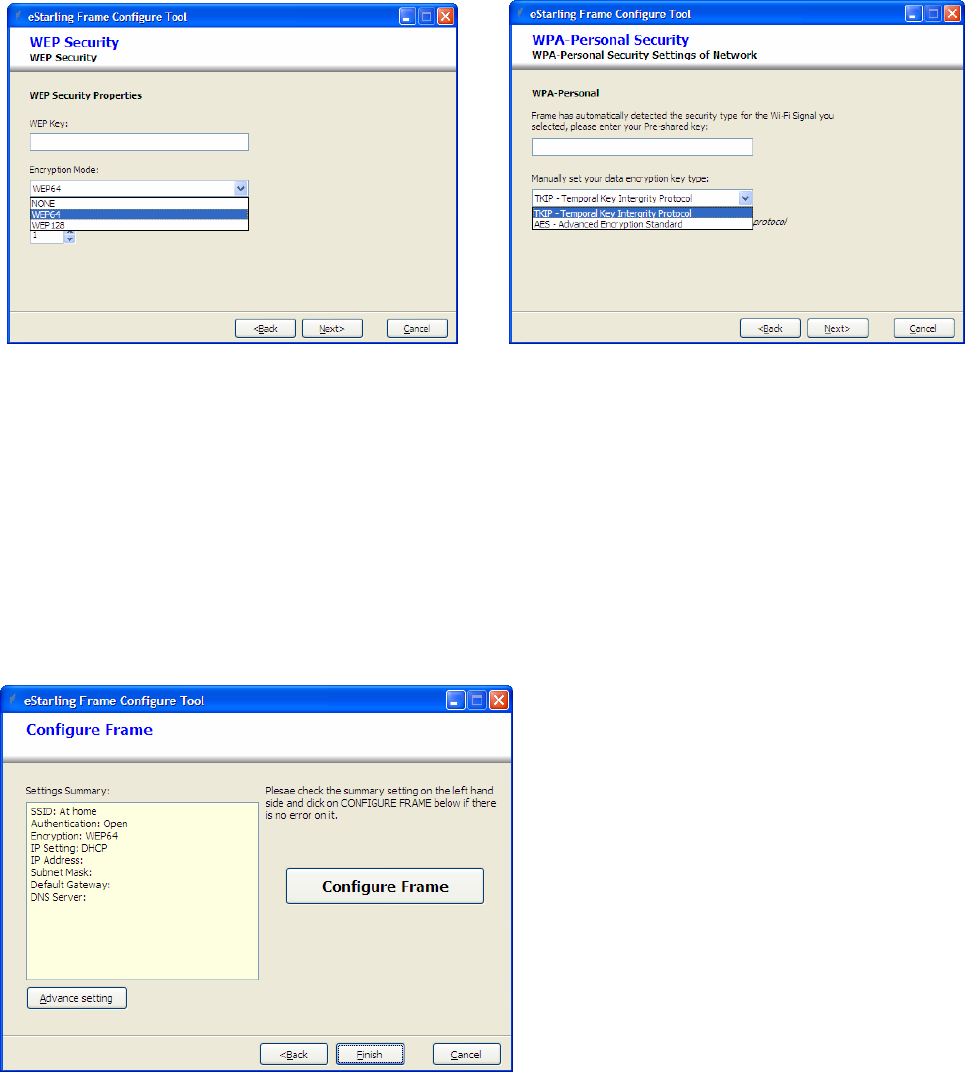
- For WEP encrypted network, enter the WEP encryption key and choose the encryption
mode (choose none for open network).
- For WPA encrypted network, enter the WPA Pre-Shared Key (PSK) and the encryption
key type (if you are not sure, try TKIP first as this is the most common type)
Click “Next” when completed.
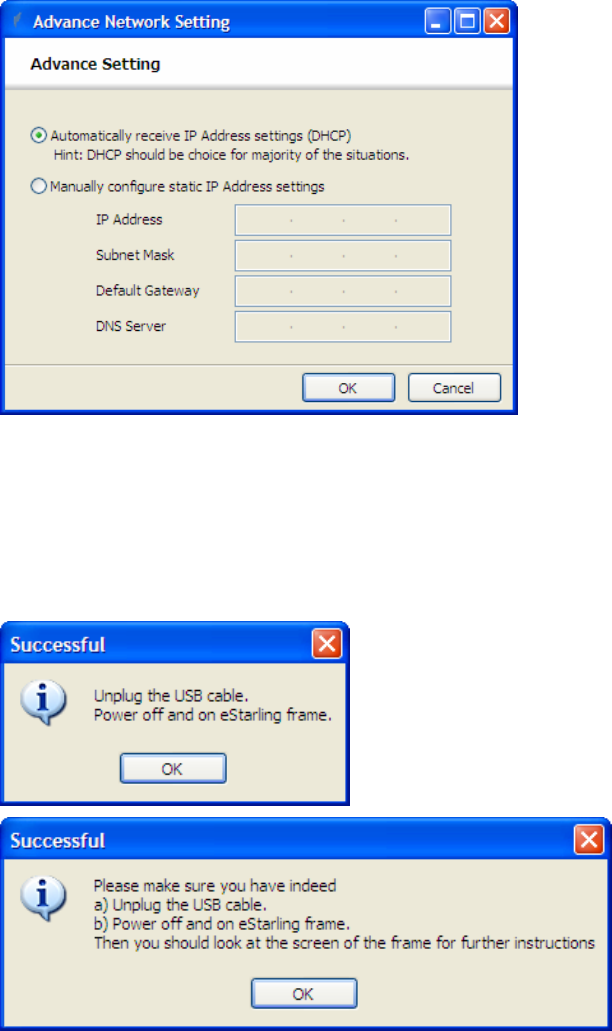
VI. A summary of the WiFi network setting will be displayed on the left hand side. Please go
through the setup procedure again if there is any error or click the “Configure Frame”
button to send the configuration information to the eStarling frame. (the configuration
data will be stored inside the config.sys file from the “system” folder of the eStarling
frame.
**************************************************************************************
(Re. : click on “Advance setting” if you need to specify your own IP address settings.
Click “OK” when you have finished the IP address settings. It is not recommended to
setup the IP address settings manually unless you are familiar with your WiFi network).
******************************************************************************************
VII. It is important to disconnect the USB cable, power down the eStarling frame and power
it up again.
(Re. : You will be reminded to unplug the USB cable from the eStarling frame and power
off and on the eStarling frame again after you click the “Configure frame” button from
the above step.
VIII. After the frame has been powered up again, it will search for the specified WiFi network
automatically and if the setting is correct, you will see the frame displaying the following
message (this may takes ~1min after the eStarling logo show up since you powered up
the frame again). The six digits code in red is the registration code for your eStarling
photo frame (XXXXXX is shown as an example only, every eStarling frame will have its
own unique registration code)
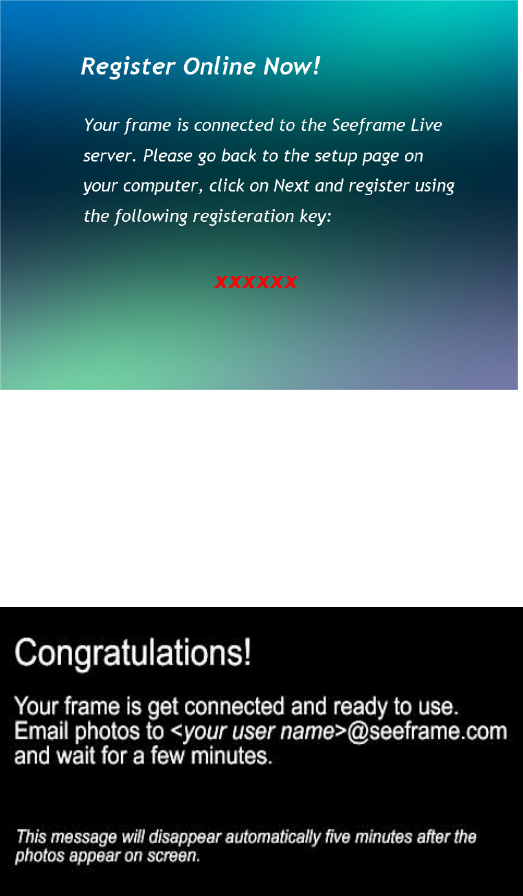
IX. Pls go back to the webpage opened at Step3 above and click “Next” to start the
registration procedure by entering the registration code. Once the registration has been
completed, the following message will be displayed on the frame (time to be taken for
the frame to display this message will vary depends on different connection
environment and usually it takes no more than 2 min):
When this message pops up, your eStarling photo frame has been fully configured and
ready for use.
X. If the eStarling frame cannot be connected to the specified WiFi network, the following
message will be displayed after you see the eStarling logo (after ~1 min you powered up
the frame from the above step). Pls verify the WiFi network settings and go through the
setup procedure again.
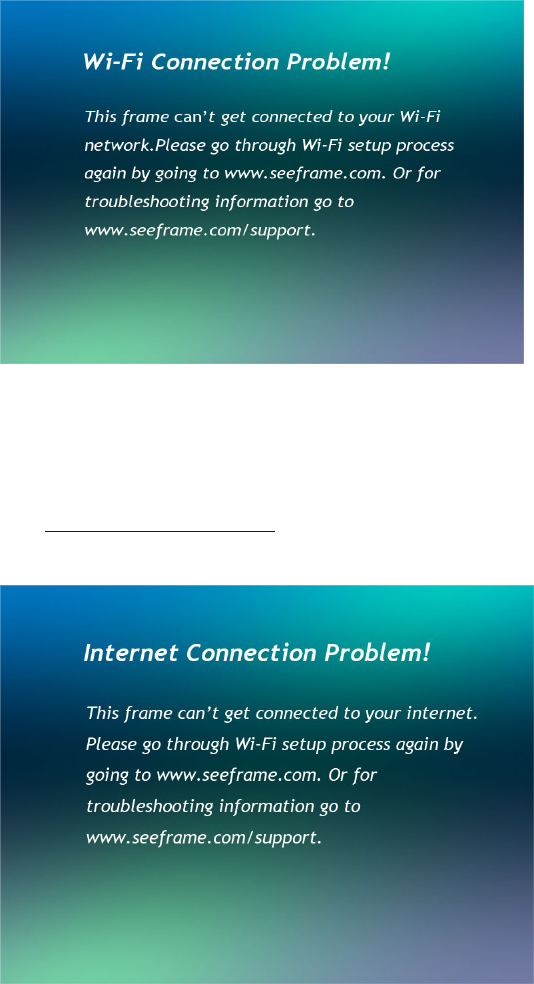
If the eStarling Frame has been connected to the specified WiFi network but the network
is not being connected to the Internet, the following message will be displayed. Please
contact your ISP and check on the Internet connection to your WiFi network. Once the
Internet connection has been re-established, the frame should automatically connect to
the www.seeframe.com and provide you the six digitals registration code in red as above
mentioned. Or, pls go through the Wifi connection setup procedure again.
Congratulations, your eStarling photo frame has been properly setup to communicate
with www.seeframe.com. You can enjoy the ultra convenient way of photo sharing which
we enabled through eStarling Frame and www.seeframe.com . Photos under your user
account on www.seeframe.com will be sent automatically to your eStarling frame
through Internet and your WiFi network. When the on-frame memory is full, photos will be
deleted from the frame in a “first-in-first-out” manner. The oldest photo will be deleted in
order to give room for new incoming photo while the corresponding original photo under
your user account on www.seeframe.com will be kept intact.
Customizing slide show
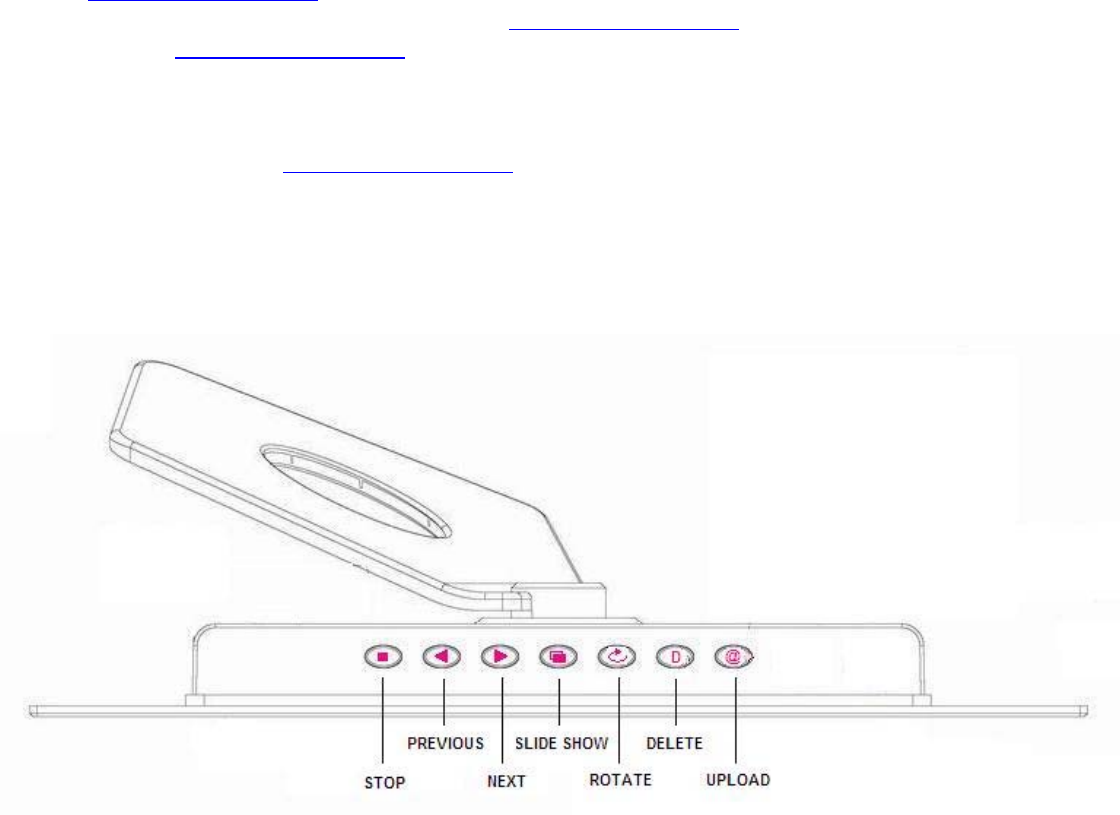
Button arrangement for customizing slide show:
1. Auto/manual slide show
Auto slide show will be started automatically after power on. To stop auto slide show
and browse through photos manually, pls. press the STOP button. Press the SLIDE
SHOW button to resume auto slide show.
Automatic slide show from built-in memory or memory card
From built-in memory :
Slide show will be started automatically from the on-frame memory when there is no
FLASH memory card attached to the eStarling frame
From memory card :
Photos on FLASH memory cards will have a higher priority for display than those being
pushed from the web server. Slide shows from memory card will be started from the
last memory card you inserted into the eStarling photo frame automatically
2. Adjusting time interval between photos under auto slide show mode
The default time interval between each photo for auto slide show is 10 sec. You can
toggle the options between 10, 60 second 180 sec. intervals by pressing the SLIDE
SHOW button consecutively.
3. Browsing through photos under manual slide show.
To display the photos manually, press the STOP button and use the NEXT and
PREVIOUS button to browse through the photo album from on-frame memory or on
memory card
4. Changing the display orientation of photos
Press the ROTATE button consecutively to rotate the photos clockwise in 90, 180, 270
and 0 degree.
5. Deleting photos
Stop the slide show by pressing the STOP button, browse through the photos using the
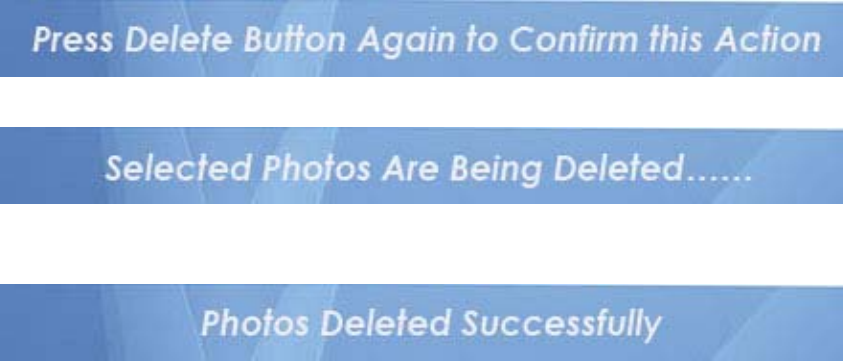
NEXT and PREVIOUS button to locate the photo to be deleted. Press the DELETE
button once and the screen will display :
Press the DELETE button again to confirm on deletion, the screen will display:
Once the photo has been completely deleted, the following message will be
displayed.
6. Upload a photo from eStarling frame

Photos from FLASH memory card can be uploaded directly to your web album under
www.seeframe.com . Stop the slide show by pressing the STOP button, browse
through the photos using the NEXT and PREVIOUS button and locate the photo to be
uploaded. Press the UPLOAD button once and the screen will display:
Once the photo has been completed uploaded, the following message will be
displayed
FCC Information
This device complies with Part 15 of the FCC Rules. Operation is subject to the following two
conditions: (1) this device may not cause harmful interference, and (2) this device must
accept any interference received, including interference that may cause undesired
operation.
Changes or modifications not expressly approved by the party responsible for compliance
could void the user's authority to operate the equipment.
This equipment complies with FCC radiation exposure limits set forth for an uncontrolled
environment. End users must follow the specific operating instructions for satisfying RF
exposure compliance. This transmitter must not be co-located or operating in conjunction
with any other antenna or transmitter.
This device complies with FCC RF radiation exposure limits set forth for an uncontrolled
environment. The antenna used for this transmitter must be installed to provide a separation
distance of at least 20 cm from all persons and must not be co-located or operating in
conjunction with any other antenna or transmitter.
This equipment has been tested and found to comply with the limits for a Class B digital
device, pursuant to Part 15 of the FCC Rules. These limits are designed to provide reasonable
protection against harmful interference in a residential installation. This equipment generates,
uses and can radiate radio frequency energy and, if not installed and used in accordance
with the instructions, may cause harmful interference to radio communications. However,
there is no guarantee that interference will not occur in a particular installation.
If this equipment does cause harmful interference to radio or television reception, which can
be determined by turning the equipment off and on, the user is encouraged to try to correct
the interference by one or more of the following measures:
-- Reorient or relocate the receiving antenna.
-- Increase the separation between the equipment and receiver.
-- Connect the equipment into an outlet on a circuit different from that to which the receiver
is connected.
-- Consult the dealer or an experienced radio/TV technician for help.