China Great Wall Computer FC18D LED Monitor User Manual 185LD
China GreatWall Computer Shenzhen Co., Ltd. LED Monitor 185LD
Users Manual

LED MONITOR USER’S MANUAL
MODEL NO.:185LD
Read this manual before operation
R
Features...........................................................................1
Inside the box...................................................................1
Connection of LED monitor to PC.....................................1
Operation of monitor........................................................2
How to use On Screen Display (OSD)...............................2
OSD shortcut key ...........................................................3
Menu
Optimal screen resolution settings.....................................5
Safety precautions............................................................6
......................................6
Cleaning and Maintenance of LED monitor........................ 6
Troubleshooting...............................................................7
Uniformity and related compliance...................................7
...............................................................................4
Installation disassembling wall mounting and adjusting the
viewing angle...................................................................8
\ \
Operational climate requirements

Connection of LED monitor to PC
Inside the box
Features
The LED monitor provides a bright, clear and vivid color display and does not emit radiation as can be generated by
common CRT monitors.
Auto setting.
Meets the energy saving standard of VESA DPMS. Allows user defined auto power off timer for additional
energy savings.
Numeric character smoothing function.
Meets Windows 9X/ME/2000/XP/Vista/7 plug & play specifications.
User-friendly functions/OSD interface.
Plug and play: Compliant with the VESA standard, supports the DDC2B standard.
- -
Before unpacking your LED monitor, make sure you have a stable and clear workspace upon which you can place your
monitor and computer.
Connect the DVI cable to the DVI In port on the back
of the LED monitor.
VGA interface
Connect the signal cable to the 15-pin D-SUB port
on the back of back of the LED monitor.
Audio interface
Connect the audio cable of the LED monitor to the aud
io port on the back of the PC.
Built-in Power
1 copy
User s Manual'
1 pc
LED Monitor
1 pc
VGA signal cable
1 pc
DVI signal cable 1 pc
Audio cable
1 pc
Power cord
1 pc
Manual screw
123 4
12
3
4
or
-1-
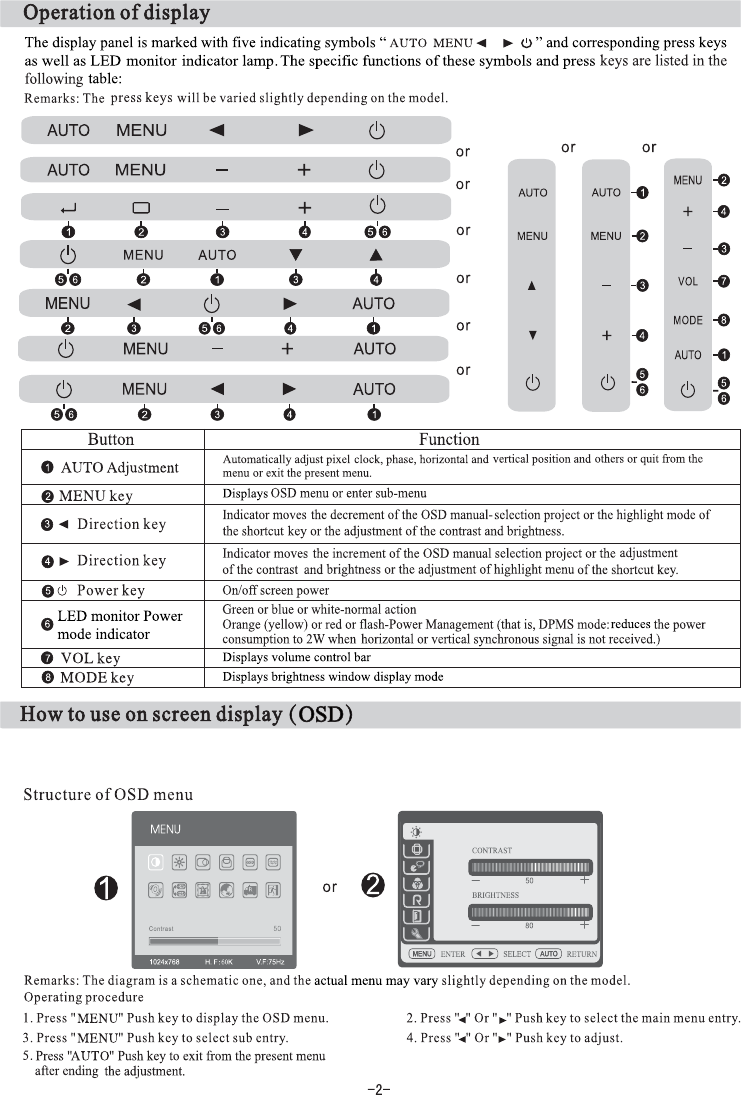
The on screen display (OSD) function lets you adjust the display quality of the monitor according to your needs.
(Remarks: Please ensure that the monitor is turned on and that the sync signal input cable is attached to your computer
before making adjustments.)
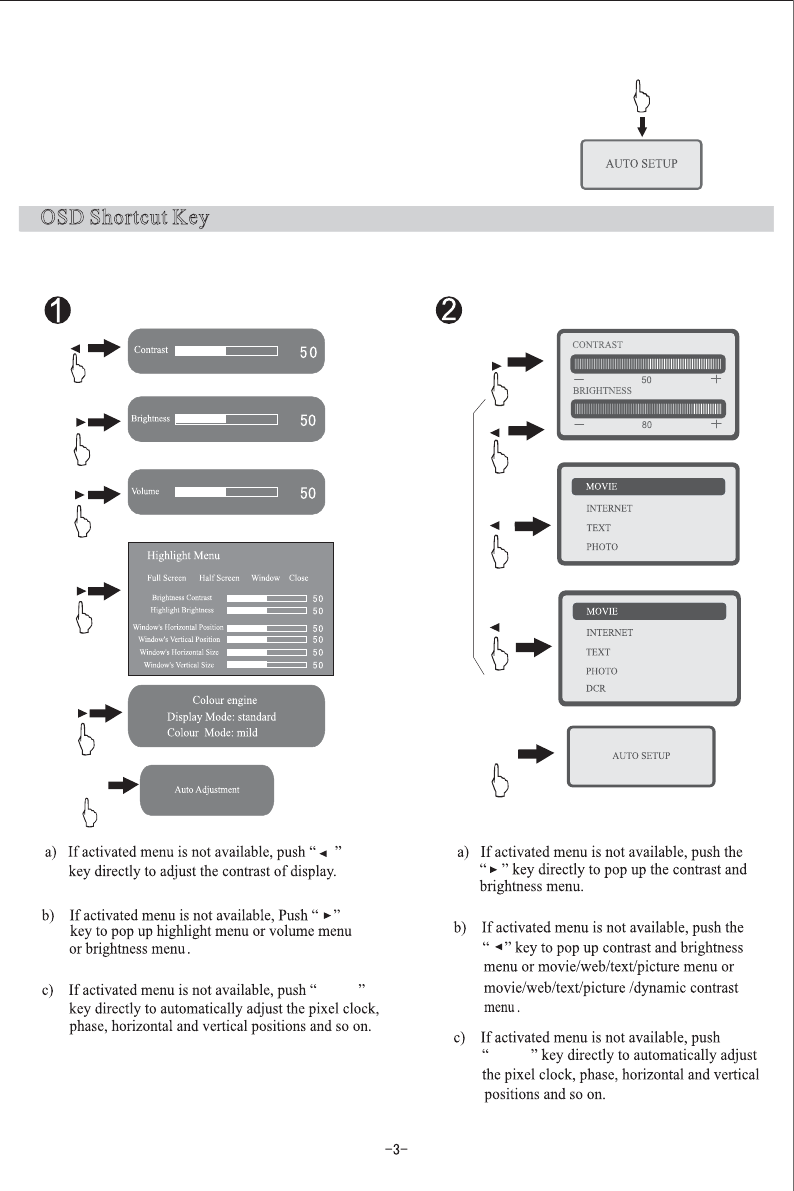
OSD Shortcut Key
or
or
or
or
or
AUTO
AUTO
AUTO
AUTO
AUTO
Auto adjustment
1. Press the key with [AUTO] on the display panel.
2. Auto adjustment will begin. OSD will be displayed automatically. It will
complete the adjustment about 10 seconds later.
Remarks: No effect will be available for the function adjustment under DVI
mode since the digital signal is very standard.
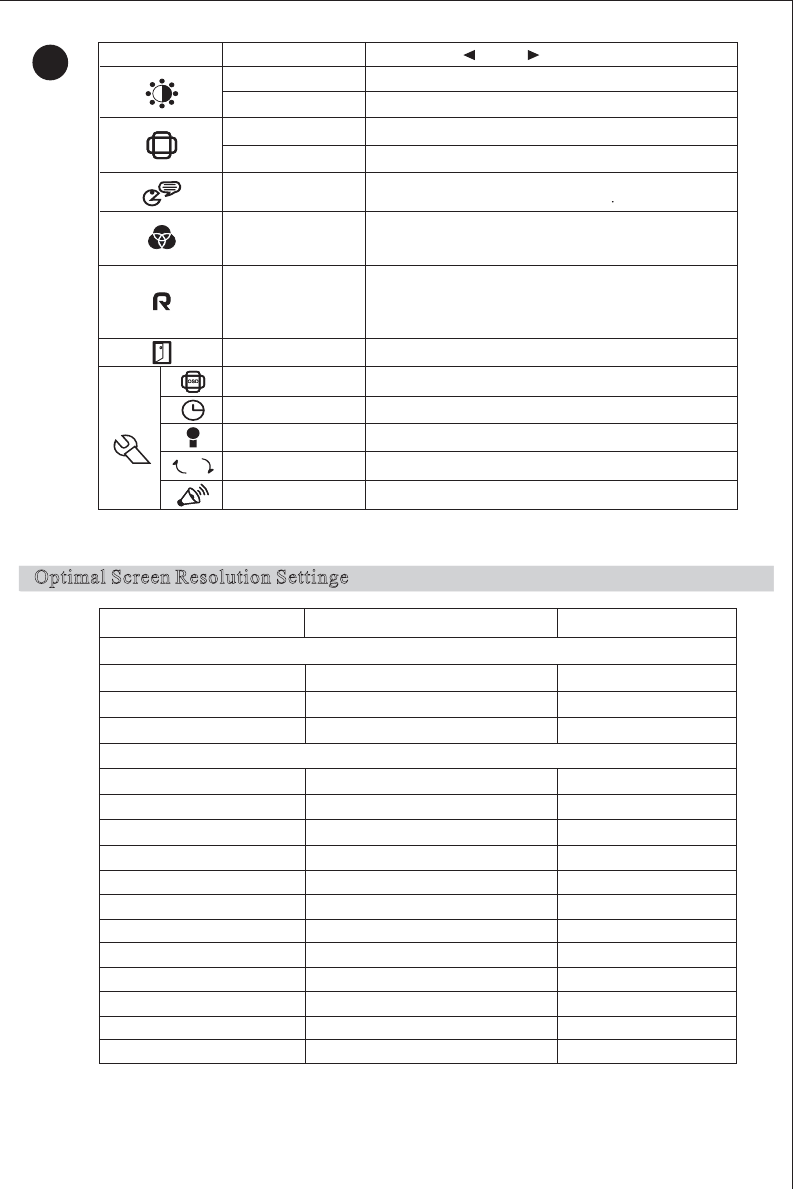
OSD Shortcut key (Remarks: The menu function may differ slightly depending on the model.)
This function allows users to adjust commonly used menus such as “brightness” and “contrast”.
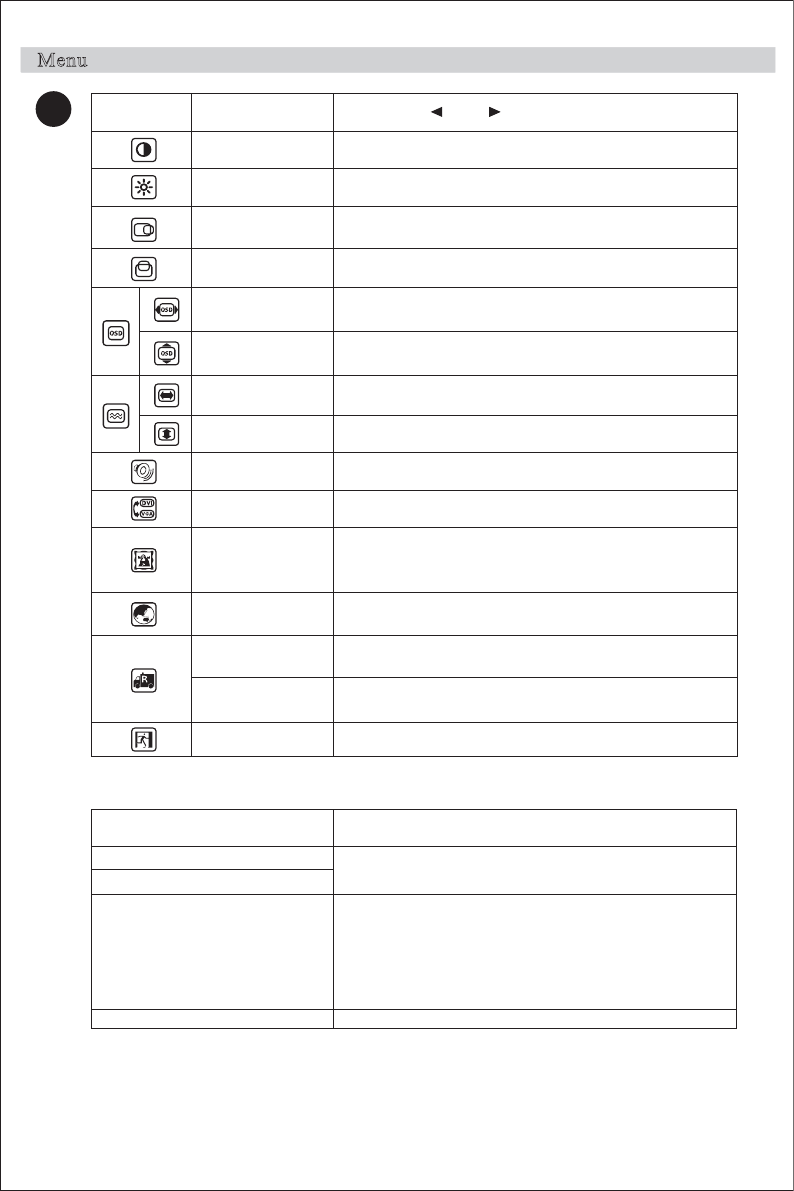
Menu
Sub-menu Function name
After press and“ ”button“ ”
Adjust the contrast of the picture.
Contrast
Brightness Adjust the brightness of the picture.
Screen picture can move left or right.
Vertical position Screen picture can move up or down.
position
Horizontal
OSD horizontal
position Adjust the horizontal orientation of the menu.
OSD vertical
position Adjust the vertical orientation of the menu.
Phase
Adjust the Clock frequency of pixel
Clock
Adjust the phase of pixel clock
Volume Adjust the volume.
Input selection A/D or D/A conversion.
Color adjustment
Language Six languages: Simplified Chinese, English, French,
German, Italian, Spanish.
Recover the mode
in the factory Reset settings to the factory default.
Screen size
adjustment
Switch between wide screen display and
common display.
Quit Quit the OSD menu
Highlight Menu
Function Name Sub-function
Full Screen Highlight Hi ghl ight contrast
Highlight brightness
Half Screen Highlight
Window Highlight
Close
Window's Vertical Size
Highlight contrast
Highlight brightness
Window's Horizontal Position
Window's Vertical Position
Window's Horizontal Size
Notes: Menu function types and function names may vary slightly depending on the model.
Preset temperature in the factory(9300K)(7500K)(6500k)
AUTO: Automatic color adjustment.
USER: User-defined color temperature
1
-4-
6
66
Optimal Screen Resolution Settinge
Sub-menu Function name
After press and “ ”button“ ”
Adjust the contrast of the picture.
Contrast
Brightness Adjust the brightness of the picture.
Adjust display orientation to the left or right.
Vertical position Adjust screen orientation up or down.
Horizontal position
2
English, Simplified Chinese, Korean, Turkish, French,
German, Italian, Spanish, Russian, and Japanese.
Language
Warm color temperature, cold temperature
AUTO: Automatic color adjustment.
USER: User-defined color temperature
Color adjustment
Switching function between wide screen display and
common display to recover the default settings in the
factory.
Automatically detects the resolution
AUTO
Recover default
settings
Quit the OSD menu.
Quit
OSD position Horizontal and vertical adjustment
Adjustment of phase and frequency.
Resolution information.
VGA/DVI conversion.
Volume adjustment.
Notes: Some menu functions may not be available depending on signal type used under normal
operation.
Volume
Output conversion
Information
Phase clock
4 : 3 Mode
60Hz
60Hz
60Hz
60Hz
60Hz
60Hz
60Hz
60Hz
60Hz
60Hz
60Hz
60Hz
60Hz
60Hz
60Hz
Inch
17
15
18.5
17
15
19
20
20.1
21.5
21.6
22
23.6
23
24
19
1280x1024
1024x768
1280x1024
136 x768
1280x720
13 x768
1600x900
1680x1050
1680x1050
1920x1080
1920x1080
1920x1200
1680x1050 or 1920x1080
1680x1050 or 1920x1080
1440x900
Remarks: The resolution may vary slightly depending on the model.
The optimal resolution Frame Rate
Wide Mode
VGA
DVI
-5-
Safety Precautions
Please read the following instructions to avoid a fire or electric shock leading to injury or damage of property.
Operational Climate Requirements
Operating
Temperature:50°F 104°F 10 40~(~)°C °C
Humidity:10% 80 non condensing~, -%
Storage Temperature:-4°F 113°F 20 45 C~(- ~)°C °
Humidity:5% 85 non condensing~, -%
Cleaning and Maintenance of LED
monitor
Do NOT use any solvent listed below to avoid any damage to the LED
monitor
and the casing.
Diluent, spray cleaner, corrosive cleaner, acid or alkaline solvent, volatile oil, wax, benzene.
Casing
Do not use rubber or plastic product to wipe the casing to avoid any peeling paint of the casing.
Wipe the casing using a cloth with a little neutral cleaner, and then dry it using a dry cloth.
LED
monitor
panel
The display shall be dusted off periodically with a piece of clean soft cloth to keep clean. Any fluid may
damage the display.
Never wipe the screen using paper or a hard substance.
Make sure to unplug the power cord before cleaning the product.
Caution:
Attention:
Always hold the plug body to pull out the plug.
To handle or clean the LED
monitor
, switch off the LED
monitor
and unplug the monitor from the power source.
Never touch the plug with a wet hand.
Others
Always operate the LED monitor with the designated power supply. To guarantee protection, we strongly recommend
that you should install a surge protector device between the main power outlet and AC power supply or AC adapter.
Remove the power plug in case of any abnormality (e.g. noise, smoke or smell).
Always keep the LED
monitor
away from moisture.
Never operate the LED
monitor
in case of lightning or storm.
Always keep the LED
monitor
well ventilated. Never block the ventilation grooves or vents. Keep the LED
monitor
at least 4 in. (10cm) away from the wall.
Do not disconnect the power cord while using the monitor.
Do not excessively bend the plug and wire nor place heavy objects upon them, which could cause damage.
Please disconnect the power if the display is not used for a long period so as to prevent damage resulted from
electric shocks and abnormal power supply voltage.
Be sure to contact an authorized Service Center when installing your monitor in a location with heavy dust, high or
low temperatures, high humidity, exposed to chemical substances or where it operates for 24 hours such as at
airports, train stations, etc. Failure to do so may cause serious damage to your monitor.
Do not insert any foreign or metal objects, such as wire or pen/pencil, or any flammable objects such as paper or
matches, into any vent, headphone port, AV ports or other inputs..
Keep the plastic packaging/bag out of the reach of children.
When viewing a fixed screen for an extended period of time, residual image or blurriness may appear.
Change the mode to energy saving mode or set a screen saver to changing picture when away from the monitor for
an extended period of time.
To prevent eye strain, do not operate in a dark room or against a bright background. For the best visual comfort, be
sure to take a rest of 10 minutes per hour when viewing the monitor for long periods of time.
-6-
The following situations are normal and do not indicate a quality issue.
Troubleshooting
1.The graph shown may deviate depending on the PC type when you turn on the LED monitor for the first time. Please
adjust it according to the operation instructions of LED monitor.
2 .The screen may flash when you turn on the LED monitor for the first time. Switch off the power and turn it on again
to confirm the flashing has ceased.
In case of abnormal operation of the LED monitor, perform troubleshooting according to the procedures described in
the table below. In case that the fault is not listed in the table , do not operate the LED monitor , and contact the dealer
or local service center for further help.
3.The brightness of the screen may vary depending on the graphic applied to the PC desktop.
<Troubleshooting>
Uniformity and related Compliance
Symptoms Check
egami yalpsid oN
a)The power indicator
is not bright
b)The power indicator is
green or blue or white
c)The power indicator
is orange (yellow) or red
or flash
Is the power cord plugged to the socket firmly?
Is the power switch turned on?
Is the AC socket with power? Please test the outlet with another electrical item.
Please press the keypad or mouse if you have activated the screen saver
program without image.
Display not synchronous
Displayed image jittered
Displayed result is not
in the positive center
Displayed result too dark
or too bright
Please increase (Contrast) or (Brightness)
Check if the signal resolution of computer is within the specifications of display?
Please press the keypad or mouse if the display is under power management mode.
Is the computer power turned on?
Is the signal cable properly inserted?
Check if the signal resolution of computer is within the specifications of display?
Check if the image output of computer is within the specifications of display?
Check if the signal resolution of computer is within the specifications of display?
Check if the voltage is within the specifications?
Check if the signal resolution of computer is within the specifications of display?
Is the signal cable properly inserted?
Check if the signal resolution of computer is within the specifications of display?
Check if the image output of computer is within the specifications of display?
-7-
FCC Caution : Any changes or modifications not expressly approved by the party responsible for
compliance could void the user’s authority to operate this equipment .
FCC Caution : Any changes or modifications not expressly approved by the party responsible for
- 8 -
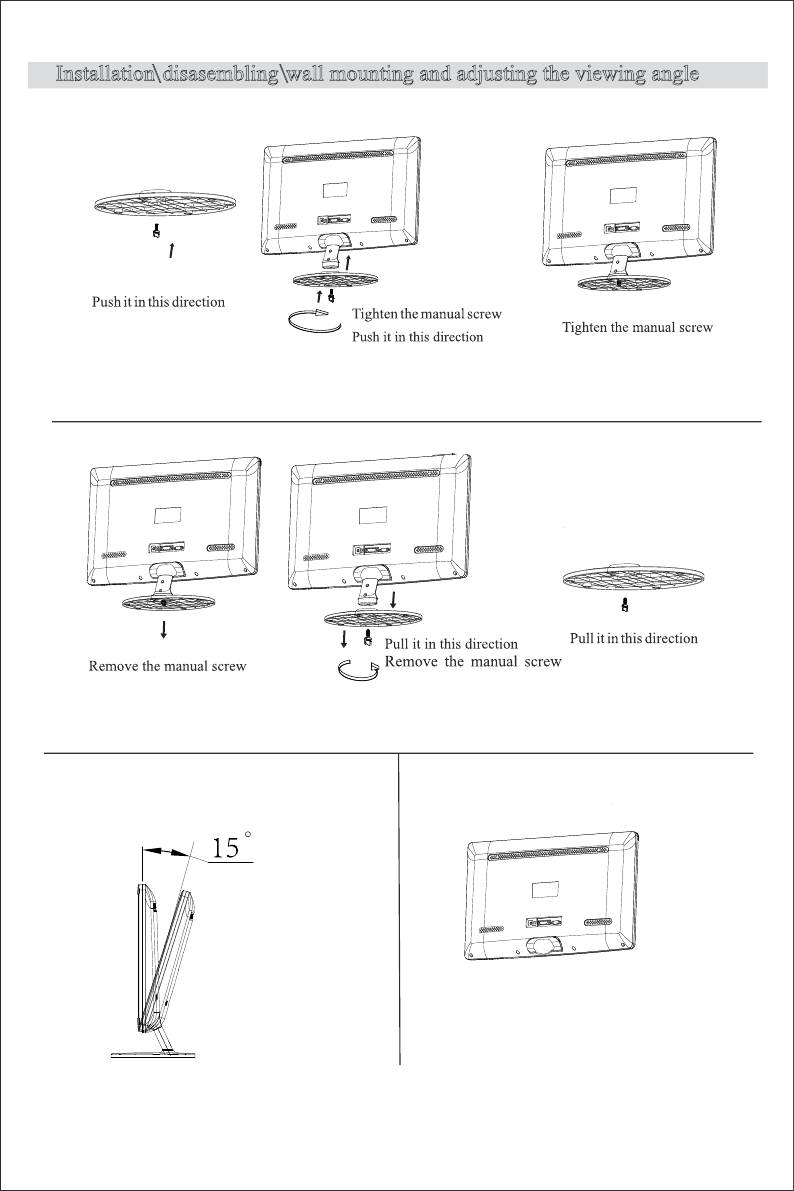
Viewing angle
Installation disasembling wall mounting and adjusting the viewing angle\ \
VESA Standard 75x75mm
Wall Mounting
① ② ③
① ② ③