Chuangwei Electronic Appliance Tech TM800W630L Tablet PC User Manual
Shenzhen Chuangwei Electronic Appliance Tech Co., Ltd. Tablet PC
User Manual

TM800W630L Quick Start Guide

NuVision Customer Service
www.nuvision.com/assistance
Phone: (800) 890-1288
Hours: 8:30am to 5:30pm PST M-F
Email: cs@nuvision.com
Customer Service
Register your tablet today at www.nuvision.com

3
Introduction
Thank you for purchasing the NuVision TM800W630L “Signature Edition” PC Tablet.
The device runs on Windows 10, the latest and best operating system yet, utilizing tablet
touch technology to make your personal computing and media content experience
convenient, productive and immersive. It is the perfect companion for accomplishing
everyday tasks, enhancing productivity on the go, playing video games, streaming music
and movies, taking photos, checking emails, engaging with social media and so much
more.
New features in Windows 10 include Cortana, your voice-activated personal assistant who
can search the web, find files for you, keep track of your personal calendar, and tell you
today’s weather. Microsoft Edge is the new replacement browser for Internet Explorer,
that is faster and more convenient to use. Other features include Bluetooth connectivity,
front & rear cameras, and a memory card slot for up to an additional 64GB of storage.
With a sleek design and bright high-definition IPS touch screen that ensures ultra wide
viewing angles, you’ll enjoy the TM800W630L for many years to come.
The following information will help you get the most out of your tablet. We strongly
recommend reading it thoroughly before first use, and go to our website to register your
tablet. For more information, check out the on-line user manual at www.nuvision.com
4
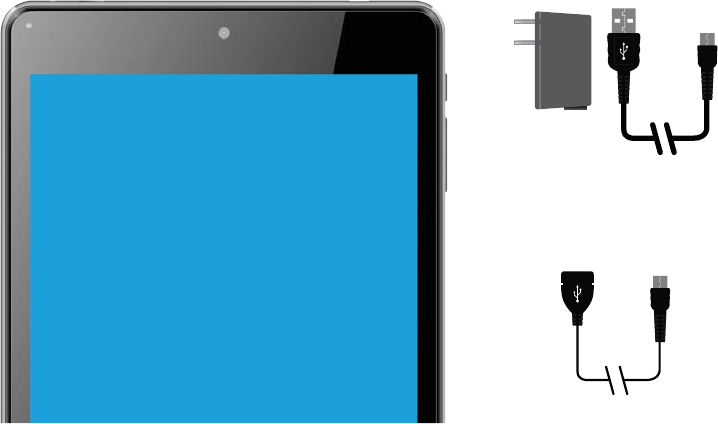
Features & Package Contents
TM800W630L Tablet AC Adapter
Transfer Cable
- 8” 1920 x 1200 IPS HD Touch Screen Tablet
- Intel® Atom™ Processor
- AC Wall Adapter
- Windows 10 Operating System
- 32GB Internal Storage; 2GB RAM
- 2.0MP Front and 5.0MP Rear Camera
- Bluetooth/ WiFi 802.11b/g/n
- Dual Microphones
- Micro HDMI Video Output
- Micro USB Port
- TF Memory Card Slot
(Up to 64GB Additional Storage)
- Cortana – Personal Assistant
5
Important Safety Instructions
This device complies with part 15 of the FCC rules. Operation is subject to the following two conditions:
(1) this device may not cause harmful interference, and (2) this device must accept any interference received,
including interference that may cause undesired operation.
Please read the following instructions and notices before using your tablet.
1. Avoid using in extremely hot, cold, dusty, damp or wet environments.
2. The tablet is not moisture or water-resistant. Avoid using the tablet around sources of water.
3. Avoid dropping or forcibly placing the tablet onto a hard surface. This may damage the screen or internal
electronic components and void the warranty.
4. Do not use alcohol, thinner or benzene to clean the surface of the tablet. Use only cleaning products designed
for computer tablet devices.
5. Do not use the tablet while walking or driving.
6. Excessive use of earphones at high volume may lead to hearing impairment. Limit earphone usage, and adjust
the volume to a moderate level only.
7. The images in this manual may vary slightly from the actual product.
8. Charge the tablet battery under any of the following circumstances:
a. Battery level icon indicates low power
b. Tablet powers-off automatically, continuing to do so even after restarting.
c. On-screen keys or display does not function properly.
9. Do not suddenly disconnect the tablet when formatting, uploading or downloading data. This may lead to
program errors (e.g., system or screen “freezing”.)
10. Static discharge is normal and can occur in an electronic device. Although not life threatening, it may corrupt
files or damage memory and its content. Do not use accessories that are not from Nuvision.
11. Dismantling the tablet will void the manufacturer’s warranty. If you are experiencing problems, review this quick
start guide or visit the FAQ online at www.nuvision.com.
12. Tablet functions, hardware, software, and warranty information may be revised by the manufacturer or their
respective owners, and subject to change without notice.
13. Warning: This product may contain a chemical known to the State of California to cause cancer, birth defects,
or other reproductive harm.
6
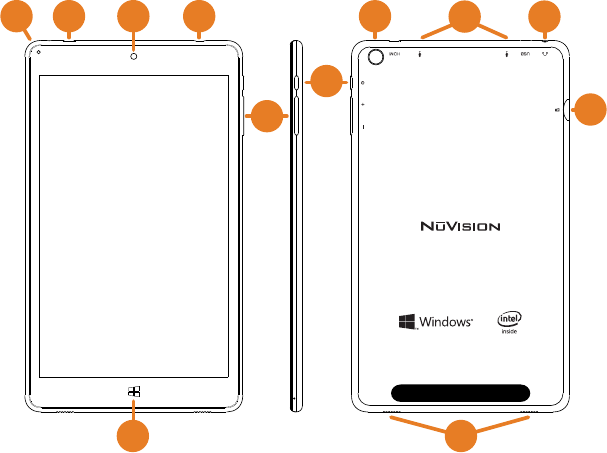
Tablet Overview
6
1 2 3 4
7
8
11
109
12
5

7
1. DC Indicator: Illuminates when unit is charging.
2. Micro USB Power Port: Connect to power supply to recharge tablet; connect an
external flash drive or other compatible device.
3. Front Camera: Built in 2.0MP front camera to take HD photos or videos.
4. HDMI: Connect to view HD quality images on your HDTV or projector.
5. Volume - / Volume +: Decrease or increase volume level for speakers or headphones.
6. Window: Press to return to Home/Start Menu.
7. Power: Press and hold for 3 seconds to turn on the tablet. Press momentarily to
enter Sleep mode. This will turn off display and save battery life. Press and hold to
turn off.
8. Rear Camera: Built in 5.0MP rear camera to take HD photos or videos.
9. Microphones: Built-in dual microphones to speak to Cortana, or for personal voice
recording.
10. Headphone: Insert headphones for private listening or connect with amplified
speakers.
11. Micro TF Memory Card Slot: The built-in storage card reader slot supports an
optional TF memory card for additional storage.
12. Speaker: Built in audio speakers to listen to music, pod casts, etc., without
headphones.
8
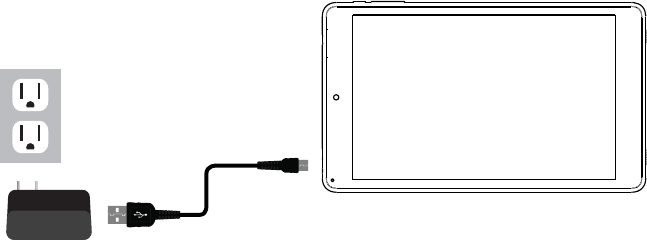
Charging the Battery
Connect the power adapter to a wall outlet, then to the tablet’s micro USB port as shown.
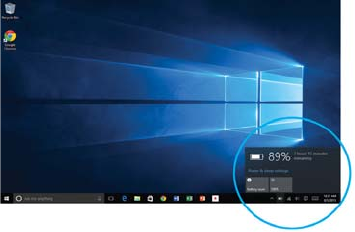
It is recommended to fully charge the battery before first use. A battery status indicator
appears in the lower right corner of the Task Bar. Tap to view the current battery level,
time remaining, brightness control, and settings for power and sleep modes.
It is normal for the tablet to become warmer while charging, streaming video, or multi-
tasking. Battery life between charges will vary depending on display brightness, apps that
remain open, and most importantly, your internet use. For example, streaming movies
from the internet will consume more battery resources than most other applications.
9
Battery Care
Operating temperature: Your device is designed to function between 32°F and 95°F
(or 0°C to 35°C). Lithium-ion batteries are sensitive to higher temperatures so keep
away from direct sun light. Don’t leave in a closed environment susceptible to extreme
temperatures (ie: a vehicle on a hot sunny day).
Recharge anytime: You can recharge the internal battery at any time. However, we
recommend discharging the battery down to 10% or lower at least once each month
before recharging.

10
Starting your Tablet
Power On/Off/Standby Mode/Reset
ON: Press and hold the side POWER button on the side for a couple of seconds until
the logo screen appears, then release.
OFF: Press and hold the side POWER button on the side of the tablet.
When prompted, slide finger downward to shut down your PC.
STANDBY MODE: While the tablet is on, press the side Power button quickly to turn
off the display only. The tablet will enter Sleep mode to minimize battery functions.
Press the Power button quickly to wake from Sleep mode.
NOTE: To avoid excessive battery drainage, turn the tablet off completely.
First time Setup Wizard
The first time you turn on the device, a Setup Wizard will guide you through a number of
steps before use to choose a language, personalize your tablet, set up WiFi, etc.
User and Password Setup
To set up passwords, enter the Action Center window by swiping inward from the right
edge of display. Open “All Settings” > “Accounts” > Sign In Options to add Passwords.
NOTE: Password policy settings may not be available if you’ve added a work email
account to the Mail app.
11
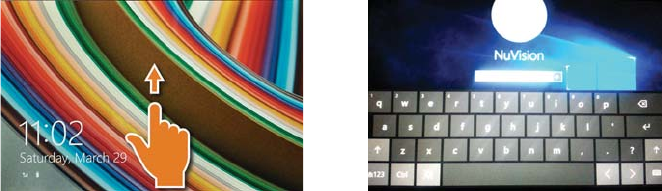
Lock Screen and Password
The Lock Screen is the starting point when the tablet is turned ON. Swipe your finger
upward from the bottom of the display to exit the Lock Screen, then enter your Password.
NOTE: To reset your Password, go to ACCOUNT.LIVE.COM/PASSWORD/RESET
12
Start Menu / Tablet Task Bar Overview
6 7 8 9 10 11
5
4
1
2
3
12
13
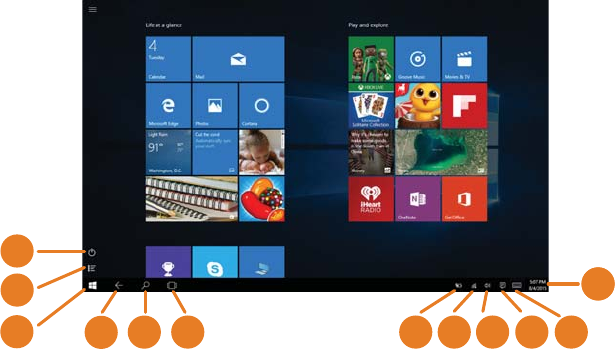
The Start Menu screen consists of colorful static and live tiles that provide quick access
to built-in apps, mail, entertainment, and the latest in news, weather, and sports. You can
reposition tiles to other areas of the screen, resize them, or pin them to the Desktop Task
Bar. To do so, press and hold a tile for one second to display available options.
1. Power: Restart > Shutdown > Sleep.
2. App Menu: View all apps arranged alphabetically.
3. Start Menu : View colorful static and live tiles. Drag along the edges to resize
4. Back: Go back to the previous page.
5. Search : Search Windows or the internet.
6. Task View: View all open apps at one time.
7. Battery Level: View percentage of battery level and the time remaining; adjust
power-saving and display settings.
8. WiFi: View network settings or activate Airplane mode.
9. Volume: Adjust volume level.
10. Action Center: View alerts, notifications, and tablet settings.
11. Keyboard: While in Desktop Mode, tap or click to use the virtual keyboard.
12. Date & Time: Adjust settings.

14
Common Finger Gestures
Swipe from the edges:
Swipe right from the left edge to access open apps.
Swipe left from the right edge to open the Action Center.
Pinch to Zoom in/out: Some apps (such as Maps,
Browser, and Gallery) allow you to zoom in and out
by placing two fingers on the screen at once. Spread
fingers apart to zoom in or pinch together to zoom
out.
15
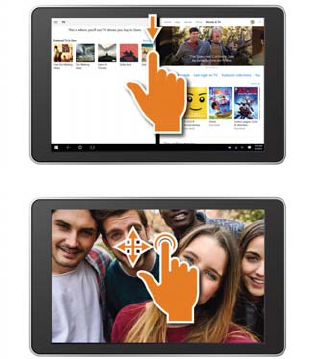
Swipe downward from the top edge to reduce the
size of an active window. Move it to one area then
open a second app to view both windows side by side.
Swipe finger side to side and up and down to
move images.
16
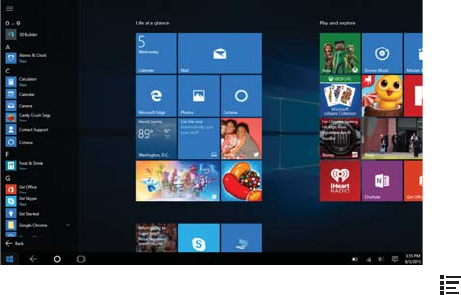
Apps Menu
To display the convenient and easy to use Apps menu, tap or click the All Apps button
in the Start Menu. Launch apps, features and programs that are set up alphabetically.
Slide your finger or scroll up and down to view all apps on your tablet.
Add / Remove / Resize Apps
You can reconfigure the tiles within the Start Menu quite easily. To create, or pin a tile
from an app located in the App Menu, select and drag your selection to place the tile in
a preferred location. To change the tile size or to remove (unpin) it, tap or click and hold
for one second to display available options.
17
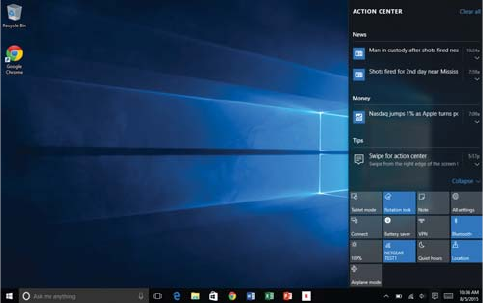
Action Center
The Action Center is the central location to view alerts, notifications, user settings, and
more. Swipe your finger inward from the right edge of the screen to bring up the Action
Center. Swipe your finger back towards the edge to hide the Action Center.
18
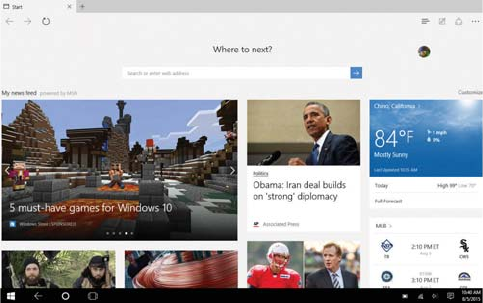
Microsoft Edge
Microsoft Edge, the new internet browser for Windows 10, replaces Internet Explorer and
offers a modern, fast web browsing experience where pages load quickly and scrolling
is smooth. Cortana, your personal assistant is located in the address bar to help you get
things done like making dinner reservations or providing instant directions.
19
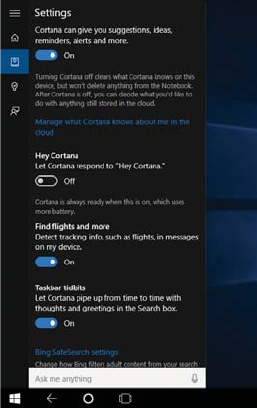
Cortana, your Voice-Activated Personal Assistant
Speak to Cortana and request the weather forecast,
set personal reminders, send an email, find specific
files, search the web, and more.
Summon Cortana by speaking clearly and slowly into
the microphone. Start by saying the command, “Hey
Cortana!”
To manage and personalize Cortana, go to the Cortana
app, press “Settings” and follow the prompts.
Manage settings and what Cortana should know about
you. Tap or click the Cortana app then click the
Settings icon in the upper left corner to display its
menu.
20
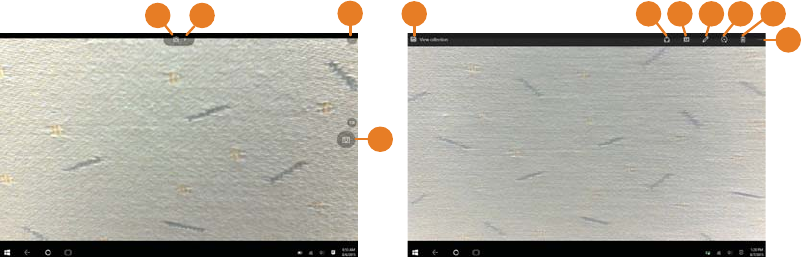
Connect to HDMI / Movies & TV / Additional Storage
Connect to HDTV or Projector
Connect your tablet to an HD television or
projector with an optional mini-HDMI to full-
size HDMI cable. Once connected, view on the
external display immediately.
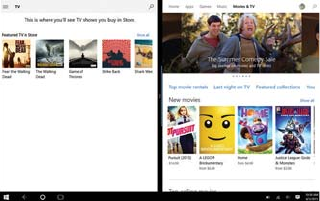
Movies & TV
Rent or purchase the latest releases in Movies
& TV shows, or games from the Windows Store.
Easily downloads to your device. In addition, you
can search for titles from your video collection.
Additional Storage with a
TF Memory Card Slot
At some point you may require additional space
on your Tablet for additional music, video, photo
or business files. Insert an optional TF style
memory card with a storage capacity up to 64GB.
21
Creating a Microsoft Account / Adding an Email Account
Create a Microsoft account
It is recommended to set up or use an existing Microsoft account for better enjoyment
of Microsoft services such as Xbox, Hotmail, Outlook.com, OneDrive, etc. Many apps and
services rely on the account to sync content and settings across devices. If you have
more than one Microsoft account already, you’ll need to choose one.
Add Other Email Accounts
To add your email accounts:
1. Open the Start Menu and select Mail.
2. Open and Add account.
3. Choose the type of account you want to add, and then follow the on-screen instructions.
22
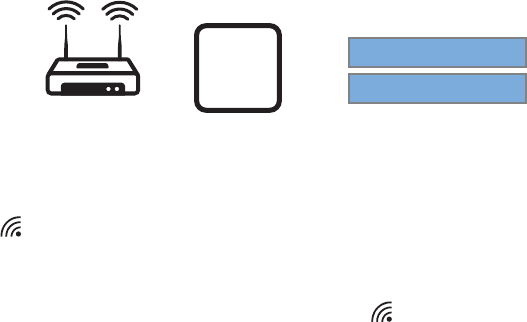
Connecting to the Internet
The tablet utilizes WiFi 802.11b/g/n networks to connect with the internet. In order to
connect, you will need the following:
or WI-FI
Available
Here +Network Name/SSID
Password
Wireless Router
Connect to a WiFi Network
Open the Action Center (swipe your finger inward from the right edge of the screen),
then tap or click All Settings > Network & Internet. Or from the Task Bar tap the wireless
network icon then connect to the appropriate network. Tap (or click) Connect.
When prompted enter the password (if applicable).
Disconnect from a WiFi Network
Open the Action Center. Tap the wireless network icon that is connected, then tap (or
click) Disconnect.
23
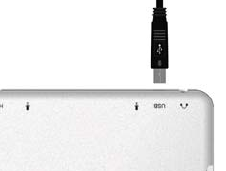
Connecting Micro USB and Bluetooth Devices
Connecting Micro USB
Connect an external device to your tablet by attaching the
included transfer cable. You can add an external mouse,
keyboard or flash drive.
NOTE: The first time you plug in a USB accessory, Windows will
install the necessary software for you (if applicable).
Add a Bluetooth device
Add or “pair” a Bluetooth compatible device with your Tablet as follows:
1. Power on the compatible Bluetooth device and make it discoverable.
2. From the Action Center open All Settings > Devices > Bluetooth. Turn on Bluetooth
then tap or click on Connected Devices. Tap or click to add a new device. Once the
Bluetooth compatible device is found, select it.
3. Make sure Bluetooth is powered on, then wait while Windows searches for the device.

24
Windows Store
The Windows Store has all the apps you’re looking for. Start searching for apps in top
categories such as games, entertainment, music, sports, eBooks, News, Food & Dining,
Travel, business and more.
Once you have signed up for a Microsoft account, you can download and install apps
from the Windows Store.
25
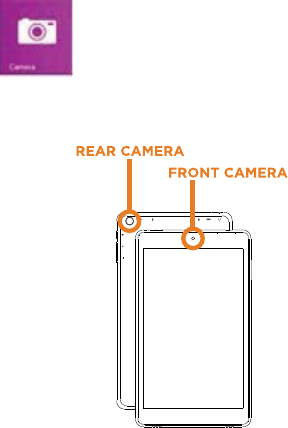
Using the Cameras
Front and Rear Cameras
Your tablet features two cameras. With the front-facing 2MP camera you can
video chat and take “selfies”. Use the 5MP rear camera to take photos or
record videos.
Open the Camera app and tap on the Camera or Video shutter buttons.
To record video, tap the Video shutter button once to start a recording;
press again to stop.
The Camera Settings menu provides options
for viewing and editing both photos and
videos.
Add folders that contain all of your photos
and videos for convenient viewing. In addition,
albums can be created automatically, whereby
Windows will select your best shots and create
an album.
26
Using the Cameras (Cont.)
11
5
4
1 2 38 9 10
6 7
Camera Function Guide
1. Change Camera: Tap to switch between front and rear cameras.
2. Camera Adjustments Menu: Adjust Brightness, White Balance, ISO and Shutter.
3. Self Timer / Settings : Activate timer, or select specific camera settings such as
recording speed (Video) and Aspect Ratio.
4. Camera & Video Shutter: Take a snap shot or start a video recording. Tap the Video
shutter again to stop recording
5. View photos on the tablet
6. Share your photos
7. View a slide show
8. Edit to fix and make adjustments
9. Rotate image
10. Discard photo
11. Options
Make automatic corrections through the Photos app. Experiment with lighting
and color adjustments, effects, cropping and rotation.
27
28
OneNote and OneDrive
Personal Cloud Storage
OneDrive is online cloud storage that comes with your Microsoft account. When you
save documents, photos, music and other files on OneDrive, they’re available from any
web-connected device to use or share with others. Add files to your OneDrive then
access them from your Tablet.
1. Go to the computer with the files that you want to copy to the Tablet.
2. Go to OneDrive.com and upload the files.
3. To access your files once uploaded, from the Start screen tap on OneDrive.
Then navigate accordingly.
Keep your notes and ideas on all of your devices, from computers to phones.
You can share notebooks with others for viewing or editing.
29
Limited Warranty
One Year Limited Warranty
TMAX Digital Inc. warrants this product against defects in material or workmanship for a period of one (1) year
from the date of which starts with the date of original purchase (“Limited Warranty period”), at its own option
either (a) repair your product with new or refurbished parts, or (b) replace it with a new or a refurbished product.
TMAX Digital Inc. will incur no liability whatsoever to provide packaging for warranty items. Upon receipt of the
warranty item, should it be determined that the packaging is insufficient, or the unit failed by a non manufacture
defect TMAX Digital Inc may at its discretion, void the warranty. The consumer is responsible for the transportation
cost to TMAX Digital Inc. A nominal handling fee does apply. You must receive a return authorization number
before sending a unit in for service.
To Obtain Warranty Service
Should it be necessary to contact Customer Support, call (800) 890-1288 or email us at cs@nuvision.com.
You will be instructed on how your claim will be processed. Have pertinent information available including proof of
purchase and an understanding of the issue.
You must retain the original bill of sale to provide proof of purchase. Call or email a customer support
representative to assess the problem. No service or shipment will be accepted unless RMA # is provided to you and
attached or printed to the shipping carton along with a copy of the bill of sale.
Customer Data
Customer shall be solely responsible for maintaining backup data necessary to replace Customer data lost or
damaged from any cause.
This warranty is effective only if the product was purchased through an Authorized Retail Seller and the unit is
operated in North America. You are responsible for all tariffs and taxes imposed to ship or receive warranty or
replacement units to and from the U.S. Warranty extends only to defects in materials or workmanship and does
not extend to cracked screens, damaged USB or DC ports or any other products that have been lost, discarded
30
Limited Warranty
or damaged by misuse, accident, neglect, liquid damage, acts of God, such as lightning, improper installation,
improper maintenance or modification. The Limited Warranty ALSO DOES NOT COVER damages of having been
previously altered, modified, repaired or serviced by anyone other than the service facilities authorized by TMAX
Digital Inc. to render such services. Warranty does not cover cosmetic damage or lost accessories. We may charge
the customer for any service call made for anything not covered by the limited warranty. If you decline our service
and wish to have the unit returned, you would need to either provide us a return label or pay TMAX for return
charges. If there is no responses from you after 45 days TMAX Digital will assume is abandoned and recycle the
unit on your behalf.
This warranty gives you specific rights and these rights may vary from state to state. Some states do not allow
limitation on how long the warranty lasts or exclusions or limitation of incidental or consequential damages, so the
above may not apply to you.
Disclaimer of Warranty
EXCEPT FOR THE FOREGOING WARRANTIES, TMAX DIGITAL INC. HEREBY DISCLAIMS AND EXCLUDES ALL
OTHER WARRANTIES, EXPRESS OR IMPLIED, INCLUDING, BUT NOT LIMITED TO ANY AND/OR ALL IMPLIED
WARRANTIES OF MERCHANTABILITY, FITNESS FOR A PARTICULAR PURPOSE AND/OR ANY WARRANTY WITH
REGARDS TO ANY CLAIMS OF INFRINGEMENT.
LIMITATION OF LIABILITY
THE LIABILITY OF TMAX DIGITAL INC. , IF ANY, PURCHASER’S SOLE AND EXCLUSIVE REMEDY FOR DAMAGES
FOR ANY CLAIM OF ANY KIND WHATSOEVER, REGARDLESS OF THE LEGAL THEORY AND WHETHER ARISING
IN TORT OR CONTRACT, SHALL NOT BE GREATER THAN THE ACTUAL PURCHASE PRICE OF THE PRODUCT
WITH RESPECT TO WHICH SUCH CLAIM IS MADE. IN NO EVENT SHALL TMAX DIGITAL INC. BE LIABLE TO
PURCHASE FOR ANY SPECIAL, INDIRECT, INCIDENTAL, OR CONSEQUENTIAL DAMAGES OF ANY KIND
INCLUDING, BUT NOT LIMITED TO , COMPENSATION, REIMBURSEMENT OR DAMAGES ON ACCOUNT OF THE
LOSS OF PRESENT OR PROSPECTIVE PROFITS OR FOR ANY OTHER REASON WHATSOEVER.
The SAR limit of USA (FCC) is 1.6 W/kg averaged over one gram of tissue. Device types Tablet PC
(FCC ID: 2AABK-TM800W630L) has also been tested against this SAR limit. The highest SAR value
reported under this standard during product certification for use when properly worn on the body
is 0.415W/kg.
This device complies with part 15 of the FCC rules. Operation is subject to the
followingtwoconditions:(1)thisdevicemaynotcauseharmfulinterference,and(2)
this device must accept any interference received, including interference that may
causeundesiredoperation.
NOTE:Themanufacturerisnotresponsibleforanyradio or TVinterferencecaused
byunauthorizedmodificationsorchangestothisequipment.Suchmodificationsor
changescouldvoidtheuser’sauthoritytooperatetheequipment.
NOTE: This equipment has been tested and found to comply with the limits for a
ClassBdigitaldevice,pursuanttopart15oftheFCCRules.Theselimitsaredesigned
to provide reasonable protection against harmful interference in aresidential
installation.Thisequipmentgeneratesusesandcanradiateradiofrequencyenergy
and,ifnotinstalledandusedinaccordancewiththeinstructions,maycauseharmful
interference to radio communications. However, there is noguarantee that
interferencewillnotoccurinaparticularinstallation.Ifthisequipmentdoescause
harmful interference to radio or television reception, whichcan be determined by
turning the equipment off and on, the user is encouraged totrytocorrectthe
interferencebyoneormoreofthefollowingmeasures:
Reorientorrelocatethereceivingantenna.
Increasetheseparationbetweentheequipmentandreceiver.
Connecttheequipmentintoanoutletonacircuitdifferentfromthattowhichthe
receiverisconnected.
Consultthedealeroranexperiencedradio/TVtechnicianforhelp.