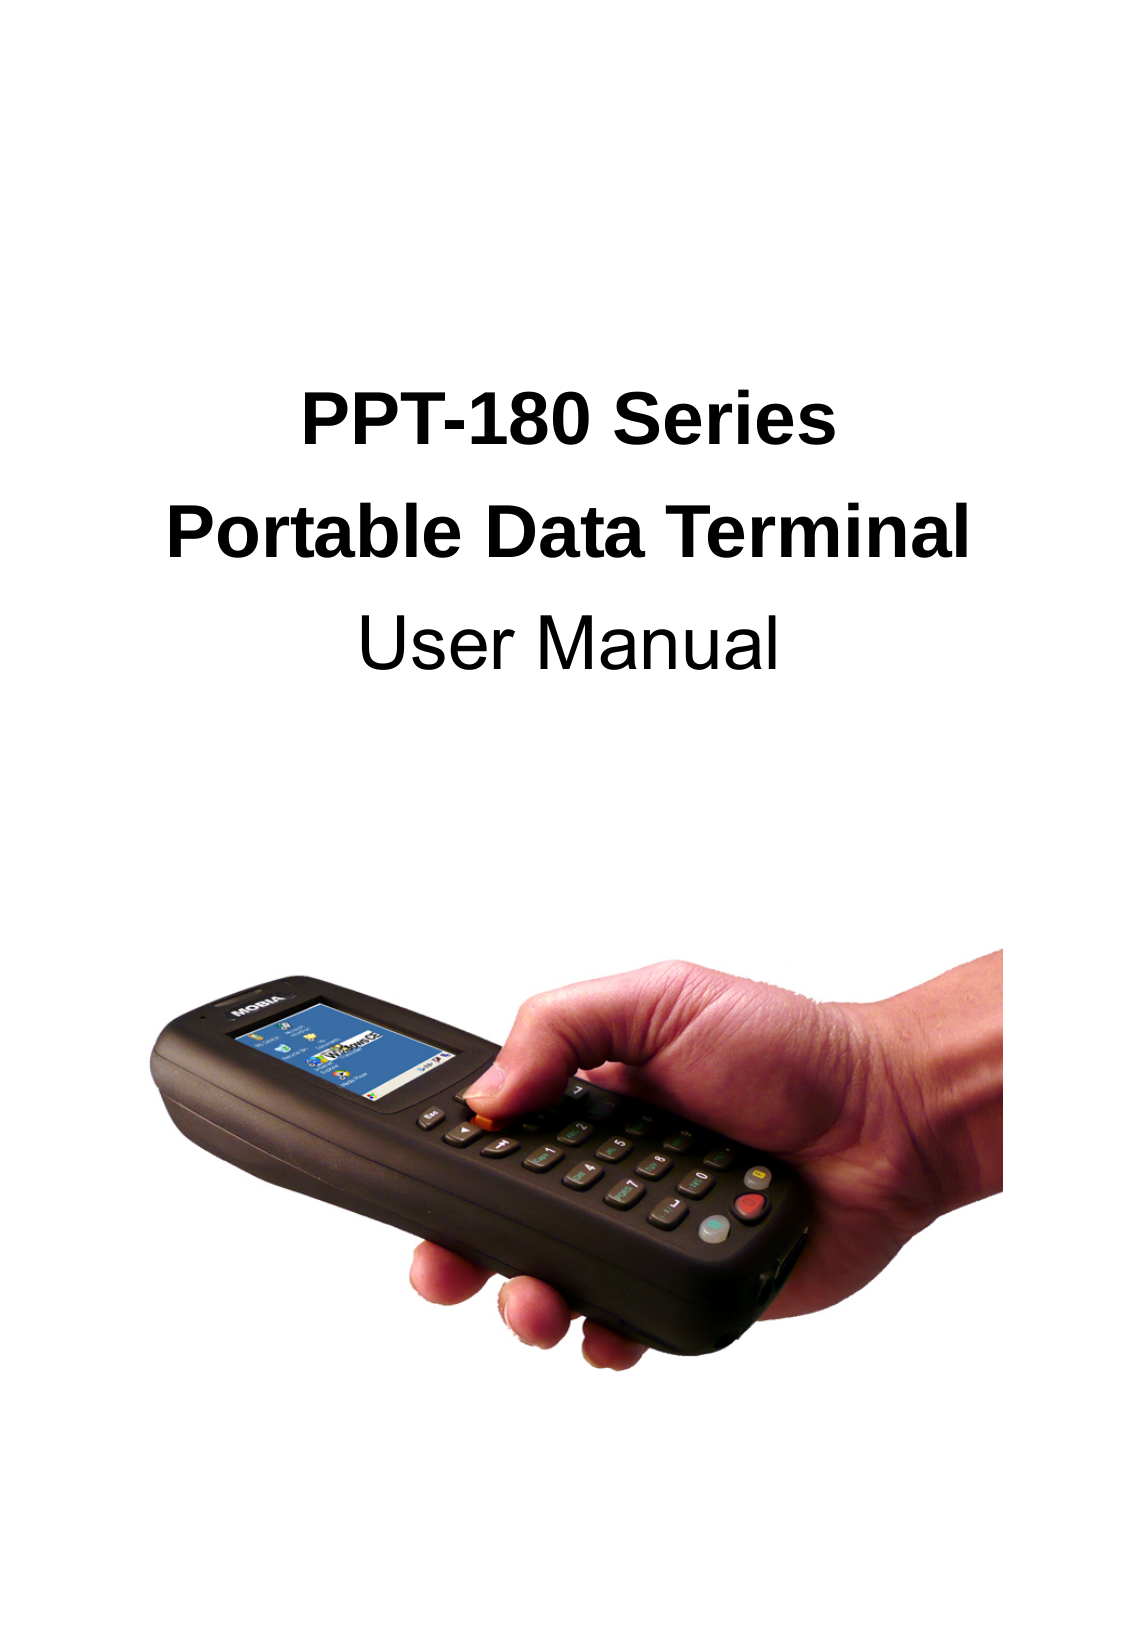
Chung Hsin Electric and Machinery Mfg
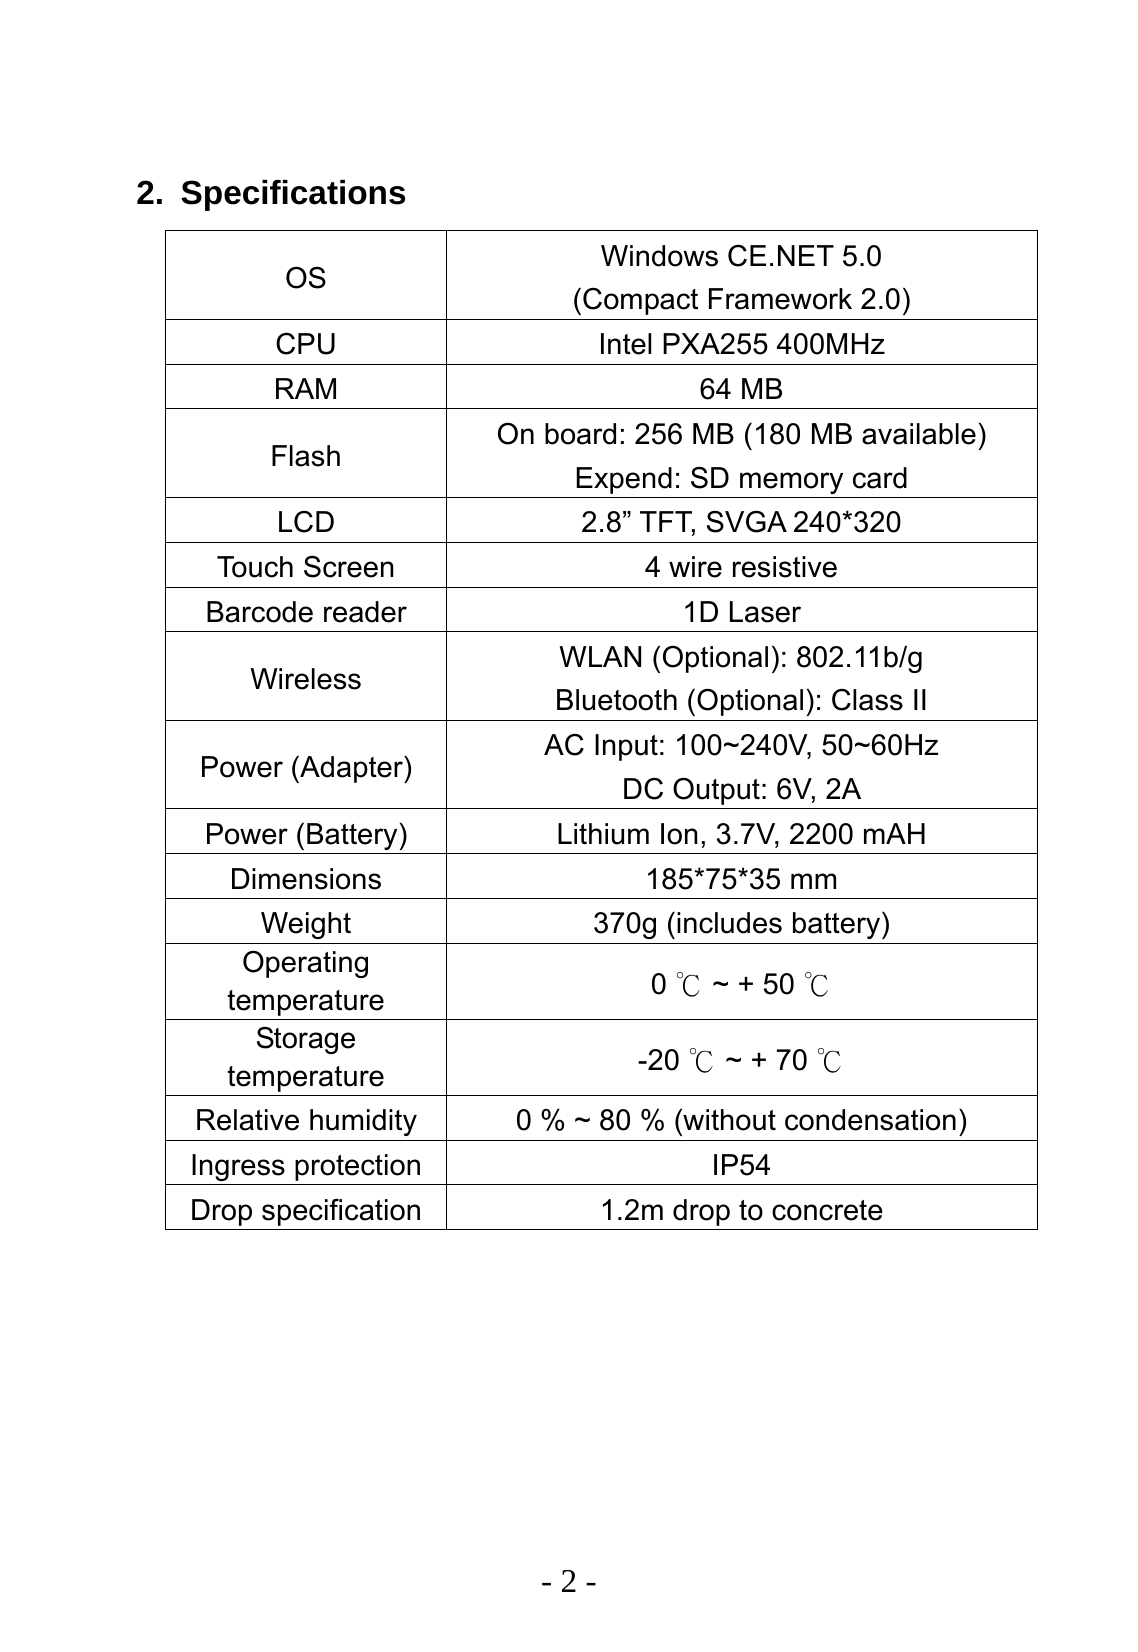
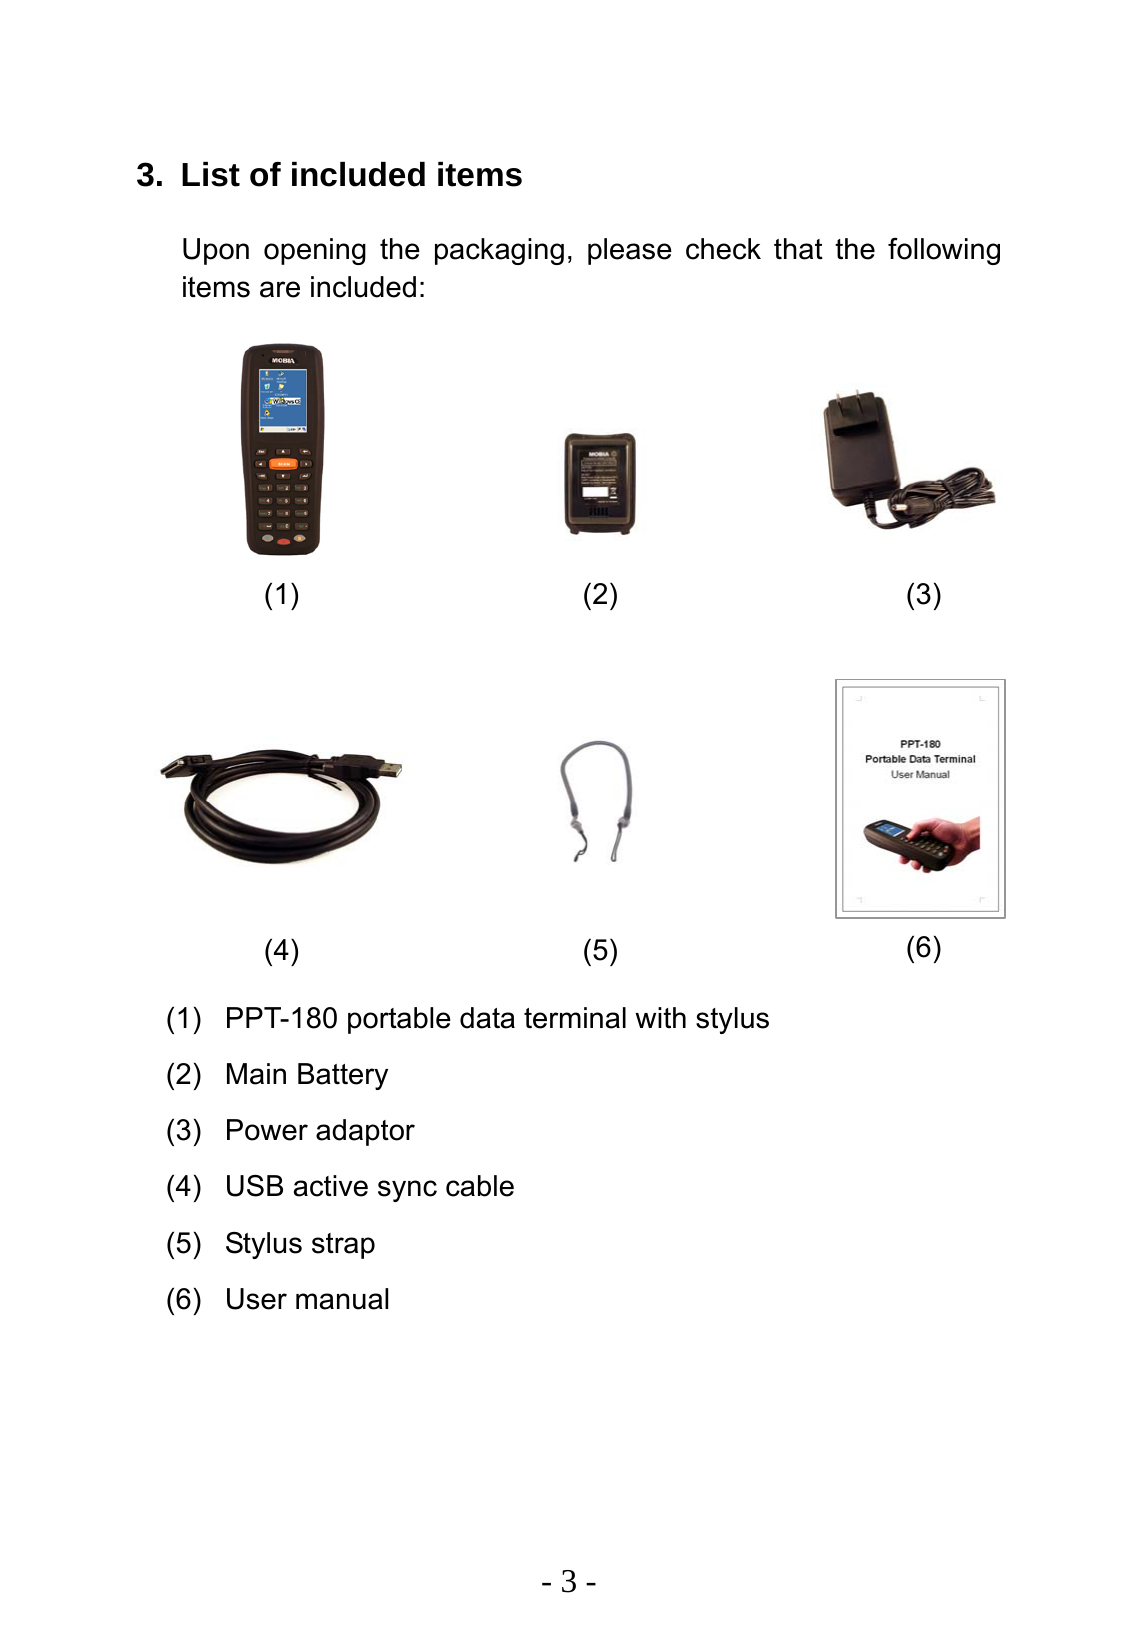
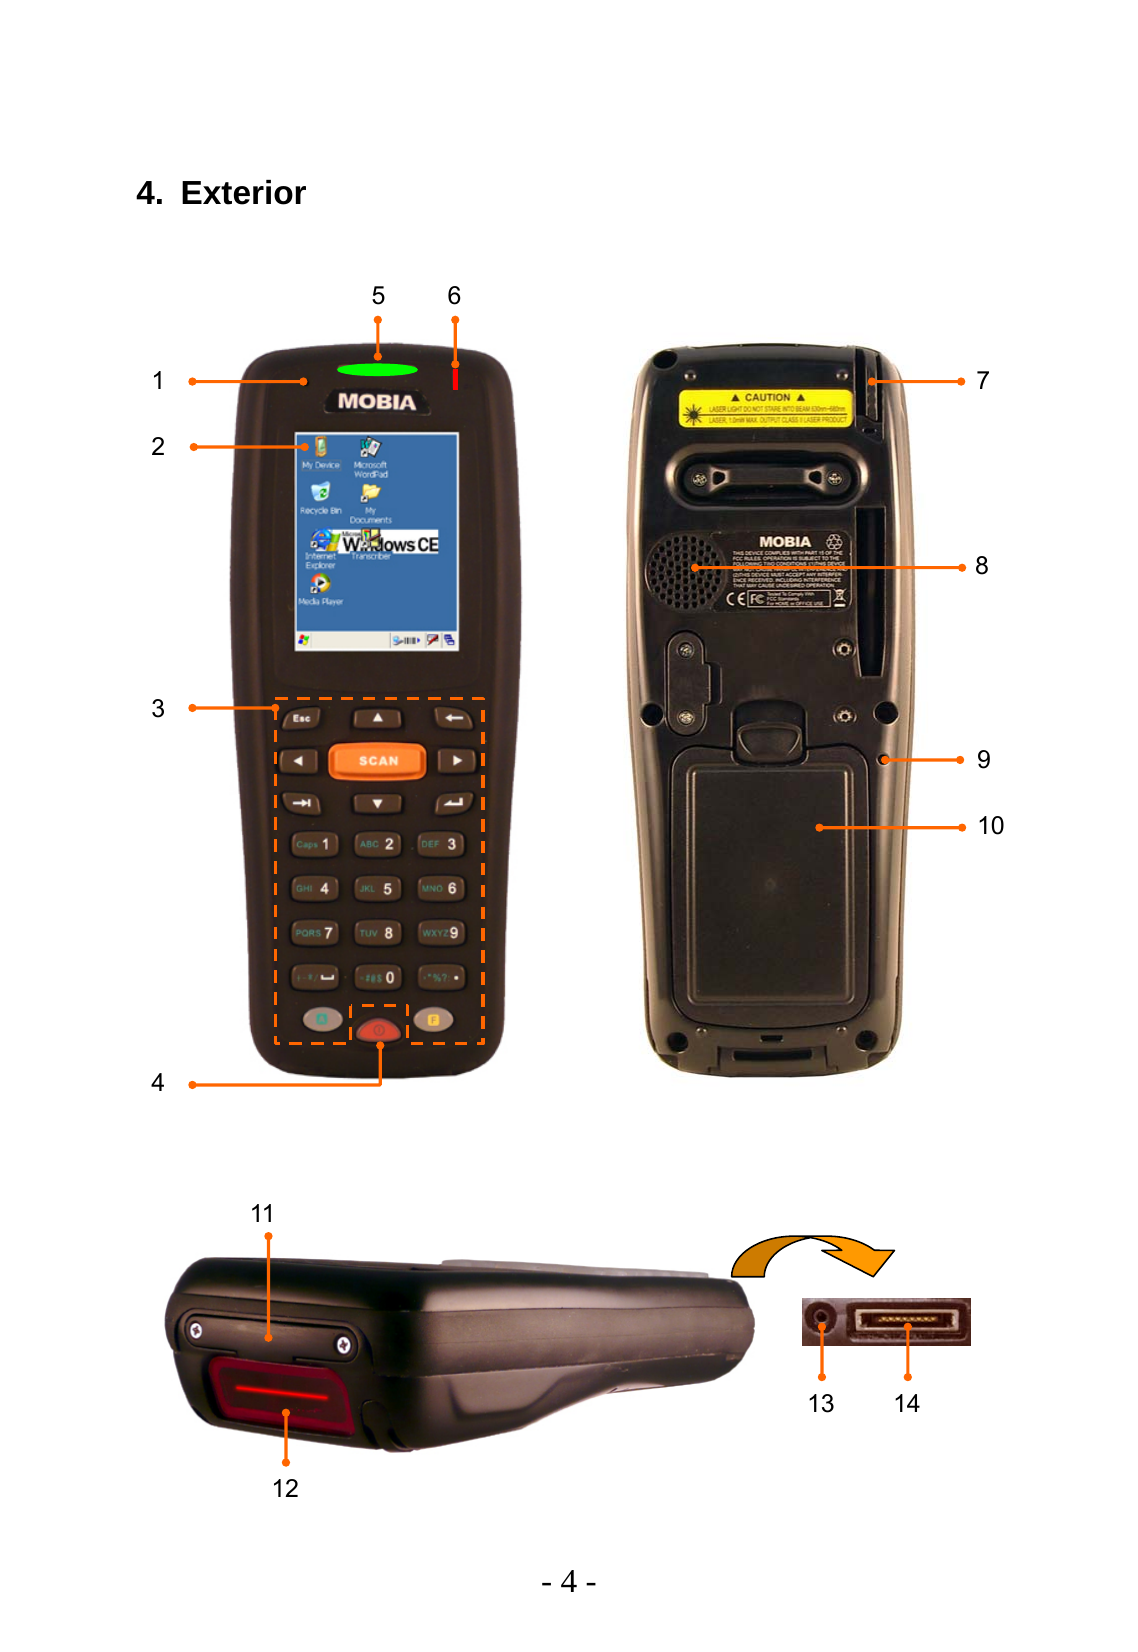
 PPT-180 Portable Data Terminal User Manual F2 Users Manual 081015

Chung-Hsin Electric & Machinery Mfg. corp. Portable Data Terminal F2 Users Manual 081015

User manual

       PPT-180 Series Portable Data Terminal User Manual
  Notice: This equipment has been tested and found to comply with the limits for a Class B Digital Device, pursuant to part 15 of the FCC Rules. These limits are designed to provide reasonable protection against harmful interference in a residential installation. This equipment generates uses and can radiate radio frequency energy and, if not installed and used in accordance with the instruction, may cause harmful interference to radio communication. However, there is no grantee that interference will not occur in a particular installation. If this equipment dose causes harmful interference to radio or television reception, which can be determined by turning the equipment off and on, the user is encouraged to try to correct the interference by one or more of the following measures:  -- Reorient or relocate the receiving antenna. -- Increase the separation between the equipment and receiver. -- Connect the equipment into an outlet on a circuit different from that to which the receiver is connected. -- Consult the dealer or an experienced radio/TV technician for help.  The changes or modifications not expressly approved by the party responsible for compliance could void the user’s authority to operate the equipment.  To comply with the FCC RF exposure compliance requirements, this device and its antenna must not be co-located or operating to conjunction with any other antenna or transmitter.
- Contents -  1. Safety precautions........................................................ 1 2. Specifications ............................................................... 2 3. List of included items.................................................... 3 4. Exterior ......................................................................... 4 5. Operation...................................................................... 7 5.1 To charge and change battery ............................... 7 5.2 System reset .......................................................... 8 5.3 Use and care of the touch panel ............................ 8 5.4 Internal data storage space (Flash memory) ......... 9 5.5 Microsoft ActiveSync software ............................... 9 6. System Tools .............................................................. 10 6.1 PC Connection..................................................... 10 6.2 Bluetooth (optional)...............................................11 6.3 SCAN Engine....................................................... 12 6.4 WiFi (optional)...................................................... 13 6.5 Screen Backlight .................................................. 14 6.6 KeyPad Backlight................................................. 15 6.7 Function Key ........................................................ 15 6.8 Volume ................................................................. 16 6.9 System ................................................................. 16 6.10 Backup and Restore ............................................ 17 6.11 User Setting ......................................................... 17
 1. Safety precautions For your safety, please read the following: (1) Please use only the accessories from the original manufacturer. Use of any accessories not provided by the manufacturer may damage the device and invalidate the product warranty. (2) Do not place the device in environments that exceed the specified temperature or humidity limits. Doing so may result in damage to the device and invalidate the product warranty. (3)  Please keep all I/O ports covered when not in use to prevent water, dirt, metal or other objects from entering the device and causing damage. (4)  Do not disassemble or modify the device, in order to prevent damage to the unit or electrical shock. Any disassembly or modification of the device automatically invalidates the product warranty.
  - 2 -  2. Specifications OS  Windows CE.NET 5.0 (Compact Framework 2.0) CPU  Intel PXA255 400MHz RAM 64 MB Flash  On board: 256 MB (180 MB available) Expend: SD memory card LCD  2.8” TFT, SVGA 240*320 Touch Screen  4 wire resistive Barcode reader  1D Laser Wireless  WLAN (Optional): 802.11b/g Bluetooth (Optional): Class II Power (Adapter)  AC Input: 100~240V, 50~60Hz DC Output: 6V, 2A Power (Battery)  Lithium Ion, 3.7V, 2200 mAH Dimensions 185*75*35 mm Weight  370g (includes battery) Operating temperature  0   ~ + 50 ℃℃ Storage temperature  -20   ~ + 70 ℃℃ Relative humidity  0 % ~ 80 % (without condensation) Ingress protection  IP54 Drop specification  1.2m drop to concrete
  - 3 -  3.  List of included items Upon opening the packaging, please check that the following items are included:                   (1)  PPT-180 portable data terminal with stylus (2) Main Battery (3) Power adaptor (4)  USB active sync cable (5) Stylus strap (6) User manual (1)  (2)  (3) (4)  (5)  (6)
  - 4 -  4. Exterior 11 12 13 14 1 3 5 6 2 4 7 10 8 9
  - 5 -  1. Internal microphone 2.  2.8” TFT color LCD with touch panel, resolution: 240*320 pixels 3. Alphanumeric keys These keys are used to enter numbers and letters. Every key can be used together with the Alpha (    ) or Function (   ) key to allow a different mode of data entry, refer to table below:  Key  Normal mode  Alpha mode  Function Mode SCAN  Trigger barcode scanning Trigger barcode scanning Not definable ESC  Esc key  Esc key  Not definable   Backspace key  Backspace key  Not definable   Tab key  Tab key  Not definable   Enter key  Enter key  Not definable   Up arrow key  Up arrow key  Not definable   Down arrow key  Down arrow key  Not definable   Left arrow key  Left arrow key  Not definable   Right arrow key  Right arrow key  Not definable 1  Numeral ” 1 ”  Caps lock change  F1 (Programmable) 2  Numeral ” 2 ”  Rotates through letters A, B, C F2 (Programmable) 3  Numeral ” 3 ”  Rotates through letters D, E, F F3 (Programmable) 4  Numeral ” 4 ”  Rotates through letters G, H, I F4 (Programmable) 5  Numeral ” 5 ”  Rotates through letters J, K, L F5 (Programmable) 6  Numeral ” 6 ”  Rotates through letters M, N, O F6 (Programmable) 7  Numeral ” 7 ”  Rotates through letters P, Q, R, S F7 (Programmable)  F A
  - 6 -  8  Numeral ” 8 ”  Rotates through letters T, U,  V F8 (Programmable) 9  Numeral ” 9 ”  Rotates through letters W, X, Y, Z F9 (Programmable) 0  Numeral ” 0 ”  Rotates through symbols=, #, @, $ Soft Keyboard (Programmable)  Space key  Rotates through symbols+, -, *, /  Not definable ▪ Symbol ” ▪ ”  Rotates through symbols,, “, %, ?, :  Not definable  4.  Power button: To turn off the device (to enter suspend mode) or turn it on. 5.  Barcode reading indicator: (1) Unlit: Currently not scanning barcode (2) Red: During the barcode engine is scanning barcode (3) Green: When a barcode is successfully scanned 6. Charging status indicator: (1) Unlit: Currently not charging (2) Red: Charging battery (3) Green: Battery fully charged 7. Stylus 8. Internal speaker 9.  System reset button 10. Main Battery 11. SD slot: Supports SD/MMC memory cards, up to 2GBytes. 12. Barcode scanner window: Location of barcode scanner Caution: This window emits a beam of laser light. During use, do not point directly into anyone’s eyes to avoid causing injury.
  - 7 - Power adapter Plug adapter here to charge battery  13. Earphone jack: Ø2.5mm, 3 poles, for external stereo earphone. 14. Multipurpose communication port for: (1) USB client: Use the USB cable included to link the device to a PC for data synchronization, software installation, etc. (2) RS-232: Use the RS-232 cable (optional) to support standard RS-232 functions. (3) Battery charging: Both the USB and RS-232 cables can be used to charge the battery when the power adapter is plugged.        5. Operation 5.1  To charge and change battery (1) When shipped from the factory, the battery is minimally charged. Please charge the battery over 8 hours before first time used, or when the device is not used for extended periods to make sure the backup battery inside is fully charged. (2) When battery power is nearly depleted, a popup window will warn user to recharge the battery. Failure to recharge the battery before power is completely depleted may result in loss of data saved on the device. (3) Please turn off the power (to enter suspend mode) before changing the battery. Caution: If the device will not be used for extended periods, please remove the battery to prolong battery life.
  - 8 -  5.2 System reset If an application causes the device to hang, the system reset function can return the terminal to normal operating status. This terminal features two types of reset: (1) Warm reset Use the stylus to lightly press the reset button on the back of the device. Warm reset will not delete data saved on the device. (2) Cold reset Caution: When doing a cold reset, all data stored in the RAM will be deleted, and the terminal will be restored to factory defaults. It is recommended to save all data before performing the cold reset, and to backup data regularly. The cold reset is performed as follows: (A) Press and hold the ‘ESC’ and “   “ (Backspace) key together. (B) Using the stylus to lightly press the reset button on the back of the device.  5.3  Use and care of the touch panel (1) Do not place any objects on the panel. (2) Use only the provided stylus on the touch panel. Do not use your finger or any other pointed objects to avoid damaging the panel. (3) Wipe the touch panel with a smooth, clean, anti-static cloth. Mild household cleaner or water can also be used if needed. Do not use alcohol or other industrial strength cleaning fluids. (4) Do not pour water directly onto the panel. Cleaning should be done only with a damp cloth, in order to avoid damaging the device.
  - 9 -  5.4  Internal data storage space (Flash memory) A limited storage space for user to save data can be found in “My Device > Flash”. Data saved in this folder remains after run out of the battery.   For data exceeds this storage space can be saved in SD memory card.  5.5 Microsoft ActiveSync software Please download the latest version of Microsoft ActiveSync software from Microsoft website as following:  http://www.microsoft.com/windowsmobile/en-us/help/synchronize/default.mspx
  - 10 -  6. System Tools System tools provide users to change the settings on this device. It can be opened when click the    icon on the tool bar.     6.1 PC Connection Use ActiveSync to synchronize data between device and PC.                    Caution: ActiveSync will automatic start up when using USB interface only, if using the other interface, it is necessary to start up ActiveSync manually. Start ActiveSync Change the connect interface
  - 11 -  6.2 Bluetooth (optional) (1) This function only active on the specified models that feature with a Bluetooth module. (2) Click ON/OFF to turn on/off the internal Bluetooth module function. (3) When Bluetooth function is on, a Bluetooth icon will show on the tool bar. (4) Click Bluetooth icon to open the BTMgr (Bluetooth management).                           Add or edit BD (Bluetooth Device) information by manually Auto find and register BD in range Select connection profile Connected Input PIN code if necessary
  - 12 -  6.3 SCAN Engine (1) Click ON/OFF to turn on/off the internal barcode scanner. (2) When barcode scanner is on, a barcode icon will show on the tool bar. (3) Scan modes setting: Advance Mode: Scanner can be triggered only on EDIT cursor. Basic Mode: Scanner can be triggered always. (4) Click barcode icon to open the scanner menu:       Scanner driver informationScan test program Scanner setting
  - 13 -  6.4 WiFi (optional) (1) This function only active on the specified models that feature with a WLAN module. (2) Click ON/OFF to turn on/off the internal WLAN module function. (3) Scan interval setting may change the refresh network time after network disconnected. (4) When WLAN function is on, a network icon will show on the tool bar. (5) Click network icon to open the WLAN management. (6) Select the desired network and click “Connect”. Enter the necessary parameters as required and click “OK”.                  (7) When WLAN connecting succeeds, the network icon status on the tool bar will appear connected.
  - 14 -  (8) According to network environment requirement to define settings for TCP/IP, DNS and other parameters (refer to the “Network and Dial-up Connections” in Start -> Settings or Control Panel).                 6.5 Screen Backlight (1) Move the cursor to desired screen backlight level. (2) Click “Detail” button to change the setting to automatically turn off the screen backlight if needed.
  - 15 -  6.6 KeyPad Backlight (1) Click ON/OFF to turn on/off the keypad backlight. (2) If keypad backlight is turn on, it will automatically light when press any key, and unlit after 3 seconds.  6.7 Function Key (1) There are 10 programmable function keys. (2) Each key can be defined to run an application or emulator. (3) Click “Restore Default” button will set all function keys back to factory defaults.
  - 16 -  6.8 Volume (1) Move the cursor to desired volume level. (2) Click “Detail” button to change other parameters if needed.           6.9 System This page shows system information as:                       System Tool version Build in modulesDevice serial number OS versionHardware versionClick this button will set all settings in System Tool back to factory default Click this button to show more system properties
  - 17 -  6.10 Backup and Restore (1) Click “Backup” button at System information page to open this Backup and Restore application. (2) All files and system register on the RAM will be saved and restored.                6.11 User Setting Click “Setting” button at System information to open this page.               Set backup file name and path Select to enable auto restore function when cold reset Select a file to restore Start backup procedure Start restore procedure Select a wallpaper file Auto start application after reset Recalibrate the touch panel Device will not auto suspend Remove all icons on desktop Disable all battery warning message Set all user settings back to factory default
 2507F200001A(081015)

Navigation menu