Chung s Electronic CHUNGS-05-003 Wireless Weather Station (Receiver) User Manual D manual 8xx C 8123DMD PD04070
Chung's Electronic Co. Ltd. Wireless Weather Station (Receiver) D manual 8xx C 8123DMD PD04070
User Manual
WIRELESS WEATHER STATION
C-8123/C-8153
USER’S INSTRUCTIONS
P17812300030

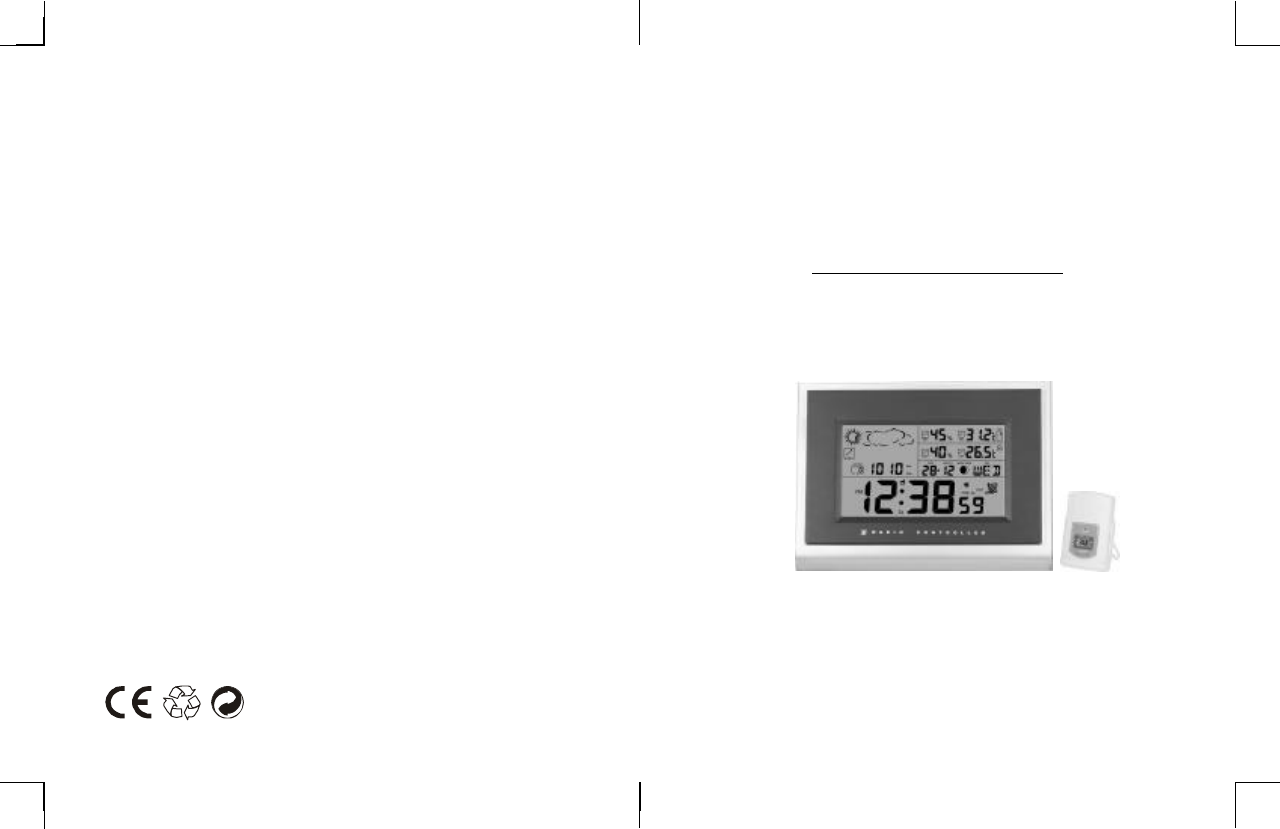
The multifunctional weather station is equipped with many
functions providing thorough weather information to you.
The receiver unit has a clear, easy-to-read display that
shows weather forecast, indoor temperature, relative
humidity, pressure, moon phase, time and date, as well as
the temperature and relative humidity measured and
transmitted by the sensor. It is able to receive and display
readings from up to 3 remote sensors.
The receiver unit retains the minimum and maximum
temperatures and relative humidity readings measured at
various locations. The 433 MHz technology means no wire
installation is required and you can place the sensors
anywhere you like.
With radio controlled function, the current time and date
are automatically synchronized with the time signal
transmitted from Frankfurt Germany (DCF77) / UK (MSF) /
US (WWVB). The signal can cover a distance of about 1500
km from the related transmitter.
Note:
C-8153 is without humidity.
1
p.
FCC Remarks:
This device complies with Part 15 of the FCC Rules. Operation is
subject to the following two conditions: (1) This device may not
cause harmful interference, and (2) This device must accept any
interference received, including interference that may cause
undesired operation.
Warning: Changes or modifications to this unit not expressly
approved by the party responsible for compliance could void the
user’s authority to operate the equipment.
NOTE: This equipment has been tested and found to comply with
the limits for a Class B digital device, pursuant to Part 15 of the FCC
Rules. These limits are designed to provide reasonable protection
against harmful interference in a residential installation. This
equipment generates, uses and can radiate radio frequency energy
and, if not installed and used in accordance with the instructions,
may cause harmful interference to radio communications.
However, there is no guarantee that interference will not occur in
a particular installation. If this equipment does cause harmful
interference to radio or television reception, which can be
determined by turning the equipment off and on, the user is
encouraged to try to correct the interference by one or more of the
following measures:
l Reorient or relocate the receiving antenna.
l Increase the separation between the equipment and receiver.
l Connect the equipment into an outlet on a circuit different from
that to which the receiver is connected.
lConsult the dealer or an experienced radio/TV technician for
help.
RF transmission frequency: 433MHz
No of remote unit: up to 3 units
RF transmission range: Maximum 30 meters
Temperature sensing cycle: around 60 ~ 64
seconds
Pressure measuring range: 800mb to 1050mb
Pressure sampling cycle: 15 minutes
Moon phase scanner range: From 2000 to 2050
Radio controlled signal: DCF77, MSF, WWVB
Power:
Main unit: 4.5 V, use 3 x AA 1.5V
alkaline battery
Remote sensor: 3 V, use 2 x AAA 1.5V
alkaline battery
Weight
Main unit: 650gm
Remote sensor: 53gm
Dimension
Main unit: 306x224x24mm
Remote sensor: 65(W)x93(H)x 27(D)mm
2
p.
25
p.
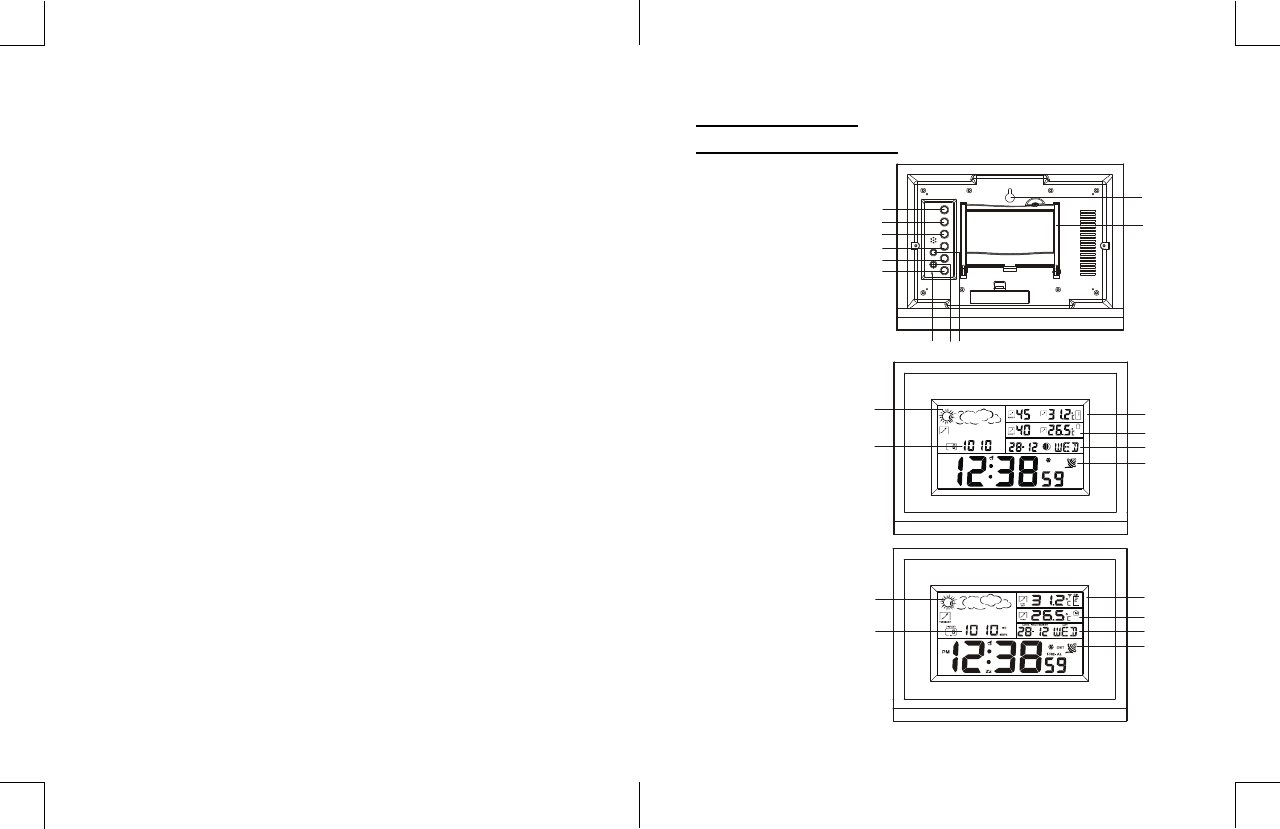
MAIN FEATURES:
WEATHTER STATION:
1
2
3
9
8
7
4
5
6
10
11
IN
CH
PM
TENDENCY
Hr
HISTORY
Zz
PRE- AL DST
hPa
mb
DATE
OUT
%
MOON PHASE
MONTH
TEMP
DAY
OUT
%
TEMP
12
13
14
15
16
17
12
13
14
15
16
17
(C-8123)
(C-8153)

1. TIME:
- Press it once to view the year.
- Press and hold it for 2 seconds to enter the time setting
mode.
2. ALARM:
- Press it to switch to alarm and temperature alarm.
- In alarm mode, press and hold it for 2 seconds to enter
the alarm and pre-alarm setting mode.
3. UP:
- In normal time mode, press it to choose between
channel (1), (2) and (3).
- In setting mode, press it to increase the setting value.
- In alarm mode, press it to turn on/off alarm and snooze.
4. DOWN:
- Press and hold it for 3 seconds, release, then press it
to change the weather indicator.
- In alarm mode, press it to turn on/off alarm and snooze.
5. HISTORY:
- Check the past 24 hours pressure records.
6. MAX/MIN :
- Press it once to check max./ min. temperature record.
- Press and hold it for 3 seconds to delete the max. and
min. record.
7. RESET:
- Press it to set all values to factory value.
SPECIFICATIONS
(The humidity data and moon phase is for C-8123 only)
MAIN UNIT
Indoor temperature measuring range: -5 ºC to +50 ºC
Recommended operating range: 0 ºC to +45 ºC
Temperature resolution: 0.1 ºC / 1ºF (above 0 ºC)
1 ºC / ºF (below 0 ºC)
Indoor relative humidity measuring range: 20% RH to 90% RH
Recommended operating range: 20% RH to 90% RH
Resolution: 1% RH
REMOTE SENSOR
Temperature measuring range: -20 ºC to +60 ºC
Recommended operating range: -20 ºC to +55 ºC
Temperature resolution: 0.1 ºC / 1ºF (above 0 ºC)
1 ºC / ºF (below 0 ºC)
Remote relative humidity measuring range: 20% RH to 90% RH
Recommended operating range: 20% RH to 90% RH
Resolution: 1%RH
24
p.
3
p.
- In case of mal-function, the unit may be required to reset.
8. ºC / ºF:
- Switch between ºC / ºF.
9. mb/hPa . inHg:
- Switch between mb/hPa or inHg.
10. WALL-MOUNTING HOLE:
- Use to support the main unit on wall.
11. TABLE STAND
- use to stand on desktop
12. WEATHER FORECAST WINDOW:
- Displays the weather forecast indicator.
13. ATMOSPHERE PRESSURE WINDOW:
- Displays the current atmospheric pressure data and
indicates the last 24 hours pressure history.
14. OUTDOOR TEMPERATURE AND HUMIDITY WINDOW:
- Shows the outdoor temperature-trend, humidity-trend,
current temperature, current humidity or the
maximum or minimum recorded temperature and
humidity.
(For C-8153, only temperature is displayed).
15. INDOOR TEMPERATURE AND HUMIDITY WINDOW:
- Shows the indoor temperature-trend, humidity-trend,
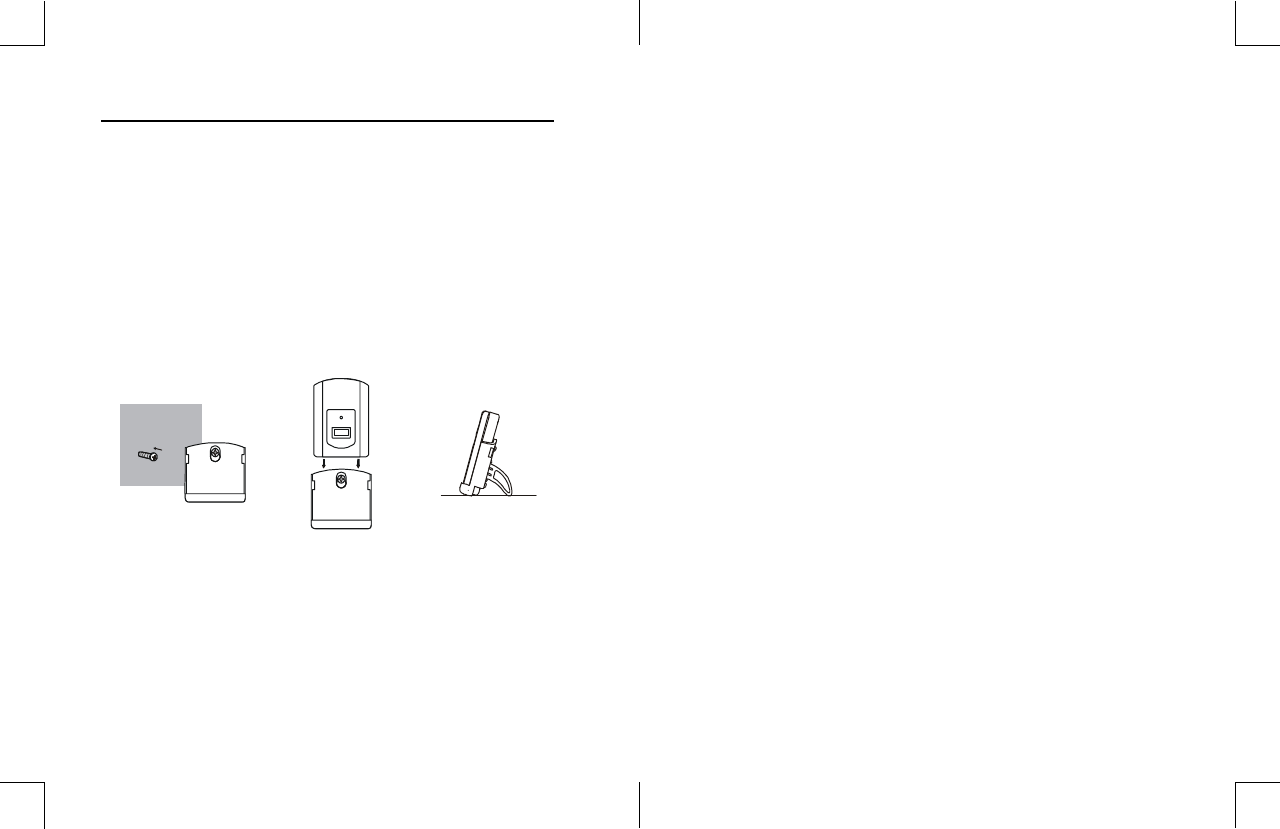
USING THE TABLE STAND OR WALL MOUNTING
The receiver has both desk-top and wall-mounting structure.
Fix the separate wall-mounting stand on the wall by screws.
Push the stand of the clock upward, hang it on the
wall-mounting stand by its recessed holes.
For the transmitter, fix the wall-mount holder on the wall or
simply place it on the table.
4
p.
23
p.
current temperature, current humidity or the maximum
or minimum recorded temperature and humidity.
(For C-8153, only temperature is displayed)
16. CALENDAR WINDOW:
- Displays the date, year, day of the week and moon
phase. (C-8153 is without moon phase)
17. CLOCK WINDOW:
- Displays the time and radio controlled signal.
TRANSMITTER:
1
2
3
4
5
6
7
22
p.
5
p.
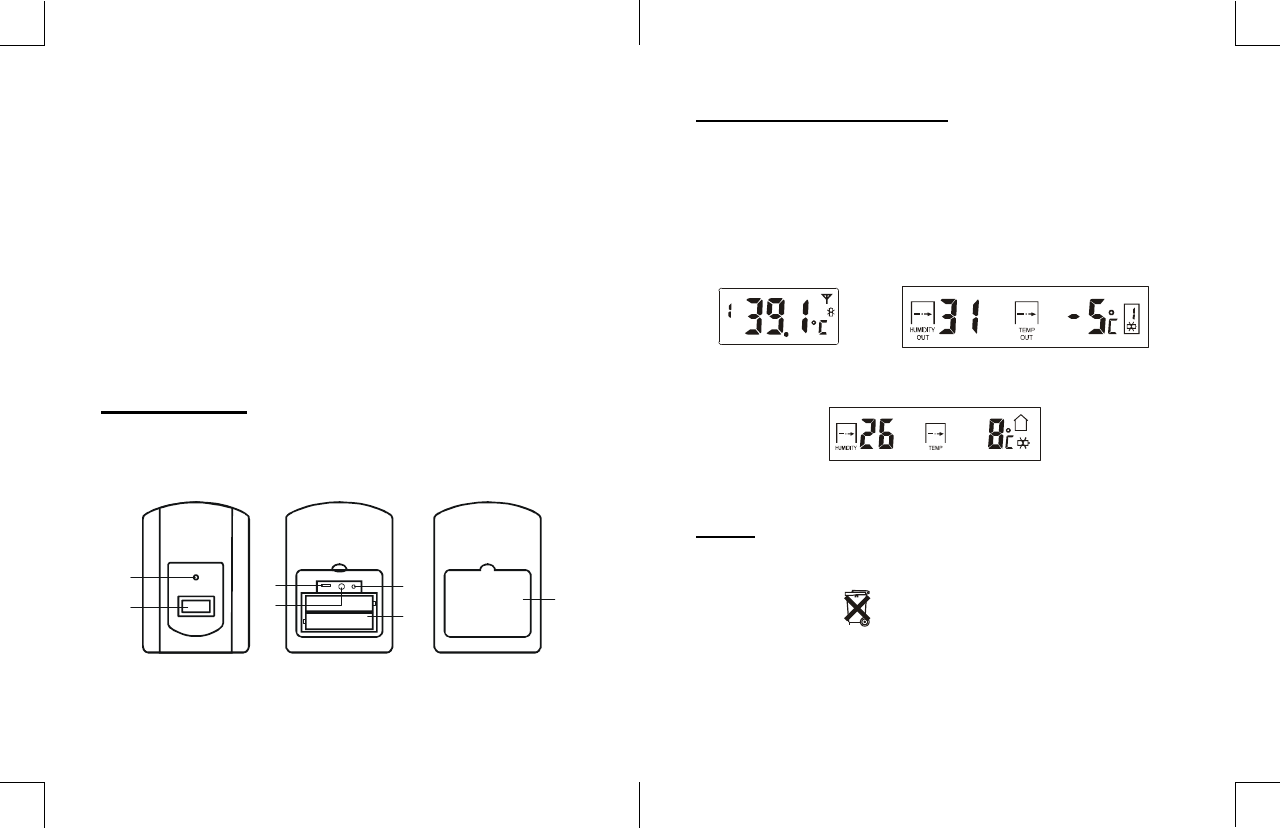
LOW BATTERY INDICATOR
When the battery does not have enough power to operate
the unit, the low battery indicator will appear to remind you
to replace with new batteries.
Transmitter’s low battery indicator Transmitter’s low battery indicator
( shows on transmitter ) ( shows on the main unit)
Receiver’s low battery indicator
NOTE:
Atlention should be drawn to the environment aspects of
battery disposal
CH
CH
%
IN
%
8
9
1. LED indicator:
- Flashes when the remote unit transmits a reading.
2. LCD:
- Displays the current temperature and humidity
monitored by the remote unit alternatively.
(For C-8153, only temperature record is displayed).
3. Channel slide switch:
- Assign the transmitter to Channel 1, Channel 2 or
Channel 3.
4. ºC / ºF:
- Switches between ºC / ºF.
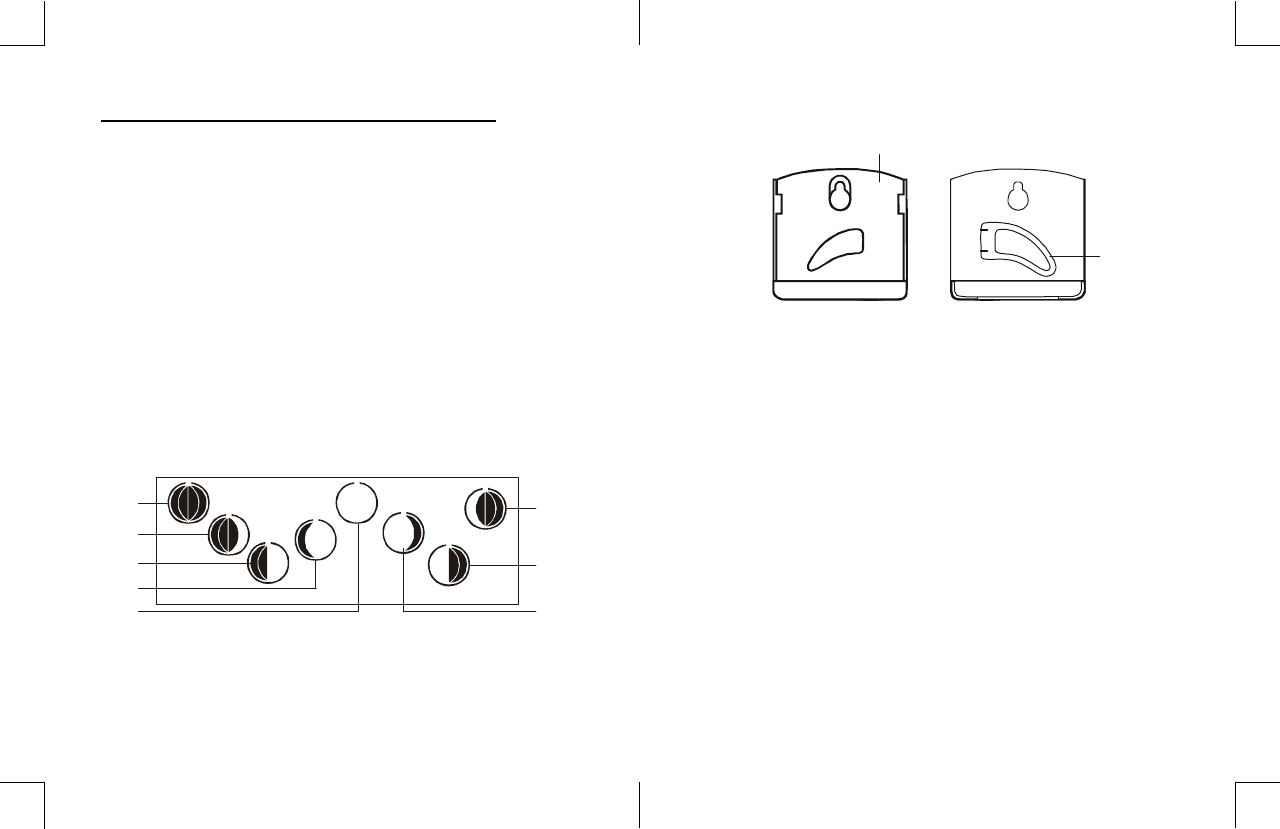
ABOUT THE MOON PHASE (C-8123 ONLY):
The unit has 8 different moon phases. It will change
according to the lunar calendar.
1. New moon
2. Waxing crescent
3. First quarter
4. Waxing Gibbous
5. Full moon
6. Waning Gibbous
7. Last quarter
8. Waning crescent
6
p.
21
p.
1
2
3
4
5
6
8
7
5. RESET:
- Return all values to default value.
6. Battery compartment:
- Accommodates 2 AAA size batteries.
7. Battery door
8. Wall mount holder:
- Supports the transmitter in wall mounting.
9. Folding table stand
BEFORE YOU BEGIN
TRANSMITTER:
1. Remove the removable stand, unscrew the screws of the
back cover and lift the cover off.
2. Insert 2 x AAA batteries into the battery compartment. Be
sure to insert them the right way round (see polarity
information +/- in the battery compartment).
3. The receiver can receive humidity and temperature data
from up to 3 transmitters. Assign the channel to each
transmitter, Channel 1, 2 or 3 respectively by sliding the
switch besides the battery compartment.
4. Press the reset key of the transmitter individually by a pin
to confirm the channel setting.
PAST 24 HOURS PRESSURE RECORDS
The current and historical barometric pressure is shown
on the atmospheric pressure window. The atmospheric
pressure can be displayed in mb/hPa or inHg by selecting
the atmospheric pressure slide switch at the case back.
Checking the pressure history for a particular hour during
the past 24 hour’s pressure, press the HISTORY button.
Each press on the button will go back by an hour. The
recorded atmospheric values for the past 24 hours are
displayed in the atmospheric pressure window.
20
p.
7
p.
5. Select the temperature unit by sliding the ºC / ºF switch
besides the battery compartment.
6. Re-fix the battery door, and secure its screws evenly
and diagonally.
NOTE:
1. Once the channel is assigned to a transmitter, you can
only change it by removing the batteries or resetting the
unit.
2. Avoid placing the transmitter in direct sunlight, rain or
snow.
WEATHER STATION:
1. Remove the battery door and insert 3 x AA batteries into
the battery compartment. Make sure you insert the
batteries the right way round (see polarity information +/-
in the battery compartment).
2. Close the battery compartment.
3.Press reset button to re-start the clock and it will
synchronise the channels of the transmitter automatically.
NOTE:
1. If extra transmitter is added in the future, press reset
button to re-start the clock and synchronise the channel
once again.
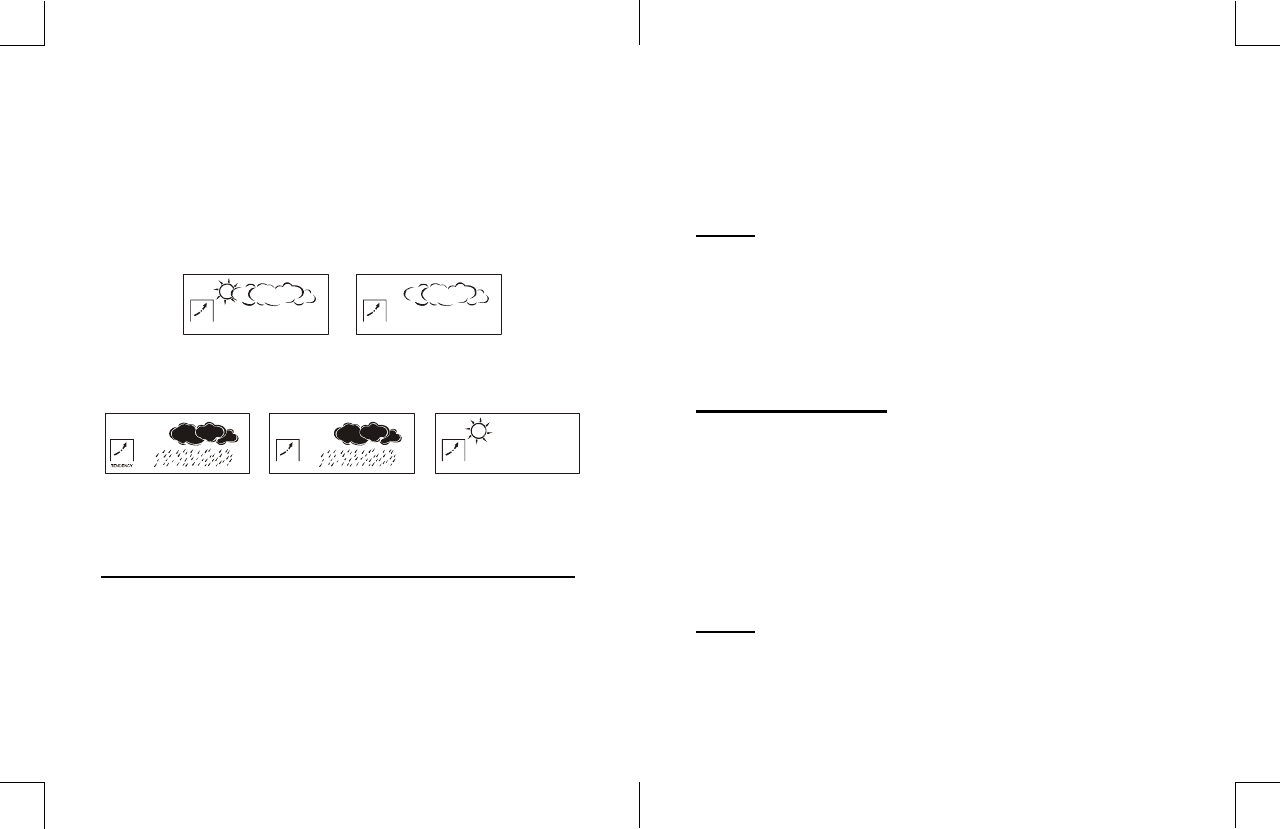
2. The weather forecast is meant for next 12 to 24 hours. It
may not necessarily reflect the current situation.
3. The “Sunny” icon, when applies to nighttime, implies clear
weather.
Slightly cloudy Cloudy
Rainy Storm Sunny
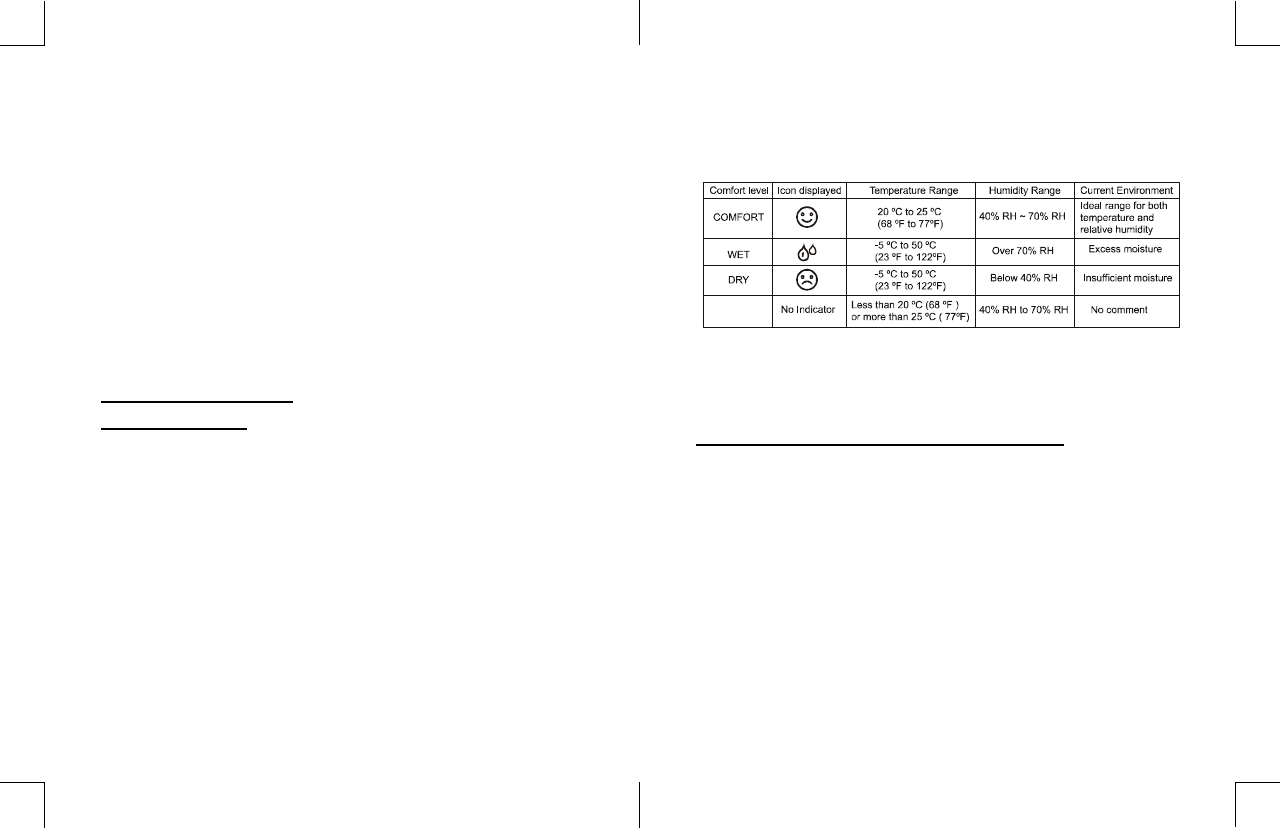
NOTE:THE COMFORT-LEVEL ICONS (C-8123 ONLY)
The comfort level icons COMFORT, DRY and WET will tell
you what the current environment is.
TENDENCY TENDENCY
TENDENCY TENDENCY
8
p.
19
p.
2. The building material and the position of the
receiver and transmitter affect the effective range. So
try various locations will help to obtain the best result.
3. Place the units away from metal objects and electrical
appliances to minimize the interference. Position the
receiver and the transmitter within effective
transmission range: 30 meters in usual circumstances.
SETTING WEATHER INDICATOR
Important: To get a better result of weather forecast
indicator, please set the weather forecast icon
according to the current weather condition.
1. In normal time mode, press and hold DOWN key for 3
seconds, weather indicator flashing.
2. Press DOWN key to change the weather indicator in this
order:
Slightly cloudy - Cloudy - Rainy - Storm - Sunny
3. Choose the suitable indicator according to the current
weather.
4. Press TIME key to return to the normal mode or let it
automatically return to normal mode after 30 seconds
without pressing any keys.
WEATHER FORECAST
The built-in barometer can notice atmospheric pressure
changes. Based on the data collected, it can predict the
weather condition in the forthcoming 12-24 hours. The
effective covers area ranges from 30 to 50 km.
NOTE:
1. The accuracy of a general pressure-based weather
forecast is about 70 to 75% , and therefore, cannot be
held responsible for any inconvenience caused by an
inaccurate data.
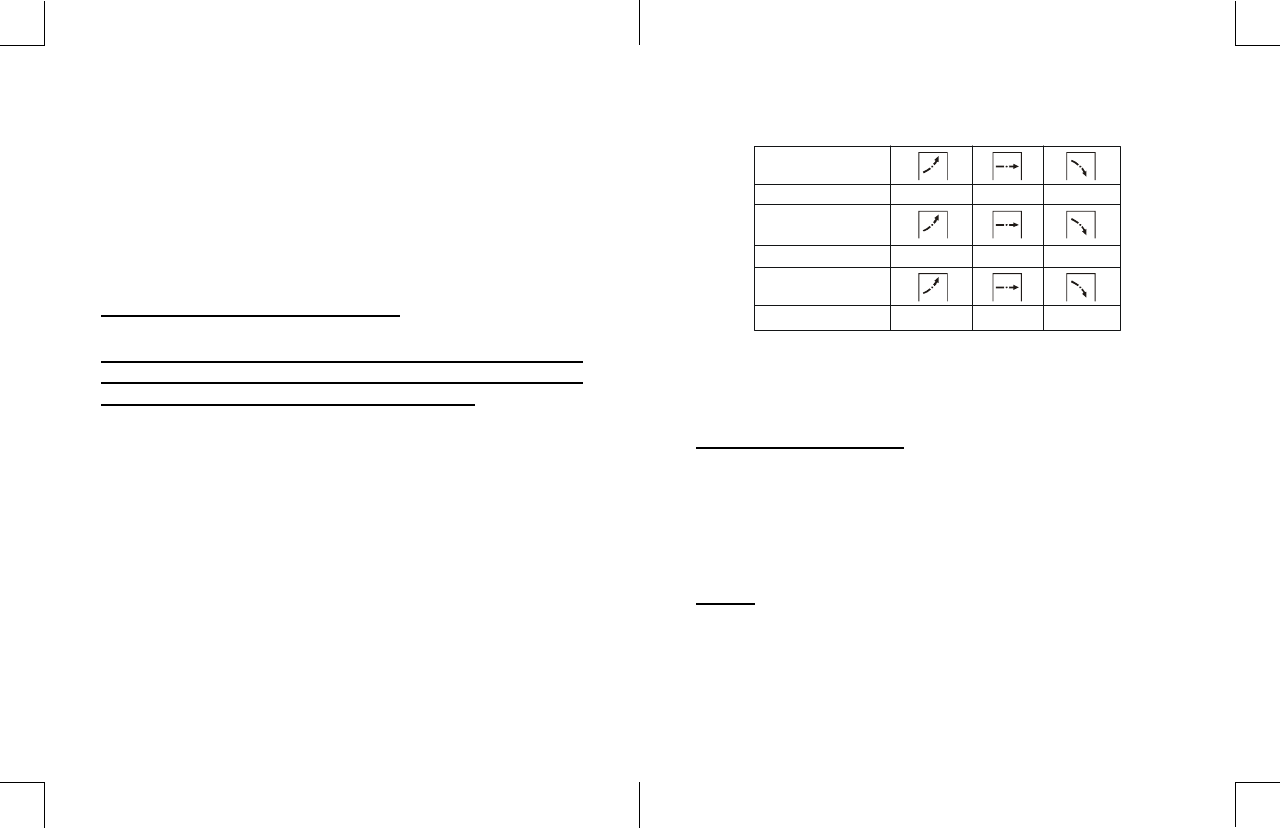
Arrow indicator
Temperature t rend Rising Steady Falling
Rising Steady Falling
Rising Steady Falling
Arrow indicator
Humidity trend
Arrow indicator
Pressure trend
18
p.
9
p.
Slightly cloudy Cloudy
Rainy Storm Sunny
NOTE:
1. Do not set the weather indicator when it is raining.
Raining will give unstable data.
2. Do not set the weather indicator in night time.
RECEPTION OF RADIO CONTROLLED TIME SIGNAL
The time and date are radio-controlled. The current time
and date are automatically synchronized with the time
signal transmitted from Frankfurt, Germany (DCF77), UK/
(MSF) / US (WWVB) provided the device is within about of
1500 km range of the transmitter.
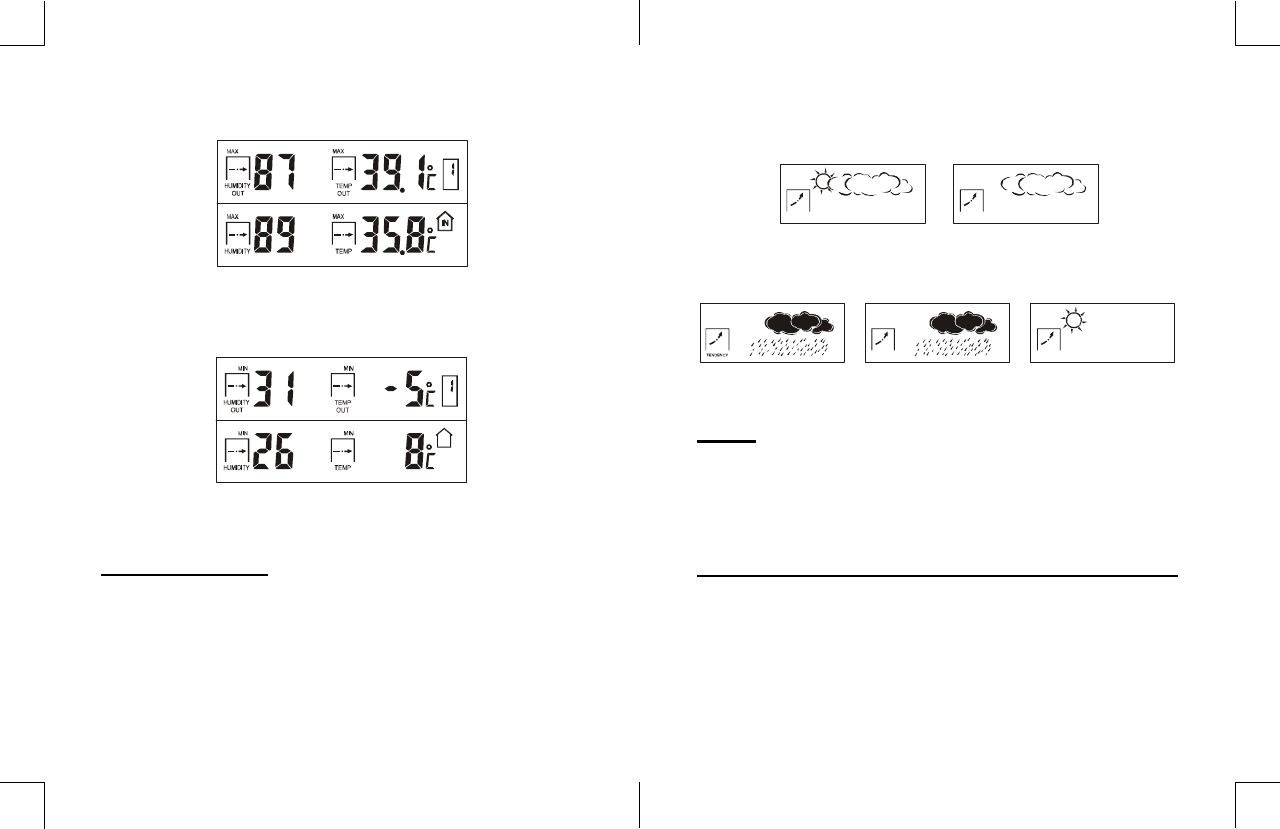
MAX. Temperature / humidity record
MIN. Temperature / humidity record
WEATHER TREND
The temperature-trend, humidity-trend and pressure-trend
indicators show the trends of changes for the last few minutes.
Arrows indicate a rising, steady or falling trend.
TENDENCY TENDENCY
TENDENCY TENDENCY
CH
%
%
IN
CH
%
%
10
p.
17
p.
When used for the first time (after inserting the batteries or
pressing RESET), the clock starts receiving time signals
and the reception display flashes.
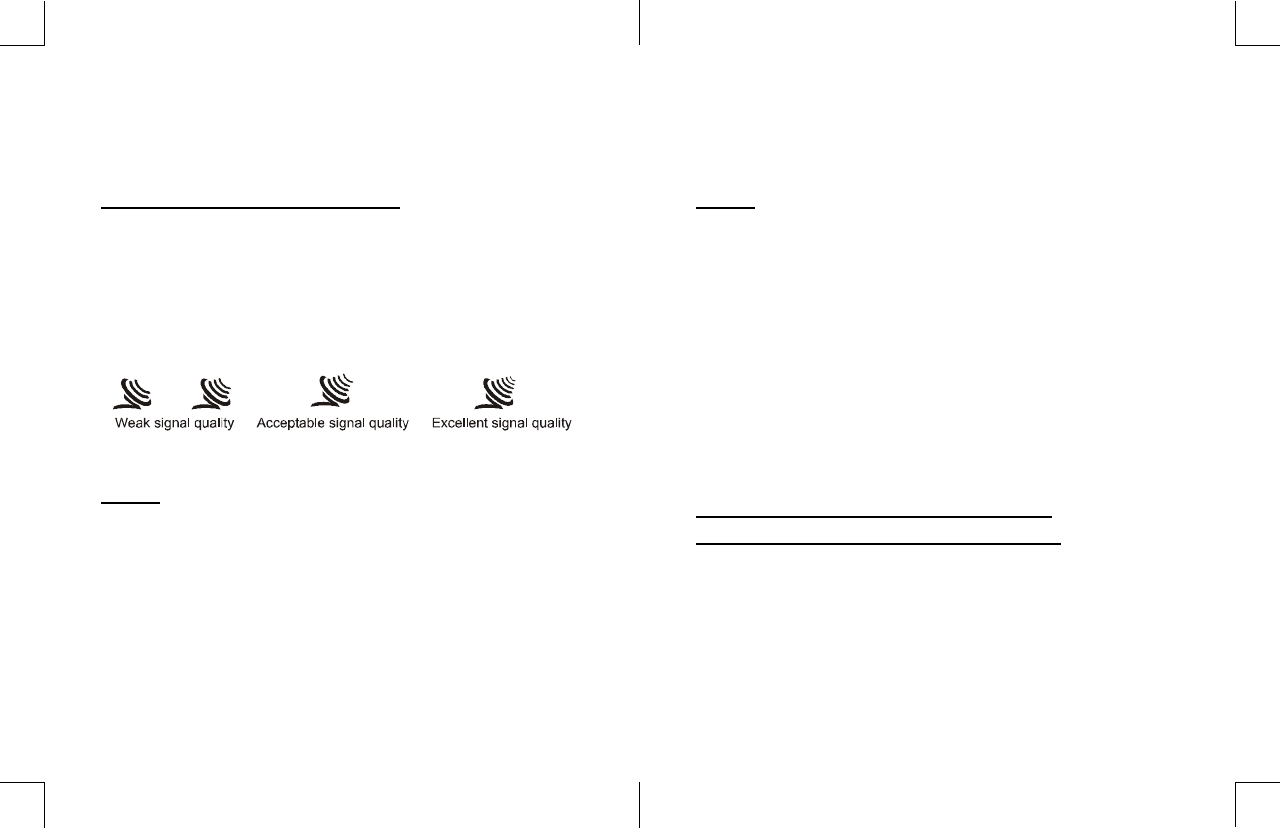
SIGNAL STRENGTH INDICATOR
The signal indicator displays signal strength in 3 levels.
Wave segment flashing means time signals are being
received. The signal quality could be classified into three
types:
NOTE:
1. Everyday the unit will automatically search for the time
signal at 2:00, 8:00, 14:00 and 20:00.
2. Always place the unit away from interfering sources such
as TV set, computer, etc.
3. Avoid placing the unit on or next to metal plate.
4. Closed area such as airport, basement, tower block or
factory is not recommended.
5. Do not start reception on a moving article such as
vehicle or train.
If the readings go above or below the specified range, the
receiver and transmitter will keep show the last record within
the operation range.
NOTE:
1. If no signals are received or the transmission is
interfered with, “---” appears in the display.
2. Locate the clock in other position and make sure the
transmission is within the effective range of 30 meters
approx.
3. After several trials but in vain, please reset the clock
thoroughly. Try out where your multifunctional alarm
clock receives the signals best.
CHECKING AND DELETING MAX./MIN.
TEMPERATURE & HUMIDITY REOCRDS
(For C-8153, only temperature is displayed)
1. Press MAX/MIN key to check Maximum temperature and
humidity records. Press it twice to check the Minimum
records. Press it thrice to exit.
2. Press and hold MAX/MIN key for 3 seconds to delete the
records.
11
p. 16
p.
SELECT THE TIME ZONE (FOR WWVB VERSION ONLY)
The default time Zone is PACIFIC Zone, if your location is out
of Pacific, set the time zone as the following:
In normal time mode, press DOWN button to change it:
P=Pacific M=Mountain C=Central E=Eastern
MANUAL TIME SETTING
If you are out of the reach of the Radio Controlled Tranmsitter
or if the reception is not reachable, the time can be set
manually. As soon as the transmitter is received again, the
clock will automatically synchronise with the received time.
1. In normal time mode, press and hold TIME key for 2
seconds, hour flashing, press UP or DOWN key to
change its value.
2. Press TIME key again, minute flashing, press UP or DOWN
key to change its value.
3. Repeat the above operation to set the time in this order:
Hour - Minute - Second - 12/24 hour - Year - Month - Date
- Day language.
4. 5 languages weekday setting sequence is : English-GB /
French-FR / German-DE / Spanish-ES / Italian-IT.
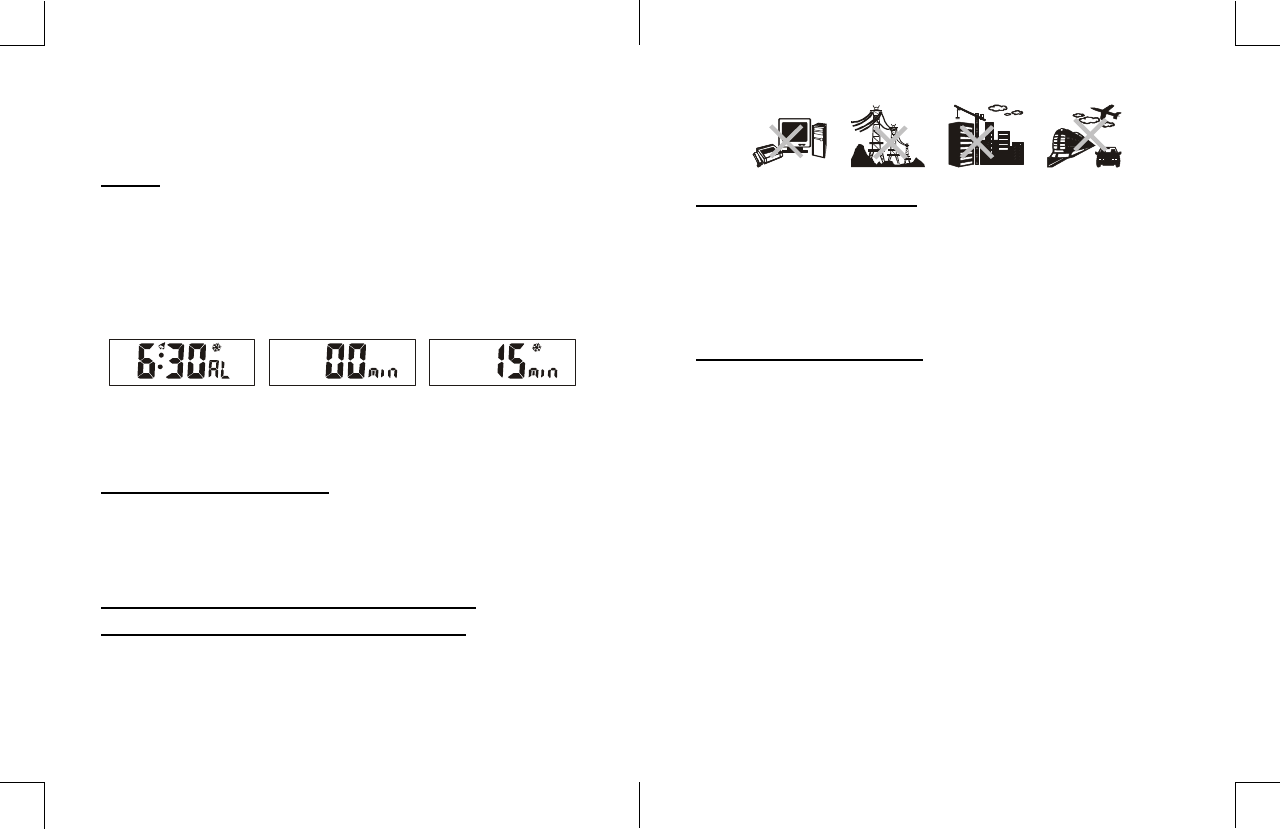
2. Press and hold the ALARM key for 2 seconds, pre-alarm
time flashing, press UP or DOWN key to change its value.
NOTE:
To activate pre-alarm function, ALARM must be on.
Temperature alarm ON Pre-alarm mode Pre-alarm 15 minutes
VIEWING THE CHANNEL
The default channel is channel 1. In normal time mode,
press UP key to view the channel from 1 to 3.
HOW TO READ INDOOR AND OUTDOOR
TEMPERATURE & HUMIDITY RECORDS
Change the temperature unit by sliding ºC / ºF slide switch
to ºC for Centigrade or ºF for Fahrenheit.
AM
PRE- AL
PRE- AL
15
p. 12
p.
13
5. After setting completed, press TIME key to exit setting
mode, or let it exit automatically in 30 seconds without
pressing any key.
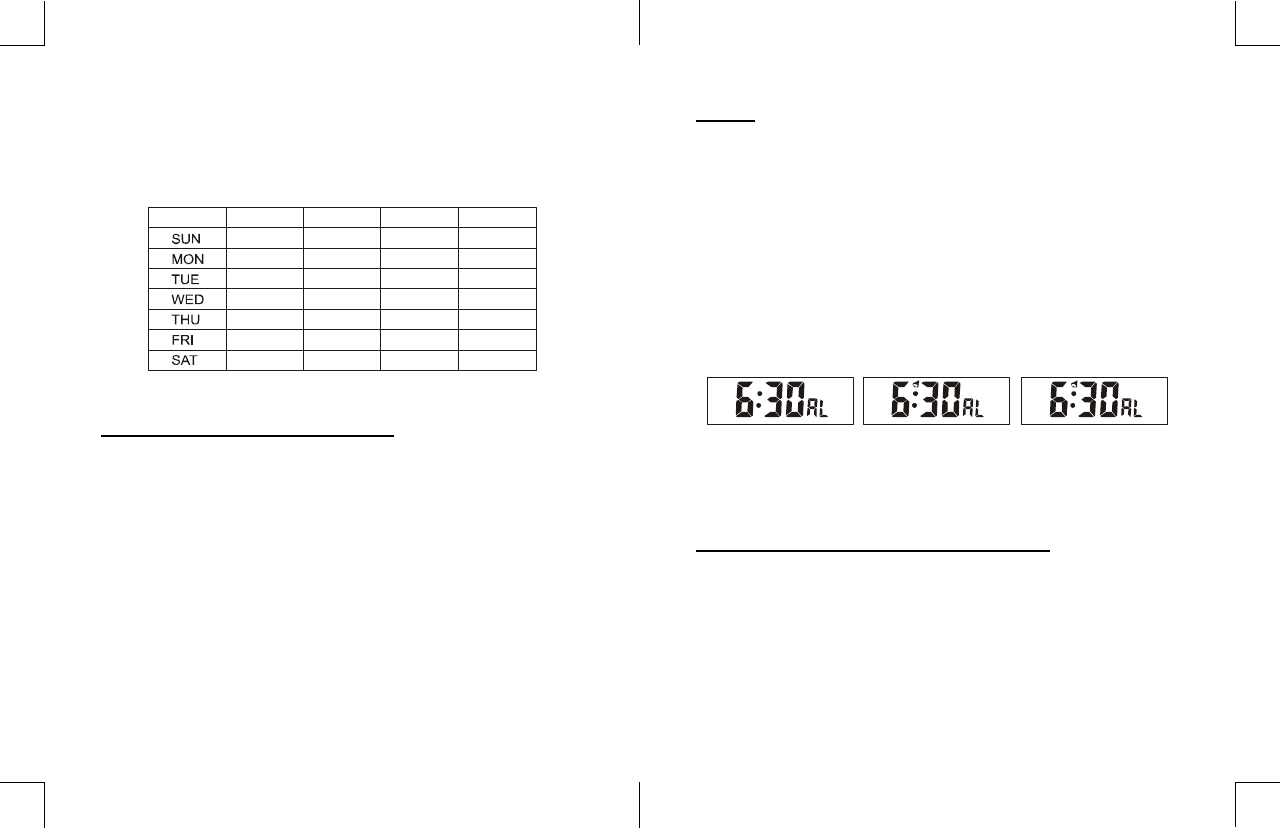
ALARM AND SNOOZE SETTING
1. In normal time mode, press ALARM key once to enter the
alarm mode. Press UP or DOWN key once, alarm is on
with the bell indicator displayed. Press UP or DOWN key
again to turn on SNOOZE with Zz displayed. Press UP or
DOWN key to turn off ALARM and SNOOZE.
2. In normal mode or alarm mode, press and hold ALARM
key for 2 seconds, hour flashing. Press UP or DOWN key
to set the value. Repeat the same operation to set the
alarm minute.
3. After setting completed, press ALARM key to return to
normal mode, or let it exit automatically 30 seconds later
without pressing any key.
AM
Zz
AMAM
NOTE:
1. The alarm will automatically turn on when setting the
alarm time.
2. The EL backlight will keep on for 5 seconds when the
alarm is sounding.
3. Once the snooze is turn on, the 4-step crescendo
alarm will sound 4 times in 5-minute interval. The alarm
duration is 120 seconds.
Alarm OFF Alarm ON Alarm and Snooze ON
SETTING THE TEMPERATURE ALARM
Use this function to be woken up at a determined period of
time earlier (1-30 minutes), if one of the transmitter’s
temperatures is below -1ºC.
1. In normal time mode, press ALARM key twice to enter
pre-alarm mode, press UP or DOWN key to turn
pre-alarm on.
14
SON
MON
DIE
MIT
DON
FRE
SAM
DIM
LUN
MAR
MER
JEU
VEN
SAM
DOM
LUN
MAR
MIE
JUE
VIE
SAB
DOM
LUN
MAR
MER
GIO
VEN
SAB
English Germany French Spanish
Italian
p. p.