Cidco Communications CL906 900MHz Cordless Telephone System User Manual CL906
Cidco Communications Corporation 900MHz Cordless Telephone System CL906
User Manual

CL906
User Manual
900 MHz
CL906.book Page 1 Friday, January 18, 2002 2:25 PM

Copyright © 2002 Cidco Communications Corporation. All Rights Reserved.
Part No. 105550-01 Rev. A
No part of this publication may be reproduced, copied, transcribed, stored in a retrieval system, or translated into any
language in any form, by any means without the prior written permission of Cidco Communications Corporation.
CL906.book Page 2 Friday, January 18, 2002 2:25 PM

TABLE OF CONTENTS i
TABLE OF CONTENTS
■ SAFETY INSTRUCTIONS & WARRANTY 1
Safety Symbols . . . . . . . . . . . . . . . . . . . . . . . . . . . . . . . . . . . . . . . . . . . . . . . . 1
Safety Instructions . . . . . . . . . . . . . . . . . . . . . . . . . . . . . . . . . . . . . . . . . . . . . . 1
Telephone Wiring and Jack Installation. . . . . . . . . . . . . . . . . . . . . . . . . . . . . . 2
Batteries . . . . . . . . . . . . . . . . . . . . . . . . . . . . . . . . . . . . . . . . . . . . . . . . . . . . . 2
FCC Requirements . . . . . . . . . . . . . . . . . . . . . . . . . . . . . . . . . . . . . . . . . . . . . 3
Warranty . . . . . . . . . . . . . . . . . . . . . . . . . . . . . . . . . . . . . . . . . . . . . . . . . . . . 5
■ INTRODUCTION 6
Key Features . . . . . . . . . . . . . . . . . . . . . . . . . . . . . . . . . . . . . . . . . . . . . . . . . . 6
■ INSTALLING THE CL906 7
Checking the Contents . . . . . . . . . . . . . . . . . . . . . . . . . . . . . . . . . . . . . . . . . . 7
Setting Up Your Phone . . . . . . . . . . . . . . . . . . . . . . . . . . . . . . . . . . . . . . . . . . 7
■ FEATURES AND CONTROLS 11
Controls and Features . . . . . . . . . . . . . . . . . . . . . . . . . . . . . . . . . . . . . . . . . . 12
Personalizing Your Phone. . . . . . . . . . . . . . . . . . . . . . . . . . . . . . . . . . . . . . . 13
■ USING THE CL906 15
Answering Calls . . . . . . . . . . . . . . . . . . . . . . . . . . . . . . . . . . . . . . . . . . . . . . 15
Dialing Calls. . . . . . . . . . . . . . . . . . . . . . . . . . . . . . . . . . . . . . . . . . . . . . . . . 15
Pre-Dialing . . . . . . . . . . . . . . . . . . . . . . . . . . . . . . . . . . . . . . . . . . . . . . . . . . 15
Redial . . . . . . . . . . . . . . . . . . . . . . . . . . . . . . . . . . . . . . . . . . . . . . . . . . . . . . 15
Paging and Finding the Handset . . . . . . . . . . . . . . . . . . . . . . . . . . . . . . . . . . 15
Using Flash . . . . . . . . . . . . . . . . . . . . . . . . . . . . . . . . . . . . . . . . . . . . . . . . . . 15
CL906.book Page i Friday, January 18, 2002 2:25 PM

ii TABLE OF CONTENTS
Using Temporary Tone Service . . . . . . . . . . . . . . . . . . . . . . . . . . . . . . . . . . . 15
Adjusting The Handset Volume . . . . . . . . . . . . . . . . . . . . . . . . . . . . . . . . . . 16
Reading The Call Timer . . . . . . . . . . . . . . . . . . . . . . . . . . . . . . . . . . . . . . . . 16
Finding Clear Reception . . . . . . . . . . . . . . . . . . . . . . . . . . . . . . . . . . . . . . . . 16
Going Out of Range . . . . . . . . . . . . . . . . . . . . . . . . . . . . . . . . . . . . . . . . . . . 16
Using Network Services . . . . . . . . . . . . . . . . . . . . . . . . . . . . . . . . . . . . . . . . 16
Voice Mail . . . . . . . . . . . . . . . . . . . . . . . . . . . . . . . . . . . . . . . . . . . . . . . . . . 17
Using Caller ID and Call Waiting ID . . . . . . . . . . . . . . . . . . . . . . . . . . . . . . . 17
Switching Between Calls. . . . . . . . . . . . . . . . . . . . . . . . . . . . . . . . . . . . . . . . 19
Using The Directory . . . . . . . . . . . . . . . . . . . . . . . . . . . . . . . . . . . . . . . . . . . 19
Reading Display Messages . . . . . . . . . . . . . . . . . . . . . . . . . . . . . . . . . . . . . . 22
■ TROUBLESHOOTING 23
Problem/Solution . . . . . . . . . . . . . . . . . . . . . . . . . . . . . . . . . . . . . . . . . . . . . 23
CL906.book Page ii Friday, January 18, 2002 2:25 PM
CL906 - 900MHz Cordless
SAFETY INSTRUCTIONS & WARRANTY 1
SAFETY INSTRUCTIONS & WARRANTY
SAFETY SYMBOLS
WARNING:
This symbol is intended to alert you to the presence of
uninsulated dangerous voltage within the product's
enclosure that might be of sufficient magnitude to
constitute a risk of electric shock. Do not open the
product's case.
CAUTION:
This symbol is intended to inform you that important
operating and maintenance instructions are included
in the literature accompanying this product.
NEED TO KNOW:
This symbol is intended to highlight important
information.
SAFETY INSTRUCTIONS
CAUTION
To reduce the risk of fire or injury to persons, read
and follow these instructions:
■ Read and understand all instructions.
■ Follow all warnings and instructions marked on the unit and in
the User Manual(s).
■ Use only the battery type recommended in this manual.
■ Unplug this telephone from the wall outlet before cleaning. Do
not use liquid or aerosol cleaners, just use a damp cloth for
cleaning.
■ Do not place this telephone on an unstable cart, stand, or
table. It could fall, causing serious damage or impede
operation.
■ Never place this telephone near or over a radiator or heat
register.
■ Only operate this telephone using the type of power source
listed on the marking label. If you are not sure of the power
supply of your home, consult your dealer or local power
company.
■ Do not overload wall outlets and extension cords as this can
result in the risk of fire or electrical shock.
■ Never push objects of any kind into this telephone as they can
touch dangerous voltage points or short out parts that could
result in a risk of fire or electrical shock.
■ Take the phone to a qualified technician when it requires
repair work or service.
■ To reduce the risk of electrical shock, do not disassemble the
telephone. Opening or removing covers can expose you to
dangerous voltages or other risks. Incorrect re-assembly can
cause electrical shock during subsequent use.
S- SAVE THESE INSTRUCTIONS -
CL906.book Page 1 Friday, January 18, 2002 2:25 PM
CL906 - 900MHz Cordless
2 SAFETY INSTRUCTIONS & WARRANTY
■ Unplug this telephone from the wall outlet and refer servicing
to qualified service personnel under the following conditions:
- If the power supply cord or plug is damaged or
frayed.
- If liquid is spilled into the unit.
- If the unit is exposed to water.
- If the unit does not operate normally by following the
operating instructions.
- If the unit is dropped or the casing is damaged.
- If the unit exhibits a distinct change in performance.
■ Avoid using the telephone during an electrical storm. There
can be a slight risk of electrical shock from lightning.
■ Do not use the telephone to report a gas leak if the leak is in
the vicinity of the phone
■ Ultimate disposal of this product should be handled according
to all national laws and regulations.
WARNINGS
WARN ING
To prevent fire or shock hazard, do not expose this
product to rain or moisture.
CAUTION
To reduce the risk of electric shock, DO NOT remove
cover or back. No user serviceable parts inside.
Refer servicing to qualified personnel.
CAUTION
Changes or modification to this device not expressly
approved by Cidco Communications could void the
user’s authority to operate this equipment.
TELEPHONE WIRING AND JACK INSTALLATION
■ Use caution when installing or modifying telephone lines.
■ Never install telephone wiring during an electrical storm.
■ Never install telephone jacks in wet locations unless the jack is
specifically designed for wet locations.
BATTERIES
■ Disconnect the telephone when replacing the battery pack.
CAUTION
To reduce the risk of fire, use only 3.6V 800mAh Nickel
Cadmium (Ni-Cad) cordless telephone replacement
battery pack.
■ Do not dispose of the battery pack in a fire as it will explode.
Check with local codes for proper battery disposal
regulations.
■ Do not open or mutilate the battery pack. Released electrolyte
is corrosive and can cause damage to the eyes or skin. It can
be toxic, if swallowed.
■ Avoid contact with rings, bracelets, keys or other metal
objects, when handling batteries. These objects could short
out the battery or cause the conductor to overheat resulting
in burns.
S- SAVE THESE INSTRUCTIONS -
CL906.book Page 2 Friday, January 18, 2002 2:25 PM
CL906 - 900MHz Cordless
SAFETY INSTRUCTIONS & WARRANTY 3
■ Do not attempt to recharge the battery pack by heating it.
Sudden release of battery electrolyte can cause burns or
irritation to the eyes or skin.
■ Remove the battery pack if you do not plan to use the phone
for several months at a time. The batteries could leak over
that time.
■ Discard “dead” battery packs as soon as possible because
they are likely to leak into the phone.
■ Do not store this phone or battery pack in a high temperature
area. Batteries stored in a freezer or refrigerator should be
protected from condensation during storage and defrosting.
Battery packs should be stabilized at room temperature
before using.
■ Your battery pack is rechargeable and can be
recycled once it outlives its usefulness.
Depending upon your local and state law, it
might be illegal to dispose of this battery into a
municipal waste system. Check with your local
solid waste company or call 1-800-8-BATTERY
for information on Ni-Cd battery recycling and
disposal restrictions in your area.
FCC REQUIREMENTS
FCC PART 15 INFORMATION
This equipment complies with Part 15 of the FCC rules. Operation
is subject to the following two conditions: (1) This device may not
cause harmful interference, and (2) this device must accept any
interference received, including interference that may cause
undesired operation.
This equipment has been tested and found to comply within the
limits for a Class B digital device, pursuant to Part 15 of the FCC
Rules. These limits provide reasonable protection against
harmful interference in a residential installation.
This equipment generates, uses and can radiate radio frequency
energy. If not installed and used in accordance with the
instructions, the equipment might cause harmful interference to
radio communications. However, there is no guarantee that
interference will not occur in a particular installation.
If this equipment does cause harmful interference to radio or
television reception, which can be determined by turning the
equipment off and on, the user is encouraged to try to correct
the interference by one or more of the following measures:
■ Reorient or relocate the receiving antenna.
■ Increase the separation between the equipment and receiver.
■ Connect the equipment into an outlet on a circuit different
from that to which the receiver is connected.
■ Consult the dealer or an experienced radio/TV technician for
help.
CL906.book Page 3 Friday, January 18, 2002 2:25 PM

CL906 - 900MHz Cordless
4 SAFETY INSTRUCTIONS & WARRANTY
FCC PART 68 INFORMATION
This telephone is hearing aid compatible.
This equipment complies with Part 68 of the FCC rules. The FCC
Part 68 label is located on the bottom of the product. This label
contains the product’s FCC Registration Number and Ringer
Equivalence Number (REN). You must give this information to
your telephone company if they request it from you.
Only use standard modular telephone jacks to connect to the
telephone network. The appropriate outlet or jack is a USOC
RJ11C or RJ11W, which complies with FCC Part 68 Rules.
The REN is useful when trying to determine the maximum
number of devices you can connect to your telephone line and still
have those devices ring when called. In most, but not all areas,
the sum of the RENs of all devices connected to one line should
not exceed five (5.0). To be certain of the number of devices you
can connect to your line, as determined by the REN, contact your
local telephone company to determine the maximum REN for
your calling area.
If this device causes harm to the telephone network, the
telephone company will give you advance notice if temporary
discontinuance of service is required. But if advance notice isn’t
practical, the telephone company will notify you as soon as
possible. Also, you will be advised of your right to file a complaint
with the FCC if you believe it is necessary.
The telephone company may make changes in its facilities,
equipment, operation, or procedures that could affect the proper
functioning of your equipment. If they do, you will receive
advanced notice in order for you to make necessary changes to
maintain uninterrupted service.
This equipment may not be used on coin service provided by the
telephone company. Connection to party lines is subject to state
tariffs.
Repairs to this equipment can only be made by the manufacturer
and its authorized agents. If it appears that this device is causing
harm to the telephone network, the telephone company might
request that the device be unplugged until the problem is fixed.
DO NOT DISASSEMBLE THIS EQUIPMENT.
CL906.book Page 4 Friday, January 18, 2002 2:25 PM

CL906 - 900MHz Cordless
SAFETY INSTRUCTIONS & WARRANTY 5
WARRANTY
If your telephone is defective in material or workmanship and you
return it within one year from the date of purchase, we will repair
it, or, at our option, we will replace it. If we repair it, we might
use reconditioned replacement parts or materials. If we choose
to replace it, we might substitute an identical reconditioned unit.
The repaired/replaced unit is warranted for either (a) ninety
days, or (b) the remainder of your phone’s original one year
warranty, whichever is longer.
A. WHAT YOU NEED TO DO
To receive warranty service, you must provide proof of purchase
(your sales receipt) and date of purchase.
B. WHAT THIS WARRANTY DOES NOT COVER
This warranty does not cover defects resulting from accidents,
alterations, failure to follow this manual’s instructions, battery
leakage, misuse, fire, flood, and Acts of God.
We do not warrant this product to be compatible with party lines,
with all types of telephone equipment, or with your specific
customer premises equipment. Shipping costs to and from
authorized service centers are not covered.
We are not responsible for implied warranties, including those of
fitness for a particular purpose and merchantability after the
initial one year period. We do not pay for loss of time,
inconvenience, loss of use of the product, or property damage
caused by this product or its failure to work, telephone company
service calls, or any other incidental or consequential damages.
C. STATE LAW RIGHTS
Some states do not allow limitations on how long an implied
warranty lasts, or the exclusion of limitation of incidental or
consequential damages, so the above exclusions might not apply
to you. This warranty gives you specific rights; you may also have
other rights, which can vary from state to state.
CL906.book Page 5 Friday, January 18, 2002 2:25 PM

CL906 - 900MHz Cordless
6 INTRODUCTION
INTRODUCTION
KEY FEATURES
■ 30 name & number Call Records
■ 20 Directory Records
■ Visual Message Waiting alert
■ New Call alert
■ Handset volume control
■ Backlit LCD
■ English and Spanish prompts
■ Hearing-aid compatible
■ Page handset locator function
■ Auto & manual channel selection
■ Audible out-of-range alert
■ Low battery indicator
■ Bi-directional handset charging
■ Preprogrammed for your local telephone Company’s
network services.
Your new CL906 telephone incorporates all the features of a cordless telephone and blends them with your local telephone company’s
best calling features, such as Caller ID, Voice Mail and Call Waiting.
CL906.book Page 6 Friday, January 18, 2002 2:25 PM
CL906 - 900MHz Cordless
INSTALLING THE CL906 7
INSTALLING THE CL906
CHECKING THE CONTENTS
Check to see that the following items are enclosed:
■ Telephone Base and Handset
■ Long Line Cord
■ Short Line Cord for Wall Mounting
■ Desktop/Wall Mount Wedge
■ AC Adapter
■ Rechargeable battery pack
■ Belt Clip
■ User Manual
■ Quick Start Card
SETTING UP YOUR PHONE
Step 1: Choose a Central Location for the Base
The base should be placed away from electronic equipment
such as a microwave, personal computer, stereo, television,
VCR or other cordless telephones. It is also a good idea to
place the unit away from noisy areas, or from heat sources
such as a radiator or direct sunlight.
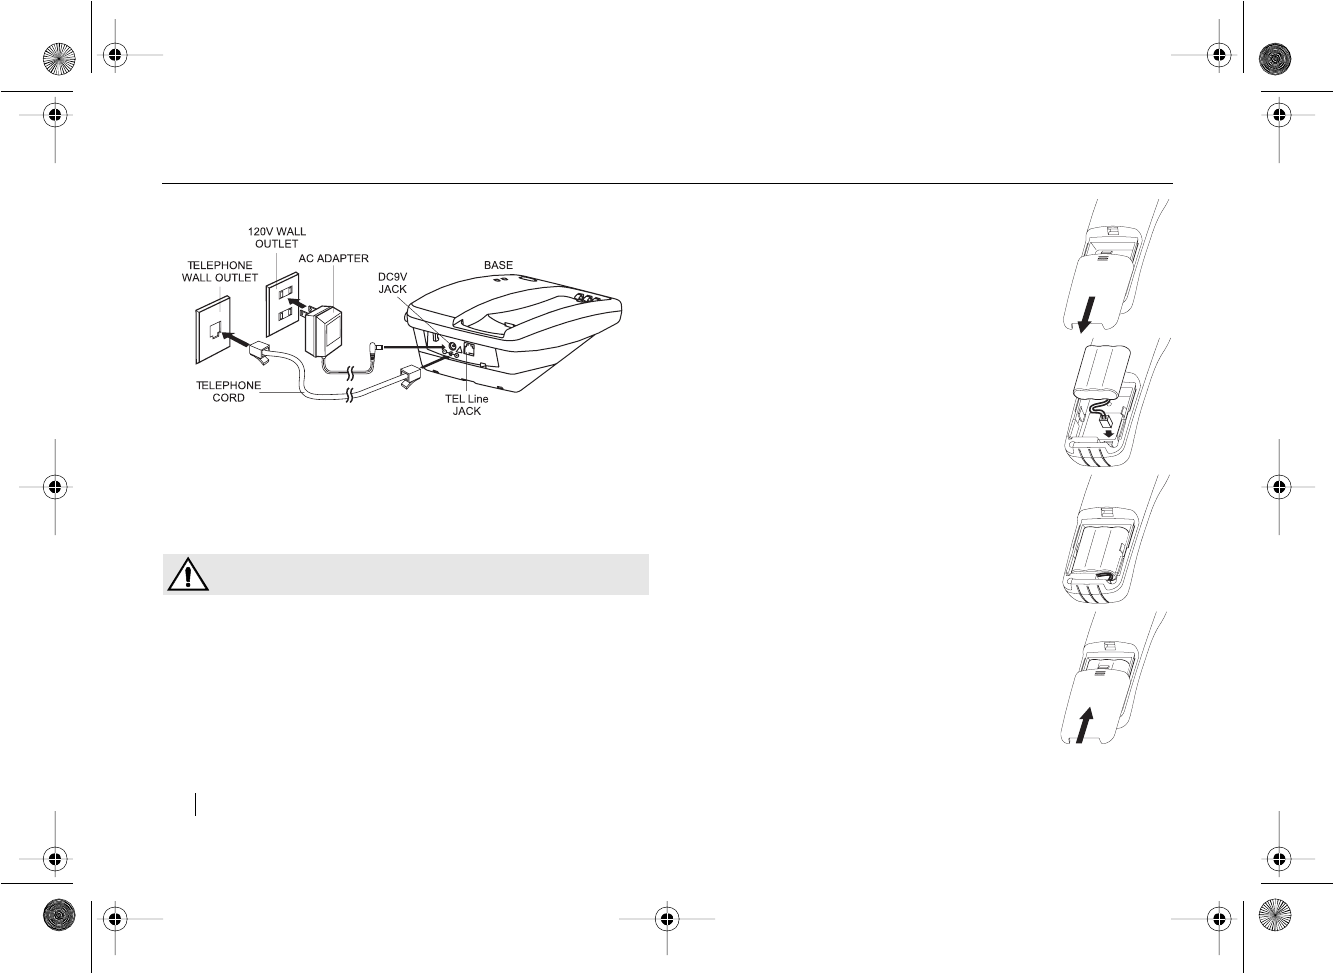
Step 2: Plug in the AC Adaptor
a. Plug the AC adapter tip into the DC 9V jack on
the base and the other end into an electrical
outlet. Be sure that the tip is securely
plugged into the jack. Without AC power your
phone will not operate.
CAUTION
You must use a Class 2 power adapter that supplies
9 Volts DC and delivers at least 300mA. Its center
tip must be set to positive and its plug must fit the
phone’s DC 9V jack. The supplied adapter meets
these specifications. Using an adapter that does not
meet these specifications could damage the phone
or the adapter.
CL906.book Page 7 Friday, January 18, 2002 2:25 PM
CL906 - 900MHz Cordless
8 INSTALLING THE CL906
b. Thread the cord through the hook on the
housing to prevent the cord from pulling
loose. Be sure that the wall outlet is not
controlled by a light switch.
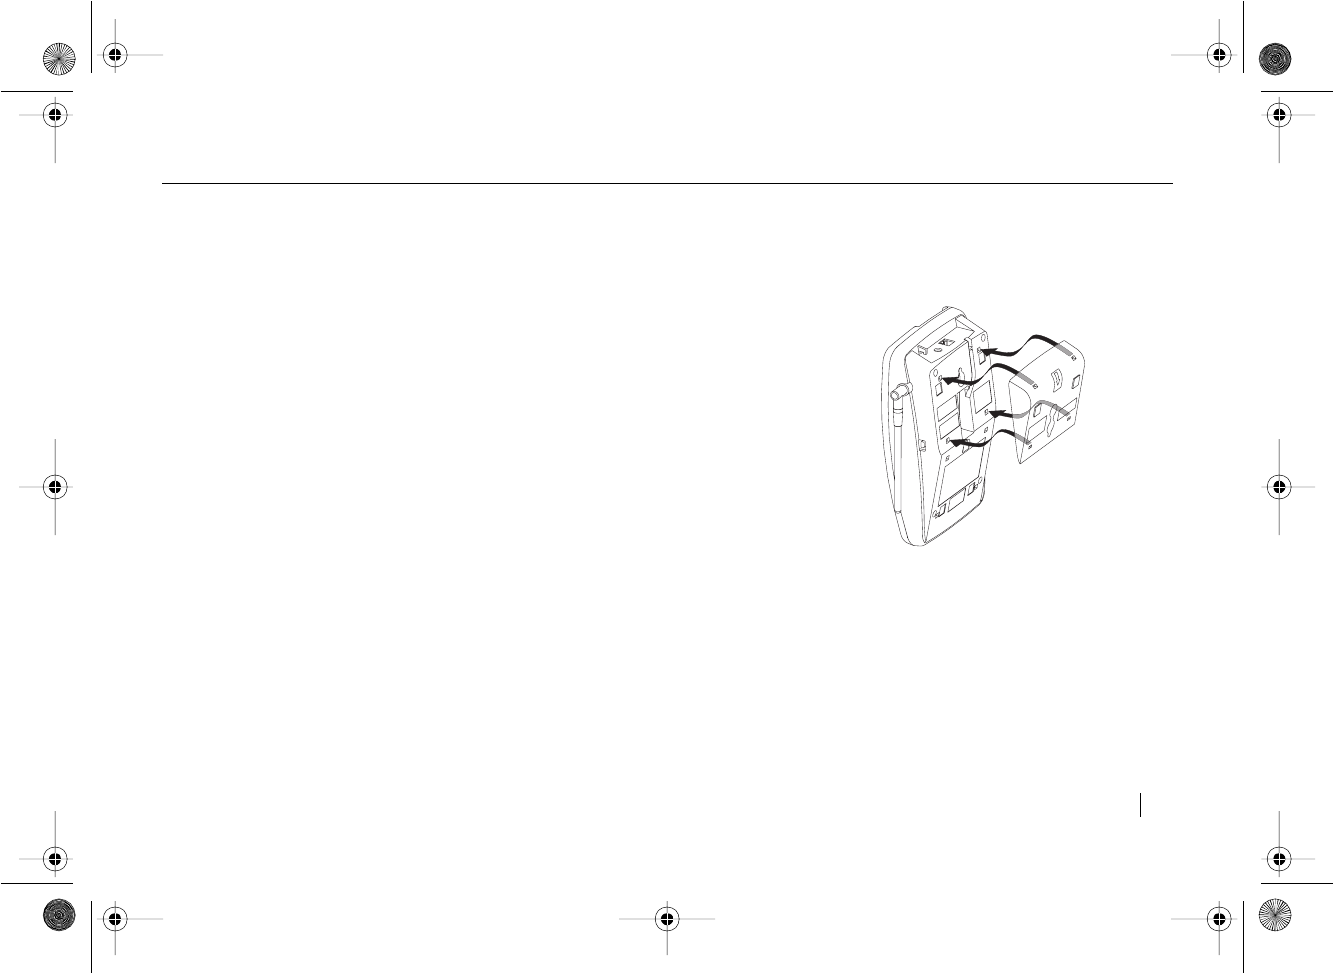
Step 3: Install Handset Battery
CAUTION
Risk of explosion if battery is replaced by an
incorrect type. Use only 3.6V 800mAh Nickel
Cadmium (NiCad) cordless telephone replacement
battery pack.
Do not attempt to open the sealed battery pack. All used
Ni-Cad batteries must be recycled or disposed of properly
in accordance with all applicable laws.
If this is the first time you are installing the
battery, the battery cover is not on the
handset. It is located in your accessory
packet. Skip step a.
a. Remove the battery cover by sliding it
out.
b. Locate the battery connector inside the
battery well. If you are replacing a
dead battery, remove the old battery
by pulling firmly on the battery cords.
c. Insert the battery plug into the
connector. It is polarized and only
inserts in one direction.
d. Place the battery in the battery well.
Make sure that the battery cords are
on top of the battery. Do not lay the
battery on top of the battery cords,
otherwise the cords may become
pinched.
e. Replace the battery cover by sliding it
into place.
f. Place the handset on the base and let
the battery charge for a full 12 hours
before using the telephone.
!
DC 9V
CL906.book Page 8 Friday, January 18, 2002 2:25 PM
CL906 - 900MHz Cordless
INSTALLING THE CL906 9
To maximize battery life, it is recommended that you leave
the handset out of the base after the handset battery has
been fully charged. Return the handset to the base and
recharge the battery when the LCD displays RECHARGE
BATTERY.
To ensure that the battery charges properly and remains
corrosion-free, periodically clean the charge contacts on the
handset and base with a soft cloth.
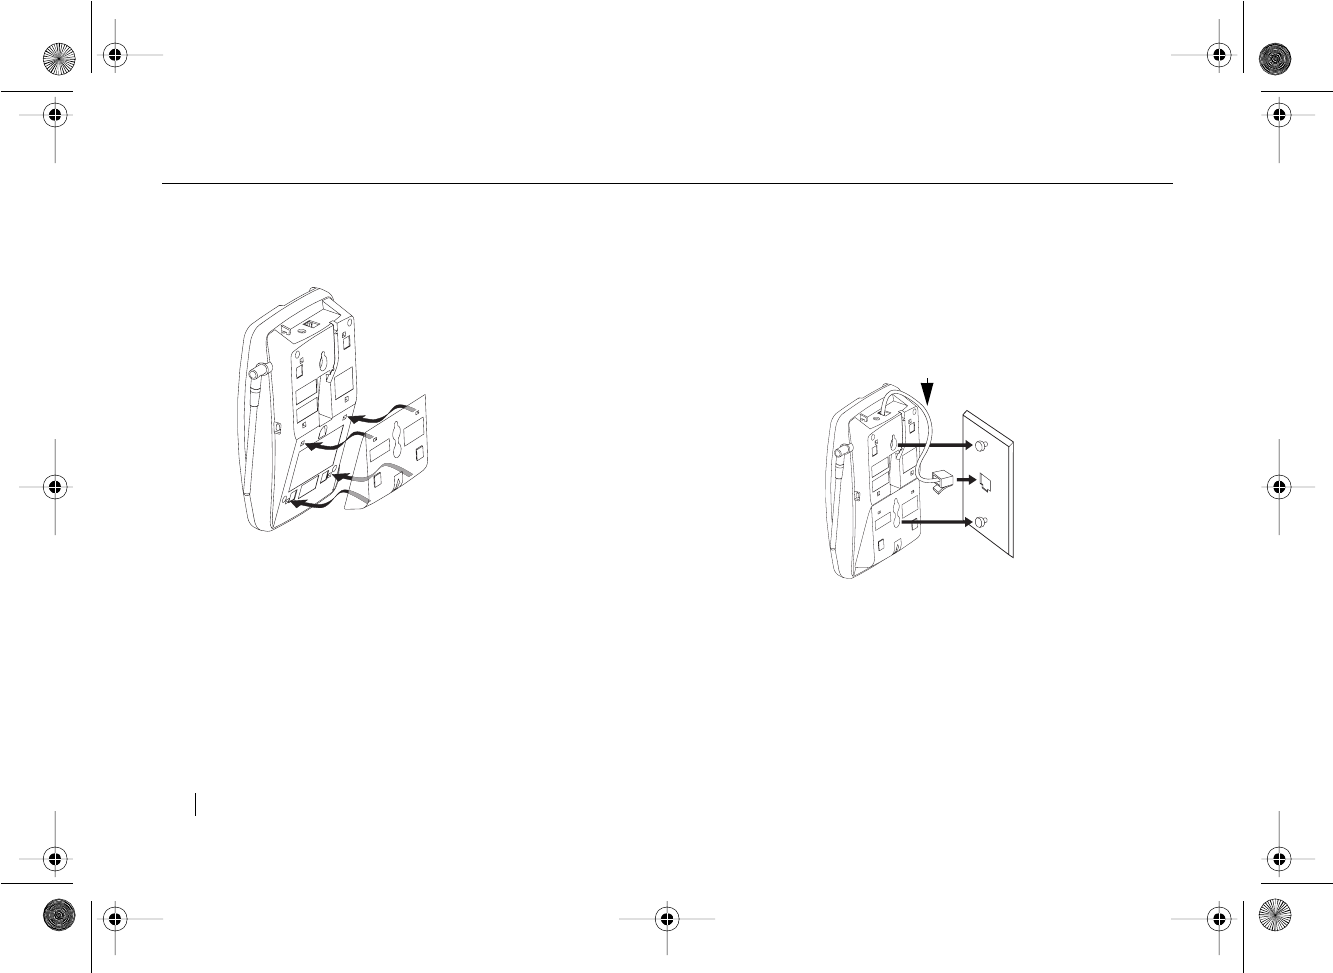
Step 4: Install the Line Cord
You can set your CL906 on a tabletop or mount the phone
on a wall.
TO USE ON A TABLETOP OR DESK
a. Position the
mounting
wedge so
that the
arrow on the
wedge is
pointing
down.
b. Place the
wedge over
the upper
portion of the
bottom of the
base so the
arrow points toward the center of the phone.
c. Install the wedge by aligning it over the holes
and pressing down and in the opposite
direction of the arrow until it snaps into
place.
d. Take the long phone cord that comes with the
phone and plug one end into the jack labeled
TEL LINE.
Desktop Mounting
CL906.book Page 9 Friday, January 18, 2002 2:25 PM
CL906 - 900MHz Cordless
10 INSTALLING THE CL906
e. Take the remaining end and plug it into the wall
phone jack.
TO MOUNT ON A WALL
a. Remove the
mounting
wedge.
b. Position the
wedge so that
the arrow on
the wedge is
pointing up.
c. Place the
wedge over
the lower
portion of the
bottom of the
base so the
arrow points
toward the center of the phone.
d. Install the wedge by aligning it over the holes
and pressing down and in the opposite
direction of the arrow until it snaps into
place.
e. Plug the short phone cord into the phone jack
marked TEL LINE.
f. Thread the phone cord through the open
channel in the base.
g. Plug the other end of the phone cord into the
wall phone jack.
h. Use the gap on the underside of the base to
gather any excess cord.
i. Hang the base over the installation hooks (wall
plate not supplied).
REMOVING THE MOUNTING WEDGE
a. Remove the mounting wedge from the bottom
of the base by placing your thumb at the top
of the arrow on the mounting wedge and
pressing down in the direction of the arrow.
Wall Mounting
Short Telephone Cord
CL906.book Page 10 Friday, January 18, 2002 2:25 PM
CL906 - 900MHz Cordless
FEATURES AND CONTROLS 11
FEATURES AND CONTROLS
PAGE
DIR CALLS 7-10-11 SERVICES
VOICE
MAIL
DELETE
SET UP
HOLD
VOLUME / REVIEW
TALK
FLASH CHAN REDIAL
PAUSE
̈
̇
IN USE / CHARGE
VOICEMAIL
SMITH JOHN
555-1234
1/12 11:59 29
PM
Directory Key
Delete/Mute Key
Hold/Setup Key
Talk Key/Light
Dial Pad
Channel Key
Flash Key
Redial/Pause Key
Calls Key
7-10-11 Key
Services Key
Voicemail Light
In Use / Charge Light
Page Key
Volume/Review Keys
New Calls/
Voice Mail Light
Headset Jack
CL906.book Page 11 Friday, January 18, 2002 2:25 PM

CL906 - 900MHz Cordless
12 FEATURES AND CONTROLS
CONTROLS AND FEATURES
Your CL906 comes with a handset and a base. The handset
can be placed in the base either facing up or down.
BASE
■ PAGE k ey is a homing system for finding the handset.
If you press the PA G E key, the handset beeps for 20
seconds.
■ VOICE MAIL light blinks when you have Voice Mail
messages, if you subscribe to your local telephone
company’s Voice Mail service.
■ IN USE / CHARGE light comes on when the phone is
in use or the handset is in the base.
HANDSET
■ DIR key is used to enter and retrieve numbers in the
Directory.
■ CALLS key is used to access Caller ID information
stored in memory.
■ 7-10-11 key allows you to modify the format of a call in
a Call Record so that it will be in the correct format to
dial from your phone.
■ SERVICES key allows you to access a subscribed
service offered by your phone company.
■ DELETE / MUTE key is used to erase digits on the
display. It can also delete single or multiple entries
from the Call Log and Directory. The DELETE / MUTE
key also mutes when pressed during a call.
■ ̇VOLUME / REVIEW ̈keys allow you to scroll
through menu options and adjust the ringer and
handset volume.
■ NEW CALL / VOICE MAIL light tells you when you have
new Caller ID information to review or a Voice Mail
message.
■ TALK key turns the phone on and off and also dials
the number on the display.
■ TALK light tells you that your phone is in use.
■ HOLD / SETUP key is used to place a call on hold.
This key is also used to access the programmable
functions of your phone.
■ VOICE MAIL key allows you to access your voice mail
box with one touch.
■ Dial Pad is used in the conventional manner for
dialing.
■ FLASH key allows Call Waiting subscribers to switch
between two calls.
■ CHAN key allows you to change channels in TALK
mode.
■ REDIAL / PAUSE key allows you to redial your last
outgoing call or insert a pause in a number when
storing numbers in the Directory. This key also
supports editing when dialing network services or
during Voice Mail programming.
■ Headset Jack allows for hands-free use of your
phone. You can use any standard headset with a
2.5mm connector.
CL906.book Page 12 Friday, January 18, 2002 2:25 PM
CL906 - 900MHz Cordless
FEATURES AND CONTROLS 13
PERSONALIZING YOUR PHONE
To enter the setup mode, press and hold the HOLD / SETUP
key until you see SELECT LANGUAGE displayed
1. SELECT LANGUAGE
Select display language, English or Spanish.
- Press 1 to select ENG (English)
- Press 2 to select ESP (Espanol)
2. VOICEMAIL
Activate / deactivate one-touch Voice Mail access.
- Press 1 to select ON
- Press 2 to select OFF
3. SETUP VMAIL?
Setup or make changes to your Voice Mail box.
- Press 1 to select YES. (Proceed to step a.
below)
- Press 2to select NO. (Proceed to setup Ring
Tone)
a. ENTR VM ACCESS is displayed. Enter your
voice mail access number and press
HOLD / SETUP.
b. #3 SEC PAUSES? is displayed.You can enter
multiple 3 second pauses after entering your
voice mail access number. These pauses
allow time for the voice mail system to
answer before your password is entered.
Enter the number of three second pauses
desired and press HOLD / SETUP.
c. VM PASSWORD? is displayed. Enter your voice
mail password and press HOLD / SETUP.
NEED TO KNOW
If you have made an error while you are entering
data, simply press DELETE until the screen is
blank and then reenter the number.
4. RING TONE 1-5
Select the way the ringer sounds on the handset. You can
choose from one of five different ringing sounds. Enter a
number between 1 and 5 to hear the sounds. You can
continue to experiment with different ring rounds. The phone
retains your latest setting. Press HOLD / SETUP.
5. RINGER ON?
Turn ringer on or off.
- Press 1 to select ON.
- Press 2 to select OFF.
6. DIAL METHOD
Select dial method, tone or pulse/rotary mode.
- Press 1 to select TONE.
CL906.book Page 13 Friday, January 18, 2002 2:25 PM

CL906 - 900MHz Cordless
14 FEATURES AND CONTROLS
- Press 2 to select PULSE.
7. HOME AREA CODE
Set the home are code for Caller ID dial back.
HOME AREA CODE is displayed. Enter your Home Area Code
and press HOLD / SETUP.
CL906.book Page 14 Friday, January 18, 2002 2:25 PM

CL906 - 900MHz Cordless
USING THE CL906 15
USING THE CL906
ANSWERING CALLS
You can answer a call two ways:
a. Press TAL K or any key on the handset.
b. Press FLASH to answer Call Waiting calls.
DIALING CALLS
a. Press TAL K .
b. Use the number pad to dial the phone number.
Listen for a connection.
c. To end the call, press TA L K or replace the
handset on to the base.
PRE-DIALING
When no digits are showing on the display, you can pre-dial
from the handset.
a. Use the keypad on the handset to enter a
phone number or special characters such as
a 3-second pause, #, and *.
b. Check the number on the display. If the
number is wrong, press DELETE to
backspace.
c. Press TALK to dial the telephone number.
d. The channel number and then the call timer, is
displayed on the screen.
e. To end the call, press TA LK or replace the
handset on the base.
REDIAL
Press REDIAL. The phone will automatically dial out the last
number called with one touch.
PAGING AND FINDING THE HANDSET
Should you misplace the handset, you can locate it by
pressing PAGE on the base. The handset beeps for 20
seconds, or until you either press a key on the handset or
press the PAGE key again. If the handset does not beep, the
handset battery may need to be recharged.
USING FLASH
Press the FLASH key to switch between calls if you
subscribe to Call Waiting. The first call is placed on hold
while you are on the second call.
USING TEMPORARY TONE SERVICE
If you do not have Tone service in your local area, but need
to set your telephone to Tone for interacting with bank and
other automated services, you can temporarily override your
CL906.book Page 15 Friday, January 18, 2002 2:25 PM

CL906 - 900MHz Cordless
16 USING THE CL906
Pulse dialing setting to Tone by pressing the * key.
Dial into the bank or other automated service and, after
receiving an answer, press * during the call and the phone
will temporarily switch to Tone service for the duration of the
call. The phone automatically returns to Pulse service when
you end the call.
ADJUSTING THE HANDSET VOLUME
You can adjust the volume of the handset from LOW to HIGH
in increments by pressing the ̇ VOLUME / REVIEW ̈ keys
on the front of the handset.
The HIGH setting (Level 4) is primarily for hearing-aid
compatibility. You may experience a slight decline in audio
clarity when the volume is set to HIGH.
READING THE CALL TIMER
When you make a call, a timer is shown on the display. The
timer counts the entire length of the time you are on the
phone. When the timer goes past 59 minutes and 59
seconds, it starts over from 01 hours and 00 minutes.
FINDING CLEAR RECEPTION
Your phone automatically selects a channel at the beginning
of a call for the best reception. If you are experiencing
interference, you can either move closer to the base, or
press CHAN on the handset until you find better reception.
GOING OUT OF RANGE
Your CL906 handset communicates with its base through a
radio link. It is possible for the handset to be too far away
from the base. The reception can also be affected by
weather, power lines, or even another cordless telephone.
If the handset is too far away from the base, you might have
a problem talking to your caller or you may lose your
connection. The handset beeps whenever you are on the
phone and the handset moves out of range from the base.
Simply walk back toward the base until you are no longer out
of range. If you do not mover closer to the base within 20
seconds, you will lose your connection.
USING NETWORK SERVICES
The CL906 telephone is configured to access all of the
convenient network services of your local telephone
company with the touch of a button. You must subscribe to
each service in order for all of the features of your CL906
telephone to work. For information on services and
packages offered in your area, contact your local telephone
company.
To use any of these services,
a. Press the SERVICES key.
b. Press VOLUME / REVIEW ̈ to scroll through
the services until the desired service is
displayed.
CL906.book Page 16 Friday, January 18, 2002 2:25 PM

CL906 - 900MHz Cordless
USING THE CL906 17
c. Press the TALK key to activate the service.
VOICE MAIL
Voice Mail service records voice messages when you are
away from your phone or while you are on the phone. The
VOICE MAIL / NEW CALL light on the handset and the VOICE
MAIL light on the base come on when you have messages in
your mailbox. Once you have programmed your Voice Mail
with your access number and password, you can get your
messages with the touch of a button.
You must subscribe to Voice Mail from your local telephone
company in order to use this feature.
USING THE VOICE MAIL KEY
If you have programmed your phone as described in “Setup
Vmail?” on page 13, press the VOICE MAIL key to access
your mailbox. The screen shows the access number as it is
being dialed. The password will then be dialed as it was
programmed above. This will take you directly into your
mailbox. Follow the prompts to get your messages.
USING CALLER ID AND CALL WAITING ID
Among the best features of your phone are the Caller ID and
Call Waiting ID functions. These allow you to see information
about an incoming call before you pick up the phone. To use
these features, you must subscribe to them from your local
telephone company.
Caller ID allows you to see information about a call BEFORE
you answer the phone.
Call Waiting ID lets you know who is calling even when you
are on the phone. In addition to hearing the Call Waiting
beep you have information you need to choose whether or
not to answer a waiting call. With Call Waiting ID you use
the FLASH key to transfer between calls.
With these services from your phone company, the CL906
displays the caller’s information and stores it in the call
records.
Before you use these features, you must first subscribe to
the services through your local telephone company. Contact
your telephone company representative for more
information and availability in your area. Caller ID and Call
Waiting ID may not be available in all areas or on all calls.
RECEIVING NEW CALLS
When you receive a new call the display shows the RINGING
message.The call record is displayed after the first ring.
DURING A CALL
If a Call Waiting call is coming in while the phone is in use,
the display shows the following Call Waiting ID information:
■ The caller’s name (if available)
■ The caller’s telephone number (if available)
■ The time and date of the call
■ A record number to show the sequence of calls
CL906.book Page 17 Friday, January 18, 2002 2:25 PM
CL906 - 900MHz Cordless
18 USING THE CL906
VIEWING CALL RECORDS
To review a call record:
a. Press CALLS key
b. Press ̇ VOLUME / REVIEW ̈ to move
through the records.
When you reach either end of the call records, you see the
END OF LIST message. If you continue to press
̇ VOLUME / REVIEW ̈, you scroll through the list again.
DELETING CALL RECORDS
You can either delete a single record or you can delete all
call records at one time.
To delete a single call record:
a. Locate the call record you want to delete.
b. Press DELETE and the call record is deleted.
To delete all call records:
a. Locate any call record.
b. Press and hold the DELETE key. The screen
prompts DELETE ALL?.
c. Press DELETE to delete all call records.
DIALING FROM CALL RECORDS
You can use your Call Records as a short-cut method of
dialing.
a. Press CALLS key
b. Press ̇ VOLUME / REVIEW ̈ to find the
desired call record.
NEED TO KNOW
Make sure that the phone number displayed
reflects the appropriate dialing sequence. For
example: if the phone number uses a 1 plus the
area code and number, make certain that all
these numbers are included, otherwise the
number will not dial correctly.
c. If this is the correct calling sequence for this
call press TALK and the number will
automatically be dialed.
d. If the number showing is not the proper
dialing sequence, press the 7-10-11 key to
change between the different formats and
choose the right format to dial the number
from your phone.
e. Press TALK and the number will
automatically be dialed.
NEED TO KNOW
When the call contains a number other than the
area code and a 7-digit phone number, you will
CL906.book Page 18 Friday, January 18, 2002 2:25 PM

CL906 - 900MHz Cordless
USING THE CL906 19
not have the option of using the Dialing From Call
Records feature.
SWITCHING BETWEEN CALLS
To put your current call on hold and answer the new call,
press FLASH when you hear the Call Waiting beep. The first
call is placed on hold and you are connected to the new call.
Press FLASH again to return to the first call and put the
second call on hold. You can alternate between calls as
often as necessary. Your callers will be disconnected when
they hang up.
USING THE DIRECTORY
MAKING A CALL
a. Press the DIR key on the handset.
DIRECTORY is displayed.
b. Use the ̇ VOLUME / REVIEW ̈ keys to find
the directory record desired.
c. Press TA LK . The TALK indicator lights and
the CL906 automatically dials the displayed
phone number.
DELETING A DIRECTORY RECORD
a. Press the DIR key on the handset.
b. Use the ̇ VOLUME / REVIEW ̈ keys to find
the directory record desired.
c. Press DELETE.
d. DELETE? is displayed
e. To delete the record, press DELETE again.
CREATING YOUR DIRECTORY LIST
You can create a personal phone directory containing up to
20 names and numbers. Once you create your personal
phone directory, you can automatically dial from the
directory.
You can create your directory in two ways:
■ Copy a Caller ID record to the directory.
■ Create a new directory record.
COPYING A CALLER ID RECORD TO THE DIRECTORY
a. Press the CALLS key.
b. Use the ̇ VOLUME / REVIEW ̈ keys to find
the call record desired.
c. Press the DIR key. EDIT NAME? is displayed.
d. To save the name as is, press the DIR key. To
edit the name, press DELETE to delete all
the characters. See “Entering Characters
Using the Dial Pad” on page 21 to enter a
new name and the press the DIR key.
e. ENTER LOCATION is displayed.
CL906.book Page 19 Friday, January 18, 2002 2:25 PM
CL906 - 900MHz Cordless
20 USING THE CL906
f. The next available directory location will
automatically be displayed. To accept the
next location given, press DIR. STORED is
displayed.
To select a different directory location, enter
a two digit number (01-20) and press DIR. If
there is a name/number stored there,
ERASE ORIGINAL? is displayed. Press DIR
to erase the original or enter a new location
and then press DIR. STORED is displayed.
NEED TO KNOW
DIRECTORY FULL is displayed when there are no
memory locations left. You need to replace an existing
entry if you want to put a new entry in. Continue
entering the directory record by selecting the entry you
wish to replace and storing the new number there.
CREATING A NEW DIRECTORY RECORD
You can enter up to 15 characters in the name field and 15
characters in the number field.
a. Press the DIR key. DIRECTORY is displayed.
b. Enter the number you wish to store (up to 15
digits) and press the DIR key.
c. Enter the name you wish to store (up to 15
characters) with this number by using the
dial pad. See “Entering Characters Using the
Dial Pad”.
NEED TO KNOW
If you make a mistake, press DELETE. Each time you
press DELETE, the last letter or number will be
deleted.
d. Press the DIR key.
e. ENTER LOCATION is displayed.
f. The next available directory location will
automatically be displayed. To accept the
next location given, press DIR. STORED is
displayed.
To select a different directory location, enter
a two digit number (01-20) and press DIR. If
there is a name/number stored there,
ERASE ORIGINAL? is displayed. Press DIR
to erase the original or enter a new location
and then press DIR. STORED is displayed.
NEED TO KNOW
DIRECTORY FULL is displayed when there are no
memory locations left. You need to replace an existing
CL906.book Page 20 Friday, January 18, 2002 2:25 PM
CL906 - 900MHz Cordless
USING THE CL906 21
entry if you want to put a new entry in. Continue
entering the directory record by selecting the entry you
wish to replace and storing the new number there.
ENTERING CHARACTERS USING THE DIAL PAD
Each number is assigned a set of letters. Press the
corresponding number until the desired letter is displayed.
For Example: to enter JOHN: press 5 once; press 6 three
times; press 4 two times. Finally, press 6 two times. If the
next desired letter is on the same key as the current letter,
press the VOLUME / REVIEW ̈ key to move to the next
position. Press VOLUME / REVIEW ̈ to enter a blank space.
To enter a space, press the 1 key until a space is displayed.
NEED TO KNOW
It is important to note: The phone dials the number
exactly as it is stored in the directory.
CL906.book Page 21 Friday, January 18, 2002 2:25 PM

CL906 - 900MHz Cordless
22 USING THE CL906
READING DISPLAY MESSAGES
The CL906 informs you of incoming caller information or the
status of phone options by displaying the following messages
■ PRIVATE
The caller has purposely chosen to block his/her
phone number.
■ UNAVAILABLE
Caller ID information is not available from the caller’s
area.
■ END OF LIST
You have reached the end of the call records.
Press ̇ VOLUME / REVIEW ̈ to see other records.
■ NO CALLS
There are no call records stored in memory.
■ INCOMPLETE DATA
The Caller ID information is incomplete. This message
usually indicates temporary interference. There is no
problem with the phone.
■ DELETE ALL?
To d elete all call records.
■ LONG DISTANCE
The message sent is a long distance call.
■ RINGING
There is an incoming call.
■ RECHARGE BATTERY
The handset battery is getting low. Place the handset
on the base in order to recharge the battery.
CL906.book Page 22 Friday, January 18, 2002 2:25 PM

CL906 - 900MHz Cordless
TROUBLESHOOTING 23
TROUBLESHOOTING
PROBLEM/SOLUTION
■ No dial tone
- Verify that the line cord is connected and
secure.
- Check that the handset battery pack is fully
charged and plugged in.
■ Phone does not dial out
-Check that TONE / PULSE is set correctly in “Dial
Method” on page 13.
- Call your phone company to check the type of
dialing service you have.
■ The phone has static or fades in and out
- Change channels. See Finding Clear Reception
on page 16.
- Check to see that you are not out of range of
the base.
- Check that the handset battery pack is fully
charged.
-Change the base location.
■ Blank or faint screen
- Place the handset in the cradle for several
seconds. Ensure the handset is making contact
in the cradle.
- Check the AC adapter. Be sure the adapter is
not damaged and that it is securely plugged
into a working outlet.
- Check that the wall plug is not controlled by a
wall switch.
- Replace or recharge the battery. See Install
Handset Battery on page 8.
■ INCOMPLETE DATA
- Call information was corrupted before reaching
the unit.
- Normal static on the telephone line can cause
an INCOMPLETE DATA message. If the
condition persists, check with the phone
company to ensure that there is not a problem
with your phone line.
■ Caller ID/Call Waiting ID does not work properly
-Verify that Caller ID service is active. Call your
phone company’s business office to ensure that
your services are active.
- You can verify that Call Waiting is working by
the double tones, indicating an incoming call.
This is provided that an extension phone is not
being used.
CL906.book Page 23 Friday, January 18, 2002 2:25 PM

CL906 - 900MHz Cordless
24 TROUBLESHOOTING
■ Charge light does not work
- Check the AC adapter. Verify the adapter is not
damaged and that it is securely plugged into a
working outlet.
- Check that the wall outlet is not controlled by a
wall switch or a power strip.
■ Handset does not charge
- Check that the AC adapter is plugged in and
operating correctly.
- See Install Handset Battery on page 8.
■ Voice Mail dials my password before the system is
ready for it
- Add more pauses to the dialed number. See
“Setup Vmail?” on page 13.
■ Phone still does not work after going through above
systems
- Try resetting the phone. Unplug and plug in the
AC adapter. Disconnect and reconnect the
handset battery. Place the handset on the base
for about 2 seconds or until you see that the
IN USE / CHARGE light comes on steadily.
CL906.book Page 24 Friday, January 18, 2002 2:25 PM