Cidco Communications D93X 900MHz Digital Spread Spectrum Cordless Phone User Manual 106389 01A
Cidco Communications Corporation 900MHz Digital Spread Spectrum Cordless Phone 106389 01A
User Manual

TITLE:
DOC NO.
REVISION
SHEET 1 OF
:
:
:
E-mail address: ________________@cidcocom.com
Contact________________ Phone___________ Fax___________
Modem________________
Fold ❑Wrap-around ❑
FINISH
Collate ❑Slip sheet ❑
Staple ❑
Drill ❑Score ❑Perf ❑
Saddle stitch ❑
PMS _______
Wire O ❑GBC ❑
Spot color ❑
INK
Black ❑
BINDING
Color separations ❑
SPECIAL INSTRUCTIONS
DATE
Text stock______________
Sample attached ❑Finished size ________
1Sided❑2 Sided ❑
Cover stock____________ Insert stock_______________
PA PE R
Color _______
Text stock (Asia)______________ or Engineering Approved Equivalent
FILM/FILES CHECKED BY:________________________________________________
DATE:__________________________________________________________________
:
SOURCE
Film ❑ Adobe PDF ❏
D936/D937-01 English/ Spanish
User Manual
106389-01
A
Heather Unger 408.782-8209 408.782-8270
heather.unger
70 lb glossy
70 lb glossy
115 gm
white 8.0 x 5.5 in.
x
x
Trim for Bleed Tabs
PDF file provided only
Print in Black and White (no color)
8/30/02
3
Heather Unger
August 30, 2002
x
X
x

TITLE:
DOC NO.
REVISION
SHEET OF
:
:A
cover blank TOC Introductio
n
Safety
Instruction
s
Installing
the D937
Features
and
Controls
Using the
D937
Troublesh
ooting
FCC and
Warranty
FCC y
Garantia
Resolucio
nde
Problemas
Uso del
D937
i ii iii iv v vi
12 34 56 78
910111213141516
17 18 19 20 21 22 23 24
25 26 27 28 28 27 26 25
24 23 22 21 20 19 18 17
16 15 14 13 12 11 10 9
D936/D937-01 English/Spanish
User Manual
106389-01
23
TITLE:
DOC NO.
REVISION
SHEET OF
:
:A
Funciones
y
Controles
Instalacion
Instruccio
nes de
Seguridad
Introducci
on
Tabla de
contenido
blank Cover
87 65 43 21
vi v iv iii ii i
D936/D937-01 English/Spanish
User Manual
106389-01
33
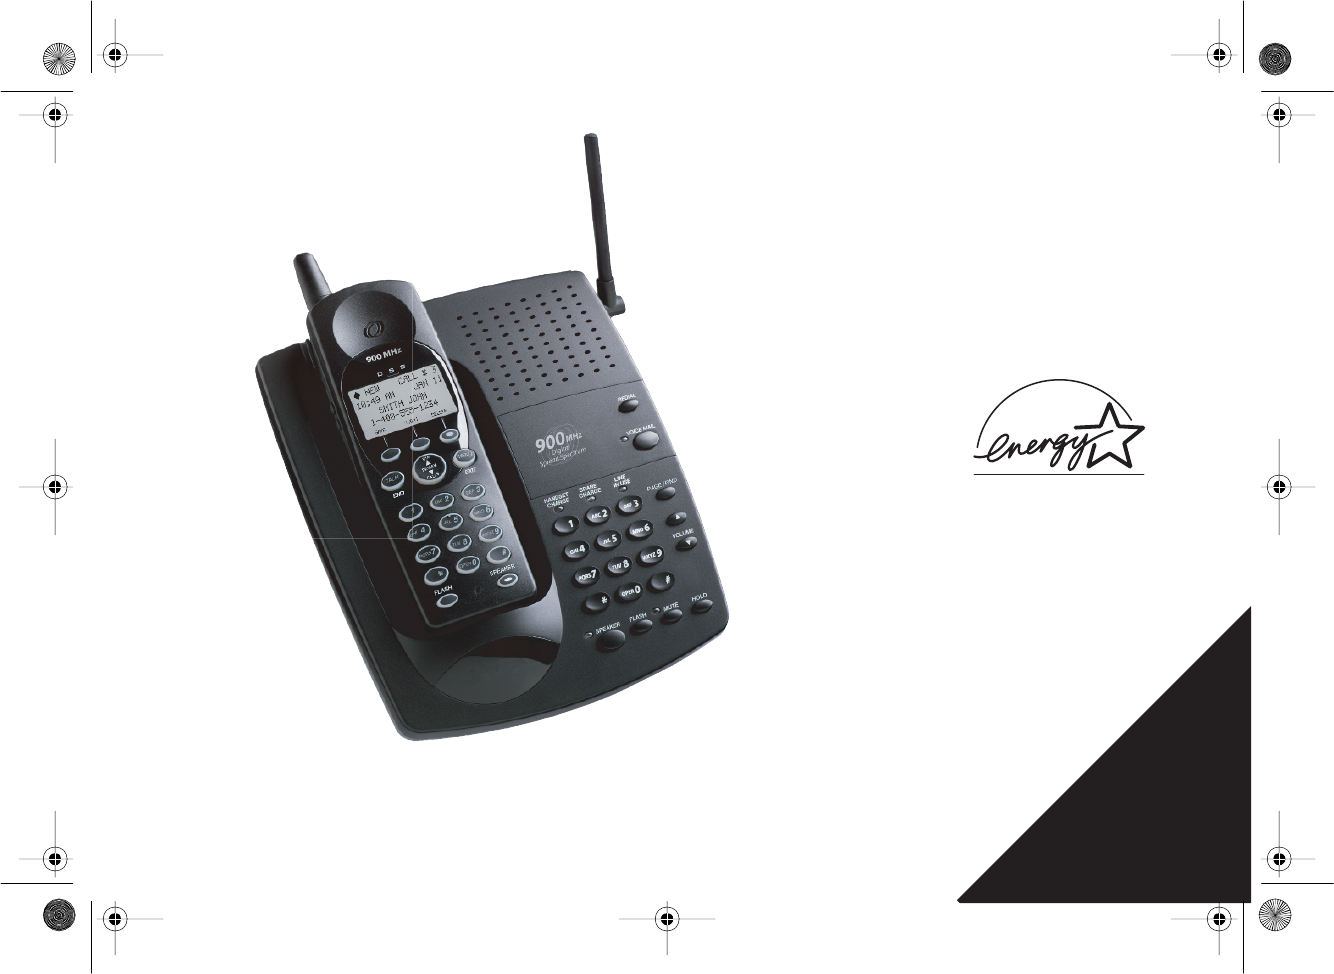
User Manual
900 MHz
DSS
106389-01A
D936/D937
D936-937.book Page 1 Friday, August 30, 2002 10:24 AM

D936-937.book Page 2 Friday, August 30, 2002 10:24 AM

TABLE OF CONTENTS i
TABLE OF CONTENTS
■ INTRODUCTION iii
D936 and D937 Features . . . . . . . . . . . . . . . . . . . . . . . . . . . . . . . . . . . . . . . . iii
D937 Only Feature. . . . . . . . . . . . . . . . . . . . . . . . . . . . . . . . . . . . . . . . . . . . . iii
■ SAFETY INSTRUCTIONS iv
Safety Symbols . . . . . . . . . . . . . . . . . . . . . . . . . . . . . . . . . . . . . . . . . . . . . . . . iv
Safety Instructions . . . . . . . . . . . . . . . . . . . . . . . . . . . . . . . . . . . . . . . . . . . . . . iv
Telephone Wiring and Jack Installation. . . . . . . . . . . . . . . . . . . . . . . . . . . . . . v
Batteries . . . . . . . . . . . . . . . . . . . . . . . . . . . . . . . . . . . . . . . . . . . . . . . . . . . . . v
■ INSTALLING THE D936/D937 1
Check the Contents. . . . . . . . . . . . . . . . . . . . . . . . . . . . . . . . . . . . . . . . . . . . . 1
Choose a Location for the Base Unit . . . . . . . . . . . . . . . . . . . . . . . . . . . . . . . . 1
Plug in the Adapter . . . . . . . . . . . . . . . . . . . . . . . . . . . . . . . . . . . . . . . . . . . . . 1
Install the Batteries . . . . . . . . . . . . . . . . . . . . . . . . . . . . . . . . . . . . . . . . . . . . . 2
Install the Telephone Line Cord and
Desktop/Wall Mount Wedge . . . . . . . . . . . . . . . . . . . . . . . . . . . . . . . . . . . 3
Removing the Desktop / Wall Mount Wedge . . . . . . . . . . . . . . . . . . . . . . . . . 4
Attach the Belt Clip. . . . . . . . . . . . . . . . . . . . . . . . . . . . . . . . . . . . . . . . . . . . . 4
Attach Headset (Optional) . . . . . . . . . . . . . . . . . . . . . . . . . . . . . . . . . . . . . . . 4
■ FEATURES AND CONTROLS 5
Handset Modes. . . . . . . . . . . . . . . . . . . . . . . . . . . . . . . . . . . . . . . . . . . . . . . . 7
Personalizing your Phone . . . . . . . . . . . . . . . . . . . . . . . . . . . . . . . . . . . . . . . . 8
D936-937.book Page i Friday, August 30, 2002 10:24 AM

ii TABLE OF CONTENTS
■ USING THE D936/D937 12
Answering Calls . . . . . . . . . . . . . . . . . . . . . . . . . . . . . . . . . . . . . . . . . . . . . . 12
Dialing . . . . . . . . . . . . . . . . . . . . . . . . . . . . . . . . . . . . . . . . . . . . . . . . . . . . . 12
Pre-Dialing . . . . . . . . . . . . . . . . . . . . . . . . . . . . . . . . . . . . . . . . . . . . . . . . . . 12
Last Number Redial . . . . . . . . . . . . . . . . . . . . . . . . . . . . . . . . . . . . . . . . . . . 12
Adjusting the Volume . . . . . . . . . . . . . . . . . . . . . . . . . . . . . . . . . . . . . . . . . . 12
Timing Calls . . . . . . . . . . . . . . . . . . . . . . . . . . . . . . . . . . . . . . . . . . . . . . . . . 13
Temporary Tone Service . . . . . . . . . . . . . . . . . . . . . . . . . . . . . . . . . . . . . . . . 13
Locating a Lost Handset . . . . . . . . . . . . . . . . . . . . . . . . . . . . . . . . . . . . . . . . 13
Low Battery . . . . . . . . . . . . . . . . . . . . . . . . . . . . . . . . . . . . . . . . . . . . . . . . . 13
Using Hold . . . . . . . . . . . . . . . . . . . . . . . . . . . . . . . . . . . . . . . . . . . . . . . . . . 14
Using Mute. . . . . . . . . . . . . . . . . . . . . . . . . . . . . . . . . . . . . . . . . . . . . . . . . . 14
Using Network Services . . . . . . . . . . . . . . . . . . . . . . . . . . . . . . . . . . . . . . . . 14
Using the Intercom . . . . . . . . . . . . . . . . . . . . . . . . . . . . . . . . . . . . . . . . . . . . 14
Using Voicemail . . . . . . . . . . . . . . . . . . . . . . . . . . . . . . . . . . . . . . . . . . . . . . 15
Clearing the Voicemail Light. . . . . . . . . . . . . . . . . . . . . . . . . . . . . . . . . . . . . 15
Using Call Waiting ID (CWID) Options . . . . . . . . . . . . . . . . . . . . . . . . . . . . 15
Caller ID Records . . . . . . . . . . . . . . . . . . . . . . . . . . . . . . . . . . . . . . . . . . . . . 16
Directory Records . . . . . . . . . . . . . . . . . . . . . . . . . . . . . . . . . . . . . . . . . . . . . 17
Reading Display Messages . . . . . . . . . . . . . . . . . . . . . . . . . . . . . . . . . . . . . . 22
■ TROUBLESHOOTING 23
Problem / Solution . . . . . . . . . . . . . . . . . . . . . . . . . . . . . . . . . . . . . . . . . . . . 23
■ FCC AND WARRANTY 26
FCC Requirements . . . . . . . . . . . . . . . . . . . . . . . . . . . . . . . . . . . . . . . . . . . . 26
Warranty . . . . . . . . . . . . . . . . . . . . . . . . . . . . . . . . . . . . . . . . . . . . . . . . . . . 28
D936-937.book Page ii Friday, August 30, 2002 10:24 AM
D936/D937 - 900MHz Cordless
INTRODUCTION iii
INTRODUCTION
D936 AND D937 FEATURES
■ 900 MHz Digital Spread Spectrum
■ Caller ID/Call Waiting ID
■ Call Waiting ID Options
■ Speakerphone in handset and base
■ Intercom
■ Works in the event of a power failure
(when spare battery (optional) is installed and
charged)
■ New Voicemail Message Indicator
■ 50 Caller ID Records
■ 50 Directory Records
D937 ONLY FEATURE
■ Voice Announce Caller ID
■ Dedicated Keys on the Base: Hold, Mute, Speaker,
Voicemail, Page/Find, Flash and Redial
■ Backlit display and keypad on handset
■ Adjustable Ringer on both handset and base
■ Adjustable Volume Control for handset, handset
speakerphone and base speakerphone
■ Hearing-aid Compatible
■ English and Spanish
■ Headset Jack
■ Call timer
■ Single key redialing
The D936 and D937 are digital 900MHz cordless phones that incorporate your telephone company’s calling features, such as Caller
ID, Voicemail and Call Waiting ID, to provide powerful, full function cordless telephones. The D937 also has an exciting new feature -
Voice Announce. The Voice Announce feature allows you to hear the caller’s number or a short message you previously recorded
announcing the caller before you answer your phone.
The D936 and D937 are the same except for the Voice Announce feature. If the icon appears next to a paragraph or section,
that paragraph or section only applies to the D937. If no icon appears, the text applies to both versions of the phone. Please refer to
your quick start card for your model number.
VA - D937
D936-937.book Page iii Friday, August 30, 2002 10:24 AM
D936/D937 - 900MHz Cordless
iv SAFETY INSTRUCTIONS S- SAVE THESE INSTRUCTIONS -
SAFETY INSTRUCTIONS
SAFETY SYMBOLS
WARNING:
This symbol is intended to alert you to the presence of
uninsulated dangerous voltage within the product's
enclosure that might be of sufficient magnitude to
constitute a risk of electric shock. Do not open the
product's case.
CAUTION:
This symbol is intended to inform you that important
operating and maintenance instructions are included
in the literature accompanying this product.
NEED TO KNOW:
This symbol is intended to highlight important
information.
SAFETY INSTRUCTIONS
CAUTION
To reduce the risk of fire or injury to persons, read
and follow these instructions:
■ Read and understand all instructions.
■ Follow all warnings and instructions marked on the unit and in
the User Manual.
■ Use only the battery type recommended in this manual.
■ Unplug this telephone from the wall outlet before cleaning. Do
not use liquid or aerosol cleaners, just use a damp cloth for
cleaning.
■ Do not place this telephone on an unstable cart, stand, or
table. It could fall, causing serious damage or impede
operation.
■ Never place this telephone near or over a radiator or heat
register.
■ Only operate this telephone using the type of power source
listed on the marking label. If you are not sure of the power
supply of your home, consult your dealer or local power
company.
■ Do not overload wall outlets and extension cords as this can
result in the risk of fire or electrical shock.
■ Never push objects of any kind into this telephone as they can
touch dangerous voltage points or short out parts that could
result in a risk of fire or electrical shock.
■ Take the phone to a qualified technician when it requires
repair work or service.
■ To reduce the risk of electrical shock, do not disassemble the
telephone. Opening or removing covers can expose you to
dangerous voltages or other risks. Incorrect re-assembly can
cause electrical shock during subsequent use.
D936-937.book Page iv Friday, August 30, 2002 10:24 AM
D936/D937 - 900MHz Cordless
SAFETY INSTRUCTIONS v
■ Unplug this telephone from the wall outlet and refer servicing
to qualified service personnel under the following conditions:
- If the power supply cord or plug is damaged or
frayed.
- If liquid is spilled into the unit.
- If the unit is exposed to water.
- If the unit does not operate normally by following the
operating instructions.
- If the unit is dropped or the casing is damaged.
- If the unit exhibits a distinct change in performance.
■ Avoid using the telephone during an electrical storm. There
can be a slight risk of electrical shock from lightning.
■ Do not use the telephone to report a gas leak if the leak is in
the vicinity of the phone
■ Ultimate disposal of this product should be handled according
to all national laws and regulations.
WARNINGS
WARNING
To prevent fire or shock hazard, do not expose this
product to rain or moisture.
CAUTION
To reduce the risk of electric shock, DO NOT remove
cover or back. No user serviceable parts inside.
Refer servicing to qualified personnel.
CAUTION
Changes or modification to this device not expressly
approved could void the user’s authority to operate
this equipment.
TELEPHONE WIRING AND JACK INSTALLATION
■ Use caution when installing or modifying telephone lines.
■ Never install telephone wiring during an electrical storm.
■ Never install telephone jacks in wet locations unless the jack is
specifically designed for wet locations.
BATTERIES
CAUTION
To reduce the risk of fire, use only 3.6V 850mAh Nickel
Cadmium (Ni-Cad) cordless telephone replacement
battery pack.
■ Do not dispose of the battery pack in a fire as it will explode.
Check with local codes for proper battery disposal
regulations.
■ Do not open or mutilate the battery pack. Released electrolyte
is corrosive and can cause damage to the eyes or skin. It can
be toxic, if swallowed.
■ Avoid contact with rings, bracelets, keys or other metal
objects, when handling batteries. These objects could short
out the battery or cause the conductor to overheat resulting
in burns.
S- SAVE THESE INSTRUCTIONS -
D936-937.book Page v Friday, August 30, 2002 10:24 AM
D936/D937 - 900MHz Cordless
vi SAFETY INSTRUCTIONS
■ Do not attempt to recharge the battery pack by heating it.
Sudden release of battery electrolyte can cause burns or
irritation to the eyes or skin.
■ Remove the battery pack if you do not plan to use the phone
for several months at a time. The batteries could leak over
that time.
■ Discard “dead” battery packs as soon as possible because
they are likely to leak into the phone.
■ Do not store this phone or battery pack in a high temperature
area. Batteries stored in a freezer or refrigerator should be
protected from condensation during storage and defrosting.
Battery packs should be stabilized at room temperature
before using.
■ Your battery pack is rechargeable and can be
recycled once it outlives its usefulness.
Depending upon your local and state law, it
might be illegal to dispose of this battery into a
municipal waste system. Check with your local
solid waste company or call 1-800-8-BATTERY
for information on Ni-Cd battery recycling and
disposal restrictions in your area.
S- SAVE THESE INSTRUCTIONS -
D936-937.book Page vi Friday, August 30, 2002 10:24 AM
D936/D937 - 900MHz Cordless
INSTALLING THE D936/D937 1
INSTALLING THE D936/D937
CHECK THE CONTENTS
Verify that the following items are enclosed:
■ Telephone Base and Handset
■ Long Line Cord
■ Short Line Cord for Wall Mounting
■ Desktop/Wall Mount Wedge
■ AC Adapter
■ One battery pack
■ Spare Battery (optional)
■ Belt Clip
■ User Manual
■ Quick Start Card
CHOOSE A LOCATION FOR THE BASE UNIT
The base should be away from all other electronic
equipment such as a personal computer, microwave,
stereo, or television. It is also a good idea to place the unit
away from noisy areas, or from heat sources such as a
radiator or direct sunlight.
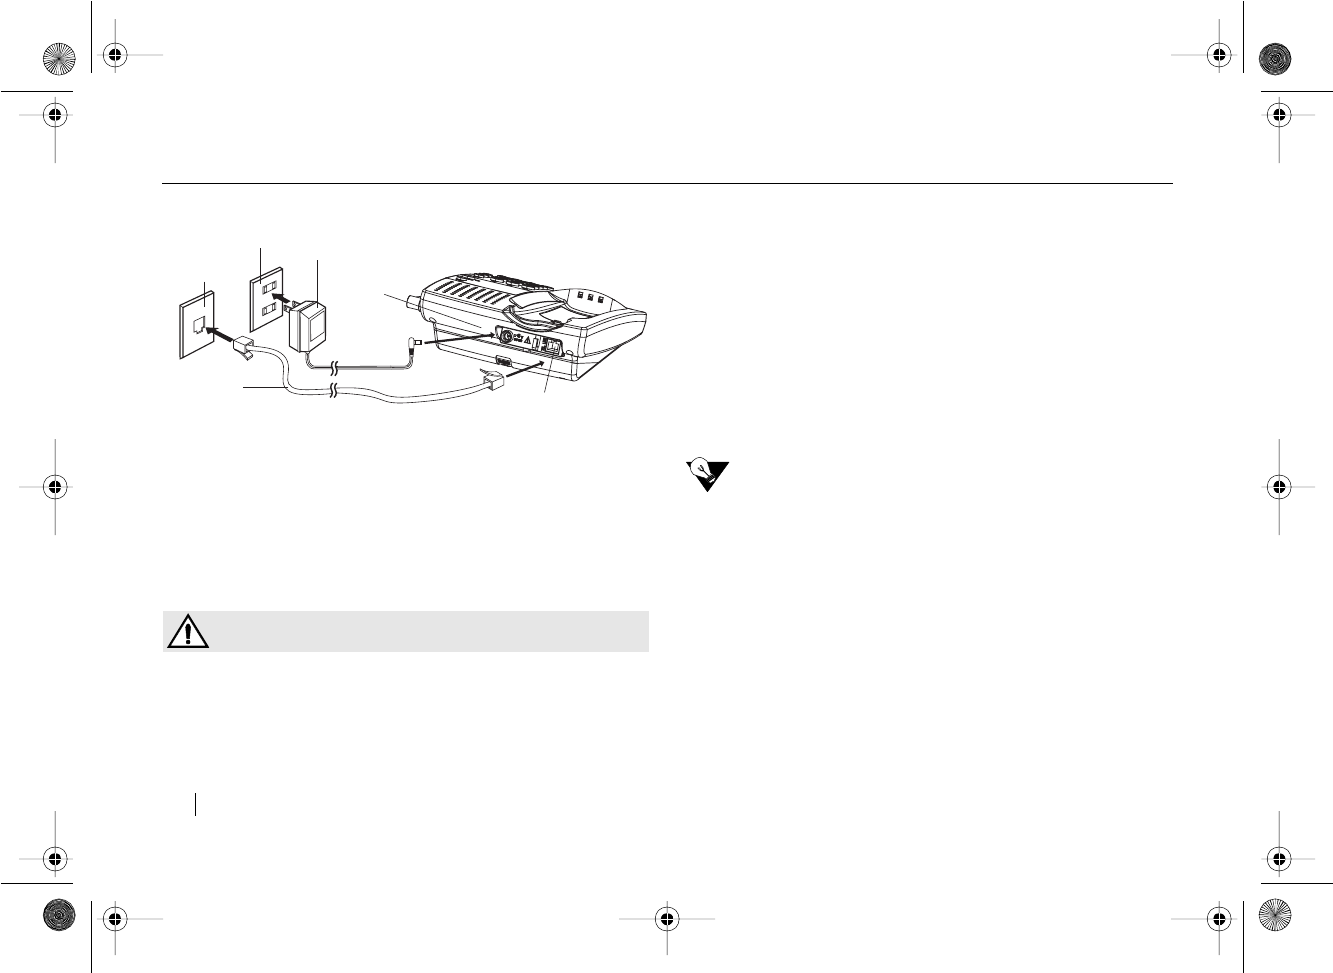
PLUG IN THE ADAPTER
a. Plug the AC adapter tip into the DC 9V jack on the base
and the other end into an electrical outlet. Verify that
the wall outlet is not controlled by a light switch and
that the tip is securely plugged into the jack. If the
optional spare battery is not charged, the phone will
not operate without AC power.
CAUTION
You must use a Class 2 power adapter that supplies
9 Volts DC and delivers at least 600mA. Its center
tip must be set to positive and its plug must fit the
phone’s DC 9V jack. The supplied adapter meets
these specifications. Using an adapter that does not
meet these specifications could damage the phone
or the adapter.
NEED TO KNOW
The installation of an AC surge arrester in the AC
outlet to which this adapter is connected to is
recommended. Telephone companies report that
electrical surges, typically lightning transients, are
very destructive to customer terminal equipment
connected to AC power sources.
D936-937.book Page 1 Friday, August 30, 2002 10:24 AM
D936/D937 - 900MHz Cordless
2 INSTALLING THE D936/D937
b. Thread the cord through the clip on the base to
prevent the cord from pulling loose.
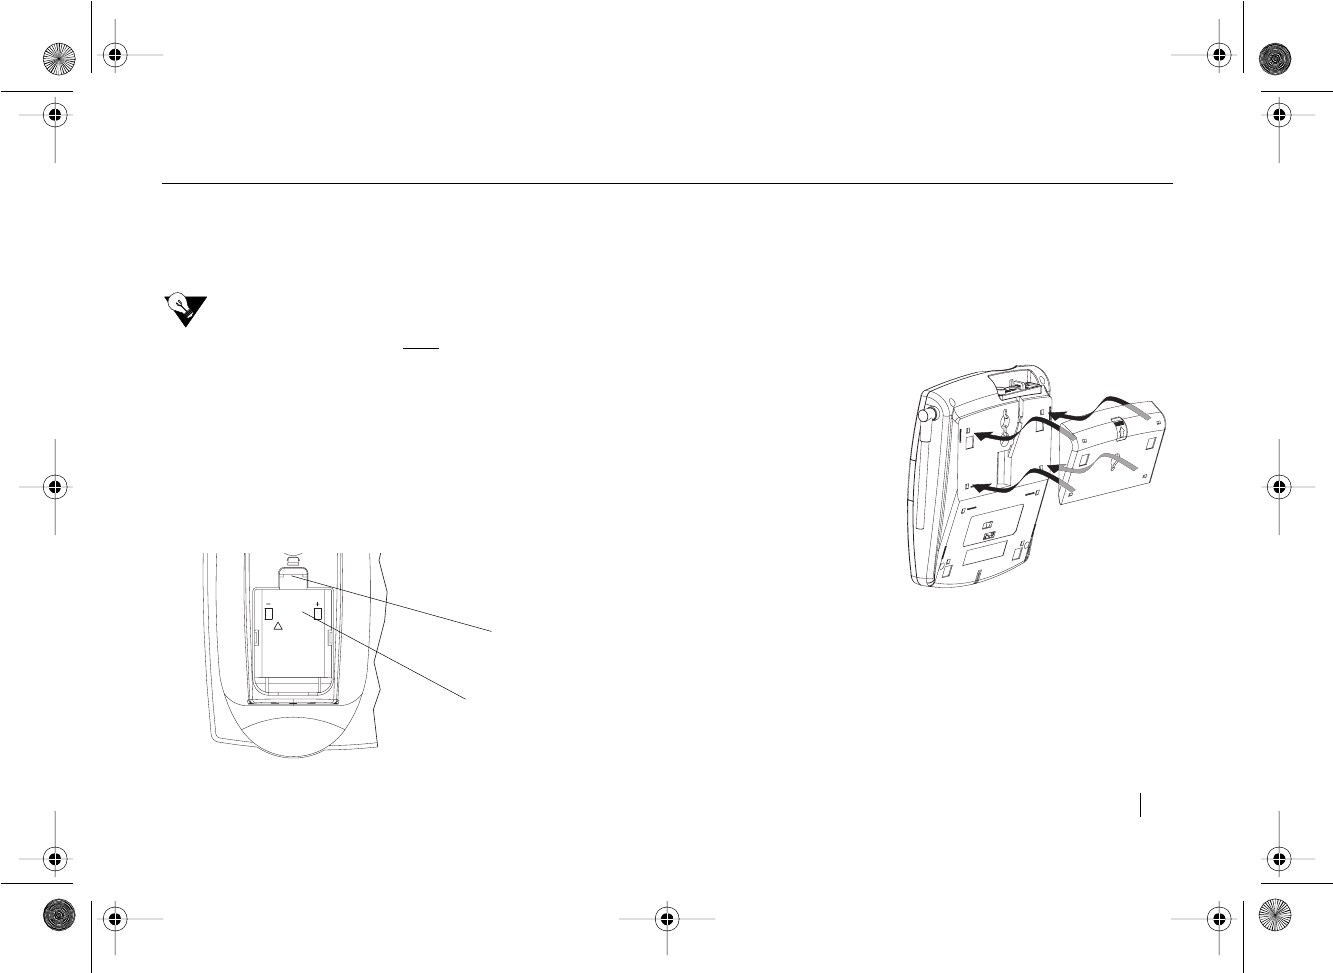
INSTALL THE BATTERIES
Use this procedure to install or replace the battery in the
handset. Be sure to follow the battery specifications and
safety instructions. See “SAFETY INSTRUCTIONS” on page
iv.
CAUTION
To reduce the risk of fire, use only 3.6V 850mAh
Nickel Cadmium (NiCad) battery pack in this phone. Do
not attempt to open the sealed battery pack. All used
Ni-Cad batteries must be recycled or disposed of
properly in accordance with all applicable laws.
HANDSET BATTERY
a. Press down on the battery cover and slide the cover
down to expose the battery compartment.
b. Locate the battery “+” and “-” signs inside the battery
compartment and the corresponding “+” and “-” on
the battery pack. Align the battery pack “+” and “-”
with the “+” and “-” in the battery compartment and
press down.
c. To replace the battery cover, slide the cover upwards
until the tab engages and the cover snaps into
place.
NEED TO KNOW
Prior to first use, place the handset (display side up) in
the base and charge the battery for at least 12 hours
before connecting the telephone line. The charge light
on the base comes on and indicates that the handset is
charging. The handset must be properly placed in the
base, display side up, in order for the handset battery
to charge.
120V WALL
OUTLET
TELEPHONE
WALL OUTLET
AC ADAPTER
DC9V
JACK
BASE
TEL Line
JACK
LONG LINE
CORD
D936-937.book Page 2 Friday, August 30, 2002 10:24 AM
D936/D937 - 900MHz Cordless
INSTALLING THE D936/D937 3
SPARE BATTERY (OPTIONAL)
When the spare battery is charged in the base, it provides
operational backup during a power failure (the handset will
continue to operate).
NEED TO KNOW
Install the spare battery after plugging in the adapter.
a. Place the spare battery pack in the charger by
pressing the battery door release and removing the
cover.
b. Align the battery pack “+” and “-” signs with the “+”
and “-” in the battery compartment and press into
place.
c. Replace the cover and verify the spare charge LED is
lit.
INSTALL THE TELEPHONE LINE CORD AND
DESKTOP/WALL MOUNT WEDGE
You can set your D936/D937 on a tabletop or mount the
phone on a wall.
TO USE ON A TABLETOP OR DESK
a. Place the
wedge over the
upper portion of
the base so the
arrow points
away from the
phone. Install the
wedge by
aligning it over
the holes and
pressing down
and in the
opposite
direction of the
arrow until it
snaps into place.
b. Plug the long line cord into the phone jack marked
TEL LINE.
c. Plug the other end of the line cord into the wall jack.
CAUTION:
To reduce risk of
fire, replace only
with the same
type battery
listed in the
User Manual.
!
Spare Battery
Battery Door
Charger
Release
Tabletop Mounting
D936-937.book Page 3 Friday, August 30, 2002 10:24 AM
D936/D937 - 900MHz Cordless
4 INSTALLING THE D936/D937
TO MOUNT ON A WALL
a. Place the
wedge over the
lower portion of
the base so the
arrow points
away from the
phone. Install the
wedge by aligning
it over the holes
and pressing
down and in the
opposite
direction of the
arrow until it
snaps into place.
b. Plug the short line
cord into the
phone jack
marked TEL LINE.
c. Thread the phone cord through the open channel in
the base.
d. Plug the other end of the phone cord into the wall
phone jack.
e. Use the gap on the underside of the base to gather
any excess cord.
f. Hang the base over the installation hooks (wall plate
not supplied).
REMOVING THE DESKTOP / WALL MOUNT
WEDGE
Remove the mounting wedge from the bottom of the base
by placing your thumb at the top of the arrow on the
mounting wedge and pressing down in the direction of the
arrow.
ATTACH THE BELT CLIP
The belt clip allows you to hang the handset from your belt.
Place the belt clip on the back of the handset. Align the tabs
on the belt clip with the slots on the handset. Press the belt
clip to the handset to snap the tabs into the slots. Make sure
both tabs are securely snapped into the handset slots.
To remove the belt clip, pull one of the side tabs out of the
slots in the handset. Carefully pull the clip away from the
handset.
NEED TO KNOW
The belt clip can remain on the handset when the
handset is placed in the base.
ATTACH HEADSET (OPTIONAL)
A headset with a standard 2.5 mm plug may be used in the
headset jack located on the side of the handset. Keep the
headset jack cap in place when the headset is not in use.
Wall Mounting
D936-937.book Page 4 Friday, August 30, 2002 10:24 AM

D936/D937 - 900MHz Cordless
FEATURES AND CONTROLS 5
FEATURES AND CONTROLS
Spare Charge Light
Voicemail Key & Light
Hold Key
TAL K MENU
EXIT
DEF
3
MNO
6
2
1
ABC
JKL
5
4
8
7
0
*
TUV
OPER
PQRS
GHI
#
WXYZ
9
FLASH SPEAKER
CALL # 5
5:05 PM
MAY 5
SMITH JOHN
1-408-555-1234
SAVE 7-10-11 DELETE
C
A
L
L
S
D
I
R
REVIEW
END
Digital
Spread Spectrum
900
MHz
DSS
900 MHz
Line In Use Light
Handset Charge Light
Voicemail
Light Menu/Exit
Key
Review Key
Speaker Key
Talk/End Key &
Talk Light
Flash Key
Dial Pad
Headset Jack
Volume
Control
Function Keys
(̆ DIR Key)
(̄ CALLS Key)
Keys
Mute Key
Redial Key
Page/Find Key
Volume Control Keys
Speaker Key & Light
Flash Key
Mute Key & Light
& Light
D936-937.book Page 5 Friday, August 30, 2002 10:24 AM

D936/D937 - 900MHz Cordless
6 FEATURES AND CONTROLS
Keys
■ Vo lume Control Keys (side of the handset and top of
base) adjust the loudness of the handset, handset
ringer and base ringer. They also adjust the volume of
the speakerphones in the handset and base.
■ Talk / End Key (handset) and Speaker Key (handset)
are used to access the telephone line and will dial the
number displayed on the screen. The Speaker Key also
turns the handset speakerphone on or off.
■ Speaker Key (base) allows you to turn the
speakerphone on or off and access the telephone line.
■ Dial Pad (handset and base) numeric keys are used for
dialing.
■ Function Keys (handset) vary depending on the
handset’s mode. The functions are listed below and
are described in “Handset Modes” on page 7.
■ ̆ Review ̄ Key (handset) allows you to scroll through
menu options and access your Directory Records
̆ (Dir) and Caller ID Records ̄ (Calls) with one touch
from the idle screen.
■ Menu / Exit Key (handset) allows you to setup your
phone and utilize the Network Services.
■ Voicemail Key (base) accesses your voice mailbox if
you subscribe to this service through your local
telephone company.
■ Redial Key (base) recalls and dials the last phone
number dialed.
■ Mute Key (side of the handset) mutes the handset or
handset speakerphone microphone.
■ Mute Key (base) mutes the base speakerphone
microphone.
■ Flash Key (handset and base) allows Call Waiting
subscribers to switch between two calls.
■ Hold Key (handset and base) places the existing call on
hold. The talk light and base speaker light blink.
■ Page / Find Key is a homing system for finding the
handset. If you press the PAGE / FI ND key, the handset
beeps for 15 seconds.
Lights
■ Voicemail Light (handset and base) blinks if you have
messages in your mailbox.
■ Talk Light (handset) is lit when the handset is in Talk
mode.
■ Speaker Light (handset and base) is lit when the
speakerphone is active.
■ Line in Use Light (base) is lit whenever this phone, or
any other telephone on the line, is being used.
■ Spare Charge Light (base) is lit when the spare battery
is in the base charging.
■ Handset Charge Light (base) is lit when the handset is
charging in the base.
■ Mute Light (base) flashes when the base
speakerphone is muted.
Miscellaneous
■ Headset Jack (handset) allows use of a headset with a
standard 2.5mm plug.
Save Voicemail
7-10-11 Edit
Delete Select
Redial / P Hold
D936-937.book Page 6 Friday, August 30, 2002 10:24 AM
D936/D937 - 900MHz Cordless
FEATURES AND CONTROLS 7
HANDSET MODES
Depending on the handset’s mode, the functions of the 3
keys below the display vary.
IDLE MODE
■ Redial / P Key recalls and dials the last phone number
dialed.
■ Voicemail Key accesses your voice mailbox if you
subscribe to this service through your local
telephone company. Voicemail must be setup to use
this key. See “Vmail Setup” on page 9.
NEED TO KNOW
Idle mode is the default display when the phone is at
rest. To return to the idle display from the other
modes, press the MENU/EXIT key.
CALLER ID MODE
■ Save Key saves information to the directory.
■ 7-10-11 Key modifies the format of a number in a Call
Record so that it will be in the correct format to dial
from your phone.
■ Delete Key deletes single or multiple entries from the
Caller ID log.
TALK / OFF HOOK MODE
■ Redial / P Key recalls and dials the last phone
number dialed.
■ HOLD KEY places the existing call on hold.
A call timer is displayed in this screen. See “Timing Calls” on
page 13.
REDIAL/P VOICEMAIL
5:05 AM MAY 5
3 NEW CALLS
CALL #5
DELETE
7-10-11
SAVE
SMITH JOHN
1-800-555-1234
11:16 AM AUG 8
REDIAL/P
HOLD
15:05
Call Timer
D936-937.book Page 7 Friday, August 30, 2002 10:24 AM
D936/D937 - 900MHz Cordless
8 FEATURES AND CONTROLS
DIRECTORY MODE
■ Edit Key edits information in the directory.
■ Delete Key erases digits and letters in the display. It
can also delete single or multiple entries from the
directory.
SETUP MODE
■ Select Key selects the option the arrow (cursor) is
next to.
PERSONALIZING YOUR PHONE
You can personalize your phone by pressing the MENU / EXIT
key. - MENU - is displayed on the screen. Using the
̆ REVIEW ̄ key, scroll through the options. Enter the
menu number to select the desired option or press SELECT
when the arrow (cursor) is next to the desired option. The
specific number for each option is listed in the following
table.
EDIT
- DIRECTORY -
JOHN SMITH
1-408-555-1234
DELETE
SELECT
- MENU -
1=NETWORK SERVS
2=INTERCOM
3=LANGUAGE
̈
MENU -
1=NETWORK SERVS
2=INTERCOM
3=LANGUAGE
4=VMAIL SETUP
5=DIAL METHOD
6=CLEAR VM LITE
7=CWID OPTIONS
8=VOICE ANNOUNC
VA - D937
D936-937.book Page 8 Friday, August 30, 2002 10:24 AM
D936/D937 - 900MHz Cordless
FEATURES AND CONTROLS 9
NETWORK SERVICES
The Network Services option provides easy access to the
network services you subscribe to through your local
telephone company. To activate a specific Network Service,
press MENU / EXIT. The arrow is next to NETWORK SERVS.
Press SELECT (or press 1). Scroll through the available
options and press TA L K / E N D to activate the displayed
Network Service.
For a list of the features that are programmed into your
phone, please refer to your Quick Start insert.
NEED TO KNOW
If you would like to have access to a feature that you
do not currently subscribe to, please contact your
local telephone company.
INTERCOM
In addition to the normal telephone functions, your
D936/D937 can also be used as an intercom. To configure
your phone as an intercom, press MENU / EXIT. Using the
̆ REVIEW ̄ key, scroll through the options until the arrow
is next to INTERCOM and press SELECT (or press 2).
INTERCOM ACTIVE is displayed.
See “Using the Intercom” on page 14 for additional
information.
SELECTING A LANGUAGE
The D936/D937 can be configured to display text in English
or Spanish. To select the language, press MENU / EXIT.
Using the ̆ REVIEW ̄ key, scroll through the options until
the arrow is next to LANGUAGE and press SELECT (or press
3). The following is displayed.
LANGUAGE/IDIOMA
1=ENGLISH
2=ESPANOL
CURRENTLY ENG
Press the number for the desired language or press
MENU / EXIT to leave as is.
VMAIL SETUP
If you subscribe to your local telephone company’s Voicemail
service, the VOICEMAIL key can be used to automatically
access your mailbox.
To initially setup your Voicemail access number, press
MENU / EXIT. Using the ̆ REVIEW ̄ key, scroll through the
options until the arrow is next to VMAIL SETUP and press
SELECT (or press 4). Enter your access number and then
press SAVE.
-VMAIL SETUP-
ACCESS NUMBER
D936-937.book Page 9 Friday, August 30, 2002 10:24 AM
D936/D937 - 900MHz Cordless
10 FEATURES AND CONTROLS
Voicemail systems operate differently and some require
additional pauses to be entered. After setting up the
Voicemail access number, the screen prompts:
-VMAIL SETUP-
DIAL PASSWORD
XX SECONDS LATER
1=MORE 2=LESS
Pressing 1 adds 3 seconds of pause. Pressing 2 reduces the
pause by 3 seconds. After the appropriate pause has been
added/removed, press SAVE. Three to six seconds of
pause is suggested and the default is 6 seconds.
-VMAIL SETUP-
ENTER PASSWORD
AND # IF NEEDED
Enter your password then press SAVE. If you normally press
a # after entering your password, add it to the end of your
password here too.
NEED TO KNOW
To change an existing voicemail access number and/
or password, repeat the steps for Voicemail Setup.
When the access number and/or password that
needs to be modified is displayed, use the delete key
to erase the original number/password. Enter the
new number/password and continue following the
setup instructions.
SELECTING A DIALING METHOD
The D936/D937 dials in either tone or pulse/rotary mode.
To select the dialing method, press MENU / EXIT. Using the
̆ REVIEW ̄ key, scroll through the options until the arrow
is next to DIAL METHOD and press SELECT (or press 5).
-DIAL METHOD-
1=TONE
2=PULSE
CURRENTLY TONE
Press the number for the desired dialing method or press
MENU / EXIT to leave as is.
CLEAR VOICEMAIL LIGHT
To clear the voicemail light, press MENU / EXIT. Using the
̆ REVIEW ̄ key, scroll through the options until the arrow
is next to CLEAR VM LIGHT and press SELECT (or press
6). See “Clearing the Voicemail Light” on page 15 for
additional information.
CWID OPTIONS SETUP
Call Waiting ID (CWID) options allow you to disposition
incoming calls when you are on another call. Feature may
not be available in all areas. Contact your local phone
company.
NEED TO KNOW
Caller ID, Call Waiting ID and Call Waiting ID (CWID)
options are required from your local telephone company.
Please contact your local telephone company to activate
these services.
D936-937.book Page 10 Friday, August 30, 2002 10:24 AM
D936/D937 - 900MHz Cordless
FEATURES AND CONTROLS 11
NEED TO KNOW
When the Show Options is set to “Yes”, CWID options
is on. When it is set to “No”, CWID options is off.
To turn Call Waiting ID options on/off, press
MENU / EXIT. Using the ̆ REVIEW ̄ key, scroll through the
options until the arrow is next to CWID OPTIONS and press
SELECT (or press 7).
-CALL WAITING-
SHOW OPTIONS
1=YES 2=NO
CURRENTLY NO
Press the number for the desired option or press
MENU / EXIT to leave as is.
VOICE ANNOUNCE SETUP
The D937 can announce each caller’s name or number
aloud while displaying the information on the handset.
“Private caller” and “Unavailable caller” are programmed into
your phone. To announce an individual’s name, you must
record the name with the individual’s number in your
directory.
NEED TO KNOW
Caller ID is required from your local telephone company.
Please contact your local telephone company to
activate this service.
To configure voice announce, press MENU / EXIT. Using the
̆ REVIEW ̄ key, scroll through the options until the arrow
is next to VOICE ANNOUNCE and press SELECT (or press
8). The following options are available. Press the number for
the desired option.
-VOICE ANNOUNCE-
1=OFF
2=NAMES+NUMBERS
3=NAMES ONLY
VA - D937
- Option - - Display -
1=OFF
Turns Voice Announce Off. No
recorded messages or numbers
heard
VOICE ANNOUNCE
OFF
2=NAMES+NUMBERS
All calls will be announced. If a
message is recorded, the message is
played instead of a number. If a
message is not recorded, the number
will be heard.
ALL CALLS WILL
BE ANNOUNCED
3=NAMES ONLY
Only recorded messages and the
following will be heard: “Private caller”,
“unavailable caller”, “long distance”
and “no caller ID”.
ONLY RECORDED
MESSAGES WILL BE
ANNOUNCED
D936-937.book Page 11 Friday, August 30, 2002 10:24 AM
D936/D937 - 900MHz Cordless
12 USING THE D936/D937
USING THE D936/D937
ANSWERING CALLS
You can answer a call three ways:
■ Press TA L K / E ND (handset).
■ Press SPEAKER (handset or base).
■ Press FLASH (handset or base) to answer Call
Waiting calls.
DIALING
a. Press TALK / E N D (handset) or SPEAKER
(handset or base).
b. Use the keypad to dial the phone number.
PRE-DIALING
Pre-dialing allows you to enter the number and verify it
before placing the call.
a. Use the handset keypad to enter a telephone
number.
b. Check the number on the display. If the number is
wrong, press DELETE to delete the entry digit-by-
digit.
c. When the correct number is displayed, press
TA L K / E ND or SPEAKER (handset) to place the call.
LAST NUMBER REDIAL
To automatically redial the last number dialed, press
REDIAL / P (handset) or REDIAL (base).
ADJUSTING THE VOLUME
HANDSET
a. Press TALK / E N D (handset).
b. Press the ̇ or ̈ VOLUME key on the side of the
handset while the phone is in use to decrease or
increase the volume. There are four volume levels.
HANDSET RINGER
a. Press the ̇ or ̈ VOLUME key on the side of
the handset while the phone is not in use.
b. The handset will ring. Press the ̇ or ̈ VOLUME key
to decrease or increase the ringer volume until the
desired ring level is obtained. There are four
different levels of ring (off, low, medium and high).
HANDSET SPEAKER
a. Press the handset SPEAKER key.
b. Press the ̇ or ̈ VOLUME key on the side of the
handset while the phone is in use to decrease or
increase the speaker/intercom volume. There are
four volume levels.
D936-937.book Page 12 Friday, August 30, 2002 10:24 AM
D936/D937 - 900MHz Cordless
USING THE D936/D937 13
BASE RINGER
a. Press the ̆ or ̄ VOLUME key on the base
while the phone is not in use.
b. The base will ring. Press the ̆ or ̄ VOLUME key to
decrease or increase the ringer volume until the
desired ring level is obtained. There are nine
different levels of ring (including off).
SPEAKER
a. Press the base SPEAKER key.
b. Press the ̆ or ̄ VOLUME key on the base while the
phone is in use to increase or decrease the
speaker/intercom volume. There are eight volume
levels.
TIMING CALLS
When you are on a call, a call timer is shown. The timer
displays the duration of the call. When the timer goes past
99 minutes and 59 seconds, it starts over at 0:00.
TEMPORARY TONE SERVICE
If your phone is set to Pulse and you need Tone service for
interacting with bank or other automated services, you can
temporarily change your dial setting to Tone. Press * during
the call and the phone switches to temporary Tone service
for the duration of the call. The phone returns to Pulse
service when you hang up. See “Selecting a Dialing Method”
on page 10.
LOCATING A LOST HANDSET
Should you misplace your handset, you can locate it quickly
and easily by pressing the PAG E / F I N D key on the base. The
handset beeps for 15 seconds, or until you either:
■ Press the PAGE / FIN D key again
or
■ Press any key on the handset except TALK / E ND. (If
you press TALK / END, you enter intercom mode.)
If the handset does not beep, it is either out of range, or the
battery needs recharging.
LOW BATTERY
When the handset battery charge becomes low, you will
hear three beeps and will see the display message
RECHARGE BATTERY. You have approximately 5 minutes to
conclude your call or switch phones before your call is
dropped.
NEED TO KNOW
Prior to first use, place the handset in the cradle and
charge the battery for at least 12 hours. The handset
charge light on the base comes on to tell you that the
handset is charging.
D936-937.book Page 13 Friday, August 30, 2002 10:24 AM
D936/D937 - 900MHz Cordless
14 USING THE D936/D937
USING HOLD
You can place a call on hold by pressing the HOLD key
(handset or base). The talk /end and speaker (base) lights
flash slowly while calls are on hold.
There are three ways to take a call off hold:
■ Press TALK / E N D or SPEAKER (handset or base) to
resume the call.
■ Pick up the call on another extension.
■ The caller hangs up.
USING MUTE
You can block your side of the conversation when you are
using the phone by pressing the MUTE key. Mute is available
on both the handset and base.
HANDSET
■ Press the MUTE key to turn ON.
■ CALL MUTED is displayed on the handset.
■ Press the MUTE key or hang up to turn OFF.
BASE
■ Press the MUTE key to turn ON.
■ The mute light on the base flashes.
■ Press the MUTE key or hang up to turn OFF.
USING NETWORK SERVICES
Your D936/D937 is programmed so you can easily use all
of the convenient network services you subscribe to through
your local telephone company. To use any of these features,
press MENU / EXIT. The arrow is next to NETWORK SERVS.
Press SELECT (or press 1).
For a list of the features that are programmed into your
phone, please refer to your Quick Start insert.
a. Press the ̆ REVIEW ̄ key to scroll through
the features until the desired feature is
displayed.
b. Press the TAL K / E ND or SPEAKER (handset) key to
activate the feature.
NEED TO KNOW
If you would like to have access to a feature that you do
not currently subscribe to, please contact your local
telephone company.
USING THE INTERCOM
The intercom feature allows you to conduct a conversation
between the base and the handset when the phone is in idle
mode or when you are on a call.
IDLE MODE
To activate, press MENU / EXIT and select 2for INTERCOM.
INTERCOM ACTIVE is displayed. The base beeps twice to
indicate intercom is active. To deactivate, press
TALK / END (handset) or SPEAKER (base).
D936-937.book Page 14 Friday, August 30, 2002 10:24 AM
D936/D937 - 900MHz Cordless
USING THE D936/D937 15
ON A CALL
When you are on the handset and want to transfer the call
to the base, press MENU / EXIT and select 2for INTERCOM.
This activates the intercom feature and places the caller on
hold. The Talk and Speaker lights are lit. Your voice will be
heard when you speak. The other person can take the call
by pressing SPEAKER (base). Once SPEAKER is pressed,
the handset goes idle. To participate in the call, press
TA L K / E N D on the handset.
USING VOICEMAIL
If you subscribe to your local telephone company’s Voicemail
Service, you can use your VOICEMAIL key to automatically
access your mailbox. (To setup your Voicemail, see “Vmail
Setup” on page 9.)
When your voicemail lights flash, or MESSAGE WAITING is
displayed on the screen, press the VOICEMAIL key (handset
or base) to access your Voicemail.
CLEARING THE VOICEMAIL LIGHT
The Voicemail light may remain on after reviewing your
messages remotely, even when there are no messages. To
clear the light, press MENU / EXIT and then press 6 for
CLEAR VM LITE to turn the light off. VOICE MAIL LIGHT
CLEARED is displayed.
USING CALL WAITING ID (CWID) OPTIONS
When a new call comes in while you are talking, you will hear
a tone. The new caller’s name and phone number, if
available, will be displayed. You can either alternate between
calls or disposition the call. Feature may not be available in
all areas. Contact your local phone company.
NEED TO KNOW
Caller ID, Call Waiting ID and CWID Options are required
from your local telephone company. Please contact your
local telephone company to activate these services.
ALTERNATING BETWEEN CALLS
When you receive a Call Waiting call and want to connect,
press FLASH. The active call will be placed on hold and the
new call will become active.
■ Press FLASH to alternate between calls.
■ Press TALK / END or SPEAKER to end the call.
D936-937.book Page 15 Friday, August 30, 2002 10:24 AM
D936/D937 - 900MHz Cordless
16 USING THE D936/D937
DISPOSITIONING CALLS
You can disposition a Call Waiting call if you subscribe to Call
Waiting ID options and Show Options is set to On. When you
hear the Call Waiting tone, do one of the following.
■ Press one of the 5 digits listed below to go directly to
the corresponding option.
OR
■ Follow the on screen prompts, when displayed, to
finish dispositioning the call.
NEED TO KNOW
You must disposition the call within 25 seconds of the
Call Waiting tone.
CALLER ID RECORDS
The D936/D937 automatically displays the caller
information the phone company sends with each call. This
allows you to view information about an incoming call before
you answer the phone. The D937 announces the caller’s
name or number aloud in addition to displaying it when Voice
Announce is turned ON. (To setup your Voice Announce, see
“Voice Announce Setup” on page 11.) Up to 50 call records
are stored in memory for later use.
NEED TO KNOW
Caller ID is required from your local telephone company.
Please contact your local telephone company to
activate this service.
REVIEWING
a. Press the CALLS (̄)key. The newest call is
displayed.
b. Use the ̆ REVIEW ̄ key to move through the call
log.
c. Press MENU / EXIT to return to the idle mode.
NEED TO KNOW
A diamond in a Caller ID record indicates the call has
been received since the last review of the log.
- MENU OPTIONS -
1=VMAIL Sends the new caller to voicemail to leave
a message.
2=BUSY Plays a pre-recorded message from your
phone company that you are on the tele-
phone and will call them back.
3=3WAY Connects the new caller with the existing
call to form a 3 way conference call.
4=PLS HOLD Places the new call on hold, plays a pre-
recorded message from your phone com-
pany that you are on the phone and will be
with them shortly.
5=DROP &
ANSWER
Drops the existing call and answers the
new call.
D936-937.book Page 16 Friday, August 30, 2002 10:24 AM
D936/D937 - 900MHz Cordless
USING THE D936/D937 17
DIALING
a. Press the CALLS (̄)key.
b. Use the ̆ REVIEW ̄ key to find the call record
desired.
c. Use the 7•10•11 key to change between the different
formats until the correct format for dialing is
displayed.
d. Press TA LK / END or SPEAKER (handset) to place
the call.
SAVING
See “Copying a Caller ID Record” on page 20.
DELETING AN INDIVIDUAL RECORD
a. Press the CALLS (̄) key.
b. Use the ̆ REVIEW ̄ key to find the call record you
want to delete.
c. Press DELETE. DELETED appears.
DELETING ALL CALL RECORDS
a. Press CALLS (̄).
b. Press and hold DELETE. The following is displayed:
DELETE ALL?
1=YES 2=NO
c. Press 1 to delete all or press the DELETE key again.
d. DELETED is displayed.
e. NO CALLS is displayed.
DIRECTORY RECORDS
The D936/D937 personal phone directory will store up to
50 names and numbers. The D937 will also store 50 Voice
Announce messages with the names and numbers. In order
for a recorded message to be heard for an individual caller
on the D937, a recorded message must be saved with the
individual’s number in the directory. You can create your
directory in two ways: copy a Caller ID record to the
directory or create a new directory record. Once you create
your personal phone directory, you can automatically dial
from the directory.
NEED TO KNOW
DIRECTORY FULL is displayed when there are no
memory locations left. You need to delete an existing
directory record in order to save a new one.
NEED TO KNOW
Entering Text Options: The numeric keys on the
handset can also be used to enter alphanumeric text.
Each number is assigned a set of letters. Press the
corresponding number until the desired letter is
displayed.
D936-937.book Page 17 Friday, August 30, 2002 10:24 AM

D936/D937 - 900MHz Cordless
18 USING THE D936/D937
For example, to enter JOHN: press 5 once; press 6 three
times; press 4 two times and press 6 two times. If the
next desired letter is on the same key as the current
letter, press the ̆ REVIEW key to move to the next
position. To enter a blank space, press ̆ REVIEW. To
delete a character, press DELETE to delete one
character at a time. Note: the phone dials the number
exactly as it is stored in the directory.
The following special symbols can be added to the “name”
field using the *and # keys:
CREATING A RECORD
You can enter up to 16 characters in the name field and 32
digits in the number field. You can also record a voice
announce message.
a. Press the DIR (̆)key. Press the ̆ REVIEW ̄ key
until the following is displayed.
- DIRECTORY -
XX AVAILABLE
TO ADD NEW
PRESS EDIT
b. Press the EDIT key. ADD NUMBER is displayed. Enter
the number using the handset key pad. Use the
DELETE key to erase a number. Press the
REDIAL / P key to add a three second delay (pause).
c. Press the SAVE key. SAVED is displayed.
d. ADD NAME is displayed. Enter the name using the
handset key pad to enter characters. Use the
DELETE key to erase a character.
e. Press the SAVE key. SAVED is displayed.
f. The following is displayed.
RECORD VOICE
ANNOUNCE MESSAGE
1=YES 2=NO
g. Press 1. The following is displayed and announced.
BEGIN RECORDING
AFTER THE TONE
*/@&‘(),-.#
VA - D937
D936-937.book Page 18 Friday, August 30, 2002 10:24 AM
D936/D937 - 900MHz Cordless
USING THE D936/D937 19
h. Hold the handset in the normal “talk” position. You
have 2 seconds to record the message you will hear
when the caller is announced. At the end of the 2
seconds, the recorded name message is
automatically saved and played back. The following
additional options are available
1=PLAY RECORDING
2=RECORD AGAIN
3=ERASE&EXIT
4=EXIT
i. Press 4 to exit and leave as is.The Directory record
indicates a voice message is recorded with the
individual record.
OR
a. From the idle screen, enter the phone
number using the handset key pad.
b. Press the SAVE key. ADD NAME is displayed. See
steps “d” through “h” to complete creating a record.
EDITING A RECORD
a. Press the DIR (̆)key. Press the ̆ REVIEW ̄ key
until the desired directory record is displayed.
b. Press the EDIT key. The following is displayed
- EDIT DIRECTORY -
1=NUMBER 2=NAME
3=VOICE ANNOUNCE
c. Press the desired number for the item that you want
to edit.
NEED TO KNOW
If you need to edit more than one item, you must repeat
the process for each item.
Press 1 to edit the number
a. EDIT NUMBER is displayed.
b. Edit the number using the handset key pad. Use the
DELETE key to erase a number. Press the
REDIAL / P key to add a three second delay (pause).
c. Press the SAVE key. SAVED is displayed and then the
individual directory record is displayed.
Press 2 to edit the name
a. EDIT NAME is displayed.
b. Edit the name using the handset key pad to enter
characters. Use the DELETE key to erase a
character.
c. Press the SAVE key. SAVED is displayed and then the
individual directory record is displayed.
Press 3 to edit the voice announce message
a. The following is displayed:
1=PLAY RECORDING
2=RECORD AGAIN
3=ERASE & EXIT
4=EXIT
VA - D937
VA - D937
D936-937.book Page 19 Friday, August 30, 2002 10:24 AM
D936/D937 - 900MHz Cordless
20 USING THE D936/D937
NEED TO KNOW
If there is no voice announce message previously saved,
see “Creating a Record” on page 18.
b. Press 2 to edit the voice announce message. The
following is displayed and announced.
BEGIN RECORDING
AFTER THE TONE
c. Hold the handset in the normal “talk” position. You
have 2 seconds to record the message you will hear
when the caller is announced. At the end of the 2
seconds, the recorded name message is
automatically saved and played back. The following
additional options are available again.
1=PLAY RECORDING
2=RECORD AGAIN
3=ERASE&EXIT
4=EXIT
d. If the new message is acceptable, press 4 to exit.
COPYING A CALLER ID RECORD
a. Press the CALLS (̄)key.
b. Use the ̆ REVIEW ̄ key to find the call record
desired.
c. Use the 7•10•11 key to change between the different
formats and choose the right format to dial the
number from your phone.
NEED TO KNOW
To edit the name and number field, you must be in
Directory mode. For details see “Editing a Record” on
page 19.
d. Press SAVE. SAVED is displayed.
e. The following is displayed.
RECORD VOICE
ANNOUNCE MESSAGE
1=YES 2=NO
f. Press 1. The following is displayed and announced.
BEGIN RECORDING
AFTER THE TONE
g. Hold the handset in the normal “talk” position. You
have 2 seconds to record the message you will hear
when the caller is announced. At the end of the 2
seconds, the recorded name message is
automatically saved and played back. The following
additional options are available.
1=PLAY RECORDING
2=RECORD AGAIN
3=ERASE&EXIT
4=EXIT
h. If the new message is acceptable, press 4 to exit.
VA - D937
VA - D937
D936-937.book Page 20 Friday, August 30, 2002 10:24 AM

D936/D937 - 900MHz Cordless
USING THE D936/D937 21
REVIEWING
a. Press the DIR (̆)key.
b. Use the ̆ REVIEW ̄ key to find the directory record
desired.
c. Press MENU / EXIT to return to the idle mode OR
press the DIR (̆)key.
d. Press a number key associated with the letter of the
directory record.
For example, if you want to find the directory
record for Red Riding Hood, press 7 until the
first record starting with the letter “R” is
displayed.
e. Press REVIEW ̄ to see additional records starting
with the letter “R.”
f. Press MENU / EXIT to return to the idle mode.
DIALING
a. Press the DIR (̆) key.
b. Use the ̆ REVIEW ̄ key to find the directory record
desired.
c. Press TA LK / E ND or SPEAKER (handset) to place
the call.
DELETING AN INDIVIDUAL RECORD
a. Press DIR (̆).
b. Use the ̆ REVIEW ̄ key or look up the directory
record alphabetically to locate the record you want
to delete.
c. Press DELETE. The following is displayed.
DELETE?
1=YES 2=NO
d. Press 1 to delete or press the DELETE key again.
e. DELETED is displayed.
DELETING ALL RECORDS
a. Press DIR (̆).
b. Press and hold DELETE. The following is displayed.
DELETE ALL?
1=YES 2=NO
c. Press 1 to delete all or press the DELETE key again.
d. DELETED is displayed.
e. The following is displayed.
- DIRECTORY -
50 AVAILABLE
TO ADD NEW
PRESS EDIT
D936-937.book Page 21 Friday, August 30, 2002 10:24 AM

D936/D937 - 900MHz Cordless
22 USING THE D936/D937
READING DISPLAY MESSAGES
The D936/D937 indicates status by displaying the following
messages:
■ END OF LIST
You have reached the end of the directory or call
records. Press either REVIEW ̆ or ̄ to see other
records.
■ INCOMPLETE DATA
The Caller ID information sent from the telephone
company is incomplete for this caller. There is no
problem with the phone.
■ LONG DISTANCE
The incoming call is long distance.
■ MESSAGE WAITING
You have a message in your voice mailbox.
■ NAME UNAVAILABLE
The person is calling from an area that provides
number-only Caller ID service, or you can be in a
service area which only shows the number.
■ NO CALLS
There are no call records stored in memory.
■ NO DATA SENT
The phone did not receive Caller ID information from
the phone company.
■ PRIVATE
The caller has purposely chosen to block his/her caller
ID information.
■ RECHARGE BATTERY
The handset battery is getting low. Place the handset
in the base in order to recharge.
■ UNAVAILABLE
Caller ID information is not available from the caller’s
area.
■ Only number is displayed
The person is calling from an area that provides
number-only Caller ID service, or you could be in a
service area which only shows the number.
■ LOOKING FOR BASE
The handset is too far away from the base. Move it
closer to the base.
D936-937.book Page 22 Friday, August 30, 2002 10:24 AM

D936/D937 - 900MHz Cordless
TROUBLESHOOTING 23
TROUBLESHOOTING
PROBLEM / SOLUTION
■ Handset or Base Lockup (Handset or Base does not
respond to any key press; display on LCD will not
change; no dial tone present)
- Reset the phone by removing the batteries
from the handset and base. Unplug the power
adapter. After 30 seconds, first plug the power
adapter back in and then reinstall the batteries
in the handset and base.
■ Blank or faint screen
- Place the handset in the cradle for several
seconds. Ensure the handset is making contact
in the cradle.
- Check the AC adapter. Be sure that the
adapter is not damaged and that it is securely
plugged into a working outlet. Also check that
the wall plug is not controlled by a wall switch.
- Recharge or replace the battery. See “Install
the Batteries” on page 2 for details.
■ Caller ID/Call Waiting ID doesn’t work properly
- Verify that Caller ID service is active. Call your
local telephone company’s business office to
ensure that your services are active. You can
verify that your Call Waiting ID is active by
listening for two beeps which indicate that
another call is being received.
- Check the AC adapter. Be sure that the adapter
is not damaged and that it is securely plugged
into a working outlet. Also check that the wall
plug is not controlled by a wall switch.
■ Handset charge light does not work
- Check whether the handset is making contact
in the cradle.
- Check the AC adapter. Be sure that the adapter
is not damaged and that it is securely plugged
into a working outlet. Also check that the wall
plug is not controlled by a wall switch.
- Verify that the handset battery has been
installed correctly. See “Install the Batteries” on
page 2.
■ Spare charge light does not work
- Check the AC adapter. Be sure that the adapter
is not damaged and that it is securely plugged
into a working outlet. Also check that the wall
plug is not controlled by a wall switch.
- Verify that the spare battery has been installed
correctly. See “Install the Batteries” on page 2.
D936-937.book Page 23 Friday, August 30, 2002 10:24 AM

D936/D937 - 900MHz Cordless
24 TROUBLESHOOTING
■ Handset lights do not work
- Press the TALK / END key to test. The talk light
should come on.
- Recharge or replace the battery. See “Install
the Batteries” on page 2 for more details.
■ INCOMPLETE DATA
- Call information was distorted before reaching
the unit. Normal static on the telephone line
can cause an INCOMPLETE DATA message. If
this condition persists, check with your local
telephone company to ensure that there is not
a problem with your phone line.
■ Phone does not ring
- Verify that the telephone line cord is connected,
secure and inserted in the proper jack.
- Verify the handset ringer and base ringer are
On. See “Adjusting the Volume” on page 12.
- If the phone still does not ring, you might have
too many communication devices hooked to a
single line. A communication device can be a
phone, modem, or facsimile (FAX) machine.
Contact your local telephone company Business
Office for help calculating the limit for your
residence or business.
- Move the handset closer to the base.
■ No dial tone
- Verify that the line cord is connected, secure
and inserted in the proper jack.
- Check that the handset is fully charged.
- Move the handset closer to the base.
■ The handset does not respond to the PAGE / FIND key
- The handset is not communicating with the
base. The handset is either too far from the
base or the battery needs recharging.
- Check the AC adapter.
■ Handset does not work
- Check the AC adapter. Be sure that the
adapter is undamaged and that it is securely
plugged into a working outlet. Also check that
the wall plug is not controlled by a wall switch.
- Place the telephone in the cradle for several
seconds. Ensure the handset is making contact
in the cradle.
- Recharge or replace the battery. See “Install
the Batteries” on page 2 for more details.
■ Voicemail light is on when there are no messages in
the mailbox
- Turn the light off manually by following the steps
in “Clearing the Voicemail Light” on page 15.
D936-937.book Page 24 Friday, August 30, 2002 10:24 AM

D936/D937 - 900MHz Cordless
TROUBLESHOOTING 25
■ VOICEMAIL key dials the password before the system
is ready for it.
- Add more pauses to the dialing number. See
“Vmail Setup” on page 9.
■ NO DATA SENT
- Check your service. Call your local telephone
company to ensure that you have Caller ID or
Call Waiting ID service.
- Check the answering machine. Ensure that
your answering machine is set to answer after
two rings.
- Ensure you answer the call after two rings.
- Check Call Forwarding. Ensure that Call
Forwarding is turned off.
- Contact your local telephone company’s Service
Department if the problem continues for more
than 24 hours. Your your local telephone
company central office may be temporarily
experiencing an overload.
■ Voice Announce message not heard.
- Verify that the handset ring volume and base
ring volume are turned on. See “Adjusting the
Volume” on page 12.
- Verify that Voice Announce is turned on. See
“Voice Announce Setup” on page 11.
D936-937.book Page 25 Friday, August 30, 2002 10:24 AM

D936/D937 - 900MHz Cordless
26 FCC AND WARRANTY
FCC AND WARRANTY
FCC REQUIREMENTS
FCC PART 15 INFORMATION
This equipment complies with Part 15 of the FCC rules.
Operation is subject to the following two conditions: (1) This
device may not cause harmful interference, and (2) this device
must accept any interference received, including interference
that may cause undesired operation.
This equipment has been tested and found to comply within the
limits for a Class B digital device, pursuant to Part 15 of the FCC
Rules. These limits provide reasonable protection against
harmful interference in a residential installation.
This equipment generates, uses and can radiate radio frequency
energy. If not installed and used in accordance with the
instructions, the equipment might cause harmful interference to
radio communications. However, there is no guarantee that
interference will not occur in a particular installation.
If this equipment does cause harmful interference to radio or
television reception, which can be determined by turning the
equipment off and on, the user is encouraged to try to correct
the interference by one or more of the following measures:
■ Reorient or relocate the receiving antenna.
■ Increase the separation between the equipment and receiver.
■ Connect the equipment into an outlet on a circuit different
from that to which the receiver is connected.
■ Consult the dealer or an experienced radio/TV technician for
help.
FCC PART 68 INFORMATION
THIS EQUIPMENT IS HEARING AID COMPATIBLE.
This equipment complies with Part 68 of the FCC rules and the
requirements adopted by the ACTA. On the bottom of the base
of this equipment is a label that contains, among other
information, a product identifier in the format
US:AAAEQ##TXXXX. If requested, this number must be provided
to the telephone company.
A plug and jack used to connect this equipment to the premises
wiring and telephone network must comply with the applicable
FCC Part 68 rules and requirement adopted by the ACTA. A
compliant telephone cord with a modular plug is provided with
this product. It is designed to be connected to a compatible
modular jack that is also compliant. See installation instructions
for details.
The REN is used to determine the number of devices that may be
connected to a telephone line. Excessive RENs on a telephone line
may result in the devices not ringing in response to an incoming
call. In most, but not all areas, the sum of RENs should not
exceed five (5.0). To be certain of the number of devices that may
be connected to a line, as determined by the total RENs, contact
the local telephone company. For products approved after July
23, 2001, the REN for this product is part of the product
identifier that has the format US:AAAEQ##TXXXX. The digits
represented by the ## are the REN without a decimal point (e.g.,
D936-937.book Page 26 Friday, August 30, 2002 10:24 AM

D936/D937 - 900MHz Cordless
FCC AND WARRANTY 27
03 is a REN of 0.3). For earlier products, the REN is separately
shown on the label.
If this equipment causes harm to the telephone network, the
telephone company will notify you in advance that temporary
discontinuance of service may be required. But if advance notice
isn’t practical, the telephone company will notify the customer as
soon as possible. Also, you will be advised of your right to file a
complaint with the FCC if you believe it is necessary.
The telephone company may make changes in its facilities,
equipment, operation, or procedures that could affect the
operation of the equipment. If this happens, the telephone
company will provide advance notice in order for you to make
necessary modifications to maintain uninterrupted service.
If trouble is experienced with this equipment or for repair/
warranty information, please contact the customer service
center at the number listed on your Quick Start. If the
equipment is causing harm to the telephone network, the
telephone company may request that you disconnect the
equipment until the problem is resolved. DO NOT DISASSEMBLE
THIS EQUIPMENT.
Connection to party line service is subject to state tariffs. Contact
the state public utility commission, public service commission or
corporation commission for information.
If your home has specially wired alarm equipment connected to
the telephone line, ensure the installation of this equipment does
not disable your alarm equipment. If you have questions about
what will disable alarm equipment, consult your telephone
company or a qualified installer.
D936-937.book Page 27 Friday, August 30, 2002 10:24 AM

D936/D937 - 900MHz Cordless
28 FCC AND WARRANTY
WARRANTY
If your telephone is defective in material or workmanship and you
return it within one year from the date of purchase, we will repair
it, or, at our option, we will replace it. If we repair it, we might
use reconditioned replacement parts or materials. If we choose
to replace it, we might substitute an identical reconditioned unit.
The repaired/replaced unit is warranted for either (a) ninety
days, or (b) the remainder of your phone’s original one year
warranty, whichever is longer.
WHAT YOU NEED TO DO
To receive warranty service, you must provide proof of purchase
(your sales receipt) and date of purchase.
WHAT THIS WARRANTY DOES NOT COVER
This warranty does not cover defects resulting from accidents,
alterations, failure to follow this manual’s instructions, battery
leakage, misuse, fire, flood, and Acts of God.
We do not warrant this product to be compatible with party lines,
with all types of telephone equipment, or with your specific
customer premises equipment. Shipping costs to and from
authorized service centers are not covered.
We are not responsible for implied warranties, including those of
fitness for a particular purpose and merchantability after the
initial one year period. We do not pay for loss of time,
inconvenience, loss of use of the product, or property damage
caused by this product or its failure to work, telephone company
service calls, or any other incidental or consequential damages.
STATE LAW RIGHTS
Some states do not allow limitations on how long an implied
warranty lasts, or the exclusion of limitation of incidental or
consequential damages, so the above exclusions might not apply
to you. This warranty gives you specific rights; you may also have
other rights, which can vary from state to state.
D936-937.book Page 28 Friday, August 30, 2002 10:24 AM
Importance Notice : This device and its antenna must not be
co-located or operating in conjunction with any other antenna or
transmitter. To comply with FCC RF exposure compliance
requirements, only use supplied antenna. Any unauthorized
modification to the antenna or device could avoid user's authority to
operate this device.

Manual del Usuario
900 MHz
DSS
106389-01A
D936/D937
D936-937sp.book Page 1 Friday, August 30, 2002 10:07 AM

D936-937sp.book Page 2 Friday, August 30, 2002 10:07 AM

TABLA DE CONTENIDO i
TABLA DE CONTENIDO
■ INTRODUCCIÓN iii
Funciones del D936 y D937. . . . . . . . . . . . . . . . . . . . . . . . . . . . . . . . . . . . . . iii
Única Función del D937 . . . . . . . . . . . . . . . . . . . . . . . . . . . . . . . . . . . . . . . . iii
■ INSTRUCCIONES DE SEGURIDAD iv
Símbolos de seguridad . . . . . . . . . . . . . . . . . . . . . . . . . . . . . . . . . . . . . . . . . . iv
Instrucciones de seguridad . . . . . . . . . . . . . . . . . . . . . . . . . . . . . . . . . . . . . . . iv
Cableado Telefónico e Instalación de Enchufes . . . . . . . . . . . . . . . . . . . . . . . v
Baterías. . . . . . . . . . . . . . . . . . . . . . . . . . . . . . . . . . . . . . . . . . . . . . . . . . . . . . v
■ INSTALACIÓN DEL D936/D937 1
Revisión del Contenido. . . . . . . . . . . . . . . . . . . . . . . . . . . . . . . . . . . . . . . . . . 1
Seleccione un Lugar para la Unidad Base . . . . . . . . . . . . . . . . . . . . . . . . . . . . 1
Conexión del Adaptador. . . . . . . . . . . . . . . . . . . . . . . . . . . . . . . . . . . . . . . . . 1
Instalación de las Baterías del Teléfono . . . . . . . . . . . . . . . . . . . . . . . . . . . . . 2
Instalación del cable de línea telefónica y de la cuña de montaje para
escritorio o pared. . . . . . . . . . . . . . . . . . . . . . . . . . . . . . . . . . . . . . . . . . . . 3
Cómo Retirar la Cuña de Montaje. . . . . . . . . . . . . . . . . . . . . . . . . . . . . . . . . . 4
Instalación del gancho del cinturón . . . . . . . . . . . . . . . . . . . . . . . . . . . . . . . . 4
Instalación de audífonos (Opcional) . . . . . . . . . . . . . . . . . . . . . . . . . . . . . . . . 4
■ FUNCIONES Y CONTROLES 5
Modalidad del Auricular. . . . . . . . . . . . . . . . . . . . . . . . . . . . . . . . . . . . . . . . . 7
Personalización de su teléfono . . . . . . . . . . . . . . . . . . . . . . . . . . . . . . . . . . . . 8
D936-937sp.book Page i Friday, August 30, 2002 10:07 AM

ii TABLA DE CONTENIDO
■ USO DEL D936/D937 12
Contestación de llamadas . . . . . . . . . . . . . . . . . . . . . . . . . . . . . . . . . . . . . . . 12
Marcación . . . . . . . . . . . . . . . . . . . . . . . . . . . . . . . . . . . . . . . . . . . . . . . . . . 12
Pre-Marcación . . . . . . . . . . . . . . . . . . . . . . . . . . . . . . . . . . . . . . . . . . . . . . . 12
Remarcación del Último Número . . . . . . . . . . . . . . . . . . . . . . . . . . . . . . . . . 12
Ajuste del Volumen . . . . . . . . . . . . . . . . . . . . . . . . . . . . . . . . . . . . . . . . . . . 12
Cronómetro de Llamadas . . . . . . . . . . . . . . . . . . . . . . . . . . . . . . . . . . . . . . . 13
Temporary Tone Service . . . . . . . . . . . . . . . . . . . . . . . . . . . . . . . . . . . . . . . . 13
Localizar el auricular perdido . . . . . . . . . . . . . . . . . . . . . . . . . . . . . . . . . . . . 13
Batería baja . . . . . . . . . . . . . . . . . . . . . . . . . . . . . . . . . . . . . . . . . . . . . . . . . 13
Uso de la tecla Hold . . . . . . . . . . . . . . . . . . . . . . . . . . . . . . . . . . . . . . . . . . . 14
Uso de la tecla Mute. . . . . . . . . . . . . . . . . . . . . . . . . . . . . . . . . . . . . . . . . . . 14
Uso de los Servicios de Red . . . . . . . . . . . . . . . . . . . . . . . . . . . . . . . . . . . . . 14
Uso del Intercomunicador . . . . . . . . . . . . . . . . . . . . . . . . . . . . . . . . . . . . . . 14
Uso de Voicemail . . . . . . . . . . . . . . . . . . . . . . . . . . . . . . . . . . . . . . . . . . . . . 15
Para apagar la luz de Voicemail . . . . . . . . . . . . . . . . . . . . . . . . . . . . . . . . . . 15
Uso de Call Waiting ID (CWID) Options . . . . . . . . . . . . . . . . . . . . . . . . . . . 15
Registros de Caller ID . . . . . . . . . . . . . . . . . . . . . . . . . . . . . . . . . . . . . . . . . . 16
Registros del Directorio . . . . . . . . . . . . . . . . . . . . . . . . . . . . . . . . . . . . . . . . 17
Lectura de Mensajes en Pantalla . . . . . . . . . . . . . . . . . . . . . . . . . . . . . . . . . . 22
■ RESOLUCIÓN DE PROBLEMAS 23
Problema / Solución . . . . . . . . . . . . . . . . . . . . . . . . . . . . . . . . . . . . . . . . . . . 23
■ FCC y GARANTÍA 26
Requisitos de la FCC . . . . . . . . . . . . . . . . . . . . . . . . . . . . . . . . . . . . . . . . . . . 26
Garantía . . . . . . . . . . . . . . . . . . . . . . . . . . . . . . . . . . . . . . . . . . . . . . . . . . . . 28
D936-937sp.book Page ii Friday, August 30, 2002 10:07 AM
D936/D937 Inalámbrico - 900MHz
INTRODUCCIÓN iii
INTRODUCCIÓN
FUNCIONES DEL D936 Y D937
■ 900 MHz Digital Spread Spectrum
■ Caller ID/Call Waiting ID
■ Opciones de Call Waiting ID
■ Altavoz tanto en el auricular como en la base
■ Intercom
■ Funciona en caso de una falla eléctrica (cuando se
instala y carga la batería de repuesto opcional)
■ Indicador de Mensajes Nuevos del Servicio de
Mensajes
■ 50 Registros de Caller ID
■ 50 Registros de DirectorioÚnica función del D937
ÚNICA FUNCIÓN DEL D937
■ Caller ID de Anuncio de Voz
■ Teclas dedicadas en la base: Hold, Mute, Speaker,
Voicemail, Page/Find, Flash y Redial
■ Luz de fondo y teclado en el auricular
■ Timbre ajustable tanto en el auricular como en la
base
■ Control de volumen ajustable para el auricular, el
altavoz del auricular y el altavoz de la base
■ Compatible con aparatos para sordera
■ Inglés y español
■ Entrada para auriculares
■ Cronómetro
■ Remarcación con una sola tecla
Los teléfonos D936 y D937 son teléfonos inalámbricos digitales de 900MHz que incorporan las funciones de llamadas de su compañía
telefónica local, tales como Caller ID, Voicemail y Call Waiting ID, para ofrecer teléfonos inalámbricos con todas las funciones. El
teléfono D937 también tiene una función muy emocionante - Voice Announce (Anuncio de Voz). La función del Anuncio de Voz le permite
escuchar el número de la persona que llama o un mensaje corto que usted grabó previamente anunciando el nombre de la persona
que llama antes de que usted conteste el teléfono.
Los teléfonos D936 y D937 son iguales excepto por la función de Anuncio de Voz. Si el icono aparece junto a un párrafo o
sección, el párrafo o sección únicamente corresponden al D937. Si no aparece ningún icono, el texto corresponde a ambas versiones
del teléfono. Por favor refiérase a su tarjeta de inicio rápido para ver su número de modelo.
VA - D937
D936-937sp.book Page iii Friday, August 30, 2002 10:07 AM
D936/D937 Inalámbrico - 900MHz
iv INSTRUCCIONES DE SEGURIDAD S- GUARDE ESTAS INSTRUCCIONES -
INSTRUCCIONES DE SEGURIDAD
SÍMBOLOS DE SEGURIDAD
ADVERTENCIA:
Este símbolo pretende avisarle de la presencia de
voltaje peligroso no aislado dentro del producto que
puede ser de suficiente magnitud como para
constituir un riesgo de descarga eléctrica. No abra la
caja protectora del producto.
PRECAUCIÓN:
Este símbolo pretende informarle de las importantes
instrucciones de operación y mantenimiento incluidas
con el manual de este producto.
DEBE SABER ESTO:
Este símbolo representa la información importante.
INSTRUCCIONES DE SEGURIDAD
PRECAUCIÓN
Para reducir el riesgo de incendio o lesiones a personas,
lea y siga estas instrucciones:
■ Lea y entienda todas las instrucciones.
■ Siga todas las advertencias e instrucciones marcadas en la
unidad y en el Manual del Usuario.
■ Use solamente el tipo de baterías recomendadas en este
manual.
■ Desconecte el teléfono de la pared antes de limpiarlo. No use
limpiadores líquidos o en aerosol, sólo use un trapo húmedo
para limpiar.
■ No coloque el teléfono sobre un carro, superficie o mesa
inestable. Éste podría caerse, causando serios daños o
impedir su operación.
■ Nunca coloque el teléfono cerca de o sobre un radiador o
calentador.
■ Sólo opere este teléfono usando el tipo de fuente de energía
eléctrica listado en la etiqueta de marca. Si no está seguro
de la fuente de energía eléctrica de su casa, consulte con su
distribuidor o con la compañía local de luz.
■ No sobrecargue las tomas y extensiones ya que esto podría
provocar un incendio o descarga eléctrica.
■ Nunca meta objetos de ningún tipo al teléfono ya que pueden
tocar puntos de voltaje peligrosos o tener descargas
eléctricas en los componentes y esto podría provocar un
incendio o descarga eléctrica.
■ Lleve el teléfono con un técnico calificado cuando requiera de
servicio.
■ Para reducir el riesgo de descarga eléctrica, no desarme el
teléfono. Abrirlo o quitar las cubiertas puede exponerlo a
voltajes peligrosos u otros riesgos. El armarlo
incorrectamente puede causar una descarga eléctrica
durante su uso posterior.
D936-937sp.book Page iv Friday, August 30, 2002 10:07 AM
D936/D937 Inalámbrico - 900MHz
INSTRUCCIONES DE SEGURIDAD v
■ Desconecte el teléfono de la toma de la pared y llévelo con
personal de servicio calificado en las siguientes condiciones:
- Si el cable de corriente o enchufe están dañados o
desgastados.
-Si entra líquido a la unidad.
- Si la unidad se expone al agua.
- Si la unidad no funciona normalmente siguiendo las
instrucciones de seguridad.
- Si la unidad se cae o se daña la cubierta.
- Si la unidad muestra un cambio en su
funcionamiento.
■ Evite usar el teléfono durante una tormenta eléctrica. Puede
haber un ligero riesgo de descargas eléctricas por los
relámpagos.
■ No use el teléfono para reportar una fuga de gas si la fuga es
cerca de la unidad.
■ El desechar este producto debe manejarse de acuerdo a las
leyes y reglamentos nacionales.
WARNINGS
ADVERTENCIA
Para evitar incendios o descargas eléctricas, no
exponga este producto a la lluvia o la humedad.
PRECAUCIÓN
Para reducir el riesgo de descargas eléctricas, NO
retire la cubierta o tapa posterior. No hay piezas de
utilidad dentro. Busque personal calificado para
servicio de reparación y mantenimiento.
PRECAUCIÓN
Cualquier cambio o modificación a este aparato no
aprobado expresamente podría cancelar la
autoridad del usuario de operar este equipo.
CABLEADO TELEFÓNICO E INSTALACIÓN DE ENCHUFES
■ Tenga precaución al instalar o modificar las líneas telefónicas.
■ Nunca instale el cableado telefónico durante una tormenta
eléctrica.
■ Nunca instale enchufes telefónicos en lugares mojados a
menos que el enchufe esté diseñado específicamente para
lugares mojados.
BATERÍAS
PRECAUCIÓN
Para reducir el riesgo de un incendio, use solamente
el paquete de baterías de repuesto de 3.6V
850mAh de Níquel Cadmio (Ni-Cad) para el teléfono
inalámbrico.
■ No tire el paquete de baterías en el fuego ya que pueden
explotar. Verifique los códigos locales a fin de conocer los
reglamentos para deshacerse apropiadamente de las
baterías.
S- GUARDE ESTAS INSTRUCCIONES -
D936-937sp.book Page v Friday, August 30, 2002 10:07 AM
D936/D937 Inalámbrico - 900MHz
vi INSTRUCCIONES DE SEGURIDAD
■ No abra o mutile el paquete de baterías. Los electrolitos que
se producen son corrosivos y pueden causar daño a los ojos
o la piel. Pueden ser tóxicos si se ingieren.
■ Evite el contacto con anillos, brazaletes, llaves u otros objetos
de metal al manejar las baterías. Estos objetos pueden
provocar un corto circuito en las baterías o sobrecalentar los
conductores produciendo quemaduras.
■ No trate de recargar el paquete de baterías recalentándolo.
La producción repentina de electrolitos puede provocar
quemaduras o irritación de los ojos y la piel.
■ Quite el paquete de baterías si no piensa usar el teléfono
durante varios meses seguidos. Las baterías pueden
derramarse con el tiempo.
■ Tire los paquetes de baterías “muertos” lo más pronto posible
porque es muy probable que se derramen dentro del
teléfono.
■ No guarde este teléfono o paquete de baterías en áreas de
temperaturas altas. Las baterías que se guardan en el
congelador o en el refrigerador deben protegerse de la
condensación durante el almacenamiento o descongelación.
Los paquetes de baterías deben estabilizarse a temperatura
ambiente antes de usarse.
■ Su paquete de baterías es recargable y se
puede reciclar una vez que termine su vida
útil. Dependiendo de sus leyes estatales y
locales, puede ser ilegal tirar las baterías al
sistema de basura municipal. Verifique con la
compañía de desechos sólidos o llame al 1-
800-8-BATTERY para pedir información sobre
el reciclado y desecho de baterías de Ni-Cd en
su área.
S- GUARDE ESTAS INSTRUCCIONES -
D936-937sp.book Page vi Friday, August 30, 2002 10:07 AM
D936/D937 Inalámbrico - 900MHz
INSTALACIÓN DEL D936/D937 1
INSTALACIÓN DEL D936/D937
REVISIÓN DEL CONTENIDO
Verifique tener todo lo siguiente:
■ Base del teléfono y auricular
■ Cable largo de línea
■ Cable corto de línea para montaje en la pared
■ Cuña de montaje para mesa o pared
■ Adaptador de CA
■ Uno paquete de baterías
■ Batería de repuesto (opcional)
■ Gancho del cinturón
■ Manual del usuario
■ Tarjeta de Inicio Rápido
SELECCIONE UN LUGAR PARA LA UNIDAD BASE
La base debe colocarse lejos de cualquier otro equipo
electrónico como computadora personal, horno de
microondas, estéreo o televisión. También es buena idea
colocar la unidad lejos de áreas ruidosas o de fuentes de
calor como radiadores y la luz directa del sol.
CONEXIÓN DEL ADAPTADOR
a. Conecte la punta del adaptador en un enchufe de CD de
9V de la base y el otro extremo a la toma eléctrica.
Asegúrese de que la toma de pared no esté
controlada por un interruptor de luz y la punta esté
bien conectada. Si la batería de repuesto opcional no
está cargada, el teléfono no funcionará son energía de
corriente alterna.
PRECAUCIÓN
Debe usar un adaptador eléctrico de Clase 2 con
capacidad para 9 Voltios de CD y por lo menos
600 mA. La punta del centro debe estar en positivo
y el enchufe debe caber en el enchufe de CD de 9V.
El adaptador incluido cumple con estas
especificaciones. Usar un adaptador que no cumpla
con estas especificaciones podría dañar el teléfono o
el adaptador.
DEBE SABER ESTO
Se recomienda la instalación de un protector de
corriente de CA en la entrada eléctrica de CA en
donde está conectado este adaptador. Las
compañías telefónicas indican que las descargas
eléctricas, normalmente los relámpagos pasajeros,
son muy destructoras del equipo de la terminal de los
usuarios conectado a la fuente de poder de CA.
D936-937sp.book Page 1 Friday, August 30, 2002 10:07 AM
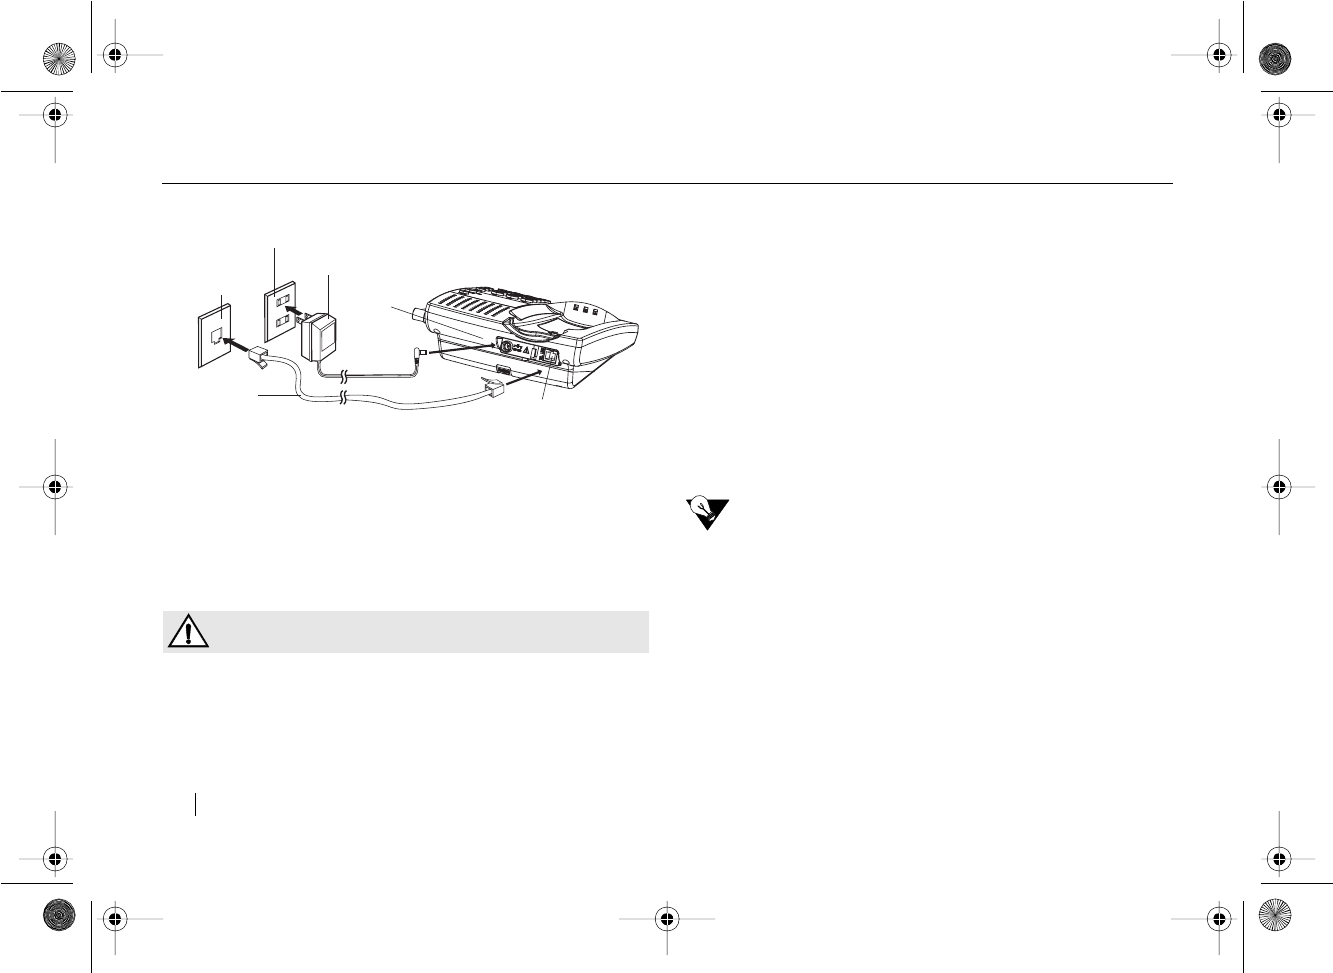
D936/D937 Inalámbrico - 900MHz
2 INSTALACIÓN DEL D936/D937
b. Ensarte el cable a través del gancho de la base para
evitar que el cable quede suelto.
INSTALACIÓN DE LAS BATERÍAS DEL TELÉFONO
Use este procedimiento para instalar o cambiar las baterías
del teléfono. Asegúrese de seguir las especificaciones de las
baterías y las instrucciones de seguridad. Vea
“INSTRUCCIONES DE SEGURIDAD” en la página iv.
PRECAUCIÓN
Para reducir el riesgo de incendio, use solamente
paquetes de baterías de 3.6V, 850 mAh de níquel-
cadmio (Ni-Cad) en este teléfono. No intente abrir el
paquete sellado de las baterías. Todas las baterías de Ni-
Cad usadas deben reciclarse o tirarse adecuadamente en
cumplimiento con las leyes correspondientes.
LAS BATERÍAS DEL AURICULAR
a. Presione la tapa de las baterías hacia abajo y
deslice la tapa hacia afuera para abrir el
compartimiento.
b. Identifique “+” y “-” de las baterías dentro del
compartimiento de baterías y “+” y “-”
correspondientes del paquete de baterías.
Asegúrese de alinear “+” y “-” del paquete de
baterías con “+” y “-” en el compartimiento de
las baterías y oprima hacia abajo.
c. Para colocar la tapa de las baterías, deslice la
tapa hacia adentro hasta que la lengüeta
entre y la tapa quede segura en su lugar.
DEBE SABER ESTO
Antes de usar su teléfono por primera vez, coloque el
auricular (cara de la pantalla asia arriba) en la base y
cargue las baterías por lo menos durante 12 horas
antes de conectar la línea telefónica. Se iluminará la luz
de carga de la base para indicarle que el auricular se
está cargando. El auricular debe colocar
correctamente en la base, cara de la pantalla asia
arriba, en la orden para que las baterIas del auricular
cargue.
LINEA TELEFÓNICA
GATO
BASE
EL GATO
DE DC9V
ADAPTER
DE LA CA
120V ENCHUFE
DE PARED
CABLE LARGO
DE LÍNEA
ENCHUFE DE
PARED
DEL TELÉFONO
D936-937sp.book Page 2 Friday, August 30, 2002 10:07 AM
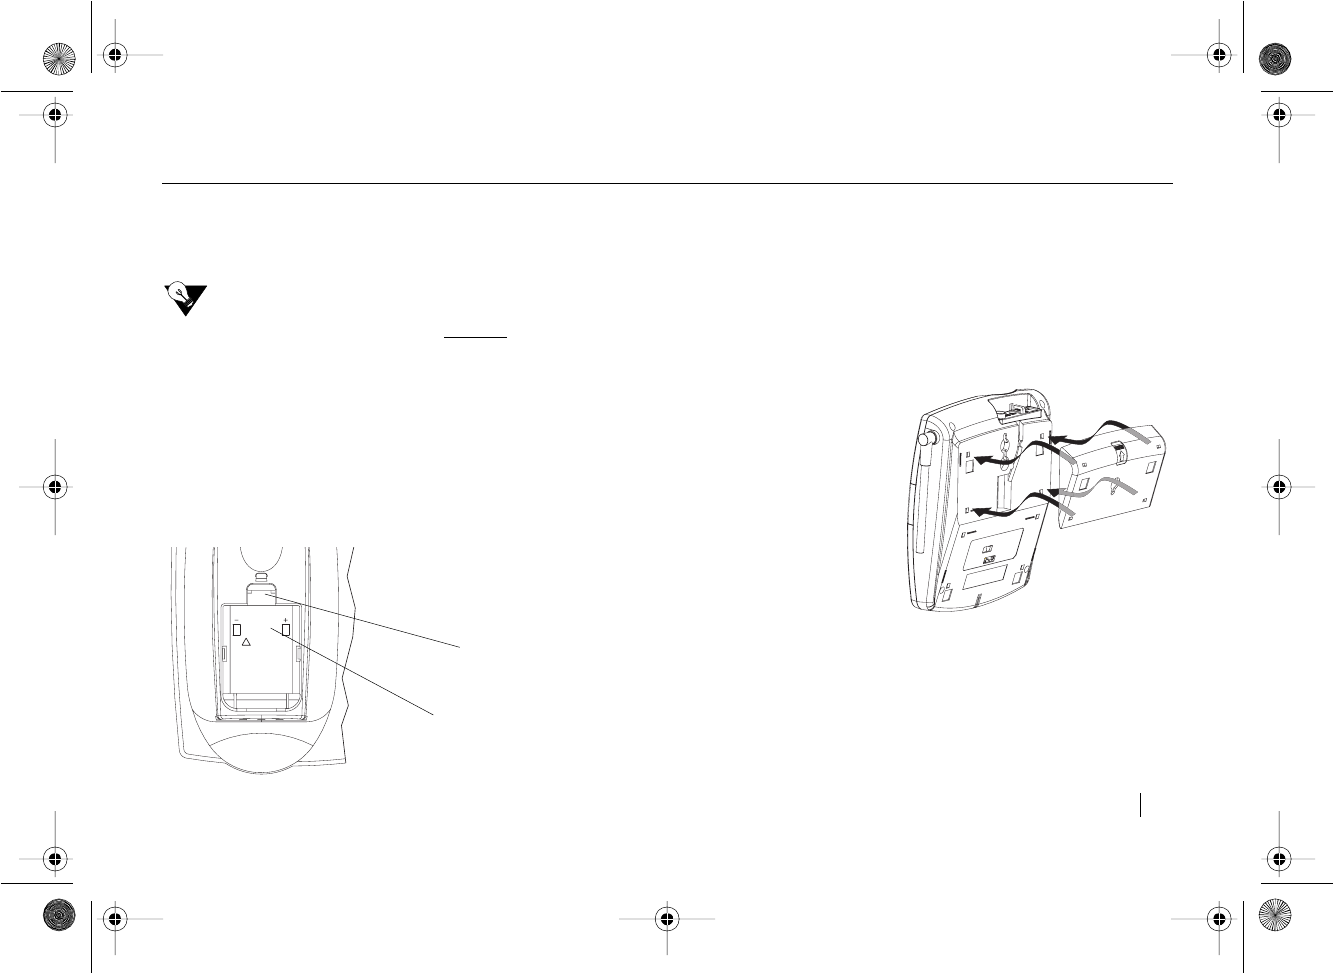
D936/D937 Inalámbrico - 900MHz
INSTALACIÓN DEL D936/D937 3
BATERÍA DE REPUESTO (OPCIONAL)
Al cambiar la batería de repuesto en la base el teléfono
podrá funcionar durante una falla de energía (el auricular
seguirá funcionando).
DEBE SABER ESTO
Instale la batería de repuesto después de conectar el
adaptador.
a. Coloque el paquete de la batería de repuesto en el
cargador al oprimir el botón de la compuerta de las
baterías para quitar la tapa.
b. Asegúrese de alinear los signos "+" y "-" del paquete de
baterías con los signos "+" y "-" del compartimiento
de las baterías y oprima para colocar en su lugar.
c. Ponga la tapa y verifique que la luz de carga LED esté
prendida.
INSTALACIÓN DEL CABLE DE LÍNEA TELEFÓNICA Y
DE LA CUÑA DE MONTAJE PARA ESCRITORIO O
PARED
Usted puede instalar el teléfono D936/D937 en una mesa
o en la pared.
PARA USO EN MESA O ESCRITORIO
a. Coloque la cuña
sobre la porción
superior de la
base de tal
forma que la
flecha indique en
dirección
opuesta del
teléfono. Instale
la cuña
asegurándose de
que quede
alineada sobre
los orificios y
oprima hacia
abajo y en la
dirección
opuesta de la
flecha hasta que quede colocada en su lugar.
b. Conecte el cable corto del teléfono en el
enchufe de pared marcado TEL LINE.
c. Tome el otro extremo y conéctelo en el
enchufe telefónico de la pared.
CAUTION:
To reduce risk of
fire, replace only
with the same
type battery
listed in the
User Manual.
!
Gancho de seguridad
de la tapa de las
baterías
Cargador de la
batería de
repuesto
Montaje en Escritorio
D936-937sp.book Page 3 Friday, August 30, 2002 10:07 AM
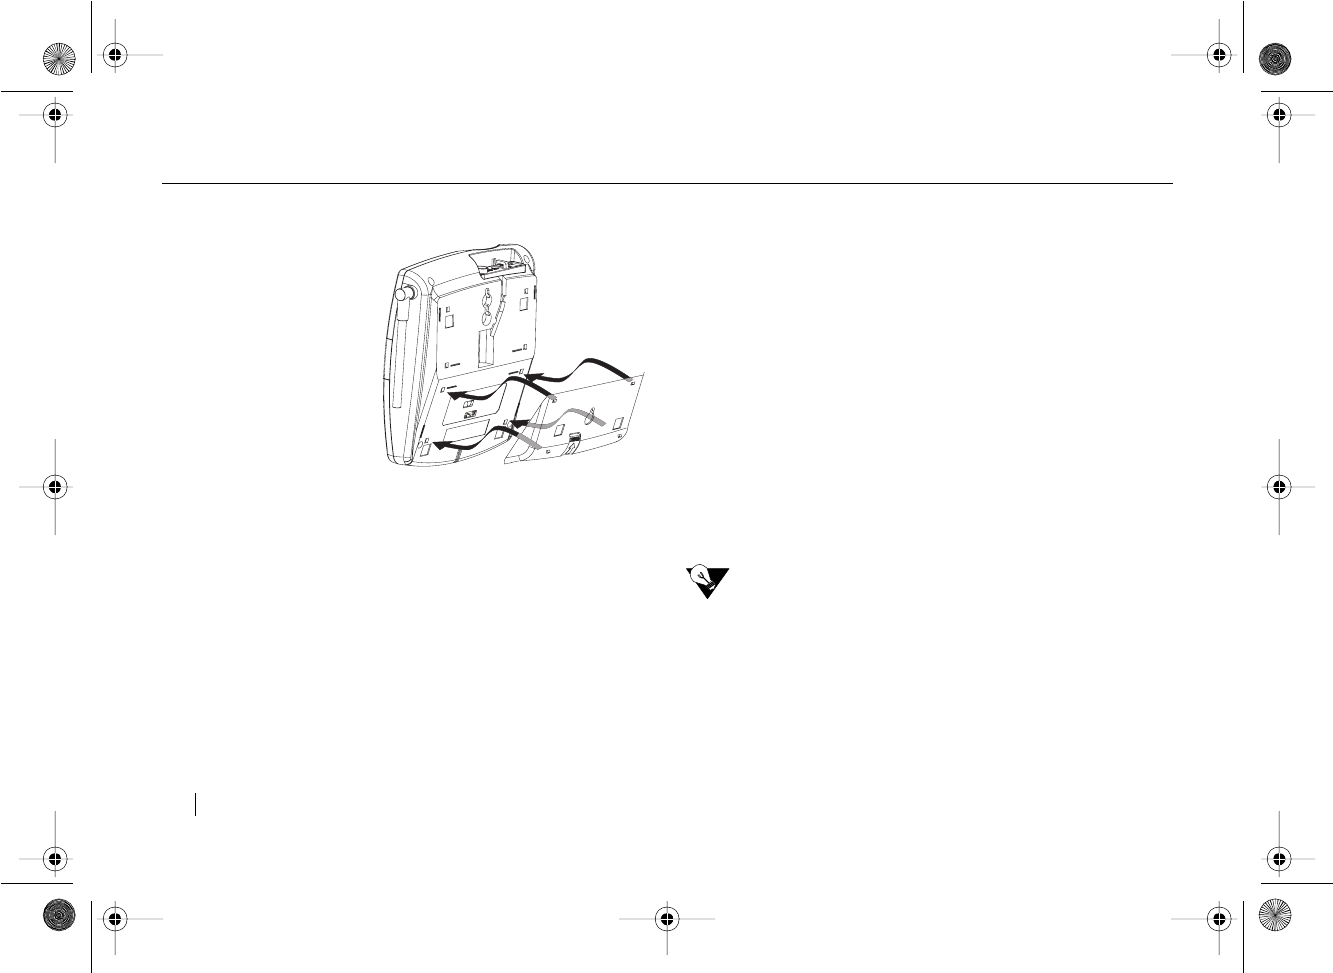
D936/D937 Inalámbrico - 900MHz
4 INSTALACIÓN DEL D936/D937
PARA MONTARLO EN LA PARED
a. Coloque la cuña
sobre la porción
inferior de la
base de tal forma
que la flecha
indique en
dirección
opuesta del
teléfono. Instale
la cuña
asegurándose de
que quede
alineada sobre
los orificios y
oprima hacia
abajo y en la
dirección opuesta de la flecha hasta que quede
colocada en su lugar.
b. Conecte el cable corto del teléfono en el
enchufe de pared marcado TEL LINE.
c. Ensarte el cable del teléfono a través del canal
abierto de la base.
d. Conecte el otro extremo del cable telefónico
en el enchufe telefónico de la pared.
e. Use el espacio de la parte baja de la base para
guardar el cable sobrante.
f. Cuelgue la base sobre los ganchos de instalación
(placa de pared no incluida).
CÓMO RETIRAR LA CUÑA DE MONTAJE
Quite la cuña de montaje de la parte baja de la base al
colocar el dedo pulgar en la parte superior de la flecha de la
cuña de montaje y presione hacia abajo en la dirección de la
flecha.
INSTALACIÓN DEL GANCHO DEL CINTURÓN
El gancho del cinturón se puede usar para colgar el auricular
de su cinturón. Coloque el gancho del cinturón en la parte
posterior del auricular. Asegúrese de alinear las lengüetas
del gancho del cinturón con las ranuras del auricular.
Oprima el gancho del cinturón al auricular para enganchar
las lengüetas en las ranuras. Asegúrese de que ambas
lengüetas estén bien enganchadas en las ranuras del
auricular.
Para quitar el gancho del cinturón, jale una de las lengüetas
fuera de las ranuras del auricular. Cuidadosamente jale el
gancho del auricular.
DEBE SABER ESTO
El gancho del cinturón puede permanecer en el auricular
cuando el auricular está colocado en la base.
INSTALACIÓN DE AUDÍFONOS (OPCIONAL)
Se puede usar un audífono con un enchufe estándar de
2.5 mm en la entrada para audífonos en el costado del
auricular. Mantenga el covertor del enchufe del audífono en
su lugar cuando el audífono no es usado.
Montaje en Pared
D936-937sp.book Page 4 Friday, August 30, 2002 10:07 AM
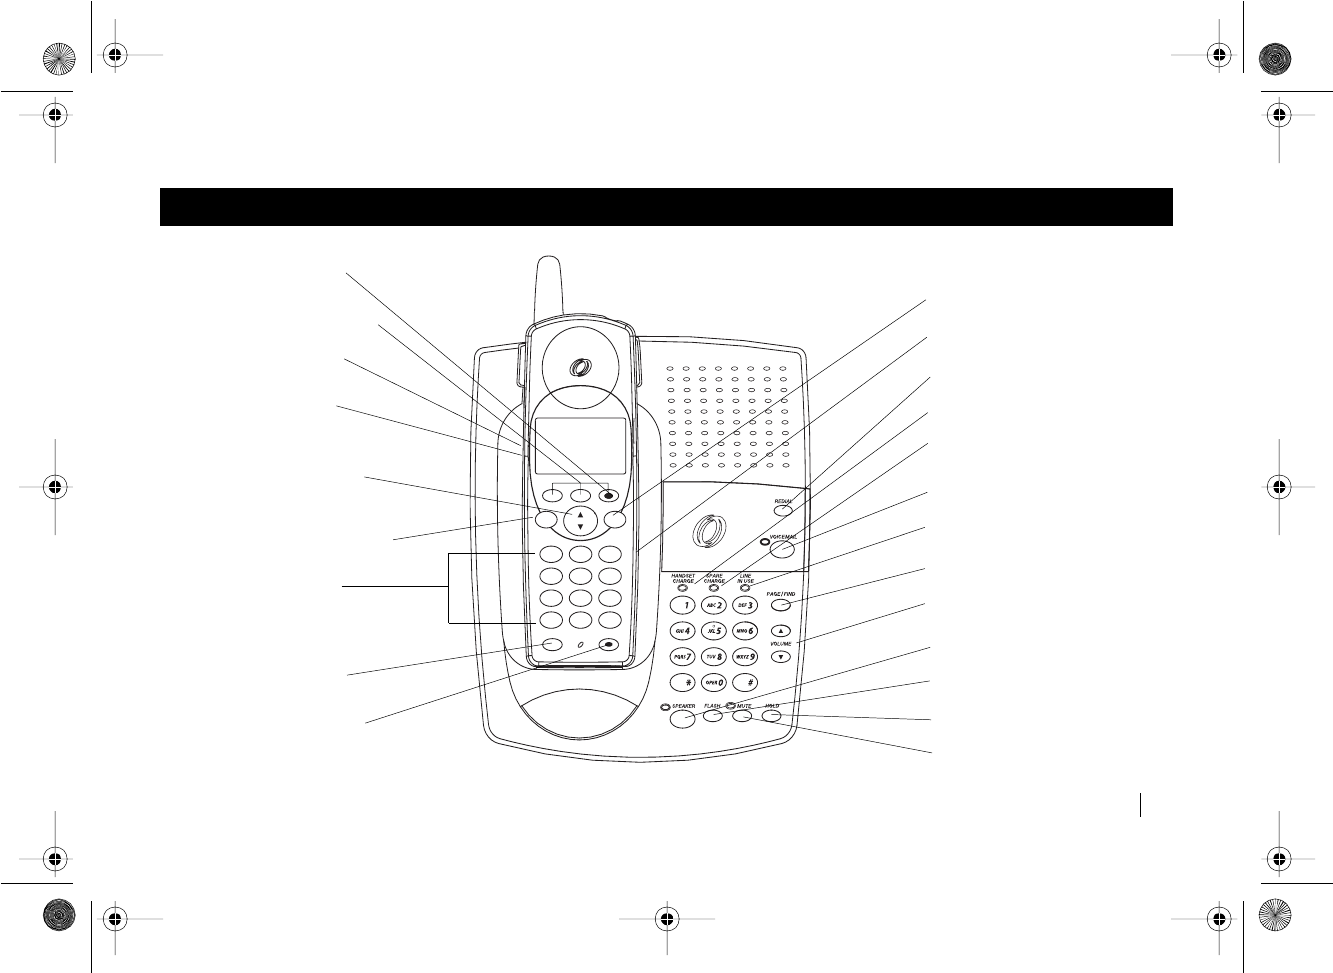
D936/D937 Inalámbrico - 900MHz
FUNCIONES Y CONTROLES 5
FUNCIONES Y CONTROLES
Luz de carga de repuesto
Tecla y Luz de Voicemail
Tecla Hold
TAL K MENU
EXIT
DEF
3
MNO
6
2
1
ABC
JKL
5
4
8
7
0
*
TUV
OPER
PQRS
GHI
#
WXYZ
9
FLASH SPEAKER
CALL # 5
5:05 PM
MAY 5
SMITH JOHN
1-408-555-1234
SAVE 7-10-11 DELETE
C
A
L
L
S
D
I
R
REVIEW
END
Digital
Spread Spectrum
900
MHz
DSS
900 MHz
Luz de Linea en Uso
Luz de carga del auricular
Tecla Menu/Exit
Tecla Review
Tecla y Luz de
Tecla Talk/End y
Luz Talk
Tecla Flash
Teclado de
Enchufe del auricular
Teclas del
control del
Teclas de
(Tecla ̆ DIR)
(Tecla ̄ CALLS)
Volumen
Tecla Mute Tecla Redial
Tecla Page/Find Key
Teclas del control
Tecla y Luz de Speaker
Tecla Flash
Tecla y Luz de Mute
marcación
funciones
Luz de
Voicemail
del Volumen
Speaker
D936-937sp.book Page 5 Friday, August 30, 2002 10:07 AM

D936/D937 Inalámbrico - 900MHz
6 FUNCIONES Y CONTROLES
Teclas
■ Control del Volumen (al lado del auricular y tapa de la
base) ajusta el volumen del auricular, del timbre del
auricular y del timbre de la base. También ajusta el
volumen del altavoz del auricular y de la base.
■ Talk / End (auricular) y Speaker (auricular) se usan para
tener acceso a la línea telefónica y marcará el número
que aparece en al pantalla. Speaker también prende o
apaga el altavoz del auricular.
■ Speaker (base) le permite prender o apagar el auricular
y le da acceso a la línea telefónica.
■ Teclado de marcación (auricular y base) las teclas
numéricas se usan para la marcación.
■ Las Teclas de Funciones (auricular) varían dependiendo
de la modalidad del auricular. Las funciones se listan
abajo y describen en “Modalidad del Auricular” en la
página 7.
■ ̆ Review ̄le permite recorrer las opciones del menú y
tener acceso a sus registros del directorio ̆ (Dir) y
registros de Caller ID ̄ (Calls) con una sola tecla de la
pantalla inactiva.
■ Menu / Exit le permite programar su teléfono y utilizar
los Servicios de Red.
■ Voicemail (base) le permite tener acceso al buzón de su
servicio de mensajes siempre y cuando esté suscrito a
través de su compañía telefónica local.
■ Redial (base) recuerda y vuelve a marcar el último
número que marcó.
■ La tecla Mute (al lado del auricular) silencia el micrófono
del auricular o el altavoz del auricular.
■ La tecla Mute (base) silencia el micrófono del altavoz de
la base.
■ Flash (auricular y base) le permite a los suscriptores a
Call Waiting alternar entre dos llamadas.
■ Hold (auricular y base) coloca la llamada existente en
espera. Parpadean la luz de hablar y la luz del altavoz
de la base.
■ Page / Find funciona como dispositivo para localizar el
auricular. Si oprime la tecla PAG E / FI N D, el auricular
timbra durante 15 segundos.
Luces
■ Voicemail (auricular y base) parpadea si tiene mensajes
en su buzón.
■ Ta lk (auricular) se ilumina cuando el auricular está en la
modalidad de Talk.
■ Speaker (auricular y base) se ilumina cuando está activo
el altavoz.
■ LíneaenUso(LineinUse)(base) aparece si se está
usando este u otro teléfono en la misma línea.
■ CargadeRepuesto(SpareCharge)(base) aparece
cuando la batería de repuesto está en el cargador.
■ Carga del Auricular (Handset Charge) (base) aparece
cuando el auricular está en la base.
■ Mute (base) parpadea indicando que los micrófonos del
altavoz están en silencio.
Varios
■ Enchufe del Auricular (auricular) le permite usar un
audífono normal con entrada de 2.5mm.
Save Voicemail
7-10-11 Edit
Delete Select
Redial / P Hold
D936-937sp.book Page 6 Friday, August 30, 2002 10:07 AM
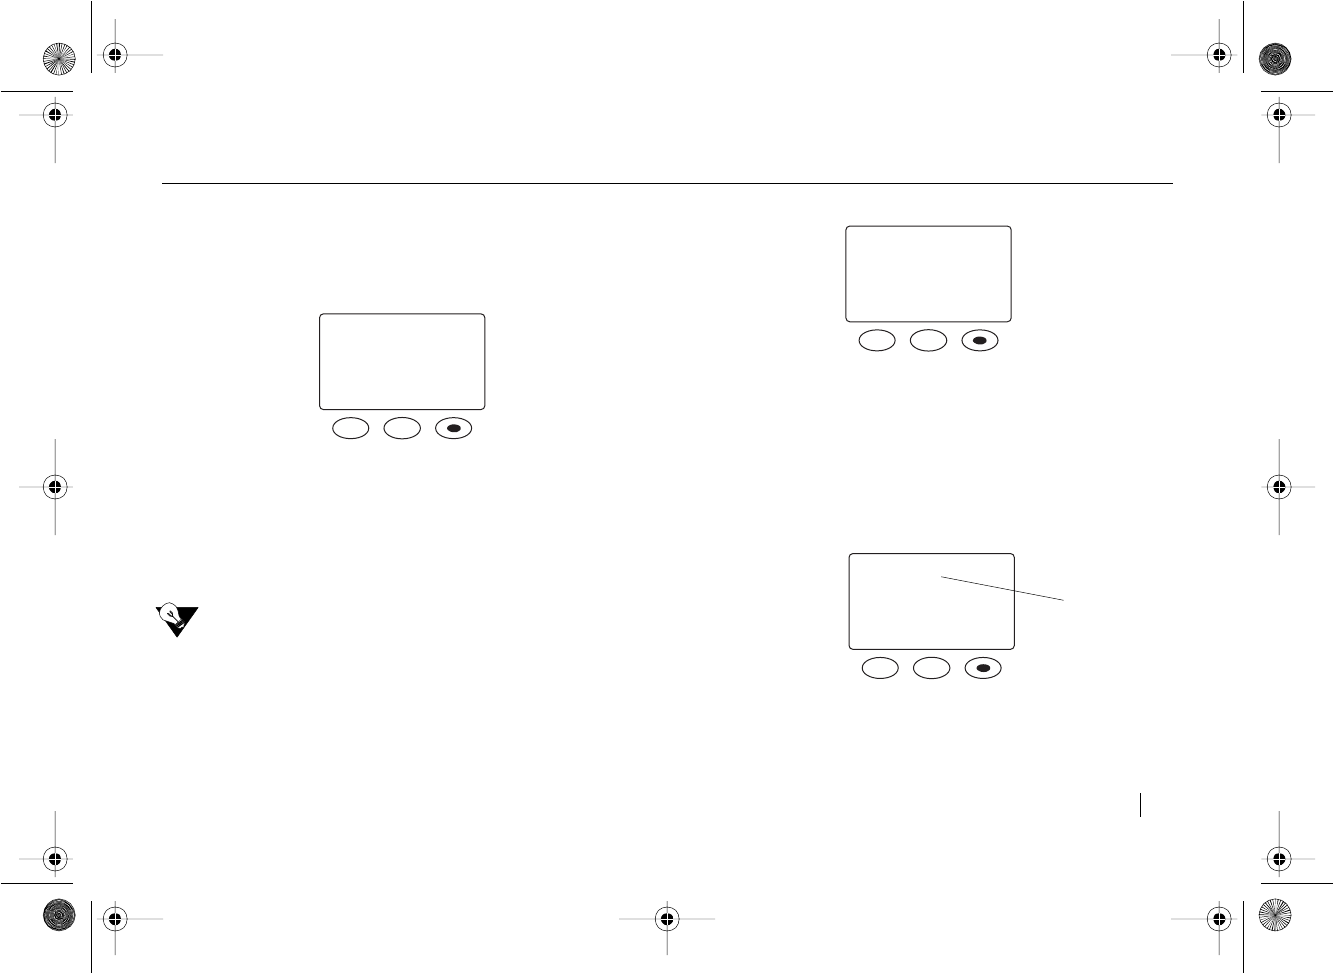
D936/D937 Inalámbrico - 900MHz
FUNCIONES Y CONTROLES 7
MODALIDAD DEL AURICULAR
La pantalla varía dependiendo de la modalidad del auricular,
las funciones de los 3 botones debajo de la pantalla varían.
MODALIDAD INACTIVA
■ La Tecla Redial / P recuerda y vuelve a marcar el último
número que marcó.
■ La Tecla Voicemail le permite tener acceso al buzón de
su servicio de mensajes siempre y cuando esté
suscrito a través de su compañía telefónica local.
Voicemail debe estar activo para que funcione esta
tecla. Vea “Programación de Vmail” en la página 9.
DEBE SABER ESTO
La modalidad inactiva es la pantalla preestablecida de
fábrica cuando no se está usando el teléfono. Para
regresar a la pantalla inactiva desde otras
modalidades, oprima la tecla MENU / EXIT.
MODALIDAD DE CALLER ID
■ La Tecla Save le permite guardar información en el
directorio.
■ La Tecla 7-10-11 le permite modificar el formato de un
número de un Registro de Llamada de tal forma que
tenga el formato correcto para marcarlo desde su
teléfono.
■ La Tecla Delete se usa para borrar registros individuales
o múltiples del registro de Caller ID.
MODALIDAD DE HABLAR
■ La Tecla Redial recuerda y vuelve a marcar el último
número que marcó.
■ La Tecla Hold coloca la llamada existente en espera.
En esta pantalla aparece el cronómetro de llamadas. Vea
“Cronómetro de Llamadas” en la página 13.
REDIAL/P VOICEMAIL
5:05 AM MAY 5
3 LLAMADAS
LLAMADA #5
DELETE
7-10-11
SAVE
SMITH JOHN
1-800-555-1234
REDIAL/P
HOLD
15:05
Cronómetro
de llamadas
D936-937sp.book Page 7 Friday, August 30, 2002 10:07 AM
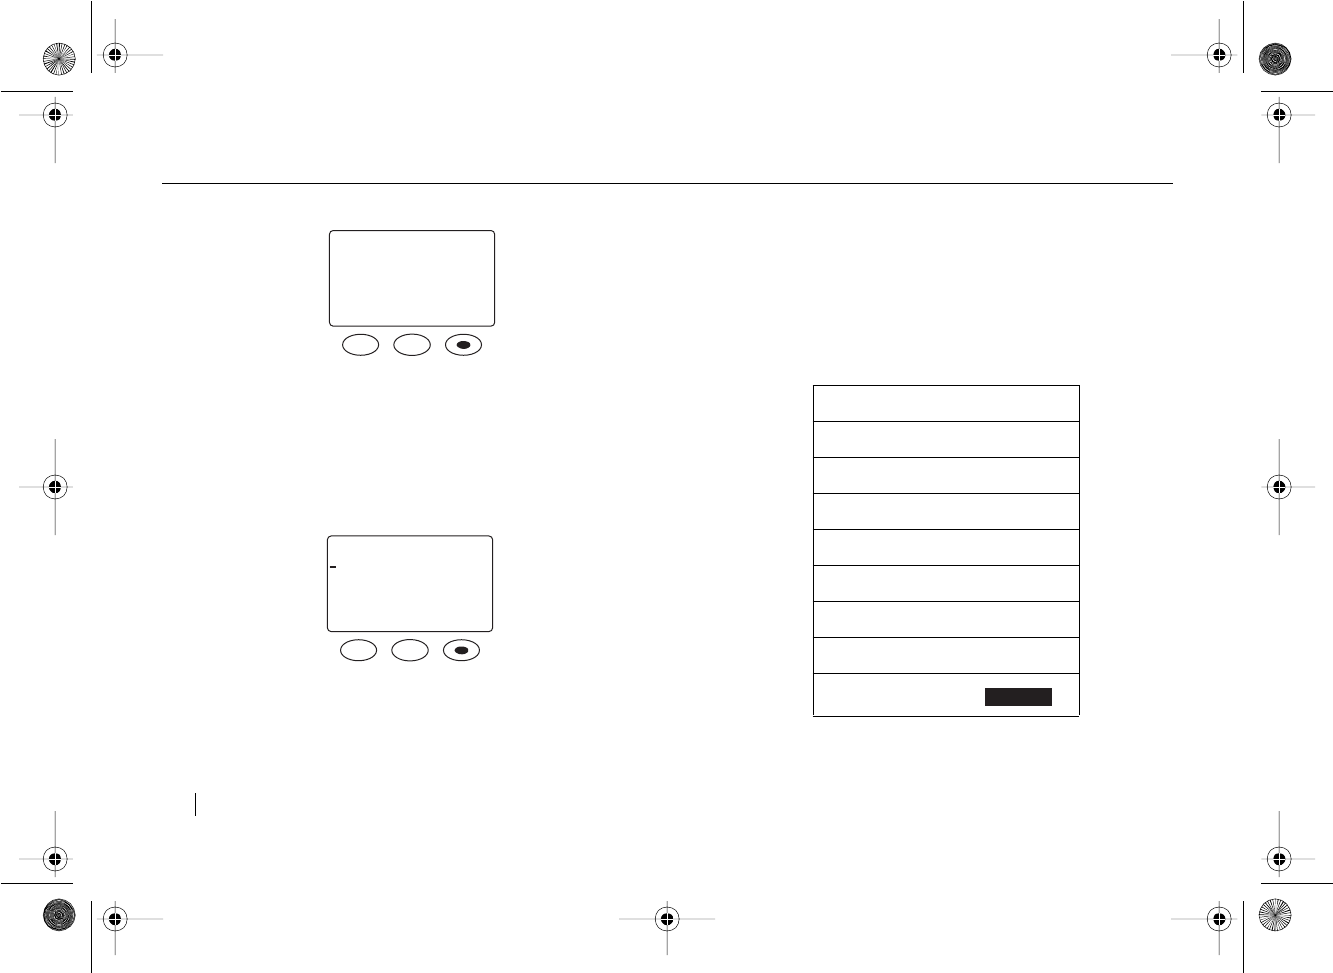
D936/D937 Inalámbrico - 900MHz
8 FUNCIONES Y CONTROLES
MODALIDAD DEL DIRECTORIO
■ La Tecla Edit le permite cambiar información en el
directorio.
■ La Tecla Delete se usa para borrar dígitos y
caracteres en la pantalla. También puede borrar
registros individuales o múltiples del Directorio.
MODALIDAD DE CONFIGURACIÓN
■ La tecla Select selecciona la opción donde está el
cursor.
PERSONALIZACIÓN DE SU TELÉFONO
Usted puede personalizar su teléfono seleccionando la tecla
MENU / EXIT. - MENU - aparecerá en la pantalla. Usando
la tecla ̆ REVIEW ̄, puede revisar las opciones. Marque
el número del menú para seleccionar la opción deseada u
oprima SELECT cuando el cursor esté junto a la opción
deseada. El número específico de cada opción se lista en la
siguiente tabla.
EDIT
- DIRECTORIO -
JOHN SMITH
1-408-555-1234
DELETE
SELECT
- MENU -
1=SRVICIOS RED
2=INTERCOM
3=IDIOMA
̈
- MENU -
1=SRVICIOS RED
2=INTERCOM
3=IDIOMA
4=PROGRAMA VM
5=METODO MARCAR
6=APGA LUZ VM
7=CWID OPCIONS
8=ANUNCIO D VOZ
VA - D937
D936-937sp.book Page 8 Friday, August 30, 2002 10:07 AM

D936/D937 Inalámbrico - 900MHz
FUNCIONES Y CONTROLES 9
SERVICIOS DE RED
La opción de los Servicios de Red le permite tener acceso
fácil a los servicios de red a los que está suscrito a través
de su compañía telefónica. Para activar un Servicio de Red
específico, oprima MENU / EXIT.Aparece SRVICIOS RED en
la pantalla. Oprima SELECT (u oprima el 1). Recorra las
opciones disponibles y oprima TAL K / EN D para activar el
Servicio de Red que aparece en la pantalla.
Para obtener una lista de las funciones que están
programadas en su teléfono, por favor haga referencia a
su tarjeta de Inicio Rápido.
DEBE SABER ESTO
Si usted desea tener acceso a una función a la que
no está suscrito actualmente, por favor
comuníquese a su compañía telefónica.
INTERCOM
Además de las funciones telefónicas normales, su teléfono
D936/D937 también se puede usar como
intercomunicador. Para configurar su teléfono como
intercomunicador, oprima MENU / EXIT. Usando la tecla ̆
REVIEW ̄, recorra las opciones hasta que el cursor esté
junto a INTERCOM y oprima SELECT (u oprima el 2).
INTERCOM ACTIVO aparece en la pantalla.
Vea “Uso del Intercomunicador” en la página 14 para
obtener información adicional.
SELECCIÓN DEL IDIOMA
El teléfono D936/D937 se puede configurar para que
muestre el texto tanto en inglés como en español. Para
seleccionar el idioma, oprima MENU / EXIT. Usando la tecla
̆ REVIEW ̄, recorra las opciones hasta que el cursor esté
junto a IDIOMA y oprima SELECT (u oprima el 3). Aparecerá
lo siguiente.
LANGUAGE/IDIOMA
1=ENGLISH
2=ESPANOL
ACTUALMENTE ESP
Oprima el número del idioma deseado u oprima MENU / EXIT
para dejarlo como está.
PROGRAMACIÓN DE VMAIL
Si está suscrito al Servicio de Mensajes de su compañía
telefónica local, puede usar la tecla VOICEMAIL para entrar
automáticamente a su buzón.
Para programar su número de acceso al Servicio de
Mensajes, oprima MENU / EXIT. Usando la tecla
̆ REVIEW ̄, recorra las opciones hasta que el cursor esté
junto a PROGRAMAR VMAIL y oprima SELECT (u oprima el
4). Marque su número de acceso y luego oprima SAVE.
PROGRAMAR VMAIL
ACCESO VMAIL
D936-937sp.book Page 9 Friday, August 30, 2002 10:07 AM

D936/D937 Inalámbrico - 900MHz
10 FUNCIONES Y CONTROLES
Los sistemas de Servicio de Mensajes funcionan diferente
unos de otros y algunos requieren que se agreguen pausas
adicionales. Después de programar el número de acceso a
Voicemail, en la pantalla aparecerá lo siguiente:
PROGRAMAR VMAIL
MARCA CONTRASENA
XX SEGS DESPUES
1=MAS 2=MENOS
Al oprimir el 1 se agregan 3 segundos de pausa. Al oprimir
el 2 se reduce la pausa 3 segundos. Cuando haya agregado
o reducido suficientes pausas, oprima SAVE. Se sugieren
las pausas de 3 a seis segundos y la pausa preprogramada
es de 6 segundos.
PROGRAMAR VMAIL
MARCA CONTRASENA
Y # SI NECESITA
Marque su contraseña y luego oprima SAVE. Si usted
normalmente oprime # después de marcar su contraseña,
agréguelo al final de su contraseña también.
DEBE SABER ESTO
Para cambiar el número de acceso o contraseña
existentes de su servicio de mensajes, repita los mismos
pasos que siguió para programar su servicio de
mensajes. Cuando aparece en la pantalla el número de
acceso y/o contraseña que se necesita modificar, use
la tecla delete para borrar el número o contraseña
originales. Marque el número o contraseña nuevos y
continúe con las instrucciones de programación.
SELECCIÓN DEL MÉTODO DE MARCACIÓN
El teléfono D936/D937 puede marcar en la modalidad de
tono o de pulso/giratorio. Para seleccionar el método de
marcación, oprima MENU / EXIT. Usando la tecla ̆ REVIEW
̄, recorra las opciones hasta que el cursor esté junto a
METODO MARCACION y oprima SELECT (u oprima el 5).
-METODO MARCACION-
1=TONO
2=PULSO
ACTUALMENTE TONO
Oprima el número del método de marcación deseado u
oprima MENU / EXIT para dejarlo como está.
APAGAR LA LUZ DE VOICEMAIL
Para apagar la luz de Voicemail, oprima MENU / EXIT.
Usando la tecla ̆ REVIEW ̄, recorra las opciones hasta
que el cursor esté junto a APGA LUZ VM y oprima SELECT
(u oprima el 6). Vea “Para apagar la luz de Voicemail” en la
página 15 para obtener información adicional.
PROGRAMAR LAS OPCIONES DE CWID
Las opciones de Call Waiting ID (CWID) le permiten disponer
de las llamadas entrantes cuando usted está en otra
llamada. Las funciones no están disponibles en todas las
áreas. Contacte a su compañía telefónica local.
DEBE SABER ESTO
Usted necesita estar suscrito a los servicios Caller ID, Call
Waiting ID y CWID Options de su compañia telefónica
local. Por favor comuníquese con su compañia teléfonica
local para activar estos servicios.
D936-937sp.book Page 10 Friday, August 30, 2002 10:07 AM
D936/D937 Inalámbrico - 900MHz
FUNCIONES Y CONTROLES 11
DEBE SABER ESTO
Cuando está programado en "Sí", las opciones de Call
Waiting ID están en ON. Cuando está programado en
"No", las opciones de Call Waiting ID están en OFF.
Para prender o apagar las opciones Call Waiting ID, oprima
MENU / EXIT. Usando la tecla ̆ REVIEW ̄, recorra las
opciones hasta que el cursor esté junto a CWID OPCIONS y
oprima SELECT (u oprima el 7).
-CALL WAITING-
MOSTRAR OPCIONCES
1=SI 2=NO
ACTUALMENTE NO
Oprima el número de la opción deseada u oprima
MENU / EXIT para dejarlo como está.
CONFIGURACIÓN DE VOICE ANNOUNCE (ANUNCIO
DE VOZ)
El teléfono D937 le permite escuchar un mensaje grabado
con su propia voz indicando la información de Caller ID.
Cuando se recibe la información de Caller ID de la compañía
telefónica, el teléfono “anuncia” el nombre o número de la
persona que llama con un mensaje que usted grabó
previamente. Los mensajes “Private Caller” y “Unavailable
Caller” vienen programados en su teléfono.
DEBE SABER ESTO
Su compañía telefónica local requiere que se suscriba
a Caller ID. Por favor comuníquese a su compañía
telefónica local para activar este servicio.
Para configurar voice announce (el anuncio de voz), oprima
MENU / EXIT. Usando la tecla ̆ REVIEW ̄, recorra las
opciones hasta que el cursor esté junto a ANUNCIO D VOZ
y oprima SELECT (u oprima el 8). Las siguientes opciones
están disponibles. Oprima el número de la opción deseada.
-ANUNCIO DE VOZ-
1=OFF
2=NOMBRES+NUM
3=SOLO NOMBRES
VA - D937
- Option - - Display -
1=OFF
Apaga Voice Announce (el Anuncio de
Voz). No se escuchan nombres o
números grabados.
ANUNCIO DE VOZ
OFF
2=NOMBRES+NUM
Se anunciarán todas las llamadas. Si se
graba un mensaje, se anunciará el
nombre de la persona que llama en
lugar del teléfono. Si no graba un
mensaje, entonces sólo se escuchará el
número telefónico.
TODAS LLAMADAS
SE ANUNCIARAN
3=SOLO NOMBRES
Sólo se escucharán mensajes grabados
y lo siguiente: “Llamada privada”,
“nombre no disponible”, “larga distancia”
y “sin caller ID”.
SOLO SE ANUNCIAN
MENSAJES
GRABADOS
D936-937sp.book Page 11 Friday, August 30, 2002 10:07 AM
D936/D937 Inalámbrico - 900MHz
12 USO DEL D936/D937
USO DEL D936/D937
CONTESTACIÓN DE LLAMADAS
Las llamadas se pueden contestar de tres formas:
■ Oprima TALK / E ND (auricular).
■ Oprima SPEAKER (auricular o base).
■ Oprima FLASH (auricular o base) para contestar las
llamadas de Call Waiting.
MARCACIÓN
a. Oprima TALK / END (handset) o SPEAKER
(auricular o base).
b. Use el teclado para marcar el número telefónico.
PRE-MARCACIÓN
La pre-marcación le permite marcar el número y verificarlo
antes de hacer la llamada.
a. Use el teclado del auricular para marcar el
número telefónico.
b. Verifique el número en la pantalla. Si el número está
equivocado, oprima DELETE para borrar el número
dígito por dígito.
c. Cuando aparezca el número correcto en la pantalla,
oprima TA L K / E N D o SPEAKER (auricular) para
hacer la llamada.
REMARCACIÓN DEL ÚLTIMO NÚMERO
Para marcar automáticamente el último número que
marcó, oprima REDIAL / P (auricular) o REDIAL (base).
AJUSTE DEL VOLUMEN
AURICULAR
a. Oprima la tecla TALK / EN D (auricular).
b. Oprima la tecla ̇ o ̈ VOLUME del lado del auricular
mientras el teléfono está fuera de la base para
disminuir o aumentar el volumen. Hay cuatro niveles
de volumen.
TIMBRE DEL AURICULAR
a. Oprima la tecla ̇ o ̈ VOLUME del lado del
auricular mientras no esté usando el
teléfono.
b. El auricular timbrará. Oprima las teclas ̇ o ̈ de
VOLUME para subir o bajar el volumen del timbre
hasta que se obtenga el nivel de timbre deseado.
Hay cuatro niveles diferentes de timbre (apagado,
bajo, mediano y alto).
ALTAVOZ DEL AURICULAR
a. Oprima la tecla SPEAKER en el auricular.
b. Oprima la tecla ̇ o ̈ VOLUME del lado del auricular
mientras el teléfono está fuera de la base para
disminuir o aumentar el volumen del auricular y del
intercomunicador. Hay cuatro niveles de volumen.
D936-937sp.book Page 12 Friday, August 30, 2002 10:07 AM
D936/D937 Inalámbrico - 900MHz
USO DEL D936/D937 13
TIMBRE DE LA BASE
a. Oprima las teclas de VOLUME ̆ o ̄ de la
base mientras el teléfono no se esté usando.
b. La base timbrará. Oprima las teclas ̆ o ̄ de
VOLUME para subir o bajar el volumen del timbre
hasta que se obtenga el nivel de timbre deseado.Hay
nueve niveles diferentes de timbre (incluyendo off-
apagado).
ALTAVOZ
a. Oprima la tecla SPEAKER de la base.
b. Oprima las teclas ̆ o ̄ VOLUME de la base
mientras el teléfono se esté usando para aumentar
o disminuir el volumen del auricular y del
intercomunicador. Hay ocho niveles de volumen.
CRONÓMETRO DE LLAMADAS
Cuando hace una llamada, aparece el cronómetro. El
cronómetro cuenta el tiempo que usted habla por teléfono.
Cuando el cronómetro pasa los 99 minutos y 59 segundos,
vuelve a empezar en 0:00.
TEMPORARY TONE SERVICE
Si su teléfono está programado para servicio de Pulso y
necesita servicio de Tono para interactuar con el banco u
otros servicios automatizados, puede cambiar
temporalmente su programación de marcación a Tono.
Oprima * durante la llamada y el teléfono cambiará
automáticamente a servicio de Tono durante esta llamada.
El teléfono regresará al servicio de Pulso cuando cuelgue.
Vea “Selección del método de marcación” en la página 10 .
LOCALIZAR EL AURICULAR PERDIDO
Si no recuerda dónde dejó el auricular, puede encontrarlo
rápida y fácilmente oprimiendo la tecla PAGE / FIND en la
base. El auricular timbrará durante 15 segundos, o hasta
que
■ Oprima de nuevo la tecla PAGE / FI ND.
u
■ Oprima cualquier tecla en el auricular.
Si el auricular no timbra, es porque está apagado, fuera de
rango, o la batería necesita recargarse.
BATERÍA BAJA
Cuando la carga de la batería del auricular está baja,
escuchará tres timbres y verá el mensaje RECARGUE
BATERIA en la pantalla. Tendrá aproximadamente 5
segundos para terminar la llamada o cambiar a otro
teléfono antes de que se desconecte su llamada.
DEBE SABER ESTO
Antes de usar el teléfono por primera vez, coloque el
auricular en la base y cargue la batería por lo menos
durante 12 horas. Se prenderá la luz de carga de la
base para indicarle que el teléfono se está cargando.
D936-937sp.book Page 13 Friday, August 30, 2002 10:07 AM
D936/D937 Inalámbrico - 900MHz
14 USO DEL D936/D937
USO DE LA TECLA HOLD
Usted puede poner una llamada en espera oprimiendo la
tecla HOLD (auricular o base). Las luces Talk / End y
Speaker (base) parpadean lentamente cuando las llamadas
están en espera.
Hay tres formas de quitar una llamada de la modalidad en
espera:
■ Oprima TA LK / E ND o SPEAKER (base) para regresar
a la llamada.
■ Conteste la llamada en otra extensión.
■ La persona que llama cuelga.
USO DE LA TECLA MUTE
Usted puede bloquear su extremo de la conversación
cuando esté usando el altavoz con sólo oprimir la tecla
MUTE. Mute está disponible tanto en el altavoz del auricular
como de la base.
AURICULAR
■ Oprima la tecla MUTE para prender.
■ SILENCIO aparece en el auricular.
■ Oprima la tecla MUTE o cuelgue para apagar.
BASE
■ Oprima la tecla MUTE para prender.
■ La luz de mute parpadea en la base.
■ Oprima la tecla MUTE para prender.
USO DE LOS SERVICIOS DE RED
El teléfono D936/D937 está programado para que pueda
usar fácilmente todos los servicios de red a los que está
suscrito a través de su compañía telefónica. Para usar
cualquiera de estas funciones, oprima la tecla MENU / EXIT.
El cursor esté junto a SRVICIOS RED. Oprima SELECT (u
oprima el 1).
Para obtener una lista de las funciones que están
programadas en su teléfono, por favor haga referencia a su
tarjeta de Inicio Rápido.
a. Oprima ̆ REVIEW ̄ para recorrer las funciones
hasta que aparezca la función deseada.
b. Oprima la tecla TALK / END para activar este función.
DEBE SABER ESTO
Si desea tener acceso a una función a la que no está
suscrito, por favor comuníquese a su compañía
telefónica local.
USO DEL INTERCOMUNICADOR
La función del intercomunicador le permite tener una
conversación entre la base y el auricular cuando el teléfono
esté en la modalidad de inactivo o cuando usted esté en una
llamada.
Modalidad de Inactivo
Para activar, oprima MENU / EXIT y seleccione el 2 para
INTERCOM. El mensaje INTERCOM ACTIVE aparecerá en la
pantalla. La base timbra dos veces para indicar que el
intercomunicador está activo. Para desactivar, oprima la
D936-937sp.book Page 14 Friday, August 30, 2002 10:07 AM
D936/D937 Inalámbrico - 900MHz
USO DEL D936/D937 15
tecla TALK / END (auricular) o SPEAKER (base).
EN UNA LLAMADA
Cuando usted esté en una llamada y quiera trasladarla a la
base, oprima EXIT/MENU y seleccione el 2 para INTERCOM.
Esto activa el intercomunicador y coloca la llamada en
espera. Las luces Talk y Speaker parpadean. Su voz se
escuchará cuando hable. La otra persona puede tomar la
llamada al oprimir la tecla SPEAKER (base). Una vez que se
haya oprimido la tecla SPEAKER, el auricular queda
inactivo. Para participar en la llamada, oprima TALK / END
en el auricular.
USO DE VOICEMAIL
Si usted está suscrito al Servicio de Mensajes de su
compañía telefónica local, puede usar la tecla VOICEMAIL
para tener acceso automático a su buzón. (Para programar
su Servicio de Mensajes, vea “Programación de Vmail” en la
página 9.)
Cuando esté parpadeando la luz de voicemail, o cuando vea
que aparece en la pantalla MENSAJE N ESPERA, oprima la
tecla VOICEMAIL (auricular o base) para tener acceso a su
Servicio de Mensajes.
PARA APAGAR LA LUZ DE VOICEMAIL
Si la luz de Voice Mail está prendida cuando no hay mensajes
en su buzón, oprima la tecla MENU / EXIT y luego oprima el
6 para que aparezca APGA LUZ VM y para apagar la luz.
Aparece LUZ DE VMAIL APAGADO en la pantalla.
USO DE CALL WAITING ID (CWID) OPTIONS
Cuando entra una llamada nueva mientras usted está
hablando por teléfono, escuchará una notificación en forma
de timbre en el auricular. En la pantalla aparecerán el
nombre y número telefónico de la persona que llama,
siempre y cuando estén disponibles. Usted puede alternar
entre llamadas o disponer de la llamada. Las funciones no
están disponibles en todas las áreas. Contacte a su
compañía telefónica local.
DEBE SABER ESTO
Usted necesita estar suscrito a los servicios Caller ID, Call
Waiting ID y CWID Options de su compañía telefónica
local. Por favor comuníquese con su compañía telefónica
local para activar estos servicios.
PARA ALTERNAR ENTRE LLAMADAS
Cuando recibe una llamada en Call Waiting y quiere
contestar la llamada, oprima FLASH. La llamada activa se
pondrá en espera y la nueva llamada quedará activa.
■ Oprima FLASH para alternar entre llamadas.
■ Oprima TALK / END o SPEAKER para terminar la
llamada.
D936-937sp.book Page 15 Friday, August 30, 2002 10:07 AM
D936/D937 Inalámbrico - 900MHz
16 USO DEL D936/D937
DISPOSICIÓN DE LLAMADAS
Usted puede disponer de una llamada de Call Waiting si está
suscrito a las opciones de Call Waiting ID y siempre y cuando
Show Options esté activado. Cuando escuche el tono de Call
Waiting, puede hacer lo siguiente.
■ Oprima uno de los 5 dígitos listados a continuación
para ir directamente a la opción correspondiente.
O
■ Siga las instrucciones de la pantalla, cuando aparezcan,
para terminar de desposicionar la llamada.
DEBE SABER ESTO
Debe disponer de la llamada después de 25 segundos
del tono de la llamada de call waiting.
REGISTROS DE CALLER ID
El teléfono D936/D937 muestra automáticamente la
información de la persona que llama la cual la envía su
compañía telefónica con cada llamada. Esto le permite ver
la información de una llamada entrante antes de contestar
el teléfono. El teléfono D937 anuncia en voz alta el nombre
o número de la persona que llama además de mostrarlo en
la pantalla cuando el Anuncio de Voz está prendido. (Para
programar su anuncio de voz, vea “Configuración de Voice
Announce (Anuncio de Voz)” en la página 11). Se pueden
guardar hasta 50 registros de llamada en la memoria para
usarlos después.
DEBE SABER ESTO
Su compañía telefónica local requiere que se suscriba a
Caller ID. Por favor comuníquese a su compañía
telefónica local para activar este servicio.
REVISIÓN
a. Oprima la tecla CALLS (̄). Aparecerá la llamada
más reciente.
b. Use la tecla ̆ REVIEW ̄ para recorrer el
registro de llamadas.
c. Oprima MENU / EXIT para regresar a la modalidad
de inactividad.
DEBE SABER ESTO
El símbolo en forma de diamante en el registro de
Caller ID indica que la llamada se recibió después de
la última vez que revisó sus registros.
- OPCIONES MENU -
1=VMAIL Envía la llamada nueva a voice mail para que
la persona que llama deje un mensaje.
2=BUSY Produce un mensaje pre-grabado de su
compañía teica local informando que usted
está en el teléfono y llamará más tarde.
3=3VIAS Conecta la llamada nueva con la llamada
existente para formar una llamada de
conferencia.
4=ESPRA Coloca la llamada nueva en espera y produce
un mensaje pre-grabado de su compañía
telefónica informando que usted está en el
teléfono y que contestará en breve.
5=CUELGA&
CONTSTA
Cuelga la llamada existente y contesta la
nueva
D936-937sp.book Page 16 Friday, August 30, 2002 10:07 AM
D936/D937 Inalámbrico - 900MHz
USO DEL D936/D937 17
MARCACIÓN
a. Oprima la tecla CALLS (̄).
b. Use la tecla ̆ REVIEW ̄ para encontrar el
registro de llamada deseado.
c. Use la tecla 7•10•11 para cambiar a los diferentes
formatos hasta que aparezca el formato correcto
de marcación.
d. Oprima TALK / END o SPEAKER (auricular) para
realizar la llamada.
GUARDAR
Vea “Cómo copiar un registro de Caller ID” en la
página 20.
CÓMO BORRAR UN REGISTRO INDIVIDUAL
a. Oprima la tecla CALLS (̄).
b. Use la tecla ̆ REVIEW ̄ para encontrar el
registro que desea borrar.
c. Oprima DELETE. BORRADO aparece.
CÓMO BORRAR TODOS LOS REGISTROS
a. Oprima CALLS (̄).
b. Oprima y sostenga DELETE. Aparecerá lo siguiente:
BORRAR TODO?
1=SI 2=NO
c. Oprima 1 para borrar todo u oprima DELETE de
nuevo.
d. BORRADO aparece en la pantalla.
e. SIN LLAMADAS aparecerá en la pantalla.
REGISTROS DEL DIRECTORIO
El directorio telefónico personal del teléfono D936/D937
tiene capacidad para guardar hasta 50 nombres y
números. El teléfono D937 también tiene capacidad para
guardar 50 mensaje de Anuncio de Voz con nombres y
números. Para poder escuchar un mensaje de una persona
que llama (D937), debe guardarse en el directorio un
mensaje grabado con el número de la persona. Puede crear
su directorio de dos formas: copie un registro de Caller ID
al directorio o puede crear un registro nuevo de directorio.
Una vez que haya creado su directorio telefónico personal,
puede marcar directamente desde el directorio.
DEBE SABER ESTO
DIRECTORIO LLENA aparece cuando ya no hay
espacios en la memoria. Necesita borrar un registro
existente del directorio para poder guardar uno nuevo.
DEBE SABER ESTO
Ingreso de opciones de texto: También se pueden usar
las teclas numéricas del auricular para ingresar un
texto alfanumérico. Cada número tiene asignadas una
serie de letras. Oprima el número correspondiente
hasta que aparezca la letra deseada.
D936-937sp.book Page 17 Friday, August 30, 2002 10:07 AM
D936/D937 Inalámbrico - 900MHz
18 USO DEL D936/D937
Por ejemplo: para escribir JOHN: oprima el 5 una vez;
oprima el 6 tres veces; oprima el 4 dos veces y oprima el
6 dos veces. Si la siguiente letra deseada está en la
misma tecla que la letra actual, oprima la tecla ̆
REVIEW
para pasar a la siguiente posición. Para dejar un espacio
en blanco, oprima ̆ REVIEW. Para borrar un caracter,
oprima DELETE para borrar un caracter a la vez. Nota:
El teléfono marcará el número exactamente como
aparece en el directorio.
Los siguientes símbolos especiales se pueden agregar al
campo del “nombre” usando las teclas
*
y
#
:
CREAR REGISTRO
Usted puede incluir hasta 16 caracteres en el campo de
nombre y 32 dígitos en el campo de número. También puede
grabar un mensaje de anuncio de voz.
a. Oprima la tecla DIR (̆). Oprima la tecla
̆ REVIEW ̄ hasta que aparezca el registro
deseado.
- DIRECTORIO -
XX DISPONIBLE
PARA UNO NUEVO
OPRIMA EDIT
b. Oprima la tecla EDIT. AGREGAR NUMERO aparece en
la pantalla. Escriba el número usando el teclado del
auricular. Use la tecla DELETE para borrar un
número. Oprima la tecla REDIAL / P para agregar un
retraso de 3 segundos (pausa).
c. Oprima la tecla SAVE. GUARDADO aparece en la
pantalla.
d. AGREGAR NOMBRE aparece en la pantalla. Escriba el
nombre usando el teclado del auricular para ingresar
los caracteres. Use la tecla DELETE para borrar un
caracter.
e. Oprima la tecla SAVE. GUARDADO aparece en la
pantalla.
f. Aparecerá lo siguiente.
GRABAR MENSAJE
DE ANUNCIO
1=SI 2=NO
g. Oprima 1. La siguiente información aparece y se
anuncia.
EMPIECE A GRABAR
DESPUES DEL TONO
h. Mantenga el auricular en la posición normal de “talk”.
Tiene 2 segundos para grabar el mensaje que
escuchará cuando se anuncie la persona que llama. Al
final de los 2 segundos, escuchará el mensaje grabado
y se guardará automáticamente. Las siguientes
opciones adicionales están disponibles:
1=ESCUCHAR
2=REGRABAR
3=BORRAR & SALIR
4=SALIR
*/@&‘(),-.#
VA - D937
D936-937sp.book Page 18 Friday, August 30, 2002 10:07 AM

D936/D937 Inalámbrico - 900MHz
USO DEL D936/D937 19
i. Oprima 4para salir y dejar la pantalla como está. El
registro del Directorio indica que se graba un
mensaje de voz con el registro individual.
O
a. Desde la pantalla inactiva, marque el número
telefónico usando el teclado del auricular.
b. Oprima la tecla SAVE. AGREGAR NOMBRE aparece en
la pantalla. Vea los pasos “d” a “h” para terminar de
crear de un registro.
EDITAR UN REGISTRO
a. Oprima la tecla DIR (̆). Oprima la tecla
̆ REVIEW ̄ hasta que aparezca el registro
deseado.
b. Oprima la tecla EDIT. Aparecerá lo siguiente.
- EDITAR DIR -
1=NUM 2=NOMBRE
3=VOZ GRABADA
c. Oprima el número deseado del registro que quiera
editar.
DEBE SABER ESTO
Si necesita editar más de un registro, debe repetir el
mismo proceso para cada uno.
Oprima 1 para editar el número
a. EDITAR NUMBERO aparece en la pantalla.
b. Edite el número usando el teclado del auricular. Use la
tecla DELETE para borrar un número. Oprima la tecla
REDIAL / P para agregar un retraso de 3 segundos
(pausa).
c. Oprima la tecla SAVE. GUARDADO aparece en la
pantalla y enseguida aparece el registro del directorio
de la persona.
Oprima 2 para editar el nombre
a. EDITAR NOMBRE aparece en la pantalla.
b. Edite el nombre usando el teclado del auricular para
ingresar los caracteres. Use la tecla DELETE para
borrar un caracter.
c. Oprima la tecla SAVE. GUARDADO aparece en la
pantalla y enseguida aparece el registro del directorio
de la persona.
Oprima 3 para editar el mensaje del anuncio de voz
a. Aparecerá lo siguiente.
1=ESCUCHAR
2=REGRABAR
3=BORRAR & SALIR
4=SALIR
DEBE SABER ESTO
Si no hay mensaje de anuncio de voz grabado
previamente, vea “Crear Registro” en la página 18.
b. Oprima 2 para editar el mensaje del anuncio de voz. La
siguiente información aparece y se anuncia.
EMPIECE A GRABAR
DESPUES DEL TONO
VA - D937
VA - D937
D936-937sp.book Page 19 Friday, August 30, 2002 10:07 AM
D936/D937 Inalámbrico - 900MHz
20 USO DEL D936/D937
c. Mantenga el auricular en la posición normal de “talk”.
Tiene 2 segundos para grabar el mensaje que
escuchará cuando se anuncie la persona que llama. Al
final de los 2 segundos, escuchará el mensaje grabado
y se guardará automáticamente. Las siguientes
opciones adicionales están disponibles:
1=ESCUCHAR
2=REGRABAR
3=BORRAR & SALIR
4=SALIR
d. Si el nuevo mensaje es aceptable, oprima 4 para
salir.
CÓMO COPIAR UN REGISTRO DE CALLER ID
a. Oprima la tecla CALLS (̄).
b. Use la tecla ̆ REVIEW ̄ para encontrar el registro
de llamada deseado.
c. Use la tecla 7•10•11 para cambiar entre los diferentes
formatos y escoger el formato correcto para marcar
el número desde su teléfono.
DEBE SABER ESTO
Para editar el campo del nombre y número, primero
debe estar en la modalidad del Directorio. Para obtener
los detalles vea “Editar un Registro” en la página 19.
d. Oprima SAVE. GUARDADO aparece en la pantalla.
e. La siguiente información aparece.
GRABAR MENSAJE
DE ANUNCIO
1=SI 2=NO
f. Oprima 1. La siguiente información aparece y se
anuncia.
EMPIECE A GRABAR
DESPUES DEL TONO
g. Mantenga el auricular en la posición normal de
“talk”. Tiene 2 segundos para grabar el mensaje que
escuchará cuando se anuncie la persona que llama.
Al final de los 2 segundos, escuchará el mensaje
grabado y se guardará automáticamente. Las
siguientes opciones adicionales están disponibles:
1=ESCUCHAR
2=REGRABAR
3=BORRAR & SALIR
4=SALIR
h. Si el nuevo mensaje es aceptable, oprima 4 para
salir.
ENCONTRAR
a. Oprima la tecla DIR (̆).
b. Use la tecla ̆ REVIEW ̄ para encontrar el registro
del directorio deseado.
c. Oprima MENU / EXIT para volver a la modalidad de
inerte u oprima la tecla DIR (̆).
d. Oprima la tecla del número asociado con la letra del
registro del directorio.
Por ejemplo, si quiere encontrar el registro del
directorio de Roja-Caperucita, oprima el 7 hasta que
aparezca el primer registro que empiece con la letra
“R”.
VA - D937
D936-937sp.book Page 20 Friday, August 30, 2002 10:07 AM
D936/D937 Inalámbrico - 900MHz
USO DEL D936/D937 21
e. Oprima ̆ REVIEW para ver registros adicionales
que empiecen con “R.”
f. Oprima MENU / EXIT para volver a la modalidad de
inerte.
MARCACIÓN
a. Oprima la tecla DIR (̆).
b. Use la tecla ̆ REVIEW ̄ para encontrar el registro
del directorio deseado.
c. Oprima TALK / END o SPEAKER (auricular) para
realizar la llamada.
BORRAR REGISTROS INDIVIDUALES
a. Oprima DIR (̆).
b. Use la tecla ̆ REVIEW ̄ o busque alfabéticamente
para encontrar el registro que desea borrar.
c. Oprima DELETE. Aparecerá lo siguiente.
BORRAR?
1=SI 2=NO
d. Oprima 1 para borrar u oprima DELETE de
nuevo.
e. BORRADO aparece en la pantalla.
BORRAR TODOS LOS REGISTROS
a. Oprima DIR (̆).
b. Use la tecla ̆ REVIEW ̄ para encontrar
algún registro.
c. Oprima y sostenga la tecla DELETE. Aparecerá lo
siguiente.
BORRAR TODO?
1=SI 2=NO
d. Oprima 1 para borrar todo u oprima DELETE de
nuevo.
e. BORRADO aparece en la pantalla.
f. Aparecerá lo siguiente.
- DIRECTORIO -
50 DISPONIBLE
PARA UNO NUEVO
OPRIMA EDIT
D936-937sp.book Page 21 Friday, August 30, 2002 10:07 AM

D936/D937 Inalámbrico - 900MHz
22 USO DEL D936/D937
LECTURA DE MENSAJES EN PANTALLA
El teléfono D936/D937 le informa de su estado actual
mediante los siguientes mensajes:
■ FIN DE LA LISTA
Usted ha llegado al final del directorio o de los registros
de llamadas. Oprima las teclas REVIEW ̆ o ̄ para
ver otros registros.
■ INFOR INCOMPLETA
La información de Caller ID que envía la compañía
telefónica está incompleta para esta llamada. El teléfono
no tiene problemas.
■ LARGA DISTANCIA
La llamada entrante es de larga distancia.
■ MENSAJE N ESPERA
Tiene un mensaje en su buzón.
■ SIN NOMBRE
La persona está llamando de un área que solamente
proporciona servicio de Caller ID de número, o tal vez se
encuentre en un área que sólo proporciona el número.
■ SIN LLAMADAS
No hay registros de llamadas guardados en la memoria.
■ SIN INFORMACION
El teléfono no recibe la información de Caller ID de la
compañía telefónica.
■ PRIVADO
La persona que llama decidió bloquear su información
de Caller ID.
■ RECARGUE BATERIA
La carga de la batería está baja. Coloque el auricular en
la base para que se recargue la batería.
■ FUERA DE AREA
La información de Caller ID no está disponible del área
de donde viene la llamada.
■ No aparece el nombre
La persona está llamando de un área que solamente
proporciona servicio de Caller ID de número, o tal vez se
encuentre en un área que sólo proporciona el número.
■ BUSCANDO BASE
El auricular esté muy lejos de la base. Acercase el
auricular a la base.
D936-937sp.book Page 22 Friday, August 30, 2002 10:07 AM

D936/D937 Inalámbrico - 900MHz
RESOLUCIÓN DE PROBLEMAS 23
RESOLUCIÓN DE PROBLEMAS
PROBLEMA / SOLUCIÓN
■ El auricular o la base no responde (el auricular o la
base no responde a ninguna oprima de tecla; la
pantalla no cambiará; no hay tono de marcar)
- Para reajustar el teléfono, quiten las baterías
del auricular y de la base. Desenchufe el
adaptor eléctrico. Después de 30 segundos,
primero enchufe la parte posteriora del
adaptor eléctrico y después reinstale las
baterías en el auricular y la base.
■ Pantalla en blanco o débil
- Coloque el auricular en la base durante varios
segundos. Asegúrese de que el auricular esté
haciendo contacto en la base.
- Revise el adaptador de CA. Asegúrese de que
el adaptador no esté dañado y de que esté bien
conectado a una toma de corriente que
funcione. También verifique que la toma de
corriente no esté controlada por un interruptor
de pared.
- Recargue o cambie la batería. Vea los detalles
de “Instalación de las Baterías del Teléfono” en
la página 2.
■ Caller ID/Call Waiting ID no funciona correctamente
- Verifique que el servicio de Caller ID esté activo.
Llame a la oficina de servicio de su compañía
telefónica local para asegurarse de que sus
servicios estén activos. Puede verificar si Call
Waiting ID está activo al escuchar dos timbres
que indica que está recibiendo otra llamada.
- Revise el adaptador de CA. Asegúrese de que
el adaptador no esté dañado y de que esté bien
conectado a una toma de corriente que
funcione. También verifique que la toma de
corriente no esté controlada por un interruptor
de pared.
■ La luz de carga del auricular no funciona
- Verifique que el auricular esté haciendo
contacto en la base.
- Revise el adaptador de CA. Asegúrese de que
el adaptador no esté dañado y de que esté bien
conectado a una toma de corriente de
funcione. También verifique que la toma de
corriente no esté controlada por un interruptor
de pared.
- Verifique que la batería del auricular se haya
instalado correctamente. Vea “Instalación de
las Baterías del Teléfono” en la página 2.
D936-937sp.book Page 23 Friday, August 30, 2002 10:07 AM

D936/D937 Inalámbrico - 900MHz
24 RESOLUCIÓN DE PROBLEMAS
■ La luz de carga de la base no funciona
- Revise el adaptador de CA. Asegúrese de que
el adaptador no esté dañado y de que esté bien
conectado a una toma de corriente de
funcione. También verifique que la toma de
corriente no esté controlada por un interruptor
de pared.
- Verifique que la batería de repuesto se haya
instalado correctamente. Vea “Instalación de
las Baterías del Teléfono” en la página 2.
■ Las luces del auricular no funcionan
- Oprima la tecla TALK / EN D para hacer una
prueba. La luz de talk debería prenderse.
- Recargue o cambie la batería. Vea los detalles
de “Instalación de las Baterías del Teléfono” en
la página 2.
■ INFOR INCOMPLETA
- La información de la llamada se distorcionó
antes de llegar a la unidad. La estática normal
en la línea del teléfono puede presentar el
mensaje INFOR INCOMPLETA. Si persiste esta
condición, verifique con su compañía telefónica
local para asegurarse de que su línea telefónico
no tenga algún problema.
■ El teléfono no timbra
- Revise que el cable de línea esté conectado,
seguro e insertado en la conexión correcta.
- Verifique que el timbre del auricular esté en On.
Vea “Ajuste del Volumen” en la página 12.
-Si el teléfono sigue sin timbrar, tal vez tenga
muchos aparatos de comunicación conectados
en una sola línea. Un aparato de comunicación
puede ser un teléfono, módem o máquina de
fax. Llame a la oficina de servicio de su
compañía telefónica local para que le ayuden a
calcular el límite para su casa u oficina.
- Acerque el auricular a la base.
■ No hay tono de marcar
- Verifique que el cable de línea esté conectado,
seguro e insertado en la conexión correcta.
- Verifique que el auricular esté cargado.
- Acerque el auricular a la base.
■ El auricular no responde a la tecla PAGE / FIND
- El auricular no se está comunicando con la
base. El auricular está fuera de rango o la
batería necesita recargarse.
- Revise el adaptador de CA.
D936-937sp.book Page 24 Friday, August 30, 2002 10:07 AM

D936/D937 Inalámbrico - 900MHz
RESOLUCIÓN DE PROBLEMAS 25
■ El auricular no funciona
- Revise el adaptador de CA. Asegúrese de que
el adaptador no esté dañado y de que esté bien
conectado a una toma de corriente de
funcione. También verifique que la toma de
corriente no esté controlada por un interruptor
de pared.
- Coloque el teléfono en la base durante varios
segundos. Asegúrese de que el auricular esté
haciendo contacto en la base.
- Recargue o cambie la batería. Vea los detalles
en “Instalación de las Baterías del Teléfono” en
la página 2.
■ La luz de Voicemail está prendida cuando no hay
mensajes en el buzón
- Apague la luz manualmente siguiendo los pasos
“Para apagar la luz de Voicemail” en la página
15.
■ La tecla VOIC EMAIL marca mi contraseña antes de
que el sistema esté listo.
-Agregue más pausas al número que va a
marcar. Vea “Programación de Vmail” en la
página 9.
■ DATOS NO ENVIADOS
- Verifique su servicio. Llame a su compañía
telefónica local para asegurarse de tener el
servicio de Caller ID o Call Waiting ID.
-Revise su máquina contestadora. Asegúrese de
que su máquina contestadora esté programada
para contestar después de dos timbres.
-Asegúrese de contestar la llamada después
dos timbres.
- Verifique Call Forwarding. Asegúrese de que
Call Forwarding estéapagado.
- Comuníquese al Departamento de Servicio de
su compañía telefónica local si sigue el
problema durante más de 24 horas. La oficina
central puede estar experimentando una sobre
carga temporal.
■ Mensaje de anuncio de voz sin escuchar.
- Verifique que el volumen del timbre del auricular
y de la base estén prendidos. Vea “Ajuste del
Volumen” en la página 12.
- Verifique que el Anuncio de Voz esté activado.
Vea “Configuración de Voice Announce (Anuncio
de Voz)” en la página 11.
D936-937sp.book Page 25 Friday, August 30, 2002 10:07 AM

D936/D937 Inalámbrico - 900MHz
26 FCC y GARANTÍA
FCC y GARANTÍA
REQUISITOS DE LA FCC
INFORMACIÓN DE LA PARTE 15 DE LA FCC
Este equipo cumple con los reglamentos de la Parte 15 de la
FCC. Su operación está sujeta a las siguientes dos condiciones:
(1) Este aparato puede no causar una interferencia dañina, y (2)
este aparato debe aceptar cualquier interferencia recibida,
incluyendo interferencia que pueda provocar una operación no
deseada.
Este equipo se ha sometido a las pruebas correspondientes y se
ha comprobado que cumple con los límites de un aparato digital
de Clase B, de acuerdo a la Parte 15 de los Reglamentos de la
FCC. Estos límites proporcionan protección razonable contra
interferencia dañina en una instalación residencial.
Este equipo genera, usa y puede radiar energía de frecuencia de
radio. Si no se instala y usa de acuerdo a las instrucciones, este
equipo puede causar interferencia dañina a las comunicaciones
de radio. Sin embargo, no se ofrece ninguna garantía de que la
interferencia no ocurra en una instalación en particular.
Si este equipo causa interferencia dañina a la recepción de radio
o televisión, lo cual se puede determinar prendiendo y apagando
el equipo, se invita al usuario a tratar de corregir la interferencia
tomando una o más de las siguientes medidas:
■ Reorientar o reubicar la antena receptora.
■ Aumentar la separación entre el equipo y el receptor.
■ Conectar el equipo a una toma de corriente en un circuito
diferente del circuito al cual el receptor está conectado.
■ Consulte a su distribuidor o a un técnico experimentado en
radio y televisión si necesita ayuda.
INFORMACIÓN DE LA PARTE 68 DE LA FCC
ESTE EQUIPO ES COMPATIBLE CON APARATOS PARA LA
AUDICIÓN.
Este equipo cumple con la Parte 68 de las reglas de la FCC y los
requisitos adoptados por la ACTA. En la parte inferior de la base
de este equipo se encuentra una etiqueta que contiene, entre
otra información, un identificador de producto en el formato
US:AAAEQ##TXXXX. Si lo solicita, este número debe
proporcionarlo a su compañía telefónica local.
La conexión y el enchufe de pared que se usan para conectar
este equipo al cableado del edificio y a la red telefónica deben
cumplir con las reglas correspondientes de la Parte 68 de la FCC
y de los requerimientos adoptados por la ACTA. Junto con este
producto se incluye un cable telefónico aprobado con una
conexión modular. Éste está diseñado para conectarse a un
enchufe de pared modular también aprobado. Vea los detalles en
las instrucciones de instalación.
D936-937sp.book Page 26 Friday, August 30, 2002 10:07 AM

D936/D937 Inalámbrico - 900MHz
FCC y GARANTÍA 27
El REN se usa para determinar el número de aparatos que se
pueden conectar a la línea telefónica. Un número de RENs
excesivo en una línea telefónica puede provocar que los aparatos
timbren en respuesta a una llamada entrante. En la mayoría,
pero no en todas las áreas, la suma de RENs no debe exceder
de cinco (5.0). Para tener seguridad del número de aparatos que
se pueden conectar en una línea, según lo determina el total de
RENs, comuníquese a su compañía telefónica local. Para
productos aprobados después del 23 de julio de 2001, el REN
para este producto es parte del identificador del producto que
tiene el formato US:AAAEQ##TXXXX. Los dígitos representados
por ## son el REN sin un punto decimal (por ejemplo, 03 es un
REN de 0.3). Para productos anteriores, el REN se muestra por
separado en la etiqueta.
Si este equipo causa daño a la red telefónica, la compañía
telefónica le notificará con anticipación si se requiere la
desconexión temporal del servicio. Si no es posible dar
notificación con anticipación, la compañía telefónica notificará al
cliente lo más pronto posible. Además, se le notificarán sus
derechos de presentar una queja ante la FCC si usted lo
considera necesario.
La compañía telefónica puede hacer cambios en sus
instalaciones, equipo, operaciones o procedimientos que puedan
afectar la operación del equipo. Si esto sucede, la compañía
telefónica le dará notificación con anticipación para que usted
pueda hacer las modificaciones necesarias para mantener el
servicio ininterrumpido.
Si experimenta problemas con este equipo o si necesita
información sobre reparaciones y garantía, por favor
comuníquese al centro de servicio al cliente en el número
listado en su tarjeta de Inicio Rápido. Si el equipo causa caños
a la red telefónica, la compañía telefónica puede pedirle que
desconecte su equipo hasta que se resuelva el problema. NO
ABRA ESTE APARATO.
La conexión al servicio de líneas compartidas está sujeta a
impuestos estatales. Comuníquese a la comisión estatal de
servicios públicos, a la comisión de servicios públicos o a la
comisión de la corporación para solicitar información.
Si su casa tiene cableado especial de equipo de sistema de
alarmas conectado a la línea telefónica, asegure que la
instalación de este equipo no desactive su equipo de alarma. Si
tiene preguntas sobre lo que puede desactivar el equipo de
alarma, consulte a su compañía telefónica o a un instalador
calificado.
D936-937sp.book Page 27 Friday, August 30, 2002 10:07 AM

D936/D937 Inalámbrico - 900MHz
28 FCC y GARANTÍA
GARANTÍA
Si su teléfono está defectuoso en sus materiales o mano de obra
y lo devuelve dentro de un año de la fecha de compra, lo
repararemos, o, a su elección, lo reemplazaremos. Si lo
reparamos, podríamos usar piezas o materiales
reacondicionados. Si decidimos cambiarlo, tal vez lo cambiemos
por una unidad reacondicionada idéntica. La unidad reparada o
reemplazada tiene garantía ya sea por (a) noventa días, o (b) el
tiempo que quede de su garantía original de un año, lo que sea
mayor.
LO QUE DEBE SABER
Para recibir el servicio de garantía, debe presentar el
comprobante (su recibo de compra) y la fecha de compra.
LO QUE ESTA GARANTÍA NO CUBRE
Esta garantía no cubre defectos de accidentes, alteraciones, el
no seguir las instrucciones de este manual, derrame de baterías,
mal uso, incendio, inundación y actos de fuerza mayor.
No garantizamos que este producto sea compatible con líneas
compartidas, con todo tipo de equipo telefónico, o con el equipo
específico de su oficina. Los costos de envío a y de los centros
de servicio no están cubiertos.
No nos hacemos responsables por garantías implícitas,
incluyendo las que se ajusten a un propósito particular de
comercialización después del período inicial de un año. No
hacemos pagos por pérdida de tiempo, inconveniencias, pérdida
de uso del producto, o daño a propiedad causado por este
producto o su falta de funcionamiento correcto, visitas de
servicio de la compañía telefónica, ni daños incidentales o por
consecuencias.
DERECHOS DE LA LEY ESTATAL
Algunos estados no permiten limitaciones sobre el tiempo de
duración de las garantías implícitas, o la exclusión de limitación
de daños incidentales o por consecuencias, de tal forma que las
exclusiones anteriores pueden no aplicarse a usted. Esta
garantía le da derechos específicos; tal vez tenga otros derechos
que pueden variar de estado a estado.
D936-937sp.book Page 28 Friday, August 30, 2002 10:07 AM