CipherLab 2560 Bluetooth Scanner User Manual
CipherLab Co., Ltd. Bluetooth Scanner Users Manual
Users Manual

2560
Bluetooth Scanne
r
2500 BT BASE Bluetooth Scanner Cradle
Version 1.00

Copyright © 2016 CIPHERLAB CO., LTD.
All rights reserved
The software contains proprietary information of CIPHERLAB CO., LTD.; it is provided
under a license agreement containing restrictions on use and disclosure and is also
protected by copyright law. Reverse engineering of the software is prohibited.
Due to continued product development this information may change without notice. The
information and intellectual property contained herein is confidential between CIPHERLAB
and the client and remains the exclusive property of CIPHERLAB CO., LTD. If you find
any problems in the documentation, please report them to us in writing. CIPHERLAB
does not warrant that this document is error-free.
No part of this publication may be reproduced, stored in a retrieval system, or
transmitted in any form or by any means, electronic, mechanical, photocopying,
recording or otherwise without the prior written permission of CIPHERLAB CO., LTD.
For product consultancy and technical support, please contact your local sales
representative. Also, you may visit our web site for more information.
The CipherLab logo is a registered trademark of CIPHERLAB CO., LTD.
All brand, product and service, and trademark names are the property of their registered
owners.
The editorial use of these names is for identification as well as to the benefit of the
owners, with no intention of infringement.
CIPHERLAB CO., LTD.
Website: http://www.cipherlab.com

FCC STATEMENT
This equipment has been tested and found to comply with the limits for a Class B digital device,
pursuant to part 15 of the FCC Rules. These limits are designed to provide reasonable protection
against harmful interference in a residential installation. This equipment generates uses and can
radiate radio frequency energy and, if not installed and used in accordance with the instructions, may
cause harmful interference to radio communications. However, there is no guarantee that interference
will not occur in a particular installation. If this equipment does cause harmful interference to radio or
television reception, which can be determined by turning the equipment off and on, the user is
encouraged to try to correct the interference by one or more of the following measures:
—Reorient or relocate the receiving antenna.
—Increase the separation between the equipment and receiver.
—Connect the equipment into an outlet on a circuit different from that to which the receiver is
connected.
—Consult the dealer or an experienced radio/TV technician for help.
FCC Statement
This device complies with FCC radiation exposure limits set forth for an uncontrolled environment.
This device complies with Part 15 of the FCC Rules. Operation is subject to the following two
conditions: (1) this device may not cause harmful interference, and (2) this device must accept any
interference received, including interference that may cause undesired operation.
Caution!
Any changes or modifications not expressly approved by the party responsible for compliance could
void the user's authority to operate the equipment.
CANADA STATEMENT
This device complies with Industry Canada’s licence-exempt RSSs. Operation is subject to the
following two conditions:
(1) This device may not cause interference; and
(2) This device must accept any interference, including interference that may cause undesired
operation of the device.
Le présent appareil est conforme aux CNR d’Industrie Canada applicables aux appareils radio
exempts de licence. L’exploitation est autorisée aux deux conditions suivantes :
(1) l’appareil ne doit pas produire de brouillage;
(2) l’utilisateur de l’appareil doit accepter tout brouillage radioélectrique subi, même si le brouillage est
susceptible d’en compromettre le fonctionnement.
The device meets the exemption from the routine evaluation limits in section 2.5 of RSS 102 and
compliance with RSS-102 RF exposure, users can obtain Canadian information on RF exposure and
compliance.
Le dispositif rencontre l'exemption des limites courantes d'évaluation dans la section 2.5 de RSS 102
et la conformité à l'exposition de RSS-102 rf, utilisateurs peut obtenir l'information canadienne sur
l'exposition et la conformité de rf.
IMPORTANT NOTICES
FOR HAND-HELD PRODUCT WITH RF FUNCTIONS
The 2560 unit (FCC ID: Q3N-2560) complies with FCC radiation exposure limits set forth
for uncontrolled environment.
The 2500 BT BASE unit (FCC ID: Q3N-25BTBASE) complies with FCC radiation exposure
limits set forth for an uncontrolled environment. This equipment should be installed and
operated with minimum distance 20 cm between the radiator & your body. It only
operated in hand-held used. If you only transfer data to the host wirelessly, please keep
the minimum distance 20 cm between machine & your body.
This transmitter (5121A-25BTBASE) must not be co-located or operating in conjunction
with any other antenna or transmitter. This equipment should be installed and operated
with a minimum distance of 20 centimeters between the radiator and your body.
Cet émetteur ne doit pas être Co-placé ou ne fonctionnant en même temps qu'aucune
autre antenne ou émetteur. Cet équipement devrait être installé et actionné avec une
distance minimum de 20 centimètres entre le radiateur et votre corps.
FOR PRODUCT WITH LASER
CAUTION
This laser component emits FDA / IEC Class 2 laser light at the exit port. Do not
stare into beam.
SAFETY PRECAUTIONS
RISK OF EXPLOSION IF BATTERY IS REPLACED BY AN INCORRECT TYPE.
DISPOSE OF USED BATTERIES ACCORDING TO THE INSTRUCTIONS.
The use of any batteries or charging devices, which are not originally sold or
manufactured by CipherLab, will void your warranty and may cause damage to
human body or the product itself.
DO NOT disassemble, incinerate or short circuit the battery.
DO NOT expose the scanner or the battery to any flammable sources.
For green-environment issue, it's important that batteries should be recycled in a
proper way.
Under no circumstances, internal components are self-serviceable.
The charging device uses an AC power adaptor. A socket outlet shall be installed near
the equipment and shall be easily accessible. Make sure there is stable power supply
for the scanner or its peripherals to operate properly.
CARE & MAINTENANCE
Use a clean cloth to wipe dust off the scanning window and the body of the scanner
as well as the charging device. DO NOT use/mix any bleach or cleaner.
If you want to put away the scanner for a period of time, download the collected data
to a host computer when in the memory mode, and then take out the battery. Store
the scanner and battery separately.

When the scanner resumes its work, make sure the battery is fully charged before
use.
Keep the scanner away from any magnets and magnetic fields to prevent the laser
engine from malfunctioning.
If you shall find the scanner malfunctioning, write down the specific scenario and
consult your local sales representative.
Version Date Notes
1.00 Jul. 27, 2016 Initial release
RELEASE NOTES

CONTENTS
IMPORTANT NOTICES ......................................................................... - 3 -
fcc statement ..................................................................................... - 3 -
Canada STATEMENT ........................................................................... - 3 -
For Hand-held Product with RF Functions ............................................... - 4 -
For Product with Laser ........................................................................ - 4 -
Safety Precautions .............................................................................. - 4 -
Care & Maintenance ............................................................................ - 4 -
RELEASE NOTES .................................................................................. - 5 -
INTRODUCTION ..................................................................................... 3
Getting Familiarized with the Scanner and the Cradle .................................. 4
Installing the Battery to the Scanner ..................................................... 4
Setting up the Cradle .......................................................................... 5
Charging the Battery via the Cradle ....................................................... 6
Charging the Battery via Charger .......................................................... 7
Inside the Package ................................................................................. 8
Product Highlights .................................................................................. 8
SPECIFICATIONS ................................................................................... 9

3
CipherLab’s 2560 Series Barcode Scanners are specifically designed to answer your
mobile demands. The versatile scanners are designed to help accelerate productivity
while lowering the total cost of ownership. Intensive data collection jobs are made easier
with fast, accurate barcode scanning in various working environments, especially in small
businesses. Integrating short-distance wireless technology to small-form-factor scanners,
the 2560 scanners are ideal for carrying around, and thus give workers tether-free
mobility anytime anywhere and get job done more efficiently. This line of scanners
deliver data over a wireless personal network at a range of up to 100 meters and a
prolonged battery life to keep business running.
Owing to the slim, ergonomic design, extremely low power consumption, and powerful
decoding capability, the 2560 Series Barcode Scanners are the best choice for the
following applications –
Receiving in Retail
Product labeling & Tracking
Shelf Product Replenishment
Mobile Point of Sale (POS)
Mobile Inventory Management
Order Picking & Staging
Work-In-Process Tracking
Material Flow Control
Transportation & Distribution
Warehousing
Asset Management
This manual contains information on operating the scanner and using its features. We
recommend that you keep one copy of the manual at hand for quick reference or
maintenance purposes. To avoid any improper disposal or operation, please read the
manual thoroughly before use.
Thank you for choosing CipherLab products!
INTRODUCTION
4
2560 Series Barcode Scanne
r
User Guide
GETTING FAMILIARIZED WITH THE SCANNER AND THE CRADLE
INSTALLING THE BATTERY TO THE SCANNER
When you first receive the package, the rechargeable battery is stored separately from
the scanner. Insert the battery into the scanner first so that it can be charged when
sitting in the cradle.
Note: Any improper handling may reduce the battery life.
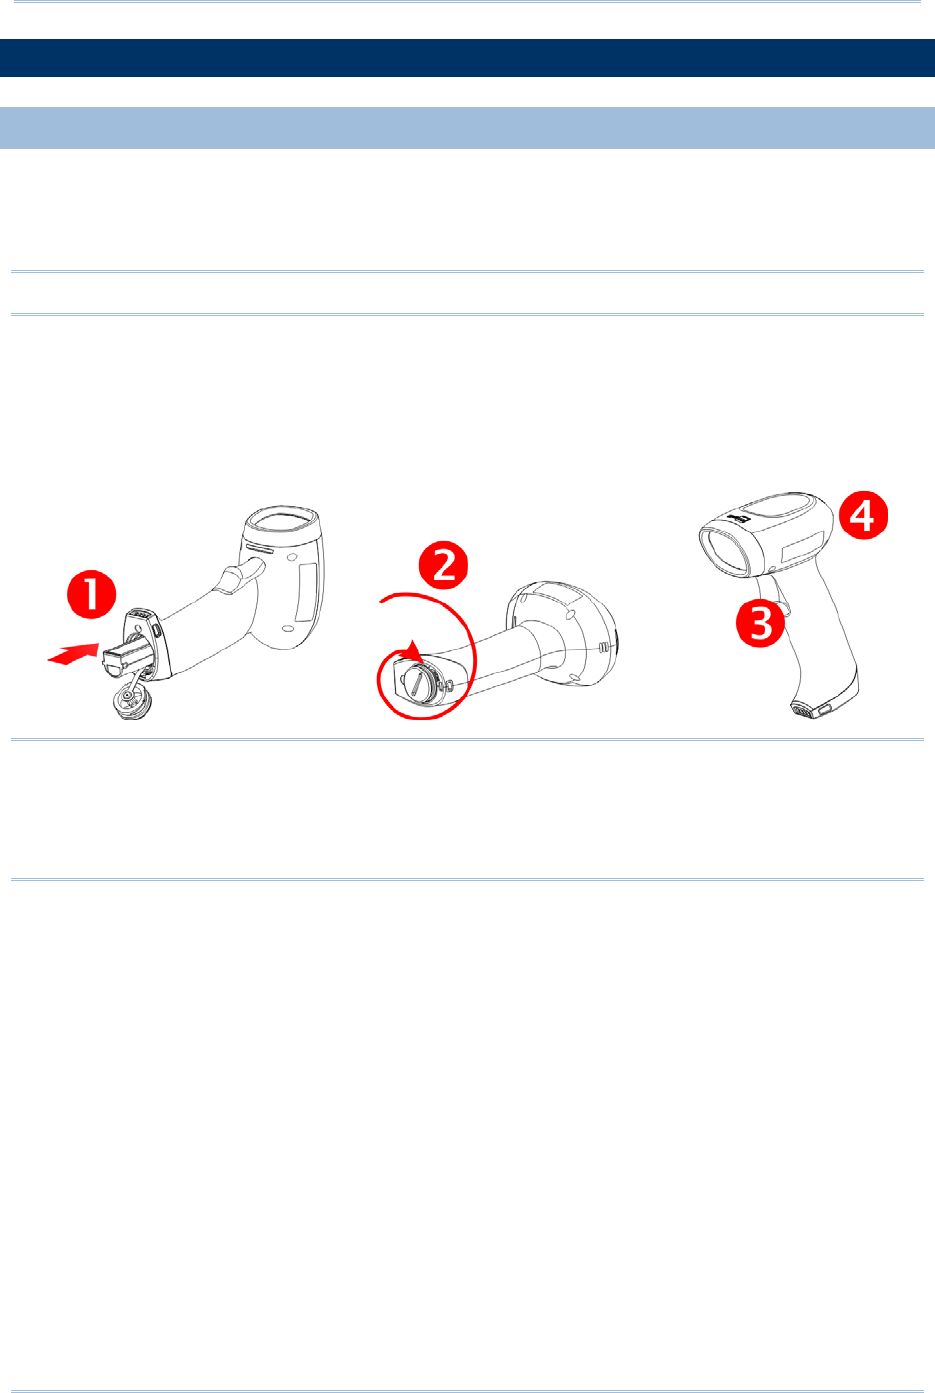
1) Insert the battery into the battery compartment and close the battery cap.
2) Use a coin or flat-blade screw driver to rotate the battery cap clockwise until snug.
3) Hold down the trigger about 2 seconds to turn on the scanner.
4) The scanner will respond with a long beep and its LED will come on-off shortly.
Note: (1) To turn off the scanner, remove the battery.
(2) For shipping and storage purposes, save the scanner and the battery
separately. This will keep the battery in good condition for future use.
(3) When the battery charge becomes low, you will find the scanner cannot emit
scan beam and its power-on beep sounds differently.
5
SETTING UP THE CRADLE
Capable of charging the scanner, the cradle is specifically designed for the scanner to
communicate with a host computer wirelessly. The connection between the scanners and
the cradle is made easy and reliable.
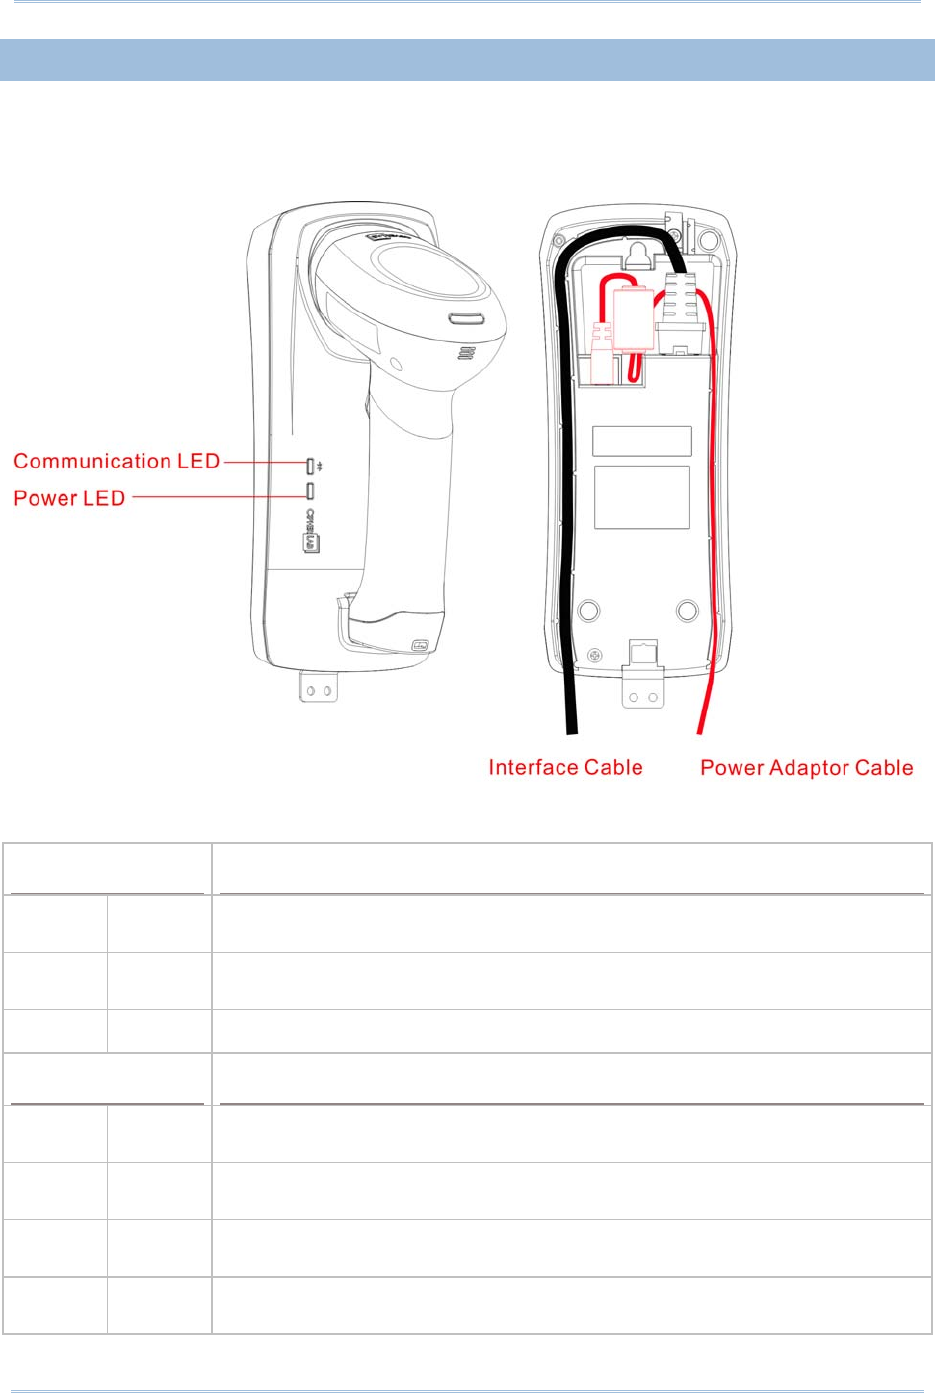
Two LED indicators are provided for power and communications status.
Power LED Meaning
Red,
solid --- Charging error
Red,
flashing Charging (On/Off ratio 0.5:0.5 seconds)
--- --- Power OFF
Communication LED Meaning
--- Blue,
solid Initializing
Red,
solid --- Failed to establish a USB connection
Red,
solid Blue,
flashing Serial command mode with USB Virtual COM or RS-232: wait 3 seconds for
starting a serial command
Red,
flashing Blue,
flashing Serial command mode with USB HID: wait 3 seconds for pressing [Num
Lock] or [Caps Lock] 5 times via keyboard
6
2560 Series Barcode Scanne
r
User Guide
--- Blue,
flashing Wait for connection request from the scanner (Slow flash at 0.5 Hz)
--- Blue,
flashing Connected with the scanner (Fast flash at 1 Hz)
Red,
solid Blue,
flashing Failed to send data to host via USB Virtual COM (Fast flash at 1 Hz)
Red,
flashing --- Enter Download Mode
CHARGING THE BATTERY VIA THE CRADLE
The battery may not be charged to full for shipment. When you first receive the package,
you will need to charge the battery to full before using the scanner. When using the
RS-232 cable, it takes approximately 5 hours to charge the battery to full (from the
power adaptor).
Note: Battery charging stops when the temperature drops below 0°C or exceeds 40°C. It
is recommended to charge the battery at room temperature (18°C to 25°C) for
optimal performance.
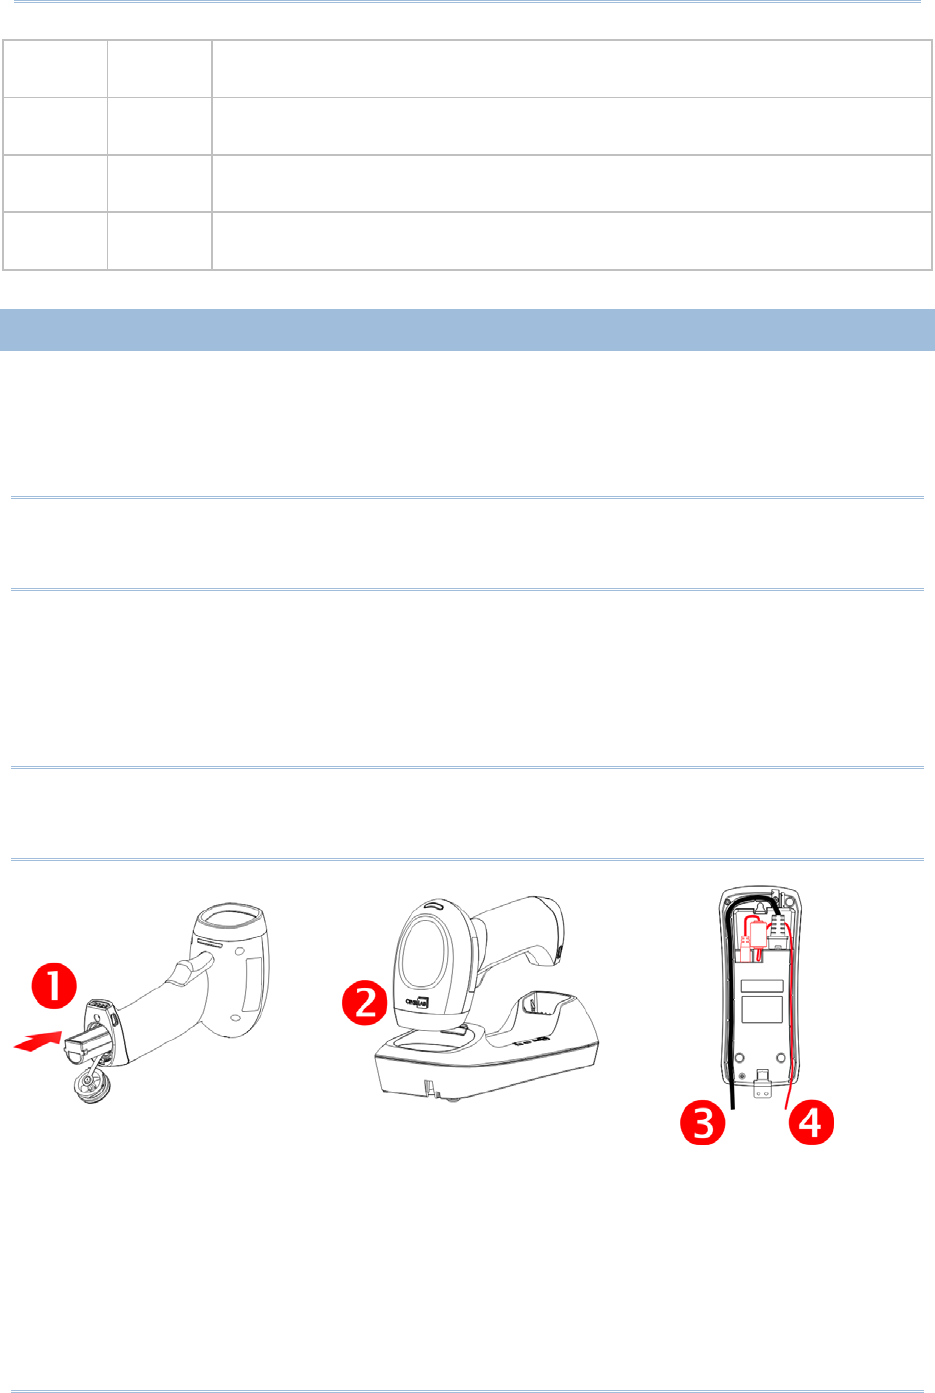
1) Install the battery to the scanner.
2) Seat the scanner in the cradle.
3) Connect the cradle to your computer or notebook via the USB or RS-232 cable.
4) Connect the power supply cord from the cradle to a proper power outlet.
Warning: RS-232/USB interface both require connecting the power supply cord.
When the cradle is solely on USB power, the current may be insufficient for
it to function normally. You must connect the power supply cord.
5) The LED for power indication on the cradle will become solid red.
6) The scanner LED will be flashing red during charging.
When the charging is done, the LED will turn off.
When charging error occurs, the LED will turn solid red.
7) The LED for communications on the cradle will first become solid blue while initializing.
Refer to the table above for details on different stage of communications.
7
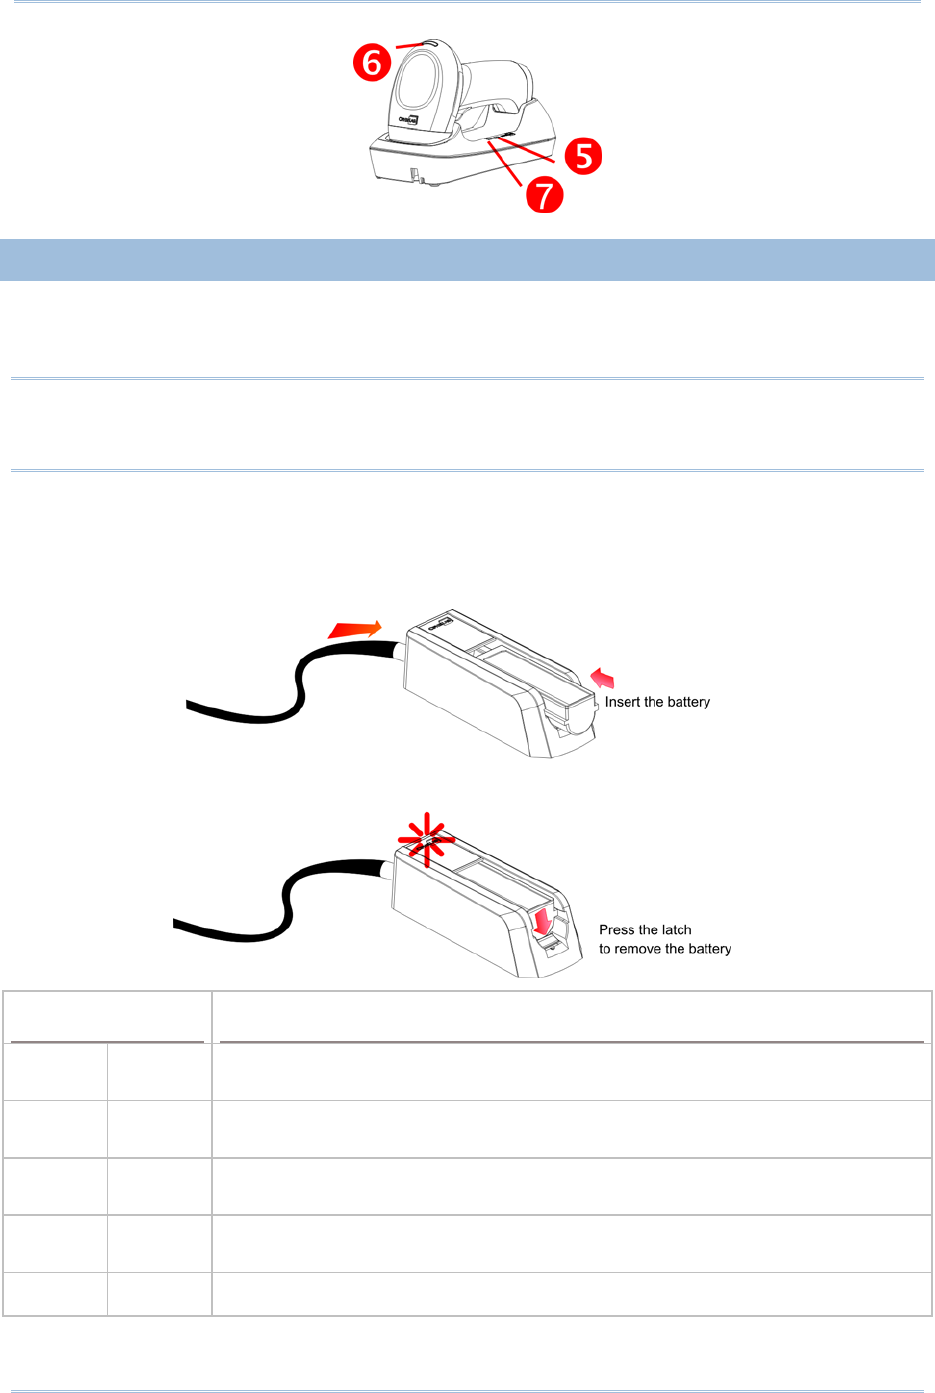
CHARGING THE BATTERY VIA CHARGER
The battery charger is provided for charging the battery only. You may purchase the
charger separately. It takes approximately 3 hours to charge the battery to full.
Note: Battery charging stops when the temperature drops below 0°C or exceeds 40°C. It
is recommended to charge the battery at room temperature (18°C to 25°C) for
optimal performance.
1) Slide the battery smoothly until the latch rises to secure it.
2) Connect the power supply cord to the charger.
3) Connect the other end of the power cord to a suitable power outlet.
Status LED Meaning
Red,
solid --- Charger power ON without battery inserted (LED on for 0.5 second)
Red,
solid --- Charging battery
--- Green,
solid Charging done
Red,
solid Green,
solid Pre-charging when battery voltage under 3V (Typical)
--- --- Power or battery not ready

8
2560 Series Barcode Scanne
r
User Guide
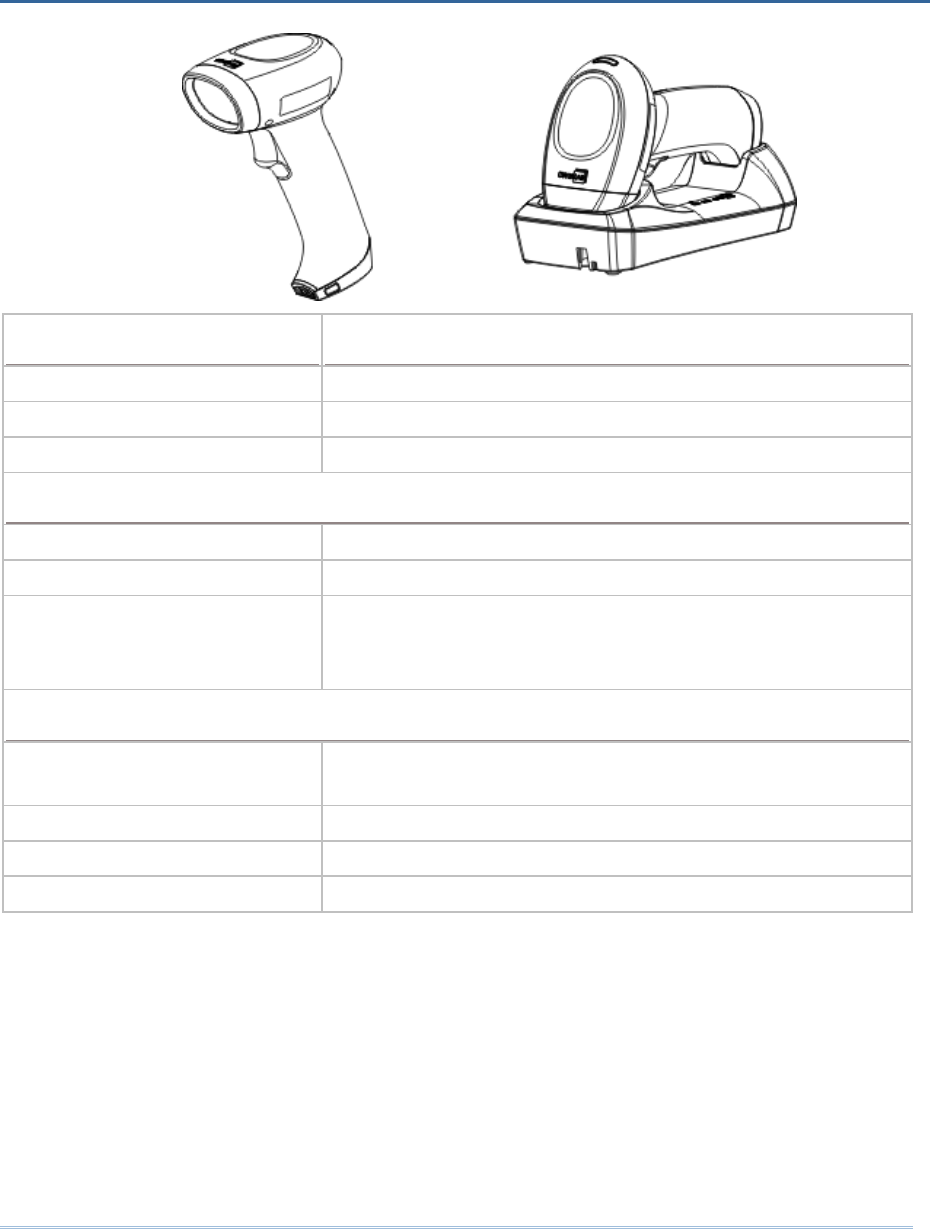
INSIDE THE PACKAGE
The items included in the package may be different, depending on your order. Save the
box and packaging material for future use in case you need to store or ship the scanner.
Barcode Scanner
BT Base
Rechargeable Li-ion battery
PRODUCT HIGHLIGHTS
Small-form-factor and built tough to survive drop test
Extremely low power consumption
Firmware upgradeable
Supports most popular barcode symbologies, including GS1-128 (EAN-128), GS1
DataBar (RSS), etc.
Supports negative barcodes
Supports different scan modes, including Aiming Mode and Multi-Barcode Mode
User feedback via LED indicator and beeper
Beeping tone and duration programmable for Good Read
4MB flash memory for Memory Mode operation, storing up to 240,000 scans based on
EAN-13 barcodes
Provides up to 10 KB SRAM for reserve buffer while getting out of range over a
wireless personal area network (WPAN), storing up to 640 scans based on EAN-13
barcodes
Capable of transmitting scanned data, emulating a serial cable (BT SPP) or as
keyboard input (BT HID), to a notebook computer or PDA with Bluetooth® wireless
technology
Programmable parameters include data output format, editing format, symbologies,
etc.
Easy configuration through ScanMaster
Easy connection through CipherConnect, available via online marketplace for mobile
devices running on Android 2.x, BlackBerry 5.x, or Windows Mobile 6.x
9
Optical Characteristics 2560
Scan Engine Non-contact type
Optical Sensor CCD
Light Source Visible red LED
RF Characteristics
WPAN Module Wireless PAN BT Class 2 compliance
Coverage (line-of-sight) 100 meters with the cradle
Interface Supported Serial Port Profile (BT SPP)
Human Interface Device Profile (BT HID)
Cradle
Physical Characteristics
Memory 10 KB for transmit buffer
4 MB flash for memory mode
Switch Tactile switch
Indication Triple-color LED (Red/Green/Blue) and beeper
Weight Approx. 185 g (battery included)
SPECIFICATIONS

10
2560 Series Barcode Scanne
r
User Guide
Electrical Characteristics
Battery Rechargeable Li-ion battery – 3.7 V, 800 mAh
Power Adaptor
Input AC 100~240 V, 50/60 Hz
Output DC 5V, 1A (Cradle)
DC 5V 1A (Battery Charger)
Operating Temperature 0 °C to 40 °C
Environmental Characteristics
Temperature Operating
Storage
0 °C to 50 °C
-20 °C to 60 °C
Humidity
(Non-condensing) Operating
Storage
10% to 90%
5% to 95%
Resistance
Impact Resistance 1.8 m, 5 drops per 6 sides
Splash / Dust Resistance IP 54
Electrostatic Discharge ± 20 kV air discharge, ± 10 kV contact discharge
Programming Support
Configuration via Setup Barcodes Use setup barcodes or host serial commands.
Software Windows®-based ScanMaster
Firmware upgradeable Download firmware updates via the download utility.
Accessories (means “supported”)
Rechargeable Li-ion Battery
Battery Charger
Cradle
USB Cable
RS-232 Cable
Keyboard Wedge Cable