CipherLab CP30 MOBILE COMPUTER User Manual
CipherLab Co., Ltd. MOBILE COMPUTER Users Manual
UserManual.wiki
>
CipherLab
>
CP30 User Manual
Users Manual
Navigation menu
Upload a User Manual
Namespaces
Wiki Guide
HTML
PDF
Info
Views
User Manual
Discussion / Help
Navigation


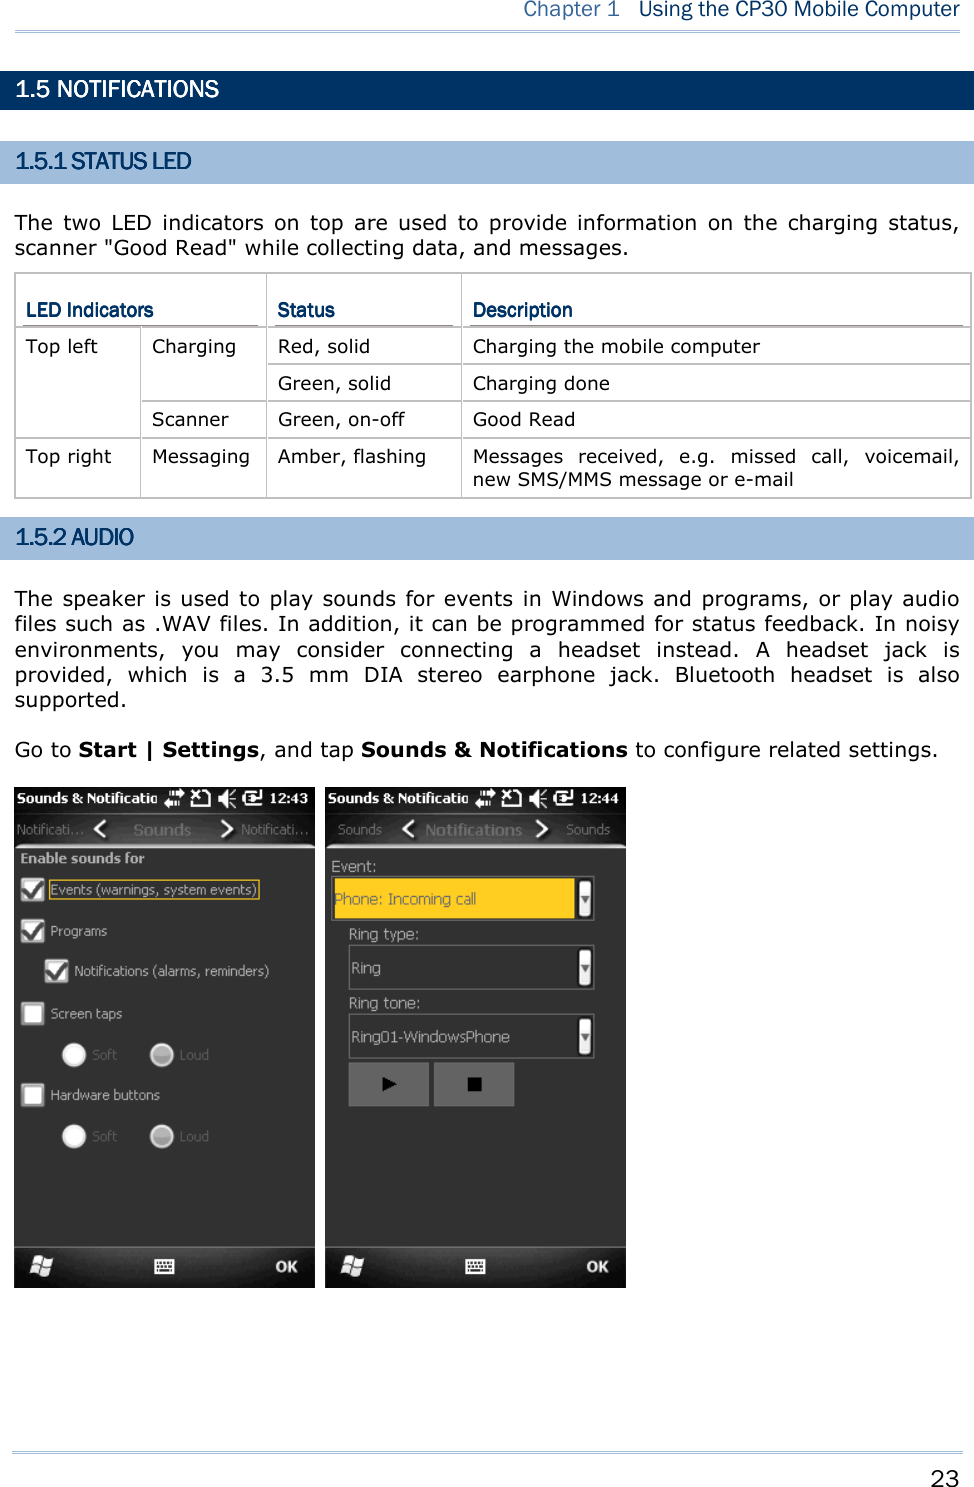
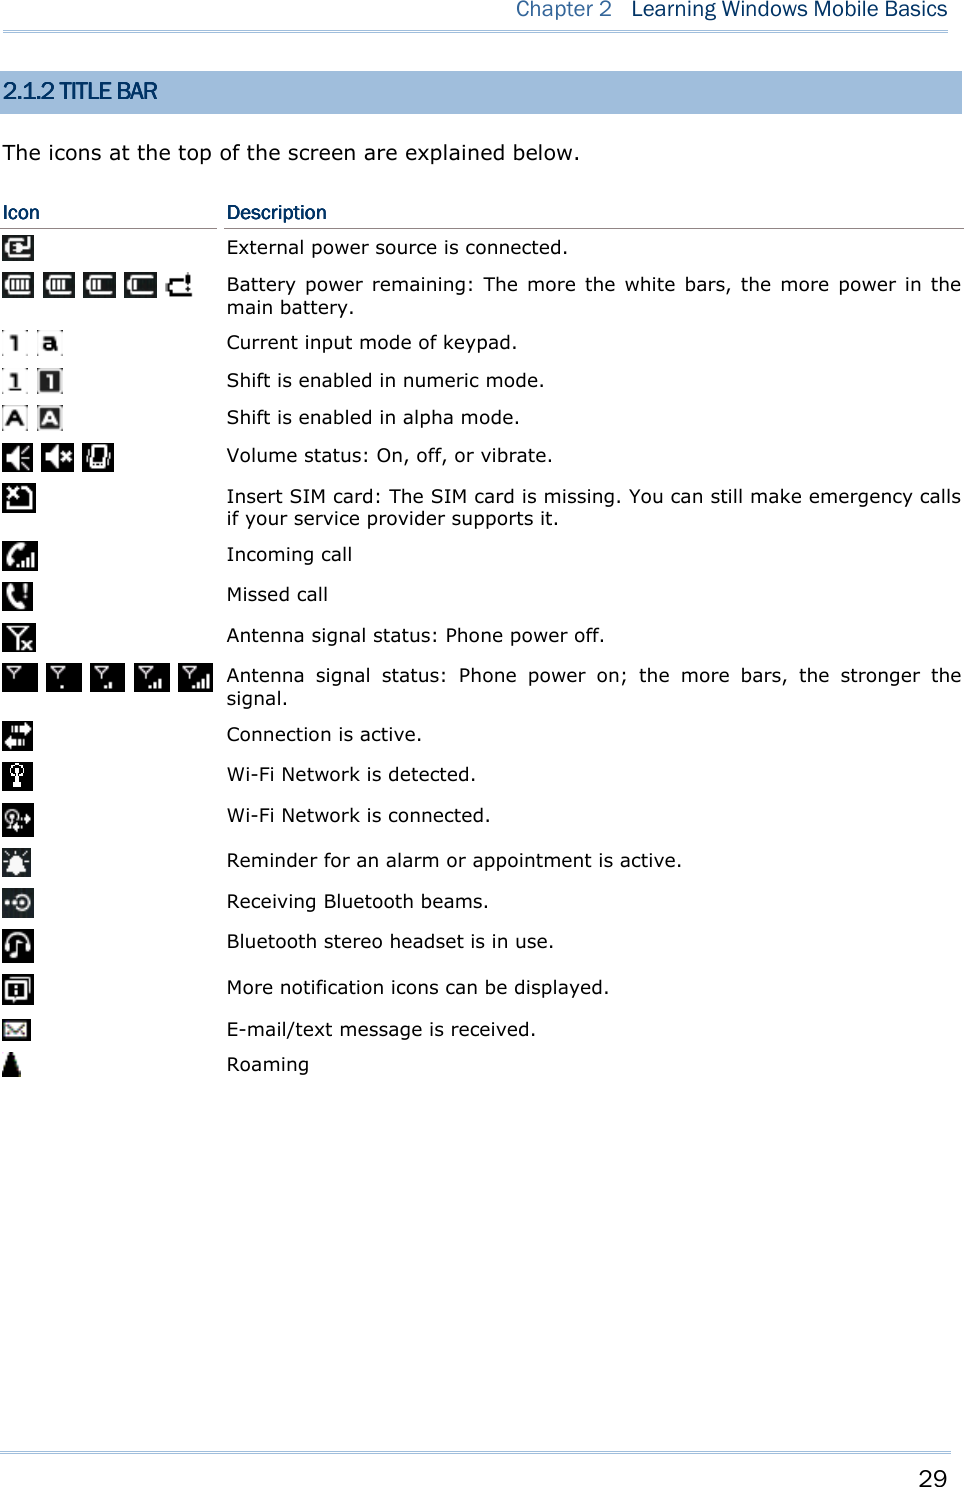
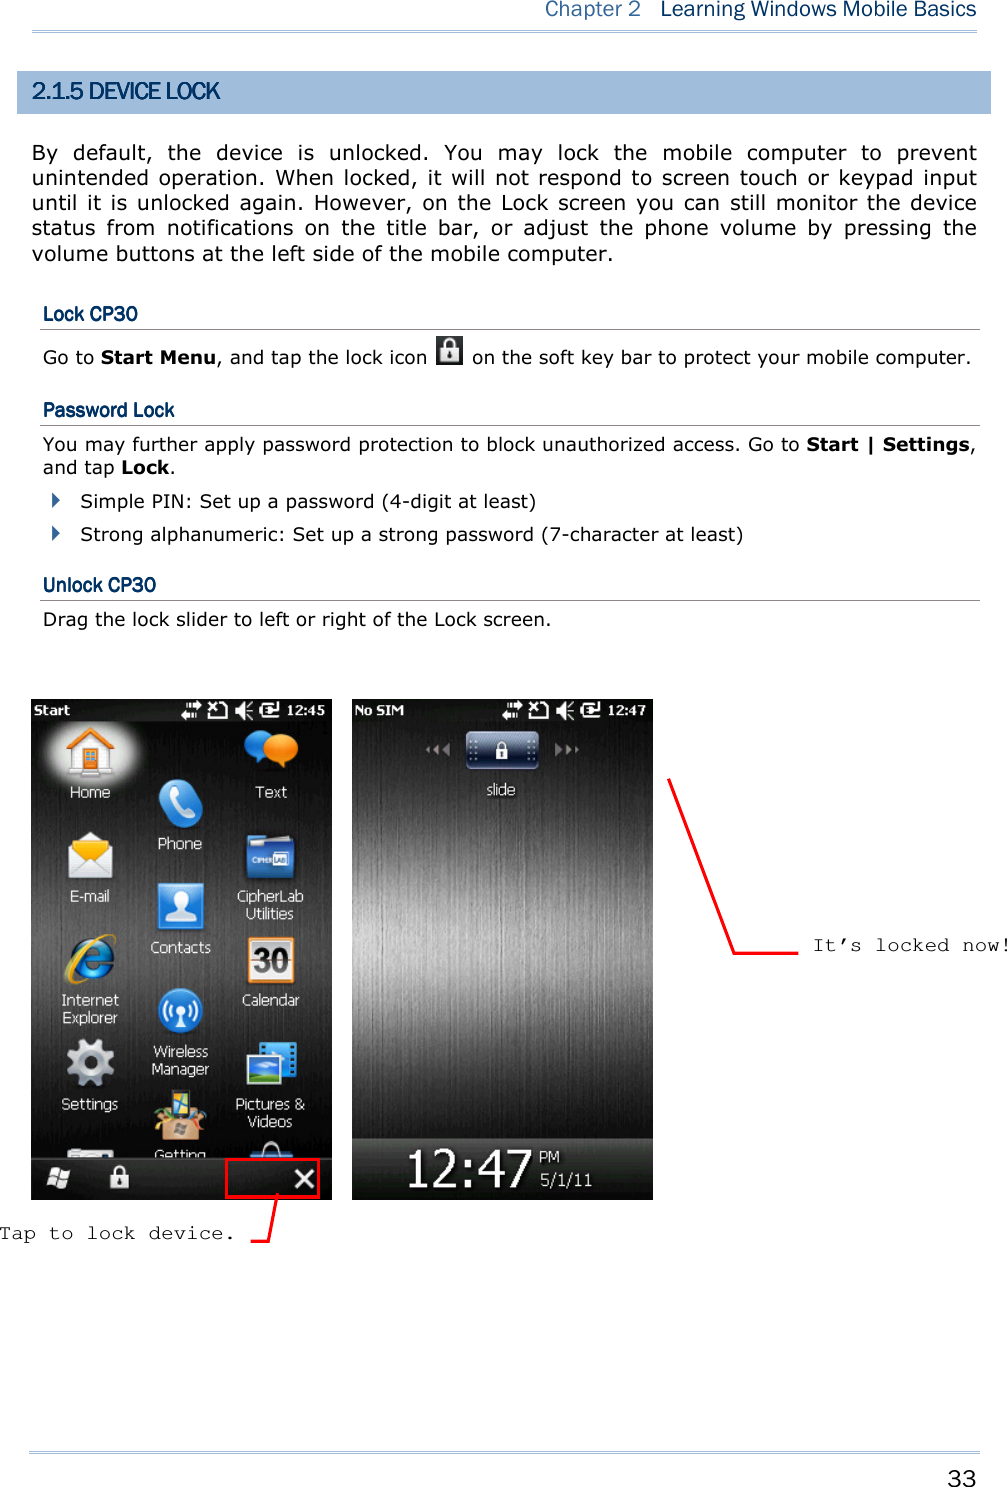
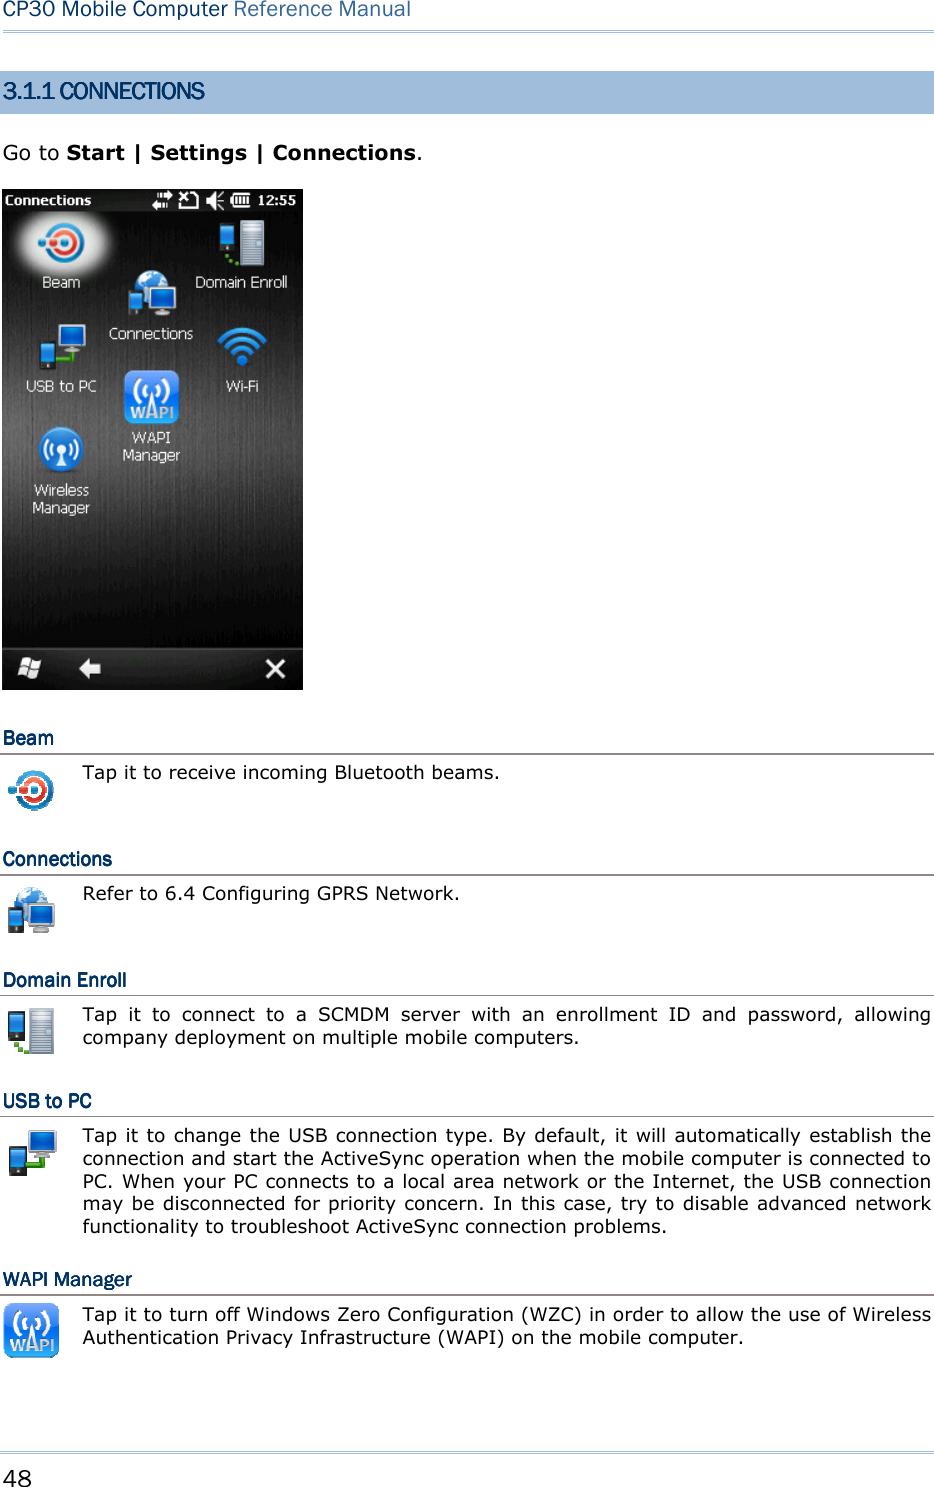
![13 This chapter explains the features and usage of the mobile computer. 1.1 BATTERY1.1 BATTERY1.1 BATTERY1.1 BATTERY Main Battery The mobile computer is powered by a rechargeable 3.7 V/2200 mAh Li-ion battery pack, and it takes approx. 4.5 hours to charge it to full from the power adaptor or approx. 6 hours from the USB cable (at 500 mA). However, the charging time may vary by working condition. Backup Battery The backup battery on the main board takes charge when the main battery is removed or drained out. It can supply power to the real-time clock (RTC) for at least 5 minutes and help retain data in RAM and maintain the system running in suspend mode without the main battery. However, you have to replace the main battery as soon as possible. Warning: The battery cover must be in position. If not, the mobile computer cannot turn on by pressing [Power] or wake up by pressing [Scan], and the red LED indicator will flash twice to alert. For a new battery, make sure it is fully charged before use. Always prepare a spare battery pack, especially when you are on the road. Chapter Chapter Chapter Chapter 1111 USING USING USING USING THE CPTHE CPTHE CPTHE CP33330 MOBILE COMPUTER0 MOBILE COMPUTER0 MOBILE COMPUTER0 MOBILE COMPUTER](https://usermanual.wiki/CipherLab/CP30/User-Guide-1491409-Page-21.png)
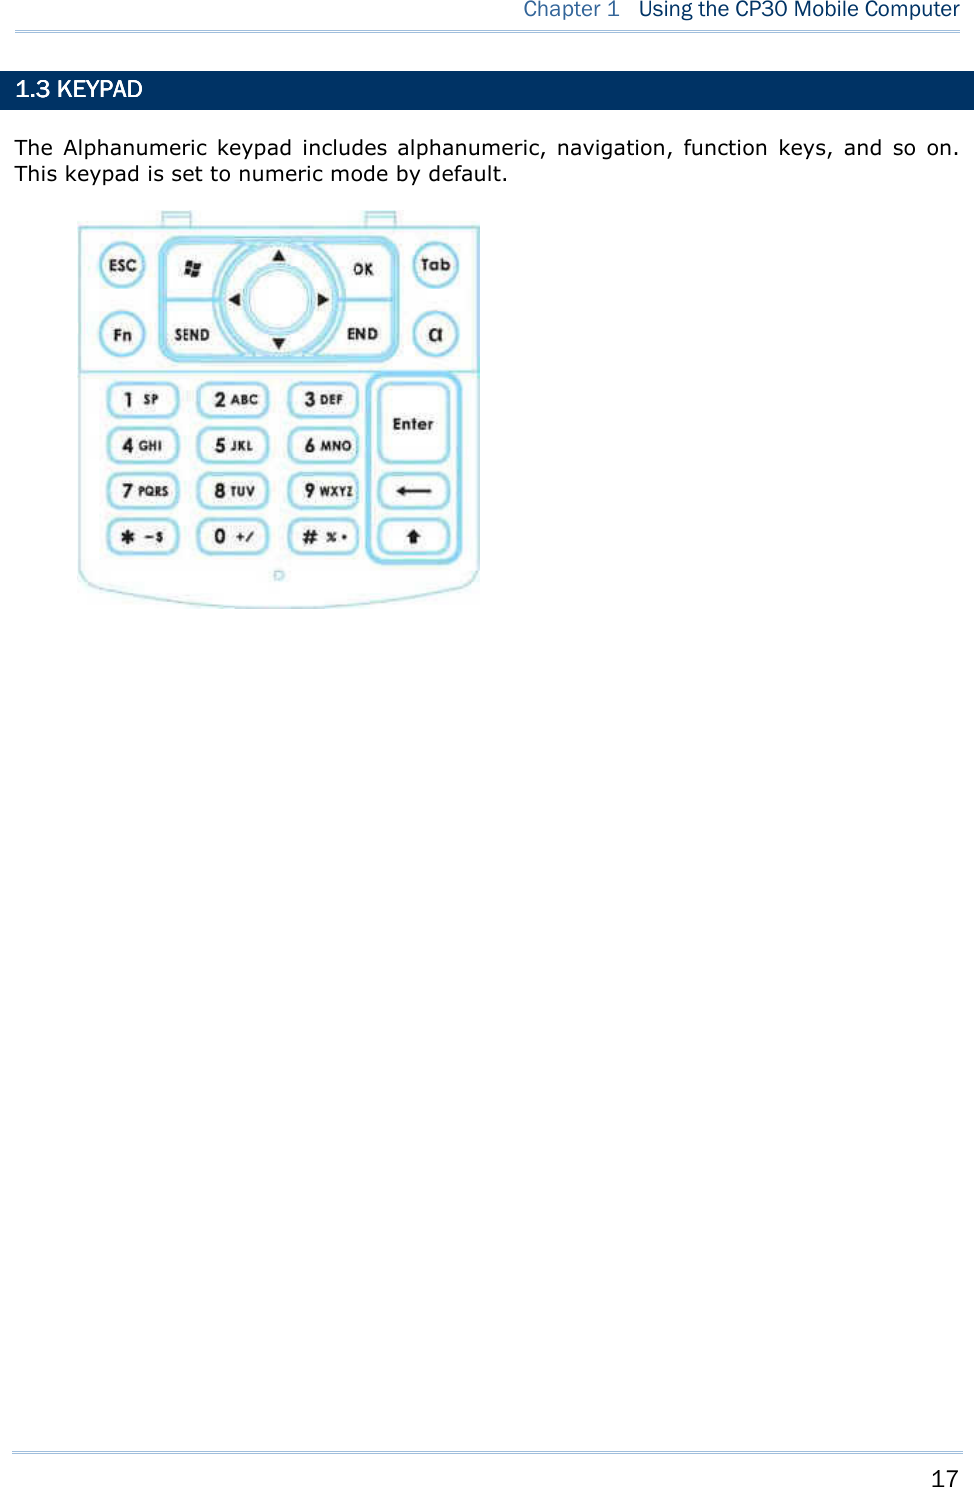
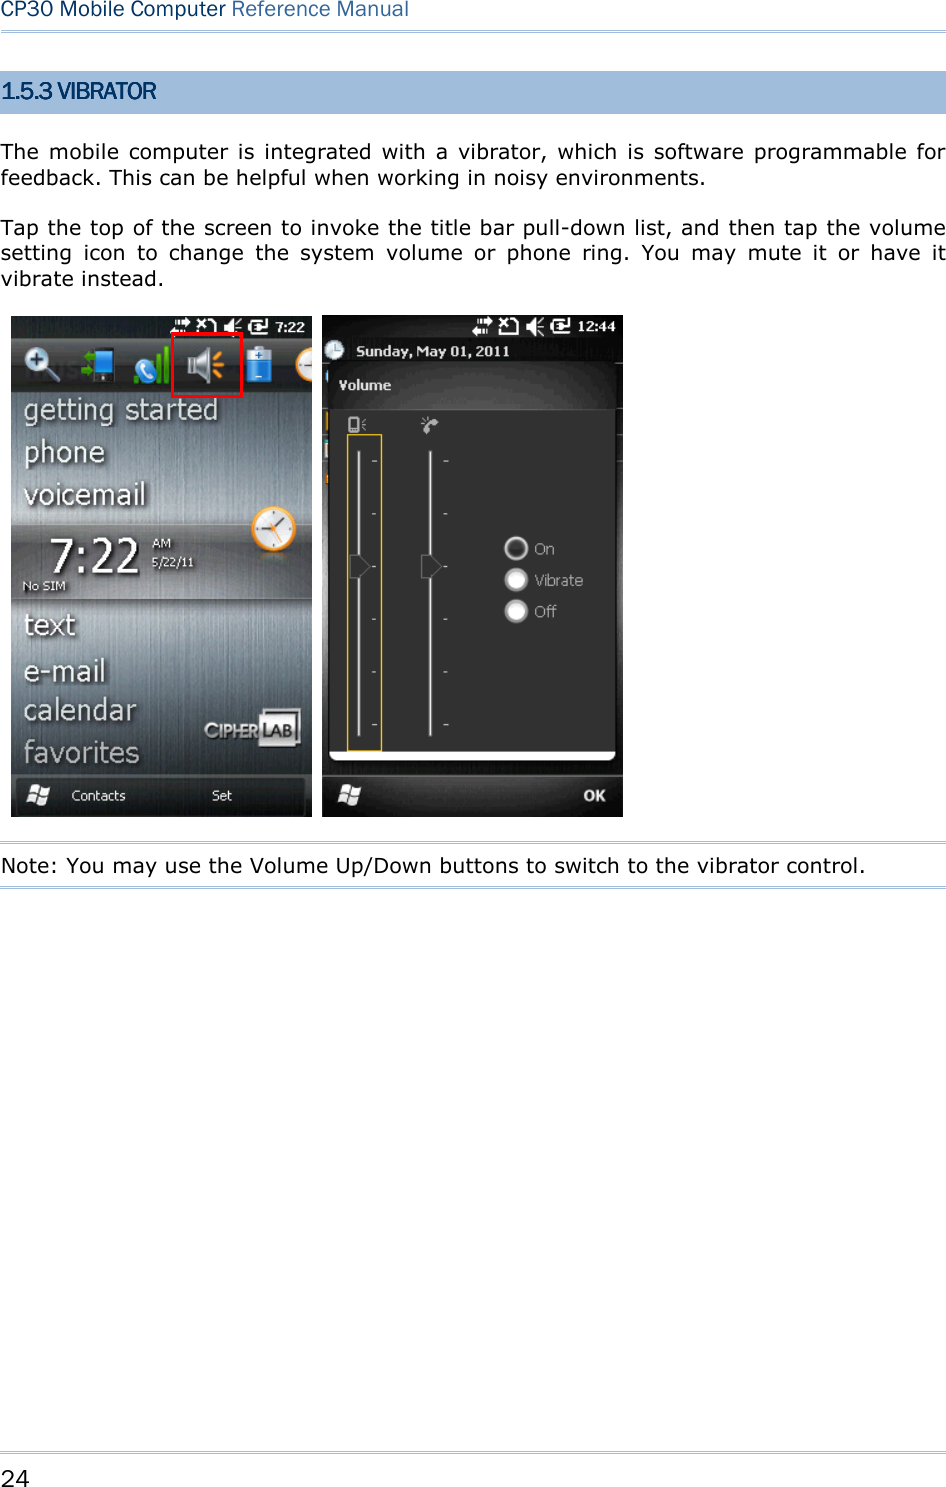
![19 Chapter 1 Using the CP30 Mobile Computer 1.3.2 ALPHA KEY1.3.2 ALPHA KEY1.3.2 ALPHA KEY1.3.2 ALPHA KEY This alphanumeric keypad is set to numeric mode by default. The Alpha key serves as a toggle among numeric, alpha (lower-case alphabetic) input modes. Note: It is not necessary to hold down the [Alpha] key. The alpha icon will appear on the status bar in a sequence as shown below. Status IconStatus IconStatus IconStatus Icon AlphaAlphaAlphaAlpha KeyKeyKeyKey Input ModeInput ModeInput ModeInput Mode --- Numbers Press [α] one time Lower-case alphabetic Note: (1) Use the [Shift] key to enter ALPHA (upper-case alphabetic) mode ( or ). (2) If you are using the software keypad via SIP, tap CAP (Caps Lock) to toggle between upper case and lower case alphabetic modes. 1.3.1.3.1.3.1.3.3 SHIFT KEY3 SHIFT KEY3 SHIFT KEY3 SHIFT KEY Status IconStatus IconStatus IconStatus Icon Shift KeyShift KeyShift KeyShift Key Input ModeInput ModeInput ModeInput Mode Press [] one time The Shift key modifies the next key pressed. Depending on the input mode, (1) In numeric mode ( ), it will modify the next key pressed and is user-definable. (2) In alpha (lower-case alphabetic) mode ( ), it will produce a single upper-case letter. For example, input letters “ABC”, it will produce “Abc”. Press [] two times (enter Shift Lock Mode) If you are in Shift Lock Mode, all keys send their shifted values when pressed alone. Depending on the input mode, (1) In numeric mode ( ), it will modify the next key pressed and is user-definable. (2) In alpha (lower-case alphabetic) mode ( ), it will produce all upper-case letters (= Caps Lock). For example, input letters “ABC”, it will produce “ABC”. Note: It is not necessary to hold down the [Shift] key.](https://usermanual.wiki/CipherLab/CP30/User-Guide-1491409-Page-27.png)
![20 CP30 Mobile Computer Reference Manual 1.3.4 FUNCTION KEY1.3.4 FUNCTION KEY1.3.4 FUNCTION KEY1.3.4 FUNCTION KEY The function key [Fn] serves as a modifier key, and the functionality of each key combination is application-dependent. 1) To enable this modifier key, press [Fn] on the keypad. Its icon will appear on the status bar. 2) Now press another key to get the value of key combination (say, press [1] to get the value of F1). 3) To get the value of another key combination modified by the function key, repeat the step 2. 4) To abort the key modification, press [Fn] again, and the icon will go off. Note: It is not necessary to hold down the [Fn] key. Below is a list of the factory setting for a variety of key combinations. Key CombinationKey CombinationKey CombinationKey Combination ActionActionActionAction [Fn], [Up] Move text up one screenful (Page Up) [Fn], [Down] Move text down one screenful (Page Down) [Fn], [Left] Move to the beginning of screen or document (Home) [Fn], [Right] Move to the end of screen or document (End) Note: Press the function key first, and then press the second key for a specific function. 1.3.5 PRO1.3.5 PRO1.3.5 PRO1.3.5 PROGRAMMABLE KEYSGRAMMABLE KEYSGRAMMABLE KEYSGRAMMABLE KEYS The following keys are user-definable. They can be re-defined as another key or to serve as a shortcut key for launching a specific program. [Scan] Two side triggers on each side of the touch screen [] (Asterisk) [#] (Hash)](https://usermanual.wiki/CipherLab/CP30/User-Guide-1491409-Page-28.png)

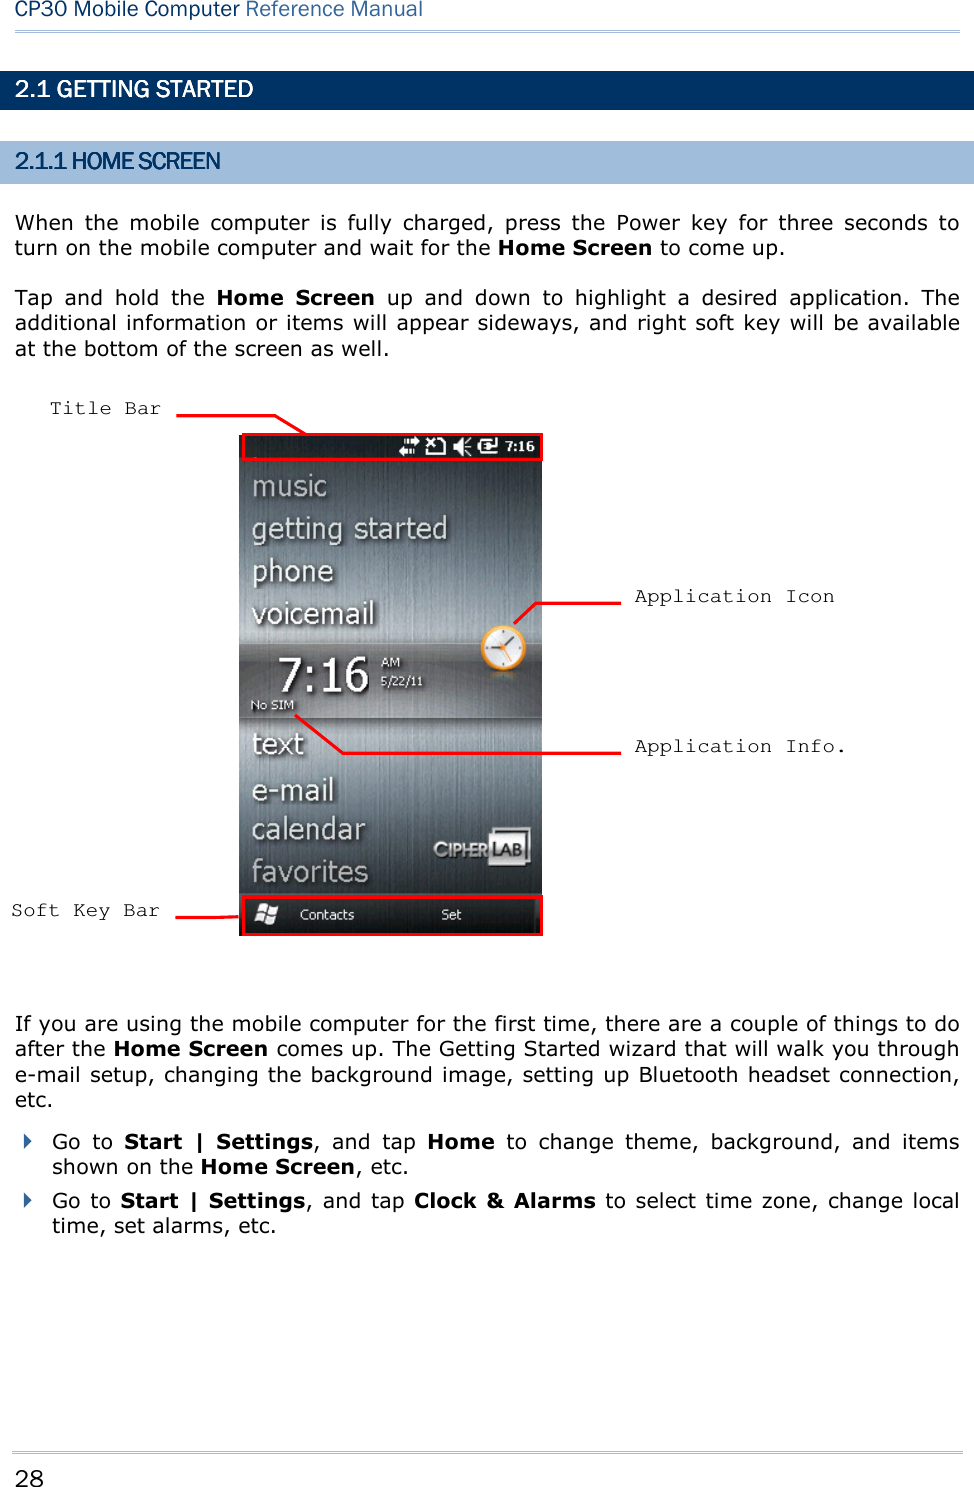
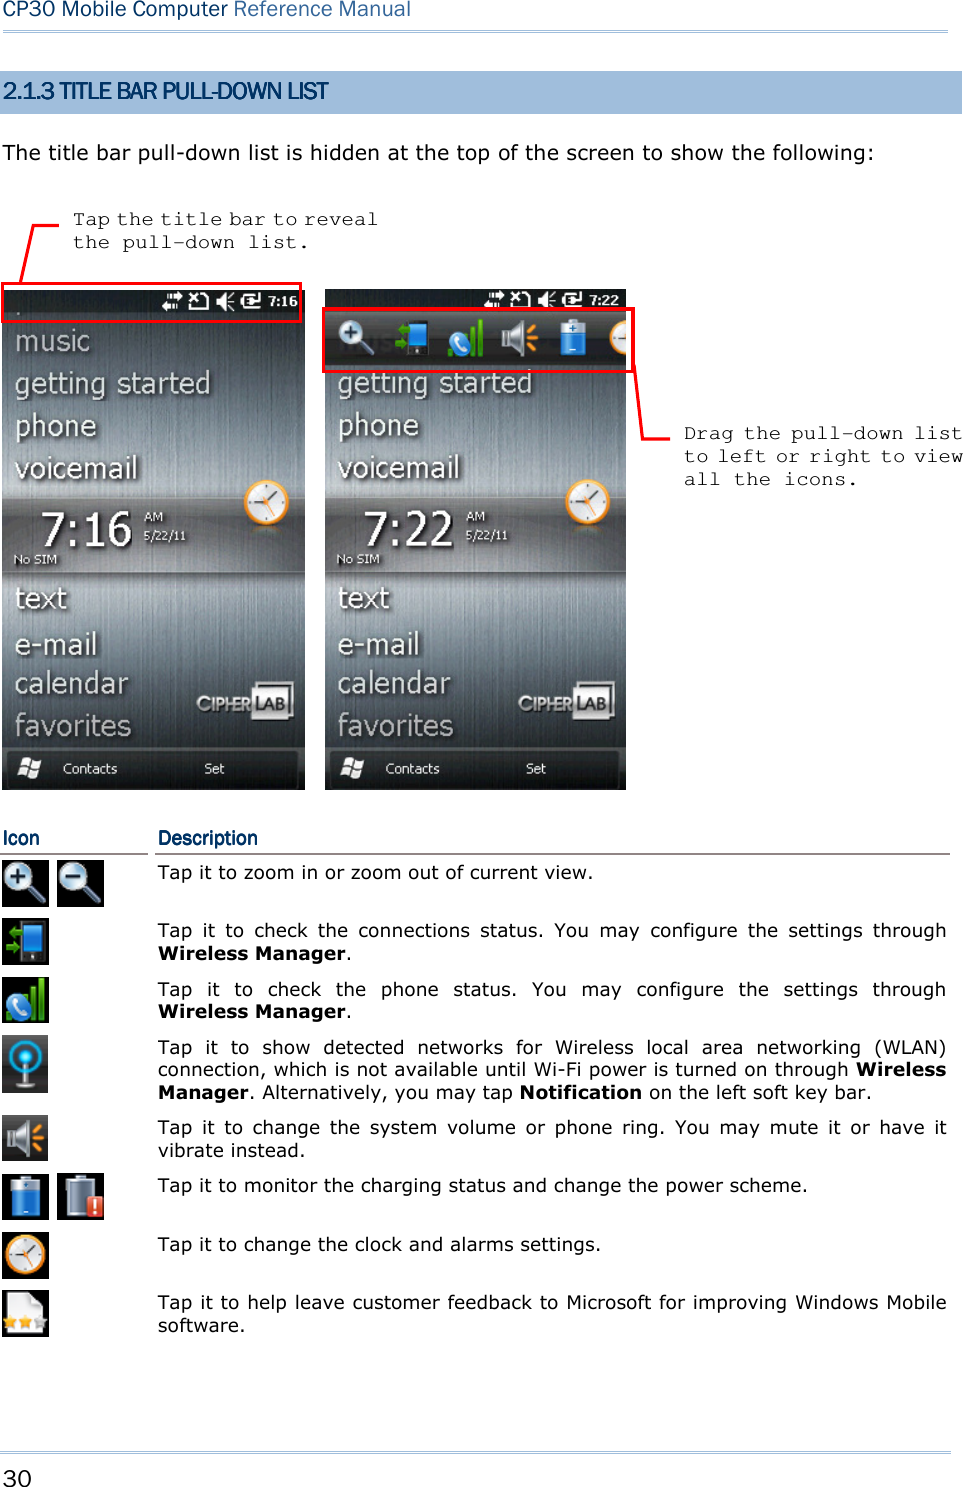
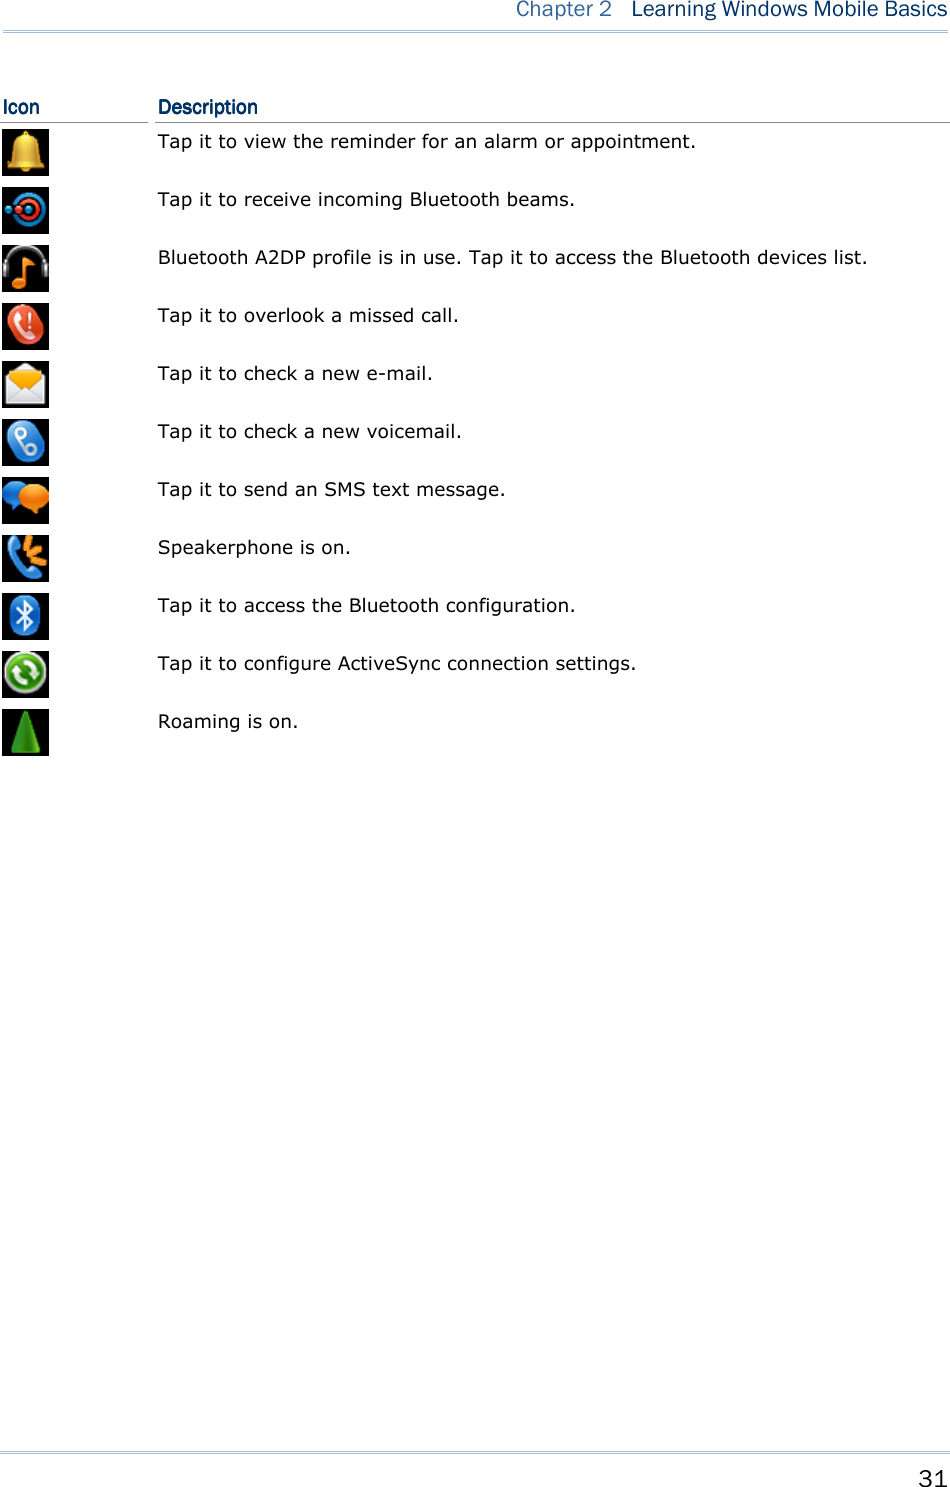
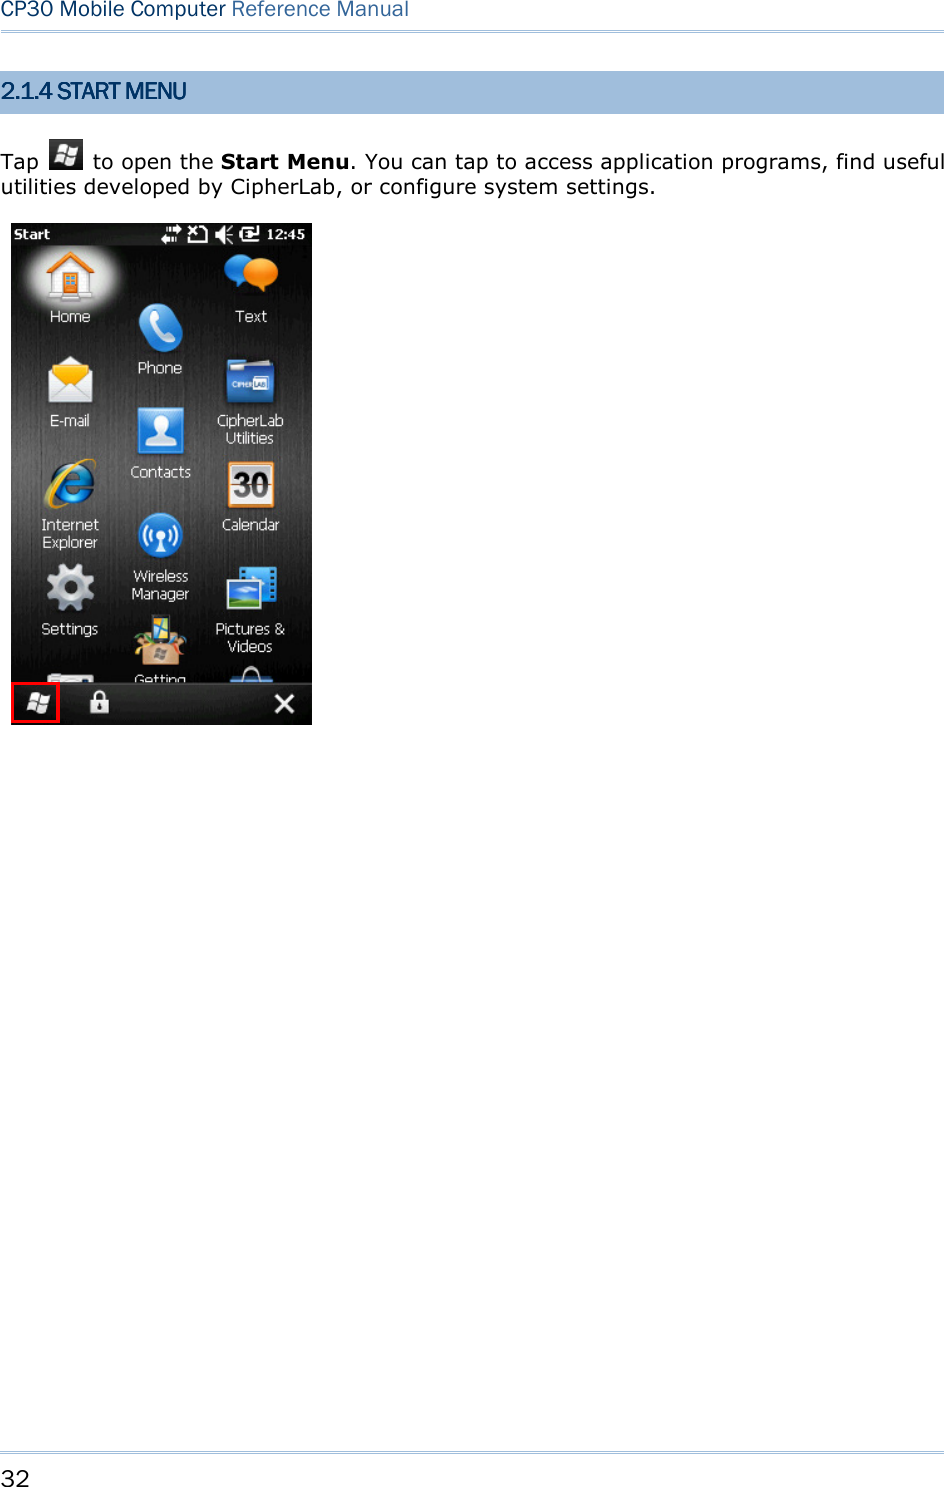
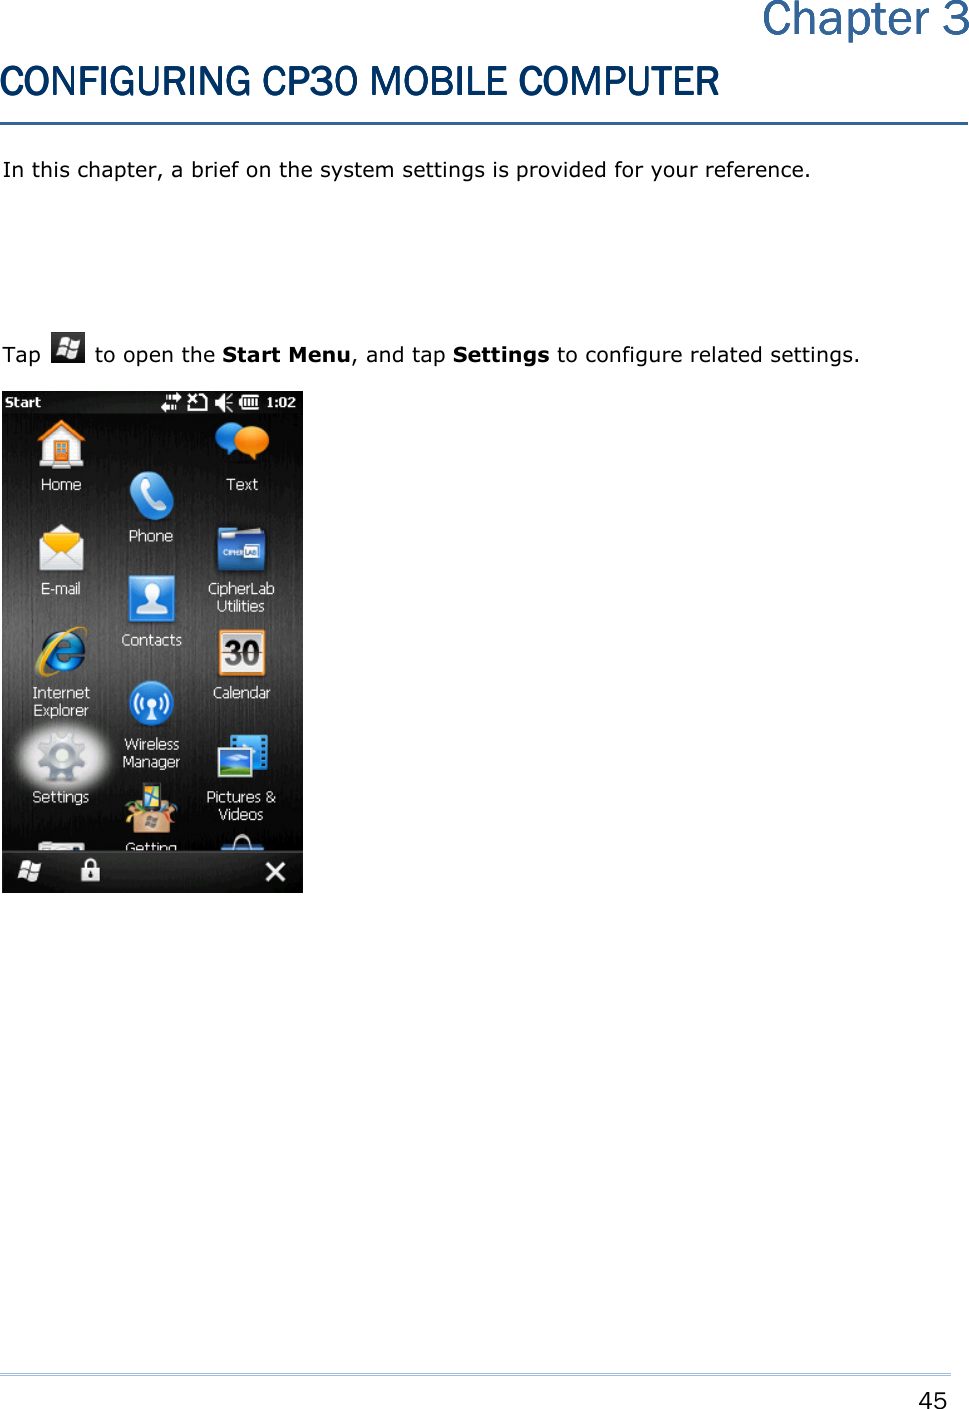
![27 This chapter mainly describes the basic skills to work with the CP30 Mobile Computer. The add-on utilities for applications regarding data collection, processing, and transmission, are introduced in the following chapters. The mobile computer is specifically designed for real-time data collection in the Windows Mobile 6.5 environment. It won't take long for any Windows user to get familiarized with it. Keep these basic skills in mind and explore this Windows Mobile device at ease. Tap an item to select it. Tap and hold an item to see a menu that enables tasks, such as cut, copy, rename, delete, etc. Tap and drag to select multiple items. Tap [] at the bottom of the screen to close an active window, a dialog box, or a running application. Tap [OK] at the bottom of the screen to save the current settings and exit the application (or minimize the window in some applications). Tap [] at the bottom of the screen to return the previous menu. Chapter Chapter Chapter Chapter 2222 LEARNING WINDOWS LEARNING WINDOWS LEARNING WINDOWS LEARNING WINDOWS MOBILEMOBILEMOBILEMOBILE BASICSBASICSBASICSBASICS](https://usermanual.wiki/CipherLab/CP30/User-Guide-1491409-Page-35.png)
![35 Chapter 2 Learning Windows Mobile Basics 2.2.2.2.3333 MANAGING PROGRAMSMANAGING PROGRAMSMANAGING PROGRAMSMANAGING PROGRAMS Tap the Start button to view the Start Menu. To quick launch a program, tap it. To add a new program or subfolder to the Start Menu, you can either use File Explorer or ActiveSync. File Explorer: to move the program by [Copy] and [Paste Shortcut]. ActiveSync on the desktop computer: to create a shortcut to the program, and place the shortcut in the Programs folder. Warning: To avoid making any changes to the program configurations by accident, we recommend you to use [Copy] and [Paste Shortcut] rather than [Cut] and [Paste]. 2.2.2.2.3.13.13.13.1 ADD A PROGRAM TO ADD A PROGRAM TO ADD A PROGRAM TO ADD A PROGRAM TO START MENUSTART MENUSTART MENUSTART MENU 1. Tap Start | File Explorer. 2. Navigate through file folders to find the program you desire. 3. Tap and hold the program to select [Copy] from the pop-up menu. 4. Navigate to the Programs folder – My Device\Windows\Start Menu\Programs. 5. Tap and hold anywhere blank on the screen to select [Paste Shortcut] from the pop-up menu. The new program will be added to the Programs folder. 6. Go to Start Menu and the new program will appear now. 2.2.2.2.3.2 3.2 3.2 3.2 CREATE A NEW FOLDERCREATE A NEW FOLDERCREATE A NEW FOLDERCREATE A NEW FOLDER 1. Tap Start | File Explorer. 2. Navigate through file folders to find where to create a new folder. 3. Tap Menu | New Folder and a subfolder will be created. 2.2.2.2.3.3.3.3.3333 SWITCH AMONG PROGRAMSWITCH AMONG PROGRAMSWITCH AMONG PROGRAMSWITCH AMONG PROGRAMSSSS 1. Tap Start | Task Manager. 2. Select which running program to use. 3. Tap Menu | Switch To on the right soft key bar and the program will be displayed.](https://usermanual.wiki/CipherLab/CP30/User-Guide-1491409-Page-43.png)
![36 CP30 Mobile Computer Reference Manual 2.2.2.2.3.3.3.3.4444 END A PROGRAMEND A PROGRAMEND A PROGRAMEND A PROGRAM In general, the system manages memory automatically, and there is no need to exit a program in order to open another or to conserve memory. However, random access memory (RAM) may be used up when running too many programs. As a result, it will slow down the operation or cause program errors. In that case, you should stop one or more running programs to free memory. In order to use memory in a more efficient way, you are recommended to exit a program when it is not desired any longer. Warning: Always remember to save data or settings before you exit a program. Tap [] to close an active window, a dialog box, or a running application. If the button is not displayed on the soft key bar, press [ESC] on the physical keypad. Tap [OK] to save the current settings and exit the application (or minimize the window in some applications). If the button is not displayed on the soft key bar, press [OK] on the physical keypad. Note: Some programs, such as the Reader Configuration Utility (ReaderConfig.exe), may create an associated icon on the taskbar. You may tap the icon and select [Exit] from the pop-up menu. 1. Tap Start | Task Manager. 2. Select which running program to stop. 3. Tap End Task on the left soft key bar and the program will be closed.](https://usermanual.wiki/CipherLab/CP30/User-Guide-1491409-Page-44.png)
![37 Chapter 2 Learning Windows Mobile Basics 2.2.2.2.3.3.3.3.5555 FIND A FILEFIND A FILEFIND A FILEFIND A FILE 1. Tap Start | Search Phone. 2. In the “Search for” box, enter the file name, word, or other information you want to search for. If you have looked for this item before, tap the drop-down menu and select it. In the “Type” box, select a data type to help narrow your search. If the data type of your file is other than listed, you may try [Larger than 64 KB]. However, if such file is less than 64 KB, it will not be searchable. 3. Tap Search. 4. In the Results list, tap the item you want to open.](https://usermanual.wiki/CipherLab/CP30/User-Guide-1491409-Page-45.png)
![39 Chapter 2 Learning Windows Mobile Basics 2.2.2.2.4444.2 ADD/REMOVE PROGRA.2 ADD/REMOVE PROGRA.2 ADD/REMOVE PROGRA.2 ADD/REMOVE PROGRAMSMSMSMS Click [Add/Remove Programs] from the Tools Menu so that you can proceed to install a program that is designed to be used on a mobile device running Windows Mobile. If a user program is no longer desired, you may remove it from the system. Click [Add/Remove Programs] from the Tools Menu so that you can un-install a program that is designed to be used on a mobile device running Windows Mobile. Alternative to Install New Programs (Copy & Paste)Alternative to Install New Programs (Copy & Paste)Alternative to Install New Programs (Copy & Paste)Alternative to Install New Programs (Copy & Paste) You may install a new program manually. 1. When connected, open the Microsoft ActiveSync window on your desktop computer. 2. Click the Explorer button from the toolbar. 3. Navigate to the target folder, e.g. the Programs folder (\Windows\Start Menu\Programs), depending on where you wish to access the program. 4. Navigate through file folders on your computer to find the new program (.CAB, .EXE, etc.) 5. Right-click the program and select [copy] from the pop-up menu. 6. Back to the target folder in step 3. Right-click anywhere blank and select [Paste] from the pop-up menu. 7. On the mobile computer, go to Start Menu and the new program will appear. Alternative to Remove ProgramsAlternative to Remove ProgramsAlternative to Remove ProgramsAlternative to Remove Programs You may un-install a new program manually. 1. Go to Start | Settings | System and select Remove Programs. 2. Tap the name of the program that you want to delete. 3. Tap [Remove]. 4. Tap [Yes] to un-install the program. Note: If the program does not appear in the list of installed programs, you may use File Explorer to locate it. Tap and hold the program to select [Delete] from the pop-up menu.](https://usermanual.wiki/CipherLab/CP30/User-Guide-1491409-Page-47.png)
![40 CP30 Mobile Computer Reference Manual 2.2.2.2.4444....3333 EXPLORE DEVICEEXPLORE DEVICEEXPLORE DEVICEEXPLORE DEVICE Add a Program to Start MenuAdd a Program to Start MenuAdd a Program to Start MenuAdd a Program to Start Menu 1. When connected, open the Microsoft ActiveSync window on your desktop computer. 2. Click the Explorer button from the toolbar. 3. Navigate through file folders to find the program you desire. 4. Right-click the program and select [Create Shortcut] from the pop-up menu. 5. Right-click the shortcut and select [Cut] from the pop-up menu. 6. Navigate to the Programs folder –\Windows\Start Menu\Programs. 7. Right-click anywhere blank on the window and select [Paste] from the pop-up menu. The new program will be added to the Programs folder. 8. On the mobile computer, go to Start Menu and the new program will appear now. Note: [Create Shortcut], [Cut], and [Paste]: The same result can be performed by [Copy] and [Paste Shortcut]. Create a New FolderCreate a New FolderCreate a New FolderCreate a New Folder 1. When connected, open the Microsoft ActiveSync window on your desktop computer. 2. Click the Explorer button from the toolbar. 3. Navigate to the target folder where you wish to create a new folder. 4. Right-click anywhere blank on the window and select [New Folder] from the pop-up menu. A subfolder will be created.](https://usermanual.wiki/CipherLab/CP30/User-Guide-1491409-Page-48.png)
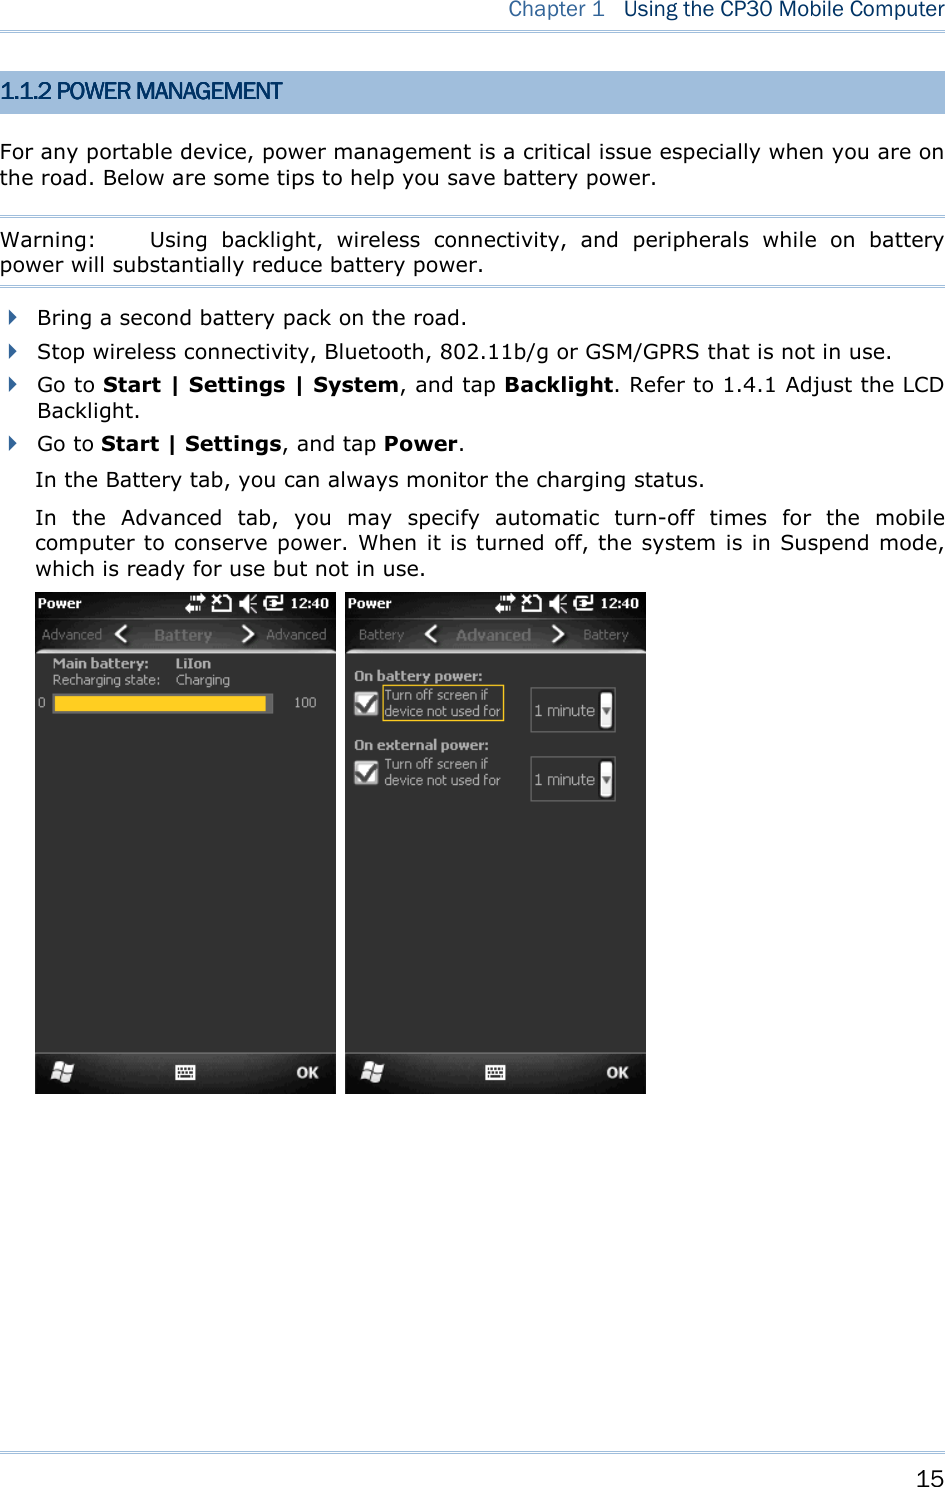
![42 CP30 Mobile Computer Reference Manual 2.2.2.2.5555 SUSPEND &SUSPEND &SUSPEND &SUSPEND & RESETRESETRESETRESET Like your PDA, Pocket PC and most handheld devices, the CP30 Mobile Computer functions when it is turned on. This is because the Windows Mobile operating system eliminates the booting process and runs continuously. You may reset the mobile computer when it stops responding to input. Program files stored in RAM will be erased after a reset. But you can restore data that is previously synchronized with your computer by performing an ActiveSync operation, or backed up by using CipherLab Backup Utility. After performing a reset, the recalibration and setup process is required to ensure touch screen accuracy and set up user settings for initial use. Follow the on-screen instruction to complete the process. You must manually adjust system date and time, as well as the time zone. 2.2.2.2.5555....1111 SUSPEND MODESUSPEND MODESUSPEND MODESUSPEND MODE When the mobile computer enters suspend mode, the system is ready for use but not in use. This is referred to as Suspend mode or Standby mode. It means the system is in power-saving status and waiting for user interference. Enter Suspend (= Standby)Enter Suspend (= Standby)Enter Suspend (= Standby)Enter Suspend (= Standby) Press the Power key for about 0.2 seconds to enter Suspend mode or Standby mode. Resume from SuspendResume from SuspendResume from SuspendResume from Suspend Press the Power key for about 0.2 seconds to awake the mobile computer. Alternatively, you may press the Scan key. Warning: To save battery power, it is suggested that the mobile computer is set to be automatically turned off when not in use. Refer to 1.1.2 Power Management for more information about saving power. 2.5.2.5.2.5.2.5.2222 SOFTWARE RESET (WARMSOFTWARE RESET (WARMSOFTWARE RESET (WARMSOFTWARE RESET (WARM BBBBOOT)OOT)OOT)OOT) Software reset, also known as a warm boot, will restart the mobile computer and keep all the saved files. Software Software Software Software RRRReseteseteseteset (=(=(=(= Warm Warm Warm Warm BBBBootootootoot)))) 1. Turn off the mobile computer by pressing the Power key for 3 seconds. The Shut Down dialog is displayed asking “Are you sure you want to shut down? All unsaved data will be lost”. Tap [Yes] to perform a warm boot. 2. Turn on the mobile computer by pressing the Power key for 3 seconds. Warning: Data loss may occur when files are not properly closed before software reset.](https://usermanual.wiki/CipherLab/CP30/User-Guide-1491409-Page-50.png)

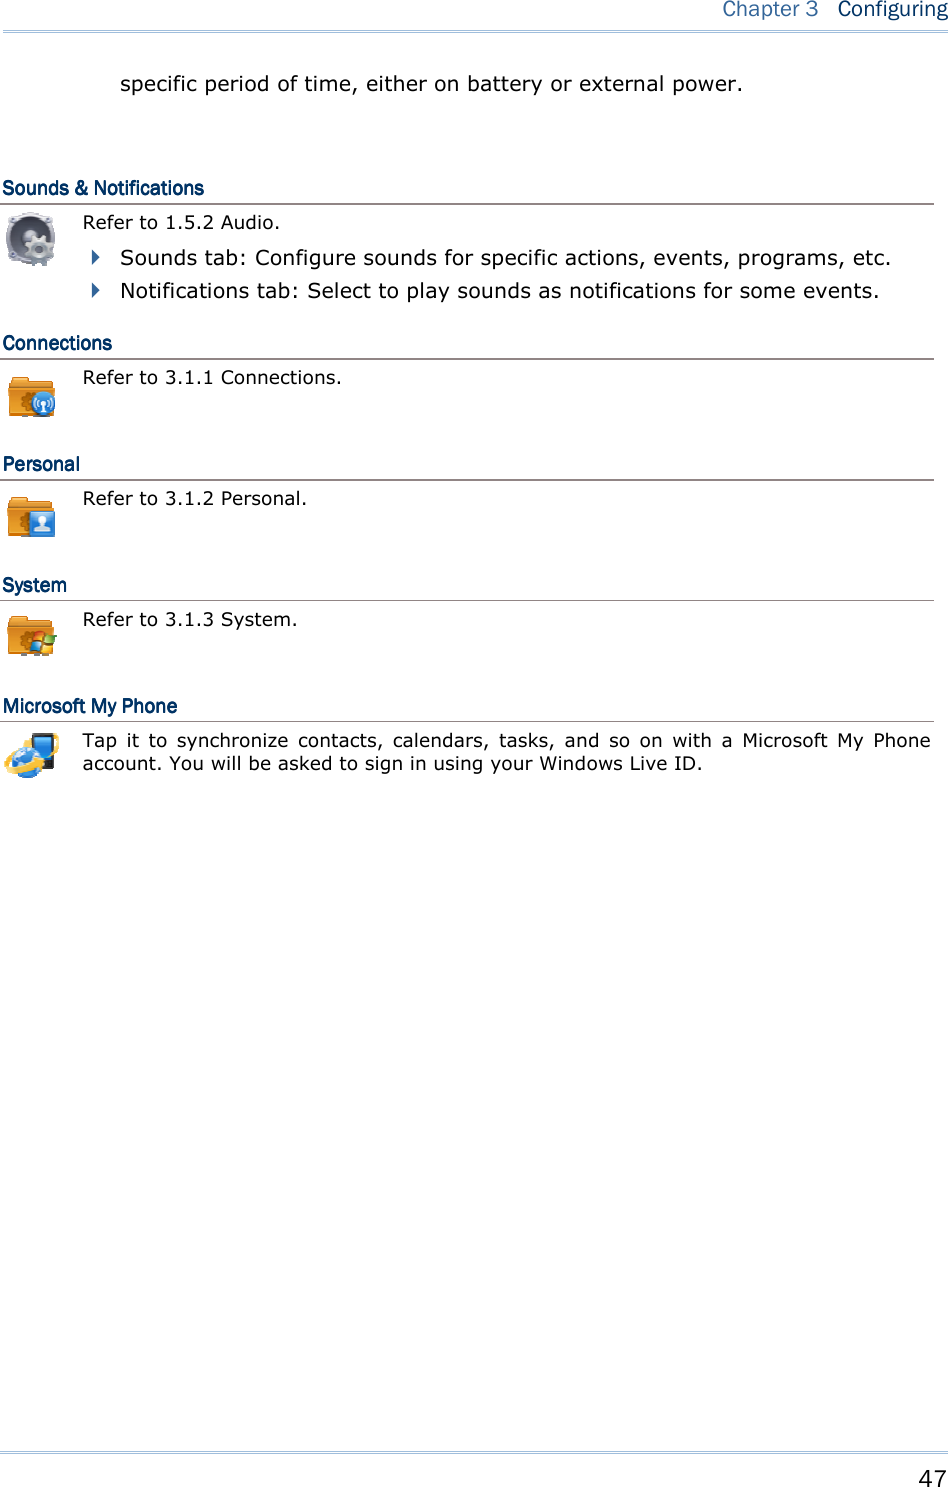
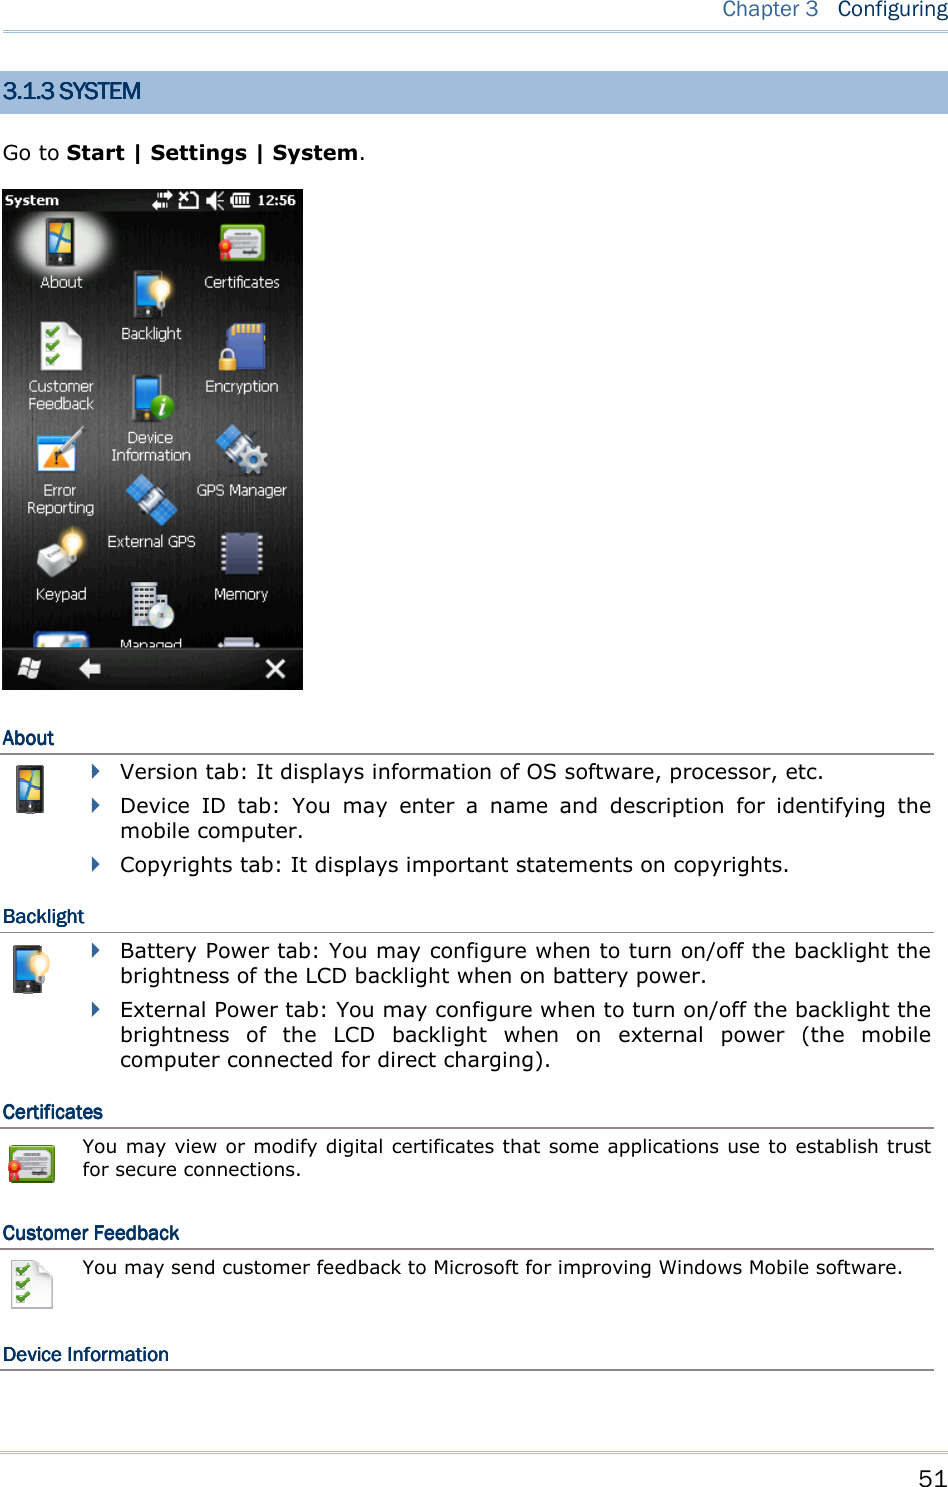
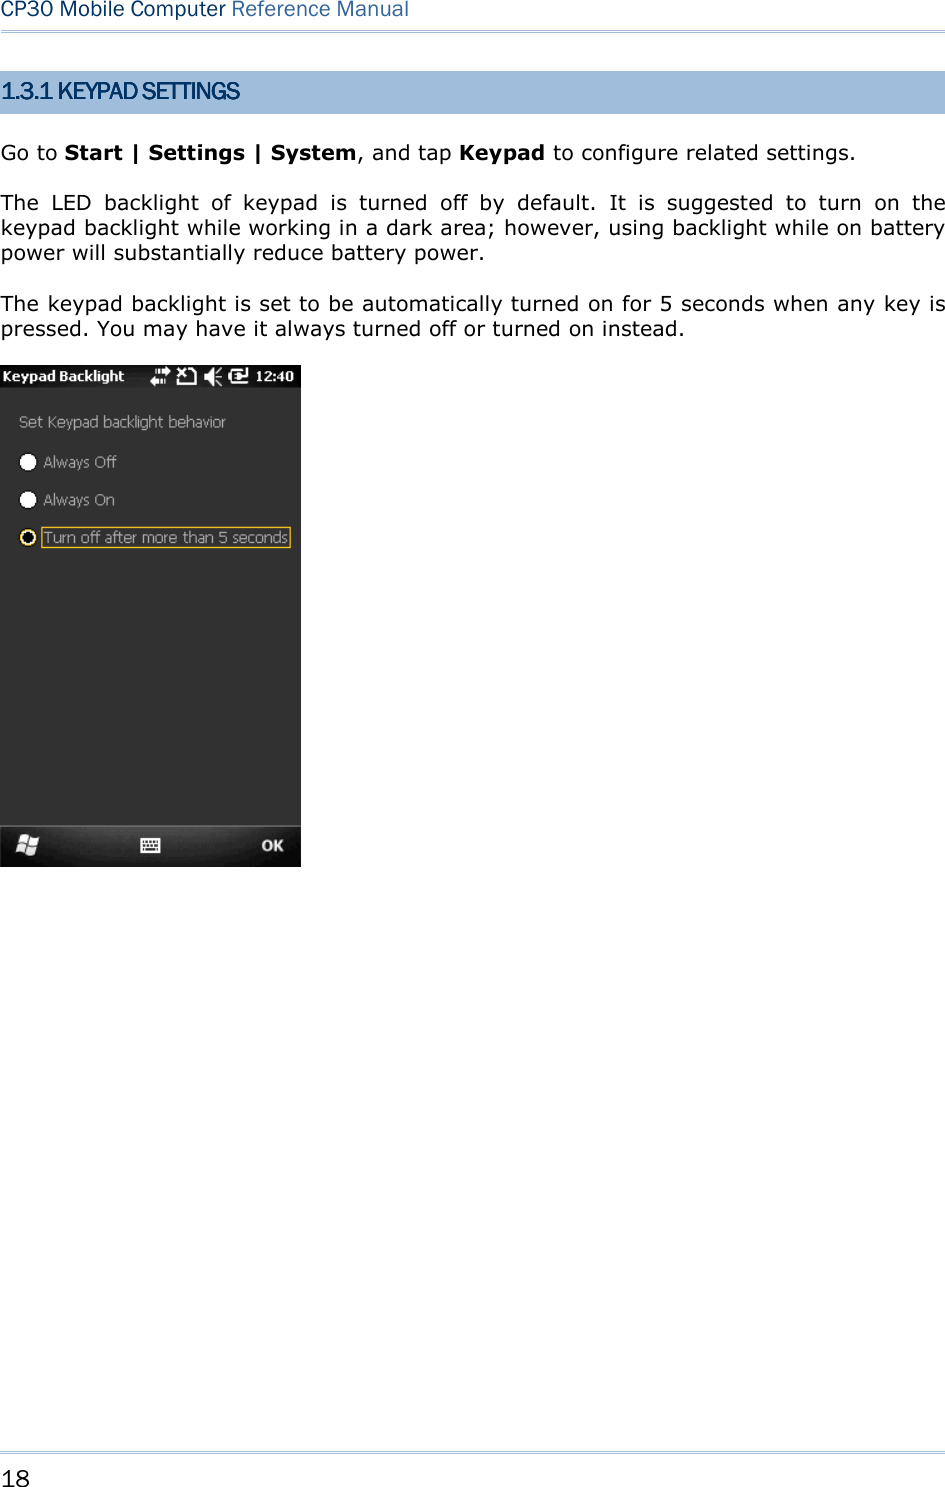
![52 CP30 Mobile Computer Reference Manual It displays important device information in system, software and hardware. EncryptionEncryptionEncryptionEncryption You may encrypt files stored in the SD card. The encrypted files are read only on the mobile computer. Error ReportingError ReportingError ReportingError Reporting You may determine whether to enable error reporting to help Microsoft improve Windows Mobile software. By default, it will automatically collect errors and report to Microsoft. External GPSExternal GPSExternal GPSExternal GPS Programs tab: You may specify a program port for multiple GPS-enabled programs to access GPS data. Hardware tab: For GPS program port to work, you must specify correct hardware port. If using the GPS receiver integrated on the mobile computer, select COM 7 and 57600 for baud rate. Access tab: By default, Windows Mobile manages access to your GPS receiver and allows multiple programs to obtain GPS data simultaneously. If you clear the check box, some programs may not be able to obtain GPS data. GPS ManagerGPS ManagerGPS ManagerGPS Manager AGPS tab: You may select to enable AGPS function to improve GPS performance. Ephemeris tab: You may configure how to download ephemeris data, or tap [Download] to update ephemeris at any time. The data is valid for seven days according to the system date and time. The date of last download will be displayed at the lower left of the screen. KeypadKeypadKeypadKeypad You may change the keypad backlight behavior. By default, the keypad backlight will be automatically turned on for five seconds when any key is pressed. Managed ProgrManaged ProgrManaged ProgrManaged Programsamsamsams You may manage programs that are installed in RAM. MemoryMemoryMemoryMemory Main tab: You may view the current capacity and usage of the onboard RAM. Storage Card tab: You may view the memory occupation of the Flash Disk folder or any storage card. Regional SettRegional SettRegional SettRegional Settingsingsingsings Region tab: You may customize the appearance and formatting to your geographic region.](https://usermanual.wiki/CipherLab/CP30/User-Guide-1491409-Page-60.png)

![58 CP30 Mobile Computer Reference Manual 4.1.1 POWER ON4.1.1 POWER ON4.1.1 POWER ON4.1.1 POWER ON VIA WIRELESS MANAGERVIA WIRELESS MANAGERVIA WIRELESS MANAGERVIA WIRELESS MANAGER 1. Go to Start | Wireless Manager as shown below. 2. Tap [All] or [Wi-Fi] to turn on the power. 3. When the Wi-Fi status is “Available”, it means it is turned on and Wi-Fi networks are available.](https://usermanual.wiki/CipherLab/CP30/User-Guide-1491409-Page-66.png)
![59 Chapter 4 Using 802.11 Radio 4.4.4.4.1.1.1.1.2 2 2 2 WLAN CONNECTIONWLAN CONNECTIONWLAN CONNECTIONWLAN CONNECTION 1. Tap Menu | Wi-Fi Settings to configure related settings. 2. On the Wireless tab, you may have a list of available Wi-Fi networks. Select one or tap [Add New…] and follow the on-screen instructions to configure related settings, such as the network name, authentication and encryption type, etc.](https://usermanual.wiki/CipherLab/CP30/User-Guide-1491409-Page-67.png)
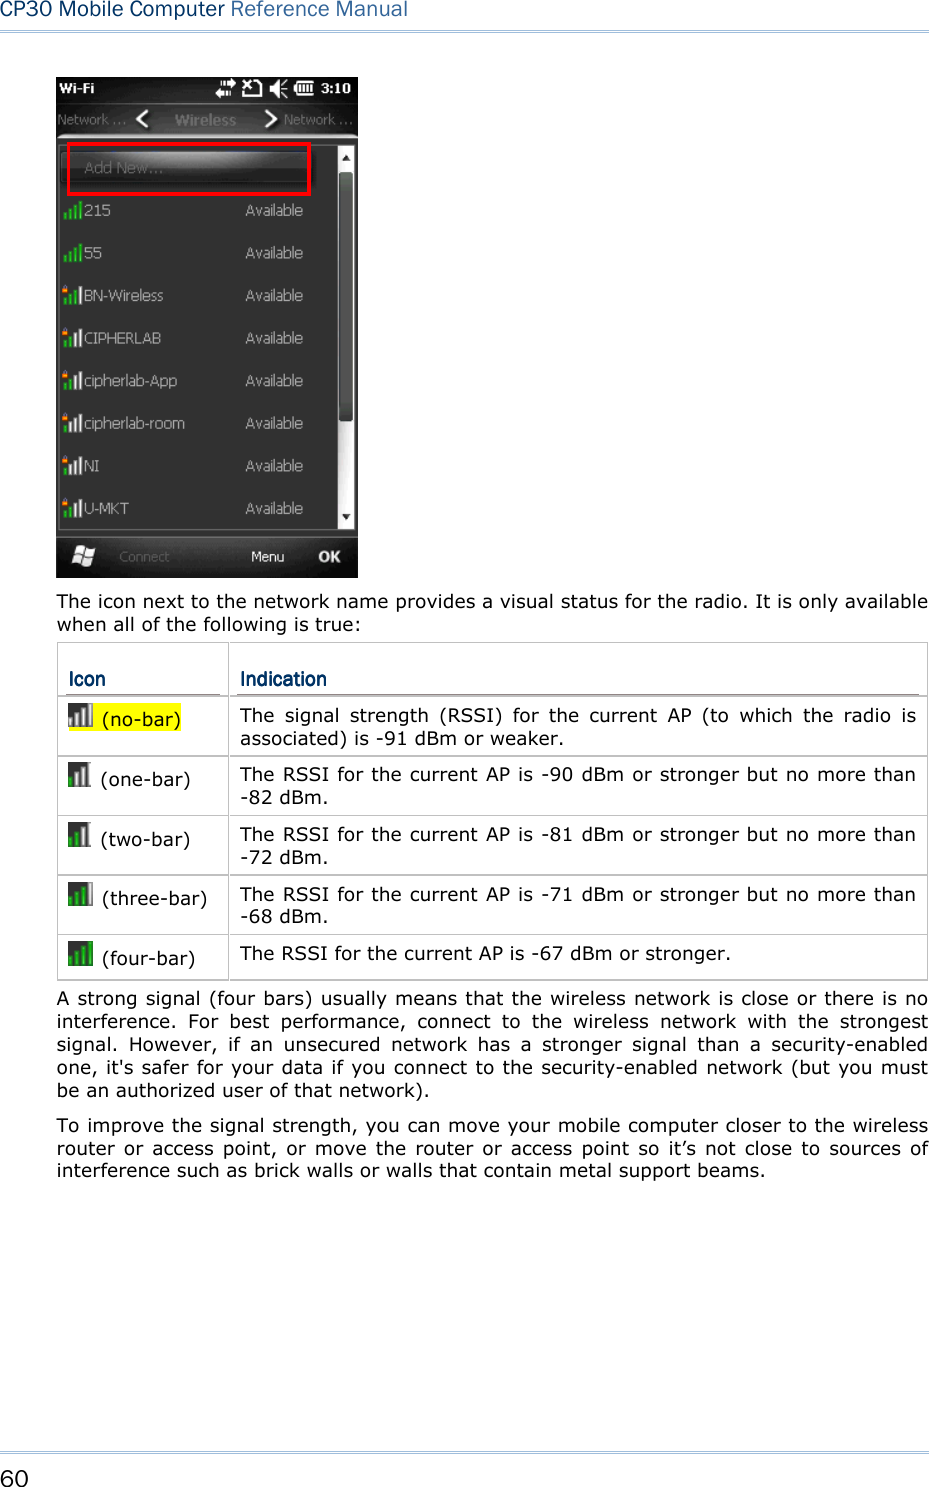
![61 Chapter 4 Using 802.11 Radio 3. Wait a few seconds for the mobile computer to connect to the preferred network you have configured. Tap [OK] to close the current window. 4. Once connected successfully, the associated icon will appear on the title bar and the connected network name will be displayed for Wi-Fi status in Wireless Manager.](https://usermanual.wiki/CipherLab/CP30/User-Guide-1491409-Page-69.png)
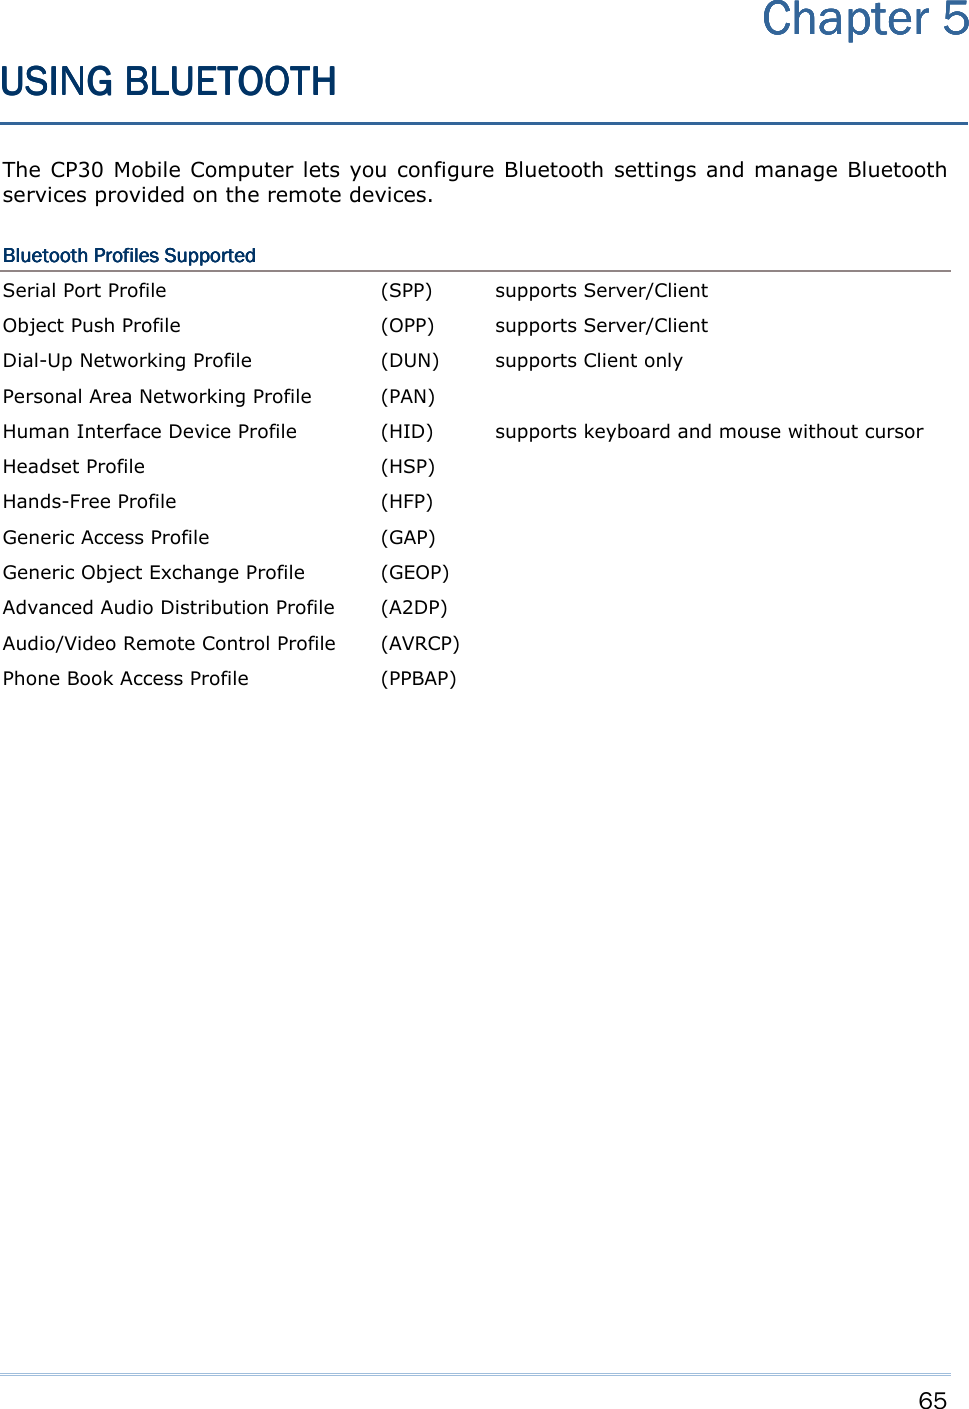
![66 CP30 Mobile Computer Reference Manual 5555.1 .1 .1 .1 BBBBLUETOOTHLUETOOTHLUETOOTHLUETOOTH POWERPOWERPOWERPOWER 5.1.1 5.1.1 5.1.1 5.1.1 POWER ON VIA POWER ON VIA POWER ON VIA POWER ON VIA WIRELESS MANAGERWIRELESS MANAGERWIRELESS MANAGERWIRELESS MANAGER 1. Go to Start | Wireless Manager as shown below. 2. Tap [All] or [Bluetooth] to turn on the power.](https://usermanual.wiki/CipherLab/CP30/User-Guide-1491409-Page-74.png)
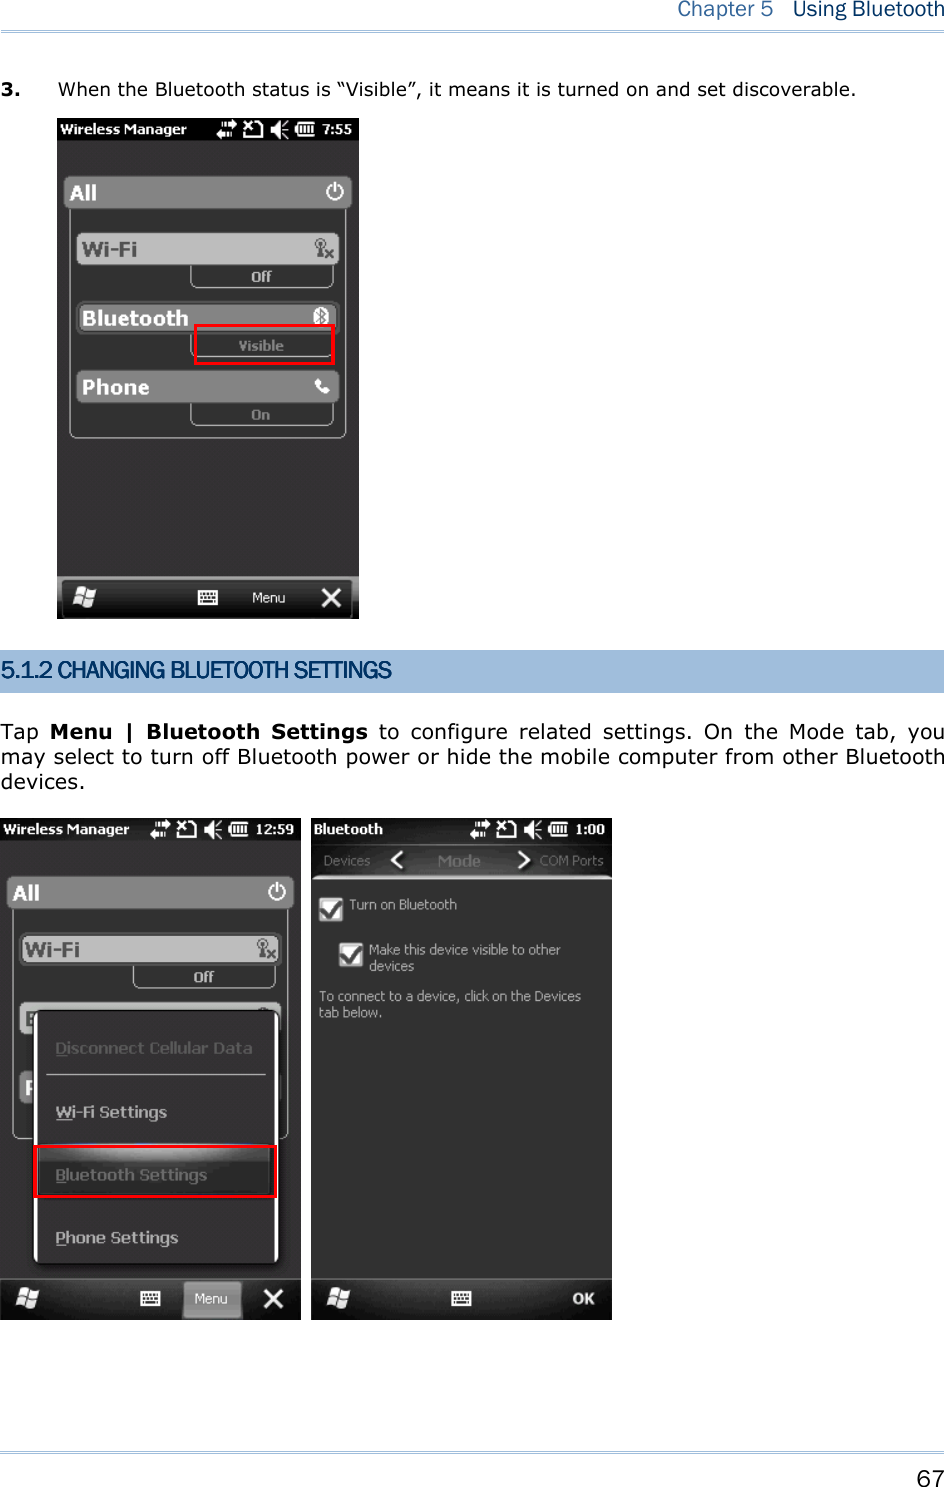
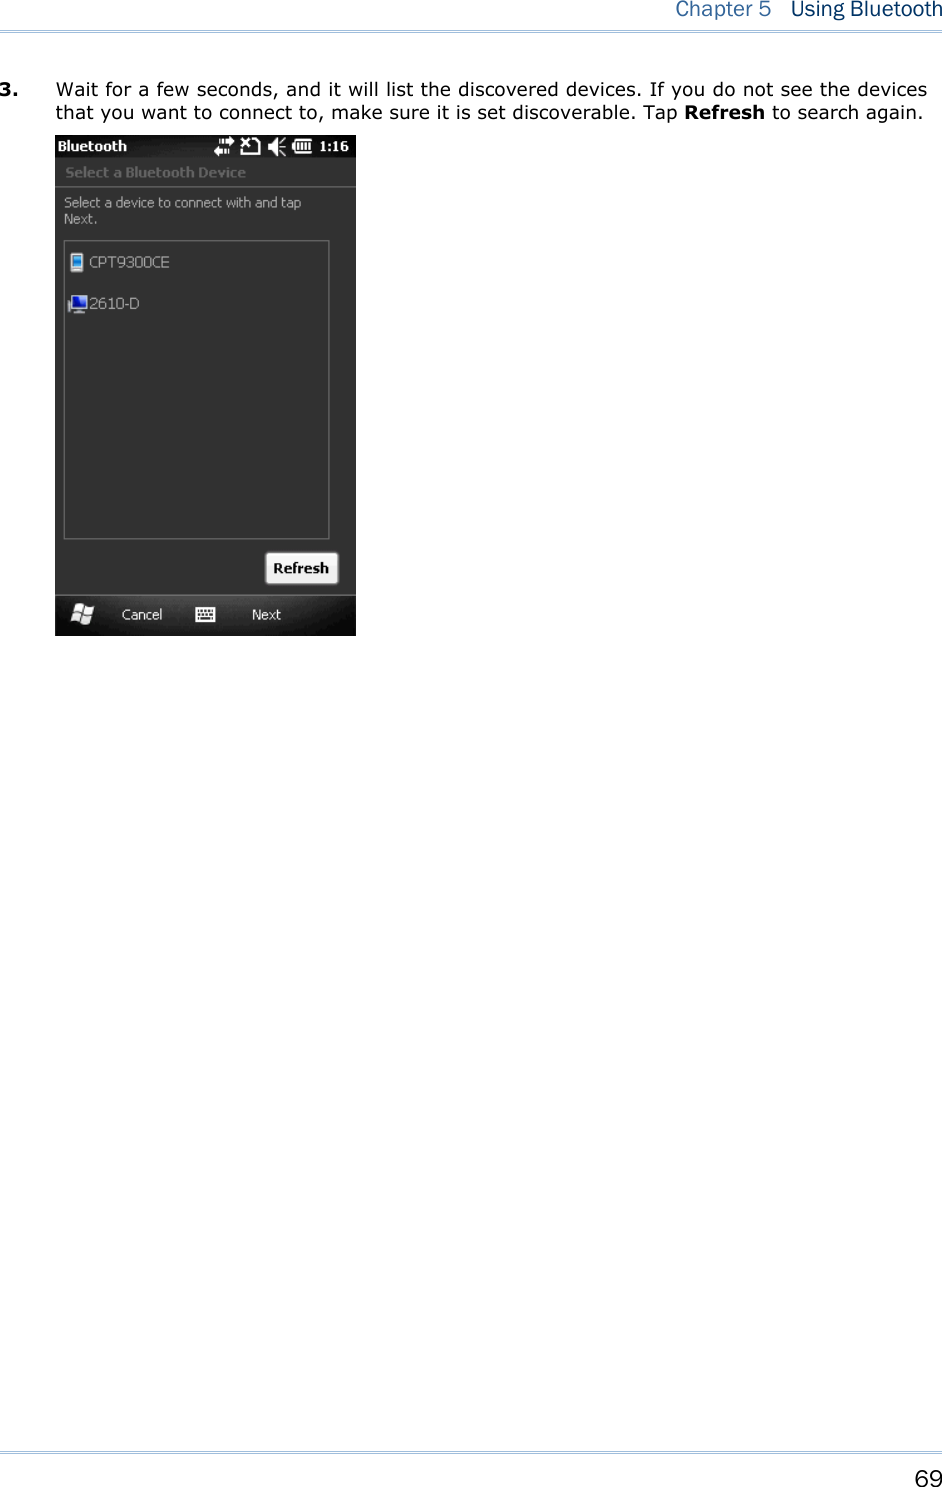
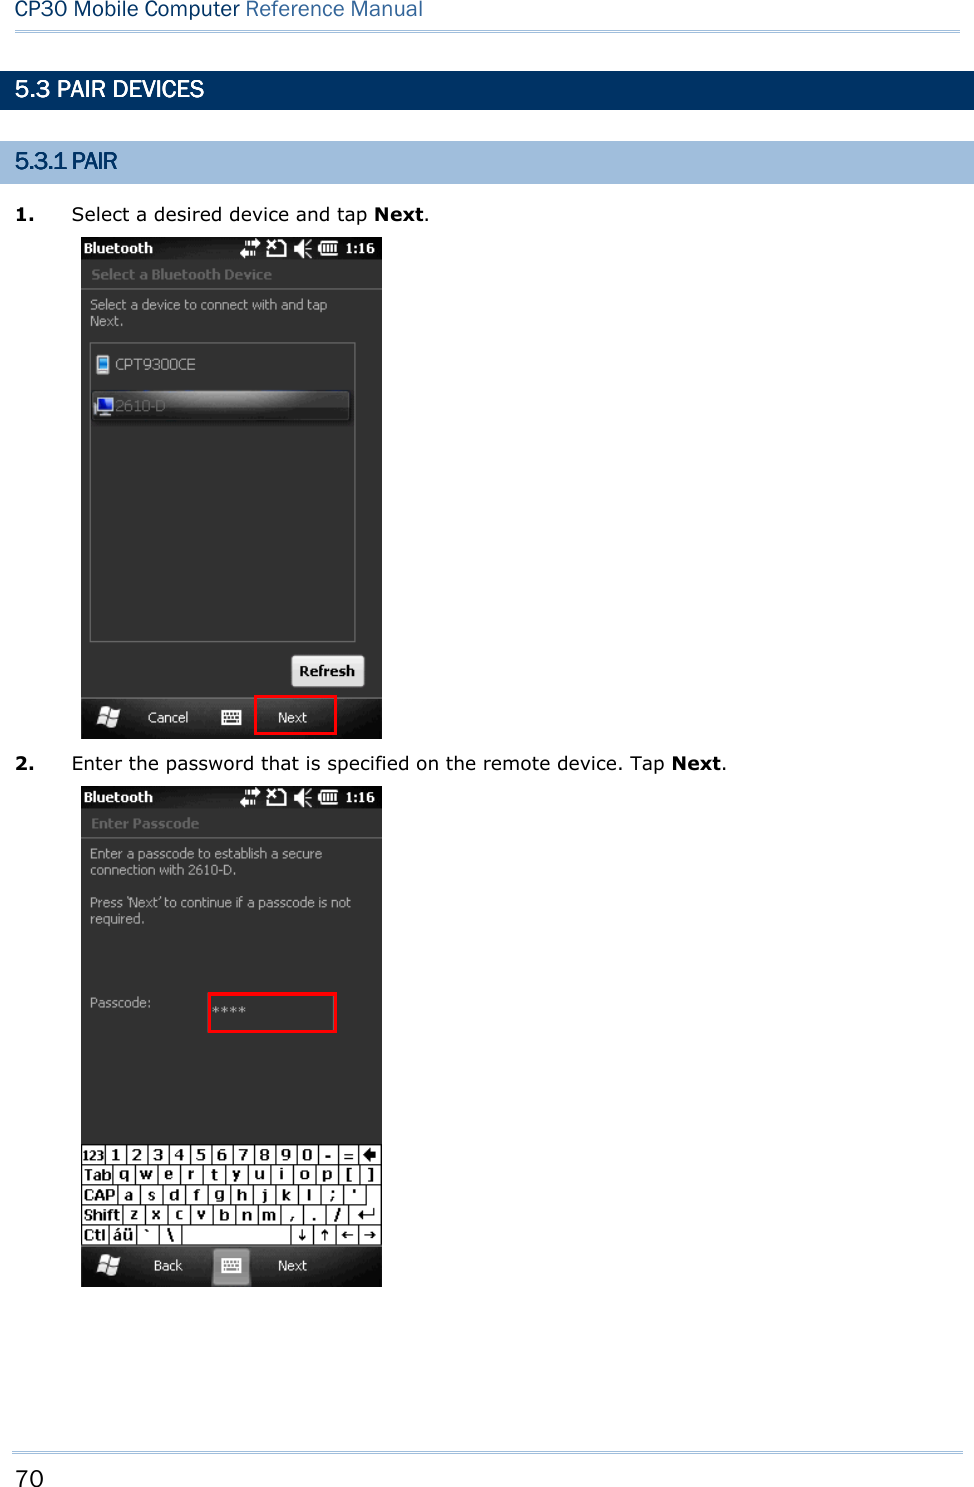
![68 CP30 Mobile Computer Reference Manual 5.2 5.2 5.2 5.2 SEARCH DEVICESSEARCH DEVICESSEARCH DEVICESSEARCH DEVICES 1. Go to Start | Settings | Bluetooth. 2. Tap [Add new device…] or Add on the soft key bar to search for Bluetooth devices.](https://usermanual.wiki/CipherLab/CP30/User-Guide-1491409-Page-76.png)
![72 CP30 Mobile Computer Reference Manual 5.5.5.5.3333....2222 UNPAIRUNPAIRUNPAIRUNPAIR 5. On the Devices tab, tap and hold the desired device to select [Delete] from the pop-up menu. Note: The mobile computer must be unpaired on the remote device as well. For example, remove it from the device list on PC. (Both devices must be unpaired!)](https://usermanual.wiki/CipherLab/CP30/User-Guide-1491409-Page-80.png)
![73 Chapter 5 Using Bluetooth 5.5.5.5.4444 SERIAL PORT SERVICESERIAL PORT SERVICESERIAL PORT SERVICESERIAL PORT SERVICE 1. On the Devices tab, tap and hold the desired device to select [Edit] from the pop-up menu. 2. Make sure the Serial Port service is enabled for use on the remote Bluetooth device.](https://usermanual.wiki/CipherLab/CP30/User-Guide-1491409-Page-81.png)
![74 CP30 Mobile Computer Reference Manual 3. On the COM Ports tab, tap [New Outgoing Port]. 4. Select the remote device, and then tap Next.](https://usermanual.wiki/CipherLab/CP30/User-Guide-1491409-Page-82.png)
![76 CP30 Mobile Computer Reference Manual 7. On the mobile computer, tap and hold the computer. Select [Connect]. Alternatively, you may tap Connect on the soft key bar to access the remote service quickly.](https://usermanual.wiki/CipherLab/CP30/User-Guide-1491409-Page-84.png)
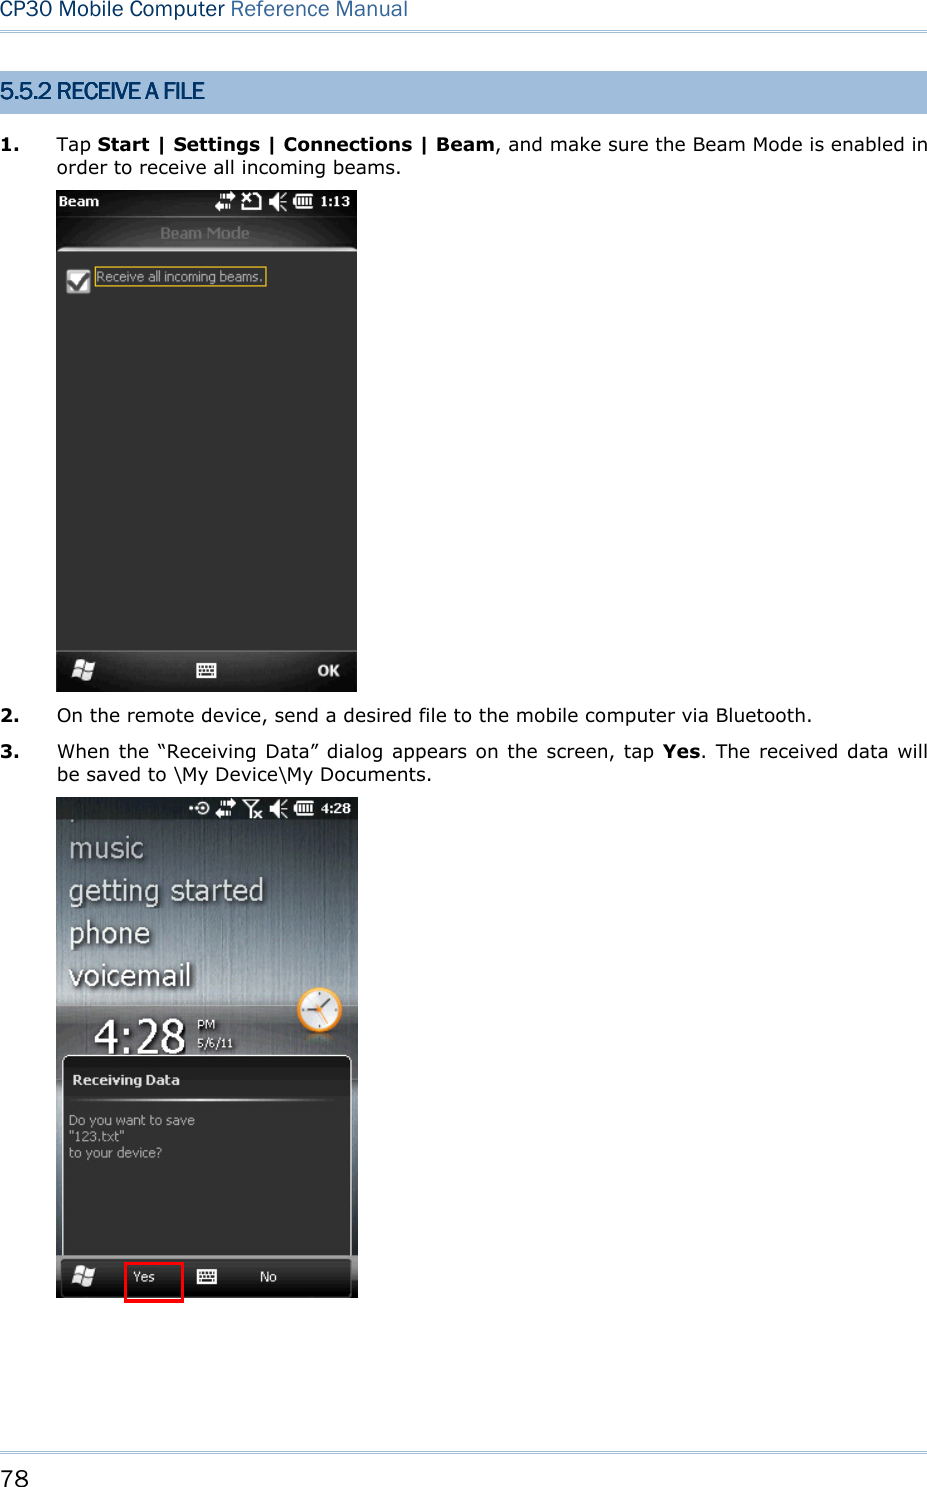
![77 Chapter 5 Using Bluetooth 5.5.5.5.5555 OBJECT PUSH OBJECT PUSH OBJECT PUSH OBJECT PUSH VIA BEAMVIA BEAMVIA BEAMVIA BEAM 5.5.5.5.5555....1111 SESESESENDNDNDND AAAA FILEFILEFILEFILE 1. Tap Start | File Explorer. 2. Navigate through file folders to find the file you wish to send to the remote device. 3. Tap and hold the file to select [Beam File] from the pop-up menu. 4. Tap the remote device to send the file via Bluetooth. The mobile computer will start uploading the file. Wait a few seconds for the remote device to receive the file. When it is done, tap OK to return.](https://usermanual.wiki/CipherLab/CP30/User-Guide-1491409-Page-85.png)
![80 CP30 Mobile Computer Reference Manual 3. Connect the mobile computer to your computer. Make sure the ActiveSync service is enabled for use on the remote computer. 4. On the Bluetooth devices list, tap and hold the remote computer. Select [Connect]. Alternatively, you may tap Connect on the right soft key bar to access the remote service quickly.](https://usermanual.wiki/CipherLab/CP30/User-Guide-1491409-Page-88.png)
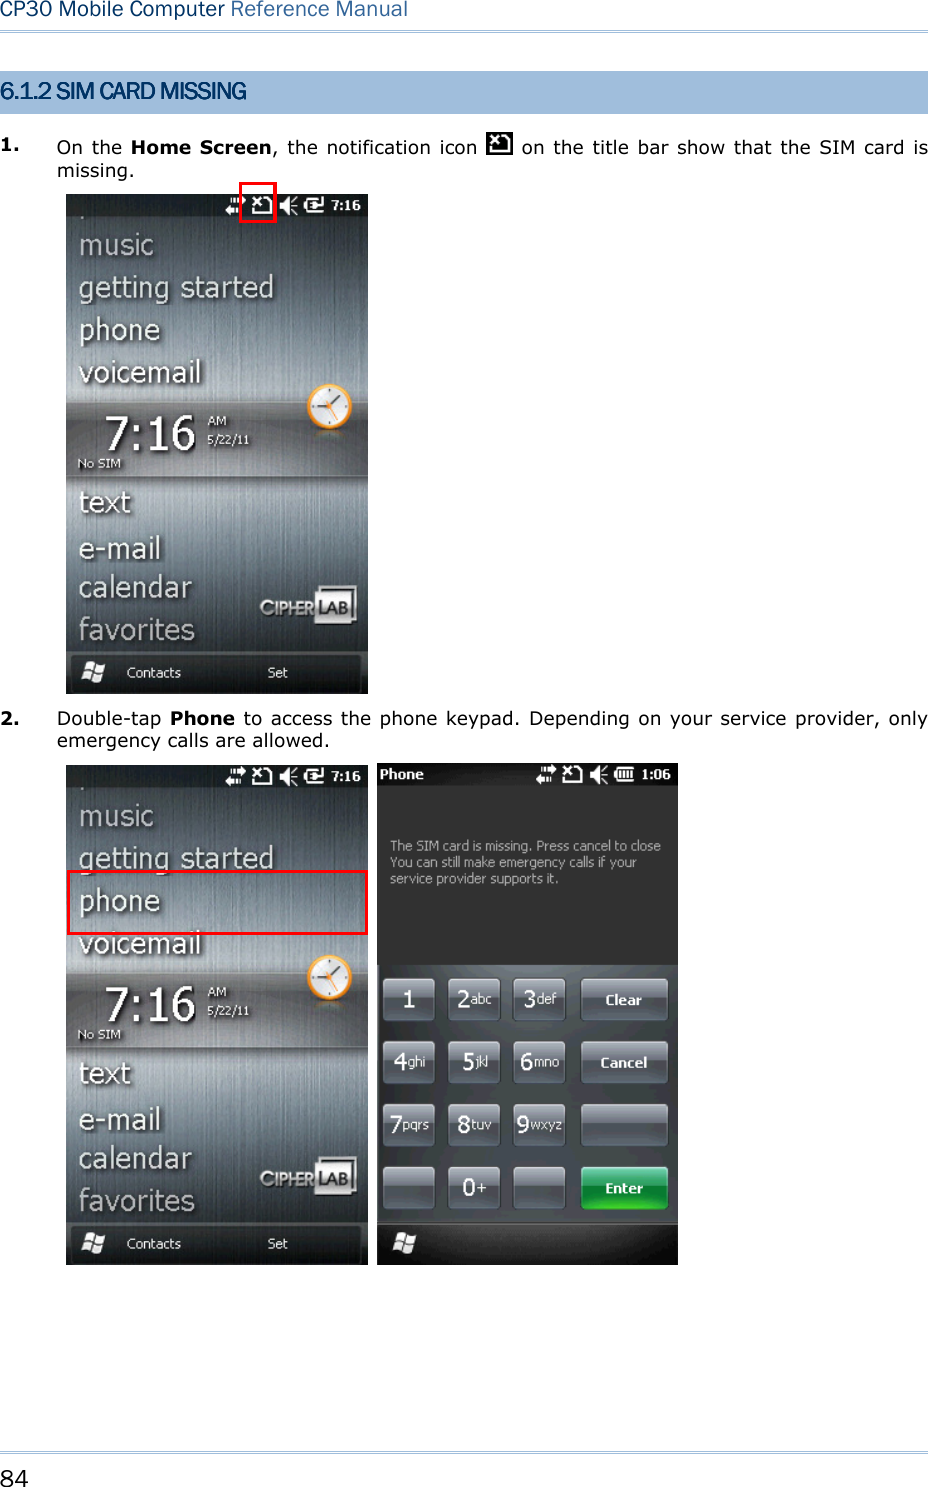
![82 CP30 Mobile Computer Reference Manual 6666.1 .1 .1 .1 PHONEPHONEPHONEPHONE POWERPOWERPOWERPOWER 6.1.1 6.1.1 6.1.1 6.1.1 WIRELESS MANAGERWIRELESS MANAGERWIRELESS MANAGERWIRELESS MANAGER 1. Go to Start | Wireless Manager as shown below. 2. Tap [All] or [Phone] to turn on the power.](https://usermanual.wiki/CipherLab/CP30/User-Guide-1491409-Page-90.png)
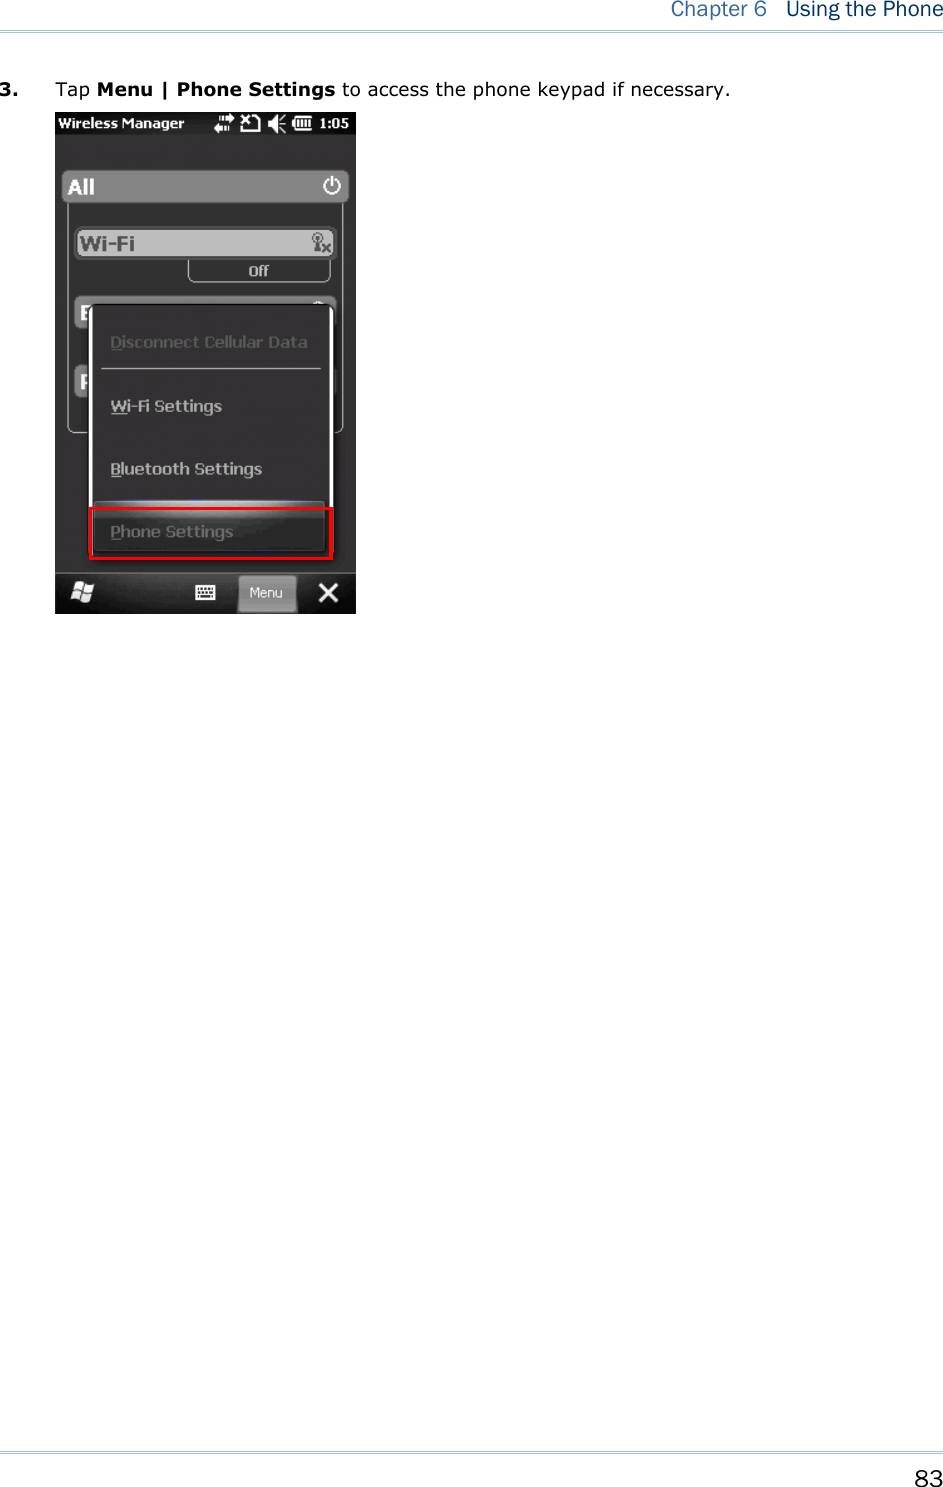
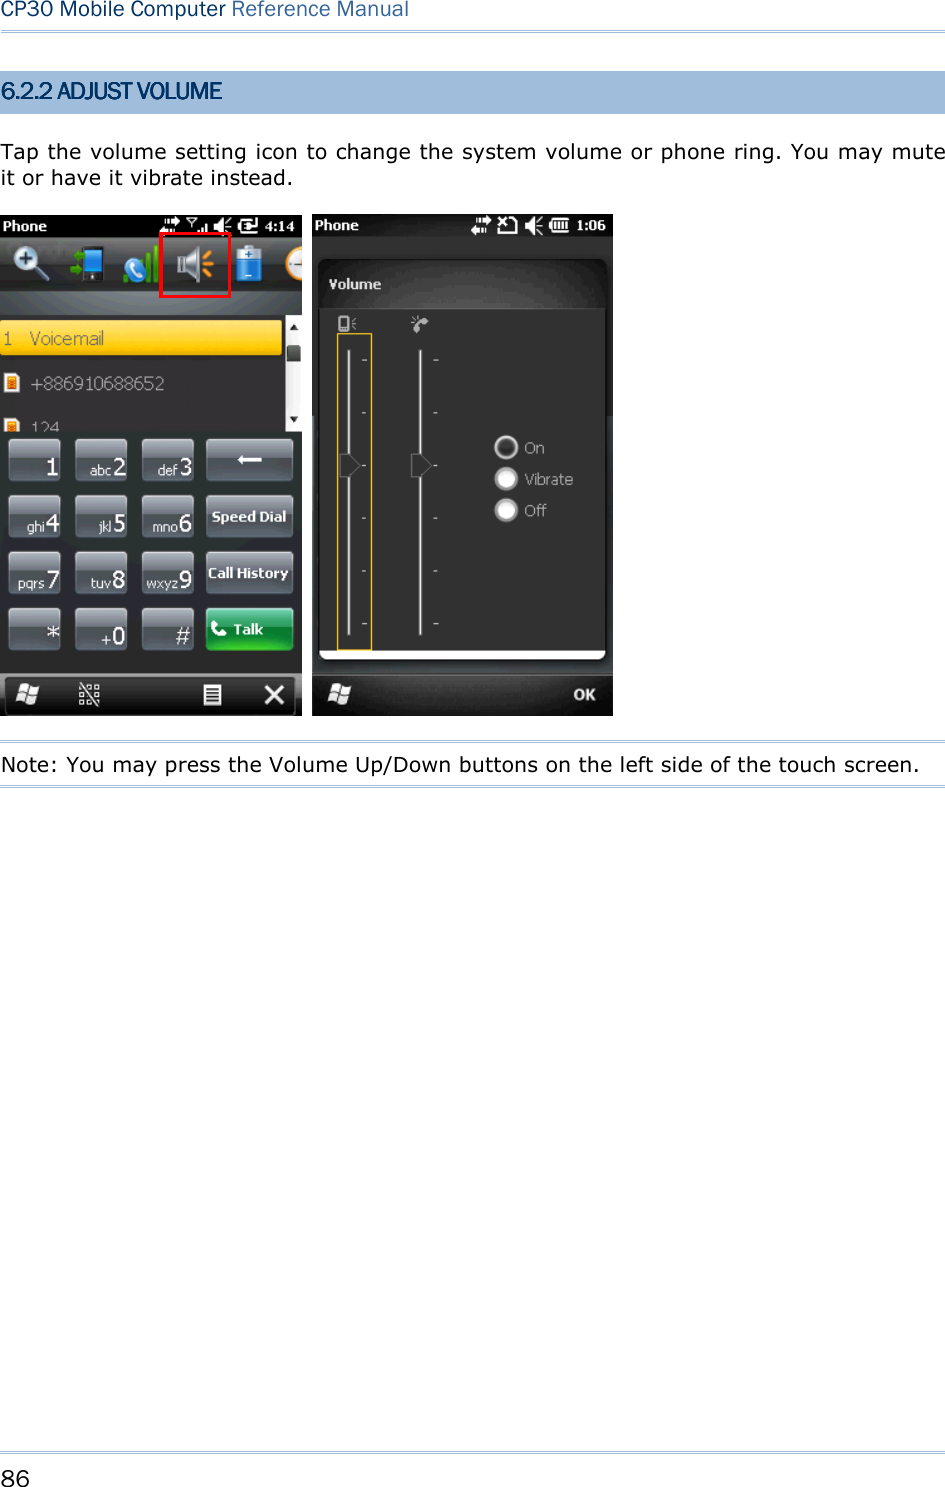
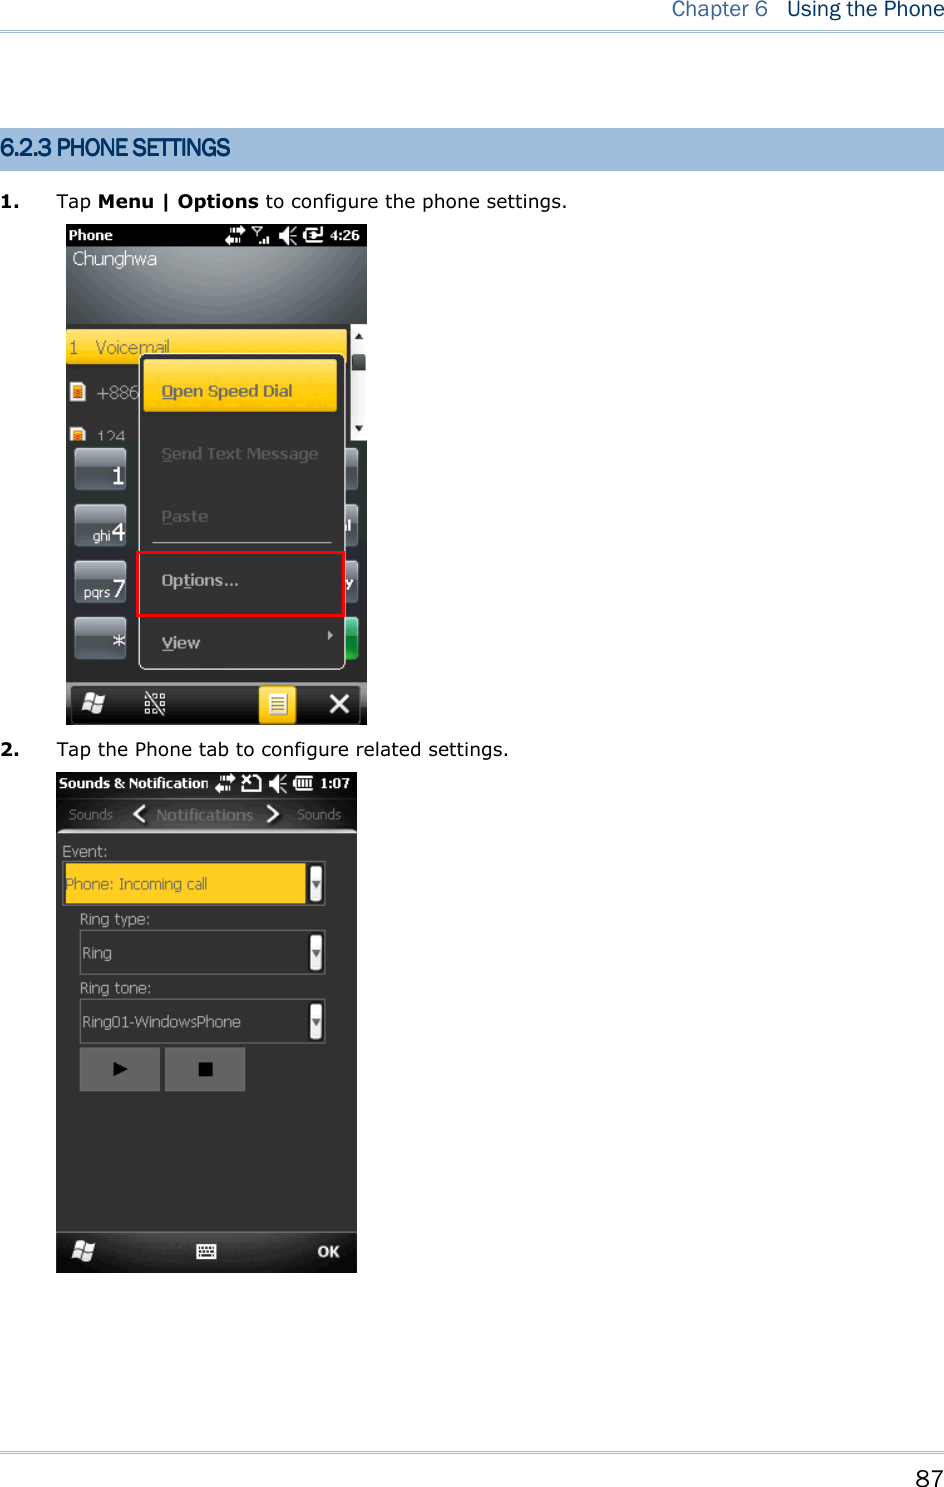
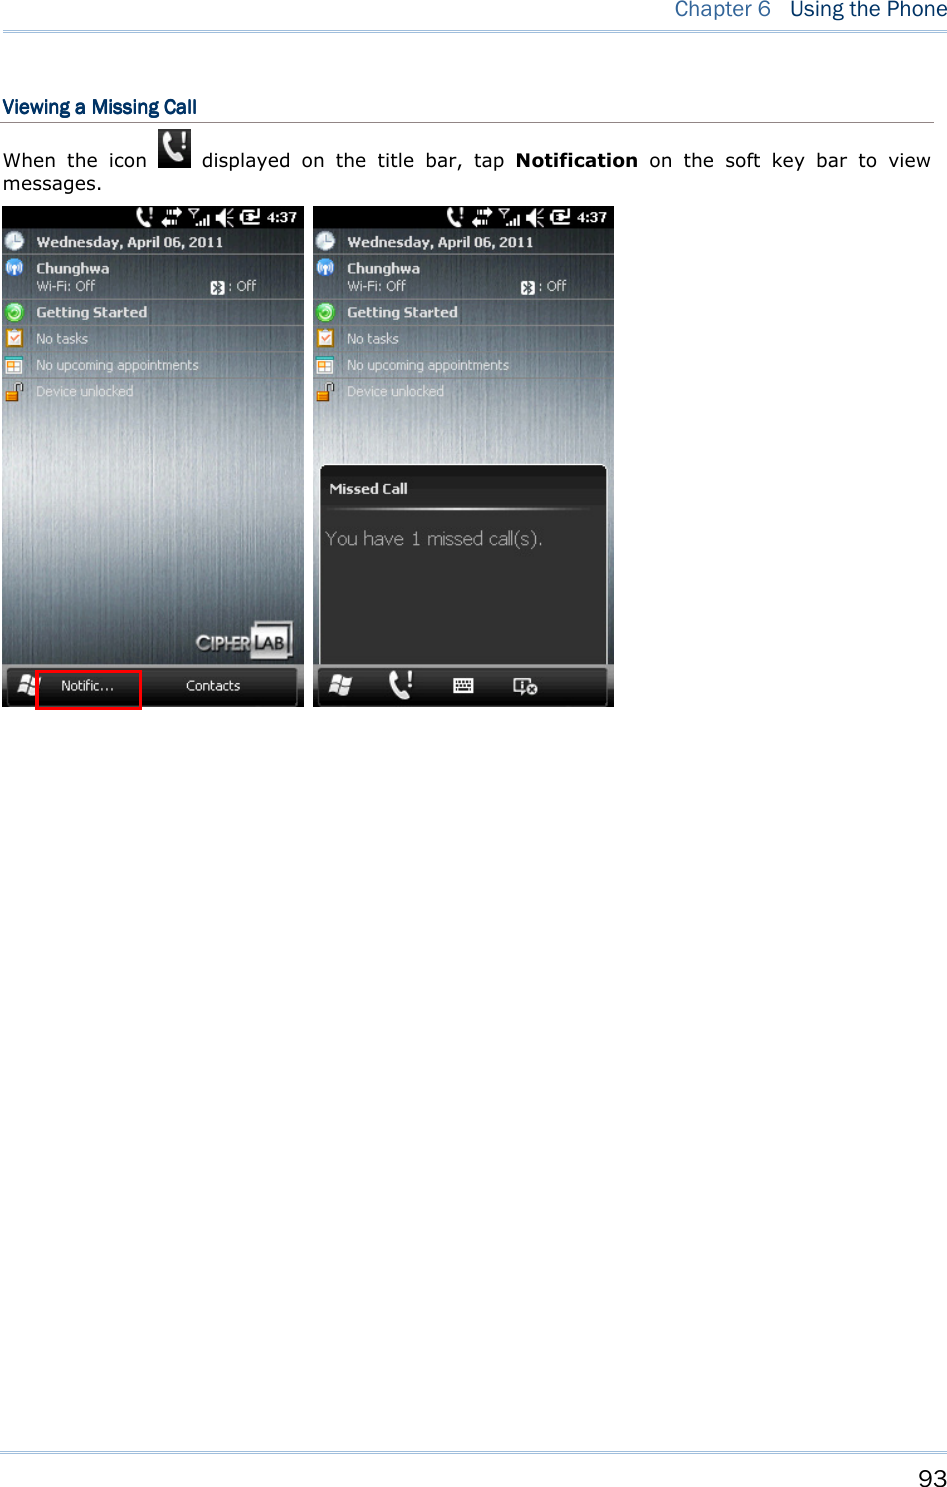
![85 Chapter 6 Using the Phone 6666.2 .2 .2 .2 PHONEPHONEPHONEPHONE SETTINGSSETTINGSSETTINGSSETTINGS 6.2.1 PHONE KEYPAD6.2.1 PHONE KEYPAD6.2.1 PHONE KEYPAD6.2.1 PHONE KEYPAD When the phone keypad appears, the YELLOW key is turned on automatically. Unless you press the YELLOW key again, only the yellow-coded numbers and symbols on the hardware keypad are enabled. 1. Tap Phone or press the green [Talk] button on the physical keypad to access the phone keypad. 2. The notification icons show the antenna signal and key status of the physical keypad.](https://usermanual.wiki/CipherLab/CP30/User-Guide-1491409-Page-93.png)
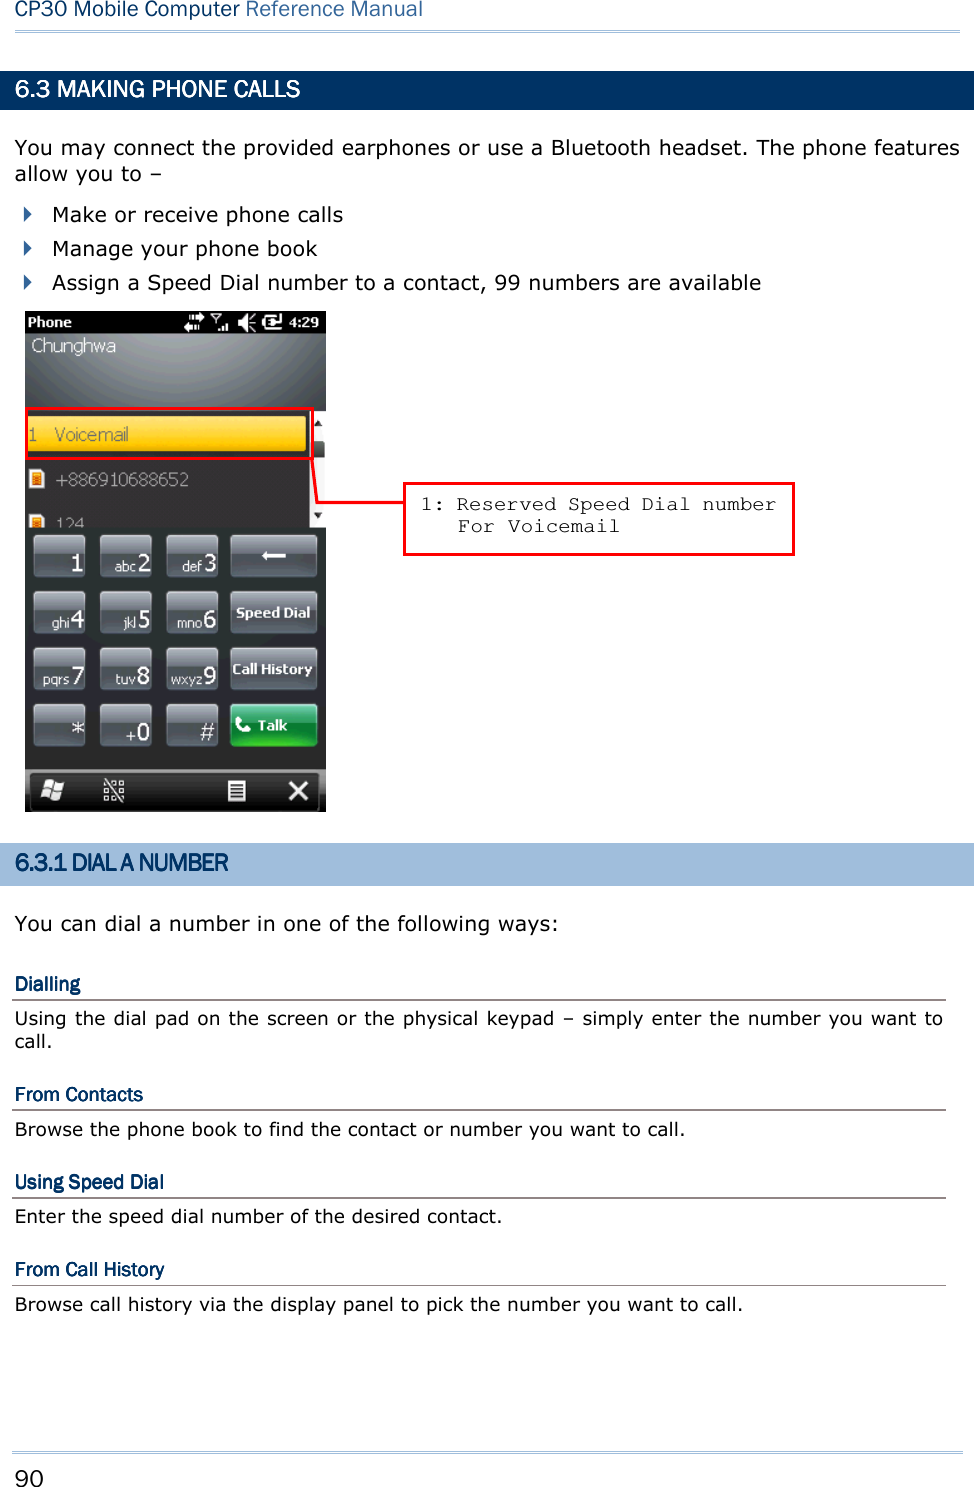
![91 Chapter 6 Using the Phone 6.3.2 MAKE6.3.2 MAKE6.3.2 MAKE6.3.2 MAKE A CALLA CALLA CALLA CALL DiallingDiallingDiallingDialling OutOutOutOut Tap the green [Talk] button on the phone keypad, or press the green telephone key on the physical keypad. HangHangHangHanginginginging upupupup Tap the red [End] button on the phone keypad, or press the red telephone key on the physical keypad.](https://usermanual.wiki/CipherLab/CP30/User-Guide-1491409-Page-99.png)
![92 CP30 Mobile Computer Reference Manual 6.3.3 ANSWER A CALL6.3.3 ANSWER A CALL6.3.3 ANSWER A CALL6.3.3 ANSWER A CALL Answering a CallAnswering a CallAnswering a CallAnswering a Call Tap Answer or press the green [SEND] key on the physical keypad. Ignoring a CallIgnoring a CallIgnoring a CallIgnoring a Call Tap Ignore or press the red [END] key on the physical keypad.](https://usermanual.wiki/CipherLab/CP30/User-Guide-1491409-Page-100.png)
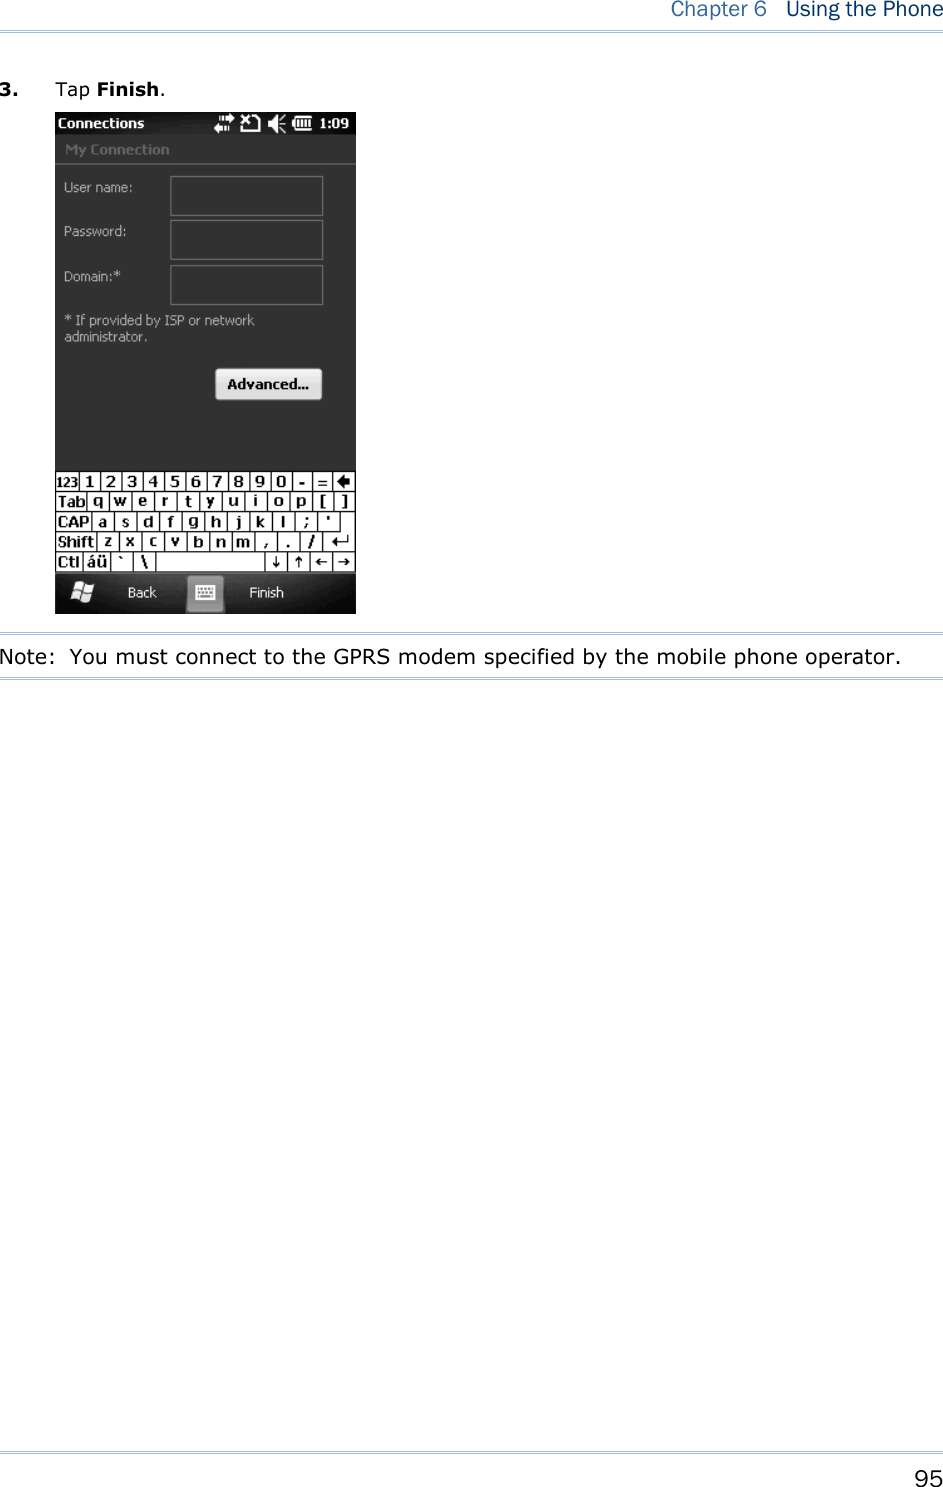
![94 CP30 Mobile Computer Reference Manual 6.46.46.46.4 CONFIGURING GPRS NETCONFIGURING GPRS NETCONFIGURING GPRS NETCONFIGURING GPRS NETWORKWORKWORKWORK 1. Tap Start | Settings | Connections and select Connections. 2. Initially, you have to configure the GPRS settings. Tap [Add a new modem connection] and follow the on-screen instructions to enter the connection name, dial-up phone number, user number, password, etc.](https://usermanual.wiki/CipherLab/CP30/User-Guide-1491409-Page-102.png)