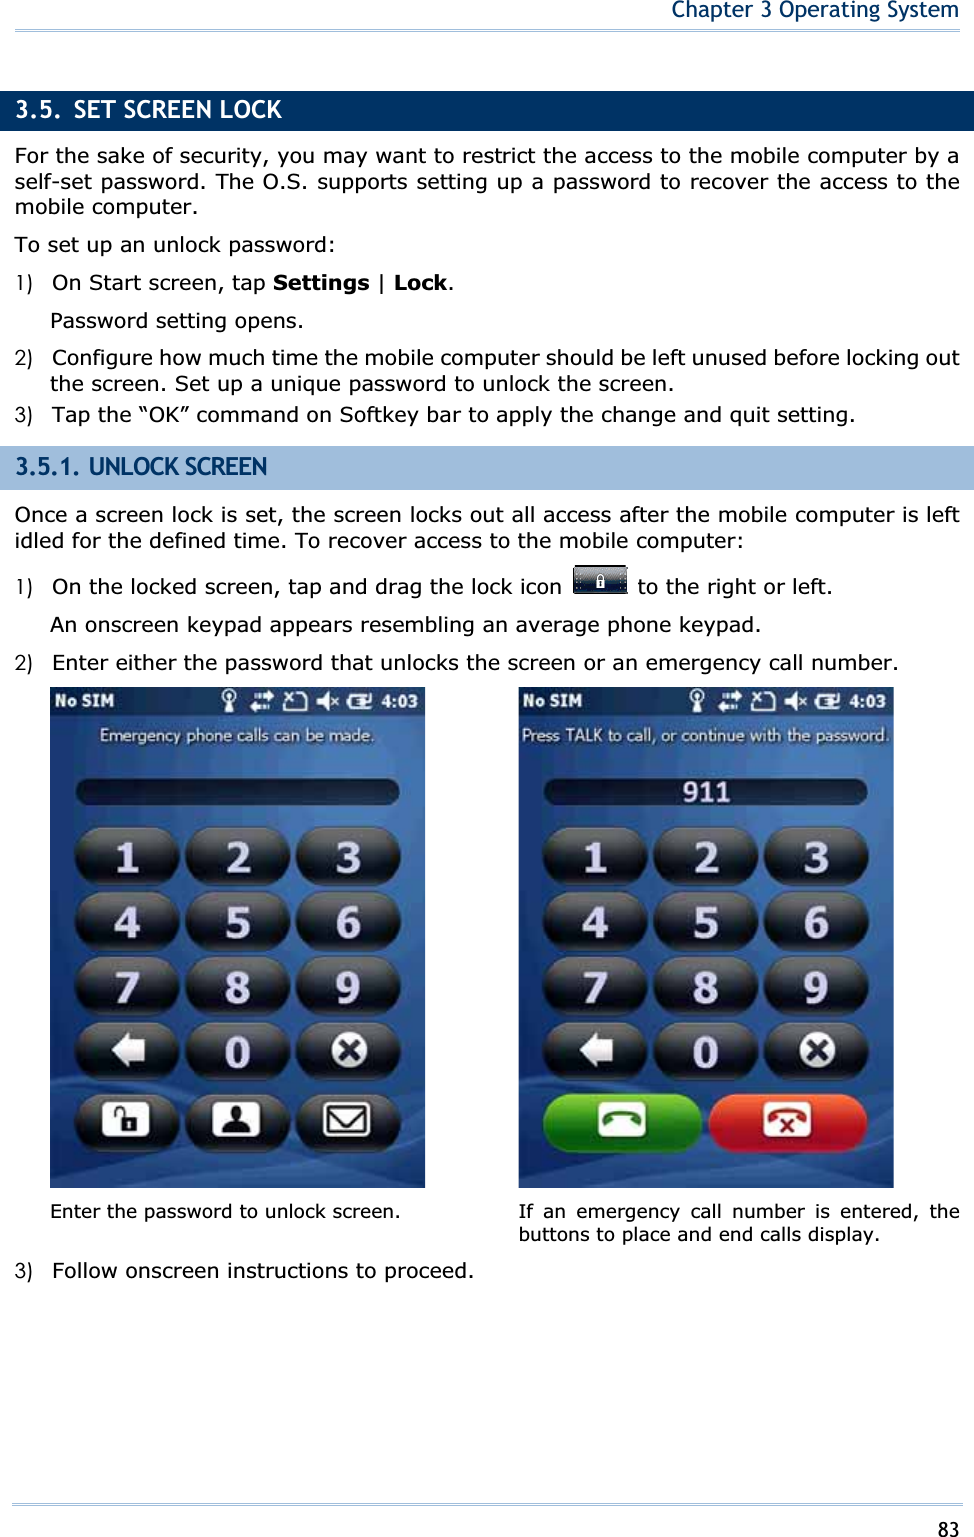
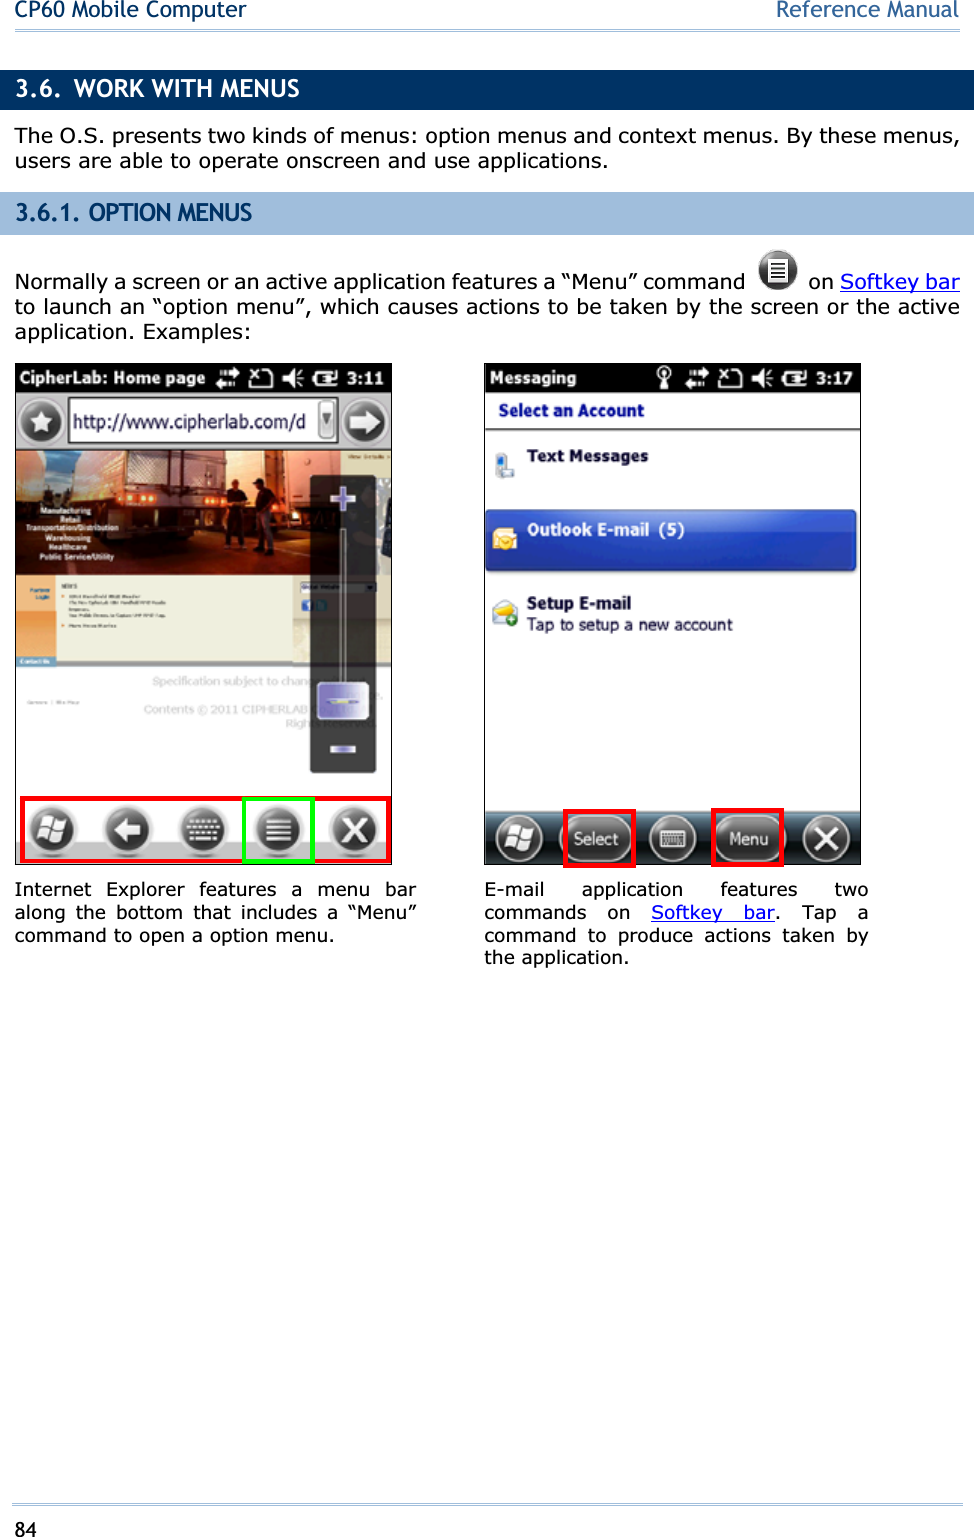
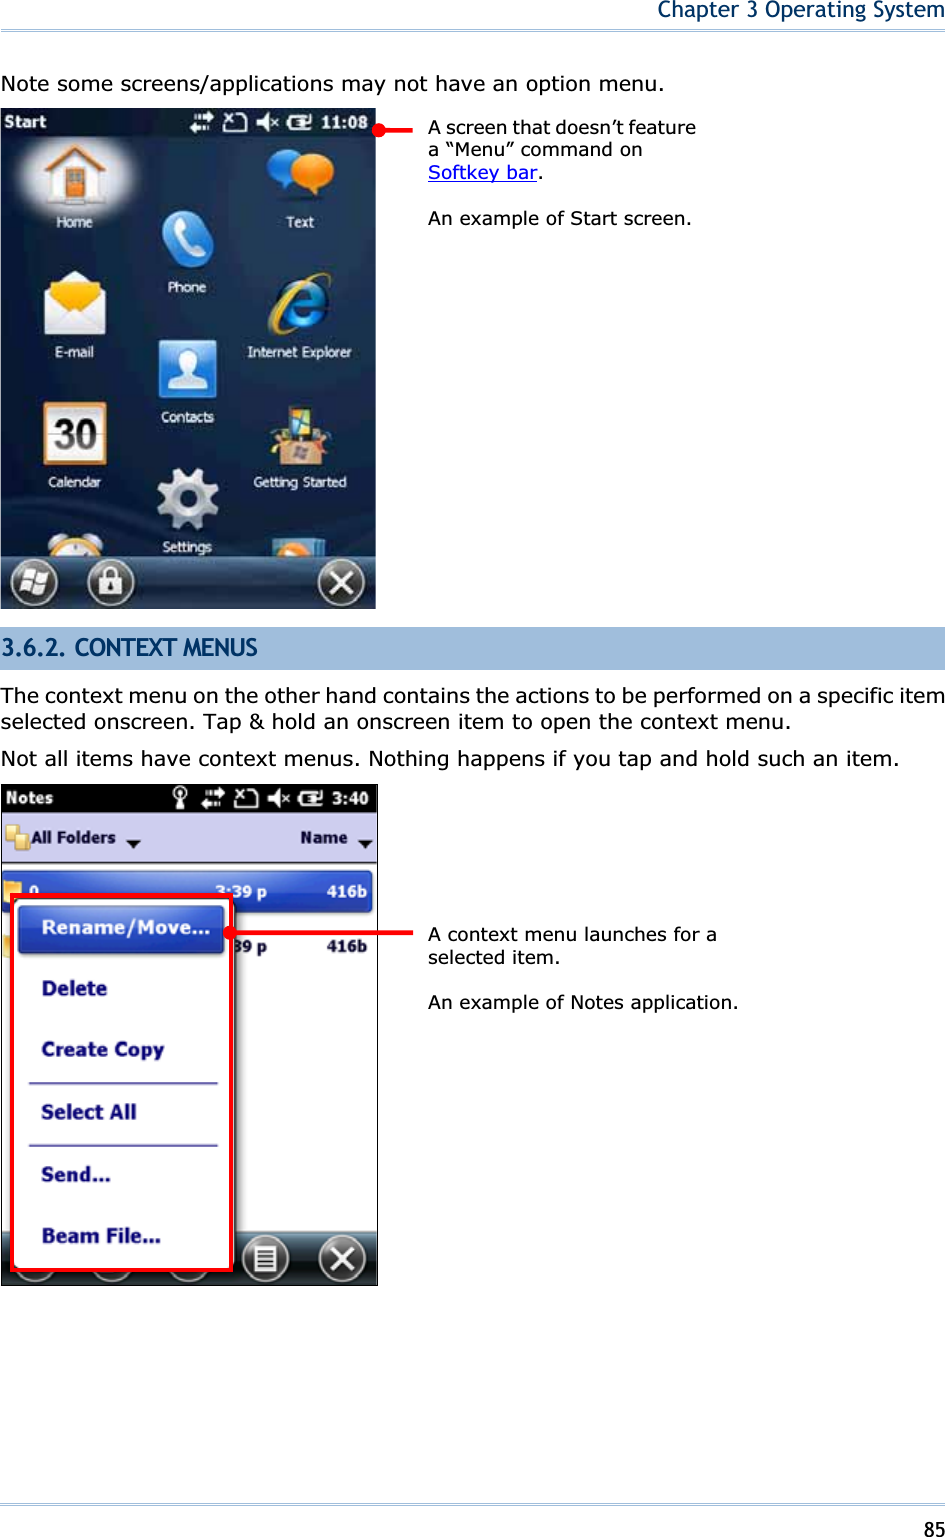
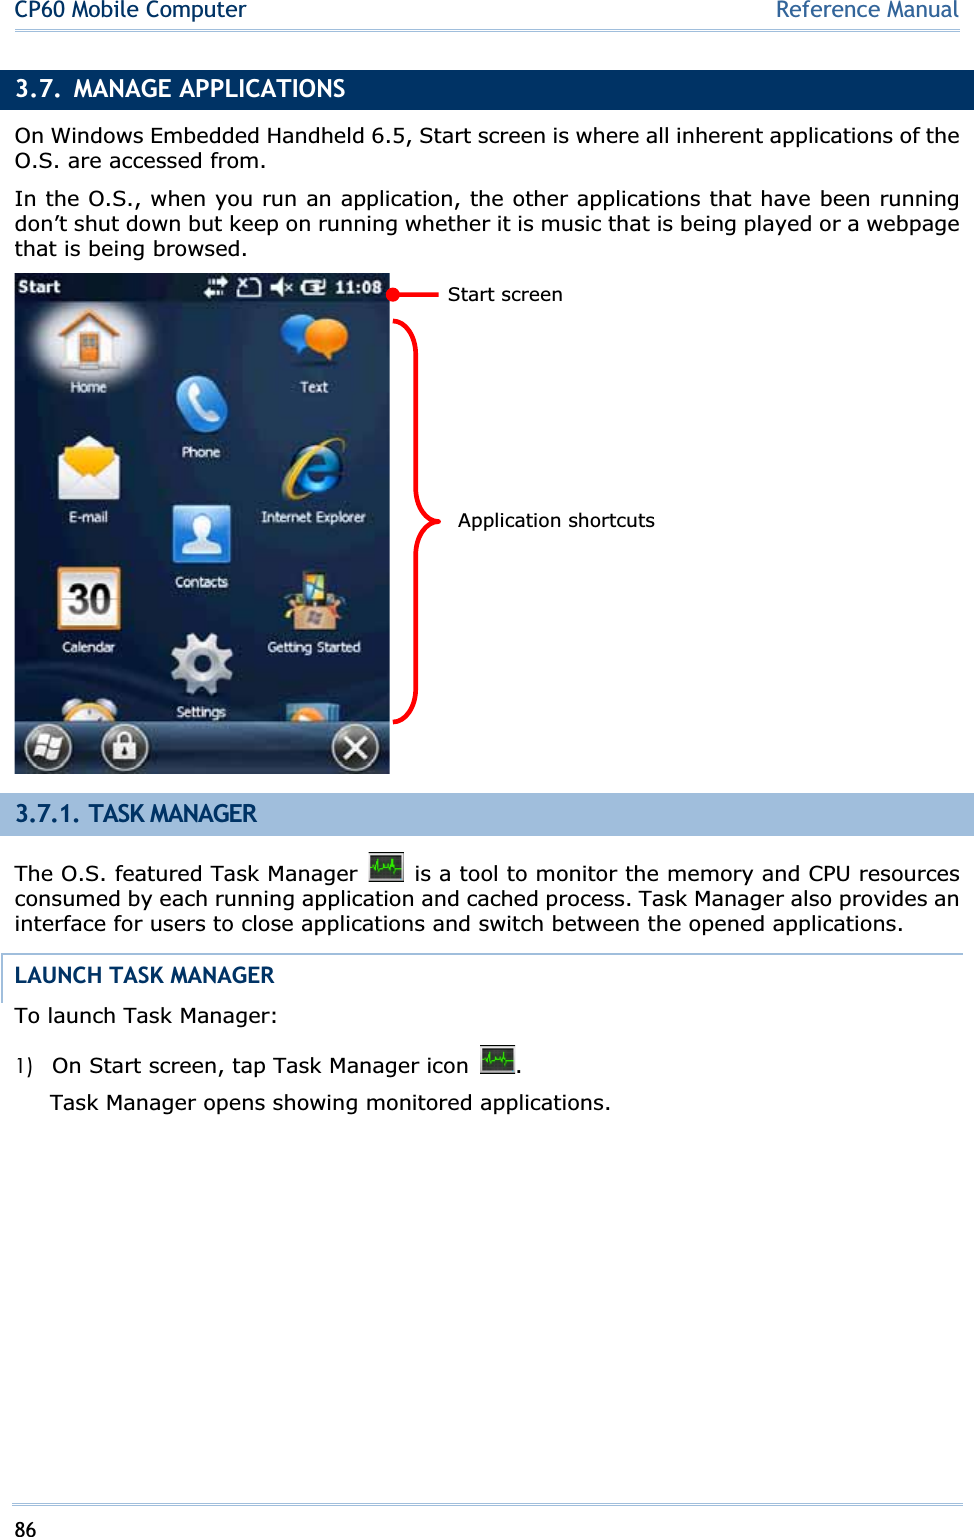
CipherLab CP60 Mobile Computer User Manual
CipherLab Co., Ltd. Mobile Computer
UserManual.wiki
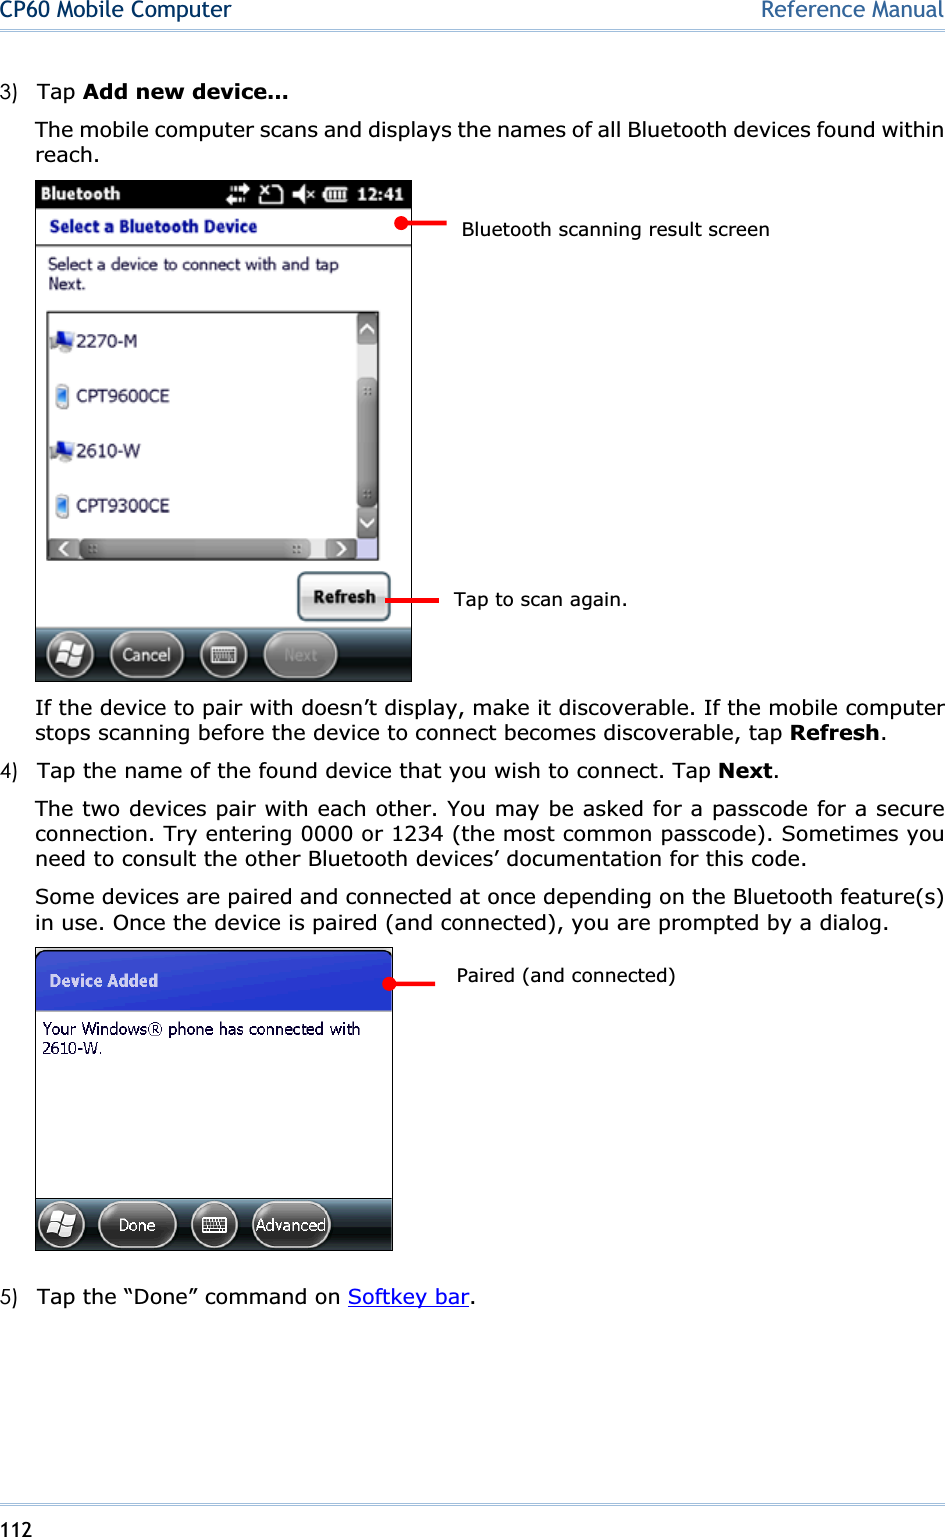
>
CipherLab
>
CP60 User Manual
>
User Manual
Contents
1.
User Manual
2.
Users Manual
User Manual
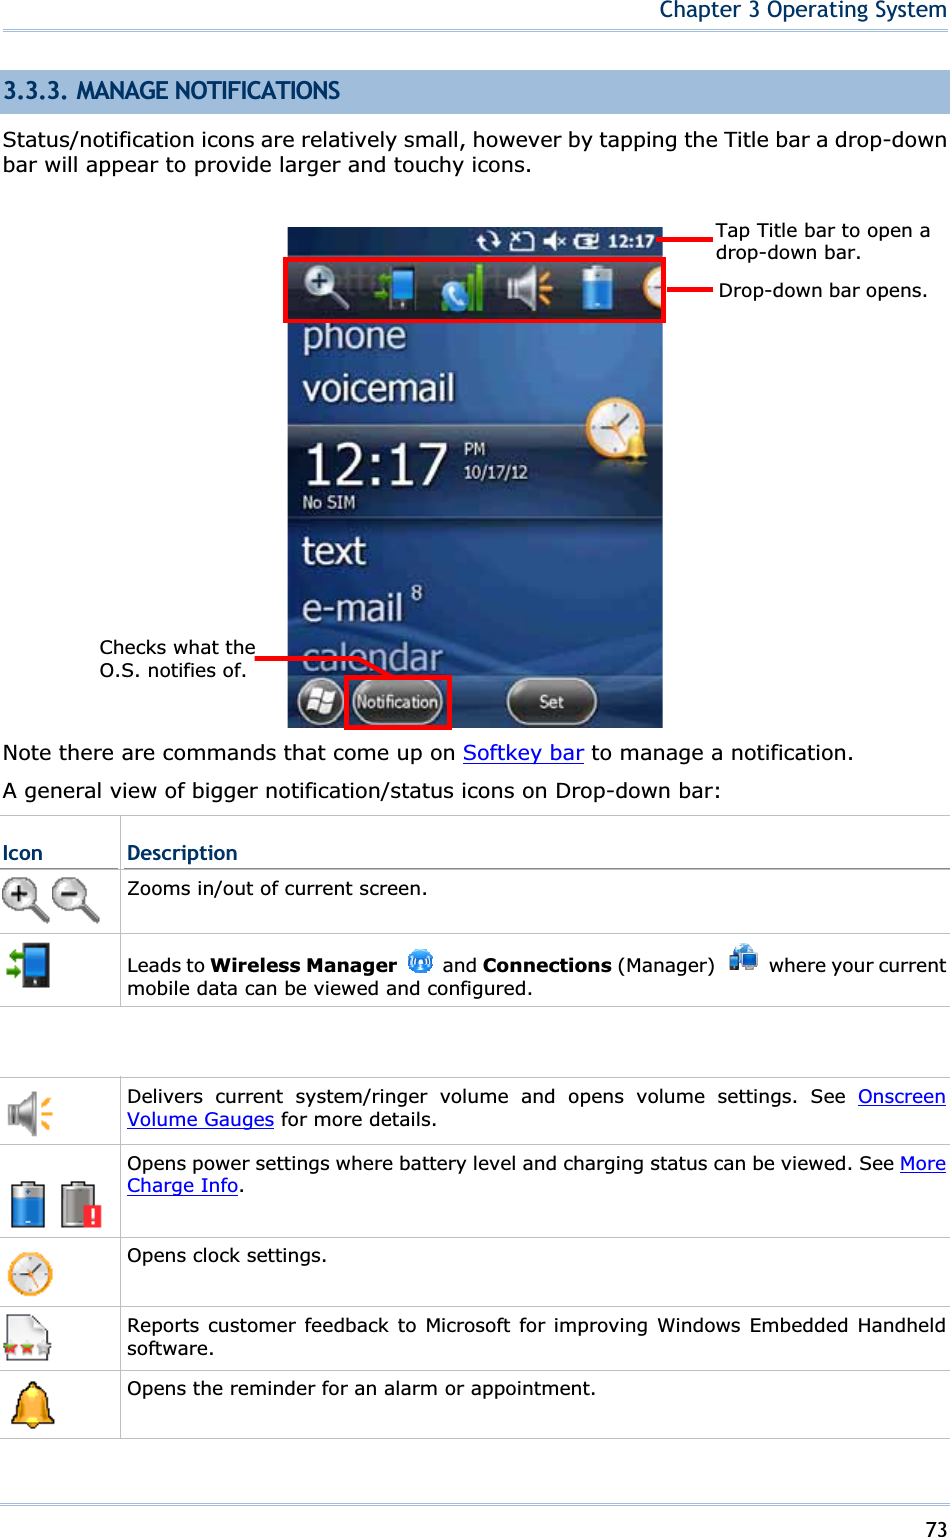
Navigation menu
Upload a User Manual
Namespaces
Wiki Guide
HTML
PDF
Info
Views
User Manual
Discussion / Help
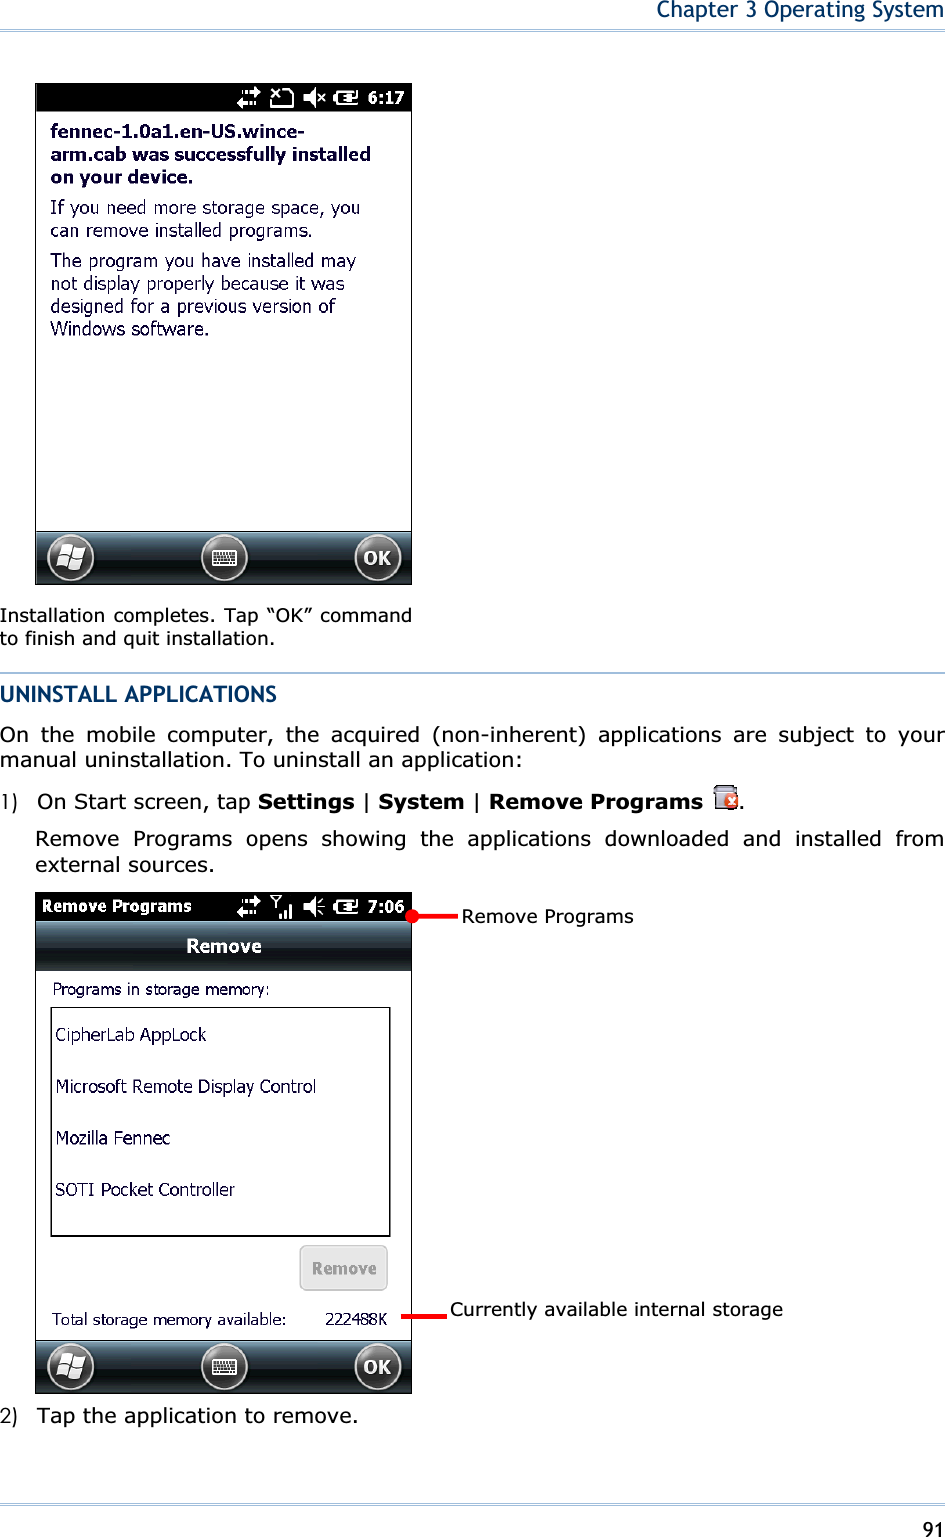
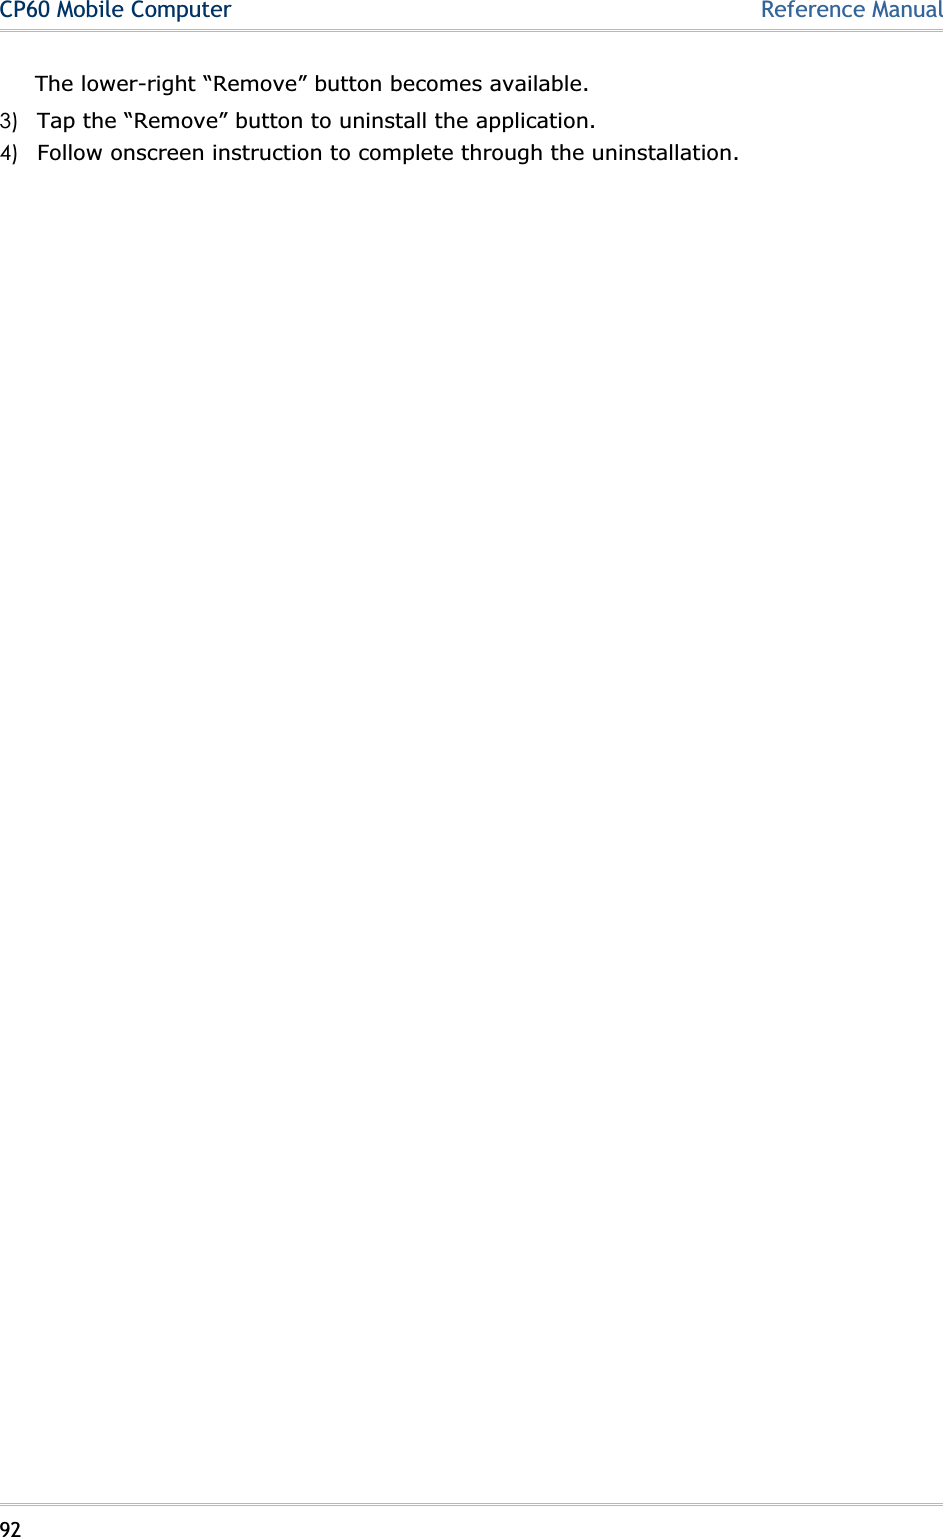
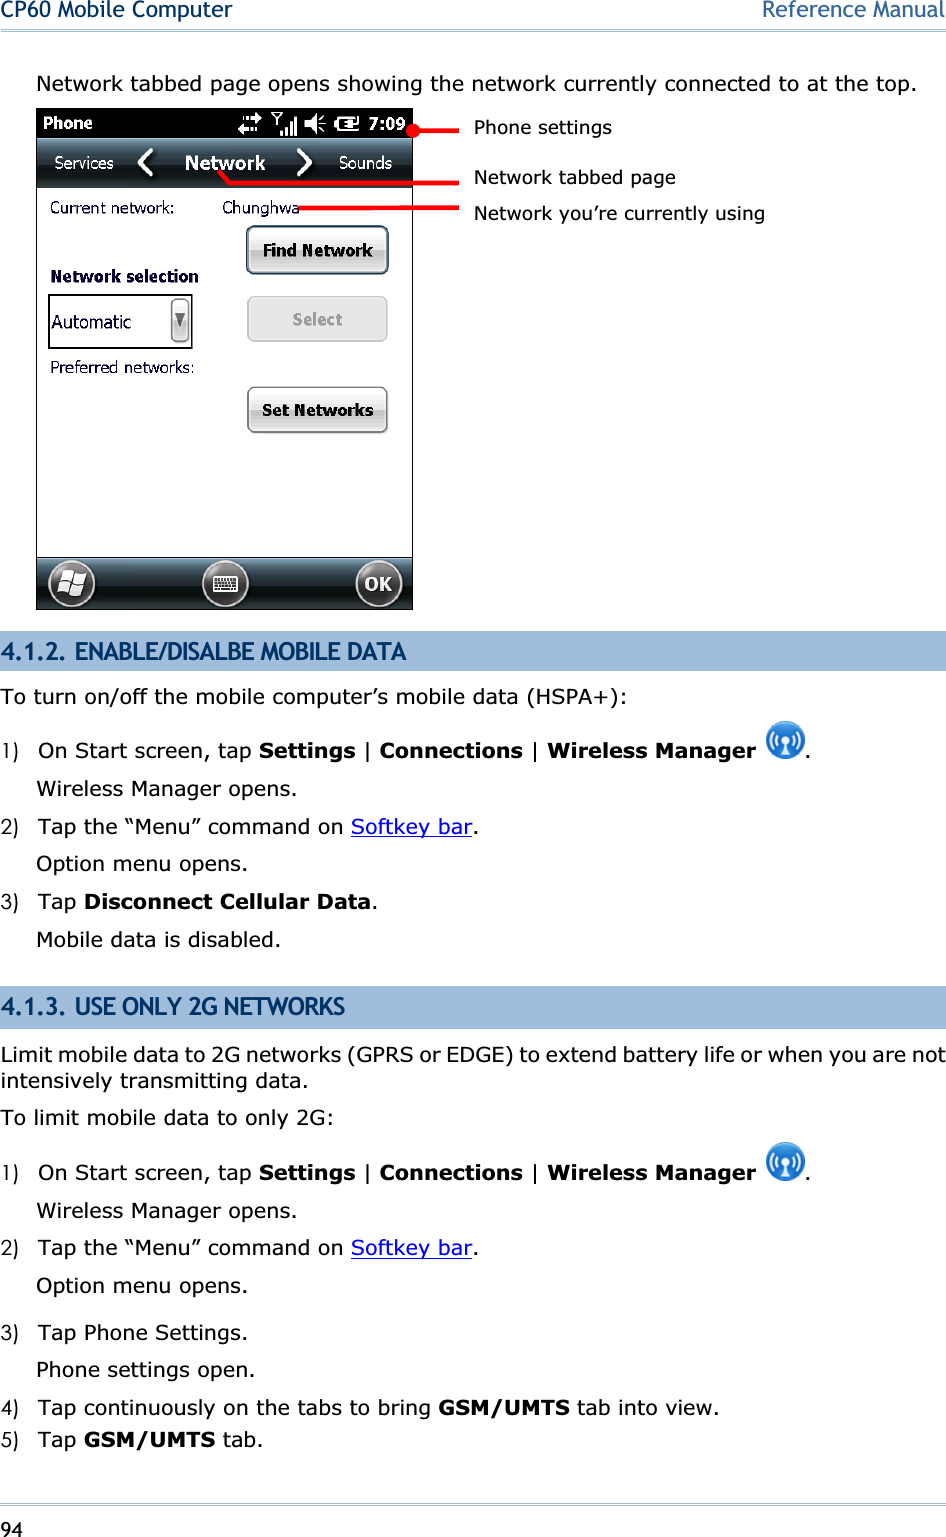
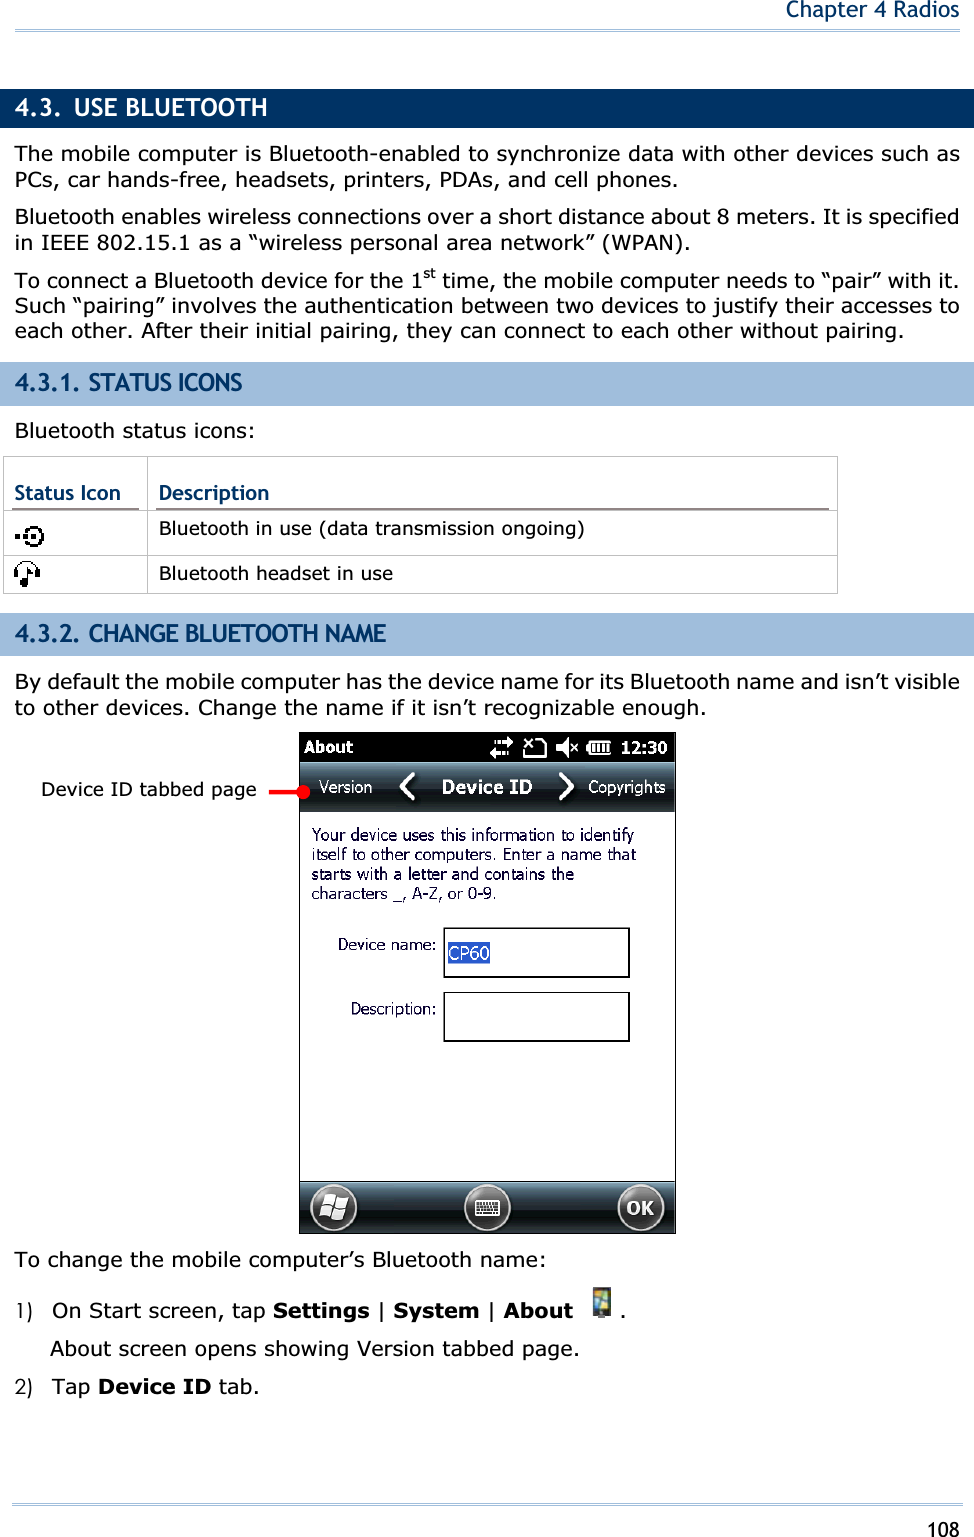
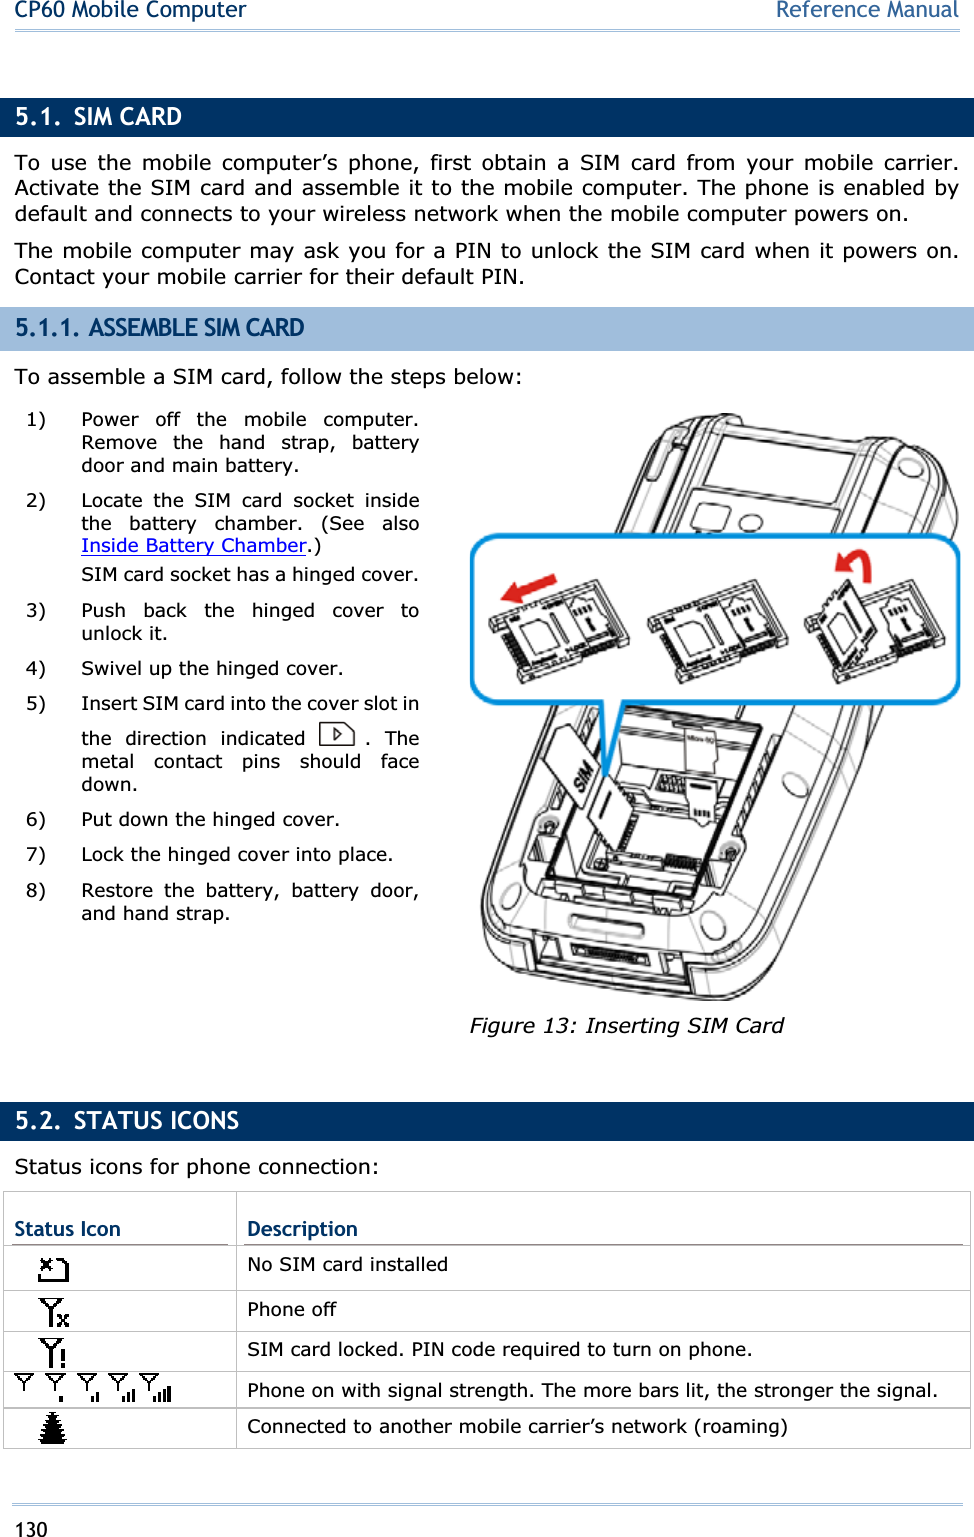
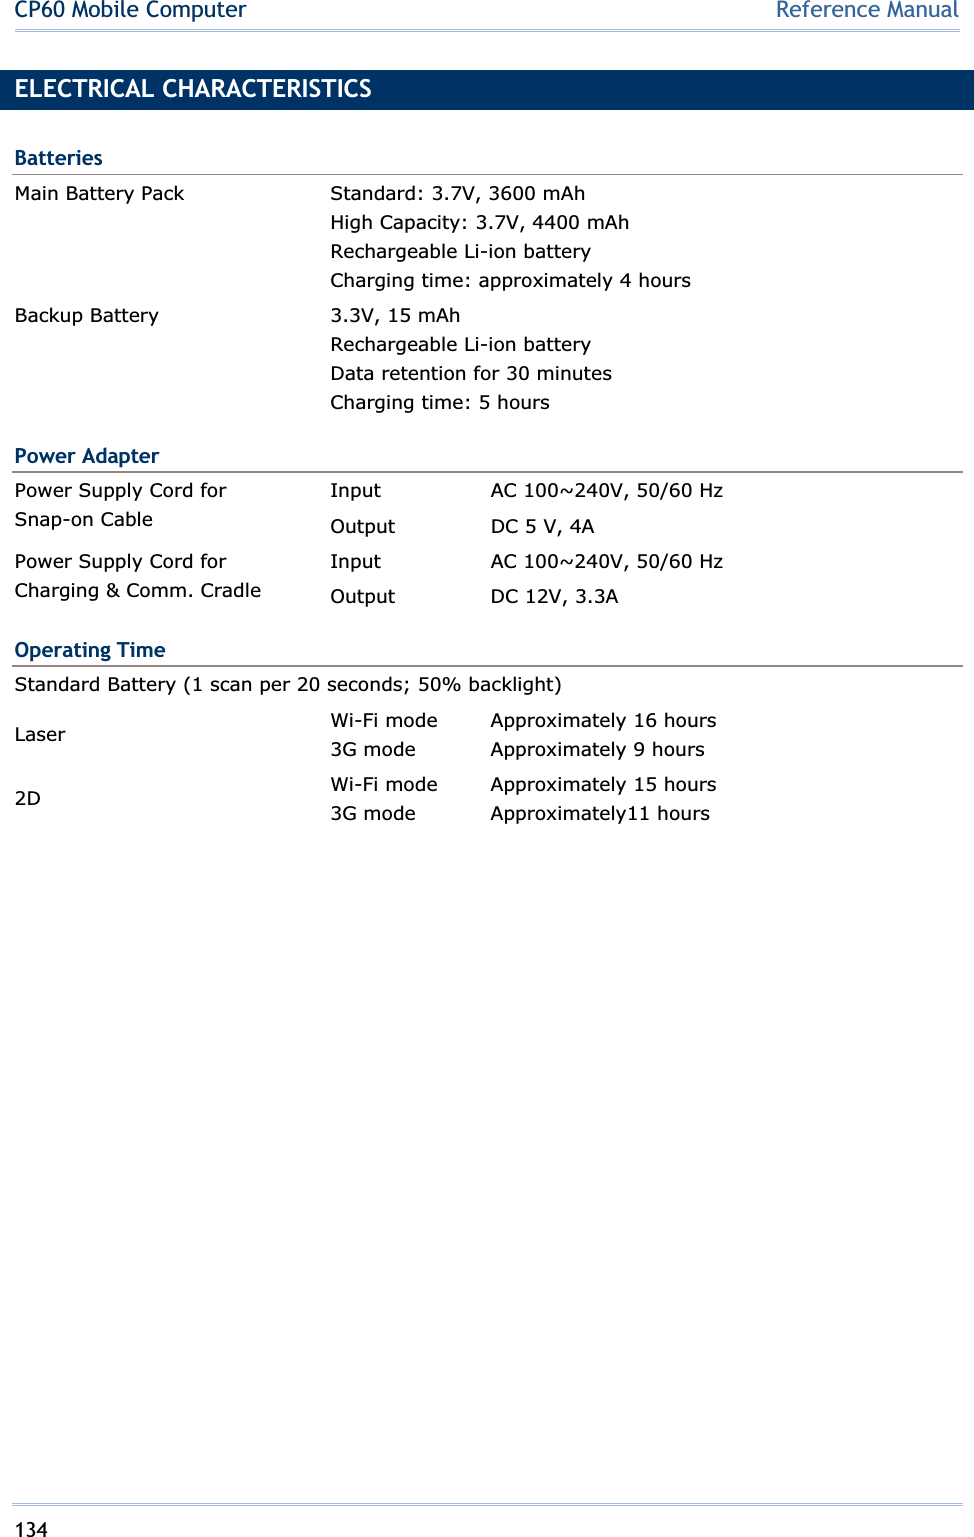
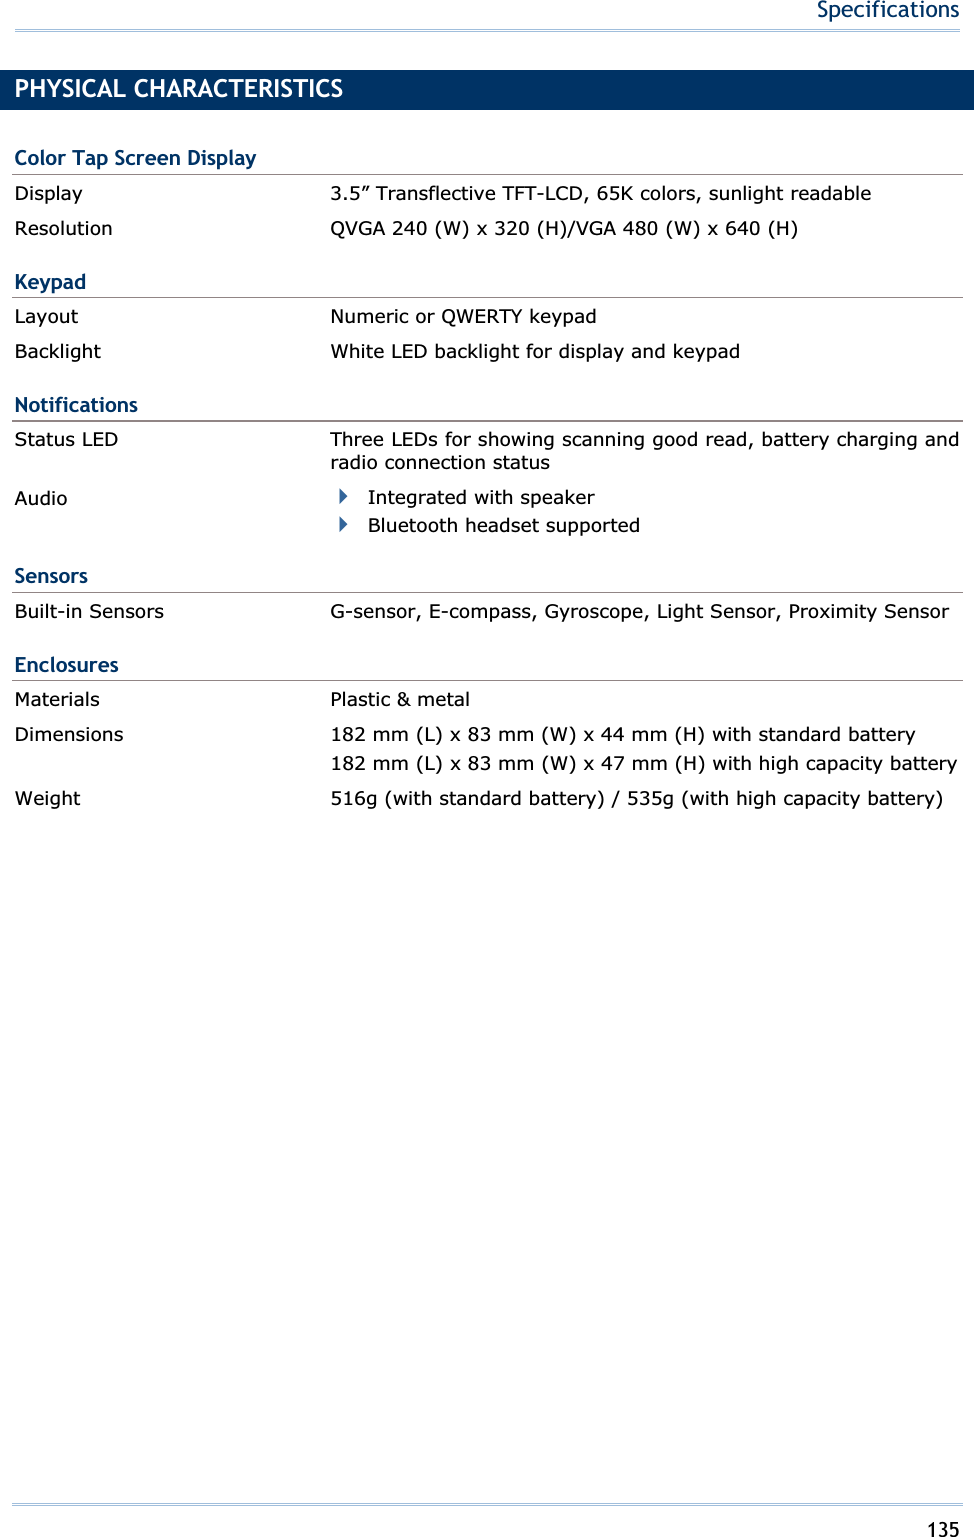
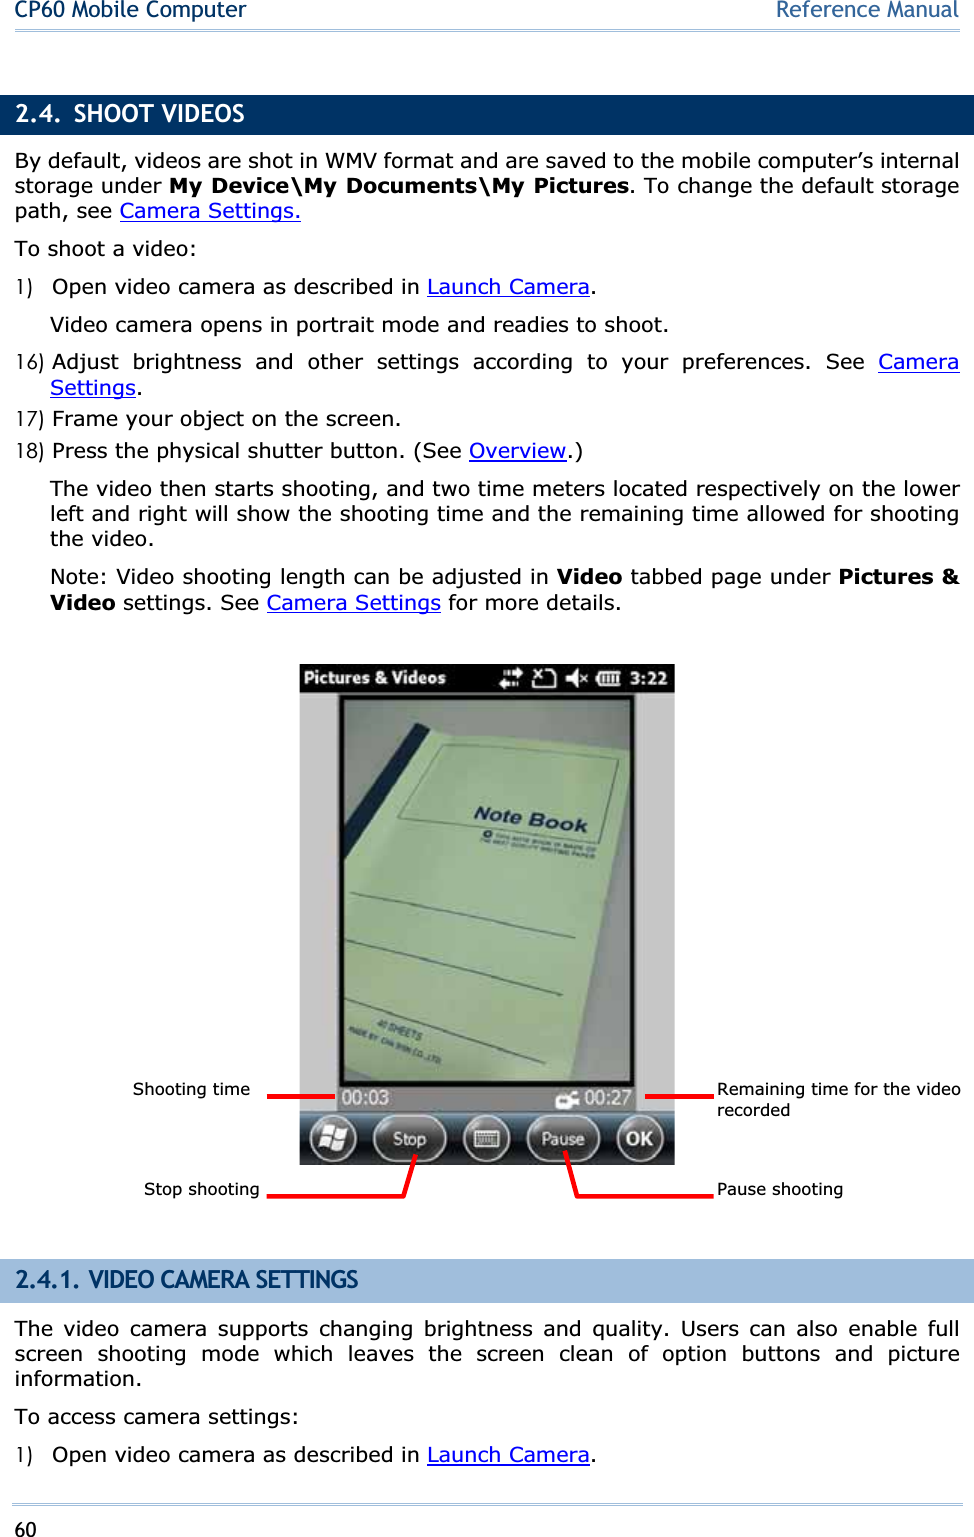
Navigation


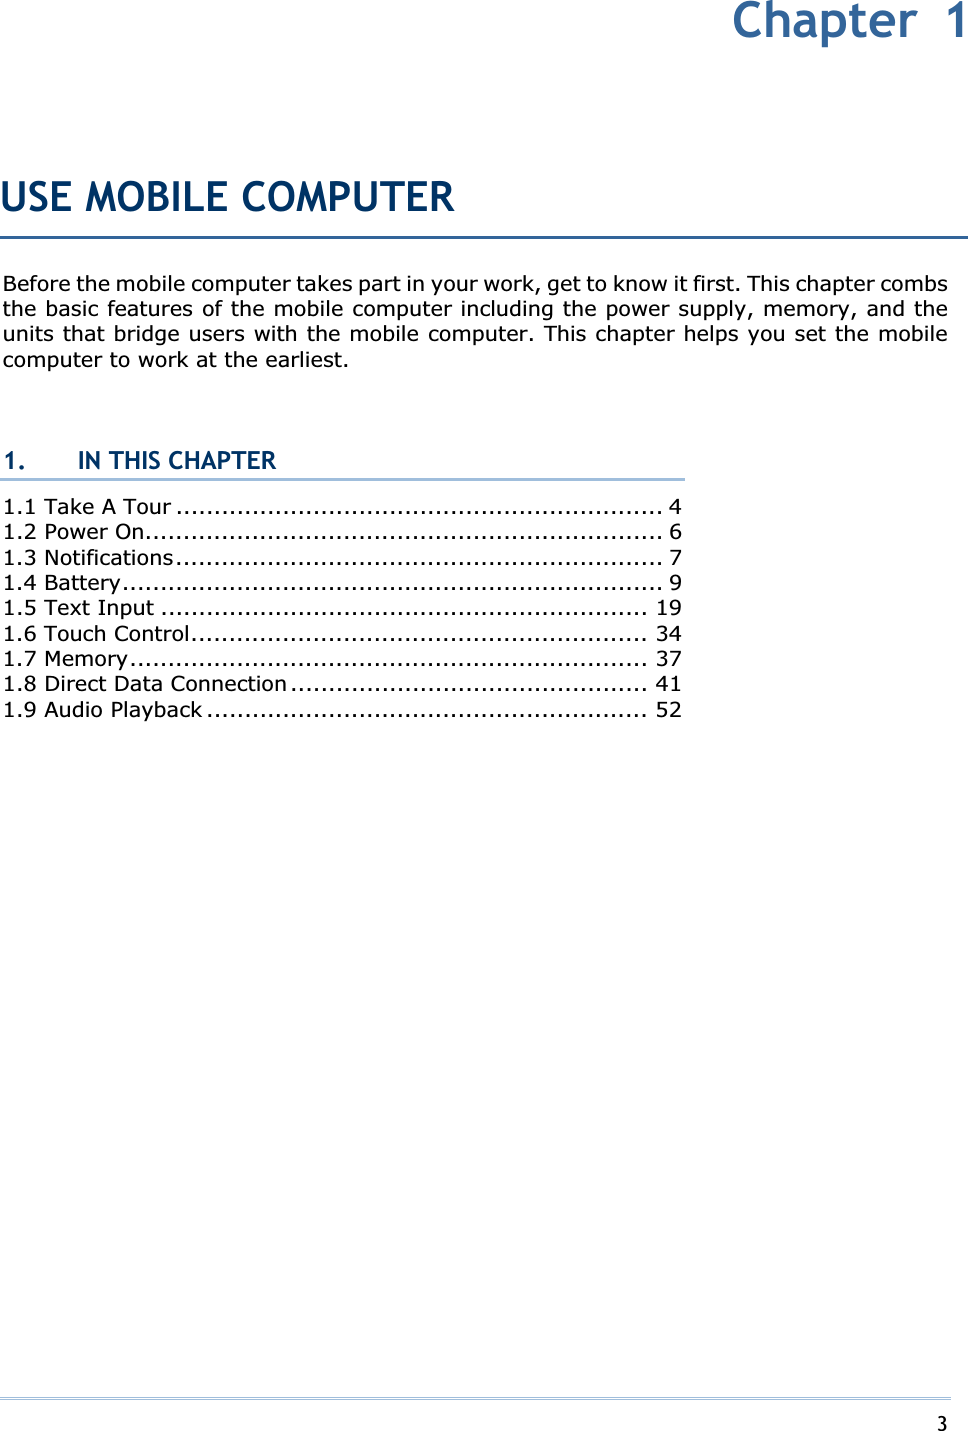
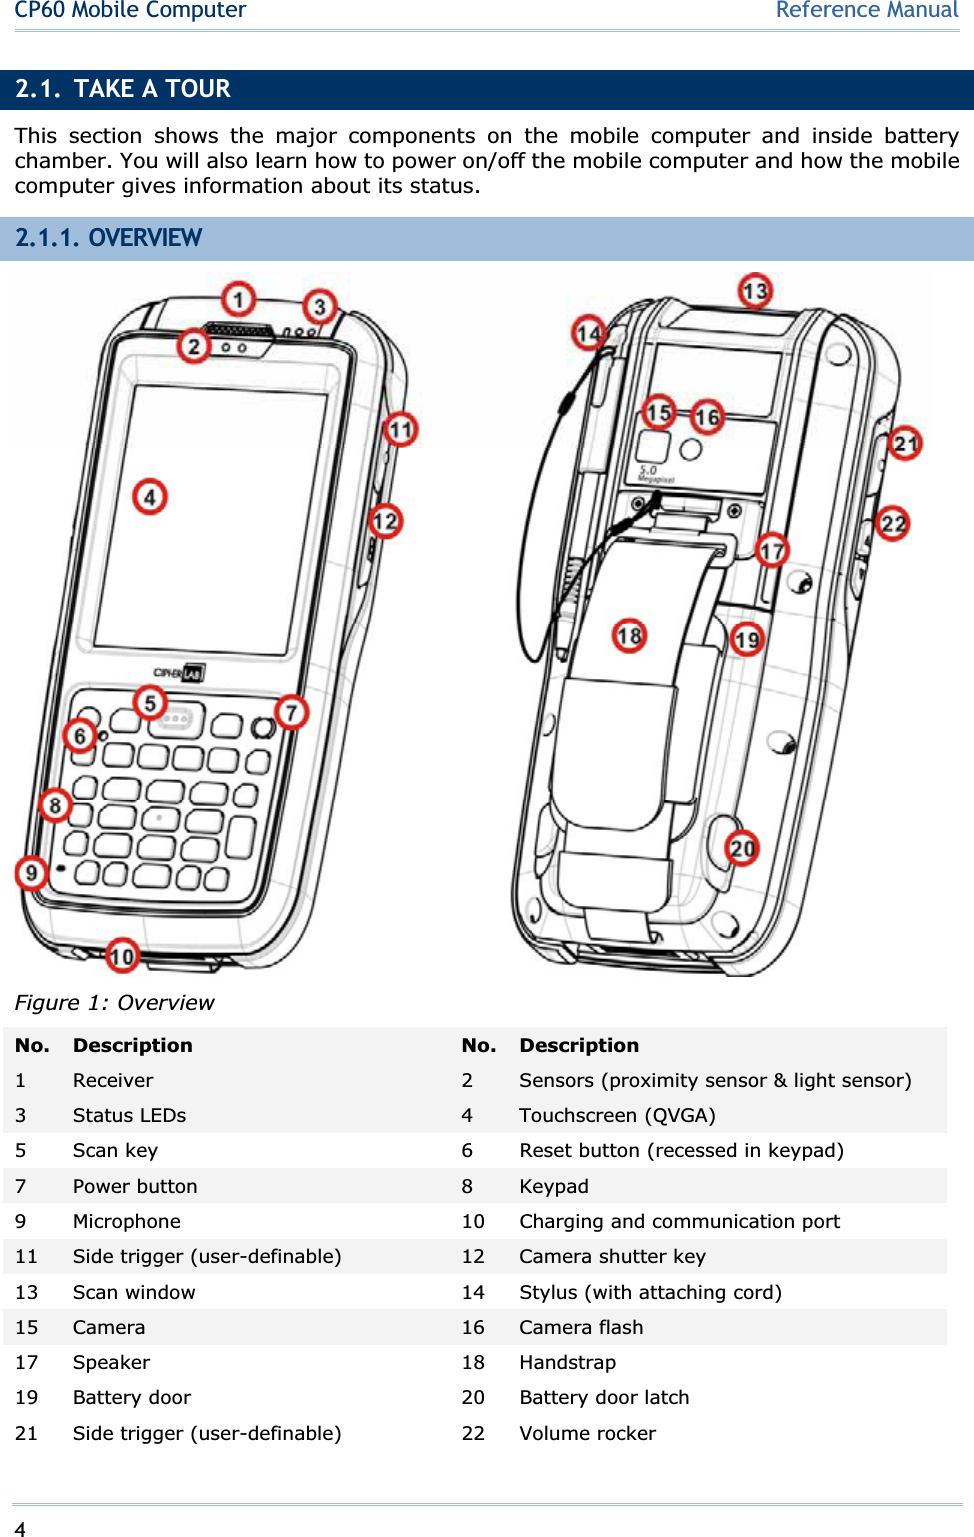
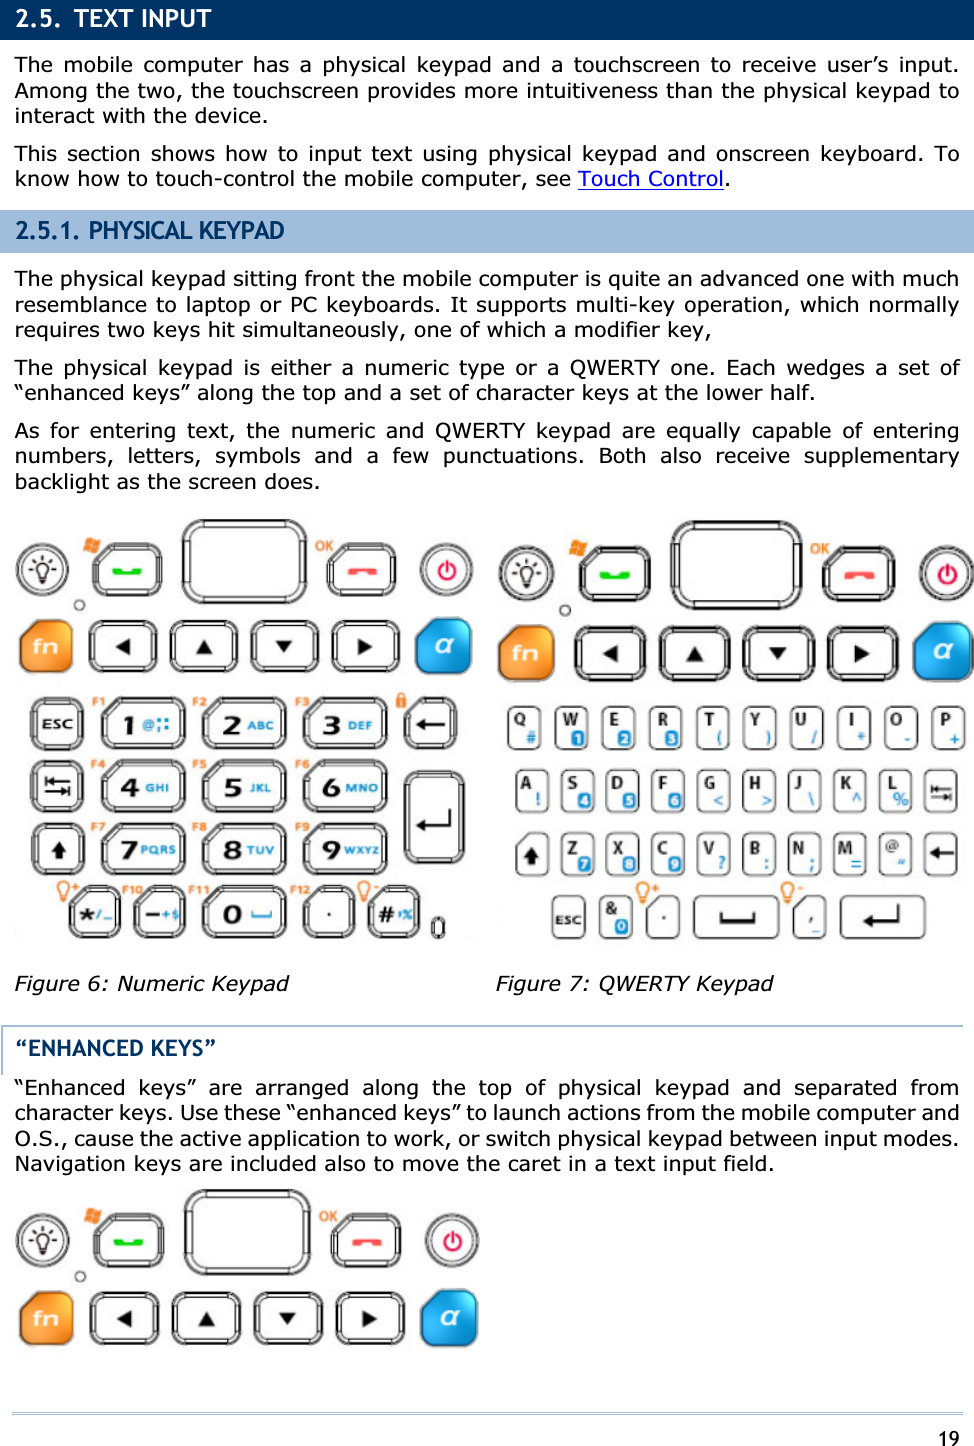
![21Chapter 1 Use Mobile Computerapplication-dependent and they all team up with key to cause actions from the active application. They produce nothing when pressed alone. [ALPHA] KEY key changes keypad input mode. When key is pressed once, [alpha] mode is activated temporarily, and the LED indicator next to the physical key lights up in blue accordingly. This mode will end after a single key has been pressed. Upon pressing any key, keypad input mode will resume back to default, and the LED indicator will turn off. When key is pressed twice, [alpha] mode is activated permenantly, and the LED indicator next to the physical key stays lit. Press the key again to quit this mode and return to default. With combined use of the Shift key , key enables maximum six input modes for physical keypad. Mode availability however depends on keypad type, numeric or QWERTY. On a numeric keypad, 6 text input modes are triggered by the [alpha] key, while on a QWERTY keypad, 2 modes are available. The icons on the Title Bar signify current input state. Numeric keypad input modes triggered by key: Mode DescriptionPhysical keypad enters an alphabetic character for the first key pressed. Physical keypad enters alphabetic characters for all keys pressed. QWERTY keypad input modes triggered by key: Mode DescriptionPhysical keypad enters a number or symbol for the first key pressed. Physical keypad enters numbers and symbols for all keys pressed. NUMERIC KEYPAD CHARACTERʳKEYSNumeric keypad wedges a set of character keys at the lower half. They are laid out analogously to a telephone keypad, and additionally featured are an key, Tab key ,Enter key , Backspace key , and Shift key that enable more sophisticated text input.Numeric keypad enters numbers 0 through 9 by default. Symbols * through ) and alphabetic characters can be entered by combined use of the key and Shift key .See [Alpha] Key for more details.](https://usermanual.wiki/CipherLab/CP60.User-Manual/User-Guide-1879477-Page-31.png)
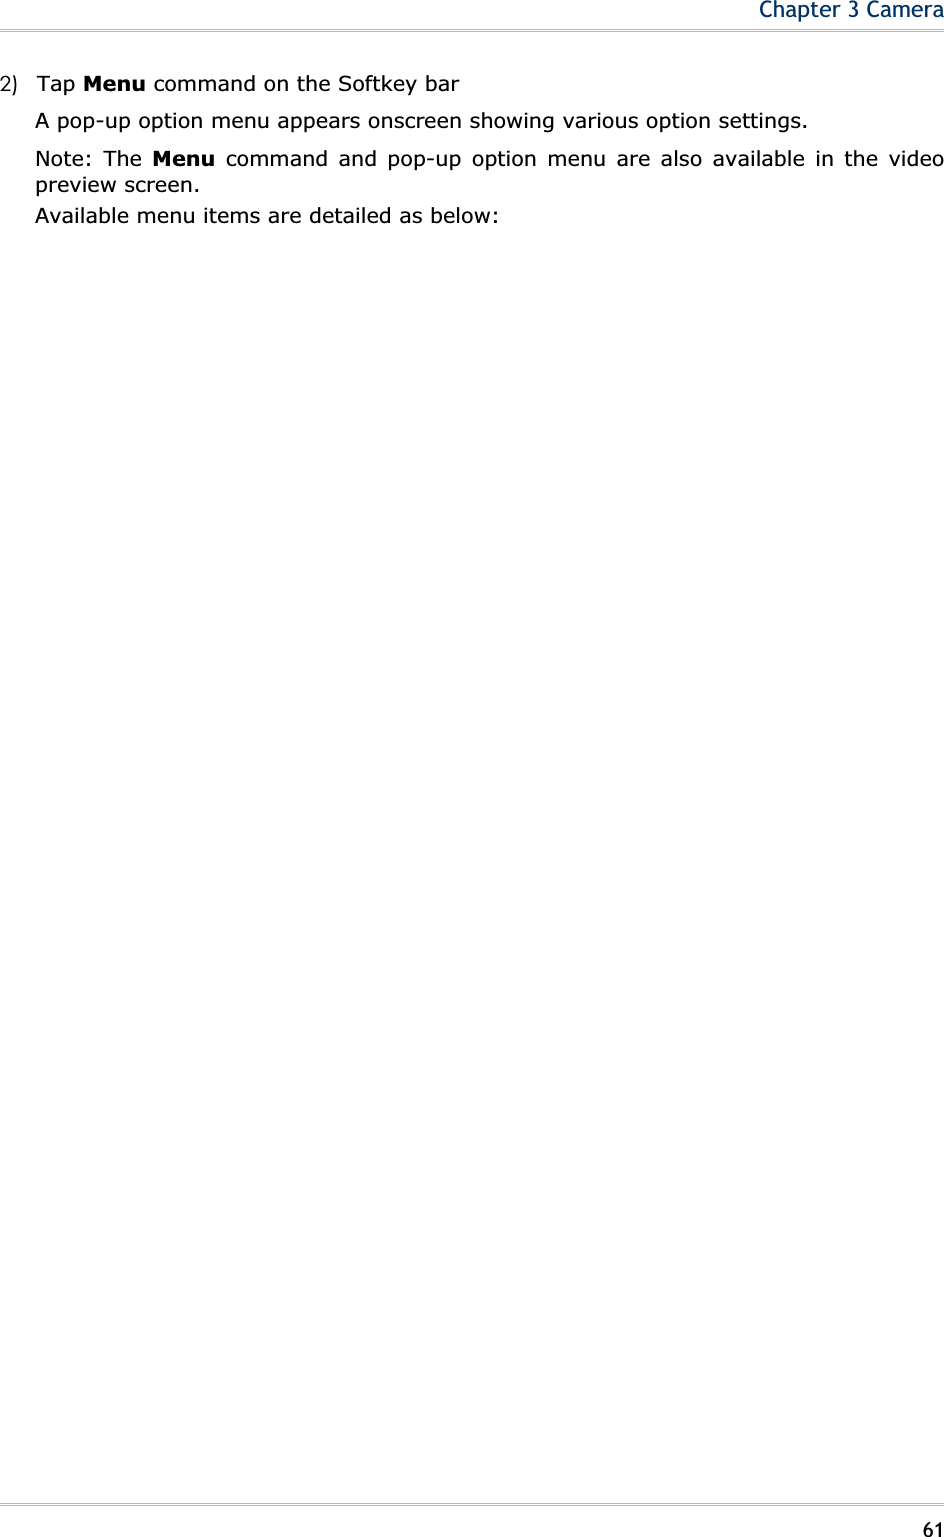
![22CP60 Mobile Computer Reference ManualKey DescriptionOpens the previous screen worked on. Closes a menu of an application, or an opened dialog. Tab Navigates among the highlight items in some applications. Enters Tab character, which means it moves the caret to the next tab stop.Executes a command or confirms input. For text input, it inserts a break between paragraphs. Backspace Erases the characters to the left of caret. Space Inserts a blank space where caret is. Shift Shift key changes keypad input mode. When is pressed once, [Shift] mode is activated temporarily, and the LED indicator next to the physical key lights up in green accordingly. This mode will end after a single key has been pressed. Upon pressing any key, keypad input mode will resume back to default, and the LED indicator will turn off. When key is pressed twice, [Shift] mode is activated permenantly, and the LED indicator next to the physical key stays lit. Press the key again to quit this mode and return to default. With combined use of the key, Shift key enables eight input modes for the physical keypad. The icons on Title Barsignify current input state. Numeric keypad input modes: Mode Description Trigger and Withdrawal Noicon Keypad enters numbers only. Default mode. This mode remains until key or Shift key is pressed. Keypad enters the first Press once to enter this mode.](https://usermanual.wiki/CipherLab/CP60.User-Manual/User-Guide-1879477-Page-32.png)
![23Chapter 1 Use Mobile Computertyped key as a symbol. Input mode returns to default once a key is pressed. Keypad enters all typed keys as symbols. Press twice to enter this mode. Input mode returns to default by pressing again. Keypad enters the first typed key as an alphabetic letter. Press once to enter this mode. Input mode returns to default once a key is pressed. Keypad enters the first typed key as a capitalized alphabetic letter. Press and once to enter this mode.Input mode returns to default once a key is pressed. Keypad enters the first typed key as a capitalized alphabetic letter. Press once and twice to enter this mode. Input mode returns to default once a key is pressed. Keypad enters all typed keys as alphabetic letters.Press twice to enter this mode. Input mode returns to default by pressing again. Keypad enters all typed keys as alphabetic letters and capitalizes the first one. Press twice and once to enter this mode. Input mode returns to default by pressing again. Keypad enters all typed keys as capitalized alphabetic letters. Press both and twice to enter this mode. Input mode returns to default by pressing again. For details about key, see [Alpha] Key.TEXT INPUT To enter text by numeric keypad: Numeric Input The numeric keypad enters numbers 0-9 by default when neither key nor Shift key is pressed. Literal Input](https://usermanual.wiki/CipherLab/CP60.User-Manual/User-Guide-1879477-Page-33.png)
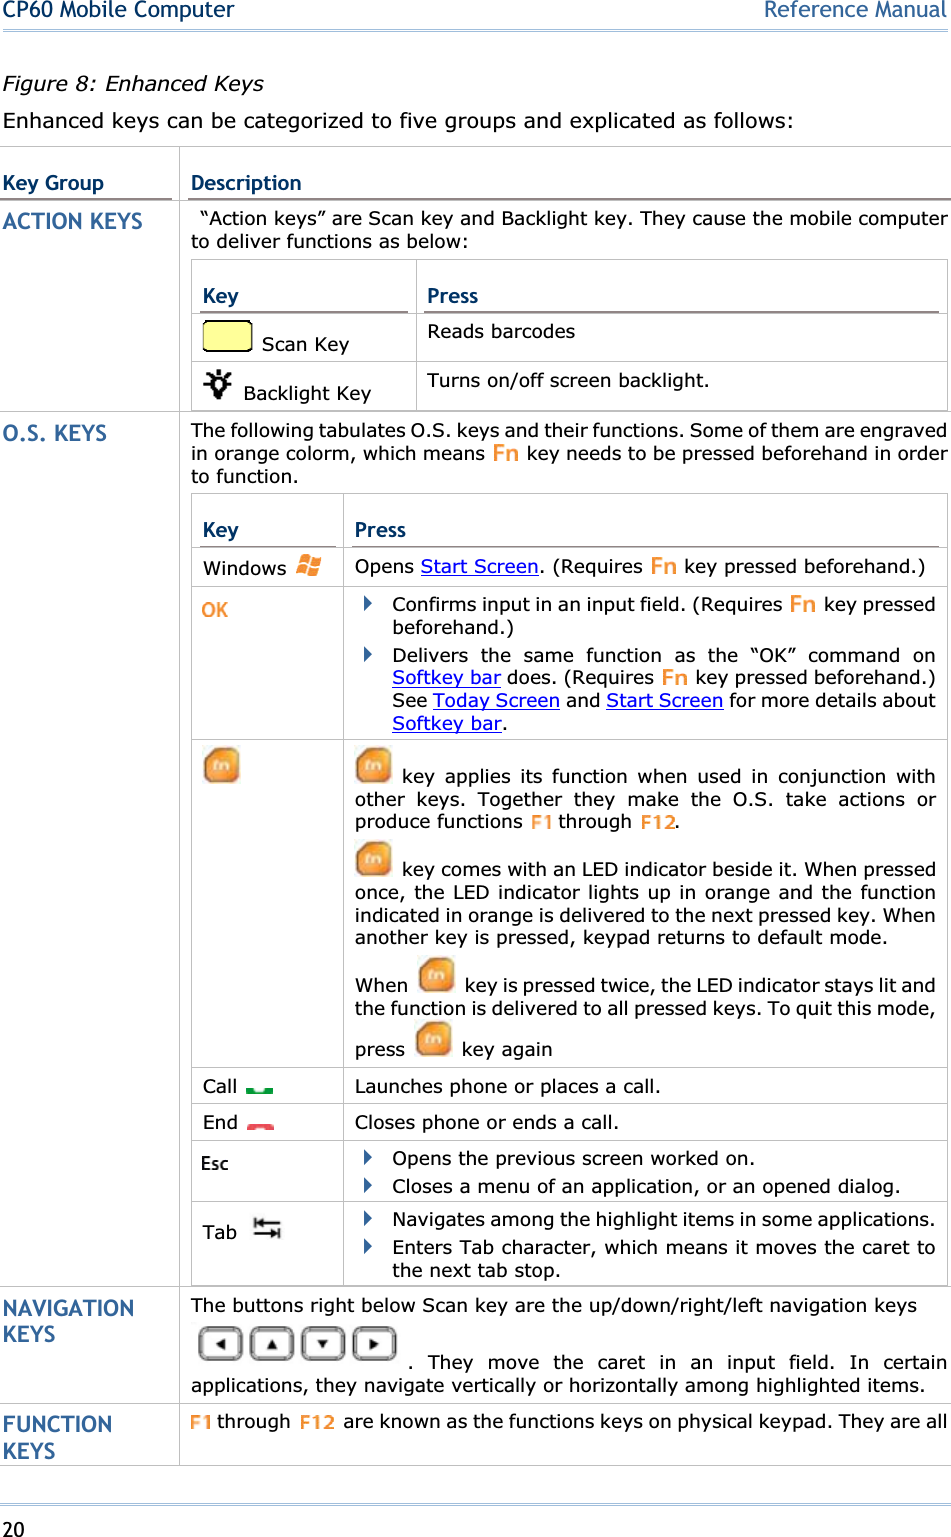
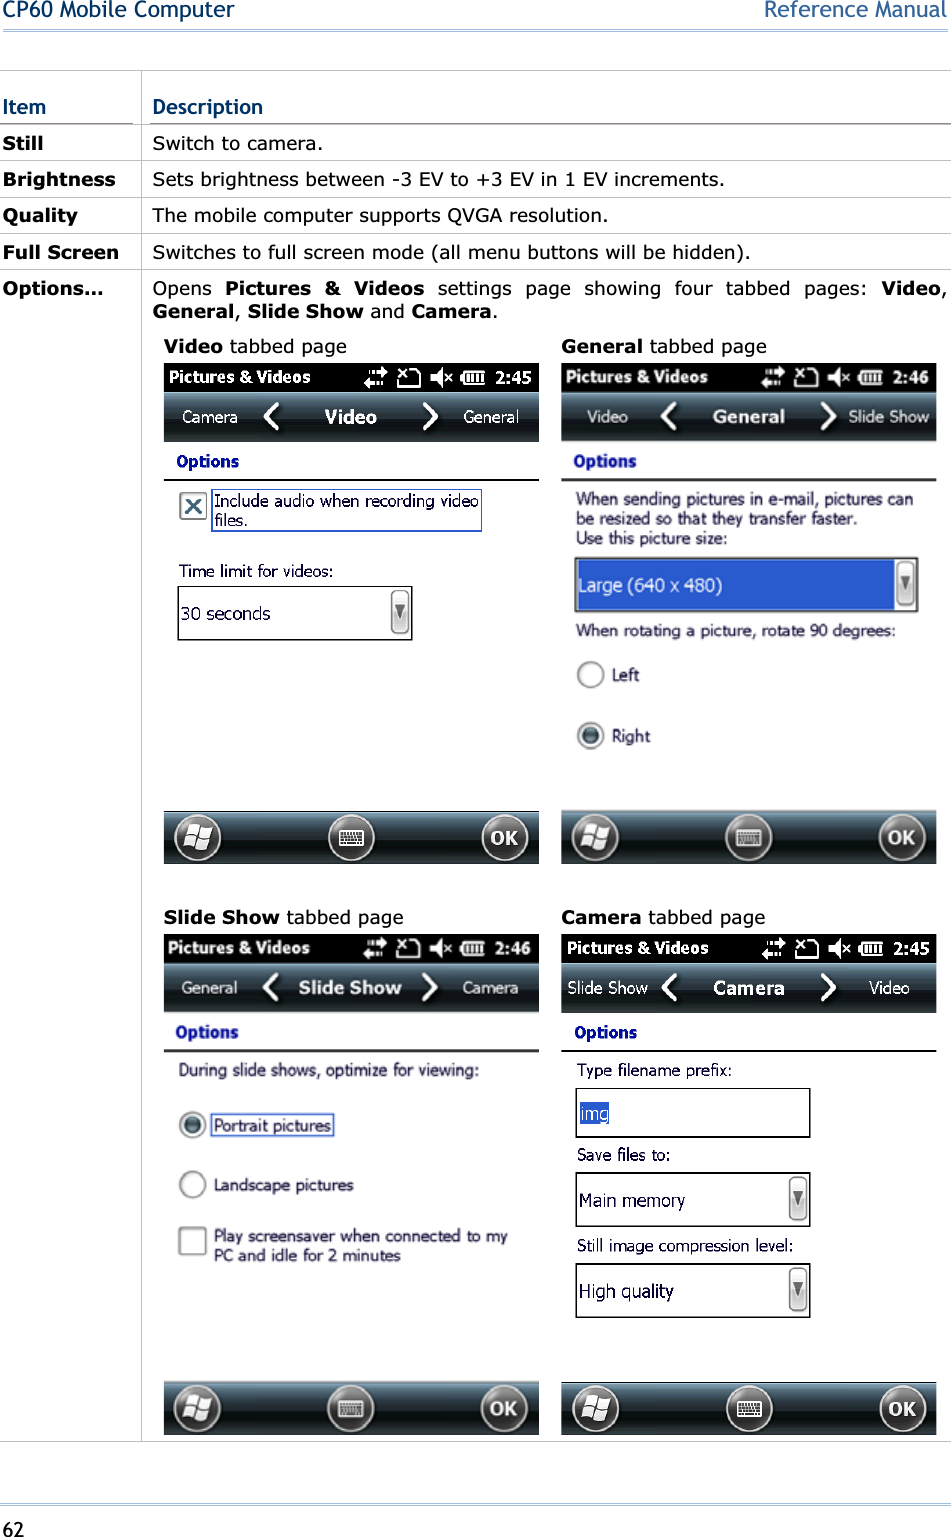
![25Chapter 1 Use Mobile ComputerQWERTY KEYPAD CHARACTER KEYS QWERTY keypad also arranges its character keys in the lower half and features them in a compact “QWERTY” layout as its name suggests. QWERTY keypad is a pared down version of an average laptop’s keyboard that bears also an key, Tab key , Enter key , Backspace key , Shift key , and space key .QWERTY keypad enters alphabetic characters by default. To enter numbers and some symbols, press key. See [Alpha] Key for more details. key, key and shift key are the modifier keys. / key is pressed with another key to launch particular actions from O.S. or the active application while shift key capitalizes the letter(s) typed.](https://usermanual.wiki/CipherLab/CP60.User-Manual/User-Guide-1879477-Page-35.png)
![26CP60 Mobile Computer Reference ManualKey Descriptionkey Performs a special operation from O.S. or the active application when pressed inconjunction with another key.key Changes the function of the key pressed together with. The launched function depends on the application.Backspace Erases the characters to the left of caret. Executes a command or confirms input. For text input, it inserts a break between paragraphs. Space Inserts a blank space where the caret is. Opens the previous screen worked on. Closes a menu of an application, or an opened dialog. Tab Navigates among the highlight items in some applications. Enters Tab character, which means it moves the caret to the next tab stop.Shift Shift key changes keypad input mode. When is pressed once, [Shift] mode is activated temporarily, and the LED indicator next to the physical key lights up accordingly. This mode will end after a single key has been pressed. Upon pressing any key, keypad input mode will resume back to default, and the LED indicator will turn off. When key is pressed twice, [Shift] mode is activated permenantly, and the LED indicator next to the physical key stays lit. Press the key again to quit this mode and return to default. With combined use of the key, Shift key enables four input modes for the physical keypad. The icons on Title Bar signify current input state.QWERTY keypad input modes: Mode Description Trigger and Withdrawal Noicon Keypad enters lowercase letters.Default mode. This mode remains until key or Shift key is pressed. Keypad enters the first typed key as an uppercase letter. Press once to enter this mode. Input mode returns to default once a key is pressed. Keypad enters all typed keys as uppercase letters.Press twice to enter this mode. Input mode returns to default by pressing again. Keypad enters the first typed key as a Press once to enter this mode.](https://usermanual.wiki/CipherLab/CP60.User-Manual/User-Guide-1879477-Page-36.png)
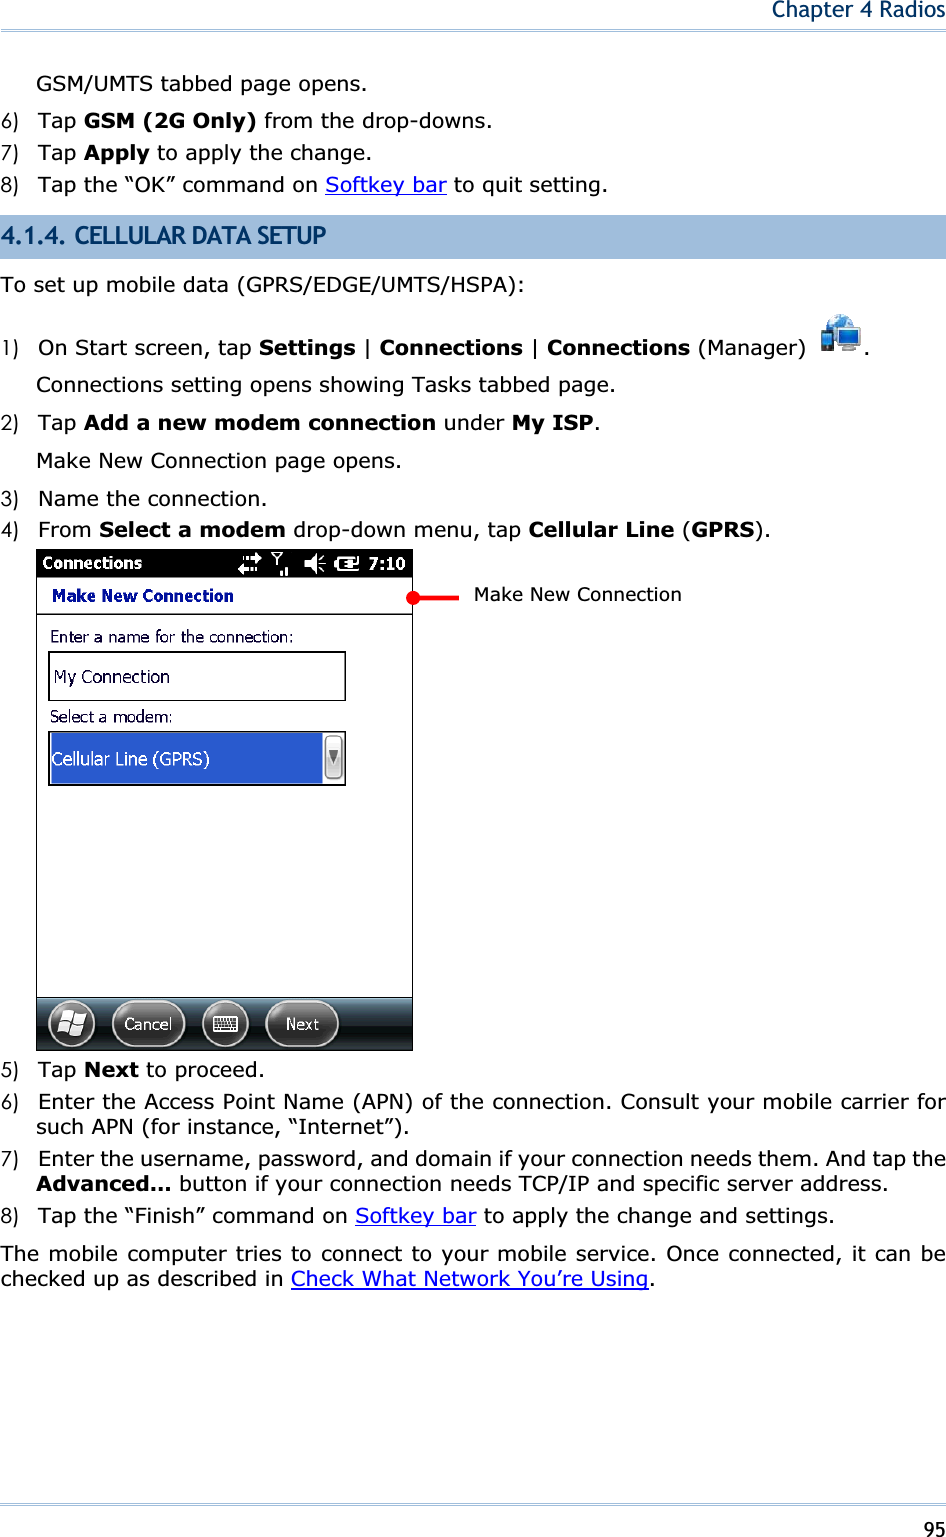
![27Chapter 1 Use Mobile Computernumber/symbol. Input mode returns to default once a key is pressed. Keypad enters all typed keys as numbers/symbols. Press twice to enter this mode. Input mode returns to default by pressing again. For details about key, see [Alpha] Key.TEXT INPUT To enter text using QWERTY keypad: Literal Input The QWERTY keypad enters lowercase letters a-z by default when neither key nor Shift key is pressed. To enter a letter in uppercase, press Shift key so appears on the Title Bar.To continuously type in uppercase, press Shift key twice to trigger mode.Numeric or symbols Input 1)To enter a single number/symbol, press key once so appears on the Title Bar. To enter multiple numbers/symbols, press Shift key twice to trigger mode.2) Press a key engraved with blue-color character to enter number(s) and symbol(s) as desired. Note there are cases when a typed letter is capitalized automatically: The letter follows a period mark and a blank space (because it is seen as the start of a new sentence). The letter is typed after a paragraph break (because it is seen as the start of a new paragraph).CHANGE INPUT TEXT SIZE Set the size to show typed text: 1) On Start screen, tap Settings | System | Screen | Text Size.2) Tap Text Size tab. 3) Adjust the text size by moving the slider. 4) Tap the “OK” command on Softkey bar to apply the change and quit setting.](https://usermanual.wiki/CipherLab/CP60.User-Manual/User-Guide-1879477-Page-37.png)

![45Chapter 1 Use Mobile Computer2.8.5. DISCONNECT USB ACTIVESYNC To disconnect USB ActiveSync: 1) On your PC, open ActiveSync by double-clicking its icon in the notification area. ActiveSync opens. 2) From the menu bar, click File | Connection Settings.[Connection Settings] window opens. 3) Deselect Allow USB connections.4) Press the OK button to apply the change and quit setting. This way when you plug your mobile computer the next time, it still gets charged but ActiveSync won’t attempt to synchronize with it. To disconnect Bluetooth syncing, see Disconnect Bluetooth ActiveSync.](https://usermanual.wiki/CipherLab/CP60.User-Manual/User-Guide-1879477-Page-55.png)
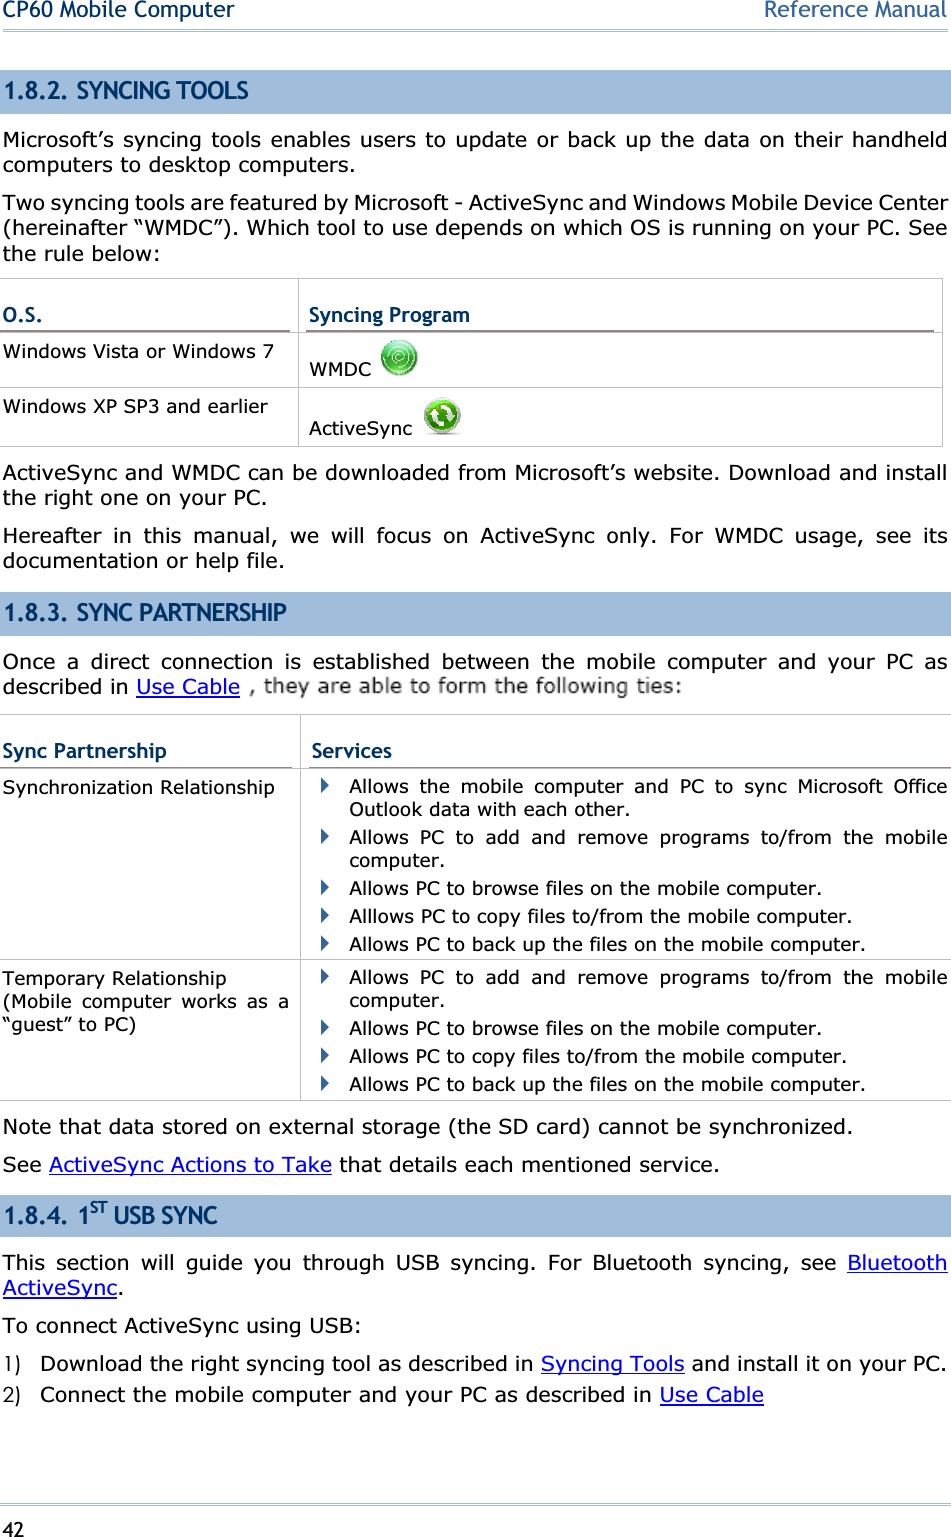
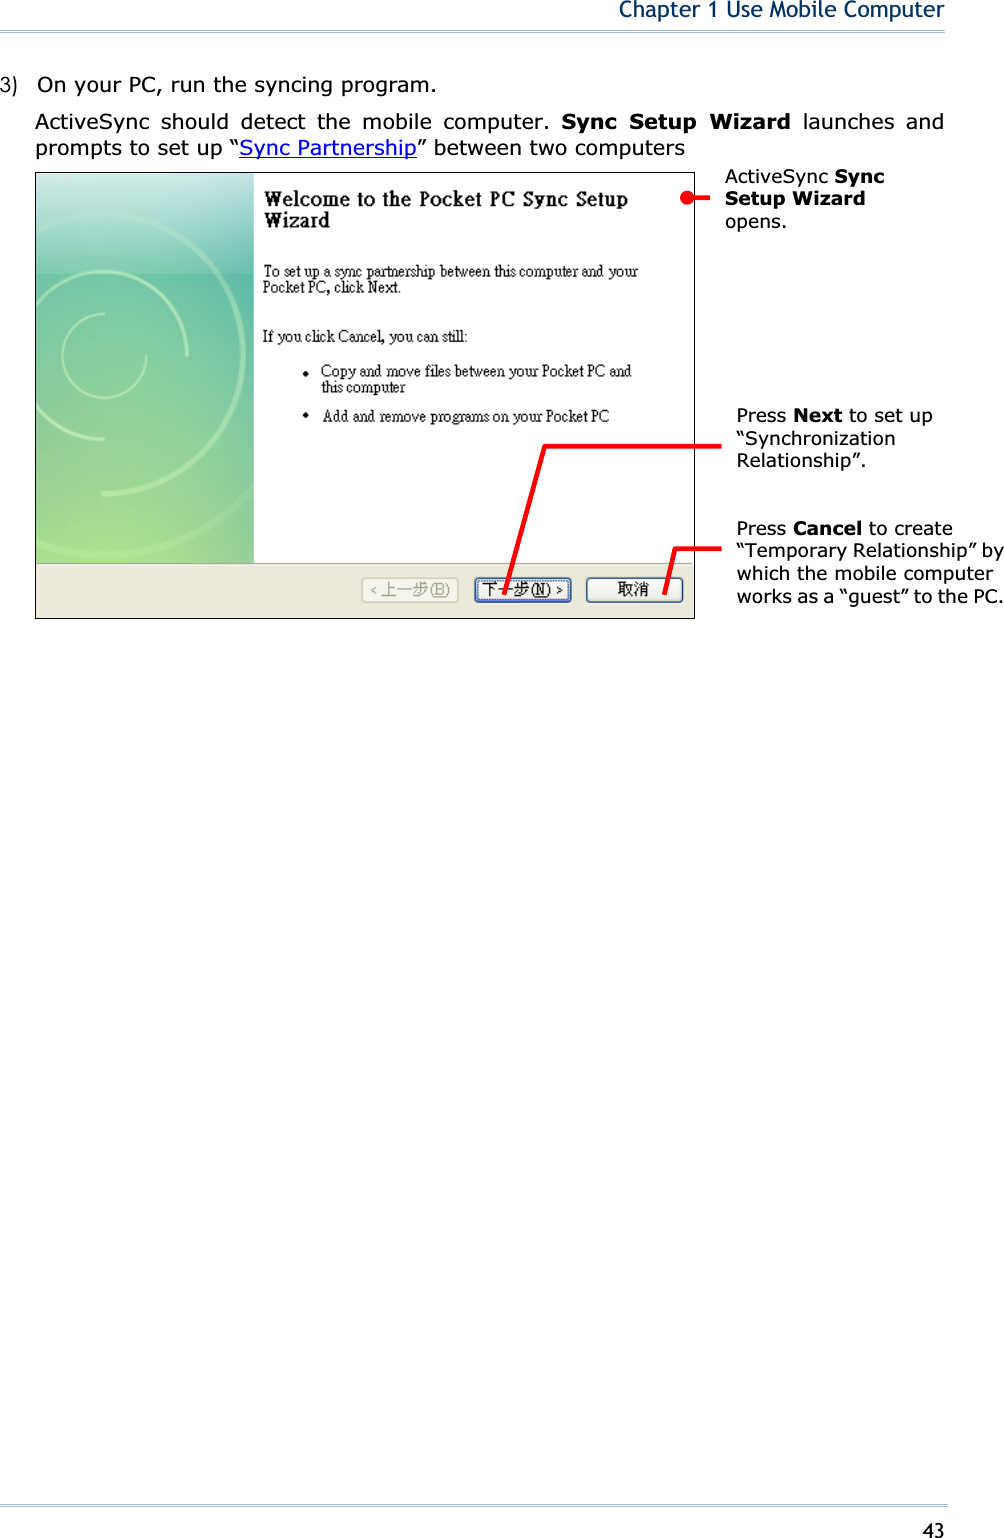
![46CP60 Mobile Computer Reference Manual2.8.6. ACTIVESYNC ACTIONS TO TAKE Once “Synchronization Relationship” or “Temporary Relationship” is established between two computers, a variety of actions can be taken to enhance resource sharing between them as previously mentioned in Sync Partnership.In summary, “Synchronization Relationship” outshines “Temporary Relationship” by being capable of syncing Microsoft Office Outlook data. However “Temporary Relationship” provides satisfactory file sharing if you don’t want to synchronize information. See the following to know what actions to take with ActiveSync: CHANGE MICROSOFT OFFICE OUTLOOK DATA TO SYNCHRONIZE Note this is for “Synchronization Relationship” only. In default state, “Synchronization Relationship” doesn’t synchronize all Microsoft Office Outlook data but only a limited amount between two computers in order to save storage on the mobile computer. You can change the amount of information to synchronize: 1) On your PC, from the menu bar of ActiveSync, select Tool | Options.ActiveSync’s [Settings] window opens showing Options tabbed page. 2) Select an information type to synchronize, and deselect an information type to stop synchronizing. 3) Press OK button to save the change and quit setting. Note you can also change the information to synchronize on the mobile computer by disconnecting ActiveSync first as mentioned in Disconnect USB ActiveSync or Disconnect Bluetooth ActiveSync and then tap ActiveSync’s “Menu” command on Softkey bar and tap Options.](https://usermanual.wiki/CipherLab/CP60.User-Manual/User-Guide-1879477-Page-56.png)
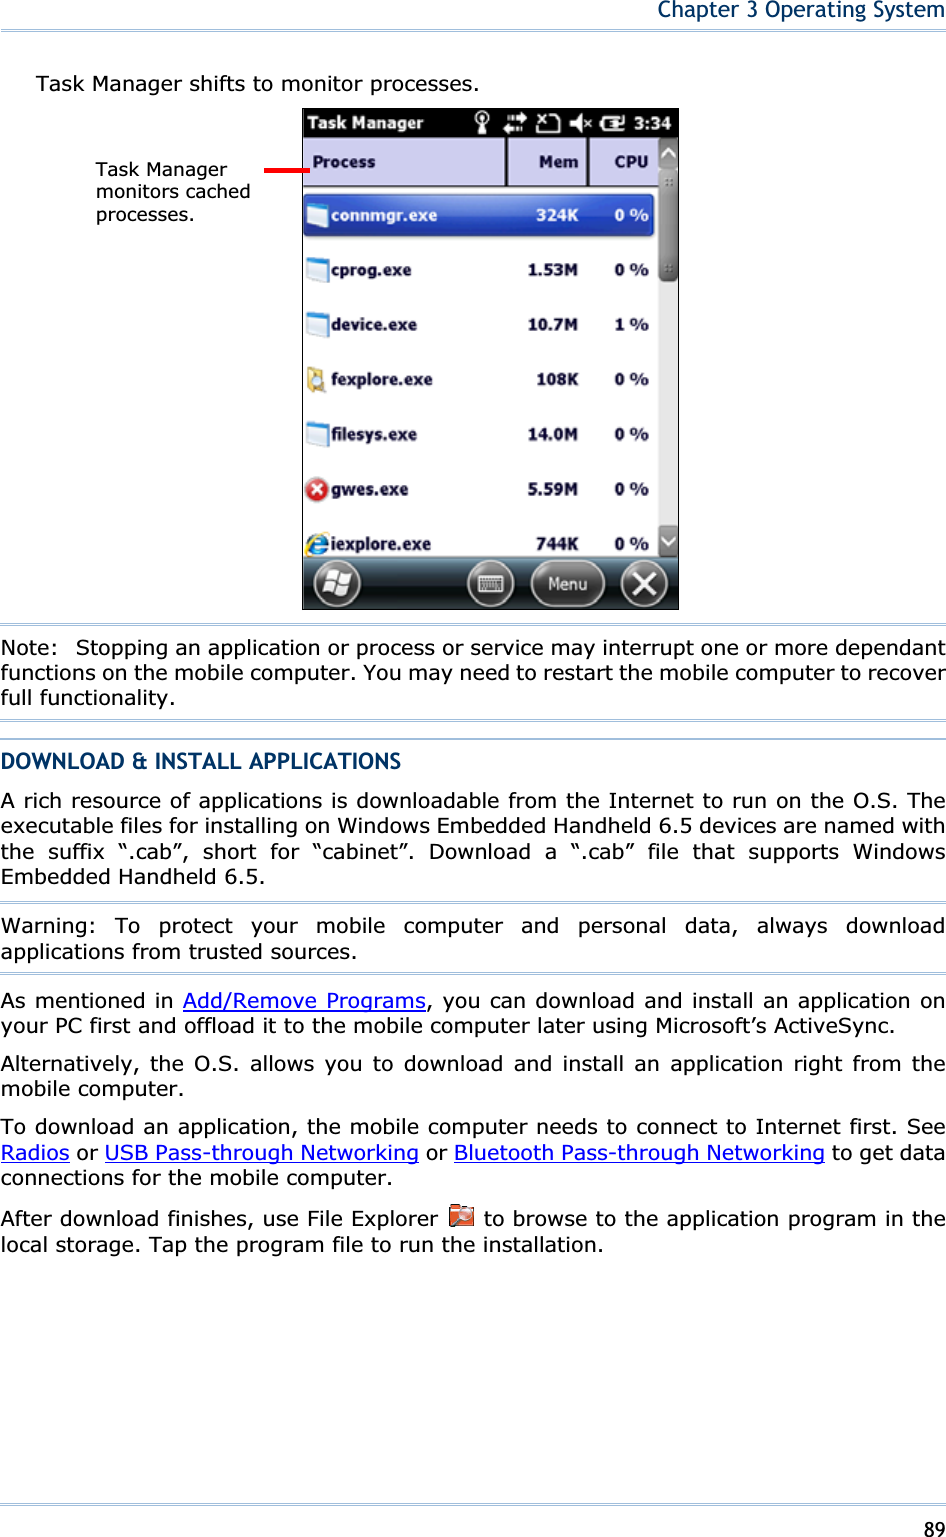
![47Chapter 1 Use Mobile ComputerADD/REMOVE PROGRAMS Note basically the applications to be installed to the mobile computer need to be installed on your PC first. So download the application programs to your PC first and install them on your PC so they can be installed onto the mobile computer later. Many application programs are installed in different ways. Read their installation guides or documentation to know how they are installed. If you are installing an application that cannot be installed on your PC first, try to install it right from the mobile computer, see Download & Install Applications for more details. To install an application on the mobile computer: 1) Connect two computers as described in Use Cable or ᙑᎄ!ބլࠩᅃࠐᄭΖ.2) Sync two computers as described in 1st USB Sync.3) On the PC, from the menu bar of ActiveSync, select Tools | Add/Remove Programs.ActiveSync starts to search for the application programs installed on your PC and opens its [Add/Remove Programs] dialog which lists those found. Each entry comes with a check box on the left. An unchecked box means the program is yet to install to the mobile computer while a checked one means an installed program.](https://usermanual.wiki/CipherLab/CP60.User-Manual/User-Guide-1879477-Page-57.png)
![48CP60 Mobile Computer Reference Manual4) Select the application program(s) to install to the mobile computer, and deselect the application program(s) to uninstall from the mobile computer. 5) Hit the OK button. ActiveSync proceeds to install programs and/or remove programs to/from the mobile computer.6) Follow the onscreen instructions on both your PC and the mobile computer to proceed. Noteworthy facts: Normally the application program(s) downloaded from external resources are installed to the mobile computer’s directory at Mobile Device\Program Files. However sometimes there are exceptions and it depends on the application. You can uninstall application(s) right by the mobile computer rather than on the PC. See Uninstall Applications for more details. If you would like to uninstall a program isn’t listedin the [Add/Remove Programs]dialog, browse to it on the mobile computer using File Explorer . Tap & hold it, and select Delete from the context menu that pops up. ADD APPLICATION SHORTCUTS TO START SCREEN ActiveSync features “Explore” to add an application shortcut to Start screen where it is easier to launch the application. To add an application shortcut to Start screen: 1) Connect two computers as described in Use Cable or ᙑᎄ!ބլࠩᅃࠐᄭΖ.2) Sync two computers as described in 1st USB Sync.3) On the PC, from ActiveSync’s menu bar, select Tools | Explore Pocket PC, or from its toolbar, press Explore button.The mobile computer’s internal storage’s root directory “Mobile Device” opens presenting a few folders (and files).](https://usermanual.wiki/CipherLab/CP60.User-Manual/User-Guide-1879477-Page-58.png)
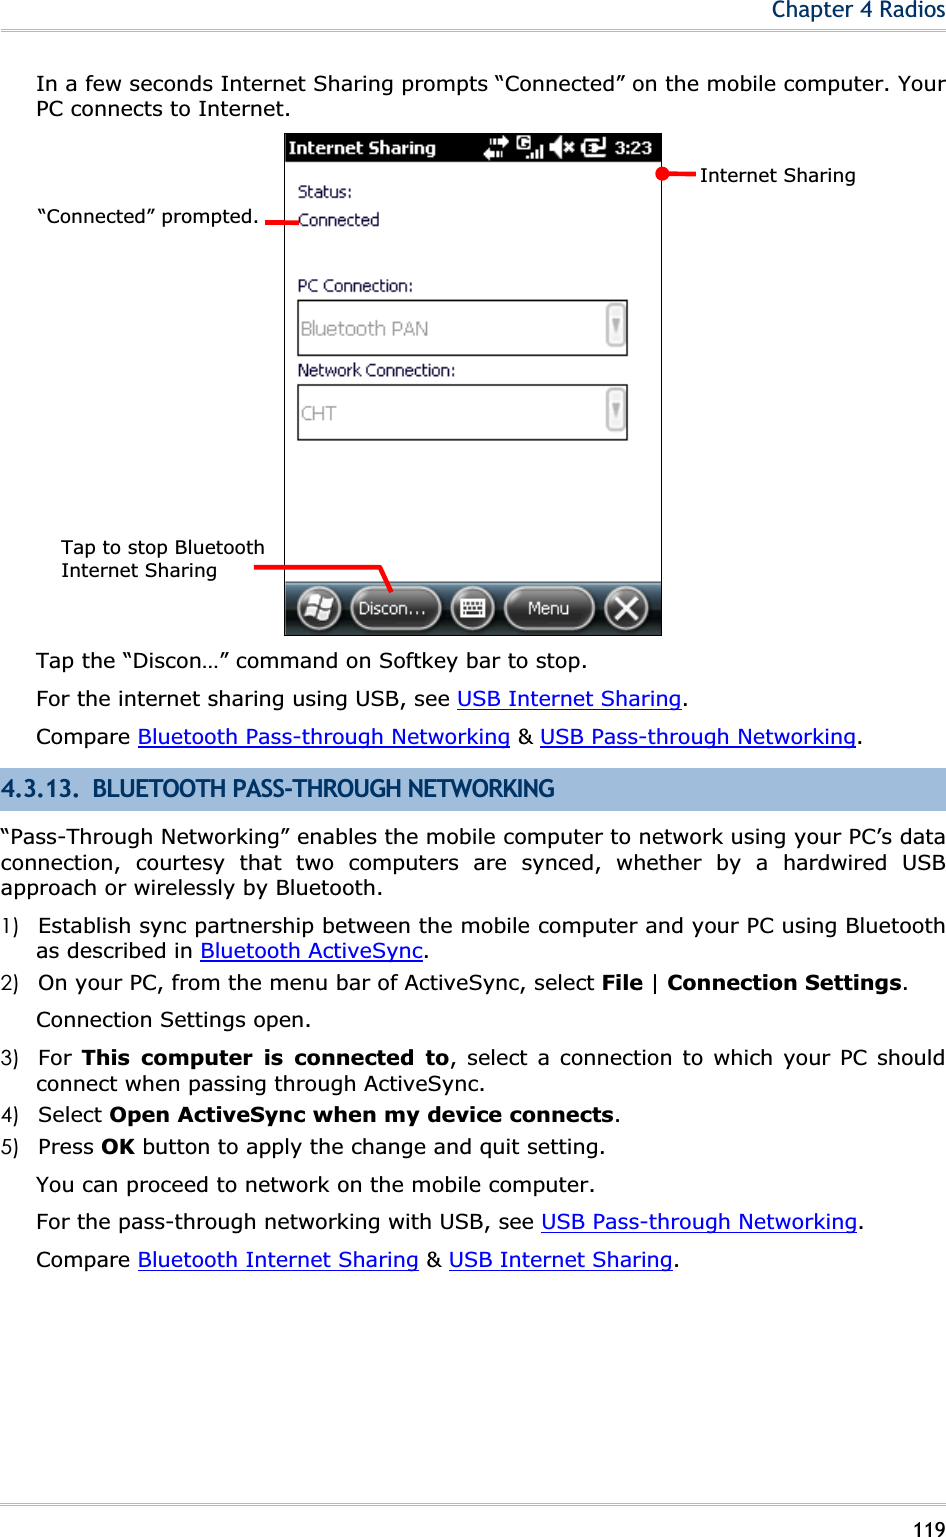
![50CP60 Mobile Computer Reference ManualYou can also add a file shortcut to Start screen right by the mobile computer. See Add Items to Start Screen for more details. REMOVE SHORTCUTS FROM START SCREEN Note the inherent shortcuts aren’t removable. Only the added shortcuts are removable. To remove an added shortcut from Start screen, simply use ActiveSync’s Explore to delete the shortcut from My Windows Mobile-Based Device\Windows\Start Menu\Programs folder. You can also remove an added shortcut from Start screen right by the mobile computer. See Remove Items from Start Screen for more details. CREATE NEW FOLDERS To create a new folder on the mobile computer: 1) Connect two computers as described in Use Cable or ᙑᎄ!ބլࠩᅃࠐᄭΖ.2) Sync two computers as described in 1st USB Sync.On the PC, from ActiveSync menu bar, select Tools | Explore Pocket PC, or from its toolbar, press Explore button. The mobile computer’s internal storage root directory “Mobile Device” opens presenting a few folders (and some files). 3) Browse where you want to create a folder. 4) Right-click any vacant spot there. Context menu opens 5) Select New Folder.A new folder is created. BACKUP DATA To best protect your work, back up regularly the data on your mobile computer. Manually back up using ActiveSync by either “Synchronization Relationship” or “Temporary Relationship” with simple copy & paste to back up files to your PC. USB PASS-THROUGH NETWORKING ActiveSync supports “Pass-Through Networking” whereby the mobile computer networks using your PC’s data connection. For security, disable the network bridging on the PC, especially the bridging to a Remote NDIS adapter. For more information on network bridging, see Windows Help on the PC. After sync partnership is up between the mobile computer and your PC: 1) On your PC, from the menu bar of ActiveSync, select File | Connection Settings.[Connection Settings] window opens. 2) For This computer is connected to, select a network which your PC should connect to when passing through ActiveSync. Options are:](https://usermanual.wiki/CipherLab/CP60.User-Manual/User-Guide-1879477-Page-60.png)
![53Chapter 1 Use Mobile Computer[Volume] dialog opens presenting the gauges for system volume and phone ringer volume. Two radio buttons [On] and [Off] are featured on the right. Select [On] or [Off] to enable or mute both volumes. 3) Adjust to the setting that meets your needs. Adjusts system volume Manufactory reserve[On] and [Off] enables or mutes both system and phone ringer volumes Onscreen volume facility](https://usermanual.wiki/CipherLab/CP60.User-Manual/User-Guide-1879477-Page-63.png)
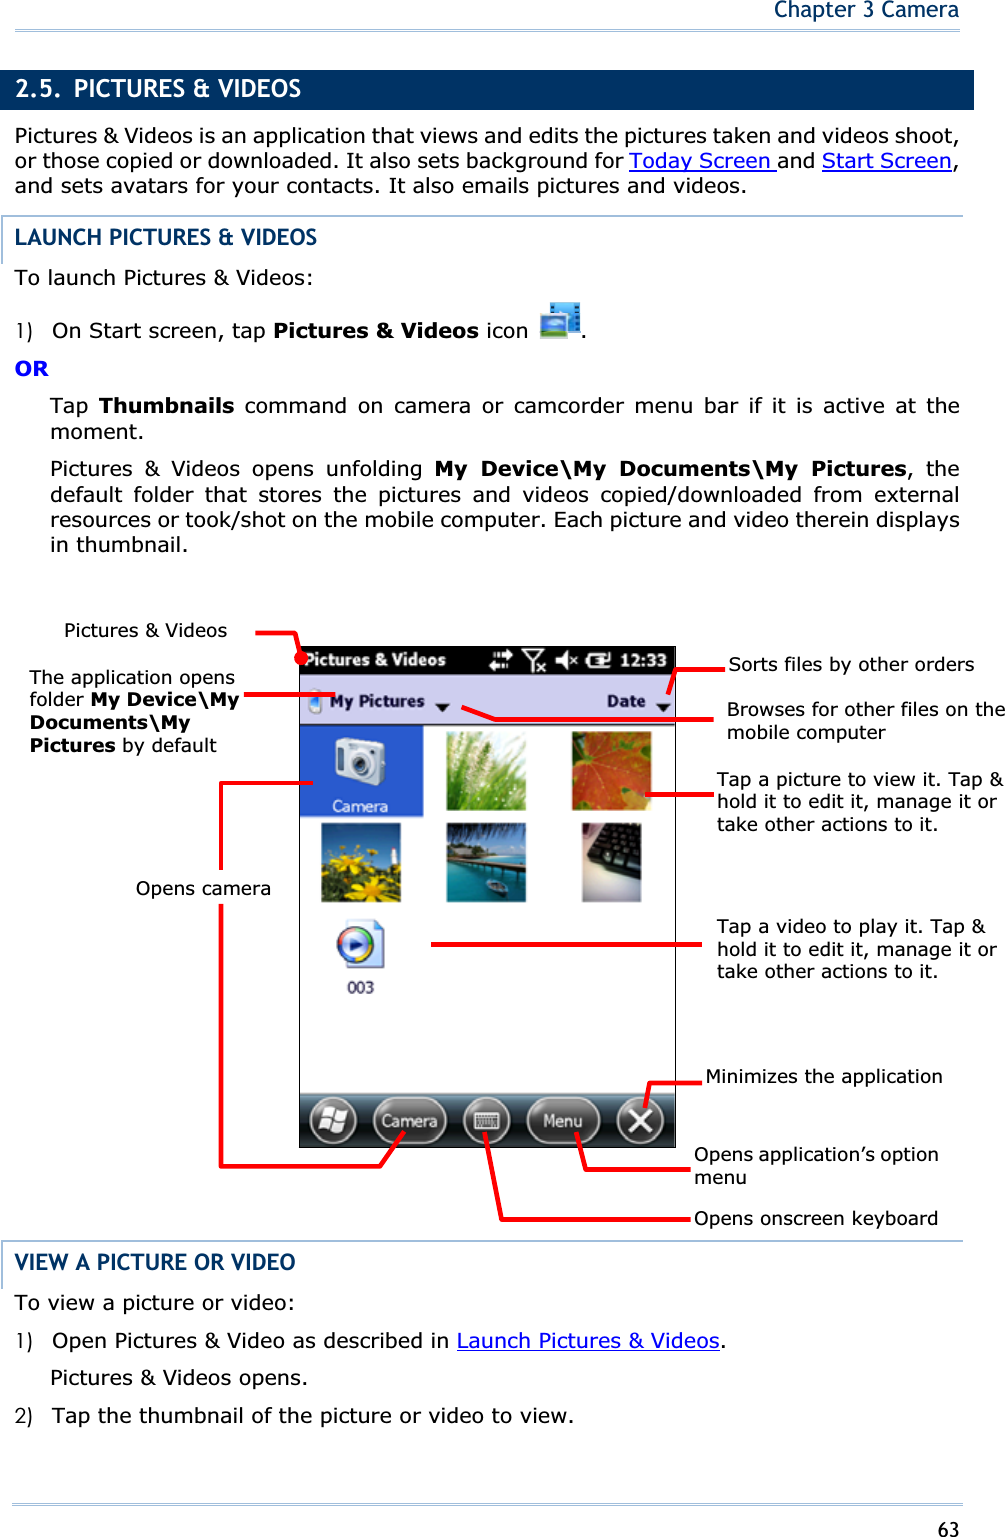
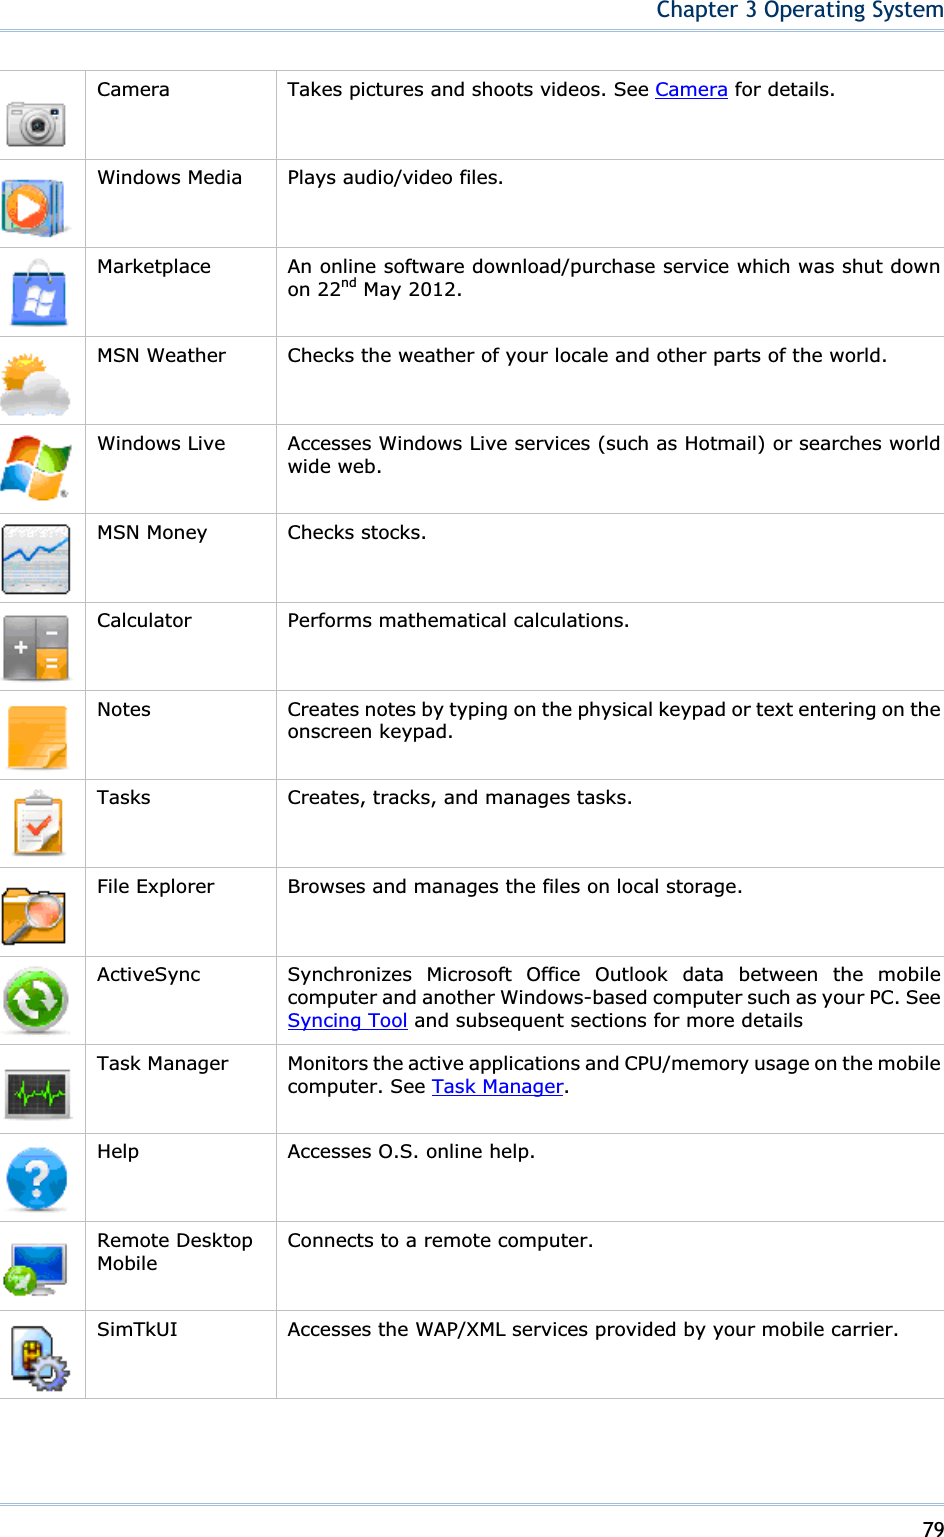
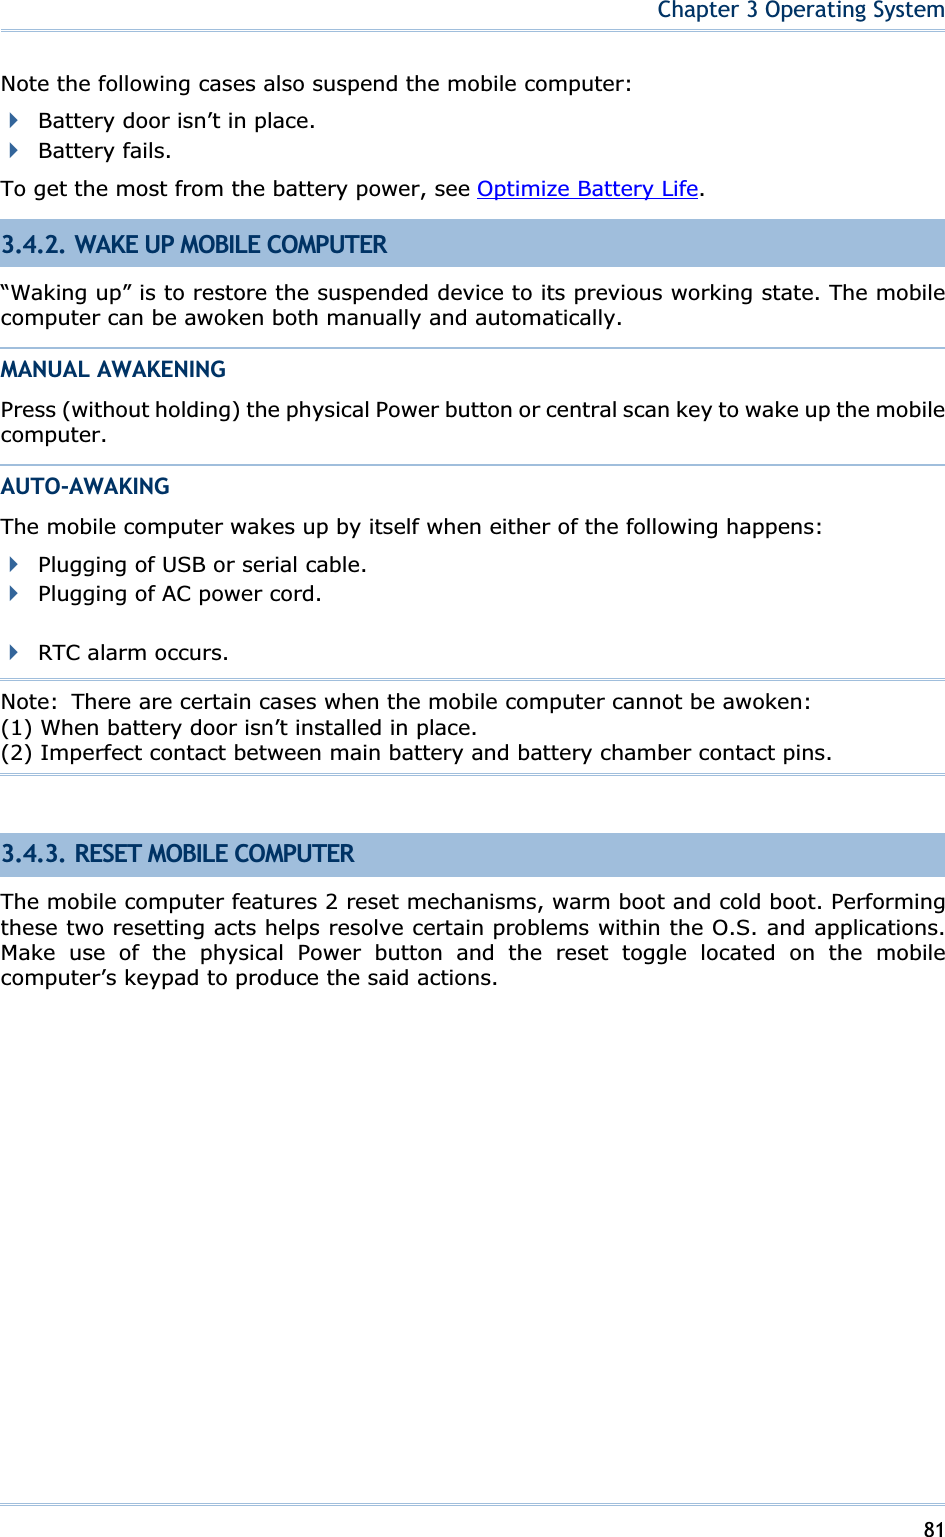
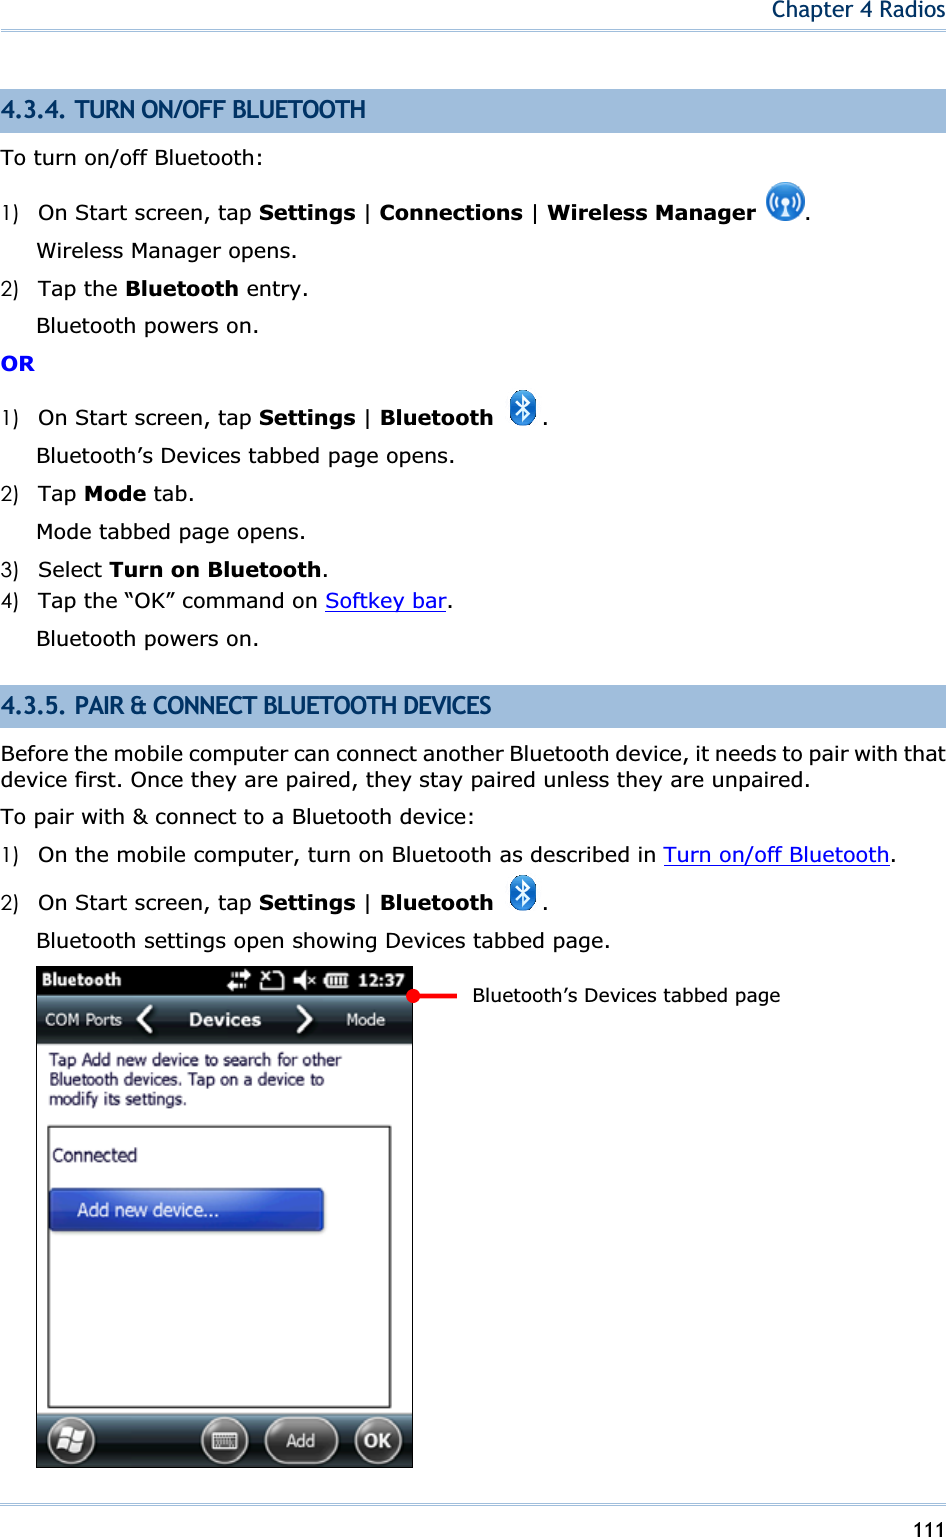
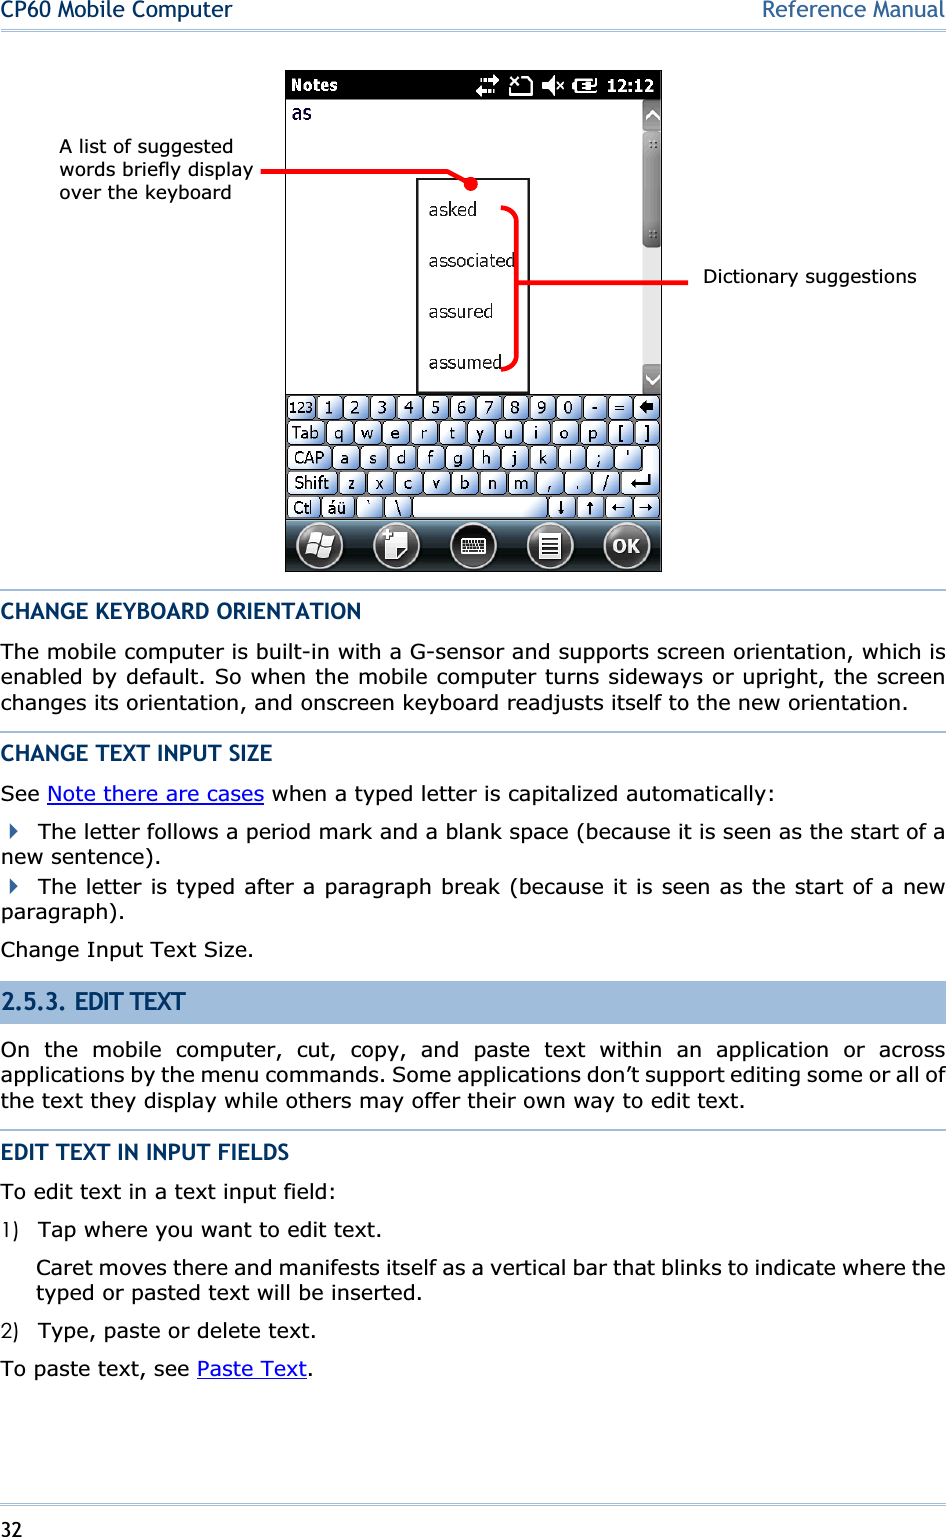
![82CP60 Mobile Computer Reference ManualFigure 12: Reset WARM BOOT (SOFT RESET) “Warm boot” is also known as “soft reset”. When the mobile computer runs slower than normal or when one or more active applications crash, perform warm boot to close all active applications and restart the mobile computer without turning off power supply to hardware. After warm boot, all flash memory, system settings and clock/calendar time are kept, and all saved data are preserved. However unsaved data is gone after warm boot if the warm boot is performed when the application in question is still running. To perform “warm boot”: Poke the reset toggle using the stylus. COLD BOOT (HARD RESET) “Cold boot” is also known as “hard reset”. In case one or more applications are misbehaving and the mobile computer doesn’t cooperate, perform cold boot as the final act. “Cold boot” restarts the mobile computer by turning power off just like pulling the battery and then powering on again. As “Cold boot” initializes DRAM, all data cached in DRAM is gone after cold boot. However all flash memory, system settings and clock/calendar time are preserved. To perform “cold boot”: Press and hold the physical Power button and poke the reset toggle. Note Power button should be held down and not released until the mobile computer powers on again. ORSimply reload main battery and re-power on the mobile computer. [1] Power button [2] Reset toggle](https://usermanual.wiki/CipherLab/CP60.User-Manual/User-Guide-1879477-Page-92.png)