CipherLab M0010 Terminal User Manual
CipherLab Co., Ltd. Terminal
UserManual.wiki
>
CipherLab
>
M0010 User Manual
>
Users manual 1
Contents
1.
Users manual 1
2.
Users manual 2
Users manual 1
Navigation menu
Upload a User Manual
Namespaces
Wiki Guide
HTML
PDF
Info
Views
User Manual
Discussion / Help
Navigation


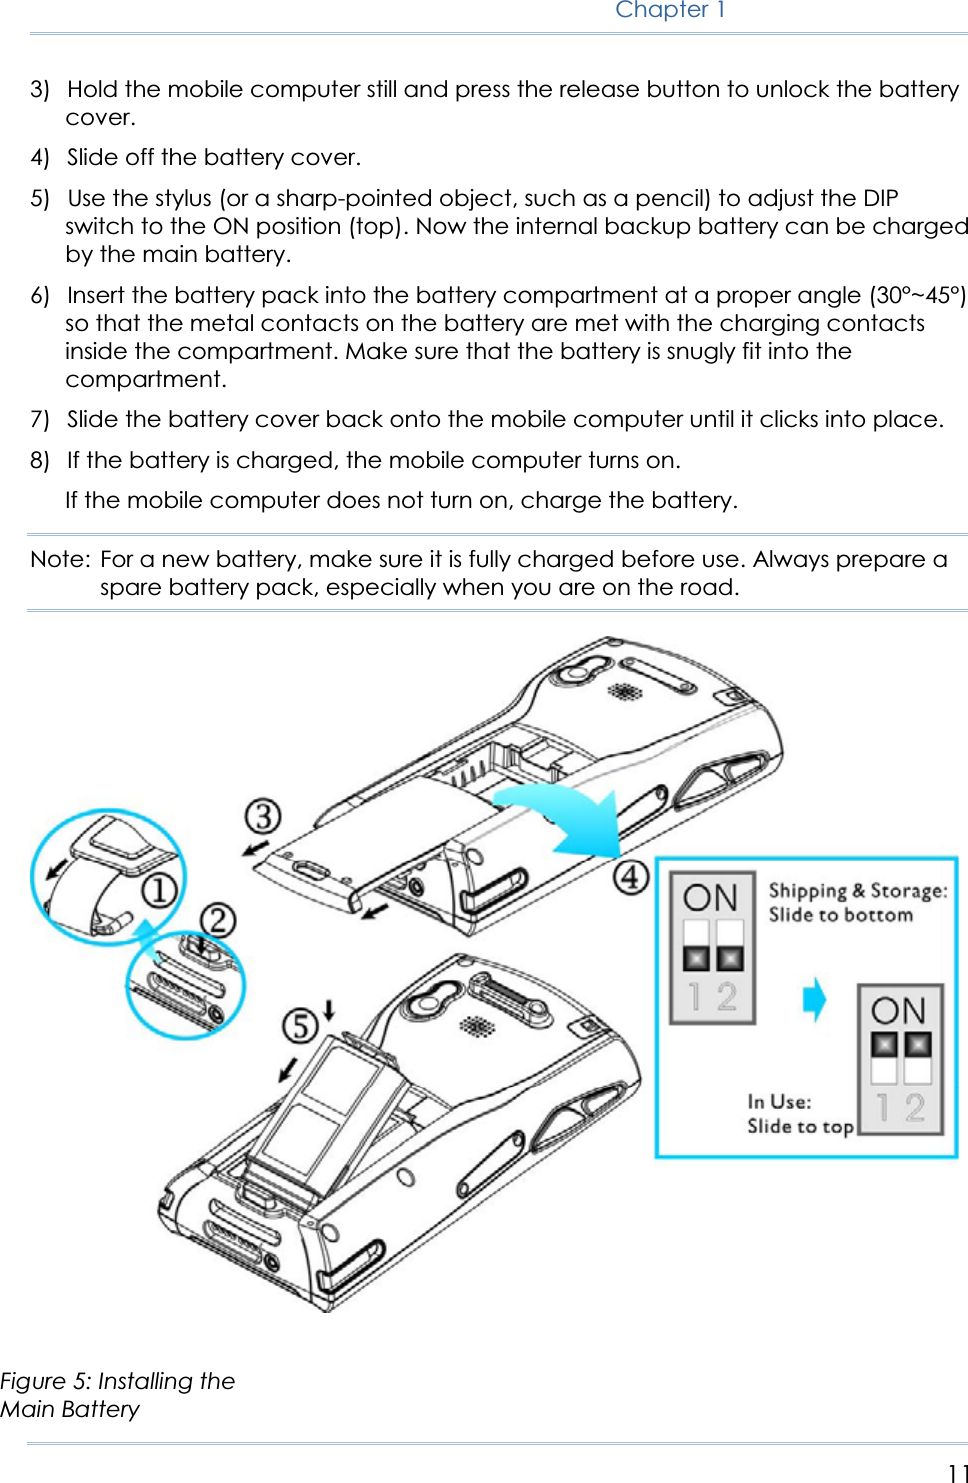
![19Chapter 1Note: Functionality of keys is application-dependent. 1.3.1 USING THE KEYPAD PRESS FIRST, AND THEN The LED backlight of keypad is turned off by default. It can be toggled ON/OFF by the key combination: [Func] + [0]. START > SETTINGS > CONTROL PANEL AND DOUBLE-TAP THE KEYBOARD ICON The Character Repeat functionality is enabled by default. You may cancel the check box to disable it. When enabled, tap, hold, and drag the slider for a desired Repeat Delay and Repeat Rate. Warning: It is suggested to turn on the keypad backlight while working in a dark area; however, using backlight while on battery power will substantially reduce battery life. 1.3.2 ALPHA KEY This alphanumeric keypad is set to numeric mode by default. The Alpha key serves as a toggle among numeric, alpha (lower-case alphabetic), and ALPHA (upper-case alphabetic) input modes. Note: It is not necessary to hold down the [Alpha] key. The alpha icon will appear on the status bar in a sequence as shown below. STATUS ICONALPHA KEY INPUT MODE N/A Numbers Press one time Small letters Press two times Capital letters Note: If you are using the software keypad via SIP, tap CAP (Caps Lock) to toggle between upper case and lower case alphabetic modes. Figure 7: 28-key Layout](https://usermanual.wiki/CipherLab/M0010.Users-manual-1/User-Guide-850574-Page-29.png)
![20Terminal Reference Manual1.3.3 FUNCTION KEY The [Func] (function) key serves as a modifier key. 1) To enable this modifier key, press on the keypad. A circular icon of the letter "F" will appear on the status bar. This modifier key is hold down as long as the icon is displayed. 2) Now press another key to get the value of key combination (say, press [1] to get the value of F1). The icon will go off now. 3) To get the value of another key combination modified by the [Func] key, repeat the above steps. 4) To abort the key modification, press again, and the icon will go off. Note: It is not necessary to hold down the [Func] key. The functionality of each key combination is application-dependent. Below is a list of the factory setting for a variety of key combinations. KEY COMBINATION ACTION ,PgUp (red-coded): move text up one screenful ,PgDn (red-coded): move text down one screenful ,Home (red-coded): move to the beginning of screen or document ,End (red-coded): move to the end of screen or document ,Toggle ON/OFF the backlight of keypad only ,Turn ON the backlight of LCD and decrease its luminosity ,Turn ON the backlight of LCD and increase its luminosity Note: Press the [Func] key first, and then press the second key for a specific function.](https://usermanual.wiki/CipherLab/M0010.Users-manual-1/User-Guide-850574-Page-30.png)
![22Terminal Reference ManualThe LED backlight of screen, which helps ease reading under dim environments, can be controlled manually and automatically. Warning: Using backlight while on battery power will substantially reduce battery life. It is suggested to dim the backlight while working in a well-lit area or automatically turn off the mobile computer when not in use. 1.4.1 ADJUSTING THE BACKLIGHT PRESS FIRST, AND THEN The LED backlight of the screen can be turned on and adjusted decreasingly by the key combination: [Func] + [-]. Keep pressing the key combination ([Func] first, and then [-]) until the luminosity is decreased to a desired level. PRESS FIRST, AND THEN The LED backlight of the screen can be turned on and adjusted increasingly by the key combination: [Func] + [.]. Keep pressing the key combination ([Func] first, and then [.]) until the luminosity is increased to a desired level. START > SETTINGS > CONTROL PANEL AND DOUBLE-TAP THE DISPLAY ICON 1) Tap the Backlight tab (left below). 2) Select one or both of the check boxes to automatically turn off the LCD backlight when using batteries or external power. From the appropriate list, select the amount of time the device should be idle before the backlight is turned off.](https://usermanual.wiki/CipherLab/M0010.Users-manual-1/User-Guide-850574-Page-32.png)
![23Chapter 13) Tap the [Advanced] button (right above). 4) In the Settings tab, you can select the luminosity of backlight when it is set to be automatically turned on by pressing any key or tapping the screen. Tap, hold, and drag the slider for AC and battery powered respectively. For more luminosity, move the slider to the right.](https://usermanual.wiki/CipherLab/M0010.Users-manual-1/User-Guide-850574-Page-33.png)
![24Terminal Reference Manual1.4.2 RE-CALIBRATING THE SCREEN This LCD is also a touch screen that can be calibrated through screen alignment. START > SETTINGS > CONTROL PANEL AND DOUBLE-TAP THE STYLUS ICON Tap the Calibration tab, and then tap the [Recalibrate] button. Warning: DO NOT use any pointed or sharp objects to move against the surface of the screen. 1.5 NOTIFICATIONS 1.5.1 STATUS LED The tri-color LED on top is used to provide information on the charging status or wireless power status. TASKS GREEN LED RED LED BLUECharging 9400 --- On ---](https://usermanual.wiki/CipherLab/M0010.Users-manual-1/User-Guide-850574-Page-34.png)


![35Chapter 2UNDERSTANDING THE ICONS ON THE TASKBAR ICON DESCRIPTION SEE ALSO The USB connection for ActiveSync operation is successfully established. Double-tap it to view status. Tap [Disconnect] if necessary. 3.2.1 USB Connection (via cradle) The Bluetooth PAN connection fails. (= disconnected) The Bluetooth PAN connection is successfully established through the Bluetooth Manager utility. Double-tap it to view or renew IP Information. 3.2.4 BTPAN It provides control of the power to the 802.11b/g modules. Double-tap any of these icons to configure the power setting. It indicates the Wi-Fi module (802.11b) is enabled. See WLAN1 status icons below. 4.1 Wireless Power Manager The Wi-Fi connection fails. (= disconnected) Double-tap it to access the Wireless Information tab for establishing a new connection. The Wi-Fi connection is successfully established. Double-tap it to view or renew IP & Wireless Information. 3.2.3 WLAN It provides access to the Bluetooth services. Initially, you need to go to Start > Programs > BTManager to open the Bluetooth Manager so that this icon will appear on the taskbar. 4.2 Bluetooth ManagerIt provides access to the Reader Configuration Utility. Initially, you need to double -tap the ReaderConfig shortcut on the desktop so that this icon will appear on the taskbar. Tap it to change the input method. Software Input Panel (SIP)Tap it to switch to desktop or any task, such as a running program or window. Switch Task It indicates the battery status. The other icons are .1.1.3 Understanding the Battery icons](https://usermanual.wiki/CipherLab/M0010.Users-manual-1/User-Guide-850574-Page-45.png)
![41Chapter 2Connect the USB cable from the cradle's USB device port ( ) to your computer. Connect the power cable from the cradle to a nearby power outlet. Turn on the mobile computer and seat it in the cradle. 2) Your computer will automatically detect the USB device. Click [OK] when the connection is established. 3) Select which partnership to set up. If you want to synchronize data between the mobile computer and your personal computer, select Standard Partnership; otherwise, select Guest Partnership. 4) Wait a few seconds for the mobile computer to get connected (and synchronized if a Standard Partnership is selected). Note: (1) For ActiveSync via Bluetooth, refer to the Bluetooth Manager. (2) We recommend that you have ActiveSync 3.7.1 installed on your computer because ActiveSync 4.x does not officially support Windows CE 5.0 devices. 2.3.2 ADD/REMOVE PROGRAMS Click [Add/Remove Programs] from the Tools Menu so that you can proceed to install a program that is designed to be used on a mobile device running Windows CE. If a user program is no longer desired, you may remove it from the system. Click [Add/Remove Programs] from the Tools Menu so that you can proceed to un-install a program that is designed to be used on a mobile device running Windows CE.](https://usermanual.wiki/CipherLab/M0010.Users-manual-1/User-Guide-850574-Page-51.png)
![42Terminal Reference ManualALTERNATIVE TO INSTALL NEW PROGRAMS (COPY & PASTE) Alternatively, you may install a new program manually. 1) When connected, open the Microsoft ActiveSync window on your desktop computer. 2) Click the Explorer button from the toolbar. 3) Navigate to the target folder, e.g. the Programs folder, depending on where you wish to access the program. 4) Navigate through file folders on your computer to find the new program (.CAB, .EXE, etc.) 5) Right-click the program and select [copy] from the pop-up menu. 6) Back to the target folder in step 3. Right-click anywhere blank and select [Paste] from the pop-up menu. 7) On the mobile computer, go to Start > Programs and the new program will appear.ALTERNATIVE TO REMOVE PROGRAMS (CONTROL PANEL) Alternatively, you may un-install a new program manually. 1) Go to Start > Settings > Control Panel and select Remove Programs.2) Tap the name of the program that you want to delete. 3) Tap [Remove]. 4) Tap [Yes] to un-install the program. Note: If the program does not appear in the list of installed programs, you may use Windows Explorer to locate it. Tap and hold the program to select [Delete] from the pop-up menu.](https://usermanual.wiki/CipherLab/M0010.Users-manual-1/User-Guide-850574-Page-52.png)
![44Terminal Reference ManualIf you wish to quick launch a new program, add it to the Programs folder: MyDevice\Windows\Programs. The program will become available in the Start Menu.To add a new program or subfolder to the Programs folder, you can either use Windows Explorer or ActiveSync.Windows Explorer: to move the program by [Copy] and [Paste Shortcut]. ActiveSync on the desktop computer: to create a shortcut to the program, and place the shortcut in the Programs folder. Warning: To avoid making any changes to the program configurations by accident, we recommend you to use [Copy] and [Paste Shortcut] rather than [Cut] and [Paste]. USING WINDOWS EXPLORER TO ADD A PROGRAM TO START MENU 1) Go to Start > Programs and select Windows Explorer.2) Navigate through file folders to find the program you desire. 3) Tap and hold the program to select [Copy] from the pop-up menu (left below).](https://usermanual.wiki/CipherLab/M0010.Users-manual-1/User-Guide-850574-Page-54.png)
![45Chapter 24) Navigate to the Programs folder – My Device\Windows\Programs (right above). 5) Tap and hold anywhere blank on the screen to select [Paste Shortcut] from the pop-up menu. The new program will be added to the Programs folder. 6) Go to Start > Programs and the new program will appear now. USING ACTIVESYNC TO ADD A PROGRAM TO START MENU 1) When connected, open the Microsoft ActiveSync window on your desktop computer.](https://usermanual.wiki/CipherLab/M0010.Users-manual-1/User-Guide-850574-Page-55.png)
![46Terminal Reference Manual2) Click the Explorer button from the toolbar. 3) Navigate through file folders to find the program you desire. 4) Right-click the program and select [Create Shortcut] from the pop-up menu. 5) Right-click the shortcut and select [Cut] from the pop-up menu. 6) Navigate to the Programs folder – My Device\Windows\Programs.7) Right-click anywhere blank on the window and select [Paste] from the pop-up menu. The new program will be added to the Programs folder. 8) On the mobile computer, go to Start > Programs and the new program will appear now. Note: [Create Shortcut], [Cut], and [Paste]: The same result can be performed by [Copy] and [Paste Shortcut].](https://usermanual.wiki/CipherLab/M0010.Users-manual-1/User-Guide-850574-Page-56.png)
![47Chapter 22.4.2 CREATE A FOLDER USING WINDOWS EXPLORER TO ADD A NEW FOLDER 1) Go to Start > Programs and select Windows Explorer.2) Navigate through file folders to find where you wish to create a new folder. 3) Right-click anywhere blank on the window and select [New Folder] from the pop-up menu. A subfolder will be created. USING ACTIVESYNC TO ADD A NEW FOLDER 1) When connected, open the Microsoft ActiveSync window on your desktop computer. 2) Click the Explorer button from the toolbar. 3) Navigate to the target folder where you wish to create a new folder. 4) Right-click anywhere blank on the window and select [New Folder] from the pop-up menu. A subfolder will be created. 2.4.3 SWITCH AMONG PROGRAMS AND DESKTOP Tap to the right of the taskbar and select a running program. 2.4.4 EXIT A PROGRAM In general, the system manages memory automatically, and there is no need to exit a program in order to open another or to conserve memory. However, random access memory (SDRAM) may be used up when running too many programs. As a result, it will slow down the operation or cause program errors. In that case, you should stop one or more running programs to free memory. In order to use memory in a more efficient way, you are recommended to exit a program when it is not desired any longer. Warning: Always remember to save data or settings before you exit a program.](https://usermanual.wiki/CipherLab/M0010.Users-manual-1/User-Guide-850574-Page-57.png)