CipherLab MR00002 Mobile Computer User Manual rev2
CipherLab Co., Ltd. Mobile Computer rev2
User manual_rev2.pdf

1
RS31
BHT-1600
Mobile Computer
(Android™ 6.0, Marshmallow)
Version 1.02
;YKX3GT[GR
The software contains proprietary information of its owner; it is provided under a license
agreement containing restrictions on use and disclosure and is also protected by copyright
law. Reverse engineering of the software is prohibited.
Due to continued product development, this information may change without notice. The
information and intellectual property contained herein is confidential between the owner
and the client and remains the exclusive property of the owner. If having any problems in
the documentation, please report them to us in writing. The owner does not warrant that
this document is error-free.
No part of this publication may be reproduced, stored in a retrieval system, or transmitted
in any form or by any means, electronic, mechanical, photocopying, recording or otherwise
without the prior written permission of the owner.
For product consultancy and technical support, please contact the local sales
representative. Also, visit our website for more information.
All brand, logo, product and service, and trademark names are the property of their
registered owners.
Google, Google Play, Android and other marks are trademarks of Google Inc.
The editorial use of these names is for identification as well as to the benefit of the owners,
with no intention of infringement.

IMPORTANT NOTICES
FOR USA
FCC ID : Q3N-MR00002
This equipment has been tested and found to comply with the limits for a Class B digital
device, pursuant to Part 15 of the FCC Rules. These limits are designed to provide
reasonable protection against harmful interference in a residential installation. This
equipment generates, uses and can radiate radio frequency energy and, if not installed and
used in accordance with the instructions, may cause harmful interference to radio
communication. However, there is no guarantee that interference will not occur in a
particular installation. If this equipment does cause harmful interference to radio or
television reception, which can be determined by turning the equipment off and on, the user
is encouraged to try to correct the interference by one or more of the following measures:
Reorient or relocate the receiving antenna.
Increase the separation between the equipment and receiver.
Connect the equipment into an outlet on a circuit different from that to which
the receiver is connected.
Consult the dealer or an experienced radio/TV technician for help.
This device complies with Part 15 of the FCC Rules. Operation is subject to the following
two conditions: (1) This device may not cause harmful interference, and (2) this device
must accept any interference received, including interference that may cause undesired
operation.
FCC Caution:
Any changes or modifications not expressly approved by the party responsible for
compliance could void the user's authority to operate this equipment.
This transmitter must not be co-located or operating in conjunction with any other
antenna or transmitter.
Find the certificate information from :
Setup
Æ
About Phone
Æ
Certificate
Tested to Comply
with FCC Standards
FOR HOME OR OFFICE USE

FOR HAC AND ACOUSTIC INFORMATION
This phone has been tested and rated for use with hearing aids for some of the wireless
technologies that it uses. However, there may be some newer wireless technologies used in
this phone that have not been tested yet for use with hearing aids. It is important to try the
different features of this phone thoroughly and in different locations, using your hearing aid
or cochlear implant, to determine if you hear any interfering noise. Consult your service
provider or the manufacturer of this phone for information on hearing aid compatibility. If
you have questions about return or exchange policies, consult your service
To determine the compatibility of a WD and a particular hearing aid, simply add the
numerical part of the hearing aid category (e.g. M2/T2=2) with the numerical part of the WD
emission rating (e.g., M3=3) to arrive at the system classification for this particular
combination of WD and hearing aid. A sum of 5 would indicate that the WD and hearing aid
would provide normal use, and a sum of 6 or greater would indicate that the WD and hearing
aid would provide excellent performance. A category sum of less than 4 would likely result in
a performance that is judged unacceptable by the hearing aid user.
WHAT IS HEARING AID COMPATIBILITY?
The Federal Communications Commission has implemented rules and a rating system
designed to enable people who wear hearing aids to more effectively use these wireless
telecommunications devices. The standard for compatibility of digital wireless phones with
hearing aids is set forth in American National Standard Institute (ANSI) standard C63.19.
There are two sets of ANSI standards with ratings from one to four (four being the best rating):
an “M” rating for reduced interference making it easier to hear conversations on the phone
when using the hearing aid microphone, and a “T” rating that enables the phone to be used
with hearing aids operating in the telecoil mode thus reducing unwanted background noise.
HOW WILL I KNOW WHICH WIRELESS PHONES ARE HEARING AID COMPATIBLE?
The Hearing Aid Compatibility rating is displayed on the wireless phone box.
A phone is considered Hearing Aid Compatible for acoustic coupling (microphone mode) if it
has an “M3” or “M4” rating. A digital wireless phone is considered Hearing Aid Compatible for
inductive coupling (telecoil mode) if it has a “T3” or “T4” rating.
The tested M-Rating and T-Rating for this device (FCC ID: Q3N-MR00002) are M4 and T4.
HOW WILL I KNOW IF MY HEARING AID WILL WORK WITH A PARTICULAR DIGITAL WIRELESS
PHONE?
You’ll want to try a number of wireless phones so that you can decide which works the best
with your hearing aids. You may also want to talk with your hearing aid professional about
the extent to which your hearing aids are immune to interference, if they have wireless
phone shielding, and whether your hearing aid has a HAC rating.
Warning statement:
A pleine puissance, l’écoute prolongée du baladeur peut endommager
l’oreille de l’utilisateur.
To prevent possible hearing damage, do not listen at high volume levels
for long periods.

FOR CANADA
This digital apparatus does not exceed the Class B limits for radio noise emissions from digital
apparatus as set out in the interference-causing equipment standard entitled "Digital Apparatus,"
ICES-003 of Industry Canada.
Cet appareil numerique respecte les limites de bruits radioelectriques applicables aux appareils
numeriques de Classe B prescrites dans la norme sur le material brouilleur: "Appareils Numeriques,"
NMB-003 edictee par l'Industrie.
IC : 5121A-MR00002
This device complies with Industry Canada’s licence-exempt RSSs. Operation is subject to the
following two conditions:
(1) This device may not cause interference; and
(2) This device must accept any interference, including interference that may cause undesired
operation of the device.
Le présent appareil est conforme aux CNR d’Industrie Canada applicables aux appareils radio exempts
de licence. L’exploitation est autorisée aux deux conditions suivantes :
(1) l’appareil ne doit pas produire de brouillage;
(2) l’utilisateur de l’appareil doit accepter tout brouillage radioélectrique subi, même si le brouillage est
susceptible d’en compromettre le fonctionnement.
The device meets the exemption from the routine evaluation limits in section 2.5 of RSS 102 and
compliance with RSS-102 RF exposure, users can obtain Canadian information on RF exposure and
compliance.
Le dispositif rencontre l'exemption des limites courantes d'évaluation dans la section 2.5 de RSS 102 et
la conformité à l'exposition de RSS-102 rf, utilisateurs peut obtenir l'information canadienne sur
l'exposition et la conformité de rf.
Find the certificate information from :
Setup
Æ
About Phone
Æ
Certificate
Caution :
(i) the device for operation in the band 5150-5250 MHz is only for indoor use to
reduce the potential for harmful interference to co-channel mobile satellite systems;
(ii) the maximum antenna gain permitted for devices in the bands 5250-5350 MHz
and 5470-5725 MHz shall be such that the equipment still complies with the e.i.r.p.
limit;
(iii) the maximum antenna gain permitted for devices in the band 5725-5850 MHz
shall be such that the equipment still complies with the e.i.r.p. limits specified for
point-to-point and non-point-to-point operation as appropriate; and
(iv) the worst-case tilt angle(s) necessary to remain compliant with the e.i.r.p. elevation
mask requirement set forth in Section 6.2.2(3) shall be clearly indicated.
(v) Users should also be advised that high-power radars are allocated as primary users
(i.e. priority users) of the bands 5250-5350 MHz and 5650-5850 MHz and that these
radars could cause interference and/or damage to LE-LAN devices.
Avertissement:
Le guide d’utilisation des dispositifs pour réseaux locaux doit inclure des instructions
précises sur les restrictions susmentionnées, notamment :
(i) les dispositifs fonctionnant dans la bande 5150-5250 MHz sont réservés
uniquement pour une utilisation à l’intérieur afin de réduire les risques de brouillage
préjudiciable aux systèmes de satellites mobiles utilisant les mêmes canaux;
(ii) le gain maximal d'antenne permis pour les dispositifs utilisant les bandes de 5250 à 5
350 MHz et de 5470 à 5725 MHz doit être conforme à la limite de la p.i.r.e;
(iii) le gain maximal d'antenne permis (pour les dispositifs utilisant la bande de 5 725 à 5
850 MHz) doit être conforme à la limite de la p.i.r.e. spécifiée pour l'exploitation point à
point et l’exploitation non point à point, selon le cas;
(iv) les pires angles d’inclinaison nécessaires pour rester conforme à l’exigence de la
p.i.r.e. applicable au masque d’élévation, et énoncée à la section 6.2.2 3), doivent être
clairement indiqués.
(v) De plus, les utilisateurs devraient aussi être avisés que les utilisateurs de radars de
haute puissance sont désignés utilisateurs principaux (c.-à-d., qu’ils ont la priorité)
pour les bandes 5250-5350 MHz et 5650-5850 MHz et que ces radars pourraient
causer du brouillage et/ou des dommages aux dispositifs LAN-EL.
FOR PRODUCT WITH LASER
This laser component emits FDA / IEC Class 2 laser light at
the exit port. Do NOT STARE INTO BEAM DIRECTLY.
Do not aim the beam at the eyes.
Any adjustments or performance excluding those specified may
result in hazardous laser light exposure.
ENVIRONMENT
Operate the handy terminal at ambient temperatures from -20 °C to 50 °C
and with humidity range from 10% to 90%.
Store the device at ambient temperatures from -30 °C to 70 °C and with
humidity range from 5% to 95%.
Charge the device at ambient temperatures from 0°C to 35°C.
This device is built with a dust-proof and splash-proof structure that
conforms to protection class IP67.
SPECIFIC ABSORPTION RATE (SAR) INFORMATION
The product complies with the FCC / Canada portable RF exposure limit set forth for an
uncontrolled environment and are safe for intended operation as described in this manual.
The further RF exposure reduction can be achieved if the products can be kept as far as
possible from the user body or set the device to lower output power if such function is
available.
A minimum separation distance of 0.5 cm must be maintained between the user’s body and the
device, including the antenna during body-worn operation to comply with the RF exposure
requirements in Europe.
To compliance with RF Exposure requirements in Europe, third-party belt-clips, holsters or similar
accessories used by this device should not contain any metallic components. The use of accessories
that do not satisfy these requirements may not comply with RF exposure requirements, and should be
avoided.
CE SAR Value (Standard limit is 2 W/Kg)
EU (10g): Max. 1.32 W/Kg
SAFETY PRECAUTIONS
RISK OF EXPLOSION IF BATTERY IS REPLACED BY AN INCORRECT TYPE.
DISPOSE OF USED BATTERIES ACCORDING TO THE INSTRUCTIONS.
For people’s safety
For body-worn operating conditions please use belt-clips, holsters, and/or accessories
that have
no metallic component in the assembly and must provide at least 1cm separation between the device
and the user's body.

Do not listen at high volume levels for long periods to prevent possible
hearing damage.
Do not operate this device while walking, cycling or car driving.
For the equipment
Do not use any batteries or charging devices which are not originally sold
Do not replace the battery with an incorrect type, to avoid the risk of heat
generation, fire, or explosion.
Do not disassemble, incinerate or short circuit the battery.
Do not touch the contact pins of the battery pack.
Do not expose the handy terminal or battery to any flammable sources.
Do not expose the handy terminal to extreme temperatures or soak it in
water.
Do not use any pointed or sharp objects against the screen surface.
Do not use the styluses which are not supplied, to prevent possible scratches
to the touch screen.
Water residue on the touch screen may cause abnormal behaviors or the fall
of its sensitivity levels.
On the surface of the terminal and the barcode reading window, the fog or
water drops caused by low temperatures may influence barcode reading.
Do not use bleaches or cleaners to clean the device. Use a clean, wet cloth
instead.
BATTERY
The main battery may not be charged to full for shipment. Charge the main
battery to full before using the handy terminal for the first time.
Main battery: The main battery powers the handy terminal to work. It takes
approximately 4 hours to charge an empty main battery to full. The charging LED
above the screen will light up in red while charging and will turn green when charging
is complete.
When the main battery is removed, RTC retention will be maintained for at
least 30 minutes.
Backup battery: The backup battery is mounted on the main board. Its role is
to temporarily keep the handy terminal in suspension when the main battery is drained
out so data in DRAM will be retained. The backup battery takes approximately 3.5
hours to charge to full by the main battery or power adapter.
It is recommended to charge the battery at room temperature (18°C to 25°C)
for optimal performance.
Battery charging stops when ambient temperature drops below 0°C or
exceeds 40°C.
In order to prevent system from shutting down after the battery is drained
out, keep a fresh battery for replacement at all times, or connect the handy terminal to
an external power.
If there are drippings or dust on the device or battery pack, wipe them away
with a soft clean cloth before battery replacement.
Turn off the power before battery replacement.
If you want to put away the handy terminal for a period of time, remove the
battery pack from the handy terminal’s battery compartment. Store the handy
terminal and battery pack separately.
Recycle batteries in a proper way for the green-environment issue.

SCANNER
Scan a 1D barcode
1) Open ReaderConfig and tap Scan Test on the menu bar.
2) Aim the scanning window at the barcode to read. Move the device,
having the barcode located in the center of the scanning area.
3) Press any of the two side triggers. The scanning light beams to read the
printed barcodes. The buzzer beeps after scanning. The scanning light goes off once
the data is decoded, or when the decode timeout period has passed.
Scan a 2D barcode
1) Open ReaderConfig and tap Scan Test on the menu bar.
2) Aim the scanning window at the barcode to read. Move the device,
having the barcode located in the center of the scanning area.
3) Press any of the two side triggers. The scanning light beams to read the
printed barcodes. The buzzer beeps after scanning. The scanning light goes off once
the data is decoded, or when the decode timeout period has passed.

CONNECTION
Via Bluetooth or WLAN
Connection may fail when the handy terminal is around other wireless
machines or power cables as the radio frequencies of those may cause interferences.
If communication fails, move the devices much closer to each other, and try
to communicate again
After turning on, Bluetooth power is sustained even when the handy terminal
is suspended. However, if the power mode is switched to Airplane Mode, Bluetooth
power will be turned off regardless of the settings.
Not Charging could be the result of battery damage, battery’s failure to touch
the connector or AC plug coming off.
Charging error could be due to high battery temperature.
CARE & MAINTENANCE
This handy terminal is intended for industrial use. The handy terminal is rated
IP67, however, damage may be done to the handy terminal if it is exposed to extreme
temperatures or soaked in water.
When the body of the handy terminal gets dirty, use a clean, wet cloth to
wipe off dust and debris. DO NOT use bleaches or cleaners.
Use a clean, non-abrasive, lint-free cloth to wipe dust off the LCD touch
screen. DO NOT use any pointed or sharp objects against the surface. Always keep the
LCD dry.
If you want to put away the handy terminal for a period of time, download the
collected data to a host computer, and then remove the battery pack from the handy
terminal’s battery compartment. Store the handy terminal and battery pack
separately.
If you encounter malfunction on the handy terminal, write down the specific
scenario and consult your local sales representative.
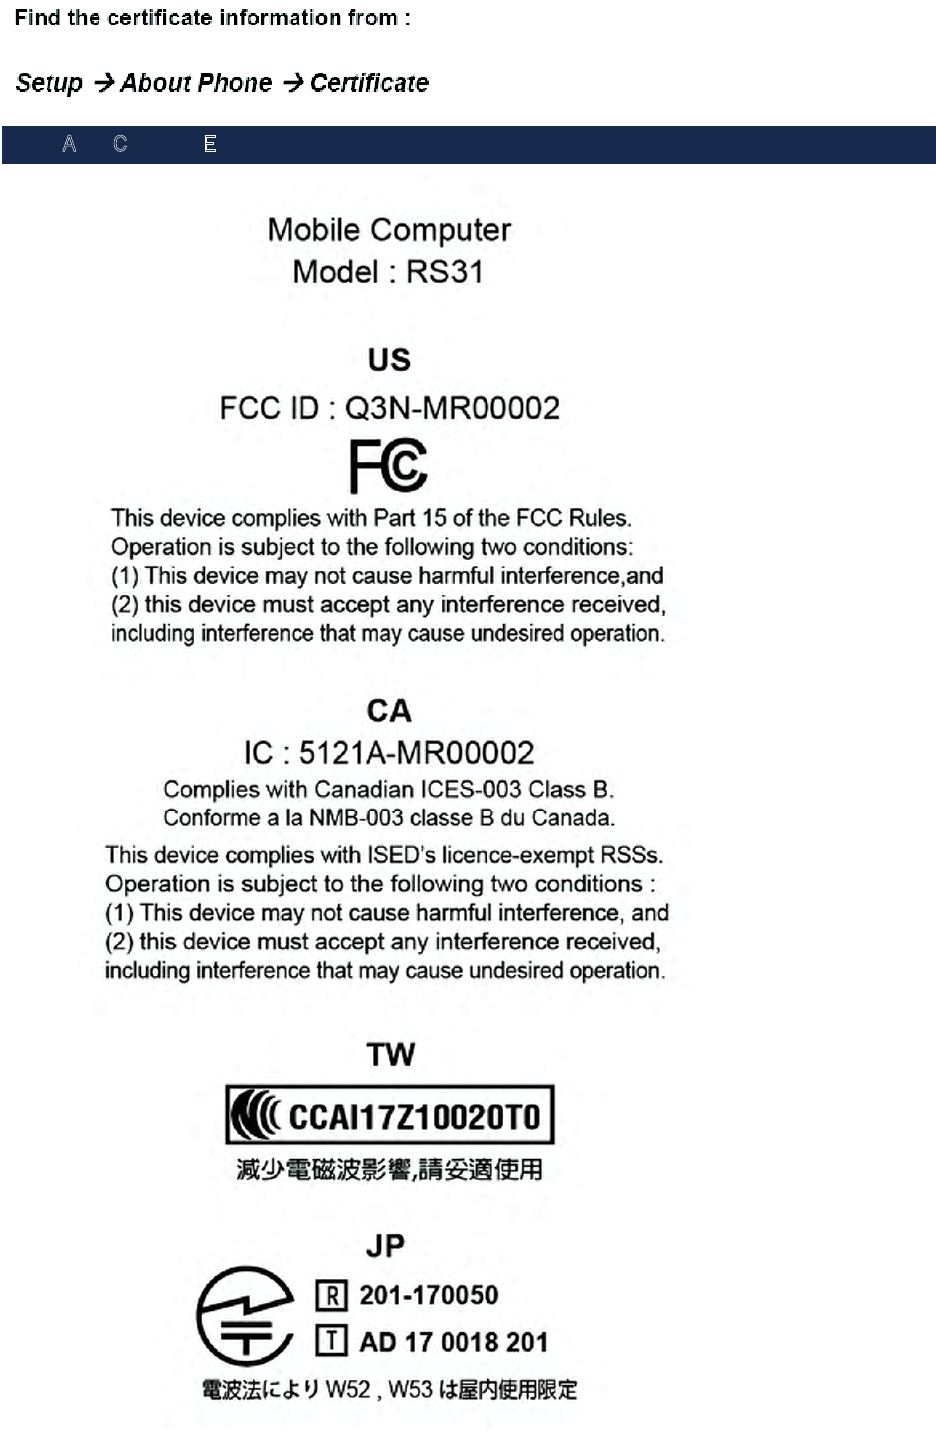
USA AND CANADA E-LABEL
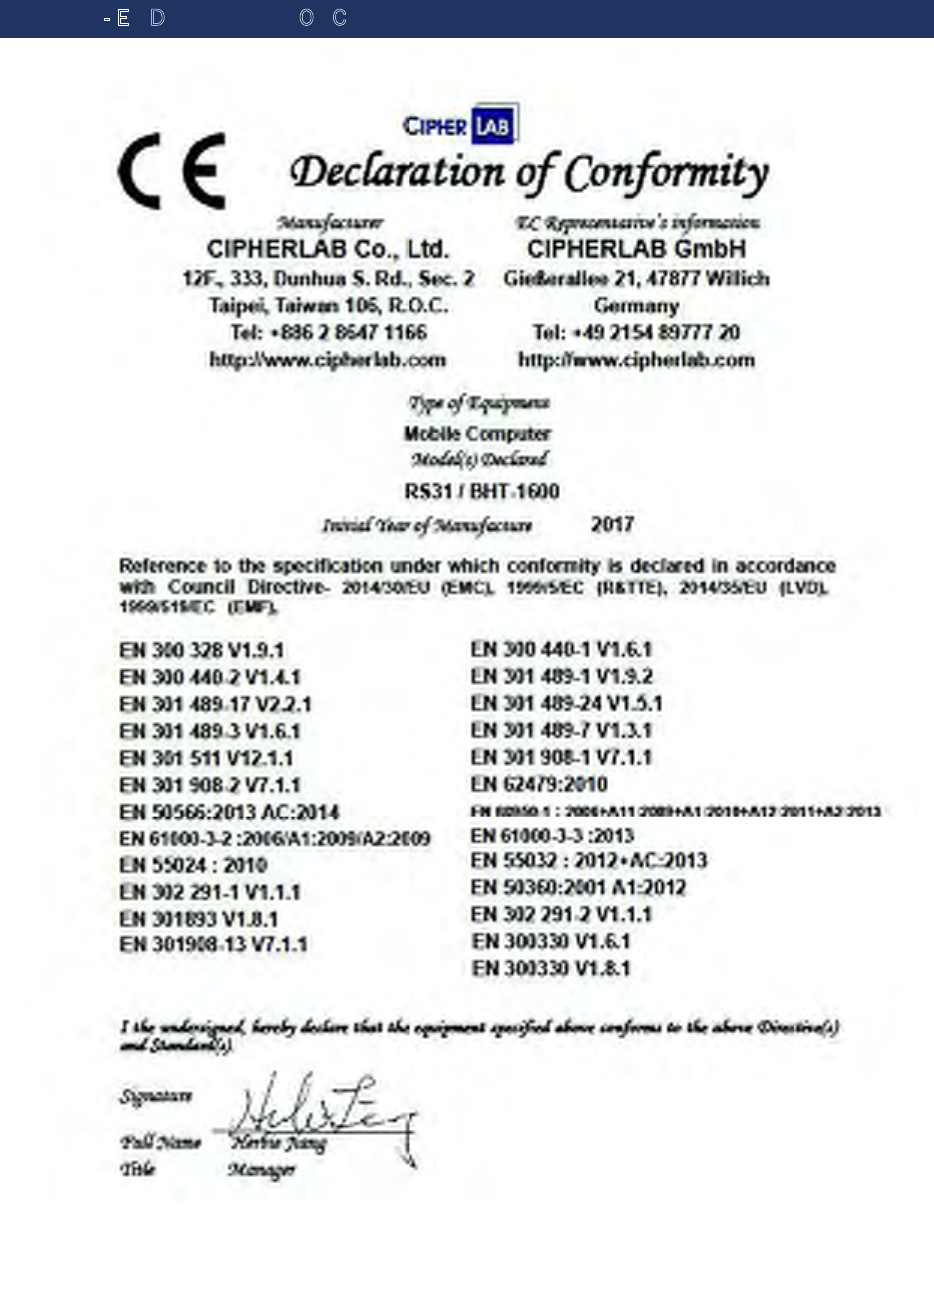
EUROPE - EU DECLARATION OF CONFORMITY

INTRODUCTION
The RS31/BHT-1600 handy terminal, powered by Android™ 6.0 Marshmallow, is
light-weight, easy to use, providing powerful and handy tools for the purpose of delivering
flexibility in customization.
Specifically designed to work as an industrial PDA, it provides rich options of data
collection, voice and data communication, long-lasting working hours, and so on. Its large
color transmissive display guarantees ease in reading in all lighting conditions. Integrated
with Bluetooth v4.1, v2.1+EDR and 802.11a/b/g/n technologies, the handy terminal also
includes a GSM/GPRS/EDGE/WCDMA/UMTS/HSDPA/HSUPA/HSPA+/LTE module to gain
greater speeds and optimal mobility. In particular, an integrated GPS receiver is made
available for use with third-party location-based applications.
This manual serves to guide you through how to install, configure, and operate the handy
terminal. The Care & Maintenance section is specifically crucial for those who are in charge
of taking care of the handy terminal.
We recommend you to keep one copy of the manual at hand for quick reference or
maintenance purposes. To avoid any improper disposal or operation, please read the
manual thoroughly before use.

FEATURES
Built tough to survive drop test and sealed against moisture/dust to industrial
standard IP67.
Android™ 6.0 Marshmallow operating system with a powerful Cortex 1.3 GHz
Quad-Core processor
16GB eMMC flash memory to store OS and software programs
2GB LPDDR3 SDRAM to store and run programs, as well as store program
data
One expansion slot for microSDHC memory card up to 32GB (SDXC
supported)
Built-in 8.0 Megapixel rear camera with white LED for flash and auto focus
and 2.0 Megapixel front camera (optional).
Left and right side triggers for ambidextrous scanning
Total wireless solution — connectivity includes Bluetooth v4.1 and v2.1+EDR,
802.11 a/b/g/n, GSM/GPRS/EDGE/WCDMA/UMTS/HSDPA/HSUPA/HSPA+/LTE, and
near field communication (NFC)
A 4.7” color transmissive display with 720x1280 pixels to deliver excellent
visibility in all lighting conditions
Configurable feedback indicators including speaker and vibrator
Built-in scan engine setting tool Reader Configuration which serves
out-of-the-box keyboard wedge functionality
Accessories and peripherals include USB Charging and Data Transfer Cable,
Direct Cable
INSIDE THE PACKAGE
The following items are included in the kit package. Save the box and packaging material
for future use in case you need to store or ship the handy terminal.
RS31/BHT-1600 Handy terminal
Rechargeable Li-ion battery pack
Hand Strap
Micro USB Charging and Data Transfer Cable
Direct Cable
AC Power Adaptor
Quick Guide
ACCESSORIES
Hardshell
Handbelt
Direct Cable
AC Power Adapter

Chapter 1
QUICK START
This chapter helps you get ready for starting using the handy terminal.
IN THIS CHAPTER
1.12.1 Overview ............................................................. 16
1.2 Charging & Communication ......................................... 25
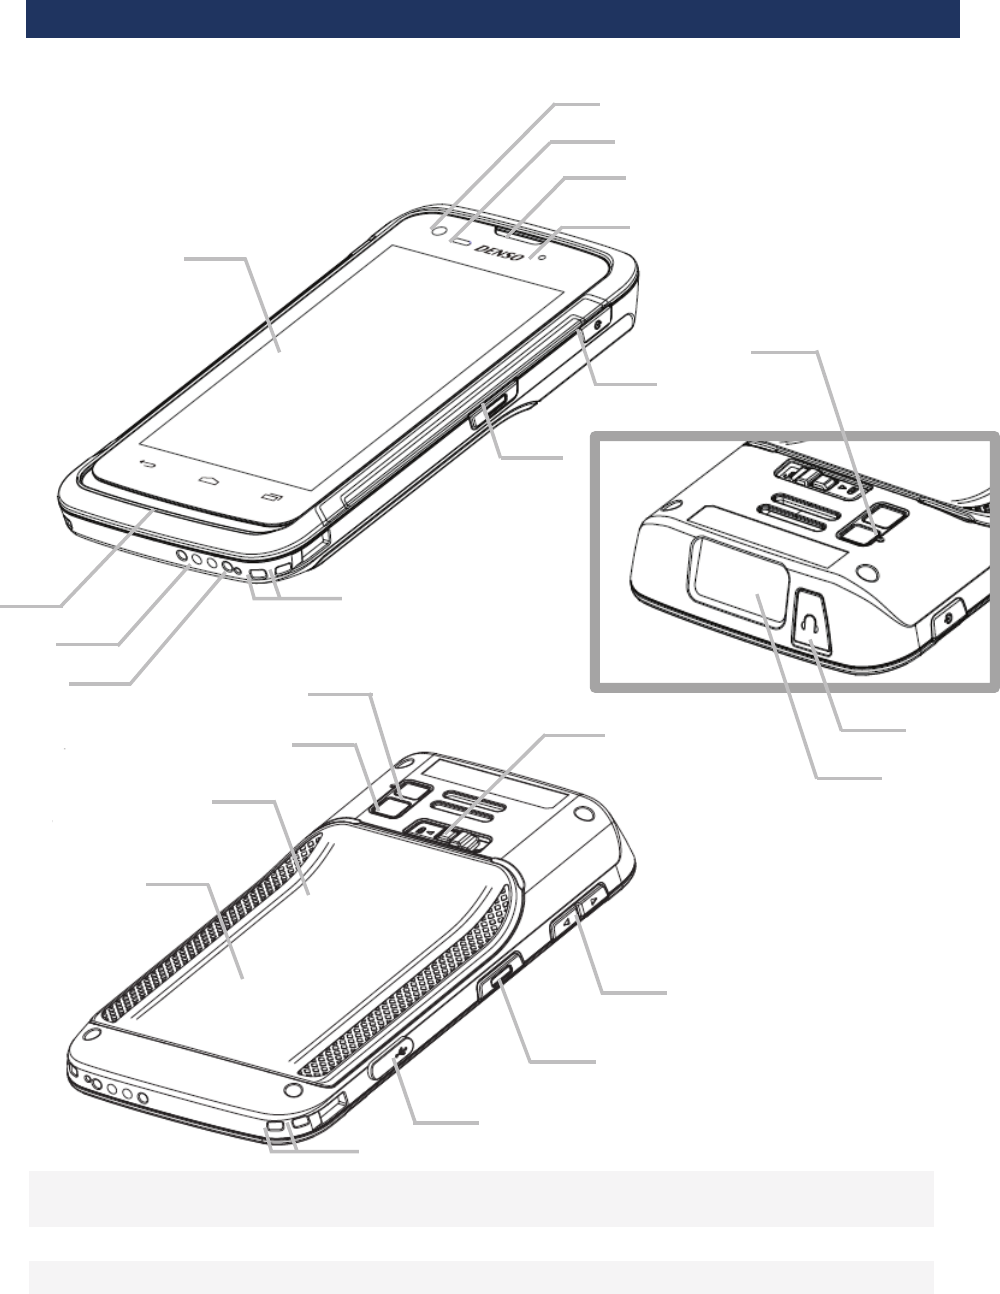
1.1. OVERVIEW
N
o.
Description N
o.
Description
1 Front Camera 2 Proximity+ALS Sensor Hole
3 Receiver 4 Status LED
5 Power Button 6 Side Key

7 Hand Strap Slot 8 Microphone
9 Charging Pins 10 Speaker
11 Touchscreen 12 Sub Microphone
13 Headset Jack 14 Scan Window
15 Battery Cover Latch and Lock 16 Volume Buttons
17 Micro USB Port 18 NFC Detection Area
19 Battery Cover 20 Rear Camera
21 Camera Flash
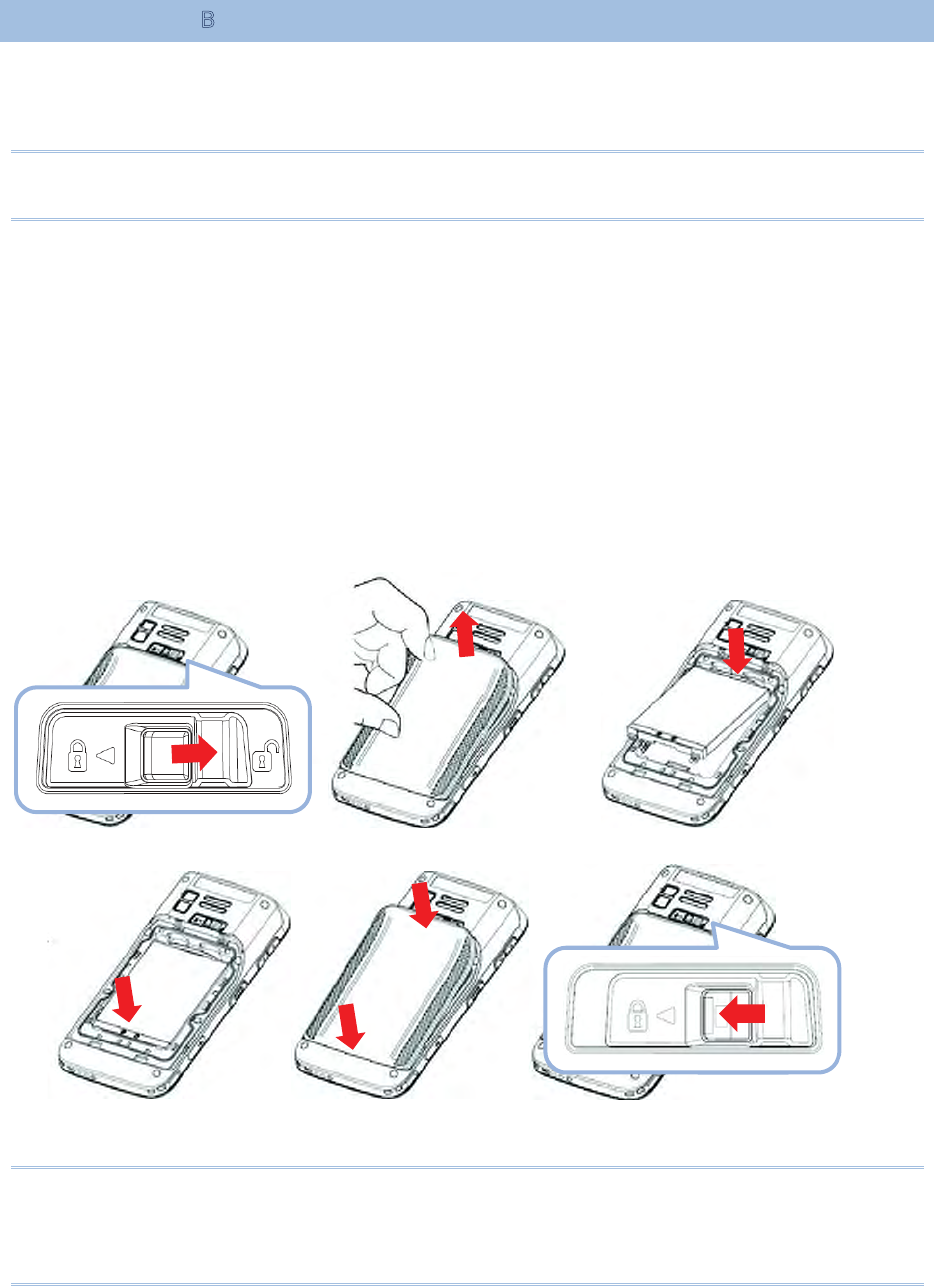
1.1.1. INSTALLING BATTERY
For shipping and storage purposes, the handy terminal and the main battery are saved in
separate packages.
Note:
Any improper handling may reduce the battery life.
To install the main battery:
1) Press down the lock button and slide it right to the “Unlock” position.
2) Insert your fingernail into the groove between the case and the top of the cover, with
a little force, lift the battery cover up and away from the device.
3) Insert the main battery with the contact pins facing the lower end. Fix the top edge
of the battery first.
4) Press down the lower edge of the battery.
5) Fix the lower edge of the battery cover, and then push the upper end in. Please make
sure that the battery lock is in “Unlock” state before replacing the battery cover.
6) Slide the battery lock to the left to the “Lock” position.
Warning
1) Make sure the battery lock is at the “Lock” position before powering on the device.
2) For initial use, insert a charged battery, lock the battery cover in place, then press the
Power key to power on the handy terminal.
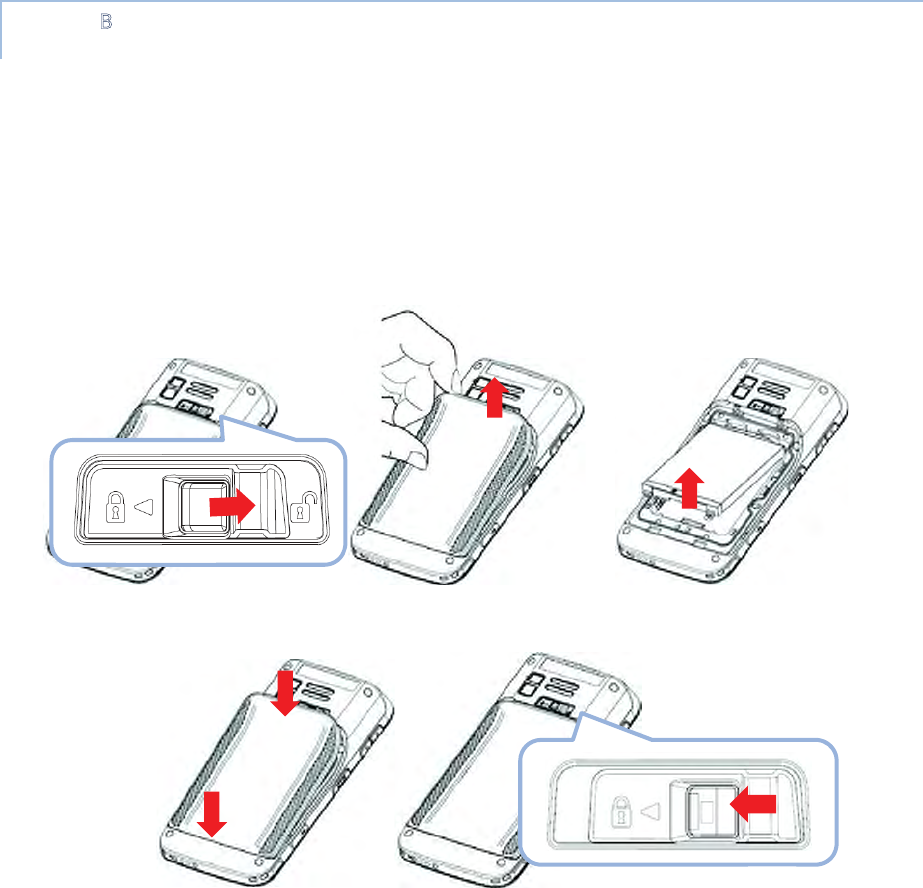
REMOVE BATTERY
1) Press down the lock button and slide it right to the “Unlock” position.
2) Insert your fingernail into the groove between the case and the top of the cover, with
a little force, lift the battery cover up and away from the device.
3) Lift the battery up from its lower end.
4) Replace the battery cover and slide the battery lock to the left to the “Lock” position.
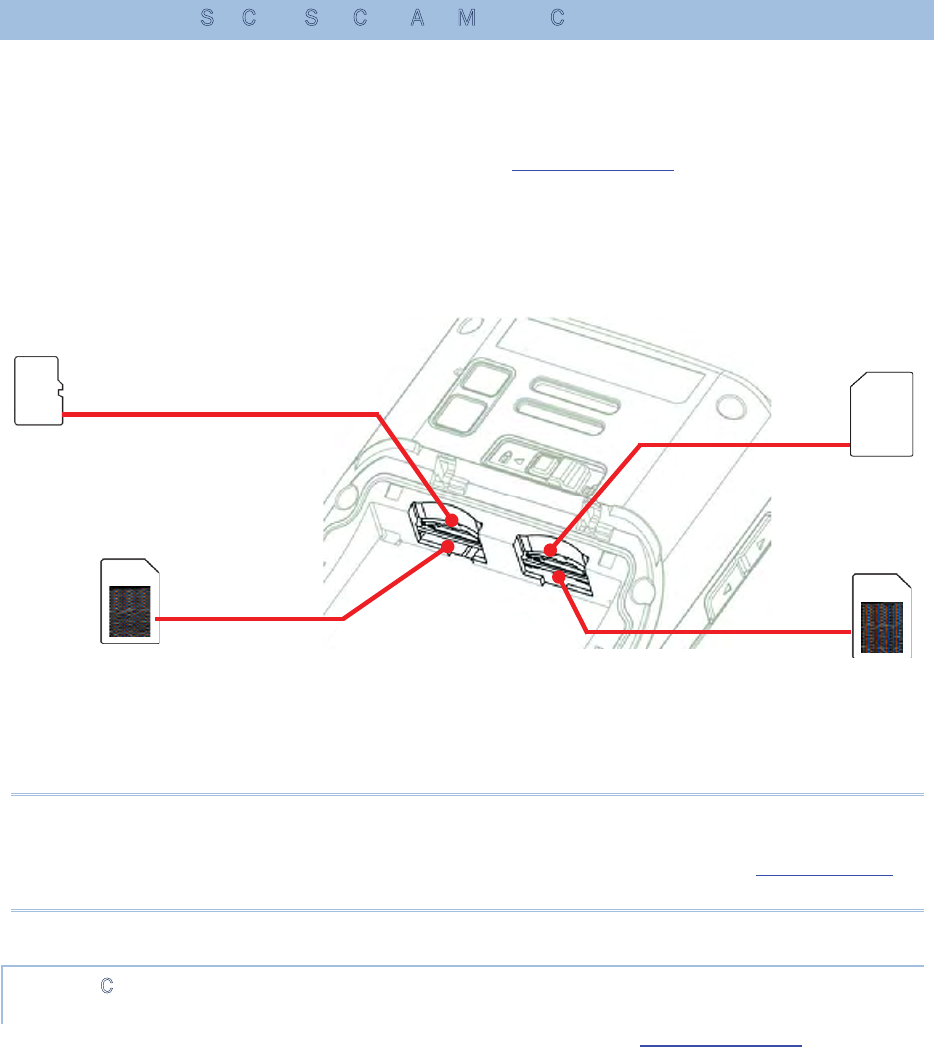
1.1.2. INSTALLING SIM CARD, SAM CARD AND MEMORY CARD
The RS31/BHT-1600 handy terminal is equipped with two SIM card slots, one SAM card
slot and one memory card slot.
To insert the cards:
1) Remove the battery cover as described in Remove Battery.
2) Insert the cards into their respective slots according to the directions indicated. Push
the cards to lock them in. Please note that when you insert the cards into their slots, the
metal contact sides of SD card and SIM1 card should be facing downwards, while those
of SIM2 card and SAM card should be facing upwards.
3) Replace the battery cover and push the battery lock back to the lock position.
Note:
Both SIM1 and SIM2 card slots support 2G/3G/4G cards. However, you can have 3G/4G
data transmission on either SIM but not on both at the same time. Refer Phone Power for
details on managing dual SIM cards.
REMOVE CARDS
1) Remove the battery cover as described in steps 1-3 of Remove Battery.
2) Push the SIM cards, SAM card and SD card to eject them from their slots.
3) Replace the battery cover and push the battery lock back to the lock position.
SIM 1 Slot
Supports2G/3G/4G
Card
Micro SD Card Slot
Supports SD/SDHC/SDXC
SIM 2 Slot
Supports 2G/3G/4G
Card
SAM SD Card Slot
ˏ
SIM1
ˏ
SD
ˏ
SIM2
ˏ
SAM

1.1.3. INSTALLING HARDSHELL
The hardshell is a protective cover that shields the handy terminal from impact due to
bumps, drops and scratches.
To fit the handy terminal in the hardshell:
1) Fix the upper end of the handy terminal in at a 45 degree angle.
2) Press the two lower corners of the handy terminal down to secure it inside the shell.
1.1.4. POWER ON/OFF HANDY TERMINAL
POWER ON
To power on the handy terminal, press and hold the power button located on the upper
right side of the device. The handy terminal opens to show the Home Screen.
Note:
For the handy terminal to power on, the battery cover must be secured in place.
POWER OFF
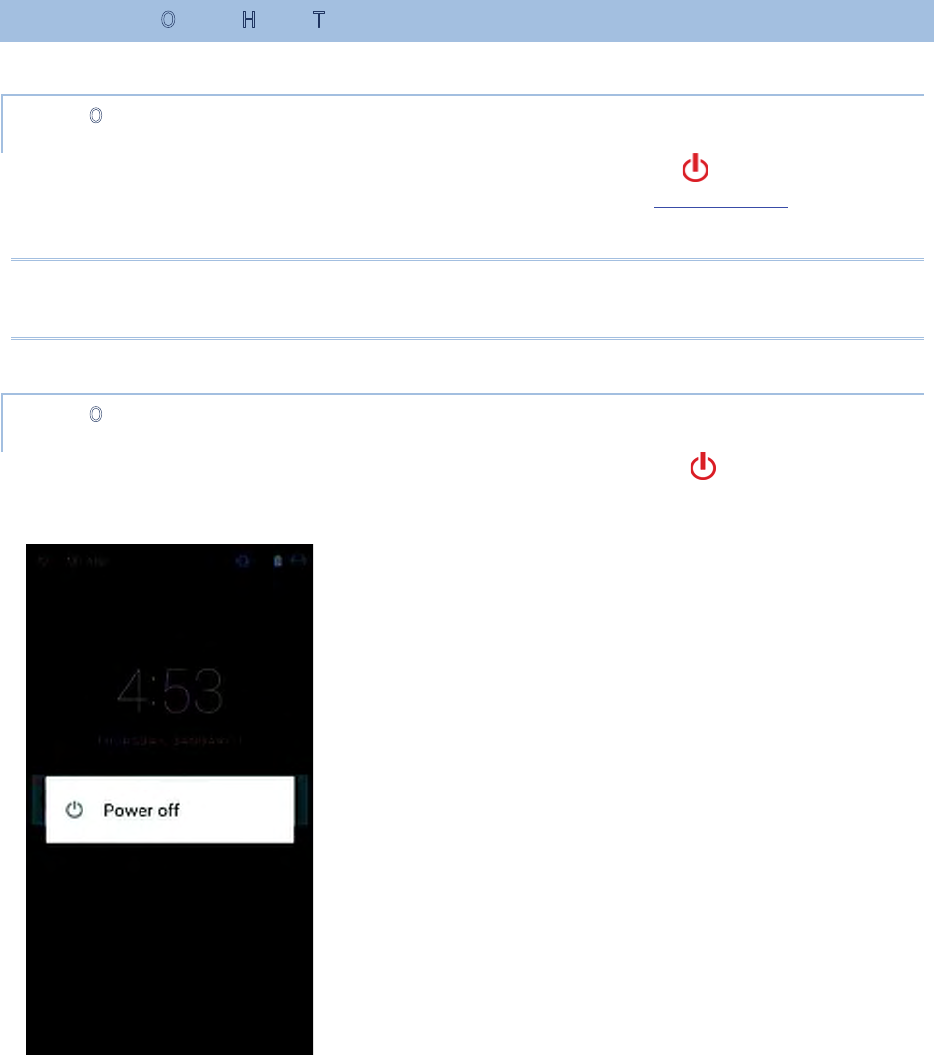
To power off the handy terminal, press and hold the power button for more than three
seconds. A menu will appear on-screen which allows you to power off the device. Make sure
all user data and tasks have been stored before tapping Power off.
1.1.5. HOMESCREEN SELECTION
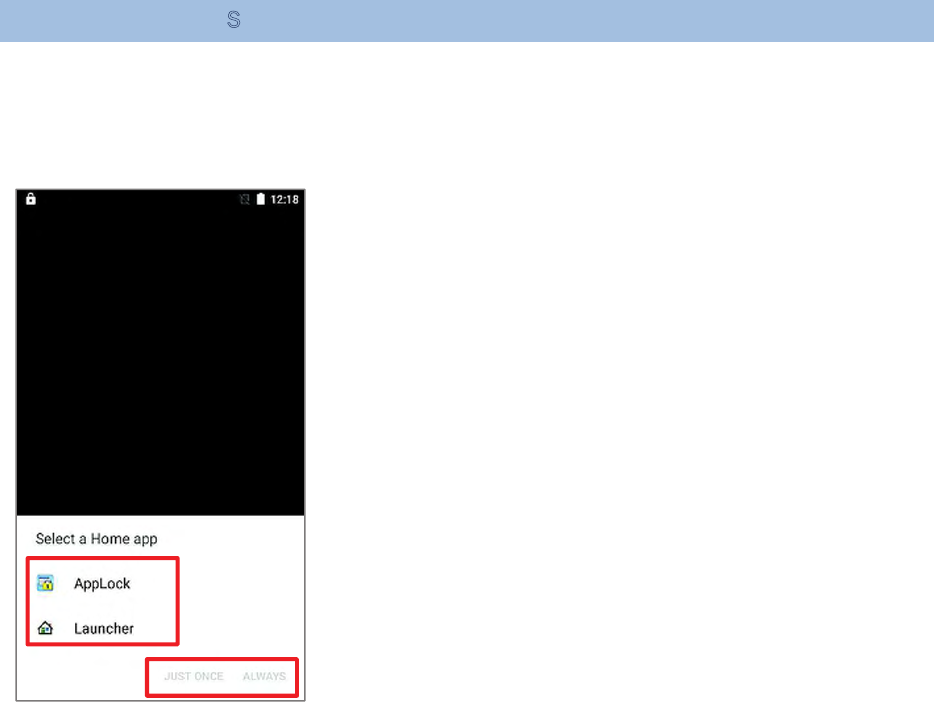
Upon the first time you launch the system, a Select Home app window will pop up to
request your immediate choice of home screen. By selecting “AppLock”, you will directly
enter AppLock application (please refer to AppLock User Guide for detailed instructions on
AppLock settings) to start configuring the interface provided to normal users of this device;
by selecting “Launcher”, you will enter the default Android™ 6.0 home screen.
1.1.6. USING HARDWARE BUTTONS
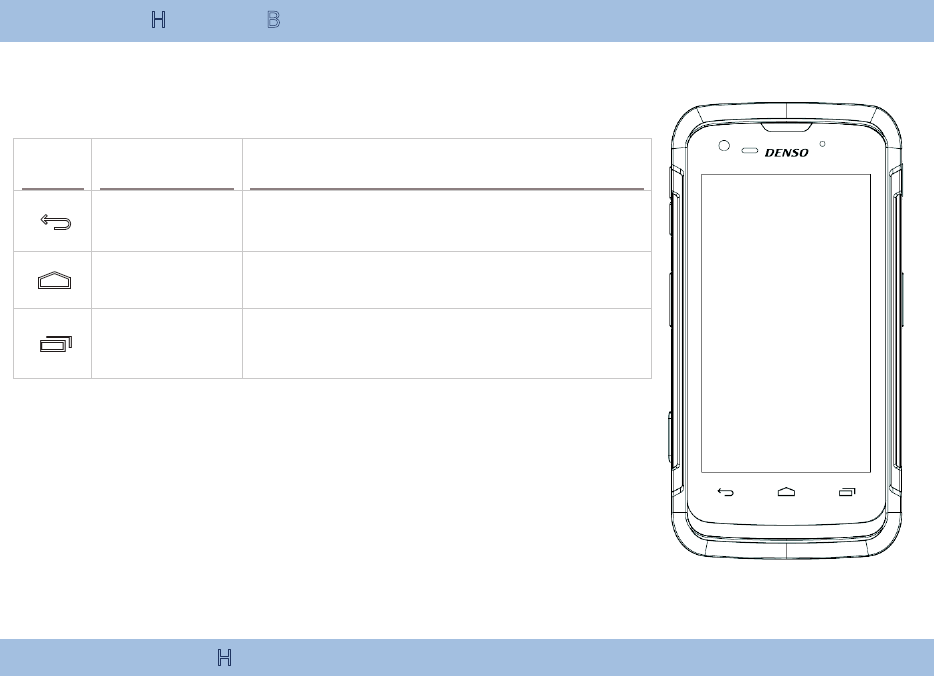
On the bottom of the handy terminal are three hardware
buttons that deliver the following functions:
Button Function Description
Back button Returns to the previous screen or closes
the active window or keyboard.
Home
button Displays the Home screen.
Recent
apps button Opens a list of recently used applications.
1.1.7. CONNECTING HEADSET
The headset jack is located on the top of the handy terminal. You can use the headset for
audio playback or communication via the phone application, audio instant messaging, etc.
1) Flip up the rubber cover.
2) Connect the headset to the headset jack.
3) Replace the rubber cover.

1.2. CHARGING & COMMUNICATION
1.2.1. CHARGE HANDY TERMINAL
The main battery may not be charged to full for shipment. When you first receive the kit
package, you will need to charge the main battery to full before using the handy terminal.
You may use the Direct Cable with a power adapter to charge the handy terminal.
Your device can be charged as well when connected to a computer via USB cable; however,
charging from a USB port on a computer is slower than charging using a supplied Direct
Cable because the voltage and amperage the computer provides is lower than in the case of
using a normal charging method.
CHARGING TIME
Main battery: The main battery powers the handy terminal to work. It takes approximately
4 hours to charge an empty main battery to full. The charging LED above the screen
(located on the right) will light up in red while charging and will turn green when charging
is complete.
When the main battery is removed, RTC retention will be maintainedġfor at least 30 minutes.
Backup battery: The backup battery is mounted on the main board. Its role is to
temporarily keep the handy terminal in suspension when the main battery is drained out so
data in DRAM will be retained. The backup battery takes approximately 3.5 hours to charge
to full by the main battery or power adapter.
CHARGING TEMPERATURE
It is recommended to charge the battery at room temperature (18°C to 25°C) for optimal
performance.
Please note that battery charging stops when ambient temperature drops below 0°C or
exceeds 40°C.
OPERATION ON BATTERY POWER
When 802.11a/b/g/n, GSM/GPRS/EDGE/WCDMA/UMTS/HSDPA/HSUPA/HSPA+/LTE,
Bluetooth v4.1 & v2.1+EDR and GPS are all enabled on battery power, the main battery
level will drop down substantially. Prolonged use of the display and continued scanning of
barcodes will also affect battery level.
In order to prevent system from shutting down after the battery is drained out, we suggest
that you keep a fresh battery for replacement at all times, or connect the handy terminal to
an external power.
USE DIRECT CABLE
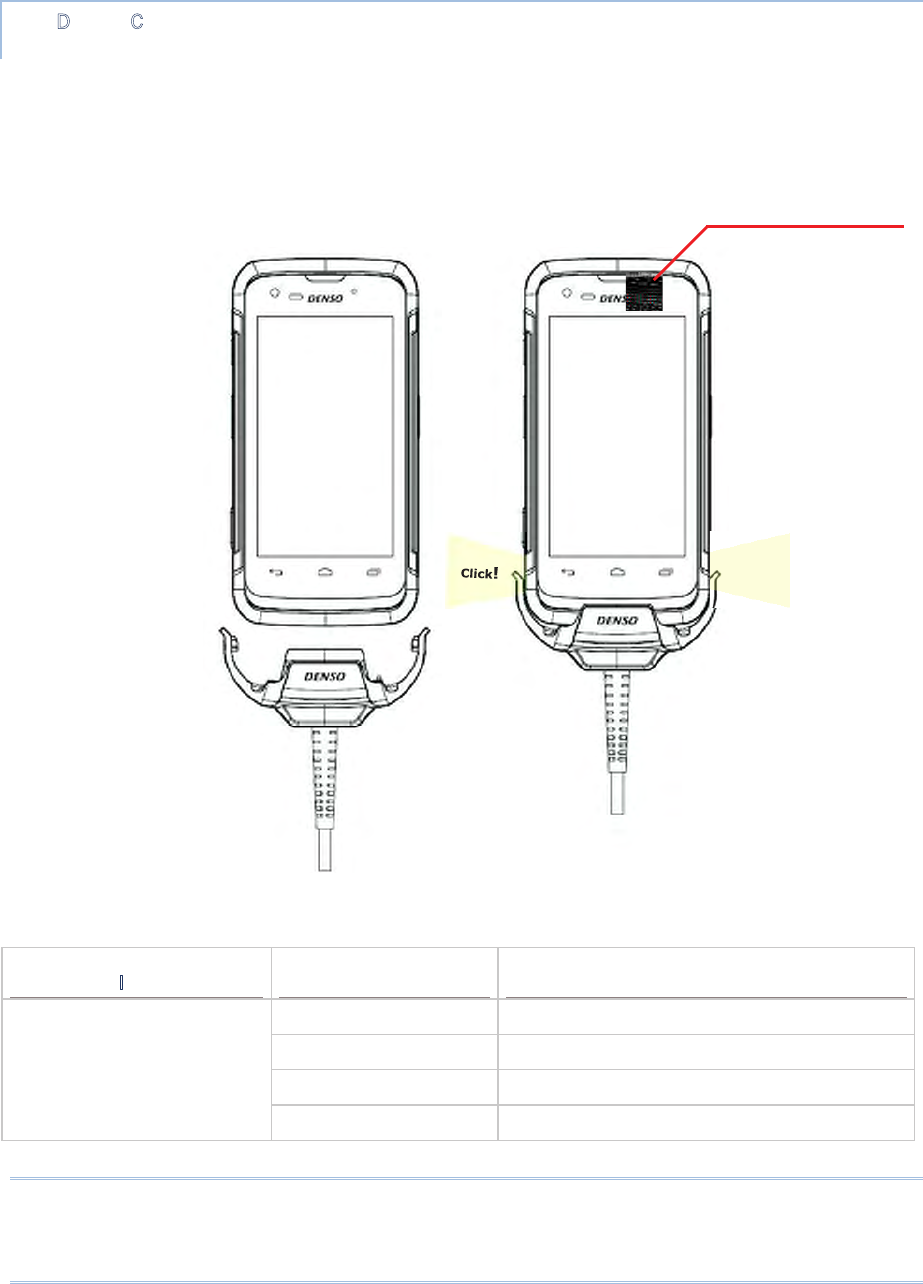
The Direct Cable provides a convenient way to charge your handy terminal.
1) Fasten the Direct Cable to the lower end of the handy terminal.
2) Connect the other end of the cable to the adapter.
3) Fix the adapter plug onto the adapter, and plug in into an electrical outlet.
While the device battery is being charged, the LED on handy terminal will indicate charging
status.
Note:
The Direct Cable is for charging only. For data communication, use the micro USB cable to
connect the handy terminal to your PC or laptop.
LED Indicator Status Description
Charging Red, solid Charging the handy terminal
Red, blink Charging error
Green, solid Charging complete
No light Charging error (charging will stop)
Click!
LED
Status
In
d
i
cato
r
1.2.2. WIRED DATA TRANSMISSION
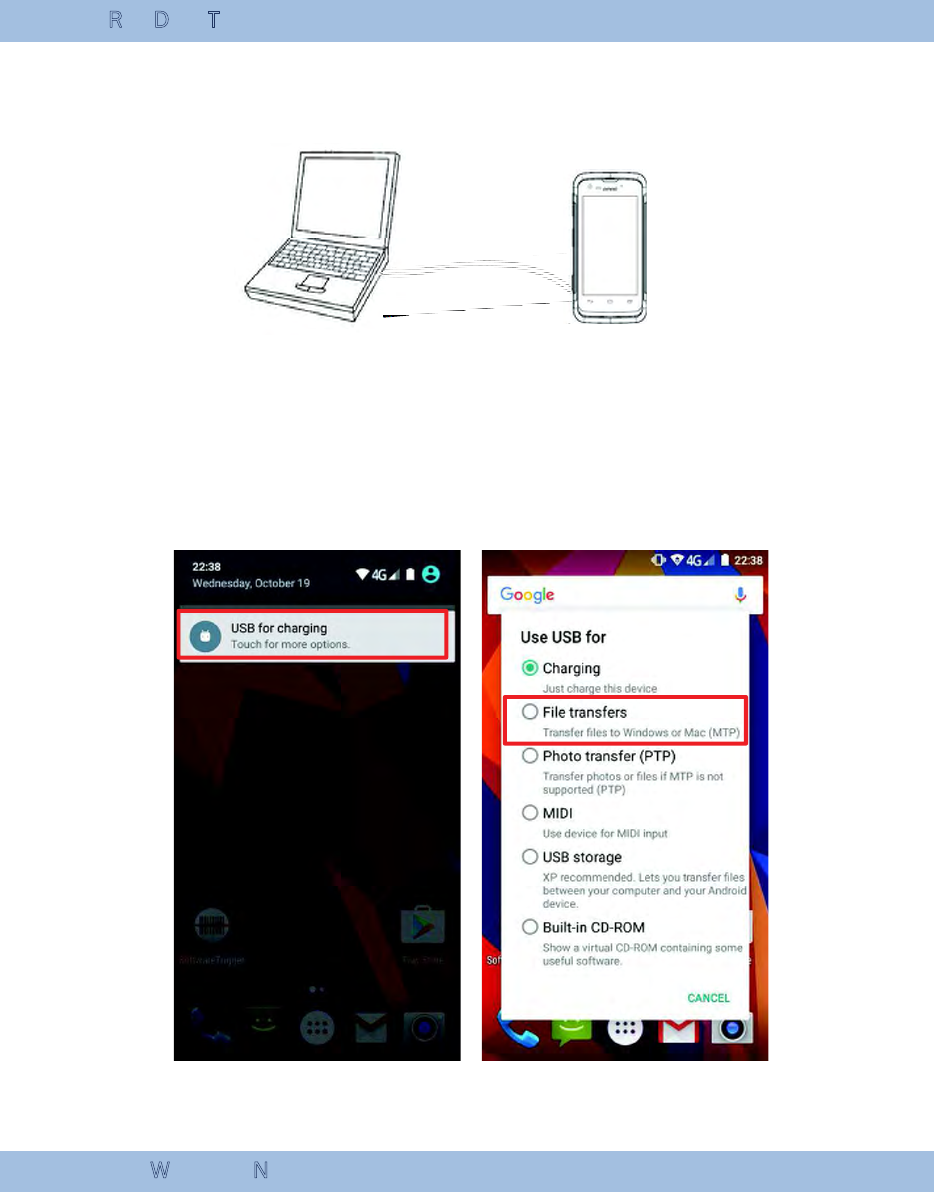
Use the micro USB cable to connect the handy terminal to your PC for data transmission.
1) Connect your device to the computer with supplied USB cable.
2) Swipe down from the status bar to reveal Notifications Panel.
3) Tap “USB for Charging” to enter USB options. By default, the device will be in
charging mode, in which you are unable to access the files on this device from the PC
client. To transfer all types of files between your device and PC, choose “File transfers”.
To transfer videos and photos, you can select “Photo transfer (PTP), in which your
device will share only videos and photos in DCIM and Pictures folders.
1.2.3. USING WIRELESS NETWORKS
The handy terminal supports widely applied wireless technologies including Bluetooth v4.1
& v2.1+EDR, 802.11 a/b/g/n and NFC, and is able to send/receive data in real time in an
efficient way. Select GSM/GPRS/EDGE/WCDMA/UMTS/HSDPA/HSUPA/HSPA+/LTE modules
embedded for a total wireless solution for data and voice communication.

Chapter 2
USING THE RS31/BHT-1600 HANDY TERMINAL
This chapter walks you through the fundamental usage and features of this device.
IN THIS CHAPTER
2.1 Battery ..................................................................... 29
2.2 Memory .................................................................... 39
2.3 Touch Screen ............................................................ 50
2.4 Notifications .............................................................. 55
2.5 Date and Time ........................................................... 57
2.6 Language & Keyboard Input ........................................ 58
2.7 Sound and Volume ..................................................... 66
2.8 Programmable Keys ................................................... 67
2.9 Data Capture ............................................................ 73

2.1. BATTERY
Main Battery
The handy terminal is powered by a rechargeable 3.85V / 2960 mAh Li-ion battery
pack, and it takes approximately 4 hours to charge it to full from the power adaptor.
However, the charging time may vary by your working condition.
Spare Battery
A spare battery pack is provided as an accessory. We recommend keeping a fully
charged spare battery at hand in order to replace the main battery when it is nearly
drained out.
Backup Battery
Settled on the main board is a backup battery that keeps the handy terminal in
suspension when the main battery is depleted. The backup battery is a 60 mAh
rechargeable Li-ion battery, and can retain data in the DRAM for 30 minutes when it is
fully charged (as long as wireless modules on the handy terminal are inactive). The
backup battery can be charged by the main battery or the power adapter, and takes
approximately 3.5 hours to charge to full.
Warning:
(1) The battery cover must be secured in position. If not, the handy terminal cannot turn on
by pressing the power key.
(2) For a new battery, make sure it is fully charged before using.
(3) To avoid data loss, when replacing the main battery, make sure you replace it with a
well-charged spare battery pack. Always prepare a spare battery at hand, especially when
you are on the road.
(4) When the handy terminal has been on backup battery for 30 minutes, the system will
shut down. Be sure to replace the main battery as soon as possible in order to avoid data
loss.
2.1.1. BATTERY STATUS INDICATORS
The main battery pack is the only power source for the handy terminal to work. Therefore,
when the main battery level goes low, you need to replace the battery pack with a charged
one or charge it as soon as possible. Most of all, you should backup important data on a
regular basis.
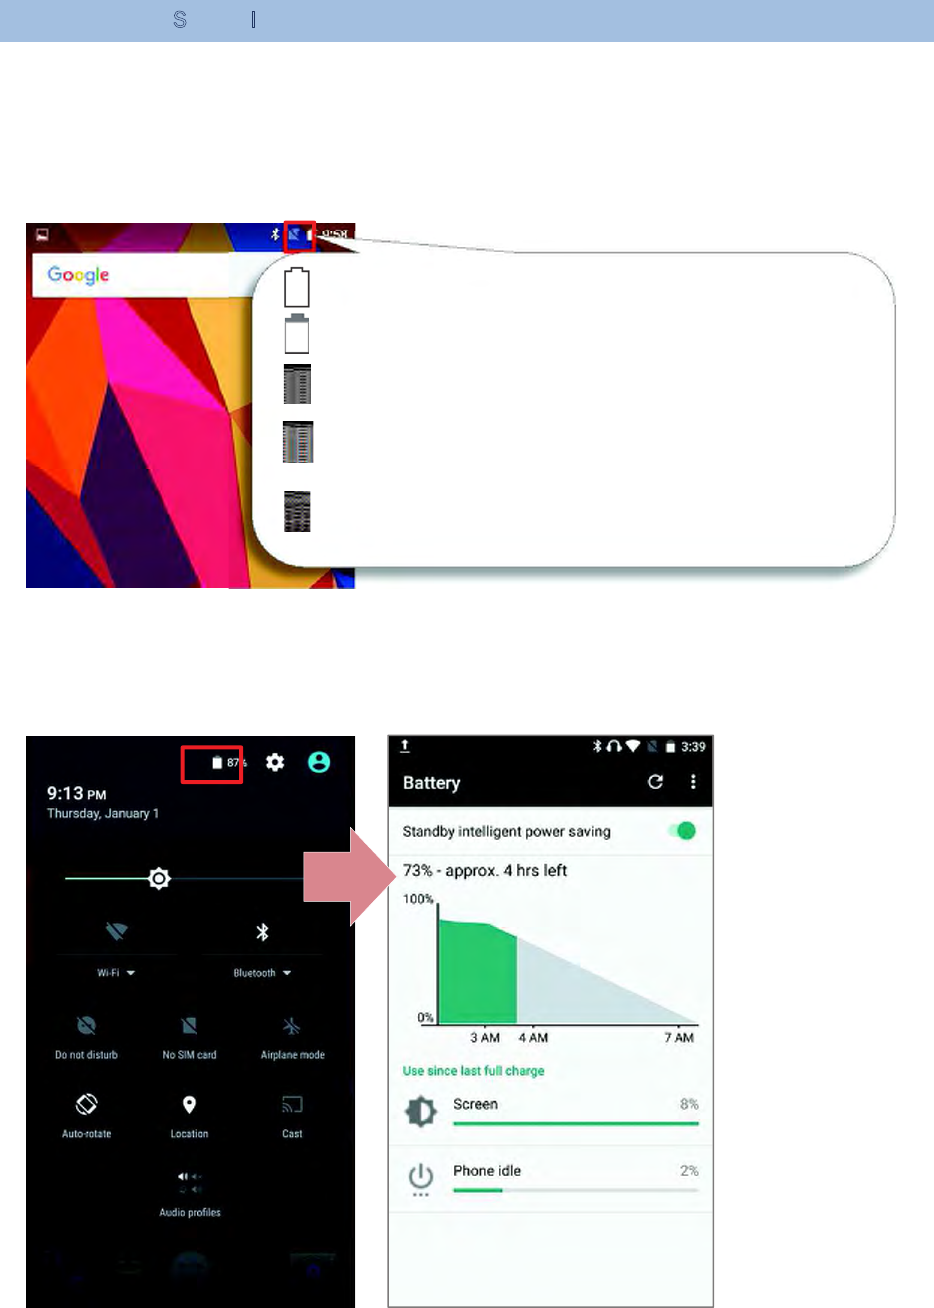
By checking the battery status icon on Status Bar, you can tell the battery level remaining
in the main battery.
To check the exact remaining percentage of power and battery life:
1) Use two fingers to swipe down from the top of the screen to open Quick Settings.
2) The percentage of remaining battery power is shown beside the battery icon; you
can tap on it to enter Battery Settings for more details and configurations.
Main battery is fully charged.
Main battery level is partially drained.
Main battery level is low.
Main battery level is very low and needs charging
immediately.
External power source is connected and main battery
is being charged.
Note:
When the handy terminal is fully charged and battery level reaches 100%, the battery icon
will change from to to indicate charging is completed.
Warning:
(1) Once the battery level drops below 15%, the low battery notification will be displayed on
the screen.
(2) Data loss with RAM may occur when battery level is low. Always save data before the
battery runs out of power or keep a fresh battery for replacement.
(3) Constant usage of the handy terminal at low battery level can affect battery life. For
maximum performance, recharge the battery periodically to avoid battery drain out and
maintain good battery health.
2.1.2. MONITOR BATTERY LEVEL
MAIN BATTERY LEVEL
The main battery is the only source that feeds the handy terminal to work. It also supplies
the backup battery on the main board in order to retain the data stored in DRAM. When
main battery level gets low, recharge it or replace it as soon as possible. Most critically, back
up the important data from time to time to protect your work.
To check main battery level:
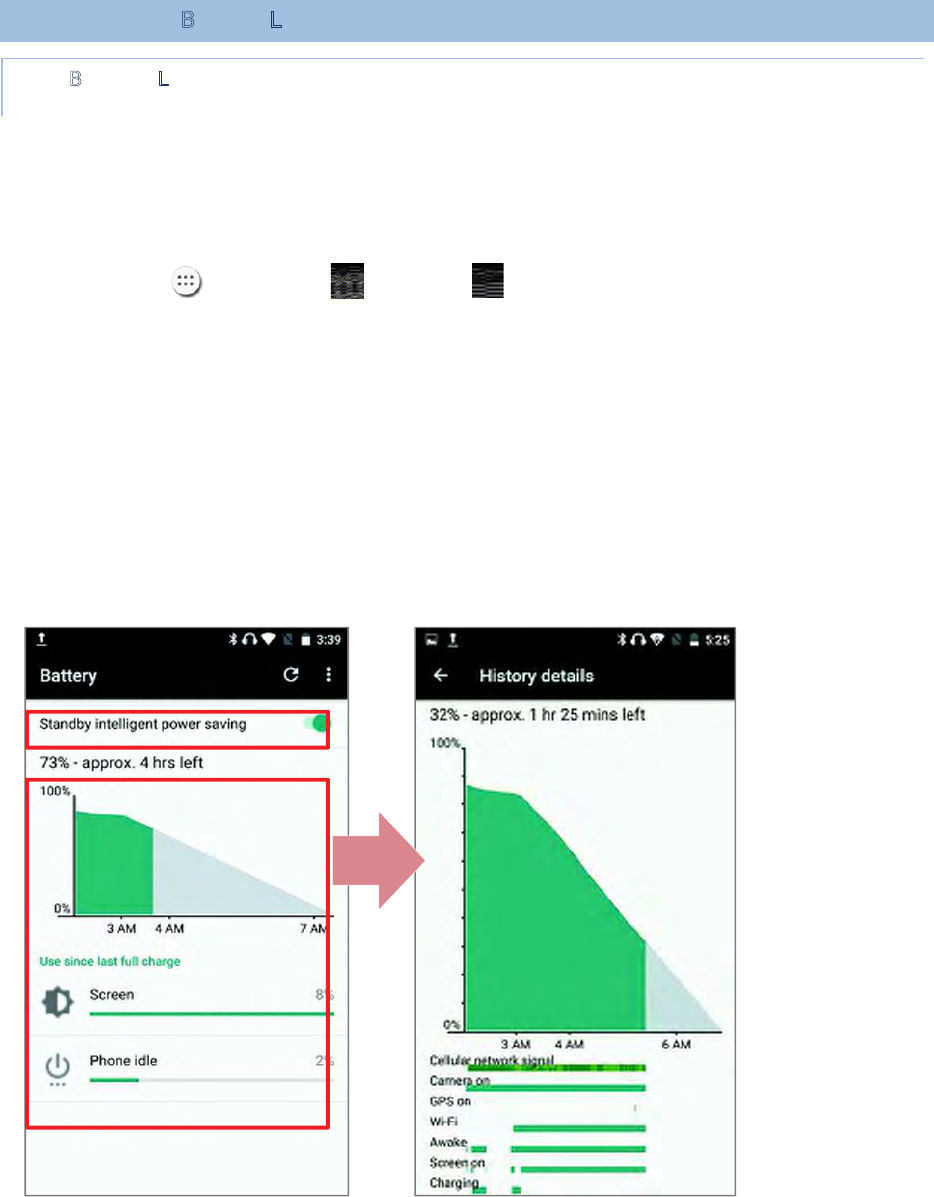
Tap All Apps | Settings | Battery .
Battery level percentage is also shown to provide a clear grasp of the remaining battery
power. The screen also shows the rate of battery discharge since the last battery charging
session, how long the device has been running on battery power, and which applications are
consuming the most battery power.
To enable Android’s smart power saving feature, activate the Standby
Intelligent power saving function, which intelligently manages the background
tasks as this device is powered on.
To look at the timeline of each application that drained or has been draining
the battery power, tap on the chart; with this, you can diagnose any serious power
drains.
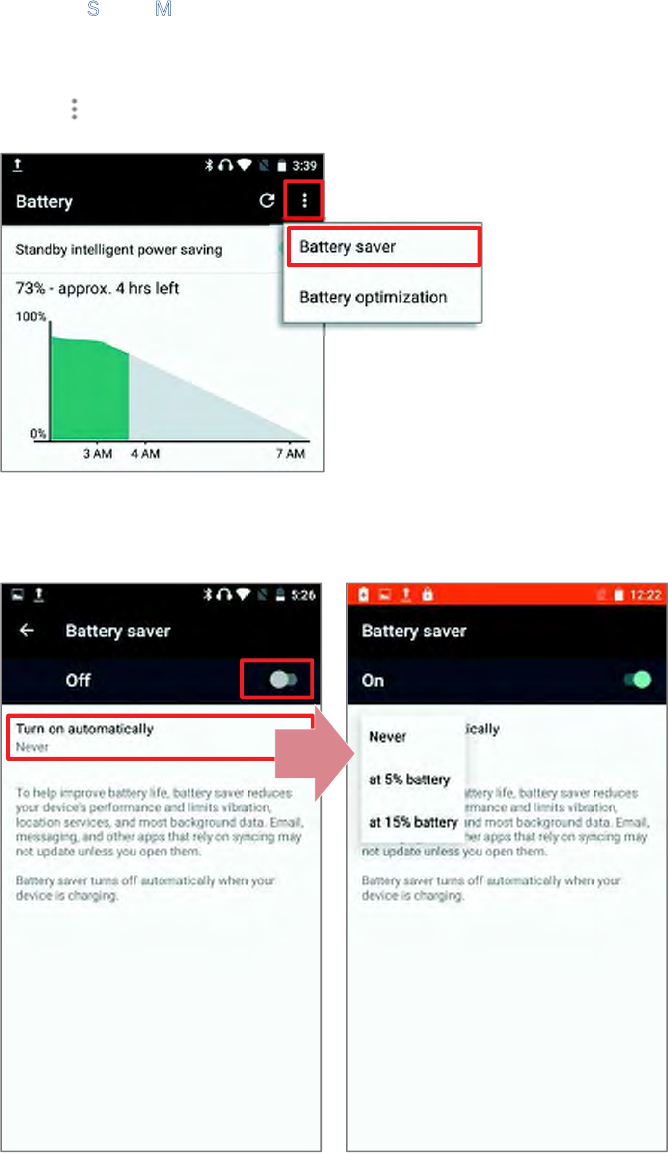
BATTERY SAVER MODE
You can have the Battery Saver Mode automatically turned on when the main battery gets
low or have activated the whole time. This mode will limit the use of location services,
vibration and most background processing data. On Battery Settings screen, tap on
More and then select “Battery saver”.
Switch on the function and choose when to have this mode automatically activated. After
enabling this function, the title bar of your screen will turn orange.
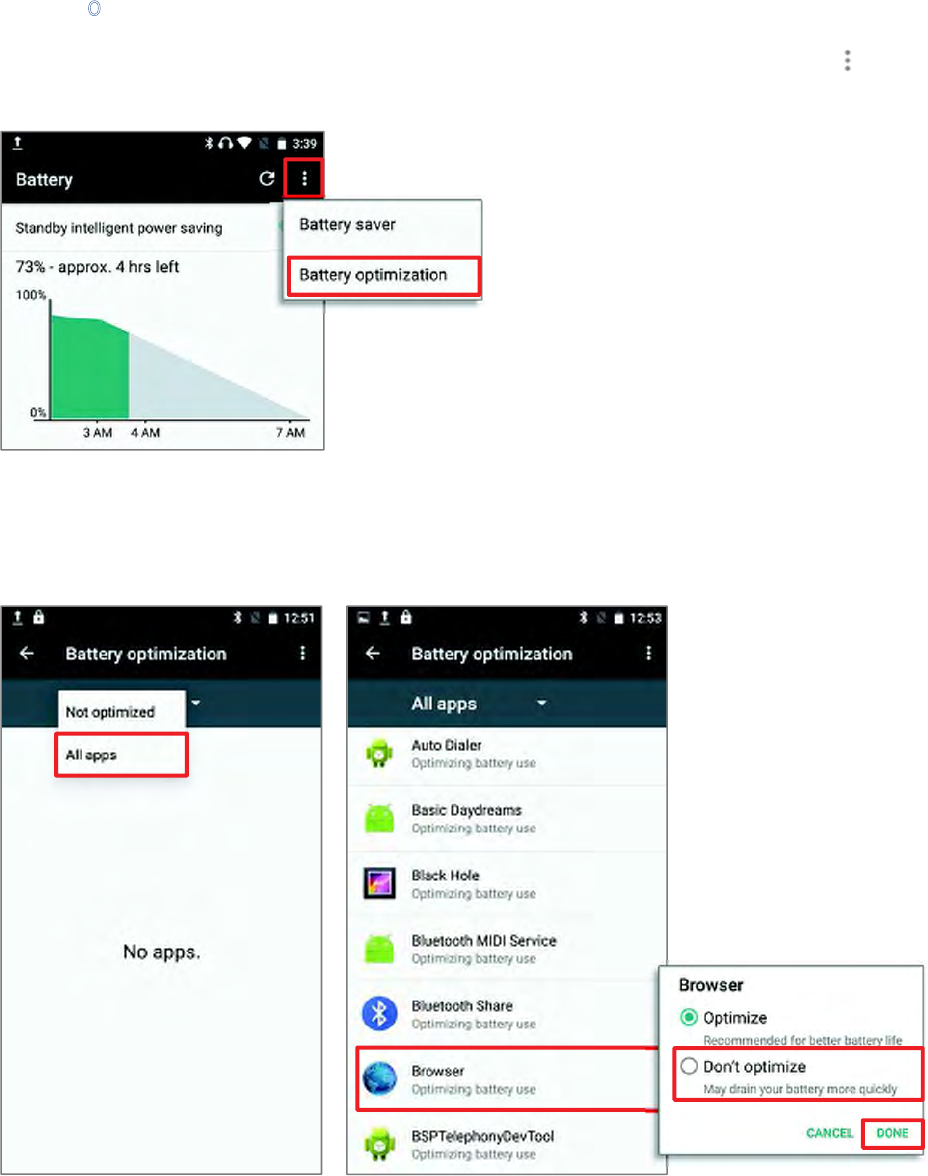
BATTERY OPTIMIZATION
Having Battery optimization on for the applications, you can make sure they stay
inactive until you start using your device. On Battery Settings screen, tap More and
then select “Battery optimization”.
On dropdown list, select “All apps”, all the applications will be optimized by this function by
default. You can individually turn off the optimization mode of a certain app if you would like
it always activated by tapping on the app name and select “Don’t optimize” and then
“DONE”

LOW BATTERY ALERT
When the main battery level drops to 15%, the handy terminal prompts a warning
reminding you to charge the main battery. Connect the handy terminal to an external power
source, or replace the main battery pack as soon as possible.
To replace the main battery pack, see Replace Main Battery.
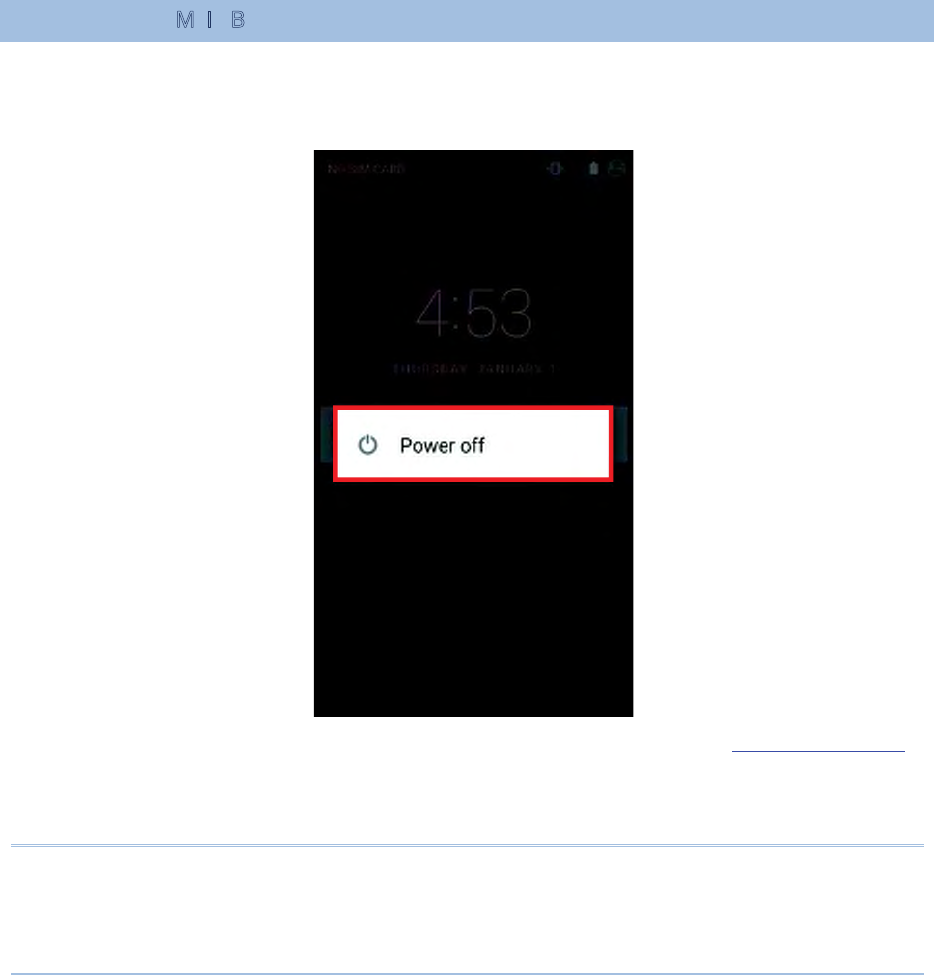
2.1.3. REPLACE MAIN BATTERY
When main battery level is low, follow the steps below to replace the main battery.
1) Press and hold the power button on the side of the handy terminal.
2) Tap “Power off” in the pop-up menu. The handy terminal will power off.
3) Open the battery cover and insert a charged main battery as in Installing Battery.
4) Press the power button to power on the handy terminal.
Note:
Before replacing the main battery, make sure the backup battery is well-charged in order to
avoid unnecessary data loss. After removing the main battery, insert a well-charged battery
as soon as possible.

BATTERY HOT SWAP
Backup battery supplies system power during battery hot swap.
When battery cover is removed, the system will enter suspend mode and not wake up until
battery cover is put back and the power button is pressed.
To perform a battery hot swapping:
1)Make sure the new battery is fully-charged.
2)Follow Step1~2 in Installing Battery to remove the battery cover. Upon the removal
of the cover, the system will prepare to enter suspend mode with the red light lit, which
will last for 3 to 5 seconds.
3)Flip the device over to observe the Status LED on the front panel. As the red light
goes off, the device is in complete suspend mode and Main battery is ready to be
replaced. Remove the battery and replace it with the new one.
Note:
When main battery is removed, the system will stay in suspend mode for 30 minutes. To
avoid system being shut down without warning, please replace the main battery within the
30 minutes.
2.1.4. POWER MANAGEMENT
For any portable device, power management is a critical issue especially when you are on
the road. Below are some tips to help you save battery power.
Warning:
Using backlight, wireless connectivity, and peripheral devices while on battery power will
substantially reduce battery power.
Bring an additional main battery pack with you on the road.
End wireless connections (such as Bluetooth transmission, wireless
connection, NFC and GPS) which are not in use.
Shorten the screen turn off time. See Screen Timeout Settings.
Reduce the screen brightness level, see Screen Brightness.
Shut down automatic data syncing of applications (such as Email, Calendar,
and Contacts).
Enable Battery saver mode and Battery optimization mode. See Battery
Saver Mode and Battery Optimization.
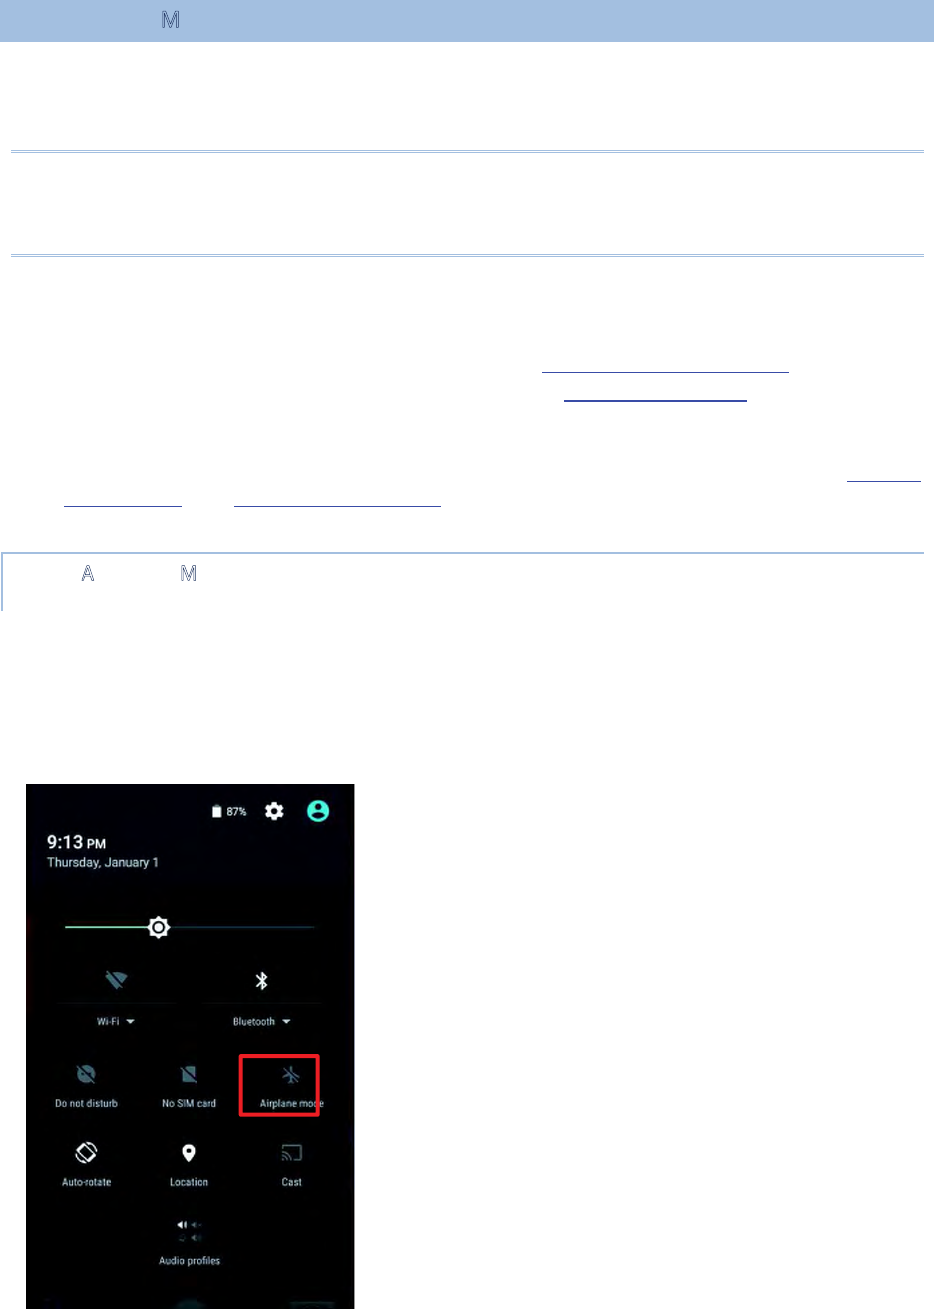
ENTER AIRPLANE MODE
You can enable Airplane mode to have all the wireless radios (including call functions, data
connections such as Bluetooth, Wi-Fi and 3G/4G) on your handy terminal turned off, which
will considerably reduce the power consumption of your battery.
1) To enter Airplane mode, use two fingers to swipe down from the top of the screen
to open Quick Settings.
2) Tap on the Airplane mode icon to enable/disable the mode.

2.2. MEMORY
Flash Memory (ROM)
16GB flash memory for storing the OS (Android™ 6.0 Marshmallow and custom
application programs.
Random-access Memory (RAM)
2GB RAM for storing and running programs, as well as storing program data.
Expansion Slot
The handy terminal is equipped with one microSDHC card slot which accommodates
an SD card up to 32 GB (microSDXC is supported as well).
CAUTION OF DATA LOSS
When the main battery is removed or drained, the backup battery on the main board takes
over to supply the handy terminal and keep it in suspension. A fully charged backup battery
will retain the data in the RAM for 30 minutes. When the backup battery is drained out as
well, the handy terminal will shut down, and only the contents of RTC will be retained. All
other unsaved data will be lost.
If you want to put away the handy terminal for a couple of days, you should be aware that
data loss occurs when the main battery and backup battery discharges completely.
Therefore, it is necessary to backup data and files before putting away the handy terminal.
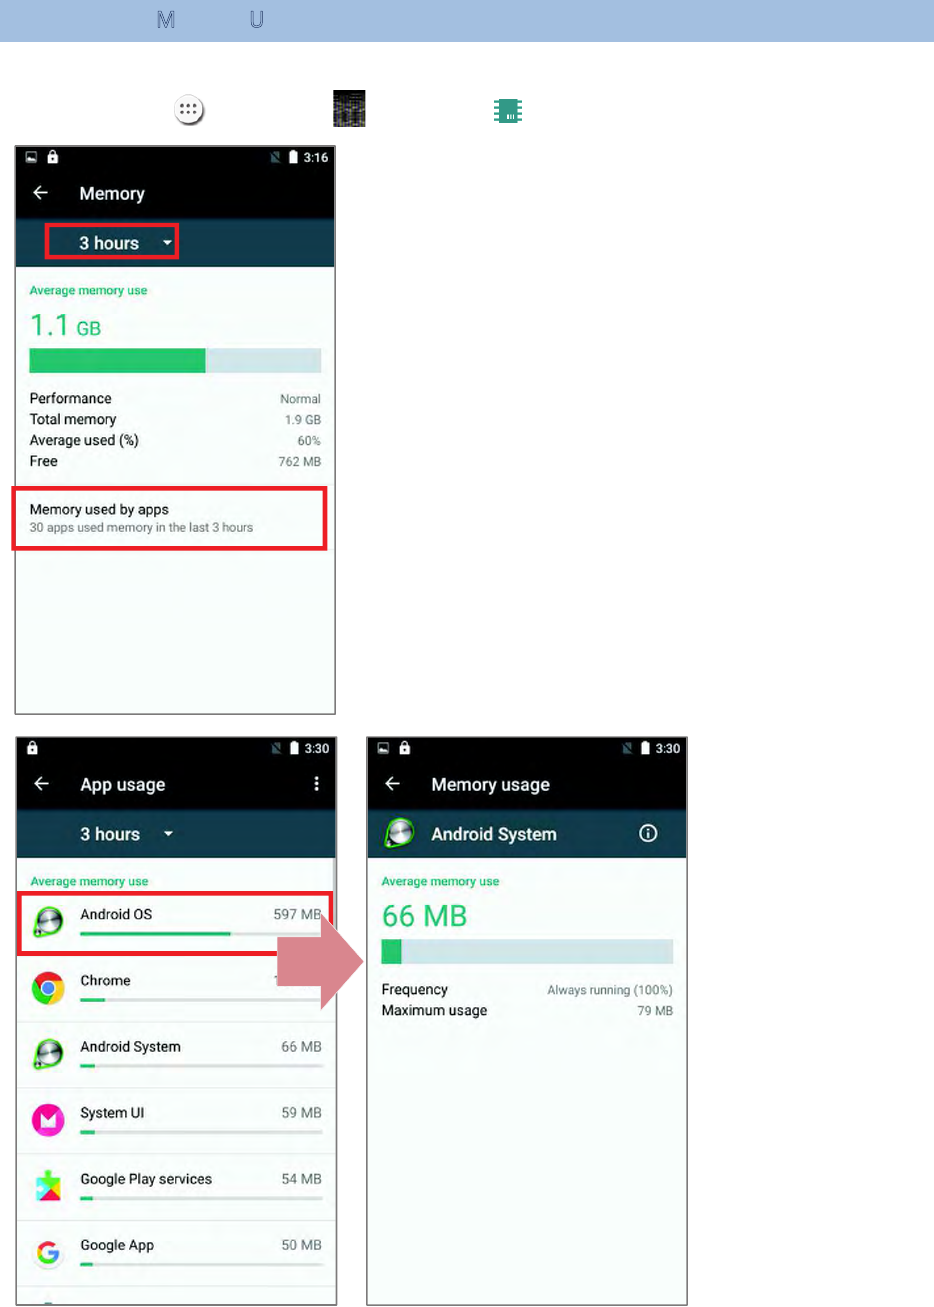
2.2.1. CHECK MEMORY USAGE
The memory manager can offer a glance of how the device is using its RAM.
Tap All Apps | Settings | Memory to enter memory manager screen.
On the main screen, it tells you not only the used and
free memory space of the RAM, but how your pattern of
usage has impacted the device’s overall performance. To
figure out how the system and apps have been taking up
the memory over a longer period, tap the dropdown list to
choose a different time span.
To look at how individual apps are consuming the
memory space, tap “Memory used by apps” to get a
breakdown of memory usage by apps.
Tap an application name
to check its memory
usage. This allows you to
make sense of how much
memory a newly-installed
application can potentially
consume your RAM.
2.2.2. MANAGE STORAGE SPACE
To your Android device, the SD card can serve as an extension of your device’s internal
storage (which comes as 16 GB of flash memory to store the OS, applications and files)
other than a portable storage place.
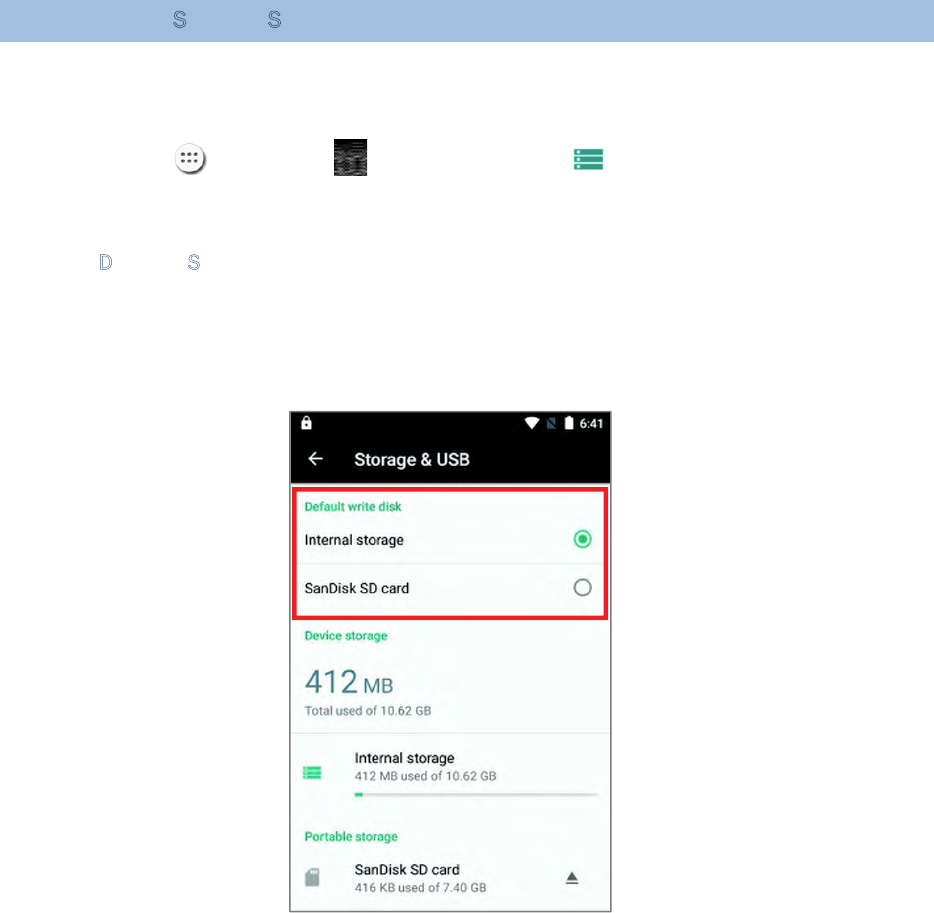
Tap All Apps | Settings | Storage & USB to check usage of the internal
and external storage spaces.
CHOOSE DEFAULT STORAGE
By default, all the videos, photos and downloaded files are directly saved to the device’s
internal storage. If you have previously inserted and mounted an SD card as portable
storage, this external storage will appear selectable below the option Internal Storage,
and you can choose it as the Default write disk.
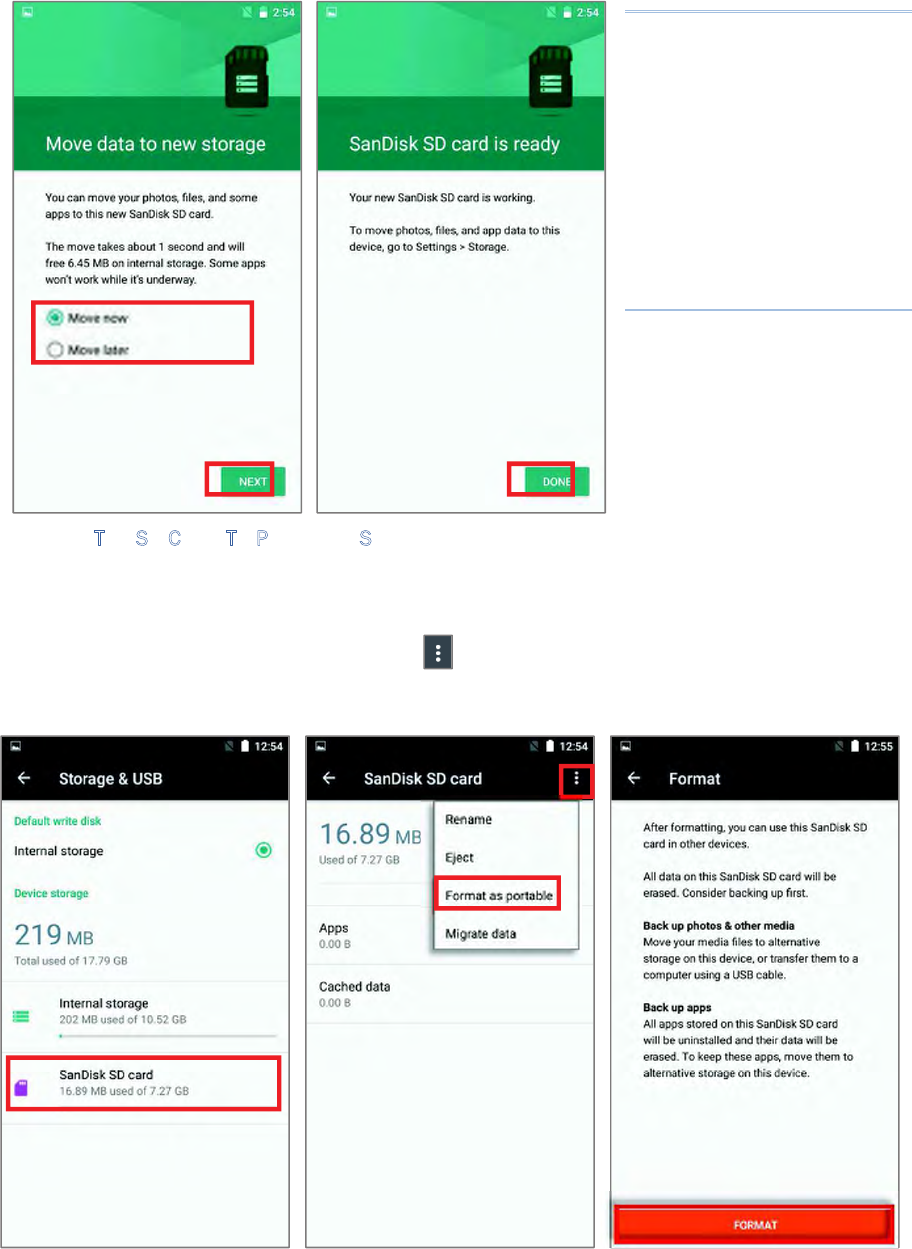
SET UP SD CARD AS PORTABLE STORAGE
Using SD card as a portable device allows you to treat it as a USB disk, by swapping it
between your Android device and the computer to easily transfer files. This is quite handy
when there is a need to offload files that are taking up too much storage space.
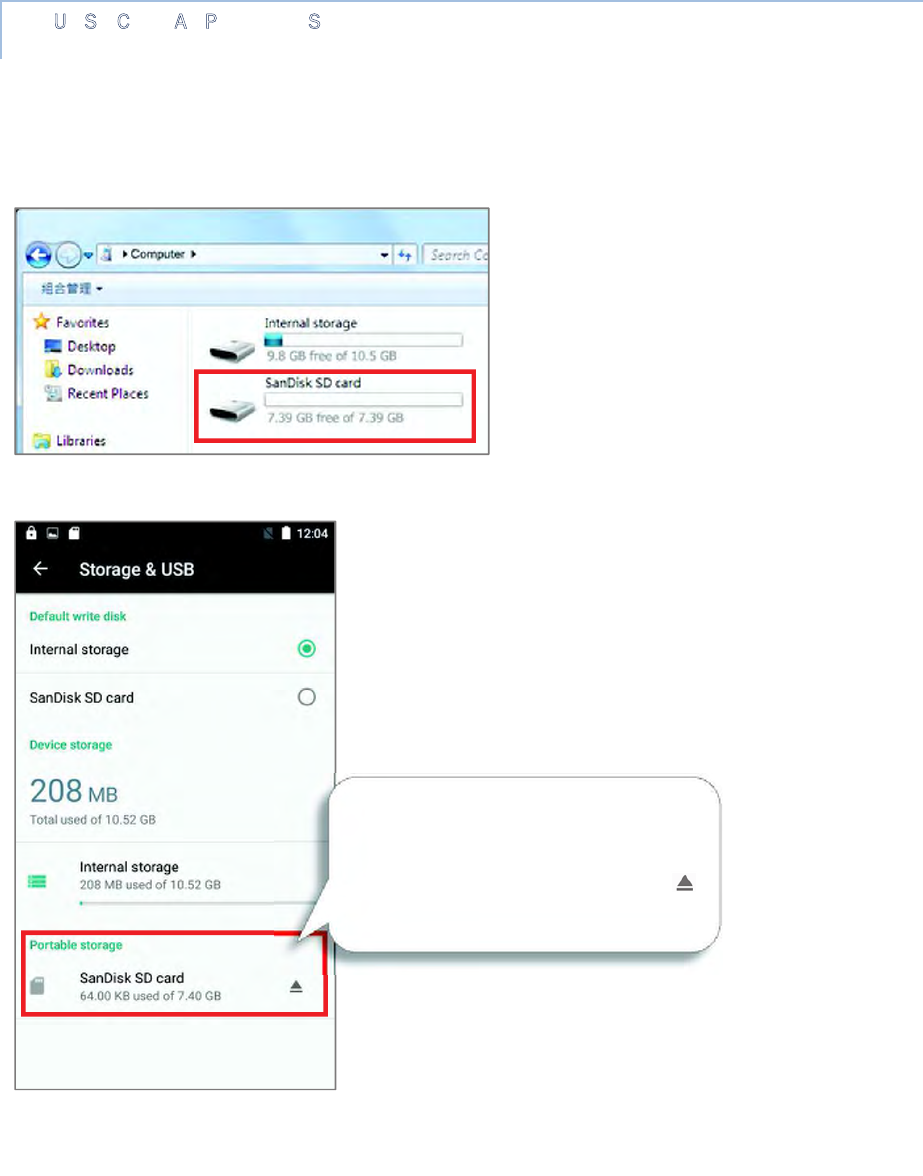
The disk content is readable on PC client:
On Storage & USB screen, this disk can be managed separately.
To start:
1)Connect your handy terminal with PC with supplied USB cable, swipe down from the
status bar to reveal Notifications Panel, tap “USB for Charging” to enter USB options
and then choose “File transfers”.
2)Insert the SD card. A notification will pop up indicating that an SD card is detected
tap “SET UP”.
The SD card is considered a
separate storage, the capacity of
which is not included in total
device storage. You can tap
to eject a mounted SD card.
RS31/BHTͲ1600
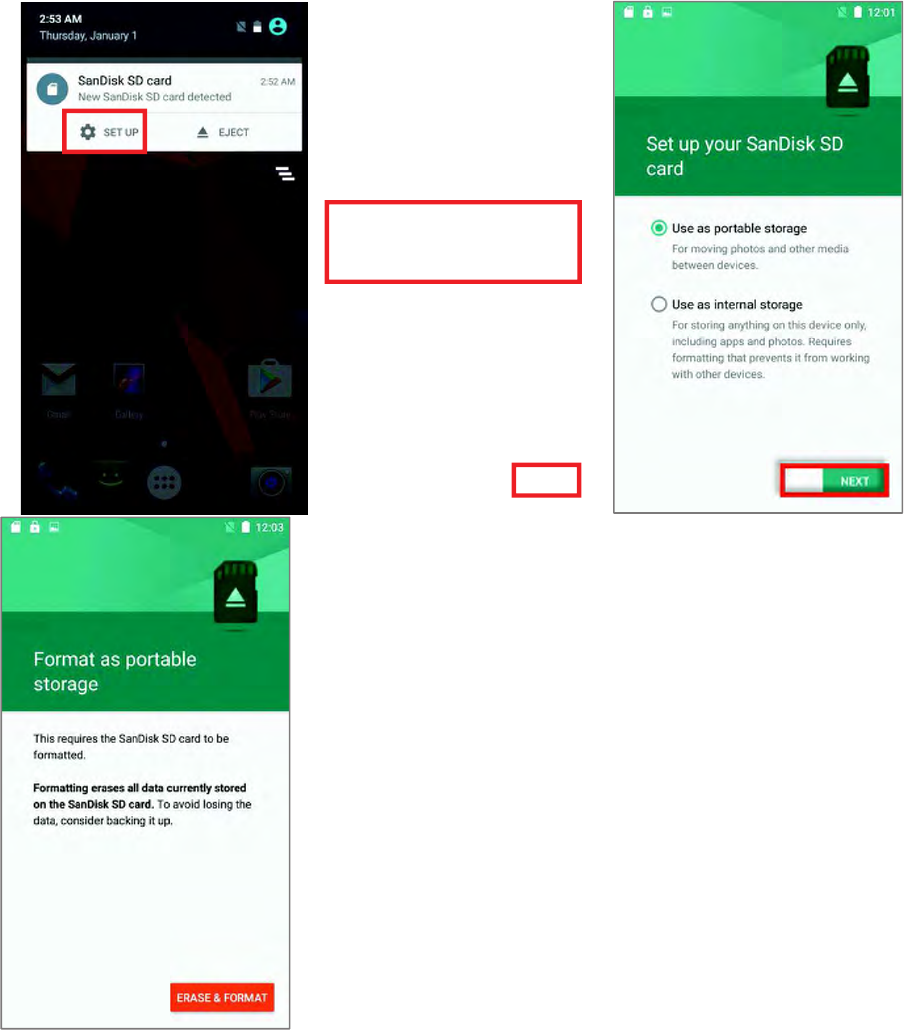
3)Tap “Use as portable storage” and then “NEXT”
4)Tap “ERASE & FORMAT” to format this card. The file format allows the card to be
readable on other devices such as PC or a digital camera.
5)At the window asking you whether to change the write disk from internal storage
(default) to the SD card, tap “OK” to do so or “Cancel ” to stay with the default setting.
6)When the setting is completed, tap “DONE”.
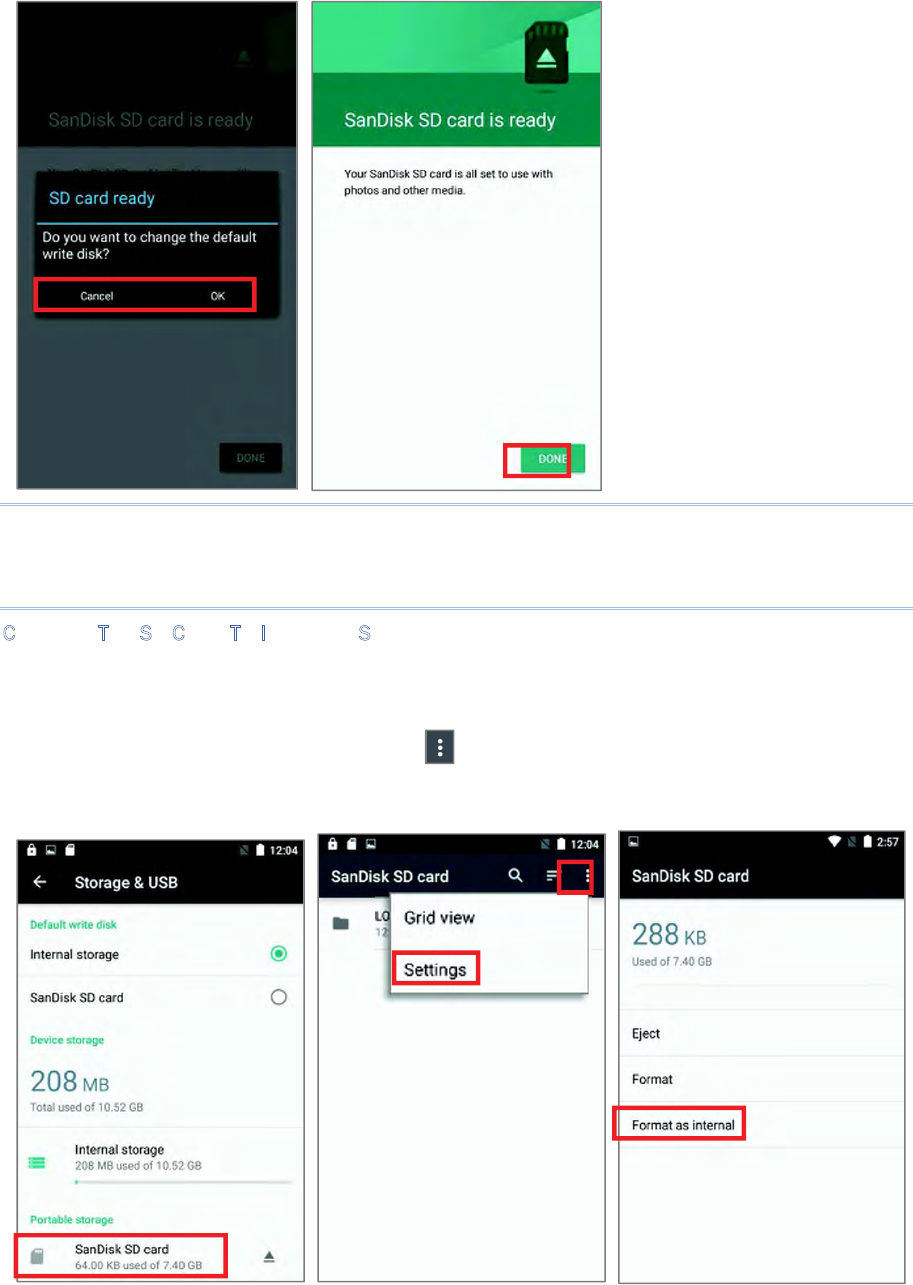
Note:
Please make sure the USB cable is properly connected while transferring files over USB
connection.
CONVERT THE SD CARD TO INTERNAL STORAGE
1) You can always convert the SD Card from portable storage to internal storage. On
Storage & USB screen, tap the SD card. Before you start, make a backup of the files on
this disk if you would like to keep them.
2) On SD card content screen, tap More and then tap “Settings”.
3) By selecting “Format as internal”, the device will eventually format this SD card
into a specific file format only readable by this device.
4) On Format as internal storage screen, tap “ERASE & FORMAT” to format the card.
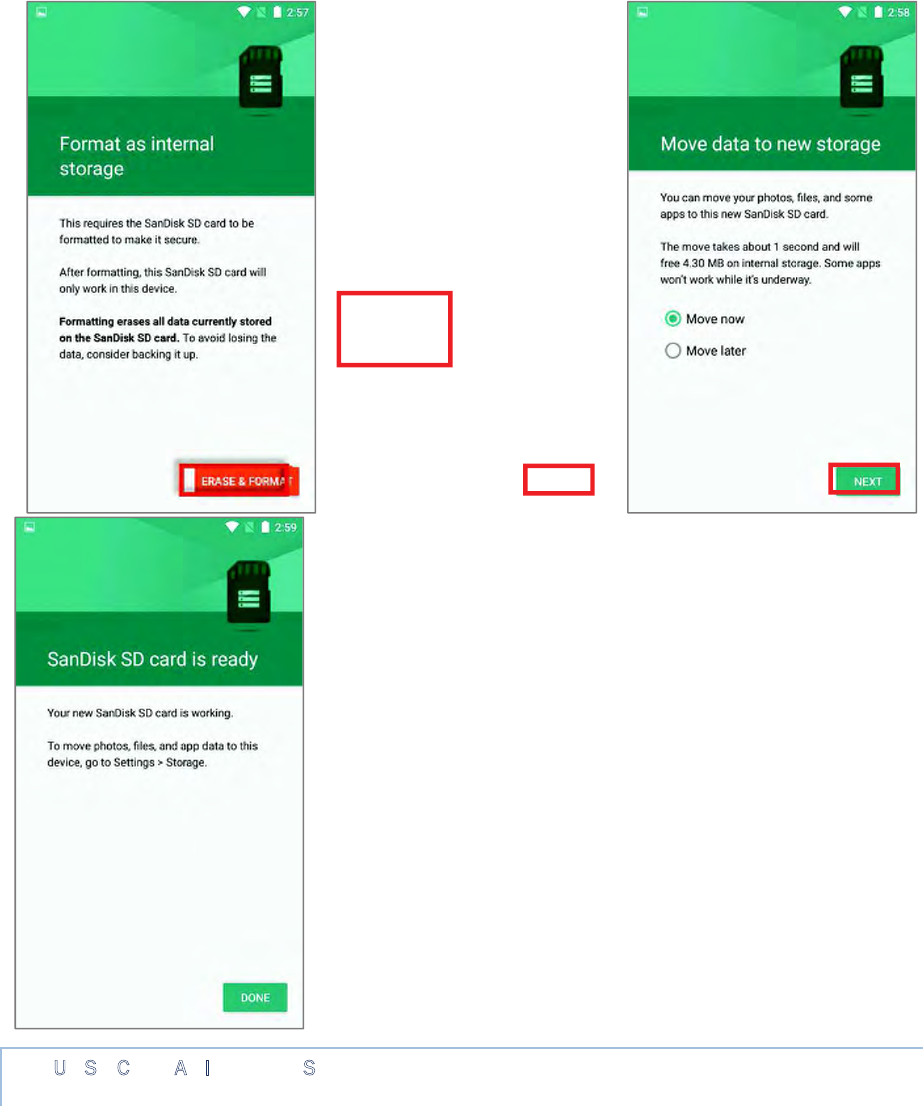
5) You will then be asked to whether to move media files to this new SD card right away
or later, make your choice and then tap “Next”.
6) When the formatting is completed, tap “DONE”.
SET UP SD CARD AS INTERNAL STORAGE
Using SD card as internal storage allows you to extend your existing device storage and to
store huge applications. This SD card will be reformatted and encrypted with a file format
that is not readable by another device. Therefore, it is essential that you back up important
files on this SD card in advance of formatting.
The disk content is not seen from PC client.
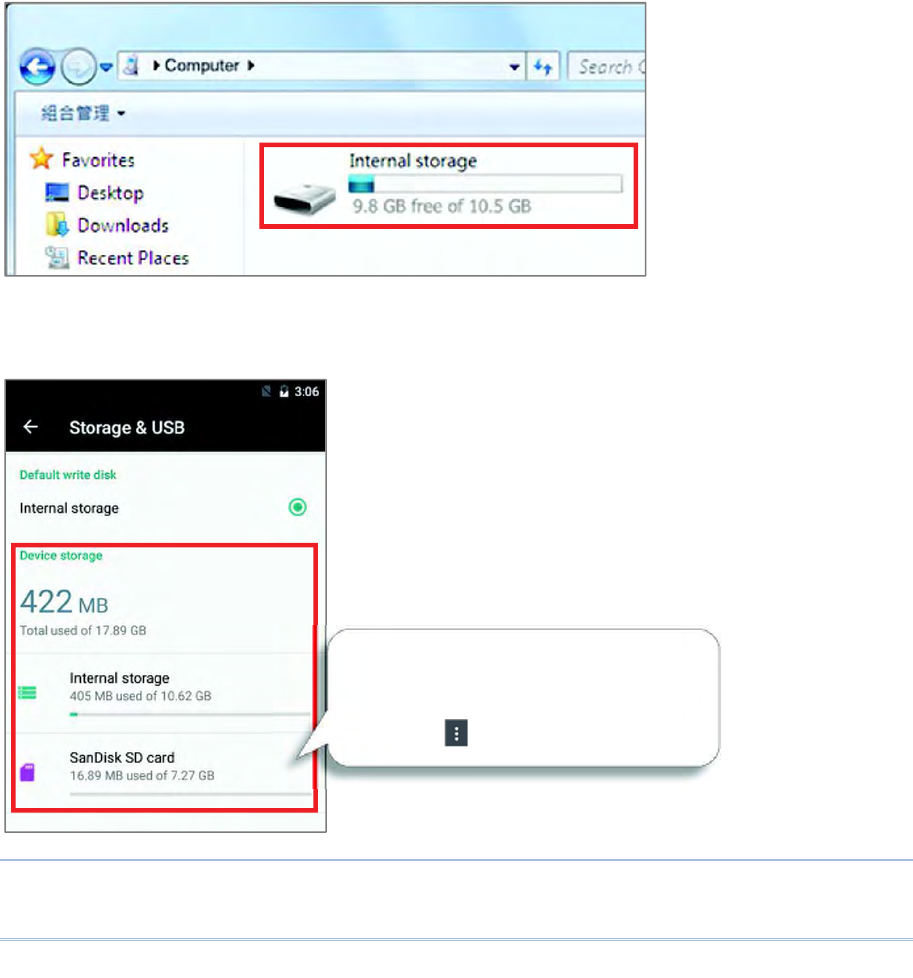
On Storage & USB screen, the capacity of this SD card is merged into the total device
storage. Please note that. In this setting, you will have no control of which files to be stored
on SD card.
Warning:
Do not physically remove the SD card from the device without ejecting this card in advance.
To eject this SD card:
1) Select this SD card.
2) On SD card content screen, tap
More and then tap “Eject”.
RS31/BHTͲ1600
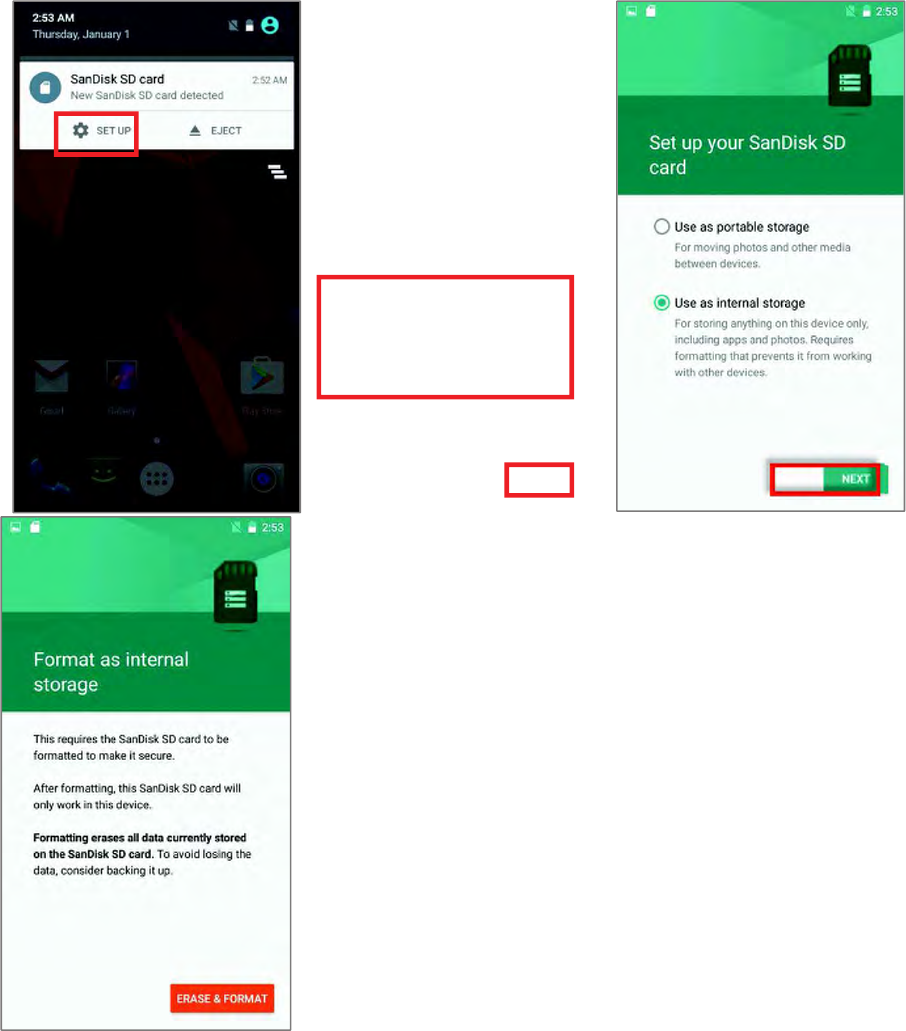
To start:
1) Insert the SD card. A notification will pop up indicating that an SD card is detected
tap “SET UP”.
2) Tap “Use as internal storage” and then “NEXT”.
3) Tap “ERASE & FORMAT” to format this card.
4) You will then be asked to whether to move media files to this new SD card, make
your choice and then tap “Next”.
5) When the setting is completed, tap “DONE”.
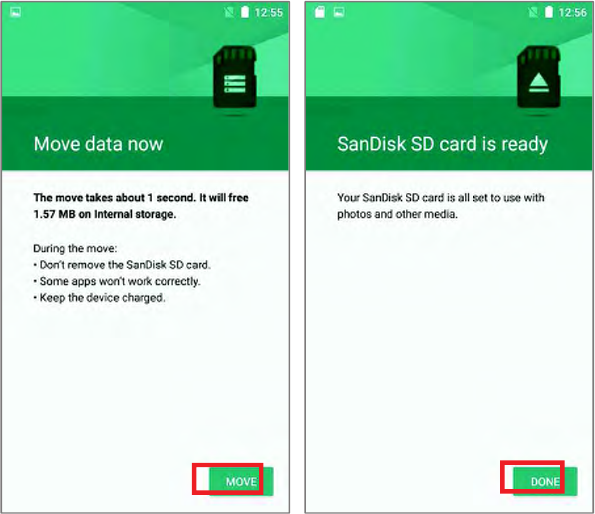
CONVERT THE SD CARD TO PORTABLE STORAGE
1) You can always convert the SD Card from internal storage to portable storage. On
Storage & USB screen, tap the SD card. Before you start, make a backup of the files on
this disk if you would like to keep them.
2) On SD card content screen, tap More and then tap “Format as portable”.
3) Tap “Format” to have this SD card re-formatted into a file type inaccessible by other
devices.
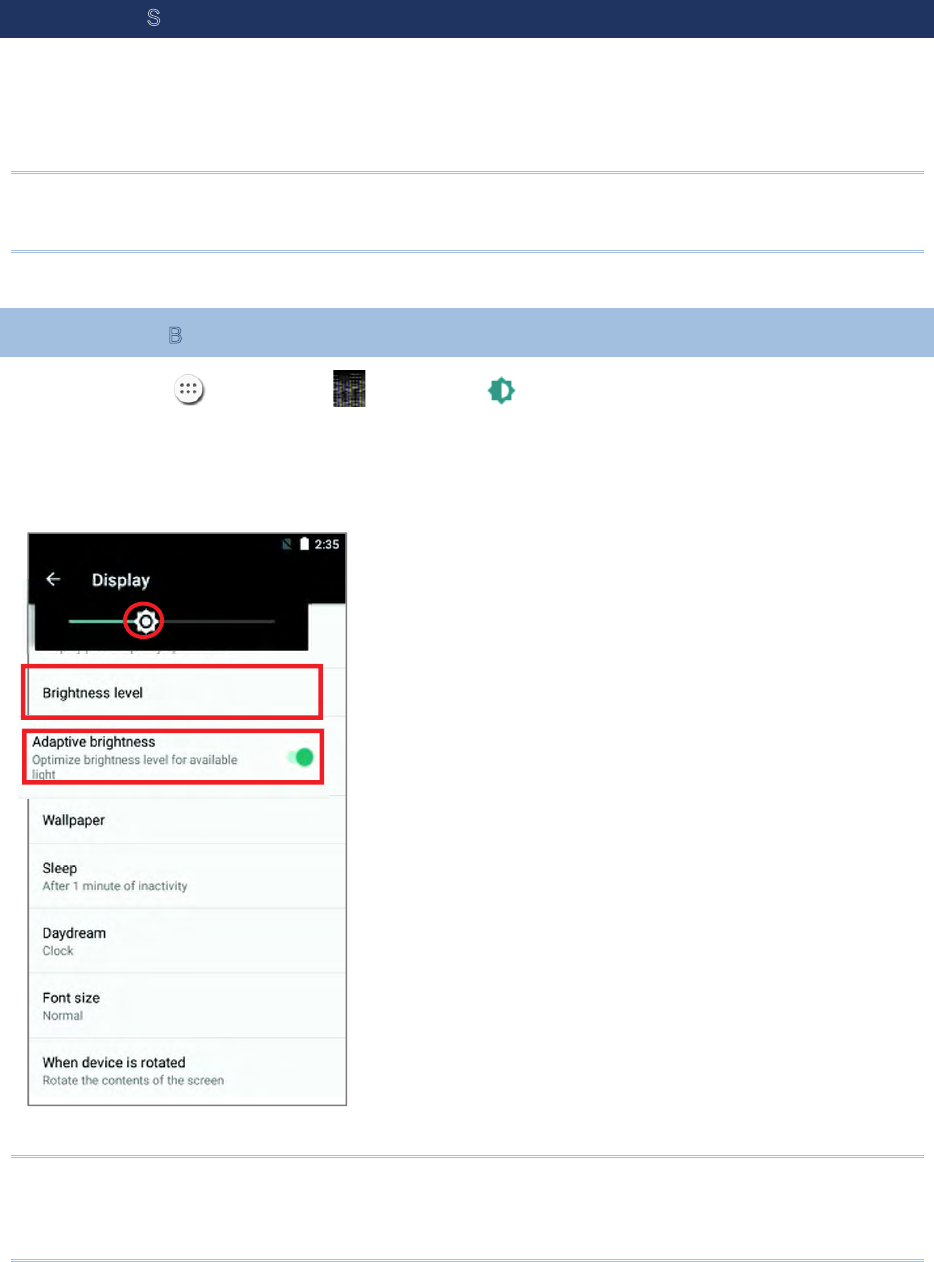
4) On Move data now screen, tap “MOVE” to migrate data from the device’s storage
to SD card and have the SD card become the primary storage location.
5) When the formatting is completed, tap “DONE”.
Note:
It is recommended that you
select “Move now” at Step
4 to have the device
immediately start making
use of SD card space. If you
select “Move later”, the
device will continue to
consider device’s original
storage the primary location
to save files.
2.3. TOUCH SCREEN
The handy terminal comes with a 4.7” transmissive LCD with 1280 by 720 pixels resolution
(HD). The LED backlight of the screen, which helps ease reading under dim environments,
can be controlled manually and automatically.
Warning:
DO NOT use any pointed or sharp objects to move against the surface of the screen.
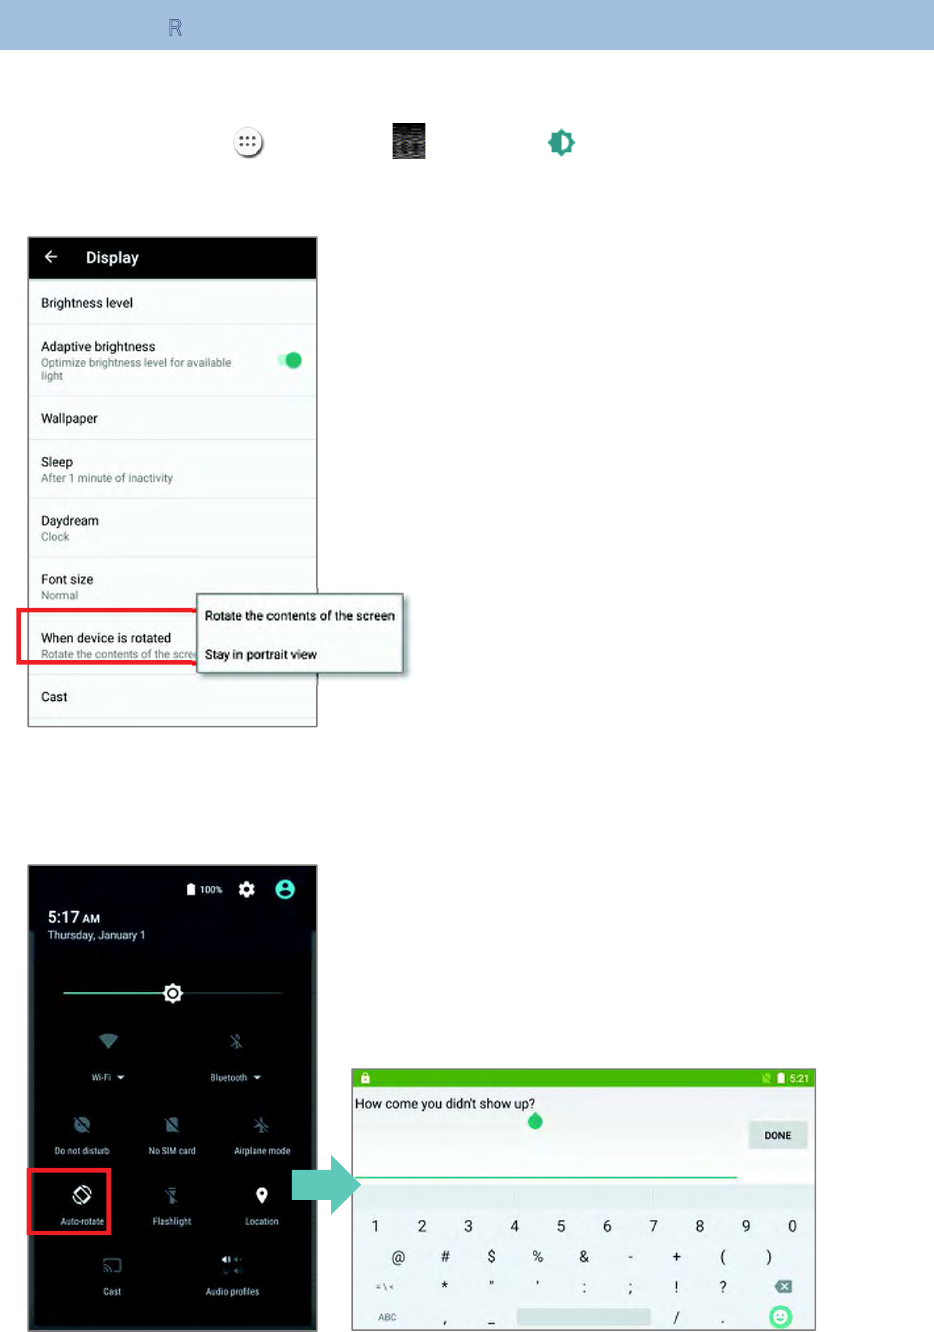
2.3.1. SCREEN BRIGHTNESS
Tap All Apps | Settings | Display | Brightness.
Adjust screen brightness by dragging the slider to the right (to increase brightness) or left
(to reduce brightness). Switch on the Adaptive brightness to enable automatic backlight
adjustment with the handy terminal’s built-in sensor. You can also use the shortcut button
on Quick Settings menu to adjust the brightness level.
Note:
To save battery power, dim the screen brightness while working in a well-lit area, or set a
shorter sleeping plan for the screen backlight to go off.
2.3.2. SCREEN ROTATION
By default, the device automatically rotates the screen to when you turn the device
sideways. To switch this function on or off:
1) Tap All Apps | Settings | Display .
2) Tap When device is rotated and them select Stay in portrait view to turn the rotation
function off or tap “Rotate the contents of the screen” to enable it.
OR
Use two fingers to swipe down from the top of the screen to open Quick Settings and tap
the Auto rotate status icon. This quick setting method allows you to temporarily enter
landscape mode to enhance your typing experience by using a wide keyboard.
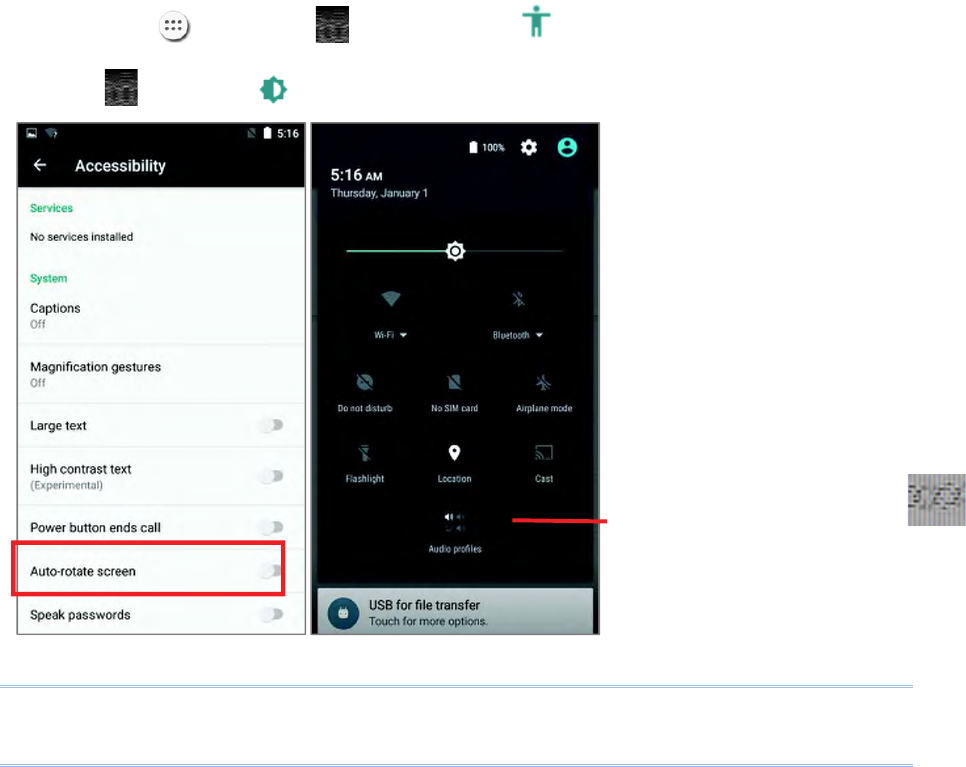
You can entirely disable the switch on the interface to minimize the possibility of
accidentally turning on the auto-rotation function.
Tap All Apps | Settings | Accessibility and switch off Auto-rotate screen.
By doing so, the auto-rotation option will be hidden on Quick Settings menu as well as in
Settings | Display .
Note:
Auto-rotation is not supported in Home Screen, All apps list and certain applications.
The Auto-rotate status icon
is absent.
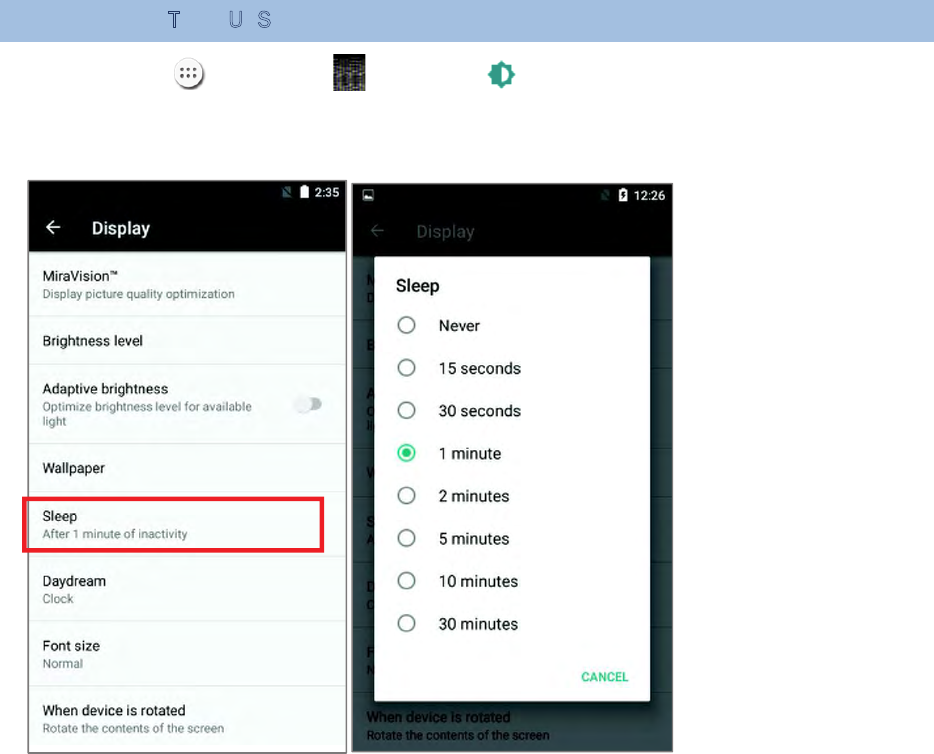
2.3.3. SCREEN TIMEOUT SETTINGS
Tap All Apps | Settings | Display | Sleep.
Select the time lapse for screen timeout.
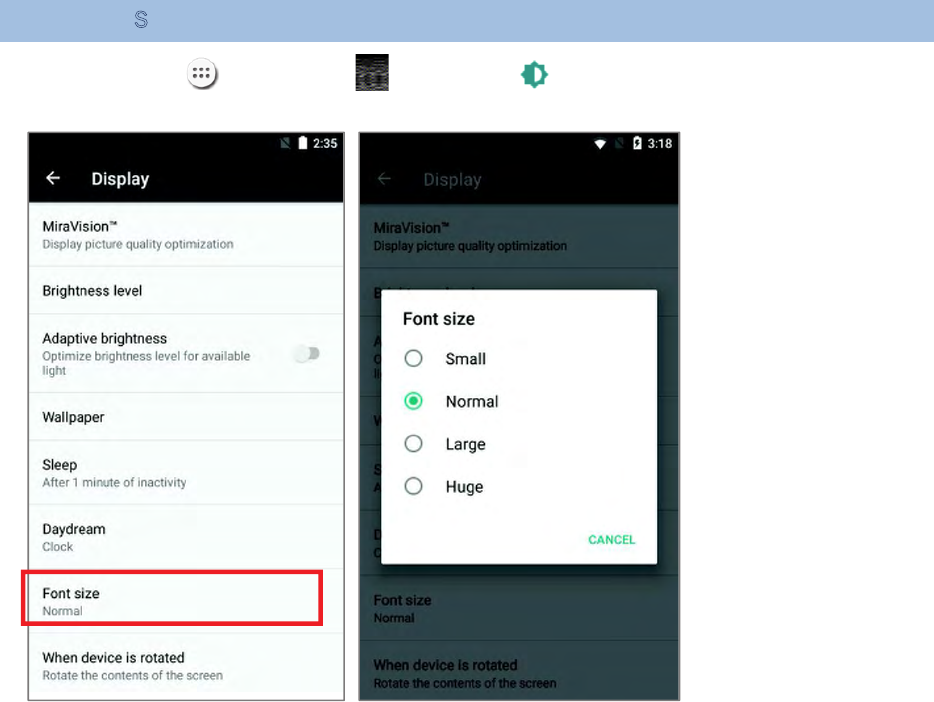
2.3.4. TEXT SIZE
Tap All Apps | Settings | Display | Font size. Select the font size
between Small,Normal,Large and Huge.
.
2.4. NOTIFICATIONS
2.4.1. STATUS LED
An LED indicators located above the touch screen provide information about charging
status, scanner light beam, and scanner "Good Read" during data collection.
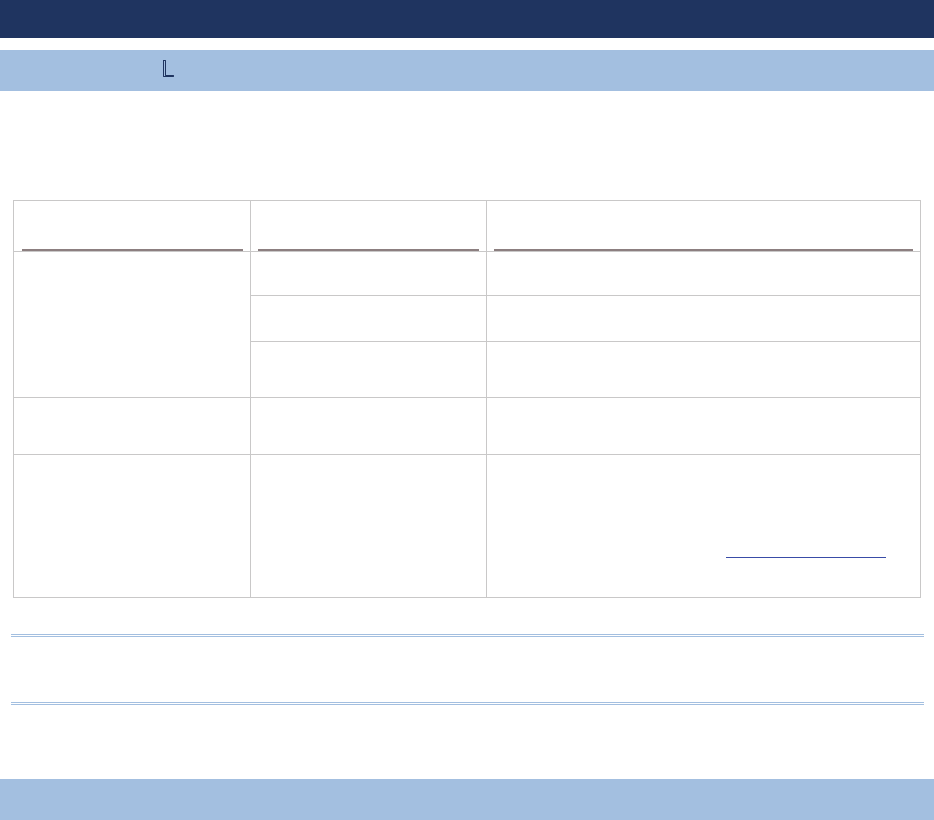
Indicator Status Description
Charging
Green, solid Charging complete
Red, solid Charging the handy terminal
Red, blinking Charging error (for instance, battery not in
place)
Barcode or RFID tag
decode Green, flash once Good read
The device is on
backup battery power
(the battery cover is
removed)
Red, solid
Upon the removal of the battery cover, the
red light is on for a while and then goes off to
signal that the main battery is ready to be
removed. Please refer to Battery Hot Swap to
perform a successful battery hot-swapping.
Note: For Scanner decode and Scanner beam LED to function, LED notification must be
enabled in Reader Configuration.
2.4.2. AUDIO
The speaker is used to play sounds for events in windows and programs, or play audio files.
In addition, it can be programmed for status feedback. In noisy environments, you may
consider connecting a headset instead. A headset jack is provided on the top of the handy
terminal, which is a 3.5 mm DIA stereo earphone jack. The handy terminal also supports
using Bluetooth headsets.
Supported audio file formats include: WAV, MP3, AAC, AAC+, Enhanced AAC+, AU
(including ADPCM), Midi, XMF, AMR (NB and WB).
Use the volume buttons on the side of the handy terminal to adjust the system volume.
2.4.3. SOUNDS AND VIBRATION
The handy terminal is integrated with a vibrator, which is software programmable for
tactile feedback. This can be helpful when working in noisy environments.
You may also set the handy terminal to vibrate only, in which all system sounds will be
muted and replaced by the vibrator.
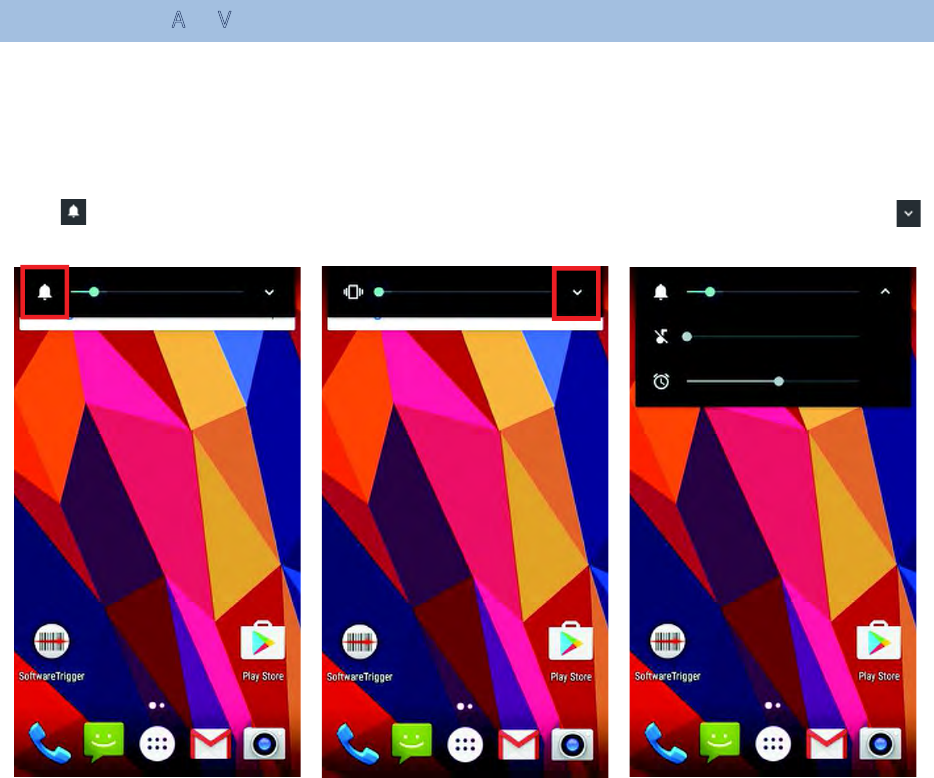
On any screen, press down Volume Up or Volume Down key to open quick sound menu.
Tap to switch this device to Vibration mode. To modify specific sound settings, tap
to access more settings.
2.5. DATE AND TIME
2.5.1. SET DATE, TIME AND TIME ZONE
By default, the handy terminal automatically synchronizes the date and time to the WWAN
network (if connected).
To set the date and time manually:
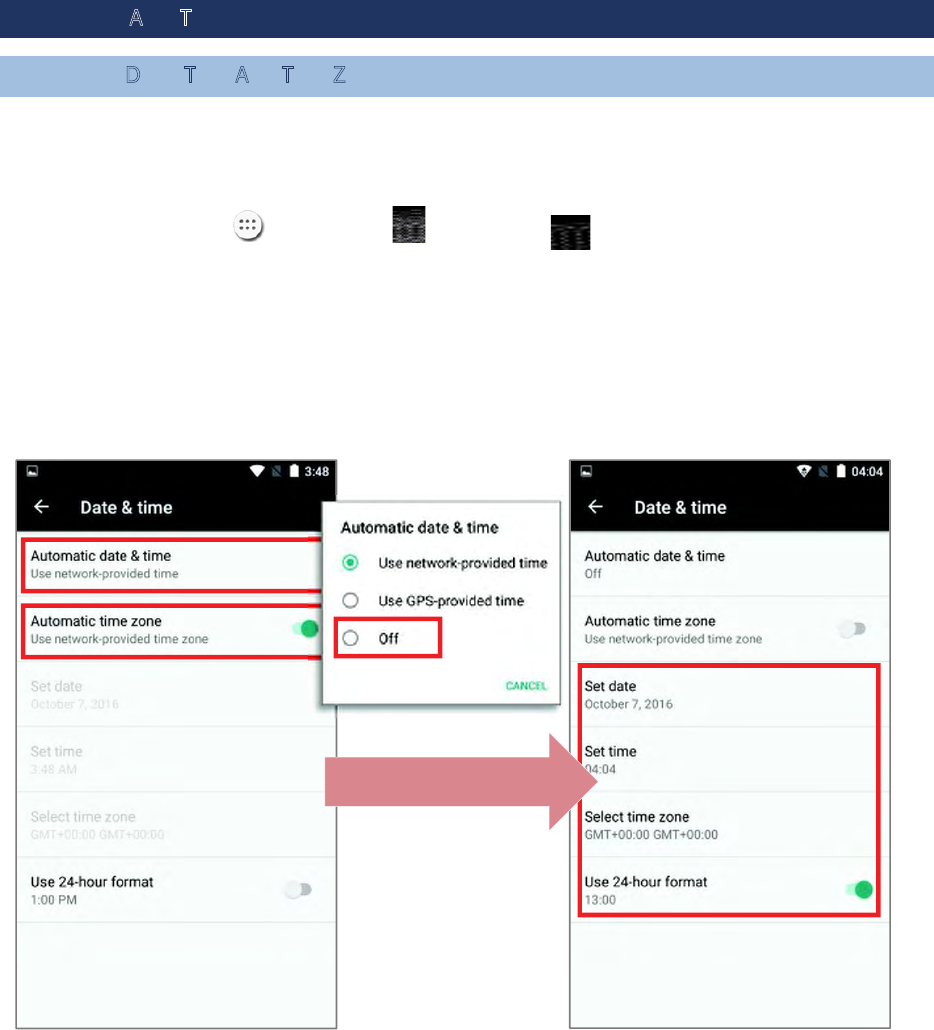
1) Tap All Apps | Settings | Date & time .
2) Tap Automatic date & time and select Off to disable using network-provided time.
3) Deselect Automatic time zone.
4) Tap Set date. Use the sliders to select the correct month, date and year. Tap OK to
save.
5) Tap Set time. Use the sliders to select the correct time. Tap OK to save.
6) Tap Select time zone. Select the correct time zone from the list.
2.6. LANGUAGE & KEYBOARD INPUT
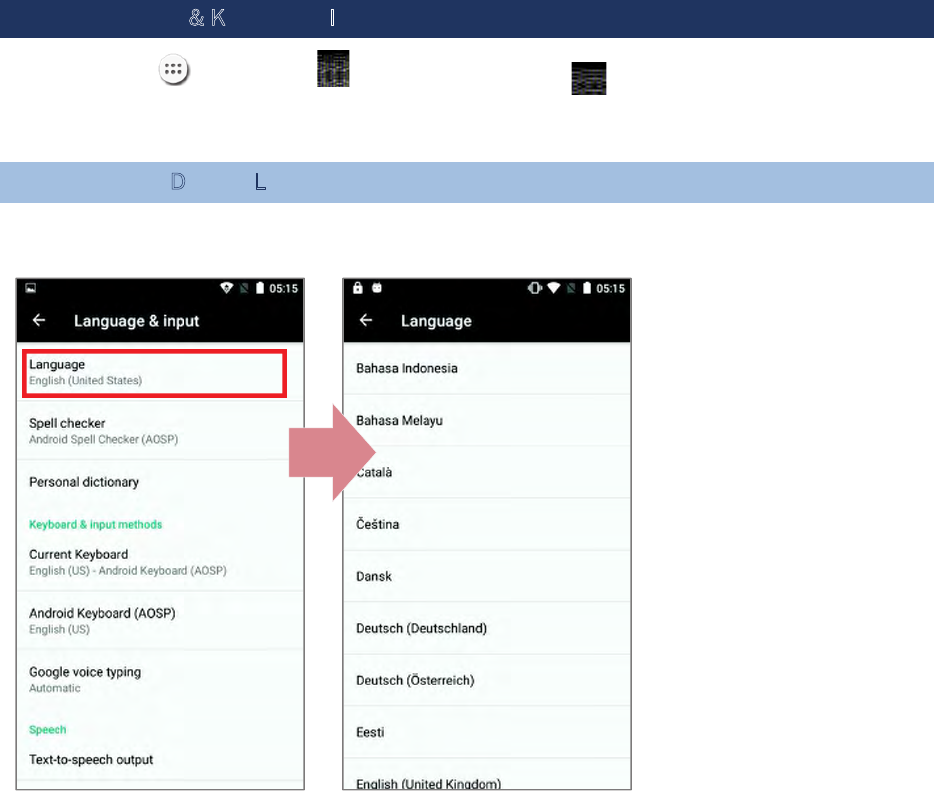
Tap All Apps | Settings | Language & input to change the system language,
default keyboard type, and configure keyboard input and speech settings.
2.6.1. CHANGE DISPLAY LANGUAGE
On Language & input screen, tap Language and then select your desired system
language, the new setting will immediately be applied after your selection.
2.6.2. ON-SCREEN KEYBOARD
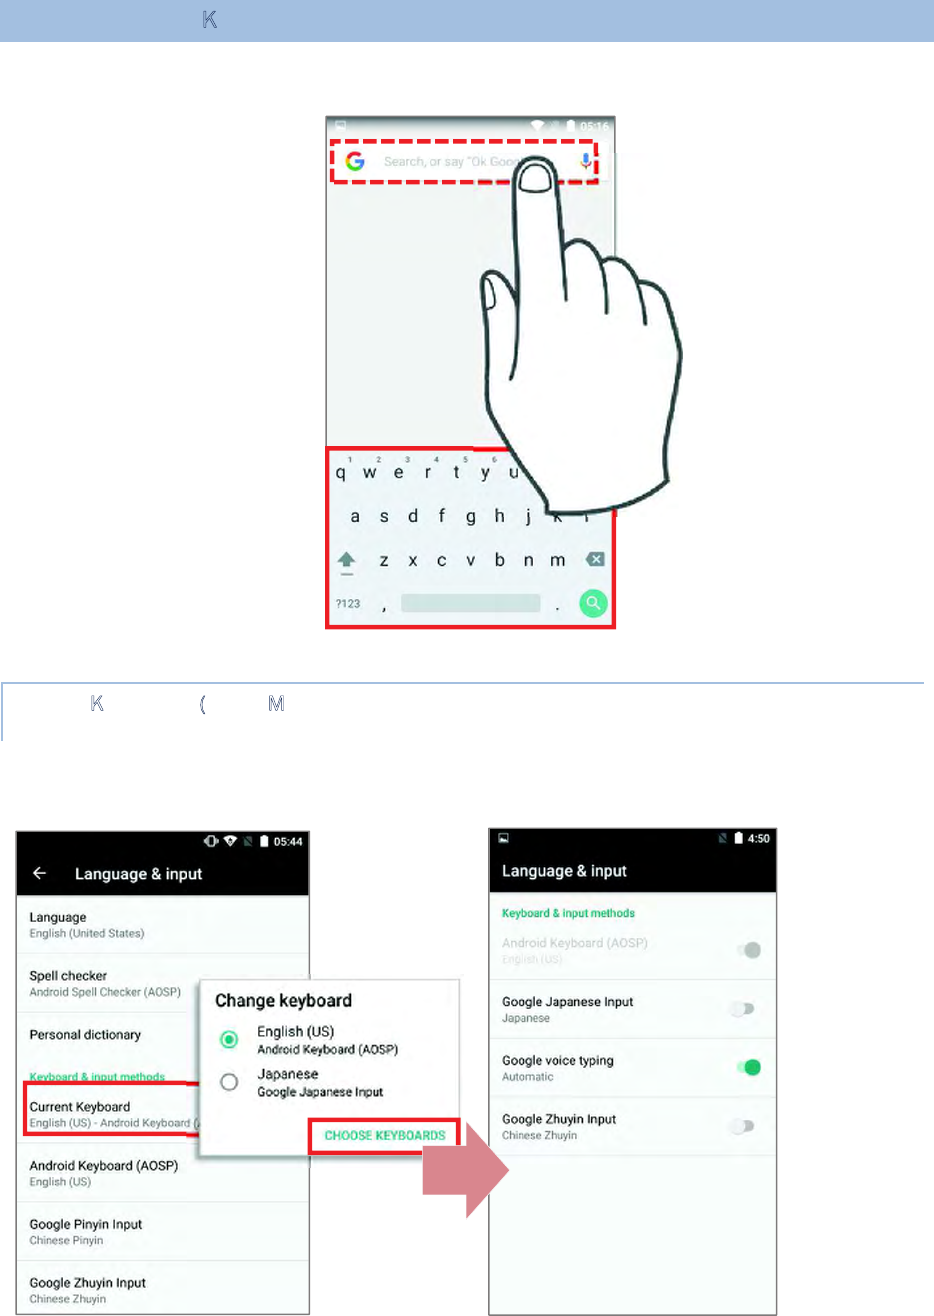
Tap a text input field to automatically open an on-screen keyboard. The virtual keyboard
will vary depending on the data type (text or numbers) this field requires.
SELECT KEYBOARD (INPUT METHOD)
On Language & input screen, select Current Keyboard to change your current
keyboard or manage the selectable keyboards by entering “CHOOSE KEYBOARDS” and
enable the input methods you need.
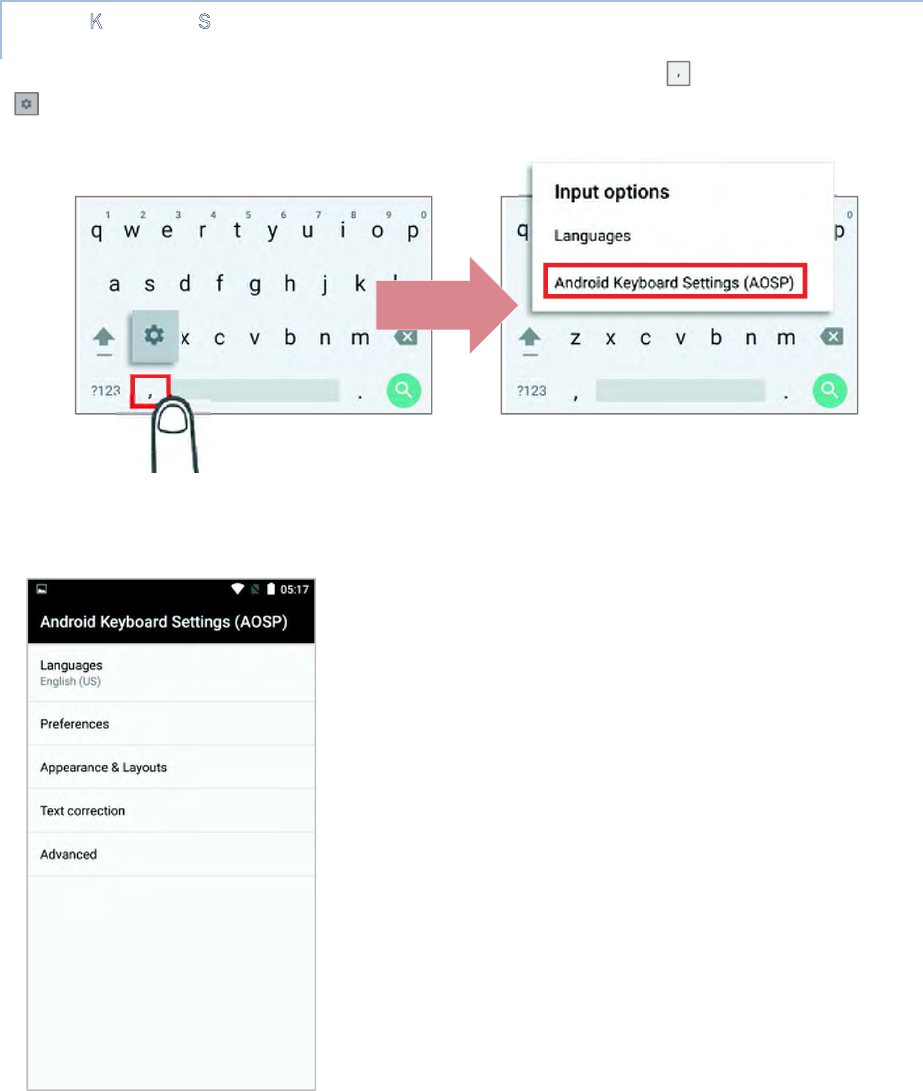
ADJUST KEYBOARD SETTINGS
To configure keyboard settings, tap and hold the comma button until a settings button
appears. A menu will open, allowing you to adjust input language (if you would like to
use an input language different from the system language) or keyboard settings.
By tapping Android Keyboard Settings (AOSP), you can further adjust the settings to
suit your needs.
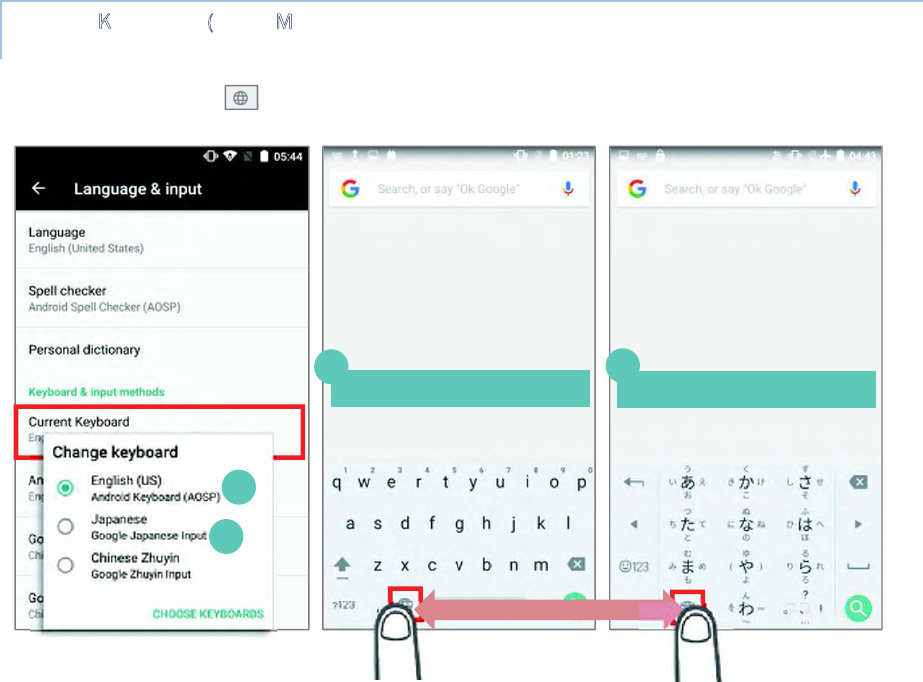
CHANGE KEYBOARD (INPUT METHOD)
The input methods you enabled in Current Keyboard under Language & input are
available by tapping on the on-screen keyboard, to use other input methods, simply tap
it to cycle through the options.
English (US) Keyboard Japanese Keyboard
1
2
1
2
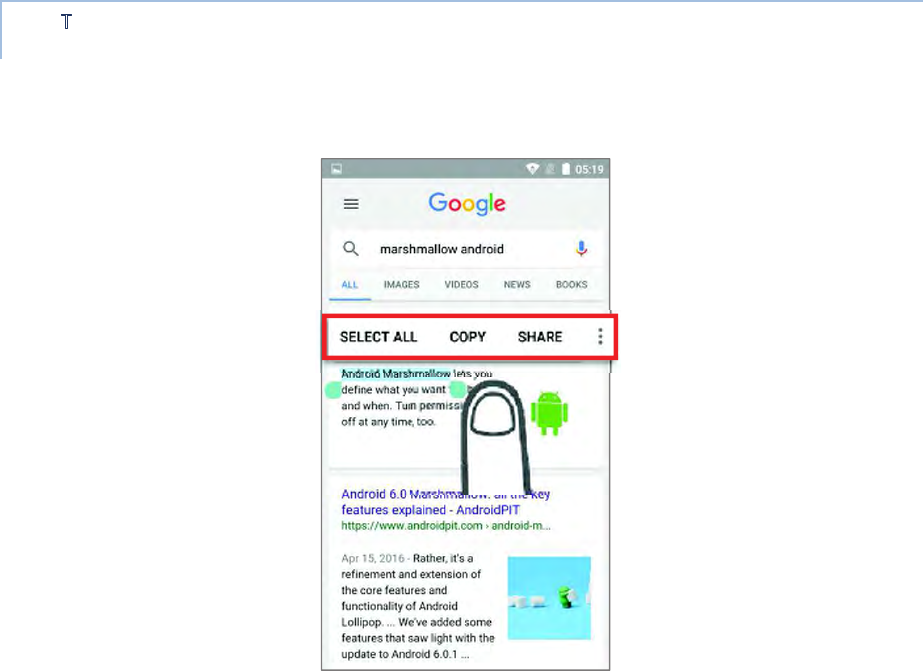
EDIT TEXT
Tap and hold text on the screen to enable a text editing menu for selecting all text, or
copying and pasting text within or across applications. Some applications may use different
ways to select or edit text.
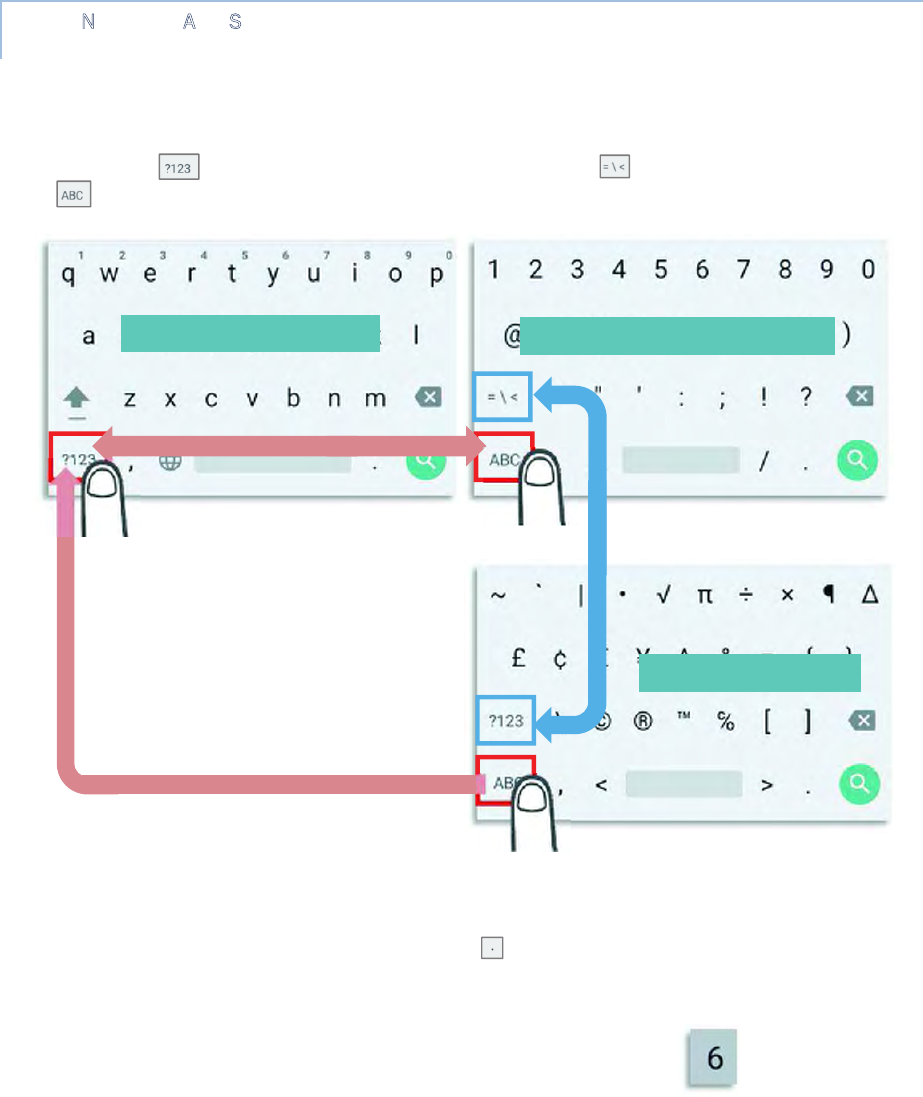
ENTER NUMBERS AND SYMBOLS
The appearance of the switch button to numeric or symbol keyboard may vary; the example
below demonstrates how to use the switch key to access your desired numeric or symbol
keyboards from the default Android English (US) keyboard. To enter Numeric / Symbol
keyboard, tap .On Numeric / Symbol keyboard, tap to access more symbols or
tap to return to Android English (US) keyboard
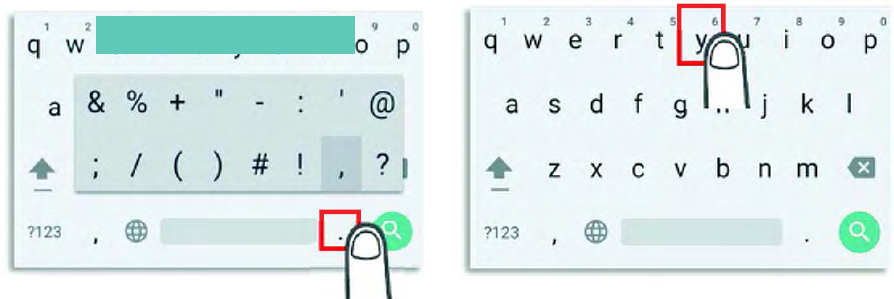
On Android English (US) keyboard, you can input number or symbols without switching
to Numeric / Symbol keyboard.
Tap and hold the period button to open quick symbol keyboard.
Tap and hold a letter from q~p on the top row to bring up the specific number
key.
English (US) Keyboard Numeric / Symbol Keyboard
Symbol Keyboard
English (US) Keyboard
ENTER UPPERCASE LETTERS
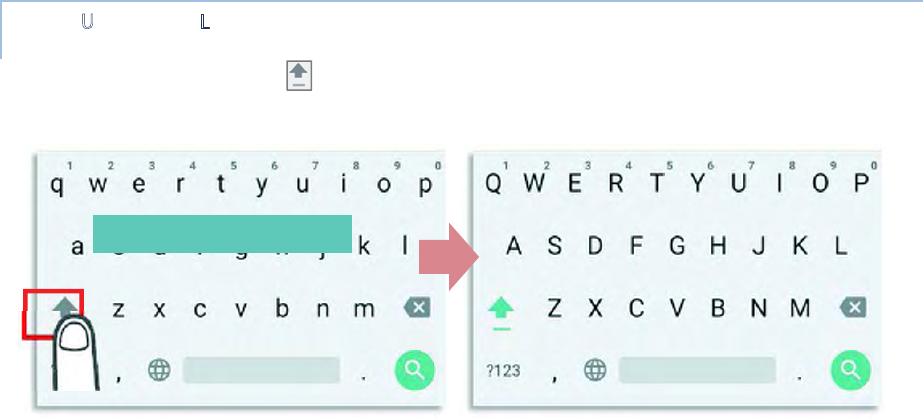
Tap and hold the Shift key , and tap a character key to enter an uppercase letter. The
letters will return to lower case once an uppercase letter is entered.
English (US) Keyboard

2.7. SOUND AND VOLUME
Use the volume buttons on the left side of the handy terminal to adjust system and ringer
volume.
2.8. PROGRAMMABLE KEYS
Use the volume buttons on the left side of the handy terminal to adjust system and ringer
volume.
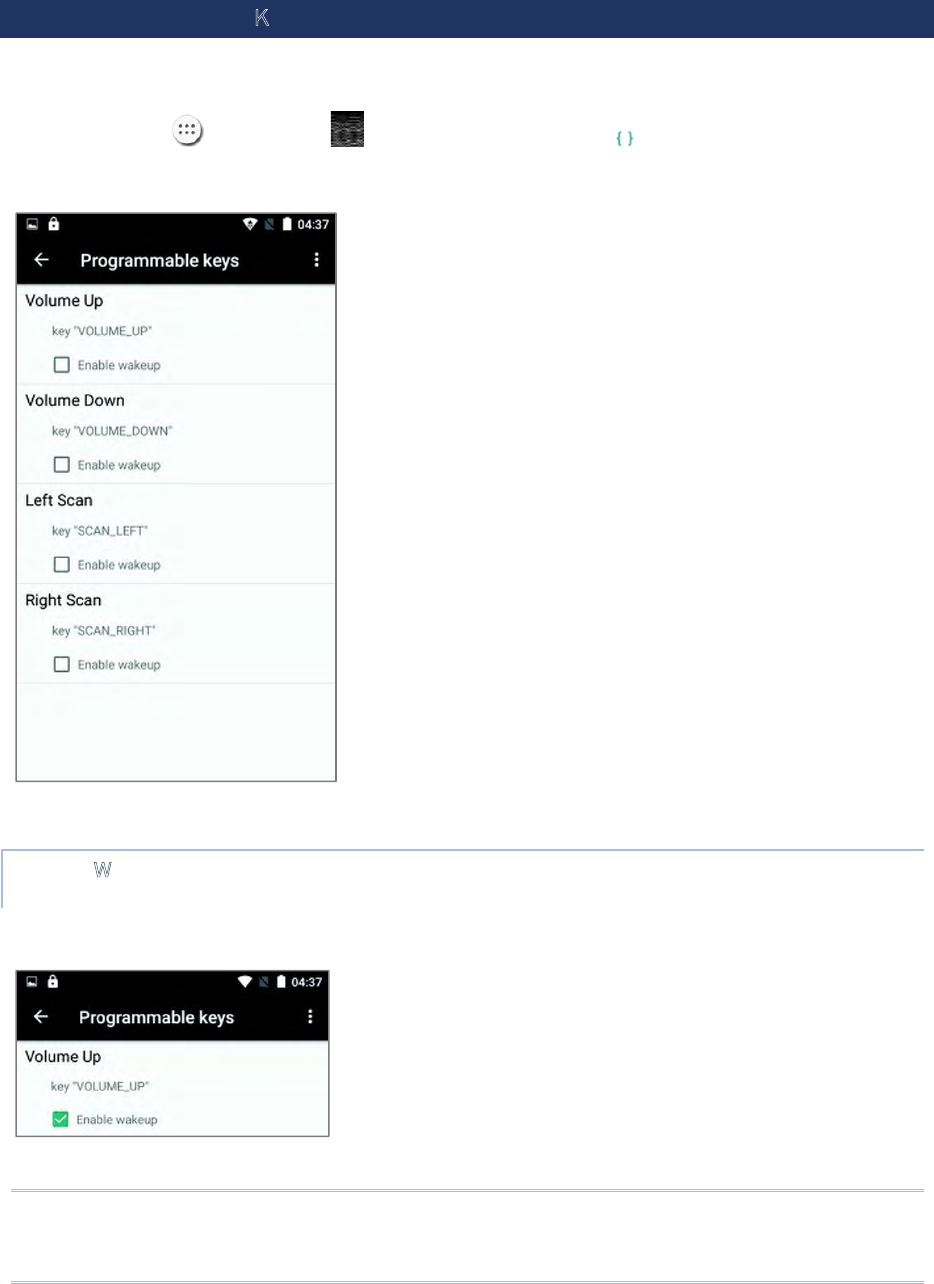
Tap All Apps | Settings | Programmable Keys to assign specific functions
to the four programmable keys: volume up, volume down, and the left and right function
keys (side keys).
After redefining the programmable keys, the changes will immediately take effect.
ENABLE WAKEUP
Select the Enable wakeup checkbox to enable pressing the key to wake the handy
terminal from suspend mode.
Note:
This checkbox is automatically disabled if an application is selected for the key on the Apps
tab page.
ASSIGN KEYCODE
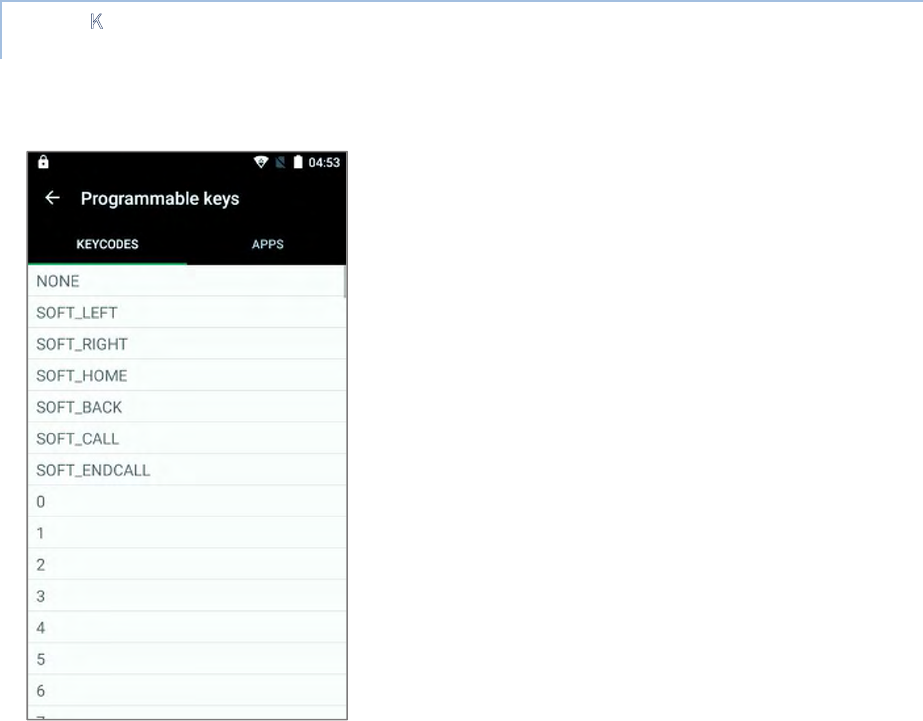
Tap the key you would like to assign. A screen opens showing a list of available keycodes
or applications. On the Keycodes tab page, scroll down to view the entire list of keycodes,
and tap a keycode to apply.
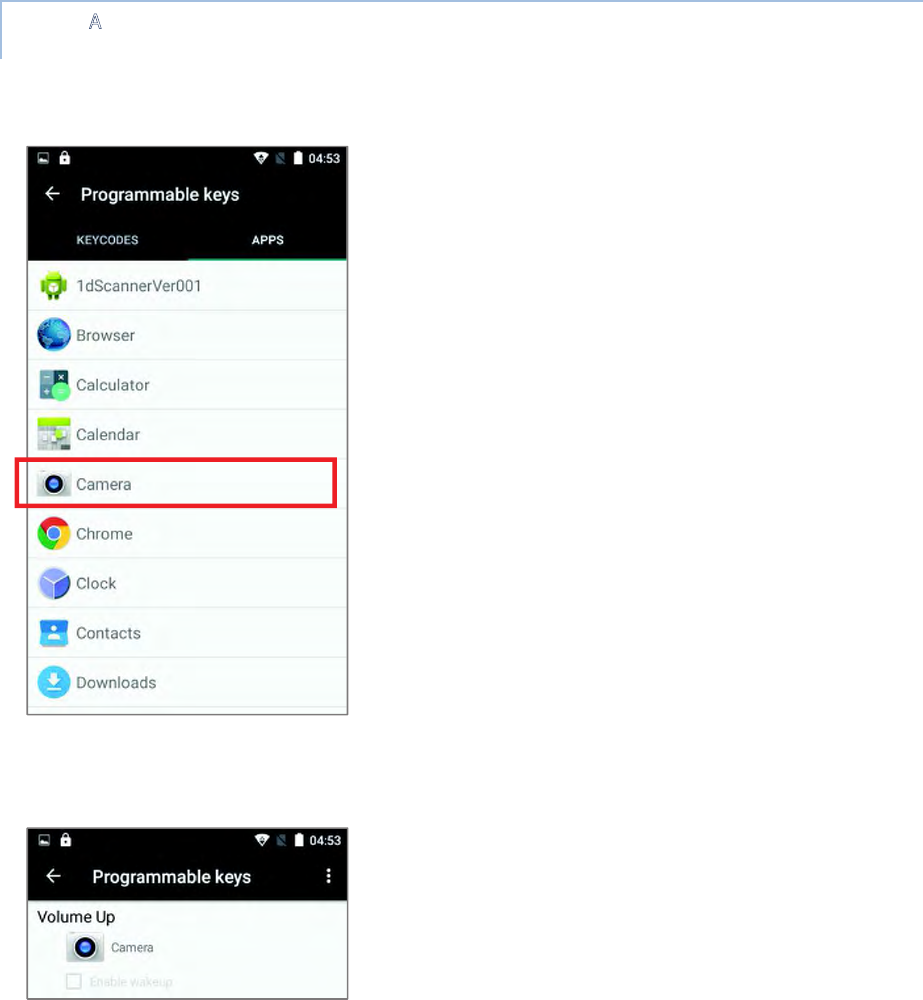
ASSIGN APPLICATION
Tap the key you would like to assign. Tap the Apps tab page to open a list of available
applications. Scroll down to view the entire list of applications, and tap an application to
apply.
After an application is selected, an icon will appear next to the assigned key. Also, the
Enable wakeup checkbox will be automatically disabled.
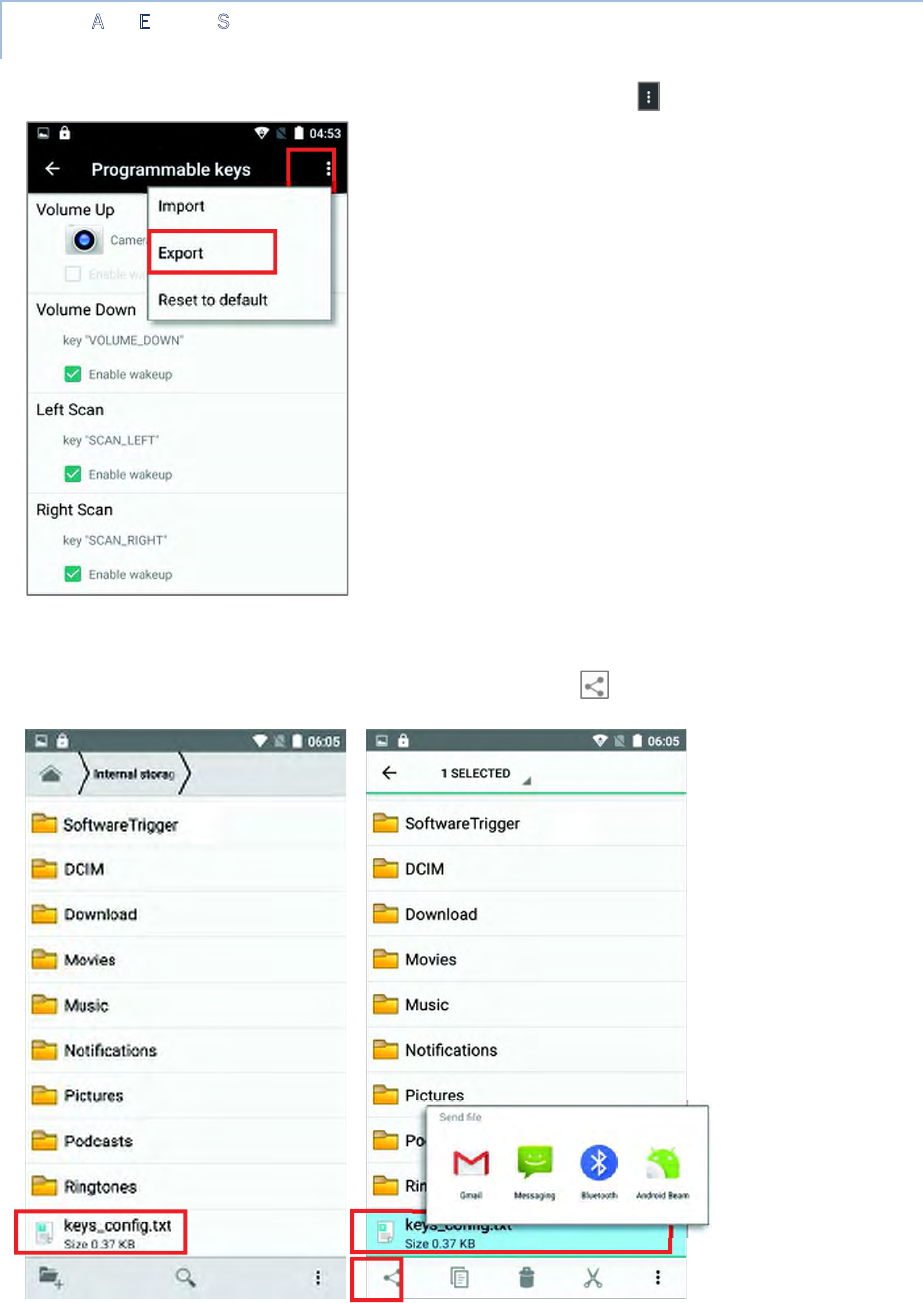
IMPORT AND EXPORT SETTING
After finishing configuring the keys, you can save the setting to a txt file, allowing you to
apply the same setting to other devices. To do this, tap More and then “Export”.
This configuration file will be saved in the internal storage as keys_config.txt. To share
it with other devices, tap and hold the file name, tap share to select a file-sharing
method from Send file menu. Please make sure the filename is not renamed.
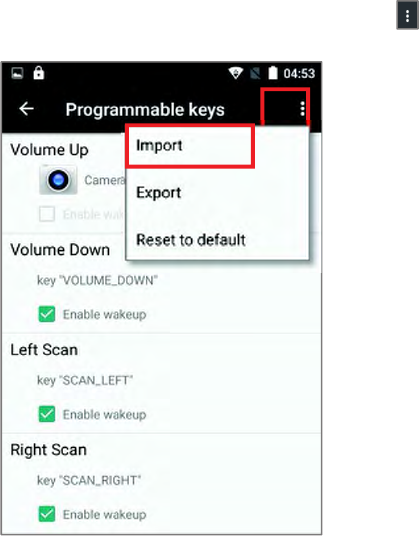
To import the configuration file to be used in Programming Keys, make sure the file is
saved in the phone’s internal storage with the file name keys_config.txt. On
Programming Key screen, tap More and then “Import”. The new setting will be
immediately applied to the keys.
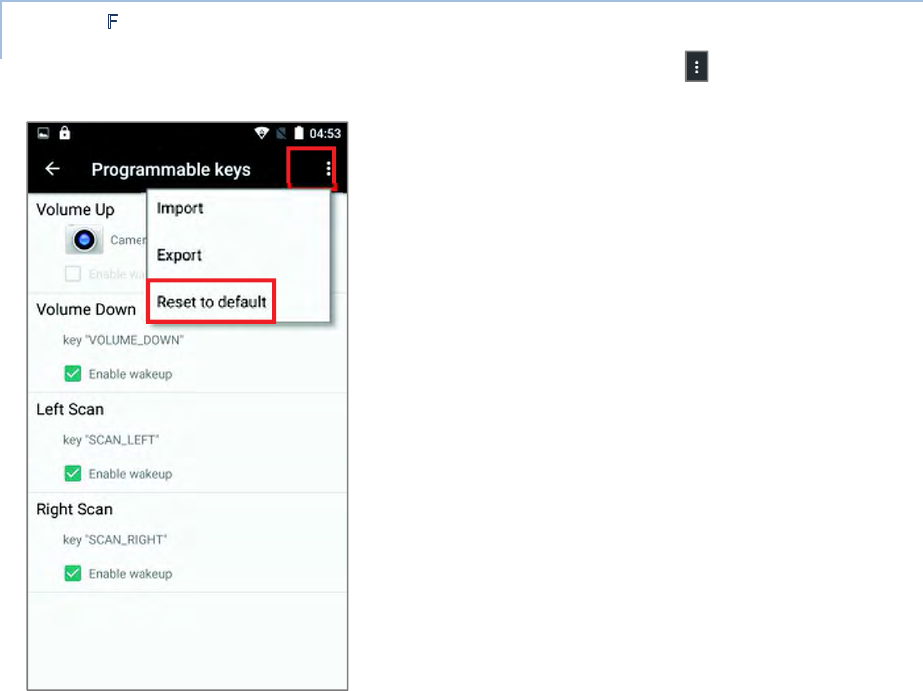
RESTORE FUNCTION
To restore a key to its previously assigned function, tap menu key and then tap “Reset
to default”.
2.9. DATA CAPTURE
2.9.1. BARCODE READER
A selection of scan engines is available for delivering flexibility to meet different
requirements. Depending on the scan engine integrated, the handy terminal is capable of
scanning barcodes of a number of symbologies that are enabled by default while running
the ReaderConfig application. If you need to scan barcodes that are encoded in a different
symbology, enable the symbology first.
2.9.2. DIGITAL CAMERA
An integrated 8 megapixel rear camera in the handy terminal is specifically designed for
collecting image data. You may use the image capture utility to turn on the camera and
capture images. By default, the images taken by this camera application are saved as JPG
files in DCIM folder in the device’s primary storage.

Chapter 3
BASIC OPERATION
This chapter describes the basic skills to work with the RS31/BHT-1600 handy terminal,
for instance how to operate the home screen, check system statuses and manage
notifications. The add-on utilities for applications regarding data collection, processing, and
transmission are introduced in the following chapters.
IN THIS CHAPTER
3.1 Home Screen ............................................................ 75
3.2 Status Bar ................................................................ 86
3.3 Manage Applications ................................................... 89
3.4 Suspend & Lock ......................................................... 92
3.5 OS Update ................................................................ 94
3.6 Back up Your Data ..................................................... 96
3.7 Reset to Factory Default ............................................. 97
3.1. HOME SCREEN
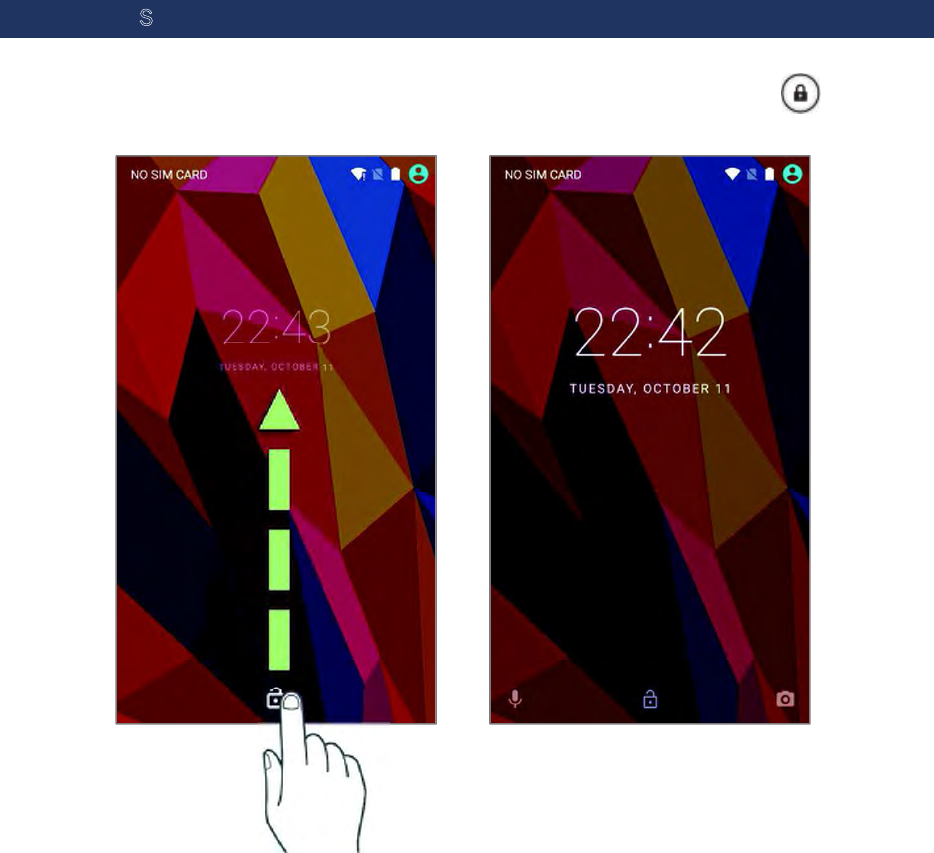
When the handy terminal is fully charged, press the Power key for three seconds to turn on
the handy terminal. A locked screen will appear. Slide the lock button in either
direction to unlock the screen.
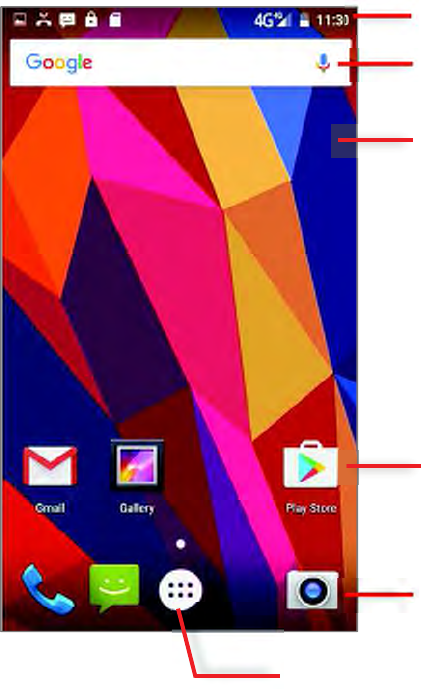
The Home Screen appears showing a status bar, shortcut icons, and a dock bar
containing an All Apps button. The home screen allows multiple pages for placing shortcut
icons and widgets. You may customize the home screen according to your preferences.
Shortcut icons
Dock
All Apps button
Status bar
Search bar
Widget icons
3.1.1. CUSTOMIZE HOME SCREEN
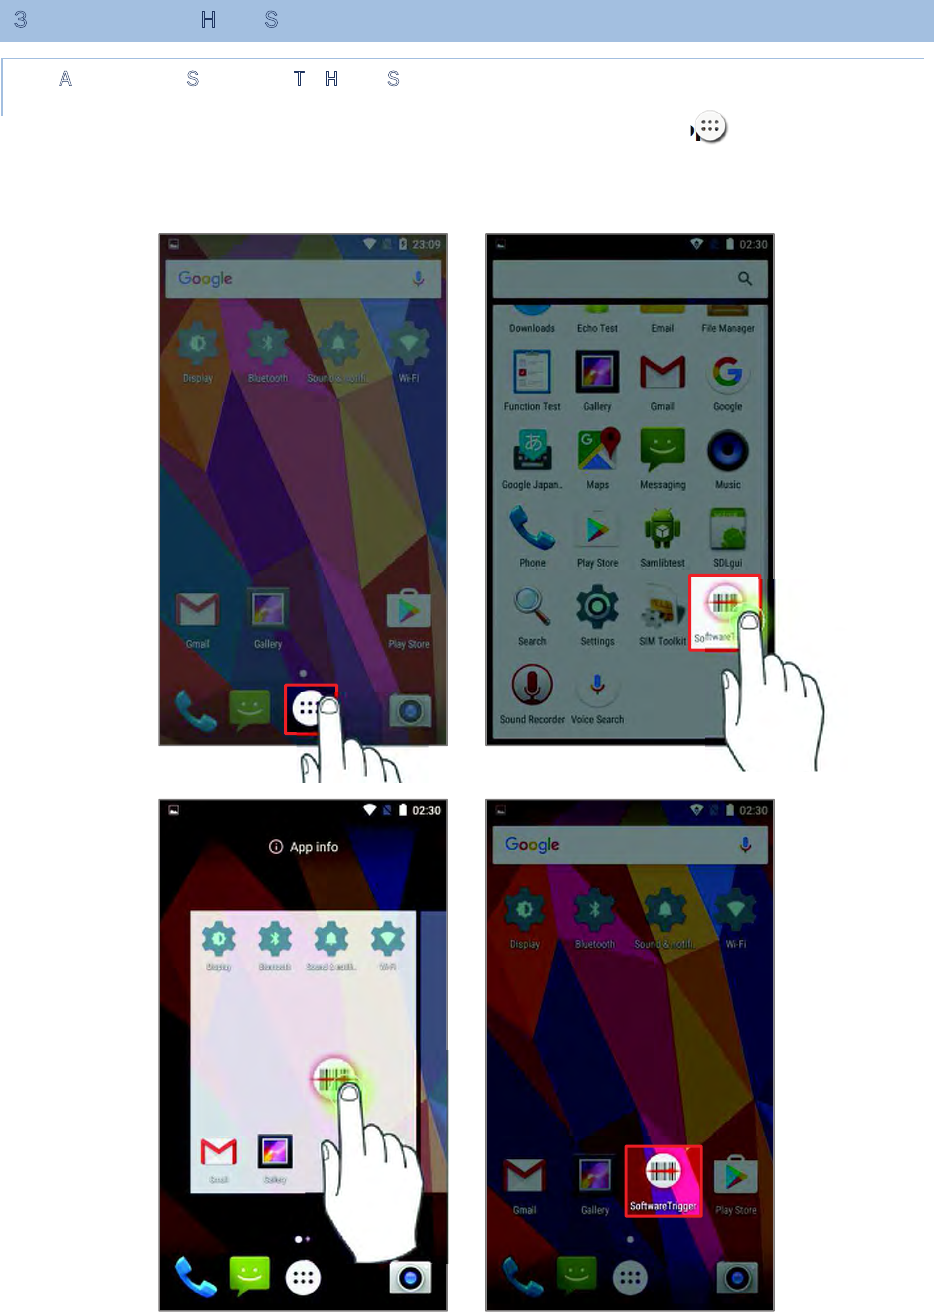
ADD APPLICATION SHORTCUT TO HOME SCREEN
1) On the home screen you would like to customize, tap All Apps .
2) Locate the application to add, tap and hold the application icon.
3) The home screen will appear. Drag the application icon to your preferred position
and release to have it placed.
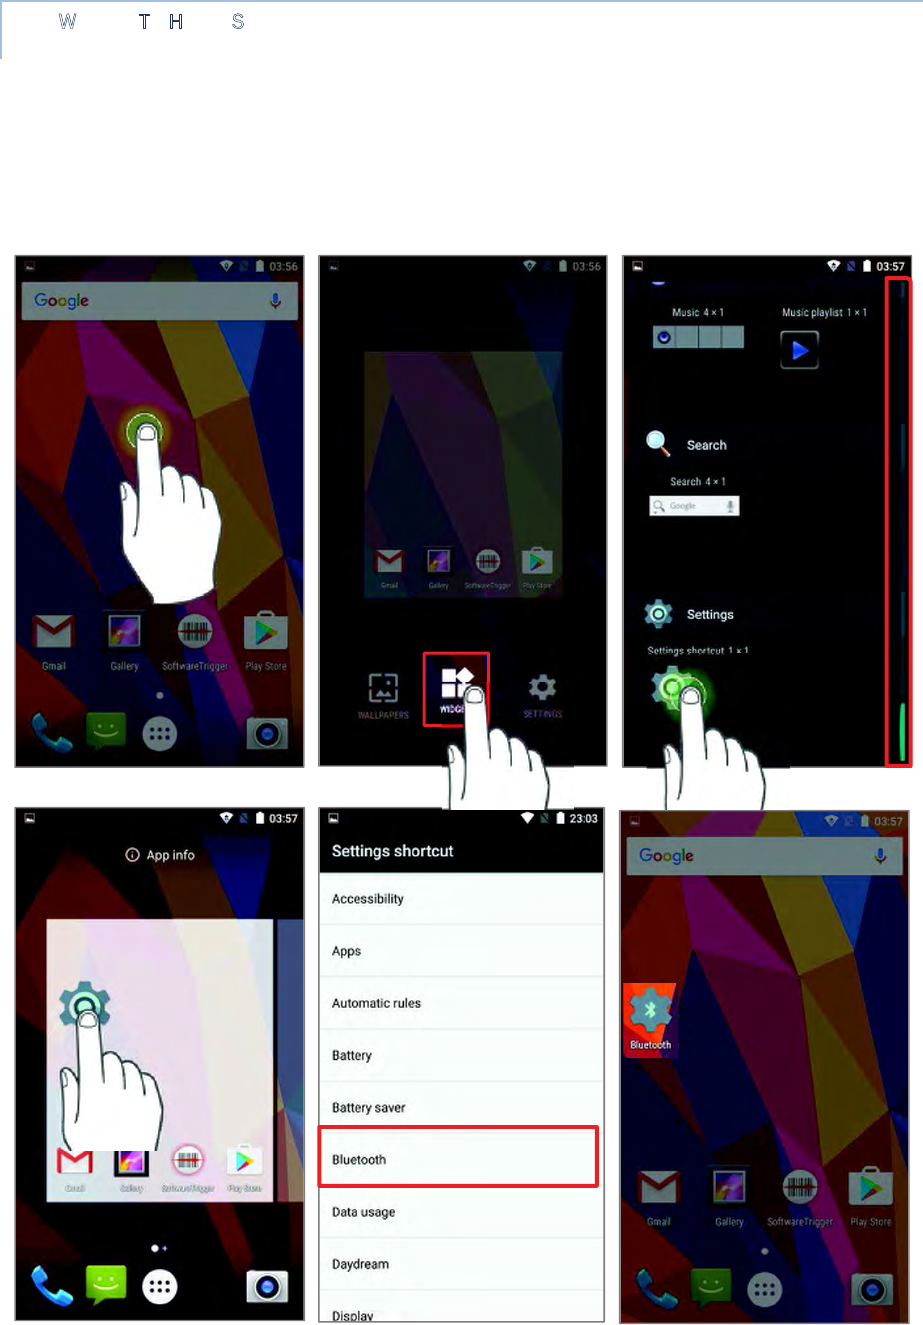
ADD WIDGET TO HOME SCREEN
1) Tap and hold any empty spot on the home screen.
2) The current layout will shrink, and the available options related to home screen
appear on the bottom. Tap Widgets to enter the widget selection list.
3) In the widget selection list, scroll to locate your desired widget.
4) Tap and hold the widget until the home screen layout appears. Drag the widget to
your preferred position and release to have it placed. For a setting shortcut, you will
have to select a specific setting from the shortcuts list.
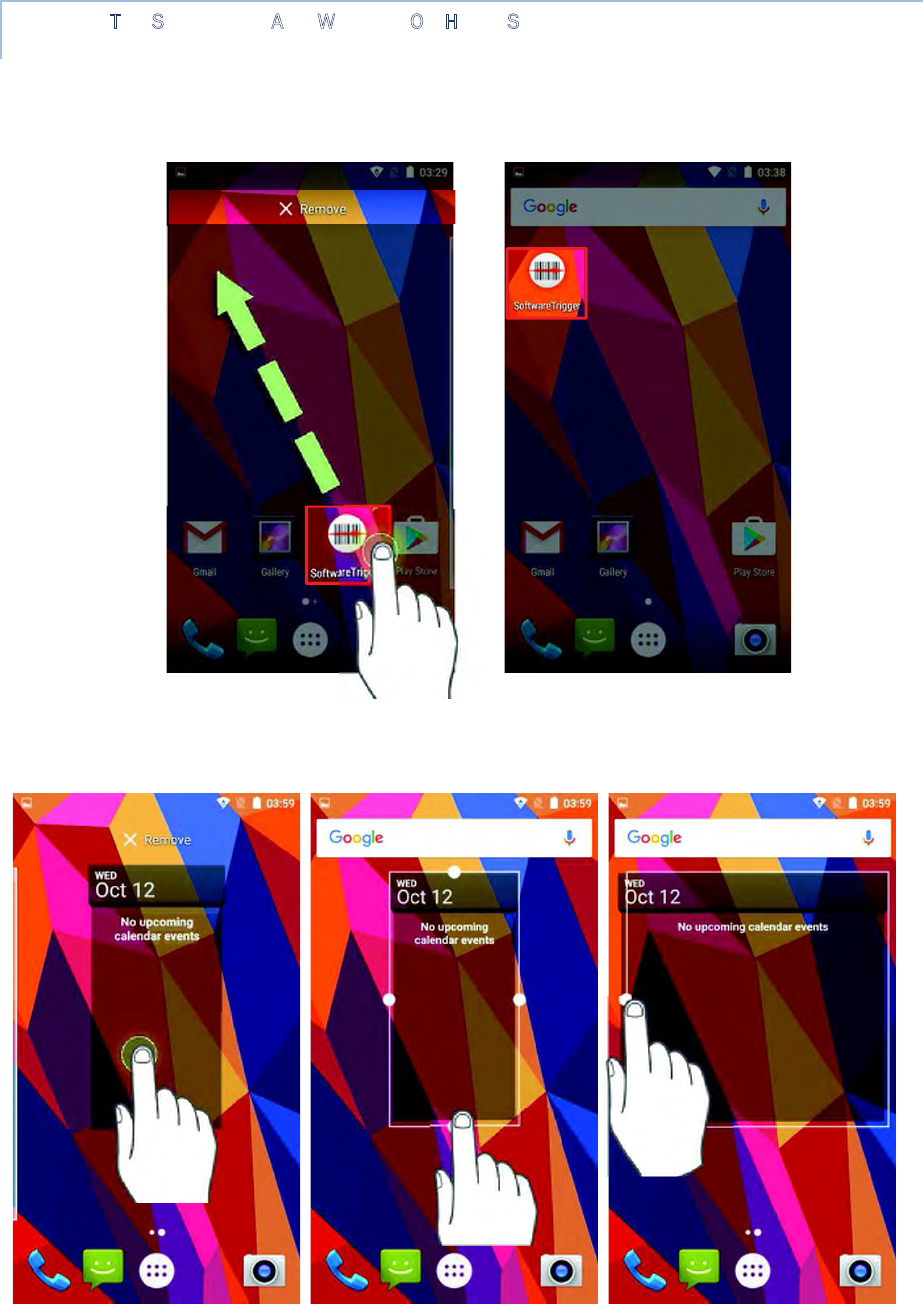
ARRANGE THE SHORTCUTS AND WIDGETS ON HOME SCREEN
1) To move or remove a shortcut / widget, on the home screen you would like to
customize, tap and hold it to enter layout edit mode, a floating option “X Remove” will
appear on top of the screen, to which you can drag the unwanted shortcut to remove it.
Drag the icon to the preferred position and release it to have it placed.
2) To resize a widget, tap and hold it until a white frame appears. Tap and drag a white
dot to re-scale the widget.

CHANGE HOME SCREEN WALLPAPER
1) Tap and hold any empty spot on the home screen.
2) Tap Wallpapers in the menu that appears.
3) Select an image to apply as the wallpaper.
4) Tap Set wallpaper at the bottom of the wallpaper preview screen to apply it.
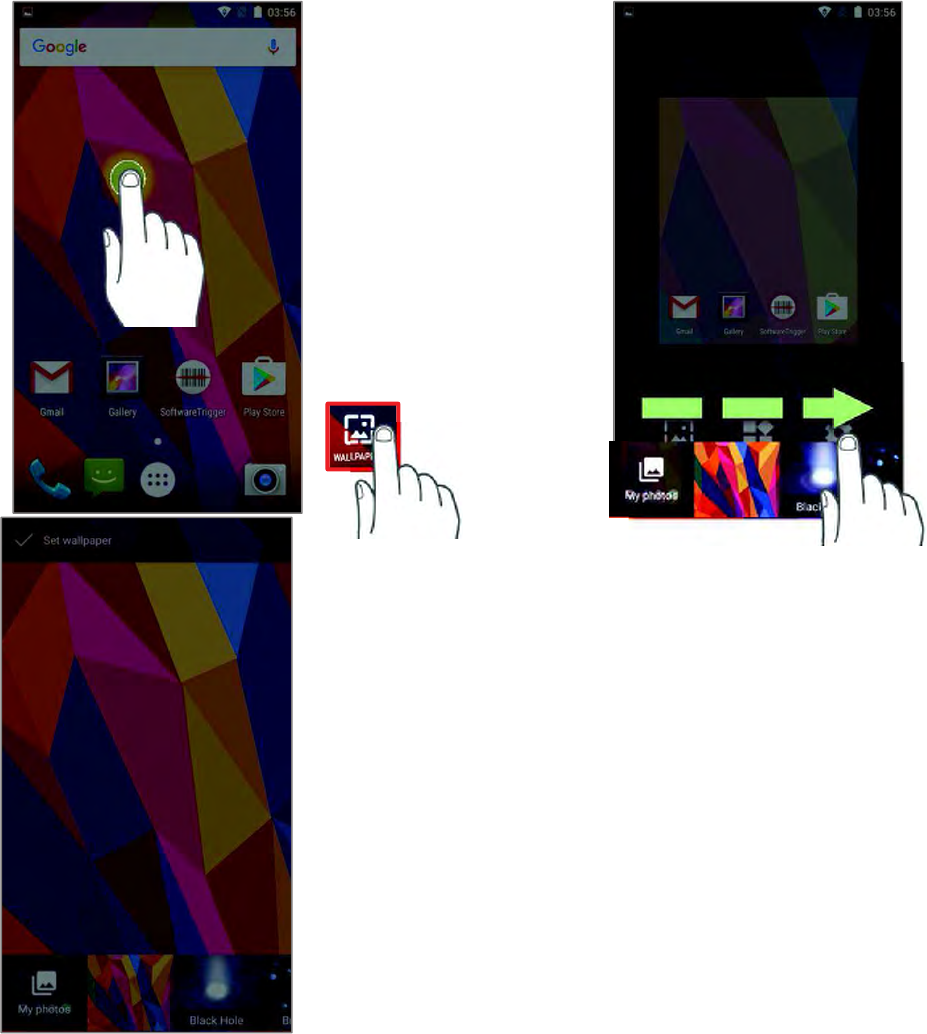
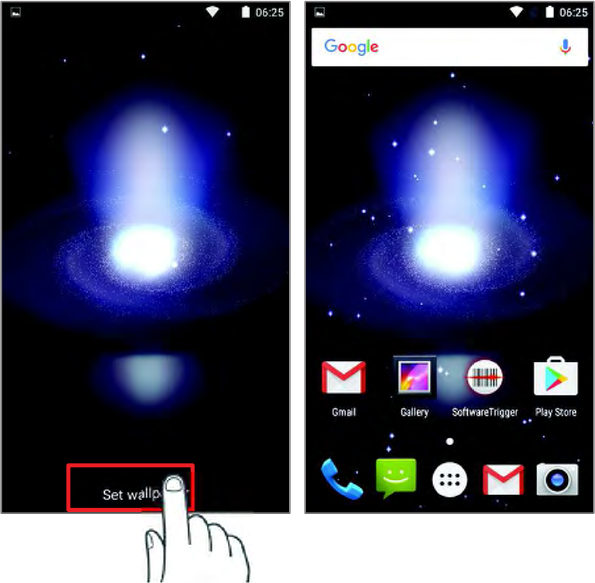
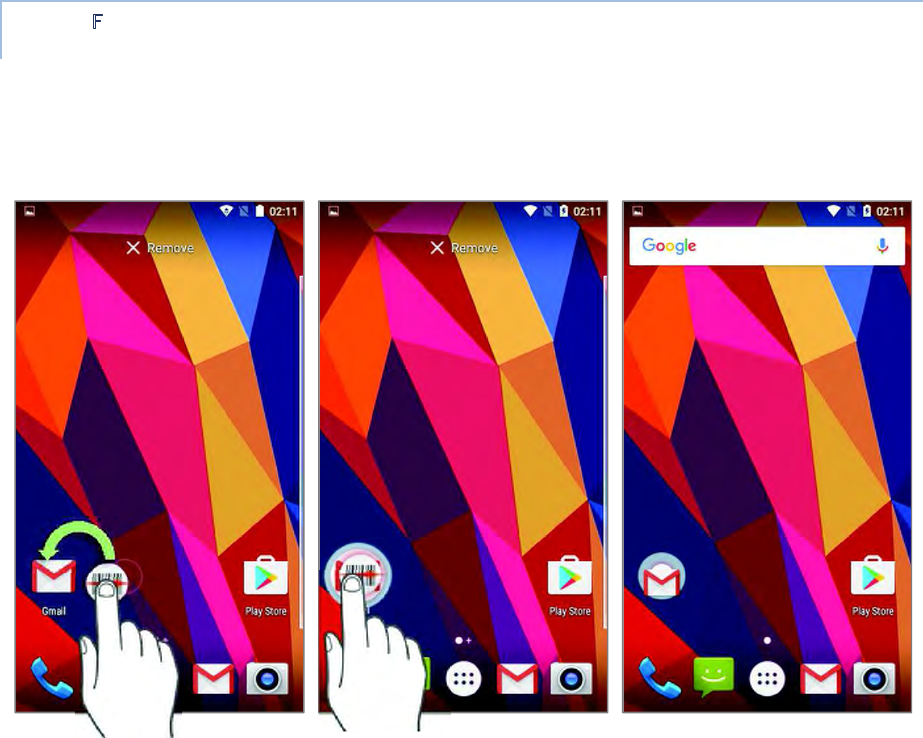
CREATE FOLDER
1) On the home screen you would like to customize, tap and hold the application
shortcut you would like to move, drag the icon on the top of another icon to create a
folder.
2) As these icons overlap, a folder is created.
3) After you let go your finger, these icons are enclosed in a circle.
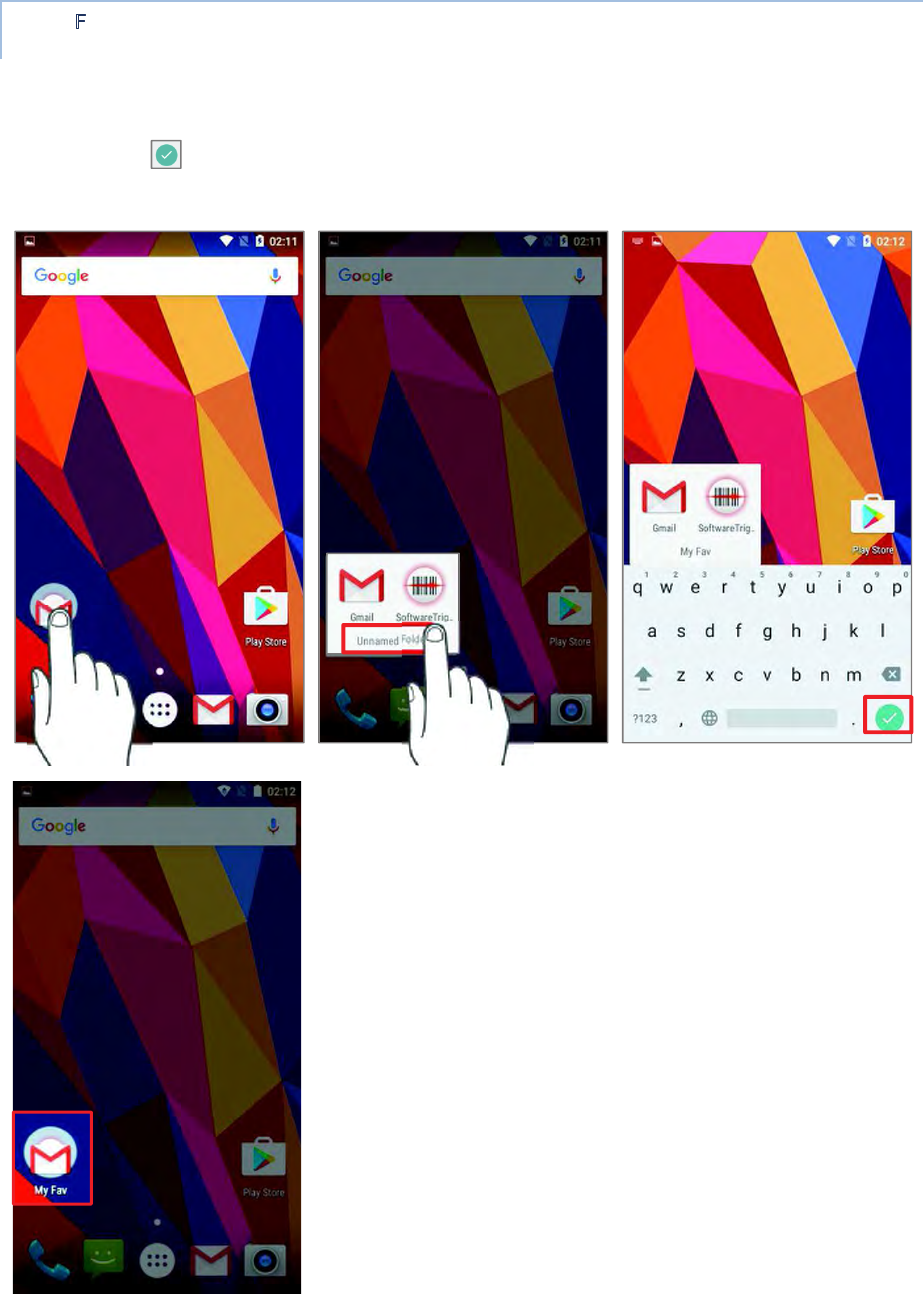
NAME FOLDER
1) Tap the folder you would like to name.
2) The folder will expand from a small circle to a full rectangle to show all the shortcuts
in it. Tap “Unnamed Folder” and edit the folder name.
3) Tap Done on the on-screen keyboard.
4) Tap elsewhere on the screen, the folder will shrink to a small circle with its new
name.
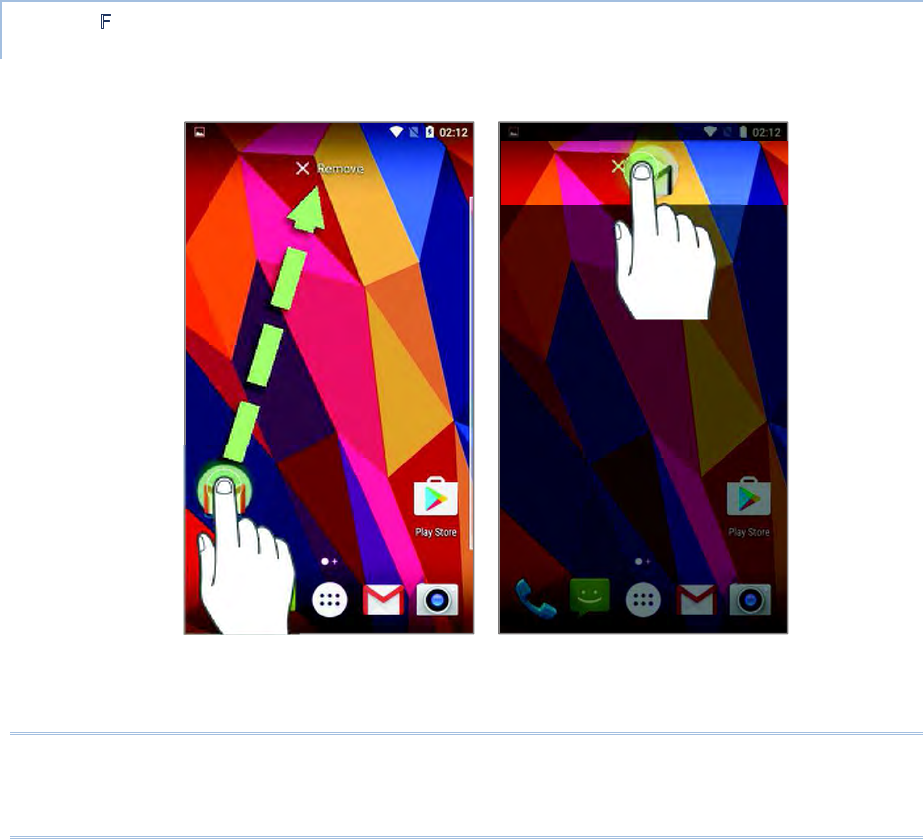
REMOVE FOLDER
1) Tap and hold the folder you would like to remove.
2) Drag the folder to the top of the screen where the option “X Remove” is located.
Note:
Please note that, when you remove a folder, the shortcuts contained in it will be removed as
well.
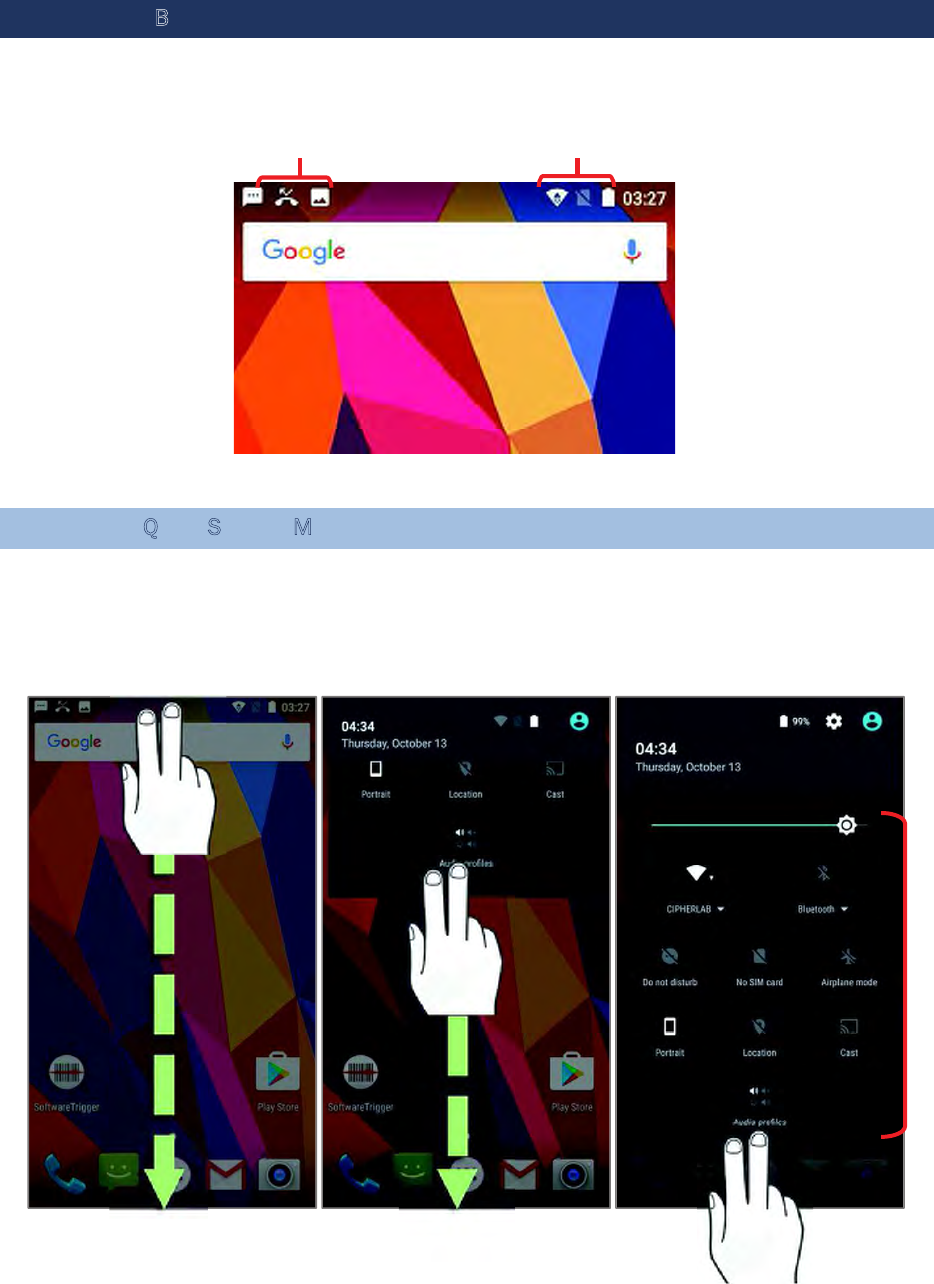
3.2. STATUS BAR
The left side of the status bar shows notification icons, and the right side of the status
bar shows status icons.
3.2.1. OPEN QUICK SETTING MENU
The status icons are related to essential settings regarding the device’s remaining power,
Bluetooth status or Wi-Fi connectivity status. The status bar offers a quick access for you to
easily make adjustments of the settings. To open Quick Setting menu, use you two fingers,
swipe from the top to the bottom of the screen. You can tap on each status icon on the menu
to switch among different modes or enter the settings.
Status icons
Notification
Quick
Setting
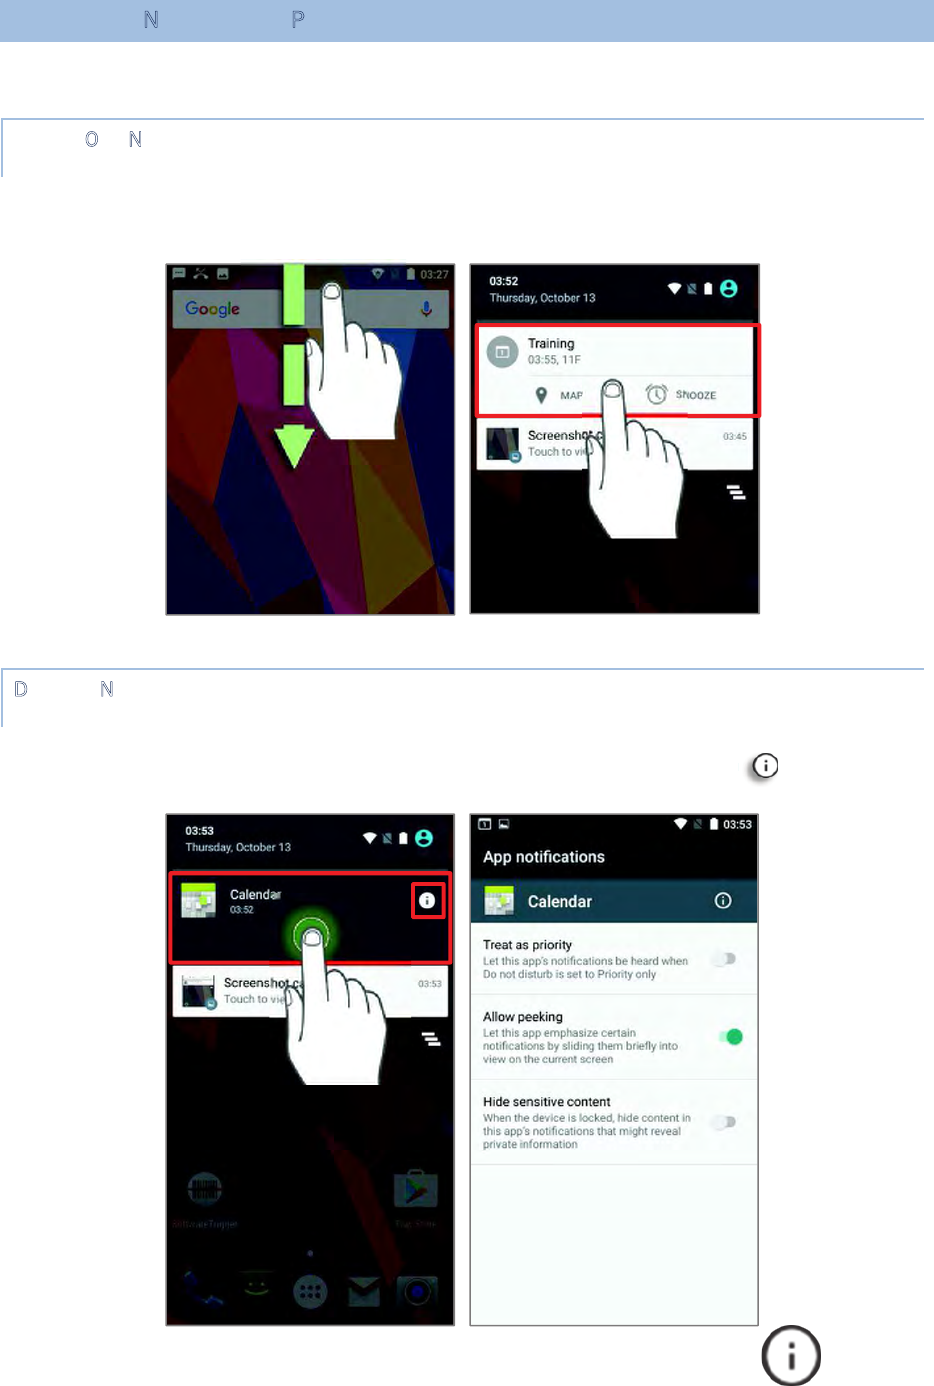
3.2.2. OPEN NOTIFICATIONS PANEL
The notifications icons on status bar inform you of the new events such as incoming calls,
messages or USB connection.
CHECK OUT NOTIFICATION
To check out details of the events, swipe down from the status bar to open Notifications
Panel. Tap on the individual notification card to carry our immediate action or to open the
corresponding application.
DISABLE NOTIFICATION
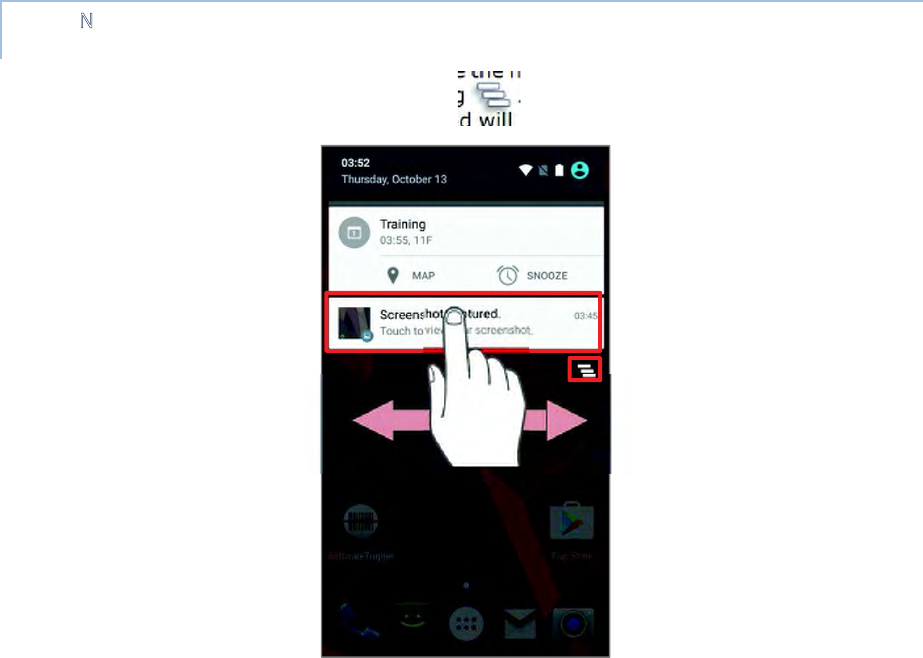
You can change or turn off the notification of a specific app by tapping and holding on the
notifications card until the corresponding app name reveals along with an icon, tap it to
modify the notification-related setting.
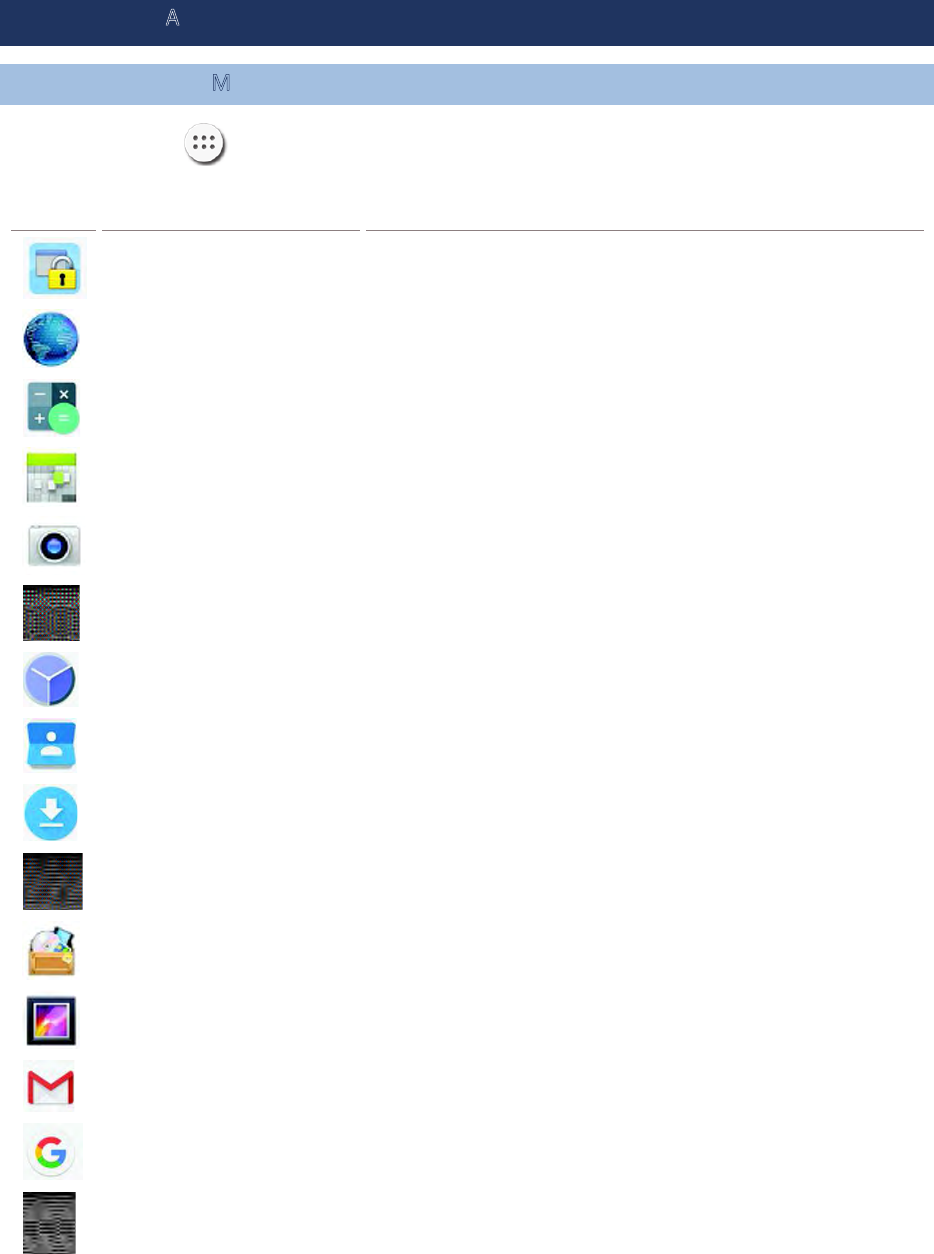
CLEAR NOTIFICATION
To dismiss a single notification, simply swipe the notification card right or left. You can also
dismiss all notifications at a time by tapping . Ongoing notifications and notifications
that require subsequent activity to be cleared will remain on the list.
3.3. MANAGE APPLICATIONS
3.3.1. APPLICATION MENU
Tap All Apps on the Home screen to open the applications menu.
Icon Name Description
AppLock An application used to limit the system resources made
available to Users
Browser Accesses the internet or intranet.
Calculator Performs mathematical calculations.
Calendar Creates and manages events, meetings and appointments.
Camera Takes pictures and shoots videos.
Chrome An Android built-in browser application developed by Google.
Clock Sets date, time, time zone according to your locale, and sets
and manages alarms.
Contacts Manages contact information, and shares or exports/imports
the information to other devices or SD card.
Downloads List all files downloaded on the handy terminal.
Drive An Android built-in application for a file storage and
synchronization service created by Google.
File Manager Browses and manages files on the local storage and storage
card.
Gallery Views photos and videos stored on the handy terminal.
Gmail An Android built-in application for Gmail, a free email service
provided by google.
Google
An Android built-in application providing you easy access to
handy services provided by Google such as searching for
nearby restaurants or updates on traffic alerts.
Hangout An Android built-in application for a communication
platform developed by Google.

Maps An Android built-in app developed by Google.
Messaging Sends SMS and MMS messages.
Phone Places and receives calls, accesses voicemail, views call
history, manages phone contacts and adjusts phone settings.
Photos An Android built-in application for a photo and video
sharing and storage service developed by Google.
Play Movies & TV An Android built-in application for an online video on
demand service operated by Google.
Play Music An Android built-in application for a music streaming
service and online music locker operated by Google.
Play Store
An Android built-in application providing access to a digital
distribution service, including a digital media store,
the Google Play Store, operated and developed by Google.
Reader Config Sets scanner preferences, data output format and
destination, symbology settings, and reads barcodes.
Search Searches the internet and handy terminal with the Google
search engine.
Settings Opens settings to configure the handy terminal.
SoftwareTrigger
An application serving as a real trigger key, floating on top of
all other programs for convenient trigger control of the
bardcode scanner.
Sound Recorder Records and plays audio information.
Voice Search An Android built-in Google product allowing users to
use Google Search by speaking on a mobile phone.
YouTube An Android built-in application for a video-sharing service.
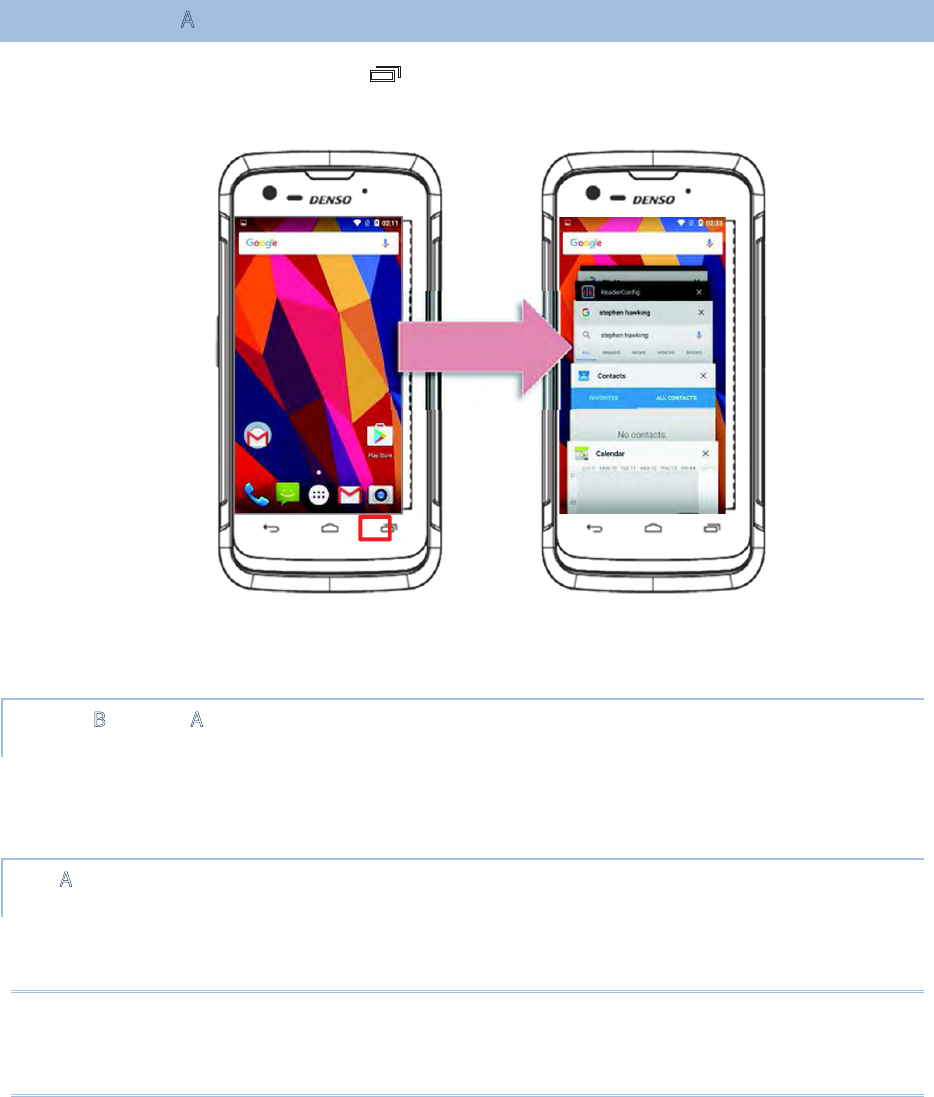
3.3.2. CURRENT APPLICATIONS
Tap the Recent Apps button . The screen will show a list of recently used
applications.
On this screen, you can:
SWITCH BETWEEN APPLICATIONS
Swipe up or down to cycle through the listed applications, tap on your desired one to open
it on the screen.
END APPLICATION
Slide an application to the left or right, or tap the X on top right to close it.
Note:
Close unused applications in order to release RAM. Remember to save your data or settings
before closing any application.
3.4. SUSPEND & LOCK
3.4.1. SUSPEND DEVICE
The handy terminal operates continuously once it is powered on. To minimize power
consumption and prevent unintended operation, suspend the handy terminal if you are not
actively using it. The handy terminal can be quickly awoken from suspend mode to operate
as needed. When the handy terminal enters suspend mode, the system is in a power-saving
status, meaning the device will not respond to screen touch, and volume keys and side
buttons will also be unavailable until the device is unlocked.
SUSPEND RS31/BHT-1600
Press the power button to suspend the handy terminal. The handy terminal will automatically
suspend when the time period set in Screen Timeout Settings has passed without any activity.
3.4.2. LOCK DEVICE
Setting a screen lock allows you to protect your personal data on this device while the
device is not at your hand. With various types of screen lock available and Smart Lock, you
can not only enjoy the benefits of this function but also great convenience.
LOCK RS31/BHT-1600
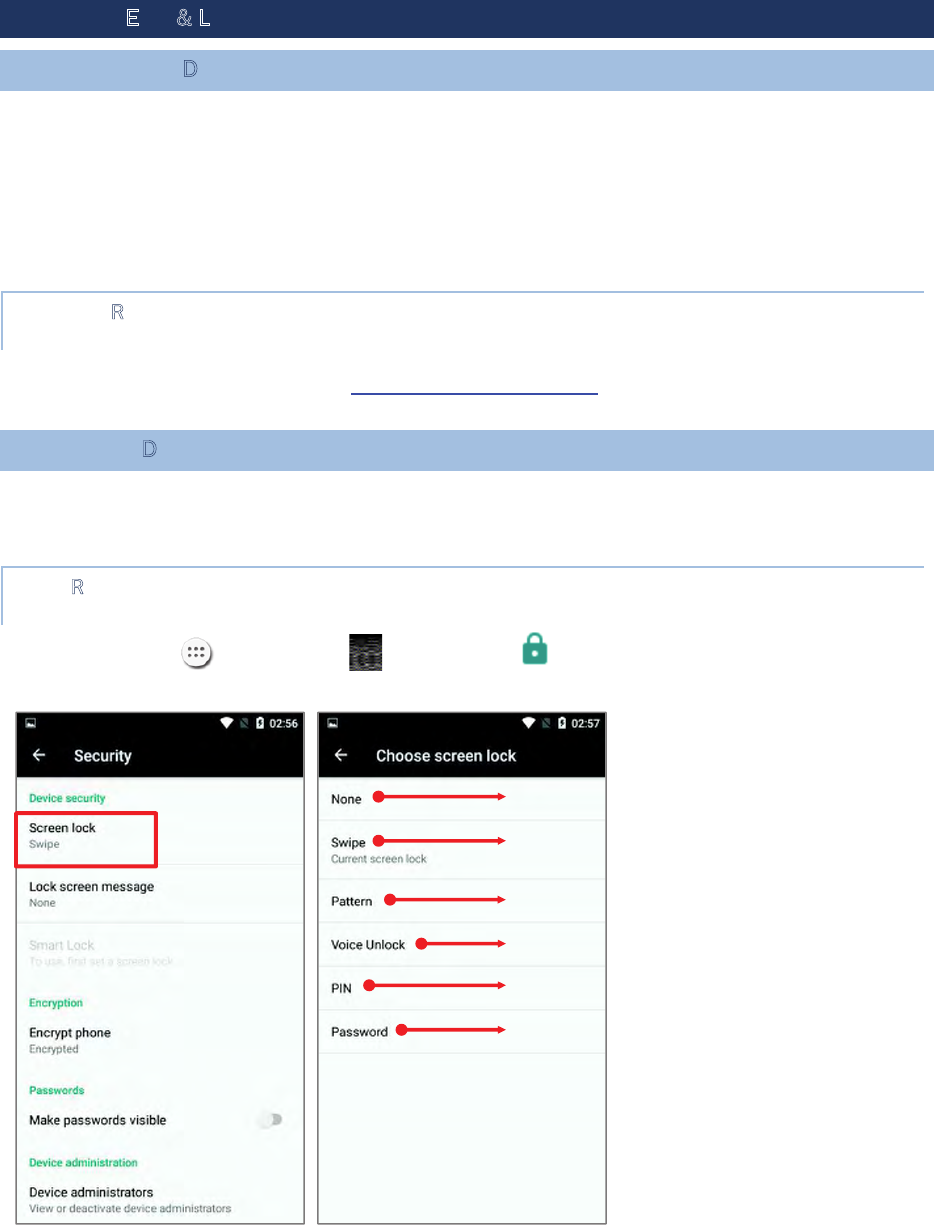
Tap All Apps | Settings | Security |Screen lock to change the lock
method.
Disable screen lock
Default slide gesture
Enter a pattern to unlock
Set a voice command to unlock
Uses the PIN code to unlock
Enter a password of at least 4 characters
to unlock.
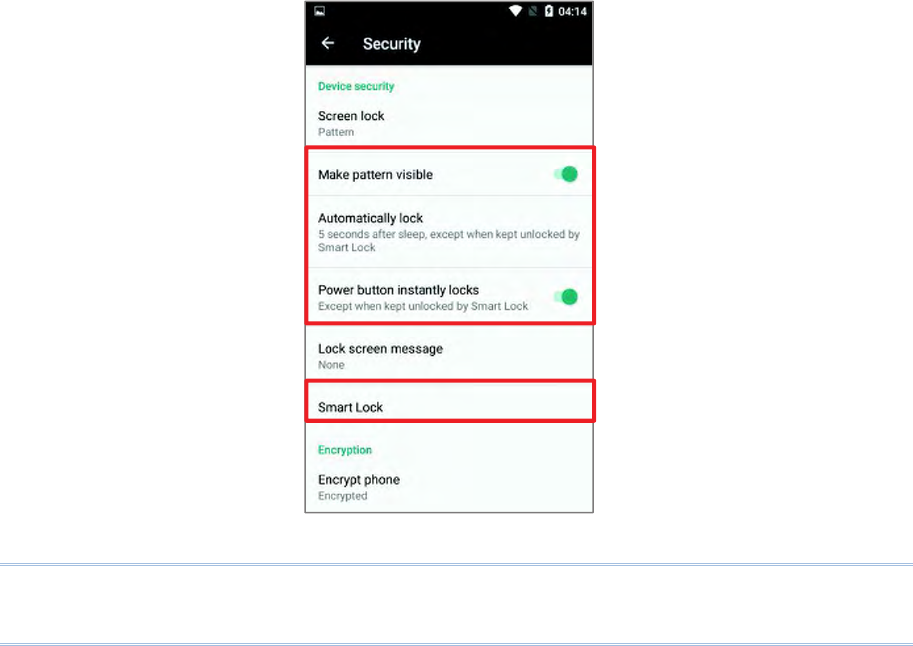
By selecting a pattern, Voice Unlock, Pin or Password method, you can access advanced
settings and Smart Lock to customize personal lock settings.
Warning:
To save battery power, suspend the handy terminal when not in use.
3.5. OS UPDATE
Updating the operating system on the handy terminal helps maintain it at an optimized
state. You may choose to update the system by establishing a wireless network connection
to the Internet and downloading the update file from the OTA server.
Note:
The handy terminal will shut down during system update. Save any unfinished tasks and
data before updating the system in order to avoid data loss.
NETWORK UPDATE
In order to check for and download the latest system update file on the server, make sure
a wireless network connection to the Internet is established on the handy terminal.
Note:
To avoid any additional charges to your wireless data plan, Wi-Fi connection to the Internet
is recommended for downloading the file.
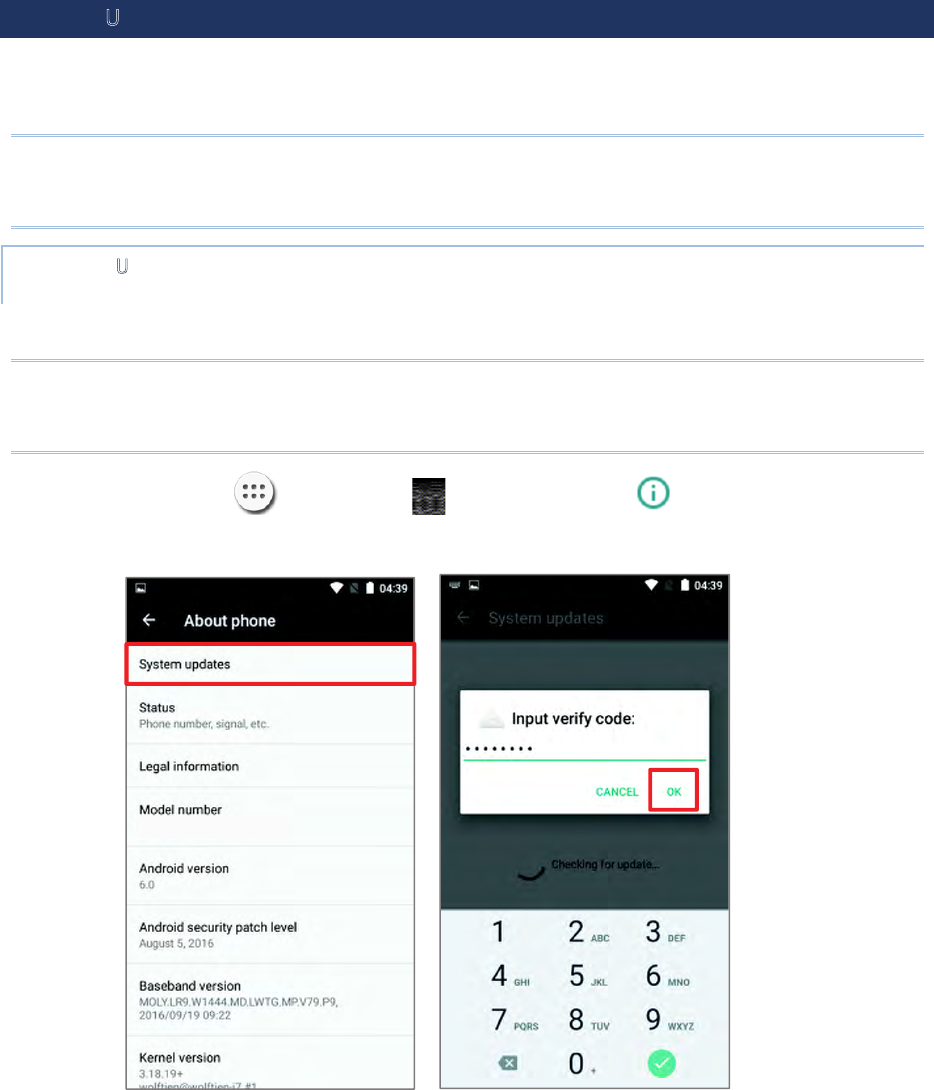
1) Tap All Apps | Settings | About phone | System updates. A
window pops up asking you to input the password for system update. Please contact
manufactory for the password. Enter the password and tap OK.
2) The handy terminal searches for the latest system update file on the server. Tap
DOWNLOAD AND INSTALL to download the update file.
3) When a new system update file is detected on the server, a notification icon will
appear on the status bar, and a text notification will pop up in the notifications panel.

SD CARD UPDATE
1) Obtain the latest system update file, and copy the file onto the root storage of your
SD card.
2) Insert the SD card into the memory card slot on the handy terminal. Press the power
button to power it on.
3) Tap All Apps | Settings About phone | System updates.
A window pops up asking you to input the password for system update. Please contact
manufactory for the password. Enter the password and tap OK.
4) The handy terminal searches for an available system update file on the SD card.
Note:
Make sure the SD card is inserted in the handy terminal. If not, the screen will show that
your system is currently up to date.
If there is a later version of the system update file available on the server, it will be listed
on the screen along with the update file found on the SD card. Tap the update file you would
like to use and proceed.
5) Tap INSTALL to open an “Install update” confirmation window. Tap Install in the
confirmation window to begin the installation.
Once complete, a notification will appear showing that the system has been updated
successfully. Tap OK to show the Home screen.
3.6. BACK UP YOUR DATA
With Android Backup Service, you can have your personal data (Google calendar
settings, Google contacts, Chrome browser data and Gmail settings) and certain system
settings under your Google account backed up (over network connection) on the cloud. This
allows you to easily restore the settings on this device after a Factory Reset (refer to Reset
to Factory Default ).
Note:
1) To back up your photos and videos, Tap All Apps |Photos to sync the files on
your device with Google Photo Library.
2) To back up other documents such as audio or video files on the device’s storage, you can
make use of Google Drive service.
3) Android Backup Service does not handle SMS messages and certain app progress data
and settings.
To start:
1)Make sure you device is connected with network.
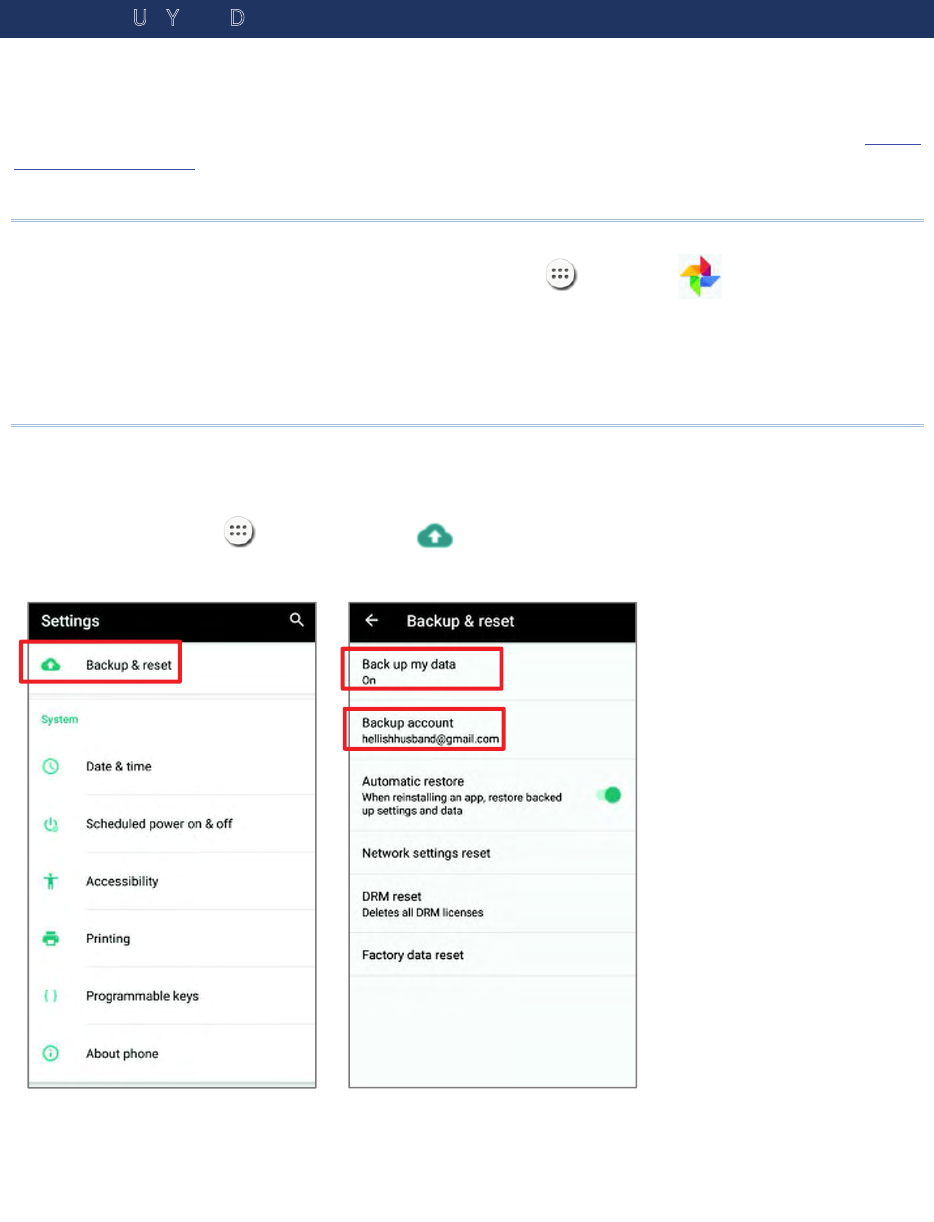
2)Tap All Apps |Backup & reset and enable Back up my data.
3)Tap Backup Account to log in to your Google account.
To restore your backed up personal data of a Google Account, just add that account to the
device.
3.7. RESET TO FACTORY DEFAULT
Performing a factory reset will erase all data on your handy terminal (including call logs,
messages, files as well as your installed apps and their associated data) and revert the
device back to its original state in which it is powered on by you for the first time.
It is strongly recommended that you follow the instructions in Back up Your Data to back
up important data before performing a factory reset.
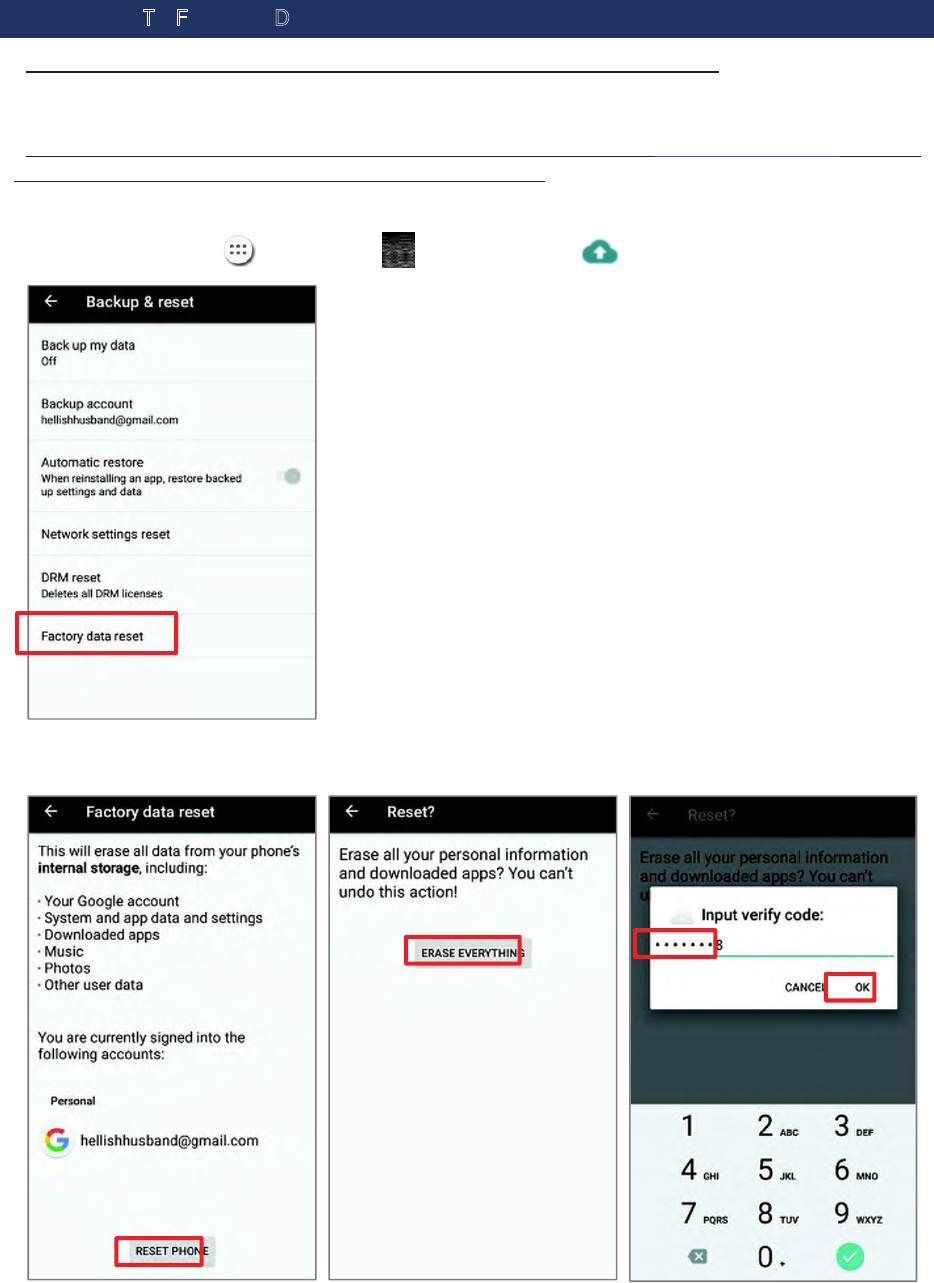
To start:
1)Tap All Apps | Settings | Backup & reset and Factory data reset.
Confirm the action by tapping on the buttons and input the verification code. Finally, tap
OK to perform a factory reset.

Chapter 4
WIRELESS RADIOS
The Wi-Fi module integrated on the handy terminal lets you configure and connect to
network wirelessly.
IN THIS CHAPTER
4.1 Use Wireless Wide Area Network .................................. 99
4.2 Use Wireless Local Area Network (Wi-Fi) ..................... 109
4.3 Use Bluetooth ...........................................................115
4.4 Use Near Field Communications .................................. 119
4.1. USE WIRELESS WIDE AREA NETWORK
The handy terminal will be automatically configured to connect to your wireless service
provider’s network when you insert a SIM card and turn on data connection for the first
time.
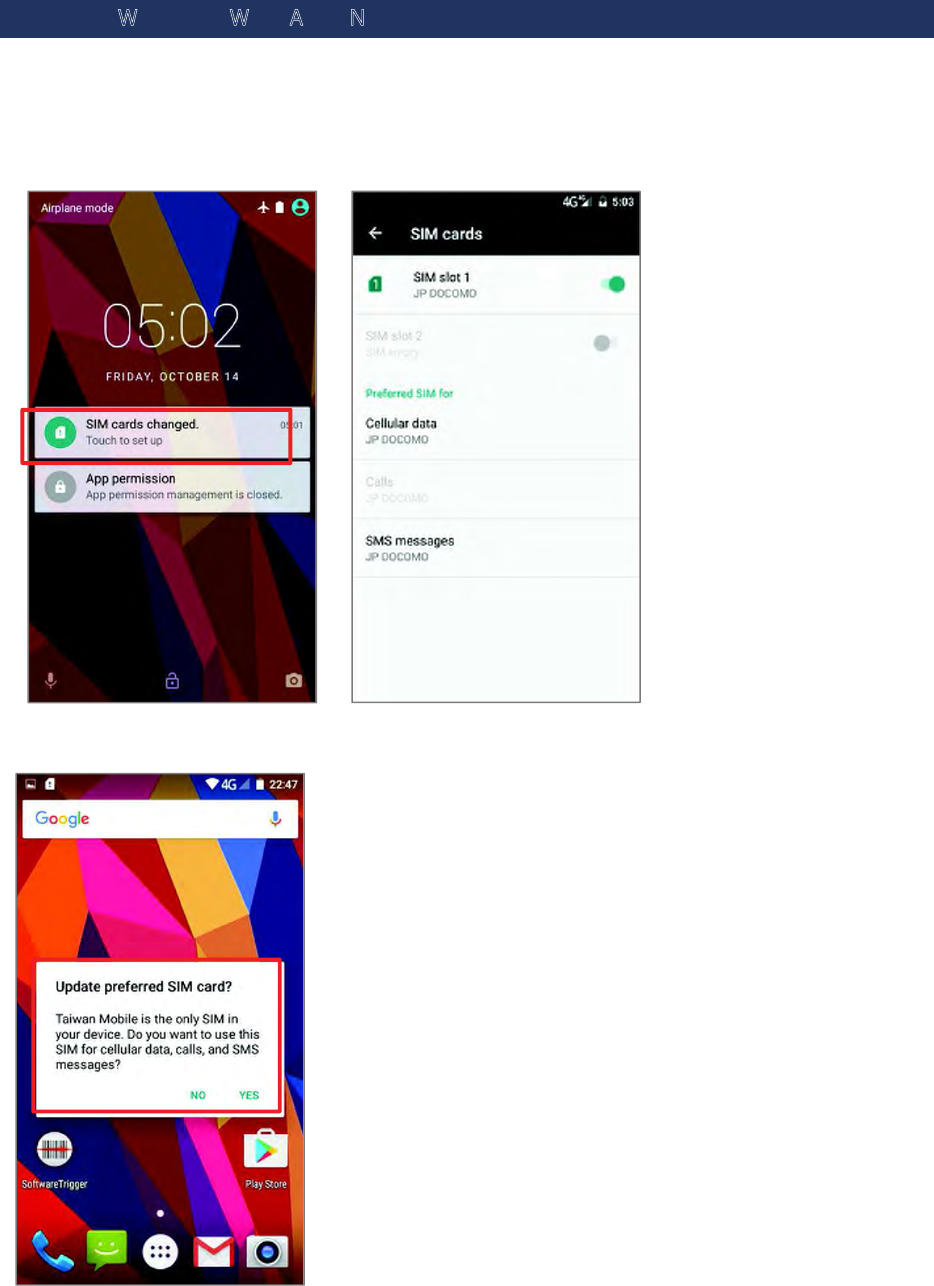
1) When a SIM card is inserted, a dialog will appear confirming the mobile carrier
detected, you may tap “Touch to set up” to enter the settings page.
2) If the SIM card you inserted is the only SIM in your device, you will be prompted to
confirm that this SIM used for all data services.
EDIT ACCESS POINT NAME
You may need to change the access point name according to the information obtained from
your mobile carrier.
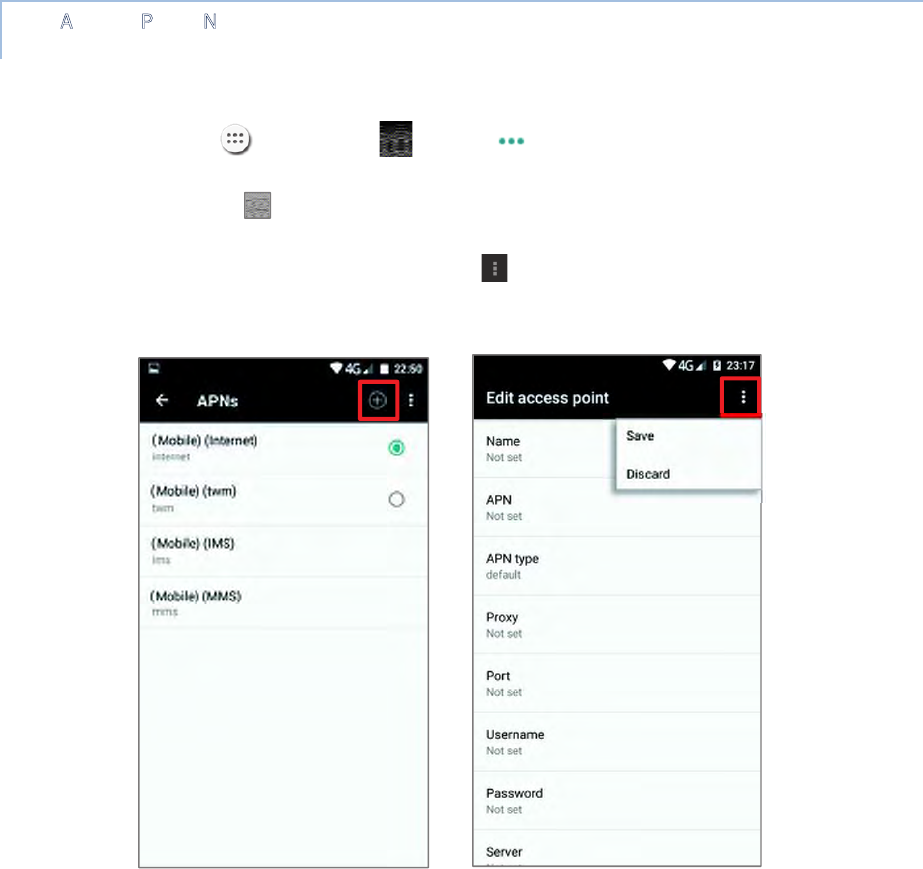
1) Tap All Apps | Settings | More | Cellular networks | Access Point
Names.
2) Tap the button , and tap each field to input the APN name and settings obtained
from your mobile carrier.
3) When finished, tap the settings button and tap Save.
4) Back to APNs page, Tap the radio button next to the APN you would like to apply.
4.1.1. SHARE WWAN DATA
The WWAN connection on the handy terminal can be shared to other devices. You may
share internet connection with a computer or device through USB or Bluetooth tethering, or
share with a maximum of eight devices by turning the handy terminal into a Wi-Fi hotspot.
BLUETOOTH TETHERING
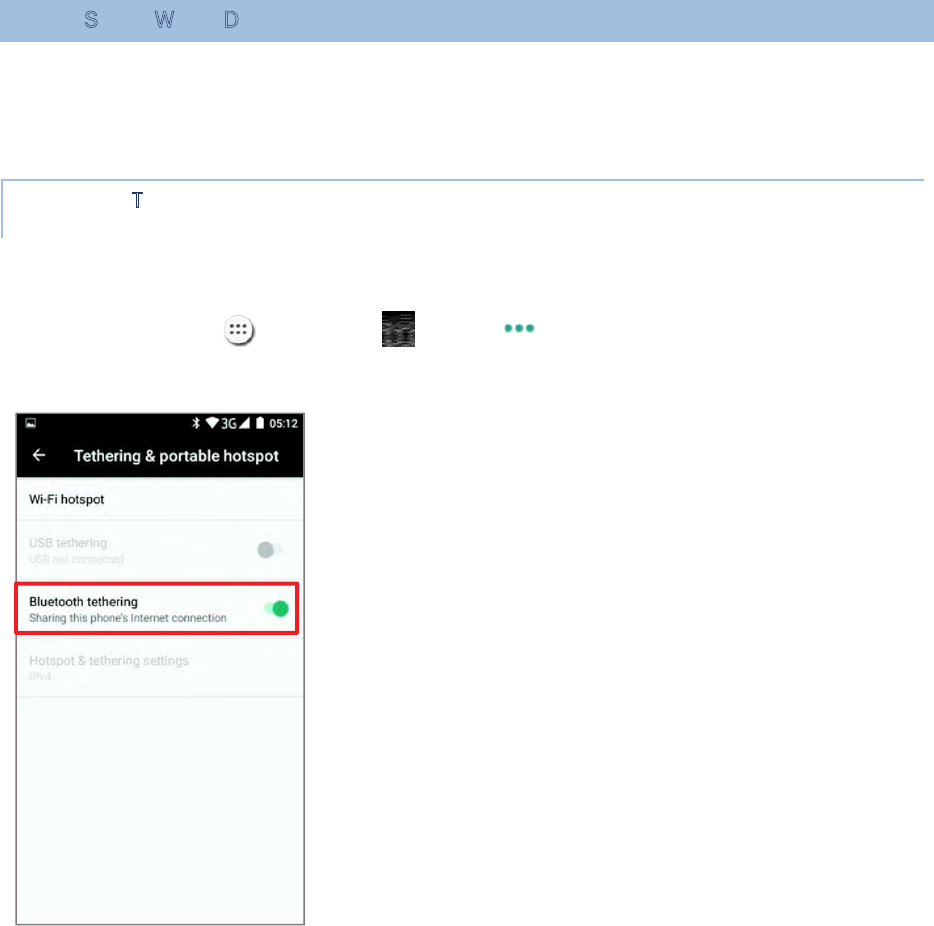
To share data connection through Bluetooth tethering:
1) Pair the handy terminal with the device of interest.
2) Tap All Apps | Settings | More | Tethering & portable hotspot.
3) Tap Bluetooth tethering. The handy terminal will share its WWAN network with
Bluetooth-connected devices through Bluetooth sharing.
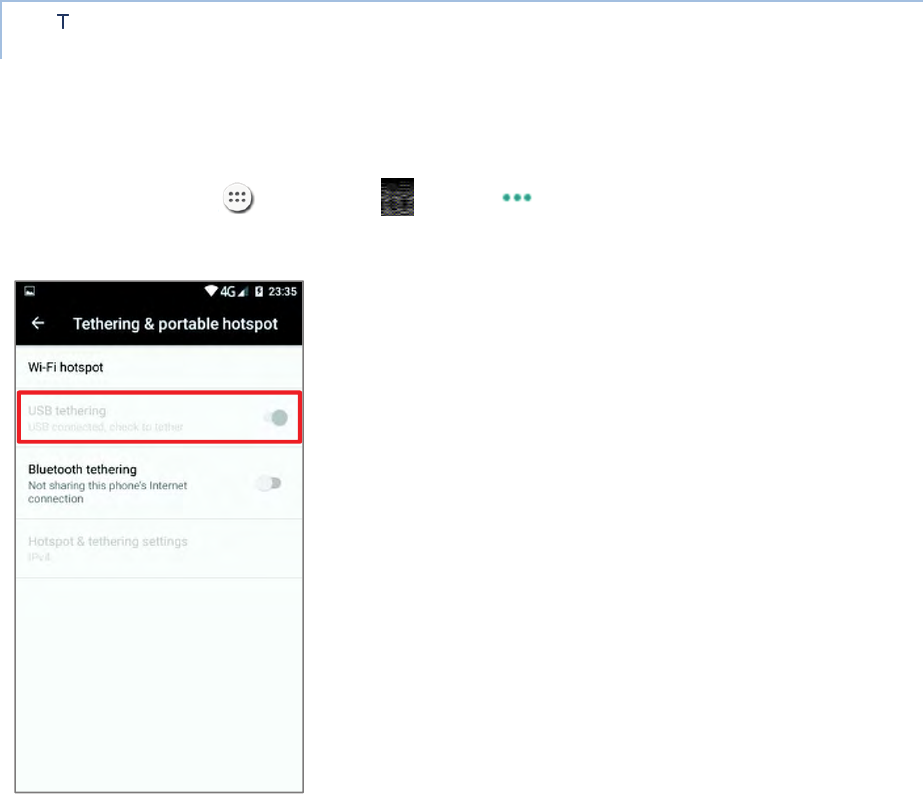
USB TETHERING
To share data connection through USB tethering:
1) Connect the handy terminal with a USB cable. A USB icon will appear at the top of the
screen, and in the Notifications panel, a description “Connected as USB Storage” will
appear.
2) Tap All Apps | Settings | More | Tethering & portable hotspot.
3) Tap USB tethering. The handy terminal will share its WWAN network with the
connected host computer.
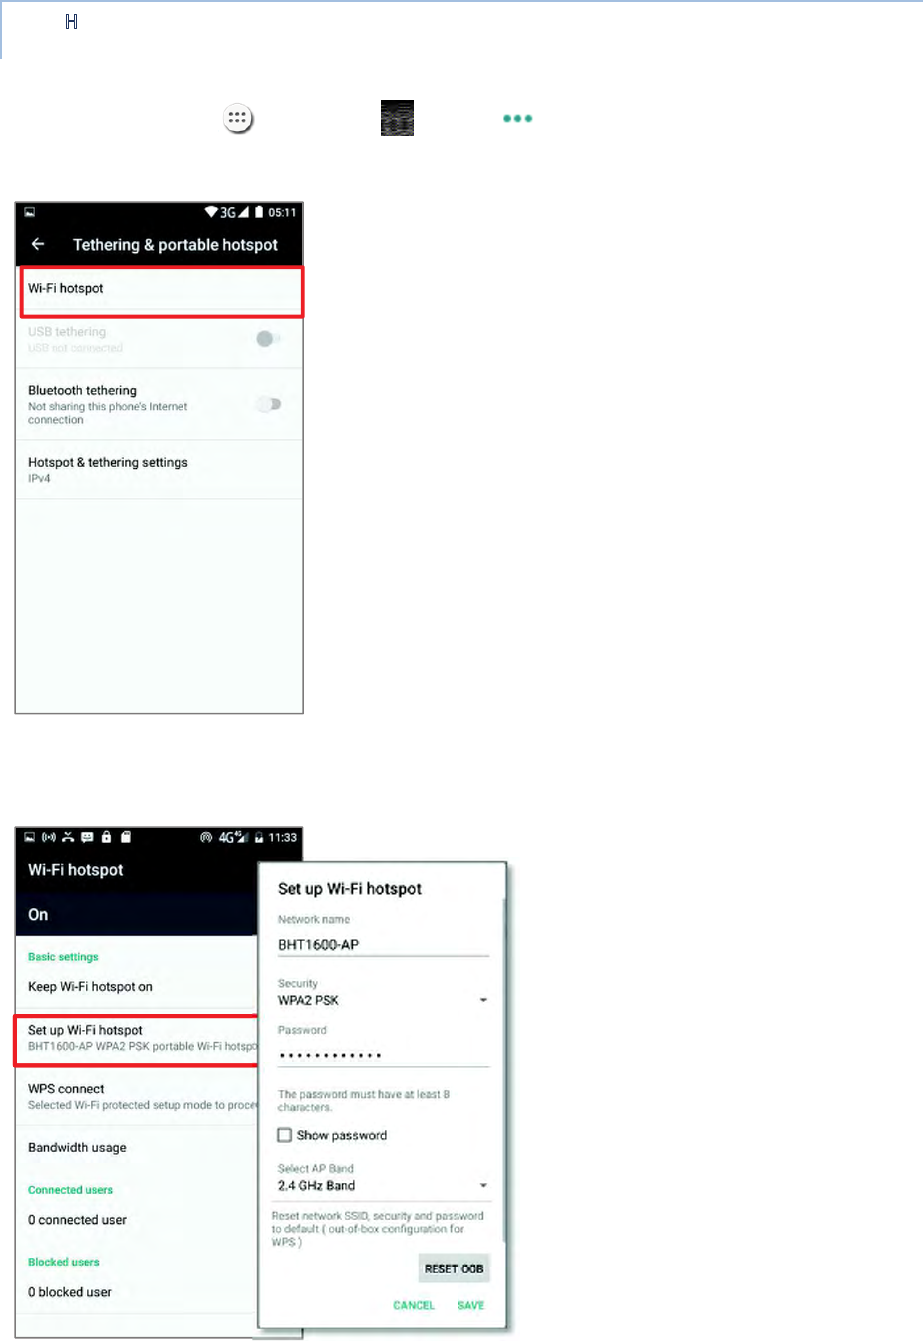
WI-FI HOTSPOT
To share data connection in the form of a Wi-Fi hotspot:
1) Tap All Apps | Settings | More | Tethering & portable hotspot.
2) Tap the Wi-Fi hotspot switch to enable data sharing through Wi-Fi. The handy
terminal will start broadcasting its SSID for other devices to connect.
3) Tap the Wi-Fi hotspot label to manage Wi-Fi hotspot settings: set when to turn the
Wi-Fi hotspot off, change SSID and security settings, select whether to minimize battery
usage when Wi-Fi hotspot is enabled, enable WPS mode and adjust bandwidth, and view
connected users.
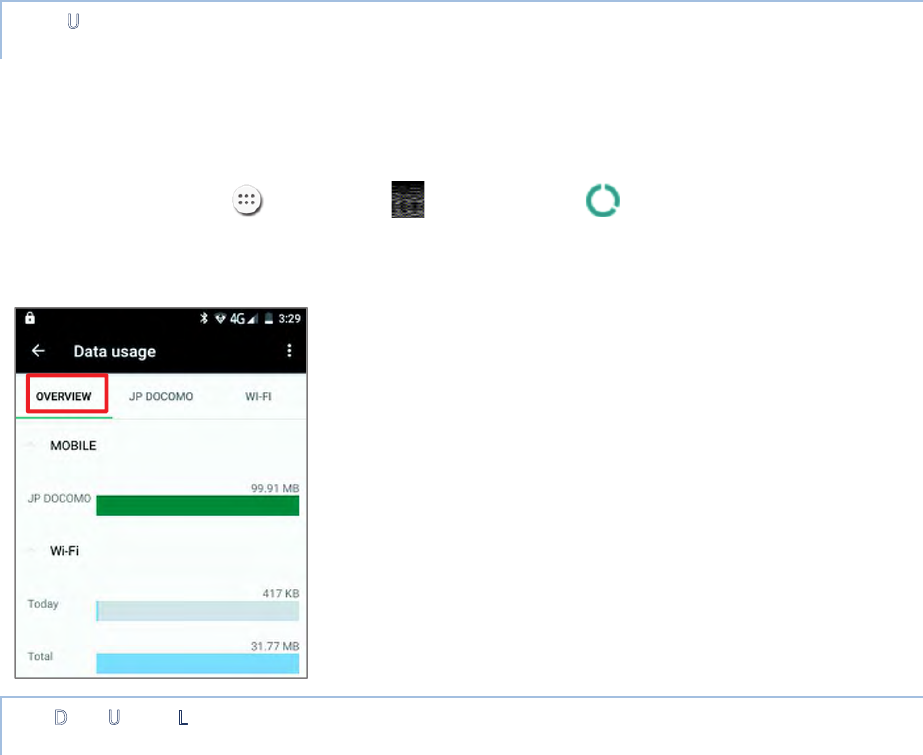
DATA USAGE
Data usage is the amount of data uploaded or downloaded on the handy terminal.
Managing the data usage amount within a certain period of time is a recommended task, as
an excess amount of data usage might incur additional fees from your service provider.
To check wireless data usage:
1) Tap All Apps | Settings | Data usage .
2) The Overview tab page opens showing a summary of data usage for your mobile
network and Wi-Fi connection. Open the tab page of your mobile carrier to view a chart
of data usage on a monthly cycle.
SET DATA USAGE LIMIT
1) On the data usage tab page for your mobile carrier. Enable Set mobile data limit.
2) To adjust the limit level, tap the limit value on the chart. If a limit is set, when the
data usage amount reaches the limit, mobile data connection will be automatically
disabled.
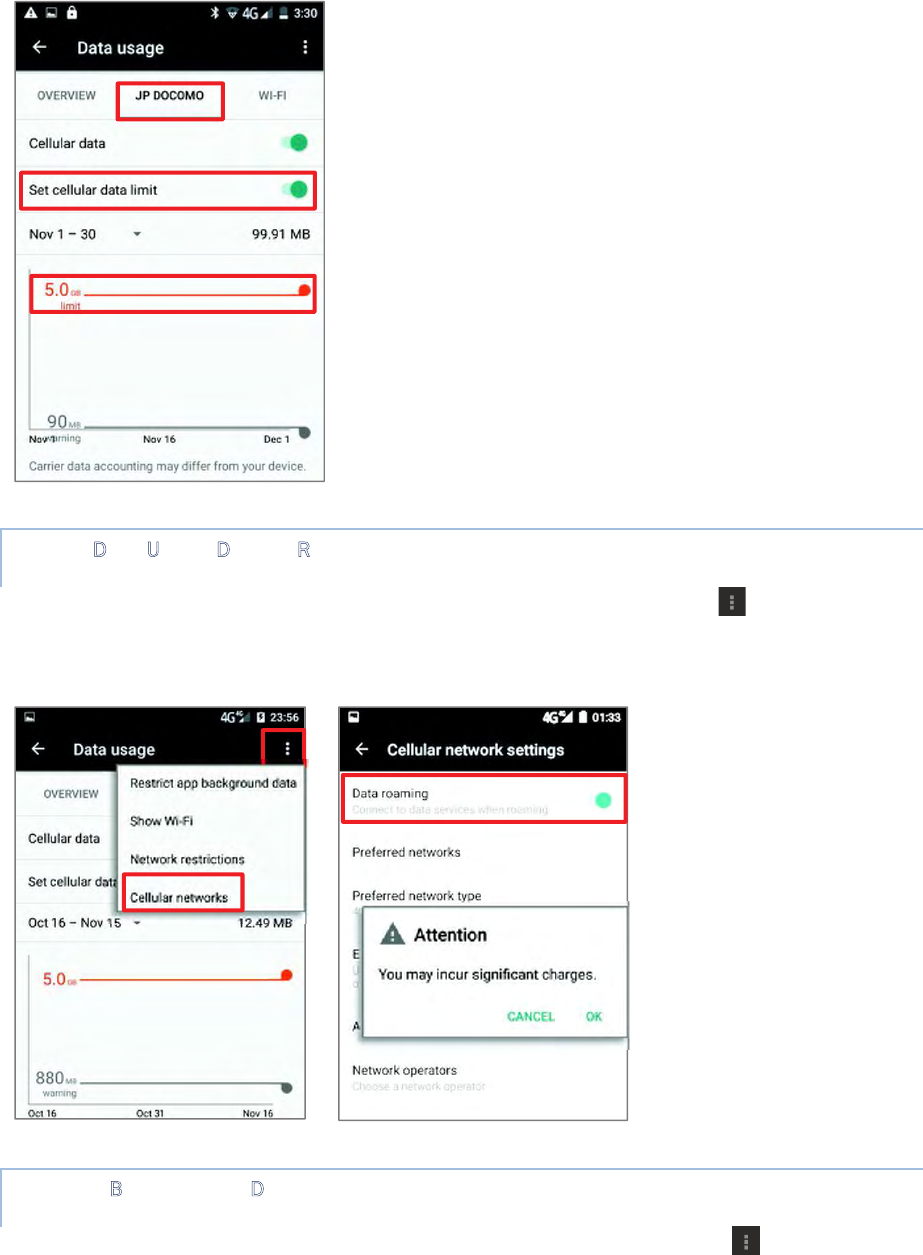
ENABLE DATA USAGE DURING ROAMING
1) On the data usage tab page for your mobile carrier, tap More .
2) Select Cellular network, and enable Data roaming checkbox for your mobile
carrier. A dialog box appears confirming whether you would like to enable data roaming.
Tap OK to confirm.
RESTRICT BACKGROUND DATA
1) On the data usage tab page for your mobile carrier, tap More , and select the
Restrict background data checkbox.
2) A dialog box appears confirming whether you would like to enable data restriction.
Tap OK to confirm.
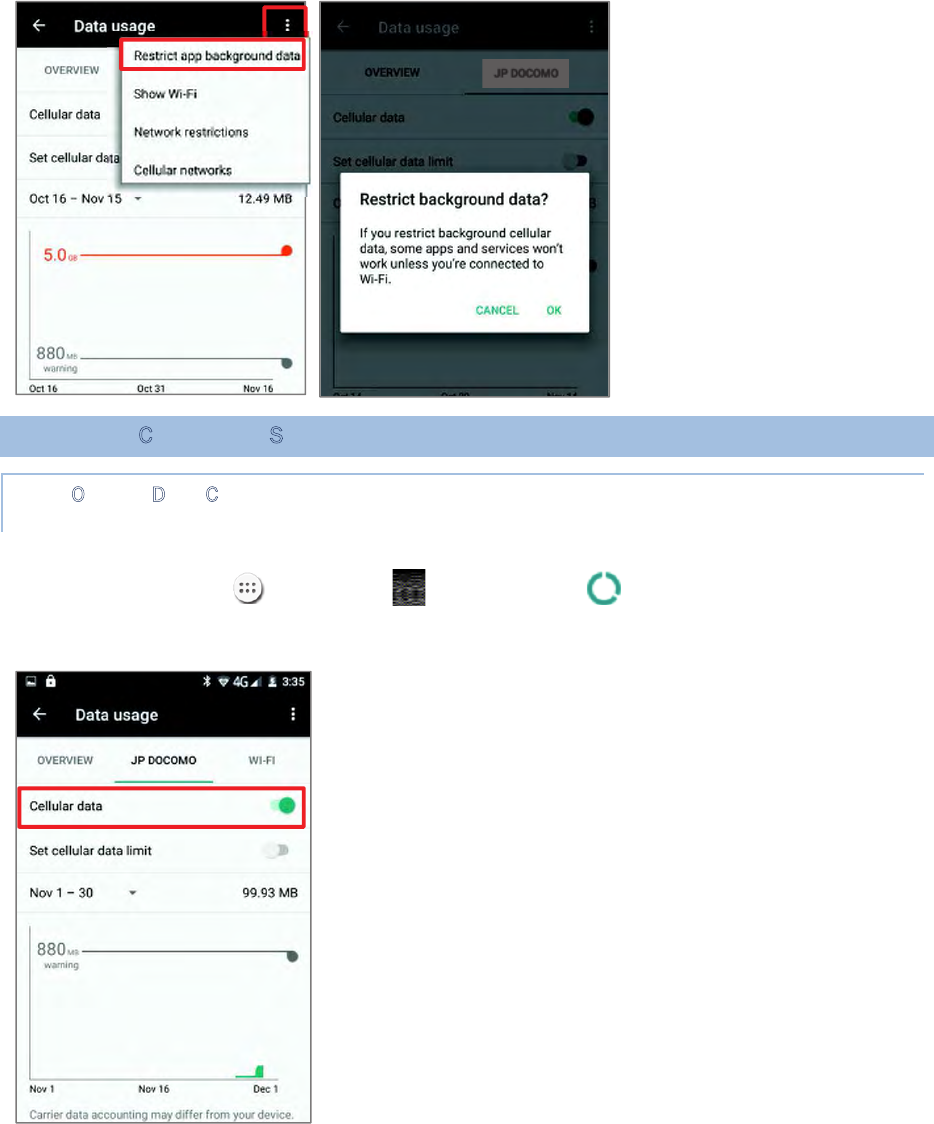
The handy terminal conserves data usage by restricting background mobile data. Certain
applications and services will be disabled unless the handy terminal is connected to a Wi-Fi
network.
4.1.2. DATA CONNECTION SETTINGS
TURN ON/OFF DATA CONNECTION
To manually turn on/off mobile data connection:
1) Tap All Apps | Settings | Data usage .
2) Select your data usage tab page for your mobile carrier. To turn on/off data
connection, switch the Cellular data to the corresponding position.
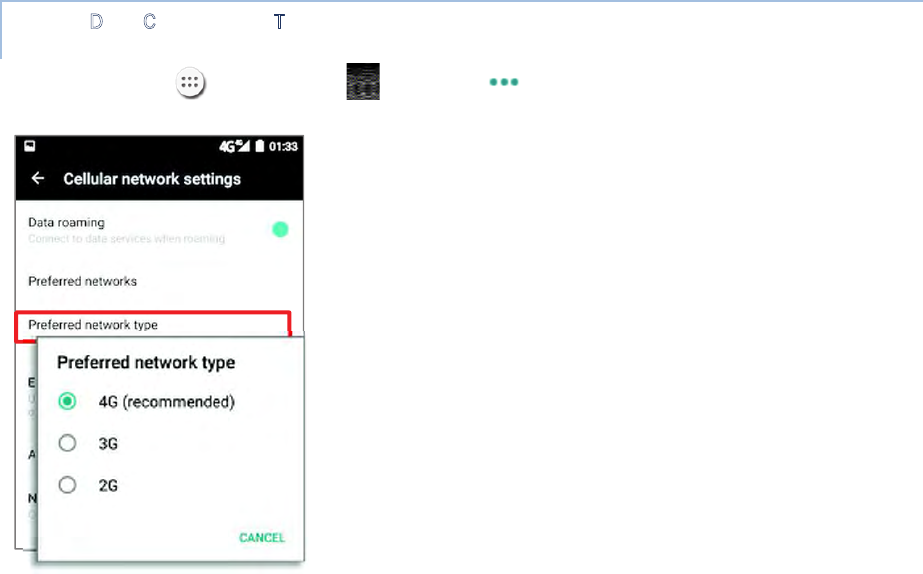
SELECT DATA CONNECTION TYPE
Tap All Apps | Settings | More | Cellular network, tap Preferred
network type to select.
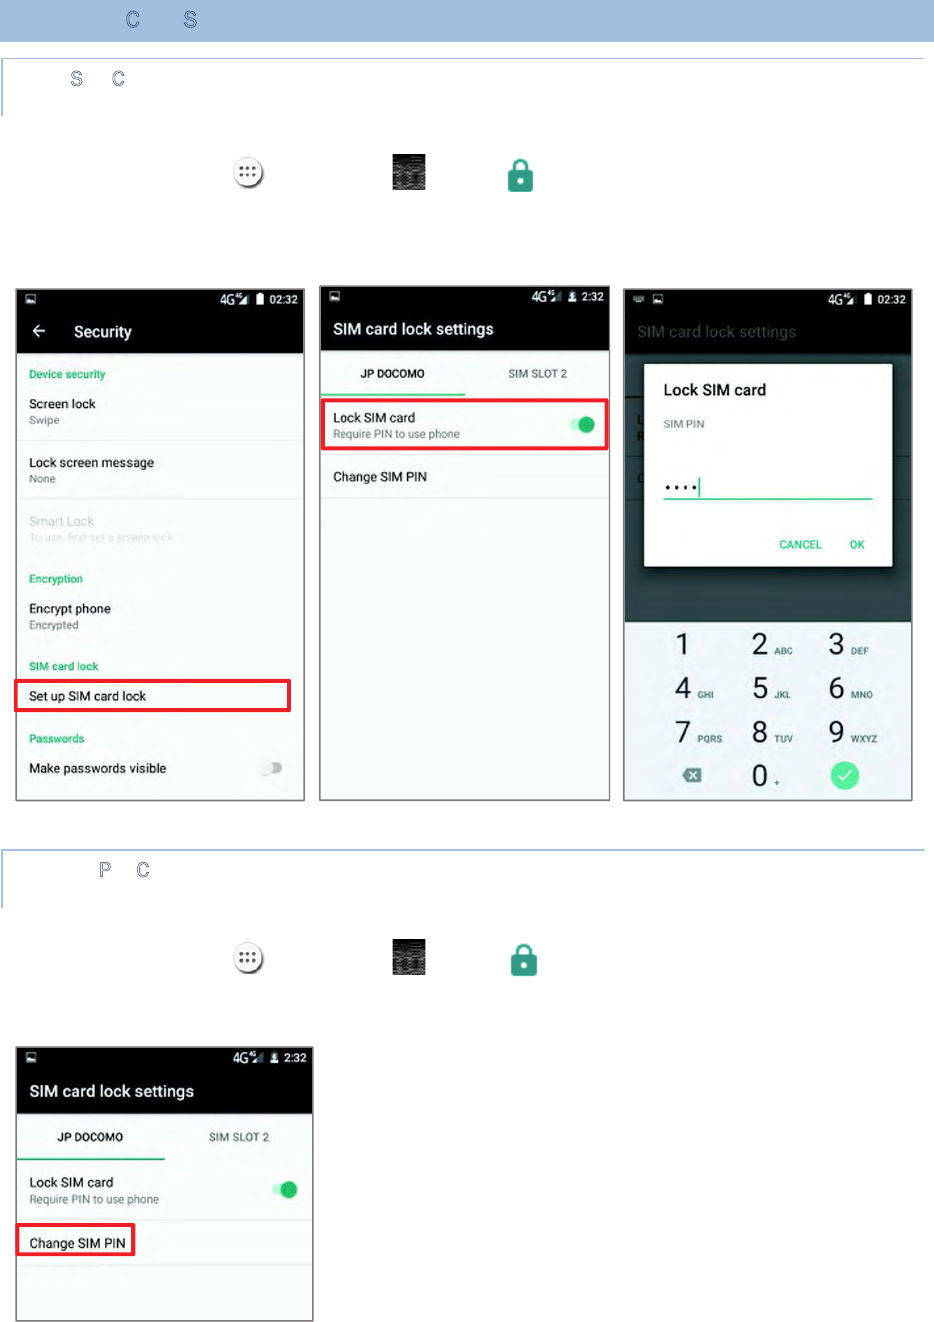
4.1.3. SIM CARD SETTINGS
LOCK SIM CARD
To lock the SIM card:
1) Tap All Apps | Settings | Security , tap Set up SIM card lock.
2) Enable Tap Lock SIM card.
3) Enter the PIN to enable SIM card lock. Once enabled, you are required to enter the
PIN code in order to use the phone
CHANGE PIN CODE
To change the PIN code:
1) Tap All Apps | Settings | Security , tap Set up SIM card lock.
2) Tap Change SIM PIN.
3) Enter your old PIN code to confirm your identity, and then input a new PIN code.
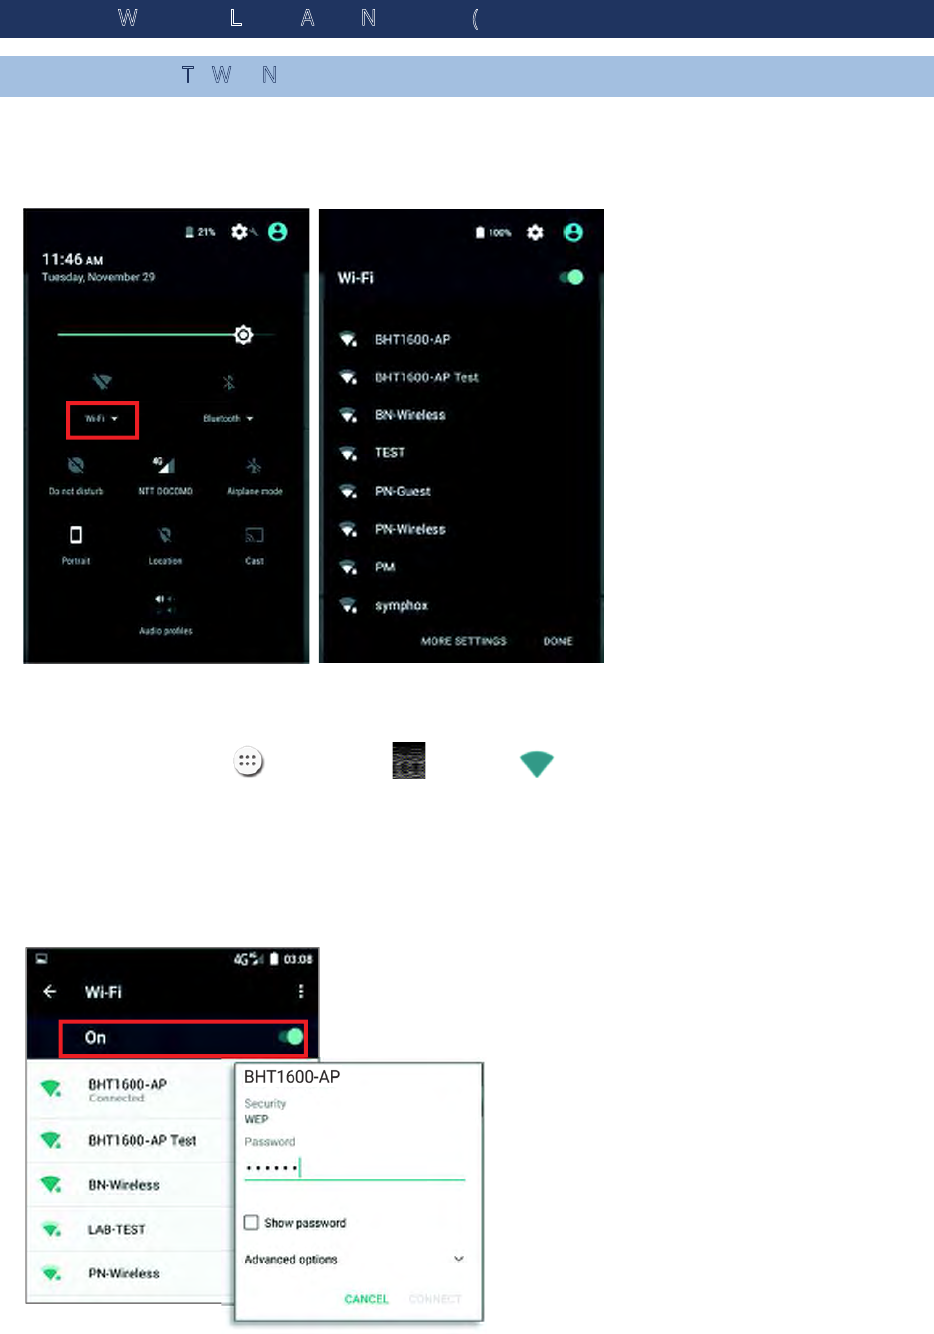
4.2. USE WIRELESS LOCAL AREA NETWORK (WI-FI)
4.2.1. CONNECT TO WI-FI NETWORK
To power on Wi-Fi:
1) Use two fingers to swipe down from the top of the screen to open Quick Settings.
2) Tap Wi-Fi bto scan for available networks. Select a network to connect.
OR
1) Tap All Apps | Settings | Wi-Fi .
2) Tap the Wi-Fi switch to scan for available networks. Select a network to connect. If
the network is an open one, the handy terminal will attempt to connect to it directly.
When connected, the status will change to show “Connected”. If the network is a
secured one, the handy terminal prompts a dialog to enter the password for the
connection.
4.2.2. MANUALLY ADD WI-FI NETWORK
If the network you would like to connect to does not broadcast its SSID, or if the network
is out of range, you may add it manually.
1) Tap All Apps | Settings | Wi-Fi .
2) Tap the Wi-Fi switch to enable this function, and then tap More and select “Add
network”.
3) In the dialog box, enter the name of the network in the Network name field, and
select a security method in the Security field (None, WEP, WPA/WPA2 PSK, 802.1x
EAP).
For WEP/WPA/WPA2 PSK connections: Enter the required password and tap
Save.
For 802.1x EAP connections: Tap Advanced options and select the EAP
method in the drop-down box (PEAP, TLS, TTLS, PWD, SIM, AKA), and the Phase 2
authentication in the drop-down box (None, MSCHAPV2, GTC). Select a CA
certificate and User certificate if required (certificates may be installed under
All Apps | Settings | Security | Install from SD card OR
All Apps | Settings | Wi-Fi | More | Advanced | Install
Certificates.) Enter your username in the Identity box and the password in the
Password box if required.
The handy terminal supports the following certificate file extensions:
4) If necessary, select the Proxy server and IPv4 settings. By default, no proxy is set
and IP settings are set to DHCP.
File Extension Type Standard certificate Key store
Description
DER-encoded X.509
certificates saved in
.crt or .cer files.
X.509 certificates saved in
PKCS#12 key store files with
a .p12 or .pfx extension.
How to install change the extension to
.crt or .cer.
Change the extension to
.p12 or .pfx.
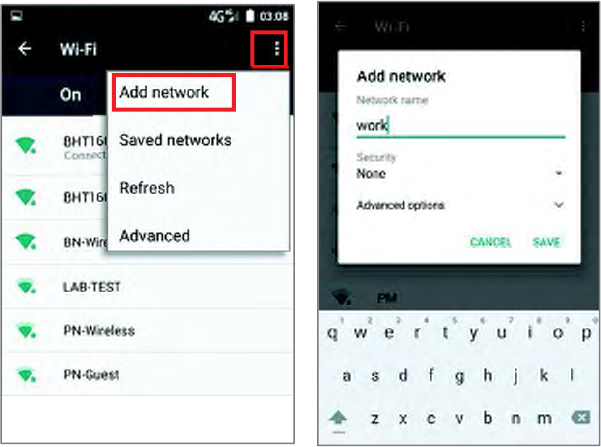
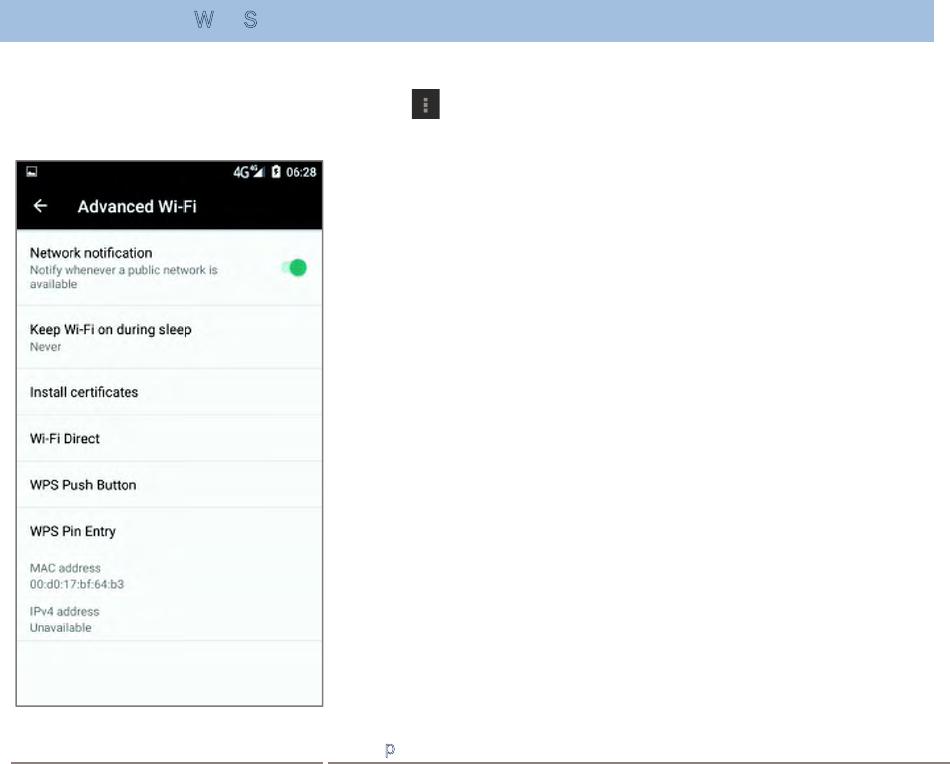
4.2.3. ADVANCED WI-FI SETTINGS
To configure advanced Wi-Fi settings:
1) On the Wi-Fi screen, tap More .
2) Select Advanced in the pop-up menu. Available settings are as below:
Item Description
Network notification Notifies when an open network is available.
Keep Wi-Fi on during sleep Sets when to turn Wi-Fi on during sleep.
Install certificates Installs certificates recently downloaded or placed on the internal
storage.
Wi-Fi Direct Enables your device to connect with a Wi-Fi Direct-capable device.
MAC address Displays the MAC address of the device when connecting to Wi-Fi-
networks.
WPS Push Button Initialize the Wi-Fi protected setup (WPS) for a WPS-capable
network. You will also have to press down the WPS button on your
router.
WPS in Entry Enter the personal identification number (PIN) for Wi-Fi protected
setup (WPS) process.
IPv6 address Displays the IPv6 address of the device.
IPv4 address Displays the IPv4 address of the device.
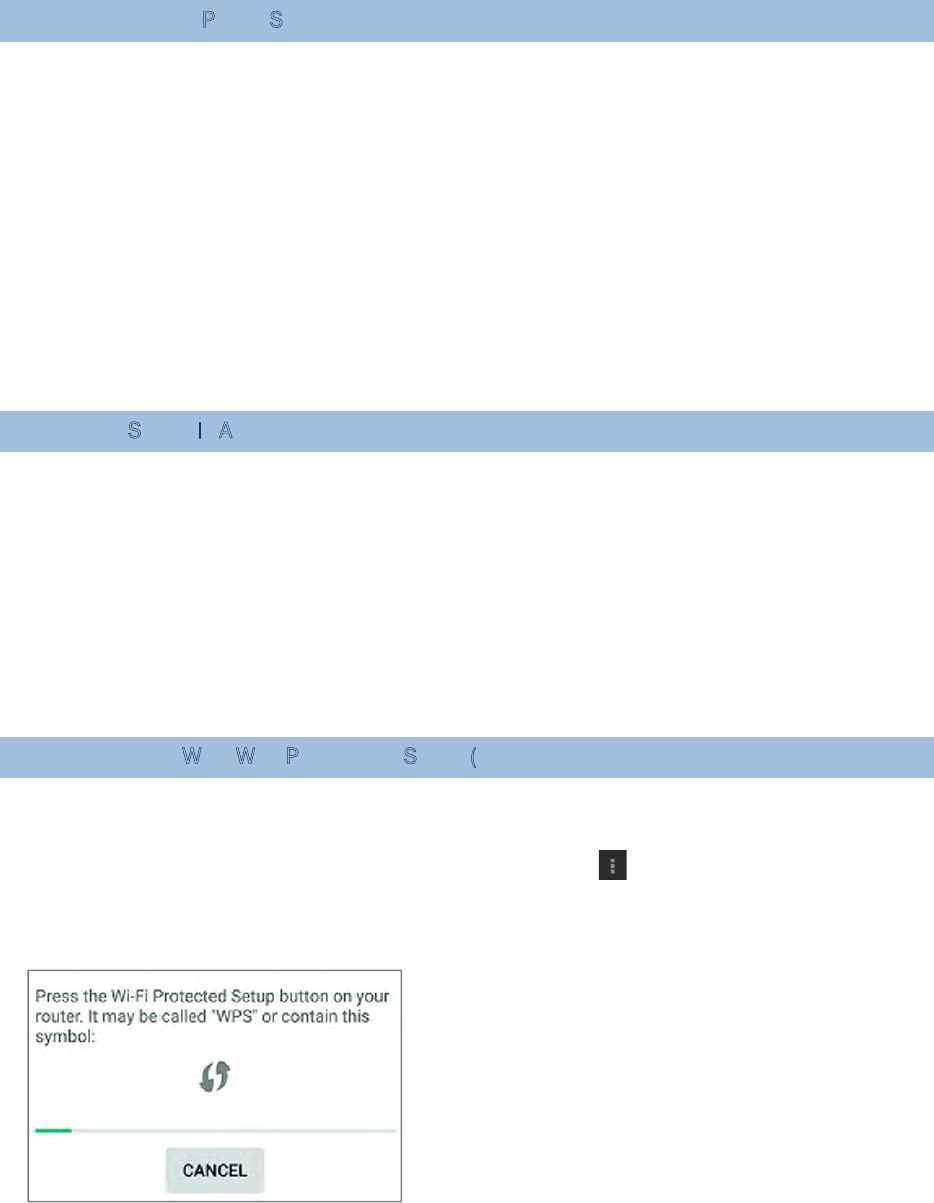
4.2.4. CONFIGURE PROXY SERVER
A proxy server acts as an intermediary between an endpoint device and another server
from which the device is requesting a service.
To change the proxy settings for a connection:
1) Tap a network in the available Wi-Fi hotspot list.
2) Tap Advanced options.
3) Tap Proxy and select Manual in the pop-up menu.
4) Enter the address of the proxy server in the Proxy hostname field. Enter the port
number for the proxy server in the Proxy port. Enter the addresses of websites which
are allowed to bypass the proxy server in the Bypass proxy for field. (Use the
separator | between addresses.)
5) Tap CONNECT.
4.2.5. USE STATIC IP ADDRESS
By default, the device uses DHCP to assign an IP address when connecting to a wireless
network. You may set for the device to connect to a network using a static IP address.
1) Tap a network in the available Wi-Fi hotspot list.
2) Tap Advanced options
3) Tap IPv4 settings and select Static in the pop-up menu.
4) Enter the IP address, gateway, network prefix length, DNS 1 address and DNS 2
address in the fields provided.
5) Tap CONNECT.
4.2.6. CONNECT WITH WI-FI PROTECTED SETUP (WPS)
Wi-Fi protected setup (WPS) allows easy establishment of a secure wireless network. The
handy terminal supports WPS through push button configuration.
1) On the Wi-Fi hotspot scanning screen, tap More , select Advanced and then
WPS Push Button.
2) A dialog will pop-up on the screen showing the remaining time allowed for pressing
the WPS button on the router.
3) On your wireless router, press the WPS button. The device will connect to your
router.
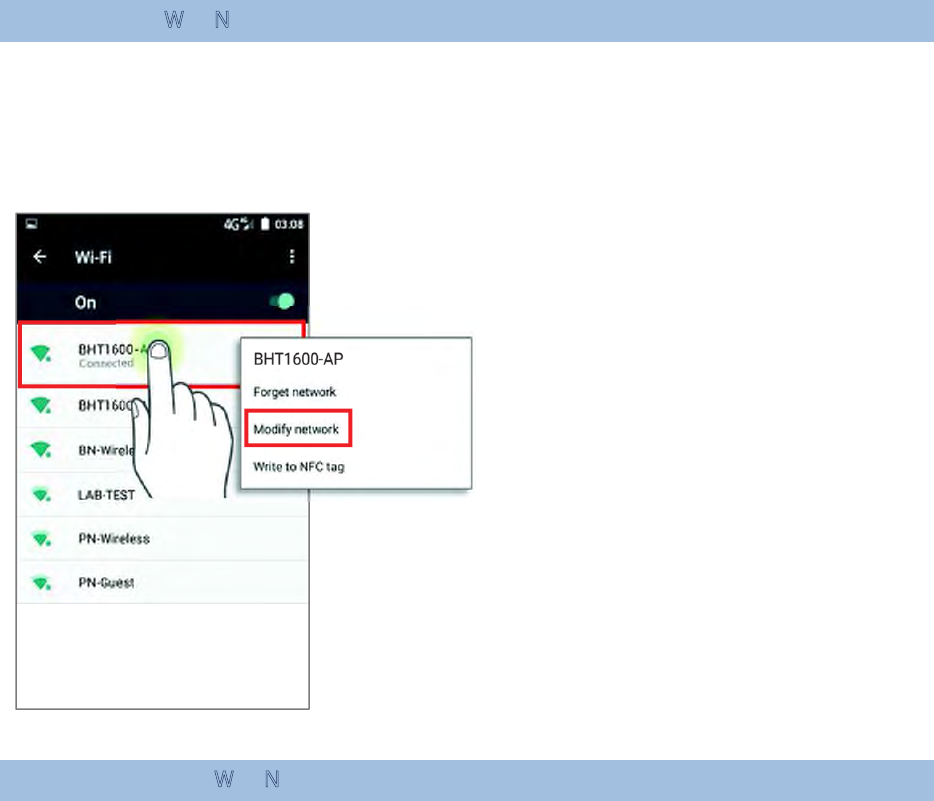
4.2.7. MODIFY WI-FI NETWORK
To change the settings for a connected network:
1) Tap and hold a connected network in the Wi-Fi hotspot list.
2) Tap Modify network in the pop-up menu.
3) In the dialog box that opens, modify the network settings, and tap Save.
4.2.8. DISCONNECT WI-FI NETWORK
To disconnect a connected network:
1) Tap and hold a connected network in the Wi-Fi hotspot list.
2) Tap Forget network in the pop-up menu.

4.3. USE BLUETOOTH
The RS31/BHT-1600 handy terminal lets you configure Bluetooth settings and manage
Bluetooth services provided on remote devices.
4.3.1. BLUETOOTH PROFILES
Bluetooth Profiles Supported
Generic Access Profile (GAP) For device discovery and authentication.
Service Discovery Access
Profile
(SDAP) Discovers services on remote devices.
Headset Profile (HSP) Describes how a Bluetooth enabled headset should
communicate with a Bluetooth enabled device
Serial Port Profile (SPP) Sets up a virtual serial port to connect two Bluetooth
devices.
Human Interface Device Profile (HID) Provides a low latency Bluetooth connection with
keyboards, pointing devices, etc.
Object Push Profile (OPP) Pushes and pulls objects to and from a push server.
Hands-Free Profile (AG1.5) (HFP) Allows using a hands-free device to place and receive
calls.
Advanced Audio Distribution
Profile
(A2DP) Streams stereo-quality audio to a wireless headset or
speaker.
Audio/Video Remote Control
Profile
(AVRCP
)
Allows controlling of television and Hi-Fi equipment.
Generic Object Exchange
Profile
(GOEP) Provides a basis for other data profiles.
Personal Area Networking
Profile
(PAN) Uses Bluetooth Network Encapsulation Protocol for
Bluetooth transmission.
General Audio/Video
Distribution Profile
(GAVD
P)
Provides a basis for A2DP and VDP.
Phone Book Access Profile (PBAP) Transfers Phone Book Objects to a car kit to display the
information of an incoming call received on the handy
terminal, or initiate a call.
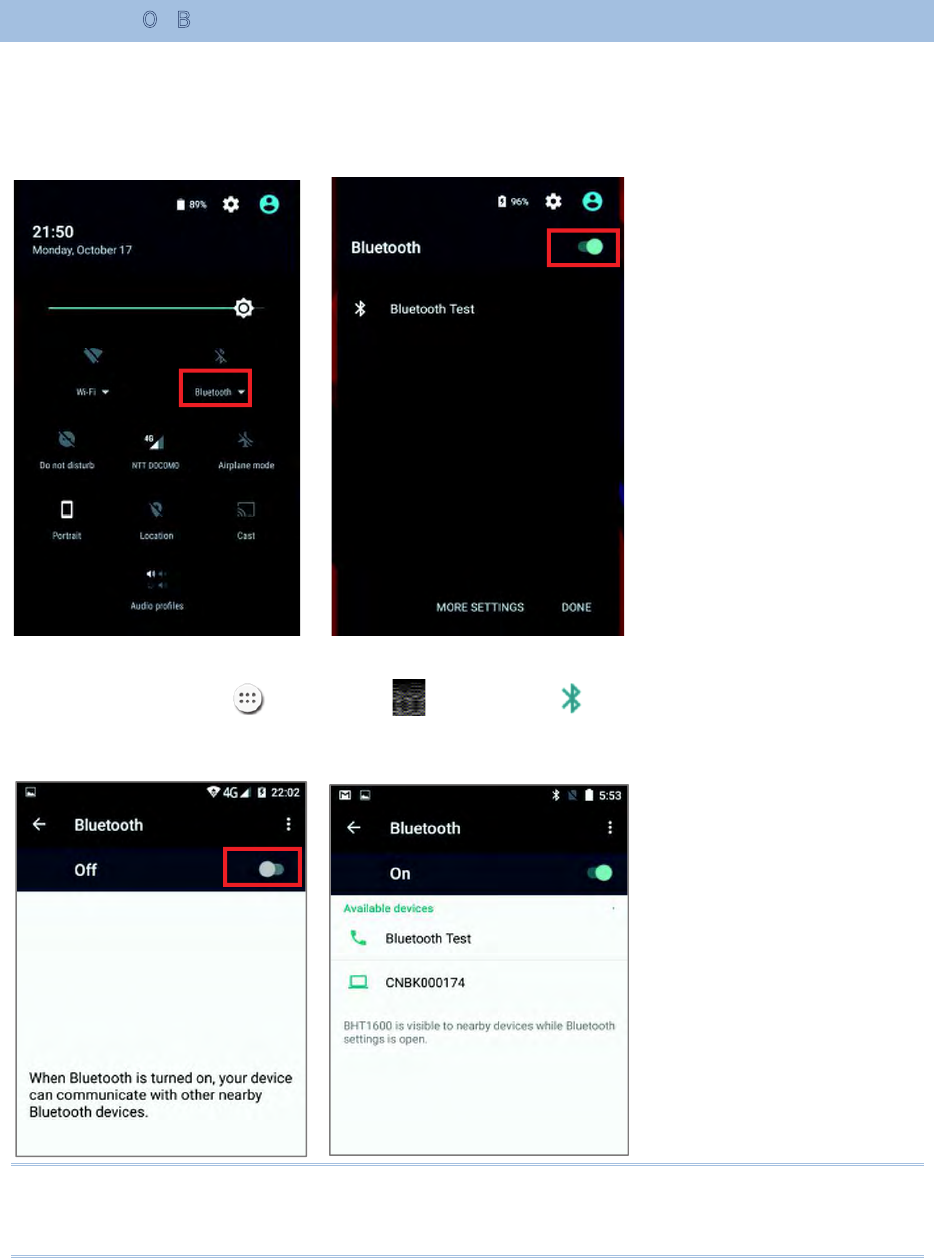
4.3.2. TURN ON BLUETOOTH
By default, Bluetooth is turned off, to turn it on:
1) Use two fingers to swipe down from the top of the screen to open Quick Settings.
2) Tap Bluetooth bto turn on this function while enabling the Bluetooth visibility of
this device.
OR
1) Tap All Apps | Settings | Bluetooth .
2) Tap the switch to turn on this function while enabling the Bluetooth visibility of this
device.
Note: After turning on, Bluetooth power is maintained even when the handy terminal is
suspended. However, if the power mode is switched to Airplane Mode, Bluetooth power will
be turned off regardless of the settings.
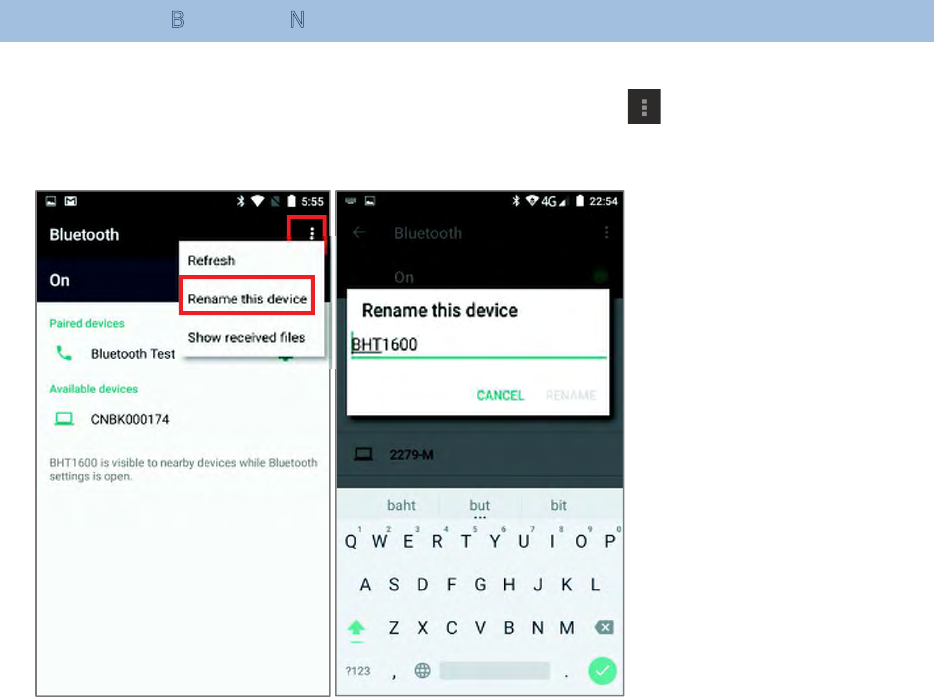
4.3.3. CHANGE BLUETOOTH NAME
To change the Bluetooth name of this handy terminal:
1) On the available Bluetooth devices screen, tap More and select Rename this
device in the pop-up menu.
2) Type a new name in the field and tap RENAME.
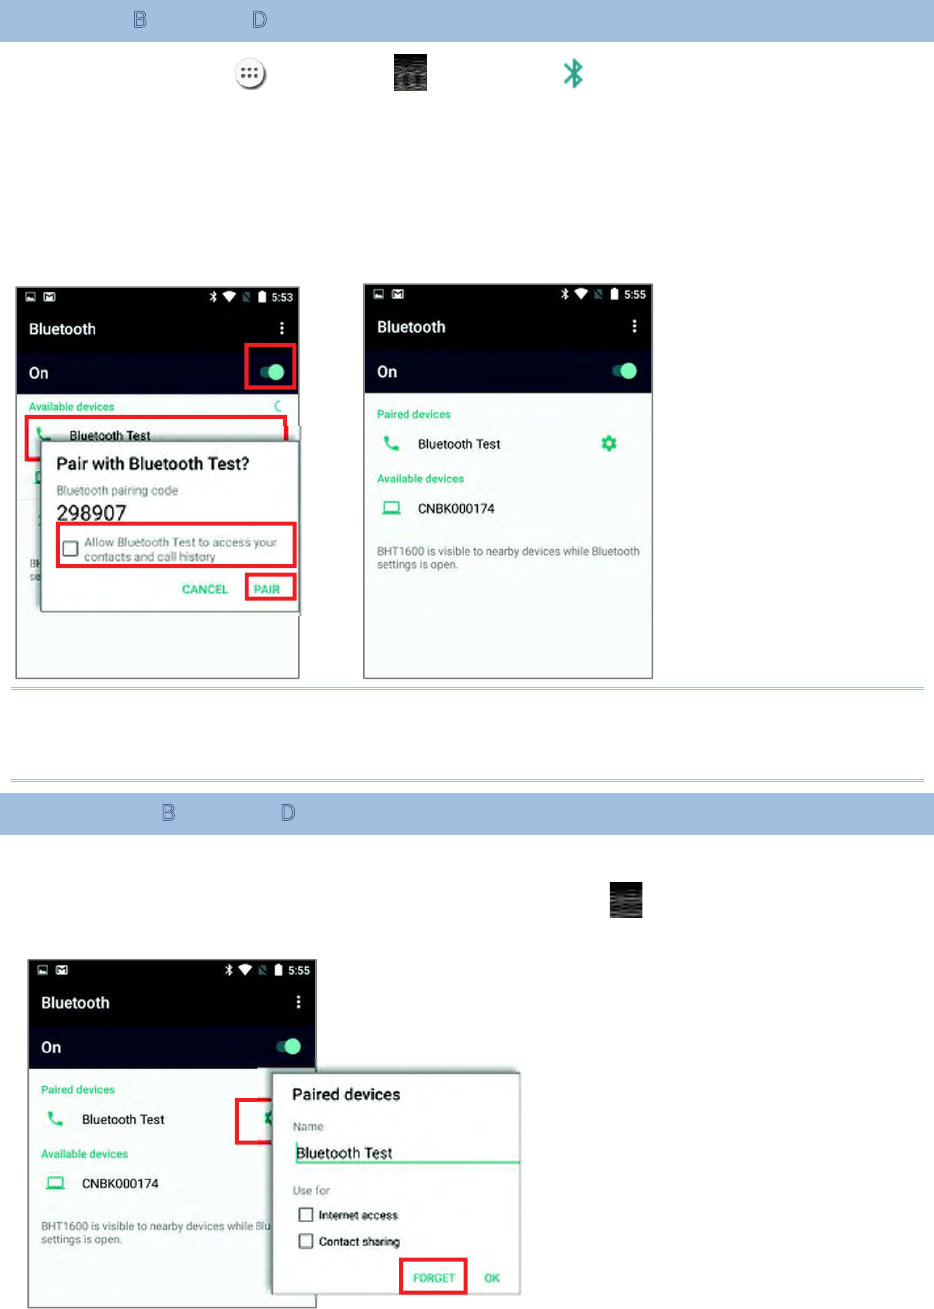
4.3.4. PAIR BLUETOOTH DEVICES
1) Tap All Apps | Settings | Bluetooth .Tap the switch to On position to
scan for available Bluetooth devices nearby. Scroll through the list and tap the device
you would like to pair.
2) The Bluetooth pairing request window opens. Depending on the pairing settings
of the Bluetooth device, you may need to enter a passkey, or confirm the assigned
passkey on the device to pair if a smart pairing method is applied. Enter/confirm the
passkey on the device to pair.
3) Once pairing is done, the Bluetooth device will be listed in the Paired Devices list.
Note:
If the device you would like to pair with is not listed, make sure Bluetooth visibility is
enabled on the device.
4.3.5. UNPAIR BLUETOOTH DEVICE
To unpair a paired device:
1) In the Paired Devices list, tap the settings button next to the paired device.
2) On the Paired device screen, tap FORGET.
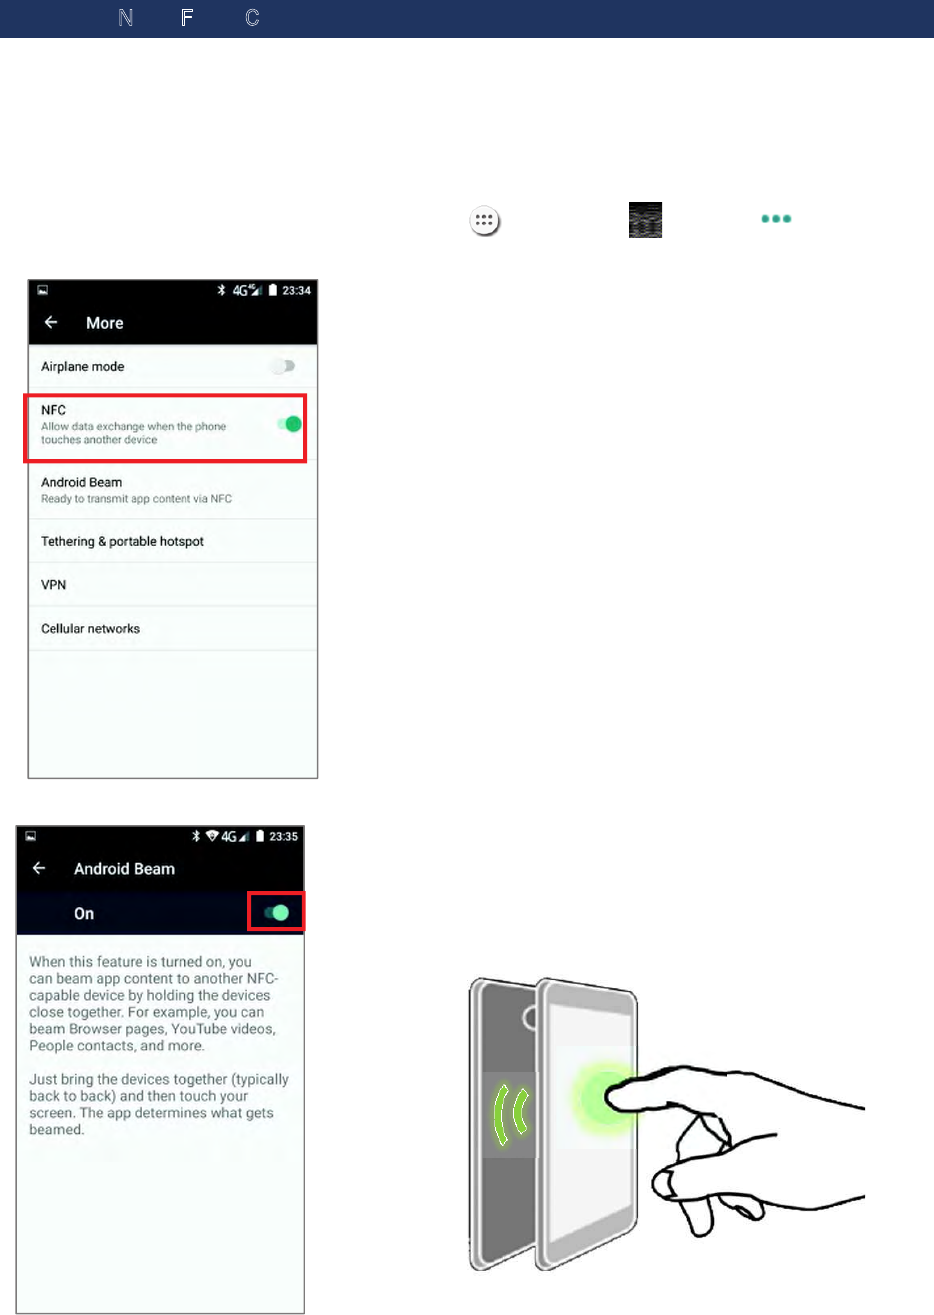
4.4. USE NEAR FIELD COMMUNICATIONS
Near field communications (NFC) uses close proximity (4 cm or less) to establish radio
communication through electromagnetic fields. With NFC enabled, the handy terminal can
collect information from NFC tags, exchange information with other NFC supported devices,
and even change information on the NFC tag if authorized.
Before starting to communicate through NFC, perform the following:
1) On the handy terminal, tap All Apps | Settings | More .
2) On the Wireless & networks page, make sure the NFC switch is enabled.
3) Tap Android Beam and enable it.
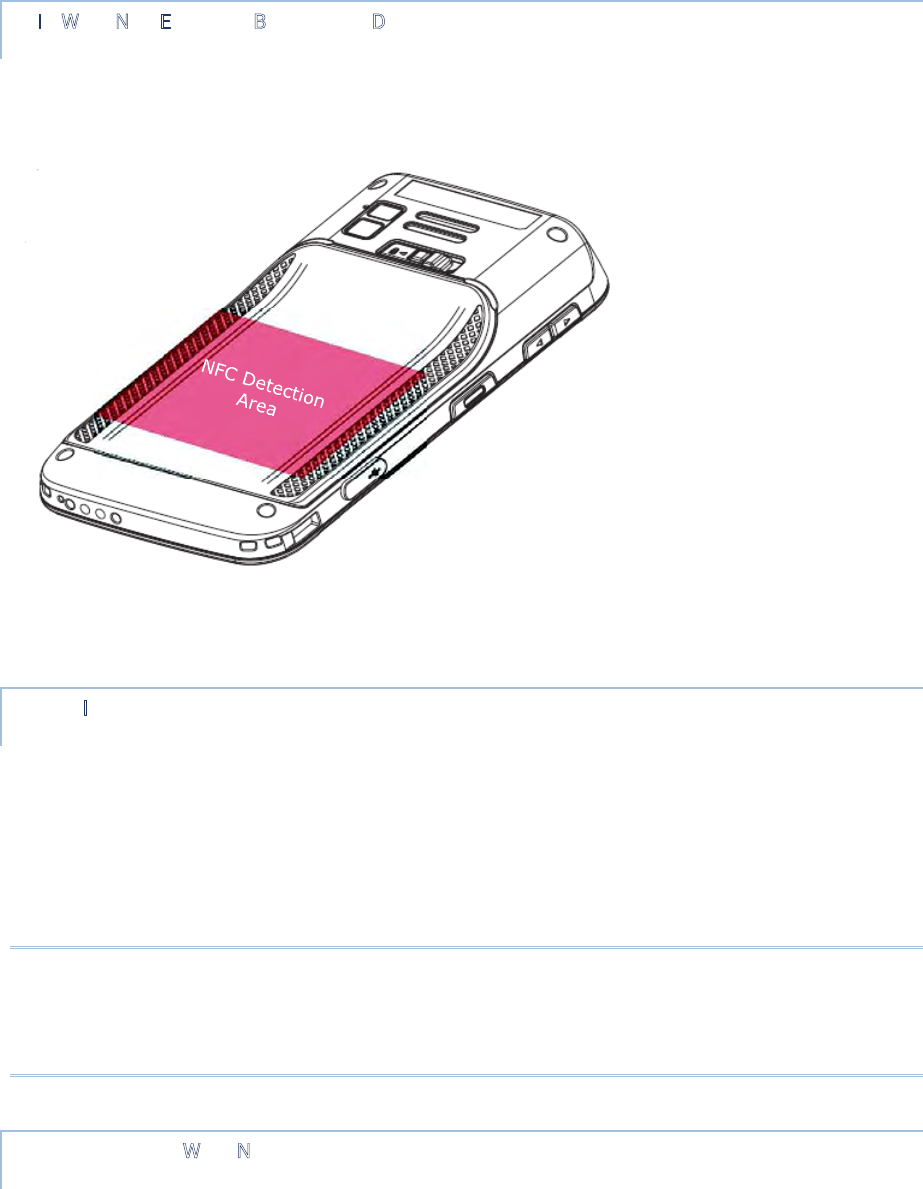
PAIR WITH NFC ENABLED BLUETOOTH DEVICES
1) On the device you would like to pair with, make sure NFC is enabled and Bluetooth
discovery is enabled.
2) Hold the handy terminal without covering the antenna area at the lower end of the
battery cover.
3) Move the handy terminal in proximity with the device. A screen notification will
appear to indicate that pairing is successful.
SHARE INFORMATION
1) Open the web page, video, photo or contact info page you would like to transfer.
2) Place the back of the handy terminal in close proximity with the other device you
would like to share data with.
3) When the two devices connect, a “Touch to beam” notification will appear on the
screen.
4) Touch the screen to initiate data transfer.
Note:
Once the data begins to transfer, the two devices only need to be held within a 10 m (32.8
ft.) range; they no longer have to be held within close range in order to transfer
successfully.
COMMUNICATION WITH NFC
1) On the handy terminal, launch an NFC enabled application.
2) Hold the handy terminal without covering the antenna area at the lower end of the
battery cover.
3) Place the handy terminal close to the NFC tag or device until the application indicates
data transfer is complete.
Chapter 5
USING THE PHONE
The RS31/BHT-1600 handy terminal allows making phone calls and connecting to the
network over Wideband Code Division Multiple Access (WCDMA). Insert the SIM card before
turning on the power. Refer to Installing SIM Card, SAM Card and Memory Card.
Note: If the SIM card is not in position, you may make emergency calls if the service is
supported.
IN THIS CHAPTER
5.1 Phone Power ............................................................ 122
5.2 Phone Application ..................................................... 123
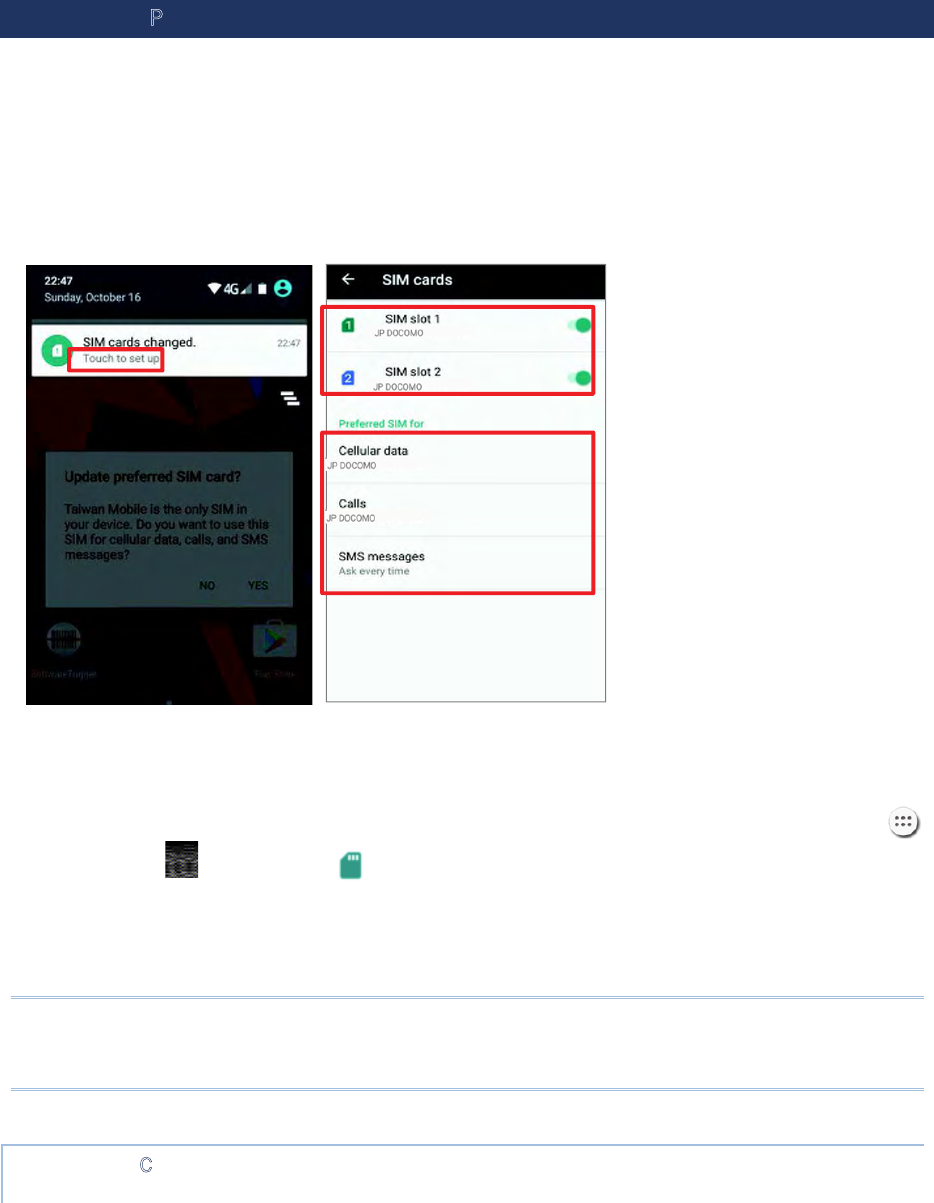
5.1. PHONE POWER
The handy terminal accommodates two SIM cards and supports dual standby of two
different networks. Both networks will be monitored at the same time, and the phone will
dynamically switch between the two networks during usage. Calls will be placed with either
one of the networks; you cannot switch networks in the middle of a received call or placed
call, or receive or place calls with both networks at the same time.
When a SIM card is installed for the first time, the phone power is turned on automatically
when the handy terminal is powered on. A dialog box pops-up when the handy terminal is
powered on notifying that a SIM card is detected.
1) Tap Touch to set up.
2) The SIM cards screen opens showing the name of the mobile carrier and the current
phone settings.
3) To open the SIM management screen from other screens, tap All Apps
|Settings | SIM cards
4) If you already have both SIM1 and SIM2 cards inserted, enable these cards on SIM
cards screen and respectively select the Preferred SIM for Cellular data, Calls and
SMS messages.
Note:
When both SIM cards are both inserted and enables, they are both active and ready to
receive an incoming call but not able to be connected at the same time.
EMERGENCY CALLS
Depending on your service provider, the handy terminal might support making emergency
phone call when the SIM card is locked, or even when no SIM card is inserted. Emergency
phone numbers will vary by country.
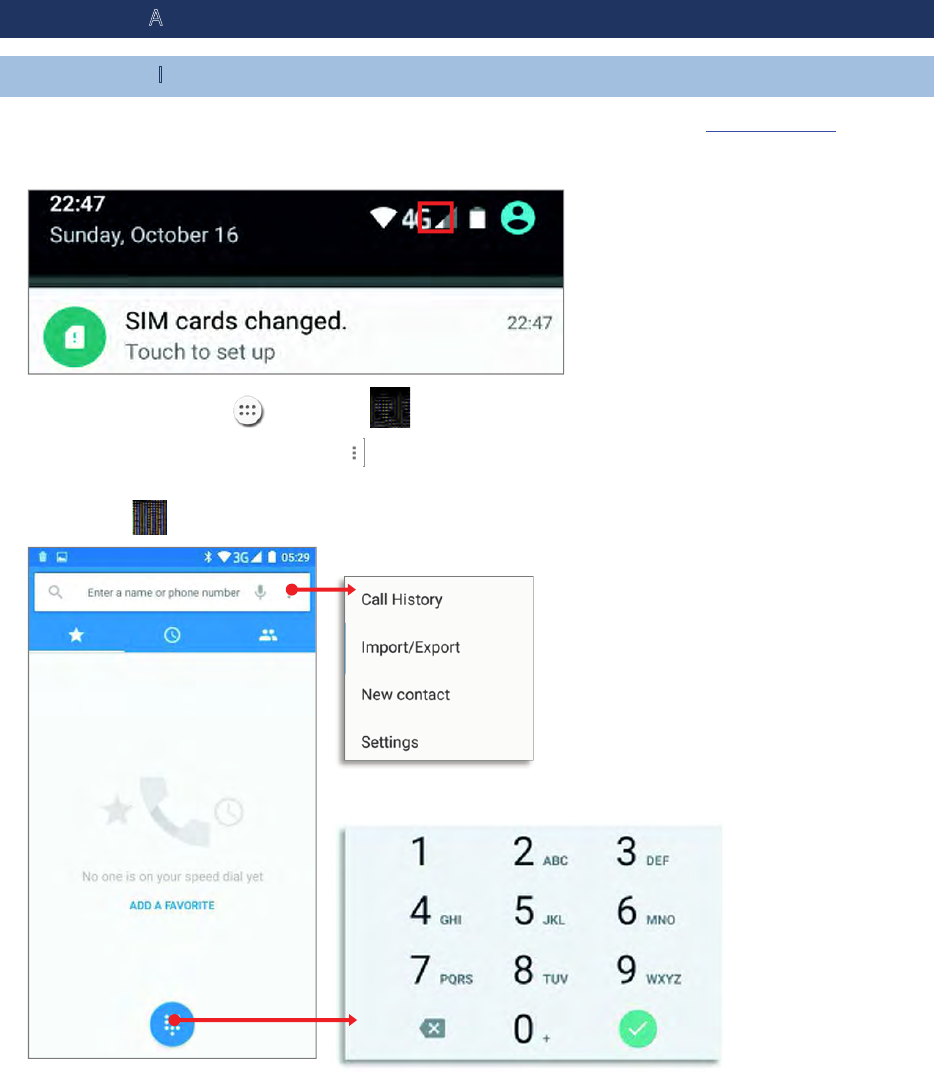
5.2. PHONE APPLICATION
5.2.1. PHONE INTERFACE
1) When a SIM card is installed on the handy terminal and the Phone Power is on, a
signal icon appears on the status bar. The number of bars indicates the strength of the
connection.
2) Tap All Apps | Phone . The Phone application opens.
3) Tap the settings button to open the phone settings menu for adding a new
contact, opening the People application.
4) Tap to open the dial pad.
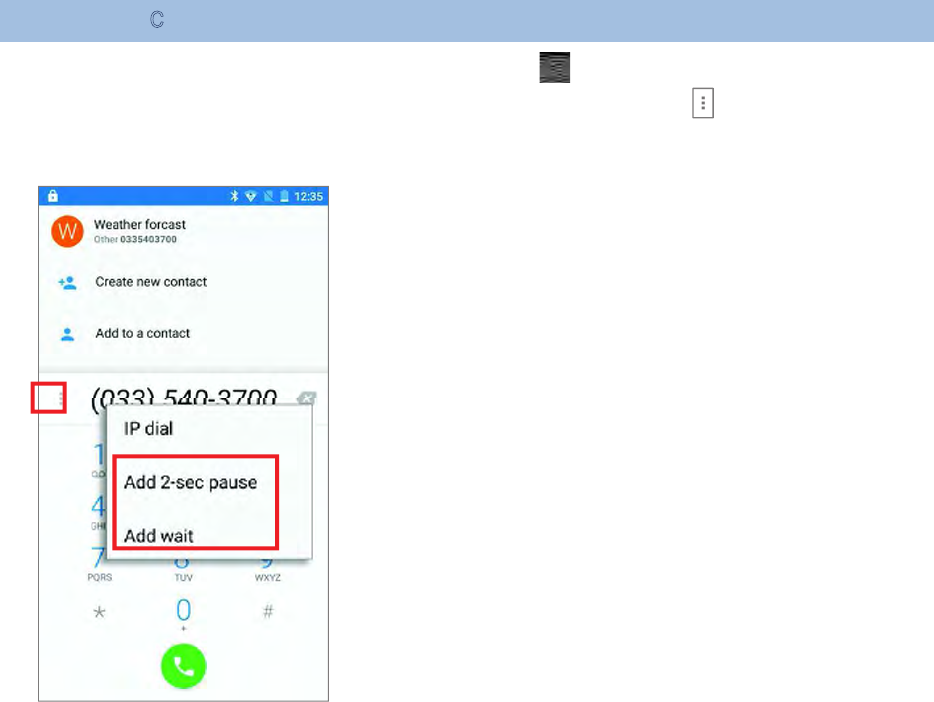
5.2.2. PLACE CALL
Enter the phone number in the dial pad and tap to initiate the call. If you need to
frequently make calls to an interactive voice system, you may tap next to the number
and select Add 2-sec pause for soft pause (a pause of 2 seconds to the buttons) or a hard
pause (a pause that will wait for your confirmation to send the following digits).
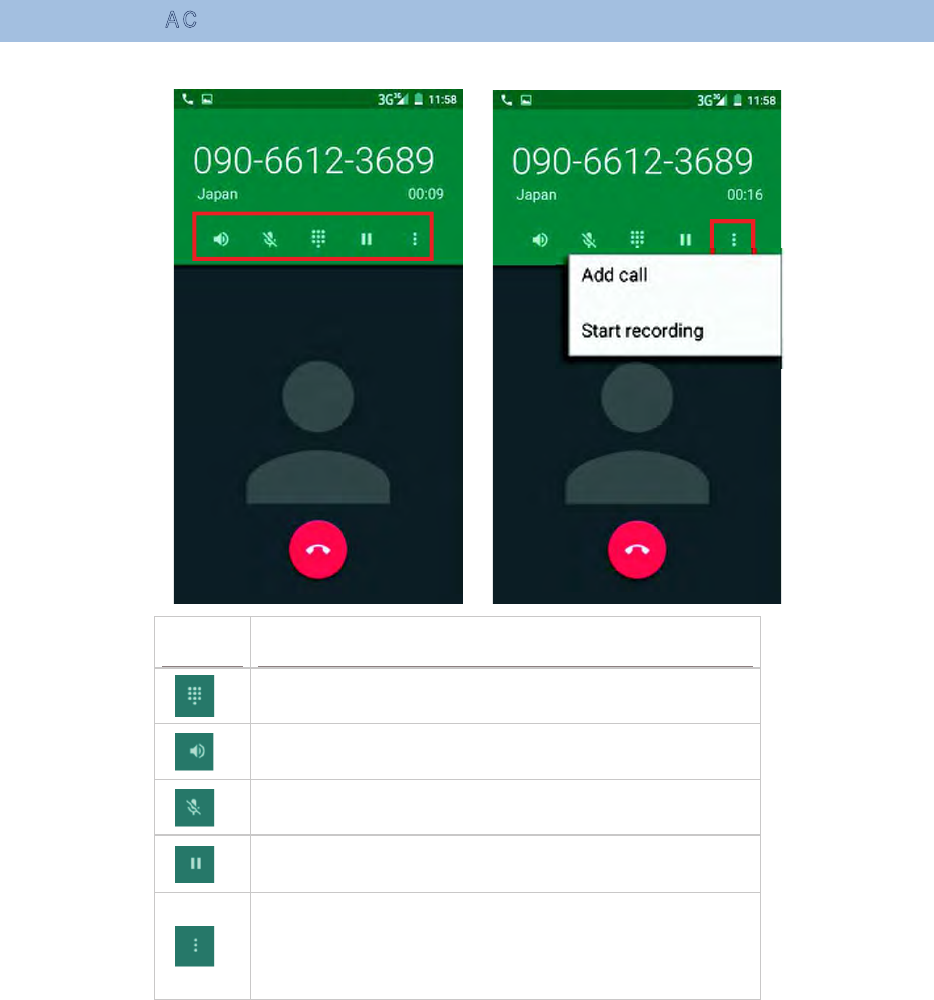
5.2.3. DURING A CALL
When a call is connected, the phone keypad features the following buttons:
Button Description
Opens the dial pad.
Turns on the speaker.
Mutes the call.
Places the call on hold.
Add call: Adds another person to the call.
Start/Stop recording: Record this conversation to
your device’s internal storage/PhoneRecord as
*.3gp file.
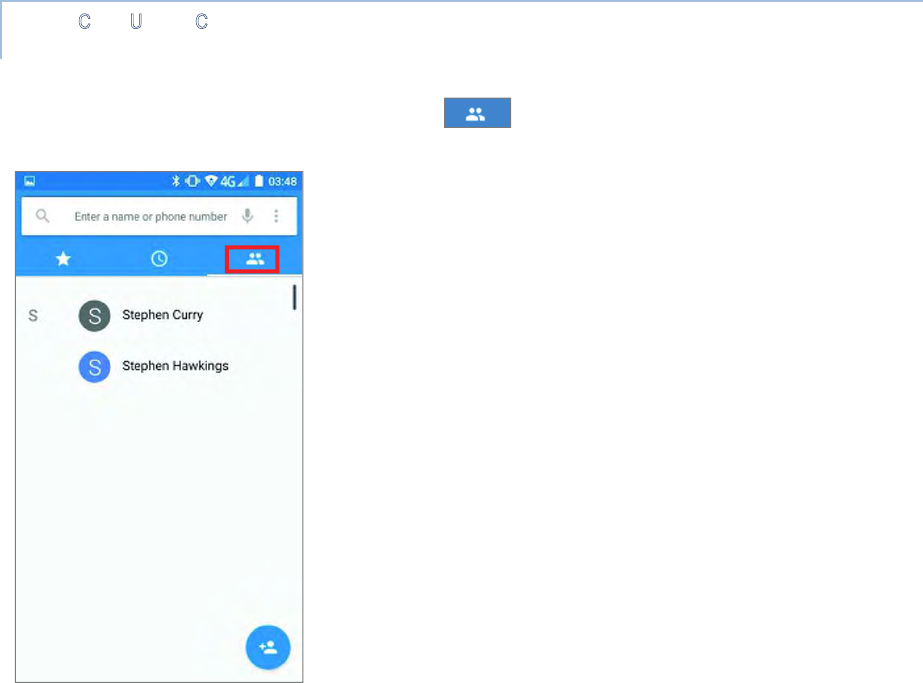
PLACE CALL USING CONTACTS
To make a call using contacts:
1) In the phone application page, tap .
2) Tap a contact to initiate a call.
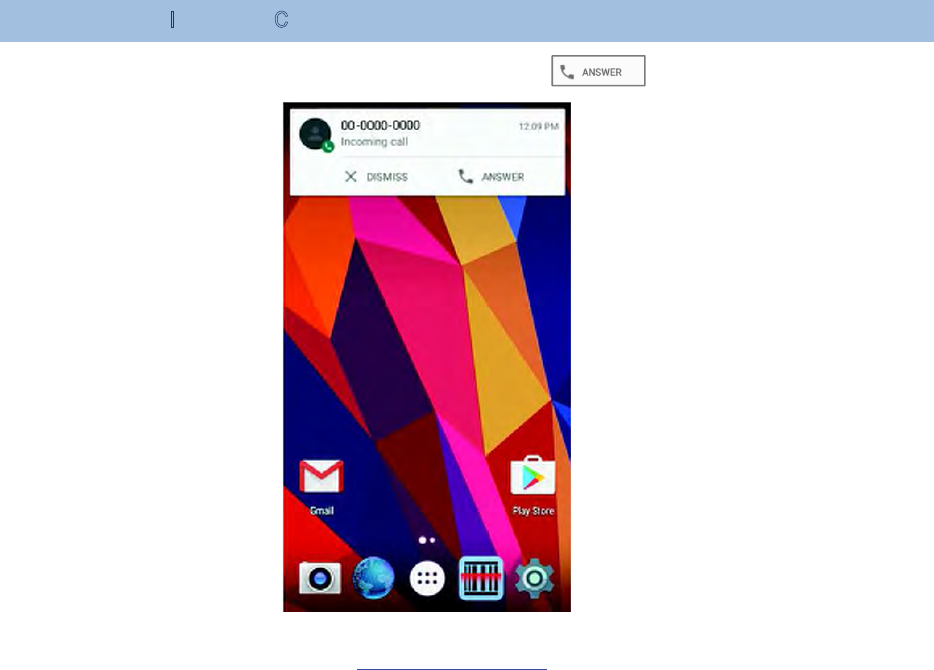
5.2.4. RECEIVE INCOMING CALL
When a call is incoming on the handy terminal, tap to pick it up.
Incoming calls will be logged in the Phone application; in the case of a missed call, a
notification will be displayed. See Check Missed Calls.
To mute the ringtone of an incoming call, press the volume down button.
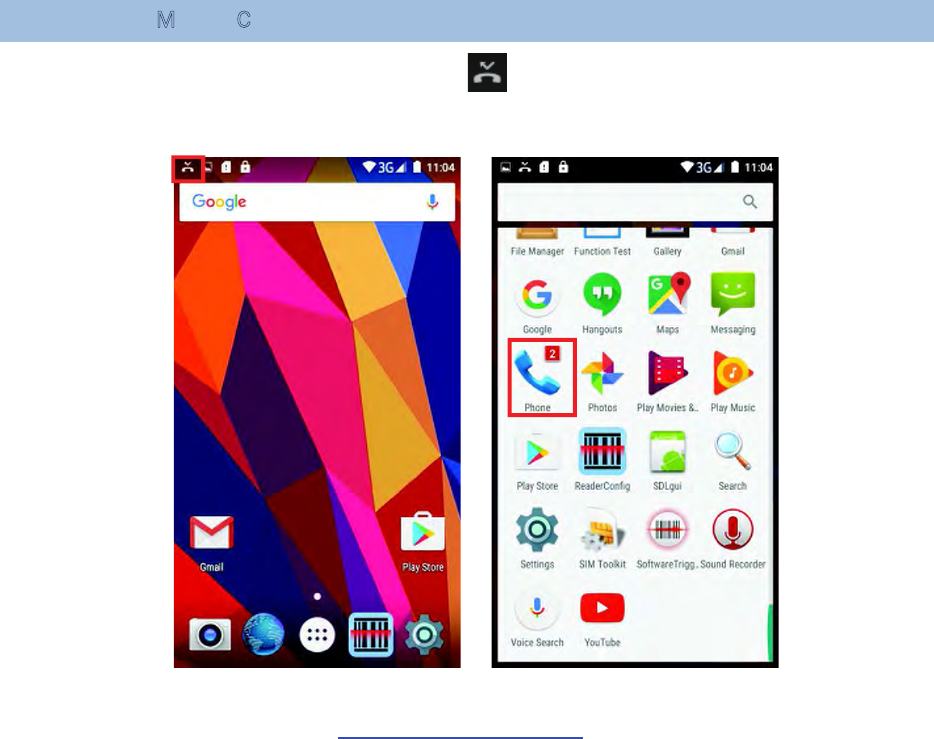
5.2.5. CHECK MISSED CALLS
If you have a missed call, a notification icon will appear on the status bar; the LED on
the top of the screen will also blink red for notification. The number of missed calls will also
be displayed next to Phone icon.
Unlock the screen and use the Open Notifications Panel to manage the missed call.
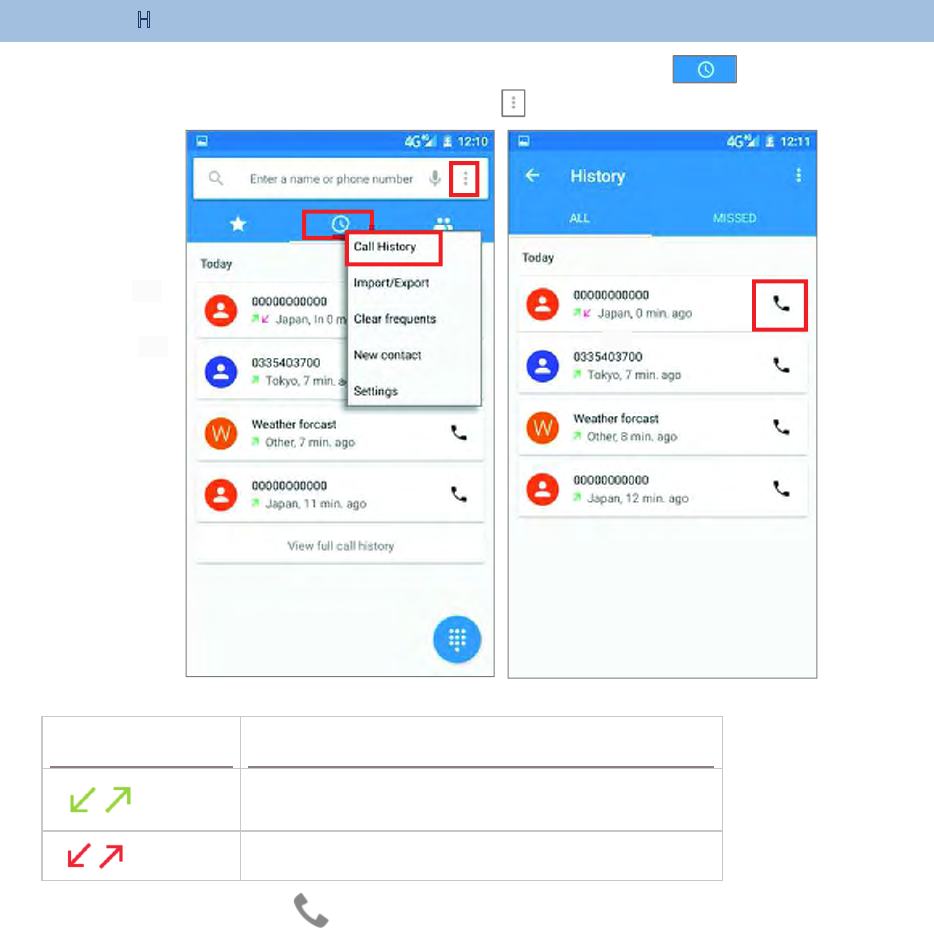
5.2.6. CALL HISTORY
1) On the Phone application page, tap the History button to open a list of
history calls. Or you can tap settings button and then Call History.
Button Description
Connected calls.
Missed calls.
2) Tap the phone icon next to a call record to place back the call.
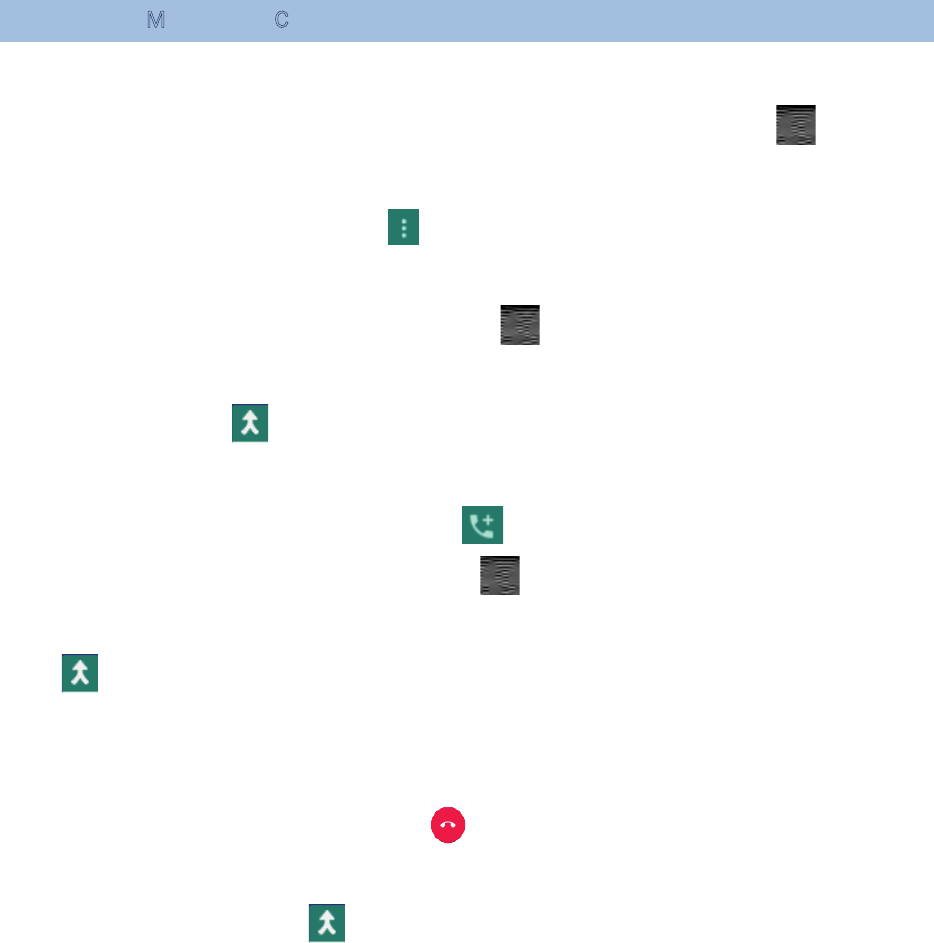
5.2.7. MAKE MULTI-PARTY CALLS
To make multi-party conference calls:
1) On the Phone application page, enter the first number to call and tap to initiate
the call.
2) After the call has begun, tap and then Add call to add another member. The
first call will be put on hold.
3) Enter the second number to call and tap to initiate the call.
4) When the second call is connected, the first call will continue to be on hold. Tap the
merge call button to add the first call to the conversation. A three-party conference
call is initiated.
To add a fourth member, tap . The three-party call will be put on hold.
Enter another number to call and tap to initiate the call. When the call is
connected, the three-party call will continue to be on hold. Tap the merge call button
to add the three-party call to the conversation. A four-party conference call is then
initiated.
Tap Manage Conference to view all members of the call.
To remove a member, tap next to the member.
To speak with a member in private, tap the member, and the conference call
will be put on hold. Tap to return back to the conference call.
5.2.8. AUDIO MODES
The handy terminal offers three different audio modes for phone calls:
HANDSET MODE
This is the default audio mode which uses the receiver above the touchscreen for audio
output during calls.
SPEAKER MODE
This mode uses the built-in speaker for audio output during calls.
HEADSET MODE
Connect a Bluetooth headset or a wired headset to the handy terminal for audio output
during calls.
USE BLUETOOTH HEADSET
See Pair Bluetooth Devices to connect the handy terminal to a Bluetooth device. The
speaker phone becomes muted when a Bluetooth headset is connected.
USE WIRED HEADSET
Insert a wired headset in the Headset Jack. The speaker phone becomes muted when a
wired headset is connected.
5.2.9. IN-CALL VOLUME
Use the Volume Buttons to adjust the ringer volume and system sound level. When in the
middle of a call, use the volume buttons to adjust in-call conversation volume.

Chapter 6
USING READER CONFIGURATION UTILITY
The Reader Configuration utility allows you to manage the barcode reader integrated on
the handy terminal.
IN THIS CHAPTER
6.1 Configure Reader ...................................................... 133
6.2 Read Printed Barcodes ...............................................150
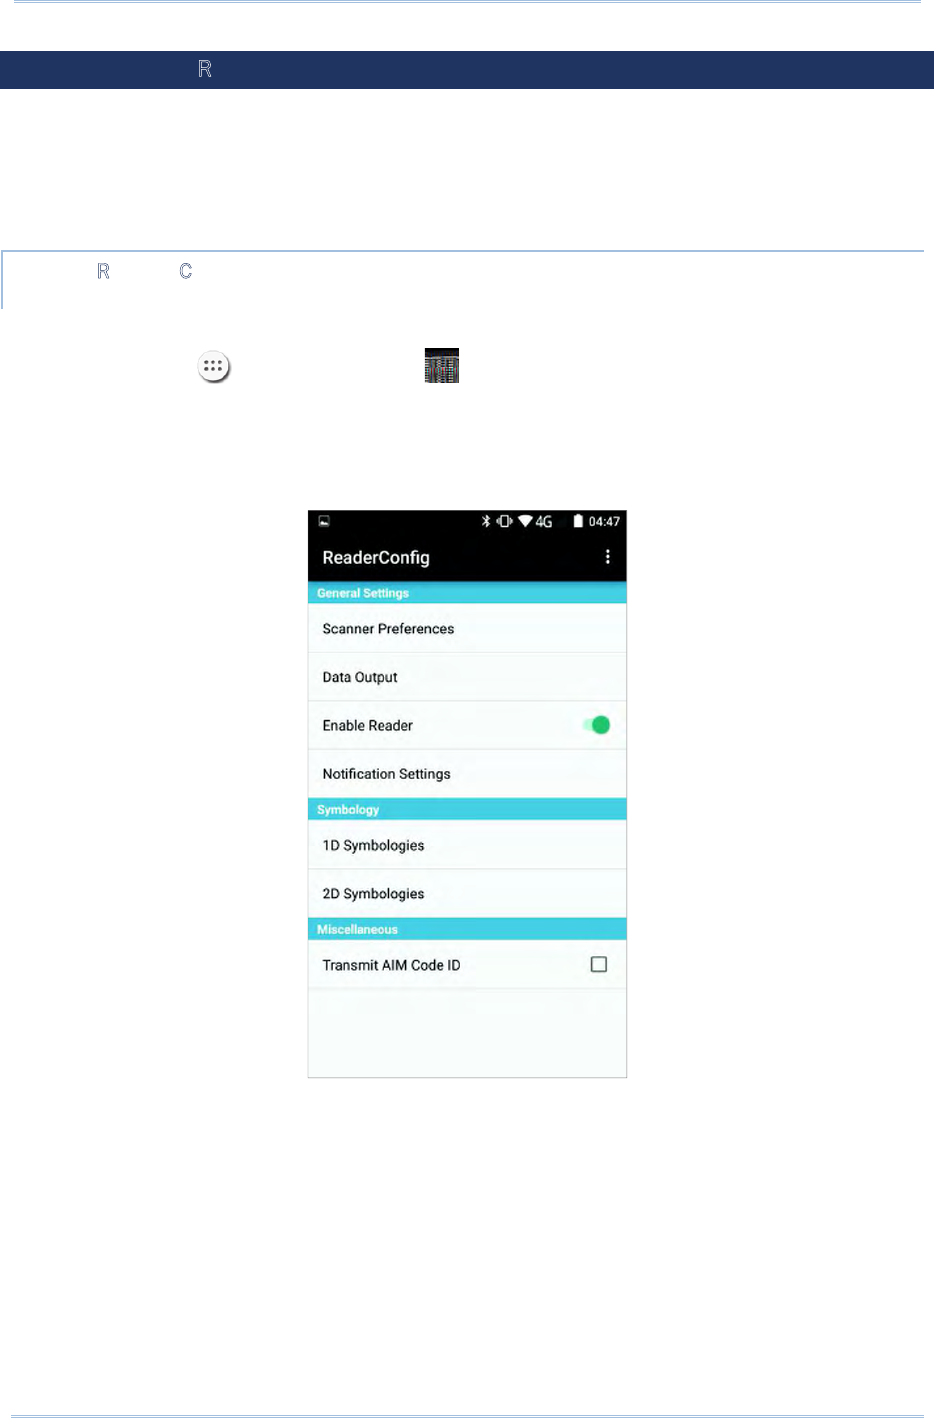
133
RS31/BHT-1600 Handy Terminal User Manual
6.1. CONFIGURE READER
The handy terminal is capable of reading printed barcodes. The reader module can be
either a (laser) 1D reader or a 2D imager. The handy terminal is installed with a Reader
Config to configure the scan engine built inside. Use it to create a profile of settings that best
suits your needs.
LAUNCH READER CONFIG
To launch Reader Config:
1) Tap Apps | Reader Config to open the Reader Configuration Utility.
2) Reader Config launches in context with the reader module(s) on board the handy
terminal. On the main settings page are three sections: General Settings,Symbology
and Miscellaneous.
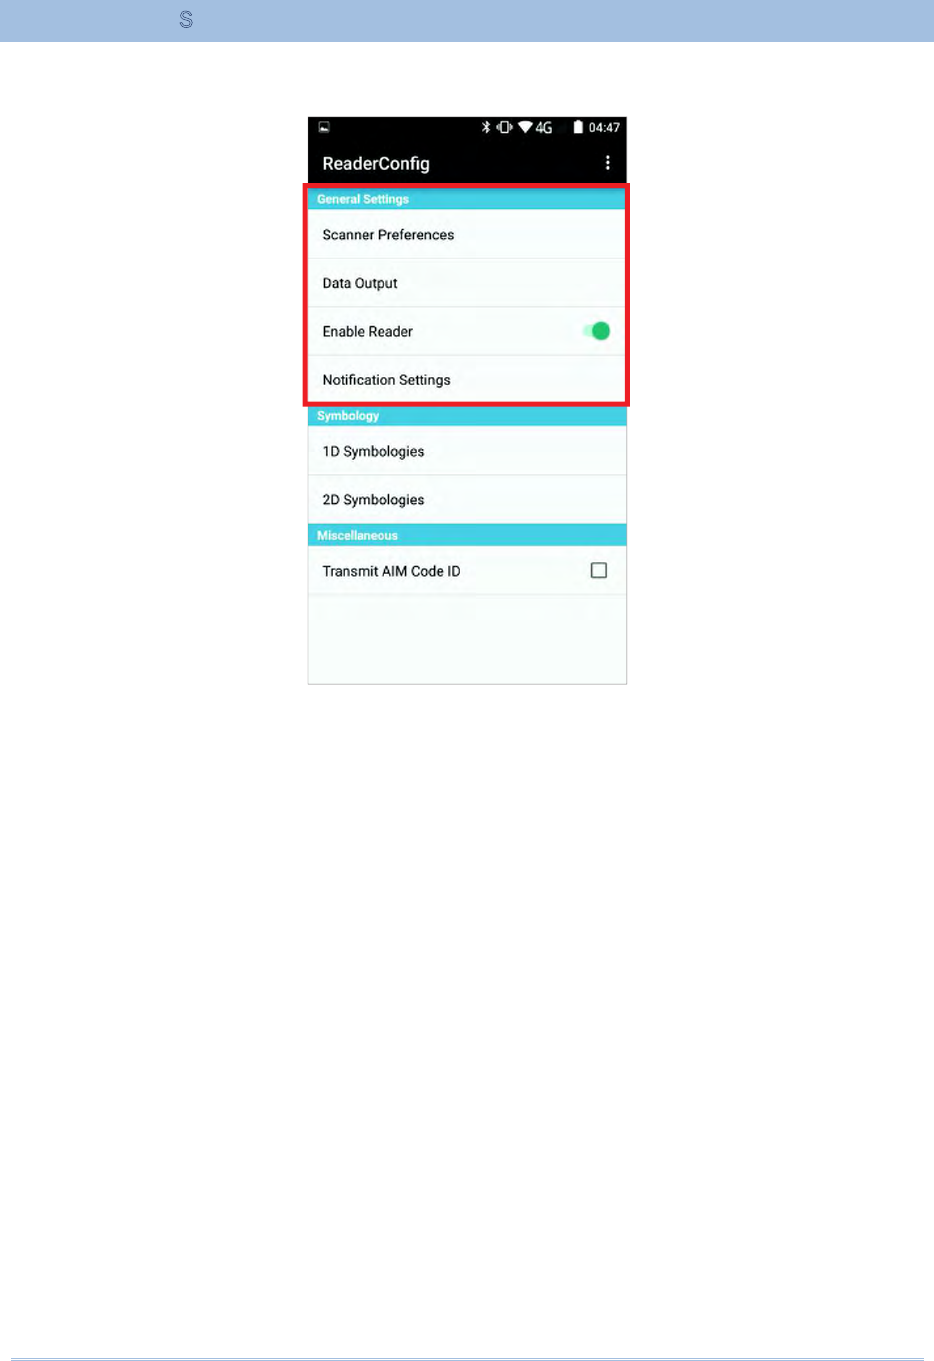
134
6.1.1. GENERAL SETTINGS
General Settings is where all reader settings are accessed from. Tap each item to enter
its sub-menu.
The functions under General Settings include:
Scanner Preferences
Data Output
Enable Reader (enabled by default)
Notification Settings
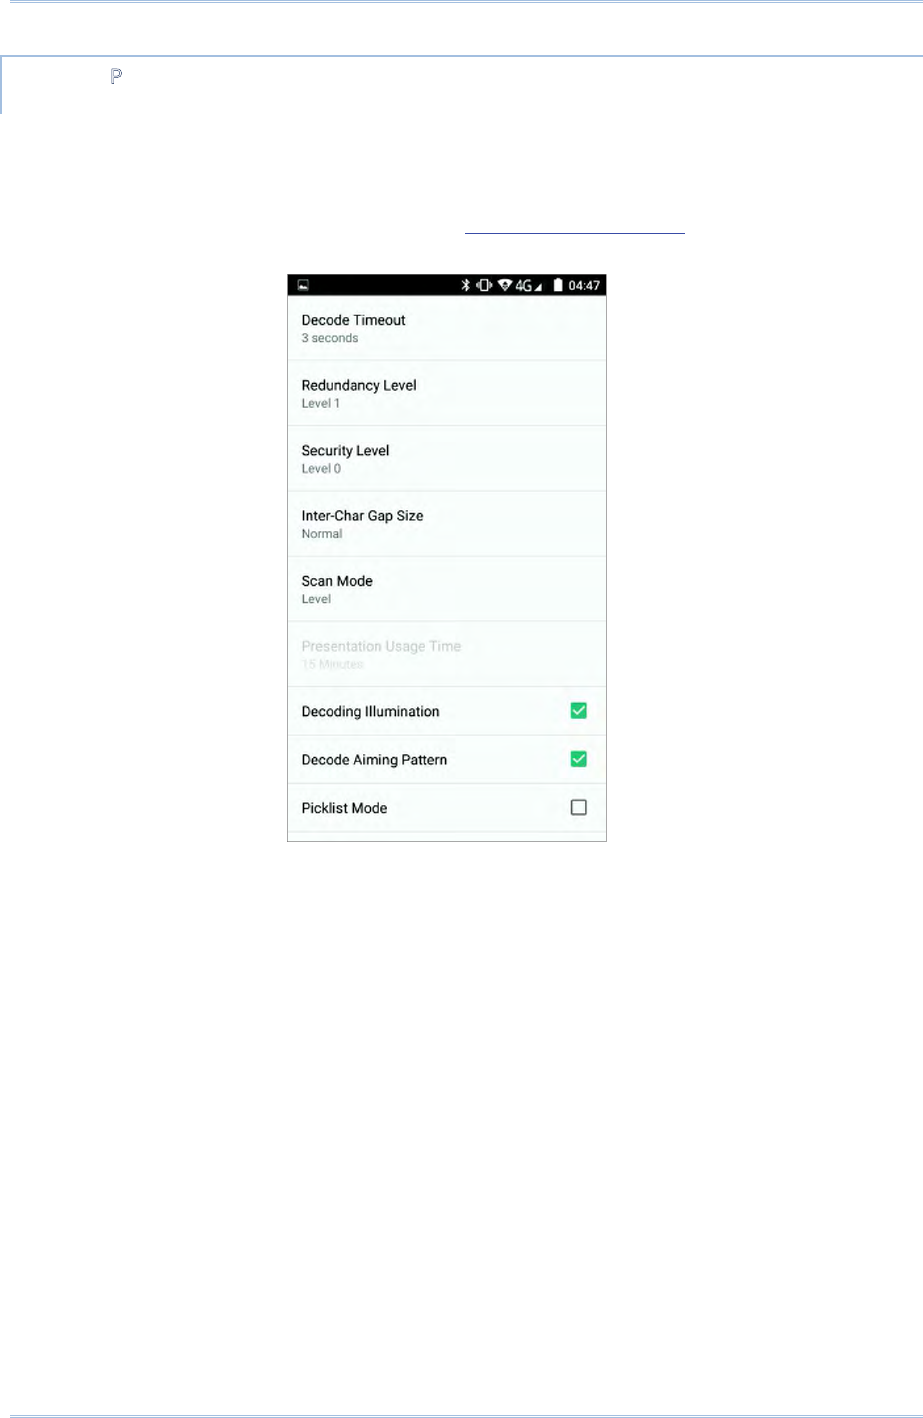
135
Usin
g
Reader Configuration Utility
SCANNER PREFERENCES
Options on the Scanner Preferences page differ according to the type of scan engine
built within the handy terminal.
To open Scanner Preferences page:
1) Open Reader Config as described inġLaunch Reader Config.
2) Tap Scanner Preferences.

136
2D IMAGER SETTINGS
Setting Description Default
Decode Timeout Sets the maximum time for the decoding process during a
scan. Configurable between 1 sec to 9 sec.
3 sec.
Redundancy Level Sets how many successful readings should be done before
linear barcodes such as Codabar, MSI, and Interleaved 2 of 5
can be decoded. Levels 1 to 4 available.
Level 1
Security Level Sets the security level to ensure decoding accuracy
considering the printed quality of barcodes such as Code 128,
Code 93, and UPC/EAN. The higher the level is, the more
security is ensured. Options are:
Level Description
0 With this default, the scan engine is aggressive
enough to decode most “in-spec” barcodes.
1 Select this level if misdecodes have occurred. It
fixes most misdecodes.
2 Select this level if Level 1 should fail to eliminate
misdecodes.
3 Select this level if Security Level 2 should fail to
prevent misdecodes. However, as this level actually
impairs the decoding ability of the decoder, a safer
solution would be to improve the quality of the bar
codes to read.
Level 0
Inter-Char Gap Size Sets the intercharacter gap size for Code 39 and Codabar.
Switch between Normal and Large.
Normal
Scan Mode Sets the reader’s scanning behavior.
Level: The decoding process is activated by a trigger event,
and continues until the trigger event ends, a valid decode
happens or decode session time-out is reached.
Presentation Mode: The imager engine attempts to decode
when an object appears in its field of view. When this device is
executing Barcode reader service under this mode, it will stay
active and never go into sleep mode.
Level
Presentation Usage
Time
This option is available when Presentation is selected as the
scan mode. This defines the duration of how long Presentation
mode stays active, after which the laser light beam will
automatically be disabled.
Decoding
Illumination
Enables an LED light beam to aid barcode reading. Selected
(Enabled)
Decode Aiming
Pattern
Projects a crosshair at the center of the laser light beam to
facilitate barcode reading.
Selected
(Enabled)
Picklist Mode When selected, only barcodes aligned at the crosshair of the
laser light beam will be decoded.
Deselecte
d
(Disabled)
Display Mode Enable improved performance for reading barcodes on
electronic displays and mobile phones.
Deselecte
d
(Disabled)
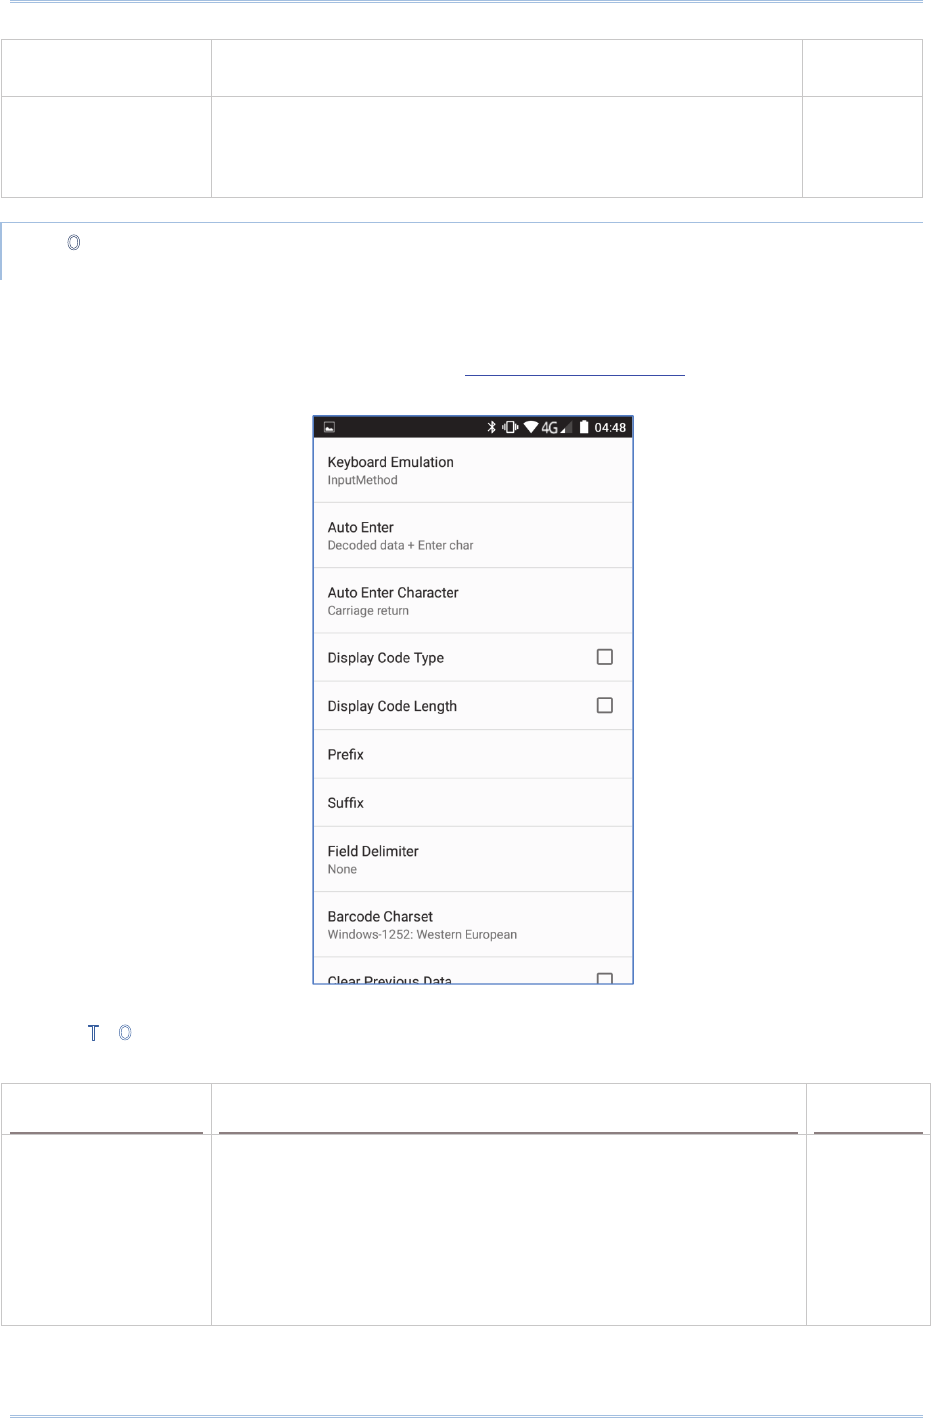
137
Usin
g
Reader Configuration Utility
Inverse Type Decide whether to disable or enable decoding inverse
barcodes, or set as auto.
Regular
only
Addon Redundancy Functions when “auto-discriminate” is applied for UPC/EAN
addons. Decides the number of times of supplemental decoding
of the same barcode in order to count as a valid read.
Configurable between 2 and 30.
10
DATA OUTPUT
Data Output allows users to set the way to output decoded data.
To open Data Output settings page:
1) Open Reader Config as described inġLaunch Reader Config.
2) Tap Data Output.
WHERE TO OUTPUT
Keyboard Emulation setting controls where the decoded data is to be output.
Setting Descriptions Default
Keyboard
Emulation
Tap the switch to enable. When enabled,
the reader module treats decoded data as typed text
and outputs it to the active application on the handy
terminal. Options are:
None
InputMethod
KeyEvent
InputMethod

138
HOW TO OUTPUT
After the output destination is set, configure how to output decoded data, i.e. the “format”
to present decoded data.
Setting Description Default
Auto Enter Adds an ENTER character before or after each string of
decoded data. The ENTER character can be defined in the
“Auto Enter character” field below. This function saves the
trouble of pressing a confirmation key to accept each string of
decoded data. Options are:
Disable
Decoded data + Enter char
Enter char + Decoded data
Decoded
data + Enter
char
Auto Enter
character
Adds a key code before or after the decoded data. If [Auto
Enter] is enabled, select the ENTER character to send.
Options are:
None
Carriage Return
Tab
Space
Comma
Semicolon
Carriage
Return
Display Code Type Prefixes the output data with code type information. Deselected
(Disabled)
Display Code
Length
Suffixes the output data with code length information. Deselected
(Disabled)
Prefix Affixes 0 to 10 characters to the left of the output data. Tap
the label to open a character table for entering the prefix.
Prefixes containing invisible characters
are supported.
--
Suffix Affixes 0 to 10 characters to the right of the output data. Tap
the label to open a character table for entering the suffix.
Suffixes containing invisible characters
are supported.
--
Field Delimiter Sets the delimiter to separate the output barcode data to the
following pieces: code type, decoded barcode data, and code
length (if applicable). Options are:
None
Comma
Semicolon
Full stop
None
ENABLE READER
Features a switch to enable or disable reader scanning ability. When enabled, a light beam
will be sent out from the scanning window each time the trigger (scan key) is pressed.
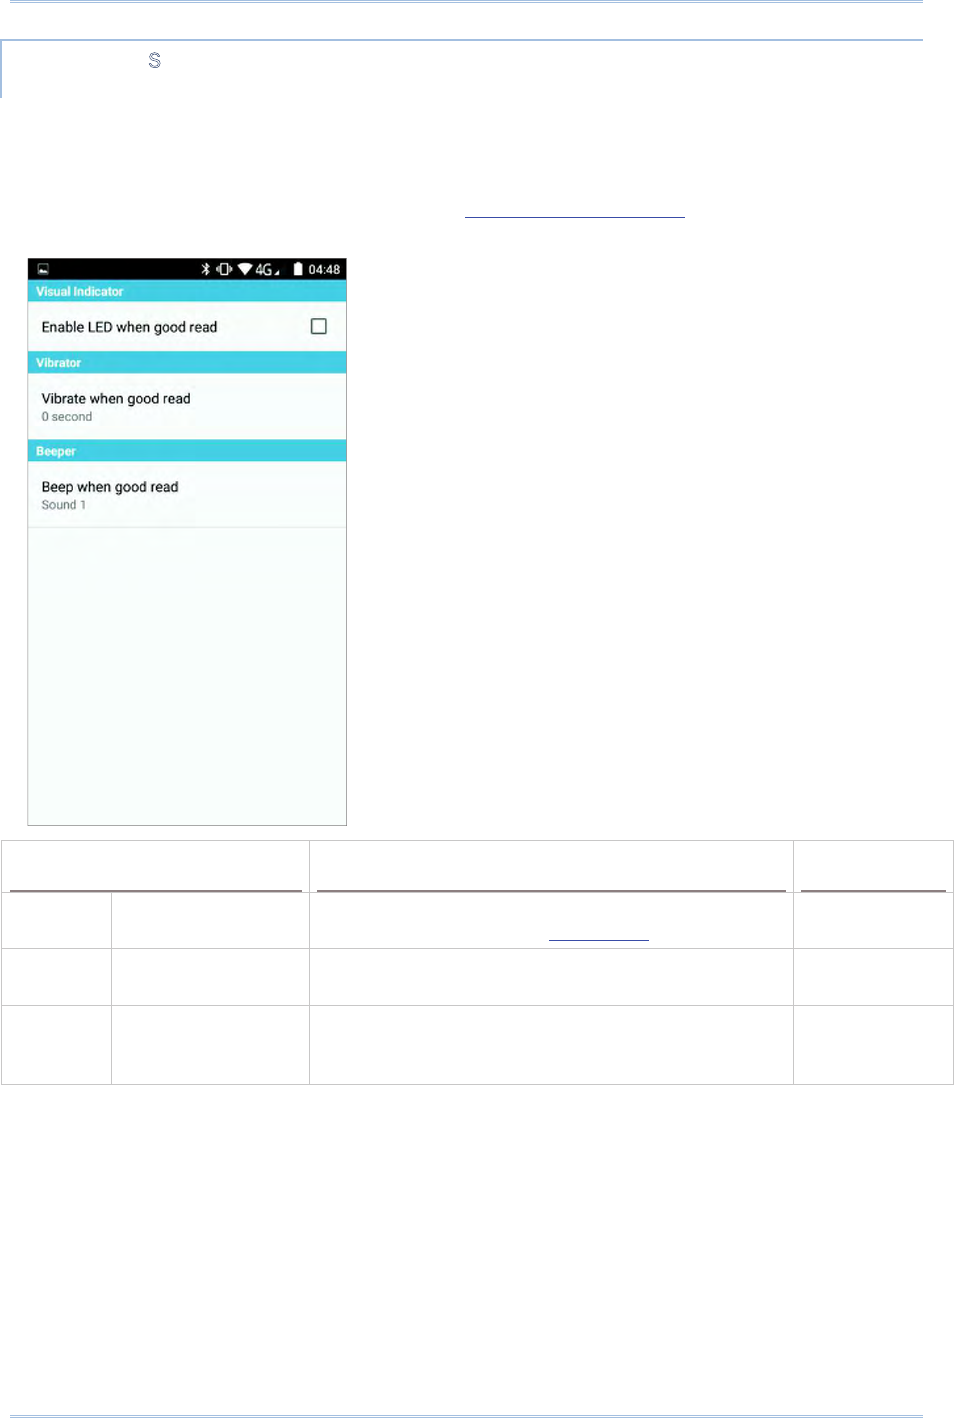
139
Usin
g
Reader Configuration Utility
NOTIFICATION SETTINGS
Notification Settings enables audible, visible and tactile feedback for scanning good
read, which helps notify the user of a successful decoding.
To open Notification Settings page:
1) Open Reader Config as described inġLaunch Reader Config.
2) Tap Notification Settings.
Setting Description Default
LED Enable LED when
good read
Selects to enable/disable LED light (left) for
scanning good read. SeeġStatus LED for details.
Deselected
(Disabled)
Vibrator Vibrate when good
read
Enables/disables tactile feedback (vibration) for
good read and sets the duration to vibrate.
0 second
(Disabled)
Beeper Beep when good
read
Sets the beeper sound for scanning good read.
Users can choose to mute the beeper sound, or
configure the beeper between sounds 1 to 9.
Sound 1
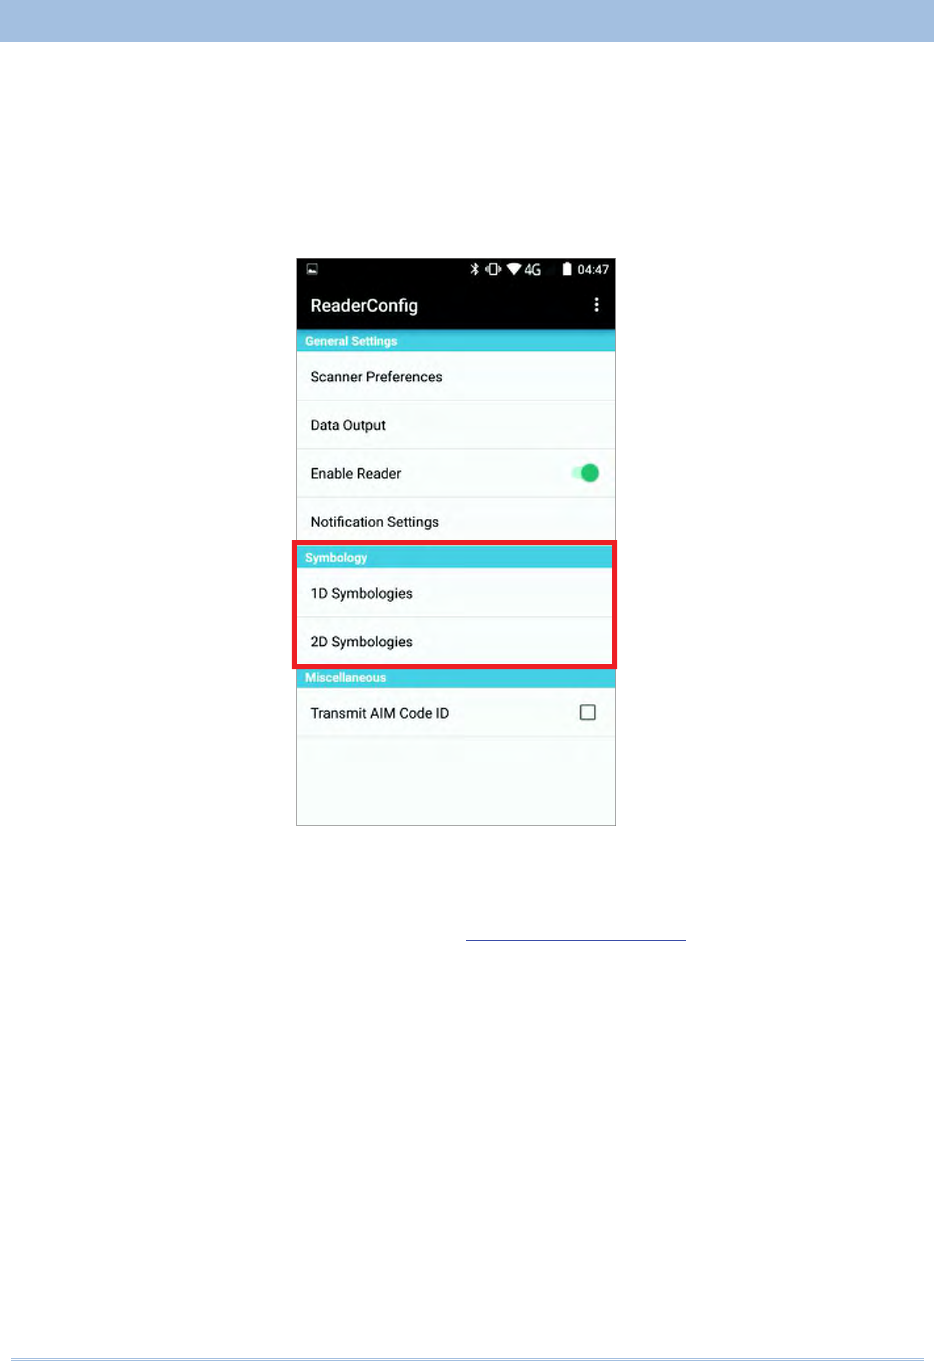
140
6.1.2. SYMBOLOGY
The Symbology page sets the symbologies to read, and also enables/disables some
feature(s) for a symbology to read, such as:
Customize and transmit start/stop characters
Verify/transmit check digits
Enable/disable addon digits
Convert to another symbology
Transmit symbology ID
To open Symbology settings page:
1) Open Reader Config as described inġLaunch Reader Config.
2) Tap 1D Symbologies or 2D Symbologies (in case of a 2D imager) to list all
symbologies which can be decoded.
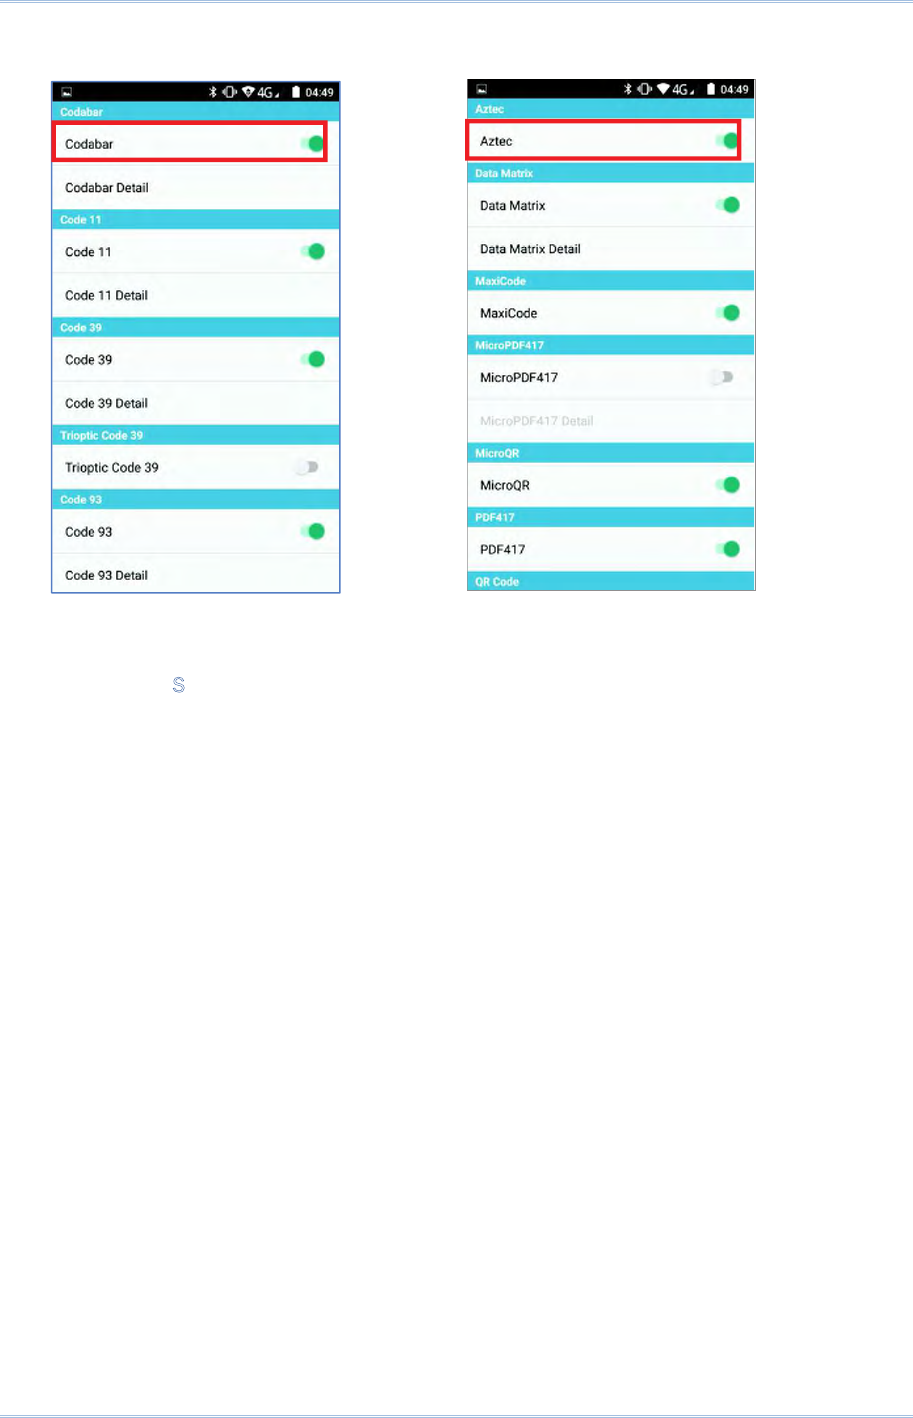
141
Usin
g
Reader Configuration Utility
1D Symbologies 2D Symbologies
ENABLE/DISABLE SYMBOLOGY
Tap the label of each symbology to enable or disable it.
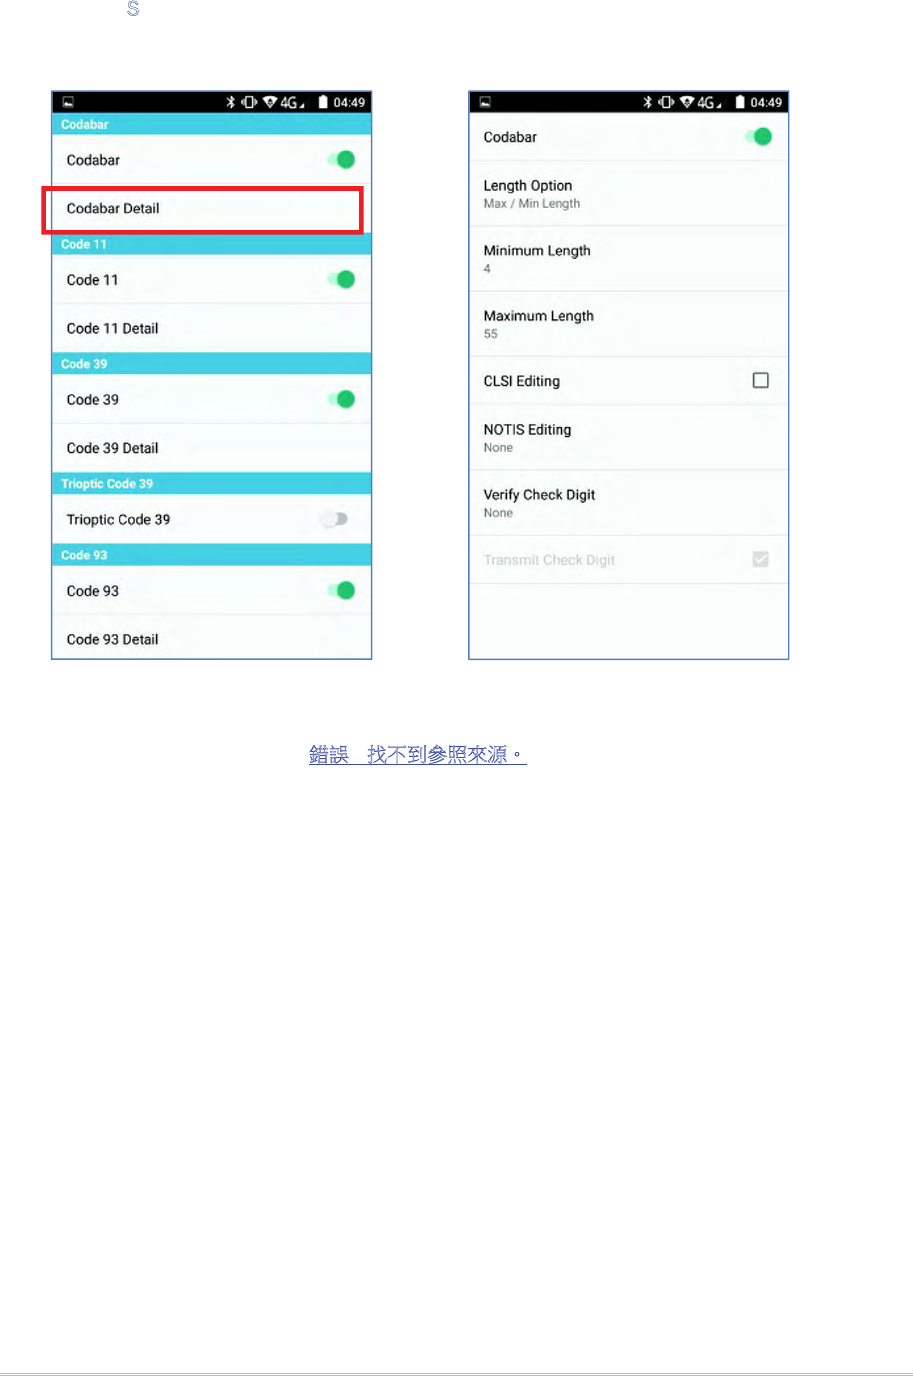
142
SYMBOLOGY SETTINGS
Tap the Detail label below each symbology to access detailed settings for the specific
symbology.
For details about the featured settings:
See 2D Imager 拗婌!㈦ᶵ⇘⍫䄏Ἦ㸸ˤ.
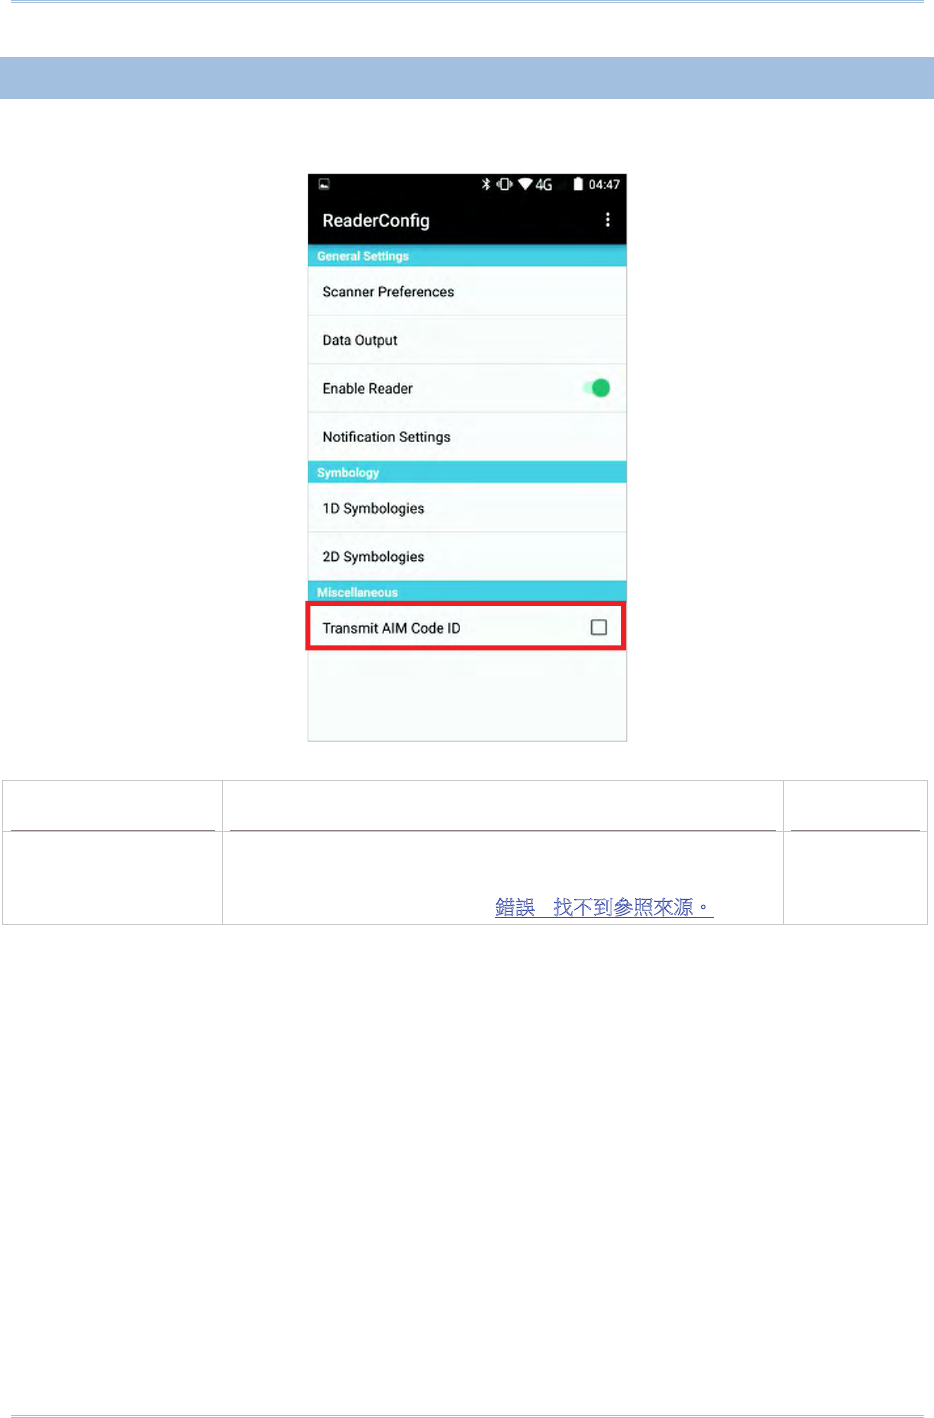
143
Usin
g
Reader Configuration Utility
6.1.3. MISCELLANEOUS
This section allows enabling code ID transmission for easy identification of the scanned
barcode.
Setting Description Default
Transmit AIM
Code ID
Sets whether to include AIM code ID character in the
decoded data. For AIM code ID, see the following:
2D Imager 拗婌!㈦ᶵ⇘⍫䄏Ἦ㸸ˤ.
Deselected
(Disabled)
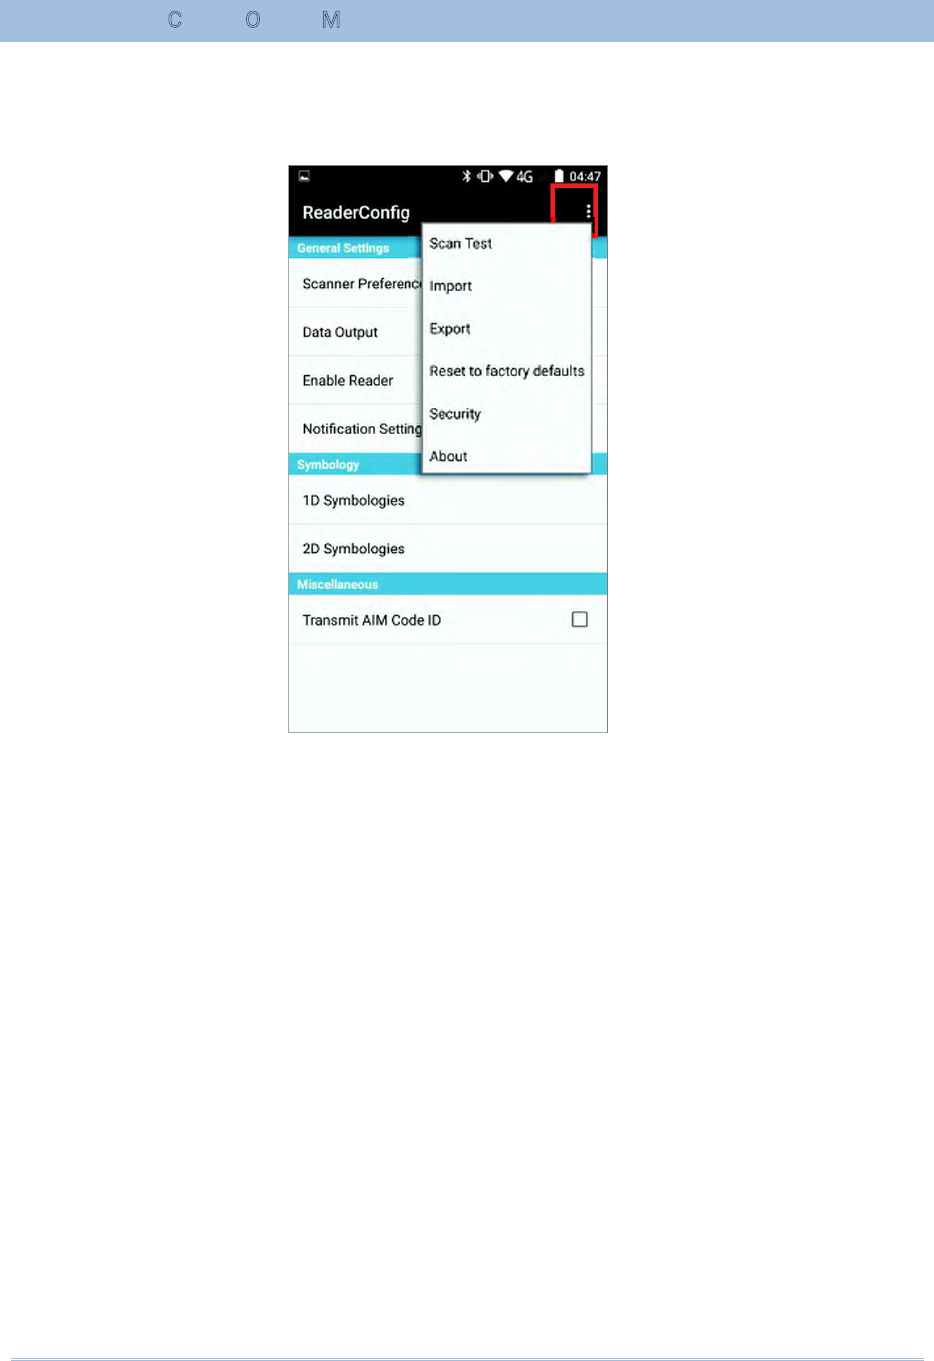
144
6.1.4. READER CONFIG OPTION MENU
Reader Config provides an option menu which is accessible on the menu bar of the main
settings page. This menu allows you to test scan barcodes, import/export all settings in a
re-usable format, reset all settings back to factory default, and view copyright and version
information.
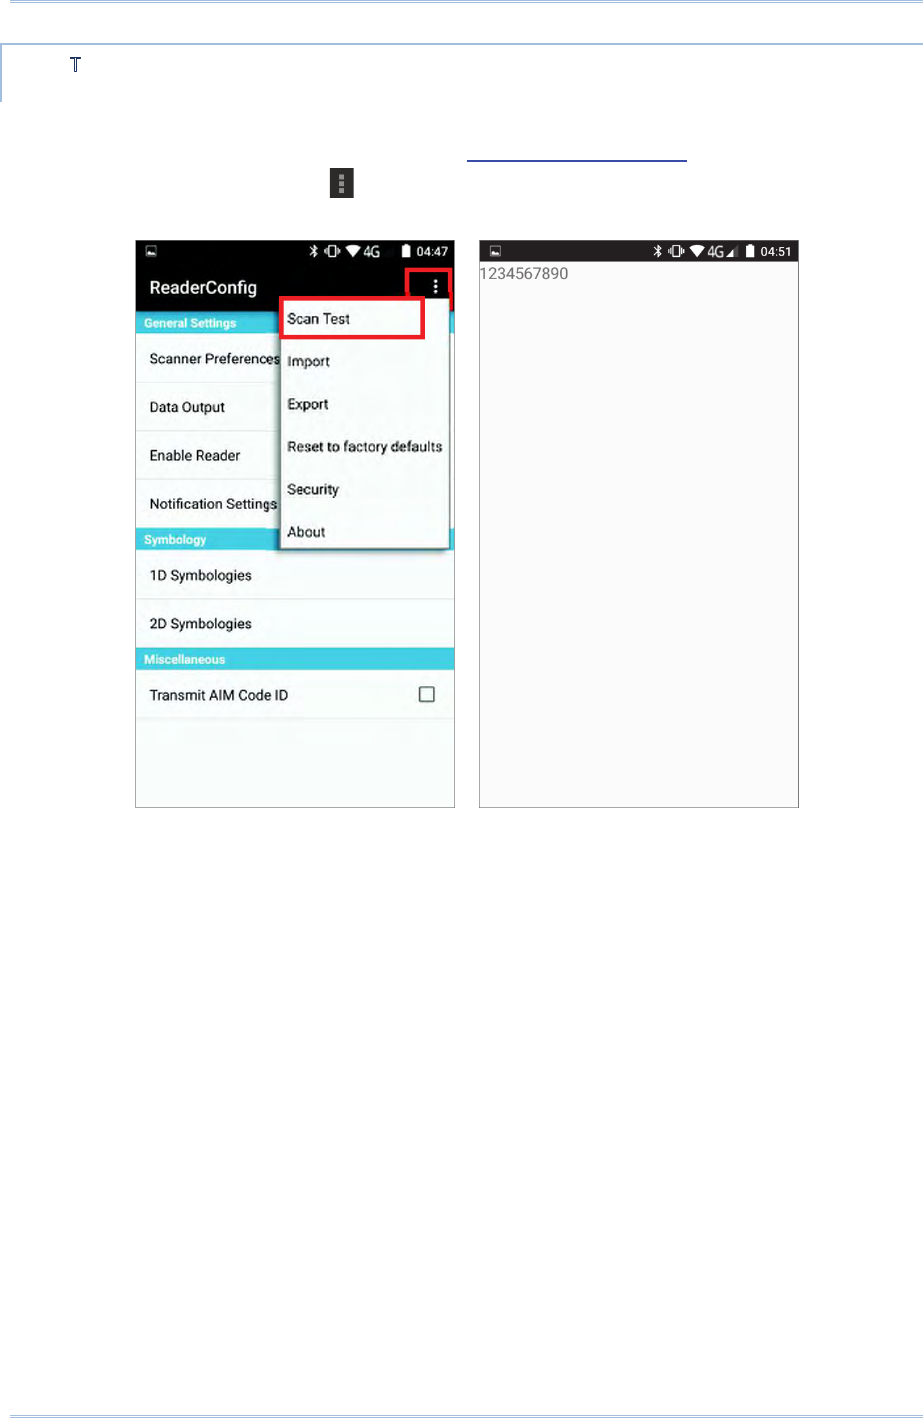
145
Usin
g
Reader Configuration Utility
SCAN TEST
To test scan a barcode:
1) Open Reader Config as described in Launch Reader Config.
2) Tap the settings button on the menu bar to open the option menu.
3) Tap Scan Test in the option menu. A page opens for test scanning.
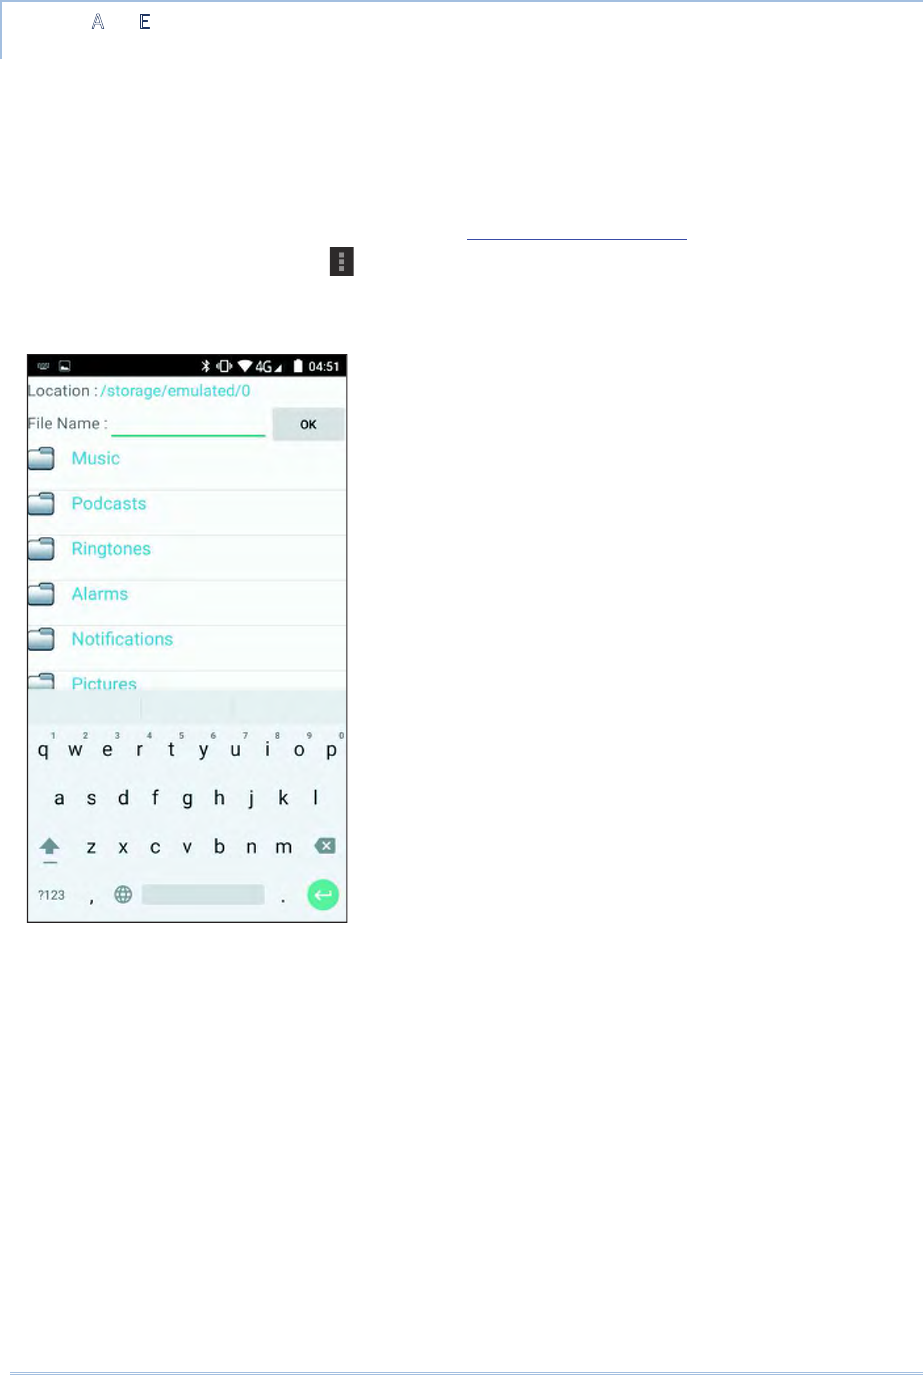
146
IMPORT AND EXPORT
Reader Config supports saving the settings and exporting them as an .xml file.
Previously exported symbology and scanner settings can be imported again on the
handy terminal. This can also be used to implement identical Reader Config settings on
multiple devices.
To import settings:
1) Open Reader Config as described in Launch Reader Config.
2) Tap the settings button on the menu bar to open the option menu.
3) Tap Import in the option menu.
A page opens allowing you to select a previously saved profile.
4) Tap OK. In a few seconds a prompt will appear on the handy terminal to indicate
settings have been imported successfully.
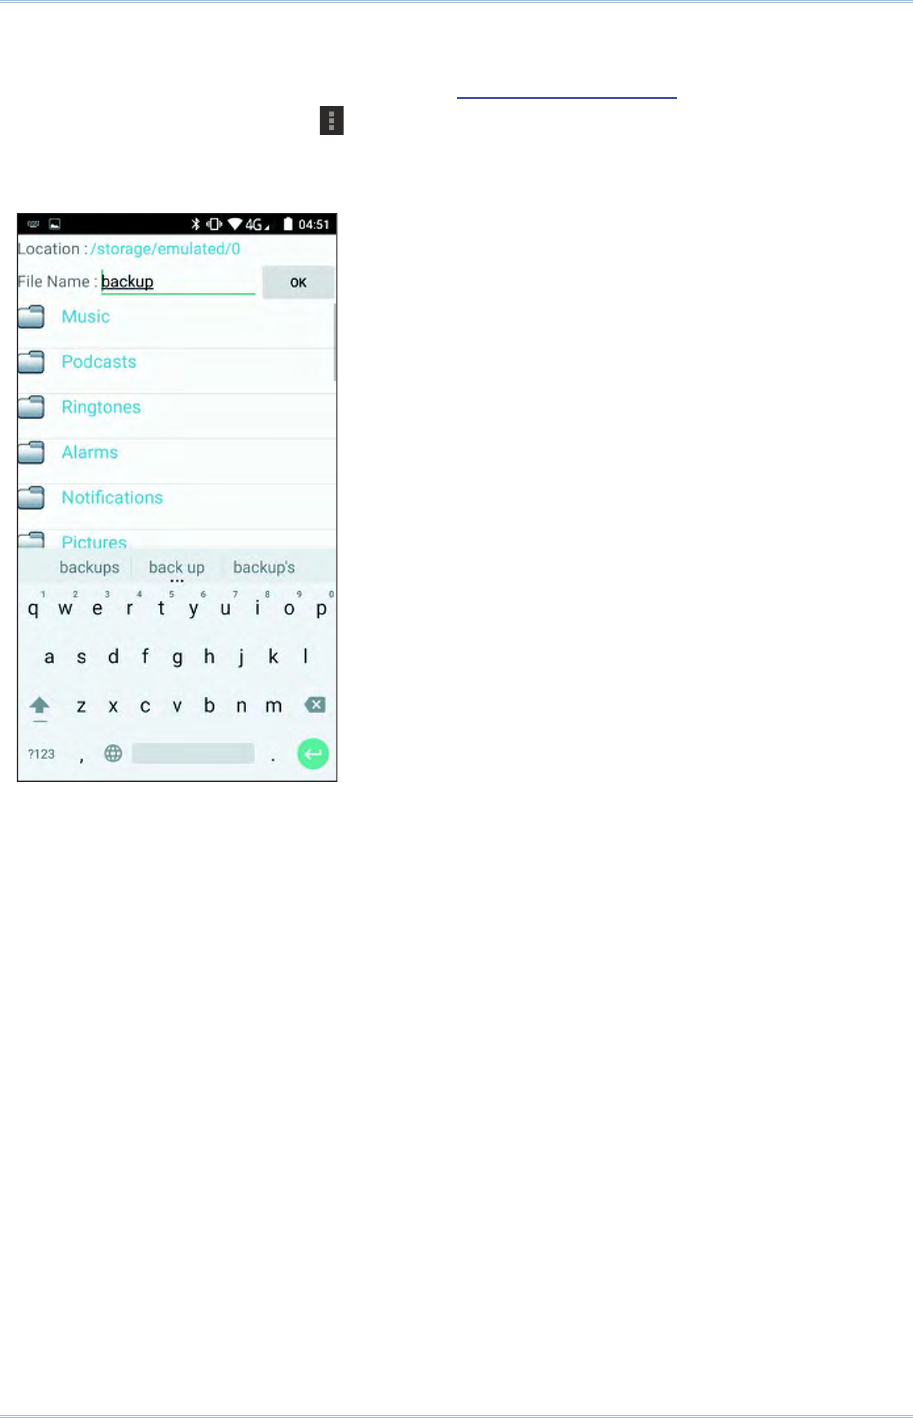
147
Usin
g
Reader Configuration Utility
To export settings:
1) Open Reader Config as described in Launch Reader Config.
2) Tap the settings button on the menu bar to open the option menu.
3) Tap Export.
An export page opens allowing you to enter the name and location of the profile to save.
4) Tap OK to export. A prompt will appear on-screen to notify that settings have been
exported.
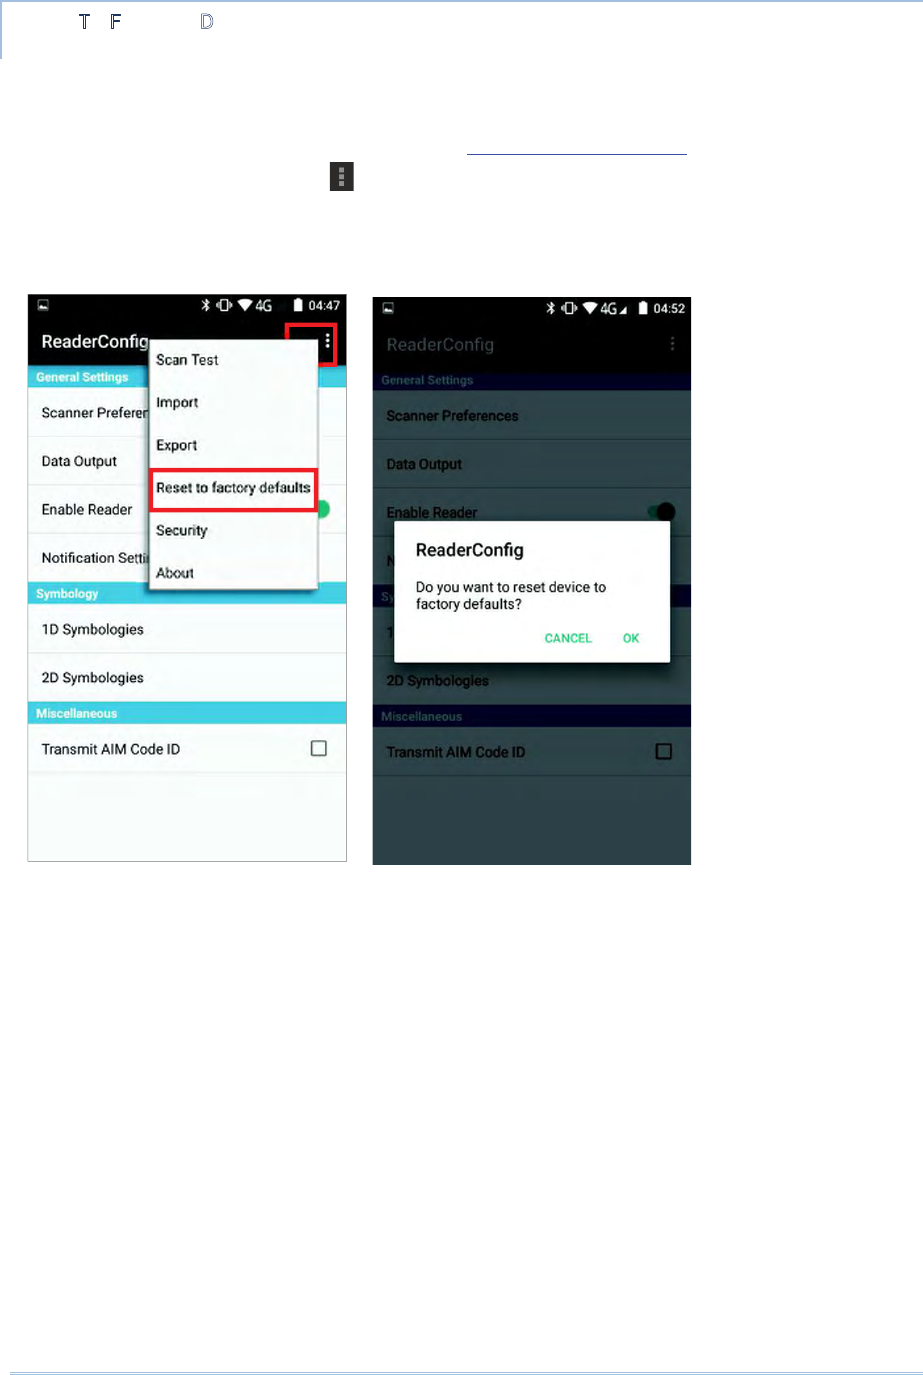
148
RESET TO FACTORY DEFAULTS
This function restores all settings in the Reader Config application to default.
To enable Factory Reset:
1) Open Reader Config as described in Launch Reader Config.
2) Tap the settings button on the menu bar to open the option menu.
3) Tap Reset to Factory defaults.
A warning dialog appears confirming whether to restore all application settings back to
default. Tap OK to reset or Cancel to close the dialog.
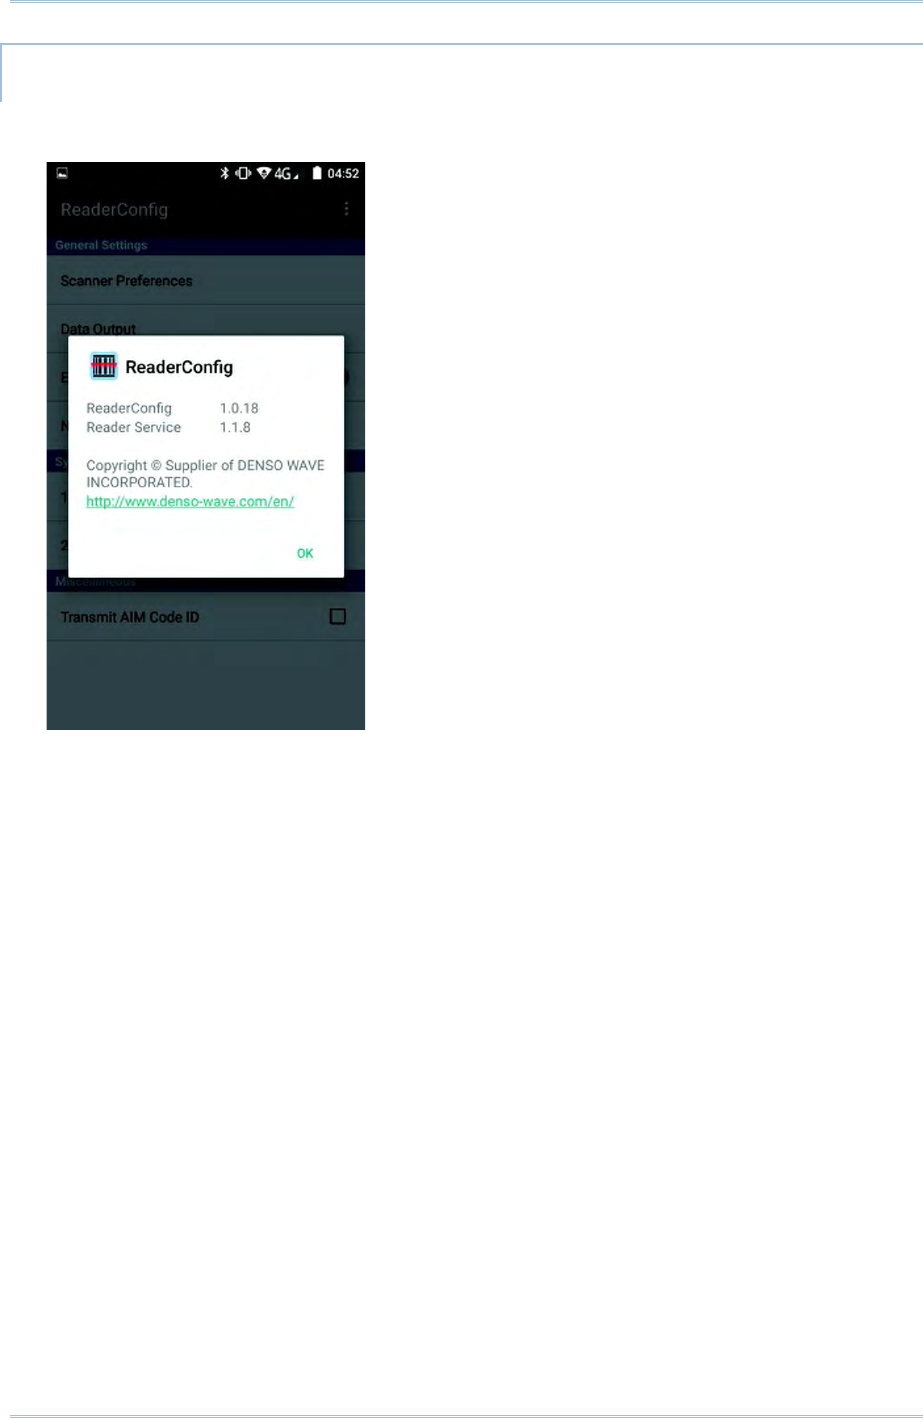
149
Usin
g
Reader Configuration Utility
ABOUT
Tap About in the Reader Config option menu to display software version and copyright
information.
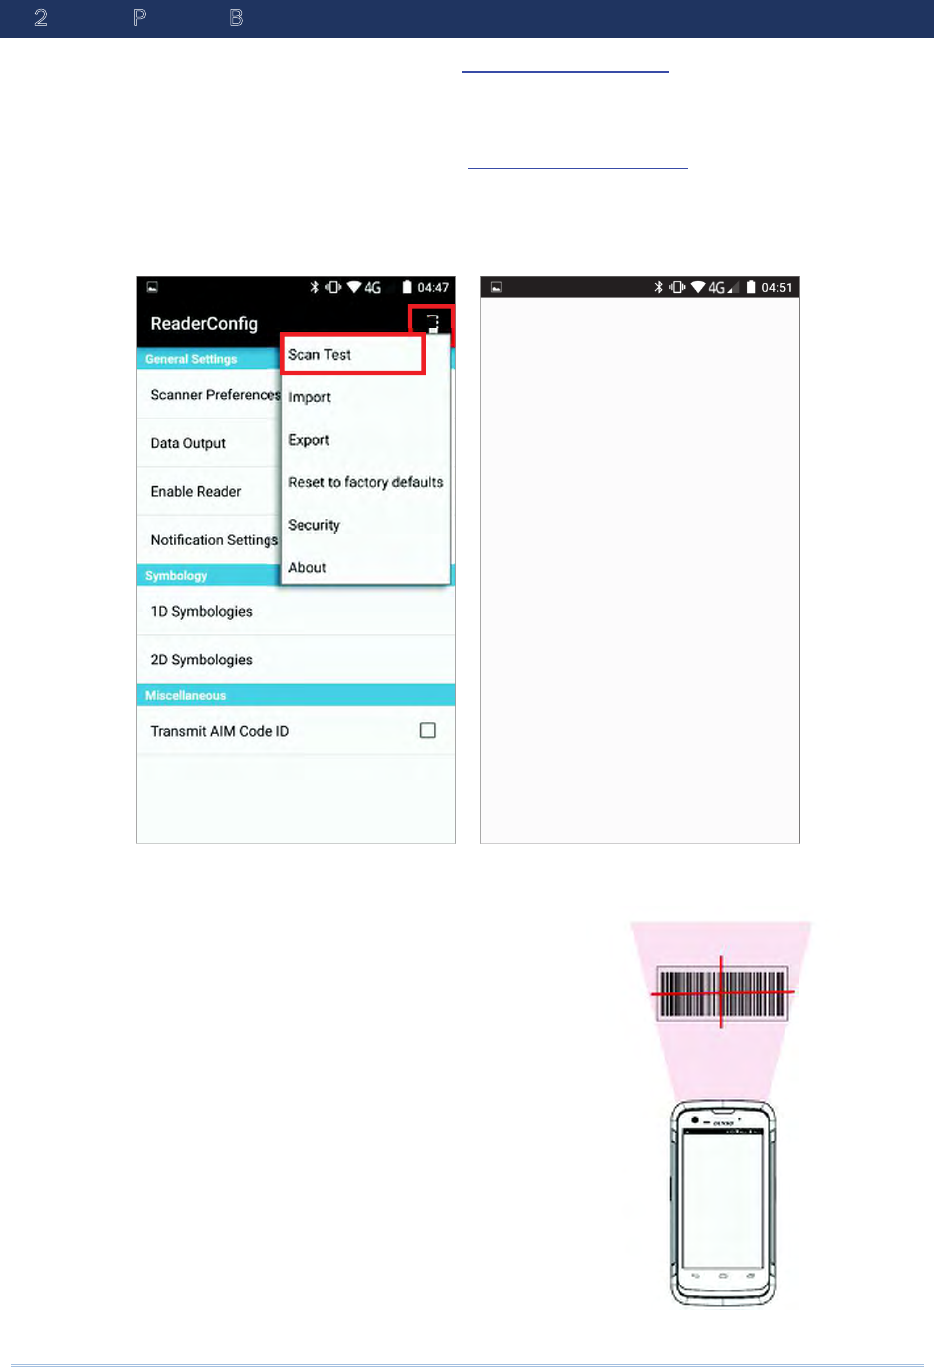
150
6.2. READ PRINTED BARCODES
Aside from output to destinations as per Keyboard Emulation settings, Reader Config
provides a Scan Test feature for quick viewing of decoded data.
To perform test scanning of barcodes:
1) Open Reader Config as described in Launch Reader Config.
2) Tap Scan Test on the menu bar.
A Test Scan Form opens for displaying the scanned data.
3) Aim the scanning window at the barcode to read
and press any of the two side triggers. The scanning
light beams to read the printed barcodes. The
scanning light goes off once the data is decoded, or
when the decode timeout period has passed.
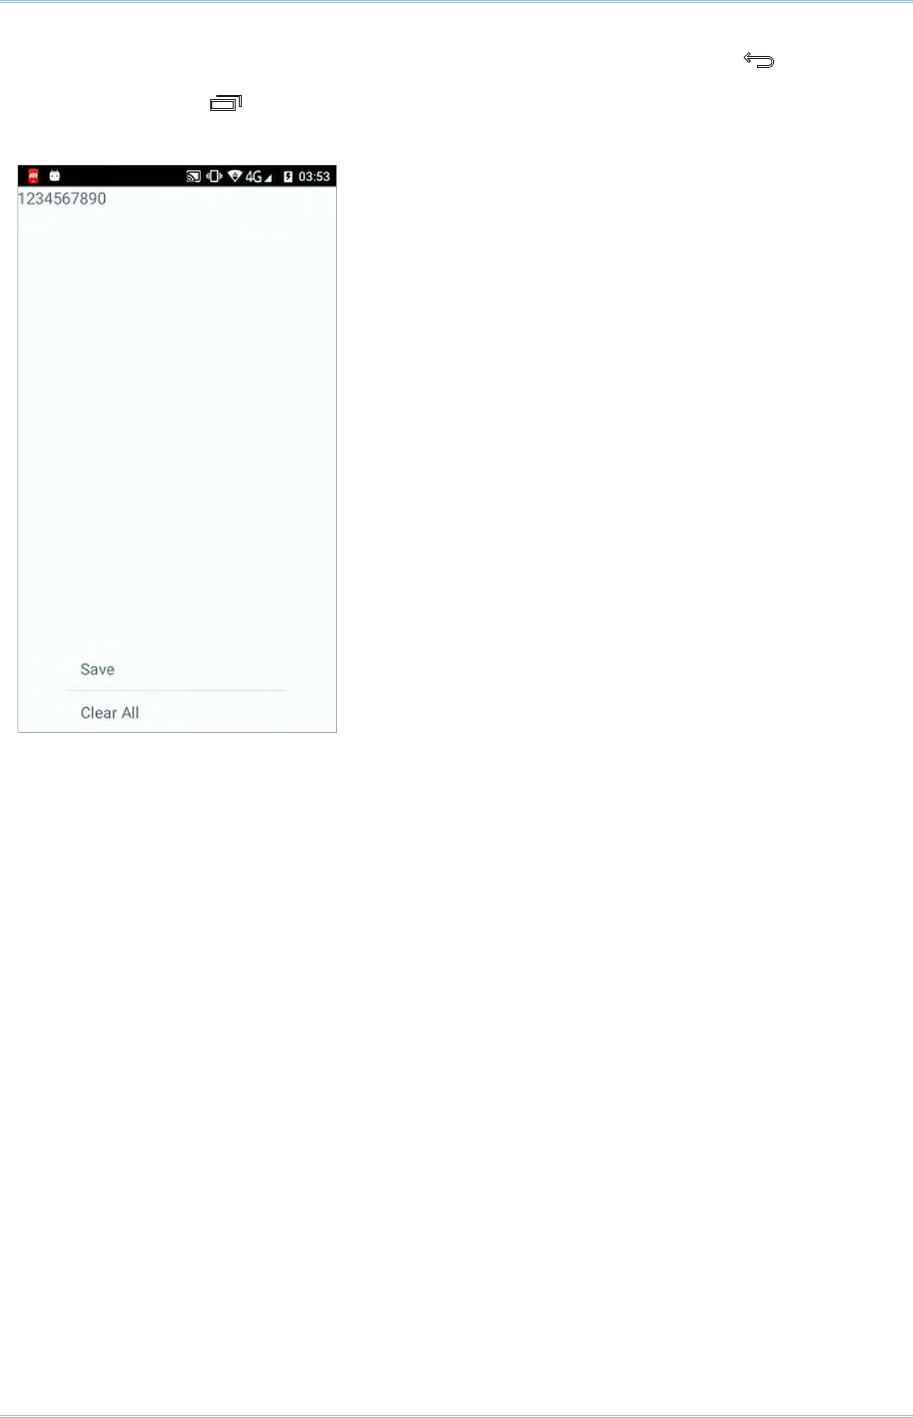
151
Usin
g
Reader Configuration Utility
The decoded data will appear on the page. When finished viewing, tap to leave the
test scan page; or to save the decoded data as a .txt file or clear all data on the
screen.
152
RS31/BHT-1600 Handy Terminal User Manual
PLATFORM, PROCESSOR & MEMORY
Operating System & CPU
OS Version Android™ 6.0 Marshmallow with GMS Certified
CPU Cortex A53 Quad-core1.3GHz
Memory
ROM 16GB eMMC(MLC) / User data 10GB
RAM 2GB LPDDR3 SDRAM
Expansion Slot One microSDHC card slot (up to 32GB)
SDXC supported
Micro SIM socket x2
Micro SAM socketx1
COMMUNICATION & DATA CAPTURE
Communication
USB Client USB 2.0 OTG
WPAN Bluetooth Class II, v4.1 and v2.1+EDR
WLAN IEEE 802.11 a/b/g/n networking
WWAN Built-in WWAN modem for Quadband GSM, UMTS, LTE functions:
GSM/GPRS/EDGE/WCDMA/UMTS/HSDPA/HSUPA/HSPA+/LTE
Frequency band
GSM/GPRS/EDGE:
WCDMA/UMTS/HSDPA/HSUPA:B1(2100),B2(1900),B6(800),B8(900)
LTE bands
FDD:B1(2100),B3(1800),B7(2600),B8(900),B19(800),B20(800)
GPS Built-in GPS with AGPS support, ephemeris downloadable, supports
GLONASS.
SPECIFICATIONS

153
Specifications
Data & Image Capture
Digital Camera Rear: 8 Mega pixels with user-controllable flash
Front: 2 Mega pixels (Front camera is optional)
Barcode Reader 2D Imager
HF RFID Reader ISO14443A/B (Mifare), ISO15693 (Felica)
Supports NFC (Peer-to-peer, Card reader, Card emulation)
ELECTRICAL CHARACTERISTICS
Batteries
Main Battery Pack Rechargeable Li-ion battery: 3.85V, 2960 mAh
Cell 3.85V, 3000mAh
Charging temperature: 0-35ɗ!
Minimum charging time: 4 hours @25 ɗ !
Please Charge batteries in temperatures from 0 °C to 35 °C. To
ensure that the battery is being charged under a safe condition, the
battery may disable charging when ambient temperature drops
below 0°C or exceeds 40°C, and resume charging after its
temperature falls within the acceptable range.
Backup Battery Rechargeable Li-ion battery: 3.7V, 60 mAh
Data retention for 30 minutes
Charging time: 4 hours
Power Adaptor
Power Supply Cord with
Universal Power Adaptor
Input AC 100~240 V, 50/60 Hz
Output DC 5V, 2A
BSMI, CCC, FCC, CE, RCM, PSE, PSB
Working Time
Supports working time for up to 12 hours at 25 degrees

154
PHYSICAL CHARACTERISTICS
Color Touch Screen Display
Display 4.7” Transmissive IPS LCD, Dragontrail Glass
Resolution HD (720x 1280 pixels)
Notifications
Status LED Single LED which lights red when charging, green when charging is
complete, and blue when wireless radio is on
Audio Integrated with one speaker, dual array digital microphones with
echo and noise cancellation, HD voice support
Dimensions & Weight
Dimensions 159 mm (L) x 80mm (W) x 17.3mm (H)
Weight Under 260 g (2D Reader, including battery)

155
Specifications
ENVIRONMENTAL CHARACTERISTICS
Temperature
Operating -20 °C to 50 °C
Storage -30 °C to 70 °C
Charging 0°C to 35°C
Humidity
Operating 10% to 90% (non-condensing)
Storage 5% to 95% (non-condensing)
Resistance
Impact Resistance Multiple drops onto concrete at 1.2 m (4 ft.) on all six sides
Tumble Test 150 tumbles (300 drops) at 0.5 m per applicable IEC tumble
specifications
Splash/Dust Resistance IP67 per applicable IEC sealing specifications
Electrostatic Discharge ±15 kV air discharge, ±8 kV contact discharge

156
PROGRAMMING SUPPORT
Development Environment & Tools
Integrated Development
Environment
Visual Studio 2015
Visual Studio 2008
Visual Studio 2005
Software Development Kit Android™ 6.0 Marshmallow SDK
Reader API (JAR) for reader configuration
SAM API (JAR) for SAM controller
Software & Utilities
Software Package Reader Configuration
Software Trigger Key
Button Assignment
MDS Server
MDS Client
App Lock
Xamarin Binding
Zetakey Browser
Third-party Software Kalipso
SoTi Mobicontrol Installer

157
Specifications