Cisco Systems 102058 1500 Series Outdoor Mesh Access Point User Manual 1500qsg
Cisco Systems Inc 1500 Series Outdoor Mesh Access Point 1500qsg
User Manual

Corporate Headquarters
Cisco Systems, Inc.
170 West Tasman Drive
San Jose, CA 95134-1706
USA
http://www.cisco.com
Tel: 408 526-4000
800 553-NETS (6387)
Fax: 408 526-4100
PRELIMINARY Quick Start Guide: Cisco
Aironet 1500 Series Lightweight Outdoor
Mesh Access Point
August 25, 2005
Text Part Number: 78-17229-01

THE SPECIFICATIONS AND INFORMATION REGARDING THE PRODUCTS IN THIS MANUAL ARE SUBJECT TO CHANGE WITHOUT NOTICE. ALL
STATEMENTS, INFORMATION, AND RECOMMENDATIONS IN THIS MANUAL ARE BELIEVED TO BE ACCURATE BUT ARE PRESENTED WITHOUT
WARRANTY OF ANY KIND, EXPRESS OR IMPLIED. USERS MUST TAKE FULL RESPONSIBILITY FOR THEIR APPLICATION OF ANY PRODUCTS.
THE SOFTWARE LICENSE AND LIMITED WARRANTY FOR THE ACCOMPANYING PRODUCT ARE SET FORTH IN THE INFORMATION PACKET THAT
SHIPPED WITH THE PRODUCT AND ARE INCORPORATED HEREIN BY THIS REFERENCE. IF YOU ARE UNABLE TO LOCATE THE SOFTWARE LICENSE
OR LIMITED WARRANTY, CONTACT YOUR CISCO REPRESENTATIVE FOR A COPY.
The following information is for FCC compliance of Class A devices: This equipment has been tested and found to comply with the limits for a Class A digital device, pursuant
to part 15 of the FCC rules. These limits are designed to provide reasonable protection against harmful interference when the equipment is operated in a commercial
environment. This equipment generates, uses, and can radiate radio-frequency energy and, if not installed and used in accordance with the instruction manual, may cause
harmful interference to radio communications. Operation of this equipment in a residential area is likely to cause harmful interference, in which case users will be required
to correct the interference at their own expense.
The following information is for FCC compliance of Class B devices: The equipment described in this manual generates and may radiate radio-frequency energy. If it is not
installed in accordance with Cisco’s installation instructions, it may cause interference with radio and television reception. This equipment has been tested and found to
comply with the limits for a Class B digital device in accordance with the specifications in part 15 of the FCC rules. These specifications are designed to provide reasonable
protection against such interference in a residential installation. However, there is no guarantee that interference will not occur in a particular installation.
Modifying the equipment without Cisco’s written authorization may result in the equipment no longer complying with FCC requirements for Class A or Class B digital
devices. In that event, your right to use the equipment may be limited by FCC regulations, and you may be required to correct any interference to radio or television
communications at your own expense.
You can determine whether your equipment is causing interference by turning it off. If the interference stops, it was probably caused by the Cisco equipment or one of its
peripheral devices. If the equipment causes interference to radio or television reception, try to correct the interference by using one or more of the following measures:
• Turn the television or radio antenna until the interference stops.
• Move the equipment to one side or the other of the television or radio.
• Move the equipment farther away from the television or radio.
• Plug the equipment into an outlet that is on a different circuit from the television or radio. (That is, make certain the equipment and the television or radio are on circuits
controlled by different circuit breakers or fuses.)
Modifications to this product not authorized by Cisco Systems, Inc. could void the FCC approval and negate your authority to operate the product.
The Cisco implementation of TCP header compression is an adaptation of a program developed by the University of California, Berkeley (UCB) as part of UCB’s public
domain version of the UNIX operating system. All rights reserved. Copyright © 1981, Regents of the University of California.
NOTWITHSTANDING ANY OTHER WARRANTY HEREIN, ALL DOCUMENT FILES AND SOFTWARE OF THESE SUPPLIERS ARE PROVIDED “AS IS” WITH
ALL FAULTS. CISCO AND THE ABOVE-NAMED SUPPLIERS DISCLAIM ALL WARRANTIES, EXPRESSED OR IMPLIED, INCLUDING, WITHOUT
LIMITATION, THOSE OF MERCHANTABILITY, FITNESS FOR A PARTICULAR PURPOSE AND NONINFRINGEMENT OR ARISING FROM A COURSE OF
DEALING, USAGE, OR TRADE PRACTICE.
IN NO EVENT SHALL CISCO OR ITS SUPPLIERS BE LIABLE FOR ANY INDIRECT, SPECIAL, CONSEQUENTIAL, OR INCIDENTAL DAMAGES, INCLUDING,
WITHOUT LIMITATION, LOST PROFITS OR LOSS OR DAMAGE TO DATA ARISING OUT OF THE USE OR INABILITY TO USE THIS MANUAL, EVEN IF CISCO
OR ITS SUPPLIERS HAVE BEEN ADVISED OF THE POSSIBILITY OF SUCH DAMAGES.
Quick Start Guide: Cisco Aironet 1500 Series Lightweight Outdoor Mesh Access Point
©2005 Cisco Systems, Inc. All rights reserved.
C
CIP, CCSP, the Cisco Arrow logo, the Cisco Powered Network mark, Cisco Unity, Follow Me Browsing, FormShare, and StackWise are trademarks of Cisco Systems, Inc.;
C
hanging the Way We Work, Live, Play, and Learn, and iQuick Study are service marks of Cisco Systems, Inc.; and Aironet, ASIST, BPX, Catalyst, CCDA, CCDP, CCIE, CCNA
,
C
CNP, Cisco, the Cisco Certified Internetwork Expert logo, Cisco IOS, the Cisco IOS logo, Cisco Press, Cisco Systems, Cisco Systems Capital, the Cisco Systems logo,
E
mpowering the Internet Generation, Enterprise/Solver, EtherChannel, EtherSwitch, Fast Step, GigaStack, Internet Quotient, IOS, IP/TV, iQ Expertise, the iQ logo, iQ Net
R
eadiness Scorecard, LightStream, MGX, MICA, the Networkers logo, Networking Academy, Network Registrar, Packet, PIX, Post-Routing, Pre-Routing, RateMUX, Registrar,
S
criptShare, SlideCast, SMARTnet, StrataView Plus, Stratm, SwitchProbe, TeleRouter, The Fastest Way to Increase Your Internet Quotient, TransPath, and VCO are registered
t
rademarks of Cisco Systems, Inc. and/or its affiliates in the United States and certain other countries.
A
ll other trademarks mentioned in this document or Website are the property of their respective owners. The use of the word partner does not imply a partnership relationship
b
etween Cisco and any other company. (0401R)

iii
Quick Start Guide: Cisco Aironet 1500 Series Lightweight Outdoor Mesh Access Point
78-17229-01
CONTENTS
Preface vii
Objectives vii
Audience vii
Organization vii
Conventions viii
Related Publications ix
Obtaining Documentation ix
Cisco.com x
Documentation DVD x
Ordering Documentation x
Documentation Feedback x
Cisco Product Security Overview xi
Reporting Security Problems in Cisco Products xi
Obtaining Technical Assistance xii
Cisco Technical Support Website xii
Submitting a Service Request xii
Definitions of Service Request Severity xiii
Obtaining Additional Publications and Information xiii
CHAPTER
1Overview 1
Key Features 2
Power 3
External Antennas 3
Ethernet Port 3
Metal Enclosure 4
CHAPTER
2Installation Overview 5
Warnings 6
Safety Information 7
FCC Safety Compliance Statement 7
Safety Precautions 7
Typical Outdoor Access Point Installation Components 8
Installation Guidelines 9

Contents
iv
Quick Start Guide: Cisco Aironet 1500 Series Lightweight Outdoor Mesh Access Point 78-17229-01
Site Surveys 9
Unpacking the Outdoor Access Point 9
Package Contents 10
Optional Equipment 10
Before Beginning the Installation 11
CHAPTER
3Installation Instructions 13
Required Tools and Materials 13
Installation Options 13
Rooftop Installations 14
Pole-Top Installations 15
Installing the Outdoor Access Point on a Wall or Overhang 17
Installing the Outdoor Access Point on a Pole 21
Where to Go From Here 28
APPENDIX
ATranslated Safety Warnings A-1
Warning Definition A-2
Installation Warning A-3
Installation and Grounding Warning A-4
Ground Conductor Warning A-6
Installation Warning A-8
Lightning Activity Warning A-9
Explosive Device Proximity Warning A-10
Radio Frequency Exposure Limits A-10
APPENDIX
ADeclarations of Conformity and Regulatory Information B-1
Manufacturers Federal Communication Commission Declaration of Conformity
Statement B-2
Channels and Antenna Settings B-3
Department of Communications—Canada B-4
Canadian Compliance Statement B-4
International Models B-4
Declaration of Conformity for RF Exposure B-4
Administrative Rules for Cisco Aironet Outdoor Access Points in Taiwan B-5
Chinese Translation B-5
English Translation B-5


Contents
vi
Quick Start Guide: Cisco Aironet 1500 Series Lightweight Outdoor Mesh Access Point 78-17229-01

vii
Quick Start Guide: Cisco Aironet 1500 Series Lightweight Outdoor Mesh Access Point
78-17229-01
Preface
This section describes the objectives, audience, organization, and conventions of the Quick Start Guide: Cisco Aironet 1500
Series Lightweight Outdoor Mesh Access Point.
Objectives
This publication explains the steps for installing the Cisco Aironet 1500 Series lightweight outdoor mesh access point
(hereafter called the outdoor access point) supporting 2.4- and 5-GHz operation, and includes detailed instructions for
mounting the outdoor access point and associated antennas.
Audience
This publication is for the person installing and configuring an outdoor access point for the first time. The installer should be
familiar with network structures, terms, and concepts.
Warning
Only trained and qualified personnel should be allowed to install, replace, or service this equipment.
Organization
This guide contains the following sections:
Chapter 1, “Overview,” describes the major components and features of the outdoor access point.
Chapter 2, “Installation Overview,” provides warnings, safety information, and information needed before you begin the
installation of your outdoor access point.
Chapter 3, “Installation Instructions,” provides an overview of components and features used during outdoor access point
mounting and antenna mounting operations.
Appendix A, “Translated Safety Warnings,” lists translations of the safety warnings in this publication.
Appendix A, “Declarations of Conformity and Regulatory Information,” describes the regulatory conventions to which the
outdoor access point conforms and provides guidelines for operating outdoor access points in Japan.
viii
Quick Start Guide: Cisco Aironet 1500 Series Lightweight Outdoor Mesh Access Point 78-17229-01
Preface
Conventions
Conventions
This publication uses the following conventions to convey instructions and information:
•Commands and keywords are in boldface type.
Note Means reader take note. Notes contain helpful suggestions or references to materials not contained in
this manual.
Caution Means reader be careful. In this situation, you might do something that could result in equipment
damage or loss of data.
Warning
This warning symbol means danger. You are in a situation that could cause bodily injury. Before
you work on any equipment, be aware of the hazards involved with electrical circuitry and be
familiar with standard practices for preventing accidents. (To see translations of the warnings
that appear in this publication, refer to the appendix “Translated Safety Warnings.”)
Waarschuwing
Dit waarschuwingssymbool betekent gevaar. U verkeert in een situatie die lichamelijk letsel kan
veroorzaken. Voordat u aan enige apparatuur gaat werken, dient u zich bewust te zijn van de bij
elektrische schakelingen betrokken risico’s en dient u op de hoogte te zijn van standaard
maatregelen om ongelukken te voorkomen. (Voor vertalingen van de waarschuwingen die in deze
publicatie verschijnen, kunt u het aanhangsel “Translated Safety Warnings” (Vertalingen van
veiligheidsvoorschriften) raadplegen.)
Varoitus
Tämä varoitusmerkki merkitsee vaaraa. Olet tilanteessa, joka voi johtaa ruumiinvammaan. Ennen
kuin työskentelet minkään laitteiston parissa, ota selvää sähkökytkentöihin liittyvistä vaaroista
ja tavanomaisista onnettomuuksien ehkäisykeinoista. (Tässä julkaisussa esiintyvien varoitusten
käännökset löydät liitteestä “Translated Safety Warnings” (käännetyt turvallisuutta koskevat
varoitukset).)
Attention
Ce symbole d’avertissement indique un danger. Vous vous trouvez dans une situation pouvant
entraîner des blessures. Avant d’accéder à cet équipement, soyez conscient des dangers posés
par les circuits électriques et familiarisez-vous avec les procédures courantes de prévention des
accidents. Pour obtenir les traductions des mises en garde figurant dans cette publication,
veuillez consulter l’annexe intitulée « Translated Safety Warnings » (Traduction des avis de
sécurité).
Warnung
Dieses Warnsymbol bedeutet Gefahr. Sie befinden sich in einer Situation, die zu einer
Körperverletzung führen könnte. Bevor Sie mit der Arbeit an irgendeinem Gerät beginnen, seien
Sie sich der mit elektrischen Stromkreisen verbundenen Gefahren und der Standardpraktiken zur
Vermeidung von Unfällen bewußt. (Übersetzungen der in dieser Veröffentlichung enthaltenen
Warnhinweise finden Sie im Anhang mit dem Titel “Translated Safety Warnings” (Übersetzung der
Warnhinweise).)

ix
Quick Start Guide: Cisco Aironet 1500 Series Lightweight Outdoor Mesh Access Point
78-17229-01
Preface Related Publications
Related Publications
For more information about outdoor access points and related products, refer to the following publications:
•Release Notes: Cisco Aironet 1400 Series Wireless Bridge describes features and caveats for the outdoor access points.
This document is available on the Cisco CCO web site at the following URL:
http://www.cisco.com/univercd/cc/td/doc/product/wireless/index.htm
•Cisco Secure Access Control Server for Windows 2000/NT Servers Version 3.0 User Guide provides complete instructions
for using Cisco Secure ACS, including steps for configuring Cisco Secure ACS to support access points. This document
is available on the Cisco CCO web site at the following URL:
http://www.cisco.com/univercd/cc/td/doc/product/access/acs_soft/csacs4nt/csnt30/user/index.htm
Obtaining Documentation
Cisco documentation and additional literature are available on Cisco.com. Cisco also provides several ways to obtain technical
assistance and other technical resources. These sections explain how to obtain technical information from Cisco Systems.
Avvertenza
Questo simbolo di avvertenza indica un pericolo. Si è in una situazione che può causare infortuni.
Prima di lavorare su qualsiasi apparecchiatura, occorre conoscere i pericoli relativi ai circuiti
elettrici ed essere al corrente delle pratiche standard per la prevenzione di incidenti. La
traduzione delle avvertenze riportate in questa pubblicazione si trova nell’appendice, “Translated
Safety Warnings” (Traduzione delle avvertenze di sicurezza).
Advarsel
Dette varselsymbolet betyr fare. Du befinner deg i en situasjon som kan føre til personskade. Før
du utfører arbeid på utstyr, må du være oppmerksom på de faremomentene som elektriske kretser
innebærer, samt gjøre deg kjent med vanlig praksis når det gjelder å unngå ulykker. (Hvis du vil
se oversettelser av de advarslene som finnes i denne publikasjonen, kan du se i vedlegget
“Translated Safety Warnings” [Oversatte sikkerhetsadvarsler].)
Aviso
Este símbolo de aviso indica perigo. Encontra-se numa situação que lhe poderá causar danos
fisicos. Antes de começar a trabalhar com qualquer equipamento, familiarize-se com os perigos
relacionados com circuitos eléctricos, e com quaisquer práticas comuns que possam prevenir
possíveis acidentes. (Para ver as traduções dos avisos que constam desta publicação, consulte
o apêndice “Translated Safety Warnings” - “Traduções dos Avisos de Segurança”).
¡Advertencia!
Este símbolo de aviso significa peligro. Existe riesgo para su integridad física. Antes de
manipular cualquier equipo, considerar los riesgos que entraña la corriente eléctrica y
familiarizarse con los procedimientos estándar de prevención de accidentes. (Para ver
traducciones de las advertencias que aparecen en esta publicación, consultar el apéndice
titulado “Translated Safety Warnings.”)
Varning!
Denna varningssymbol signalerar fara. Du befinner dig i en situation som kan leda till
personskada. Innan du utför arbete på någon utrustning måste du vara medveten om farorna med
elkretsar och känna till vanligt förfarande för att förebygga skador. (Se förklaringar av de
varningar som förekommer i denna publikation i appendix “Translated Safety Warnings”
[Översatta säkerhetsvarningar].)

x
Quick Start Guide: Cisco Aironet 1500 Series Lightweight Outdoor Mesh Access Point 78-17229-01
Preface
Documentation Feedback
Cisco.com
You can access the most current Cisco documentation at this URL:
http://www.cisco.com/univercd/home/home.htm
You can access the Cisco website at this URL:
http://www.cisco.com
You can access international Cisco websites at this URL:
http://www.cisco.com/public/countries_languages.shtml
Documentation DVD
Cisco documentation and additional literature are available in a Documentation DVD package, which may have shipped with
your product. The Documentation DVD is updated regularly and may be more current than printed documentation. The
Documentation DVD package is available as a single unit.
Registered Cisco.com users (Cisco direct customers) can order a Cisco Documentation DVD (product number
DOC-DOCDVD=) from the Ordering tool or Cisco Marketplace.
Cisco Ordering tool:
http://www.cisco.com/en/US/partner/ordering/
Cisco Marketplace:
http://www.cisco.com/go/marketplace/
Ordering Documentation
You can find instructions for ordering documentation at this URL:
http://www.cisco.com/univercd/cc/td/doc/es_inpck/pdi.htm
You can order Cisco documentation in these ways:
•Registered Cisco.com users (Cisco direct customers) can order Cisco product documentation from the Ordering tool:
http://www.cisco.com/en/US/partner/ordering/
•Nonregistered Cisco.com users can order documentation through a local account representative by calling Cisco Systems
Corporate Headquarters (California, USA) at 408 526-7208 or, elsewhere in North America, by calling 1 800 553-NETS
(6387).
Documentation Feedback
You can send comments about technical documentation to bug-doc@cisco.com.
xi
Quick Start Guide: Cisco Aironet 1500 Series Lightweight Outdoor Mesh Access Point
78-17229-01
Preface Cisco Product Security Overview
You can submit comments by using the response card (if present) behind the front cover of your document or by writing to the
following address:
Cisco Systems
Attn: Customer Document Ordering
170 West Tasman Drive
San Jose, CA 95134-9883
We appreciate your comments.
Cisco Product Security Overview
Cisco provides a free online Security Vulnerability Policy portal at this URL:
http://www.cisco.com/en/US/products/products_security_vulnerability_policy.html
From this site, you can perform these tasks:
•Report security vulnerabilities in Cisco products.
•Obtain assistance with security incidents that involve Cisco products.
•Register to receive security information from Cisco.
A current list of security advisories and notices for Cisco products is available at this URL:
http://www.cisco.com/go/psirt
If you prefer to see advisories and notices as they are updated in real time, you can access a Product Security Incident Response
Team Really Simple Syndication (PSIRT RSS) feed from this URL:
http://www.cisco.com/en/US/products/products_psirt_rss_feed.html
Reporting Security Problems in Cisco Products
Cisco is committed to delivering secure products. We test our products internally before we release them, and we strive to
correct all vulnerabilities quickly. If you think that you might have identified a vulnerability in a Cisco product, contact PSIRT:
•Emergencies—security-alert@cisco.com
•Nonemergencies—psirt@cisco.com
Tip We encourage you to use Pretty Good Privacy (PGP) or a compatible product to encrypt any sensitive
information that you send to Cisco. PSIRT can work from encrypted information that is compatible with
PGP versions 2.x through 8.x.
Never use a revoked or an expired encryption key. The correct public key to use in your correspondence with PSIRT is the one
that has the most recent creation date in this public key server list:
http://pgp.mit.edu:11371/pks/lookup?search=psirt%40cisco.com&op=index&exact=on
In an emergency, you can also reach PSIRT by telephone:
•1 877 228-7302
•1 408 525-6532

xii
Quick Start Guide: Cisco Aironet 1500 Series Lightweight Outdoor Mesh Access Point 78-17229-01
Preface
Obtaining Technical Assistance
Obtaining Technical Assistance
For all customers, partners, resellers, and distributors who hold valid Cisco service contracts, Cisco Technical Support provides
24-hour-a-day, award-winning technical assistance. The Cisco Technical Support Website on Cisco.com features extensive
online support resources. In addition, Cisco Technical Assistance Center (TAC) engineers provide telephone support. If you do
not hold a valid Cisco service contract, contact your reseller.
Cisco Technical Support Website
The Cisco Technical Support Website provides online documents and tools for troubleshooting and resolving technical issues
with Cisco products and technologies. The website is available 24 hours a day, 365 days a year, at this URL:
http://www.cisco.com/techsupport
Access to all tools on the Cisco Technical Support Website requires a Cisco.com user ID and password. If you have a valid
service contract but do not have a user ID or password, you can register at this URL:
http://tools.cisco.com/RPF/register/register.do
Note Use the Cisco Product Identification (CPI) tool to locate your product serial number before submitting
a web or phone request for service. You can access the CPI tool from the Cisco Technical Support
Website by clicking the Tools & Resources link under Documentation & Tools. Choose Cisco Product
Identification Tool from the Alphabetical Index drop-down list, or click the Cisco Product
Identification Tool link under Alerts & RMAs. The CPI tool offers three search options: by product ID
or model name; by tree view; or for certain products, by copying and pasting show command output.
Search results show an illustration of your product with the serial number label location highlighted.
Locate the serial number label on your product and record the information before placing a service call.
Submitting a Service Request
Using the online TAC Service Request Tool is the fastest way to open S3 and S4 service requests. (S3 and S4 service requests
are those in which your network is minimally impaired or for which you require product information.) After you describe your
situation, the TAC Service Request Tool provides recommended solutions. If your issue is not resolved using the recommended
resources, your service request is assigned to a Cisco TAC engineer. The TAC Service Request Tool is located at this URL:
http://www.cisco.com/techsupport/servicerequest
For S1 or S2 service requests or if you do not have Internet access, contact the Cisco TAC by telephone. (S1 or S2 service
requests are those in which your production network is down or severely degraded.) Cisco TAC engineers are assigned
immediately to S1 and S2 service requests to help keep your business operations running smoothly.
To open a service request by telephone, use one of the following numbers:
Asia-Pacific: +61 2 8446 7411 (Australia: 1 800 805 227)
EMEA: +32 2 704 55 55
USA: 1 800 553-2447
For a complete list of Cisco TAC contacts, go to this URL:
http://www.cisco.com/techsupport/contacts

xiii
Quick Start Guide: Cisco Aironet 1500 Series Lightweight Outdoor Mesh Access Point
78-17229-01
Preface Obtaining Additional Publications and Information
Definitions of Service Request Severity
To ensure that all service requests are reported in a standard format, Cisco has established severity definitions.
Severity 1 (S1)—Your network is “down,” or there is a critical impact to your business operations. You and Cisco will commit
all necessary resources around the clock to resolve the situation.
Severity 2 (S2)—Operation of an existing network is severely degraded, or significant aspects of your business operation are
negatively affected by inadequate performance of Cisco products. You and Cisco will commit full-time resources during normal
business hours to resolve the situation.
Severity 3 (S3)—Operational performance of your network is impaired, but most business operations remain functional. You
and Cisco will commit resources during normal business hours to restore service to satisfactory levels.
Severity 4 (S4)—You require information or assistance with Cisco product capabilities, installation, or configuration. There is
little or no effect on your business operations.
Obtaining Additional Publications and Information
Information about Cisco products, technologies, and network solutions is available from various online and printed sources.
•Cisco Marketplace provides a variety of Cisco books, reference guides, and logo merchandise. Visit Cisco Marketplace,
the company store, at this URL:
http://www.cisco.com/go/marketplace/
•Cisco Press publishes a wide range of general networking, training and certification titles. Both new and experienced users
will benefit from these publications. For current Cisco Press titles and other information, go to Cisco Press at this URL:
http://www.ciscopress.com
•Packet magazine is the Cisco Systems technical user magazine for maximizing Internet and networking investments. Each
quarter, Packet delivers coverage of the latest industry trends, technology breakthroughs, and Cisco products and solutions,
as well as network deployment and troubleshooting tips, configuration examples, customer case studies, certification and
training information, and links to scores of in-depth online resources. You can access Packet magazine at this URL:
http://www.cisco.com/packet
•iQ Magazine is the quarterly publication from Cisco Systems designed to help growing companies learn how they can use
technology to increase revenue, streamline their business, and expand services. The publication identifies the challenges
facing these companies and the technologies to help solve them, using real-world case studies and business strategies to
help readers make sound technology investment decisions. You can access iQ Magazine at this URL:
http://www.cisco.com/go/iqmagazine
•Internet Protocol Journal is a quarterly journal published by Cisco Systems for engineering professionals involved in
designing, developing, and operating public and private internets and intranets. You can access the Internet Protocol
Journal at this URL:
http://www.cisco.com/ipj
•World-class networking training is available from Cisco. You can view current offerings at this URL:
http://www.cisco.com/en/US/learning/index.html

xiv
Quick Start Guide: Cisco Aironet 1500 Series Lightweight Outdoor Mesh Access Point 78-17229-01
Preface
Obtaining Additional Publications and Information

CHAPTER
1
Quick Start Guide: Cisco Aironet 1500 Series Lightweight Outdoor Mesh Access Point
78-17229-01
1
Overview
The Cisco Aironet 1500 Series lightweight outdoor mesh access point (hereafter called the outdoor
access point) is a wireless device designed for wireless client access and point-to-point bridging,
point-to-multipoint bridging, and point-to-multipoint mesh wireless connectivity. The outdoor access
point is a standalone unit that can be mounted on a building wall or overhang, on a rooftop pole, or on a
street light pole. It is a self-contained outdoor unit which can be configured with a wired backhaul
connection to an Ethernet segment for a rooftop deployment, or can be configured with a wireless
backhaul for a pole-top deployment.
The outdoor access point provides client access and point-to-point connectivity and provides wireless
backhaul in the 2.4-GHz UNII band as defined in the 802.11b and 802.11g standards and in the 5-GHz
UNII 3 band derived from the 802.11a standard. The outdoor access point delivers 6 to 54 Mbps data
rates without the need for a license.
The outdoor access point is configured, monitored, and operated through a Cisco Wireless LAN
Controller as described in the Cisco Wireless LAN Solution Product Guide. The Cisco Wireless LAN
Controllers use a browser-based management system, a command-line interface (CLI), or the Cisco
WCS (Wireless Control System) network management system to manage the Cisco Wireless LAN
Controller and the associated outdoor access points.
This chapter provides information on the following topic:
•Key Features, page 1-2
2
Quick Start Guide: Cisco Aironet 1500 Series Lightweight Outdoor Mesh Access Point 78-17229-01
Chapter 1 Overview
Key Features
Key Features
Key features of the outdoor access point:
•Unlicensed UNII 2.4- and 5-GHz radio operation
•Metal enclosure supports outdoor installations
•Industrial temperature rating
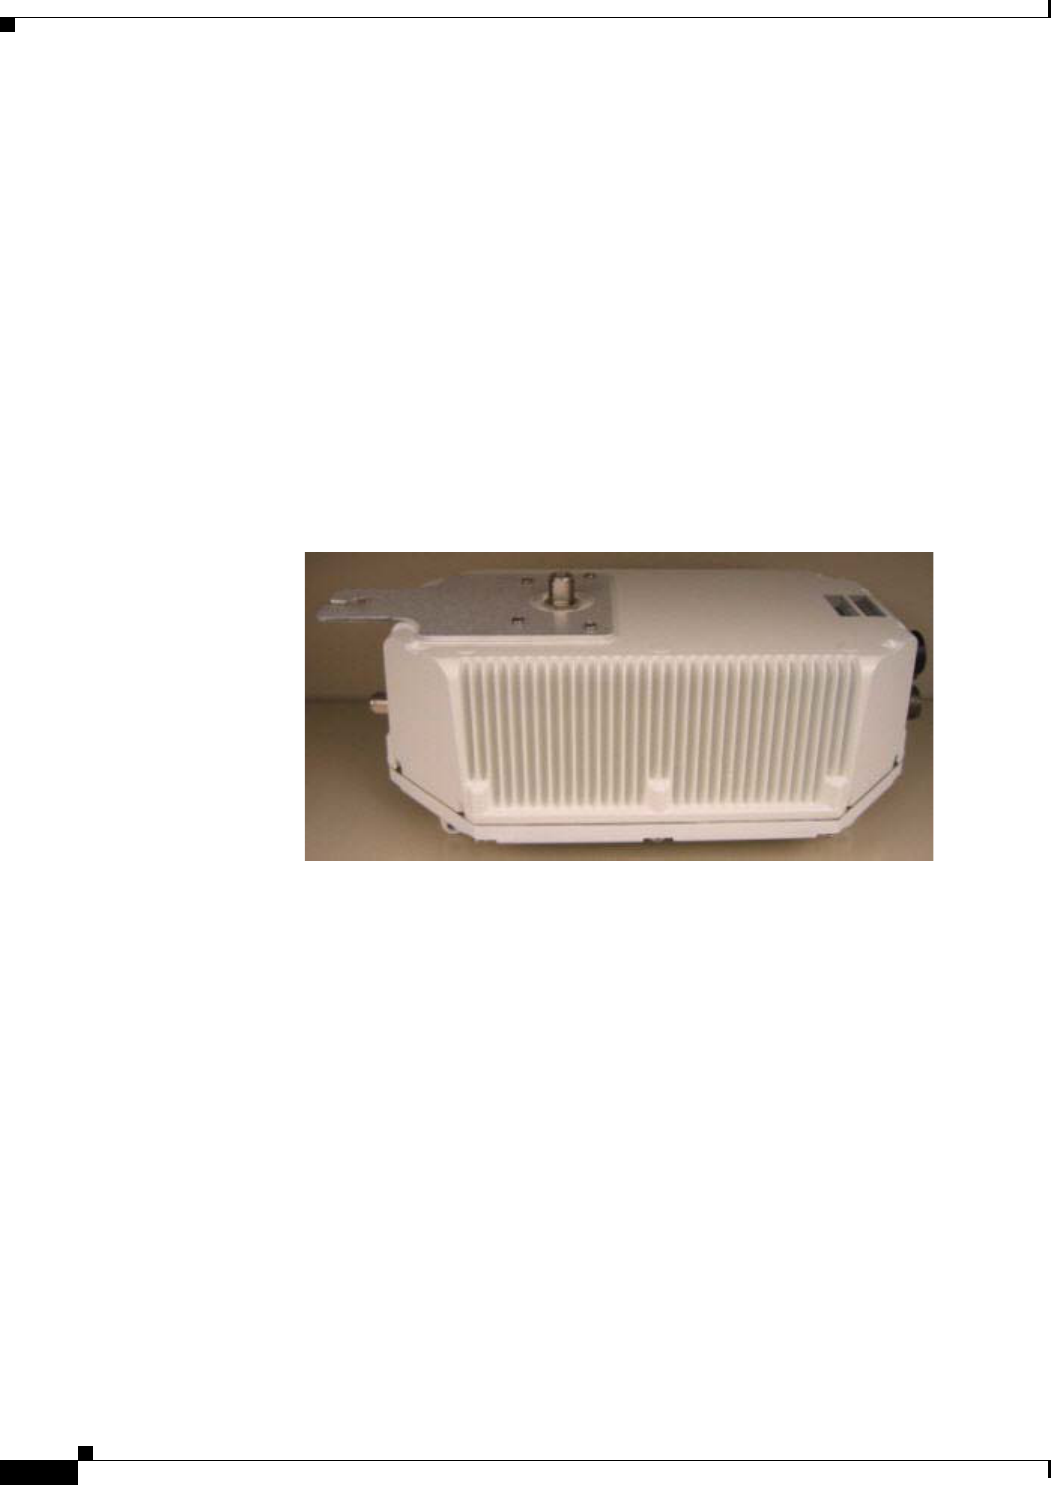
•Mounting plate shipping configuration for external antennas (see Figure 1-1)
•Mil-spec Ethernet and power ports
•Inline power over Ethernet cables or 100- to 240-VAC 50/60 Hz power over separate power cables
•Optional light pole mounting kit for rooftop and pole-top deployments
•Outdoor access point control using a browser-based management system, a CLI, or Cisco WCS
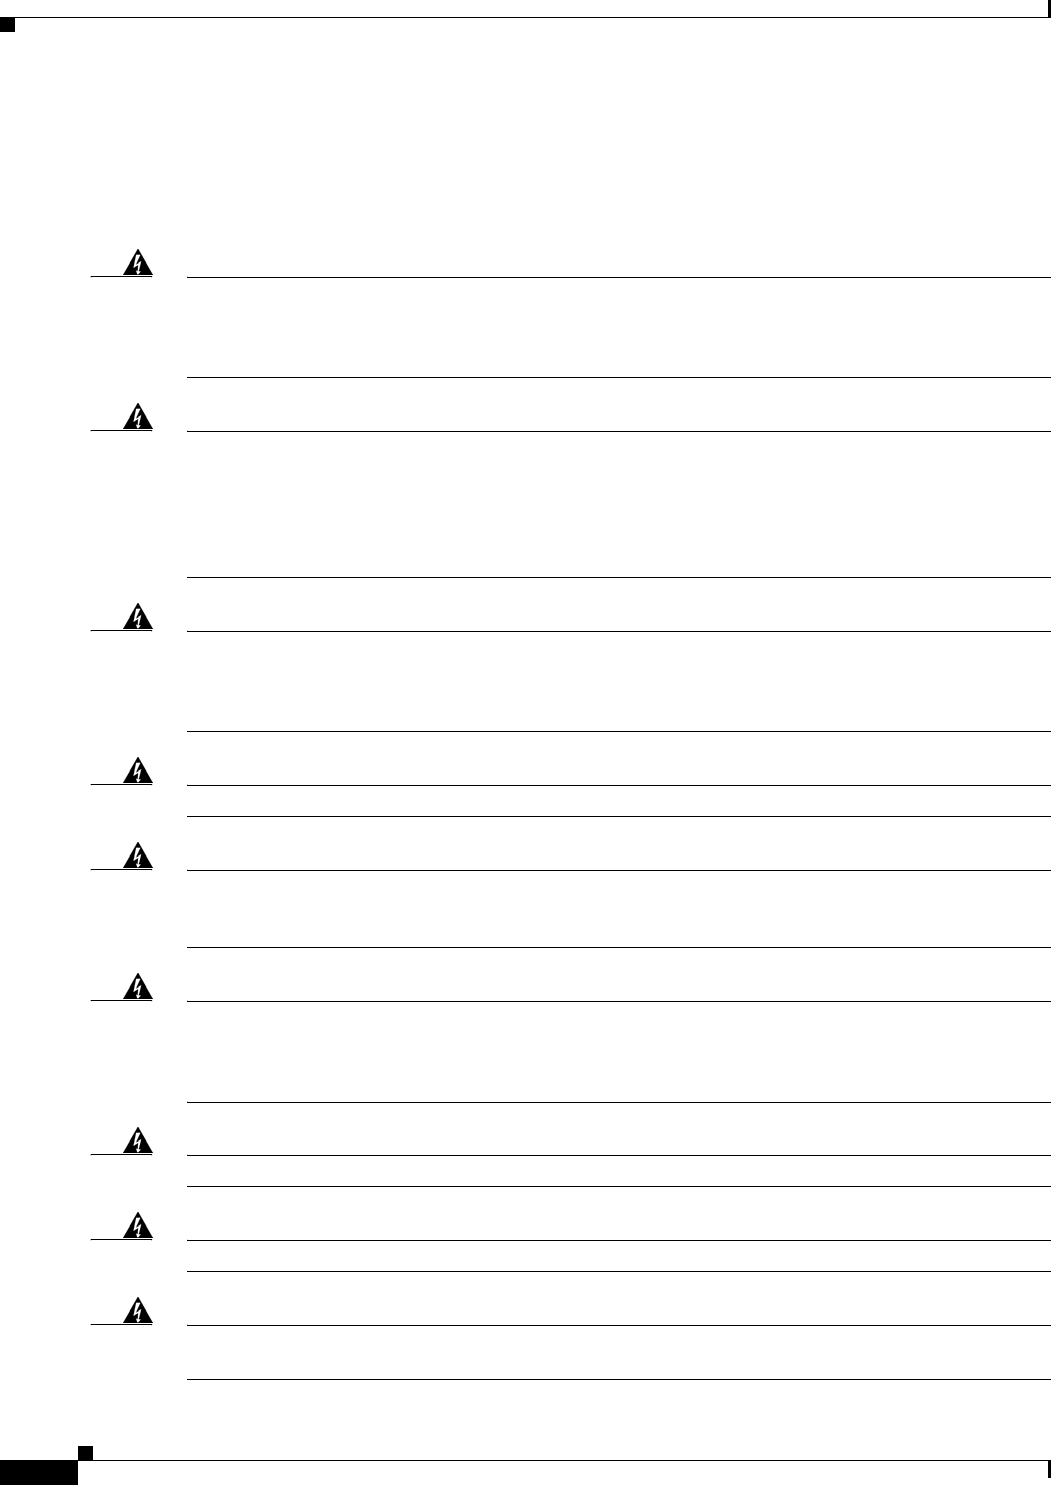
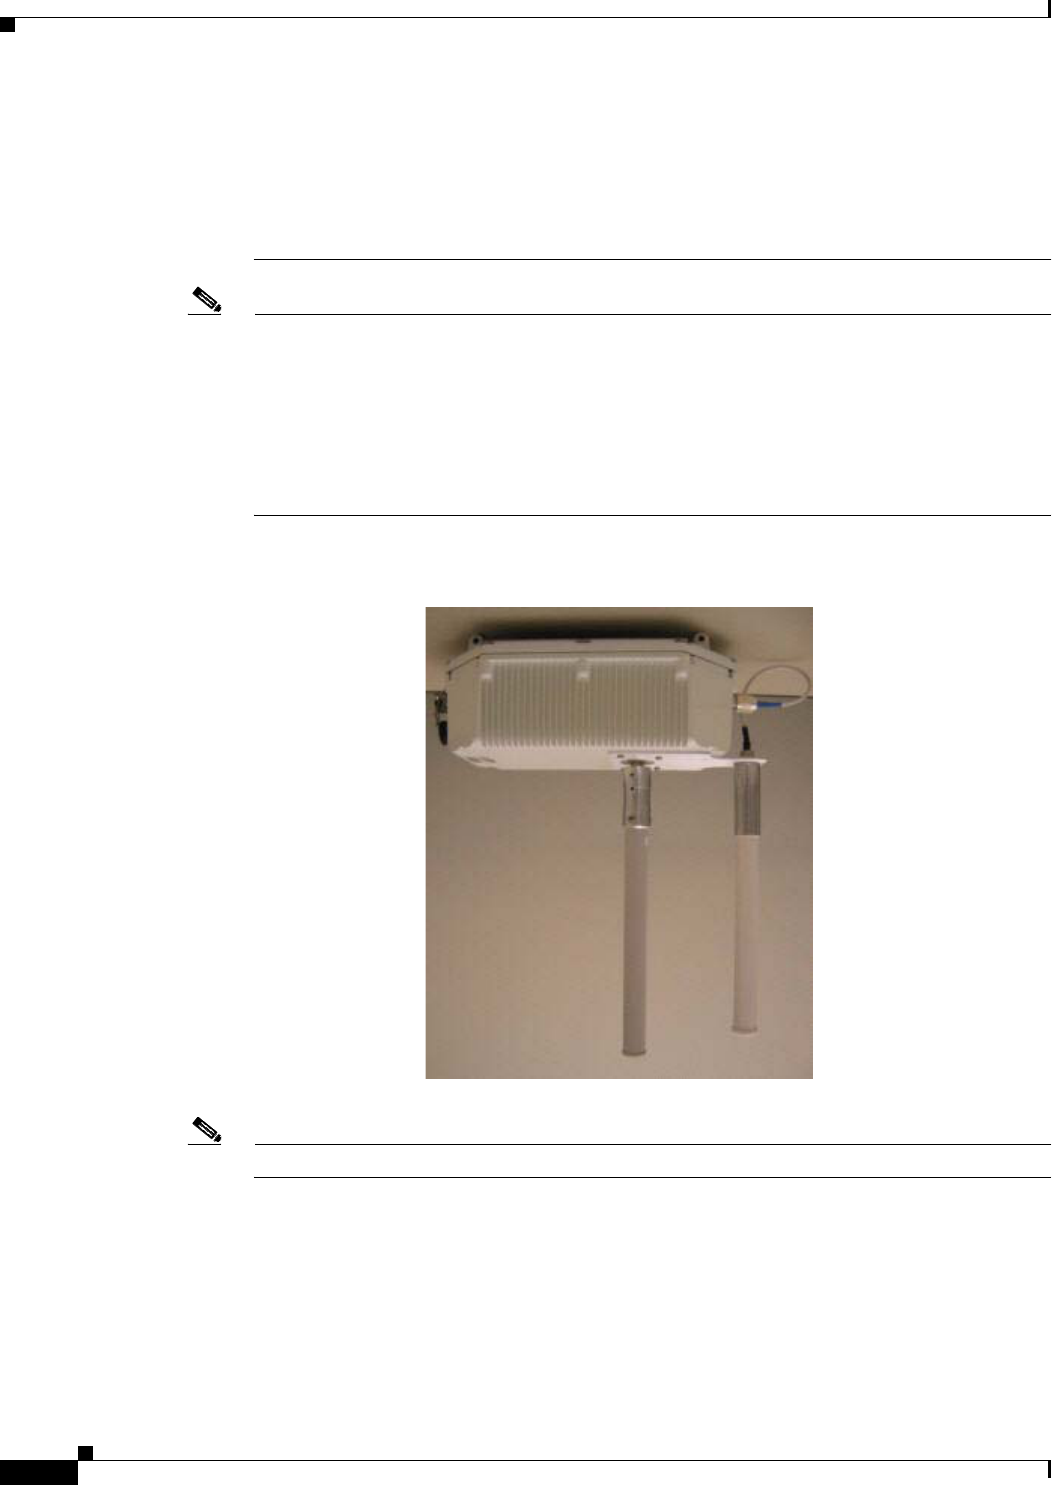
Figure 1-1 Outdoor Access Point
3
Quick Start Guide: Cisco Aironet 1500 Series Lightweight Outdoor Mesh Access Point
78-17229-01
Chapter 1 Overview Key Features
Power
The outdoor access point transmit output power can be configured to support many international
regulatory domains, as specified in the Cisco Wireless LAN Solution Product Guide.
The rooftop outdoor access point receives inline power from the Cisco Aironet Power Injector (hereafter
called the power injector) or from a 110- to 220-VAC power source. Shielded Ethernet cables provide
Ethernet data and power from the power injector, and optional shielded power cables provide power from
the power source to the outdoor access point. The power injector is a separate unit designed for operation
in a sheltered indoor environment, such as inside a building. The power injector also functions as an
Ethernet repeater by connecting to a Category 5 LAN backbone and using the Ethernet cable interface
to the outdoor access point.
The power injector uses an external 48-VDC power module and injects the DC voltage into the Ethernet
cables to power the outdoor access point.
Caution Only use the power injector specified for the Cisco Aironet 1500 Series lightweight outdoor mesh access
point. Other power injectors, including 802.03af power injectors, can damage the outdoor access point
and/or can cause a hazardous condition.
Warning
The power injector and the power module should not be placed in an unprotected outdoor
environment.
External Antennas
The outdoor access point is equipped with an N-type RF connector on the front of the unit for an external
2.4-GHz antenna and with an N-type RF connector on the end of the unit for an external 5-GHz antenna
(see Figure 1-1). When using the optional Cisco external omnidirectional antennas, the 2.4-GHz antenna
connects directly to the outdoor access point, and the 5-GHz antenna connects to the outdoor access
point using the antenna’s included coax cable.
The Cisco omnidirectional external antennas use vertical polarization.
The outdoor access point can also be equipped with third-party external antennas, subject to local
regulatory requirements. Note that when you are installing third-party antennas, that they must be
waterproof and installed with all waterproofing steps recommended by the third-party manufacturer.
Warning
To meet regulatory restrictions, the outdoor access point and external antennas must be
professionally installed.
Ethernet Port
When used, the outdoor access point’s power injector port accepts a Mil-spec connector, linking the
outdoor access point to your 100BASE-T Ethernet LAN through the optional power injector. The
Ethernet cables are used to send and receive Ethernet data and to optionally supply inline 48-VDC power
from the power injector.

4
Quick Start Guide: Cisco Aironet 1500 Series Lightweight Outdoor Mesh Access Point 78-17229-01
Chapter 1 Overview
Key Features
Warning
When you are installing the outdoor access point with a ethernet cable, and powering through that
cable, the outdoor access point must be reliably grounded using an external ground wire as described
in the Rooftop Installations, page 3-14 and Pole-Top Installations, page 3-15 sections.
Tip The outdoor access point senses the Ethernet and power signals and automatically switches internal
circuitry to match the cable connections.
Note This product is designed for connection to an IT power distribution system, as well as other
systems (TN, TT).
Note Use only the optional Cisco power injector for the outdoor access point. The optional Cisco
power injector is specified to meet the requirements of the outdoor access point and is a Listed
Class 2 Limited Power Source (LPS).
Metal Enclosure
The outdoor access point uses a metal enclosure that supports outdoor operating environments and
supports an industrial temperature operating range of -30 to 55 degrees C.

CHAPTER
5
Quick Start Guide: Cisco Aironet 1500 Series Lightweight Outdoor Mesh Access Point
78-17229-01
2
Installation Overview
This chapter provides warnings, safety information, and information needed before you begin the
installation of your outdoor access point. This chapter includes the following sections:
•Warnings, page 2-6
•Safety Information, page 2-7
•Unpacking the Outdoor Access Point, page 2-9
•Before Beginning the Installation, page 2-11
6
Quick Start Guide: Cisco Aironet 1500 Series Lightweight Outdoor Mesh Access Point 78-17229-01
Chapter 2 Installation Overview
Warnings
Warnings
Translated versions of the following safety warnings are provided in Appendix A, “Translated Safety
Warnings.”
Warning
This warning symbol means danger. You are in a situation that could cause bodily injury. Before
you work on any equipment, be aware of the hazards involved with electrical circuitry and be
familiar with standard practices for preventing accidents. (To see translations of the warnings
that appear in this publication, refer to the appendix “Translated Safety Warnings.”)
Warning
You can be killed when installing the outdoor access point. To avoid this, locate the external antennas
away from electric power lines or other power circuits, or where they can come into contact with
such circuits. Make sure you follow all of the instructions and pay attention to all the Warning notes
in this manual.
For proper installation and grounding of the antenna, please refer to national and local codes (e.g.
U.S.:NFPA 70, National Electrical Code, Article 810, in Canada: Canadian Electrical Code, Section 54).
Warning
When installing the antenna, take extreme care not to come into contact with such circuits, as they
may cause serious injury or death. For proper installation and grounding of the antenna, please refer
to national and local codes (e.g. U.S.:NFPA 70, National Electrical Code, Article 810, in Canada:
Canadian Electrical Code, Section 54).
Warning
Only trained and qualified personnel should be allowed to install, replace, or service this equipment.
Warning
The outdoor access point is a sealed unit, and may not be opened in the field, or the outdoor access
point can become a hazard. Should the seal be broken on an outdoor access point, return it to Cisco
for a replacement.
Warning
This equipment must be externally grounded using a customer-supplied ground wire before power is
applied. Refer to the mounting instructions in the Rooftop Installations, page 3-14 or Pole-Top
Installations, page 3-15 sections for more information. Contact the appropriate electrical inspection
authority or an electrician if you are uncertain that suitable grounding is available.
Warning
Read the installation instructions before you connect the system to its power source.
Warning
Do not work on the system or connect or disconnect cables during periods of lightning activity.
Warning
Do not operate your wireless network device near unshielded blasting caps or in an explosive
environment unless the device has been modified to be especially qualified for such use.

7
Quick Start Guide: Cisco Aironet 1500 Series Lightweight Outdoor Mesh Access Point
78-17229-01
Chapter 2 Installation Overview Safety Information
Warning
In order to comply with radio frequency (RF) exposure limits, the antennas for this product should be
positioned no less than 6.56 ft (2 m) from your body or nearby persons.
Safety Information
Follow the guidelines in this section to ensure proper operation and safe use of the outdoor access point.
FCC Safety Compliance Statement
The FCC, with its action in ET Docket 96-8, has adopted a safety standard for human exposure to RF
electromagnetic energy emitted by FCC-certified equipment. When used with approved Cisco Aironet
antennas, Cisco Aironet products meet the uncontrolled environmental limits found in OET-65 and ANSI
C95.1, 1991. Proper operation of this radio device according to the instructions in this publication results
in user exposure substantially below the FCC recommended limits.
Safety Precautions
Warning
You can be killed when installing the outdoor access point. To avoid this, locate the external antennas
away from electric power lines or other power circuits, or where they can come into contact with
such circuits. Make sure you follow all of the instructions and pay attention to all the Warning notes
in this manual.
For proper installation and grounding of the antenna, please refer to national and local codes (e.g.
U.S.:NFPA 70, National Electrical Code, Article 810, in Canada: Canadian Electrical Code, Section 54).
Each year hundreds of people are killed or injured when attempting to install antennas. In many of these
cases, the victim was aware of the danger of electrocution, but did not take adequate steps to avoid the
hazard.
For your safety, and to help you achieve a good installation, please read and follow these safety
precautions. They may save your life!
1. Select your installation site with safety, as well as performance in mind. Remember: electric power
lines and phone lines look alike. For your safety, assume that any overhead line can kill you.
2. Call your electric power company. Tell them your plans and ask them to come look at your proposed
installation. This is a small inconvenience considering your life is at stake.
3. Plan your installation carefully and completely before you begin. Successfully raising a pole is
largely a matter of coordination. Each person should be assigned to a specific task, and should know
what to do and when to do it. One person should be in charge of the operation to issue instructions
and watch for signs of trouble.
4. When installing your antenna, remember:
a. Do not use a metal ladder.
b. Do not work on a wet or windy day.
c. Do dress properly—shoes with rubber soles and heels, rubber gloves, long sleeved shirt or
jacket.

8
Quick Start Guide: Cisco Aironet 1500 Series Lightweight Outdoor Mesh Access Point 78-17229-01
Chapter 2 Installation Overview
Safety Information
5. If the assembly starts to drop, get away from it and let it fall. Remember, the antenna, pole, cable,
and metal guy wires are all excellent conductors of electrical current. Even the slightest touch of any
of these parts to a power line complete an electrical path through the antenna and the installer: you!
6. If any part of the antenna system should come in contact with a power line, don’t touch it or try to
remove it yourself. Call your local power company. They will remove it safely.
If an accident should occur with the power lines call for qualified emergency help immediately.
Typical Outdoor Access Point Installation Components
The outdoor access point is designed to be installed in an outdoor environment, such as a tower, street
light, or tall building. Note that you can install the outdoor access point at any height, but best outdoor
access point-to-outdoor access point throughput is achieved when the outdoor access points are mounted
within line of sight of each other.
A typical outdoor access point installation diagram is shown in Figure 2-1.
Figure 2-1 Typical Outdoor Access Point Rooftop and Street Light Installation Diagram
Note Grounding and wiring means must comply with Articles 810 and 820 of the National Electrical Code
(NEC) and Section 54 of the Canadian Electrical Code (CEC).
Caution To ensure correct installation and grounding, install the outdoor access point in compliance with your
local and national electrical codes: National Fire Protection Association (NFPA) 70, National Electrical
Code (U.S.); Canadian Electrical Code, Part I, CSA 22.1 (Canada); and if local or national electrical
codes are not available, refer to IEC 364, Part 1 through 7 (other countries).
(Graphic to be determined)

9
Quick Start Guide: Cisco Aironet 1500 Series Lightweight Outdoor Mesh Access Point
78-17229-01
Chapter 2 Installation Overview Installation Guidelines
Installation Guidelines
Because the outdoor access point is a radio device, it is susceptible to common causes of interference
that can reduce throughput and range. Follow these basic guidelines to ensure the best possible
performance:
•Install the outdoor access point in an area where structures, trees, or hills do not obstruct radio
signals to and from the outdoor access point.
•Install the outdoor access point at a height sufficient to provide clear line-of-sight signal path.
Site Surveys
Every network application is a unique installation. Before installing multiple outdoor access points, you
should perform a site survey to determine the optimum use of networking components and to maximize
range, coverage, and network performance.
Consider the following operating and environmental conditions when performing a site survey:
•Data rates—Sensitivity and range are inversely proportional to data bit rates. The maximum radio
range is achieved at the lowest workable data rate. A decrease in receiver sensitivity occurs as the
radio data increases.
•Antenna type and placement—Proper antenna configuration is a critical factor in maximizing radio
range. As a general rule, range increases in proportion to antenna height. However, do not place the
antenna higher than necessary, because the extra height also increases potential interference from
other unlicensed radio systems.
•Physical environment—Clear or open areas provide better radio range than closed or filled areas.
•Obstructions—Physical obstructions such as buildings, trees, or hills can hinder performance of
wireless devices. Avoid locating the devices in a location where there is an obstruction between the
sending and receiving antennas.
Unpacking the Outdoor Access Point
Note When you are unpacking the outdoor access point, do not remove the foam block attached to the face of
the outdoor access point until after the outdoor access point is installed. The foam protects the antenna
connector.
Follow these steps to unpack the outdoor access point:
Step 1 Open the shipping container and carefully remove the contents.
Step 2 Return all packing materials to the shipping container and save it.
Step 3 Ensure that all items listed in the “Package Contents” section are included in the shipment. If any item
is damaged or missing, notify your authorized Cisco sales representative.

10
Quick Start Guide: Cisco Aironet 1500 Series Lightweight Outdoor Mesh Access Point 78-17229-01
Chapter 2 Installation Overview
Unpacking the Outdoor Access Point
Package Contents
Each outdoor access point package contains the following items:
•Outdoor access point
•Installed mounting plate
•Cisco product registration and Cisco documentation feedback cards
Optional Equipment
•Street light adapter
•Ethernet cable
•Power injector unit
•Pole mount kit
•Cisco external omnidirectional antennas, 2.4- and 5-GHz
•Third-party external antennas
•Third-party lightning arrestors, as required by local authorities
11
Quick Start Guide: Cisco Aironet 1500 Series Lightweight Outdoor Mesh Access Point
78-17229-01
Chapter 2 Installation Overview Before Beginning the Installation
Before Beginning the Installation
Before you begin the installation process, please carefully review the following list of figures to become
familiar with the system components, connectors, indicators, cables, system interconnection, and
grounding:
•Outdoor access point installation diagram (Figure 2-1)
•Outdoor access point connectors (Figure 2-2)
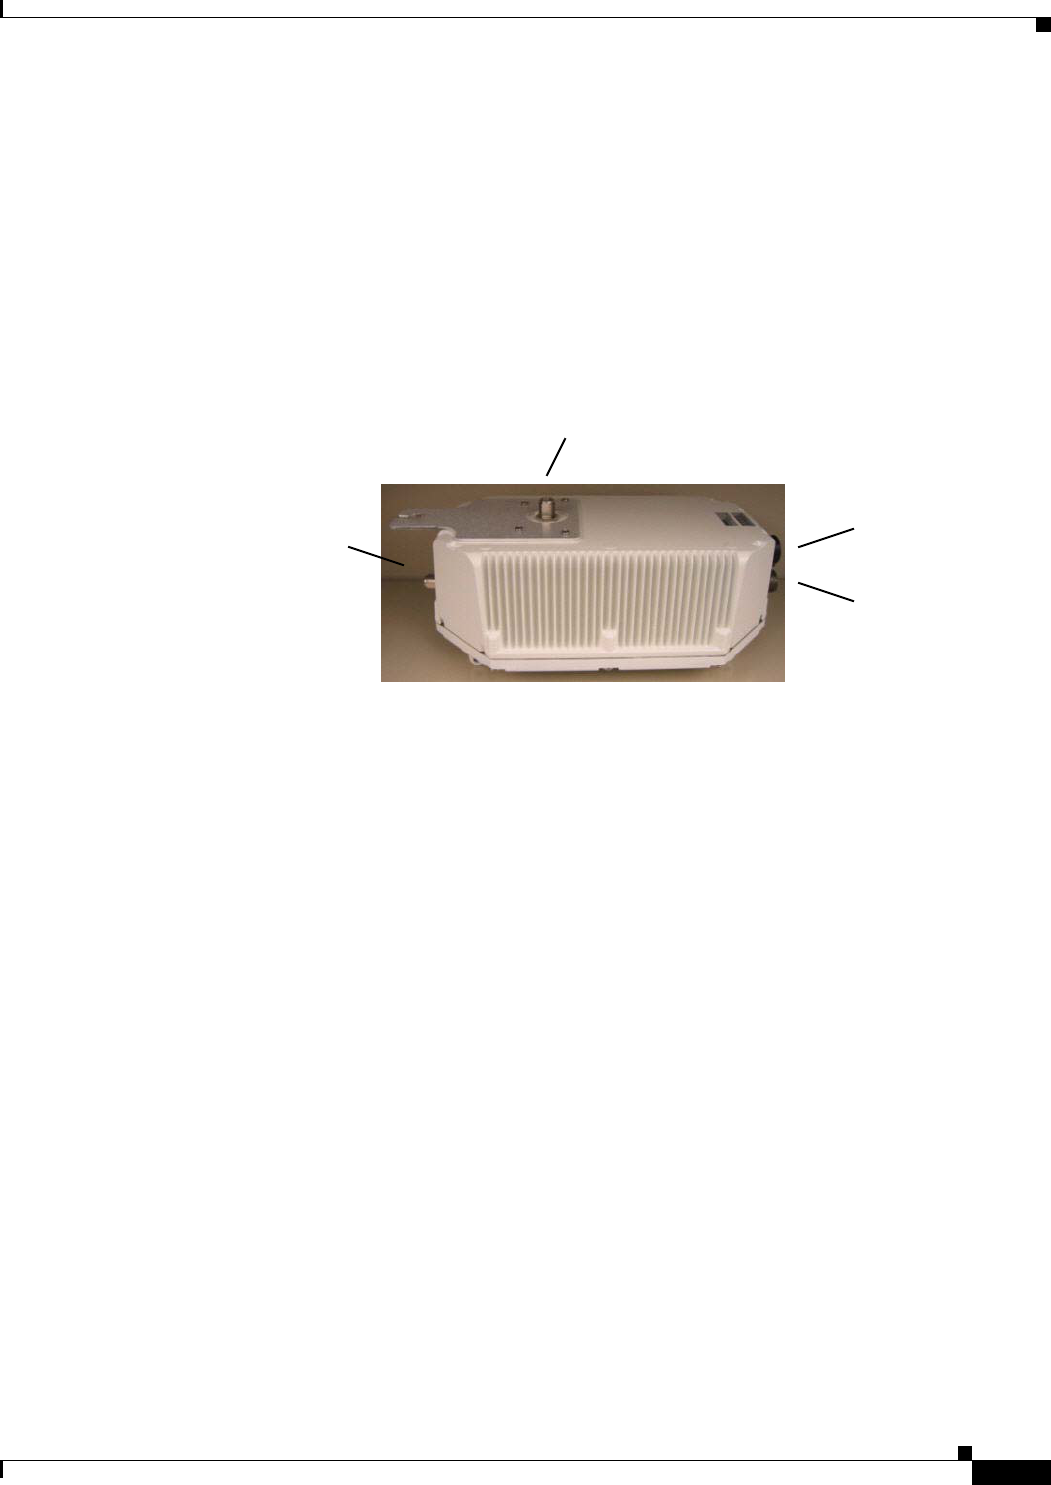
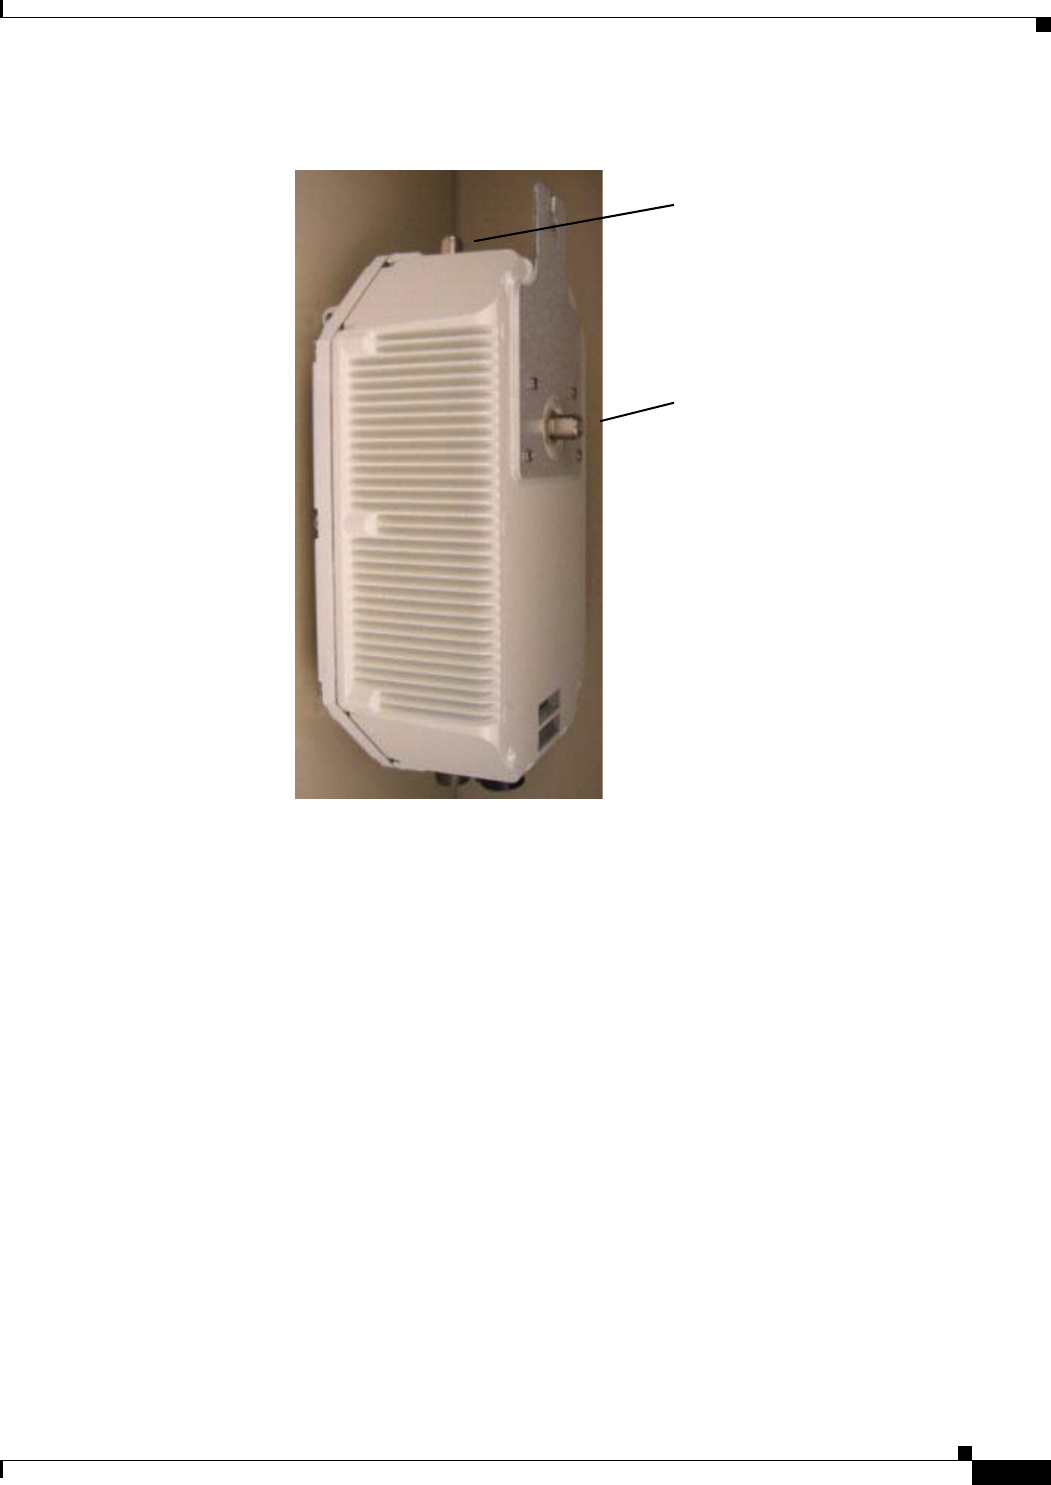
Figure 2-2 Outdoor Access Point Connectors
2.4 GHz N-Type Connector
5 GHz
AC Power
N-Type
Connector
Connector
Ethernet and
DC Power
Connector

12
Quick Start Guide: Cisco Aironet 1500 Series Lightweight Outdoor Mesh Access Point 78-17229-01
Chapter 2 Installation Overview
Before Beginning the Installation

CHAPTER
13
Quick Start Guide: Cisco Aironet 1500 Series Lightweight Outdoor Mesh Access Point
78-17229-01
3
Installation Instructions
Note To meet regulatory restrictions, the outdoor access point and the external antennas must be
professionally installed.
Personnel installing the outdoor access point must understand wireless bridging techniques and
grounding methods.
Warning
The outdoor access point is a sealed unit, and may not be opened in the field, or the outdoor access
point can become a hazard. Should the seal be broken on an outdoor access point, return it to Cisco
for a replacement.
Required Tools and Materials
To install the outdoor access point you will need the following:
•Open and box-end wrenches
•Pocket level
•Customer-supplied 10 AWG ground wire
•Customer-supplied UL-Listed ground lug
•Other tools, as required
Installation Options
There are two common installation locations, using the Cisco-supplied mounting plate and/or optional
Cisco pole mount kit. Refer to the appropriate sections for installation details.
•Rooftop Installations, page 3-14
•Pole-Top Installations, page 3-15
•Installing the Outdoor Access Point on a Wall or Overhang, page 3-17
•Installing the Outdoor Access Point on a Pole, page 3-21

14
Quick Start Guide: Cisco Aironet 1500 Series Lightweight Outdoor Mesh Access Point 78-17229-01
Chapter 3 Installation Instructions
Installation Options
Rooftop Installations
While installing a rooftop outdoor access point, you will typically perform the following operations:
1. Mount the outdoor access point to a wall, overhang, or external tower or pole. Refer to the Installing
the Outdoor Access Point on a Wall or Overhang, page 3-17 or Installing the Outdoor Access Point
on a Pole, page 3-21 section, as appropriate.
2. Connect a 10 AWG or larger ground wire to the outdoor access point grounding screw, and make
sure it is connected to a reliable earth ground, such as a grounded pole or a grounding rod.
Loop the bare end of the ground wire about 7/8 of the way around the grounding screw, and tighten
the grounding screw to 20 ft-lbs. Do not overtighten!
Warning
This equipment must be externally grounded using a customer-supplied ground wire before power is
applied. Contact the appropriate electrical inspection authority or an electrician if you are uncertain
that suitable grounding is available.
3. Connect a user-supplied Category 5 Ethernet cable from your wired LAN network to the optional
Cisco power injector.
Note Use only the optional Cisco power injector for the outdoor access point. The optional Cisco
power injector is specified to meet the requirements of the outdoor access point and is a Listed
Class 2 Limited Power Source (LPS).
4. Connect a user-supplied Category 5 Ethernet cable from the optional Cisco power injector to the
optional third-party lightning arrestor.
5. Connect the Cisco-supplied Ethernet cable between the power injector or optional third-party
lightning arrestor and the outdoor access point Ethernet and DC Power Connector, which is shown
in Figure 3-1.
Note You should hand tighten the cable connector to between 15 and 20 inch-pounds.
Note Leave the AC Power Connector cap installed on its connector.
15
Quick Start Guide: Cisco Aironet 1500 Series Lightweight Outdoor Mesh Access Point
78-17229-01
Chapter 3 Installation Instructions Installation Options
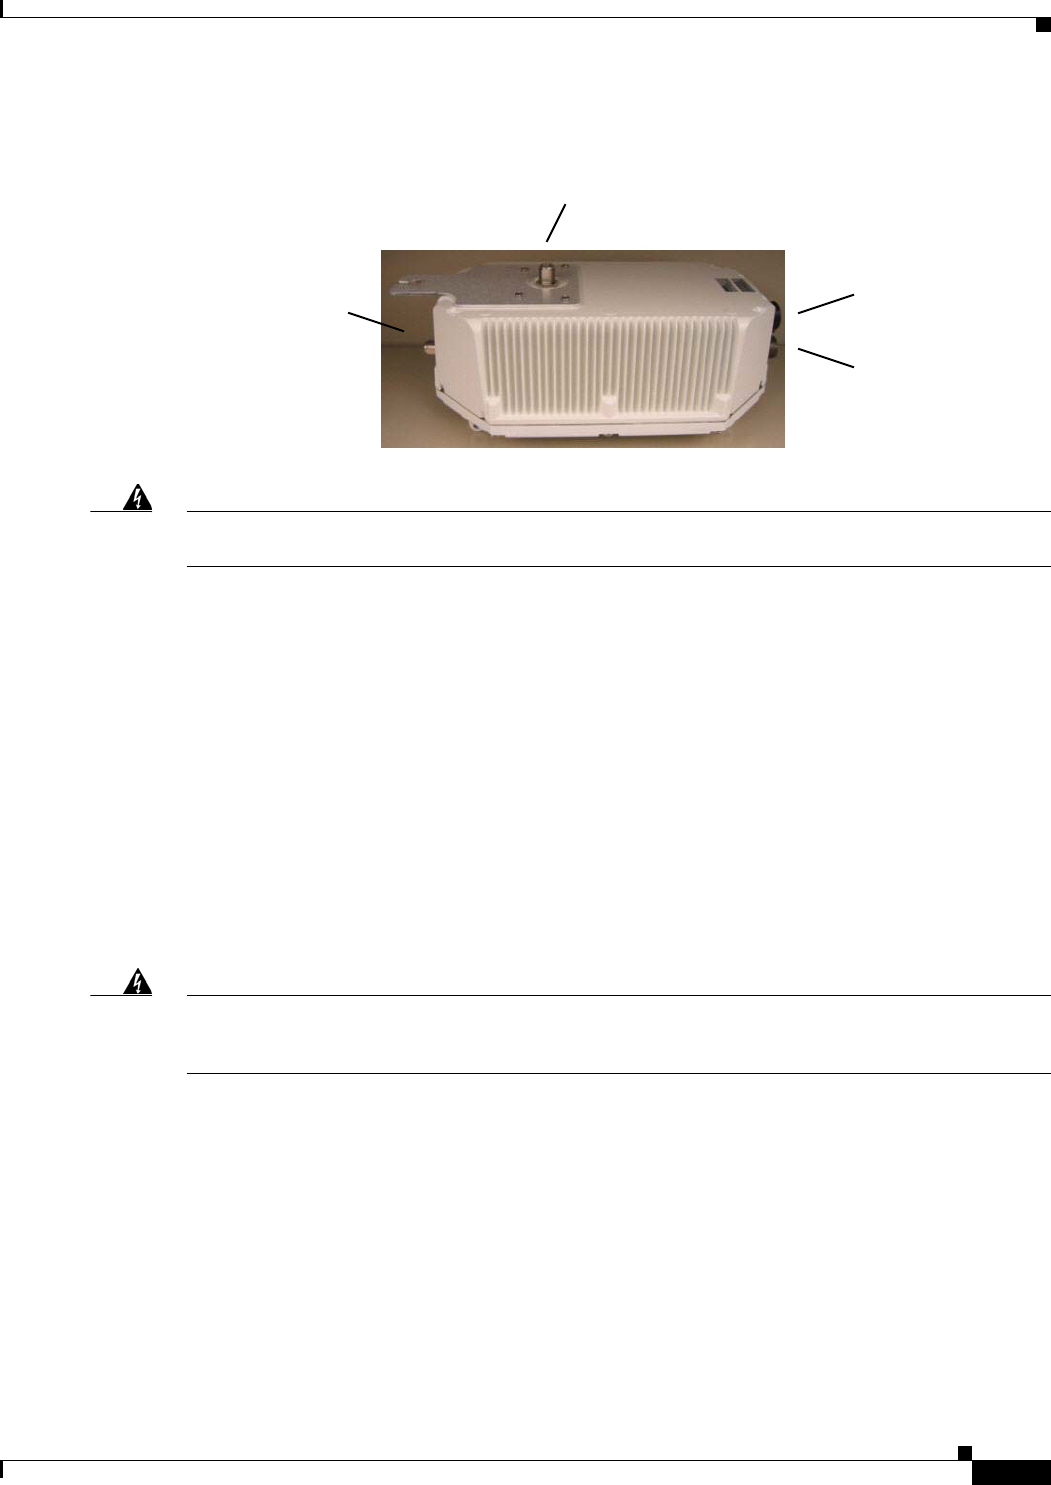
Figure 3-1 Outdoor Access Point Connectors
Warning
Use the captive connector cap on the unused mil spec connector to prevent water intrusion and
possible safety hazards.
6. When using the optional Cisco external omnidirectional antennas, connect them to the outdoor
access point as shown in Figure 3-3.
--OR--
When using optional third-party external antennas, connect them to the outdoor access point as
described in the installation documents that shipped with those antennas.
7. If necessary, align the outdoor access point external antennas. The outdoor access point can be
ordered with two compact omnidirectional antennas, which normally do not require alignment when
the outdoor access point is mounted horizontally. For additional information on third-party external
antennas, refer to the installation documents that shipped with those antennas.
Pole-Top Installations
Warning
When powered by 100- to 240-VAC 50/60 Hz, connect this equipment only to a twist-lock outdoor
lighting control as shown in
Figure 3-2
. Do not connect it to a twist-lock outdoor lighting control
powered by higher voltages.
While installing an outdoor access point on a light pole, you will typically perform the following
operations:
1. Mount the outdoor access point to the light pole within 3 feet (1 meter) of the outdoor lighting
control. Refer to the Installing the Outdoor Access Point on a Pole, page 3-21 section.
2. Connect a 10 AWG or larger ground wire to the outdoor access point grounding screw, and make
sure it is connected to a reliable earth ground, such as a grounded pole or a grounding rod.
Loop the bare end of the ground wire about 7/8 of the way around the grounding screw, and tighten
the grounding screw to 20 ft-lbs. Do not overtighten!
2.4-GHz N-Type Connector
5 GHz AC Power
N-Type
Connector
Connector
Ethernet and
DC Power
Connector
16
Quick Start Guide: Cisco Aironet 1500 Series Lightweight Outdoor Mesh Access Point 78-17229-01
Chapter 3 Installation Instructions
Installation Options
Warning
This equipment must be externally grounded using a customer-supplied ground wire before power is
applied. Contact the appropriate electrical inspection authority or an electrician if you are uncertain
that suitable grounding is available.
Warning
When powering the product with AC power – other than the street lamp power option – the power plug
should be installed:
(1) where it can be conveniently accessed to de-energize power from the unit. Power should not be
removed by disconnecting the AC power connector at the equipment itself, and
(2) where it is not subjected to water or the outdoor elements. This may be accomplished by the use
of UL Listed power receptacles, such as GFCIs, provided with UL Listed waterproofing covers suitable
for covering the receptacle and plugs with the plugged in equipment in use.
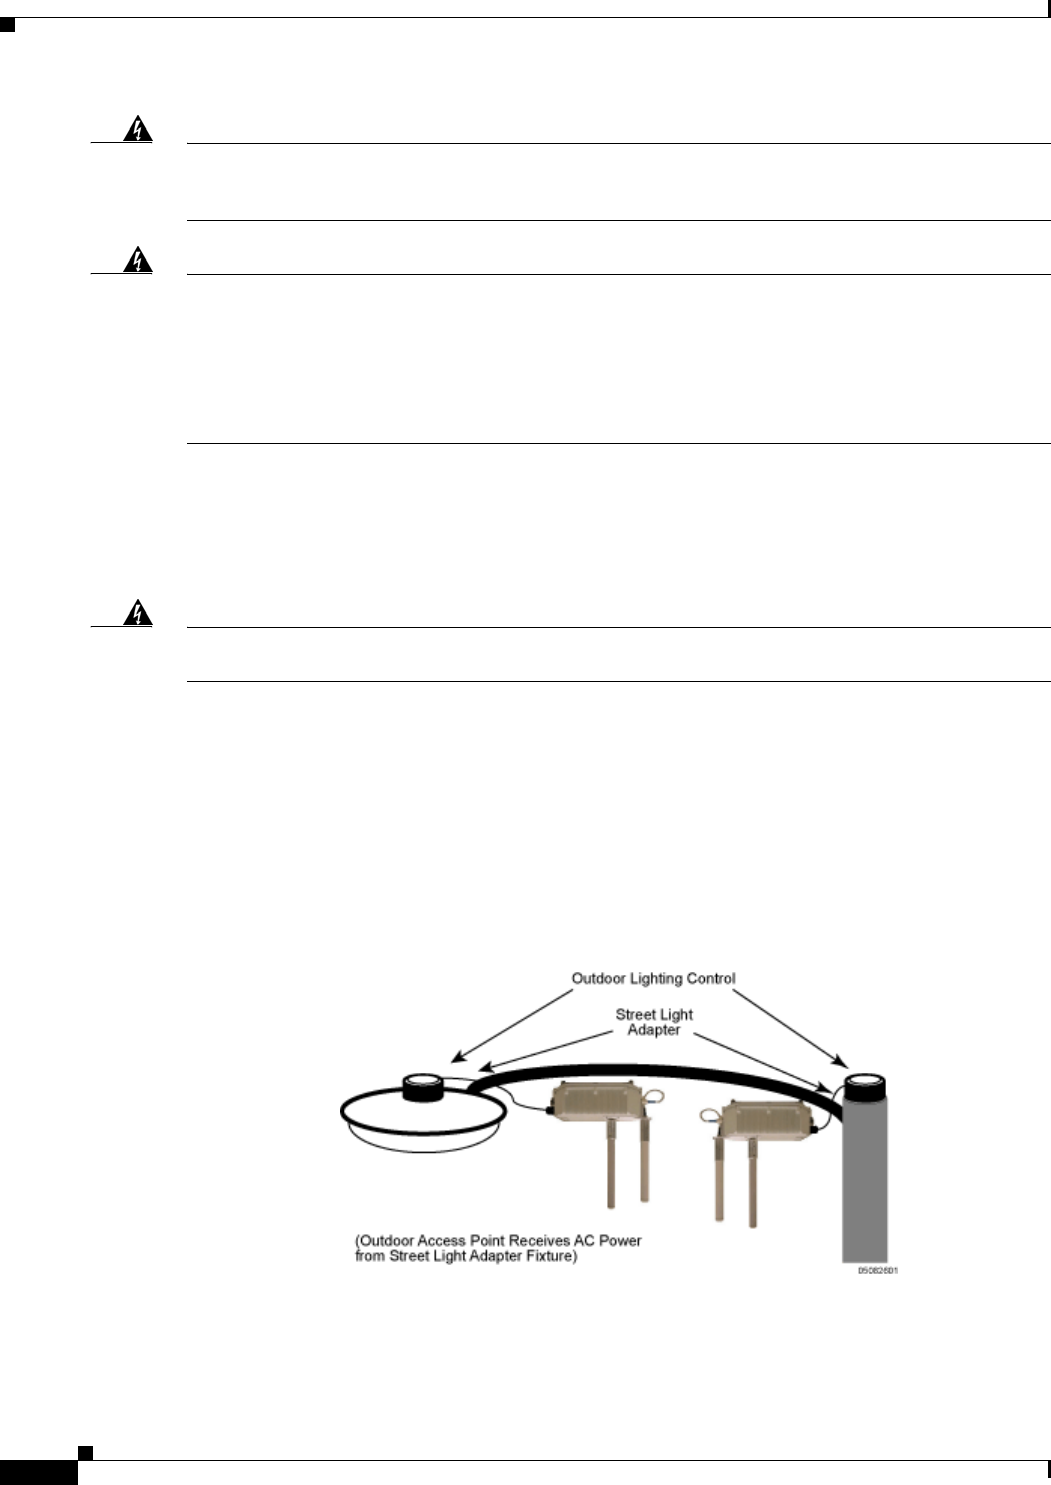
3. Refer to the AC power connections for Category C power from a street light outdoor lighting control
shown in Figure 3-2. The street light adapter uses a 3-prong NEMA twist-lock adapter that installs
between the outdoor lighting control and its fixture. The NEMA twist-lock adapter is designed to be
used with UL 773 listed outdoor lighting controls operating at and rated for 100 and 240 VAC
50/60 Hz.
Warning
Be very careful when connecting the street light adapter to Category 3 pole-top power to avoid being
hurt or killed!
4. Disconnect the outdoor lighting control from its fixture.
5. Verify that the voltage available at the fixture is between 100 and 240 VAC 50/60 Hz.
6. Turn off power to the fixture at the designated circuits.
7. Plug the Cisco-supplied street light adapter into the outdoor lighting control fixture. Refer to
Figure 3-2.
8. Plug the outdoor lighting control to the street light adapter.
Figure 3-2 Using the Street Light Adapter
9. Connect the other end of the Cisco-supplied street light adapter to the outdoor access point AC
Power Connector, as shown in Figure 3-2.

17
Quick Start Guide: Cisco Aironet 1500 Series Lightweight Outdoor Mesh Access Point
78-17229-01
Chapter 3 Installation Instructions Installation Options
Warning
When installing the Cisco-supplied street light adapter to the outdoor access point AC Power
Connector, ALWAYS connect the outdoor access point end of the cable FIRST. When removing the
Cisco-supplied street light adapter, ALWAYS disconnect the outdoor access point end of the cable
LAST.
Warning
Use the captive connector cap on the unused mil spec connector to prevent water intrusion and
possible safety hazards.
Note You should hand tighten the cable connector on the outdoor access point end to between 15 and
20 inch-pounds.
Note Move the AC Power Connector cap to the Ethernet and DC Power connector, because that
connector is not used in pole-top deployments.
10. Turn power back on to the outdoor lighting control fixture at the designated circuits.
11. Use a pocket level to verify that the outdoor access point is horizontal, and tighten its adjustment
screws.
12. When using the optional Cisco external omnidirectional antennas, connect them to the outdoor
access point as shown in Figure 3-3.
--OR--
When using optional third-party external antennas, connect them to the outdoor access point as
described in the installation documents that shipped with those antennas.
13. If necessary, align the outdoor access point external antennas. The outdoor access point can be
ordered with two compact omnidirectional antennas, which normally do not require alignment when
the outdoor access point is mounted horizontally. For additional information on third-party external
antennas, refer to the installation documents that shipped with those antennas.
Installing the Outdoor Access Point on a Wall or Overhang
While installing a rooftop outdoor access point on a wall or overhang, you will typically use the
Cisco-supplied mounting plate and perform the following operations:
Note When the product is installed outside of the building, and the DC power/Ethernet connection is
used, this cabling should be installed in accordance with the requirements of a Class 2 circuit,
as detailed in Article 725 of the National Electric Code (NEC). Such requirements include, but
are not limited to, routing the Class 2 cabling away from AC power lines and AC building wiring,
and limiting the exposed cable runs external to the building to less than 140ft (42m) – or is
directly buried or in underground conduit, where a continuous metallic cable shield or a
18
Quick Start Guide: Cisco Aironet 1500 Series Lightweight Outdoor Mesh Access Point 78-17229-01
Chapter 3 Installation Instructions
Installation Options
continuous metallic conduit containing the cable is bonded to each building grounding electrode
system. If such installation methods are not followed, the cabling must be installed according to
the requirements for telecommunication circuits (TNV) as detailed in Article 800, which
includes requirements for a Listed primary protector upon entering the building, and limits the
installation to only Listed networking equipment designed to accommodate telecommunication
interfaces.
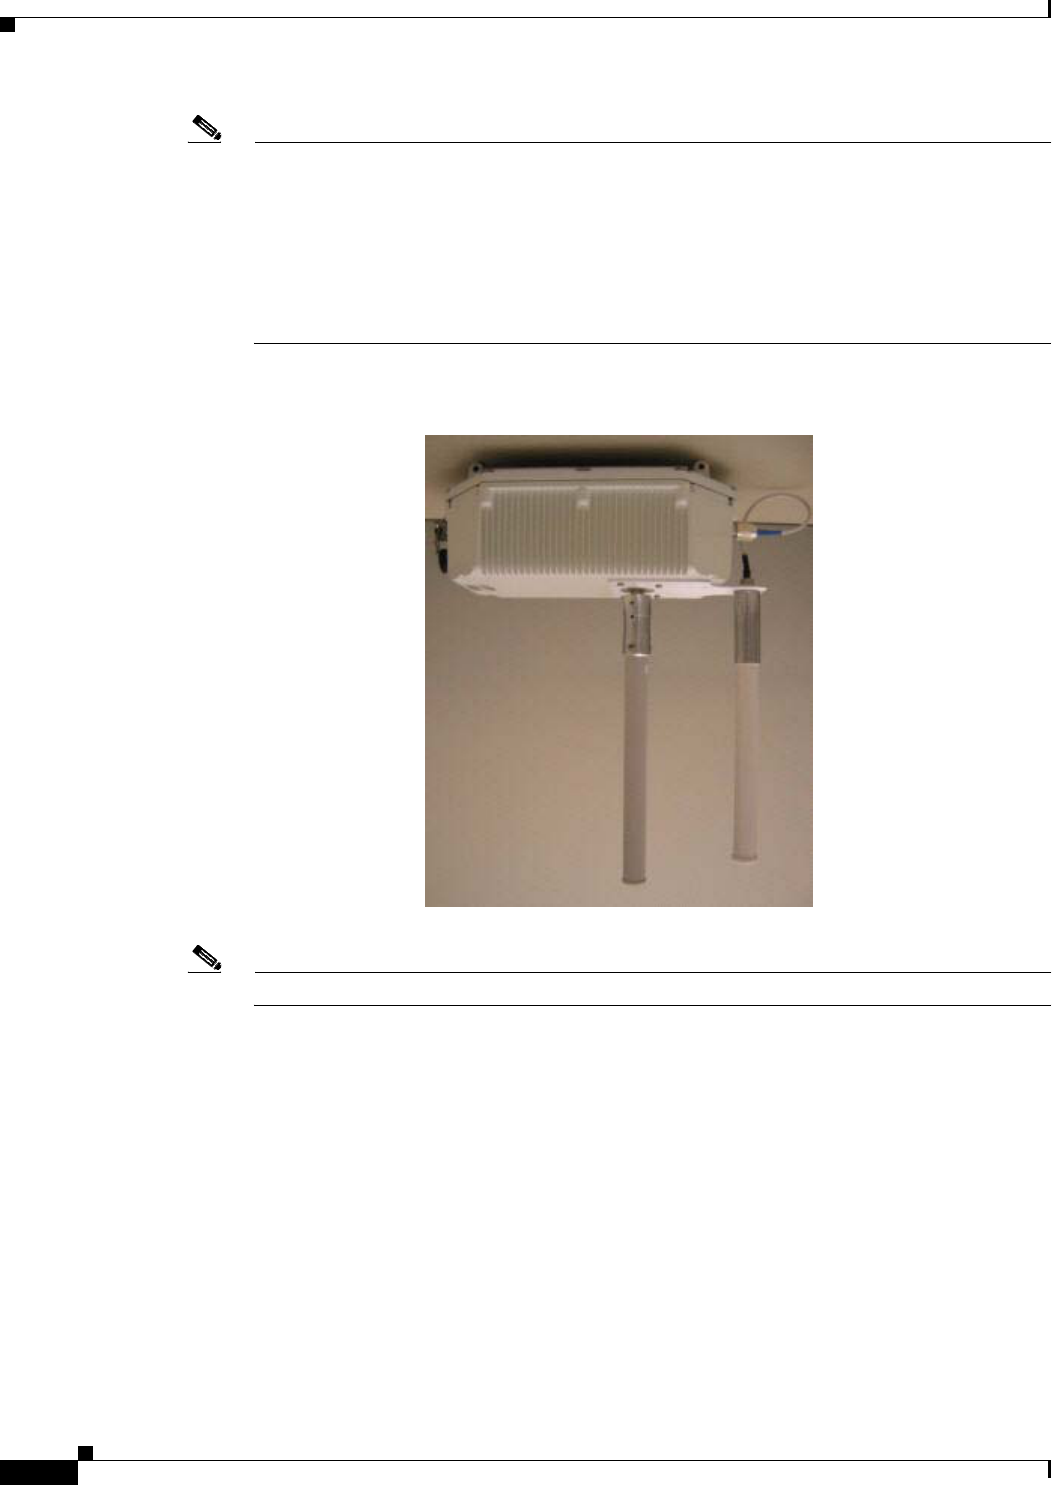
Note When used with the Cisco external omnidirectional antennas, the outdoor access point provides
the greatest coverage area and data transfer rate when the outdoor access point is mounted
horizontally and the omnidirectional antennas are mounted vertically. Figure 3-3 shows the
preferred outdoor access point and antenna mounting orientation. As shown in Figure 3-4, the
outdoor access point can be mounted vertically and the external antennas can be mounted
independent of the outdoor access point. Note that when you install the outdoor access point
vertically, you must install the AC Power and Ethernet and DC Power connectors facing DOWN
to prevent water intrusion.
Figure 3-3 Preferred Outdoor Access Point and Antenna Orientation
Note Mount the Cisco external omnidirectional antennas facing DOWN to prevent water intrusion.
19
Quick Start Guide: Cisco Aironet 1500 Series Lightweight Outdoor Mesh Access Point
78-17229-01
Chapter 3 Installation Instructions Installation Options
Figure 3-4 Optional Outdoor Access Point and Antenna Orientation
To 5 GHz
External Antenna
To 2.4GHz
THIS END DOWN
External Antenna
20
Quick Start Guide: Cisco Aironet 1500 Series Lightweight Outdoor Mesh Access Point 78-17229-01
Chapter 3 Installation Instructions
Installation Options
1. Refer to Figure 3-5 for the mounting plate location. Note that during shipping the mounting plate is
attached to the outdoor access point by two carriage bolts.
Figure 3-5 Cisco-Supplied Mounting Plate Location
2. Remove the nuts and washers from the carriage bolts and remove the carriage bolts.
3. Remove the mounting plate from the outdoor access point.
21
Quick Start Guide: Cisco Aironet 1500 Series Lightweight Outdoor Mesh Access Point
78-17229-01
Chapter 3 Installation Instructions Installation Options
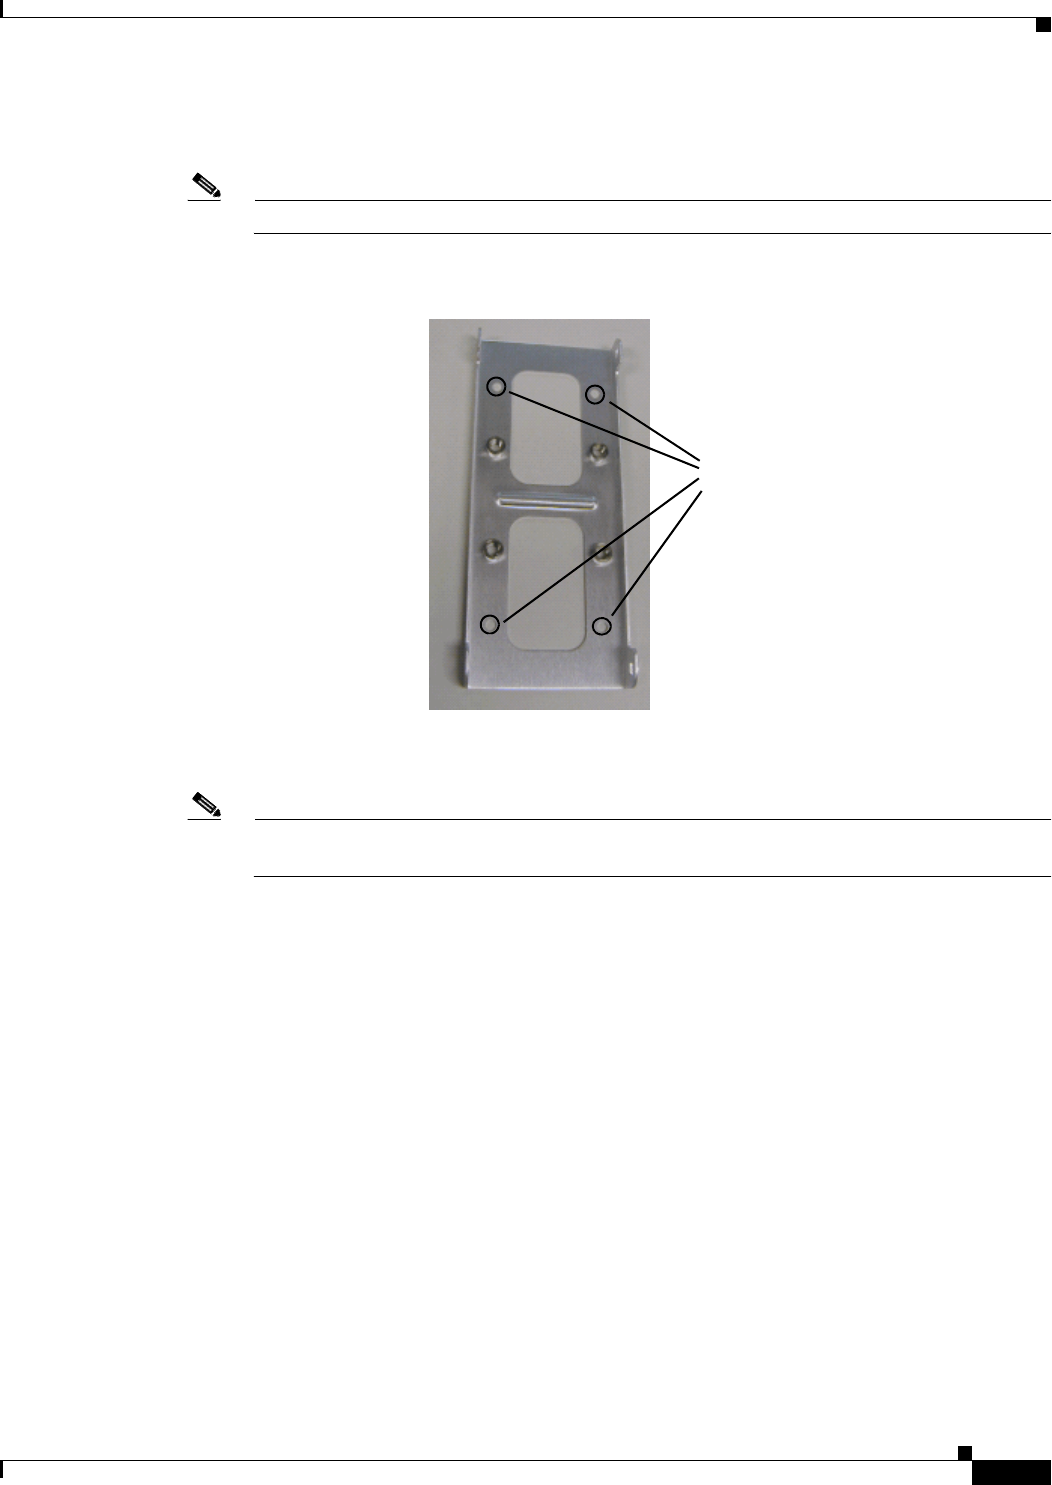
4. Use the mounting plate as a template to mark four screw hole locations on your mounting surface.
Figure 3-6 shows the mounting plate screw hole locations.
Note The mounting surface must be able to support 50 pounds static weight.
Figure 3-6 Mounting Plate Screw Hole Locations
5. Use four customer-supplied screws to attach the mounting plate to the mounting surface. Make sure
the screws are able to hold at least 50 pounds of static weight.
Note If necessary, use suitable screw anchors and/or an exterior-grade plywood backboard to mount
the outdoor access point to a stucco, cement, or drywall surface.
6. Use the carriage bolts and the associated nuts and washers to reattach the outdoor access point to
the mounting plate.
7. Continue with the Rooftop Installations, page 3-14 or Pole-Top Installations, page 3-15 procedure.
Installing the Outdoor Access Point on a Pole
While installing a outdoor access point on a light pole, you will typically use the optional Cisco pole
mount kit and perform the following operations. Note that the optional Cisco-supplied pole mount kit is
works best on galvanized steel or aluminum light poles. The pole mount kit brackets are designed to bite
through any oxidation on the outside of the pole, ensuring an electrical grounding connection to the pole.
Four Locations
22
Quick Start Guide: Cisco Aironet 1500 Series Lightweight Outdoor Mesh Access Point 78-17229-01
Chapter 3 Installation Instructions
Installation Options
Note When used with the Cisco external omnidirectional antennas, the outdoor access point provides
the greatest coverage area and data transfer rate when the outdoor access point is mounted
horizontally and the omnidirectional antennas are mounted vertically. Figure 3-7 shows the
preferred outdoor access point and antenna mounting orientation. As shown in Figure 3-8, the
outdoor access point can be mounted vertically and the external antennas can be mounted
independent of the outdoor access point. Note that when you install the outdoor access point
vertically, you must install the AC Power and Ethernet and DC Power connectors facing DOWN
to prevent water intrusion.
Figure 3-7 Preferred Outdoor Access Point and Antenna Orientation
Note Mount the Cisco external omnidirectional antennas facing DOWN to prevent water intrusion.

23
Quick Start Guide: Cisco Aironet 1500 Series Lightweight Outdoor Mesh Access Point
78-17229-01
Chapter 3 Installation Instructions Installation Options
Figure 3-8 Optional Outdoor Access Point and Antenna Orientation
To 5 GHz
External Antenna
To 2.4GHz
THIS END DOWN
External Antenna

24
Quick Start Guide: Cisco Aironet 1500 Series Lightweight Outdoor Mesh Access Point 78-17229-01
Chapter 3 Installation Instructions
Installation Options
8. Refer to Figure 3-9 for the mounting plate location. Note that during shipping the mounting plate is
attached to the outdoor access point by two carriage bolts.
Figure 3-9 Cisco-Supplied Mounting Plate Location
25
Quick Start Guide: Cisco Aironet 1500 Series Lightweight Outdoor Mesh Access Point
78-17229-01
Chapter 3 Installation Instructions Installation Options
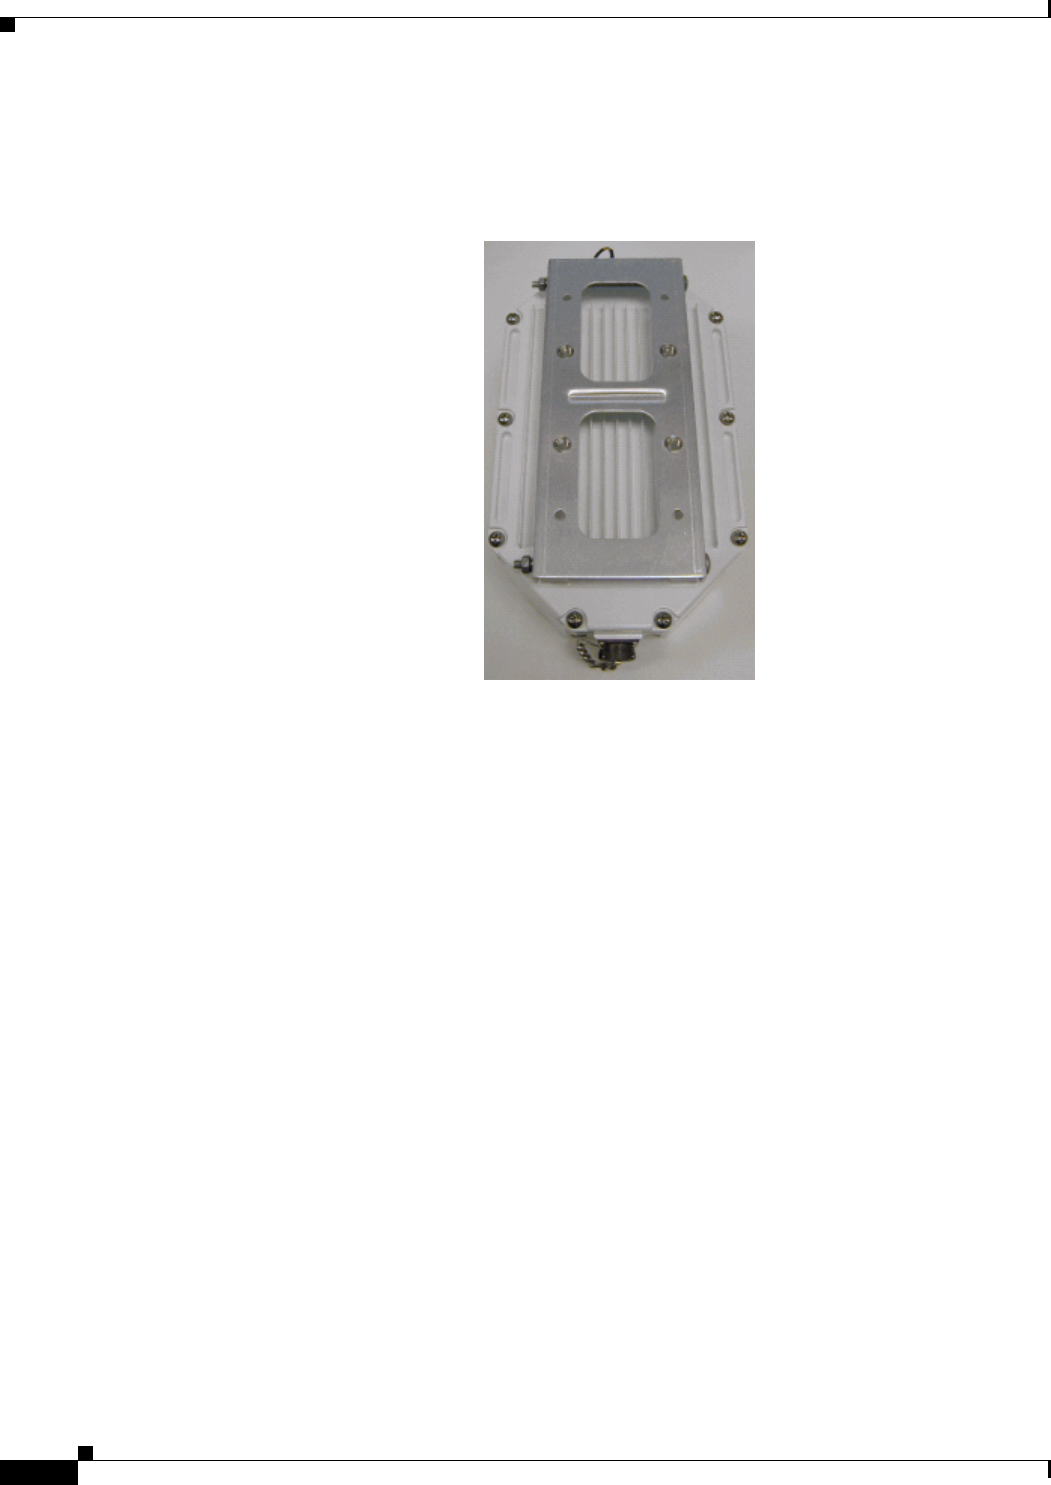
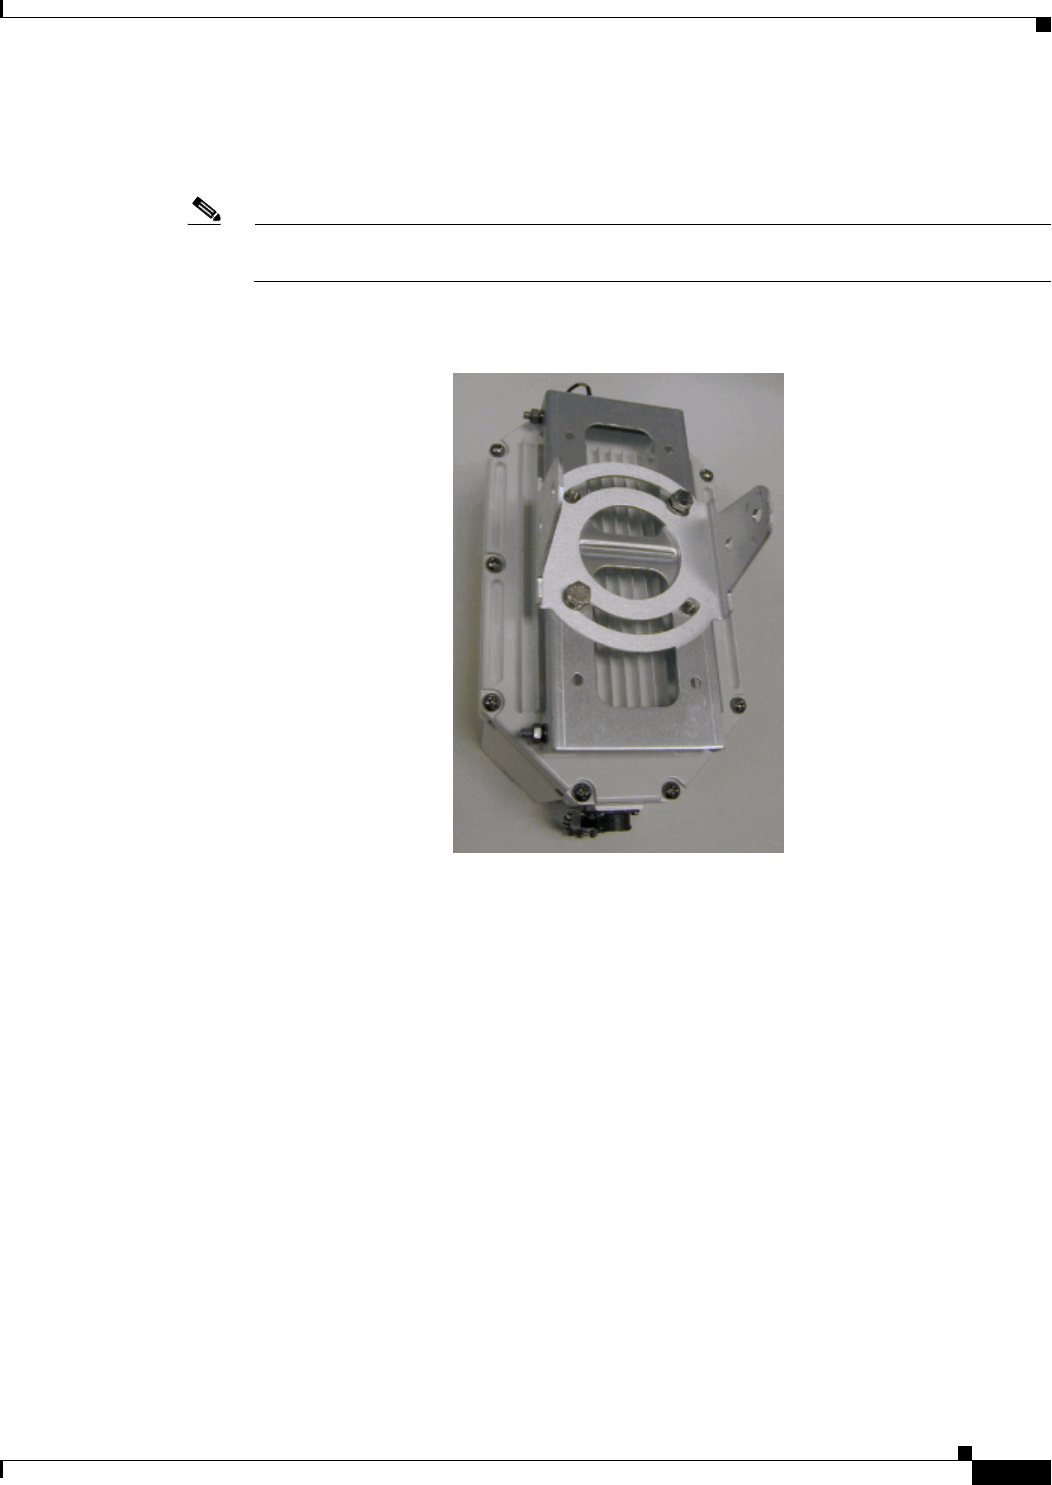
9. Use two supplied nut and lock washer sets to loosely attach the pole mount kit adjustment plate to
the outdoor access point mounting plate to create the adjustment and mounting plate subassembly
as shown in Figure 3-10.
Note Make sure to leave the screws somewhat loose so you can adjust the outdoor access point
orientation later.
Figure 3-10 Adjustment and Mounting Plate Subassembly Attached to the Outdoor Access Point
26
Quick Start Guide: Cisco Aironet 1500 Series Lightweight Outdoor Mesh Access Point 78-17229-01
Chapter 3 Installation Instructions
Installation Options
10. Select a mounting location. You can attach the outdoor access point to any light pole upright or arm
with between XXX and YYY inches in diameter.
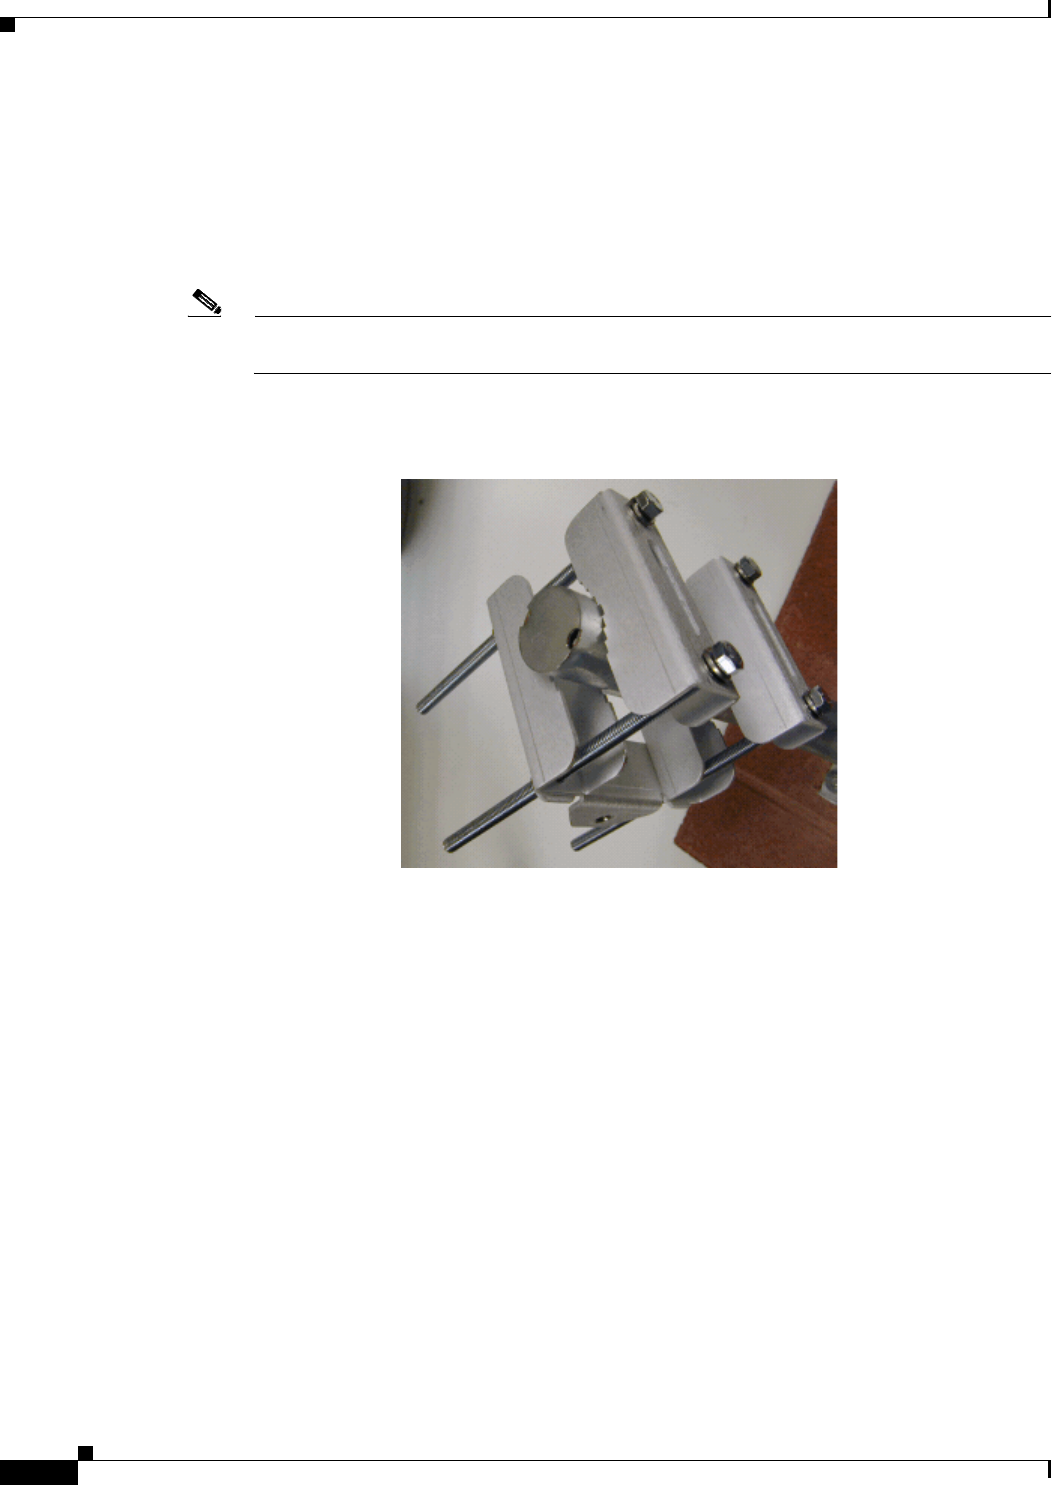
11. Loosely assemble the rest of the pole mount kit components AROUND THE POLE. Figure 3-11
shows the pole clamp subassembly attached to a pole.
12. Use a pocket level to verify that the top edge of the pole clamp subassembly is horizontal, and
tighten its adjustment screws.
Note Snug the screws to ZZZZ inch pounds. If you overtighten the pole clamp screws, you will bend
the clamps.
Figure 3-11 Pole Clamp Subassembly Mounted on a Pole
13. If necessary, use a hacksaw or cutoff wheel to remove any excess bolt length. (The bolts can protrude
1 to 3 inches and still allow the final pole mount assembly to swivel and rotate.
27
Quick Start Guide: Cisco Aironet 1500 Series Lightweight Outdoor Mesh Access Point
78-17229-01
Chapter 3 Installation Instructions Installation Options
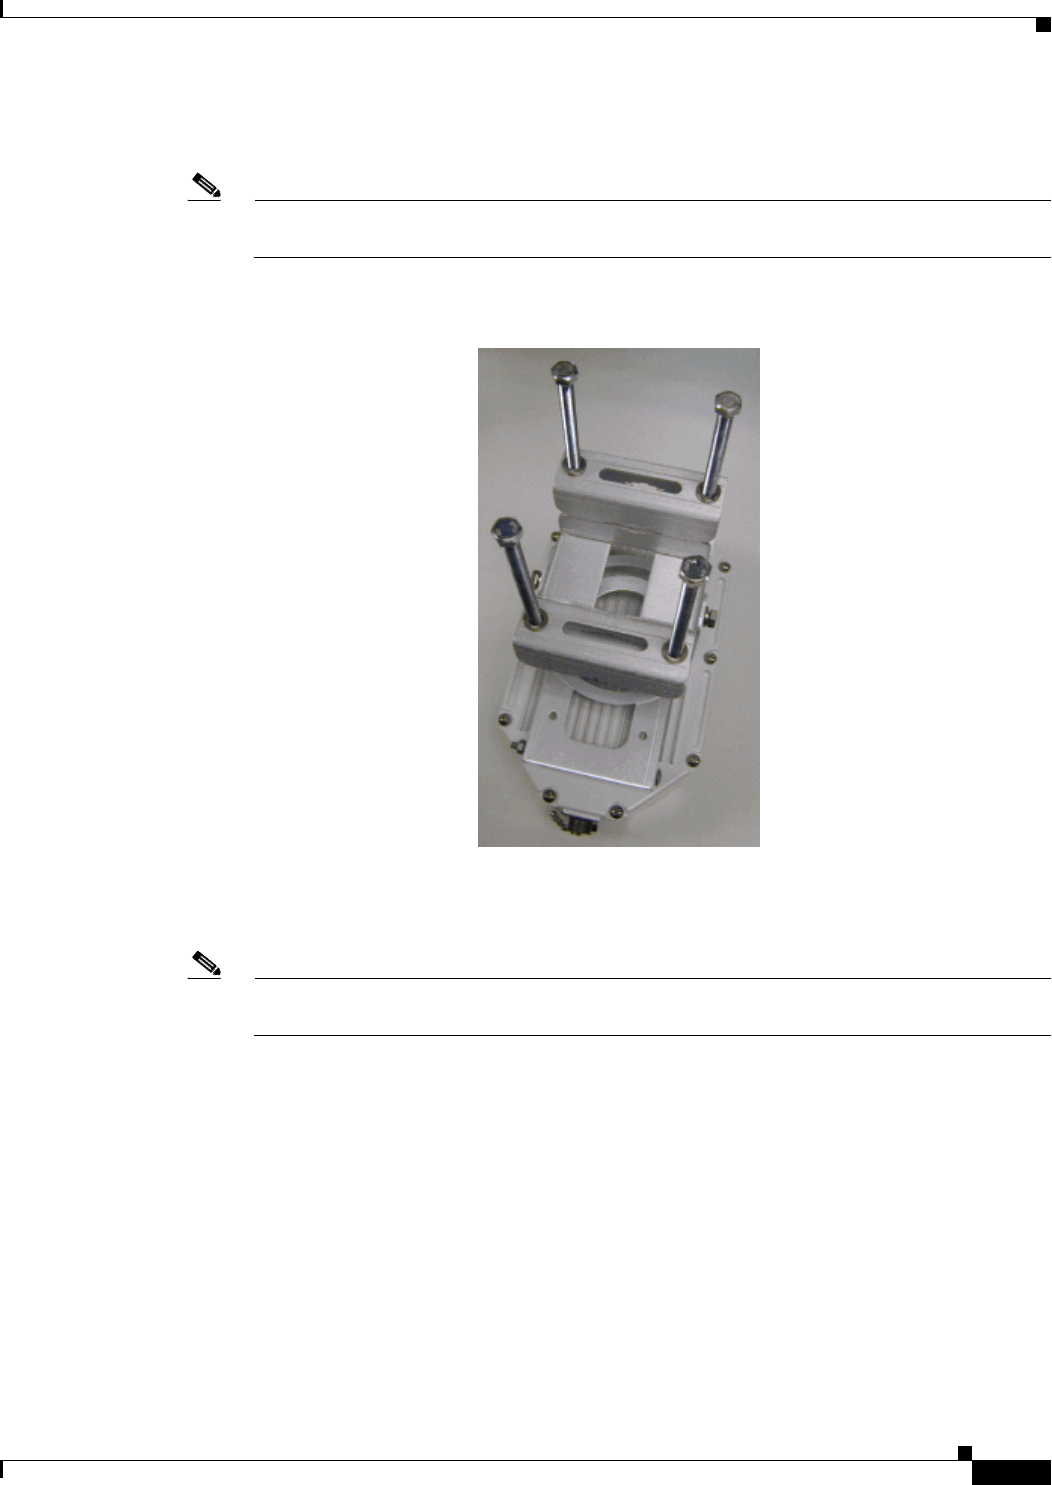
14. Use the last two screw and lock washer sets to loosely assemble the outdoor access point to the pole
clamp subassembly as shown in Figure 3-12.
Note Make sure to leave the screws somewhat loose so you can adjust the outdoor access point
orientation.
Figure 3-12 Attaching the Outdoor Access Point to the Pole Clamp Subassembly (pole not shown)
15. If necessary, rotate the outdoor access point until it is level. Use a pocket level to verify that the top
edge of the outdoor access point is horizontal, and tighten all four of its adjustment screws.
Note Snug the screws to ZZZZ inch pounds. If you overtighten the adjustment screws, you can twist
the captive T-nuts loose.
16. Continue with the Rooftop Installations, page 3-14 or Pole-Top Installations, page 3-15 procedure.

28
Quick Start Guide: Cisco Aironet 1500 Series Lightweight Outdoor Mesh Access Point 78-17229-01
Chapter 3 Installation Instructions
Where to Go From Here
Where to Go From Here
When the outdoor access point is initially powered up, it attempts to associate with a rooftop outdoor
access point. If it is unable to associate with a rooftop outdoor access point, it continues broadcasting its
beacon until it associates with a rooftop outdoor access point.
Refer to the Cisco Wireless LAN Solution Product Guide for more information on configuring,
monitoring, and operating the outdoor access point.

A-1
Quick Start Guide: Cisco Aironet 1500 Series Lightweight Outdoor Mesh Access Point
78-17229-01
APPENDIX
A
Translated Safety Warnings
This appendix provides translations of the safety warnings that appear in this publication. These
translated warnings apply to other documents in which they appear in English. The following safety
warnings appear in this appendix:
•Installation Warning, page A-3
•Installation and Grounding Warning, page A-4
•Ground Conductor Warning, page A-6
•Ground Conductor Warning, page A-6
•Installation Warning, page A-8
•Lightning Activity Warning, page A-9
•Explosive Device Proximity Warning, page A-10
•Radio Frequency Exposure Limits, page A-10

A-2
Quick Start Guide: Cisco Aironet 1500 Series Lightweight Outdoor Mesh Access Point 78-17229-01
Appendix
Warning Definition
Warning Definition
Warning
This warning symbol means danger. You are in a situation that could cause bodily injury. Before
you work on any equipment, be aware of the hazards involved with electrical circuitry and be
familiar with standard practices for preventing accidents. (To see translations of the warnings
that appear in this publication, refer to the appendix “Translated Safety Warnings.”)
Waarschuwing
Dit waarschuwingssymbool betekent gevaar. U verkeert in een situatie die lichamelijk letsel kan
veroorzaken. Voordat u aan enige apparatuur gaat werken, dient u zich bewust te zijn van de bij
elektrische schakelingen betrokken risico’s en dient u op de hoogte te zijn van standaard
maatregelen om ongelukken te voorkomen. (Voor vertalingen van de waarschuwingen die in deze
publicatie verschijnen, kunt u het aanhangsel “Translated Safety Warnings” (Vertalingen van
veiligheidsvoorschriften) raadplegen.)
Varoitus
Tämä varoitusmerkki merkitsee vaaraa. Olet tilanteessa, joka voi johtaa ruumiinvammaan. Ennen
kuin työskentelet minkään laitteiston parissa, ota selvää sähkökytkentöihin liittyvistä vaaroista
ja tavanomaisista onnettomuuksien ehkäisykeinoista. (Tässä julkaisussa esiintyvien varoitusten
käännökset löydät liitteestä “Translated Safety Warnings” (käännetyt turvallisuutta koskevat
varoitukset).)
Attention
Ce symbole d’avertissement indique un danger. Vous vous trouvez dans une situation pouvant en-
traîner des blessures. Avant d’accéder à cet équipement, soyez conscient des dangers posés par
les circuits électriques et familiarisez-vous avec les procédures courantes de prévention des ac-
cidents. Pour obtenir les traductions des mises en garde figurant dans cette publication, veuillez
consulter l’annexe intitulée « Translated Safety Warnings » (Traduction des avis de sécurité).
Warnung
Dieses Warnsymbol bedeutet Gefahr. Sie befinden sich in einer Situation, die zu einer Körperver-
letzung führen könnte. Bevor Sie mit der Arbeit an irgendeinem Gerät beginnen, seien Sie sich der
mit elektrischen Stromkreisen verbundenen Gefahren und der Standardpraktiken zur Vermeidung
von Unfällen bewußt. (Übersetzungen der in dieser Veröffentlichung enthaltenen Warnhinweise
finden Sie im Anhang mit dem Titel “Translated Safety Warnings” (Übersetzung der Warnhin-
weise).)
Avvertenza
Questo simbolo di avvertenza indica un pericolo. Si è in una situazione che può causare infortuni.
Prima di lavorare su qualsiasi apparecchiatura, occorre conoscere i pericoli relativi ai circuiti
elettrici ed essere al corrente delle pratiche standard per la prevenzione di incidenti. La traduz-
ione delle avvertenze riportate in questa pubblicazione si trova nell’appendice, “Translated Safe-
ty Warnings” (Traduzione delle avvertenze di sicurezza).
Advarsel
Dette varselsymbolet betyr fare. Du befinner deg i en situasjon som kan føre til personskade. Før
du utfører arbeid på utstyr, må du være oppmerksom på de faremomentene som elektriske kretser
innebærer, samt gjøre deg kjent med vanlig praksis når det gjelder å unngå ulykker. (Hvis du vil
se oversettelser av de advarslene som finnes i denne publikasjonen, kan du se i vedlegget “Trans-
lated Safety Warnings” [Oversatte sikkerhetsadvarsler].)
Aviso
Este símbolo de aviso indica perigo. Encontra-se numa situação que lhe poderá causar danos fi-
sicos. Antes de começar a trabalhar com qualquer equipamento, familiarize-se com os perigos
relacionados com circuitos eléctricos, e com quaisquer práticas comuns que possam prevenir
possíveis acidentes. (Para ver as traduções dos avisos que constam desta publicação, consulte
o apêndice “Translated Safety Warnings” - “Traduções dos Avisos de Segurança”).
A-3
Quick Start Guide: Cisco Aironet 1500 Series Lightweight Outdoor Mesh Access Point
78-17229-01
Appendix Installation Warning
Installation Warning
¡Advertencia!
Este símbolo de aviso significa peligro. Existe riesgo para su integridad física. Antes de manipu-
lar cualquier equipo, considerar los riesgos que entraña la corriente eléctrica y familiarizarse
con los procedimientos estándar de prevención de accidentes. (Para ver traducciones de las ad-
vertencias que aparecen en esta publicación, consultar el apéndice titulado “Translated Safety
Warnings.”)
Varning!
Denna varningssymbol signalerar fara. Du befinner dig i en situation som kan leda till personska-
da. Innan du utför arbete på någon utrustning måste du vara medveten om farorna med elkretsar
och känna till vanligt förfarande för att förebygga skador. (Se förklaringar av de varningar som
förekommer i denna publikation i appendix “Translated Safety Warnings” [Översatta
säkerhetsvarningar].)
Warning
Only trained and qualified personnel should be allowed to install, replace, or service
this equipment.
Waarschuwing
Deze apparatuur mag alleen worden geïnstalleerd, vervangen of hersteld door bevoegd
geschoold personeel.
Varoitus
Tämän laitteen saa asentaa, vaihtaa tai huoltaa ainoastaan koulutettu ja laitteen
tunteva henkilökunta.
Attention
Il est vivement recommandé de confier l'installation, le remplacement et la maintenance de ces
équipements à des personnels qualifiés et expérimentés.
Warnung
Das Installieren, Ersetzen oder Bedienen dieser Ausrüstung sollte nur geschultem, qualifiziertem
Personal gestattet werden.
Figyelem!
A berendezést csak szakképzett személyek helyezhetik üzembe, cserélhetik és tarthatják karban.
Avvertenza
Questo apparato può essere installato, sostituito o mantenuto unicamente da un personale
competente.
Advarsel
Bare opplært og kvalifisert personell skal foreta installasjoner, utskiftninger eller service på
dette utstyret.
Aviso
Apenas pessoal treinado e qualificado deve ser autorizado a instalar, substituir ou fazer a revisão
deste equipamento.
¡Advertencia!
Solamente el personal calificado debe instalar, reemplazar o utilizar este equipo.
Varning!
Endast utbildad och kvalificerad personal bör få tillåtelse att installera, byta ut eller reparera
denna utrustning.

A-4
Quick Start Guide: Cisco Aironet 1500 Series Lightweight Outdoor Mesh Access Point 78-17229-01
Appendix
Installation and Grounding Warning
Installation and Grounding Warning
Warning
Do not locate the antenna near overhead power lines or other electric light or power circuits, or
where it can come into contact with such circuits. When installing the antenna, take extreme care
not to come into contact with such circuits, because they may cause serious injury or death. For
proper installation and grounding of the antenna, please refer to national and local codes (for
example, U.S.:NFPA 70, National Electrical Code, Article 810, Canada: Canadian Electrical Code,
Section 54).
Waarschuwing
Zorg dat antenne niet in de buurt wordt geplaatst van langs het plafond lopende stroomkabels of
andere voorzieningen voor licht of elektriciteit of op een plaats waar contact met dergelijke
stroomvoorzieningen mogelijk is. Wees bij het installeren van de antenne voorzichtig dat u niet in
contact komt met dergelijke stroomvoorzieningen aangezien dit kan leiden to ernstig lichamelijk of
dodelijk letsel. Voor het juist installeren en aarden van de antenne, dient u de nationale en
plaatselijke verordeningen te raadplegen (bijv. in de VS NFPA 70, National Electrical Code, Artikel
810, in Canada: Canadian Electrical Code, Sectie 54).
Varoitus
Älä sijoita antennia lähelle voimajohtoja, muita sähkövalo- tai virtapiirejä tai paikkaa, jossa se voi
joutua kosketuksiin sellaisten piirien kanssa. Kun asennat antennia, varo, ettet joudu kosketuksiin
mainittujen piirien kanssa, sillä seurauksena voi olla vakava vamma tai kuolema. Tarkista antennin
asennus- ja maadoitustiedot kansallisista ja paikallisista sähkösäännöksistä (esimerkiksi
Yhdysvalloissa NFPA 70, National Electrical Code, Article 810 ja Kanadassa Canadian Electrical
Code, Section 54).
Attention
Ne placez pas l'antenne à proximité d'une ligne aérienne ou d'autres circuits d'éclairage ou
d'alimentation, ou dans un endroit où elle risque d'être en contact avec des circuits de ce type. Lors
de son installation, assurez-vous bien qu'elle ne touche pas de tels circuits car cela risquerait
d'entraîner des blessures graves, voire mortelles. Pour une installation et mise à la terre correctes
de l'antenne, veuillez consulter les codes nationaux et locaux (par exemple, États-Unis: NFPA 70,
National Electrical Code, Article 810; Canada: Code électrique canadien, Section 54).

A-5
Quick Start Guide: Cisco Aironet 1500 Series Lightweight Outdoor Mesh Access Point
78-17229-01
Appendix Installation and Grounding Warning
Warnung
Platzieren Sie die Antenne nicht in der Nähe von Starkstrom-Freileitungen oder Schwach- bzw.
Starkstromkreisen oder an Stellen, wo sie damit in Kontakt kommen könnte. Gehen Sie bei der
Installation der Antenne besonders vorsichtig vor, damit Sie nicht in Kontakt mit derartigen
Stromkreisen kommt, da dies zu schweren Verletzungen sogar mit Todesfolge führen kann.
Installieren und erden Sie die Antenne sachgerecht unter Einhaltung der jeweils gültigen
Sicherheitsvorschriften (zum Beispiel USA: NFPA 70, National Electrical Code, Artikel 810 oder
Kanada: Canadian Electrical Code, Abschnitt 54).
Figyelem!
Ne helyezze az antennát elektromos felsõvezetékek és más elektromos világítási és tápellátási
áramkörök közelébe, és semmilyen olyan környezetbe, ahol ilyen áramkörökkel érintkezhet. Az
antenna felszerelésekor különösképpen ügyeljen arra, hogy ne kerüljön érintkezésbe ilyen
áramkörökkel, mert az súlyos sérülést vagy halált okozhat. Az antenna helyes üzembe helyezésével
és földelésével kapcsolatban az országos és helyi elõírások tartalmaznak útmutatást (például az
USA-ban: NFPA 70, National Electrical Code, Article 810, Kanadában: Canadian Electrical Code,
Section 54).
Avvertenza
Non sistemare l'antenna nelle vicinanze di circuiti elettrici generali o di altri circuiti di
illuminazione o di alimentazione, o dove questa possa venire a contatto con tali circuiti. Durante
l'installazione dell'antenna, prestare particolare attenzione a non entrare in contatto con tali
circuiti, in quanto questo potrebbe provocare seri danni o morte. Per una corretta installazione e
messa a terra dell'antenna, fare riferimento ai codici nazionali e locali (es. U.S.A.: NFPA 70, Codice
Elettrico Nazionale, articolo 810, Canada: Codice Elettrico Canadese, sezione 54).
Advarsel
Plasser ikke antennen nær de overliggende strømledningene eller andre lys- eller strømkretser,
eller der den kan komme i kontakt med slike kretser. Ved installering av antennen må du være ytterst
forsiktig slik at du ikke kommer i kontakt med slike kretser. Dette kan føre til alvorlig skade eller
død. For riktig installasjon og jording av antennen, se statlige og lokale forskrifter (for eksempel i
USA: NFPA 70, National Electrical Code, Article 810, og i Canada: Canadian Electrical Code,
Section 54).
Aviso
Não coloque a antena perto de linhas de alimentação, de outros circuitos ou onde possa entrar em
contato com esses circuitos. Ao instalar a antena, tenha muito cuidado para não tocar nesses
circuitos, visto que podem provocar ferimentos graves ou até a morte. Para obter informações sobre
como instalar e aterrar corretamente a antena, consulte a legislação local e nacional (por ex., U.S.:
NFPA 70, National Electrical Code, Artigo 810, Canadá: Canadian Electrical Code, Seção 54).
¡Advertencia!
No coloque la antena cerca de cables de tendido eléctrico u otros circuitos eléctricos, ni donde
pueda entrar en contacto con los mismos. Al instalar la antena, extreme las precauciones para no
entrar en contacto con dichos circuitos, ya que puede causar heridas graves e incluso la muerte.
Para instalar la antena y conectarla a tierra correctamente, consulte los códigos nacionales y
locales (p.ej., Estados Unidos: NFPA 70, National Electrical Code, Sección 810, Canadá: Canadian
Electrical Code, Artículo 54).
Varning!
Placera inte antennen nära överhängande kraftledningar, andra elljus- eller strömkretsar eller där
den kan komma i kontakt med sådan kretsar. Vid installation av antennen måste du vara mycket
försiktig så att du inte kommer i kontakt med sådana kretsar eftersom de kan orsaka allvarlig
kroppsskada eller dödsfall. För riktig installation och jordning av antennen, hänvisas du till
nationella och lokala koder (t.ex. USA: NFPA 70, National Electrical Code, Article 810, Kanada:
Canadian Electrical Code, Section 54).
A-6
Quick Start Guide: Cisco Aironet 1500 Series Lightweight Outdoor Mesh Access Point 78-17229-01
Appendix
Ground Conductor Warning
Ground Conductor Warning
Warning
This equipment must be grounded. Never defeat the ground conductor or operate the equipment in
the absence of a suitably installed ground conductor. Contact the appropriate electrical inspection
authority or an electrician if you are uncertain that suitable grounding is available.
Waarschuwing
Deze apparatuur dient geaard te zijn. De aardingsleiding mag nooit buiten werking worden gesteld
en de apparatuur mag nooit bediend worden zonder dat er een op de juiste wijze geïnstalleerde
aardingsleiding aanwezig is. Neem contact op met de bevoegde instantie voor elektrische
inspecties of met een elektricien als u er niet zeker van bent dat er voor passende aarding
gezorgd is.
Varoitus
Laitteiden on oltava maadoitettuja. Älä koskaan ohita maajohdinta tai käytä laitteita ilman oikein
asennettua maajohdinta. Ota yhteys sähkötarkastusviranomaiseen tai sähköasentajaan, jos olet
epävarma maadoituksen sopivuudesta.
Attention
Cet équipement doit être mis à la masse. Ne jamais rendre inopérant le conducteur de masse ni
utiliser l'équipement sans un conducteur de masse adéquatement installé. En cas de doute sur la
mise à la masse appropriée disponible, s'adresser à l'organisme responsable de la sécurité
électrique ou à un électricien.
Warnung
Dieses Gerät muss geerdet sein. Auf keinen Fall den Erdungsleiter unwirksam machen oder das
Gerät ohne einen sachgerecht installierten Erdungsleiter verwenden. Wenn Sie sich nicht sicher
sind, ob eine sachgerechte Erdung vorhanden ist, wenden Sie sich an die zuständige
Inspektionsbehörde oder einen Elektriker.

A-7
Quick Start Guide: Cisco Aironet 1500 Series Lightweight Outdoor Mesh Access Point
78-17229-01
Appendix Ground Conductor Warning
Figyelem!
A berendezés csak megfelelõ védõföldeléssel mûködtethetõ. Ne iktassa ki a földelés csatlakozóját,
és ne üzemeltesse a berendezést szabályosan felszerelt földelõ vezeték nélkül! Ha nem biztos
benne, hogy megfelelõ földelés áll rendelkezésbe, forduljon a helyi elektromos hatóságokhoz vagy
egy villanyszerelõhöz.
Avvertenza
Questa apparecchiatura deve essere dotata di messa a terra. Non escludere mai il conduttore di
protezione né usare l'apparecchiatura in assenza di un conduttore di protezione installato in modo
corretto. Se non si è certi della disponibilità di un adeguato collegamento di messa a terra,
richiedere un controllo elettrico presso le autorità competenti o rivolgersi a un elettricista.
Advarsel
Dette utstyret må jordes. Omgå aldri jordingslederen og bruk aldri utstyret uten riktig montert
jordingsleder. Ta kontakt med fagfolk innen elektrisk inspeksjon eller med en elektriker hvis du er
usikker på om det finnes velegnet jordning.
Aviso
Este equipamento deve ser aterrado. Nunca anule o fio terra nem opere o equipamento sem um
aterramento adequadamente instalado. Em caso de dúvida com relação ao sistema de aterramento
disponível, entre em contato com os serviços locais de inspeção elétrica ou um eletricista
qualificado.
¡Advertencia!
Este equipo debe estar conectado a tierra. No inhabilite el conductor de tierra ni haga funcionar el
equipo si no hay un conductor de tierra instalado correctamente. Póngase en contacto con la
autoridad correspondiente de inspección eléctrica o con un electricista si no está seguro de que
haya una conexión a tierra adecuada.
Varning!
Denna utrustning måste jordas. Koppla aldrig från jordledningen och använd aldrig utrustningen
utan en på lämpligt sätt installerad jordledning. Om det föreligger osäkerhet huruvida lämplig
jordning finns skall elektrisk besiktningsauktoritet eller elektriker kontaktas.
A-8
Quick Start Guide: Cisco Aironet 1500 Series Lightweight Outdoor Mesh Access Point 78-17229-01
Appendix
Installation Warning
Installation Warning
Warning
Read the installation instructions before connecting the system to the power source.
Waarschuwing
Raadpleeg de installatie-instructies voordat u het systeem op de voedingsbron aansluit.
Varoitus
Lue asennusohjeet ennen järjestelmän yhdistämistä virtalähteeseen.
Attention
Avant de brancher le système sur la source d'alimentation, consulter les directives d'installation.
Warnung
Vor dem Anschließen des Systems an die Stromquelle die Installationsanweisungen lesen.
Figyelem!
Mielõtt áramforráshoz csatlakoztatná a rendszert, olvassa el az üzembe helyezési útmutatót!
Avvertenza
Consultare le istruzioni di installazione prima di collegare il sistema all'alimentatore.
Advarsel
Les installasjonsinstruksjonene før systemet kobles til strømkilden.
Aviso
Leia as instruções de instalação antes de ligar o sistema à fonte de energia.
¡Advertencia!
Lea las instrucciones de instalación antes de conectar el sistema a la red de alimentación.
Varning!
Läs installationsanvisningarna innan du kopplar systemet till strömförsörjningsenheten.
A-9
Quick Start Guide: Cisco Aironet 1500 Series Lightweight Outdoor Mesh Access Point
78-17229-01
Appendix Lightning Activity Warning
Lightning Activity Warning
Warning
Do not work on the system or connect or disconnect cables during periods of lightning activity.
Waarschuwing
Tijdens onweer dat gepaard gaat met bliksem, dient u niet aan het systeem te werken of kabels aan
te sluiten of te ontkoppelen.
Varoitus
Älä työskentele järjestelmän parissa äläkä yhdistä tai irrota kaapeleita ukkosilmalla.
Attention
Ne pas travailler sur le système ni brancher ou débrancher les câbles pendant un orage.
Warnung
Arbeiten Sie nicht am System und schließen Sie keine Kabel an bzw. trennen Sie keine ab, wenn
es gewittert.
Figyelem!
Villámlás közben ne dolgozzon a rendszeren, valamint ne csatlakoztasson és ne húzzon ki
kábeleket!
Avvertenza
Non lavorare sul sistema o collegare oppure scollegare i cavi durante un temporale con fulmini.
Advarsel
Utfør aldri arbeid på systemet, eller koble kabler til eller fra systemet når det tordner eller lyner.
Aviso
Não trabalhe no sistema ou ligue e desligue cabos durante períodos de mau tempo (trovoada).
¡Advertencia!
No operar el sistema ni conectar o desconectar cables durante el transcurso de descargas
eléctricas en la atmósfera.
Varning!
Vid åska skall du aldrig utföra arbete på systemet eller ansluta eller koppla loss kablar.

A-10
Quick Start Guide: Cisco Aironet 1500 Series Lightweight Outdoor Mesh Access Point 78-17229-01
Appendix
Explosive Device Proximity Warning
Explosive Device Proximity Warning
Radio Frequency Exposure Limits
Warning
Do not operate your wireless network device near unshielded blasting
caps or in an explosive environ-
ment unless the device has been modified to be especially qualified for such use.
Waarschuwing
Gebruik dit draadloos netwerkapparaat alleen in de buurt van onbeschermde ontstekers of in
een omgeving met explosieven indien het apparaat speciaal is aangepast om aan de eisen voor
een dergelijk gebruik te voldoen.
Varoitus
Älä käytä johdotonta verkkolaitetta suojaamattomien räjäytysnallien läheisyydessä tai räjäy-
tysalueella, jos laitetta ei ole erityisesti muunnettu sopivaksi sellaiseen käyttöön.oen.
Attention
Ne jamais utiliser un équipement de réseau sans fil à proximité d'un détonateur non blindé ou
dans un lieu présentant des risques d'explosion, sauf si l'équipement a été modifié à cet effet.
Warnung
Benutzen Sie Ihr drahtloses Netzwerkgerät nicht in der Nähe ungeschützter Sprengkapseln oder
anderer explosiver Stoffe, es sei denn, Ihr Gerät wurde eigens für diesen Gebrauch modifiziert
und bestimmt.
Avvertenza
Non utilizzare la periferica di rete senza fili in prossimità di un detonatore non protetto o di es-
plosivi a meno che la periferica non sia stata modificata a tale proposito.
Advarsel
Ikke bruk den trådløse nettverksenheten nært inntil uisolerte fenghetter eller i et eksplosivt mil-
jø med mindre enheten er modifisert slik at den tåler slik bruk.
Aviso
Não opere o dispositivo de rede sem fios perto de cápsulas explosivas não protegidas ou num
ambiente explosivo, a não ser que o dispositivo tenha sido modificado para se qualificar espe-
cialmente para essa utilização.
¡Advertencia!
No utilizar un aparato de la red sin cable cerca de un detonador que no esté protegido ni tam-
poco en un entorno explosivo a menos que el aparato haya sido modificado con ese fin.
Varning!
Använd inte den trådlösa nätverksenheten i närheten av oskyddade tändhattar eller i en explo-
siv miljö om inte enheten modifierats för att kunna användas i sådana sammanhang.
Warning
In order to comply with radio frequency (RF) exposure limits, the antennas for this product should be
positioned no less than 6.56 ft (2 m) from your body or nearby persons.
Waarschuwing
De antennes van dit product moeten minimaal 2 m van u of andere personen zijn verwijderd om te
voldoen aan de vereisten voor blootstelling aan radiofrequenties (RF).
A-11
Quick Start Guide: Cisco Aironet 1500 Series Lightweight Outdoor Mesh Access Point
78-17229-01
Appendix Radio Frequency Exposure Limits
Varoitus
Radiotaajuuksille altistumista koskevien rajoitusten mukaan tämän tuotteen antennien tulee olla
sijoitettuna vähintään kahden (2) metrin päähän käyttäjästä tai lähellä olevista henkilöistä.
Attention
Pour respecter les limites d'exposition à la fréquence radio, veillez à placer les antennes de ce
produit à plus de 2 m des personnes.
Warnung
Um die in den Richtlinien der Expositionshöchstgrenzen für Radiofrequenzen (RF) festgelegten
Grenzwerte nicht zu überschreiten, sollten die Antennen für dieses Produkt mindestens 2 m von
Ihnen oder anderen Personen entfernt aufgestellt werden.
Avvertenza
Per conformarsi ai limiti di esposizione alle frequenze radio (RF, Radio Frequency) posizionare
l’antenna del prodotto ad almeno due metri di distanza dall’utente e dalle persone vicine.
Advarsel
I henhold til eksponeringsgrensene for radiofrekvenser (RF), skal antenner for dette produktet
plasseres på en avstand av minst 2 meter fra mennesker.
Aviso
Para estar de acordo com os limites de exposição a freqüência de rádio (RF), as antenas desse
produto devem ser colocadas a um mínimo de 2 m (6,56 pol) de distância de seu corpo ou das pessoas
ao redor.
¡Advertencia!
Para cumplir con los límites de exposición de radio frecuencia (RF), es preciso ubicar las antenas
de este producto a un mínimo de 2 m (6,56 pies) de su cuerpo o de las personas que se encuentren
cerca.
Varning!
För att följa exponeringsgränserna för radiofrekvens (RF), bör antennerna för denna produkt
placeras minst 2 m från din kropp och från personer som finns i närheten.

A-12
Quick Start Guide: Cisco Aironet 1500 Series Lightweight Outdoor Mesh Access Point 78-17229-01
Appendix
Radio Frequency Exposure Limits

A-1
Quick Start Guide: Cisco Aironet 1500 Series Lightweight Outdoor Mesh Access Point
78-17229-01
APPENDIX
A
Declarations of Conformity and Regulatory
Information
This appendix provides declarations of conformity and regulatory information for the Cisco Aironet
1400 Series Outdoor Access Point.
This appendix contains the following sections:
•Manufacturers Federal Communication Commission Declaration of Conformity Statement, page
A-2
•Channels and Antenna Settings, page A-3
•Department of Communications—Canada, page A-4
•International Models, page A-4
•Declaration of Conformity for RF Exposure, page A-4
•Administrative Rules for Cisco Aironet Outdoor Access Points in Taiwan, page A-5
A-2
Quick Start Guide: Cisco Aironet 1500 Series Lightweight Outdoor Mesh Access Point 78-17229-01
Appendix A Declarations of Conformity and Regulatory Information
Manufacturers Federal Communication Commission Declaration of Conformity Statement
Manufacturers Federal Communication Commission
Declaration of Conformity Statement
Models: AIR-LAP1510AG-A-K9
FCC Certification number: LDK102058
Manufacturer: Cisco Systems, Inc.
170 West Tasman Drive
San Jose, CA 95134-1706
USA
This device complies with Part 15 rules. Operation is subject to the following two conditions:
1. This device may not cause harmful interference, and
2. This device must accept any interference received, including interference that may cause undesired
operation.
This equipment has been tested and found to comply with the limits of a Class B digital device, pursuant
to Part 15 of the FCC Rules. These limits are designed to provide reasonable protection against harmful
interference when the equipment is operated in a residential environment. This equipment generates,
uses, and radiates radio frequency energy, and if not installed and used in accordance with the
instructions, may cause harmful interference. However, there is no guarantee that interference will not
occur. If this equipment does cause interference to radio or television reception, which can be determined
by turning the equipment off and on, the user is encouraged to correct the interference by one of the
following measures:
•Reorient or relocate the receiving antenna.
•Increase separation between the equipment and receiver.
•Connect the equipment to an outlet on a circuit different from which the receiver is connected.
•Consult the dealer or an experienced radio/TV technician.
Caution The Part 15 radio device operates on a non-interference basis with other devices operating at this
frequency when using Cisco-supplied antennas. Any changes or modification to the product not
expressly approved by Cisco could void the user’s authority to operate this device.
Caution To meet regulatory restrictions, the outdoor access point must be professionally installed.
Tested To Comply
With FCC Standard
s
FOR HOME OR OFFICE USE
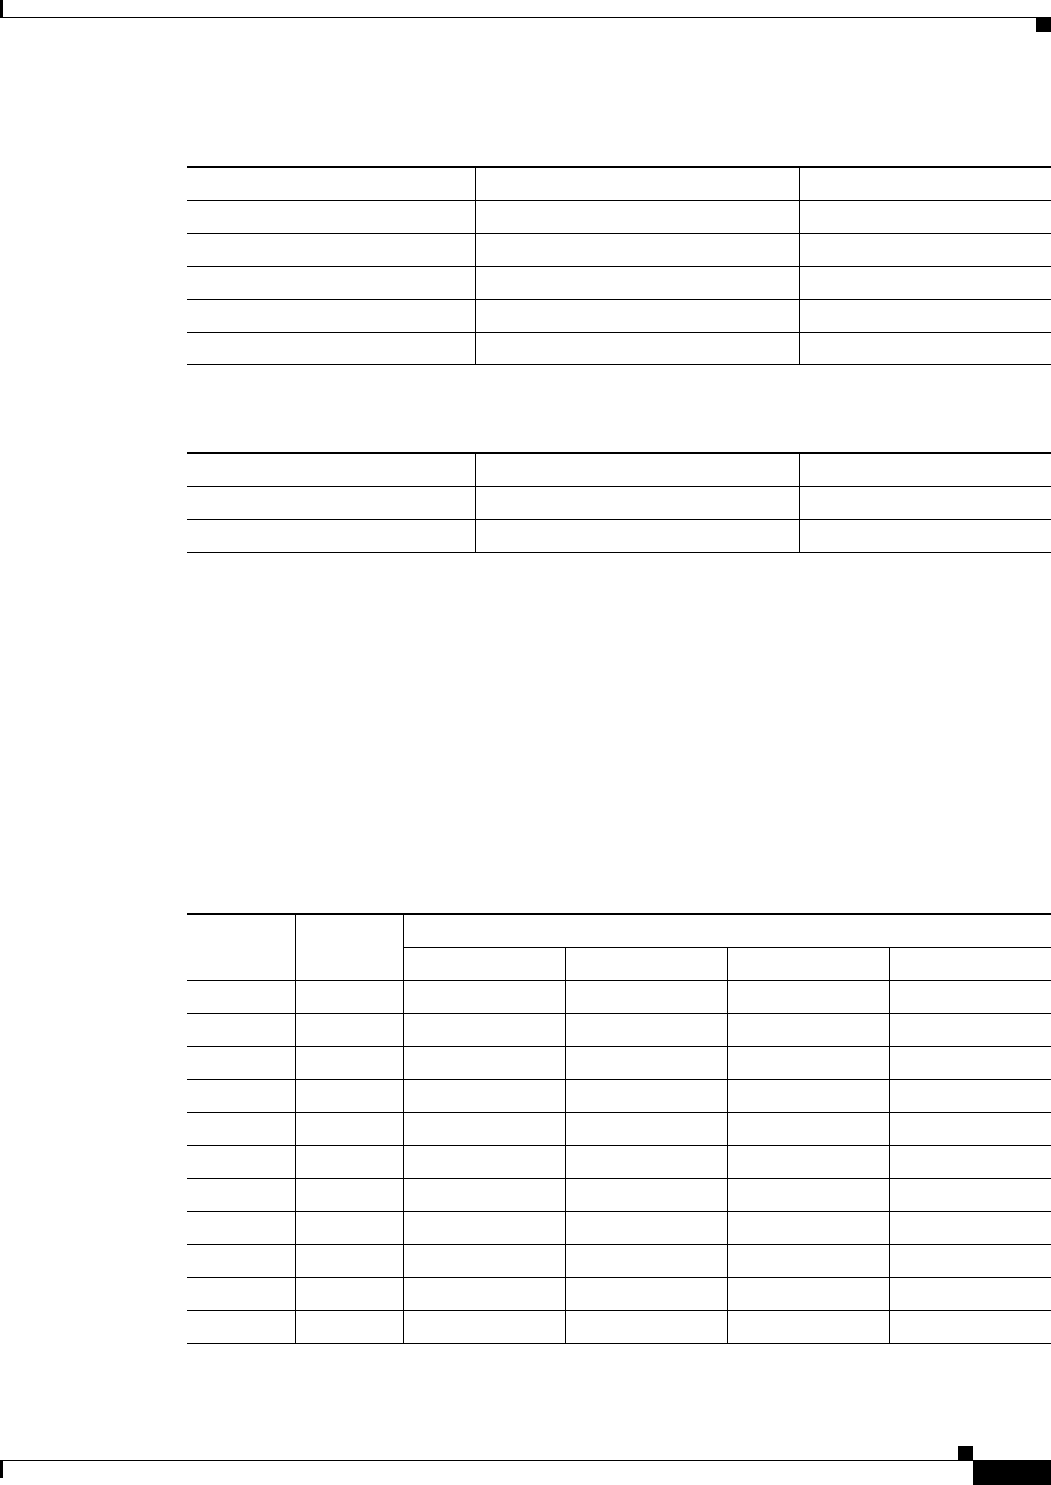
A-3
Quick Start Guide: Cisco Aironet 1500 Series Lightweight Outdoor Mesh Access Point
78-17229-01
Appendix A Declarations of Conformity and Regulatory Information Channels and Antenna Settings
Channels and Antenna Settings
This section lists the IEEE 802.11a and 802.11b/g (5- 3and 2.4-GHz bands) and channels and indicates
the maximum power levels for each regulatory domain supported by the outdoor access point.
An improper combination of power level and antenna configurations can result in equivalent isotropic
radiated power (EIRP) above the amount allowed per regulatory domain. Table A-3 indicates the
maximum power levels and antenna gains allowed.
To configure your outdoor access point output power level, refer to the Cisco Wireless LAN Solution
Product Guide.
Table A-1 External 5-GHz Antennas
Cisco Part Number Model Gain
AIR-ANT5175V-N 4.9 GHz Omnidirectional 6.5 dBi
AIR-ANT5175V-N 5 GHz Compact Omnidirectional 7.5 dBi
AIR-ANT58G10SSA-N 5 GHz Sector 9.5 dBi
Cushcraft S49014WP 5 GHz Patch 14 dBi
Cushcraft S54717P 5 GHz Patch 17 dBi
Table A-2 External 2.4-GHz Antennas
Cisco Part Number Model Gain
AIR-ANT-2455V-N 2.4 GHz Compact Omnidirectional 5.5 dBi
Cushcraft S2406BP 2.4 GHz Omnidirectional 8 dBi
Table A-3 2.4-GHz Maximum Power Levels and Antenna Gains
Channel ID Frequency
(MHz)
Maximum Conducted Average Power Levels in dBm with 8dBi Antenna
1-11 Mbps CCK 9-36 Mbps OFDM 48 Mbps OFDM 54 Mbps OFDM
12412 22.5 18.5 18.5 18.5
22417 24 24 22 21
32422 24 24 22 21
42427 24 24 22 21
52432 24 24 22 21
62437 24 24 22 21
72442 24 24 22 21
82447 24 24 22 21
92452 24 24 22 21
10 2457 24 24 22 21
11 2462 24 20 20 20
A-4
Quick Start Guide: Cisco Aironet 1500 Series Lightweight Outdoor Mesh Access Point 78-17229-01
Appendix A Declarations of Conformity and Regulatory Information
Department of Communications—Canada
Department of Communications—Canada
Canadian Compliance Statement
This Class B Digital apparatus meets all the requirements of the Canadian Interference-Causing
Equipment Regulations.
Cet appareil numerique de la classe B respecte les exigences du Reglement sur le material broilleur du
Canada.
This device complies with Class B Limits of Industry Canada. Operation is subject to the following two
conditions:
1. This device may not cause harmful interference, and
2. This device must accept any interference received, including interference that may cause undesired
operation.
Cisco’s outdoor access points are certified to the requirements of RSS-210 issue 5, RSP 100, and
RSS 102 for spread spectrum devices.
International Models
The international outdoor access point models are listed in Table A-4.
Declaration of Conformity for RF Exposure
This outdoor access point product has been found to be compliant to the requirements set forth in CFR 47
Section 1.1307 addressing RF Exposure from radio frequency devices as defined in Evaluating
Compliance with FCC Guidelines for Human Exposure to Radio Frequency Electromagnetic Fields.T he
antennas should be positioned more than 6.56 feet (2 meters) from your body or nearby persons.
This outdoor access point is also compliant to EN 50835 for RF exposure.
Table A-4 International Outdoor Access Point Models
Models Regulatory Region
AIR-LAP1510AG-N-K9 Canada, Australia, New Zealand, Mexico, and
Taiwan

A-5
Quick Start Guide: Cisco Aironet 1500 Series Lightweight Outdoor Mesh Access Point
78-17229-01
Appendix A Declarations of Conformity and Regulatory Information Administrative Rules for Cisco Aironet Outdoor Access Points in Taiwan
Administrative Rules for Cisco Aironet Outdoor Access Points in
Taiwan
This section provides administrative rules for operating Cisco Aironet outdoor access points in Taiwan.
The rules are provided in both Chinese and English.
Chinese Translation
English Translation
Administrative Rules for Low-power Radio-Frequency Devices
Article 12
For those low-power radio-frequency devices that have already received a type-approval, companies,
business units or users should not change its frequencies, increase its power or change its original
features and functions.
Article 14

A-6
Quick Start Guide: Cisco Aironet 1500 Series Lightweight Outdoor Mesh Access Point 78-17229-01
Appendix A Declarations of Conformity and Regulatory Information
Administrative Rules for Cisco Aironet Outdoor Access Points in Taiwan
The operation of the low-power radio-frequency devices is subject to the conditions that no harmful
interference is caused to aviation safety and authorized radio station; and if interference is caused, the
user must stop operating the device immediately and can't re-operate it until the harmful interference is
clear.
The authorized radio station means a radio-communication service operating in accordance with the
Communication Act.
The operation of the low-power radio-frequency devices is subject to the interference caused by the
operation of an authorized radio station, by another intentional or unintentional radiator, by industrial,
scientific and medical (ISM) equipment, or by an incidental radiator.

GL-1
Quick Start Guide: Cisco Aironet 1500 Series Lightweight Outdoor Mesh Access Point
78-17229-01
GLOSSARY
802.11 The IEEE standard that specifies carrier sense media access control and physical layer
specifications for 1- and 2-megabit-per-second (Mbps) wireless LANs operating in the 2.4-GHz
band.
802.11a The IEEE standard that specifies carrier sense media access control and physical layer
specifications for wireless LANs operating in the 5-GHz frequency band.
A
ad hoc network A wireless network composed of stations without access points.
antenna gain The gain of an antenna is a measure of the antenna’s ability to direct or focus radio energy over a
region of space. High-gain antennas have a more focused radiation pattern in a specific direction.
associated A non-root outdoor access point is configured properly to allow it to wirelessly communicate with
a root outdoor access point.
B
beacon A packet that signals the availability and presence of the wireless device. Beacon packets are sent
by root outdoor access points.
BOOTP Boot Protocol. A protocol used for the static assignment of IP addresses to devices on the network.
broadcast packet A single data message (packet) sent to all addresses on the same subnet.
C
cell The area of radio range or coverage in which the wireless devices can communicate with the base
station. The size of the cell depends upon the speed of the transmission, the type of antenna used,
and the physical environment, as well as other factors.
CSMA Carrier sense multiple access. A wireless LAN media access method specified by the IEEE 802.11
specification.

Glossary
GL-2
Quick Start Guide: Cisco Aironet 1500 Series Lightweight Outdoor Mesh Access Point 78-17229-01
D
data rates The range of data transmission rates supported by a device. Data rates are measured in megabits
per second (Mbps).
dBi A ratio of decibels to an isotropic antenna that is commonly used to measure antenna gain. The
greater the dBi value, the higher the gain, and the more narrow the angle of coverage.
dBm An absolute power level described in decibels referenced to 1 mW. 0 dBm is equivalent to 1 mW.
DHCP Dynamic Host Configuration Protocol. A protocol available with many operating systems that
automatically issues IP addresses within a specified range to devices on the network. The device
retains the assigned address for a specific administrator-defined period.
dipole A type of low-gain (2.2-dBi) antenna consisting of two (often internal) elements.
domain name The text name that refers to a grouping of networks or network resources based on
organization-type or geography; for example: name.com commercial; name.edu educational;
name.gov government; ISPname.net network provider (such as an ISP); name.ar Argentina;
name.au Australia; and so on.
DNS Domain Name System server. A server that translates text names into IP addresses. The server
maintains a database of host alphanumeric names and their corresponding IP addresses.
DSSS Direct sequence spread spectrum. A type of spread spectrum radio transmission that spreads its
signal continuously over a wide frequency band.
E
EAP Extensible Authentication Protocol. An optional IEEE 802.1x security feature ideal for
organizations with a large user base and access to an EAP-enabled Remote Authentication Dial-In
User Service (RADIUS) server.
Ethernet The most widely used wired local area network. Ethernet uses carrier sense multiple access
(CSMA) to enable computers to share a network and operates at 10, 100, or 1000 Mbps, depending
on the physical layer used.
F
file server A repository for files from which a local area network can share files, mail, and programs.
firmware Software that is programmed on a memory chip.

Glossary
GL-3
Quick Start Guide: Cisco Aironet 1500 Series Lightweight Outdoor Mesh Access Point
78-17229-01
G
gateway A device that connects two otherwise incompatible networks.
GHz Gigahertz. One billion cycles per second. A unit of measure for frequency.
I
IEEE Institute of Electrical and Electronic Engineers. A professional society serving electrical engineers
through its publications, conferences, and standards development activities. The body responsible
for the Ethernet 802.3 and wireless LAN 802.11 specifications.
infrastructure The wired Ethernet network.
IP address The Internet Protocol (IP) address of a station.
IP subnet mask The number used to identify the IP subnetwork, indicating whether the IP address can be
recognized on the LAN or if it must be reached through a gateway. This number is expressed in a
form similar to an IP address, such as 255.255.255.0.
isotropic An antenna that radiates its signal in a spherical pattern.
M
MAC Media Access Control address. A unique 48-bit number used in Ethernet data packets to identify
an Ethernet device, such as a outdoor access point.
modulation Any of several techniques for combining user information with a transmitter’s carrier signal.
multipath The echoes created as a radio signal bounces off physical objects.
multicast packet A single data message (packet) sent to multiple addresses.
O
omni-directional A primarily circular antenna radiation pattern.
Orthogonal Frequency
Division Multiplex
(OFDM)
A modulation technique used by IEEE 802.11a-compliant wireless LANs for transmission at 6, 9,
12, 18, 24, 36, 48, and 54 Mbps.
outdoor access point A wireless LAN transceiver that is used to provide wireless Ethernet networks.

Glossary
GL-4
Quick Start Guide: Cisco Aironet 1500 Series Lightweight Outdoor Mesh Access Point 78-17229-01
P
packet A basic message unit for communication across a network. A packet usually includes routing
information, data, and sometimes error-detection information.
pole-top outdoor access
point (PAP) A transceiver wirelessly connected to other pole-top access points (PAPs) and rooftop access
points (RAPs), which are connected to a wired Ethernet network.
power injector A device that supplies DC power to another device over unused Ethernet cable wires.
R
range A linear measure of the distance that a transmitter can send a signal.
receiver sensitivity A measurement of the weakest signal a receiver can receive and still correctly translate it into data.
RF Radio frequency. A generic term for radio-based technology.
rooftop outdoor access
point (RAP) A wireless transceiver which is connected to a wired Ethernet network, and which then
communicates with other pole-top access points (PAPs) and rooftop access points (RAPs).
S
spread spectrum A radio transmission technology that spreads the user information over a much wider bandwidth
than otherwise required in order to gain benefits such as improved interference tolerance and
unlicensed operation.
SSID Service Set Identifier (also referred to as Radio Network Name). A unique identifier used to
identify a radio network and which stations must use to be able to communicate with each other
or an outdoor access point. The SSID can be any alphanumeric entry up to 32 characters.
T
transmit power The power level of radio transmission.
U
UNII Unlicensed National Information Infrastructure—regulations for UNII devices operating in the
5.15 to 5.35 GHz and 5.725 to 5.825 GHz frequency bands.
UNII-1 Regulations for UNII devices operating in the 5.15 to 5.25 GHz frequency band.
UNII-2 Regulations for UNII devices operating in the 5.25 to 5.35 GHz frequency band.

Glossary
GL-5
Quick Start Guide: Cisco Aironet 1500 Series Lightweight Outdoor Mesh Access Point
78-17229-01
UNII-3 Regulations for UNII devices operating in the 5.725 to 5.825 GHz frequency band.
unicast packet A single data message (packet) sent to a specific IP address.
W
WEP Wired Equivalent Privacy. An optional security mechanism defined within the 802.11 standard
designed to make the link integrity of wireless devices equal to that of a cable.
workstation A computing device with an installed PC card.

Glossary
GL-6
Quick Start Guide: Cisco Aironet 1500 Series Lightweight Outdoor Mesh Access Point 78-17229-01

IN-1
Quick Start Guide: Cisco Aironet 1500 Series Lightweight Outdoor Mesh Access Point, AIR-LW1510AG
78-17229-01
INDEX
A
audience vii
C
caution viii
connectors 3
conventions, document viii
D
data rates 9
declarations of conformity B-1
documentation
conventions viii, A-3
related publications ix
E
environmental conditions 9
F
FCC Declaration of Conformity B-2
FCC Safety Compliance 7
I
inline power 3
installation guidelines 7
O
obtaining documentation ix
P
package contents 10
power
inline 3
R
regulatory
information B-1
related publications ix
RF exposure B-4
S
safety warnings, translated A-1
site survey 9
U
unpacking 9
W
warning, defined viii to ix
warnings 6, A-1

Index
IN-2
Quick Start Guide: Cisco Aironet 1500 Series Lightweight Outdoor Mesh Access Point, AIR-LW1510AG 78-17229-01