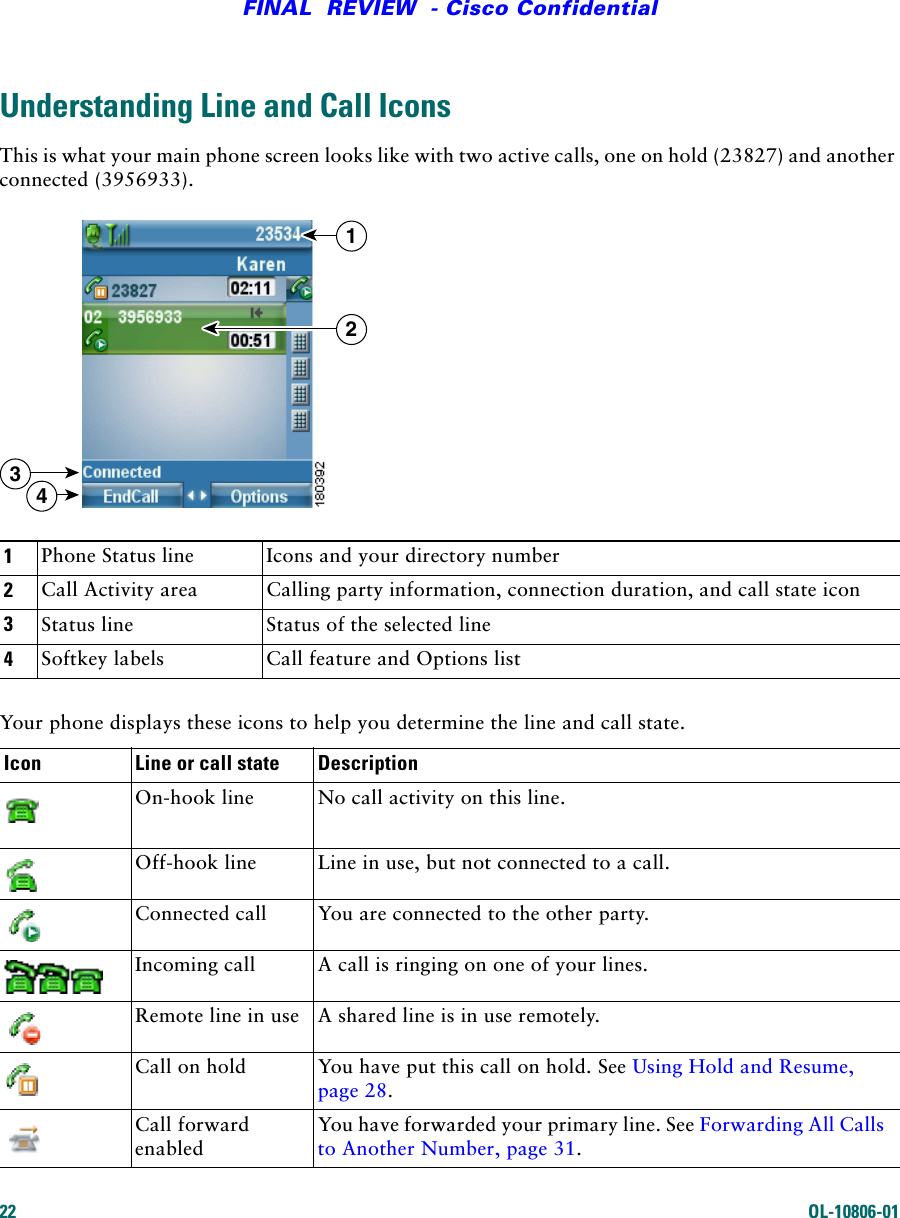
Cisco Systems 7900001 802.11a/b/g Wireless IP Phone User Manual 7921
Cisco Systems Inc 802.11a/b/g Wireless IP Phone 7921
UserManual.wiki
>
Cisco Systems
>
7900001 User Manual
Manual
Navigation menu
Upload a User Manual
Namespaces
Wiki Guide
HTML
PDF
Info
Views
User Manual
Discussion / Help
Navigation

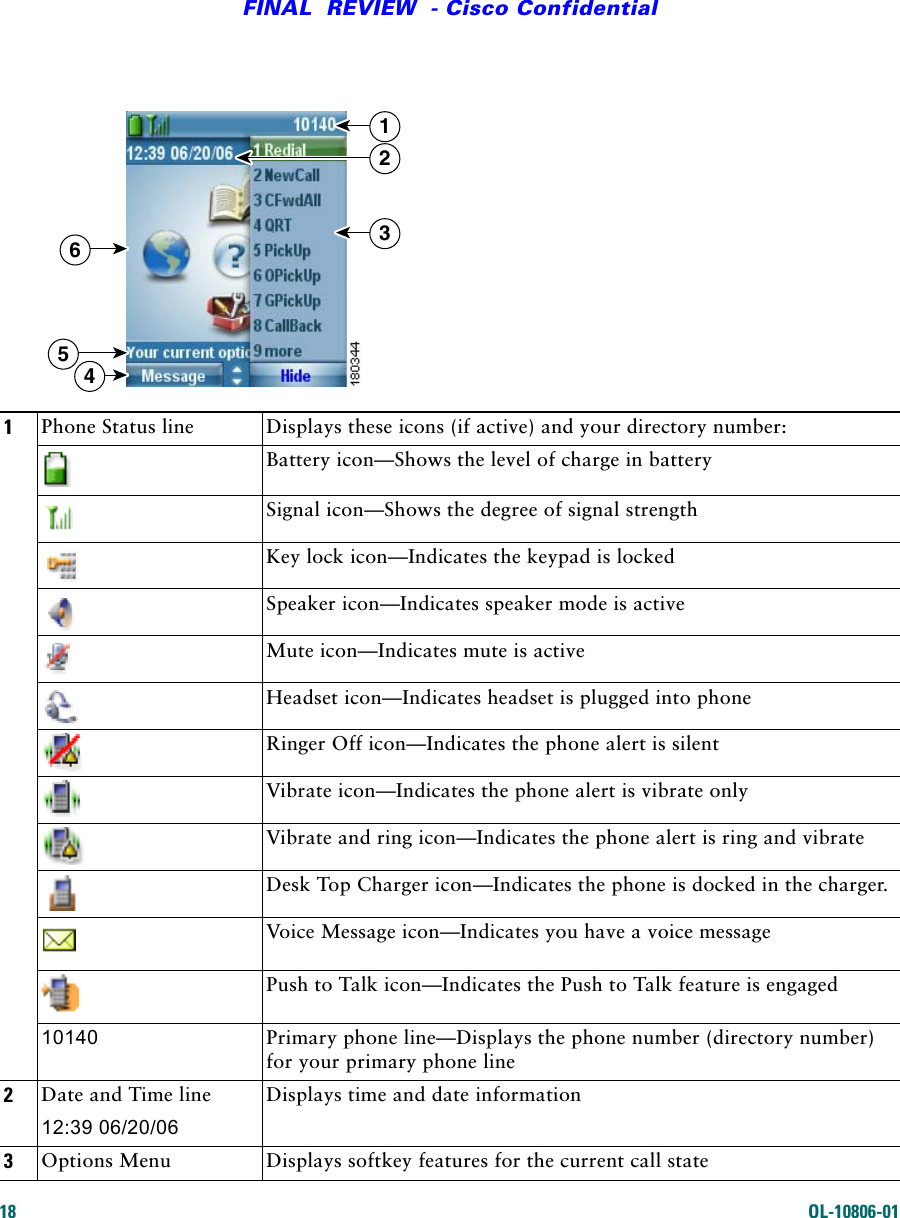
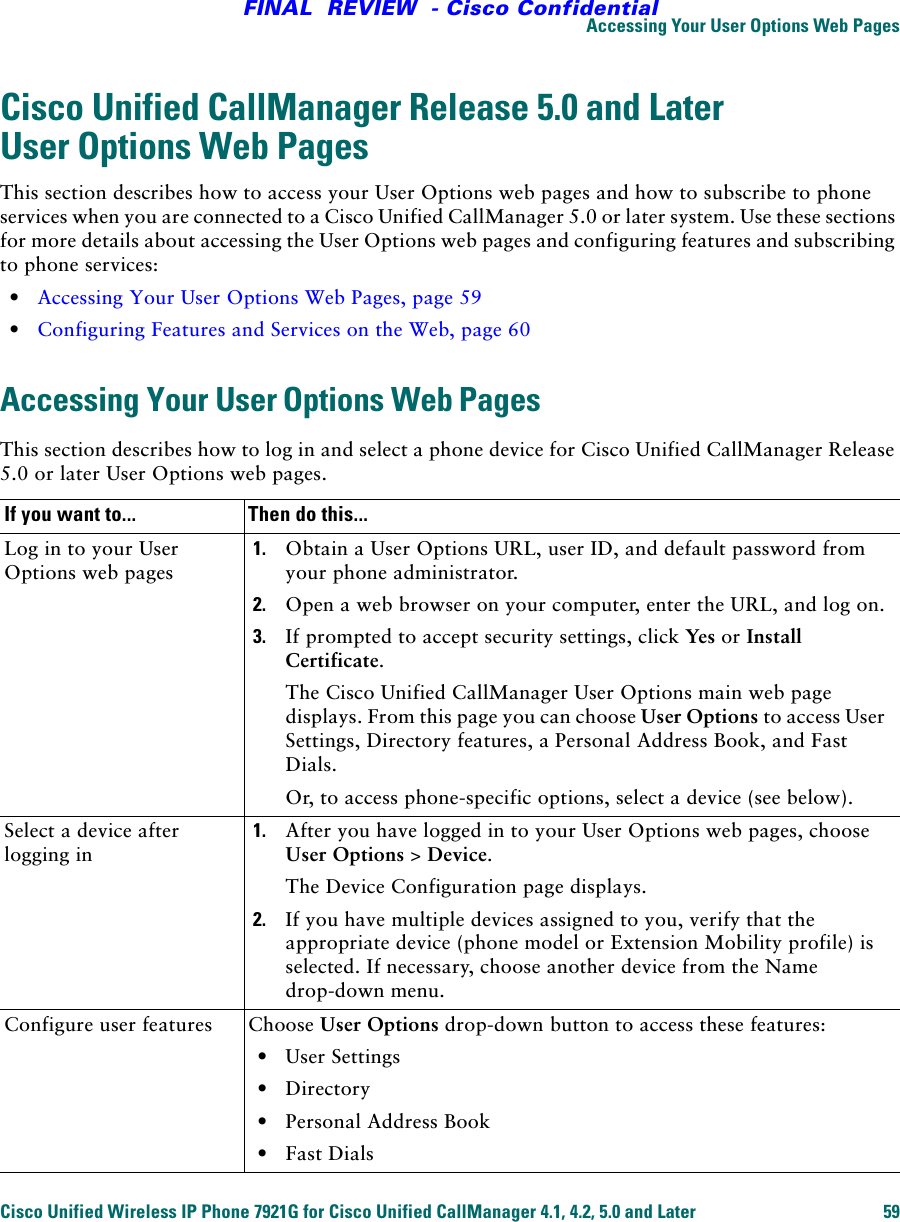
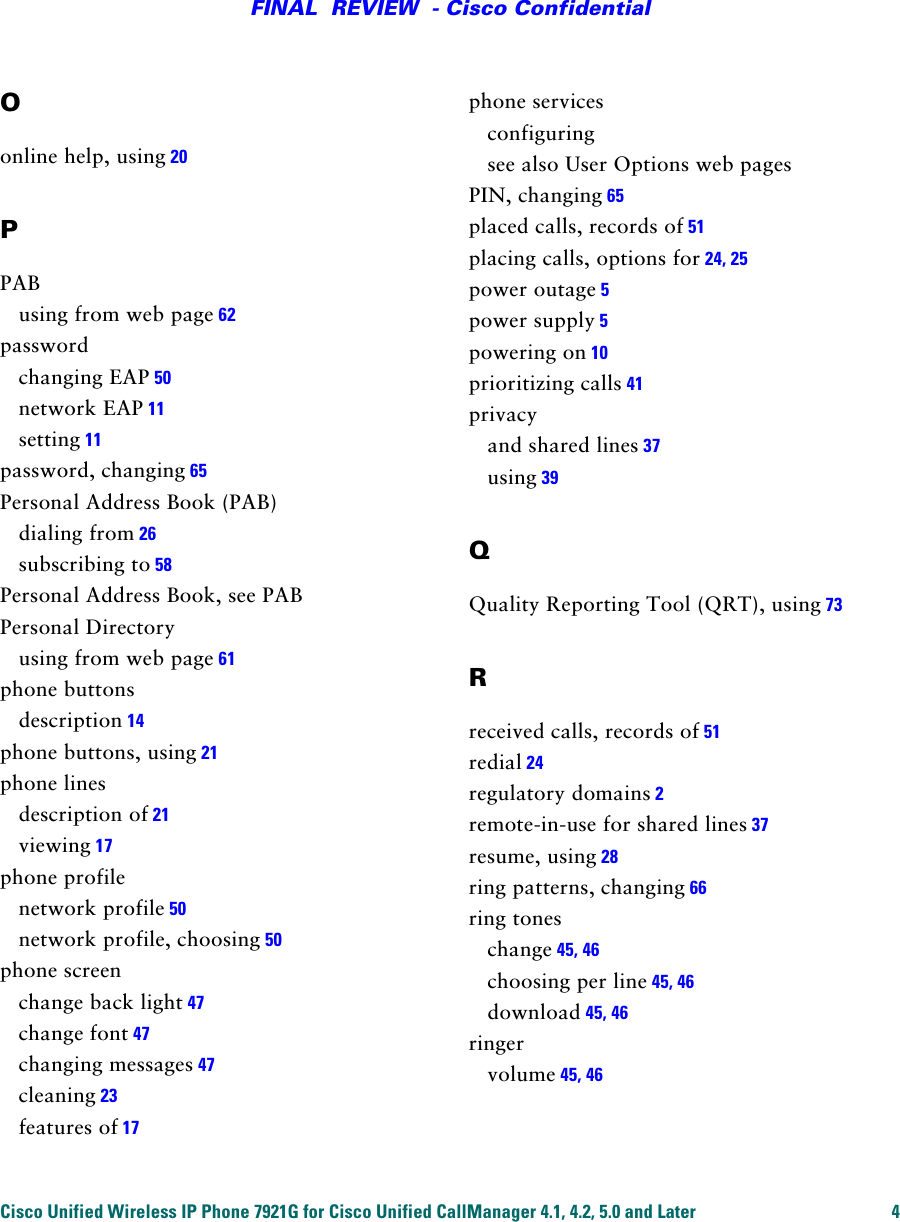
![Softkey DefinitionsAbbrDial Dial using a speed dial index numberAnswer Answer a callBarge Add yourself to a call on a shared lineCallBack Receive notification when a busy extension becomes availableCancel Cancel an action or exit a screen without applying changescBarge Add yourself to a call on a shared line and establish a conference CFwdAll Setup/cancel call forwardingClear Delete records or settingsConfList View conference participantsConfrn Create a conference callDelete Remove characters or item at the cursor Detail Display details in a recordDial Dial a phone numberDirTrfr Transfer two calls to each otherEdit Change a settingEditDial Edit a number in a call logEndCall Disconnect current callGPickUp Answer a call ringing in another groupHLog Log in or out of your hunt groupiDivert Send a call to your voice messaging systemJoin Join several calls already on a single line to create a conference MCID Report suspicious callsMeetMe Host a Meet-Me conference callNewCall Make a new callEntering TextOptions Access softkey feature listOPickUp Answer a call ringing in another group associated with your groupPark Store a call using Call ParkPickUp Answer a call in your groupQRT Submit call problems to the system administratorRedial Redial the most recent numberRemove Remove a conference participantResume Resume a call on holdRmLstC Drop the last party added to a conference callSave Save the chosen settingsSelect Choose an option or callSubmit Search for a directory listingTrnsfer Transfer a callUpdate Refresh content Character—Press appropriate key to highlight and enter the lower or upper case character.Space—Press to enter a space.Number—Press the number key to highlight and enter the number. Symbol—Press these keys to display symbols. to enter * + - / = \ : ; to enter space , . ‘ “ | _ ~ ’ to enter # ? ( ) [ ] { } to enter ! @ < > $ % ^ &0*0#1@Phone Screen IconsLine and Call StatesIncoming callCall on holdConnected callOff-hookShared line in useCall Forwarding enabledOther FeaturesPhone lineSpeed-dial number Service URLVoice messageMute onHeadset in useSpeaker mode activeRinger off (silent mode)Ring and vibrate onVibrate only onPush to talk in useRadio signalBattery charge statusNo radio signalDocked in desk top chargerKeypad lockec](https://usermanual.wiki/Cisco-Systems/7900001/User-Guide-732156-Page-8.png)

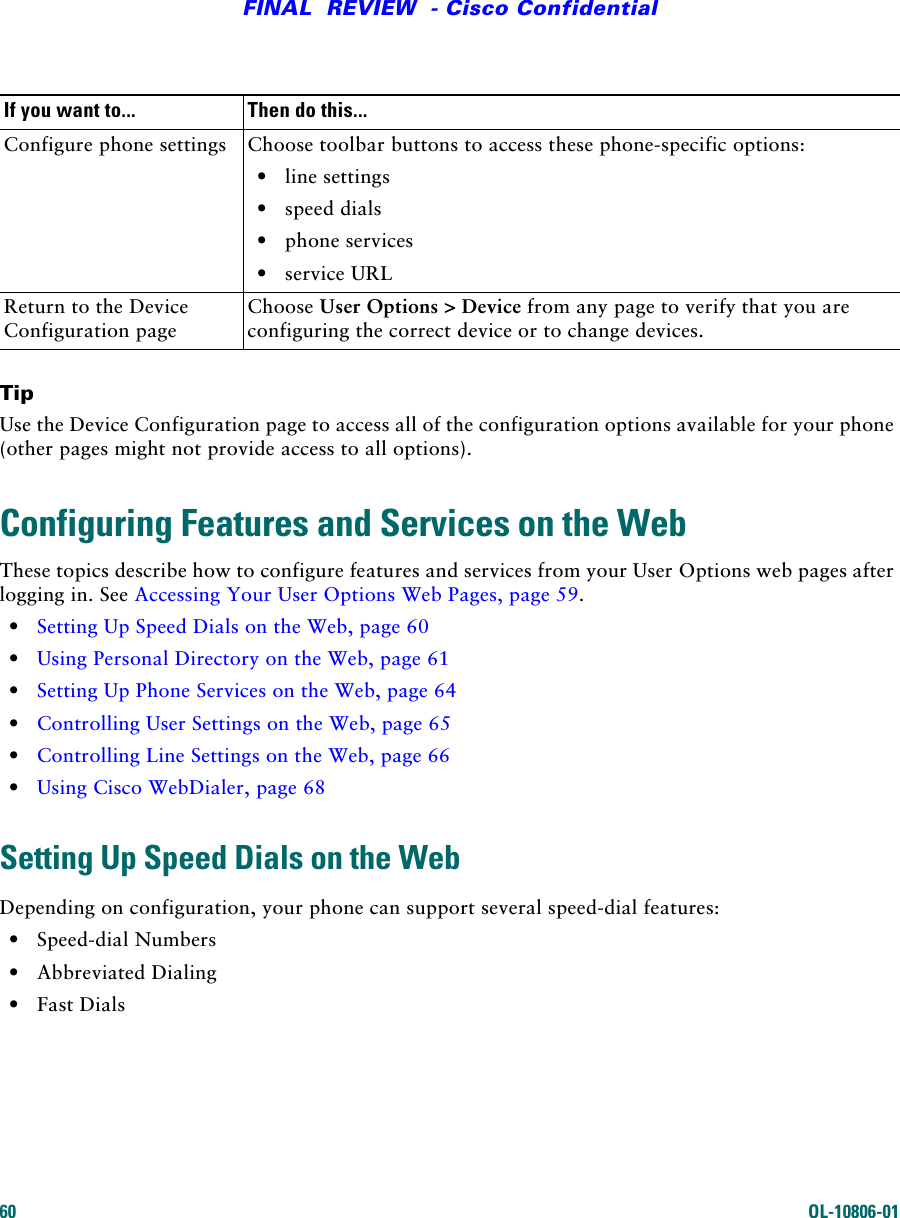
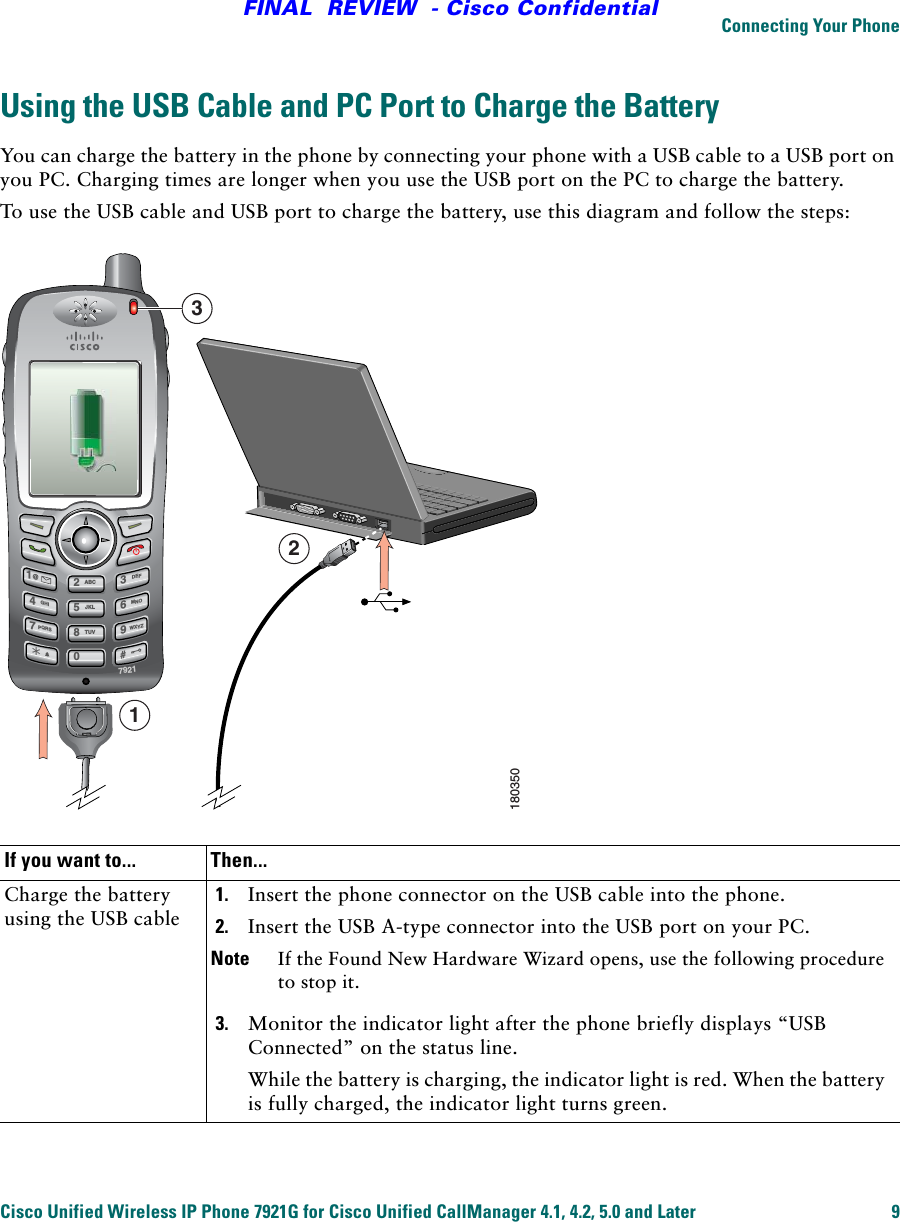
![Getting StartedCisco Unified Wireless IP Phone 7921G for Cisco Unified CallManager 4.1, 4.2, 5.0 and Later 5FINAL REVIEW - Cisco ConfidentialCaution Use only the Cisco power supply that was provided with your phone. If you need to replace your power supply, refer to the list of Cisco part numbers. Australia—CP-PWR-7921G-AUCentral Europe—CP-PWR-7921G-CEChina—CP-PWR-7921G-CNJapan—CP-PWR-7921G-JPNorth America—CP-PWR-7921G-NAUnited Kingdom—CP-PWR-7921G-UKPower OutageYour accessibility to emergency service through the phone is dependent on the wireless access point being powered. If there is an interruption in the power supply, Service and Emergency Calling Service dialing will not function until power is restored. In the case of a power failure or disruption, you may need to reset or reconfigure equipment before using the Service or Emergency Calling Service dialing.Using External DevicesThe following information applies when you use external devices with the Cisco Unified Wireless IP Phone: Cisco recommends the use of good quality external devices (such as headsets) that are shielded against unwanted radio frequency (RF) and audio frequency (AF) signals. Depending on the quality of these devices and their proximity to other devices such as mobile phones or two-way radios, some audio noise may still occur. In these cases, Cisco recommends that you take one or more of the following actions: •Move the external device away from the source of the RF or AF signals. •Route the external device cables away from the source of the RF or AF signals. •Use shielded cables for the external device, or use cables with a better shield and connector. •Shorten the length of the external device cable. •Apply ferrites or other such devices on the cables for the external device. Cisco cannot guarantee the performance of the system because Cisco has no control over the quality of external devices, cables, and connectors. The system will perform adequately when suitable devices are attached using good quality cables and connectors. Caution In European Union countries, use only external headsets that are fully compliant with the EMC Directive [89/336/EC].Accessibility FeaturesA list of accessibility features is available upon request.](https://usermanual.wiki/Cisco-Systems/7900001/User-Guide-732156-Page-13.png)
![12 OL-10806-01FINAL REVIEW - Cisco ConfidentialRegistering with TAPSAfter your phone is connected to the wireless LAN network, your phone administrator might ask you to auto-register your phone using TAPS (Tool for Auto-Registered Phones Support). TAPS might be used for a new phone or to replace an existing phone. To register with TAPS, enter the TAPS extension provided by your phone administrator, and follow the voice prompts. You might need to enter your entire extension, including the area code. After your phone displays a confirmation message, disconnect. The phone will re-start.Accessories for the Cisco Unified Wireless IP Phone 7921GThe following phone accessories are available for your phone:•Standard and extended batteries•AC power supplies for different geographical areas•Desktop charger with speakerphone•Carrying cases•Lock setsFor a complete list of accessories, refer to the Cisco Unified Wireless IP Phone 7921G Accessory Guide.Headset InformationTo use a headset, see Using a Handset, Headset, and Speakerphone, page 43. Although Cisco Systems performs some internal testing of third-party headsets for use with the Cisco Unified IP Phones, Cisco does not certify or support products from headset or handset vendors. Because of the inherent environmental and hardware inconsistencies in the locations where Cisco Unified IP Phones are deployed, there is not a single “best” solution that is optimal for all environments. Cisco recommends that customers test the headsets that work best in their environment before deploying a large number of units in their network.In some instances, the mechanics or electronics of various headsets can cause remote parties to hear an echo of their own voice when they speak to Cisco Unified IP Phone users.Enter special characters and symbolsPress to display and enter these symbols * + - / = \ : ;Press to display and enter these symbols space , . ‘ “ | _ ~ ’ Press to display and enter these symbols # ? ( ) [ ] { }Press to display and enter these symbols ! @ < > $ % ^ &Cancel editing mode Choose Options > Cancel to return to the menu option or main screen. If you want to... Then...*0#1@](https://usermanual.wiki/Cisco-Systems/7900001/User-Guide-732156-Page-20.png)
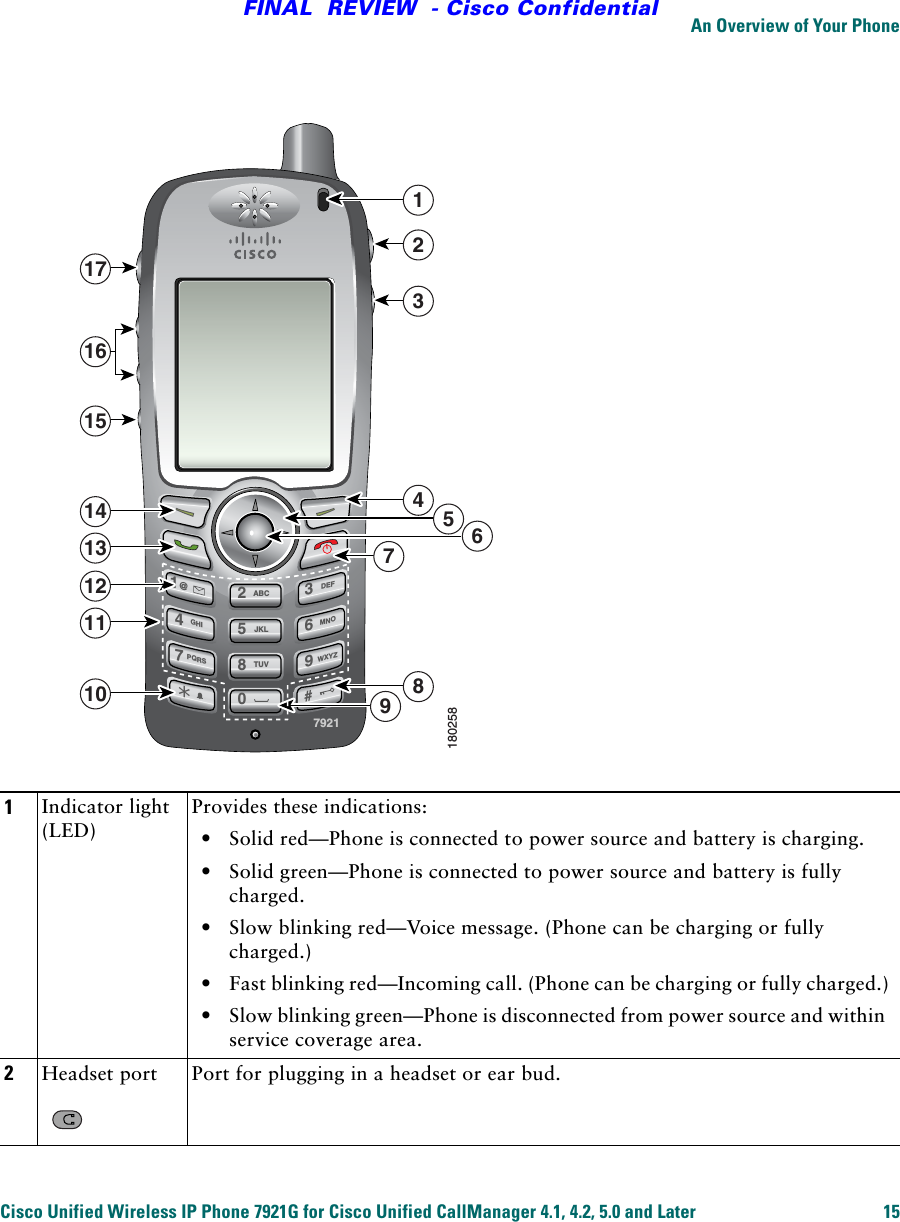
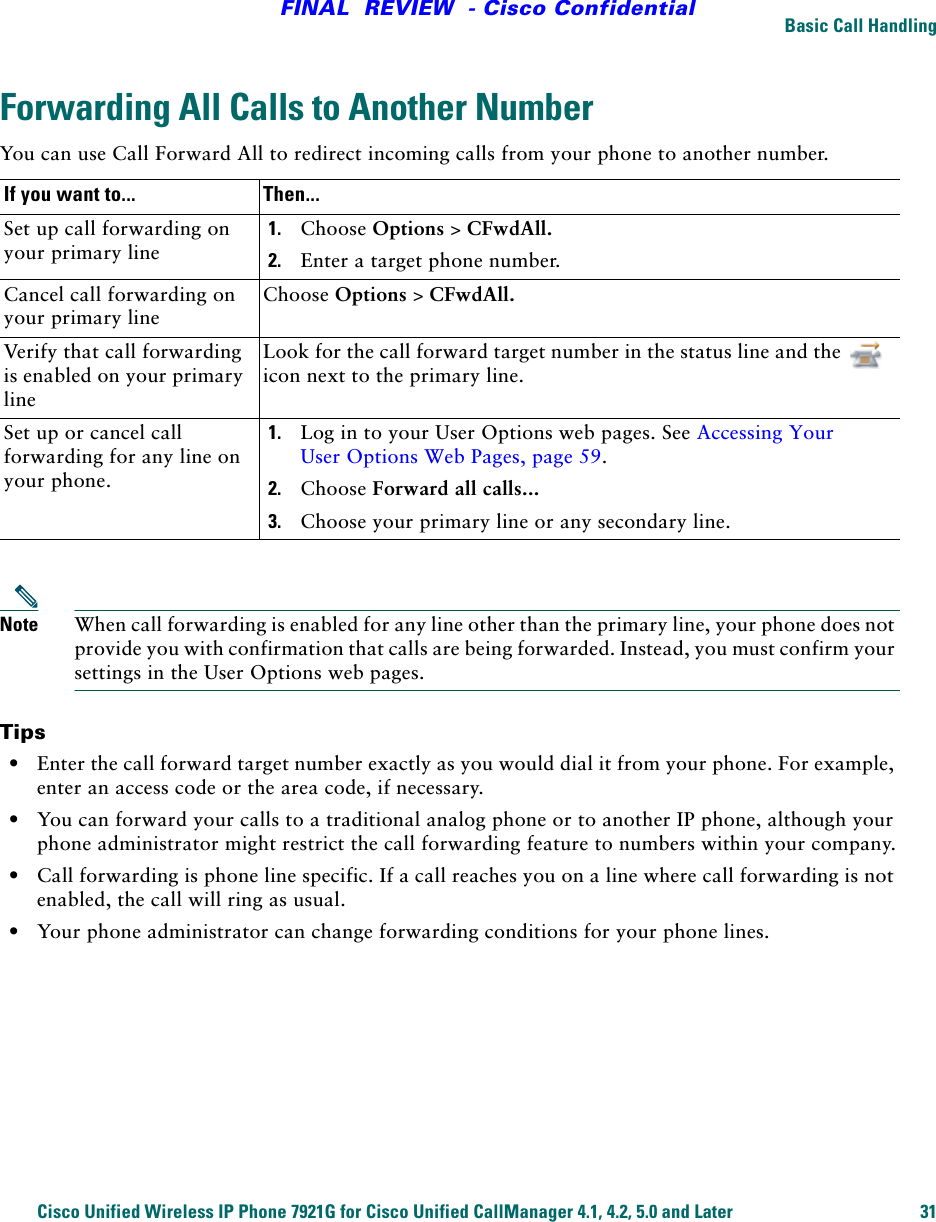
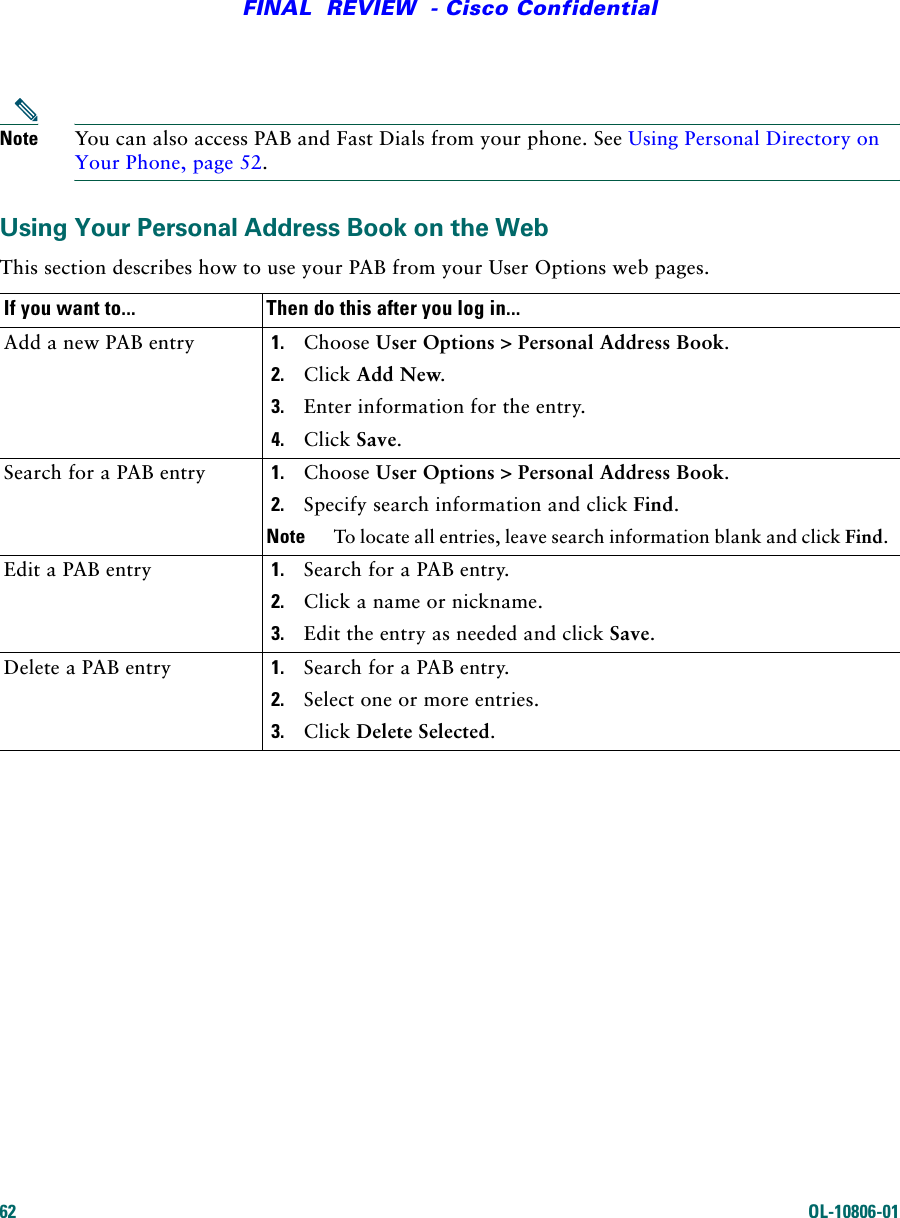
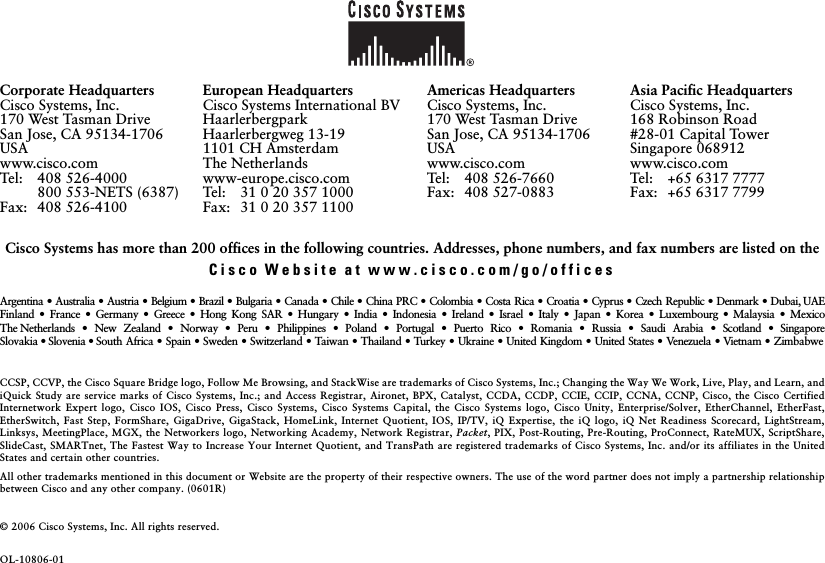
![16 OL-10806-01FINAL REVIEW - Cisco Confidential3Speaker button Toggles the speaker mode on or off for the phone.4Right softkey buttonActivates the Options menu for access to the list of softkeys. Sometimes displays a softkey label.5Navigation buttonAccesses these menus and lists from the main screen. (Directory) (Line View) (Settings) (Services)Allows you to scroll up and down menus to highlight options and to move left and right through phone numbers and text entries. 6Select button Activates the Help menu from the main screen.Allows you to select a menu item, a softkey, a call, or an action. 7Power/End button (red)Turns the phone on or off, diverts a ringing call to your voice messaging system, or ends a connected call. If there is no voice messaging system, then silences the ring.When using menus, acts as a shortcut to return to the main screen.8Pound (#) key Toggles between locking and unlocking the key pad.Allows you to enter these special characters when you are entering text:# ? ( ) [ ] { }9Zero (0) key Enters “0” when dialing a number. Allows you to enter a space or these special characters when you are entering text:, . ‘ “ | _ ~ ’10 Asterisk (*) keyToggles between Ring and Vibrate mode.Allows you to enter these special characters when you are entering text:* + - / = \ : ;11 Keypad Allows you to dial numbers, enter letters, and choose menu items by number.#0*](https://usermanual.wiki/Cisco-Systems/7900001/User-Guide-732156-Page-24.png)