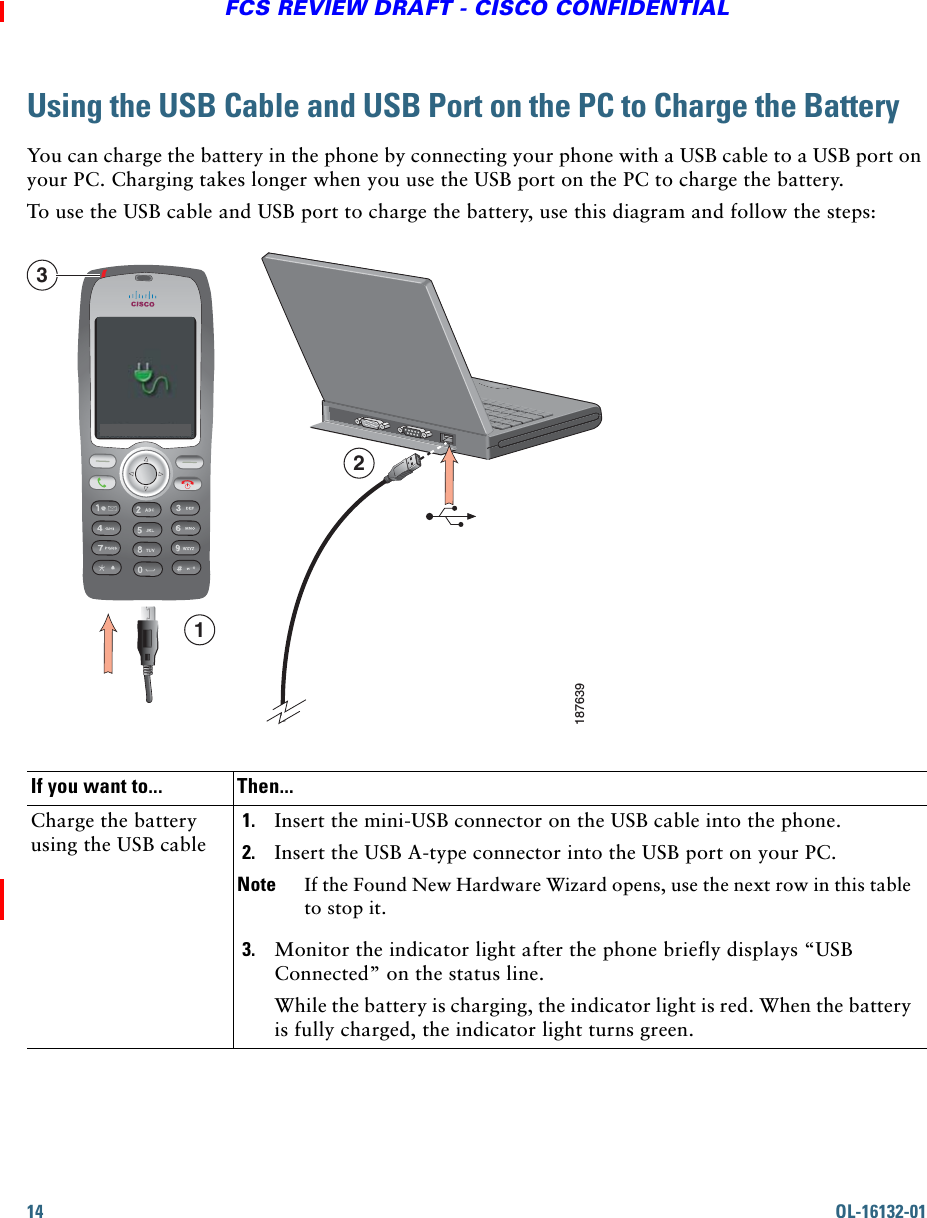
Cisco Systems 7926G0356 802.11 a/b/g & Bluetooth Phone with IR Scanner User Manual 1
Cisco Systems Inc 802.11 a/b/g & Bluetooth Phone with IR Scanner 1
UserManual.wiki
>
Cisco Systems
>
7926G0356 User Manual
>
User Manual 1
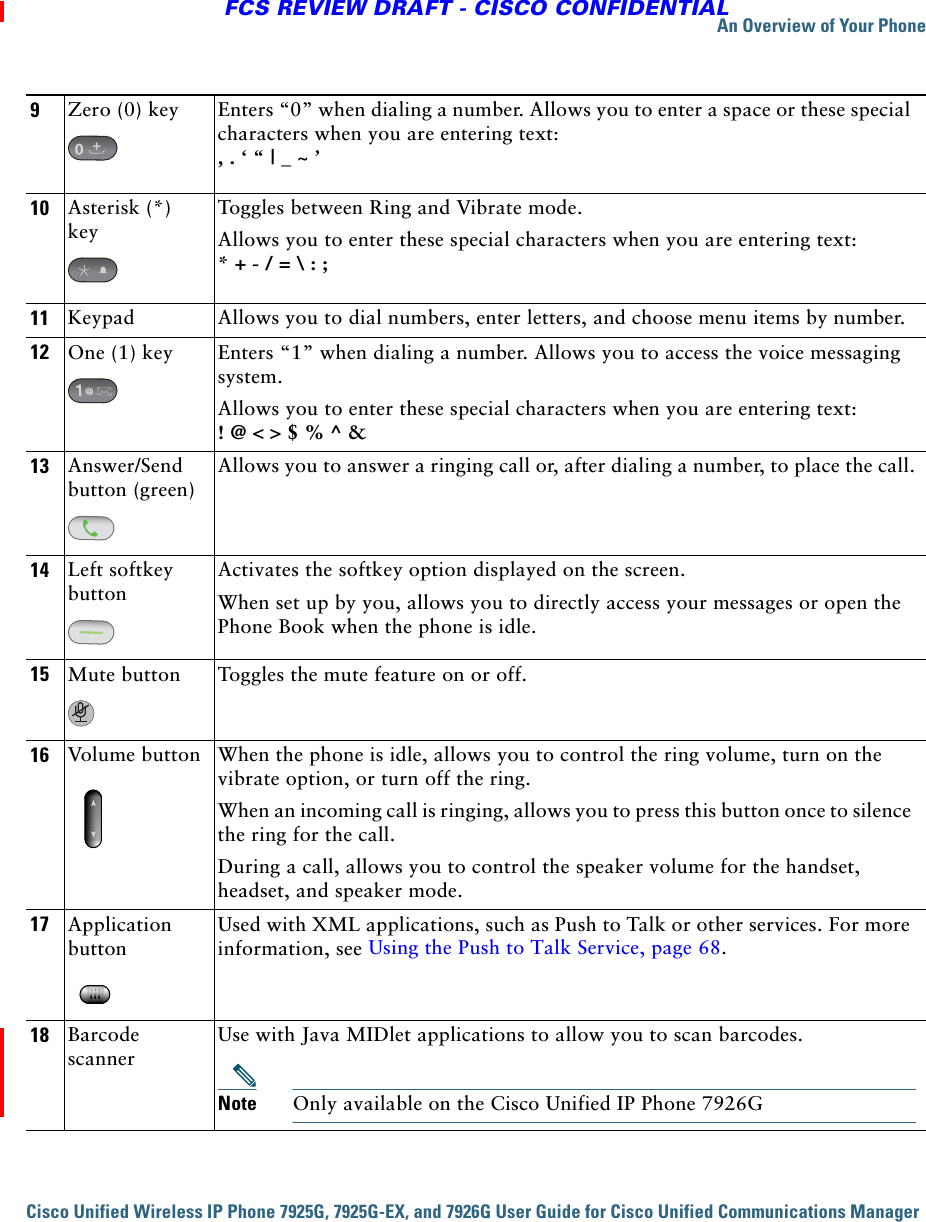
Contents
1.
User Manual 1
2.
User Manual 2
User Manual 1
Navigation menu
Upload a User Manual
Namespaces
Wiki Guide
HTML
PDF
Info
Views
User Manual
Discussion / Help
Navigation

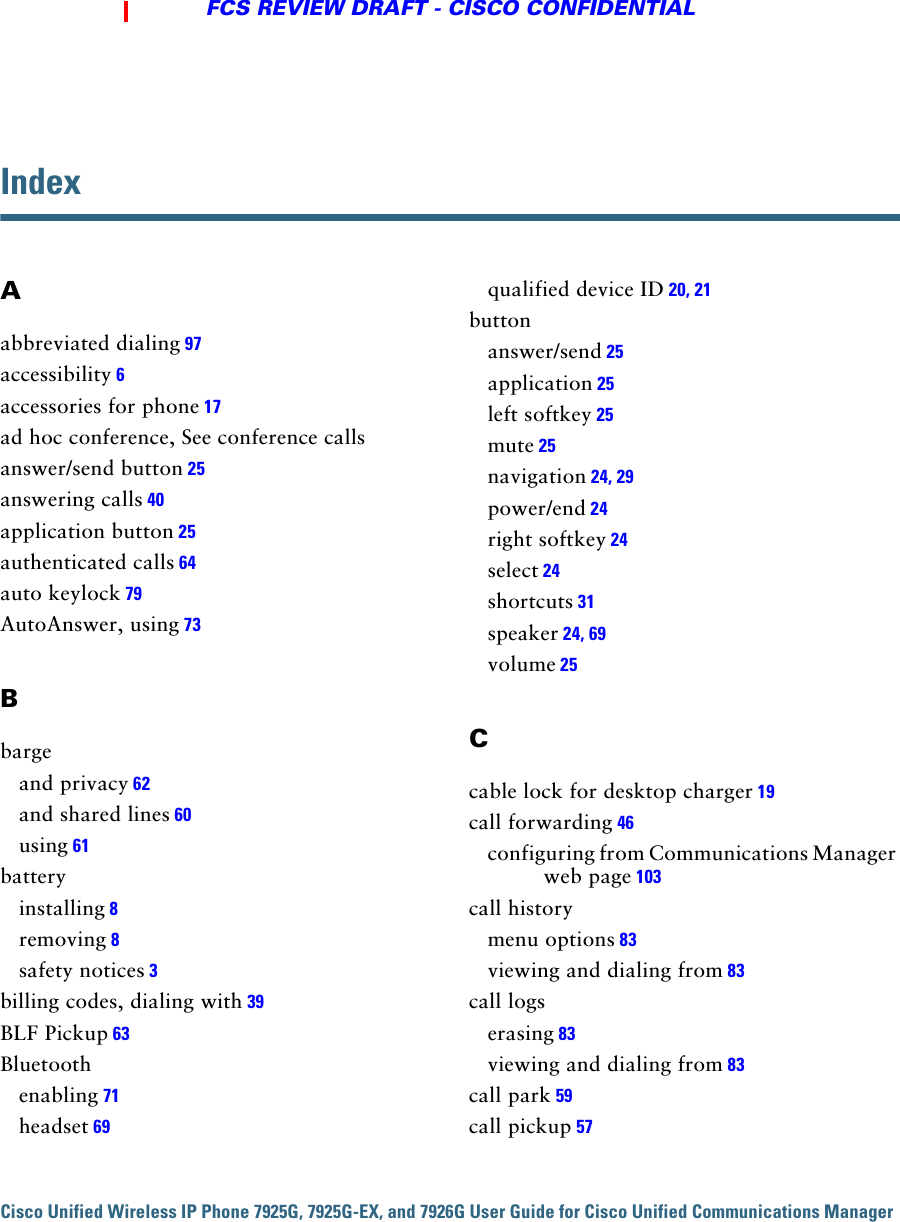
![Softkey DefinitionsAbbrDial Dial using a speed dial index numberBarge Add yourself to a call on a shared lineCallBack Receive notification when a busy extension becomes availableCFwdAll Set up/cancel call forwardingConfList View conference participantsConfrn Create a conference callDND Turn on/off Do Not Disturb (DND)EditDial Edit a number in a call logGPickUp Answer a call that is ringing in another group or on another lineHLog Log in or out of your hunt groupiDivert Send a call to your voice messaging systemJoin Join several calls already on a single line to create a conference MCID Report suspicious callsMeetMe Host a Meet-Me conference callMessage Access your voicemailPark Store a call using Call ParkPh Book Open your Phone Book PickUp Answer a call in your groupQRT Submit call problems to the system administratorRemove Remove a conference participantTrnsfer Transfer a callEntering TextPhone Screen IconsCharacter—Press key one or more times.Space—Press .Number—Press the number key. Symbol—Press these keys: to enter * + - / = \ : ; to enter space , . ‘ “ | _ ~ ’ to enter # ? ( ) [ ] { } to enter ! @ < > $ % ^ &Line and Call StatesCall on holdShared line in useCall Forwarding enabledIncoming call, or BLF-monitored line is ringing (BLF Pickup only)BLF-monitored line is in-useBLF-monitored line is idleBLF-monitored line is in Do Not Disturb stateSpeed-dial, call log, or directory listing (BLF status unknown)Intercom line in idle stateIntercom line in one-way audioIntercom line in two-way audio0+Line FeaturesPhone lineService URLVoice messageOther FeaturesMute onHeadset activeBluetooth enabledBluetooth device connectedSpeaker mode activeRinger off (silent mode)Ring and vibrate onVibrate only onApplication activeRadio signal statusNo radio signalBattery charge statusKeypad lockedBusiness number for a contactHome number for a contactMobile number for a contactOther number for a contact](https://usermanual.wiki/Cisco-Systems/7926G0356.User-Manual-1/User-Guide-1517494-Page-4.png)


![6OL-16132-01FCS REVIEW DRAFT - CISCO CONFIDENTIALUsing External DevicesThe following information applies when you use external devices with the Cisco Unified Wireless IP Phone: Cisco recommends the use of good quality external devices (such as headsets) that are shielded against unwanted radio frequency (RF) and audio frequency (AF) signals. Depending on the quality of these devices and their proximity to other devices such as mobile phones or two-way radios, some audio noise may still occur. In these cases, Cisco recommends that you take one or more of the following actions: • Move the external device away from the source of the RF or AF signals. • Route the external device cables away from the source of the RF or AF signals. • Use shielded cables for the external device, or use cables with a better shield and connector. • Shorten the length of the external device cable. • Apply ferrites or other such devices on the cables for the external device. Cisco cannot guarantee the performance of the system because Cisco has no control over the quality of external devices, cables, and connectors. The system will perform adequately when suitable devices are attached using good quality cables and connectors. Caution In European Union countries, use only external headsets that are fully compliant with the EMC Directive [89/336/EC].Cisco Product Security OverviewThis product contains cryptographic features and is subject to United States and local country laws governing import, export, transfer and use. Delivery of Cisco cryptographic products does not imply third-party authority to import, export, distribute or use encryption. Importers, exporters, distributors and users are responsible for compliance with U.S. and local country laws. By using this product you agree to comply with applicable laws and regulations. If you are unable to comply with U.S. and local laws, return this product immediately. Further information regarding U.S. export regulations may be found at http://www.access.gpo.gov/bis/ear/ear_data.html.Accessibility FeaturesA list of accessibility features is available upon request. You can find more information about Cisco accessibility features at this URL:www.cisco.com/go/accessibility](https://usermanual.wiki/Cisco-Systems/7926G0356.User-Manual-1/User-Guide-1517494-Page-16.png)
![Connecting Your PhoneCisco Unified Wireless IP Phone 7925G, 7925G-EX, and 7926G User Guide for Cisco Unified Communications Manager FCS REVIEW DRAFT - CISCO CONFIDENTIALRegistering with TAPSAfter your phone is connected to the wireless LAN network, your system administrator might ask you to auto-register your phone using TAPS (Tool for Auto-Registered Phones Support). TAPS might be used for a new phone or to replace an existing phone. To register with TAPS, enter the TAPS extension provided by your system administrator, and follow the voice prompts. You might need to enter your entire extension, including the area code. After your phone displays a confirmation message, disconnect. The phone will re-start.Accessories for the Cisco Unified Wireless IP Phone 7925G, 7925G-EX, and 7926GAccessories that are available for your phone include the following: • Standard and extended batteries • AC power supplies for different geographical areas • Desktop charger • Multi-charger • Carrying cases • Lock setsWarningUse CSA or ATEX qualified accessories with the Cisco Unified IP Wireless Phone 7925G-EX in hazardous environments.For a complete list and description of accessories, see the Cisco Unified Wireless IP Phone 7925G, 7925G-EX, and 7926G Accessory Guide.Enter special characters and symbolsPress to display and enter these symbols * + - / = \ : ;Press to display and enter these symbols space , . ‘ “ | _ ~ ’ Press to display and enter these symbols # ? ( ) [ ] { }Press to display and enter these symbols ! @ < > $ % ^ &Cancel editing mode Choose Options > Cancel to return to the menu option or main screen. If you want to... Then...+](https://usermanual.wiki/Cisco-Systems/7926G0356.User-Manual-1/User-Guide-1517494-Page-27.png)
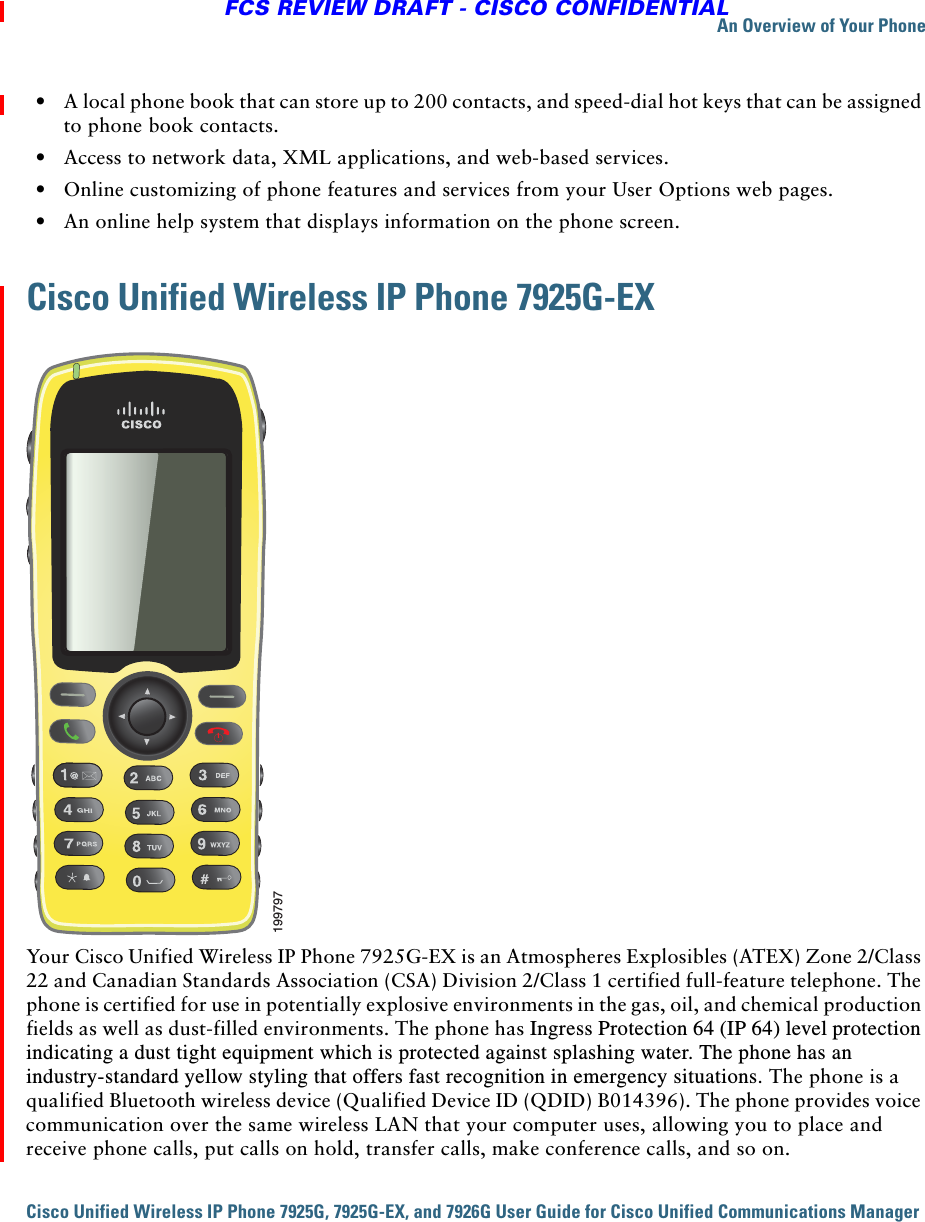
![20 OL-16132-01FCS REVIEW DRAFT - CISCO CONFIDENTIALAn Overview of Your PhoneCisco Unified Wireless IP Phone 7925G and 7926GYour Cisco Unified Wireless IP Phone 7925G and 7926G is a full-feature telephone and a qualified Bluetooth wireless device (Qualified Device ID [QDID] B014396). The phone provides voice communication over the same wireless LAN that your computer uses, allowing you to place and receive phone calls, put calls on hold, transfer calls, make conference calls, and so on.In addition to basic call-handling features, your phone can provide enhanced productivity features that extend your call-handling capabilities.Depending on the configuration, your phone supports: • Use of Bluetooth wireless headsets, including certain handsfree call features. • Wireless access to your phone number and the corporate directory.199644+](https://usermanual.wiki/Cisco-Systems/7926G0356.User-Manual-1/User-Guide-1517494-Page-30.png)
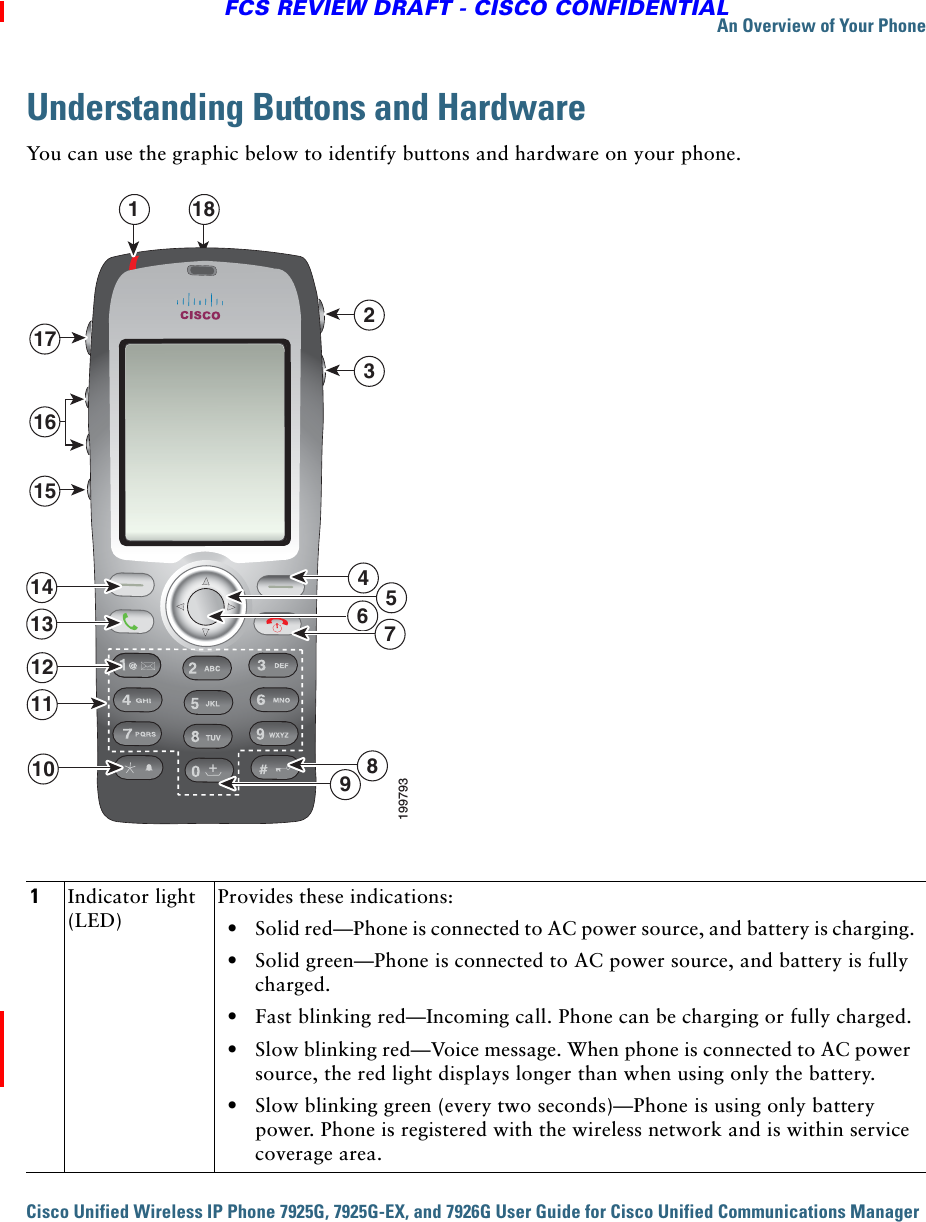
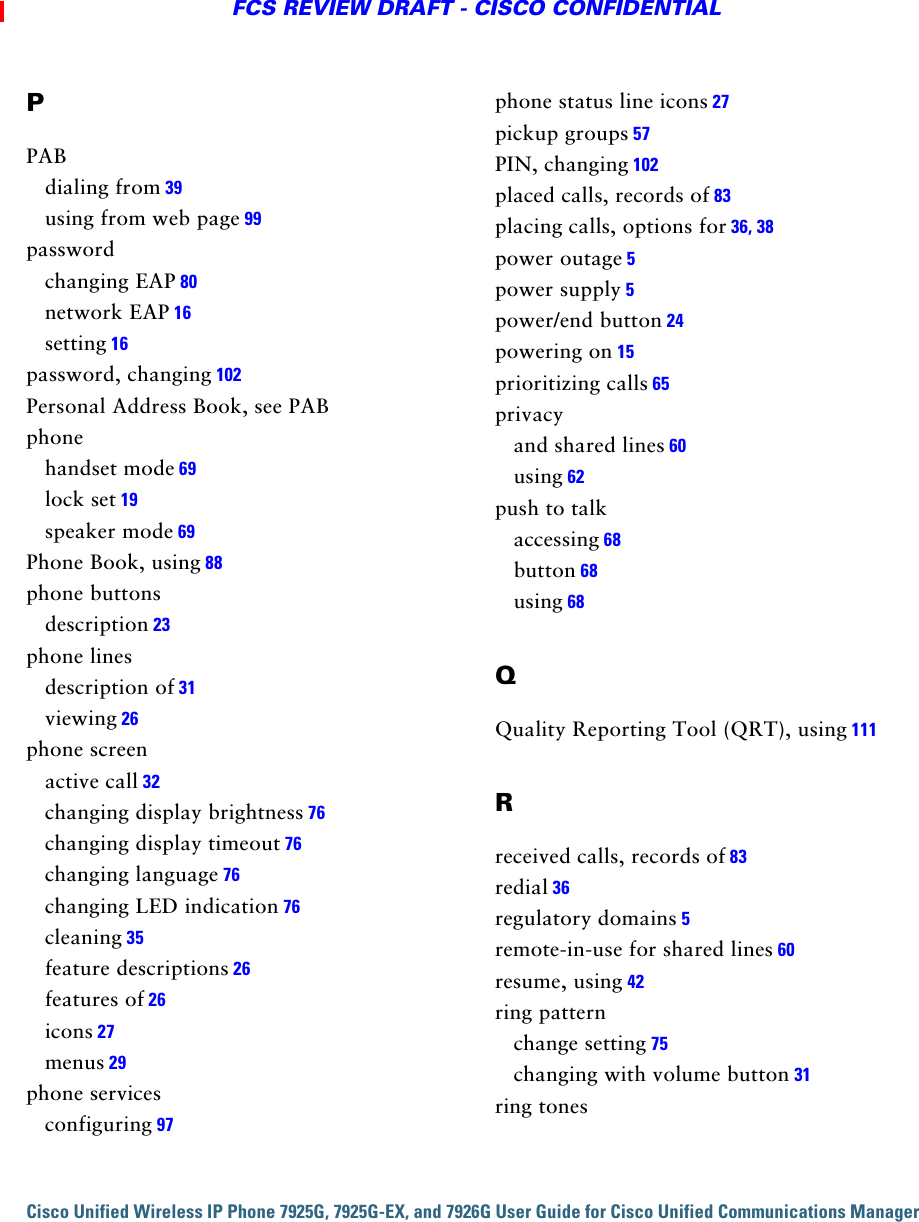
![24 OL-16132-01FCS REVIEW DRAFT - CISCO CONFIDENTIAL2Headset port with coverPort for plugging in a headset or ear bud has a protective cover.3Speaker button Toggles the speaker mode on or off for the phone.4Right softkey buttonActivates the Options menu for access to the list of softkeys. Sometimes displays a softkey label.5Navigation buttonAccesses these menus and lists from the main screen. DirectoryLine ViewSettingsServicesAllows you to scroll up and down menus to highlight options and to move left and right through phone numbers and text entries. 6Select button Activates the Help menu from the main screen.Allows you to select a menu item, a softkey, a call, or an action. 7Power/End button (red)Turns the phone on or off, ends a connected call, or silences the ring during an incoming call.When using menus, acts as a shortcut to return to the main screen.8Pound (#) key Allows you to lock the key pad.Allows you to enter these special characters when you are entering text:# ? ( ) [ ] { }](https://usermanual.wiki/Cisco-Systems/7926G0356.User-Manual-1/User-Guide-1517494-Page-34.png)