Cisco Systems C1130U Part15 Subpart B-Digital Set-Top User Manual
Cisco Systems (Shanghai) Video Technology Co., Ltd. Part15 Subpart B-Digital Set-Top
ZOO-C1130U_User Manual
Battery Disposal
• The batteries may contain substances that could be harmful to the environment.
• Recycle or dispose of batteries in accordance with the battery manufacturer’s
instructions and local/national disposal and recycling regulations.
• The batteries may contain perchlorate, a known hazardous substance, so special
handling and disposal of this product might be necessary. For more information about
perchlorate and best management practices for perchlorate-containing substance, see
www.dtsc.ca.gov/hazardouswaste/perchlorate
Provide Ventilation and Select a Location
• Remove all packaging material before applying power to the product.
• Do not place this apparatus on a bed, sofa, rug, or similar surface.
• Do not place this apparatus on an unstable surface.
• Do not install this apparatus in an enclosure, such as a bookcase or rack, unless the
installation provides proper ventilation.
• Do not place entertainment devices (such as VCRs or DVDs), lamps, books, vases
with liquids, or other objects on top of this product.
• Do not block ventilation openings.
Operating Environment
This product is designed for operation indoors with a temperature range from 32° to
122 F (0° to 50°C). Each product should have adequate spacing on all sides so that
the cooling air vents on the chassis are not blocked.
Quick Reference Guide
Cisco PDS1100 iDTA Adapter
Notice for Installers
The servicing instructions in this notice are for use by quali ed service
personnel only. To reduce the risk of electric shock, do not perform any
servicing other than that contained in the operating instructions, unless you
are quali ed to do so.
20080814_Installer820
Welcome
The Cisco® PDS1100 iDTA Digital Transport Adapter (PDS1100 iDTA)
changes digital signals into signals you can view on an analog cable-ready
TV. Use the instructions in this guide to install the adapter. The consumer
support website provides news and information about thisproduct. For more
information, please refer to:
http://www.cisco.com/web/consumer/support/index.html
Safety First
Before using this adapter, read the IMPORTANT SAFETY INSTRUCTIONS
section in the safety sheet.
Serial Number and MAC Address
Your service provider may ask for the serial number or the MAC address of
the adapter if your system requires troubleshooting in the future.
Look for the serial number and the MAC address on the bottom of the
adapter.
Write the serial number here: ____________________
Write the MAC address here: ____________________
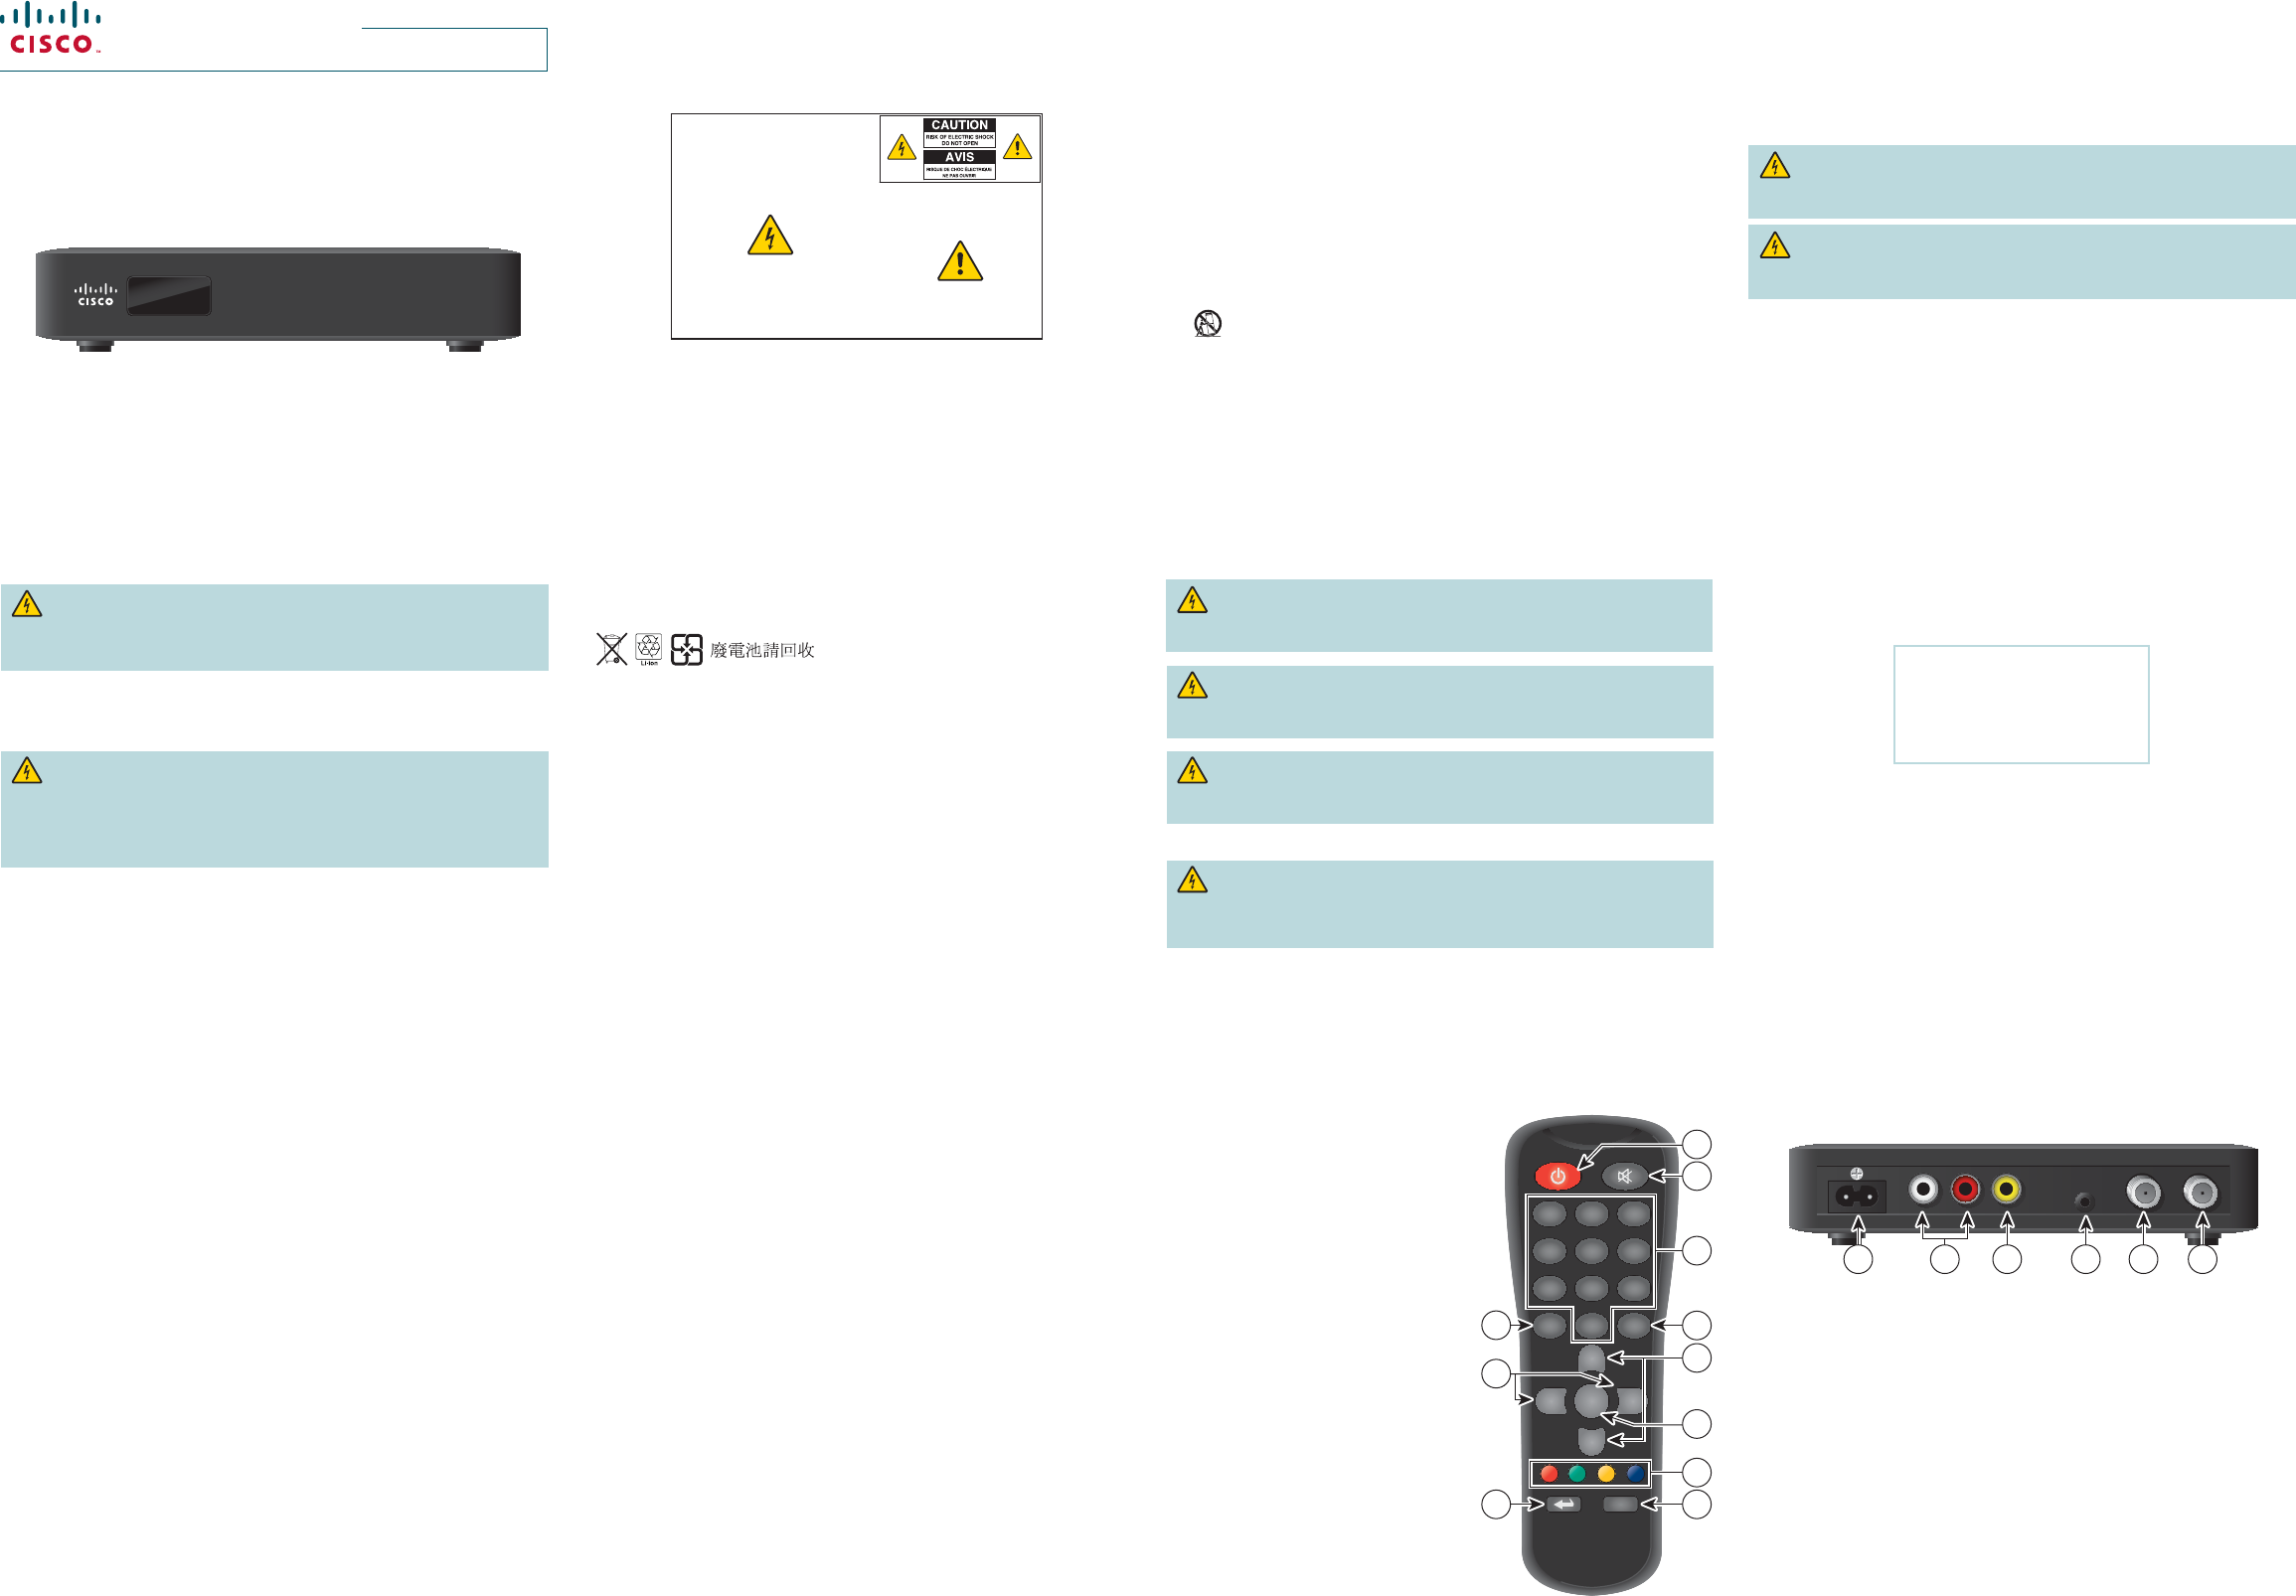
Back PanelAbout the Remote Control
1 Power Power on and o
2 Mute Mute audio
3 0–9 Display speci c channels
4 FAV Display the Favorites list
5 CH+/ Scroll through channels
CH-
6 OK Display the Favorites list
7 Red Reserved for future use
Green Display the Options menu
Yellow Display messages
Blue Switch between
TV/Radio channels
8 MENU Display the Services Portal
9 Exit Exit menus
10 VOL+/ Adjust volume
VOL-
11 NAV Display the Navigator bar
Note: This illustration may vary from the
actual product.
1 Power Connects to power cord
2 CVBS Connects to the composite video input of the TV
3 R/L Connects to left/right audio inputs of the TV
4 IR In Connects the IR extension cable
5 TV Out Connects to the RF input of the TV
6 Cable In Connects to the coaxial cable that delivers the signal from
your service provider
Note: This illustration may vary from the actual product.
2
9 10 11
Note to System Installer
CAUTION: To reduce the risk of electric shock, do not
remove cover (or back). No user-serviceable parts
inside. Refer servicing to qualified service personnel.
WARNING
TO PREVENT FIRE OR ELECTRIC SHOCK, DO NOT
EXPOSE THIS UNIT TO RAIN OR MOISTURE.
For this apparatus, the coaxial cable shield/screen shall be
grounded as close as practical to the point of entry of the cable
into the building. For products sold in the US and Canada, this
reminder is provided to call the system installer's attention to
Article 820-93 and Article 820-100 of the NEC (or Canadian
Electrical Code Part 1), which provides guidelines for proper
grounding of the coaxial cable shield.
This symbol is intended to alert you that uninsulated voltage
within this product may have sufficient magnitude to cause
electric shock.Therefore, it is dangerous to make any kind of
contact with any inside part of this product.
Ce symbole a pour but d’alerter toute personne qu’un contact
avec une pièce interne de ce produit, sous tension et non isolée,
pourrait être suffisant pour provoquer un choc électrique. Il est
donc dangereux d’être en contact avec toute pièce interne de
ce produit.
This symbol is intended to alert you of the presence
of important operating and maintenance (servicing)
instructions in the literature accompanying this product.
Ce symbole a pour but de vous avertir qu’une
documentation importante sur le fonctionnement et
l’entretien accompagne ce produit.
3 4
12
PDS1100
1) Read these instructions.
2) Keep these instructions.
3) Heed all warnings.
4) Follow all instructions.
5) Do not use this apparatus near water.
6) Clean only with dry cloth.
7) Do not block any ventilation openings. Install in accordance with the
manufacturer’s instructions.
8) Do not install near any heat sources such as radiators, heat registers,
stoves, or other apparatus (including amplifiers) that produce heat.
9) Do not defeat the safety purpose of the polarized or grounding-type plug. A
polarized plug has two blades with one wider than the other. A grounding-
type plug has two blades and a third grounding prong. The wide blade or the
third prong are provided for your safety. If the provided plug does not fit
into your outlet, consult an electrician for replacement of the obsolete outlet.
10) Protect the power cord from being walked on or pinched particularly at plugs,
convenience receptacles, and the point where they exit from the apparatus.
11) Only use attachments/accessories specified by the manufacturer.
12) Use only with the cart, stand, tripod, bracket, or table specified by the
manufacturer, or sold with the apparatus. When a cart is used, use
caution when moving the cart/apparatus combination to avoid injury
from tip-over.
13) Unplug this apparatus during lightning storms or when unused for long
periods of time.
14) Refer all servicing to qualified service personnel. Servicing is required when
the apparatus has been damaged in any way, such as a power-supply cord
or plug is damaged, liquid has been spilled or objects have fallen into the
apparatus, the apparatus has been exposed to rain or moisture, does not
operate normally, or has been dropped.
Power Source Warning
A label on this product indicates the correct power source for this product. Operate
this product only from an electrical outlet with the voltage and frequency indicated on
the product label. If you are uncertain of the type of power supply to your home or
business, consult your service provider or your local power company.
The AC inlet on the unit must remain accessible and operable at all times.
Ground the Product
WARNING: Avoid electric shock and re hazard! If this product connects to
coaxial cable wiring, be sure the cable system is grounded (earthed). Grounding
provides some protection against voltage surges and built-up static charges.
WARNING: Avoid electric shock and re hazard! Do not locate an outside
antenna system in the vicinity of overhead power lines or power circuits.
Touching power lines or circuits might be fatal.
This product may contain a tuner capable of receiving o -the-air broadcasts.
Protect the Product from Lightning
In addition to disconnecting the AC power from the wall outlet, disconnect the signal
inputs.
Verify the Power Source from the On/O Power Light
When the on/o power light is not illuminated, the apparatus may still be connected to
the power source. The light may go out when the apparatus is turned o , regardless of
whether it is still plugged into an AC power source.
5 6 78
Eliminate AC Power/Mains Overloads
WARNING: Avoid electric shock and re hazard! Do not overload AC
power/mains, outlets, extension cords, or integral convenience receptacles.
For products that require battery power or other power sources to operate
them, refer to the operating instructions for those products.
Handling Disposable Batteries
This product may contain disposable batteries. Heed the following warning and follow
the Battery Safety and Battery Disposal instructions below.
WARNING: There is danger of explosion if the battery is mishandled
or incorrectly replaced. Replace only with the same type of battery. Do not
disassemble it or attempt to recharge it outside the system. Do not crush,
puncture, dispose of in re, short the external contacts, or expose to water or
other liquids. Dispose of the battery in accordance with local regulations and
instructions from your service provider.
Battery Safety
• Insert batteries correctly. There may be a risk of explosion if the batteries are
incorrectly inserted.
• Do not attempt to recharge ‘disposable’ or ‘non-reusable’ batteries.
• Please follow instructions provided for charging ‘rechargeable’ batteries.
• Replace batteries with the same or equivalent type that we recommend.
• Do not expose batteries to excessive heat (such as sunlight or re).
• Do not expose batteries to temperatures above 100°C (212°F).
OK
+
CH
CH
–
VOL
–
VOL
+
1 2 3
4 5 6
7 8 9
NAV 0FAV
MENU
T15350
2
4
89
11
1
6
3
5
7
10
Protect from Exposure to Moisture and Foreign Objects
WARNING: Avoid electric shock and re hazard! Do not expose this
product to dripping or splashing liquids, rain, or moisture. Objects lled with
liquids, such as vases, should not be placed on this apparatus.
WARNING: Avoid electric shock and re hazard! Unplug this product
before cleaning. Do not use a liquid cleaner or an aerosol cleaner. Do not use a
magnetic/static cleaning device (dust remover) to clean this product.
WARNING: Avoid electric shock and re hazard! Never push objects
through the openings in this product. Foreign objects can cause electrical
shorts that can result in electric shock or re.
Service Warnings
WARNING: Avoid electric shock! Do not open the cover of this product.
Opening or removing the cover may expose you to dangerous voltages. If you
open the cover, your warranty will be void. This product contains no user-
serviceable parts.
Check Product Safety
Upon completion of any service or repairs to this product, the service technician must
perform safety checks to determine that this product is in proper operating condition.
Protect the Product When Moving It
Always disconnect the power source when moving the apparatus or connecting or
disconnecting cables.
20110316_Cable_Safety
Cisco PDS1100 iDTA Adapter
Model: PDS1100
Manufactured by:
Cisco Systems, Inc.
5030 Sugarloaf Parkway
Lawrenceville, Georgia 30044 USA
Notice to Consumers
The Cisco® PDS1100 Series Adapter receives digital signals from your service provider
and delivers programs in standard de nition.
Please read the safety instructions before connecting the adapter.
For PLUGGABLE EQUIPMENT, the socket-outlet shall be installed near the equipment
and shall be easily accessible.
FCC Notice
This device has been tested and found to comply with the limits for a Class B digital
device pursuant to Part 15 of the FCC Rules. These limits are designed to provide
reasonable protection against harmful interference in a residential installation. This
device generates, uses, and can radiate radio frequency energy and, if not installed
and used in accordance with the instructions, may cause harmful interference to radio
communications.
However, there is no guarantee that interference will not occur in a particular installation.
If this device does cause harmful interference to radio or television reception, which can
be determined by turning the device o and on, the user is encouraged to try to correct
the interference by one or more of the following measures:
• Reorient or relocate the receiving antenna
• Increase the separation between the device and receiver
• Connect the device into an outlet on a circuit di erent from that to which the receiver
is connected
• Consult the dealer or an experienced radio/television technician for help.
Note: The manufacturer is not responsible for any radio or TV interference caused by
unauthorized modi cations to this equipment. Such modi cations could void the user’s
authority to operate the equipment.
Open Source GNU GPL Statement
Cisco PDS1100 iDTA Digital Transport Adapter contain(s), in part, certain free/open
source software (“Free Software”) under licenses which generally make the source
code available for free copy, modi cation, and redistribution. Examples ofsuchlicenses
include all the licenses sponsored by the Free Software Foundation (e.g. GNU General
Public License (GPL), GNU Lesser General Public License (LGPL), Berkeley Software
Distribution (BSD), the MIT licenses and di erent versions of the Mozilla and Apache
licenses). To nd additionalinformation regarding the Free Software, including a copy
of the applicable license and related information, please go to: (i) for North America
http://www.cisco.com/web/consumer/support/open_source.html, or (ii) for
outside North America http://www.cisco.com/web/consumer/support/open_
source.html#~international. Once at the site, search for the product listing and click
on the related items identi ed. If you have any questions or problems accessing any of
the links, please contact: spvtg-external-opensource-requests@cisco.com.
CVBS IR IN CABLE OUT CABLE INRL
T16058
1 42 5 63

Disclaimer
Cisco Systems, Inc. assumes no responsibility for errors or omissions that
may appear in this guide. We reserve the right to change this guide at any
time without notice.
Wall Mounting
Follow these steps to mount the adapter on a wall.
1. Secure two screws 98 millimeters (3.86 inches) apart into a wall, with the
space between the underside of each screw head and the surface of the
wall equal to 6.5 millimeters (1/4 inch).
2. Locate the mounting screw slots on the bottom of the adapter.
3. Hang the adapter on the screws.
CAUTION: If you mount the adapter into drywall, you must
secure the screws with two wall anchors. If you do not anchor the
adapter properly, the cable connections could pull the adapter from
the wall.
Cisco and the Cisco logo are trademarks or registered trademarks of Cisco and/or its a liates in the U.S. and other
countries. To view a list of Cisco trademarks, go to this URL: www.cisco.com/go/trademarks. Third-party trademarks
mentioned are the property of their respective owners. The use of the word partner does not imply a partnership
relationship between Cisco and any other company. (1110R)
Manufactured under license from Dolby Laboratories. Dolby and the double-D symbol are trademarks of Dolby
Laboratories.
© 2013 Cisco and/or its a liates. All rights reserved.
Last Updated: July 2013
78-100200-01
Printed in China
Factory Settings
Selecting Factory Settings will reset your adapter to the default selections.
Troubleshooting
If the adapter does not perform as expected, the following tips may help. If
you need further assistance, contact your service provider.
No Picture
• Plug the TV and adapter into an electrical outlet that has been veri ed to
have power.
• Verify that all cables are properly connected.
• Verify that the Power to the TV is turned on.
• Verify that the TV is set to the proper input.
No Color
• Verify that the current TV program is broadcast in color.
• Adjust the TV color controls.
• Verify that all cables are properly connected.
No Sound
• Verify that the TV and adapter are properly connected to an electrical outlet.
• Verify that all cables are properly connected.
• Verify that the TV is set to the proper input.
• Verify that the volume is turned on for both the TV and the adapter.
Note: This illustration may vary from the actual product.
20
21 22 23
In the nal Setup Wizard screen, you
can con rm the settings you have
selected. Press OK.
Set Up Parental Control
PIN
1. Press Menu to display the
Services Portal screen.
2. Press CH+ or CH- to highlight
Settings.
3. Press OK to select
Settings.
Favorites
Displays the Favorites list. From
the Favorites list, you can choose
pre-de ned bouquets/favorites and
any bouquets/favorites that you have
created.
8. Enter a four-digit number that is
meaningful to you.
9. Press OK.
10. Press the Exit key twice to
close the menus.
Important: Write down the PIN you
chose in step 8. You will use the PIN
to block and unblock TV programs
or channels for viewing.
Service Portal Options
Press MENU to display the Services
Portal. From the Services Portal,
press CH+ and CH- to highlight
a service, and then press OK to
select the service. Follow on-screen
instructions to use the service.
Channel List
Lists all channels for you to scroll
through and select a channel to watch.
Mosaic
Lists Mosaic channels (if supported
by your service provider). A Mosaic
channel displays four channels on
the TV screen at once. For example,
a Sports Pick mosaic channel would
display four di erent sports channels
at once.
Settings
Lists default system settings for you
to change.
4. Press CH- four times to highlight
Set Block PIN/Set PIN.
5. Press OK to select this setting.
13 14 15 16
Messages
Displays messages sent to you by
your service provider.
18 1917
Setup Wizard
The rst time you turn on the adapter,
the system begins the auto scan.
Note: Read and follow the Setup
Wizard on-screen instructions.
In the next Setup Wizard screen, you
can select English as the language
the adapter will use for audio and for
menus and subtitles. Press OK.
1. Unplug all electronic devices before connecting the adapter.
2. Connect the adapter to the coaxial cable coming in from the wall.
3. Connect an IEC cable from the adapter to your TV.
4. Plug the DC cord from the external power supply into the adapter.
5. Plug the adapter’s external power supply and the TV into an AC power source.
6. If you purchased an approved IR Extender from your service provider, read
and follow the installation instructions for the IR Extender. The IR Extender
is an optional accessory.
7. Press the POWER key on the remote control.
Note: This illustration may vary from the actual product.
When the auto scan completes,
the Setup Wizard screen appears.
From the Setup Wizard screen, you
can select the default language and
audio and video settings. Press OK.
In the next Setup Wizard screen,
you can choose the audio mode the
adapter will use for every channel.
Press VOL– or VOL+ to scroll
through the audio options.
When the option you want to use is
shown, press OK.
6. Press 4-3-2-1 to enter the default
PIN.
Note: The rst time you set the
PIN, you must enter the Default
PIN number (4321). Later, you
will be prompted to enter a
four-digit PIN number that is
meaningful to you.
7. Press OK.
Connecting to a TV
WARNING: Electric shock hazard! Unplug all electronic devices
before connecting or disconnecting any device cables to the adapter.
CVBS IR IN CABLE OUT CABLE INRL
Cable In
Back
of TV Cable
Input
T16060
To Wall Jack
Cisco TAN: XX-XXXXX-XX
Manufacture Date: XXXXXXXX
Input 12V , 1.67A
Digital Set-Top
Model: PDS1100
Cisco PID: XXXXXXXXXX
This device complies with part 15 of the FCC rules.
Operations subject to the following two conditions:
(1)This device may not cause harmful interference,
and (2)This device must accept any interference
received, including interference that may cause
undesired operation.
E362186
All Rights Reserved. Manufactured under license from Cisco
Systems, Inc. PowerKEY is a registered trademark of Cisco Systems, Inc.
XXXXXXXX Made in XXXXX
S/N XXXXXXXXXX
MAC XXXXXXXXXXXXXX
T16059
Mounting Holes