Cisco Systems All Gateway Controller Installation Manual MNM_INS
Media Gateway Controller Node Manager to the manual e9e1d362-fe84-43d7-bf80-a78828216c6e
2015-01-05
: Cisco-Systems Cisco-Systems-All-Gateway-Controller-Installation-Manual-202352 cisco-systems-all-gateway-controller-installation-manual-202352 cisco-systems pdf
Open the PDF directly: View PDF ![]() .
.
Page Count: 46
- Cisco Media Gateway Controller Node Manager Installation Guide
- Contents
- Preface
- Installation Overview and Planning
- Installing Cisco MNM
- Performing a New Installation of Cisco MNM
- Task 1: Gather Installation Software and Required Information
- Task 2: Ensure That Network Devices Have the Correct Software
- Task 3: Plan and Execute Hard Drive Partitioning
- Task 4: Ensure That the Sun Solaris 10 Operating System Is Installed
- Task 5: Make System Configuration Modifications
- Task 6: Obtain a Cisco EMF License
- Task 7: Install CiscoView 6.1.8 on a Solaris 10 Operating System
- Task 8: Install Cisco EMF 3.2
- Task 9: Install Cisco MNM Release 2.8(1) and Verify the Installation
- Task 10: Install the CiscoView Security Module
- Task 11: Set Up the X Terminal Workstations for Remote Access
- Task 12. Synchronize Time
- Task 13: Configure Network Devices to Forward Alarms
- Upgrading from Previous Cisco MNM Releases
- Uninstalling Cisco MNM
- Displaying Current Cisco MNM Release Packages
- Viewing Help for Cisco MNM Install Scripts
- Uninstalling Cisco EMF
- Troubleshooting Common Installation Problems
- Performing a New Installation of Cisco MNM
- Index

THE SPECIFICATIONS AND INFORMATION REGARDING THE PRODUCTS IN THIS MANUAL ARE SUBJECT TO CHANGE WITHOUT NOTICE. ALL
STATEMENTS, INFORMATION, AND RECOMMENDATIONS IN THIS MANUAL ARE BELIEVED TO BE ACCURATE BUT ARE PRESENTED WITHOUT
WARRANTY OF ANY KIND, EXPRESS OR IMPLIED. USERS MUST TAKE FULL RESPONSIBILITY FOR THEIR APPLICATION OF ANY PRODUCTS.
THE SOFTWARE LICENSE AND LIMITED WARRANTY FOR THE ACCOMPANYING PRODUCT ARE SET FORTH IN THE INFORMATION PACKET THAT
SHIPPED WITH THE PRODUCT AND ARE INCORPORATED HEREIN BY THIS REFERENCE. IF YOU ARE UNABLE TO LOCATE THE SOFTWARE LICENSE
OR LIMITED WARRANTY, CONTACT YOUR CISCO REPRESENTATIVE FOR A COPY.
The Cisco implementation of TCP header compression is an adaptation of a program developed by the University of California, Berkeley (UCB) as part of UCB’s public
domain version of the UNIX operating system. All rights reserved. Copyright © 1981, Regents of the University of California.
NOTWITHSTANDING ANY OTHER WARRANTY HEREIN, ALL DOCUMENT FILES AND SOFTWARE OF THESE SUPPLIERS ARE PROVIDED “AS IS” WITH
ALL FAULTS. CISCO AND THE ABOVE-NAMED SUPPLIERS DISCLAIM ALL WARRANTIES, EXPRESSED OR IMPLIED, INCLUDING, WITHOUT
LIMITATION, THOSE OF MERCHANTABILITY, FITNESS FOR A PARTICULAR PURPOSE AND NONINFRINGEMENT OR ARISING FROM A COURSE OF
DEALING, USAGE, OR TRADE PRACTICE.
IN NO EVENT SHALL CISCO OR ITS SUPPLIERS BE LIABLE FOR ANY INDIRECT, SPECIAL, CONSEQUENTIAL, OR INCIDENTAL DAMAGES, INCLUDING,
WITHOUT LIMITATION, LOST PROFITS OR LOSS OR DAMAGE TO DATA ARISING OUT OF THE USE OR INABILITY TO USE THIS MANUAL, EVEN IF CISCO
OR ITS SUPPLIERS HAVE BEEN ADVISED OF THE POSSIBILITY OF SUCH DAMAGES.
CCDE, CCENT, Cisco Eos, Cisco Lumin, Cisco Nexus, Cisco StadiumVision, Cisco TelePresence, Cisco WebEx, the Cisco logo, DCE, and Welcome to the Human Network
are trademarks; Changing the Way We Work, Live, Play, and Learn and Cisco Store are service marks; and Access Registrar, Aironet, AsyncOS, Bringing the Meeting To
You, Catalyst, CCDA, CCDP, CCIE, CCIP, CCNA, CCNP, CCSP, CCVP, Cisco, the Cisco Certified Internetwork Expert logo, Cisco IOS, Cisco Press, Cisco Systems,
Cisco Systems Capital, the Cisco Systems logo, Cisco Unity, Collaboration Without Limitation, EtherFast, EtherSwitch, Event Center, Fast Step, Follow Me Browsing,
FormShare, GigaDrive, HomeLink, Internet Quotient, IOS, iPhone, iQuick Study, IronPort, the IronPort logo, LightStream, Linksys, MediaTone, MeetingPlace,
MeetingPlace Chime Sound, MGX, Networkers, Networking Academy, Network Registrar, PCNow, PIX, PowerPanels, ProConnect, ScriptShare, SenderBase, SMARTnet,
Spectrum Expert, StackWise, The Fastest Way to Increase Your Internet Quotient, TransPath, WebEx, and the WebEx logo are registered trademarks of Cisco Systems, Inc.
and/or its affiliates in the United States and certain other countries.
All other trademarks mentioned in this document or website are the property of their respective owners. The use of the word partner does not imply a partnership relationship
between Cisco and any other company. (0809R)
Any Internet Protocol (IP) addresses used in this document are not intended to be actual addresses. Any examples, command display output, and figures included in the
document are shown for illustrative purposes only. Any use of actual IP addresses in illustrative content is unintentional and coincidental.
Cisco Media Gateway Controller Node Manager Installation Guide
© 2008 Cisco Systems, Inc. All rights reserved.

iii
Cisco Media Gateway Controller Node Manager Installation Guide
OL-18332-01
CONTENTS
Preface v
Document Objectives v
Audience v
Related Documentation v
Obtaining Documentation and Submitting a Service Request vi
Document Change History vi
CHAPTER
1Installation Overview and Planning 1-1
Installation Overview 1-1
Who Should Install Cisco MNM? 1-1
Determine Your Hardware Requirements 1-2
Supported Configurations 1-3
Hardware Requirements 1-4
Disk Drives and Database Storage 1-4
Installation Checklist 1-5
CHAPTER
2Installing Cisco MNM 2-1
Performing a New Installation of Cisco MNM 2-1
Task 1: Gather Installation Software and Required Information 2-1
Installation Software 2-1
Required Information 2-3
Task 2: Ensure That Network Devices Have the Correct Software 2-4
Task 3: Plan and Execute Hard Drive Partitioning 2-4
Task 4: Ensure That the Sun Solaris 10 Operating System Is Installed 2-5
Task 5: Make System Configuration Modifications 2-5
Setting Up IP and Remote User Access Files 2-6
DNS Configurations 2-6
Task 6: Obtain a Cisco EMF License 2-6
Task 7: Install CiscoView 6.1.8 on a Solaris 10 Operating System 2-7
Task 8: Install Cisco EMF 3.2 2-9
Installing on the Management Server 2-9
Installing on the Presentation Server 2-10
Installing Cisco EMF Service Packs 2-11
Installing the Cisco EMF SSH Add-On Package 2-12

Contents
iv
Cisco Media Gateway Controller Node Manager Installation Guide
OL-18332-01
Starting Cisco EMF 2-13
Task 9: Install Cisco MNM Release 2.8(1) and Verify the Installation 2-13
Installing Cisco MNM 2-14
Starting Cisco MNM 2-17
Getting Started with Secure Communications on Cisco MNM 2-18
Task 10: Install the CiscoView Security Module 2-19
Task 11: Set Up the X Terminal Workstations for Remote Access 2-20
Creating an XDMCP Connection 2-20
Creating a Workstation Connection 2-20
Fixing Insufficient Color Problems 2-21
Task 12. Synchronize Time 2-21
Task 13: Configure Network Devices to Forward Alarms 2-21
Upgrading from Previous Cisco MNM Releases 2-21
Backing Up Your Databases 2-23
Uninstalling Cisco MNM 2-23
Displaying Current Cisco MNM Release Packages 2-24
Viewing Help for Cisco MNM Install Scripts 2-25
Uninstalling Cisco EMF 2-25
Troubleshooting Common Installation Problems 2-26
I
NDEX

v
Cisco Media Gateway Controller Node Manager Installation Guide
OL-18332-01
Preface
This preface describes the objectives of this document and explains how to find additional information
on related products and services. It contains the following sections:
• Document Objectives, page v
• Audience, page v
• Related Documentation, page v
• Obtaining Documentation and Submitting a Service Request, page vi
• Document Change History, page vi
Document Objectives
This installation guide provides information for installing and configuring the Cisco Media Gateway
Controller (MGC) Node Manager (MNM). It also contains reference information for administrators,
service technicians, and users.
Audience
The Cisco MGC Node Manager (Cisco MNM) Installation Guide is designed for
• System administrators who install and configure Cisco MNM
• Network Operations Center (NOC) personnel who use Cisco MNM to monitor the network and
respond to events and alarms
This document describes Cisco MNM in the context of the Cisco Element Management Framework
(Cisco EMF).
Cisco MNM enhances some capabilities of Cisco EMF. Therefore, this manual includes links to
Cisco EMF documentation. You need to be familiar with both Cisco EMF and Cisco MNM to use some
of the customizable features of Cisco MNM.
Related Documentation
The documents that contain information related to Cisco Media Gateway Controller Node Manager are
at the following URL:
vi
Cisco Media Gateway Controller Node Manager Installation Guide
OL-18332-01
Preface
http://www.cisco.com/en/US/products/sw/netmgtsw/ps1912/tsd_products_support_series_home.html
The documents that contain information related to the Cisco PGW 2200 Softswitch are at the following
URL:
http://www.cisco.com/en/US/products/hw/vcallcon/ps2027/tsd_products_support_series_home.html
You can also find the Cisco PGW 2200 Softswitch Documentation Map at the following URL:
http://www.cisco.com/en/US/products/hw/vcallcon/ps2027/products_documentation_roadmaps_list.ht
ml
Obtaining Documentation and Submitting a Service Request
For information on obtaining documentation, submitting a service request, and gathering additional
information, see the monthly What’s New in Cisco Product Documentation, which also lists all new and
revised Cisco technical documentation at
http://www.cisco.com/en/US/docs/general/whatsnew/whatsnew.html
Subscribe to the What’s New in Cisco Product Documentation as a Really Simple Syndication (RSS) feed
and set content to be delivered directly to your desktop using a reader application. The RSS feeds are a free
service and Cisco currently supports RSS version 2.0.
Document Change History
Release Number Document Number Change Date Change Summary
2.8(1) OL-18332-01 December 2008 Initial release
CHAPTER
1-1
Cisco Media Gateway Controller Node Manager Installation Guide
OL-18332-01
1
Installation Overview and Planning
This chapter provides overview and planning information for installation of the Cisco Media Gateway
Controller (MGC) Node Manager (MNM). Chapter 2 provides detailed installation procedures.
Note In Cisco MNM Release 2.8(1), the Cisco Voice Services Provisioning Tool (VSPT) is packaged with
Cisco MNM.
The following topics are covered in this chapter:
• Installation Overview, page 1-1
• Determine Your Hardware Requirements, page 1-2
• Installation Checklist, page 1-5
Installation Overview
Successful network management using Cisco MNM begins with a well planned and carefully executed
installation. Network element management involves many interdependent factors, including:
• The correct Sun server for your network size
• The correct software release and patch levels on managed devices
• The correct installation of Cisco Element Management Framework (EMF), the foundation software
for Cisco MNM
• Performing installation tasks in the required order, so that required items are in place
To organize the installation process, use the Installation Checklist, page 1-5 to plan and execute your
installation. Read through the checklist and check off each task as it is completed.
Who Should Install Cisco MNM?
Installing Cisco MNM involves setting up hard drives, and checking and modifying system files, tasks
that are best performed by a system administrator with good knowledge of the Solaris operating system.

1-2
Cisco Media Gateway Controller Node Manager Installation Guide
OL-14272-02
Chapter 1 Installation Overview and Planning
Determine Your Hardware Requirements
Determine Your Hardware Requirements
The hardware required and the way Cisco MNM is installed depend on the size of the network you are
managing and the amount of data you collect. Use this section to determine your hardware requirements
and software configurations.
Cisco EMF and Cisco MNM consist of server and client software. You can manage all small, medium,
and most large networks from a single server using the Sun T2000 server which combines the client and
server software. The multi-core, multi-thread architecture of Sun T2000 servers works well with VNC.
It gives each VNC server a processor thread and keeps X-terminal traffic off the network. The
combination of the Sun T2000 server and VNC for Cisco MNM provides excellent operator response
time, even when your access is over WAN network connections. Here is a breakdown of the client and
server roles in the situation that the distributed approach is needed:
Server Software
• Network management, including management of databases that contain network information, store
alarms, and performance data
• GUI applications, with user interaction, when Cisco MNM is installed on a standalone server
Client Software
• GUI applications, with which users interact.
The Cisco EMF and Cisco MNM software runs on a separate machine, or on machines other than the
Cisco MGC host. In a small network, server and client software might reside on a single machine (a
standalone configuration). In larger networks, the software is installed on two or more machines in the
following distributed configuration:
• One machine, known as the Management server, contains the server software (including the
ObjectStore database management software included with Cisco EMF) and client software
• One machine, known as the Presentation server, contains the client software only. In some large
networks, more than one Presentation server might be required.
In either configuration, users typically access Cisco MNM from X terminal workstations that run the
Client software through a Telnet session. In the distributed configuration, the X terminal workstations
connect directly to the Presentation server to run the Client software.
See the standalone and distributed configurations illustrated in Figure 1-1.
1-3
Cisco Media Gateway Controller Node Manager Installation Guide
OL-14272-01
Chapter 1 Installation Overview and Planning
Determine Your Hardware Requirements
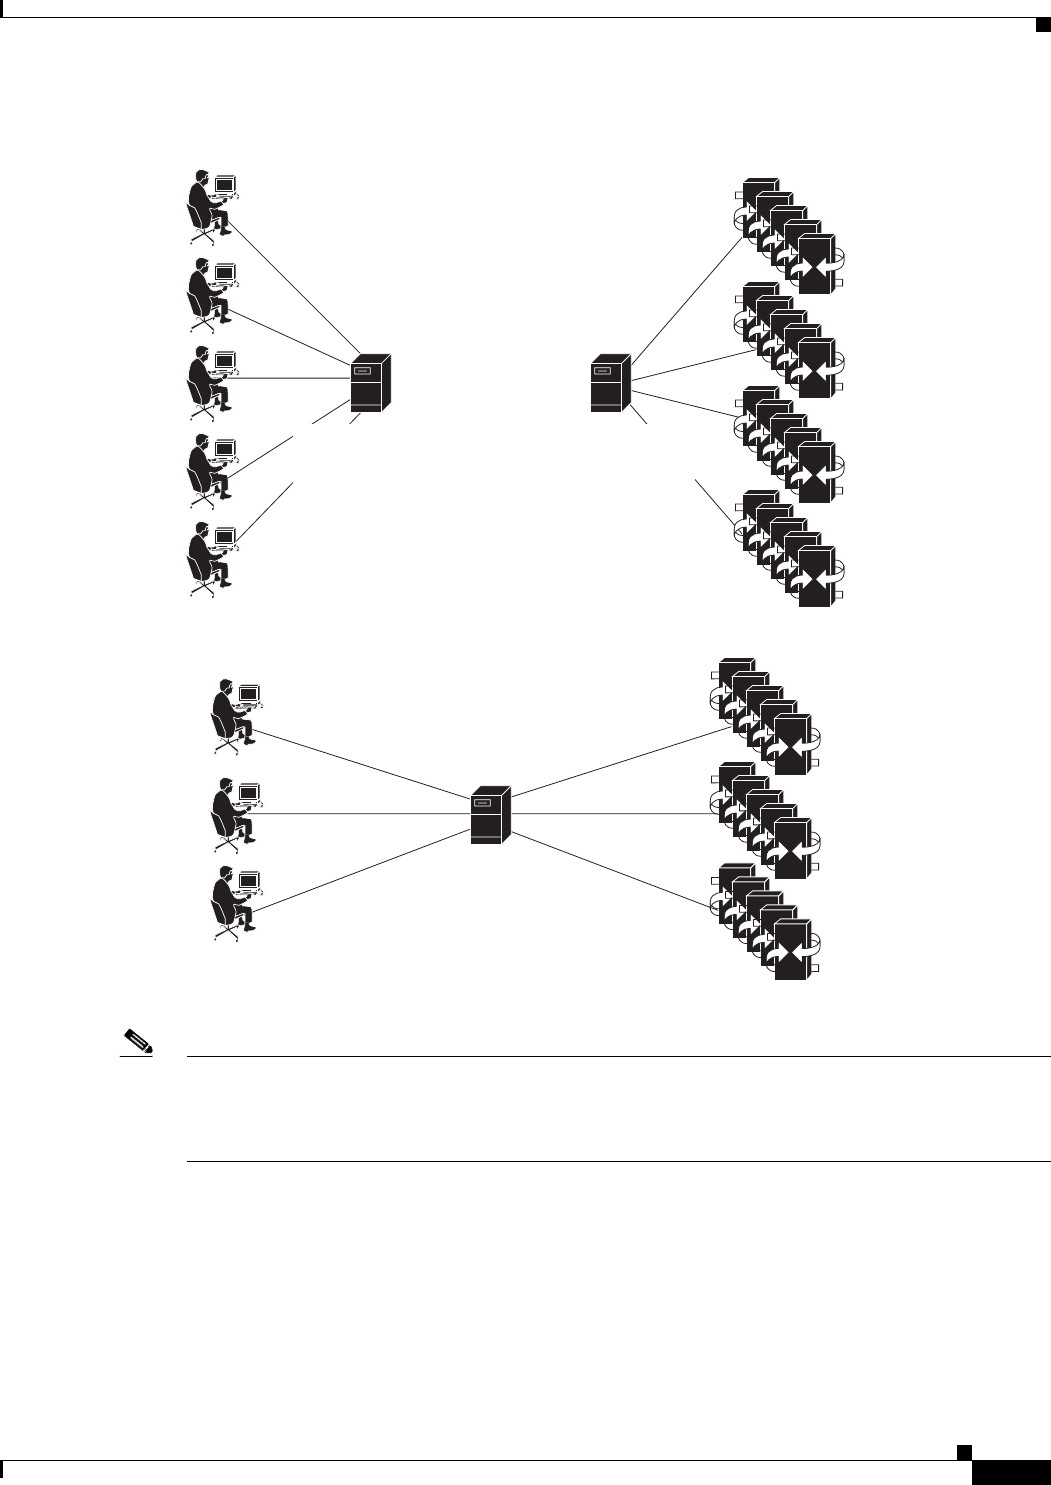
Figure 1-1 Standalone and Distributed Configurations
Note The Management server is sometimes called the Database server. The Presentation server is sometimes
called the Client, GUI, or Application server. To avoid confusion, this document uses Management
server and Presentation server consistently, and these terms denote the machines in a distributed
configuration, not the software that resides on them.
The Cisco MNM client simultaneously supports up to ten X terminal users or VNC users. The exact
number supported in a given installation depends on your processing resources, and the network size.
Supported Configurations
The following configurations are supported:
• Cisco MNM and Cisco VSPT installed together on a network management server (recommended)
Distributed Configuration
Standalone Configuration
Presentation Server
Cisco EMF and
Cisco MNM
Client Software only
Managment Server
Cisco EMF and Cisco MNM
Client software and Server
software (including
ObjectStore database)
Cisco EMF and Cisco MNM
Client software and Server
software (including
ObjectStore database)
X terminal
workstations
X terminal
workstations Cisco MGC nodes
Cisco MGC nodes
120692
1-4
Cisco Media Gateway Controller Node Manager Installation Guide
OL-14272-02
Chapter 1 Installation Overview and Planning
Determine Your Hardware Requirements
• Cisco VSPT (only) installed on a Cisco PGW 2200 Softswitch host machine
• Cisco MNM installed on a network management server and Cisco VSPT installed on a separate
server
Caution Cisco MNM is not supported on a Cisco PGW 2200 Softswitch host machine.
Hardware Requirements
The Cisco MNM hardware requirements for various network sizes are described in Table 1-1. Except in
a very small network, each operator requires an X terminal workstation.
Note Disk drive requirements are based on the number of drives. The Cisco MNM host machine requires the
minimum number of drives indicated in Table 1-1. These are recommendations to aid you in planning.
The total amount of disk space required depends on many factors, such as the amount of alarm and
performance data collected.
Disk Drives and Database Storage
In a medium or large network, using multiple disk drives to store databases helps alleviate I/O
bottlenecks and improves software performance. If you are using multiple disk drives for database
storage, or you expect to generate large database files, use raw partitions, as described in the Cisco
Element Management Framework Installation and Administration Guide at
http://www.cisco.com/en/US/docs/net_mgmt/element_manager_system/3.2_service_pack_7/installatio
n/guide/3_2p7adm.pdf
Note If you are using Unix File System (UFS) partitions, installing more than one drive for database storage
does not improve performance because the databases cannot span multiple partitions.
Ta b l e 1-1 Hardware Requirements for Cisco MNM Host Machine(s)
Cisco PGW 2200 Softswitch
Number, Network Size
Small Network, 1-3 Operators,
1-3 Pairs of
Cisco PGW 2200 Softswitch
Medium Network
, 4-6 Operators, 6-10 Pairs of
Cisco PGW 2200 Softswitch
Large Network, 7-10
Operators, 11-20 Pairs of
Cisco PGW 2200 Softswitch
RAM (GB) 8816
Swap (GB) 8816
Disk drives 2 x 73 G1
1. Two-drive machines work for smaller networks that have less traffic and fewer operators. Response time to operator commands slows down as the
network grows and additional operators are added.
4 x 73 G RAID 0 (maximum
performance)
or
4 x 73 G RAID 0+1 (for
stability)
4 x 73 G RAID 0 (maximum
performance)
or
4 x 73 G RAID 0+1 (for
stability)
CPU T2000—4 Core T2000—4 Core T2000—8 Core

1-5
Cisco Media Gateway Controller Node Manager Installation Guide
OL-14272-01
Chapter 1 Installation Overview and Planning
Installation Checklist
Installation Checklist
This checklist summarizes the tasks required for an initial installation of Cisco MNM. The procedures
for completing each task are provided in the following chapter.
We recommend that you print out the checklist and use it during the installation. Perform the tasks in
sequence unless otherwise noted.
Before You Begin
Note Read the release notes. If information there differs from what is presented here, use
the information in the release notes.
Determine Your Hardware Requirements, as described in this chapter.
___ Task 1: Gather Installation Software and Required Information.
___ Task 2: Ensure That Network Devices Have the Correct Software.
___ Task 3: Plan and Execute Hard Drive Partitioning.
___ Task 4: Ensure That the Sun Solaris 10 Operating System Is Installed.
___ Task 5: Make System Configuration Modifications.
___ Task 6: Obtain a Cisco EMF License.
___ Task 7: Install CiscoView 6.1.8 on a Solaris 10 Operating System. This task is required only
if you want to manage Cisco ITP-Ls or LAN switches from Cisco MNM, which uses the
CiscoView server as the management interface.
CiscoView now ships as part of LMS 3.1 with MGC Node Manager. Only the CiscoView part
of LMS is provided. To obtain licenses for other LMS features, order LMS 3.1 from the
Cisco.com website.
Cisco MNM Release 2.8(1) includes CiscoView for Solaris 10 only. CiscoView for Solaris 8
is not provided with the Cisco MNM media kit. However, previous CiscoView versions
shipped with previous Cisco MNM media kits can be re-used. New Cisco MNM customers
should be using Solaris 10 for best long-term satisfaction and full CiscoView support. New
Cisco MNM customers who only use Solaris 8 operating systems must obtain CiscoView for
Solaris 8 separately, possibly by purchasing the appropriate LMS 2.5.1 package.
___ Task 8: Install Cisco EMF 3.2.
___ Task 9: Install Cisco MNM Release 2.8(1) and Verify the Installation.
Note If you want to install other element managers to run co-resident with Cisco MNM,
install them now.
___ Task 10: Install the CiscoView Security Module (if you are using CiscoView).
___ Task 11: Set Up the X Terminal Workstations for Remote Access. The CiscoView Security
module restricts non-MNM users from accessing the CiscoView Web client. If you want to be
able to access the CiscoView external web browser, do not install this module.
___ Task 12. Synchronize Time.
___ Task 13: Configure Network Devices to Forward Alarms. This task, which must be completed
before Cisco MNM can collect alarm information from network devices, is covered in Chapter
2 in the “Configuring Network Devices for Management” section of the Cisco Media Gateway
Controller Node Manager User Guide, Release 2.8(1).

1-6
Cisco Media Gateway Controller Node Manager Installation Guide
OL-14272-02
Chapter 1 Installation Overview and Planning
Installation Checklist

CHAPTER
2-1
Cisco Media Gateway Controller Node Manager Installation Guide
OL-18332-01
2
Installing Cisco MNM
This chapter provides detailed instructions for the following installation tasks:
• Performing a New Installation of Cisco MNM, page 2-1
• Upgrading from Previous Cisco MNM Releases, page 2-21
• Uninstalling Cisco MNM, page 2-23
• Displaying Current Cisco MNM Release Packages, page 2-24
• Viewing Help for Cisco MNM Install Scripts, page 2-25
• Uninstalling Cisco EMF, page 2-25
• Troubleshooting Common Installation Problems, page 2-26
Before you begin
• Read the Installation Overview, page 1-1
• Determine Your Hardware Requirements, page 1-2
• Print the Installation Checklist, page 1-5 and use it to guide your installation.
Performing a New Installation of Cisco MNM
Task 1: Gather Installation Software and Required Information
This section describes the software and information you need before you begin the installation.
Installation Software
Cisco MNM and Cisco VSPT Software
Your order includes the following:
• Cisco Media Gateway Controller Node Manager, Release 2.8(1), including the Cisco MNM element
managers that work with Cisco EMF.
• Cisco Element Management Framework (Cisco EMF) 3.2. This software includes Cisco EMF
Service Packs 7, 7.1, and 7.2. Also included is ObjectStore 5.1, which provides the database
management.
2-2
Cisco Media Gateway Controller Node Manager Installation Guide
OL-18332-01
Chapter 2 Installing Cisco MNM
Performing a New Installation of Cisco MNM
See the latest Cisco EMF 3.2 software patch and release note (an Acrobat PDF file, such as
CEMF3.2P7DepRelNote.pdf) at the following URL.
http://www.cisco.com/en/US/docs/net_mgmt/element_manager_system/3.2/release/notes/rn_3_2.h
tml
For all releases of 3.2 release notes, go to the following URL.
http://www.cisco.com/en/US/docs/net_mgmt/element_manager_system/3.2_service_pack_7/releas
e/notes/rn3_2sp7.html
• CEMF Crypto Add-on Package Software
If you want to use SSH for secure communications with SSH-enabled network components,
download the CEMF Crypto Add-On package available at
http://www.cisco.com/cgi-bin/tablebuild.pl/cemf-addon-3des
Download both the CEMF Crypto Add-on Package Software and the CEMF Crypto Add-on Package
Installation Guide. You must have authorization to download cryptographic software. If you do not
have it, you are automatically redirected to an authorization request page.
• CiscoView 6.1.8 (from LMS DVD—Solaris 10 only). Install CiscoView 6.1.8 if you want to manage
Cisco ITP-Ls or Cisco LAN switches (Cisco MNM uses the CiscoView server as the management
interface). Install CiscoView before you install Cisco EMF and Cisco MNM. The full LMS 3.1
package is not licensed when included with Cisco MNM. However, you can purchase the complete
LMS 3.1 product and install it with the MGC Node Manager on the same Sun Server. Make sure
there is enough disk and partition space, since the full LMS package is large.
Note If Cisco MNM coexists with CiscoView 6.1.8 on a Solaris 10 Operating System, the version
of the Solaris Operating System must be the November 2006 release or higher, and the
minimum recommended cluster patch levels are those released April 17, 2007.
• Cisco VSPT. The Cisco VSPT version must support your version of the
Cisco PGW 2200 Softswitch software. If you are managing nodes with
Cisco PGW 2200 Softswitch hosts running different software versions, you can install multiple
VSPT versions. Cisco MNM automatically launches the correct version for the selected host.
For the latest VSPT patch, go to http://www.cisco.com/cgi-bin/tablebuild.pl/vspt.
For Cisco MNM release notes, go to
http://www.cisco.com/en/US/products/sw/netmgtsw/ps1912/prod_release_notes_list.html.
Note CD is the installation media for Cisco MNM, and DVD is the installation media for LMS 3.1 and
CiscoView 6.1.8.
X Terminal Software
You must have Reflection 7.2 or higher installed to access Cisco MNM from a remote workstation. See
the “Task 11: Set Up the X Terminal Workstations for Remote Access” section on page 2-20 for more
information.
Solaris Operating System
The machines that run Cisco MNM must have the Sun Solaris 10 operating system with Common
Desktop Environment (CDE) 1.3 installed.

2-3
Cisco Media Gateway Controller Node Manager Installation Guide
OL-18332-01
Chapter 2 Installing Cisco MNM
Performing a New Installation of Cisco MNM
Caution The Solaris language setting must be English and the locale setting must be English (C-7 bit ASCII).
Other language and locale choices are not supported.
Required Information
Table 2-1 lists information you should have before you begin installation. Review the table and have it
available as you work through the installation tasks.
Ta b l e 2-1 Required Information
Information Where To Find It Value
Superuser (su) password and
privileges.
Your UNIX system
administrator.
Host name and host ID of the
machine where Cisco EMF is to
be installed (in a distributed
configuration, the Management
server).
On the machine, enter hostname
at the command prompt. The
host name displays.
At the command prompt, enter
hostid. The host ID displays.
This is a hexadecimal string that
identifies the system, not the IP
address.
Hostname
Host ID
Host IP address of the machine. At the command prompt, enter
ifconfig -a.
If there are multiple interfaces,
select the IP address of the
interface where traps will be
forwarded (as specified when
you configure devices for
network management). See
Chapter 3 of the Cisco Media
Gateway Controller Node
Manager User Guide at
http://www.cisco.com/en/US/pr
oducts/sw/netmgtsw/ps1912/pro
ducts_user_guide_list.html.
Product Authorization Key for
Cisco EMF, to be used in Task 5:
Make System Configuration
Modifications.
On the Cisco EMF product CD
sleeve.

2-4
Cisco Media Gateway Controller Node Manager Installation Guide
OL-18332-01
Chapter 2 Installing Cisco MNM
Performing a New Installation of Cisco MNM
Task 2: Ensure That Network Devices Have the Correct Software
Cisco MNM interacts with other software that runs on the various components of the Cisco Media
Gateway Controller node. The software on the device and the version or patch that is compatible with
Cisco MNM need to match to prevent network management problems. See the software requirements for
these components in the Cisco MNM 2.8(1) Release Notes at
http://www.cisco.com/en/US/products/sw/netmgtsw/ps1912/prod_release_notes_list.html
Caution Upgrades are released frequently. To ensure that you have the most recent software patch(es), check the
website for the latest bulletins and upgrades.
Task 3: Plan and Execute Hard Drive Partitioning
By default, the Cisco EMF software is installed with standard UFS partitions (partitions with readable
directory structures). However, we recommend using RAW File System (RAWFS) partitions (partitions
without readable directory structures) for the database drives for larger networks, because RAWFS
partitions offer the following advantages over UFS partitions:
• The capability to span multiple hard disks
• The option of having databases over 2GB in size
For more information, see the “Hard Drive Partitioning” section of the Cisco Element Management
Framework Installation and Administration Guide at
http://www.cisco.com/en/US/docs/net_mgmt/element_manager_system/3.2_service_pack_7/installatio
n/guide/3_2p7adm.pdf
Table 2-2 gives you hard drive partitioning recommendations.
DNS Domain of the machine
where Cisco EMF will be
installed (in a distributed
configuration, the Management
server) if your network uses
DNS.
Your UNIX system
administrator.
IP address of the CiscoView
server, required when you install
Cisco MNM.
IP address
Table 2-1 Required Information
Information Where To Find It Value

2-5
Cisco Media Gateway Controller Node Manager Installation Guide
OL-18332-01
Chapter 2 Installing Cisco MNM
Performing a New Installation of Cisco MNM
Task 4: Ensure That the Sun Solaris 10 Operating System Is Installed
Cisco MNM machines must have the Sun Solaris 10 operating system with CDE 1.3 installed. If the Sun
Solaris 8 or 10 operating system is not already installed, install it according to instructions provided by
the manufacturer.
Also install the latest J2SE Solaris 10 patch cluster, available at this URL:
http://sunsolve.sun.com/pub-cgi/show.pl?target=patches/patch-access
Note • The Solaris 8 operating system is now at end of sale; therefore, migration to Solaris 10 is required.
The Cisco MNM Release 2.8(1) does not support Solaris 8.
• If you prepare to install the Solaris 10 Operating System, install the Solaris 10 OEM Distribution
kernel 11/06. Do not install the Cisco PGW 2200 Softswitch Solaris 10 Jumpstart or the
Cisco PGW 2200 Softswitch OS recommended patches.
• If Cisco MNM coexists with LMS 3.1 Common Services (CiscoView) on a Solaris 10 Operating
System, the version of the Solaris Operating System must be the November 2006 release or higher,
and the minimum recommended cluster patch levels are those released April 17, 2007.
Task 5: Make System Configuration Modifications
Two kinds of system modifications are required after the Solaris operating system and set up disk drives
are installed:
1. Setting Up IP and Remote User Access Files
2. DNS Configurations
Ta b l e 2-2 Hard Drive Partitioning Recommendations
Small to Medium-Sized Deployments1
1. A small to medium-sized deployment applies to a network environment with no more than eight active/standby pairs of Cisco PGW 2200 Softswitches.
The recommendations for the small to medium size deployment are based on Sun Sparc-based platforms with a single hard drive, and RAM size ranging
from 2 GB to 8 GB.
Medium to Large-Sized Deployments2
2. A medium to large-sized deployment is supported by Sun Netra T2000 series or Sun Netra T5200 serires platforms.
Single Drive (73 GB) Single Drive (146 GB) Dual Drives or Quad Drives
filesys c1t0d0s0 4 GB /
filesys c1t0d0s1 8 GB Solaris
swap
filesys c1t0d0s3 6 GB /var
filesys c1t0d0s4 30 GB /opt
filesys c1t0d0s5 8 GB /overlap
filesys c1t0d0s6 6 GB /usr
filesys c1t0d0s7 8 GB /exprt/home
filesys c1t0d0s0 4 GB /
(Solaris remaining space for future
allocation)
filesys c1t0d0s1 10 GB Solaris
swap
filesys c1t0d0s3 6 GB /var
filesys c1t0d0s4 50 GB /opt
filesys c1t0d0s5 8 GB /overlap
filesys c1t0d0s6 6 GB /usr
filesys c1t0d0s7 8 GB /exprt/home
• Dual Drives—RAID 0
• Quad Drives—RAID 0+1

2-6
Cisco Media Gateway Controller Node Manager Installation Guide
OL-18332-01
Chapter 2 Installing Cisco MNM
Performing a New Installation of Cisco MNM
Setting Up IP and Remote User Access Files
After you have installed Solaris and added all hard drives, you need to edit files on the Management
server that contain data for IP networking and remote user access. See Table 2-3 for instructions.
DNS Configurations
Use these steps to modify DNS configurations:
Step 1 Ask your IT administrator if DNS should be used. If yes, perform Steps 2 and 3. If no, perform Steps 4
and 5.
Step 2 If DNS should be used, the IT administrator must configure the hostname of your machine on the DNS
server.
Step 3 Add the valid DNS server and domain name in /etc/resolv.conf.
Step 4 If DNS should not be used, delete the /etc/resolve.conf file if it exists.
Step 5 Verify that the host’s entry in the /etc/nsswitch.conf file looks exactly like the following line:
hosts: files
Note If you change how DNS is configured after Cisco EMF is installed, you must uninstall and reinstall Cisco
EMF. For more information on DNS configurations, see the Cisco Element Management Framework
Installation and Administration Guide at
http://www.cisco.com/en/US/docs/net_mgmt/element_manager_system/3.2_service_pack_7/installatio
n/guide/3_2p7adm.pdf
Task 6: Obtain a Cisco EMF License
To start Cisco EMF, you must have a valid license key file available. In a distributed configuration, the
license key is required on the Management server.
To obtain a required permanent license key file, do the following:
Ta b l e 2-3 IP Networking and Remote User Access Files
File Modification
/etc/defaultrouter Add the host name and IP address of the default
gateway router that provides network access
between remote users, network devices, and the
standalone system or the Management server.
/etc/default/login Add a # symbol at the front of the line that reads,
“CONSOLE = /dev/console” to comment out the
line. If you do not comment out this line, users
cannot log in to the machine remotely.
/etc/default/login Add the login accounts for all users accessing the
server by Telnet.
/etc/hosts Add the Presentation server’s host information.

2-7
Cisco Media Gateway Controller Node Manager Installation Guide
OL-18332-01
Chapter 2 Installing Cisco MNM
Performing a New Installation of Cisco MNM
Step 1 Go to the Cisco Product License Registration site at
https://tools.cisco.com/SWIFT/Licensing/PrivateRegistrationServlet
Step 2 Fill in the Product Authorization Key (PAK). The PAK is provided on the Cisco EMF product CD sleeve.
Step 3 Click Submit.
Step 4 Verify that the product information shown on the screen is correct, and then click Continue.
Step 5 Select the version of the Cisco EMF product you are licensing in the Version number field.
Step 6 Enter the hostname of the server where the Cisco EMF product is installed. You can obtain the server’s
hostname by entering the hostname command at the server’s command line prompt.
Note The server hostname must not include a period (.).
Step 7 Enter the host ID of the server where the Cisco EMF product is installed. (The host ID is a hexadecimal
string that identifies the system; it is not the IP address.) You can obtain the server’s host ID by entering
the hostid command at the server’s command line prompt.
Step 8 Read the End-User License Agreement and select I Accept. You must accept to get a license.
Step 9 Verify the registrant information shown on the screen.
Step 10 Click Continue.
Step 11 Verify the summarized information and click Submit.
The license request is submitted. The Cisco EMF permanent license key file is returned to you as an
e-mail attachment.
Task 7: Install CiscoView 6.1.8 on a Solaris 10 Operating System
Note Cisco IP Transfer Point LinkExtender (ITP-L) replaces the term Cisco Signaling Link Terminal (SLT ).
CiscoView is a graphical device management tool based on the Simple Network Management
Protocol (SNMP) that provides real-time views of networked Cisco devices. Cisco MNM uses
CiscoView to configure and monitor the Cisco ITP-L and the LAN switch (Cisco Catalyst 2900, 5500,
and 6509) devices through a CiscoView server.
CiscoView is optional; install it only if you want to manage the Cisco ITP-L or LAN switches from Cisco
MNM.
Install CiscoView 6.1.8 before installing Cisco MNM 2.8(1) so that you can identify the CiscoView
server IP address that must be entered when you install Cisco MNM. You can install CiscoView locally
on the Cisco MNM workstation or on a remote server.
Use these steps to install CiscoView 6.1.8:
Step 1 Insert the LMS 3.1 DVD that comes with your Cisco MNM package in the DVD-ROM drive.
Note • CiscoView ships as part of LMS 3.1 with MGC Node Manager. Only the CiscoView part of LMS is
provided. To obtain licenses for other LMS features, order LMS 3.1 from the Cisco.com website.

2-8
Cisco Media Gateway Controller Node Manager Installation Guide
OL-18332-01
Chapter 2 Installing Cisco MNM
Performing a New Installation of Cisco MNM
• If your machine does not have a DVD-ROM drive, see Table 2-5 in the Troubleshooting section for
steps on mounting a DVD-ROM drive from a remote machine.
Step 2 Write down the CiscoView server IP address, which is needed for Task 9 when you install Cisco MNM.
Step 3 Run the installation setup script by entering:
# sh setup.sh
or
# ./setup.sh
Step 4 Press Enter to read the license agreement.
Step 5 Enter Y to accept the license agreement and proceed with the installation, or enter N to exit the
installation.
Note • Error messages or warning messages appear if you do not have the required or recommended Server
and Client patches.
• CiscoView must use the default port number 1741. Do not modify this number during installation.
Step 6 Select one of the following installation modes:
a. Typical to select the components and install the selected components in the default location
(/opt/CSCOpx). This is the default installation mode.
b. Custom to select optional components, customize the settings, and to specify the location.
Step 7 Select CiscoView 6.1.8 to begin the installation. When the installation is complete, the following
messages display:
Software Installation Tool Completed
Possible Warnings/Errors Encountered
The warning and error messages that appear after these messages do not hinder the installation. They
only indicate that you need to take corrective actions after the installation is complete.
Your Solaris machine has successfully installed CiscoView.
For more CiscoView installation details, see the Installation and Setup Guide for CiscoView 5.4
(Standalone) at
http://www.cisco.com/en/US/products/sw/cscowork/ps4565/products_installation_guide_book09186a0
0800e19f6.html
To get the supported device list, see the User Guide for CiscoView 6.1.8 at
http://www.cisco.com/en/US/docs/net_mgmt/ciscoworks_ciscoview/6.1.8/user/guide/cv618_ug.html
After installing CiscoView 6.1.8, get the support list for Signaling Link Terminals ITP-Ls and Media
Gateways (MGWs) by logging in to the CiscoView server. If your Cisco ITP-L or MGW isn't included
in the list, download the device package at
http://www.cisco.com/cgi-bin/Software/CiscoView/cvplanner.cgi
Add the device package by following the instructions provided in the readme file.

2-9
Cisco Media Gateway Controller Node Manager Installation Guide
OL-18332-01
Chapter 2 Installing Cisco MNM
Performing a New Installation of Cisco MNM
Note If you are using CiscoView, be sure to install the CiscoView security module after installing
Cisco MNM. See the “Task 10: Install the CiscoView Security Module” section on page 2-19.
Task 8: Install Cisco EMF 3.2
Follow the procedures below to install Cisco EMF 3.2 on a standalone system or on both machines
(Management server and Presentation server) in a distributed configuration.
For more information on the Cisco EMF 3.2 installation, see the Cisco Element Management Framework
Installation and Administration Guide at
http://www.cisco.com/en/US/docs/net_mgmt/element_manager_system/3.2_service_pack_7/installatio
n/guide/3_2p7adm.pdf
Installing on the Management Server
Step 1 Log in as the root user on the machine where Cisco EMF is to be installed.
Step 2 Insert the Cisco EMF 3.2 Service Pack 7, CD #1 in the CD-ROM drive.
Step 3 Change the folder using the following command:
# cd /cdrom/cdrom0
Step 4 Invoke the Cisco EMF installation script using the following command:
# ./cemfinstall
A menu listing the Cisco EMF installation options displays.
Step 5 Select the Cisco Element Manager Framework - Server option, and press Enter.
Step 6 Accept the default location for the installation (<CEMF_ROOT>) and press Enter.
Step 7 Accept the default location (/opt/Backup) and press Enter.
Note You should specify a separate disk to gain better performance.
Step 8 Choose the hostname, and then press Enter.
Note If the there are more than one hostnames, choose the correct hostname. If the correct hostname
is not listed in the menu, press Enter. Then enter the desired hostname and press Enter.
Step 9 Press Enter to verify that the setup information is correct.
Step 10 Enter y to accept the default DNS domain and press Enter.
Note To change the default DNS domain, enter n and press Enter. Then specify the DNS domain and
press Enter.
Step 11 Enter y and press Enter to run the FlexLM daemon, which is provided with Cisco EMF.

2-10
Cisco Media Gateway Controller Node Manager Installation Guide
OL-18332-01
Chapter 2 Installing Cisco MNM
Performing a New Installation of Cisco MNM
Note To use an existing FlexLM daemon running on your system, enter n and press Enter.
Step 12 Press Enter if you have a valid license file available on your network. If you do not have a valid license
file, enter n.
Note To obtain a license, see “Task 6: Obtain a Cisco EMF License” section on page 2-6.
Note If you do not have a valid license file, you can still continue with the installation. The installation process
continues, but you cannot start the Cisco EMF Server until a valid license key is provided and the
<CEMF_ROOT>/bin/cemf license command is run to update the license information.
Step 13 Enter the full name, including the path, of the license file and press Enter.
The installation process begins and takes several minutes. When the installation is complete, a message
indicates that the Cisco EMF Server Package installation completed satisfactorily.
This completes the Cisco EMF installation procedure on the management server.
If you are using a distributed configuration (with the management server and the presentation server),
continue installing Cisco EMF on the presentation server by following the steps in the “Installing on the
Management Server” section on page 2-9. Otherwise, continue the installation by performing the
procedure described in the “Installing Cisco EMF Service Packs” section on page 2-11.
Installing on the Presentation Server
Note Cisco EMF must be installed on the Management server first, and the Cisco EMF server must be started
before a Presentation client is installed.
Step 1 Log in as the root user on the Presentation Server where the Cisco EMF client is to be installed.
Step 2 Insert the Cisco EMF 3.2 Service Pack 7, CD #1 in the CD-ROM drive.
Step 3 Change the folder using the following command:
# cd /cdrom/cdrom0
Step 4 Invoke the Cisco EMF installation script using the following command:
# ./cemfinstall
A menu listing the Cisco EMF installation options displays.
Step 5 Select the Cisco Element Manager Framework - Client option, and press Enter.
Step 6 Accept the default location for installation, /opt/cemf and press Enter.
Step 7 Specify the hostname of the management system where the Cisco EMF Server is installed, and then press
Enter.
Step 8 Press Enter to confirm the hostname for the management server.
2-11
Cisco Media Gateway Controller Node Manager Installation Guide
OL-18332-01
Chapter 2 Installing Cisco MNM
Performing a New Installation of Cisco MNM
Note Enter n and press Enter if you want to change the hostname for the management server.
Step 9 Press Enter to confirm the hostname and corresponding IP address of the management server.
Note Enter n and press Enter if you want to change the values.
The installation process begins and takes several minutes. When the installation is complete, a message
indicates that the Cisco EMF Server Package installation completed satisfactorily.
This completes the Cisco EMF installation procedure on the presentation server.
Note After installing the Cisco EMF 3.2 base version, you must install Cisco EMF Service Packs 7, 7.1, and
7.2. See “Installing Cisco EMF Service Packs” for more information.
Installing Cisco EMF Service Packs
Cisco MNM requires Cisco EMF Service Packs 7, 7.1, and 7.2. See the release notes for additional patch
requirements.
To install Service Packs 7, 7.1, and 7.2, follow these steps.
Caution The Cisco EMF Service Packs must be installed in this order: 7, 7.1, and 7.2.
Step 1 Insert the Cisco EMF 3.2 Service Pack 7, CD #2 in the CD-ROM drive.
Note The Cisco EMF 3.2 Service Pack is also available at
http://www.cisco.com/cgi-bin/tablebuild.pl/cemf-sp32-sp1
Step 2 Change the directory to cdrom using the following command:
# cd /cdrom/cdrom0
Step 3 Determine your current Cisco EMF version and patch level by entering this command:
# ./cemfinstall -show
Step 4 Proceed to Step 5 if Service Pack 7, 7.1, and 7.2 are not listed. Otherwise, you can skip this installation
procedure for Cisco EMF service packs.
Step 5 Start the Cisco EMF installation script using the following command:
# ./cemfinstall
Step 6 Choose the package to install.
Note If you have a Cisco EMF Server installed, you can install only the server patch. If you have a
Cisco EMF Client installed, you can install only the client patch.

2-12
Cisco Media Gateway Controller Node Manager Installation Guide
OL-18332-01
Chapter 2 Installing Cisco MNM
Performing a New Installation of Cisco MNM
The installation begins. Wait until the installation is complete.
This complete the installation procedure for Cisco EMF Service Packs 7, 7.1, and 7.2
Installing the Cisco EMF SSH Add-On Package
To enable SSH support on Cisco MNM running on Solaris 8 or 10, install the CEMF Crypto Add-on
Package by following these steps:
Note We recommend installing SSH on Cisco MNM and Cisco VSPT before installing on
Cisco PGW 2200 Softswitch so that you can use the element managers to monitor the installation
process on the Cisco PGW 2200 Softswitch and other managed components.
Step 1 Download the CEMF Crypto Add-on Package Software and the CEMF Crypto Add-on Package
Installation Guide available from the network management download page at
http://www.cisco.com/cgi-bin/tablebuild.pl/cemf-addon-3des
Step 2 Under the heading, “Cisco Element Management Systems,” click CEMF Strong Cryptographic
Software.
Note Authorization is required for downloading the cryptographic software. If you do not have
authorization, you are automatically redirected to an authorization request page.
Step 3 Follow the installation instructions in the CEMF Crytpo Add-on Package Installation Guide.
Note Make sure the entry of SSH exists in the /etc/services file on the machine where Cisco MNM is
installed.
Caution Using the # character in the /etc/motd banner may cause problems in the SSH connectivity.
The # character might interfere in the scripts used in Cisco MNM. If you encounter problems
using SSH with the installation of the CEMF Crypto Add-on package, and the SSH entry in
the /etc/services file, try removing the motd banner.
Caution Do not use special characters, such as %$#@&, in the SSH password because the
CEMF Crypto Add-on package does not support these special characters for the SSH
password.
Downloading Cisco EMF Patches
To download a Cisco EMF patch, use the following steps:

2-13
Cisco Media Gateway Controller Node Manager Installation Guide
OL-18332-01
Chapter 2 Installing Cisco MNM
Performing a New Installation of Cisco MNM
Note Access to all tools on the Cisco Technical Support & Documentation website requires a Cisco.com user
ID and password. If you have a valid contract but do not have a user ID or password, you can register at
this URL: http://tools.cisco.com/RPF/register/register.do.
Step 1 Go to http://www.cisco.com/kobayashi/sw-center/sw-netmgmt.shtml.
Note There are no CEMF patches planned currently.
Step 2 Log in to Cisco.com. The Network Management Software page appears.
Step 3 Click Cisco Element Management Framework. The Software Download page appears.
Step 4 Select the version of the CEMF Patch that you want to download to your system.
Step 5 Log in and follow the on-screen prompts.
Starting Cisco EMF
To initiate background processes in Cisco EMF, use these steps:
Step 1 Log in to the system where you installed Cisco EMF
Step 2 Become the root user using the following command:
# su - root
Step 3 Change the working directory to <CEMF_ROOT>/bin using the following command:
# cd <CEMF_ROOT>/bin
Where <CEMF_ROOT> is the directory where Cisco EMF is installed.
Step 4 Use the following command to start Cisco EMF if the Cisco EMF background processes are not already
running
#./cemf start
Note Depending on your server, it might take 10-30 minutes for the Cisco EMF startup processes to
complete. A relatively longer startup might occur if your database is new or has been reset.
Task 9: Install Cisco MNM Release 2.8(1) and Verify the Installation
Follow the instructions in this section to install Cisco MNM. If you are upgrading from Version 1.5 or
2.x, see the “Upgrading from Previous Cisco MNM Releases” section on page 2-21.
Check for the latest software patches by going to the URL provided in the “Installation Software” section
on page 2-1.

2-14
Cisco Media Gateway Controller Node Manager Installation Guide
OL-18332-01
Chapter 2 Installing Cisco MNM
Performing a New Installation of Cisco MNM
Note The Cisco MNM software must be installed as the root user.
Follow the procedure below to install Cisco MNM on a standalone system or on both machines
(management server and presentation server) in a distributed configuration. The Cisco MNM installation
process automatically detects if the complete Cisco EMF software is installed, or only the Cisco EMF
client, and then it installs the correct Cisco MNM components.
Installing Cisco MNM
Step 1 Start Cisco EMF if it is not already running.
Step 2 Change the working directory using the following command:
% cd <CEMF_ROOT>/bin
Step 3 Verify that Cisco EMF is running using the following command
% ./cemf query
Text similar to the following is displayed:
CEMF Manager 3.2 initialized
Step 4 Change to the root user using the following command:
# su - root
Step 5 Verify that the Volume Management daemon is running using the following command:
# ps -ef | grep vold
Text similar to the following is displayed:
root 483 1 0 Oct 23 ? 0:00 /usr/sbin/vold -f /etc/vold.conf
Note If the daemon is not running, start the daemon using the following command:
/etc/init.d/volmgt start
Verify that the Volume Management daemon is running with the command provided above. If it
is still not running, contact your system administrator.
Step 6 Insert the Cisco MNM CD in the CD-ROM drive.
Step 7 Enter the following command:
# cd /cdrom/cscocmnm
Step 8 Enter the following command to start the installation
# ./cmnminstall
Text similar to the following is displayed:
----------------------------------------------------------------------
Cisco MGC-Node Manager Installation
Wed Oct 29 07:57:35 PM
----------------------------------------------------------------------
Setup has detected that the CEMF Manager software is installed.
Do you wish to install the CSCOcmnm Manager software. [y/n]:

2-15
Cisco Media Gateway Controller Node Manager Installation Guide
OL-18332-01
Chapter 2 Installing Cisco MNM
Performing a New Installation of Cisco MNM
Note To upgrade to the next release of Cisco MNM, use the command:
./cmnminstall -u
Step 9 Enter y and press Enter to continue.
Step 10 Enter the required information as follows:
• Database backed up—Press Enter if you had your databased backed up.
• CiscoView Server IP address—Enter the IP address of the CiscoView server installed in “Task 7:
Install CiscoView 6.1.8 on a Solaris 10 Operating System” section on page 2-7. If you are not using
CiscoView, press Enter.
• Logfile directory location—Press Enter to accept the default location /var/tmp, or enter another
location and press Enter.
• Logfile name—Press Enter to accept the default name CSCOcmnm.log, or enter another name and
press Enter.
Step 11 Enter y to proceed with the installation if the disk space is sufficient.
When the installation is complete, text similar to the following is displayed:
Everything appears to be installed correctly.
Note The installation might take 15–40 minutes, depending on your system. If the installation is not
successful, check the installation log, /var/tmp/installCSCOcmnm.log.
This completes the Cisco MNM installation procedure. Continue with “Verifying the Cisco MNM
Installation” section on page 2-15.
Verifying the Cisco MNM Installation
Step 1 Before starting Cisco MNM, verify that the package is installed by using the following command:
# pkginfo CSCOcmnm
Text similar to the following is displayed:
application CSCOcmnm Cisco MGC-Node Manager(CMNM)2.8.1
Step 2 Verify that the Cisco MNM element managers have been installed using the following command:
# <CEMF_ROOT>/bin/cmnmversion -verbose
Text similar to the following is displayed:
CSCOcmnm Tool Versions
Patch Build Build
Name Version Level Num Type
------------------------------------
CSCOcmnm 2.8.1(FCS) 00 102308 REL
CSCOcmcv 2.8.1
CSCOcmhp 2.8.1 00

2-16
Cisco Media Gateway Controller Node Manager Installation Guide
OL-18332-01
Chapter 2 Installing Cisco MNM
Performing a New Installation of Cisco MNM
CSCOcemfm 3.2 Patch: 170007-06
Patch: 190701-05
Patch: 190702-01
------------------------------------
CSCOcmnm Element Manager Versions
Patch Build Build
Name Version Level Num Type
------------------------------------
hostEMm 2.8.1 00 102308 REL
mgcEMm 2.8.1 00 102308 REL
------------------------------------
Note The information displayed when you run this script varies with the Cisco MNM release and the patch
you are using.
Note If you suspect problems with the installation, check the installation log file (which by default is
/var/tmp/installCSCOcmnm.log) to search for errors.
Verifying the Installation of CiscoView 6.1.8
Before starting Cisco MNM, verify that the CiscoView 6.1.8 package is installed by entering the
following command:
# ./cmnmupdateCVip -s
• If the package is installed, text similar to the following is displayed:
Current Ciscoview IP Address: 10.10.10.10
where 10.10.10.10 is the server IP address.
• If the package is not installed, text similar to the following is displayed:
./modules/installUtilities: not found
CiscoView is designed to work with CiscoWorks 2000. If you install CiscoView packages outside this
environment, certain functions are not supported. The following CiscoView buttons do not work in the
Cisco MNM environment:
• Telnet
• CCO connection
• Preferences
Ta b l e 2-4 Element Managers
mgcEM Common Element Manager forCisco PGW 2200 Softswitch node devices
hostEM Element Manager forCisco PGW 2200 Softswitch host signaling, trunking, and dial
plan components

2-17
Cisco Media Gateway Controller Node Manager Installation Guide
OL-18332-01
Chapter 2 Installing Cisco MNM
Performing a New Installation of Cisco MNM
• About
• Help
Note When you are running xdsu, the following exception is generated and can be ignored:
ERROR: exception occurred while examining Integration Utility configuration:
com.cisco.nm.nmim.nmic.IntgUtilCheckConfig
Changing the IP Address of the CiscoView Server If Needed
During the installation of Cisco MNM, the IP address of the CiscoView server is filled in. If you need
to change the IP address after Cisco MNM is installed, enter the following command from the
Cisco EMF base directory:
# ./cmnmupdateCVip -i new CiscoView IP address
Text similar to the following is displayed:
cmnm CiscoView Server IP Addresses changed
From: <old IP address>
To: <new IP address>
Starting Cisco MNM
Use the following steps to start Cisco MNM:
Step 1 Start Cisco EMF.
Step 2 Log in with your user ID.
Step 3 Change to the directory using the following command:
% cd <CEMF_ROOT>/bin
Note An X-server must be running, and the DISPLAY environment variable must be properly
configured. Use one of the following commands, depending on which shell you are using, to set
the x-display variable:
In “csh” or “tcsh”: setenv DISPLAY <hostname>:<display number>
In “sh” or “ksh”: DISPLAY=<hostname>:<display number>;export $DISPLAY
The default value for the display number is 0.
Step 4 Start the Cisco MNM using the following command:
% ./cemf session
Step 5 Enter your login name and password.
Note The default Cisco MNM login and password is admin. Use the login and password configured
for your system.

2-18
Cisco Media Gateway Controller Node Manager Installation Guide
OL-18332-01
Chapter 2 Installing Cisco MNM
Performing a New Installation of Cisco MNM
For help with navigation and basic operations, see Chapter 3, “Getting Started with Cisco MNM” in the
Cisco Media Gateway Controller Node Manager User’s Guide at
http://www.cisco.com/en/US/products/sw/netmgtsw/ps1912/products_user_guide_list.html
If you are using SSH for secure communications with SSH-enabled network devices, go to the next
section, Getting Started with Secure Communications on Cisco MNM.
Getting Started with Secure Communications on Cisco MNM
This section tells you how to enable secure communications on network devices managed with
Cisco MNM.
Before you begin: The CEMF Crypto Add-on Package must already be installed (see the “Installing the
Cisco EMF SSH Add-On Package” section on page 2-12), and you must know the security policy for the
elements you are enabling.
Note SSH is enabled on network elements directly, not by the use of Cisco MNM. See the network element
documents at
http://www.cisco.com/en/US/products/hw/vcallcon/ps2027/tsd_products_support_series_home.html
for Cisco PGW 2200 Softswitch, Cisco HSI, and Cisco BAMS.
You do not need to know the specific SSH version. Cisco MNM automatically negotiates the correct
version (SSH 2 if available or SSH 1.x).
Do you have existing (already deployed in Cisco MNM) network elements that are now SSH-enabled?
See the “Updating Existing SSH-Enabled Network Elements” section on page 2-18.
Do you want to deploy new network elements that are SSH-enabled? See the “Deploying New
SSH-Enabled Elements” section on page 2-18.
Updating Existing SSH-Enabled Network Elements
Use this procedure to set SSH as the security policy for network elements that are already deployed and
SSH-enabled:
Step 1 In the Map Viewer, select the SSH-enabled element you want to update.
Step 2 Right-click and choose Accounts. The Accounts dialog box opens.
Step 3 For Security Policy, select SSH. (None is the default.)
Step 4 Click Save.
Step 5 Repeat the steps above for the remaining SSH-enabled elements.
Deploying New SSH-Enabled Elements
Use this procedure to deploy new elements that have been SSH-enabled:
Step 1 For Security Policy in the Deployment Wizard template, select SSH and follow the on-screen prompts.
Step 2 Click Finish.

2-19
Cisco Media Gateway Controller Node Manager Installation Guide
OL-18332-01
Chapter 2 Installing Cisco MNM
Performing a New Installation of Cisco MNM
Cisco MNM finds the new elements using the appropriate SSH protocol. Non-SNMP communication
with elements now uses SSH secure utilities.
Identifying SSH-Enabled Elements
You can find out if an element uses SSH by checking the Security Policy in the Accounts dialog box.
Task 10: Install the CiscoView Security Module
If you are using CiscoView, you must install the CiscoView Security Module on the CiscoView server
after CiscoView and Cisco MNM have been installed.
Step 1 Find the IP address that Cisco MNM is using for the CiscoView server.
For example, if Cisco EMF is installed in <CEMF_ROOT>, enter
% <CEMF_ROOT>/bin/cmnmupdateCVip -showip
Note An IP address of 0.0.0.0 is the local workstation.
If the address is not correct, see the “Changing the IP Address of the CiscoView Server If Needed”
section on page 2-17 for instructions.
Step 2 Locate the CSCOcvsec.pkg that is shipped with the Cisco MNM software that resides in the following
ciscoviewsecurity directory:
# cd ciscoviewsecurity
If the CiscoView server is not installed on the Cisco EMF server, go to Step 3. If the CiscoView server
is installed on the Cisco EMF server, go to Step 5.
Step 3 Use ftp to copy the CSCOcvsec package to the CiscoView server using the CiscoView server IP address
you determined with the cmnmupdateCVip command:
% ftp cvserverIPAddress
ftp> cd /tmp
ftp> binary
ftp> put CSCOcvsec.pkg /tmp/CSCOcvsec.pkg
Step 4 Use Telnet (or SSH) to connect to the CiscoView server using the following command:
# telnet cvserver
Step 5 Change the user to root.
% su - root
Step 6 Install the package using the following command:
# /usr/sbin/pkgadd -d /tmp/CSCOcvsec.pkg
Note If you uninstall and reinstall Cisco MNM, you must reinstall the security package.

2-20
Cisco Media Gateway Controller Node Manager Installation Guide
OL-18332-01
Chapter 2 Installing Cisco MNM
Performing a New Installation of Cisco MNM
Task 11: Set Up the X Terminal Workstations for Remote Access
Use the steps below to create an XDMCP connection to access Cisco MNM remotely from a workstation
or PC.
Note Cisco MNM has been tested with the Reflection 7.20 X server software package.
Creating an XDMCP Connection
For Reflection software to display Cisco MNM correctly, it must be run in the XDMCP mode. For the
host name, use the name of the Presentation server (in a distributed configuration) or the name of the
standalone system.
Step 1 Start the Reflection software.
Step 2 From the Connection menu, choose New XDMCP Connection.
Step 3 From the Method pull-down menu, choose Broadcast or Direct, and continue with one of the following
set of steps:
For Broadcast method:
a. Click Connect.
b. Select the appropriate XDMCP computer. If you do not know which computer to select, contact your
system administrator.
For Direct method:
a. In the Host Name field, enter the host name of the XDMCP computer.
b. Click Connect.
In either method, an X terminal window opens on the host machine. Start Cisco MNM in the usual
manner, as described in the “Starting Cisco MNM” section on page 2-17.
Note If the Cisco EMF Launchpad displays but appears to be inactive, check for a message box behind the
Launchpad that reads “there are insufficient colors available for Cisco EMF Manager.” You can safely
ignore this message and close the message box, or remedy the problem as described in the “Fixing
Insufficient Color Problems” section on page 2-21.
Creating a Workstation Connection
To connect to Cisco MNM from a remote UNIX workstation, use the following procedure:
Step 1 Open an X terminal window.
Step 2 Use Telnet to connect to the Cisco MNM host.
Step 3 Enter the following command to change to the Cisco MNM directory:
# cd <CEMF_ROOT>/bin

2-21
Cisco Media Gateway Controller Node Manager Installation Guide
OL-18332-01
Chapter 2 Installing Cisco MNM
Upgrading from Previous Cisco MNM Releases
Step 4 Enter the following command to launch Cisco MNM:
# ./cemf session
Fixing Insufficient Color Problems
To fix the “… insufficient colors available for Cisco EMF Manager” problem, see the procedure in the
“Configuring Reflection X Version 7.20 to Support Cisco EMF Color Usage” section in the Cisco
Element Management Framework Installation and Administration Guide at
http://www.cisco.com/en/US/docs/net_mgmt/element_manager_system/3.2_service_pack_7/installatio
n/guide/3_2p7adm.pdf
Task 12. Synchronize Time
After installing Cisco MNM, you should synchronize the time configured for the Cisco MGC, Cisco
MNM, and the Billing and Measurement Server (BAMS). To ensure that the Cisco MNM records are
correct, these components should all be configured to Greenwich Mean Time (GMT). For instructions
on setting the time for these components, see both the Cisco Media Gateway Controller Software
Release 9 Installation and Configuration Guide at
http://www.cisco.com/en/US/products/hw/vcallcon/ps2027/prod_installation_guides_list.html
and the Cisco Billing and Measurements Server User’s Guide for your BAMS server at
http://www.cisco.com/en/US/products/sw/voicesw/ps522/products_user_guide_list.html.
Task 13: Configure Network Devices to Forward Alarms
The final task in readying Cisco MNM for network management is to configure the devices in the
network so that they send alarm information to Cisco MNM. For more information, see Chapter 3 in the
Cisco Media Gateway Controller Node Manager User Guide at
http://www.cisco.com/en/US/products/sw/netmgtsw/ps1912/products_user_guide_list.html
Upgrading from Previous Cisco MNM Releases
When you upgrade from a previous release of Cisco MNM, the installation updates the content but leaves
your existing data intact (for example, network data and user access settings). You do not need to
uninstall your previous release before upgrading.
When upgrading CiscoView, upgrade according to the LMS 3.1 installation guide. CiscoView 6.1.8
requires more disk space than the previous release, and if the space is insufficient, CiscoView 6.1.8 can
be installed on another machine. If you install CiscoView 6.1.8 on another machine, use the following
command to reconfigure CiscoView server's IP address: # <CEMF_ROOT>/bin/cmnmupdateCVip -i
<CiscoView_NewServer_IP>.
Although the upgrade option preserves your data, we recommend that you perform a backup before
upgrading, as described in the “Uninstalling Cisco MNM” section on page 2-23.
Use the following steps to upgrade from a previous Cisco MNM release:

2-22
Cisco Media Gateway Controller Node Manager Installation Guide
OL-18332-01
Chapter 2 Installing Cisco MNM
Upgrading from Previous Cisco MNM Releases
Step 1 Read the “Installation Checklist” section on page 1-5 to identify other tasks needed for the upgrade.
Step 2 Have Cisco EMF and Cisco MNM running.
Step 3 Change the working directory using the following command:
% cd <CEMF_ROOT>/bin
Step 4 Verify that Cisco EMF is running using the following command
% ./cemf query
Text similar to the following is displayed:
CEMF Manager 3.2 initialized
Step 5 Change to the root user using the following command:
# su - root
Step 6 Verify that the Volume Management daemon is running using the following command:
# ps -ef | grep vold
Text similar to the following is displayed:
root 483 1 0 Oct 23 ? 0:00 /usr/sbin/vold -f /etc/vold.conf
Note If the daemon is not running, start the daemon using the following command:
/etc/init.d/volmgt start
Verify that the Volume Management daemon is running with the command provided above. If it
is still not running, contact your system administrator.
Step 7 Insert the Cisco MNM 2.8(1) CD in the CD-ROM drive:
Step 8 Change the working folder using the following command:
# cd /cdrom/cscocmnm
Step 9 Back up your database (see the “Backing Up Your Databases” section on page 2-23).
Step 10 Start Cisco MNM.
Step 11 Close Cisco MNM.
Step 12 Eject the Cisco MNM 2.8(1) CD.
Step 13 Insert the Cisco EMF 3.2 Service Pack 7, CD #2 in the CD-ROM drive.
Step 14 Install the CEMF 3.2 Service Packs 7, 7.1, and 7.2.
Step 15 Enter either the following commands:
# ./cmnminstall -u
or
# ./cmnminstall -upgrade
Step 16 Enter the required information as summarized here:
• Logfile directory location—Press Enter to accept the default location /var/tmp, or enter another
location and press Enter.
• Logfile name—Press Enter to accept the default name CSCOcmnm.log, or enter another name and
press Enter.

2-23
Cisco Media Gateway Controller Node Manager Installation Guide
OL-18332-01
Chapter 2 Installing Cisco MNM
Uninstalling Cisco MNM
Text similar to the following is displayed:
**WARNING** We don't check diskspace for upgrade right now.
It is the user's responsibility to make sure there is enough free
diskspace.
Continue with CSCOcmnm install [y,n,?]
Step 17 Enter y to continue the installation.
Step 18 Verify the installation according to the instructions in the “Verifying the Cisco MNM Installation”
section on page 2-15.
Step 19 Start Cisco MNM and do the rediscover of the following objects:
• All BAMS objects, using the Map Viewer BAMS-View
• All HSI objects, using the Map Viewer HSI-View
• All MGC objects, using the Map Viewer MGC-Node-View
Step 20 Remove the dial plan components if they exists manually for each MGC node:
a. Expand the MGC node
b. Right click the dial plan component
c. Choose Deployment > Delete Objects
d. Click Finish in the prompt.
Note During the upgrade process, you might see error messages caused by Cisco EMF trying to create
controllers that already exist. These messages can be safely ignored.
Backing Up Your Databases
If you are upgrading from Cisco MNM 2.x, the upgrade process retains your databases. However, it is
good practice to back up your databases before upgrading. For more information, see the Cisco Element
Management Framework Installation and Administration Guide at
http://www.cisco.com/en/US/docs/net_mgmt/element_manager_system/3.2_service_pack_7/installatio
n/guide/3_2p7adm.pdf
Uninstalling Cisco MNM
Cisco EMF must be running in order for you to uninstall Cisco MNM. Use the following procedure to
uninstall the Cisco MNM software:
Step 1 If Cisco MNM is running, quit it. Do not stop Cisco EMF.
Step 2 Insert the Cisco MNM 2.8(1) CD in the CD-ROM drive:
Step 3 Change the working folder using the following command:
# cd /cdrom/cscocmnm

2-24
Cisco Media Gateway Controller Node Manager Installation Guide
OL-18332-01
Chapter 2 Installing Cisco MNM
Displaying Current Cisco MNM Release Packages
Step 4 Enter either the following commands:
# ./cmnminstall -r
or
# ./cmnminstall -remove
Text similar to the following is displayed:
----------------------------------------------------------------------
Cisco MGC-Node Manager Uninstallation
Thu Oct 30 10:53:35 AM
----------------------------------------------------------------------
Setup has detected that the CEMF Manager and CSCOcmnm Manager
software is installed on this workstation.
Do you wish to uninstall the CSCOcmnm Manager software. [y/n]: [n]
Step 5 Enter y to uninstall Cisco MNM.
Text similar to the following is displayed:
Have your databases been backed up [y/n]: [n]
Step 6 Enter y and press Enter.
Step 7 Press Enter twice to accept the default log file directory and the default log file name.
Text similar to the following is displayed:
Continue with CSCOcmnm uninstall [y,n,?]
Step 8 Enter y to continue the uninstallation.
Step 9 Use the following procedure to verify that Cisco MNM was successfully unistalled:
• Enter pkginfo CSCOcmnm to verify that the CSCOcmnm package could not be found.
• Enter pkginfo hostEM to verify that the hostEM package could not be found.
• Enter pkginfo mgcEM to verify that the mgcEM package could not be found.
• Enter pkginfo CSCOcmcv to verify that the CSCOcmcv package could not be found.
This completes the uninstallation procedure of Cisco MNM.
Displaying Current Cisco MNM Release Packages
To display the current Cisco MNM release packages, do the following:
Step 1 Log in as the root user.
Step 2 Insert the Cisco MNM 2.8(1) CD in the CD-ROM drive:
Step 3 Change the working folder using the following command:
# cd /cdrom/cscocmnm
Step 4 Enter either the following commands:
# ./cmnminstall -s

2-25
Cisco Media Gateway Controller Node Manager Installation Guide
OL-18332-01
Chapter 2 Installing Cisco MNM
Viewing Help for Cisco MNM Install Scripts
or
# ./cmnminstall -show
All current Cisco MNM release packages display.
Viewing Help for Cisco MNM Install Scripts
To view the help content of the current Cisco MNM packages, do the following:
Step 1 Log in as the root user.
Step 2 Insert the Cisco MNM 2.8(1) CD in the CD-ROM drive:
Step 3 Change the working folder using the following command:
# cd /cdrom/cscocmnm
Step 4 Enter either the following commands:
# ./cmnminstall -h
or
# ./cmnminstall -help
The help information script displays.
Uninstalling Cisco EMF
You must uninstall Cisco MNM before uninstalling Cisco EMF. When Cisco EMF is uninstalled, all
Cisco EMF processes are automatically stopped. If ObjectStore was installed as part of the Cisco EMF
installation, it is removed during uninstallation. If ObjectStore was installed as a separate package before
the Cisco EMF installation, ObjectStore remains installed after Cisco EMF is uninstalled.
Use the following procedure to uninstall Cisco EMF:
Step 1 As a superuser (su), log in to the machine where Cisco EMF is installed.
Step 2 Verify that Cisco MNM has been uninstalled.
Step 3 Insert the Cisco EMF 3.2 Service Pack 7, CD #1 in the CD-ROM drive.
Step 4 Change the folder using the following command:
# cd /cdrom/cdrom0
Step 5 Remove the Cisco EMF using the following command:
# ./cemfinstall -remove

2-26
Cisco Media Gateway Controller Node Manager Installation Guide
OL-18332-01
Chapter 2 Installing Cisco MNM
Troubleshooting Common Installation Problems
Cisco EMF is uninstalled.
For more information on Cisco EMF, see the Cisco Element Management Framework Installation and
Administration Guide at
http://www.cisco.com/en/US/docs/net_mgmt/element_manager_system/3.2_service_pack_7/installatio
n/guide/3_2p7adm.pdf
Troubleshooting Common Installation Problems
Carefully following the “Installation Checklist” in Chapter 1 helps you to avoid most installation pitfalls.
But if a problem occurs, check this section for troubleshooting guidelines.
See Table 2-5 for suggested steps on troubleshooting common installation problems.
Related Topics
Cisco Media Gateway Controller Node Manager User’s Guide, Appendix C, “Troubleshooting Cisco
MNM”.
“Problems Installing an Element Manager on Cisco EMF” in the “Troubleshooting” section of the Cisco
Element Management Framework Installation and Configuration Guide Version 3.2 Service Pack 7

2-27
Cisco Media Gateway Controller Node Manager Installation Guide
OL-18332-01
Chapter 2 Installing Cisco MNM
Troubleshooting Common Installation Problems
Ta b l e 2-5 Troubleshooting Installation Problems
Problem Suggested Steps
No local DVD-ROM
drive is available.
Mounting a DVD-ROM Drive from a Remote System
Use these steps to mount a remote DVD-ROM drive:
Note The steps below show you how to mount a DVD-ROM driver from a
remote system. It provides general information only. For more
information, refer to the Sun Solaris documentation or consult your
IT administrator.
1. Insert the DVD-ROM in the DVD-ROM drive of the remote system. The
DVD-ROM should work normally on the remote system. If it does not,
consult with your IT administrator.
Note The DVD-ROM is mounted as /cdrom/cdrom0.
2. Log in to the remote system as the root user, and use a text editor to
create the /etc/dfs/dfstab file if it does not exist.
Note x is the DVD-ROM drive controller number, y is the DVD-ROM
drive SCSI ID number, and z is the slice of the partition on which the
DVD-ROM is located.
3. On the remote system, enter the following command to share the
DVD-ROM on the network:
share -F nfs -o ro -d “NFS description” /cdrom/cdrom0
4. Log in as the superuser by entering the command su and the root
password, or log in as the root user. If the /cdrom directory does not
already exist, enter the following command to create it:
# mkdir -p /cdrom/cmnm
5. Mount the DVD-ROM drive by entering the following:
# /usr/sbin/mount -r remote_host_name:/cdrom/cdrom0
/cdrom/cmnm
The DVD-ROM drive is mounted.
How to unmount a
remote DVD-ROM
drive
Unmouting a DVD-ROM Drive From a Remote System
After you complete the installation of CiscoView 6.1.8 from a remote
DVD-ROM, you must unmount the remote DVD-ROM from your local
system.
To unmount a remote DVD-ROM from a local machine, use these steps:
1. Log in to the local machine as root, and enter the following command:
# umount /cdrom/cmnm
Note Assume that “cmnm” is the directory where the remote DVD-ROM
was originally mounted.
2. Log in to the remote machine as root, and enter the following command:
# unshare -F nfs -o ro /cdrom/cdrom0
The DVD-ROM drive is unmounted.

2-28
Cisco Media Gateway Controller Node Manager Installation Guide
OL-18332-01
Chapter 2 Installing Cisco MNM
Troubleshooting Common Installation Problems
You get the message,
“Cannot connect to
session” when you try to
start a Cisco MNM
session.
Make sure that Cisco EMF is running.
• If Cisco EMF is not running, start it, and then retry starting Cisco MGC
Node Manager.
• If Cisco EMF is running, check to see if the IP address or host name of
the Cisco MNM server has changed since Cisco MNM was installed. If
it has, follow the steps described for the next problem.
License challenges Verify the following:
• The license file has a .lic extension.
• The license file is present in the <CEMF_ROOT>/config/licenses
directory.
• The license has not expired. If it has, get a new license at
https://tools.cisco.com/SWIFT/Licensing/PrivateRegistrationServlet.
For detailed instructions, see “Task 6: Obtain a Cisco EMF License”.
• The license is a multi-user license.
• The license file was not issued for a different machine. The license is
machine-specific; you cannot move a license file from one machine to
another but must get a new license for your current machine.
Uninstallation problem Make sure you are uninstalling in the correct sequence. Before uninstalling
Cisco EMF, you must uninstall Cisco MNM. Before uninstalling Cisco
MNM, make sure that Cisco EMF is running.
Password problems Reset the password.
You get the message,
“System IP address
does not match database
address” when you try
to start Cisco EMF.
This can be caused by a change in the IP address or host name of the
Cisco MNM server after Cisco MNM was installed. Use the following steps
to correct the problem:
1. Stop Cisco EMF:
<CEMF_ROOT>/bin/cemf stop
2. If needed, update the IP address in Cisco EMF:
<CEMF_ROOT>/bin/cemf updateIP -m
When prompted, enter the new IP address.
3. If needed, update the host name in Cisco EMF:
<CEMF_ROOT>/bin/cemf updateName -m
When prompted, enter the new host name.
4. Restart Cisco EMF:
<CEMF_ROOT>/bin/cemf start
Note If the Management server address or name has changed in a
distributed configuration, make the necessary changes on both the
Management server and the Presentation server. If the Presentation
server address or name has changed, make the changes on the
Presentation server only.
Table 2-5 Troubleshooting Installation Problems (continued)
Problem Suggested Steps

2-29
Cisco Media Gateway Controller Node Manager Installation Guide
OL-18332-01
Chapter 2 Installing Cisco MNM
Troubleshooting Common Installation Problems
ObjectStore problems
starting CEMF on
workstations with 16GB
of RAM or more
ObjectStore cannot start up properly on a Cisco EMF server installed on a
large workstation with 16GB of RAM or more. Use the following steps to
correct the problem:
1. Identify the CEMF AppsServer.ini and ObjectServer.ini failure in
<CEMF_ROOT>/log/sysmgr.log.
2. Remove the partial EM Installation (mgcEMm and the hostEMm).
<CEMF_ROOT>/bin/cemf load -remove mgcEMm -skipportcheck
3. Stop Cisco EMF:
<CEMF_ROOT>/bin/cemf stop
4. Clear the cache files by deleting the files in /tmp/ostore:
rm -rf /tmp/ostore/*
5. Change the cache size settings in the following files by reducing each
setting by a factor of four.
abstractionServer.ini:cacheSize = 2
agServer.ini:cacheSize = 4
alarmDirServer.ini:cacheSize = 4
appsServer.ini:cacheSize = 32
asyncIosDataRepository.ini:cacheSize = 4
asyncSnmpDataRepositoryCommon.include:cacheSize = 0
attributeHistoryCollector.ini:cacheSize = 24
attributeHistoryServer.ini:cacheSize = 8
genericController.ini:cacheSize = 4
localDBServer.ini:cacheSize = 16
mapServer.ini:cacheSize = 4
nbinterface.ini:cacheSize = 4
notificationServer.ini:cacheSize = 8
objectServer.ini:cacheSize = 32
ogServer.ini:cacheSize = 4
pasTestRig.ini:cacheSize = 16
pollerServer.ini:cacheSize = 2
queryServer.ini:cacheSize = 8
reallocator.ini:cacheSize = 16
RMEBridge.ini:cacheSize = 4
statusPropagationRecalculator.ini:cacheSize = 4
statusPropagationServer.ini:cacheSize = 16
trapAlarmMapper.ini:cacheSize = 16
trServer.ini:cacheSize = 8
vectorServer.ini:cacheSize = 6
virtualAttributeServer.ini:cacheSize = 4
6. Restart Cisco EMF.
<CEMF_ROOT>/bin/cemf start
Table 2-5 Troubleshooting Installation Problems (continued)
Problem Suggested Steps

2-30
Cisco Media Gateway Controller Node Manager Installation Guide
OL-18332-01
Chapter 2 Installing Cisco MNM
Troubleshooting Common Installation Problems
7. Check the file <CEMF_ROOT>/log/sysmgr.log for ObjectStore
failures. If you don’t see ObjectStore errors in this file, this completes
the troubleshooting procedure for this problem. If you see ObjectStore
errors similar to the following, go to Step 8.
INFO processControl.cc:1240 AV process produced bad message:
[ObjectServer], [PID : 18736] No handler for exception:
ObjectStore internal error
<maint-0025-0045> The client communication area is filled
up. (err_internal)
8. Stop Cisco EMF:
<CEMF_ROOT>/bin/cemf stop
9. Set the following values in the <CEMF_ROOT>/config/env/avCore.sh
file.
OS_COMMSEG_SIZE=26640384; export OS_COMMSEG_SIZE
OS_COMMSEG_RESERVED_SIZE=26640384; export
OS_COMMSEG_RESERVED_SIZE
10. Restart Cisco EMF.
<CEMF_ROOT>/bin/cemf start
Table 2-5 Troubleshooting Installation Problems (continued)
Problem Suggested Steps

IN-1
Cisco Media Gateway Controller Node Manager Installation Guide
OL-18332-01
INDEX
C
CEMF
downloading EMF patches 2-12
installing on the management server 2-9
installing on the presentation server 2-10
installing service packs 2-11
installing SSH add-on package 2-12
licensing 2-6
starting Cisco EMF 2-13
troubleshooting 2-28
uninstalling 2-25
checklist for installation 1-5
CiscoView
changing the IP address 2-17
installing 2-7
installing on Solaris 10 2-7
installing the security module 2-19
verifying the installation 2-16
CiscoWorks 2000 2-16
Client software 1-2
color problems 2-21
configurations
Cisco MNM 1-2
distributed 1-2
DNS 2-6
IP and remote user access files 2-6
standalone 1-2
supported 1-3
to forward alarms 2-21
D
database storage 1-4
deploy network elements for SSH 2-18
distributed Cisco MNM configuration 1-2
E
EMF
downloading EMF patches 2-12
installing on the management server 2-9
installing on the presentation server 2-10
installing service packs 2-11
installing SSH add-on package 2-12
licensing 2-6
starting Cisco EMF 2-13
G
GMT 2-21
Greenwich Mean Time 2-21
H
hard drive, partitioning 2-4
hardware
required 1-2
requirements table 1-4
help scripts 2-25
hostname, changing for Cisco MNM server 2-28

Index
IN-2
Cisco Media Gateway Controller Node Manager Installation Guide
OL-18332-01
I
installation
checklist 1-5
overview 1-1
required information 2-3
troubleshooting 2-26
installation checklist 1-5
installing
Cisco MNM 2-13
Cisco SSH add-on package 2-12
CiscoView 6.1.8 2-7
CiscoView security module 2-19
EMF add-on packages 2-12
EMF on the management server 2-9
EMF on the presentation server 2-10
EMF service packs 2-11
SSH on Cisco MNM 2-12
SSH on Cisco PGW 2-12
SSH on Cisco VSPT 2-12
Sun Solaris 2-5
install scripts, help 2-25
IP address, changing for Cisco MNM server 2-28
IP information, setting up 2-6
ITP-L 2-7
L
language, on Solaris 2-3
LAN switch 2-7
license challenges, troubleshooting 2-28
M
Management server 1-2
MNM
audience i-v
configurations to forward alarms 2-21
connection issues 2-28
current release packages 2-24
installing 2-13
LMS 3.1 DVD 2-7
release notes 2-2
software requirements for components 2-4
Sun Solaris 2-5
synchronize time 2-21
uninstalling the software 2-23
upgrading from previous releases 2-21
verifying the installation 2-15
viewing help install scripts 2-25
who should install 1-1
multiple disk drives 1-4
O
ObjectStore software 1-2
overview, of installation 1-1
P
partitions
hard drive 2-4
RAW File System 2-4
RAWFS 2-4
UFS 2-4
patches
EMF patches 2-11
Solaris 2-5
Presentation server
installing 2-10
requirements 1-2
previous releases, upgrading from 2-21
R
RAW File System partitions 2-4
remote user access, setting up 2-6

Index
IN-3
Cisco Media Gateway Controller Node Manager Installation Guide
OL-18332-01
required
hardware 1-2
software 2-1
requirements
hardware table 1-4
information 2-4
software 2-4
S
Security 2-19
security module, CiscoView 2-19
server software 1-2
setting up, IP and remote user access information 2-6
software
client 1-2
required 2-1
required on managed network devices 2-4
server 1-2
Solaris
J2SE patch cluster 2-5
language 2-2
locale setting 2-2
Sun Solaris 8 or 10 operating system 2-2
SSH 2-20
deploying new enabled elements 2-18
download for CEMF 2-2
identifying enabled elements 2-19
installing add-on package 2-2
updating existing network elements 2-18
standalone Cisco MNM configuration 1-2
starting Cisco MNM 2-17
synchronize time 2-21
T
time
Greenwich Mean Time 2-21
synchronize 2-21, 1-1
troubleshooting
common installation problems 2-26
no local DVD-ROM drive 2-27
problems starting Cisco MNM 2-28
U
uninstalling
Cisco EMF 2-25
Cisco MNM 2-23
updating network elements for SSH 2-18
upgrading
backing up databases 2-23
Cisco MNM 2-21
V
VSPT, patch 2-2, 1-1
W
workstation connection, create 2-20
X
XDMCP connection 2-20
X terminal
general information 2-2
setting up for remote access 2-20

Index
IN-4
Cisco Media Gateway Controller Node Manager Installation Guide
OL-18332-01
