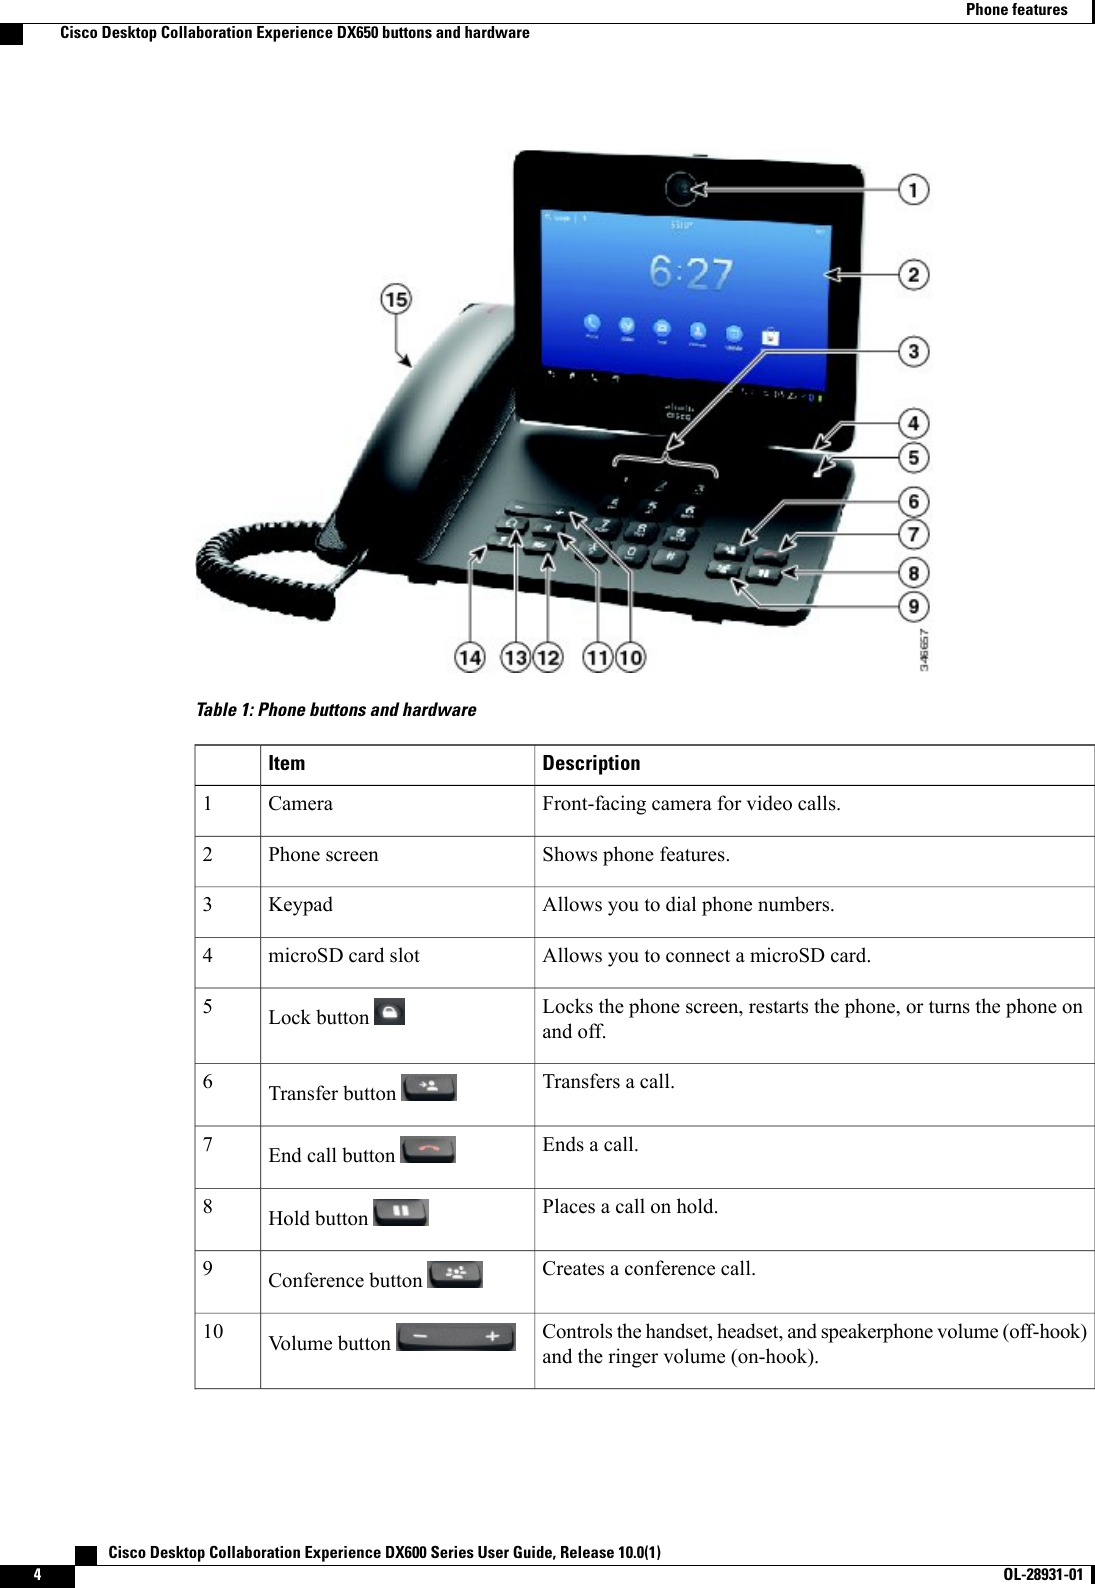
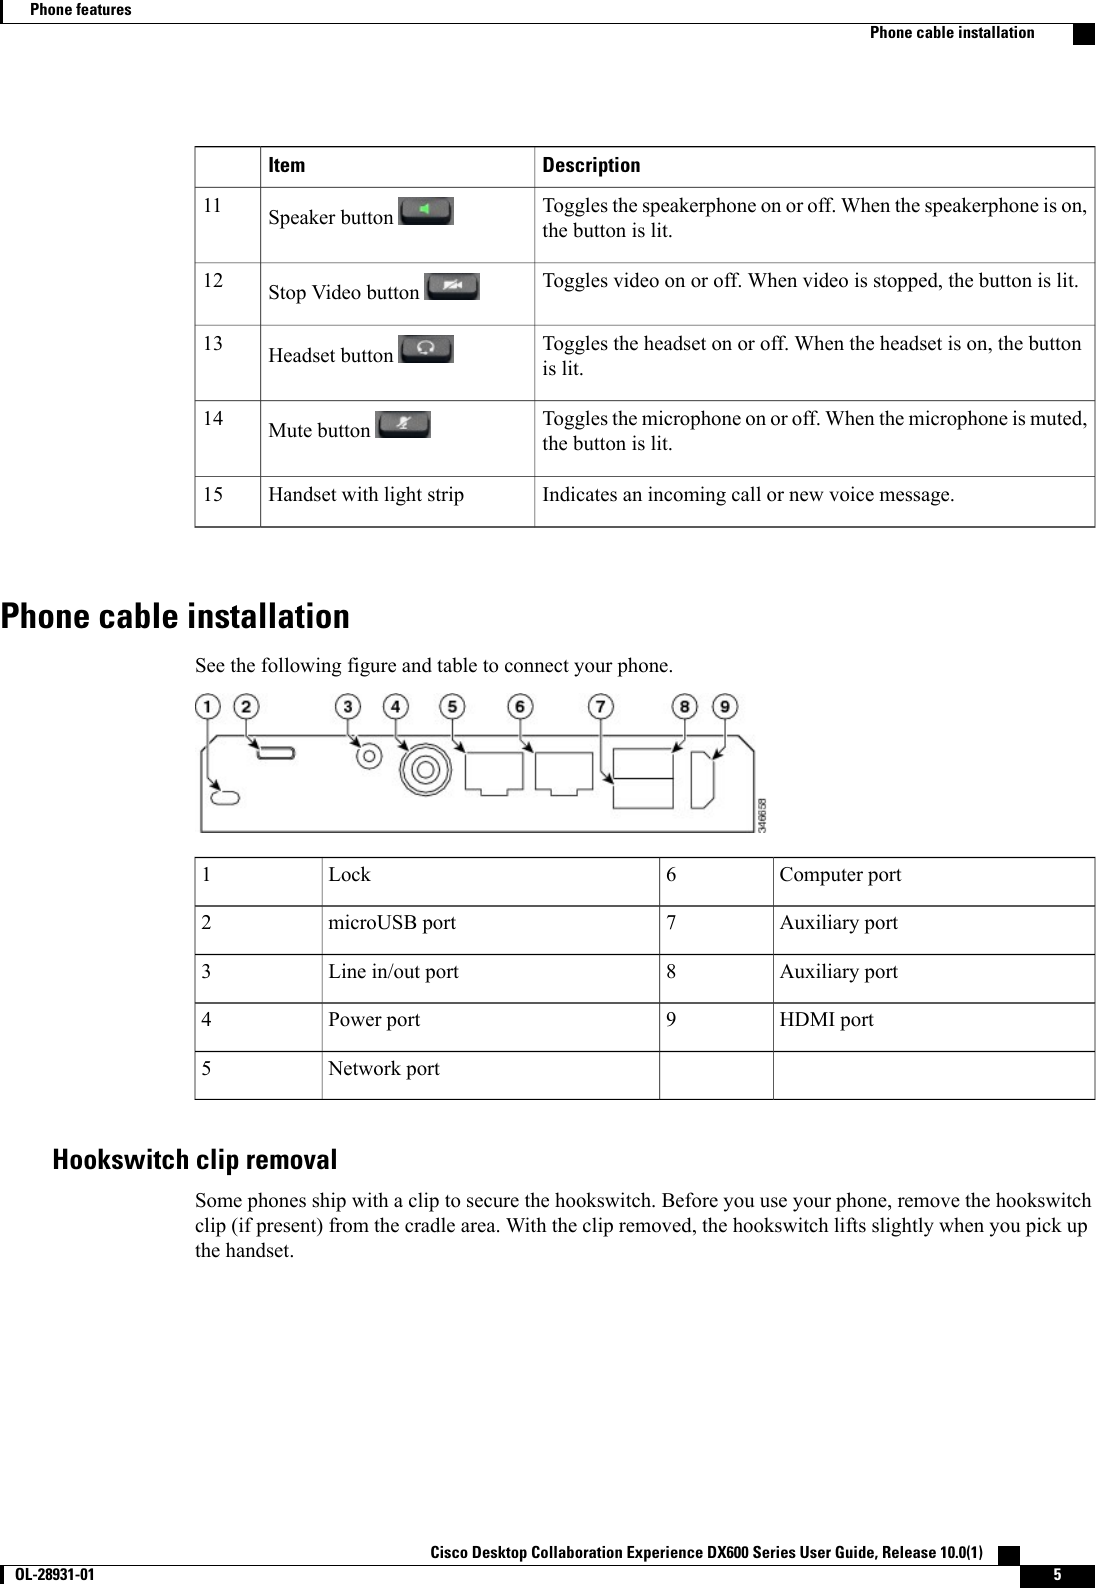
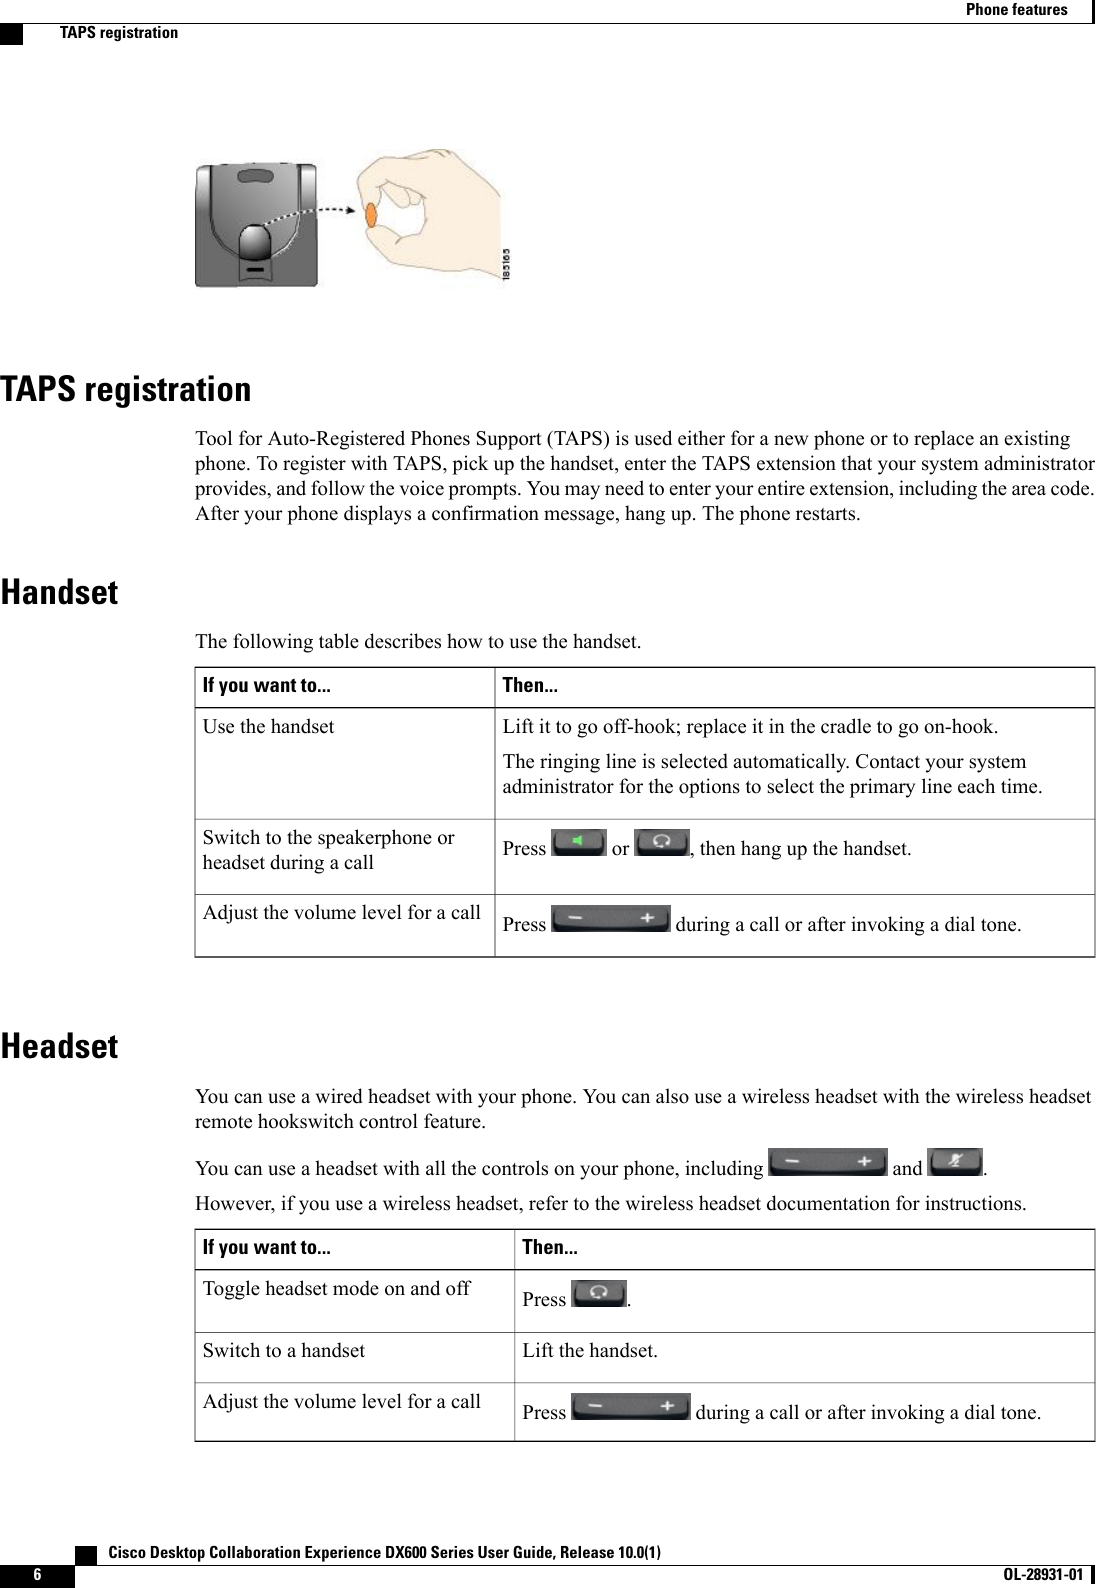
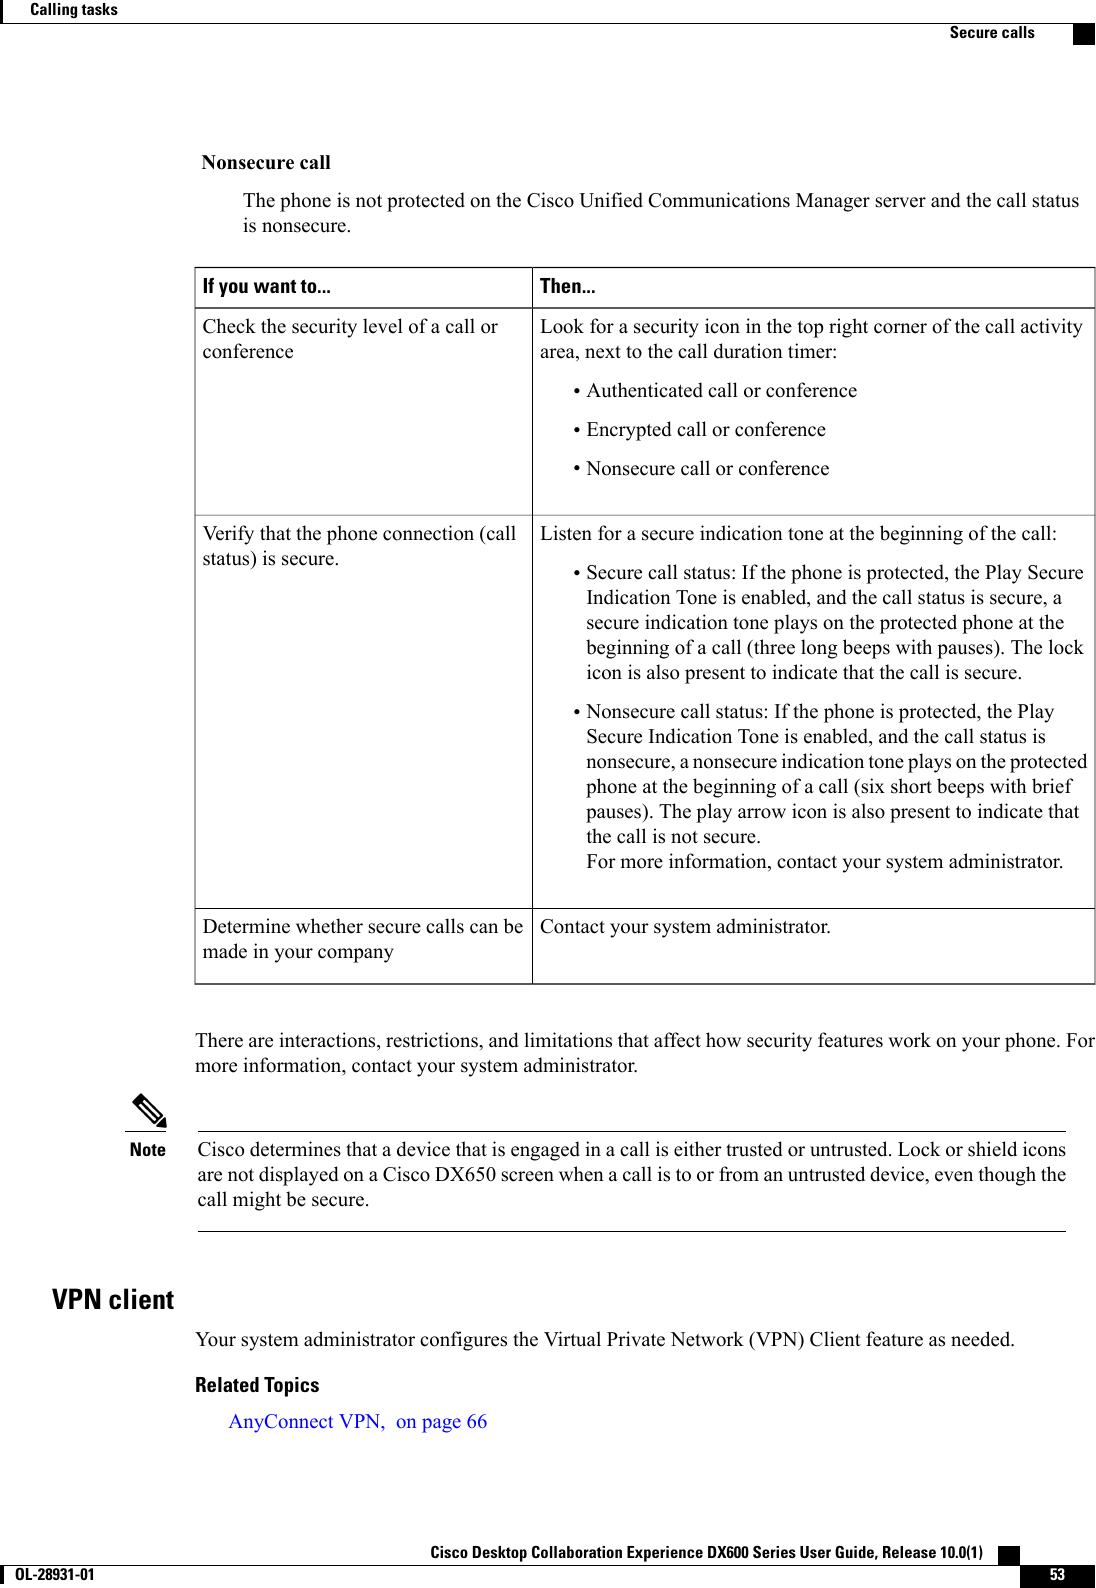
Cisco Systems DX6500736 CP-DX650 User Manual

Cisco Systems Inc CP-DX650

User Guide

Cisco Desktop Collaboration Experience DX600 Series User Guide,Release 10.0(1)First Published: February 15, 2013Americas HeadquartersCisco Systems, Inc.170 West Tasman DriveSan Jose, CA 95134-1706USAhttp://www.cisco.comTel: 408 526-4000       800 553-NETS (6387)Fax: 408 527-0883Text Part Number: OL-28931-01
THE SPECIFICATIONS AND INFORMATION REGARDING THE PRODUCTS IN THIS MANUAL ARE SUBJECT TO CHANGE WITHOUT NOTICE. ALL STATEMENTS,INFORMATION, AND RECOMMENDATIONS IN THIS MANUAL ARE BELIEVED TO BE ACCURATE BUT ARE PRESENTED WITHOUT WARRANTY OF ANY KIND,EXPRESS OR IMPLIED. USERS MUST TAKE FULL RESPONSIBILITY FOR THEIR APPLICATION OF ANY PRODUCTS.THE SOFTWARE LICENSE AND LIMITED WARRANTY FOR THE ACCOMPANYING PRODUCT ARE SET FORTH IN THE INFORMATION PACKET THAT SHIPPED WITHTHE PRODUCT AND ARE INCORPORATED HEREIN BY THIS REFERENCE. IF YOU ARE UNABLE TO LOCATE THE SOFTWARE LICENSE OR LIMITED WARRANTY,CONTACT YOUR CISCO REPRESENTATIVE FOR A COPY.The following information is for FCC compliance of Class A devices: This equipment has been tested and found to comply with the limits for a Class A digital device, pursuant to part 15of the FCC rules. These limits are designed to provide reasonable protection against harmful interference when the equipment is operated in a commercial environment. This equipmentgenerates, uses, and can radiate radio-frequency energy and, if not installed and used in accordance with the instruction manual, may cause harmful interference to radio communications.Operation of this equipment in a residential area is likely to cause harmful interference, in which case users will be required to correct the interference at their own expense.The following information is for FCC compliance of Class B devices: This equipment has been tested and found to comply with the limits for a Class B digital device, pursuant to part 15of the FCC rules. These limits are designed to provide reasonable protection against harmful interference in a residential installation. This equipment generates, uses and can radiate radiofrequency energy and, if not installed and used in accordance with the instructions, may cause harmful interference to radio communications. However, there is no guarantee that interferencewill not occur in a particular installation. If the equipment causes interference to radio or television reception, which can be determined by turning the equipment off and on, users areencouraged to try to correct the interference by using one or more of the following measures:•Reorient or relocate the receiving antenna.•Increase the separation between the equipment and receiver.•Connect the equipment into an outlet on a circuit different from that to which the receiver is connected.•Consult the dealer or an experienced radio/TV technician for help.Modifications to this product not authorized by Cisco could void the FCC approval and negate your authority to operate the productThe Cisco implementation of TCP header compression is an adaptation of a program developed by the University of California, Berkeley (UCB) as part of UCB’s public domain versionof the UNIX operating system. All rights reserved. Copyright ©1981, Regents of the University of California.NOTWITHSTANDING ANY OTHER WARRANTY HEREIN, ALL DOCUMENT FILES AND SOFTWARE OF THESE SUPPLIERS ARE PROVIDED "AS IS" WITH ALL FAULTS.CISCO AND THE ABOVE-NAMED SUPPLIERS DISCLAIM ALL WARRANTIES, EXPRESSED OR IMPLIED, INCLUDING, WITHOUT LIMITATION, THOSE OFMERCHANTABILITY, FITNESS FOR A PARTICULAR PURPOSE AND NONINFRINGEMENT OR ARISING FROM A COURSE OF DEALING, USAGE, OR TRADE PRACTICE.IN NO EVENT SHALL CISCO OR ITS SUPPLIERS BE LIABLE FOR ANY INDIRECT, SPECIAL, CONSEQUENTIAL, OR INCIDENTAL DAMAGES, INCLUDING, WITHOUTLIMITATION, LOST PROFITS OR LOSS OR DAMAGE TO DATA ARISING OUT OF THE USE OR INABILITY TO USE THIS MANUAL, EVEN IF CISCO OR ITS SUPPLIERSHAVE BEEN ADVISED OF THE POSSIBILITY OF SUCH DAMAGES.Cisco and the Cisco logo are trademarks or registered trademarks of Cisco and/or its affiliates in the U.S. and other countries. To view a list of Cisco trademarks, go to this URL: http://www.cisco.com/go/trademarks. Third-party trademarks mentioned are the property of their respective owners. The use of the word partner does not imply a partnershiprelationship between Cisco and any other company. (1110R)Any Internet Protocol (IP) addresses used in this document are not intended to be actual addresses. Any examples, command display output, and figures included in the document are shownfor illustrative purposes only. Any use of actual IP addresses in illustrative content is unintentional and coincidental.Cisco and the Cisco logo are trademarks or registered trademarks of Cisco and/or its affiliates in the U.S. and other countries. To view a list of Cisco trademarks, go to this URL: http://www.cisco.com/go/trademarks. Third-party trademarks mentioned are the property of their respective owners. The use of the word partner does not imply a partnershiprelationship between Cisco and any other company. (1110R)The Bluetooth word mark and logo are registered trademarks owned by Bluetooth SIG, Inc., and any use of such marks by Cisco Systems, Inc., is under license.Google, Google Play, Android and certain other marks are trademarks of Google Inc.©2013 Cisco Systems, Inc. All rights reserved.
CONTENTSCHAPTER 1 Preface 1Guide organization 1Related documentation 1Additional information 2Obtaining documentation and submitting service request 2CHAPTER 2 Phone features 3Buttons and hardware 3Cisco Desktop Collaboration Experience DX650 buttons and hardware 3Phone cable installation 5Hookswitch clip removal 5TAPS registration 6Handset 6Headset 6Headset support 7Audio quality 73.5 mm headsets 7Wireless headset 7Speakerphone 8AutoAnswer with headset or speakerphone 8Phone cable lock 9Line and call definitions 9Line and call icons 9Energy savings 10Android 10Gestures 11Lock screen 11Unlock screen 12Cisco Desktop Collaboration Experience DX600 Series User Guide, Release 10.0(1)       OL-28931-01 iii
Place emergency call from Lock screen 12Add PIN 12Add password 12Reset lost PIN or password 13Awake to Phone application 13Cisco Extension Mobility 14Sign In to Extension Mobility from Lock screen 14Sign in to Extension Mobility from Settings 15Sign Out of Extension Mobility from Lock screen 15Sign Out of Extension Mobility from Settings 15Set screen timeout 16Setup Assistant 16Run Setup Assistant 16Home screen 17Status bar 17Navigation icons 17Applications menu 17Work spaces 17Navigate work spaces 18Widgets 18Set up home screen 18Add application icon to home screen 19Add widget to home screen 19Move widget or icon 19Remove widget or icon 19Change wallpaper 20Quick Contact Badge 20Share menu 20On-screen keyboard 20Cleaning and maintenance 21CHAPTER 3 Calling tasks 23Common call tasks 23Answer call 23Disconnect call 24   Cisco Desktop Collaboration Experience DX600 Series User Guide, Release 10.0(1)iv OL-28931-01  Contents
Hold and resume 25Put call on hold 26Remove call from hold on different line 26Mute 26Mute or unmute call 26Place call 27Place call with headset 27Place call with speakerphone 27Place call when another call is active 27Redial number 28Video calls 28Video call control bar 28Stop your video transmission 28Automatic video transmission 28Stop automatic video transmission 29Adjust video call settings 29Self-video 29Show self-video 29Visual Voicemail 29Set up Visual Voicemail 30Listen to voice message 30View voice message details 30Reply to voice message 30Forward voice message 31Delete voice message 31Advanced call tasks 31Business calls with single phone number 31Mobile Connect and Mobile Voice Access 32Put call picked up on mobile phone on hold 33Connect to Mobile Voice Access 33Turn on Mobile Connect from mobile phone 33Turn off Mobile Connect from mobile phone 34Turn on or off Mobile Connect access to all remote destinations from desk phone 34Conference calls 34Ad hoc conference 34Cisco Desktop Collaboration Experience DX600 Series User Guide, Release 10.0(1)       OL-28931-01 vContents
Call participants to create conference 35Add contacts to conference 35Join conference 35Join together existing calls on single phone line 36Join together existing calls on multiple phone lines 36Barge conference 36Barge call on shared line to create conference 36Meet Me conference 36Start Meet Me conference 37Join Meet Me conference 37Conference participants list 37Control conference with participants list 37Call forward 38Set up and cancel Call Forward All from phone 39Set up or cancel call forwarding 39Call Park 39Store and retrieve active call with Call Park 40Direct and store active call at Directed Call Park number 40Retrieve parked call from Directed Call Park number 40Direct, store, and retrieve active call at Assisted Directed Call Park number 40Call Pickup 41Answer call ringing on another extension within Call Pickup group 41Answer call ringing on another extension outside Call Pickup group 41Answer call ringing on another extension in group or in associated group 42Answer call ringing on particular extension 42Call transfer 42Transfer call without talking to transfer recipient 43Talk to transfer recipient before transferring call 43Call transfer to voice message system 43Send active, ringing, or held call to voice message system 44Dial from corporate directory on personal computer using Cisco Web Dialer 44Notify when busy or ringing extension available 44Dial from corporate directory on phone 45Do Not Disturb 45Turn DND on and off 45   Cisco Desktop Collaboration Experience DX600 Series User Guide, Release 10.0(1)vi OL-28931-01  Contents
Set up DND settings 45Hunt groups 46Sign in and out of hunt groups 46Active call movement 46Switch active call on desk phone to mobile phone 47Switch active call from mobile phone to desk phone 47Switch active call from mobile phone to desk phone that shares same line 47Intercom calls 47Place intercom call to preconfigured intercom number 48Place intercom call to any intercom number 48Receive intercom call 49Line status features 49Use line status pickup to answer ringing call 50Make call from mobile phone using mobile voice access 50Multiple calls 50Switch between calls on one line 51Switch between calls on different lines 51Switch from active call to answer ringing call 51Remove call from hold on current line 51Place call while another call is active (using different line) 52Secure calls 52VPN client 53Shared lines 54Remote-in-use icon 54Call information and Barge 54Barge, cBarge, and shared lines 54Single-button and multitouch Barge 54Barge features 55Privacy and shared lines 55Prevent and allow others to view or barge calls on shared line 56Speed Dial 56Make call using Speed-Dial button 56Make call using on-hook abbreviated dial 57Suspicious call trace 57Notify system administrator about suspicious or harassing call 57Cisco Desktop Collaboration Experience DX600 Series User Guide, Release 10.0(1)       OL-28931-01 viiContents
CHAPTER 4 Phone customization and settings 59Rings and message indicator customization 59Change ringtone 60Adjust phone ringer volume level 60Change ring pattern 60Change audible voice-message indicator 61Change how voice message light on handset works 61Phone screen customization 61Change phone screen language 61Change phone screen brightness 62Change line text label 62Networks 62Wired network connection 62Connect to wired network 63Share wired network connection with computer 63Connect to wireless network 63Connect to hidden wireless network 63Edit wireless network 64Delete wireless network 64Supported wireless security 64Web proxy 64Add web proxy 65Edit web proxy 65Delete web proxy 66TFTP 66Connect to TFTP Server 66AnyConnect VPN 66AutoNetDetect 67Password persistence 67Add VPN connection profile 67Edit VPN connection profile 67Connect to VPN 68Disconnect from VPN 68Delete VPN connection profile 69   Cisco Desktop Collaboration Experience DX600 Series User Guide, Release 10.0(1)viii OL-28931-01  Contents
CHAPTER 5 User Options web pages 71User Options web page actions 71Sign in and out of User Options web pages 71Select device from User Options web page 72Select configuration option 72Features and services setup on web 72Speed Dial setup on web 72Set up speed-dial buttons 73Set up abbreviated dialing codes 73Phone services setup on web 73Subscribe to service 74Search for services 74Change or end services 74Change service name 75Add service to programmable feature button 75User settings on web 75Change browser password 76Change PIN 76Change User Options web page language setting 76Change phone display language 77Line settings on web 77Set up call forward for each line 77Change voice message indicator setting for each line 78Change audible voice message indicator setting for each line 78Change or create line text label that appears on phone screen 79Set up phone and access list for Mobile Connect 79Create access list 79Add new remote destination 80Cisco Web Dialer 81Use WebDialer with User Options directory 81Use WebDialer with another online corporate directory 81Log out of WebDialer 82Set up, view, or change Web Dialer preferences 82Cisco Desktop Collaboration Experience DX600 Series User Guide, Release 10.0(1)       OL-28931-01 ixContents
CHAPTER 6 Applications 83Calendar 83Calendar account 83Add calendar account 84Add calendar event 84Edit event 84Delete event 85Start scheduled WebEx meeting 85Join scheduled WebEx meeting 85Settings 85Hide declined events 86Set alerts and notifications 86Select ringtone 86Edit vibrate settings 87Set default reminder time 87Calendar widget 87Contacts 87Contact details 87View recent activity 88Add contact 88Edit contact 88Remove contact 88Join contacts 89Share contact 89Favorites 89Mark contact as favorite 89Groups 89Add group 90Delete group 90Add contact to group 90Edit group 91Search 91Search your contacts 91Import contacts 92   Cisco Desktop Collaboration Experience DX600 Series User Guide, Release 10.0(1)xOL-28931-01  Contents
Export contacts 92Set display options 92Availability 92Email 93Settings 93Add email account 93Inbox 93Refresh inbox 94Sort mailbox 94Search email messages 94Send email message 94Save email message draft 95Reply to email message 95Forward email message 95Add attachment to email message 95Add CC or BCC recipient 96Delete email message 96Delete multiple email messages 96Delete folder 96Move email message 97Mark email message as favorite 97Mark multiple email messages as favorites 97Mark email message as new 97Mark multiple email messages as new 98Search email messages 98Set sorting options 98Add signature to email messages 99Digitally signed email messages 99Set email check frequency 99Reset email account password 99Select ringtone 100Edit vibrate settings 100Jabber IM 100Jabber IM account 100Add Jabber IM account 100Cisco Desktop Collaboration Experience DX600 Series User Guide, Release 10.0(1)       OL-28931-01 xiContents
Signing in 101Availability 101Add custom status 101Delete custom status 102Contacts 102Add Chat contact 102Contact requests 102View contact requests 103Remove chat contact 103Show offline contacts 103Unsynced contacts 103Add unsynced contact to chat contacts 104Conversations 104Start conversation 104Emoticons 104Insert emoticon into conversation 104End conversation 104Search 105Start conversation with search result 105Settings 105Enable audio and vibration notifications 105Enable status bar notifications 105Set profile photo 106Set your ringtone 106Sign out of Jabber IM 106Unified Inbox 106View communications with contact 107Search contact list 107View email message 107View visual voice message 107Play visual voice message 107Reply to visual voice message 108View event details 108Join WebEx meeting 108Reorder panels 108   Cisco Desktop Collaboration Experience DX600 Series User Guide, Release 10.0(1)xii OL-28931-01  Contents
Refresh application data 108Unified Inbox widget 109WebEx 109Sign in to WebEx 109Sign in to WebEx with single sign-on 109Start instant WebEx meeting 110Schedule new WebEx meeting 110Start scheduled WebEx meeting 110Join scheduled WebEx meeting 110Join WebEx meeting by meeting number 111View participant list 111Chat with participant 111Chat with everyone 111Invite more participants to WebEx meeting 112Invite more participants during WebEx meeting 112Show video during WebEx meeting 112WebEx widget 112More applications 112UCM App 113Remove application 113CHAPTER 7 Accessories 115Bluetooth 115Enable Bluetooth 116Scan for Bluetooth device 116Pair Bluetooth device 116Unpair Bluetooth device 116Sharing files 117View received files 117Make phone discoverable 117Set Bluetooth device name 117External camera 117External monitor 118Connect external monitor 118Switch display mode 118Cisco Desktop Collaboration Experience DX600 Series User Guide, Release 10.0(1)       OL-28931-01 xiiiContents
Set monitor orientation 119Launch application on external monitor 119Autolaunch application to external monitor 119Move application to external monitor 120Move application to phone screen 120HDCP support 120Virtual desktop infrastructure 121USB accessories 121USB keyboard and mouse 122VDI shortcuts 122VDI keyboard shortcuts 122VDI mouse actions 122USB memory stick 122USB-powered hub 123USB console cable 123CHAPTER 8 Product safety, security, accessibility, and related information 125Safety and performance information 125Power outage 125Emergency response notification 125Emergency response notification for phone 126Emergency response notification for VPN 126External devices 126Headset safety 127Bluetooth wireless headset performance 127FCC compliance statements 127FCC part 15.21 statement 127FCC receivers and class B digital statement 128CE marking 128Cryptographic information 128Data backup 128Problem Report Tool 129Report problem 129Accessibility features 129Change font size 130   Cisco Desktop Collaboration Experience DX600 Series User Guide, Release 10.0(1)xiv OL-28931-01  Contents
Change screen brightness 130Change touch and hold delay 130Enable spoken passwords 131Enable TalkBack 131Enable web scripts 131Cisco Desktop Collaboration Experience DX600 Series User Guide, Release 10.0(1)       OL-28931-01 xvContents
   Cisco Desktop Collaboration Experience DX600 Series User Guide, Release 10.0(1)xvi OL-28931-01  Contents
CHAPTER 1PrefaceThis guide describes the Cisco Desktop Collaboration Experience DX600 Series phone and how to use it.The audience for this guide is system administrators and users.•Guide organization, page 1•Related documentation, page 1•Additional information, page 2•Obtaining documentation and submitting service request, page 2Guide organizationThis guide is organized into these topics:•Phone features, on page 3•Calling tasks, on page 23•Phone customization and settings, on page 59•User Options web pages, on page 71•Applications, on page 83•Accessories, on page 115•Product safety, security, accessibility, and related information, on page 125Related documentationSee these documents for additional information about Cisco Desktop Collaboration Experience DX600 Seriesphones:•Cisco Desktop Collaboration Experience DX600 Series Administration Guide•Cisco Desktop Collaboration Experience DX650 Quick Start•Regulatory Compliance and Safety Information for Cisco Desktop Collaboration Experience DX650Cisco Desktop Collaboration Experience DX600 Series User Guide, Release 10.0(1)        OL-28931-01 1
•Cisco Desktop Collaboration Experience DX600 Series Release Notes•Cisco Desktop Collaboration Experience DX600 Series Wireless LAN Deployment GuideAdditional informationYou can access the Cisco website at this URL:http://www.cisco.comCisco Desktop Collaboration Experience DX600 Series Quick Start, Administration, Deployment, and UserGuides:http://www.cisco.com/en/US/products/ps12956/products_user_guide_list.htmlLicensing information:http://www.cisco.com/en/US/docs/general/warranty/English/EU1KEN_.htmlCisco international websites:Access international Cisco websites from www.cisco.com by clicking the Worldwide link at the top of theweb page.Obtaining documentation and submitting service requestFor information about obtaining documentation, submitting a service request, and gathering additionalinformation, see the monthly What’s New in Cisco Product Documentation, which also lists all new and revisedCisco technical documentation, at this URL:http://www.cisco.com/en/US/docs/general/whatsnew/whatsnew.htmlSubscribe to the What’s New in Cisco Product Documentation as a Really Simple Syndication (RSS) feedand set content to be delivered directly to your desktop using a reader application. The RSS feeds are a freeservice and Cisco currently supports RSS Version 2.0.   Cisco Desktop Collaboration Experience DX600 Series User Guide, Release 10.0(1)2OL-28931-01  PrefaceAdditional information
CHAPTER 2Phone featuresThis chapter outlines the features of the Cisco Desktop Collaboration Experience DX600 Series phones.•Buttons and hardware, page 3•Line and call definitions, page 9•Energy savings, page 10•Android, page 10•Cleaning and maintenance, page 21Buttons and hardwareThis section describes the phone buttons and hardware.Cisco Desktop Collaboration Experience DX650 buttons and hardwareThis figure identifies the important parts of the phone.Cisco Desktop Collaboration Experience DX600 Series User Guide, Release 10.0(1)        OL-28931-01 3
Table 1: Phone buttons and hardwareDescriptionItemFront-facing camera for video calls.Camera1Shows phone features.Phone screen2Allows you to dial phone numbers.Keypad3Allows you to connect a microSD card.microSD card slot4Locks the phone screen, restarts the phone, or turns the phone onand off.Lock button5Transfers a call.Transfer button6Ends a call.End call button7Places a call on hold.Hold button8Creates a conference call.Conference button9Controls the handset, headset, and speakerphone volume (off-hook)and the ringer volume (on-hook).Volume button10   Cisco Desktop Collaboration Experience DX600 Series User Guide, Release 10.0(1)4OL-28931-01  Phone featuresCisco Desktop Collaboration Experience DX650 buttons and hardware
DescriptionItemToggles the speakerphone on or off. When the speakerphone is on,the button is lit.Speaker button11Toggles video on or off. When video is stopped, the button is lit.Stop Video button12Toggles the headset on or off. When the headset is on, the buttonis lit.Headset button13Toggles the microphone on or off. When the microphone is muted,the button is lit.Mute button14Indicates an incoming call or new voice message.Handset with light strip15Phone cable installationSee the following figure and table to connect your phone.Computer port6Lock1Auxiliary port7microUSB port2Auxiliary port8Line in/out port3HDMI port9Power port4Network port5Hookswitch clip removalSome phones ship with a clip to secure the hookswitch. Before you use your phone, remove the hookswitchclip (if present) from the cradle area. With the clip removed, the hookswitch lifts slightly when you pick upthe handset.Cisco Desktop Collaboration Experience DX600 Series User Guide, Release 10.0(1)       OL-28931-01 5Phone featuresPhone cable installation
TAPS registrationTool for Auto-Registered Phones Support (TAPS) is used either for a new phone or to replace an existingphone. To register with TAPS, pick up the handset, enter the TAPS extension that your system administratorprovides, and follow the voice prompts. You may need to enter your entire extension, including the area code.After your phone displays a confirmation message, hang up. The phone restarts.HandsetThe following table describes how to use the handset.Then...If you want to...Lift it to go off-hook; replace it in the cradle to go on-hook.The ringing line is selected automatically. Contact your systemadministrator for the options to select the primary line each time.Use the handsetPress or , then hang up the handset.Switch to the speakerphone orheadset during a callPress during a call or after invoking a dial tone.Adjust the volume level for a callHeadsetYou can use a wired headset with your phone. You can also use a wireless headset with the wireless headsetremote hookswitch control feature.You can use a headset with all the controls on your phone, including and .However, if you use a wireless headset, refer to the wireless headset documentation for instructions.Then...If you want to...Press .Toggle headset mode on and offLift the handset.Switch to a handsetPress during a call or after invoking a dial tone.Adjust the volume level for a call   Cisco Desktop Collaboration Experience DX600 Series User Guide, Release 10.0(1)6OL-28931-01  Phone featuresTAPS registration
If you use AutoAnswer, see AutoAnswer with headset or speakerphone, on page 8.Headset supportAlthough Cisco performs limited internal testing of third-party headsets for use with the Cisco DX600 Seriesphones, Cisco does not certify or support products from headset (or handset) vendors.Cisco recommends the use of good-quality headsets that are screened against unwanted radio frequency (RF)and audio frequency (AF) signals. Depending on the quality of the headsets and their proximity to otherdevices such as mobile phones and two-way radios, some audio noise or echo may still occur. An audiblehum or buzz may be heard by either the remote party or by both you and the remote party. A range of outsidesources can cause humming or buzzing sounds : for example, electric lights, electric motors, or large PCmonitors.In some cases, use of a local power cube or power injector may reduce or eliminate hum.NoteBecause of the environmental and hardware inconsistencies in the locations where Cisco DX600 Series phonesare deployed no single headset solution is optimal for all environments.Cisco recommends that customers test headsets in their intended environment to determine performance beforethey make a purchasing decision and deploy on a large scale.Audio qualityBeyond physical, mechanical, and technical performance, the audio portion of a headset must sound good tothe user and to the party on the far end. Sound quality is subjective and Cisco cannot guarantee the performanceof any headsets. However, a variety of headsets from leading headset manufacturers perform well with CiscoDX600 Series phones. For details, see the headset documentation.3.5 mm headsetsYou can plug a 3.5 mm headset into the headset port at the back of your phone.Some headsets may have hardware incompatibilities with the phone, including pinout, microphone voltage,and device control functionality. Headsets with an incompatible or nonexistent microphone generally can beused with the phone built-in microphone for voice calls.Wireless headsetCisco DX600 Series phones support wireless headsets. Refer to the wireless headset documentation forinformation about using the wireless headset remote features. Also, check with your system administrator tobe sure that your phone can use a wireless headset with the wireless headset remote hookswitch control feature.Cisco Desktop Collaboration Experience DX600 Series User Guide, Release 10.0(1)       OL-28931-01 7Phone featuresHeadset
SpeakerphoneIf the handset is in its cradle and is not lit, many actions that you take to dial a number or answer a calltrigger speakerphone mode automatically.Speakerphone is unavailable while headphones, or a headset with an incompatible microphone, are pluggedin.Then...If you want to...Press .Toggle speakerphone mode on or offLift the handset.Switch to a handsetPress during a call or after invoking a dial tone.Adjust the volume level for a callAutoAnswer with headset or speakerphoneWhen AutoAnswer is enabled, your phone answers incoming calls automatically after a few rings. Yoursystem administrator configures AutoAnswer to use either the speakerphone or a headset. You may want touse AutoAnswer if you receive a high volume of incoming calls.Then...If you...Keep headset mode active (in other words, keep lit), even when you are not ona call.To keep headset mode active, perform the following actions:•Press EndCall to hang up.•Press New Call or Dial to place new calls.If your phone is set up to use AutoAnswer in headset mode, calls are automaticallyanswered only if is lit.Otherwise, calls ring normally and you must answer them manually.Use AutoAnswerwith a headsetKeep the handset in the cradle and headset mode inactive ( unlit).Otherwise, calls ring normally and you must answer them manually.Use AutoAnswerwith thespeakerphoneAutoAnswer is disabled when the Do Not Disturb feature is active.Note   Cisco Desktop Collaboration Experience DX600 Series User Guide, Release 10.0(1)8OL-28931-01  Phone featuresSpeakerphone
Phone cable lockYou can secure the phone to a desktop with a laptop cable lock. The lock connects to the security slot on theback of the phone, and the cable can be secured to a desktop.The security slot can accommodate a lock that is up to 20 mm wide. Compatible laptop cable locks includethe Kensington laptop cable lock and laptop cable locks from other manufacturers that can fit into the securityslot on the back of the phone.Line and call definitionsThe terms lines and calls can be easily confused.•Lines: Each line corresponds to a directory number or intercom number that others can use to call you.Your phone can support up to six lines, depending on your phone and configuration. To see how manylines you have, look at the right side of your phone screen. You have as many lines as you have directorynumbers and phone line icons.•Calls: Each line can support multiple calls. By default, your phone supports four calls per line, but yoursystem administrator can adjust this number according to your needs. Only one call can be active at anytime; other calls are automatically placed on hold.Line and call iconsYour phone displays icons to help you determine the line and call state.DescriptionLine or call stateIconNo call activity on this line.On-hook lineYou are dialing a number or an outgoing call is ringing.Off-hook lineYou are connected to the other party.Connected callA call is ringing on one of your lines.Ringing callYou have put the call on hold. See Hold and resume, on page 25.Call on holdAnother phone that shares your line has a connected call. See Sharedlines, on page 54.Remote-in-useSee Secure calls, on page 52.Encrypted callSee Do Not Disturb, on page 45.Do Not DisturbCisco Desktop Collaboration Experience DX600 Series User Guide, Release 10.0(1)       OL-28931-01 9Phone featuresPhone cable lock
DescriptionLine or call stateIconThe intercom line is not in use. See Intercom calls, on page 47.Idle intercom lineThe intercom line is sending or receiving one-way audio. See Intercomcalls, on page 47.One-way intercom callYou press the intercom line to enable two-way audio with the intercomcaller. See Intercom calls, on page 47.Two-way intercom callSee Call Park, on page 39.Call ParkEnergy savingsYour phone supports the Cisco EnergyWise program. Your system administrator may set up sleep (powerdown) and wake (power up) times for your phone to save energy.If your phone is scheduled to sleep, the Lock button begins to blink 10 minutes before the scheduled sleeptime.. If your system administrator enables audible alert, you hear your ringtone play. The ringtone playsaccording to the following schedule:•At 10 minutes before power down, the ringtone plays four times.•At 7 minutes before power down, the ringtone plays four times.•At 4 minutes before power down, the ringtone plays four times.•At 30 seconds before power down, the ringtone plays 15 times or until the phone powers down.If your phone is inactive (idle) at the sleep time, a message reminds you that your phone is going to powerdown. To keep the phone active, tap the screen or press any key on the phone.If your phone is active (for example, on a call), your phone waits until it has been inactive for a period of timebefore it notifies you of the pending power shutdown. Before the shutdown happens, a message reminds youthat your phone is going to power down.At the scheduled time, your phone powers up. To wake up the phone before the scheduled time, press .Wake and sleep times are linked to the configured days that you normally work. If your requirements change(for example, your work hours or work days change), contact your system administrator to adjust your phonesettings.For more information about EnergyWise and your phone, contact your system administrator.AndroidThis section describes the basic Android™features on your phone.   Cisco Desktop Collaboration Experience DX600 Series User Guide, Release 10.0(1)10 OL-28931-01  Phone featuresEnergy savings
GesturesAndroid includes some basic gestures.ActionGestureUse your fingertip to press the touchscreen.Using other objects can damage the display. Be aware thattapping a phone number can cause the phone to dial the number.NoteTapTap and hold.Long pressTap and move.SwipeLong press and move.DragTwo taps in quick succession.Double-tapTap with two fingers, then move your fingers apart.Pinch openTap with two fingers, then move your fingers together.Pinch closeLock screenThe Lock screen is displayed when the phone is locked (inactive). The Lock screen displays the date and time,the number of unread email messages, the number of recently missed calls, the number of new voice messages,and the number of upcoming events for the next 24 hours.The number of unread email messages, and the number of upcoming events, are displayed only if youhave configured a Microsoft Exchange account.NoteYou can set the amount of time that your phone can be inactive before the screen locks. Your systemadministrator may disable the screen lock during your work hours.By default, the home screen is displayed when you unlock your phone. You can configure your phone tounlock to the phone application.Related TopicsAwake to Phone application, on page 13Cisco Desktop Collaboration Experience DX600 Series User Guide, Release 10.0(1)       OL-28931-01 11Phone featuresGestures
Unlock screenProcedureStep 1 Enter your PIN.Step 2 Press #or tap Unlock.Place emergency call from Lock screenTap Emergency Call.Add PINThe phone must be unlocked to set or reset your PIN.NoteProcedureStep 1 Tap .Step 2 Tap Settings.Step 3 Tap Security.Step 4 Tap Screen Lock.Step 5 Tap PIN.Step 6 Enter a PIN and tap Continue. Your PIN must be at least four digits.Step 7 Enter your PIN again and tap OK to confirm your PIN.Add passwordThe phone must be unlocked to set or reset your password.Note   Cisco Desktop Collaboration Experience DX600 Series User Guide, Release 10.0(1)12 OL-28931-01  Phone featuresLock screen
ProcedureStep 1 Tap .Step 2 Tap Settings.Step 3 Tap Security.Step 4 Tap Screen Lock.Step 5 Tap Password.Step 6 Enter a password and tap Continue. Your password must be at least four characters.Step 7 Enter your password again and tap OK to confirm your password.Reset lost PIN or passwordThe phone must be unlocked to set or reset your PIN or password.NoteProcedureStep 1 Tap Forgot PIN or Forgot Password on the Unlock screen.Step 2 Select a Cisco Unified Communications Manager or Google™account and enter your credentials. You canonly select an active account.Step 3 Reset your PIN or password. Your phone is now unlocked and your new PIN or password is ready to use.Awake to Phone applicationProcedureStep 1 Tap .Step 2 Tap Settings.Step 3 Tap Security.Step 4 Tap Default App.Step 5 Select Awake to phone app.Cisco Desktop Collaboration Experience DX600 Series User Guide, Release 10.0(1)       OL-28931-01 13Phone featuresLock screen
Cisco Extension MobilityCisco Extension Mobility allows you to configure any Cisco DX600 Series phone as your own temporarily.After you sign in to Extension Mobility, the phone adopts your user profile, including your phone lines,features, established services, and web-based settings. Your system administrator must configure ExtensionMobility for you.The Extension Mobility Change PIN feature allows you to change your PIN from the Settings application.Tips•Extension Mobility automatically signs you out after a certain amount of time. Your system administratorestablishes this time limit.•Changes that you make to your Extension Mobility profile from your Cisco Unified CommunicationsManager User Options web pages take effect immediately if you are signed in to Extension Mobility onthe phone; otherwise, changes take effect the next time you sign in.•Changes that you make to the phone from your User Options web pages take effect immediately if youare signed out of Extension Mobility; otherwise, changes take effect after you log out.•Local settings that your phone controls are not maintained in your Extension Mobility profile.•The data and applications of other users are not available to you when you sign in to Extension Mobility.•Your phone deletes unused data after a certain length of time.Sign In to Extension Mobility from Lock screenProcedureStep 1 Tap Sign In As New User.Step 2 Enter your user ID and PIN, provided by your system administrator.Step 3 If prompted, select a device profile.   Cisco Desktop Collaboration Experience DX600 Series User Guide, Release 10.0(1)14 OL-28931-01  Phone featuresLock screen
Sign in to Extension Mobility from SettingsProcedureStep 1 Tap .Step 2 Tap Settings.Step 3 Tap Extension Mobility.Step 4 Tap Sign In.Step 5 Enter your user ID and PIN.Step 6 Tap Submit.Sign Out of Extension Mobility from Lock screenProcedureTap Sign Out.Sign Out of Extension Mobility from SettingsProcedureStep 1 Tap .Step 2 Tap Settings.Step 3 Tap Extension Mobility.Step 4 Tap Sign Out.Cisco Desktop Collaboration Experience DX600 Series User Guide, Release 10.0(1)       OL-28931-01 15Phone featuresLock screen
Set screen timeoutProcedureStep 1 Tap .Step 2 Tap Settings.Step 3 Tap Security.Step 4 Tap Automatically Lock.Step 5 Select the length of time that your phone can be inactive before the screen locks. Note that your securitysettings may limit your screen timeout choices.Setup AssistantUse the Setup Assistant to set up the following:•Email•Jabber IM•WebEx•Visual VoicemailThe Setup Assistant runs automatically the first time that you use your Cisco DX600 Series phone. If youchoose not to use the Setup Assistant, you can set up these applications through the Settings application.Launch the Settings application from the Applications menu.Some users find it easier to enter complex passwords with a standard keyboard, rather than the onscreenkeyboard. For information about using a standard keyboard with your phone, see USB keyboard andmouse, on page 122.NoteRun Setup AssistantProcedureStep 1 Tap Email and follow the on-screen instructions.Step 2 Tap Jabber IM and follow the on-screen instructions.Step 3 Tap WebEx and follow the on-screen instructions.Step 4 Tap Voice Messages and follow the on-screen instructions.   Cisco Desktop Collaboration Experience DX600 Series User Guide, Release 10.0(1)16 OL-28931-01  Phone featuresSetup Assistant
Related TopicsEmail, on page 93Jabber IM, on page 100WebEx, on page 109Home screenThe home screen uses a landscape orientation. Place widgets and shortcuts anywhere on the home screen.Status barThe status bar is at the bottom of the screen. The status bar includes:•Navigation icons•Notification icons for applications such as the phone, email, and Jabber IM•Status icons for network connectionsTap a notification icon or status icon to see more detailed information.Navigation iconsTable 2: Navigation iconsTap Back to go to the previous page or application., or to dismiss theon-screen keyboard.BackTap Home to view the home screen.HomeTap Phone to launch the phone application.PhoneTap Recents to view the list of recently used applications.RecentsApplications menuTap to display the full collection of installed applications.Work spacesMultiple work spaces are available for you to set up. Each work space holds a variety of widgets and shortcutsin any configuration.Cisco Desktop Collaboration Experience DX600 Series User Guide, Release 10.0(1)       OL-28931-01 17Phone featuresHome screen
Navigate work spacesProcedureSwipe left or right on an open space on the home screen to go to the work space to the left or to the right.WidgetsWidgets are small applications that you can place on the home screen. Widgets provide at-a-glance informationand some functions from full applications.The following table describes some of the widgets that your phone includes:Table 3: WidgetsDisplay upcoming events.CalendarDisplay an icon for one of your contacts. Tap the iconto open the Quick Contact Badge for that contact.ContactsDisplay a digital clock.Digital clockDisplay an icon for one of your contacts. Tap the iconto call that contact.Direct DialDisplay recent email messages.EmailDisplay your favorite contacts.FavoritesDisplay all recent calls, missed calls, messages, orspeed dials.PhoneToggle these features on or off: Forward All, Privacy,Do Not Disturb, Mobility and Self-View.Phone featuresDisplay the number of missed calls, new voicemessages, unread email messages, and upcomingevents.Unified InboxDisplay upcoming WebEx meetings.WebExSet up home screenAdd applications, widgets, and folders, or change your wallpaper to set up your home screen.   Cisco Desktop Collaboration Experience DX600 Series User Guide, Release 10.0(1)18 OL-28931-01  Phone featuresHome screen
Add application icon to home screenProcedureStep 1 Tap .Step 2 Long press an application.Step 3 Drag the application icon to an empty space on any of the home screen work spaces.Add widget to home screenProcedureStep 1 Tap .Step 2 Tap Widgets.Step 3 Long press a widget.Step 4 Drag the widget to an empty space on any of the home screen work spaces.Move widget or iconProcedureDrag the widget or icon to an empty space on the home screen. Drag a widget or icon to either side of thescreen to place the widget or icon on another work space.Remove widget or iconProcedureStep 1 Long press the widget or icon.Step 2 Drag the widget or icon up to Remove. The widget or icon is deleted and Remove disappears.Cisco Desktop Collaboration Experience DX600 Series User Guide, Release 10.0(1)       OL-28931-01 19Phone featuresHome screen
Change wallpaperProcedureStep 1 Long press an open space on the home screen.Step 2 Tap Wallpapers.Step 3 Select a wallpaper.Quick Contact BadgeThe Quick Contact Badge allows you to communicate with your contacts from within several applicationsand in a variety of ways. Use the Quick Contact Badge to place a call, send an email message, send an instantmessage (IM), or start a WebEx meeting.Other options may be available on the Quick Contact Badge, depending on which applications you haveinstalled.NoteTap a contact icon to open the Quick Contact Badge.The following image shows the Quick Contact Badge:Share menuSome content, such as URLs, contacts, and photos, can be shared with Bluetooth, email, Jabber IM, and otherapplications through the Share menu. In any application that supports the Share menu, tap Share to view thesharing options.On-screen keyboardAn on-screen keyboard pops up automatically when you select a text input field.   Cisco Desktop Collaboration Experience DX600 Series User Guide, Release 10.0(1)20 OL-28931-01  Phone featuresQuick Contact Badge
Cleaning and maintenanceUse only a soft, dry cloth to wipe the touchscreen. Do not use any liquids or powders on the phone, becausethey can contaminate phone components and cause failures.Cisco Desktop Collaboration Experience DX600 Series User Guide, Release 10.0(1)       OL-28931-01 21Phone featuresCleaning and maintenance
   Cisco Desktop Collaboration Experience DX600 Series User Guide, Release 10.0(1)22 OL-28931-01  Phone featuresCleaning and maintenance
CHAPTER 3Calling tasksYou can use a range of features and services to perform basic call-handling tasks. Feature availability canvary; contact your system administrator for more information.•Common call tasks, page 23•Advanced call tasks, page 31Common call tasksHere are some easy ways to place a call on your phone.Tips•You can dial on-hook, without a dial tone (predial). To predial, enter a number, then go off-hook bylifting the handset, by tapping Dial, or by pressing or .•When you predial, your phone tries to anticipate the number that you are dialing by displaying matchingnumbers (if available) from your call history. This feature is called Auto Dial. To call a number that isdisplayed with Auto Dial, tap the number, or scroll to it and go off-hook.•If you make a mistake while dialing, tap Delete to delete digits.•If parties on a call hear a beep, the call may be monitored or recorded. Contact your system administratorfor more information.•You can start or stop a recording by tapping Record.•Your phone may be set up for international call logging, as indicated by a plus (+) symbol on the callhistory, redial, or call directory entries. Contact your system administrator for more information.Answer callYou can answer a call by lifting the handset, or you can use other options if they are available on your phone.Cisco Desktop Collaboration Experience DX600 Series User Guide, Release 10.0(1)        OL-28931-01 23
Then...If you want to...Press if it is not lit. Or, if is lit, tap Answer.The phone selects the ringing line automatically. For theoption to select the primary line each time, contact yoursystem administrator.NoteIf you are using a wireless headset, refer to the wireless headsetdocumentation.Answer with a headsetPress , or tap Answer.The phone selects the ringing line automatically. For theoption to select the primary line each time, contact yoursystem administrator.NoteAnswer with the speakerphoneTap Answer.Switch from an active call to answer anew callTap Answer.Answer by using call waitingTap Divert.Send a call to a voice message systemUse AutoAnswer.Autoconnect callsUse Call Park, Directed Call Park, or Assisted Directed Call Park.Retrieve a parked call on another phoneUse Call Pickup.Use your phone to answer a call that isringing elsewhereSet up Mobile Connect and answer your phone.If you answer a call on your mobile phone, and you haveconfigured up to four IP Phones as shared lines, the additionalphones stop flashing when you answer the call.Answer a call on your mobile phone orother remote destinationTips•If parties on a call hear a beep, the call may be monitored or recorded. Contact your system administratorfor more information.•If you work in a contact center or similar environment, you can create, update, and delete your ownprerecorded greeting that plays automatically if Agent Greeting is configured on your phone. For moreinformation, contact your system administrator.•A Call Chaperone user cannot answer an incoming call while calls are chaperoned.Disconnect callTo end a call, simply hang up. The following table provides more details.   Cisco Desktop Collaboration Experience DX600 Series User Guide, Release 10.0(1)24 OL-28931-01  Calling tasksDisconnect call
Then...If you want to...Return the handset to the cradle. Or, press .Hang up while using the handsetPress . Or, to keep headset mode active, press .If you are using a wireless headset, refer to the wireless headsetdocumentation for instructions.Hang up while using a headsetPress orpress .Hang up while using the speakerphonePress . If necessary, remove the call that you want to endfrom hold first.Hang up one call, but preserve another callon the same lineHold and resumeYou can hold and resume calls. When you put a call on hold, the Hold icon appears on the right in the callinformation area. With a shared line, when another phone places a call on hold, the phone displays the RemoteHold icon.If the Hold Reversion feature is enabled for your phone, a call that you put on hold reverts to ringing after acertain time. The reverting call remains on hold until you resume it or until Hold Reversion times out. Yourphone indicates the presence of a reverting call by the following actions:•Alerts you at intervals with a single ring (or flash or beep, depending on your phone line setting).•Briefly displays a Hold Reversion message in the status bar at the bottom of the phone screen.•Displays the animated Hold Reversion icon next to the caller ID for the held call.Tips•The Hold feature typically generates music (if Music on Hold is configured) or a beeping tone.•If you receive an alert for an incoming call and a reverting call at the same time, your phone shifts thefocus of the phone screen to display the incoming call by default. Your system administrator can changethis focus priority setting.•If you use a shared line, Hold Reversion rings only on the phone that puts the call on hold, not on theother phones that share the line.•Your system administrator determines the duration between Hold Reversion alerts.•When a call is chaperoned, the call chaperone cannot use Hold.Cisco Desktop Collaboration Experience DX600 Series User Guide, Release 10.0(1)       OL-28931-01 25Calling tasksHold and resume
Put call on holdProcedureStep 1 Make sure that the call you want to put on hold is highlighted.Step 2 Press .Remove call from hold on different lineProcedureStep 1 Select a line. Doing so may cause a held call to resume automatically:•If a reverting call is on the line, that call resumes.•If more than one reverting call is on the line, the oldest reverting call resumes.•If a nonreverting held call is the only call on the line, the nonreverting held call resumes.Step 2 If necessary, scroll to the appropriate call and press .MuteWith Mute enabled, you can hear other parties on a call but they cannot hear you. You can use Mute with thehandset, speakerphone, or headset.Mute or unmute callProcedureStep 1 To mute a call, press .Step 2 To unmute a call, press again.   Cisco Desktop Collaboration Experience DX600 Series User Guide, Release 10.0(1)26 OL-28931-01  Calling tasksMute
Place callProcedurePick up the handset and dial the number.Place call with headsetProcedurePerform one of the following actions:•Press and enter a number.•If is lit, press New Call and enter a number.Place call with speakerphoneProcedureStep 1 Press .Step 2 Enter a number.Place call when another call is activeProcedureStep 1 Press .Step 2 Press .Step 3 Enter a number.Cisco Desktop Collaboration Experience DX600 Series User Guide, Release 10.0(1)       OL-28931-01 27Calling tasksPlace call
Redial numberProcedurePress Redial to dial the last number.Video callsYou can send and receive video calls. Some third-party endpoints will display compatibility issues. Forexample, video may not resume after placing a call on hold, during video calls with a third-party endpoint.Contact your system administrator for more details.If you launch another application that requires use of the camera while you are on a video call, thatapplication may crash.NoteVideo call control barA call control bar appears at the bottom of an active video call. The video call control bar disappears after afew seconds. Tap the screen to make the call control bar reappear.Stop your video transmissionProcedureStep 1 Press to stop your video.Step 2 Press again to resume video transmission.Automatic video transmissionBy default, your phone automatically transmits video during a video call.   Cisco Desktop Collaboration Experience DX600 Series User Guide, Release 10.0(1)28 OL-28931-01  Calling tasksRedial number
Stop automatic video transmissionProcedureStep 1 Tap .Step 2 Toggle Always Send Video to off.Adjust video call settingsYou can adjust your video quality for video calls or turn off video calls.ProcedureStep 1 Tap .Step 2 Tap Settings.Step 3 Tap Calls.Step 4 Select a video call setting. Depending on how your system administrator set up your phone application, somevideo call settings may not be available. Contact your system administrator for more information.Self-videoUse self-video to preview the video of yourself that you display during video calls.Show self-videoProcedureStep 1 Tap .Step 2 Tap Self View.Step 3 Tap Xto stop showing self-video. During a video call, self-video disappears after a few seconds.Visual VoicemailVisual Voicemail allows you to manage your voice messages. You can also access your voice messages inthe Unified Inbox application.Cisco Desktop Collaboration Experience DX600 Series User Guide, Release 10.0(1)       OL-28931-01 29Calling tasksVisual Voicemail
Set up Visual VoicemailBefore you can use Visual Voicemail, you must set up an account. If you have not already used the SetupAssistant to enter your Visual Voicemail credentials, you can set up your account on the Voice Messages tab.ProcedureStep 1 Tap Recents.Step 2 Tap Messages.Step 3 Enter your account credentials and tap Sign In.Listen to voice messageProcedureTap next to a voice message to listen to that voice message.View voice message detailsProcedureTap a voice message to view details.Reply to voice messageProcedureStep 1 Tap a voice message to view details.Step 2 Tap .   Cisco Desktop Collaboration Experience DX600 Series User Guide, Release 10.0(1)30 OL-28931-01  Calling tasksVisual Voicemail
Forward voice messageProcedureStep 1 Tap a voice message to view details.Step 2 Tap More.Step 3 Tap Forward and select the recipients.Delete voice messageProcedureStep 1 Select one or more voice messages.Step 2 Tap .Advanced call tasksYou can use special features and services that may be available on your phone to place calls. For moreinformation about these options, contact your system administrator.Tips•For more information about using your Cisco Extension Mobility prefix to place a call, see CiscoExtension Mobility, on page 14.•To check if a line that is associated with a Speed Dial, call record, or directory listing is busy beforeplacing a call to that line, see Line status features, on page 49.Business calls with single phone numberIntelligent Session Control associates your mobile phone number with your business phone number. Whenyou receive a call to your remote destination (mobile phone), your desk phone does not ring; only your remotedestination rings. When you answer an incoming call on the mobile phone, the desk phone displays a Remotein Use message.During a call, you can also use any of your mobile phone features. For example, if you receive a call on yourmobile number, you can either answer the call from your desk phone or you can hand off the call from yourmobile phone to your desk phone.Cisco Desktop Collaboration Experience DX600 Series User Guide, Release 10.0(1)       OL-28931-01 31Calling tasksAdvanced call tasks
Then...If you want to...Use the various features of your mobile phone (for example,*74). Contact your system administrator for a list of accesscodes.Transfer your incoming mobile active callto desk phoneMobile Connect and Mobile Voice AccessIf you have Mobile Connect and Mobile Voice Access installed, you can use your mobile phone to handlecalls that are associated with your desktop phone number.Your desktop and remote destinations receive calls simultaneously.When you answer the call on your desktop phone, the remote destinations stop ringing, disconnect, and displaya missed call message.When you answer the call on one remote destination, the other remote destinations stop ringing and disconnect;the other remote destinations show a missed call message.Then...If you want to...Use the User Options web pages to set up remote destinations and createaccess lists to allow or block calls from specific phone numbers from beingpassed to the remote destinations. See Set up phone and access list for MobileConnect, on page 79.Configure Mobile ConnectSee Answer call, on page 23.Answer a call using yourmobile phoneSee Active call movement, on page 46.Switch an active call betweenyour desk phone and mobilephoneSee Advanced call tasks, on page 31.Make a call from your mobilephoneTips•When you call Mobile Voice Access, you must enter the number that you are calling and your PIN ifany of the following are true:◦The number you are calling from is not one of your remote destinations.◦The number is blocked by you or your carrier (shown as Unknown Number).◦The number is not accurately matched in the Cisco Unified Communications Manager database;for example, if your number is 510-666-9999, but it is listed as 666-9999 in the database, or yournumber is 408-999-6666, but the database entry is 1-408-999-6666.   Cisco Desktop Collaboration Experience DX600 Series User Guide, Release 10.0(1)32 OL-28931-01  Calling tasksBusiness calls with single phone number
•If you incorrectly enter any requested information (such as mobile phone number or PIN) three timesin a row, the Mobile Voice Access call disconnects, and you are locked out for a period of time. Contactyour system administrator for assistance.Put call picked up on mobile phone on holdProcedureStep 1 Tap Enterprise Hold (name may vary).The other party is placed on hold.Step 2 On your mobile phone, tap Resume (name may vary).Connect to Mobile Voice AccessProcedureStep 1 From any phone, dial your assigned Mobile Voice Access number.Step 2 Enter the number that you are calling from, if prompted, and your PIN.Turn on Mobile Connect from mobile phoneProcedureStep 1 Dial your assigned Mobile Voice Access number.Step 2 If requested, enter your mobile phone number and PIN.Step 3 Press 2to enable Mobile Connect.Step 4 Choose whether to turn Mobile Connect on for all configured phones or just one:•All phones: Enter 2.•One phone: Enter 1and enter the number that you want to add as a remote destination, followed by #.Cisco Desktop Collaboration Experience DX600 Series User Guide, Release 10.0(1)       OL-28931-01 33Calling tasksBusiness calls with single phone number
Turn off Mobile Connect from mobile phoneProcedureStep 1 Dial your assigned Mobile Voice Access number.Step 2 If requested, enter your mobile phone number and PIN.Step 3 Press 3to disable Mobile Connect.Step 4 Choose whether to turn Mobile Connect off for all configured phones or just one:•All phones: Enter 2.•One phone: Enter 1and enter the number that you want to remove as a remote destination, followed by#.Turn on or off Mobile Connect access to all remote destinations from desk phoneProcedureStep 1 Tap Mobility to display the current remote destination status (Enabled or Disabled).Step 2 Tap Select to change the status.Step 3 Tap Exit.Conference callsYour phone allows you to talk with multiple parties in a conference call.You can create a conference in various ways, depending on your needs and the features that are available onyour phone.•Conference: Allows you to create a standard (ad hoc) conference by calling each participant. Conferenceis available on most phones.•Join: Allows you to create a standard (ad hoc) conference by combining existing calls.•cBarge: Allows you to create a standard (ad hoc) conference by adding yourself to a call on a sharedline. Press a line button or use cBarge. Only phones that use shared lines have cBarge.•Meet Me: Allows you to create or join a conference by calling a conference number.Ad hoc conferenceAd hoc conference allows you to call each participant.   Cisco Desktop Collaboration Experience DX600 Series User Guide, Release 10.0(1)34 OL-28931-01  Calling tasksConference calls
Call participants to create conferenceYour system administrator determines whether noninitiators of a conference can add or remove participants.ProcedureStep 1 From a call, press .Step 2 Enter the phone number of the participant.Step 3 Wait for the call to connect.Step 4 Press again to add the participant to your call.Step 5 Repeat to add additional participants.Add contacts to conferenceProcedureStep 1 From a call, tap .Step 2 Drag a contact from the contact list to the call.Step 3 Repeat to add additional participants.Join conferenceJoin allows you to combine two or more existing calls to create a conference in which you are a participant.Tips•If you frequently join more than two parties into a single conference, you may find it useful to first selectthe calls that you want to join together, and then tap Join to complete the action.•When Join completes, the caller ID changes to Conference.•You may be able to combine multiple conference calls by using the Join button. Contact your systemadministrator to see if this feature is available to you.•A Call Chaperone user can conference only the first caller. The other participants in the conference canconference subsequent callers.Cisco Desktop Collaboration Experience DX600 Series User Guide, Release 10.0(1)       OL-28931-01 35Calling tasksConference calls
Join together existing calls on single phone lineProcedureStep 1 From an active call, highlight another call that you want to include in the conference and tap Select.Step 2 Repeat this step for each call that you want to add.Step 3 Tap Join. You may need to tap to see Join.Join together existing calls on multiple phone linesProcedureStep 1 From an active call, highlight a call on another line that you want to include in the conference and tap Select.Step 2 Repeat this step for each call that you want to add.Step 3 Tap Join. You may need to tap to see Join.Barge conferenceYou can create a conference by using cBarge to add yourself to a call on a shared line.Related TopicsBarge, cBarge, and shared lines, on page 54Barge call on shared line to create conferenceProcedureTap the line button for the shared line.Meet Me conferenceMeet Me conferencing enables you to start or join a conference by calling the conference number.Tips•If you call a secure Meet Me conference number from a nonsecure phone, your phone displays themessage Device Not Authorized. For more information, see Secure calls, on page 52.•A Meet Me conference ends when all participants hang up.   Cisco Desktop Collaboration Experience DX600 Series User Guide, Release 10.0(1)36 OL-28931-01  Calling tasksConference calls
•If the conference initiator disconnects, the conference call continues until all participants hang up.Start Meet Me conferenceParticipants cannot join the conference until the initiator starts the conference.ProcedureStep 1 Obtain a Meet Me phone number from your system administrator.Step 2 Distribute the number to participants.Step 3 When you are ready to start the meeting, go off-hook to get a dial tone, then tap Meet Me.Step 4 Dial the Meet Me conference number.Participants can now join the conference by dialing the Meet Me number.Join Meet Me conferenceProcedureStep 1 Dial the Meet Me conference number that the conference initiator provides.Step 2 If you hear a busy tone, the conference initiator has not joined the conference. Wait a minute and then tryyour call again.Conference participants listDuring a standard (ad hoc) conference, you can view a list of participants and remove participants.Control conference with participants listThe conference participants list displays conference participants.ProcedureStep 1 Tap Conference List.Participants are listed in the order in which they join the conference with the most recent additions at the top.Step 2 To remove any conference participant, highlight the participant and tap End Call.You can remove participants only if you initiated the conference call.Cisco Desktop Collaboration Experience DX600 Series User Guide, Release 10.0(1)       OL-28931-01 37Calling tasksConference calls
Call forwardYou can use the call forwarding features to redirect incoming calls from your phone to another number.Your system administrator may allow you to choose from two types of call forwarding features:•Unconditional call forwarding (Call Forward All): Applies to all calls that you receive.•Conditional call forwarding (Call Forward No Answer, Call Forward Busy, Call Forward No Coverage):Applies to certain calls that you receive, according to conditions.You can access Call Forward All on your phone or from your Cisco Unified Communications Manager UserOptions web pages. Conditional call forwarding features are accessible only from your User Options webpages. Your system administrator determines which call forwarding features are available to you.Tips•Enter the call forward target number exactly as you would dial it from your phone. For example, enteran access code or the area code, if necessary.•You can forward your calls to a traditional analog phone or to another phone, although your systemadministrator may restrict the call forwarding feature to numbers within your company.•Call forwarding is specific to the phone line. If a call reaches you on a line where call forwarding is notenabled, the call rings as usual.•Your system administrator can enable a call forward override feature that allows the person receivingyour forwarded calls to reach you. With override enabled, a call placed from the target phone to yourphone is not forwarded, but rings through.•Your phone may reject your attempt to set up Call Forward All directly on the phone if the target numberthat you enter creates a call forwarding loop or exceeds the maximum number of links that are permittedin a call forwarding chain.•When you switch an in-progress call from your mobile phone to Cisco DX600 Series phones that sharethe same line (Session Handoff), the phone disables the Call Forward feature. The Call Forward featurereturns when the call ends.•To verify that your primary line has Call Forward All enabled look for:◦The call forward icon above your primary phone number.◦The call forward target number in the status line.Related TopicsLine settings on web, on page 77User Options web page actions, on page 71   Cisco Desktop Collaboration Experience DX600 Series User Guide, Release 10.0(1)38 OL-28931-01  Calling tasksCall forward
Set up and cancel Call Forward All from phoneProcedureStep 1 To set Call Forward All, tap Forward All Calls and enter a target phone number.Step 2 To cancel Call Forward All, tap Forward All Calls.Set up or cancel call forwardingWhen call forwarding is enabled for any line other than the primary line, your phone does not provide youwith confirmation that calls are being forwarded. Instead, you must confirm your settings in the User Optionsweb pages.ProcedureStep 1 Log in to your User Options web pages.Step 2 Access your call forwarding settings.Call ParkYou park a call when you want to store the call so that you or someone else can retrieve it from another phonein the Cisco Unified Communications Manager system (for example, a phone at a coworker’s desk or in aconference room).Use these methods to park a call:•Call Park: Use Park to store the call. Your phone displays the call park number where the system storedyour call. You must record this number and then use the same number to retrieve the call.•Directed Call Park: Tap Transfer during a call. To store the call, dial the Directed Call Park numberand tap Transfer again.•Assisted Directed Call Park: Tap the Directed Call Park button that displays an idle line status indicator.To retrieve the call from any other phone in your network, tap the flashing Directed Call Park button.Tips•You have a limited amount of time to retrieve a parked call before it reverts to ringing at the originalnumber. Contact your system administrator for details.•You can dial Directed Call Park numbers if you do not have Directed Call Park buttons. However, youcannot see the status of the directed call park number.Cisco Desktop Collaboration Experience DX600 Series User Guide, Release 10.0(1)       OL-28931-01 39Calling tasksCall Park
Store and retrieve active call with Call ParkProcedureStep 1 During a call, tap Park. You may need to tap to see Park.Step 2 Record the call park number that is displayed on your phone screen.Step 3 Hang up.Step 4 To pick up the parked call, enter the Call Park number from any phone in your network.Direct and store active call at Directed Call Park numberProcedureStep 1 During a call, tap Transfer.Step 2 Select a speed-dial number that is assigned to a Directed Call Park number or dial the number.Step 3 Tap Transfer again to finish storing the call.Retrieve parked call from Directed Call Park numberProcedureFrom any phone in your network, enter the park retrieval prefix and dial the Directed Call Park number.Direct, store, and retrieve active call at Assisted Directed Call Park numberProcedureStep 1 During a call, tap the Direct Call Park button that displays an idle line status indicator.Step 2 To retrieve the call, tap the flashing Direct Call Park button.If your administrator has not configured a reversion directory number, the parked call reverts to the phonethat parked the call.   Cisco Desktop Collaboration Experience DX600 Series User Guide, Release 10.0(1)40 OL-28931-01  Calling tasksCall Park
Call PickupCall Pickup enables you to answer a call that is ringing on a coworker’s phone by redirecting the call to yourphone. You might use Call Pickup if you share call-handling tasks with coworkers.Tips•If multiple calls are available for pickup, your phone picks up the oldest call first (the call that has beenringing for the longest time).•If you tap Pickup or Group Pickup and enter a line number, your phone picks up the ringing call onthat particular line (if available).•If you have multiple lines and want to pick up the call on a nonprimary line, first tap the line button forthe desired line, then tap Pickup or Group Pickup.•Depending on how your phone is configured, you might receive an audio or visual alert about a call toyour pickup group.Answer call ringing on another extension within Call Pickup groupProcedureStep 1 Tap Pickup.If your phone supports autopickup, you are now connected to the call.Step 2 If the call rings, tap Answer to connect to the call.Answer call ringing on another extension outside Call Pickup groupProcedureStep 1 Tap Group Pickup.Step 2 Enter the group pickup number.If your phone supports autopickup, you are now connected to the call.Step 3 If the call rings, tap Answer to connect to the call.Cisco Desktop Collaboration Experience DX600 Series User Guide, Release 10.0(1)       OL-28931-01 41Calling tasksCall Pickup
Answer call ringing on another extension in group or in associated groupProcedureStep 1 Tap Pickup.If your phone supports autopickup, you are now connected to the call.Step 2 If the call rings, tap Answer to connect to the call.Answer call ringing on particular extensionProcedureStep 1 Tap Group Pickup.Step 2 Enter the line number with the call that you want to pick up. For example, if the call that you want to pick upis ringing on line 12345, enter 12345.If your phone supports autopickup, you are now connected to the call.Step 3 If the call rings, tap Answer to connect to the call.Call transferTransfer redirects a call. The target is the number to which you want to transfer the call.Tips•If on-hook transfer is enabled on your phone, you can either hang up to complete the call, or tap Transferand then hang up.•If on-hook transfer is not enabled on your phone, hanging up without tapping Transfer again places thecall on hold.•You cannot use Transfer to redirect a call that is on hold. Tap Resume to remove the call from holdbefore transferring it.•When a call is chaperoned, the call chaperone cannot use transfer.•To redirect a call to a voice message system, tap iDivert.   Cisco Desktop Collaboration Experience DX600 Series User Guide, Release 10.0(1)42 OL-28931-01  Calling tasksCall transfer
Transfer call without talking to transfer recipientProcedureStep 1 From an active call, tap Transfer.Step 2 Enter the target number.Step 3 Tap Transfer again to complete the transfer or EndCall to cancel.Step 4 If your phone has on-hook transfer enabled, complete the transfer by hanging up.Talk to transfer recipient before transferring callProcedureStep 1 From an active call, tap Transfer.Step 2 Enter the target number.Step 3 Wait for the transfer recipient to answer.Step 4 Tap Transfer again to complete the transfer or EndCall to cancel.Step 5 If your phone has on-hook transfer enabled, complete the transfer by hanging up.Call transfer to voice message systemYou can use Divert to send an active, ringing, or held call to your voice message system. Depending on thetype of call and your phone configuration, you can also use Divert to send the call to the voice message systemof another party.•If the call was originally sent to the phone of another person, Divert allows you to redirect the call eitherto your own voice message system or to the voice message system of the original called party. Yoursystem administrator makes this option available to you.•If the call is sent to you directly (not transferred or forwarded to you), or if your phone does not supportthe option described above, using Divert redirects the call to your voice message system.Tips•If your phone displays a menu that disappears before you make your selection, tap Divert again toredisplay the menu. You can also contact your system administrator to configure a longer timeout value.•When you switch an in-progress call from your mobile phone to a Cisco DX600 Series phone that sharesthe same line (Session Handoff), the Divert feature is disabled on the Cisco DX600 Series phone. TheDivert feature returns when the call ends.Cisco Desktop Collaboration Experience DX600 Series User Guide, Release 10.0(1)       OL-28931-01 43Calling tasksCall transfer to voice message system
Send active, ringing, or held call to voice message systemProcedureStep 1 Tap Divert.If you have no redirect options available, the call transfers to your voice message system.Step 2 If you have redirect options available, your phone displays a new menu. Choose an option to redirect the call.Dial from corporate directory on personal computer using Cisco Web DialerProcedureStep 1 Open a web browser and go to a Web Dialer-enabled corporate directory.Step 2 Click the number that you want to dial.Notify when busy or ringing extension availableWhen a call is being chaperoned, the call chaperone cannot use CallBack.NoteProcedureStep 1 Tap Call Back while listening to the busy tone or ring sound.Step 2 Hang up. Your phone alerts you when the line is free.Step 3 Tap the call back notification to place the call again.   Cisco Desktop Collaboration Experience DX600 Series User Guide, Release 10.0(1)44 OL-28931-01  Calling tasksDial from corporate directory on personal computer using Cisco Web Dialer
Dial from corporate directory on phoneProcedureStep 1 Tap .Step 2 Enter a name in the Search field. This will search your local contacts and the corporate directory.Step 3 Highlight a listing and go off-hook.Do Not DisturbDo Not Disturb (DND) turns off all audible and visual notifications of incoming calls. Your system administratorenables DND on your phone.When DND and Call Forward are enabled on your phone, calls forward immediately and the caller does nothear a busy tone.DND interaction with other types of calls includes:•DND does not affect intercom calls or nonintercom priority calls.•If both DND and AutoAnswer are enabled, only intercom calls autoanswer.•When you switch an in-progress call from your mobile phone to a Cisco DX600 Series phone that sharethe same line (Session Handoff), the Cisco DX600 Series phone disables the DND feature. The DNDfeature returns when the call ends.Turn DND on and offProcedureStep 1 To turn DND on, tap Do Not Disturb. You may need to tap if Do Not Disturb is not visible.Step 2 To turn DND off, tap Do Not Disturb again.Set up DND settingsIf your system administrator configured DND settings to appear on the User Options page, perform thesesteps:Cisco Desktop Collaboration Experience DX600 Series User Guide, Release 10.0(1)       OL-28931-01 45Calling tasksDial from corporate directory on phone
ProcedureStep 1 Log in to your User Options web pages.Step 2 From the drop-down menu, choose User Options >Device.Step 3 You can set the following options:•Do Not Disturb: Set to enable/disable DND.•DND Option: Choose either Call Reject (to turn off all audible and visual notifications) or Ringer Off(to turn off only the ringer).•DND Incoming Call Alert (applies to either DND option set): Set the alert to beep only, flash only,disable the alert, or choose “None”(to use the “Alert”setting configured by your system administrator).Hunt groupsIf your organization receives a large number of incoming calls, you may be a member of a hunt group, whichincludes a series of directory numbers that share the incoming call load. When the first directory number inthe hunt group is busy, the system hunts for the next available directory number in the group and directs thecall to that phone.When you are away from your phone, you can prevent hunt group calls from ringing your phone by loggingout of hunt groups.Logging out of hunt groups does not prevent non-hunt-group calls from ringing your phone.Sign in and out of hunt groupsProcedureStep 1 Tap Sign In. You are now signed into the Hunt Group.Step 2 Tap Sign Out.Active call movementYou can switch active calls between the desktop phone and your mobile phone or other remote destination.   Cisco Desktop Collaboration Experience DX600 Series User Guide, Release 10.0(1)46 OL-28931-01  Calling tasksHunt groups
Switch active call on desk phone to mobile phoneProcedureStep 1 Tap Mobility and select Send call to mobile.Step 2 Answer the active call on your mobile phone.The handset icons and the calling party number appear on the phone display. You cannot use the same phoneline for any other calls, but if your desk phone supports multiple lines, you can use another line to make orreceive calls.Switch active call from mobile phone to desk phoneProcedureStep 1 Hang up the call on your mobile phone to disconnect the mobile phone but not the call.Step 2 Tap Resume on your desk phone within 4 seconds and start talking on the desk phone.Switch active call from mobile phone to desk phone that shares same lineProcedureStep 1 While on your mobile phone, enter the access code for the Session Handoff feature (for example, *74). Contactyour system administrator for a list of access codes.Step 2 Hang up the call on your mobile phone to disconnect the mobile phone but not the call.Step 3 Tap Answer on your desk phone within 10 seconds and start talking on the desk phone. Your systemadministrator sets the maximum number of seconds you have to answer the call on your desk phone.Cisco Unified IP phones that share the same line display a Remote in Use message.Intercom callsYou can place an intercom call to a target phone that autoanswers the call in speakerphone mode with muteenabled. The one-way intercom call allows you to deliver a short message to the recipient. The audio playson the handset or headset, if one of these is in use. Any current call activity that your recipient is engaged incontinues simultaneously.When you receive an intercom-alert tone, you can choose one of these options:Cisco Desktop Collaboration Experience DX600 Series User Guide, Release 10.0(1)       OL-28931-01 47Calling tasksIntercom calls
•Listen to the caller with your microphone muted (you can hear the caller, but the caller cannot hear you).•End the intercom call by tapping End Call with the intercom call in focus. Do this if you do not wantto hear the message.•Talk to the caller by tapping the active intercom button and using either the handset, headset, or speaker.The intercom call becomes a two-way connection so that you can converse with the caller.When using the intercom feature, be aware of the following:•From an intercom line, you can only dial other intercom lines.•You can use only one intercom line at a time.•When your active call is being monitored or recorded, you can receive or place intercom calls.•You cannot place an intercom call on hold.If you sign in to the same phone on a daily basis using your Cisco Extension Mobility profile, ensure thatyour system administrator assigns the phone button template that contains intercom information to thisprofile and assign the phone as the default intercom device for the intercom line.NotePlace intercom call to preconfigured intercom numberProcedureStep 1 Tap a dedicated intercom line.Step 2 After you hear the intercom-alert tone, begin speaking.Place intercom call to any intercom numberProcedureStep 1 Tap a dialable intercom line.Step 2 Enter the intercom target number or tap a speed-dial number for your target.Step 3 After you hear the intercom-alert tone, begin speaking.   Cisco Desktop Collaboration Experience DX600 Series User Guide, Release 10.0(1)48 OL-28931-01  Calling tasksIntercom calls
Receive intercom callProcedureWhen you hear the intercom-alert tone, handle the call in one of these ways:•Listen to the message in one-way audio.•Speak to the caller by tapping Connect.•Tap Decline.Line status featuresLine status features allow you to view the state of a phone line that is associated with a speed-dial button, callhistory, or directory listing on your phone. If you use Line Status Pickup, you can answer a ringing call forthe line that you are monitoring. Your system administrator determines which line status features are set upon your phone.Then...If you want to...Look for one of these line status indicators next to the line number:•Line is in-use.•Line is idle.•Line is in Do Not Disturb state.•Line status indicator unavailable for this line.See the state of a linelisted in a call historyor directoryLook for one of these line status indicators next to the line number:•Line is in-use.•Line is idle.•Line is in Do Not Disturb state.•Line is ringing (Line Status Pickup only).•Line status indicator unavailable for this line.See the state of aspeed-dial lineTips•Your phone may play an audible indicator to alert you when a call is ringing on the monitored line (LineStatus Pickup only).•Line Status Pickup answers the oldest ringing call first, if the line that you are monitoring has more thanone ringing call.Cisco Desktop Collaboration Experience DX600 Series User Guide, Release 10.0(1)       OL-28931-01 49Calling tasksLine status features
•If you press the Line Status Pickup button when the monitored line is not ringing, your phone will speeddial the line number.Use line status pickup to answer ringing callProcedureStep 1 If the current line is ringing, tap the Line Status Pickup button.The call redirects to the next available line on your phone.Step 2 If you want to specify a line, first press a line button and then tap the line status button.If your phone supports autopickup, the call connects automatically.Step 3 If the call rings on your phone, answer it.Make call from mobile phone using mobile voice accessProcedureStep 1 Obtain your Mobile Voice Access number and PIN from your system administrator.Step 2 Dial your assigned Mobile Voice access number.Step 3 Enter your mobile phone number (if requested) and PIN.Step 4 Press 1to make a call to an enterprise IP Phone.Step 5 Dial a desktop phone number other than your desktop phone number.Multiple callsUnderstanding how multiple calls display on your phone can help you organize your call-handling efforts.In standard viewing mode, your phone displays calls as follows for the highlighted line:•Calls with the highest precedence and longest duration display at the top of the list.•Calls of a similar type are grouped together. For example, calls that you have interacted with are groupednear the top, and calls on hold are grouped last.You can switch between multiple calls on one or more lines.   Cisco Desktop Collaboration Experience DX600 Series User Guide, Release 10.0(1)50 OL-28931-01  Calling tasksMake call from mobile phone using mobile voice access
Switch between calls on one lineProcedureStep 1 Highlight the call you want to switch to.Step 2 Tap Resume.Any active call is placed on hold and the selected call resumes.Switch between calls on different linesProcedureStep 1 Select the line that you are switching to.If a single call is holding on the line, the call automatically resumes.Step 2 If multiple calls are holding, highlight the appropriate call and tap Resume.Switch from active call to answer ringing callProcedurePerform one of the following actions:•Tap Answer.•If the call is ringing on a different line, select that line.The phone places the active call on hold and the selected call resumes.Remove call from hold on current lineProcedureStep 1 Highlight the appropriate call.Step 2 Tap Resume.Cisco Desktop Collaboration Experience DX600 Series User Guide, Release 10.0(1)       OL-28931-01 51Calling tasksMultiple calls
Place call while another call is active (using different line)ProcedureStep 1 Tap a new line. The first call is automatically placed on hold.Step 2 Enter a number.Secure callsDepending on how your system administrator configured your phone system, your phone may support makingand receiving secure calls.Your phone can support these types of calls:Authenticated callThe identities of the phones participating in the call have been verified.Encrypted callThe phone is receiving and transmitting encrypted audio (your conversation) within the Cisco UnifiedCommunications Manager network. Encrypted calls are authenticated.Protected callThe phone is a secure (encrypted and trusted) device on the Cisco Unified Communications Managerserver and is configured as a Protected Device in Cisco Unified Communications ManagerAdministration.If Play Secure Indication Tone is enabled (True) in Cisco Unified Communications ManagerAdministration, the protected phone plays a secure or nonsecure indication tone at the beginning of thecall:•When end-to-end secure media is established through the Secure Real-Time Transfer Protocol(SRTP) and the call status is secure, the phone plays the secure indication tone (three long beepswith brief pauses).•When end-to-end nonsecure media is established through the Real-Time Protocol (RTP) and thecall status is nonsecure, the phone plays the nonsecure indication tone (six short beeps with briefpauses).If the Play Secure Indication Tone option is disabled (False), no tone plays.Nonprotected callThe phone does not have a Protected Device status in Cisco Unified Communications Manager. Nosecure or nonsecure indication tone is played.   Cisco Desktop Collaboration Experience DX600 Series User Guide, Release 10.0(1)52 OL-28931-01  Calling tasksPlace call while another call is active (using different line)
Nonsecure callThe phone is not protected on the Cisco Unified Communications Manager server and the call statusis nonsecure.Then...If you want to...Look for a security icon in the top right corner of the call activityarea, next to the call duration timer:•Authenticated call or conference•Encrypted call or conference•Nonsecure call or conferenceCheck the security level of a call orconferenceListen for a secure indication tone at the beginning of the call:•Secure call status: If the phone is protected, the Play SecureIndication Tone is enabled, and the call status is secure, asecure indication tone plays on the protected phone at thebeginning of a call (three long beeps with pauses). The lockicon is also present to indicate that the call is secure.•Nonsecure call status: If the phone is protected, the PlaySecure Indication Tone is enabled, and the call status isnonsecure, a nonsecure indication tone plays on the protectedphone at the beginning of a call (six short beeps with briefpauses). The play arrow icon is also present to indicate thatthe call is not secure.For more information, contact your system administrator.Verify that the phone connection (callstatus) is secure.Contact your system administrator.Determine whether secure calls can bemade in your companyThere are interactions, restrictions, and limitations that affect how security features work on your phone. Formore information, contact your system administrator.Cisco determines that a device that is engaged in a call is either trusted or untrusted. Lock or shield iconsare not displayed on a Cisco DX650 screen when a call is to or from an untrusted device, even though thecall might be secure.NoteVPN clientYour system administrator configures the Virtual Private Network (VPN) Client feature as needed.Related TopicsAnyConnect VPN, on page 66Cisco Desktop Collaboration Experience DX600 Series User Guide, Release 10.0(1)       OL-28931-01 53Calling tasksSecure calls
Shared linesYour system administrator might ask you to use a shared line if you:•Have multiple phones and want one phone number•Share call-handling tasks with coworkers•Handle calls on behalf of a managerRemote-in-use iconThe remote-in-use icon appears when another phone that shares your line has a connected call. You can placeand receive calls as usual on the shared line, even when the remote-in-use icon appears.Call information and BargePhones that share a line each display information about calls that are placed and received on the shared line.This information might include caller ID and call duration. See the Privacy section for exceptions.When call information is visible in this way, you and the coworkers who share a line can use Barge or cBargeto join a call.Barge, cBarge, and shared linesYou can use barge features (cBarge or Barge) to add yourself to calls on your shared line. Calls must benonprivate calls.Depending on how your phone is configured, you can add yourself to a nonprivate call on a shared line usingeither cBarge or Barge:•cBarge converts the call into a standard conference, allowing you to add new participants.•Barge enables you to add yourself to the call but does not convert the call into a conference or allowyou to add new participants.Related TopicsShared lines, on page 54Conference calls, on page 34Single-button and multitouch BargeYour system administrator determines whether the barge feature on your phone operates as a single-buttonor multitouch feature.•Single-button barge allows you to press a line button to barge a call (if only one call is on the line).•Multitouch barge allows you to view call information before barging.   Cisco Desktop Collaboration Experience DX600 Series User Guide, Release 10.0(1)54 OL-28931-01  Calling tasksShared lines
Barge featuresThe table below describes how to use barge features (cBarge or Barge) to add yourself to a call on a sharedline.Then...If you want to...Look for the remote-in-use icon.See if the shared line is inuseTap the line button for the shared line. You see one of these results:•You are added to the call.•A window opens on your phone screen prompting you to select the callthat you want to barge. Tap Barge or cBarge to complete the action. Youmay need to tap to display Barge or cBarge.Add yourself to a call ona shared lineTips•When you Barge a call, other parties may hear a beep announcing your presence. With cBarge, otherparties hear a brief audio interruption and the phone screen changes to display conference details.•If a phone that is using the shared line has Privacy enabled, call information and barge buttons do notappear on the other phones that share the line.•If a phone that is using the shared line has Privacy disabled and is configured with Private Line AutomatedRingdown (PLAR), the Barge and cBarge features are available.•You will be disconnected from a call that you have joined using Barge if the call is put on hold, transferred,or turned into a conference call.Related TopicsConference participants list, on page 37Privacy and shared linesIf you share a phone line, use the Privacy feature to prevent others who share the line from viewing or barging(adding themselves to) your calls.Tips•If the phone that shares your line has Privacy enabled, you can place and receive calls using the sharedline as usual.•The Privacy feature applies to all shared lines on your phone. Consequently, if you have multiple sharedlines and Privacy is enabled, coworkers cannot view or barge calls on any of your shared lines.Cisco Desktop Collaboration Experience DX600 Series User Guide, Release 10.0(1)       OL-28931-01 55Calling tasksShared lines
Prevent and allow others to view or barge calls on shared lineProcedureStep 1 To prevent others from viewing or barging a call on a shared line,a) Tap Private.b) To verify that Privacy is on, look for the Privacy-enabled icon.Step 2 To allow others to view or barge calls on a shared line,a) Tap Private.b) To verify that Privacy is off, look to see that the Privacy-enabled icon has disappeared.Speed DialSpeed Dial enables you to enter an index number, or tap a phone screen item to place a call. Depending onconfiguration, your phone can support several speed-dial features:•Speed-dial buttons•Abbreviated DialingTo set up speed-dial buttons and Abbreviated Dial, tap Add a speed dial and follow the on-screen prompts.There is a brief interruption to telephony service after you add a speed dial. Alternately, your systemadministrator can configure speed-dial features for you.Make call using Speed-Dial buttonIf your phone supports the line status speed-dial feature, you can see if the speed-dial number is busy beforedialing.ProcedureStep 1 Set up speed-dial numbers.Step 2 To place a call, tap a speed-dial icon. Or, drag the icon to the idle screen to prepopulate the phone number.   Cisco Desktop Collaboration Experience DX600 Series User Guide, Release 10.0(1)56 OL-28931-01  Calling tasksSpeed Dial
Make call using on-hook abbreviated dialProcedureStep 1 Set up Abbreviated Dialing codes.Step 2 To place a call, enter the Abbreviated Dialing code.Suspicious call traceIf you are receiving suspicious or malicious calls, your system administrator can add the Malicious CallIdentification (MCID) feature to your phone. This feature enables you to identify an active call as suspicious,which initiates a series of automated tracking and notification messages.Notify system administrator about suspicious or harassing callProcedureStep 1 Tap Report.Step 2 Tap Report Caller.Your phone displays the message The caller has been reported as malicious. Youradministrator receives notification about the call with supporting information to take appropriate actions.Cisco Desktop Collaboration Experience DX600 Series User Guide, Release 10.0(1)       OL-28931-01 57Calling tasksSuspicious call trace
   Cisco Desktop Collaboration Experience DX600 Series User Guide, Release 10.0(1)58 OL-28931-01  Calling tasksSuspicious call trace
CHAPTER 4Phone customization and settingsYou can personalize your phone by adjusting the ringtone and other settings.•Rings and message indicator customization, page 59•Phone screen customization, page 61•Networks, page 62Rings and message indicator customizationYou can customize how your phone indicates an incoming call and a new voicemail message. You can alsoadjust the ringer volume for your phone.TipYou can customize your phone to have up to six distinctive ringtones. In addition, you can have a defaultringtone.Related TopicsUser Options web page actions, on page 71Line settings on web, on page 77Cisco Desktop Collaboration Experience DX600 Series User Guide, Release 10.0(1)        OL-28931-01 59
Change ringtoneProcedureStep 1 Tap .Step 2 Tap Settings.Step 3 Tap Sound.Step 4 Tap Phone Ringtone.Step 5 Tap a ringtone to play a sample of it.Step 6 Select a ringtone and tap OK.Adjust phone ringer volume levelCheck with your system administrator to see if a minimum ringer volume setting was configured.ProcedurePress while the handset is in the cradle and the headset and speakerphone buttons are off. Thenew ringer volume is saved automatically.Change ring patternBefore you can access this setting, your system administrator might need to enable it for you.ProcedureStep 1 Log in to your User Options web pages.Step 2 Access your call ring pattern settings.   Cisco Desktop Collaboration Experience DX600 Series User Guide, Release 10.0(1)60 OL-28931-01  Phone customization and settingsChange ringtone
Change audible voice-message indicatorProcedureStep 1 Log in to your User Options web pages.Step 2 Access your message indicator settings.Change how voice message light on handset worksProcedureStep 1 Log in to your User Options web pages.Step 2 Choose Change the Message Waiting Lamp policy.Step 3 Access your message indicator settings. Typically, the default system policy is to indicate a new voice messageby displaying a steady light on the handset light strip.Phone screen customizationYou can adjust the characteristics of the phone screen.Change phone screen languageProcedureStep 1 Log in to your User Options web pages.Step 2 Access your user settings.Step 3 Select a language.Cisco Desktop Collaboration Experience DX600 Series User Guide, Release 10.0(1)       OL-28931-01 61Phone customization and settingsChange audible voice-message indicator
Change phone screen brightnessIf you change the brightness setting on your phone, do not unplug the phone from its power source for atleast one minute or the brightness setting will not get saved.NoteProcedureStep 1 Tap Settings.Step 2 To make adjustments, slide the brightness indicator up or down.Change line text labelProcedureStep 1 Log in to your User Options web pages.Step 2 Access your line text label settings.NetworksConnect your Cisco DX650 to a network before launching an Internet application such as the email or browserapplication.You can connect to an Ethernet or wireless network. Wi-Fi is disabled while your phone is connected to anEthernet network.You can add a total of four wireless network profiles.Wired network connectionYou can connect your Cisco DX650 to a wired network.You can also share a wired connection between a computer and your phone.If you restart your phone with the Lock button, network connectivity may be disrupted.Note   Cisco Desktop Collaboration Experience DX600 Series User Guide, Release 10.0(1)62 OL-28931-01  Phone customization and settingsChange phone screen brightness
Connect to wired networkProcedureConnect an Ethernet cable from the network port to the network.Share wired network connection with computerProcedureStep 1 Connect an Ethernet cable from the network port to the network.Step 2 Connect an Ethernet cable from the computer port to a network port on the computer.Connect to wireless networkProcedureStep 1 Tap .Step 2 Tap Settings.Step 3 Toggle on Wi-Fi.Step 4 Select a wireless network from the list of available networks.Step 5 Enter your credentials and tap Connect.Connect to hidden wireless networkProcedureStep 1 Tap .Step 2 Tap Settings.Step 3 Toggle on Wi-Fi.Step 4 Tap Add Network.Step 5 Enter the Network Service Set Identifier (SSID), select the Security, enter your credentials and tap Save.Step 6 Select the network and tap Connect.Cisco Desktop Collaboration Experience DX600 Series User Guide, Release 10.0(1)       OL-28931-01 63Phone customization and settingsConnect to wireless network
Edit wireless networkProcedureStep 1 Tap .Step 2 Tap Settings.Step 3 Long press a wireless network from the list of available networks.Step 4 Tap Modify Network.Delete wireless networkProcedureStep 1 Tap .Step 2 Tap Settings.Step 3 Long press a wireless network from the list of available networks.Step 4 Tap Forget Network.Supported wireless securityCisco DX650 supports the following security types:•None (open)•WEP (Static)•WPA/WPA2-PSK•802.1x EAP (FAST/EAP-FAST, PEAP-GTC, PEAP-MSCHAPv2, TLS/EAP-TLS)Contact your system administrator for more information.Web proxyDepending on your security settings, you may need to connect to a web proxy to access the Internet. If a VPNis enabled, you cannot use a web proxy with that VPN. Contact your system administrator for more information.   Cisco Desktop Collaboration Experience DX600 Series User Guide, Release 10.0(1)64 OL-28931-01  Phone customization and settingsEdit wireless network
Add web proxyProcedureStep 1 Tap .Step 2 Tap Settings.Step 3 Tap Wireless & Networks.Step 4 Tap Proxy Settings.Step 5 Tap Proxy.Step 6 Tap Add Proxy.Step 7 Enter the Web Proxy settings and tap Save.Edit web proxyProcedureStep 1 Tap .Step 2 Tap Settings.Step 3 Tap Wireless & Networks.Step 4 Tap Proxy Settings.Step 5 Tap and hold a proxy from the list of available proxies.Step 6 Tap Modify.Step 7 Edit the Web Proxy settings and tap Save.Cisco Desktop Collaboration Experience DX600 Series User Guide, Release 10.0(1)       OL-28931-01 65Phone customization and settingsWeb proxy
Delete web proxyProcedureStep 1 Tap .Step 2 Tap Settings.Step 3 Tap Wireless & Networks.Step 4 Tap Proxy Settings.Step 5 Tap and hold a proxy from the list of available proxies.Step 6 Tap Delete.Step 7 Tap Yes.TFTPConnect to a Trivial File Transfer Protocol (TFTP) server for phone configuration, connectivity, and to receivefirmware updates. Contact your system administrator for a TFTP server address.Connect to TFTP ServerProcedureStep 1 Tap .Step 2 Tap Settings.Step 3 Tap More.Step 4 Tap TFTP Server Settings.Step 5 Tap Use Alternate TFTP Server.Step 6 Tap TFTP Server1.Step 7 Enter the TFTP server address and tap OK.AnyConnect VPNYour system administrator sets up the AnyConnect VPN application. AnyConnect VPN allows you to havesecure remote access to corporate resources on your Cisco DX650. For security reasons, it is usuallyrecommended that you connect to a VPN through a wired network connection.If your system administrator has set up a VPN connection profile for you with Cisco Unified CommunicationsManager, it will appear in the VPN Connection list. You cannot edit or delete these VPN connections.   Cisco Desktop Collaboration Experience DX600 Series User Guide, Release 10.0(1)66 OL-28931-01  Phone customization and settingsTFTP
Your system administrator can enable you to create and edit your own VPN connections.AutoNetDetectIf your system administrator enables the AutoNetDetect feature for a VPN connection profile that is set upwith Cisco Unified Communications Manager, your phone will automatically attempt to establish a VPNconnection.Password persistenceIf your system administrator enables the Password Persistence feature for a VPN connection profile that isset up with Cisco Unified Communications Manager, the AnyConnect VPN application will store a previouslysuccessful password. You cannot change a working password.Add VPN connection profileProcedureStep 1 Tap .Step 2 Tap Settings.Step 3 Tap More.Step 4 Tap VPN .Step 5 Tap Add VPN Network.Step 6 Enter a description of the VPN connection and the server address.Step 7 Tap Save.Edit VPN connection profileProcedureStep 1 Tap .Step 2 Tap Settings.Step 3 Tap More.Step 4 Tap VPN.Step 5 Tap and hold a VPN connection.Step 6 Tap Edit Network.Step 7 Edit the connection description or server address.Step 8 Tap Save.Cisco Desktop Collaboration Experience DX600 Series User Guide, Release 10.0(1)       OL-28931-01 67Phone customization and settingsAnyConnect VPN
Connect to VPNProcedureStep 1 Tap .Step 2 Tap Settings.Step 3 Tap More.Step 4 Tap VPN.Step 5 Tap and hold a VPN connection.Step 6 If necessary, do either of the following in response to the appropriate prompts:•Enter your credentials. If prompted to do so, also enter your secondary credentials to support doubleauthentication.•Tap Get Certificate, then enter the certificate enrollment credentials that are supplied by your systemadministrator. AnyConnect saves the certificate and reconnects to the VPN secure gateway to use thecertificate for authentication.Step 7 Tap Connect.Disconnect from VPNProcedureStep 1 Tap .Step 2 Tap Settings.Step 3 Tap More.Step 4 Tap VPN.Step 5 Tap and hold a VPN connection.Step 6 Tap Disconnect.   Cisco Desktop Collaboration Experience DX600 Series User Guide, Release 10.0(1)68 OL-28931-01  Phone customization and settingsAnyConnect VPN
Delete VPN connection profileProcedureStep 1 Tap .Step 2 Tap Settings.Step 3 Tap More.Step 4 Tap VPN.Step 5 Tap and hold a VPN connection.Step 6 Tap Delete Network.Cisco Desktop Collaboration Experience DX600 Series User Guide, Release 10.0(1)       OL-28931-01 69Phone customization and settingsAnyConnect VPN
   Cisco Desktop Collaboration Experience DX600 Series User Guide, Release 10.0(1)70 OL-28931-01  Phone customization and settingsAnyConnect VPN
CHAPTER 5User Options web pagesYour Cisco DX650 is a network device that can share information with other network devices in yourcompany, including your personal computer. You can use your computer to log in to your Cisco UnifiedCommunications Manager User Options web pages, where you control features, settings, and services foryour phone. For example, you can set up speed-dial buttons from your User Options web pages.•User Options web page actions, page 71•Features and services setup on web, page 72User Options web page actionsThis section describes how to log in and select a phone device.Sign in and out of User Options web pagesBefore you can access any of your user options, you must sign in. When you are finished using the UserOptions web pages, you must sign out.In some cases, you can access your User Option web pages without having to sign in. For more information,contact your system administrator.ProcedureStep 1 Obtain the User Options URL, user ID, and default password from your system administrator.Step 2 Open a web browser on your computer and enter the URL.Step 3 If prompted to accept security settings, select Yes or Install Certificate.Step 4 Enter your user ID in the Username field.Step 5 Enter your password in the Password field.Step 6 Select Login.Cisco Desktop Collaboration Experience DX600 Series User Guide, Release 10.0(1)        OL-28931-01 71
The Cisco Unified CM User Options home page displays. From this page you can select User Options toselect a device, access User Settings, Directory features, and Fast Dials.Step 7 To sign out of your User Options web pages, select Logout.Select device from User Options web pageProcedureStep 1 On your User Options web page, select User Options >Device.The Device Configuration window displays. Toolbar buttons located at the top of the Device Configurationwindow are specific to the selected device type.Step 2 (Optional) If you have multiple devices assigned to you, select the appropriate device (phone model, ExtensionMobility profile, or Remote Destination profile) from the Name drop-down menu.Select configuration optionProcedureStep 1 After you have logged in to your User Options web pages, choose User Options to access User Settings,Directory, Fast Dials, and Mobility Settings.Step 2 To return to the Device Configuration page from another page, choose User Options >Device.Features and services setup on webThe topics in this section describe how to configure features and services from your User Options web pagesafter logging in.Speed Dial setup on webDepending on configuration, your phone can support several speed-dial features:•Speed-dial buttons•Abbreviated Dialing•Fast Dials   Cisco Desktop Collaboration Experience DX600 Series User Guide, Release 10.0(1)72 OL-28931-01  User Options web pagesSelect device from User Options web page
Set up speed-dial buttonsProcedureStep 1 On your User Options web page, select User Options >Device.Step 2 Select a phone from the Name drop-down menu.Step 3 Select Speed Dials.Step 4 In the Speed Dial Settings area, enter a number and label for a speed-dial button on your phone.Step 5 Select Save.Set up abbreviated dialing codesProcedureStep 1 Select User Options >Device.Step 2 Select a phone from the Name drop-down list.Step 3 Select Speed Dials.Step 4 Enter a number and label for an Abbreviated Dialing code.Step 5 Select Save.Phone services setup on webPhone services can include special phone features, network data, and web-based information (for example,stock quotes and movie listings). You must first subscribe to a phone service before accessing it on yourphone.The services available for your phone depend on the phone system configuration and the services you subscribedto. Contact your system administrator for more information.Cisco Desktop Collaboration Experience DX600 Series User Guide, Release 10.0(1)       OL-28931-01 73User Options web pagesPhone services setup on web
Subscribe to serviceProcedureStep 1 On your User Options web page, select User Options >Device.Step 2 Select a phone from the Name drop-down menu.Step 3 Select Phone Services.Step 4 Select Add New.Step 5 Select a service from the drop-down list and select Next.Step 6 (Optional) Change the service label or enter additional service information, if available.Step 7 Select Save.Search for servicesProcedureStep 1 On your User Options web page, select a device.Step 2 Select Phone Services.Step 3 Select Find.Change or end servicesProcedureStep 1 On your User Options web page, search for services.Step 2 Select one or more entries.Step 3 Select Delete Selected.   Cisco Desktop Collaboration Experience DX600 Series User Guide, Release 10.0(1)74 OL-28931-01  User Options web pagesPhone services setup on web
Change service nameProcedureStep 1 On your User Options web page, search for services.Step 2 Select a service name.Step 3 Change the information and select Save.Add service to programmable feature buttonProcedureStep 1 On your User Options web page, select User Options >Device.Step 2 Select a phone from the Name drop-down menu.Step 3 Select Service URL.Your system administrator sets up a service URL button for your phone.Step 4 Select a service from the Button Service drop-down list .Step 5 (Optional) If you want to rename the service, edit the label fields.If your phone does not support double-byte character sets, it uses ASCII Label fields.Step 6 Select Save.Step 7 Select Reset to reset your phone to see the new button label on your phone.User settings on webUser settings include your password, PIN, and language (locale) settings.Your PIN and password allow you to access different features and services. For example, use your PIN to login to Cisco Extension Mobility or Personal Directory on your phone. Use your password to log in to yourUser Options web pages and Cisco Web Dialer on your personal computer. For more information, contactyour system administrator.Cisco Desktop Collaboration Experience DX600 Series User Guide, Release 10.0(1)       OL-28931-01 75User Options web pagesUser settings on web
Change browser passwordProcedureStep 1 Sign in to your User Options web pages.Step 2 Select User Options >User Settings.Step 3 Enter your Current Password.Step 4 Enter your New Password.Step 5 Reenter your new password in the Confirm Password field.Step 6 Select Save.Change PINProcedureStep 1 Sign in to your User Options web pages.Step 2 Select User Options >User Settings.Step 3 Enter your Current PIN.Step 4 Enter your New PIN.Step 5 Reenter your new PIN in the Confirm PIN field.Step 6 Select Save.Change User Options web page language settingProcedureStep 1 Sign in to your User Options web page.Step 2 Select User Options >User Settings.Step 3 In the User Locale area, select an item from the Locale drop-down list.Step 4 Select Save.   Cisco Desktop Collaboration Experience DX600 Series User Guide, Release 10.0(1)76 OL-28931-01  User Options web pagesUser settings on web
Change phone display languageProcedureStep 1 Sign in to your User Options web page.Step 2 Select User Options >Device.Step 3 Select an item from the User Locale drop-down list.Step 4 Select Save.Line settings on webLine settings affect a specific phone line (directory number) on your phone. Line settings can includecall-forwarding, voice message indicators, ring patterns, and line labels.You can set up other line settings directly on your phone:•Set up call forwarding for your primary phone line.•Change rings, display, and other phone-model specific settings.Related TopicsCall forward, on page 38Phone customization and settings, on page 59Set up call forward for each lineProcedureStep 1 Select User Options >Device.Step 2 Select a phone from the Name drop-down menu.Step 3 Select Line Settings.Step 4 (optional) If you have more than one directory number (line) assigned to your phone, choose a line from theLine drop-down menu.Step 5 In the Incoming Call Forwarding area, select Call Forward settings for various conditions.Step 6 Select Save.Cisco Desktop Collaboration Experience DX600 Series User Guide, Release 10.0(1)       OL-28931-01 77User Options web pagesLine settings on web
Change voice message indicator setting for each lineProcedureStep 1 Select User Options >Device.Step 2 Select a phone from the Name drop-down menu.Step 3 Select Line Settings.Step 4 (optional) If you have more than one directory number (line) assigned to your phone, select a line from theLine drop-down list.Step 5 In the Message Waiting Lamp area, choose from various settings.By default your phone displays a steady red light from the handset light strip to indicate a new voicemessage.NoteStep 6 Select Save.Change audible voice message indicator setting for each lineProcedureStep 1 Select User Options >Device.Step 2 Select a phone from the Name drop-down menu.Step 3 Select Line Settings.Step 4 (optional) If you have more than one directory number (line) assigned to your phone, choose a line from theLine drop-down menu.Step 5 In the Audible Message Waiting Indicator area, select from various settings.By default your phone displays a steady red light from the handset light strip to indicate a new voicemessage.NoteStep 6 Select Save.   Cisco Desktop Collaboration Experience DX600 Series User Guide, Release 10.0(1)78 OL-28931-01  User Options web pagesLine settings on web
Change or create line text label that appears on phone screenProcedureStep 1 Select User Options >Device.Step 2 Select a phone from the Name drop-down menu.Step 3 Select Line Settings.Step 4 (optional) If you have more than one directory number (line) assigned to your phone, select a line from theLine drop-down menu.Step 5 In the Line Text Label area, enter a text label.Step 6 Select Save.Your phone uses the ASCII Label field if the phone does not support double-byte charactersets.NoteSet up phone and access list for Mobile ConnectYou must add your mobile phone (and any other phones you use) to Cisco Mobile Connect, before you canplace and receive calls using the same directory numbers as your desk phone. These phones are called remotedestinations. You can also define access lists to restrict or allow calls from certain numbers to be sent to yourmobile phone.Create access listProcedureStep 1 Sign in to your User Options web page.Step 2 Select User Options >Mobility Settings >Access Lists.Step 3 Select Add New.Step 4 Enter a name to identify the access list and a description (optional).Step 5 Select whether the access list will allow or block specified calls.Step 6 Select Save.Step 7 Select Add Member to add phone numbers or filters to the list.Step 8 Select an option from the Filter Mask drop-down list box. You can filter a directory number, calls withrestricted caller ID (Not Available), or calls with anonymous caller ID (Private).Step 9 If you select a directory number from the Filter Mask drop-down list box, enter a phone number or filter inthe DN Mask field.You can use the following wildcards to define a filter:•X (upper or lower case): Matches a single digit. For example, 408555123X matches any number between4085551230 and 4085551239.Cisco Desktop Collaboration Experience DX600 Series User Guide, Release 10.0(1)       OL-28931-01 79User Options web pagesSet up phone and access list for Mobile Connect
•!: Matches any number of digits. For example, 408! matches any number that starts with 408.•#: Used as a single digit for exact match.Step 10 To add this member to the access list, select Save.Step 11 To save the access list, select Save.Add new remote destinationProcedureStep 1 Sign in to your User Options web page.Step 2 Select User Options >Mobility Settings >Remote Destinations.Step 3 Select Add New.Step 4 Enter the following information:•Name: Enter a name for the mobile (or other) phone.•Destination Number: Enter your mobile phone number.Step 5 Select your remote destination profile from the drop-down list box. Your remote destination profile containsthe settings that apply to remote destinations that you create.Step 6 Check the Mobile Phone check box to allow your remote destination to accept a call sent from your deskphone.Step 7 Check the Enable Mobile Connect check box to allow your remote destination to ring simultaneously withyour desk phone.Step 8 Select one of the following options in the Ring Schedule area (the ring schedule drop-down list boxes includeonly the access lists that you have created):•All the time: Select this option if you do not want to impose day and time restrictions on ringing theremote destination.•As specified below: Select this option and select from the following items to set up a ring schedule basedon day and time:1Check a check box for each day of the week you want to allow calls to ring the remote destination.2For each day, select All Day or select the beginning and ending times from the drop-down lists.3Select the time zone from the drop-down list box.Step 9 Select one of these ringing options:•Always ring this destination.•Ring this destination only if the caller is in the allowed access list that you select.•Do not ring this destination if the caller is in the blocked access list that you select.   Cisco Desktop Collaboration Experience DX600 Series User Guide, Release 10.0(1)80 OL-28931-01  User Options web pagesSet up phone and access list for Mobile Connect
Step 10 Select Save.Cisco Web DialerCisco Web Dialer allows you to place calls on your phone to directory contacts by selecting items in a webbrowser. Your system administrator configures this feature for you.Use WebDialer with User Options directoryProcedureStep 1 Log in to your User Options web pages.Step 2 Select User Options >Directory and search for a coworker.Step 3 Select the number that you want to dial.Step 4 If this is your first time using WebDialer, set up preferences on the Make Call page.Step 5 Select Dial.The call is now placed on your phone.Step 6 To end a call, select Hangup or hang up from your phone.Use WebDialer with another online corporate directoryProcedureStep 1 Log in to a WebDialer-enabled corporate directory and search for coworkers.Step 2 Click the number that you want to dial.Step 3 When prompted, enter your user ID and password.Step 4 If this is your first time using WebDialer, set up preferences on the Make Call page.Step 5 Click Dial.The call is now placed on your phone.Step 6 To end a call, click Hangup or hang up from your phone.Cisco Desktop Collaboration Experience DX600 Series User Guide, Release 10.0(1)       OL-28931-01 81User Options web pagesCisco Web Dialer
Log out of WebDialerProcedureClick the Logout icon in the Make Call or Hang Up page.Set up, view, or change Web Dialer preferencesProcedureStep 1 Access the Make Call page.The Make Call page appears the first time that you use Web Dialer (after you click the number that you wantto dial).Step 2 (Optional) Make changes to your settings.The Make Call page contains the following options:•Preferred language: Determines the language that is used for Web Dialer settings and prompts.•Use preferred device: Identifies the phone (Calling device) and directory number (Calling device or line)that you use to place WebDialer calls. If you have one phone with a single line, the appropriate phoneand line are automatically selected. Otherwise, choose a phone or line. If you have more than one phone,it will be specified by device type and MAC address. To display the MAC address on your phone, selectSettings >About device >Status.If you have an Extension Mobility profile, you can select your Extension Mobility logged-indevice from the Calling device menu.Note•Do not display call confirmation: If selected, prompts Web Dialer to suppress the Make Call page. Thispage appears by default after you click a phone number in a Web Dialer-enabled online directory.•Disable Auto Close: If selected, the call window does not close automatically after 15 seconds.   Cisco Desktop Collaboration Experience DX600 Series User Guide, Release 10.0(1)82 OL-28931-01  User Options web pagesCisco Web Dialer
CHAPTER 6ApplicationsThis chapter outlines the Cisco DX650 applications.•Calendar, page 83•Contacts, page 87•Email, page 93•Jabber IM, page 100•Unified Inbox, page 106•WebEx, page 109•More applications, page 112CalendarTap Day,Week,Month, or Agenda to change your calendar view. Tap Today to return to the Day view ofthe current day.Upcoming appointments are listed on the right side of the screen.Calendar reminders appear on the notification bar.The Calendar application is integrated with the Cisco WebEx application.Calendar accountThe Calendar application shares account settings with the Email application. If your email account is alreadyset up, you do not need to enter that account information again for the Calendar application.The first time that you open the Calendar application, you are taken to the Settings page to configure youraccount credentials, unless you already entered the credentials using the Setup Assistant or the Settingsapplication.If you choose not to set up the account credentials right away, use the Settings application to enter the credentialslater.Cisco Desktop Collaboration Experience DX600 Series User Guide, Release 10.0(1)        OL-28931-01 83
On first use, you are prompted to sign in to Cisco WebEx, where you must enter a valid WebEx account userID and password.Use the Calendar application to set up multiple calendar accounts. ActiveSync can be set up with Google,Yahoo, and other accounts.Use the Calendar application to sync your calendar events with Microsoft Outlook and Microsoft Exchange.Add calendar accountProcedureStep 1 Tap .Step 2 Tap Settings.Step 3 Tap Accounts & Sync.Step 4 Tap Add Account.Step 5 Select an account type.Step 6 Enter the calendar account credentials.Enter all credentials before you save account settings. The application tries to authenticate credentials beforesaving and prompts you to try again when you enter incorrect information.Add calendar eventProcedureStep 1 Tap .Step 2 Enter the details of the event on the Add Event screen.Step 3 Tap Done.Your event is displayed in the Day view for the date of the event.Edit eventSome events cannot be edited.Note   Cisco Desktop Collaboration Experience DX600 Series User Guide, Release 10.0(1)84 OL-28931-01  ApplicationsAdd calendar event
ProcedureStep 1 Long press an event.Step 2 Tap .Step 3 Edit the event.Step 4 Uncheck the WebEx check box on the Edit Event screen if you do not wish to make a WebEx event.Step 5 Tap Done.Delete eventProcedureStep 1 Long press an event.Step 2 Tap .Step 3 Tap OK.Start scheduled WebEx meetingTap Start.Join scheduled WebEx meetingTap Join.SettingsThe Calendar application allows you to edit your settings for declined events, alerts and notifications, andyour default reminder time.Cisco Desktop Collaboration Experience DX600 Series User Guide, Release 10.0(1)       OL-28931-01 85ApplicationsDelete event
Hide declined eventsProcedureStep 1 Tap .Step 2 Tap Settings.Step 3 Tap Hide Declined Events.Set alerts and notificationsProcedureStep 1 Tap .Step 2 Tap Settings.Step 3 Tap Set Alerts & Notifications.Select ringtoneProcedureStep 1 Tap .Step 2 Tap Settings.Step 3 Tap Select Ringtone.Step 4 Select a ringtone and tap OK.   Cisco Desktop Collaboration Experience DX600 Series User Guide, Release 10.0(1)86 OL-28931-01  ApplicationsSettings
Edit vibrate settingsProcedureStep 1 Tap .Step 2 Tap Settings.Step 3 Tap Vibrate.Set default reminder timeProcedureStep 1 Tap .Step 2 Tap Settings.Step 3 Tap Default Reminder Time.Calendar widgetUse the Calendar widget to display your upcoming events on your home screen.ContactsUse Contacts to store, sort, and search your contacts. Contacts is integrated into other applications, such asEmail, and also functions as a standalone application.The first time that you open the Contacts application, you are prompted to create a new contact, sign in to anaccount, or to import contacts.You can view your contacts all together, by group, or view your favorite and most frequent contacts.Contact detailsTap an entry in your contact list to view details for that contact. From the contact details screen, you can editthe contact details, mark the contact as a favorite, place a call, start a chat, start a Cisco WebEx meeting, orsend an email message to that contact.Cisco Desktop Collaboration Experience DX600 Series User Guide, Release 10.0(1)       OL-28931-01 87ApplicationsCalendar widget
View recent activityProcedureTo view your recent activity, select the entry for yourself at the top of the contact list.Add contactProcedureStep 1 Tap .Step 2 Enter the contact name and detailsStep 3 Tap Done.Edit contactProcedureStep 1 Select a contact.Step 2 Tap .Step 3 Edit the contact information.Step 4 Tap Done.Remove contactProcedureStep 1 Select a contact.Step 2 Tap .Step 3 Tap Delete.Step 4 Tap OK.   Cisco Desktop Collaboration Experience DX600 Series User Guide, Release 10.0(1)88 OL-28931-01  ApplicationsView recent activity
Join contactsProcedureStep 1 Select a contact.Step 2 Tap Join.Step 3 Select another contact to join.Step 4 Tap Done.Share contactProcedureStep 1 Tap .Step 2 Tap Share.Step 3 Select a service from the Share menu.FavoritesTap Favorites to view your favorite and most frequent contacts.Mark contact as favoriteProcedureStep 1 Select a contact.Step 2 Tap .Step 3 Tap again to unmark the contact as a favorite.GroupsUse groups to organize your contacts.Cisco Desktop Collaboration Experience DX600 Series User Guide, Release 10.0(1)       OL-28931-01 89ApplicationsJoin contacts
Add groupProcedureStep 1 Tap Groups.Step 2 Tap .Step 3 Enter the name of the group.Step 4 Tap OK.Delete groupProcedureStep 1 Select a group.Step 2 Tap .Step 3 Tap Delete.Add contact to groupProcedureStep 1 Select a group.Step 2 Tap New Contact.Step 3 Select a contact.Step 4 Tap OK.   Cisco Desktop Collaboration Experience DX600 Series User Guide, Release 10.0(1)90 OL-28931-01  ApplicationsGroups
Edit groupProcedureStep 1 Select a group.Step 2 Tap .Step 3 Make your changes and tap Done.SearchWhile your Cisco DX650 is connected to a network, search for contacts in:•Your local contacts•Microsoft Exchange Global Address List (GAL)•Cisco User Data Services (UDS)•Jabber contactsYou can search by:•First name•Last name•Phone number•UsernameThe People application automatically merges search results that have similar data.UDS search results that are not in your local contacts are displayed in their own block under the list of localcontacts.The GAL is searched only if an ActiveSync account is set up and you enter at least three characters in thesearch field.Search your contactsProcedureStep 1 Tap .Step 2 Enter your search criteria.Cisco Desktop Collaboration Experience DX600 Series User Guide, Release 10.0(1)       OL-28931-01 91ApplicationsSearch
Import contactsProcedureStep 1 Tap .Step 2 Tap Import/Export.Step 3 Tap Import from SD card.Export contactsProcedureStep 1 Tap .Step 2 Tap Import/Export.Step 3 Tap Export to SD card.Set display optionsProcedureStep 1 Tap .Step 2 Tap Settings.Step 3 Tap Display Options.AvailabilityAvailability is displayed when you are signed in to the Jabber IM application. Availability shows the statusof local contacts.   Cisco Desktop Collaboration Experience DX600 Series User Guide, Release 10.0(1)92 OL-28931-01  ApplicationsImport contacts
EmailThe Email application allows you to manage multiple email accounts. Use the Email application to viewindividual email account inboxes or a combined inbox. The Email application supports POP3, IMAP andExchange email accounts.Use the Email application to add and manage multiple email accounts, including multiple Exchange accountson different servers.Email accounts can use ActiveSync for the Calendar and Contacts applications.SettingsThe first time that you open the Email application, you are taken to the Settings page to configure the accountcredentials (server and username, password, incoming server address, check box for Secure Connections andAccept all SSL certificates), unless you already entered the credentials using the Setup Assistant or the Settingsapplication.Add email accountProcedureStep 1 Tap .Step 2 Tap Settings.Step 3 Tap Add Account.Step 4 Enter the email account credentials.The Email application shares account settings with the Calendar application; either application initiates theaccount setup.InboxAccounts are listed in the tab on the left side, followed by a summary of folders with new messages.Folders are listed on the left side.View email messages from an individual or a combined inbox. While an email message is open, the inbox isdisplayed in the left tab.Tap the Mailbox button at top left of the email message screen to return to the mailbox.Cisco Desktop Collaboration Experience DX600 Series User Guide, Release 10.0(1)       OL-28931-01 93ApplicationsEmail
Refresh inboxProcedureTap .Sort mailboxProcedureStep 1 Tap .Step 2 Tap Sorting Options.Step 3 Select a sorting method.Search email messagesProcedureStep 1 Tap .Step 2 Select the type of search.Step 3 Enter your search query into the search bar.Send email messageProcedureStep 1 Tap .Step 2 Enter the recipient email address, enter the subject, and compose the message.Step 3 Tap Send.   Cisco Desktop Collaboration Experience DX600 Series User Guide, Release 10.0(1)94 OL-28931-01  ApplicationsSend email message
Save email message draftProcedureStep 1 Tap .Step 2 Enter the email address, enter the subject, and compose the message.Step 3 Tap Save as draft.Reply to email messageProcedureStep 1 Tap or .Step 2 Compose the message.Step 3 Tap Send.Forward email messageProcedureStep 1 Tap .Step 2 Enter the email address.Step 3 Tap Send.Add attachment to email messageProcedureStep 1 Tap .Step 2 Select a file.Cisco Desktop Collaboration Experience DX600 Series User Guide, Release 10.0(1)       OL-28931-01 95ApplicationsSave email message draft
The total size of attachments cannot exceed 5 MB. A warning is displayed when the total size ofattachments reaches 3 MB.NoteAdd CC or BCC recipientProcedureStep 1 Tap .Step 2 Tap Add Cc/Bcc.Step 3 Enter the email address in the Cc or Bcc field.Delete email messageTap .Delete multiple email messagesProcedureStep 1 Check the email messages.Step 2 Tap .Delete folderProcedureStep 1 Long press a folder.Step 2 Select .   Cisco Desktop Collaboration Experience DX600 Series User Guide, Release 10.0(1)96 OL-28931-01  ApplicationsAdd CC or BCC recipient
Move email messageProcedureStep 1 Long press a message.Step 2 Tap Move.Step 3 Select a folder.Mark email message as favoriteTap .Mark multiple email messages as favoritesProcedureStep 1 Check the email messages.Step 2 Tap .Mark email message as newProcedureStep 1 Check the email message.Step 2 Tap Mark Unread.Cisco Desktop Collaboration Experience DX600 Series User Guide, Release 10.0(1)       OL-28931-01 97ApplicationsMove email message
Mark multiple email messages as newProcedureStep 1 Check the email messages.Step 2 Tap Mark Unread.Search email messagesProcedureStep 1 Tap .Step 2 Select a search type.Step 3 Enter your search query.Set sorting optionsProcedureStep 1 Tap .Step 2 Tap Sorting Options.   Cisco Desktop Collaboration Experience DX600 Series User Guide, Release 10.0(1)98 OL-28931-01  ApplicationsMark multiple email messages as new
Add signature to email messagesProcedureStep 1 Tap .Step 2 Tap Account Settings.Step 3 Tap Signature.Step 4 Enter your signature and tap OK. Your signature appears on any new email message that you compose. Yoursignature does not appear when you reply to a message.Digitally signed email messagesA digitally signed email message that is sent from an Exchange 2003 server appears as a downloadableattachment of unknown size.Set email check frequencyProcedureStep 1 Tap .Step 2 Tap Account Settings.Step 3 Tap Email Check Frequency.Step 4 Select a frequency.Reset email account passwordProcedureStep 1 Tap .Step 2 Tap Account Settings.Step 3 Tap Incoming Settings.Step 4 Enter your new password in the Password field.Cisco Desktop Collaboration Experience DX600 Series User Guide, Release 10.0(1)       OL-28931-01 99ApplicationsAdd signature to email messages
Select ringtoneProcedureStep 1 Tap .Step 2 Tap Account Settings.Step 3 Tap Select Ringtone.Step 4 Select a ringtone and tap OK.Edit vibrate settingsProcedureStep 1 Tap .Step 2 Tap Account Settings.Step 3 Tap Vibrate.Jabber IMUse the Jabber IM application to send and receive instant messages, to update your availability, and to addand remove contacts. You receive chat messages and presence updates while the Jabber IM application isminimized or out of focus. While you are not signed in to the Jabber IM application, presence updates in otherapplications may be inaccurate.Jabber IM accountIf you choose not to set up the account credentials in the Setup Assistant, you will be prompted to do so whenyou first launch the Jabber IM application.Add Jabber IM accountEnter all credentials before you save account settings. The application tries to authenticate credentials beforesaving and prompts you to try again when you enter incorrect information.   Cisco Desktop Collaboration Experience DX600 Series User Guide, Release 10.0(1)100 OL-28931-01  ApplicationsSelect ringtone
ProcedureStep 1 Enter your Jabber IM account credentials.Step 2 Tap Sign In.Signing inAn automatic sign-in option for the Jabber IM application is enabled by default.If you are not signed in to the Jabber IM application, the application will try to sign you in automatically whenthe application is launched. If the sign-in succeeds, the Contacts screen is displayed. If the sign-in does notsucceed, you will be prompted to reenter your account credentials.AvailabilityTap the top left of the screen to set your status to one of the following:•Available•Away•Do Not Disturb•CustomAdd custom statusProcedureStep 1 Tap your status at the top left of the screen.Step 2 Tap Enter your custom status.Step 3 Enter the text for your status.Step 4 Select an availability status.Step 5 Tap OK.Cisco Desktop Collaboration Experience DX600 Series User Guide, Release 10.0(1)       OL-28931-01 101ApplicationsAvailability
Delete custom statusProcedureStep 1 Tap your status at the top left of the screen.Step 2 Long press a custom status.Step 3 Tap Delete.ContactsManage your contacts on the Contacts tab.Add Chat contactProcedureStep 1 Tap Contacts.Step 2 Tap .Step 3 Tap Add Contact.Step 4 Enter a name in the Name field. This will search your corporate directory.Step 5 Tap Add to group and select a group.Step 6 Tap Done.Contact requestsWhile you are signed in to the Jabber IM application, you will receive a notification in the notification bar ifyou receive a new contact request.   Cisco Desktop Collaboration Experience DX600 Series User Guide, Release 10.0(1)102 OL-28931-01  ApplicationsContacts
View contact requestsProcedureStep 1 Tap .Step 2 Tap Contact Requests.Step 3 Tap Allow or Deny.Step 4 Tap Confirm.Remove chat contactProcedureStep 1 Tap and hold a contact on the Contacts tab or in an active conversation.Step 2 Tap .Show offline contactsProcedureStep 1 Tap .Step 2 Tap Show Offline Contacts.Unsynced contactsYou can use the Chat application to communicate with unsynced contacts. Unsynced contacts are contactsthat you have not added to your chat contacts.Cisco Desktop Collaboration Experience DX600 Series User Guide, Release 10.0(1)       OL-28931-01 103ApplicationsContacts
Add unsynced contact to chat contactsProcedureStep 1 Long press the contact icon.Step 2 Tap Add in the Contact Details dialog box.ConversationsChats open in the Active Conversations tab on the right side of the screen.While you are viewing an active conversation, a scrollable list of your active conversations displays on theleft side of the screen. Select a conversation to view it.Start conversationTap a contact from your contact list.EmoticonsThe Jabber IM application includes emoticons that you can use in conversation.Insert emoticon into conversationProcedureStep 1 Tap Emoticons.Step 2 Tap an emoticon to insert it into the conversation.End conversationProcedurePurposeCommand or ActionTap .Step 1Tap End chat.Step 2   Cisco Desktop Collaboration Experience DX600 Series User Guide, Release 10.0(1)104 OL-28931-01  ApplicationsConversations
SearchUse the search function to search your chat contacts and your corporate directory.Start conversation with search resultTap on a search result to start a conversation with that contact.SettingsThe Jabber IM application settings allow you to set up your auto-sign-in option and to edit your chat accountinformation.Enable audio and vibration notificationsProcedureStep 1 Tap .Step 2 Tap Settings.Step 3 Tap Sounds and vibrate.Step 4 Check the sound and vibrate options that you want.Enable status bar notificationsProcedureStep 1 Tap .Step 2 Tap Settings.Step 3 Check Message notifications.Cisco Desktop Collaboration Experience DX600 Series User Guide, Release 10.0(1)       OL-28931-01 105ApplicationsSearch
Set profile photoProcedureStep 1 Tap .Step 2 Tap Settings.Step 3 Tap Profile photo.Step 4 Tap Take new photo to launch the Camera application and take a picture. Or, tap Select from Gallery tolaunch the Gallery application and select a picture.Set your ringtoneProcedureStep 1 Tap .Step 2 Tap Settings.Step 3 Tap Choose ringtone.Step 4 Select a ringtone.Step 5 Tap OK.Sign out of Jabber IMProcedureStep 1 Tap .Step 2 Tap Sign Out.Unified InboxThe Unified Inbox application lets you manage all communications at a glance.The Unified Inbox application has two display modes:•Contacts View   Cisco Desktop Collaboration Experience DX600 Series User Guide, Release 10.0(1)106 OL-28931-01  ApplicationsSign out of Jabber IM
•Events ViewView communications with contactTap a contact photo to view communications with that contact.Search contact listProcedureStep 1 Tap .Step 2 Enter your search criteria.View email messageTap an email message to view it.If the message is part of a thread, the other messages appear in the tab on the left. You can select a messagefrom that tab to display its contents. You can also swipe an email message to the left or right to navigate tothe next (left) or the previous (right) email message.View visual voice messageProcedureTap a voice message to view it.Play visual voice messageProcedureTap .Cisco Desktop Collaboration Experience DX600 Series User Guide, Release 10.0(1)       OL-28931-01 107ApplicationsView communications with contact
Reply to visual voice messageProcedureStep 1 Tap a voice message to view it.Step 2 Tap Reply or Reply All button.View event detailsTap an event to view the event details. The event information is displayed on the left, and the participants aredisplayed on the right.Join WebEx meetingTap Join or Start if you are viewing an event that is a Cisco WebEx meeting that is about to start.Reorder panelsProcedureStep 1 Tap .Step 2 Tap Reorder Panels.Step 3 Drag a panel to change its position.Step 4 Tap Close.Refresh application dataProcedureTap .   Cisco Desktop Collaboration Experience DX600 Series User Guide, Release 10.0(1)108 OL-28931-01  ApplicationsView event details
Unified Inbox widgetThe Unified Inbox widget shows the number of new voice messages, missed calls, and upcoming events, andshows pictures of your newest contacts. The bigger the picture, the more recent the contact. The type ofcommunication is not shown with the contact picture.WebExCisco WebEx is a standalone application, but it is also integrated into the Calendar, Phone, Chat, and Contactsapplications.During a Cisco WebEx meeting, participants can join the audio conference, see who is in the meeting, viewshared presentations, and chat with everyone or privately. A popup at the bottom of the screen identifies thecurrent speaker.Note that you cannot share your desktop or a presentation in a Cisco WebEx meeting from the Cisco DX650.The meeting host can drag the WebEx ball during a meeting to change presenters and mute or unmuteparticipants. The host has full control of the meeting.Sign in to WebExProcedureStep 1 Tap Sign in.Step 2 Enter your email address.Step 3 Tap Next.Step 4 Enter your password.Step 5 Tap Sign In.Sign in to WebEx with single sign-onProcedureStep 1 Tap Sign in.Step 2 Tap Sign in through your corporate website.Step 3 Enter your WebEx site URL.Step 4 Tap Next.Step 5 Enter your credentials.Cisco Desktop Collaboration Experience DX600 Series User Guide, Release 10.0(1)       OL-28931-01 109ApplicationsUnified Inbox widget
Start instant WebEx meetingProcedureStep 1 Tap .Step 2 The Instant Meeting dialog box appears. You can optionally set the meeting topic and the meeting passwordand invite participants, or you can accept the default values. Note that some meeting sites require you to seta meeting password.Step 3 Tap Start Meeting.Step 4 When prompted to call in, select Connect using the internet.Schedule new WebEx meetingUse the Calendar application to schedule a Cisco WebEx meeting.Start scheduled WebEx meetingProcedureStep 1 Tap Start.Step 2 When prompted to call in, select Connect using the internet.Join scheduled WebEx meetingProcedureStep 1 Tap Join.Step 2 When prompted to call in, select Connect using the internet.   Cisco Desktop Collaboration Experience DX600 Series User Guide, Release 10.0(1)110 OL-28931-01  ApplicationsStart instant WebEx meeting
Join WebEx meeting by meeting numberProcedureStep 1 Tap Join by Meeting Number.Step 2 Enter the meeting number and your name. Enter the meeting password if it is required.Step 3 Tap Join Meeting.Step 4 When prompted to call in, select Connect using the internet.View participant listProcedureStep 1 Tap Participants.Step 2 Tap Participants again to hide the participant list.Chat with participantProcedureStep 1 View the participant list.Step 2 Select a participant.Step 3 Enter your message and tap Send.Chat with everyoneProcedureStep 1 View the participant list.Step 2 Tap Chat with everyone.Step 3 Enter your message and tap Send.Cisco Desktop Collaboration Experience DX600 Series User Guide, Release 10.0(1)       OL-28931-01 111ApplicationsJoin WebEx meeting by meeting number
Invite more participants to WebEx meetingProcedureStep 1 If you are the host of a Cisco WebEx meeting, tap on the meeting detail view.Step 2 Select contacts to invite to the meeting.Invite more participants during WebEx meetingProcedureStep 1 If you are the host of a Cisco WebEx meeting, tap .Step 2 Select contacts to invite to the meeting.Show video during WebEx meetingThe WebEx application always uses the internal camera for video, even if you have an external cameraattached.NoteProcedureIn a Cisco WebEx meeting, tap .WebEx widgetUse the WebEx widget to display, schedule, and start Cisco WebEx meetings on your home screen.More applicationsUse the Google Play™Store to find and add applications to your phone. Depending on your security settings,the Google Play Store may not be available.   Cisco Desktop Collaboration Experience DX600 Series User Guide, Release 10.0(1)112 OL-28931-01  ApplicationsInvite more participants to WebEx meeting
Some applications found in the Google Play Store may have hardware requirements that are not available onyour phone, such as GPS or a rear-facing camera.Cisco cannot guarantee that an application that is downloaded from a third-party site will work.UCM AppUse the UCM app to install or remove applications that are provisioned for your phone by your systemadministrator. Depending on your system settings, you may not be able to remove applications that areprovisioned by your system administrator. Contact your system administrator for more information.Remove applicationProcedureStep 1 Tap .Step 2 Tap Settings.Step 3 Tap Applications.Step 4 Tap Manage Applications.Step 5 Tap an application in one of the application lists.Step 6 Tap Uninstall.Step 7 Tap OK.Cisco Desktop Collaboration Experience DX600 Series User Guide, Release 10.0(1)       OL-28931-01 113ApplicationsUCM App
   Cisco Desktop Collaboration Experience DX600 Series User Guide, Release 10.0(1)114 OL-28931-01  ApplicationsRemove application
CHAPTER 7Accessories•Bluetooth, page 115•External camera, page 117•External monitor, page 118•USB accessories, page 121BluetoothCisco DX650 supports Bluetooth 2.1+EDR, with headsets that support Hands-Free Profile (HFP) for voicecommunications and Advanced Audio Distribution Profile (A2DP) for streaming audio. Cisco DX650 alsosupports Object Push Profile (OPP) for generic file exchange over Bluetooth, and Human Interface Device(HID) protocol for connecting a keyboard or mouse.Bluetooth HFP support offers the following features:•Ring•Answer a Call•End a Call•Volume Control•Last Number Redial•Call Waiting•Divert/Reject•Three-Way Calling◦Hold and Accept◦Release and Accept•Speed DialBluetooth A2DP support allows for the unidirectional transfer of an audio stream to other Bluetooth-enableddevices, such as a stereo headset.Cisco Desktop Collaboration Experience DX600 Series User Guide, Release 10.0(1)        OL-28931-01 115
You can use a Bluetooth device up to 30 feet (10 meters) away from your Cisco DX650. However, for bestperformance, it is recommended that you use Bluetooth devices within 10 feet (3 meters) of the Cisco DX650.Enabling Bluetooth may degrade your wireless network connection. For improved wireless networkperformance, disable Bluetooth when it is not in use, or use the 5 GHz band for your wireless networkconnection.Enable BluetoothProcedureStep 1 Tap .Step 2 Tap Settings.Step 3 Toggle Bluetooth on.Scan for Bluetooth deviceTap Search for Devices if devices do not appear in the Bluetooth devices submenu.Pair Bluetooth deviceProcedureStep 1 Tap a device to pair from the available devices list.Step 2 Verify the passkey and tap Pair.Unpair Bluetooth deviceProcedureStep 1 Tap Settings next to the device.Step 2 Tap Unpair.   Cisco Desktop Collaboration Experience DX600 Series User Guide, Release 10.0(1)116 OL-28931-01  AccessoriesEnable Bluetooth
Sharing filesProcedureStep 1 Pair your Cisco DX650 with another Bluetooth enabled device.Step 2 Select a file to share. For example, you can share a photo from the Gallery application or a contact from theContact application.Step 3 Select Bluetooth from the Share menu.View received filesProcedureStep 1 Tap More.Step 2 Tap Show received files.Make phone discoverableTap the name of your phone to make it discoverable. Your Cisco DX650 will be discoverable for 120 seconds.Set Bluetooth device nameProcedureStep 1 Tap More.Step 2 Tap Rename Device.Step 3 Enter a device name and tap Rename.External cameraCisco DX650 supports the Logitech C920-C Webcam. While an external camera is connected, it becomes thedefault camera for the phone application. Other applications will continue to use the internal camera.Tap Swap to swap between the external and internal cameras.Cisco Desktop Collaboration Experience DX600 Series User Guide, Release 10.0(1)       OL-28931-01 117AccessoriesSharing files
While you are using both an external camera and an external monitor, video from video calls will appear onthe external monitor, and the call will display on the internal screen as if it is an audio call. When you openanother application on the external monitor during a video call, the video call is overlaid on the applicationbeing viewed.External monitorConnect your phone to a monitor by inserting one end of an HDMI cable into the micro-HDMI port and theother end into a monitor HDMI port.Your phone screen is displayed on an external monitor in mirror mode, or the external monitor acts as a dualindependent display. In mirror mode, the content that is displayed on the phone screen is also shown on theexternal monitor. In dual independent display mode, the external monitor functions as a second, independentscreen.Cisco DX650 supports the following external monitor resolutions:•1920 x 1200 (WUXGA)•1920 x 1080 (1080p)•1680 x 1050•1280 x 720 (720p)If Cisco DX650 enters sleep mode, the external monitor enters sleep mode too. When the phone is locked,the external monitor is also locked and cannot be used until the phone is unlocked.You can move applications to or from the external monitor. Moving the Browser application will cause theapplication to restart. You cannot have more than one instance of an application running at the same time.A mouse and a keyboard can be used on both the internal screen and an external monitor. Mouse panning issupported. The keyboard follows the focus of the mouse.Connect external monitorProcedureInsert one end of an HDMI cable into the HDMI port and the other end into a monitor HDMI port.Switch display modeProcedureStep 1 Tap Monitor on the status bar.Step 2 Select Mirror to mirror the Cisco DX650 screen on the external monitor. Select External Display to use theexternal monitor as an independent display.   Cisco Desktop Collaboration Experience DX600 Series User Guide, Release 10.0(1)118 OL-28931-01  AccessoriesExternal monitor
Set monitor orientationProcedureStep 1 Tap .Step 2 Tap Settings.Step 3 Tap External display.Step 4 Tap Orientation.Step 5 Select a monitor orientation.Launch application on external monitorProcedureStep 1 Select on the external monitor display.Step 2 Select an application.Autolaunch application to external monitorProcedureStep 1 Tap on the internal display.Step 2 Tap Settings.Step 3 Select External Display.Step 4 Select Auto Launch.Step 5 Select up to three applications to automatically launch on the external monitor.Cisco Desktop Collaboration Experience DX600 Series User Guide, Release 10.0(1)       OL-28931-01 119AccessoriesSet monitor orientation
Move application to external monitorProcedureStep 1 Tap Monitor on the status bar.Step 2 Select Open in External Display.Move application to phone screenProcedureStep 1 Tap Monitor on the external monitor status bar.Step 2 Select Open in Phone Display.HDCP supportCisco DX600 Series phones support Digital Rights Management (DRM) protected content. For example, yourphone plays video that is purchased from the Google Play Store.To prevent unauthorized copying of HD video using the HDMI port, it is required that an HDMI monitor (orany HDMI sink device) that is connected to the phone must be HDCP compliant.HDCP is used to encrypt the data between your phone and the HDMI monitor. If the HDMI monitor is notHDCP compliant, your phone will not play protected content.This table summarizes when DRM content can be played.HDCP not supported monitorHDCP supported monitorDisplay modeN/ADRM content can be playedNo external monitorDRM content will not play.The DRM content player willprompt you that content cannot beplayed. It does not matter if thecontent player is started on theinternal display or on a Dualindependent display (DID)monitor.DRM content can be playedregardless of where the media isbeing displayed.Dual independent display   Cisco Desktop Collaboration Experience DX600 Series User Guide, Release 10.0(1)120 OL-28931-01  AccessoriesMove application to external monitor
DRM content will not play.The DRM content player willprompt you that content cannot beplayed.DRM content can be playedMirror modeVirtual desktop infrastructureFor users who adopt Virtual Desktop Infrastructure (VDI), Cisco DX650 supports third-party virtual desktopclients from leading third-party vendors:•Citrix•VMware•WyseDesktop virtualization technologies may offer a degraded level of performance when remotely accessingaudio, video, and interactive multimedia resources. Unlike other desktop virtualization endpoints, your phonefeatures a local voice and video media plane, which enables your phone to connect to media traffic throughthe device itself and outside of the remote desktop display protocol. For example, two Cisco DX600 Seriesphone users in the same branch can call each other using Cisco Unified Personal Communicator running ontheir remote virtual desktop and, while the control (signaling) plane resides in the data center, the audio andvideo connection between the users never leaves the branch. The branch network applies packet prioritizationto the Real-time Transport Protocol (RTP) flow, and the two phones connect directly to each other withoutthe need for the voice to traverse the WAN twice to reach the data center. The local voice and video mediaplane delivers the best quality experience for audio and video collaboration without inflating the bandwidthconsumption over the WAN.Some applications on a remote desktop are designed for a larger screen size. To avoid cutting off part of anapplication in a virtual desktop client, Cisco recommends that you set the remote desktop to a larger screensize than 1024 x 600.You musy run desktop virtualization clients on an external monitor in external mode, not in mirror mode.The desktop virtualization experience on Cisco DX650 includes keyboard and mouse support. However, thedesktop virtualization clients retain the touch-mode behavior, and some keyboard and mouse actions maydiffer from a typical Microsoft Windows experience. For a description of supported keyboard shortcuts andmouse actions, refer to the USB keyboard and mouse section of this guide.For additional information about Citrix Receiver, VMware View Client, and Wyse PocketCloud Pro, see theproduct description for each application.Related TopicsUSB keyboard and mouse, on page 122USB accessoriesEach available Cisco DX650 features a USB port on the right side.The USB port allows you to use any of the following accessories:Cisco Desktop Collaboration Experience DX600 Series User Guide, Release 10.0(1)       OL-28931-01 121AccessoriesVirtual desktop infrastructure
•USB keyboard•USB mouse•USB memory stick•USB-powered hub•USB serial console cableUSB keyboard and mouseNot every USB keyboard or mouse is guaranteed to work with Cisco DX650. However, most USB keyboardsthat are human interface device (HID) compliant will work correctly. Because all USB hubs need to bepowered, keyboards that include one or more hubs are not allowed on the Cisco DX650, because they containa nonpowered hub.VDI shortcutsThe keyboard shortcuts and mouse actions available in virtual desktop clients differ from those for other CiscoDX650 applications.VDI keyboard shortcutsControl key meta-state (combination keys), Num Lock, and Caps Lock state are not currently supported bymany of the virtual desktop clients on Android. For information about supported shortcuts, see the productdescription for each application.VDI mouse actionsThe Cisco DX600 platform maps the mouse events into touchscreen input and the VDI clients usually mapthe touchscreen input to customary Android actions, resulting in the following behavior:•Click: tap•Click and drag: Scroll up and down, or left and right, on the remote desktop•Click, hold, and drag: Move windows, scroll bar handles, and other objects on the remote desktopSome applications on a remote desktop are designed for a larger screen size. To avoid cutting off part of anapplication in a virtual desktop client, Cisco recommends that you set the remote desktop to a larger screensize than the Cisco DX650 screen size.USB memory stickInsert a USB memory stick into the USB port to expand the available disk space of the Cisco DX650.The USB memory stick is mounted at /sdcard/external/usb-sda1.   Cisco Desktop Collaboration Experience DX600 Series User Guide, Release 10.0(1)122 OL-28931-01  AccessoriesUSB keyboard and mouse
USB-powered hubUse a USB-powered hub to expand the number of available USB ports. USB-powered hubs allow you toconnect up to five USB accessories.USB console cableA USB console cable is typically used only for debugging by a system administrator.For more information about how to use a USB console cable, contact your system administrator.Cisco Desktop Collaboration Experience DX600 Series User Guide, Release 10.0(1)       OL-28931-01 123AccessoriesUSB-powered hub
   Cisco Desktop Collaboration Experience DX600 Series User Guide, Release 10.0(1)124 OL-28931-01  AccessoriesUSB console cable
CHAPTER 8Product safety, security, accessibility, andrelated information•Safety and performance information, page 125•Emergency response notification, page 125•FCC compliance statements, page 127•CE marking, page 128•Cryptographic information, page 128•Data backup, page 128•Problem Report Tool, page 129•Accessibility features, page 129Safety and performance informationPower outages and other devices can affect your Cisco DX650.Power outageYour access to emergency services through the phone application depends on the phone being connected toa network. If there is an interruption in the power supply for your router, Service and Emergency CallingService dialing will not function until power is restored. In the case of a power failure or disruption, you mayneed to reset or reconfigure equipment before using the Service or Emergency Calling Service dialing.Emergency response notificationThe text of the Emergency Response Notification displays the first time that you open the Phone applicationand also when you select an existing VPN network or add a new VPN network.Cisco Desktop Collaboration Experience DX600 Series User Guide, Release 10.0(1)        OL-28931-01 125
Emergency response notification for phoneWhen you open the Phone application on your Cisco DX650 for the first time, the Emergency ResponseNotification dialog box alerts you that your ability to dial emergency numbers may be hindered because youare using a VoIP network.This dialog requires that you check the “I acknowledge this information”check box and tap OK in order todismiss the dialog. After the initial acceptance, the dialog will reappear only if you perform a factory reset ofyour device or the system administrator performs a remote wipe of your device.The text of the Emergency Response Notification dialog for the Phone application follows here:Dialing emergency numbers (for example, 911 or 112) may not work on anenterprise-class IP telephony network like that used for Cisco DX650. Correct locationinformation may not be passed on to emergency responders. Your network administratorcan advise you about the capabilities of your network, including the dialing sequencethat you will need to use when on or off the enterprise premises.Emergency response notification for VPNWhenever you choose to connect to an existing VPN network or choose the option to Add a New VPNConnection, a dialog displays to warn about the potential disruption of emergency response numbers. Youcan proceed to the VPN connection step by tapping OK. You can dismiss the dialog and cancel the connectionby tapping Back.The text of the Emergency Response Notification dialog for VPN networks follows here:CAUTION - Emergency response numbers (for example, 911 or 112) may not workon software telephony clients. Your exact location and the appropriate emergencyresponse agency may not be easily identified. Some countries restrict use of VoIPsoftware via VPN over the Internet, including: UAE, Saudi Arabia, Pakistan, Lebanon,Jordan, Egypt, Oman, Qatar, Yemen, Algeria, and Kuwait.External devicesThe following information applies when you use external devices with your phone:Cisco recommends using good-quality external devices (such as headsets) that are shielded against unwantedradio frequency (RF) and audio frequency (AF) signals.Depending on the quality of these devices and their proximity to other devices such as mobile phones ortwo-way radios, some audio noise may still occur. In these cases, Cisco recommends that you take one ormore of these actions:•Move the external device away from the source of the RF or AF signals.•Route the external device cables away from the source of the RF or AF signals.•Use shielded cables for the external device, or use cables with a better shield and connector.•Shorten the length of the external device cable.•Apply ferrites or other such devices on the cables for the external device.   Cisco Desktop Collaboration Experience DX600 Series User Guide, Release 10.0(1)126 OL-28931-01  Product safety, security, accessibility, and related informationEmergency response notification for phone
Cisco cannot guarantee the performance of the system because Cisco has no control over the quality of externaldevices, cables, and connectors. The system will perform adequately when suitable devices are attached usinggood-quality cables and connectors.In European Union countries, use only external speakers, microphones, and headsets that are fully compliantwith the EMC Directive [89/336/EC].CautionHeadset safetyWhen using a headset, set the volume to a safe level. Permanent hearing loss or damage may occur if headsetsare used at high volume.Do not use a headset at high volume to block out other noise. Lower the volume if you cannot hear peoplespeaking near you.If you experience ringing in your ears, muffled voices, or other signs of hearing loss or damage, stop usingyour headset and have your hearing checked.Avoid using a headset while operating a vehicle. Using a headset while operating a vehicle can be distractingand dangerous, and is illegal in some areas. Likewise, avoid using a headset while performing any activitythat requires your undivided attention.Bluetooth wireless headset performanceCisco DX650 supports Bluetooth Class 2 technology when the headsets support Bluetooth. Bluetooth enableslow-bandwidth wireless connections within a range of 30 feet (10 meters). The best performance is in the 3-to 6-foot (1- to 2-meter) range. You can connect up to five headsets, but only the last one connected is usedas the default.Because there can be potential interference issues, it is recommended that you move 802.11b/g devices,Bluetooth devices, microwave ovens, and large metal objects away from the wireless headset.For a Bluetooth wireless headset to work, it does not need to be within direct line-of-sight of the phone. Somebarriers, such as walls or doors, and interference from other electronic devices can affect the Bluetoothconnection.FCC compliance statementsThe Federal Communications Commission requires compliance statements for the following:•FCC Part 15.21•FCC Receivers and Class B DigitalFCC part 15.21 statementChanges or modifications not expressly approved by the party responsible for compliance could void theuser’s authority to operate the equipment.Cisco Desktop Collaboration Experience DX600 Series User Guide, Release 10.0(1)       OL-28931-01 127Product safety, security, accessibility, and related informationHeadset safety
FCC receivers and class B digital statementThis product has been tested and complies with the specifications for a Class B digital device, pursuant toPart 15 of the FCC Rules. These limits are designed to provide reasonable protection against harmfulinterference in a residential installation. This equipment generates, uses, and can radiate radio frequencyenergy and, if not installed and used according to the instructions, may cause harmful interference to radiocommunications. However, there is no guarantee that interference will not occur in a particular installation.If this equipment does cause harmful interference to radio or television reception, which is found by turningthe equipment off and on, the user is encouraged to try to correct the interference by one or more of thefollowing measures:•Reorient or relocate the receiving antenna•Increase the separation between the equipment or devices•Connect the equipment to an outlet other than the receiver’s•Consult a dealer or an experienced radio/TV technician for assistanceCE markingFor Cisco DX650, the CE mark and class-2 identifier are affixed to the equipment and packaging.Cryptographic informationNOTICEThis product contains cryptographic features and is subject to United States and local country laws governingimport, export, transfer, and use. Delivery of Cisco cryptographic products does not imply third-party authorityto import, export, distribute, or use encryption. Importers, exporters, distributors, and users are responsiblefor compliance with U.S. and local country laws. By using this product you agree to comply with applicablelaws and regulations. If you are unable to comply with U.S. and local laws, return this product immediately.A summary of U.S. laws governing Cisco cryptographic products may be found at http://www.cisco.com/web/about/doing_business/legal/global_export_trade/general_export/contract_compliance.html.If you require further assistance concerning the exporting of these products, please contact us by sendingemail to export@cisco.com.Data backupA Google account is required for data backup. If you do not add a Google account, none of your data will bebacked up.Your Email application data will not be backed up; however data from the Gmail application will be backedup.Google does not guarantee that data is encrypted as it is being sent to the Backup service.If you turn the backup option off, all saved backup data is deleted.   Cisco Desktop Collaboration Experience DX600 Series User Guide, Release 10.0(1)128 OL-28931-01  Product safety, security, accessibility, and related informationFCC receivers and class B digital statement
ProcedureStep 1 Tap .Step 2 Tap Settings.Step 3 Tap Backup & Reset.Step 4 Tap Back Up My Data.Problem Report ToolUse the Cisco Collaboration Problem Report Tool to send information to your system administrator whenyou experience problems with your phone or applications. You must have an email account configured onyour phone to send reports from the Problem Report Tool.Report problemProcedureStep 1 Tap .Step 2 Tap Settings.Step 3 Tap About device.Step 4 Tap Cisco Collaboration Problem Reporting Tool.Step 5 Fill in each report option, and tap Create email report.Step 6 Send the email report to your system administrator.Accessibility featuresCisco DX650 provides accessibility features for the vision impaired, the blind, and the hearing and mobilityimpaired.Cisco Desktop Collaboration Experience DX600 Series User Guide, Release 10.0(1)       OL-28931-01 129Product safety, security, accessibility, and related informationProblem Report Tool
Change font sizeProcedureStep 1 Tap .Step 2 Tap Settings.Step 3 Tap Accessibility.Step 4 Tap Font size.Step 5 Select a font size.Change screen brightnessProcedureStep 1 Tap .Step 2 Tap Settings.Step 3 Tap Display.Step 4 Tap Brightness.Step 5 Slide the bar left to lower the brightness or right to increase the brightness.Step 6 Tap OK.Change touch and hold delayProcedureStep 1 Tap .Step 2 Tap Settings.Step 3 Tap Accessibility.Step 4 Tap Touch & hold delay.Step 5 Select a short, medium, or long delay.   Cisco Desktop Collaboration Experience DX600 Series User Guide, Release 10.0(1)130 OL-28931-01  Product safety, security, accessibility, and related informationChange font size
Enable spoken passwordsProcedureStep 1 Tap .Step 2 Tap Settings.Step 3 Tap Accessibility.Step 4 Check Speak passwords.Enable TalkBackProcedureStep 1 Tap .Step 2 Tap Settings.Step 3 Tap Accessibility.Step 4 Tap TalkBack.Step 5 Toggle TalkBack on.Step 6 Tap OK.Enable web scriptsProcedureStep 1 Tap .Step 2 Tap Settings.Step 3 Tap Accessibility.Step 4 Tap Install web scripts.Step 5 Tap Allow.Cisco Desktop Collaboration Experience DX600 Series User Guide, Release 10.0(1)       OL-28931-01 131Product safety, security, accessibility, and related informationEnable spoken passwords
   Cisco Desktop Collaboration Experience DX600 Series User Guide, Release 10.0(1)132 OL-28931-01  Product safety, security, accessibility, and related informationEnable web scripts

Navigation menu