Cisco Systems ISM-CPE-R1 Spread spectrum transmitter User Manual CPE 2 6 Installation Manual
Cisco Systems, Inc Spread spectrum transmitter CPE 2 6 Installation Manual
user guide

RipwaveÔ CPE Installation
and User Guide
For use with all Ripwave 2400
and 2600 CPE models
For Installation With Windows® 95 or
later Operating Systems
Part Number 40-00097-00
Revision A, Version 1.0
June 20, 2002
Proprietary & Confidential
All information disclosed by this document is confidential, and is the proprietary property of Navini
Networks, Inc. All rights therein are expressly reserved.

Ripwave Unit Installation and User Guide Navini Networks, Inc.

Ripwave CPE Installation and User Guide Navini Networks, Inc.
TABLE OF CONTENTS
Permissions, Trademarks, and Distribution ............................................................................. iii
Symbols ......................................................................................................................................... iv
Safety.............................................................................................................................................. v
Regulatory Information.............................................................................................................. vii
FCC Notice ...................................................................................Error! Bookmark not defined.
Battery Cautionary Procedures.................................................................................................. ix
Introduction................................................................................................................................... 1
Ripwave CPE Models ................................................................................................................... 1
Minimum System Requirements ................................................................................................. 2
Equipment Inventory.................................................................................................................... 2
Location of Controls and Features.............................................................................................. 3
2400 Ripwave CPE.................................................................................................................... 3
2600 Ripwave CPE.................................................................................................................... 3
Ripwave CPE Installation ............................................................................................................ 4
USB Connections....................................................................................................................... 4
Ethernet Connections ............................................................................................................... 9
Ripwave Monitor Software Installation.................................................................................... 11
Installation Procedures........................................................................................................... 11
Accessing the Internet......................................................................Error! Bookmark not defined.
Ripwave CPE Indicator Lights.......................................................Error! Bookmark not defined.
Displaying the Ripwave Monitor....................................................Error! Bookmark not defined.
Uninstall the Ripwave Monitor Software ......................................Error! Bookmark not defined.
Installing / Charging the Battery Pack ..........................................Error! Bookmark not defined.
2600E and 2600U Battery Pack ..................................................Error! Bookmark not defined.
0-00098-00 Rev A v1.0 i
2400E and 2400U Battery Pack ..................................................Error! Bookmark not defined.

Ripwave Unit Installation and User Guide Navini Networks, Inc.
Care and Maintenance ....................................................................Error! Bookmark not defined.
Glossary ............................................................................................Error! Bookmark not defined.
End User Software License Agreement .........................................Error! Bookmark not defined.
Hardware Warranty........................................................................Error! Bookmark not defined.
0-00098-00 Rev A v1.0
ii

Ripwave CPE Installation and User Guide Navini Networks, Inc.
Permissions, Trademarks, and Distribution
Copyright© November 2001 - 2002, Navini Networks, Inc. All information contained herein and
disclosed by this document is confidential and the proprietary property of Navini Networks, Inc.
and all rights therein are expressly reserved. Acceptance of this material signifies agreement by
the recipient that the information contained in this document is confidential and that it will be
used solely for the purposes set forth herein. Acceptance of this material signifies agreement by
the recipient that it will not be used, reproduced in whole or in part, disclosed, distributed, or
conveyed to others in any manner or by any means – graphic, electronic, or mechanical,
including photocopying, recording, taping, or information storage and retrieval systems –
without the express written permission of Navini Networks, Inc.
Navini Networks ™, Internet at the Speed of Thought ™, Zero-Install ™, Ripwave ™, and
Unwired by Navini ™ are registered trademarks of Navini Networks, Inc. Other product and
company names mentioned herein may be trademarks and/or service marks of their respective
owners.
Except for the hardware warranty, nothing herein constitutes any representation,
warranty, assurance, or guaranty of any kind.
Because of continuing developments and improvements in design, manufacturing, and
deployment, material in this document is subject to change without notification and does not
represent any commitment or obligation on the part of Navini Networks, Inc.
Navini Networks, Inc. shall have no liability for any error or damages resulting from the use of
this document.
All Navini Networks logos and trademarks are the property of Navini Networks, Inc.
Unauthorized usage is strictly prohibited without the express written permission of Navini
Networks, Inc.
Ó 2001 - 2002 Navini Networks, Inc. All rights reserved.
0-00098-00 Rev A v1.0 iii

Ripwave Unit Installation and User Guide Navini Networks, Inc.
Symbols
Throughout this manual, the following symbols are used. For proper operation and
protection of the equipment, observe these safety measures when installing, operating, or
servicing the equipment.
Caution
Symbol
This symbol indicates a potentially hazardous
situation that may result in equipment damage
or improper operation. Safety measures need to
be taken when performing the step.
Notes
Symbol
This symbol indicates points, comments, or
special attention, or additional information
about the topic.
0-00098-00 Rev A v1.0
iv

Ripwave CPE Installation and User Guide Navini Networks, Inc.
Safety
To optimize safety when using the Navini equipment, please read before using.
When using the Navini electronic equipment, always follow the basic safety precautions to
reduce the risk of electrical shock, fire, and injury to people and/or property.
Follow all warnings and instructions that come with the equipment.
1. Do not use the equipment while you are in a bathtub, shower, pool, or spa. Exposure of
the equipment to water could cause severe electrical shock or serious damage to the
equipment.
2. Do not immerse the equipment in any type of liquid. Use a damp cloth and if needed,
water and a mild detergent to clean the plastic shell. Unplug the equipment from the
power source before cleaning.
3. Follow all airport and FAA regulations when using the equipment on or near aircraft.
4. Only operate the equipment from the type of power source(s) indicated in this manual
(110 VAC adapter or Navini supplied battery). Any other type of input power source may
cause damage to the equipment.
5. Power the equipment using only the battery or the AC adapter cable provided, and in
accordance with the instructions specified in the user manual.
6. Do not use a frayed or damaged power cord. Do not place the power cord where it can be
stepped on or tripped over.
7. Do not touch wires where the insulation is frayed or worn unless the equipment has been
disconnected from its power source.
8. Do not overload wall outlets, power strips, or extension cords. This can cause serious
electrical shock or fire.
9. Do not place the equipment on an unstable surface. It can fall and cause injury or damage
to the equipment.
0-00098-00 Rev A v1.0 v

Ripwave Unit Installation and User Guide Navini Networks, Inc.
Safety (continued)
10. Do not disassemble the equipment. Removing covers exposes dangerous voltages or
other risks and also voids the warranty. Incorrect reassembly can cause equipment
damage or electrical shock. Only an authorized repair technician should service this
product.
11. Do not expose the equipment to extreme hot or cold temperatures.
12. Do not use the equipment under the following conditions:
· When the equipment has been exposed to water or moisture.
· When the equipment has been damaged.
· When the power cord is damaged or frayed.
· When the equipment does not operate properly or shows a distinct change in
performance.
0-00098-00 Rev A v1.0
vi

Ripwave CPE Installation and User Guide Navini Networks, Inc.
Regulatory Information
FCC Compliance and Advisory Statements
Caution: This device is a Radio Frequency transmitter. It is required to comply with FCC RF
exposure requirements for transmitting devices. A minimum separation distance of 8 inches (20
cm) or more must be maintained between the antenna and all persons during device operations
to ensure compliance with the FCC’s rules for Radio Frequency Exposure. If this minimum
distance cannot be maintained, exposure to RF levels that exceed the FCC’s limits may result.
Tested To Comply
With FCC Standards
FOR HOME OR OFFICE USE
This equipment has been tested and found to comply with the limits for a class B digital device,
Pursuant to Part 15 of the FCC rules. The operation is subject to the following two conditions:
(1) this device may not cause harmful interference, and
(2) this device must accept any interference received, including interference
that may cause undesired operation.
These limits are designed to provide reasonable protection against harmful interference in a
residential installation. This equipment generates, uses, and can radiate radio frequency energy
and, if not installed or used in accordance with the instructions, may cause harmful interference
to radio communications. However, there is no guarantee that interference will not occur in a
particular installation. If this equipment does cause harmful interference to radio or television
reception, which can be determined by turning the equipment off and on, the user is encouraged
to try to correct the interference by one or more of the following measures:
1) reorient or relocate the receiving antenna-
2) increase the separation between the equipment and the receiver;
3) connect the equipment to an outlet on a circuit different from that to which the
receiver is connected;
4) consult the dealer or an experienced radio/TV technician for additional
suggestions.
Information to User
This device has been authorized as a radio frequency transmitter under the appropriate rules of
the Federal Communications Commission. Any changes or modifications not expressly
approved by Navini Networks could void the user's authority to operate the equipment.
0-00098-00 Rev A v1.0 vii

Ripwave Unit Installation and User Guide Navini Networks, Inc.
0-00098-00 Rev A v1.0
viii

Ripwave CPE Installation and User Guide Navini Networks, Inc.
Battery Cautionary Procedures
CAUTION: To reduce risk of injury or fire, follow these instructions when handling the
battery.
1. Risk of explosion is possible if the battery is replaced with one not supplied by Navini
Networks.
2. Do not dispose of the battery in a fire. They may explode. Check with the local codes for
battery disposal guidelines.
3. Do not open or mutilate the battery. The battery contains substances that are toxic,
corrosive, or harmful to humans. If battery substances come in contact with the skin, seek
medical help immediately.
4. Do not attempt to recharge the battery by any means except per the instructions in this
manual.
5. Remove the battery from the equipment if the equipment is not going to be used for a
long period of time. The battery could leak and cause damage to the equipment.
6. Exercise care when handling the battery to prevent shorting the battery with conducting
materials such as bracelets, rings, and keys.
7. Dispose of used batteries according to environmental guidelines.
0-00098-00 Rev A v1.0 ix

Ripwave Unit Installation and User Guide Navini Networks, Inc.
0-00098-00 Rev A v1.0
x

Ripwave CPE Installation and User Guide Navini Networks, Inc.
0-00098-00 Rev A v1.0 xi
Ripwave Unit Installation and User Guide Navini Networks, Inc.
Introduction
Congratulations on your purchase of the Navini Networks Ripwave Customer Premise
Equipment (CPE). It provides complete wireless broadband Internet access to residential and
small office/home office (SOHO) customers without any professional hardware installation
or an external antenna. The Ripwave CPE also provides “nomadic” service availability as a
computer is moved from room to room, location to location, or even city to city as long as
there is coverage in the area.
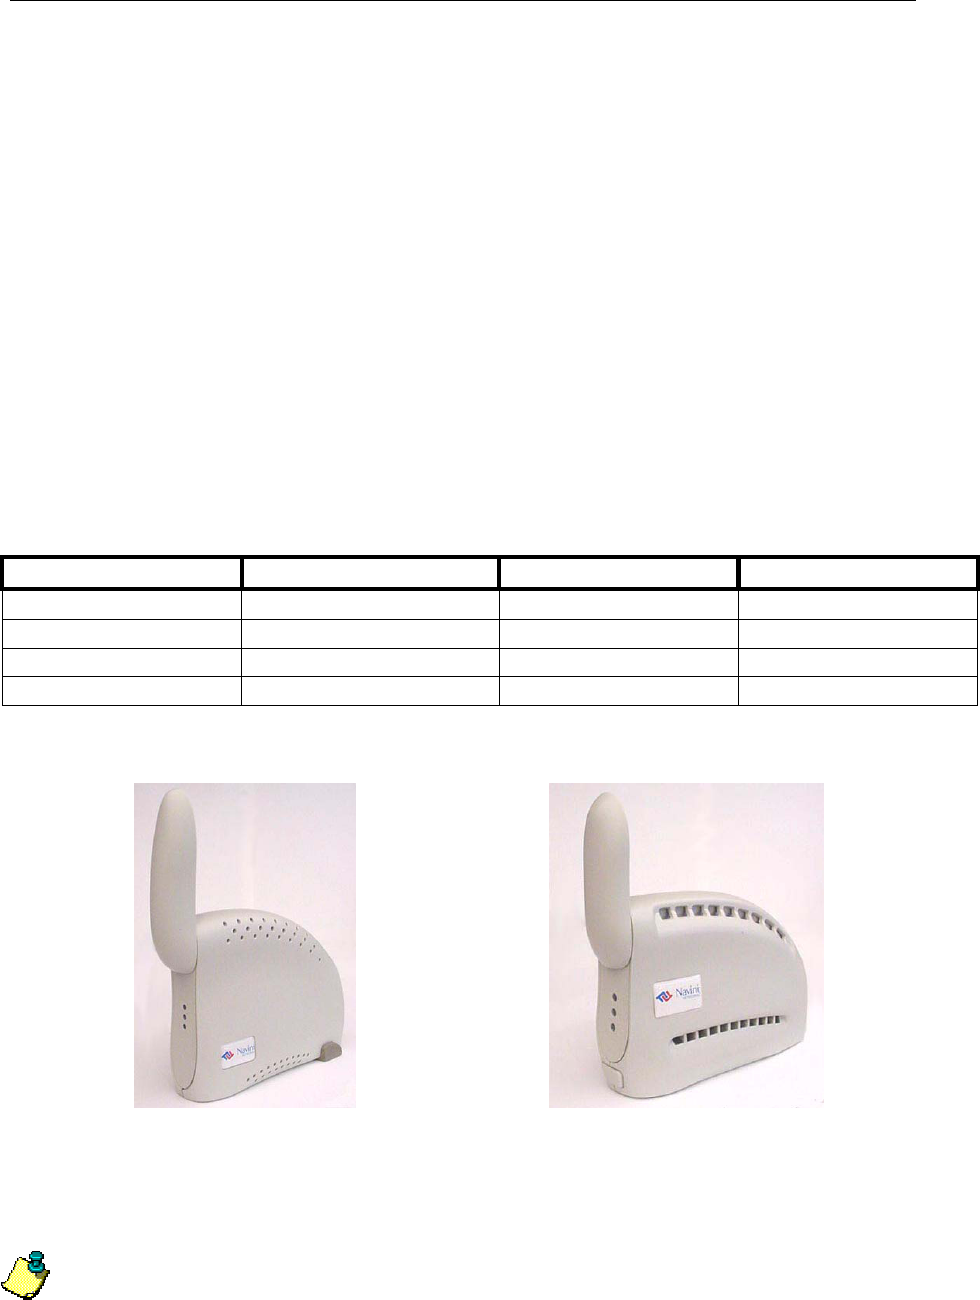
Ripwave CPE Models
The Ripwave CPE models vary by the operating band frequency range (2.4 GHz or 2.6 GHz)
of the CPE and by the port connection to the computer – Ethernet (E) or Universal Serial Bus
(USB).
Model Frequency Range Operating Band Port Connection
2400E 2.4 GHz - 2.473 GHz ISM Ethernet
2400U 2.4 GHz - 2.473 GHz ISM USB
2600E 2.596 GHz – 2.686 GHz MMDS/ITFS Ethernet
2600U 2.596 GHz – 2.686 GHz MMDS/ITFS USB
The models vary in appearance as shown in the pictures below:
2400E and 2400U 2600E and 2600U
Note: The 2600 model is used in the illustrations throughout this manual.
40-00098-00 Rev A v1.0
1

Ripwave Unit Installation and User Guide Navini Networks, Inc.
You must have the Ripwave CPE model with the appropriate connection for your PC port –
either a USB or an Ethernet connection. At first glance, the models appear the same, but the
ports and cables for the connections are different.
· A USB connection will function only with
Windows® 98, Windows® 98SE, Windows® 2000,
Windows® ME, or Windows® XP. It will not
work with Windows® 95 or Windows NT®.
USB Connection
· An Ethernet connection will function with any
Win32 Operating System (Windows® 95 or later). Ethernet Connection
Minimum System Requirements
Operating System Windows® 95 or later – Internet Explorer
3.0 or higher is required for installation on
Windows 95 operating systems. Macintosh
systems are not supported.
CPU Pentium level or higher
RAM 32MB or the Operating System minimum
(whichever is greater)
Hard Drive 10MB free disk space
Monitor Colors and Resolution 256 colors, 800 x 600 resolution
The Ripwave CPE Installation section includes instructions for both USB and Ethernet
connections. Be sure to use the instructions that apply to your Ripwave model. The Ripwave
Monitor Software Installation procedure is the same for either of the Ripwave models.
This manual will guide you through the simple process of installing the Navini Networks
Ripwave CPE and software, which has been developed to optimize the ease and convenience
for you, our valued customer.
Equipment Inventory
Verify the contents of your package. The contents should consist of the following items:
Ø Navini Networks Ripwave CPE
Ø Ripwave CPE AC power adapter
Ø PC-to-Ripwave CPE cable (USB or Ethernet)
Ø Ripwave User Guide
Ø Ripwave Quick Installation Guide
Ø Navini Networks Ripwave Installation CD
If you do not find all of these items in your package, notify the supplier from whom you
obtained your package.
0-00098-00 Rev A v1.0
2
Ripwave Unit Installation and User Guide Navini Networks, Inc.
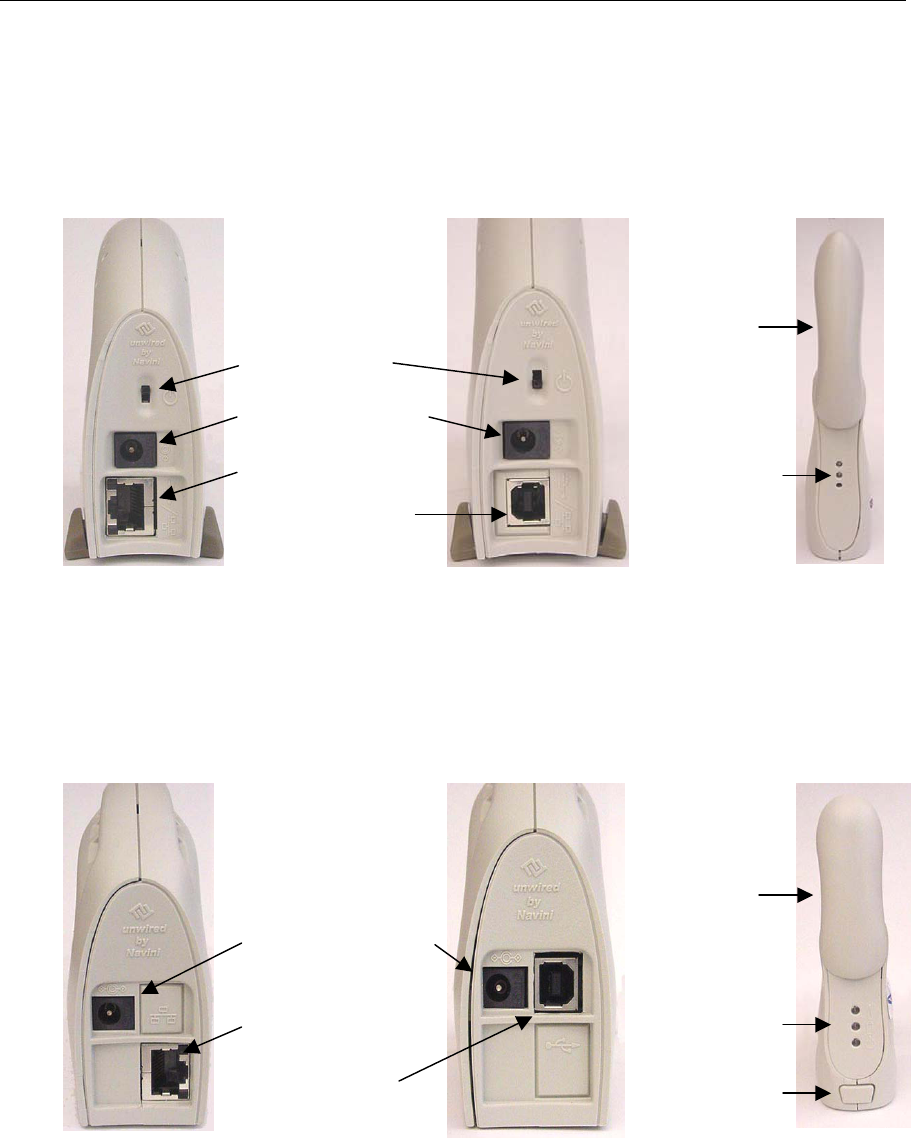
Location of Controls and Features
2400 Ripwave CPE
Indicator Lights
Antenna
USB Cable Input
Ethernet Cable Input
Power Adapter Input
On/Off Switch
2400E 2400U
2600 Ripwave CPE
Indicator Lights
Antenna
On/Off Switch
USB Cable Input
Ethernet Cable Input
Power Adapter Input
2600E 2600U
40-00098-00 Rev A v1.0
3
Ripwave Unit Installation and User Guide Navini Networks, Inc.
Ripwave CPE Installation
USB Connections
The following instructions are for the installation of the Ripwave CPE using a USB
connection. Please read all instructions before attempting installation. It is recommended that
the computer and the Ripwave CPE be turned off before performing the installation.
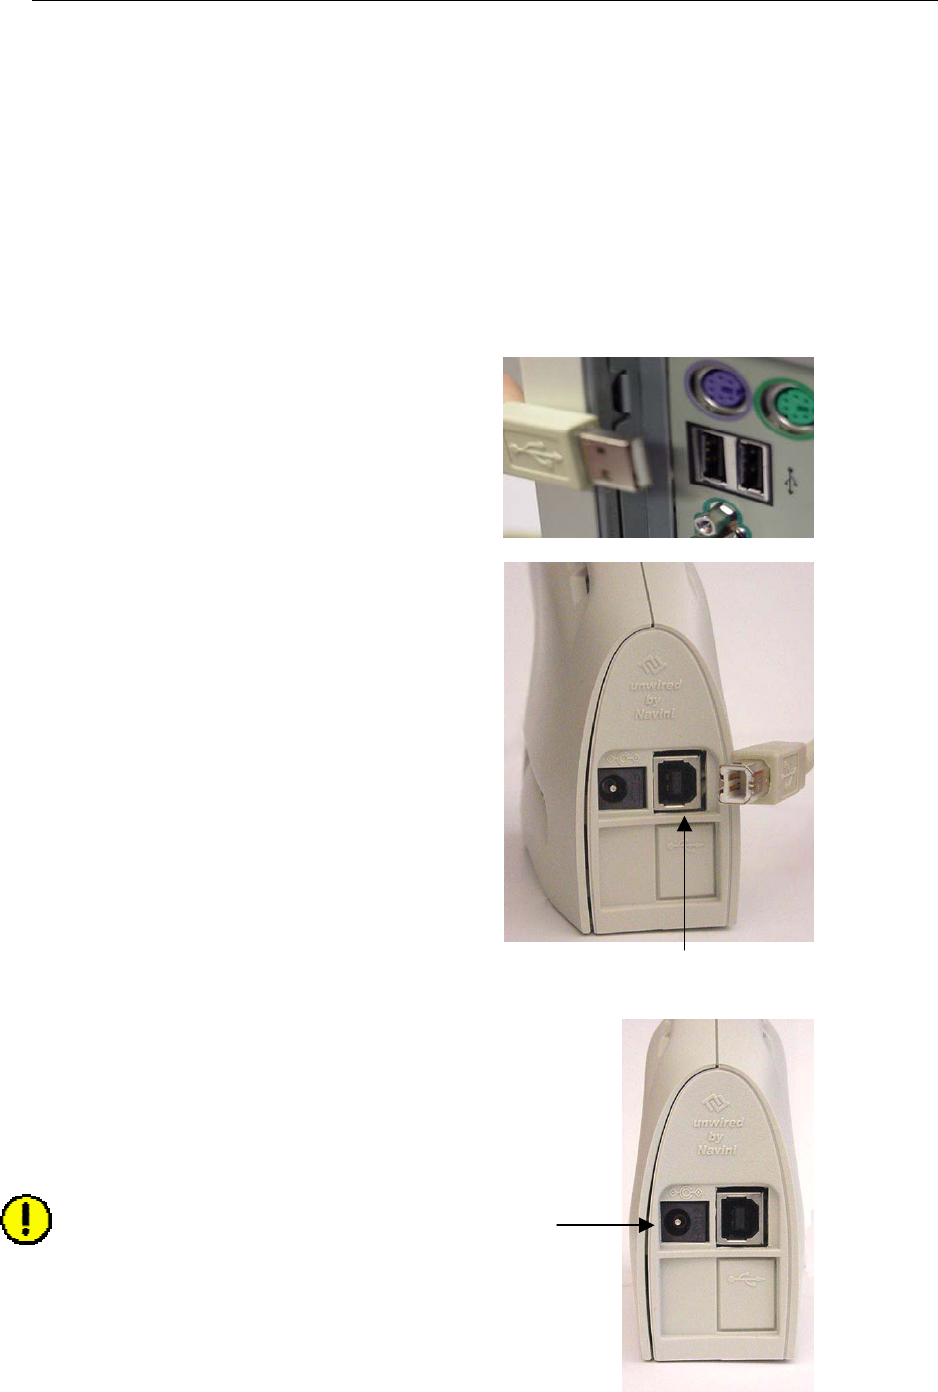
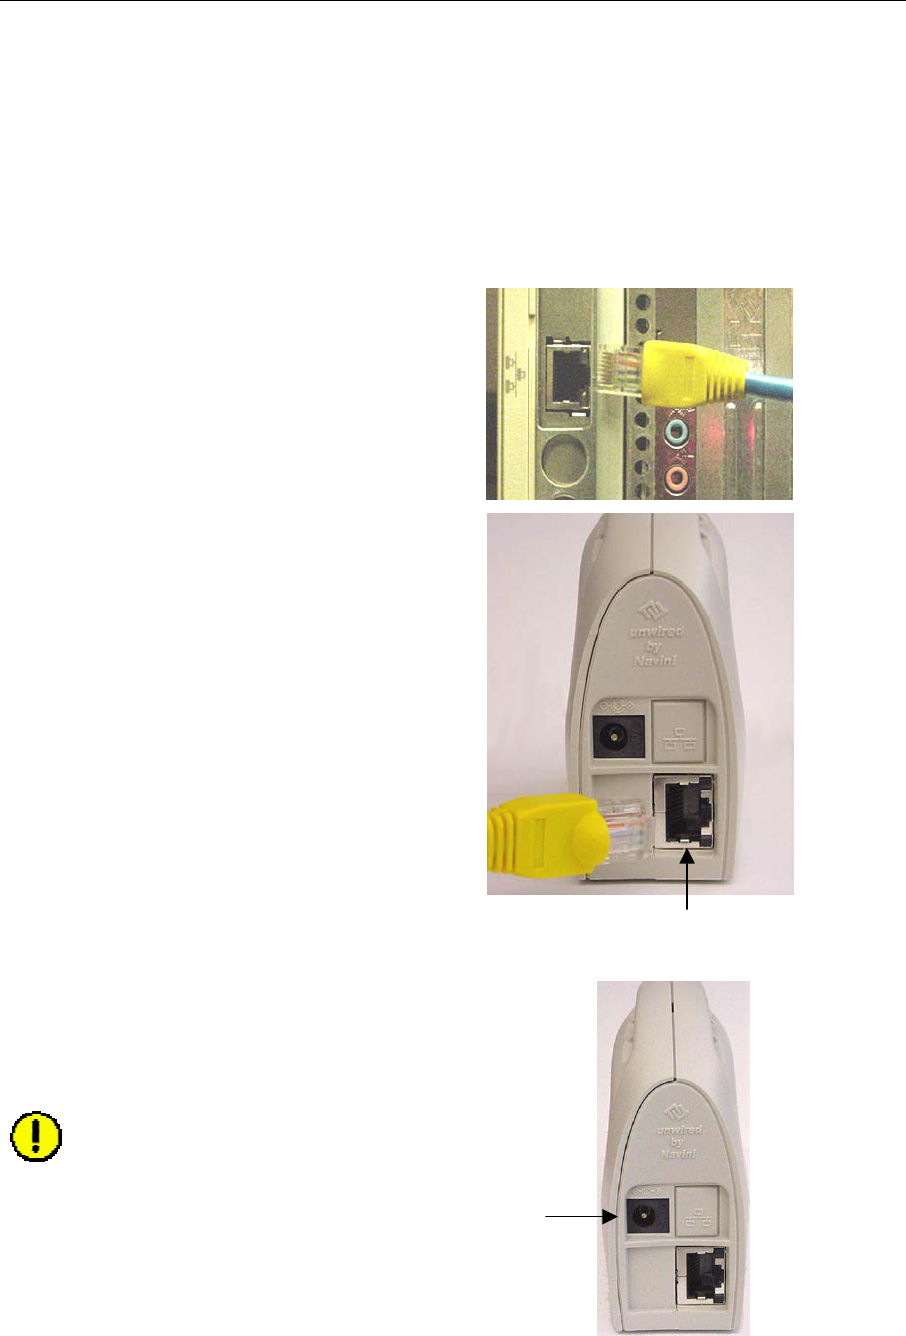
1. Connect the USB cable
to the USB port on the
computer as shown.
2. Connect the other end of the
USB cable to the
Ripwave CPE as shown.
USB Port
3. Connect the AC power adapter
cable to the Ripwave CPE.
Plug the other end of the AC
power adapter cable
into a 110 VAC outlet.
AC Power
adapter cable
j
ac
k
CAUTION: Only use the
AC power adapter supplied
with the Ripwave CPE. Using
any other adapter may cause
damage to the Ripwave CPE.
0-00098-00 Rev A v1.0
4
Ripwave Unit Installation and User Guide Navini Networks, Inc.
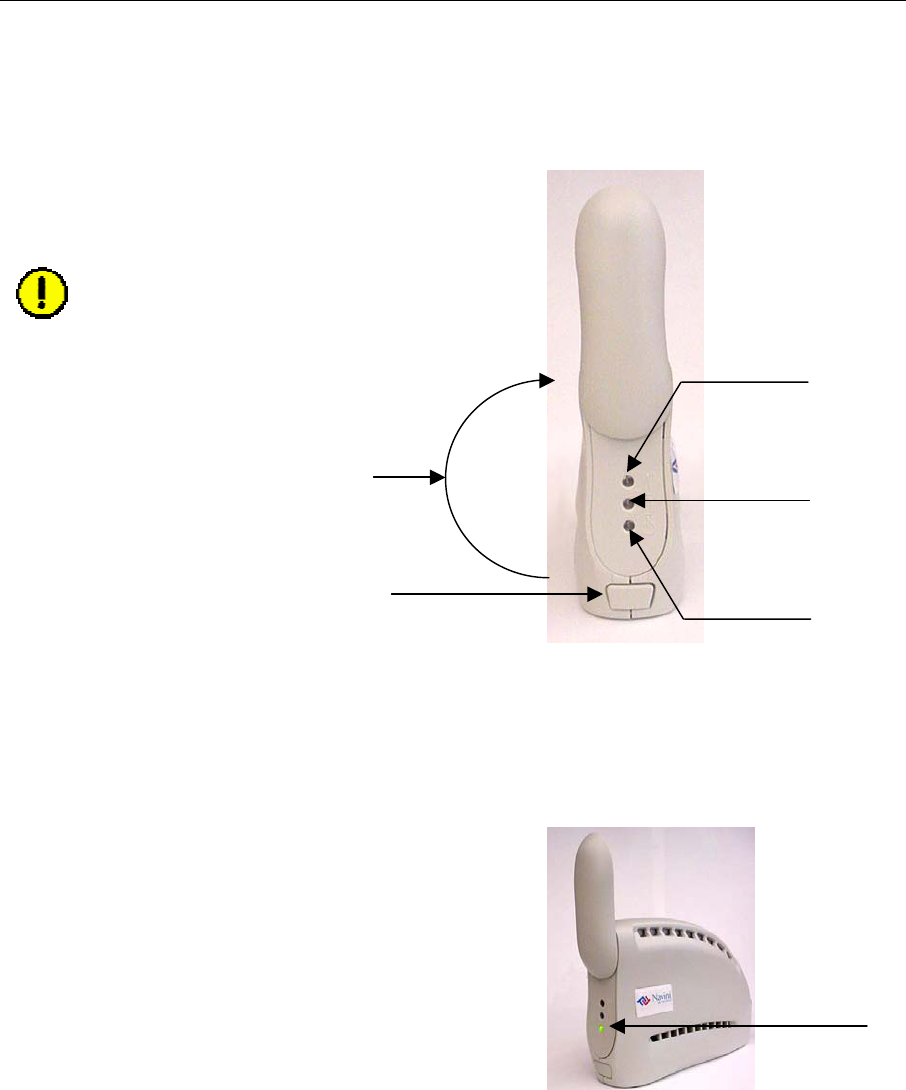
4. Rotate the antenna on the
Ripwave CPE clockwise
180 degrees to the ‘UP’ position.
This reveals the Ripwave CPE
indicator lights.
CAUTION: Rotation or movement
of the antenna in any other
direction may cause
damage to the Ripwave CPE.
On/Off switch
Rotate
antenna
clockwise
180 degrees
Signal Strength Indicator
Battery Indicator
Power Indicator
5. Push the On/Off switch
on the Ripwave CPE to turn the
CPE ON.
6. If the green Power Indicator light is
on, proceed to step 7. If the green
Power Indicator light is not on, there
is a problem with the Ripwave CPE
or the AC power adapter. Check all
cables for proper connection.
Otherwise, contact the supplier
from whom you obtained
the package.
Power Indicator
7. Set the power switch on the computer to the ON position. When the system is up, log
in to the computer.
Note: For Windows® 2000, you must be logged into an account having administrative
privileges to install the Ripwave CPE and its software.
8. Plug and Play will detect the Ripwave device now attached to the PC and will launch
the Plug and Play application. If not, one of the following items may be the problem:
· Windows NT and Windows 95 do not support a USB device.
40-00098-00 Rev A v1.0
5
Ripwave Unit Installation and User Guide Navini Networks, Inc.
· The Ripwave CPE is not turned on.
· The Ripwave CPE is not properly connected to the computer.
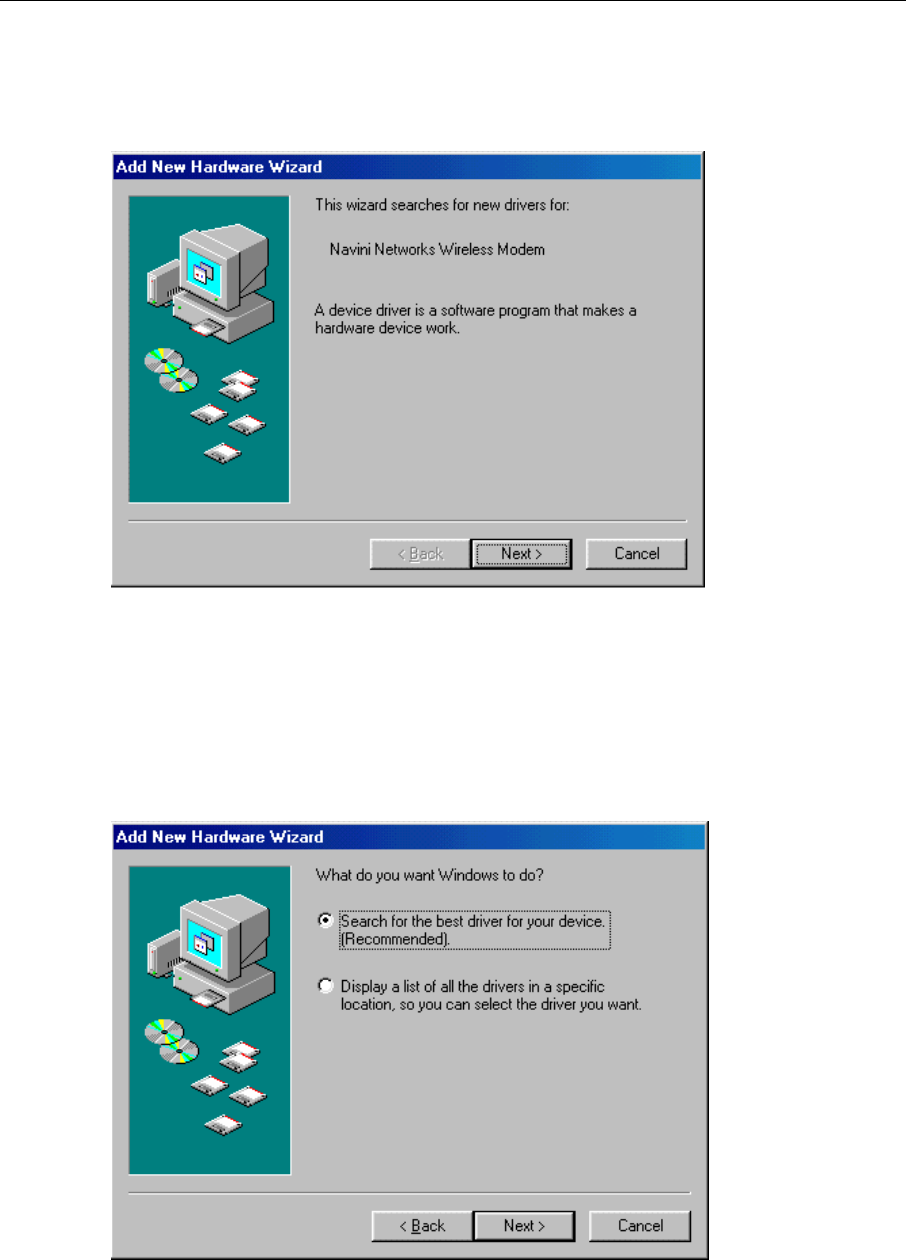
9. The Add New Hardware Wizard dialog box appears. Click Next to continue.
10. Insert the Navini Networks Ripwave installation CD in the CD-ROM drive.
11. Select the ‘Search for the best driver for your device’ option. Click Next to continue.
0-00098-00 Rev A v1.0
6
Ripwave Unit Installation and User Guide Navini Networks, Inc.
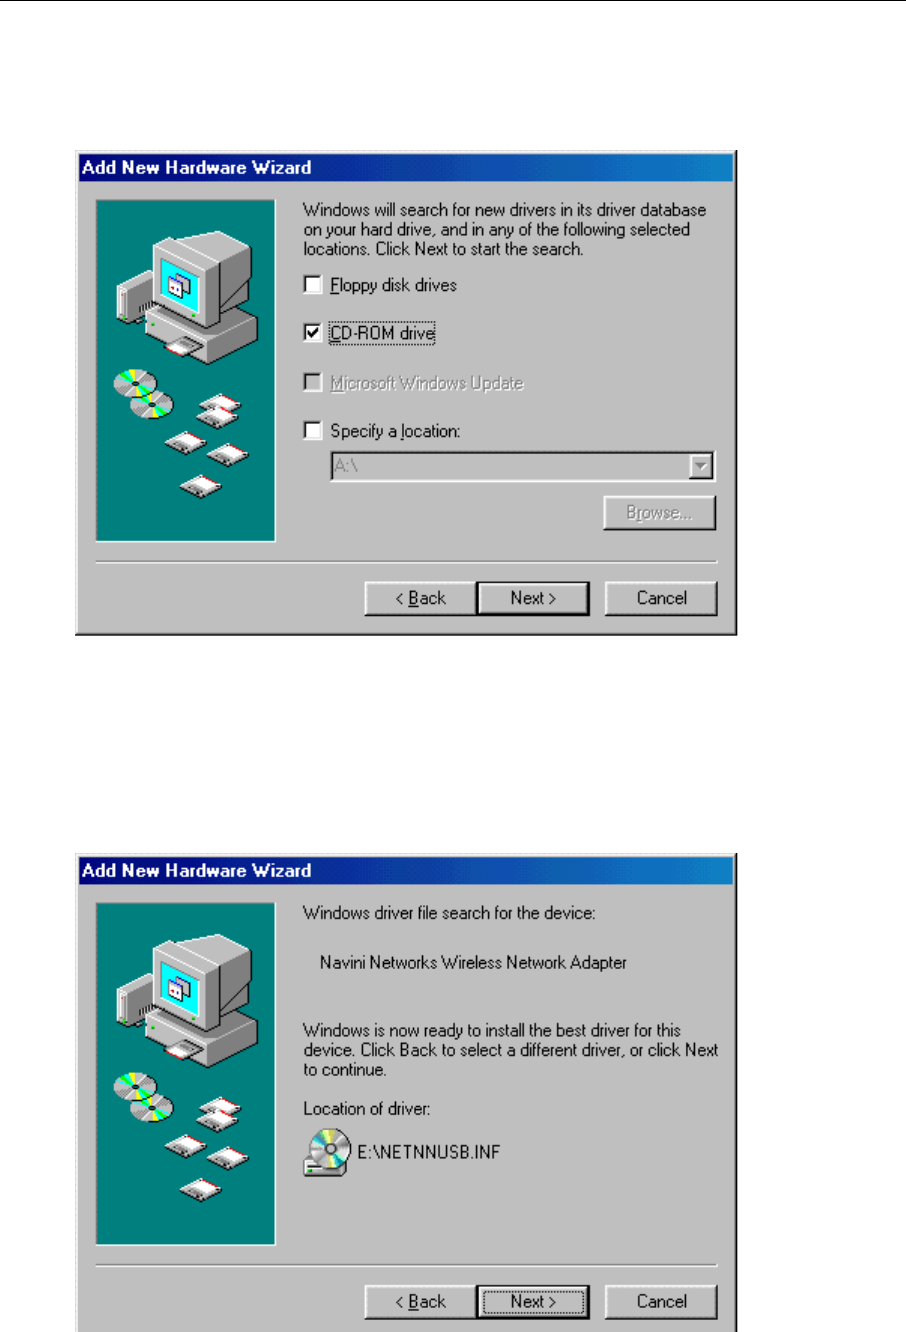
12. Select the ‘CD-ROM drive’ checkbox. Click Next to continue.
13. Confirm that the drive location is correct (the CD-ROM drive letter may be different
than shown below) and that the file to be installed is NETNNUSB.INF. Click Next to
continue.
40-00098-00 Rev A v1.0
7
Ripwave Unit Installation and User Guide Navini Networks, Inc.
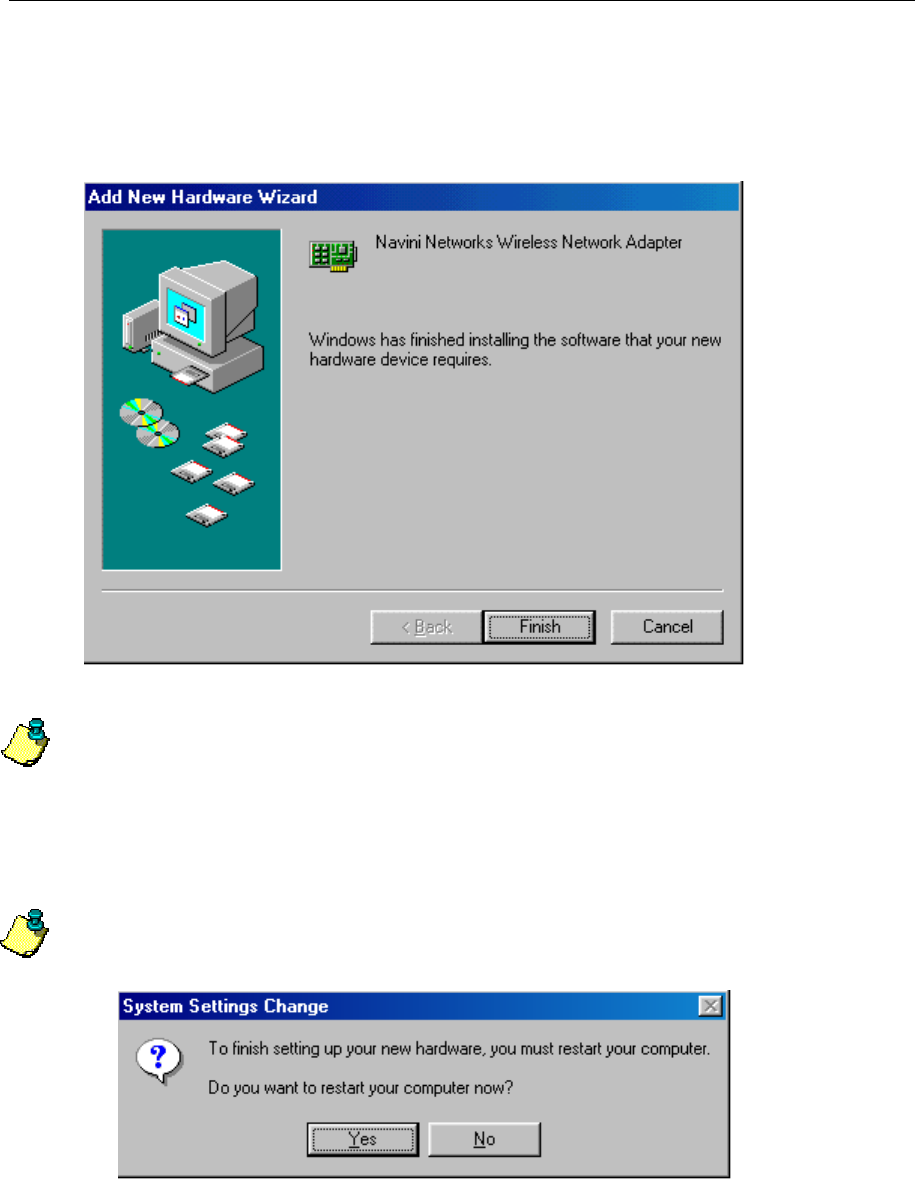
14. Click Finish.
Note: For Windows® 98, a window may appear asking for drivers to be installed from
the Windows® 98 setup disk. If so, insert the Windows® 98 setup disk in the CD-
ROM drive and accept the defaults.
15. After clicking Finish, the System Settings Change window appears asking if you
want to restart your computer now. Click Yes.
Note: You must restart your computer at this point before proceeding.
16. After the computer restart is complete, proceed to the Ripwave Monitor Software
Installation procedure on page 11.
0-00098-00 Rev A v1.0
8
Ripwave Unit Installation and User Guide Navini Networks, Inc.
Ethernet Connections
The following instructions are for the installation of the Ripwave CPE using an Ethernet
connection. Please read all instructions before attempting installation. It is recommended that
the computer and the Ripwave CPE be turned off before performing the installation.
1. Connect the Ethernet cable to the
Ethernet port on the computer
as shown.
2. Connect the other end of the
Ethernet cable to the Ripwave
CPE as shown.
E
t
h
e
rn
et
P
o
r
t
3. Connect the AC power adapter
cable to the Ripwave CPE.
Plug the other end of the AC
power adapter cable
into a 110 VAC outlet.
CAUTION: Only use the
AC power adapter supplied
with the Ripwave CPE. Using
any other adapter may cause
damage to the Ripwave CPE.
AC Power
adapter cable
j
ac
k
40-00098-00 Rev A v1.0
9
Ripwave Unit Installation and User Guide Navini Networks, Inc.
4. Rotate the antenna on the
Ripwave CPE clockwise
180 degrees to the ‘UP’ position.
This reveals the Ripwave CPE
indicator lights.
CAUTION: Rotation or movement
of the antenna in any other
direction may cause damage
to the Ripwave CPE.
On/Off switch
Rotate
antenna
clockwise
180 degrees
Signal Strength Indicator
Battery Indicator
Power Indicator
5. Push the On/Off switch
on the Ripwave CPE to turn the
CPE ON.
6. If the green power indicator light is
on, proceed to step 7. If the green
Power Indicator light is not on, there
is a problem with the Ripwave CPE
or the AC power adapter. Check all
cables for proper connection.
Otherwise, contact the supplier
from whom you obtained
the package.
Power Indicator
7. Set the power switch on the computer to the ON position. When the system is up, log
in to the computer.
8. Proceed to the Ripwave Monitor Software Installation procedure on page 11.
0-00098-00 Rev A v1.0
10

Ripwave Unit Installation and User Guide Navini Networks, Inc.
Ripwave Monitor Software Installation
The Ripwave Monitor provides information on the strength and quality of the incoming
signal and battery strength. It also checks the connectivity to the Internet Service Provider
(ISP) network.
Notes:
· For Windows NT® and Windows® 2000, you must be logged into an account
having administrative privileges to install the Ripwave Monitor software.
· For Ripwave Monitor software installation on Windows® 95, Windows® 98, and
Windows® 98SE Operating Systems, the operating system CD may be needed to
complete the installation. If prompted, insert the operating system CD in the
CD-ROM drive and accept the defaults.
Installation Procedures
The following instructions are for installing the software that monitors the operation and
performance of the Ripwave CPE.
1. Shut down all programs before installing the Ripwave Monitor software. This
includes all anti-virus software.
2. Insert the Navini Networks Ripwave Installation CD in the CD-ROM drive.
3. Click Start > Run at the bottom left corner of your screen. In the Run window, enter
e:\setup (where “e” represents the CD drive; use the letter representing your specific
CD drive) in the Open field. Click OK to continue.
40-00098-00 Rev A v1.0
11