Cisco Systems MICWL1717 Cisco IP Conference Phone - Wireless Mic User Manual
Cisco Systems Inc Cisco IP Conference Phone - Wireless Mic
User Manual

Zs/tZ&dͲ/^KKE&/Ed/>
ŝƐĐŽ/WŽŶĨĞƌĞŶĐĞWŚŽŶĞϴϴϯϮhƐĞƌ'ƵŝĚĞ
&ŝƌƐƚWƵďůŝƐŚĞĚ͗2017-09-15 >ĂƐƚDŽĚŝĨŝĞĚ͗2018-03-15
ŵĞƌŝĐĂƐ,ĞĂĚƋƵĂƌƚĞƌƐ
ŝƐĐŽ^LJƐƚĞŵƐ͕/ŶĐ͘
ϭϳϬtĞƐƚdĂƐŵĂŶƌŝǀĞ
^ĂŶ:ŽƐĞ͕ϵϱϭϯϰͲϭϳϬϲ
h^
ŚƚƚƉ͗ͬͬǁǁǁ͘ĐŝƐĐŽ͘ĐŽŵ
dĞů͗ϰϬϴϱϮϲͲϰϬϬϬ
ϴϬϬϱϱϯͲEd^;ϲϯϴϳͿ
&Ădž͗ϰϬϴϱϮϳͲϬϴϴϯ
THE SPECIFICATIONS AND INFORMATION REGARDING THE PRODUCTS IN THIS MANUAL ARE SUBJECT TO CHANGE WITHOUT NOTICE. ALL STATEMENTS,
INFORMATION, AND RECOMMENDATIONS IN THIS MANUAL ARE BELIEVED TO BE ACCURATE BUT ARE PRESENTED WITHOUT WARRANTY OF ANY KIND,
EXPRESS OR IMPLIED. USERS MUST TAKE FULL RESPONSIBILITY FOR THEIR APPLICATION OF ANY PRODUCTS.
THE SOFTWARE LICENSE AND LIMITED WARRANTY FOR THE ACCOMPANYING PRODUCT ARE SET FORTH IN THE INFORMATION PACKET THAT SHIPPED
WITH THE PRODUCT AND ARE INCORPORATED HEREIN BY THIS REFERENCE. IF YOU ARE UNABLE TO LOCATE THE SOFTWARE LICENSE OR LIMITED
WARRANTY, CONTACT YOUR CISCO REPRESENTATIVE FOR A COPY.
The following information is for FCC compliance of Class A devices: This equipment has been tested and found to comply with the limits for a Class A digital device, pursuant to part
15 of the FCC rules. These limits are designed to provide reasonable protection against harmful interference when the equipment is operated in a commercial environment. This
equipment generates, uses, and can radiate radio-frequency energy and, if not installed and used in accordance with the instruction manual, may cause harmful interference to radio
communications. Operation of this equipment in a residential area is likely to cause harmful interference, in which case users will be required to correct the interference at their own
expense.
The following information is for FCC compliance of Class B devices: This equipment has been tested and found to comply with the limits for a Class B digital device, pursuant to part 15
of the FCC rules. These limits are designed to provide reasonable protection against harmful interference in a residential installation. This equipment generates, uses and can radiate radio
frequency energy and, if not installed and used in accordance with the instructions, may cause harmful interference to radio communications. However, there is no guarantee that interference

will not occur in a particular installation. If the equipment causes interference to radio or television reception, which can be determined by turning the equipment off and on, users are
encouraged to try to correct the interference by using one or more of the following measures:
Reorient or relocate the receiving antenna.
Increase the separation between the equipment and receiver.
Connect the equipment into an outlet on a circuit different from that to which the receiver is connected.
Consult the dealer or an experienced radio/TV technician for help.
Modifications to this product not authorized by Cisco could void the FCC approval and negate your authority to operate the product
The Cisco implementation of TCP header compression is an adaptation of a program developed by the University of California, Berkeley (UCB) as part of UCB s public domain version
of the UNIX operating system. All rights reserved. Copyright
©
1981, Regents of the University of California.
NOTWITHSTANDING ANY OTHER WARRANTY HEREIN, ALL DOCUMENT FILES AND SOFTWARE OF THESE SUPPLIERS ARE PROVIDED "AS IS" WITH ALL
FAULTS. CISCO AND THE ABOVE-NAMED SUPPLIERS DISCLAIM ALL WARRANTIES, EXPRESSED OR IMPLIED, INCLUDING, WITHOUT LIMITATION, THOSE OF
MERCHANTABILITY, FITNESS FOR A PARTICULAR PURPOSE AND NONINFRINGEMENT OR ARISING FROM A COURSE OF DEALING, USAGE, OR TRADE
PRACTICE.
IN NO EVENT SHALL CISCO OR ITS SUPPLIERS BE LIABLE FOR ANY INDIRECT, SPECIAL, CONSEQUENTIAL, OR INCIDENTAL DAMAGES, INCLUDING,
WITHOUT LIMITATION, LOST PROFITS OR LOSS OR DAMAGE TO DATA ARISING OUT OF THE USE OR INABILITY TO USE THIS MANUAL, EVEN IF CISCO OR
ITS SUPPLIERS HAVE BEEN ADVISED OF THE POSSIBILITY OF SUCH DAMAGES.
Any Internet Protocol (IP) addresses and phone numbers used in this document are not intended to be actual addresses and phone numbers. Any examples, command display output,
network topology diagrams, and other figures included in the document are shown for illustrative purposes only. Any use of actual IP addresses or phone numbers in illustrative content is
unintentional and coincidental.
Cisco and the Cisco logo are trademarks or registered trademarks of Cisco and/or its affiliates in the U.S. and other countries. To view a list of Cisco trademarks, go to this URL:
http:// www.cisco.com/go/trademarks
. Third-party trademarks mentioned are the property of their respective owners. The use of the word partner does not imply a
partnership relationship between Cisco and any other company. (1110R)
©
2017-2018 Cisco Systems, Inc. All rights reserved.
KEdEd^
,WdZϭ
Your Phone ϭ
Your Cisco IP Conference Phone 8832 and 8832NR ϭ
New and Changed Information Ϯ
New and Changed Information for Firmware Release 12.1(1) ϯ
New and Changed Information for Firmware Release 12.0(1)SR2 ϰ
Phone Setup ϰ
Ways to Provide Power to Your Conference Phone ϰ
Connect to the Network ϲ
Set Up Wi-Fi Client ϳ

ŝƐĐŽ/WŽŶĨĞƌĞŶĐĞWŚŽŶĞϴϴϯϮhƐĞƌ'ƵŝĚĞ
ŝŝŝ
Connect to a Preconfigured Wi-Fi Network ϴ
Connect to Expressway ϴ
Install the Wired Expansion Microphones ϵ
Install the Wireless Expansion Microphones ϵ
Pair a Wireless Microphone ϭϬ
Unpair a Wireless Microphone ϭϭ
Daisy Chain Mode ϭϭ
Self Care Portal ϭϭ
Speed-Dial Numbers ϭϮ
Cisco IP Conference Phone 8832 Buttons and Hardware ϭϰ
Wired Expansion Microphone ϭϱ
Wireless Expansion Microphone ϭϲ
Phone Firmware and Upgrades ϭϳ
Postpone a Phone Upgrade ϭϳ
View the Progress of a Phone Firmware Upgrade ϭϳ
Additional Help and Information ϭϳ
Accessibility Features ϭϴ
Hearing-Impaired Accessibility Features ϭϴ
Vision-Impaired and Blind Accessibility Features ϮϬ

Zs/tZ&dͲ/^KKE&/Ed/>
ŝƐĐŽ/WŽŶĨĞƌĞŶĐĞWŚŽŶĞϴϴϯϮhƐĞƌ'ƵŝĚĞ
ŝǀ
ŽŶƚĞŶƚƐ
Mobility-Impaired Accessibility Features ϮϮ
Third-Party Accessibility Applications Ϯϯ
Troubleshooting Ϯϯ
Find Information About Your Phone Ϯϯ
Report Call Quality Issues Ϯϯ
Report All Phone Issues Ϯϰ
Lost Phone Connectivity Ϯϰ
Cisco One-Year Limited Hardware Warranty Terms Ϯϰ
,WdZϮ
Calls Ϯϱ
Make Calls Ϯϱ
Make a Call Ϯϱ
Redial a Number Ϯϱ
Speed Dial Ϯϲ
Make a Speed-Dial Call with Your Conference Phone Ϯϲ
Make a Call With a Speed-Dial Code Ϯϲ
Get Notified When a Contact is Available Ϯϲ
Dial an International Number Ϯϳ
Calls That Require a Billing Code or Authorization Code Ϯϳ
Secure Calls Ϯϳ
Answer Calls Ϯϳ
Answer a Call Ϯϴ
Answer Call Waiting on Your Conference Phone Ϯϴ
Decline a Call Ϯϴ
Turn On Do Not Disturb Ϯϴ
Trace a Suspicious Call Ϯϴ
Mute Your Call Ϯϵ
Hold Calls Ϯϵ
Put a Call on Hold Ϯϵ
Answer a Call Left on Hold for Too Long Ϯϵ
Swap Between Active and Held Calls ϯϬ
Forward Calls ϯϬ
Transfer Calls ϯϬ

ŝƐĐŽ/WŽŶĨĞƌĞŶĐĞWŚŽŶĞϴϴϯϮhƐĞƌ'ƵŝĚĞ
ǀ
Transfer a Call to Another Person ϯϬ
Consult Before You Complete a Transfer ϯϭ
Zs/tZ&dͲ/^KKE&/Ed/>
Conference Calls and Meetings ϯϭ
Add Another Person to a Call ϯϭ
Swap Between Calls Before You Complete a Conference ϯϮ
View and Remove Conference Participants ϯϮ
,WdZϯ
Contacts ϯϯ
Corporate Directory ϯϯ
Dial a Contact in the Corporate Directory ϯϯ
Personal Directory ϯϯ
Sign In and Out of a Personal Directory ϯϰ
Add a New Contact to Your Personal Directory ϯϰ
Search for a Contact in Your Personal Directory ϯϱ
Call a Contact in Your Personal Directory ϯϱ
Assign a Fast-Dial Code to a Contact ϯϱ
Call a Contact with a Fast-Dial Code ϯϲ
Edit a Contact in Your Personal Directory ϯϲ
Remove a Contact from Your Personal Directory ϯϲ
Delete a Fast-Dial Code ϯϳ
Cisco Web Dialer ϯϳ
,WdZϰ
Recent Calls ϯϵ
Recent Calls List ϯϵ
View Your Recent Calls ϯϵ
Return a Recent Call ϯϵ
Clear the Recent Calls List ϰϬ
Delete a Call Record ϰϬ
,WdZϱ
Voicemail ϰϭ
Your Voicemail Account ϰϭ
Check for New Voice Messages ϰϭ
Access Voicemail ϰϮ

Zs/tZ&dͲ/^KKE&/Ed/>
ŝƐĐŽ/WŽŶĨĞƌĞŶĐĞWŚŽŶĞϴϴϯϮhƐĞƌ'ƵŝĚĞ
ǀŝ
ŽŶƚĞŶƚƐ
,WdZϲ
Settings ϰϯ
Change the Ringtone ϰϯ
Adjust the Phone Ringer Volume ϰϯ
Adjust the Volume During a Call ϰϰ
Safety and
Performance
Information ϰϳ
Power Outage ϰϳ
Regulatory Domains ϰϳ
Health-Care
Environments ϰϳ
External Devices ϰϴ
Ways to Provide Power to Your Phone ϰϴ
Phone Behavior During Times of Network Congestion ϰϴ
Compliance Statements ϰϵ
Compliance Statements for the European Union ϰϵCE
Marking ϰϵ
RF Exposure Statement for the European Union ϰϵ
Compliance Statements for the USA ϰϵ
Part 15 Radio Device ϰϵ
Compliance Statements for Canada ϰϵ
Canadian RF Exposure Statement ϱϬ
Canadian High-Power Radars Statement ϱϬ
Compliance Statements for New Zealand ϱϭ
Permit to Connect (PTC) General Warning ϱϭ
Compliance Statements for Taiwan ϱϮ
DGT Warning Statement for Cisco Wireless IP Phone 882x Series ϱϮ
Compliance Statement for Argentina ϱϯ
Compliance Information for Brazil ϱϯ
Compliance Statement for Singapore ϱϯ
Compliance Information for China ϱϯ
Compliance Information for Japan ϱϰ
Compliance Information for Korea ϱϰ
,WdZϳ
Applications ϰϱ
Available Applications ϰϱ
View Active Applications ϰϱ
Switch to Active Applications ϰϲ
Close Active Applications ϰϲ
,WdZϴ
Product Safety and Security ϰϳ

ŝƐĐŽ/WŽŶĨĞƌĞŶĐĞWŚŽŶĞϴϴϯϮhƐĞƌ'ƵŝĚĞ
ǀŝŝ
Zs/tZ&dͲ/^KKE&/Ed/>
Compliance Information for Mexico ϱϰ
Compliance Information for Russia ϱϰ
FCC Compliance Statements ϱϰ
FCC Part 15.21 Statement ϱϱ
FCC RF Radiation Exposure Statement ϱϱ
FCC Receivers and Class B Digital Statement ϱϱ
Cisco Product Security Overview ϱϱ
Important Online Information ϱϲ

Zs/tZ&dͲ/^KKE&/Ed/>
ŝƐĐŽ/WŽŶĨĞƌĞŶĐĞWŚŽŶĞϴϴϯϮhƐĞƌ'ƵŝĚĞ
ǀŝŝŝ
ŽŶƚĞŶƚƐ

ŝƐĐŽ/WŽŶĨĞƌĞŶĐĞWŚŽŶĞϴϴϯϮhƐĞƌ'ƵŝĚĞ
ϭ
,WdZ
ϭ
zŽƵƌWŚŽŶĞ
Your Cisco IP Conference Phone 8832 and 8832NR, page 1
New and Changed Information, page 2
Phone Setup, page 4
Self Care Portal, page 11
Cisco IP Conference Phone 8832 Buttons and Hardware, page 14
Phone Firmware and Upgrades, page 17
Additional Help and Information , page 17
zŽƵƌŝƐĐŽ/WŽŶĨĞƌĞŶĐĞWŚŽŶĞϴϴϯϮĂŶĚϴϴϯϮEZ
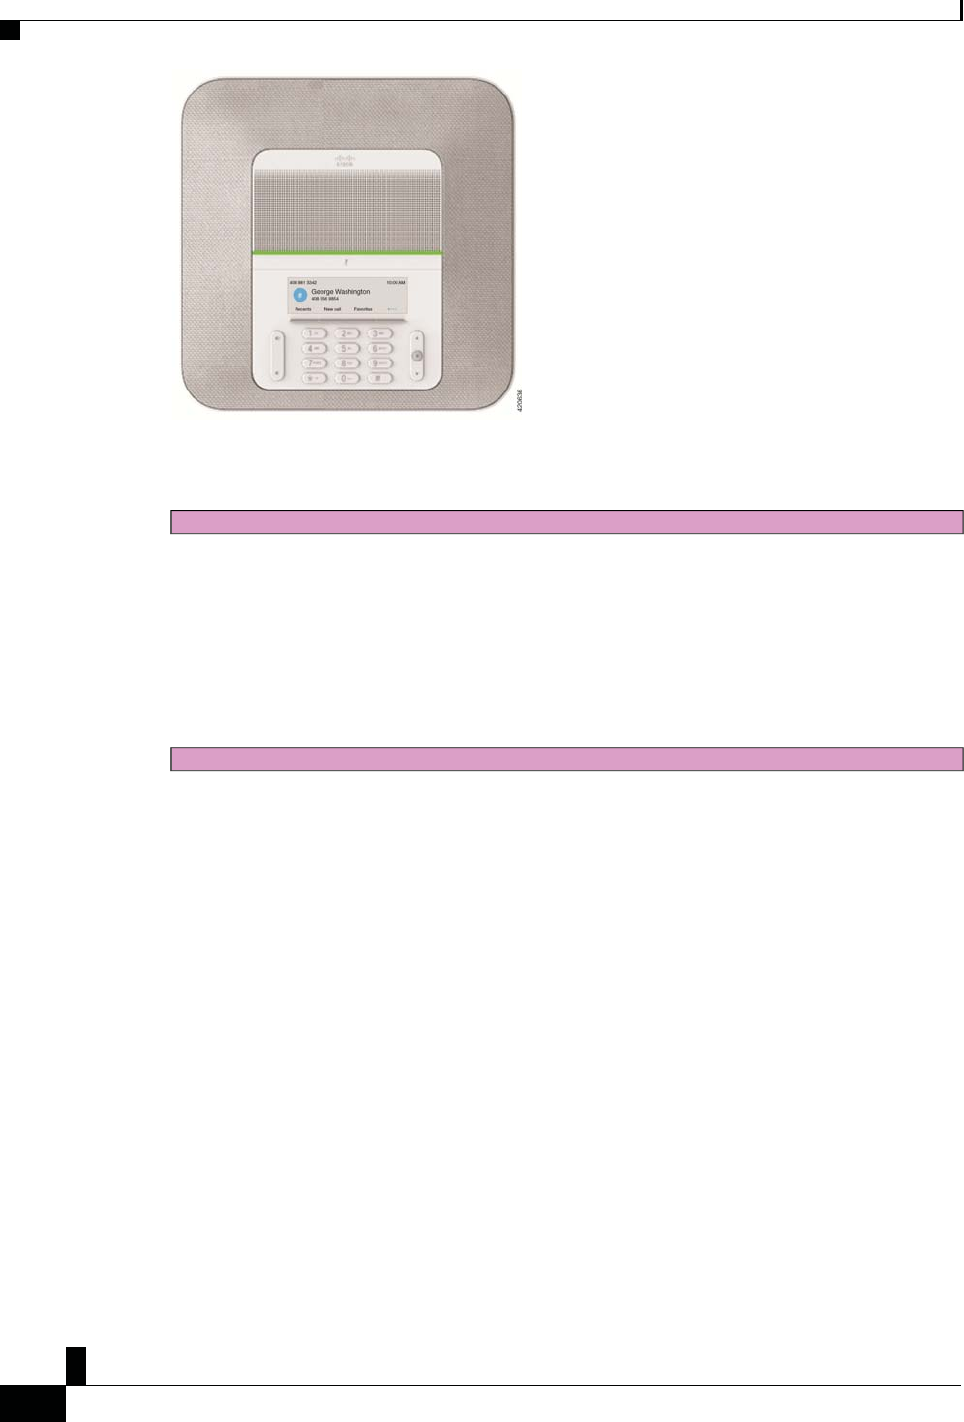
The Cisco IP Conference Phone 8832 and 8832NR provide high definition (HD) audio performance and
360-degree coverage for medium to large conference rooms and executive offices. The conference phone has
EĞǁĂŶĚŚĂŶŐĞĚ/ŶĨŽƌŵĂƚŝŽŶ
sensitive microphones that let you speak in a normal voice and be clearly heard from up to 10 feet (2.1 m) away.
&ŝŐƵƌĞϭ͗ŝƐĐŽ/WŽŶĨĞƌĞŶĐĞWŚŽŶĞϴϴϯϮ
Zs/tZ&dͲ/^KKE&/Ed/>
ŝƐĐŽ/WŽŶĨĞƌĞŶĐĞWŚŽŶĞϴϴϯϮhƐĞƌ'ƵŝĚĞ
Ϯ
z
ŽƵƌ WŚŽŶĞ
You can connect two wired expansion microphones to the phone to increase coverage in larger conference rooms.
Draft comment: Design team: This has been added for the Wireless Microphones feature.
The phone also supports an optional set of two wireless expansion microphones.
The Cisco IP Conference Phone 8832NR (non-radio) version does not support Wi-Fi or wireless expansion
microphones.
The phone can be used for a 20 x 20 foot (6.1 x 6.1 m) room and up to 10 people. When you add the expansion
microphones, coverage extends to a 20 x 34 foot (6.1 x 10 m) room and up to 22 people.
Draft comment: Design team: This has been added for the Daisy Chain feature.
You can connect two base units to increase the coverage for a room. This configuration requires the optional
Daisy Chain kit and can support two expansion microphones (either wired or wireless, but not a mixed
combination). If you are using wired microphones with the Daisy Chain kit, the configuration provides
coverage for a room up to 20 x 50 feet (6.1 x 15.2 m) and up to 38 people. If you are using wireless
microphones with the Daisy Chain kit, the configuration provides coverage for a room up to 20 x 57 feet (6.1
x 17.4 m) and up to 42 people.
EĞǁĂŶĚŚĂŶŐĞĚ/ŶĨŽƌŵĂƚŝŽŶ
You can use the information in the following sections to understand what has changed in the document.
EĞǁĂŶĚŚĂŶŐĞĚ/ŶĨŽƌŵĂƚŝŽŶĨŽƌ&ŝƌŵǁĂƌĞZĞůĞĂƐĞϭϮ͘ϭ;ϭͿ
Zs/tZ&dͲ/^KKE&/Ed/>
ŝƐĐŽ/WŽŶĨĞƌĞŶĐĞWŚŽŶĞϴϴϯϮhƐĞƌ'ƵŝĚĞ
ϯ
zŽƵƌWŚŽŶĞ
EĞǁĂŶĚŚĂŶŐĞĚ/ŶĨŽƌŵĂƚŝŽŶĨŽƌ&ŝƌŵǁĂƌĞZĞůĞĂƐĞϭϮ͘ϭ;ϭͿ
The following table describes changes to the CiscoIPConferencePhone8832UserGuide to support Firmware
Release 12.1(1).
ZĞǀŝƐŝŽŶ EĞǁŽƌhƉĚĂƚĞĚ^ĞĐƚŝŽŶ
Support for Wireless Microphone
Your Cisco IP Conference Phone 8832 and 8832NR, on
page 1
Wireless Expansion Microphone, on page 16
Install the Wireless Expansion Microphones, on page 9
Pair a Wireless Microphone, on page 10
Unpair a Wireless Microphone, on page 11
Support for Daisy Chain
Your Cisco IP Conference Phone 8832 and 8832NR, on
page 1
Daisy Chain Mode, on page 11
Support for Cisco IP Conference Phone
8832 Non-PoE Adapter Ways to Provide Power to Your Conference Phone, on
page 4
Connect to the Network, on page 6
Support for Wi-Fi
Ways to Provide Power to Your Conference Phone, on
page 4
Connect to the Network, on page 6
Set Up Wi-Fi Client, on page 7
Connect to a Preconfigured Wi-Fi Network, on page 8
Support for Mobile and Remote Access
Through Expressway Connect to the Network, on page 6
Connect to Expressway, on page 8
Support for CMC and FAC Calls That Require a Billing Code or Authorization Code, on
page 27
EĞǁĂŶĚŚĂŶŐĞĚ/ŶĨŽƌŵĂƚŝŽŶĨŽƌ&ŝƌŵǁĂƌĞZĞůĞĂƐĞϭϮ͘Ϭ;ϭͿ^ZϮ
Zs/tZ&dͲ/^KKE&/Ed/>
ŝƐĐŽ/WŽŶĨĞƌĞŶĐĞWŚŽŶĞϴϴϯϮhƐĞƌ'ƵŝĚĞ
ϰ
z
ŽƵƌ WŚŽŶĞ
EĞǁĂŶĚŚĂŶŐĞĚ/ŶĨŽƌŵĂƚŝŽŶĨŽƌ&ŝƌŵǁĂƌĞZĞůĞĂƐĞϭϮ͘Ϭ;ϭͿ^ZϮ
The following table describes changes to the CiscoIPConferencePhone8832UserGuide to support Firmware
Release 12.0(1)SR2.
ZĞǀŝƐŝŽŶ EĞǁŽƌhƉĚĂƚĞĚ^ĞĐƚŝŽŶ
Updated for Cisco IP
Conference Phone 8832 PoE
Injector support
Ways to Provide Power to Your Conference Phone, on page 4
Connect to the Network, on page 6
WŚŽŶĞ^ĞƚƵƉ
Typically, your administrator sets up your phone and connects it to the network. If your phone is not set up and
connected, contact your administrator for instructions.
tĂLJƐƚŽWƌŽǀŝĚĞWŽǁĞƌƚŽzŽƵƌŽŶĨĞƌĞŶĐĞWŚŽŶĞ
Your conference phone needs power from one of these sources:
Power over Ethernet (PoE): You plug the USB-C cable in the back of the unit and connect it to either
the Cisco IP Conference Phone 8832 PoE Injector or the Cisco IP Conference Phone 8832 Ethernet
Injector. Then you connect the injector to the Ethernet port using the RJ45 cable. If you are based in
North America, you can use either injector. However, if you are based outside North America, you
must use the Cisco IP Conference Phone 8832 PoE Injector.
Draft comment: Design team: Since Norvos is being introduced in Volantis Phase 2 release, I have added
information about the Non-PoE Adapter below.
Power adapter and Ethernet: You plug the USB-C cable in the back of the unit and connect it to either
the Cisco IP Conference Phone 8832 Non-PoE Adapter or the Cisco IP Conference Phone 8832
Ethernet Injector. If you are using the adapter, plug it into an electrical outlet, and to the Ethernet using
a RJ45 cable. But, if you are using the injector, connect it to a power adapter using a USB-C midspan
cable, and to the Ethernet using a RJ45 cable. If you are based in North America, you can use either of
the Ethernet power options. However, if you are based outside North America, you must use the Cisco
IP Conference Phone 8832 Non-PoE Adapter.
Draft comment: Design team: This has been added for the Wi-Fi support feature in Volantis Phase 2
release.
Power adapter and Wi-Fi: You plug the USB-C cable in the back of the unit and connect it directly to the
power adapter.
tĂLJƐƚŽWƌŽǀŝĚĞWŽǁĞƌƚŽzŽƵƌŽŶĨĞƌĞŶĐĞWŚŽŶĞ
Zs/tZ&dͲ/^KKE&/Ed/>
ŝƐĐŽ/WŽŶĨĞƌĞŶĐĞWŚŽŶĞϴϴϯϮhƐĞƌ'ƵŝĚĞ
ϱ
zŽƵƌWŚŽŶĞ
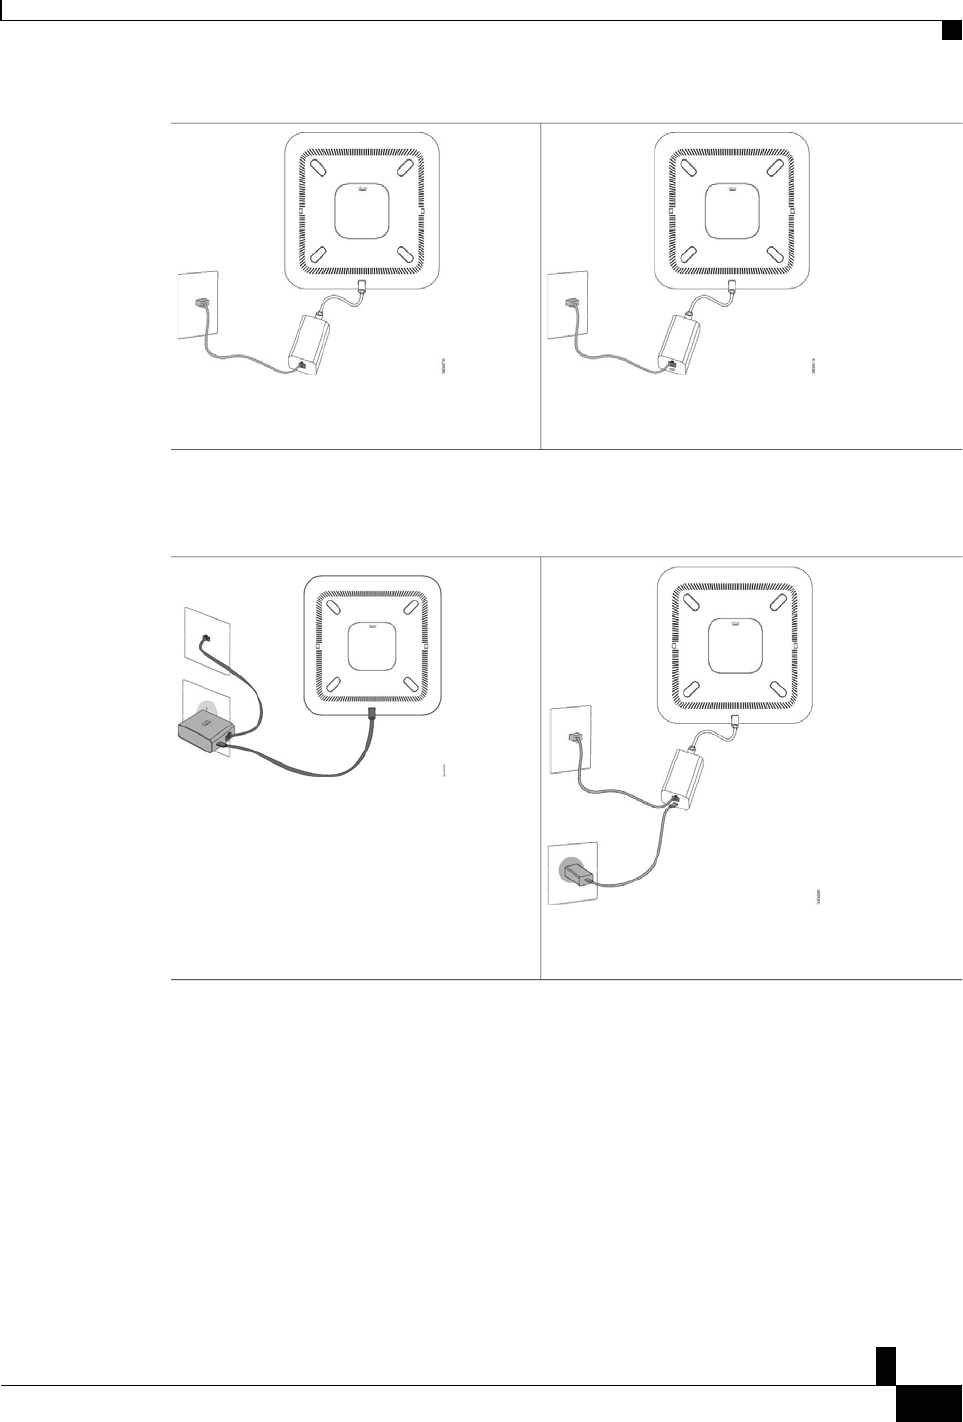
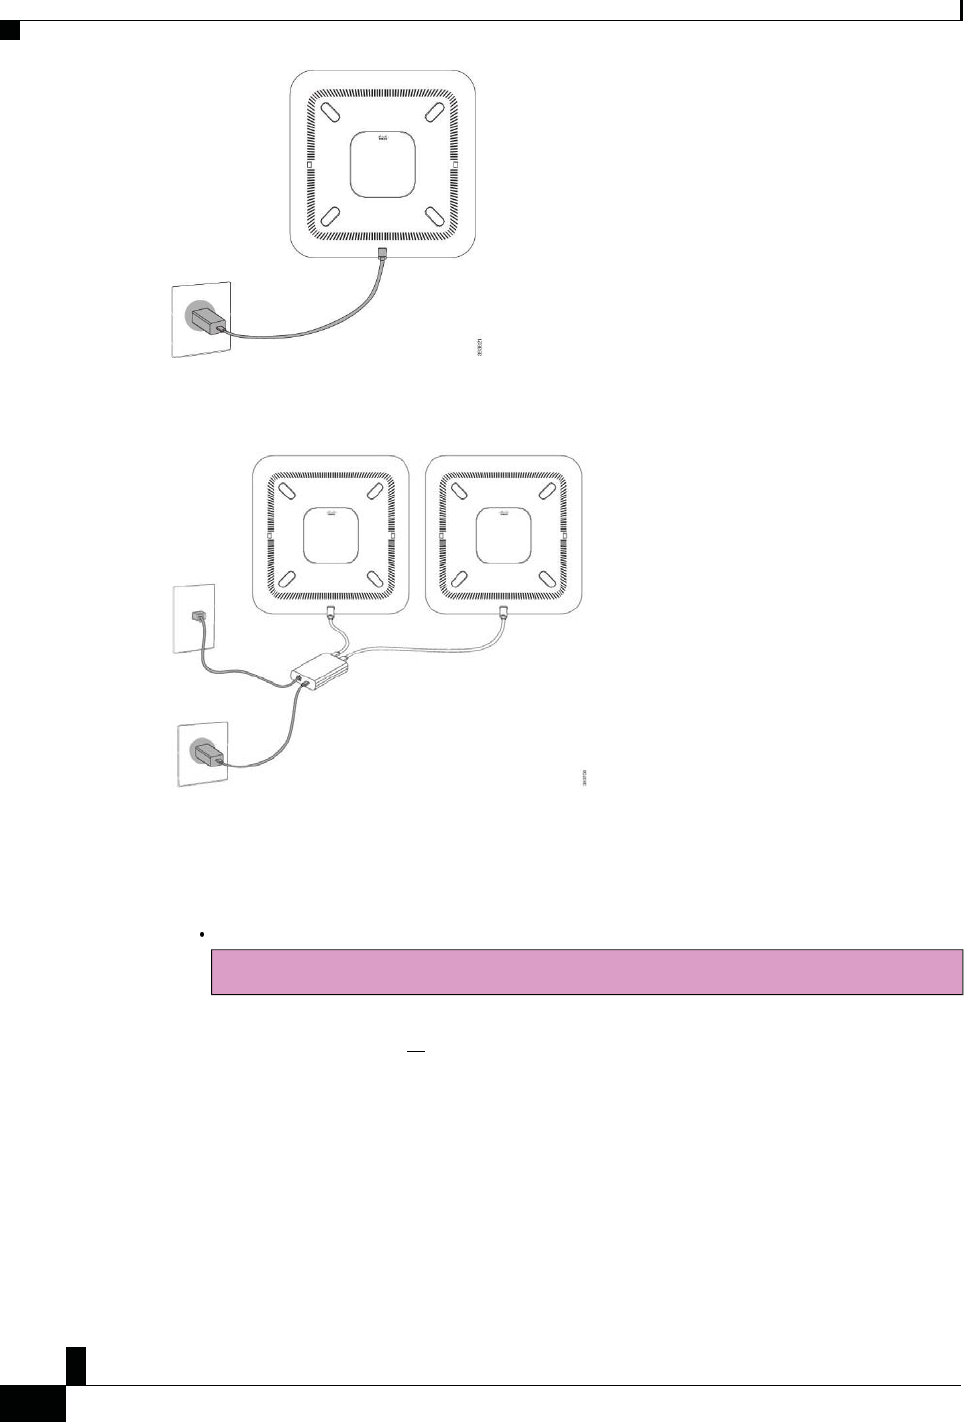
The following figure shows the two PoE power options.
&ŝŐƵƌĞϮ͗ŽŶĨĞƌĞŶĐĞWŚŽŶĞWŽWŽǁĞƌKƉƚŝŽŶƐ
The following figure shows the two Ethernet power options.
&ŝŐƵƌĞϯ͗ŽŶĨĞƌĞŶĐĞWŚŽŶĞƚŚĞƌŶĞƚWŽǁĞƌKƉƚŝŽŶƐ
ŽŶŶĞĐƚƚŽƚŚĞEĞƚǁŽƌŬ
&ŝŐƵƌĞϰ͗ŽŶĨĞƌĞŶĐĞWŚŽŶĞWŽǁĞƌKƉƚŝŽŶtŚĞŶŽŶŶĞĐƚĞĚƚŽĂtŝͲ&ŝEĞƚǁŽƌŬ
Cisco IP Conference Phone 8832
E
thernet Injecto
r
with
the PoE power option
Cisco IP Conference Phone 8832 PoE Injecto
r
with the PoE
p
ower option
Cisco IP Conference Phone 8832
E
thernet Injecto
r
with
the
E
thernet
p
ower option
Cisco IP Conference Phone 8832
N
on-PoE
Adapte
r
with the Ethernet power option
Zs/tZ&dͲ/^KKE&/Ed/>
ŝƐĐŽ/WŽŶĨĞƌĞŶĐĞWŚŽŶĞϴϴϯϮhƐĞƌ'ƵŝĚĞ
ϲ
z
ŽƵƌ WŚŽŶĞ
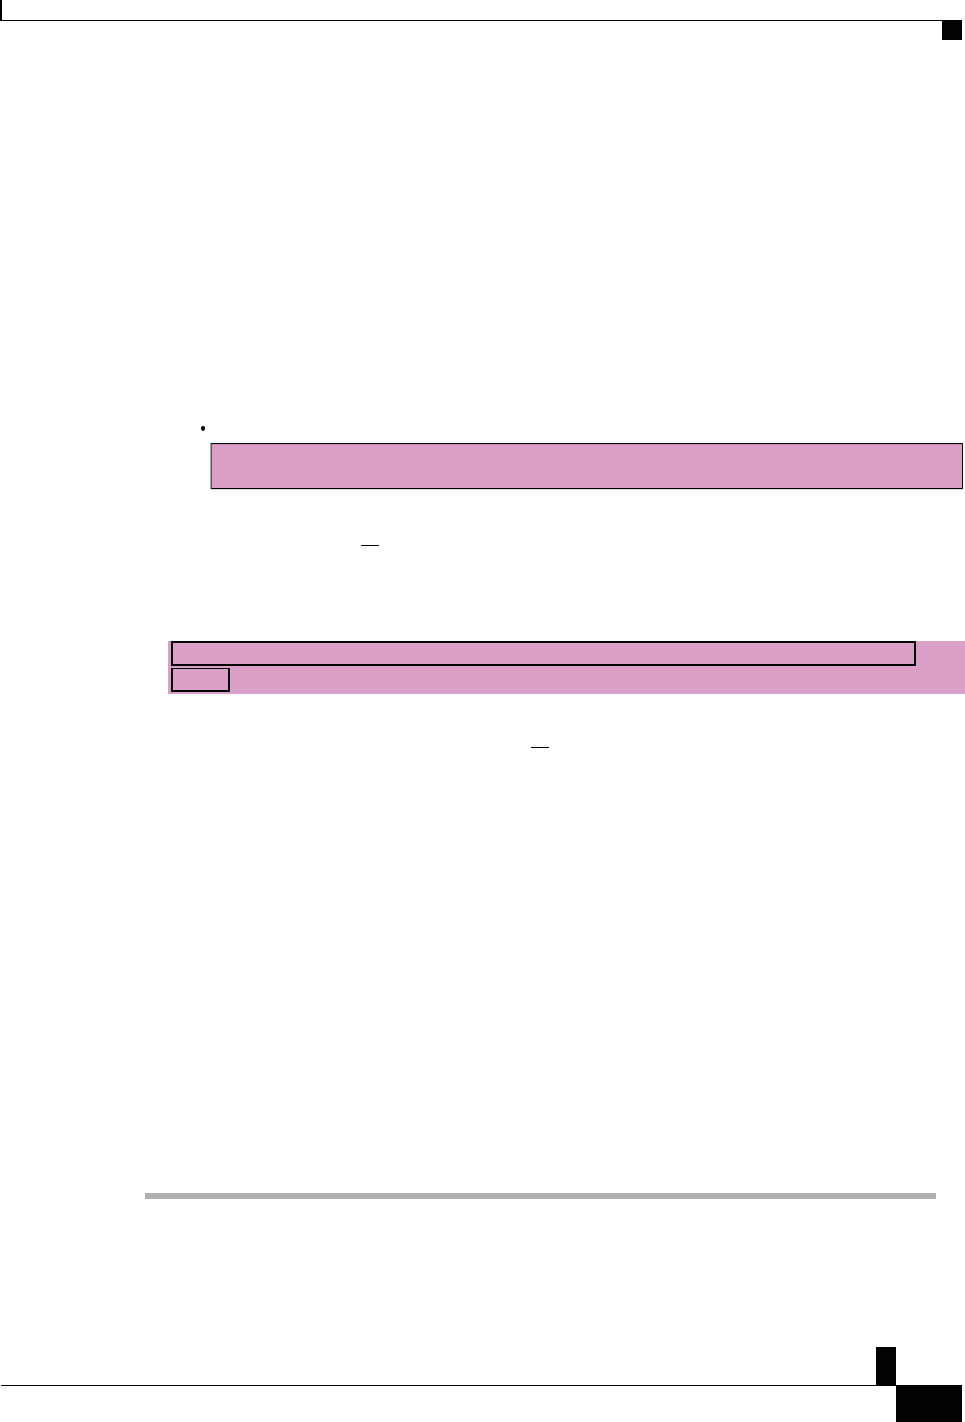
The following figure shows the power option when the phone is connected in daisy chain mode.
&ŝŐƵƌĞϱ͗ŽŶĨĞƌĞŶĐĞWŚŽŶĞWŽǁĞƌKƉƚŝŽŶŝŶĂŝƐLJŚĂŝŶDŽĚĞ
ŽŶŶĞĐƚƚŽƚŚĞEĞƚǁŽƌŬ
You need to connect the phone to the network.
Draft comment: Design team: Since Norvos is being introduced in Volantis Phase 2 release, I have added
information about the Non-PoE Adapter below.
Wired network connection All wired network connections use one of the following:
ŽŶŶĞĐƚƚŽƚŚĞEĞƚǁŽƌŬ
Zs/tZ&dͲ/^KKE&/Ed/>
ŝƐĐŽ/WŽŶĨĞƌĞŶĐĞWŚŽŶĞϴϴϯϮhƐĞƌ'ƵŝĚĞ
ϳ
zŽƵƌWŚŽŶĞ
Cisco IP Conference Phone 8832 PoE Injector: Use this if the LAN supports Power over Ethernet (PoE).
The phone is plugged into the Cisco IP Conference Phone 8832 PoE Injector, which in turn is plugged
into the network using an Ethernet cable.
Cisco IP Conference Phone 8832 Non-PoE Adapter: Use this if the LAN does not support PoE. The
phone is plugged into the Cisco IP Conference Phone 8832 Non-PoE Adapter, which in turn is
plugged into the network using an Ethernet cable. Then, the adapter is plugged into an electrical
outlet.
Cisco IP Conference Phone 8832 Ethernet Injector: If the LAN does not support PoE and you are
based in North America, you can use this as an alternate non-PoE option. However, if you are based
outside North America, you must use the Cisco IP Conference Phone 8832 Non-PoE Adapter. The
phone is plugged into the Cisco IP Conference Phone 8832 Ethernet Injector, which in turn is plugged
into the network using an Ethernet cable. Then, the injector is plugged into an electrical outlet with a
power adapter.
Draft comment: Design team: This has been added for the Wi-Fi support feature in Volantis Phase 2
release.
Wireless connection The Cisco IP Conference Phone 8832 can connect to a Wireless Access Point
using Wi-Fi.
Draft comment: Design team: This has been added for the MRA support feature in Volantis Phase 2
release.
Mobile and Remote Access Through Expressway If your administrator sets up Mobile and Remote Access
Through Expressway and you connect your phone to the network, it connects to the Expressway server
automatically.
^ĞƚhƉtŝͲ&ŝůŝĞŶƚ
The Cisco IP Conference Phone 8832 can access a Wi-Fi network. You need a power adapter to power the
phone. The Cisco IP Conference Phone 8832NR cannot be used with a Wi-Fi network.
ĞĨŽƌĞzŽƵĞŐŝŶ
Your administrator needs to configure settings on the call control system to enable Wi-Fi access.
ŽŶŶĞĐƚƚŽƚŚĞEĞƚǁŽƌŬ
WƌŽĐĞĚƵƌĞ

Zs/tZ&dͲ/^KKE&/Ed/>
ŝƐĐŽ/WŽŶĨĞƌĞŶĐĞWŚŽŶĞϴϴϯϮhƐĞƌ'ƵŝĚĞ
ϴ
z
ŽƵƌ WŚŽŶĞ
^ƚĞƉϭ If the phone is plugged into the Ethernet, unplug the Ethernet cable.
^ƚĞƉϮ Press Settings.
^ƚĞƉϯ Navigate to Admin settings > Network setup > Wi-Fi client setup.
^ƚĞƉϰ Navigate to Wireless and press On.
^ƚĞƉϱ Press Apply to save the changes, or press Revert to cancel the changes.
^ƚĞƉϲ Navigate to Network name.
^ƚĞƉϳ When the phone finishes scanning the SSID, choose a network to join.
^ƚĞƉϴ Enter your Wi-Fi credentials and press Connect.
ŽŶŶĞĐƚƚŽĂWƌĞĐŽŶĨŝŐƵƌĞĚtŝͲ&ŝEĞƚǁŽƌŬ
You can connect your Cisco IP Conference Phone 8832 to the network using Wi-Fi, but, for security, enter your
username and password. But, the Cisco IP Conference Phone 8832NR does not support Wi-Fi.
Depending upon how your phone is configured, you could be required to sign in when you join a Wi-Fi network
or when your phone powers up.
You cannot dismiss the Wi-Fi sign-in window without entering the correct username and password.
WƌŽĐĞĚƵƌĞ
^ƚĞƉϭ Enter your Wi-Fi credentials when prompted.
^ƚĞƉϮ Select Sign-in.
ŽŶŶĞĐƚƚŽdžƉƌĞƐƐǁĂLJ
You can use Mobile and Remote Access Through Expressway to connect to your corporate network when you
are working away from your office.
WƌŽĐĞĚƵƌĞ
^ƚĞƉϭ Reset service mode through Settings > Admin Settings > Reset Settings > Service mode.
^ƚĞƉϮ Press Select when prompted to change the service mode.
^ƚĞƉϯ Enter the service domain and press Continue.
^ƚĞƉϰ Enter your username and password.
^ƚĞƉϱ Select Sign in.
/ŶƐƚĂůůƚŚĞtŝƌĞĚdžƉĂŶƐŝŽŶDŝĐƌŽƉŚŽŶĞƐ
Zs/tZ&dͲ/^KKE&/Ed/>
ŝƐĐŽ/WŽŶĨĞƌĞŶĐĞWŚŽŶĞϴϴϯϮhƐĞƌ'ƵŝĚĞ
ϵ
zŽƵƌWŚŽŶĞ
/ŶƐƚĂůůƚŚĞtŝƌĞĚdžƉĂŶƐŝŽŶDŝĐƌŽƉŚŽŶĞƐ
The conference phone supports an optional kit with two wired expansion microphones. You can extend the
microphones up to 7 feet (2.13m) from the phone. For best results, we recommend that the microphones be
placed at least 3 feet (0.91m) away from the phone.
WƌŽĐĞĚƵƌĞ
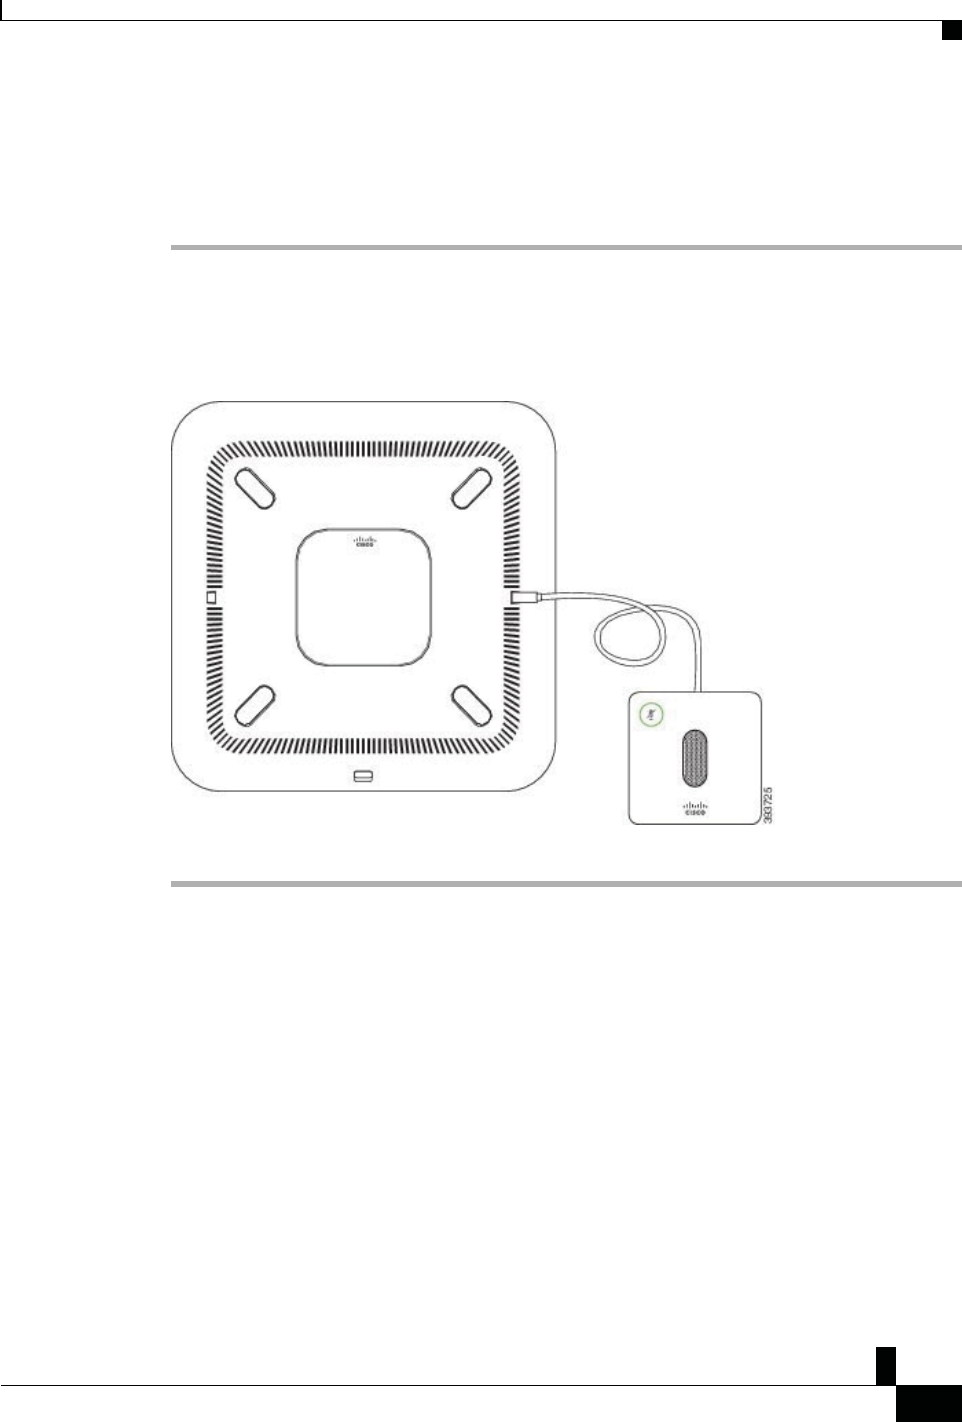
^ƚĞƉϭ Plug the end of the microphone cable into the port on the side of the conference phone.
^ƚĞƉϮ Extend the microphone cable to the desired position.
The following figure shows installation of a wired expansion microphone.
&ŝŐƵƌĞϲ͗tŝƌĞĚdžƉĂŶƐŝŽŶDŝĐƌŽƉŚŽŶĞ/ŶƐƚĂůůĂƚŝŽŶ
ZĞůĂƚĞĚdŽƉŝĐƐ
Wired Expansion Microphone, on page 15
/ŶƐƚĂůůƚŚĞtŝƌĞůĞƐƐdžƉĂŶƐŝŽŶDŝĐƌŽƉŚŽŶĞƐ
The Cisco IP Conference Phone 8832 provides the option of two wireless expansion microphones.
When the conference phone is in a call, the LED on the expansion microphone is lit green. To mute the
expansion microphone, press the Mute key. When the microphone is muted, the LED is lit red. When the
battery in the microphone is low, the LED blinks rapidly.

Zs/tZ&dͲ/^KKE&/Ed/>
ŝƐĐŽ/WŽŶĨĞƌĞŶĐĞWŚŽŶĞϴϴϯϮhƐĞƌ'ƵŝĚĞ
ϭϬ
z
ŽƵƌ WŚŽŶĞ
WĂŝƌĂtŝƌĞůĞƐƐDŝĐƌŽƉŚŽŶĞ
ĞĨŽƌĞzŽƵĞŐŝŶ
Draft comment: Design Team: Please review this procedure.
Disconnect the wired expansion microphones before you install wireless expansion microphones. You cannot
use both wired and wireless expansion microphones at the same time.
WƌŽĐĞĚƵƌĞ
^ƚĞƉϭ Position the table mount plate on the table surface location where you want to place the microphone.
^ƚĞƉϮ Remove the adhesive for the double-stick tape on the bottom of the table mount plate. Place the table mount
plate to adhere to the table surface.
^ƚĞƉϯ Attach the microphone to the table mount plate. Magnets are embedded in the microphone to snap the unit
into place.
You can move the microphone and attached table mount to a different location on the table surface as needed.
Use care when moving to protect the unit.
ZĞůĂƚĞĚdŽƉŝĐƐ
Wireless Expansion Microphone, on page 16
WĂŝƌĂtŝƌĞůĞƐƐDŝĐƌŽƉŚŽŶĞ
ĞĨŽƌĞzŽƵĞŐŝŶ
Unplug any wired microphones.
WƌŽĐĞĚƵƌĞ
^ƚĞƉϭ Press Settings.
^ƚĞƉϮ Select Admin Settings > Wireless Microphones.
^ƚĞƉϯ Select either Wireless Microphone 1 or Wireless Microphone 2.
If the selected channel is available, a Pair microphone 1? or Pair microphone 2? prompt
appears and you see the Pair softkey on the phone screen.
If a microphone is already linked to a particular channel, it cannot pair on a different channel and the phone
screen shows that the microphone is linked.

Zs/tZ&dͲ/^KKE&/Ed/>
ŝƐĐŽ/WŽŶĨĞƌĞŶĐĞWŚŽŶĞϴϴϯϮhƐĞƌ'ƵŝĚĞ
ϭϭ
zŽƵƌWŚŽŶĞ
^ƚĞƉϰ On the microphone to be paired, press the Mute button until the white LEDs begin to blink. If
pairing succeeds, a success message appears on the phone screen.
If pairing times out or fails, a message indicating this appears on the phone screen.
^ƚĞƉϱ (Optional) Press Cancel to revert to the Wireless Microphones menu.
hŶƉĂŝƌĂtŝƌĞůĞƐƐDŝĐƌŽƉŚŽŶĞ
ZĞůĂƚĞĚdŽƉŝĐƐ
Wireless Expansion Microphone, on page 16
hŶƉĂŝƌĂtŝƌĞůĞƐƐDŝĐƌŽƉŚŽŶĞ
WƌŽĐĞĚƵƌĞ
^ƚĞƉϭ Press Settings.
^ƚĞƉϮ Select Admin Settings > Wireless Microphones.
^ƚĞƉϯ Select either Wireless Microphone 1 or Wireless Microphone 2.
If the selected channel is paired, the Unpair softkey displays on the phone screen.
^ƚĞƉϰ Press Unpair.
ZĞůĂƚĞĚdŽƉŝĐƐ
Wireless Expansion Microphone, on page 16
ĂŝƐLJŚĂŝŶDŽĚĞ
You can connect two conference phones using a Smart Adapter and a pair of USB-C cables to expand the
audio coverage area in a room. Only one unit needs to be connected to the network.
In daisy chain mode, both units receive power though the Smart Adapter which is connected to a power
adapter. You can use only one microphone per unit. You can use either a pair of wired microphones with the
units or a pair of wireless microphones with the units, but not a mixed combination of the microphones.
When a wired microphone is connected to one of the units, it unpairs any wireless microphones connected
to the same unit. Whenever there is an active call, the LEDs and the menu options on the phone screen of
both units are synchronized.
To enable the Unpair option,
p
lace the wireless microphone on its charge
r
o
r
turn it off.
Zs/tZ&dͲ/^KKE&/Ed/>
ŝƐĐŽ/WŽŶĨĞƌĞŶĐĞWŚŽŶĞϴϴϯϮhƐĞƌ'ƵŝĚĞ
ϭϮ
z
ŽƵƌ WŚŽŶĞ
^ĞůĨĂƌĞWŽƌƚĂů
You can customize some phone settings with the Self Care portal web site, which you access from your
computer. The Self Care portal is part of your organization's Cisco Unified Communications Manager.
Your administrator gives you the URL to access the Self Care portal, and provides your user ID and password.
In the Self Care portal, you can control features, line settings, and phone services for your phone.
Phone features include speed dial, do not disturb, and your personal address book.
Line settings affect a specific phone line (directory number) on your phone. Line settings can include
call forwarding, visual and audio message indicators, ring patterns, and other line-specific settings.
^ƉĞĞĚͲŝĂůEƵŵďĞƌƐ
Phone services can include special phone features, network data, and web-based information (such as
stock quotes and movie listings). Use the Self Care Portal to subscribe to a phone service before you
access it on your phone.
The following table describes some specific features that you configure with the Self Care portal. For more
information, see the Self Care portal documentation for your call control system.
&ĞĂƚƵƌĞƐ ĞƐĐƌŝƉƚŝŽŶ
Call forward Use the number that will receive calls when call forward is enabled on the phone. Use
the Self Care portal to set up more complicated call forward functions, for example,
when your line is busy.
Additional phones Specify additional phones (your mobile and other phones) that you want to use to
make and receive calls with the same directory numbers as your desk phone. You can
also define blocked and preferred contacts to restrict or allow calls from certain
numbers to be sent to your mobile phone. When you set up additional phones, you
can also set up these features:
Single number reach Specify whether the additional phone should ring when
someone calls your desk phone.
Mobile calls If the additional phone is a mobile phone, you can set it up to
allow you to transfer mobile calls to your desk phone or desk phone calls to
your mobile phone.
Speed dial Assign phone numbers to speed-dial numbers so that you can quickly call that person.
ZĞůĂƚĞĚdŽƉŝĐƐ
Speed Dial, on page 26
Forward Calls, on page 30

Zs/tZ&dͲ/^KKE&/Ed/>
ŝƐĐŽ/WŽŶĨĞƌĞŶĐĞWŚŽŶĞϴϴϯϮhƐĞƌ'ƵŝĚĞ
ϭϯ
zŽƵƌWŚŽŶĞ
^ƉĞĞĚͲŝĂůEƵŵďĞƌƐ
When you dial a number on your phone, you enter a series of digits. When you set up a speed-dial number,
the speed-dial number must contain all the digits you need to make the call. For example, if you need to
dial 9 to get an outside line, you enter the number 9 and then the number you want to dial.
You can also add other dialed digits to the number. Examples of additional digits include a meeting access
code, an extension, a voicemail password, an authorization code, and a billing code.
The dial string can contain the following characters:
0 to 9
Pound (#)
Asterisk (*)
Comma (,) This is the pause character, and gives a 2- second delay in the dialing. You can have
several commas in a row. For example, two commas (,,) represent a pause of 4 seconds.
^ƉĞĞĚͲŝĂůEƵŵďĞƌƐ
The rules for dial strings are:
Use the comma to separate the parts of the dial string.
An authorization code must always precede a billing code in the speed-dial string.
A single comma is required between the authorization code and the billing code in the string.
A speed-dial label is required for speed dials with authorization codes and additional digits.
Before you configure the speed dial, try to dial the digits manually at least once to ensure that the digit sequence is correct.
EŽƚĞ Your phone does not save the authorization code, billing code, or extra digits from the speed dial in the call history. If
you press Redial after you connect to a speed-dial destination, the phone prompts you to enter any required authorization
code, billing code, or additional digits manually.
džĂŵƉůĞ
To set up a speed-dial number to call a person at a specific extension, and if you need an authorization code and billing code,
consider the following requirements:
You need to dial 9 for an outside line.
You want to call 5556543.
You need to input the authorization code 1234.
You need to input the billing code 9876.
You must wait for 4 seconds.
After the call connects, you must dial the extension 56789#.
Zs/tZ&dͲ/^KKE&/Ed/>
ŝƐĐŽ/WŽŶĨĞƌĞŶĐĞWŚŽŶĞϴϴϯϮhƐĞƌ'ƵŝĚĞ
ϭϰ
z
ŽƵƌ WŚŽŶĞ
In this scenario, the speed-dial number is 95556543,1234,9876,,56789#.
ZĞůĂƚĞĚdŽƉŝĐƐ
Calls That Require a Billing Code or Authorization Code, on page 27
ŝƐĐŽ/WŽŶĨĞƌĞŶĐĞWŚŽŶĞϴϴϯϮƵƚƚŽŶƐĂŶĚ,ĂƌĚǁĂƌĞ
ŝƐĐŽ/WŽŶĨĞƌĞŶĐĞWŚŽŶĞϴϴϯϮƵƚƚŽŶƐĂŶĚ,ĂƌĚǁĂƌĞ
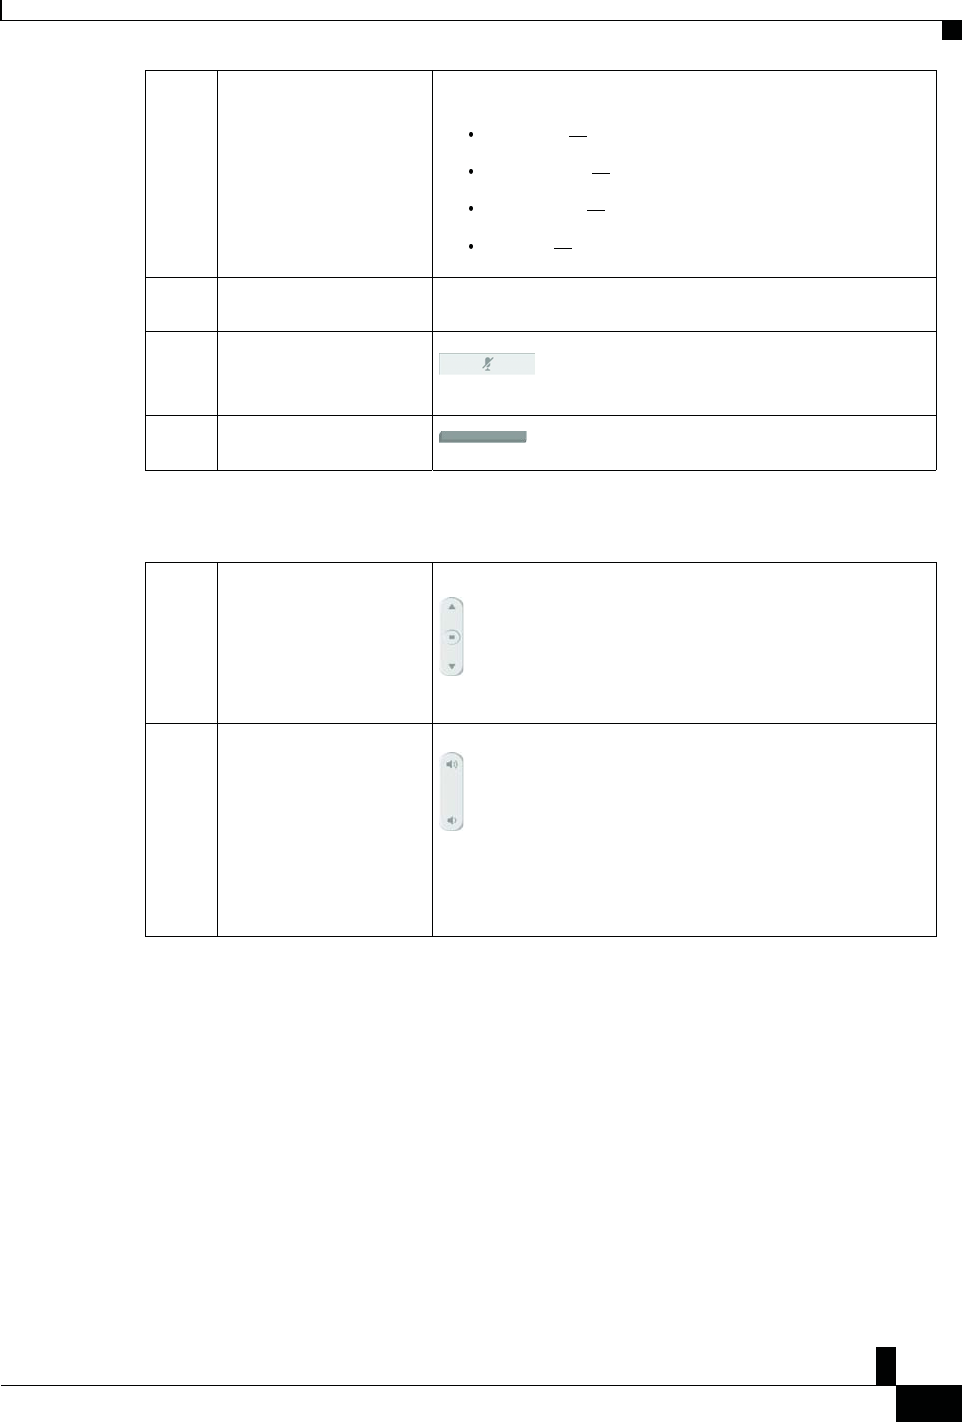
The following figure shows the Cisco IP Conference Phone 8832.
&ŝŐƵƌĞϳ͗ŝƐĐŽ/WŽŶĨĞƌĞŶĐĞWŚŽŶĞϴϴϯϮƵƚƚŽŶƐĂŶĚ&ĞĂƚƵƌĞƐ
Zs/tZ&dͲ/^KKE&/Ed/>
ŝƐĐŽ/WŽŶĨĞƌĞŶĐĞWŚŽŶĞϴϴϯϮhƐĞƌ'ƵŝĚĞ
ϭϱ
zŽƵƌWŚŽŶĞ
1 LED bar Indicates call states:
Green, solid Active call
Green, flashing Incoming call
Green, pulsing Held call
Red, solid Muted call
2 Expansion microphone port The wired expansion microphone cable plugs into the port.
3 Mute bar Toggle the microphone on or off. When the
microphone is muted, the LED bar is lit red.
4 Softkey buttons Access functions and services.
tŝƌĞĚdžƉĂŶƐŝŽŶDŝĐƌŽƉŚŽŶĞ
5 Navigation bar and Select
button
Scroll through menus, highlight items, and select the
highlighted item.
6 Volume button
Adjust the speakerphone volume (off hook) and the ringer
volume (on hook).
When you change the volume, the LED bar lights white to show the
volume change.
tŝƌĞĚdžƉĂŶƐŝŽŶDŝĐƌŽƉŚŽŶĞ
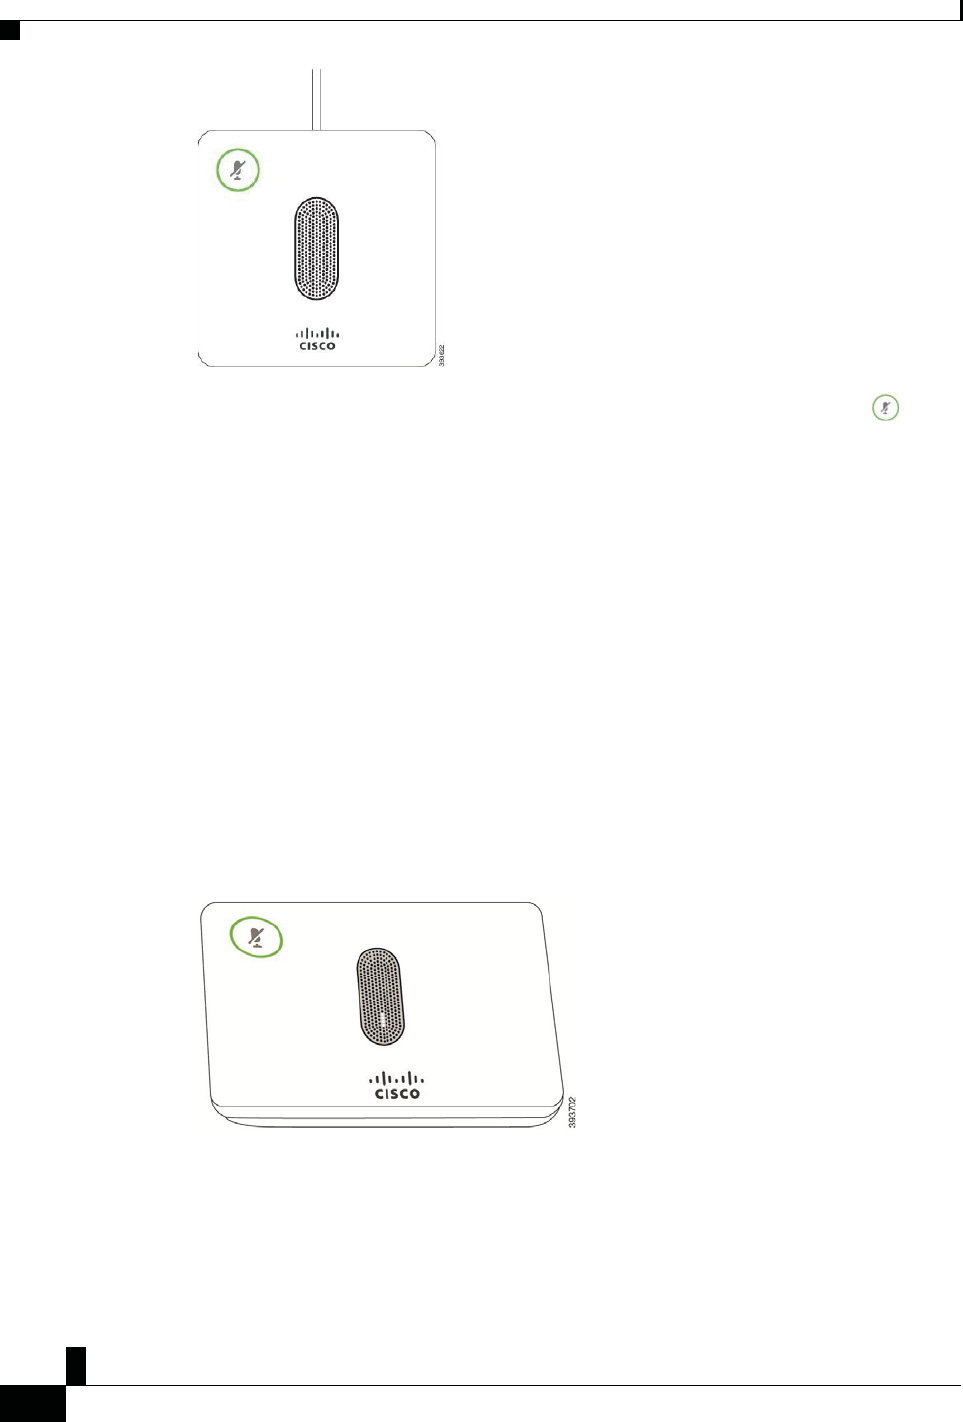
The Cisco IP Conference Phone 8832 supports two wired expansion microphones, available in an optional
kit. Use of the expansion microphones allows greater coverage in a larger room and for more people. For
best results, we recommend that the microphones be placed between 3 feet (0.91 m) and 7 feet (2.1 m) away
from the phone.
&ŝŐƵƌĞϴ͗tŝƌĞĚdžƉĂŶƐŝŽŶDŝĐƌŽƉŚŽŶĞ
Zs/tZ&dͲ/^KKE&/Ed/>
ŝƐĐŽ/WŽŶĨĞƌĞŶĐĞWŚŽŶĞϴϴϯϮhƐĞƌ'ƵŝĚĞ
ϭϲ
z
ŽƵƌ WŚŽŶĞ
When the conference phone is in a call, the expansion microphone LED around the Mute button is lit
green.
When the microphone is muted, the LED is lit red. When you press the Mute button, the phone and the
expansion microphones are muted.
ZĞůĂƚĞĚdŽƉŝĐƐ
Install the Wired Expansion Microphones, on page 9
tŝƌĞůĞƐƐdžƉĂŶƐŝŽŶDŝĐƌŽƉŚŽŶĞ
tŝƌĞůĞƐƐdžƉĂŶƐŝŽŶDŝĐƌŽƉŚŽŶĞ
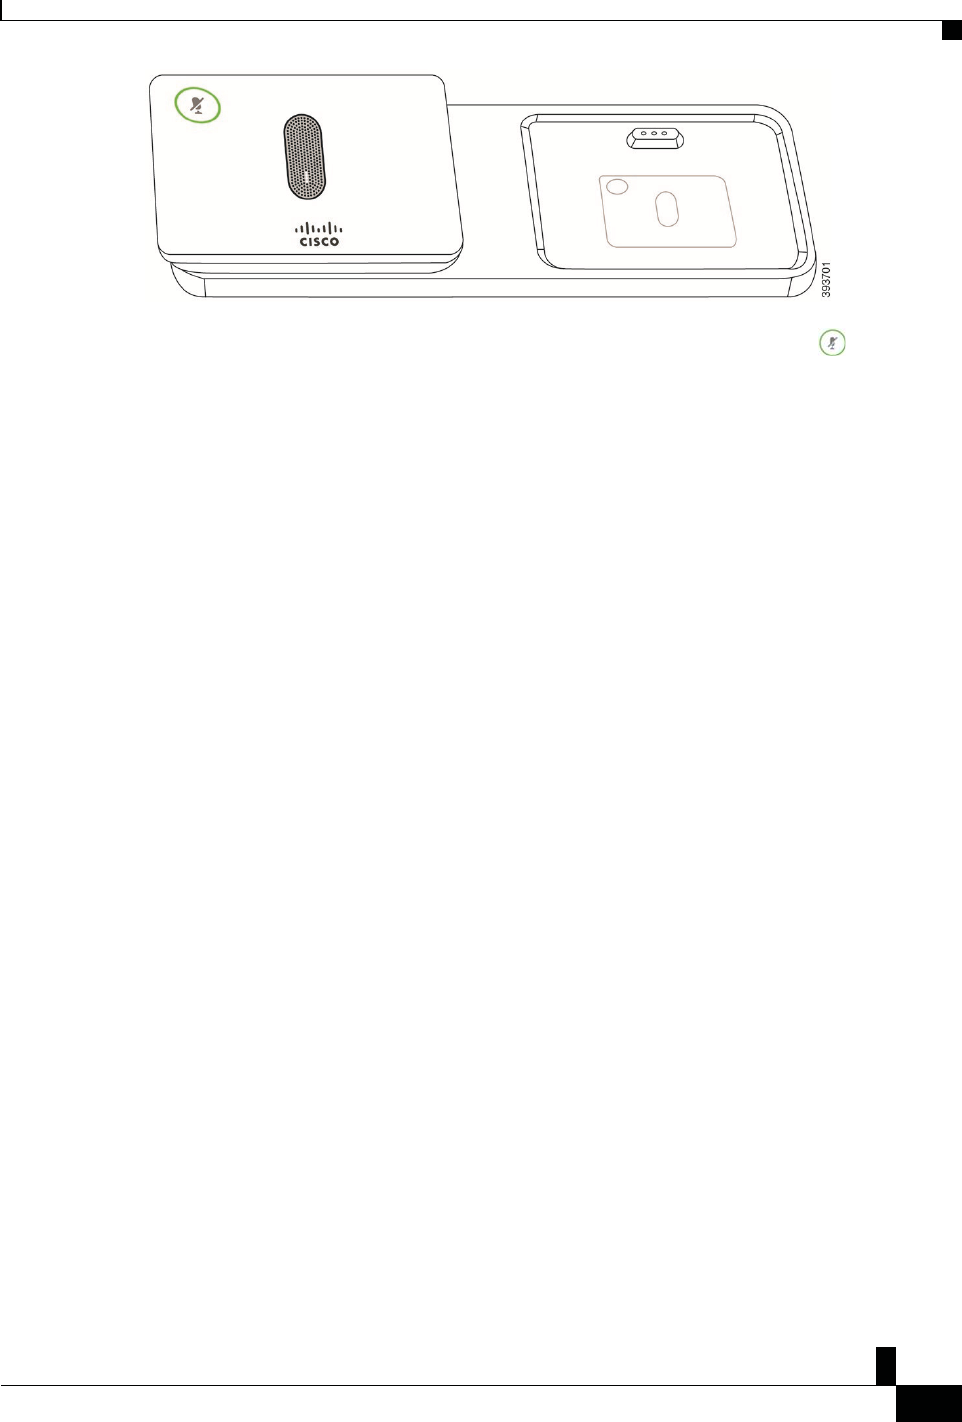
The Cisco IP Conference Phone 8832 supports two expansion wireless microphones, available with a
charging cradle in an optional kit. When the wireless microphone is placed on the charging cradle for
charging, the LED on the cradle is lit white.
&ŝŐƵƌĞϵ͗tŝƌĞůĞƐƐDŝĐƌŽƉŚŽŶĞ
&ŝŐƵƌĞϭϬ͗tŝƌĞůĞƐƐDŝĐƌŽƉŚŽŶĞDŽƵŶƚĞĚŽŶƚŚĞŚĂƌŐŝŶŐƌĂĚůĞ
Zs/tZ&dͲ/^KKE&/Ed/>
ŝƐĐŽ/WŽŶĨĞƌĞŶĐĞWŚŽŶĞϴϴϯϮhƐĞƌ'ƵŝĚĞ
ϭϳ
zŽƵƌWŚŽŶĞ
When the conference phone is in a call, the expansion microphone LED around the Mute button is lit
green.
When the microphone is muted, the LED is lit red. When you press the Mute button, the phone and the
expansion microphones are muted.
If the phone is paired with a wireless microphone (for example, Wireless microphone 1) and you connect the
wireless microphone to a charger, pressing the Show detail softkey indicates the charge level for that
microphone.
When the phone is paired with a wireless microphone and you connect a wired microphone, the wireless
microphone gets unpaired and the phone is paired with the wired microphone. A notification appears on the
phone screen indicating that the wired microphone is connected.
ZĞůĂƚĞĚdŽƉŝĐƐ
Install the Wireless Expansion Microphones, on page 9
Pair a Wireless Microphone, on page 10
WŚŽŶĞ&ŝƌŵǁĂƌĞĂŶĚhƉŐƌĂĚĞƐ
Unpair a Wireless Microphone, on page 11
WŚŽŶĞ&ŝƌŵǁĂƌĞĂŶĚhƉŐƌĂĚĞƐ
Your phone comes with firmware already installed, which is specific to the call control system that your
phone uses.
Occasionally, your administrator upgrades the phone firmware for you. This upgrade happens in the
background even if you are using your phone.
WŽƐƚƉŽŶĞĂWŚŽŶĞhƉŐƌĂĚĞ
When new firmware is available, the Ready to upgrade window is displayed on your phone and a timer
begins a 15-second countdown. If you do nothing, the upgrade proceeds.
You can postpone your firmware upgrade for 1 hour and up to 11 times. The upgrade is also postponed if
you make or receive a phone call.

Zs/tZ&dͲ/^KKE&/Ed/>
ŝƐĐŽ/WŽŶĨĞƌĞŶĐĞWŚŽŶĞϴϴϯϮhƐĞƌ'ƵŝĚĞ
ϭϴ
z
ŽƵƌ WŚŽŶĞ
WƌŽĐĞĚƵƌĞ
Select Delay to postpone a phone upgrade.
sŝĞǁƚŚĞWƌŽŐƌĞƐƐŽĨĂWŚŽŶĞ&ŝƌŵǁĂƌĞhƉŐƌĂĚĞ
During a phone firmware upgrade, you can view the upgrade progress.
WƌŽĐĞĚƵƌĞ
^ƚĞƉϭ Press Settings.
^ƚĞƉϮ Select System information , and press Show details.
^ƚĞƉϯ Press Exit.
ĚĚŝƚŝŽŶĂů,ĞůƉĂŶĚ/ŶĨŽƌŵĂƚŝŽŶ
If you have questions about the functions available on your phone, contact your administrator.
The Cisco website (https://www.cisco.com) contains more information about the phones and call control
systems.
Zs/tZ&dͲ/^KKE&/Ed/>
ŝƐĐŽ/WŽŶĨĞƌĞŶĐĞWŚŽŶĞϴϴϯϮhƐĞƌ'ƵŝĚĞ
ϭϵ
zŽƵƌWŚŽŶĞ
ĐĐĞƐƐŝďŝůŝƚLJ&ĞĂƚƵƌĞƐ
The Cisco IP Conference Phone 8832 provides accessibility features for the blind, and for the visually, hearing,
and mobility impaired. Because many of these features are standard, users with disabilities can access them
without any special configuration.
The term phone support pages refers to the web pages that you can access to set up certain features. For Cisco
Unified Communications Manager (Release 10.0 and later), these pages are the Self Care Portal. For Cisco
Unified Communications Manager (Release 9.1 and earlier), these pages are the User Options web pages.
Cisco is committed to designing and delivering accessible products and technologies to meet the needs of your
organization. You can find more information about Cisco and its commitment to accessibility at this URL:
https://www.cisco.com/go/accessibility
,ĞĂƌŝŶŐͲ/ŵƉĂŝƌĞĚĐĐĞƐƐŝďŝůŝƚLJ&ĞĂƚƵƌĞƐ
Your conference phone comes with standard accessibility features that require little or no setup.
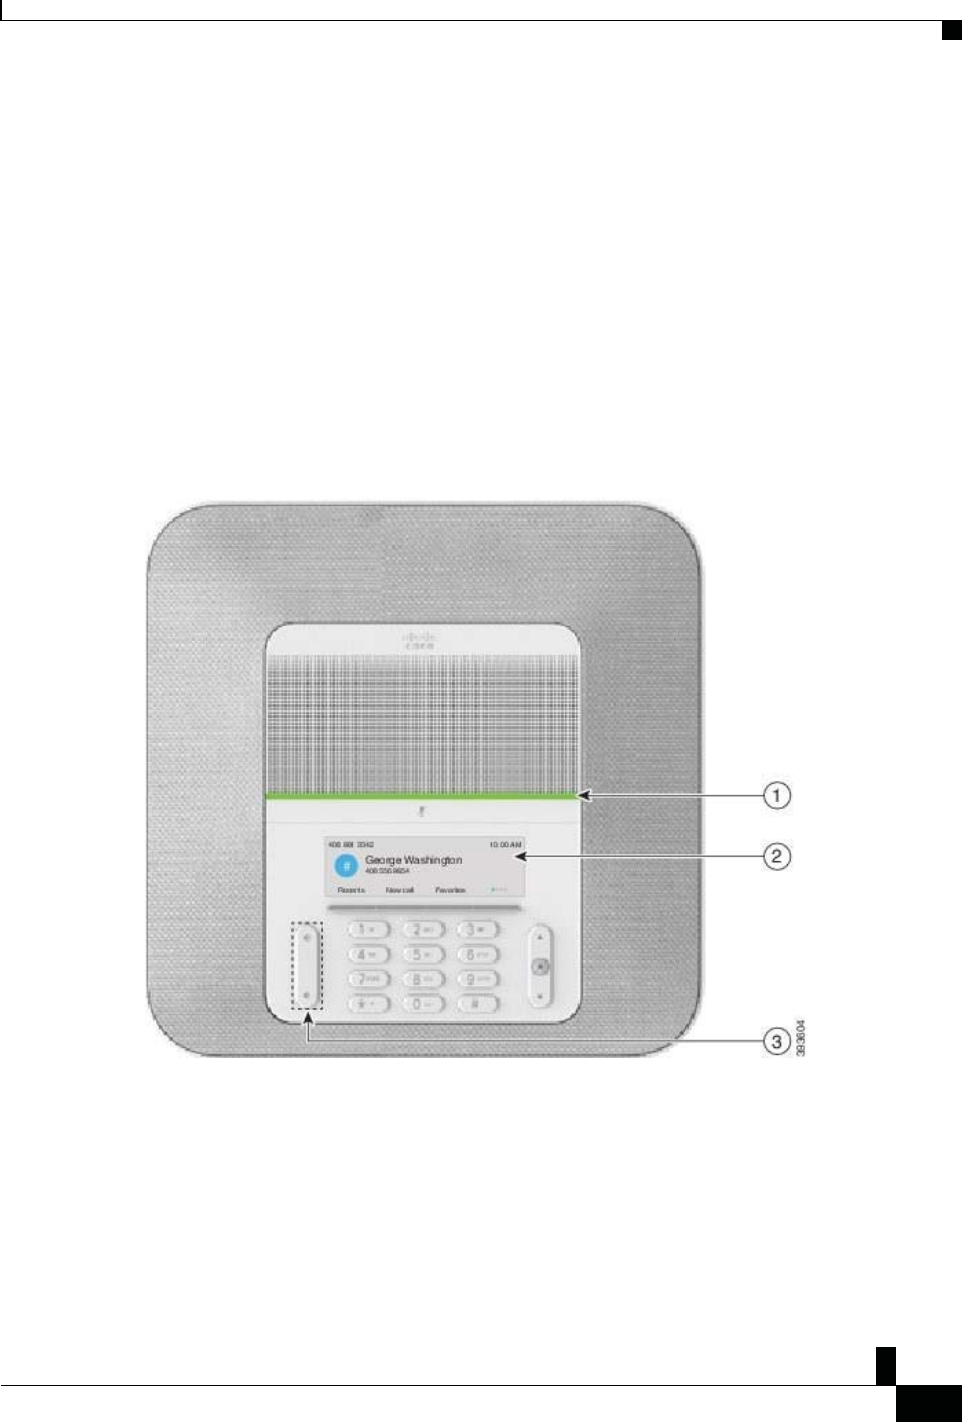
&ŝŐƵƌĞϭϭ͗,ĞĂƌŝŶŐͲ/ŵƉĂŝƌĞĚĐĐĞƐƐŝďŝůŝƚLJ&ĞĂƚƵƌĞƐ
ĐĐĞƐƐŝďŝůŝƚLJ&ĞĂƚƵƌĞƐ
dĂďůĞϭ͗,ĞĂƌŝŶŐͲ/ŵƉĂŝƌĞĚĐĐĞƐƐŝďŝůŝƚLJ&ĞĂƚƵƌĞƐ
Zs/tZ&dͲ/^KKE&/Ed/>
ŝƐĐŽ/WŽŶĨĞƌĞŶĐĞWŚŽŶĞϴϴϯϮhƐĞƌ'ƵŝĚĞ
ϮϬ
z
ŽƵƌ WŚŽŶĞ
ĐĐĞƐƐŝďŝůŝƚLJ&ĞĂƚƵƌĞƐ
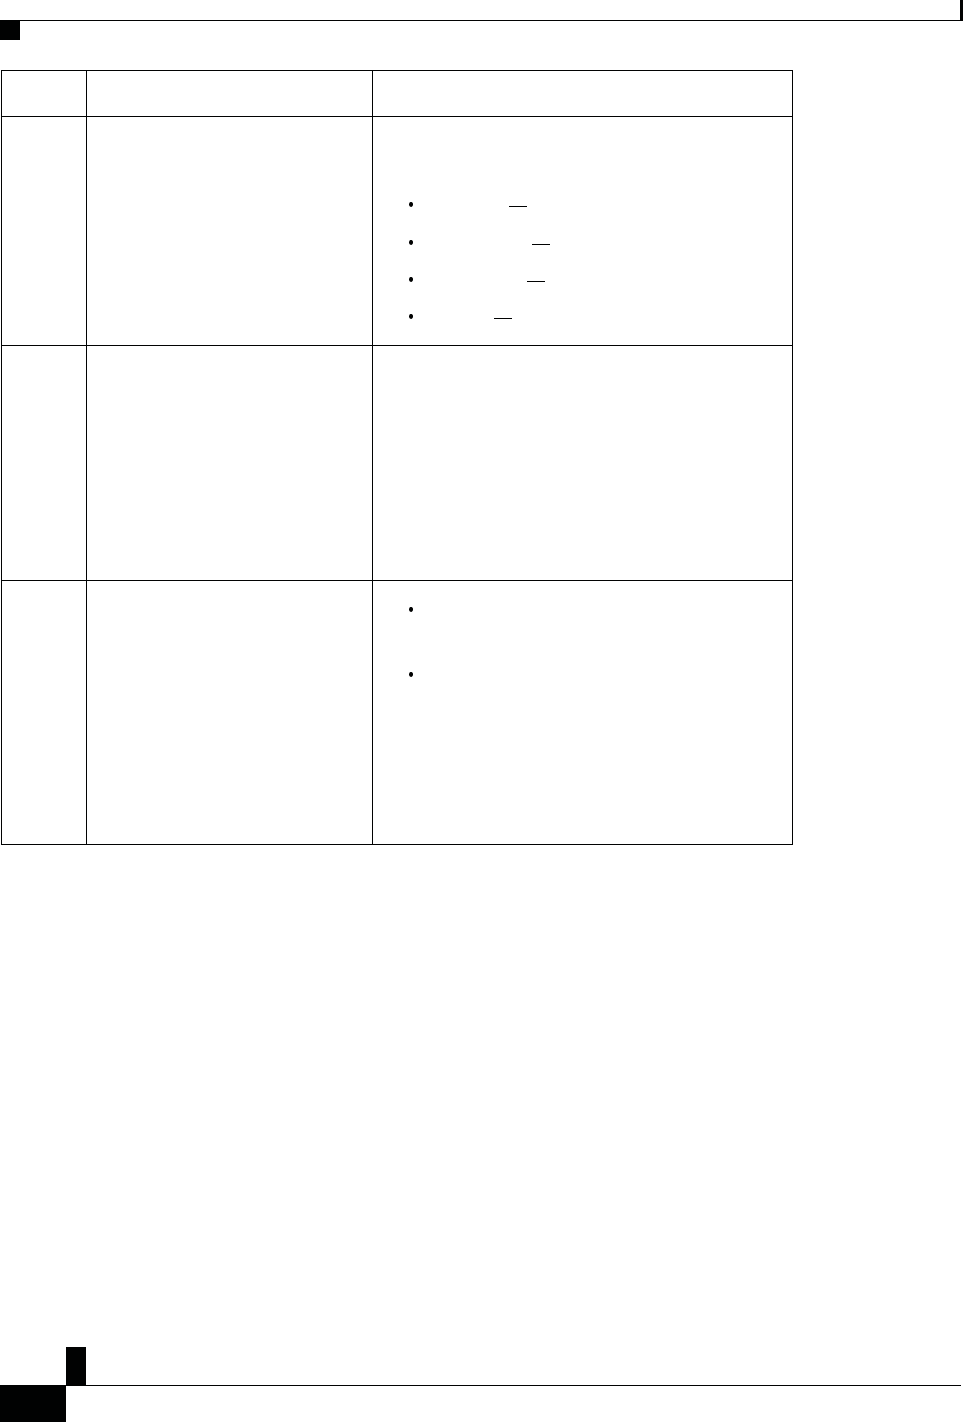
/ƚĞŵ ĐĐĞƐƐŝďŝůŝƚLJ&ĞĂƚƵƌĞ ĞƐĐƌŝƉƚŝŽŶ
1 LED bar The phone screen displays the current state and the LED
bar displays:
Green, solid Active call
Green, flashing Incoming call
Green, pulsing Held call
Red, solid Muted call
2 Visual notification of phone state
and message-waiting indicator
The phone screen displays the current state.
When you have a message, a message is displayed on
the phone screen. Your phone also provides an audible
message-waiting indicator.
To change the audible voice-message indicator, sign in
to the Self Care portal and access the message-indicator
settings. You can change each setting to on or off.
Your administrator can also change your settings.
3 Adjustable ringtone, pitch, and
volume Select Settings > Preferences to change the
ringtone.
Adjust the volume level for the phone ring. When
not in a call, press Volume to raise or lower the
volume.
When you adjust the volume, the LED bar lights
white to show the volume increase or decrease.
Your administrator can also change your settings.
sŝƐŝŽŶͲ/ŵƉĂŝƌĞĚĂŶĚůŝŶĚĐĐĞƐƐŝďŝůŝƚLJ&ĞĂƚƵƌĞƐ
Your phone comes with standard accessibility features that require little or no setup.
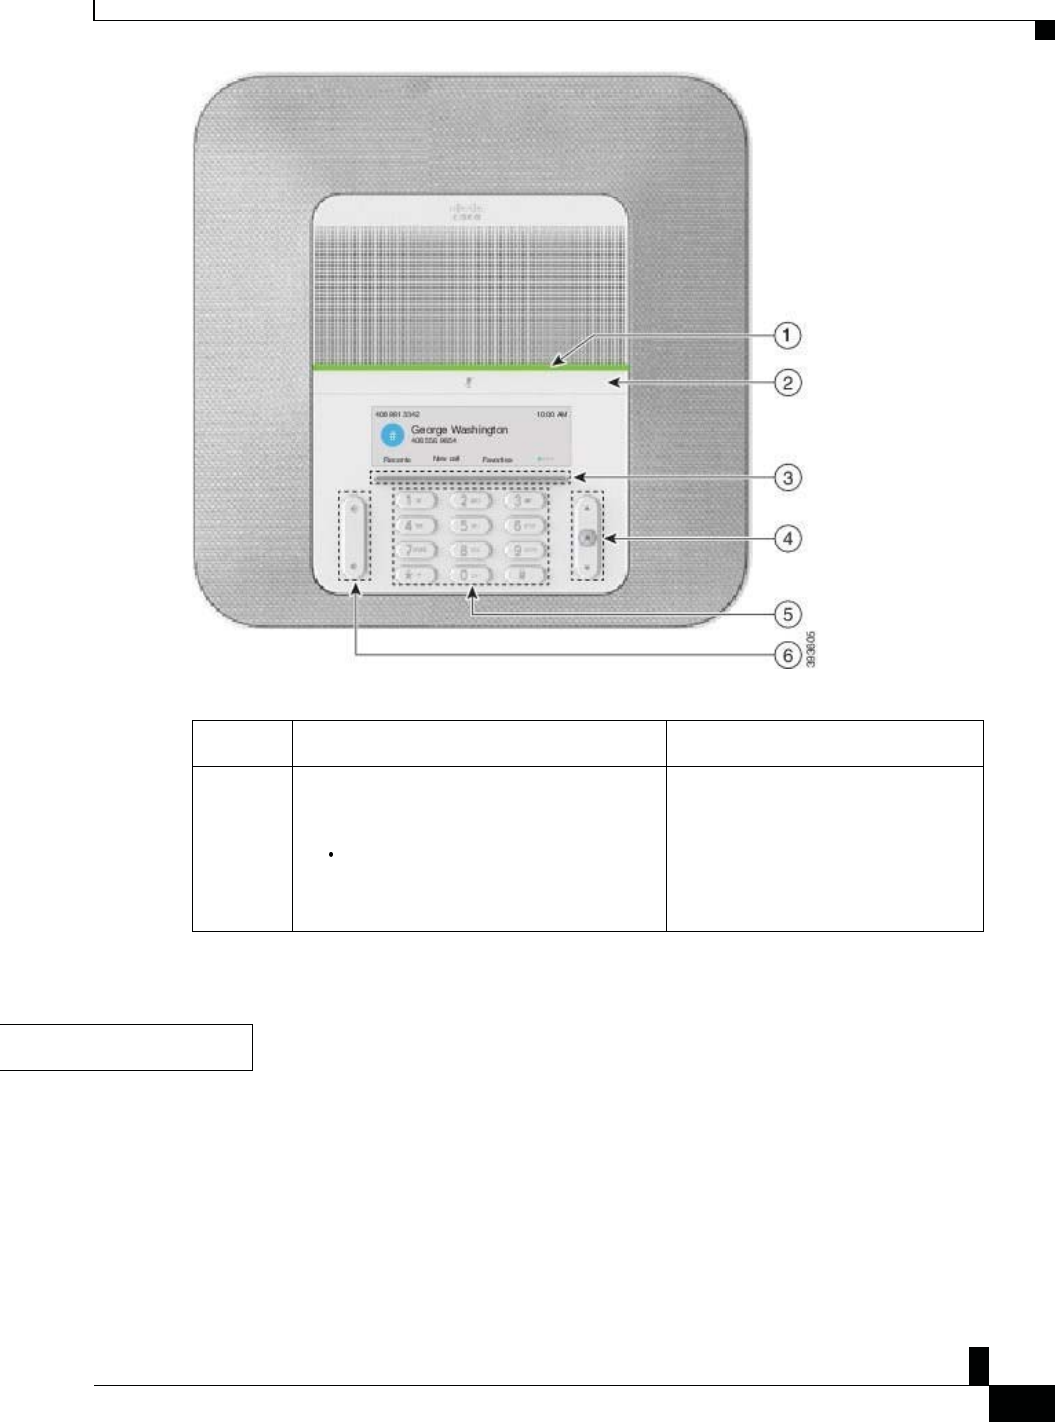
&ŝŐƵƌĞϭϮ͗sŝƐŝŽŶͲ/ŵƉĂŝƌĞĚĂŶĚůŝŶĚĐĐĞƐƐŝďŝůŝƚLJ&ĞĂƚƵƌĞƐ
Zs/tZ&dͲ/^KKE&/Ed/>
ŝƐĐŽ/WŽŶĨĞƌĞŶĐĞWŚŽŶĞϴϴϯϮhƐĞƌ'ƵŝĚĞ
Ϯϭ
zŽƵƌWŚŽŶĞ
dĂďůĞϮ͗sŝƐŝŽŶͲ/ŵƉĂŝƌĞĚĂŶĚůŝŶĚĐĐĞƐƐŝďŝůŝƚLJ&ĞĂƚƵƌĞƐ
/ƚĞŵ ĐĐĞƐƐŝďŝůŝƚLJ&ĞĂƚƵƌĞ ĞƐĐƌŝƉƚŝŽŶ
1 High-contrast visual and audible alert of
incoming call with the LED bar
The LED bar is located above the Mute
button and the screen.
Use the Mute button to toggle the
microphone on or off. When the
microphone is muted, the LED bar lights
red. When you turn on Mute, your phone
beeps once; when you turn off Mute,
your phone beeps twice.
ĐĐĞƐƐŝďŝůŝƚLJ&ĞĂƚƵƌĞƐ
ƚ
ŝŽŶ
Zs/tZ&dͲ/^KKE&/Ed/>
ŝƐĐŽ/WŽŶĨĞƌĞŶĐĞWŚŽŶĞϴϴϯϮhƐĞƌ'ƵŝĚĞ
ϮϮ
z
ŽƵƌ WŚŽŶĞ
ĐĐĞƐƐŝďŝůŝƚLJ&ĞĂƚƵƌĞƐ
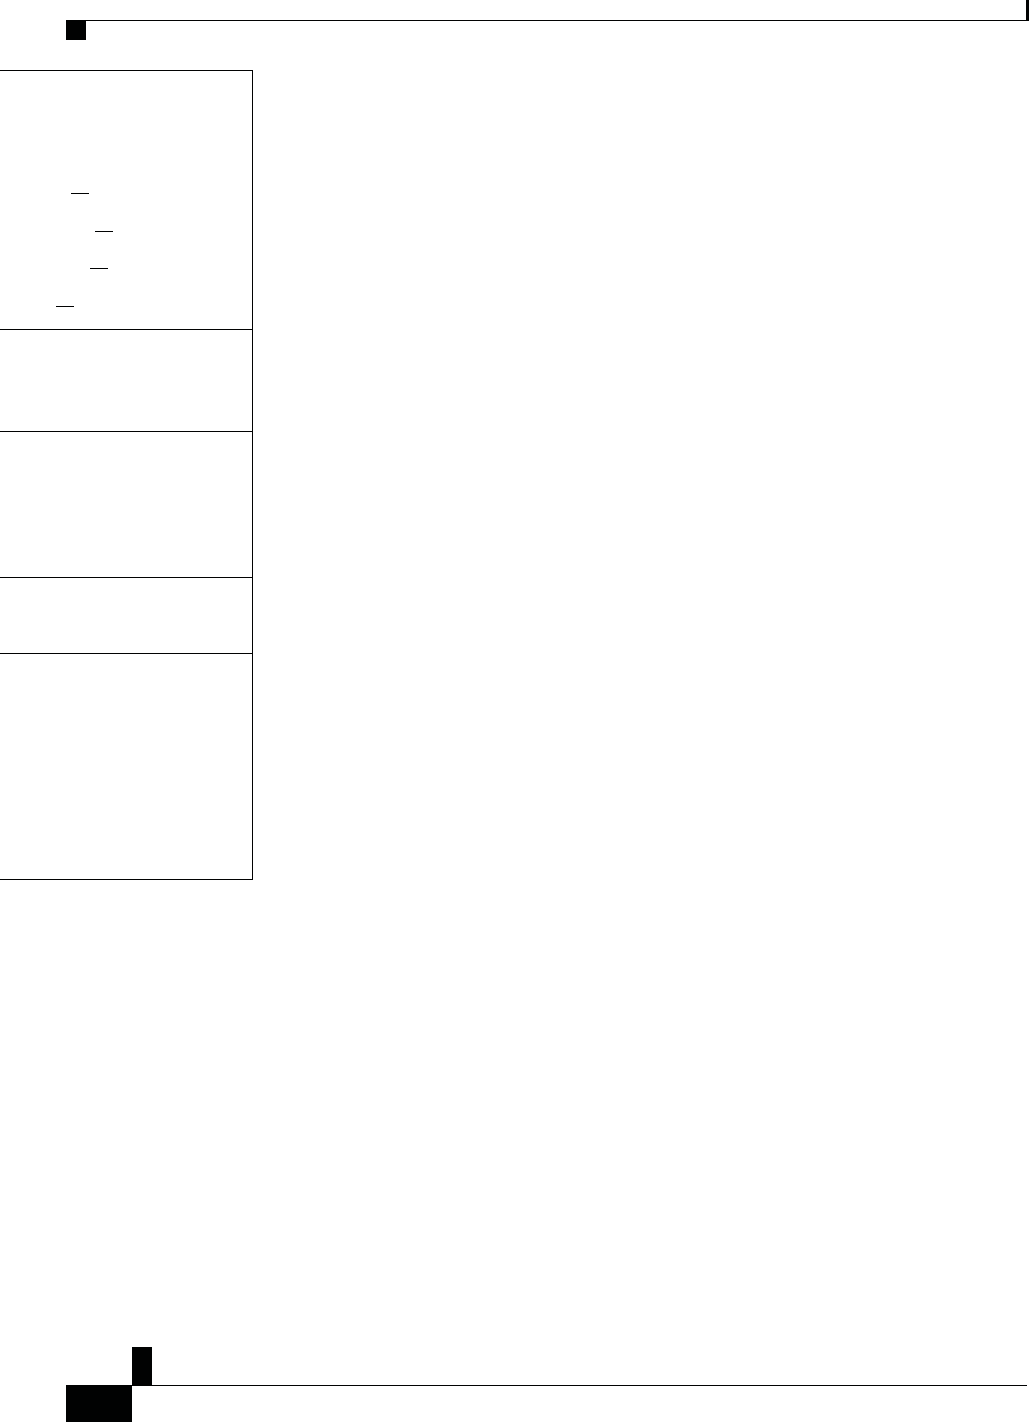
ou to an incoming call. The LED
d
uring incoming calls.
ndicate your phone's status:
r
een, solid Active call
r
een, flashing Incoming call
r
een, pulsing Held call
e
d, solid Muted call
access to special functions. The
s
plays the functions.
Navigation bar to move up and
n
the phone LCD. The Select
s in the center of the Navigation
y
ou to use existing or familiar key
n
s. Key 5 has a nib.
you to increase or decrease the
u
me or the sound.
p
on the rocker key to increase
u
me. Press down on the rocker
d
ecrease the volume.
o
u adjust the volume, the LED bar
w
hite to show the volume increase
e
ase.
DŽďŝůŝƚLJͲ/ŵƉĂŝƌĞĚĐĐĞƐƐŝďŝůŝƚLJ&ĞĂƚƵƌĞƐ
Your conference phone comes with standard accessibility features that require little or no setup.
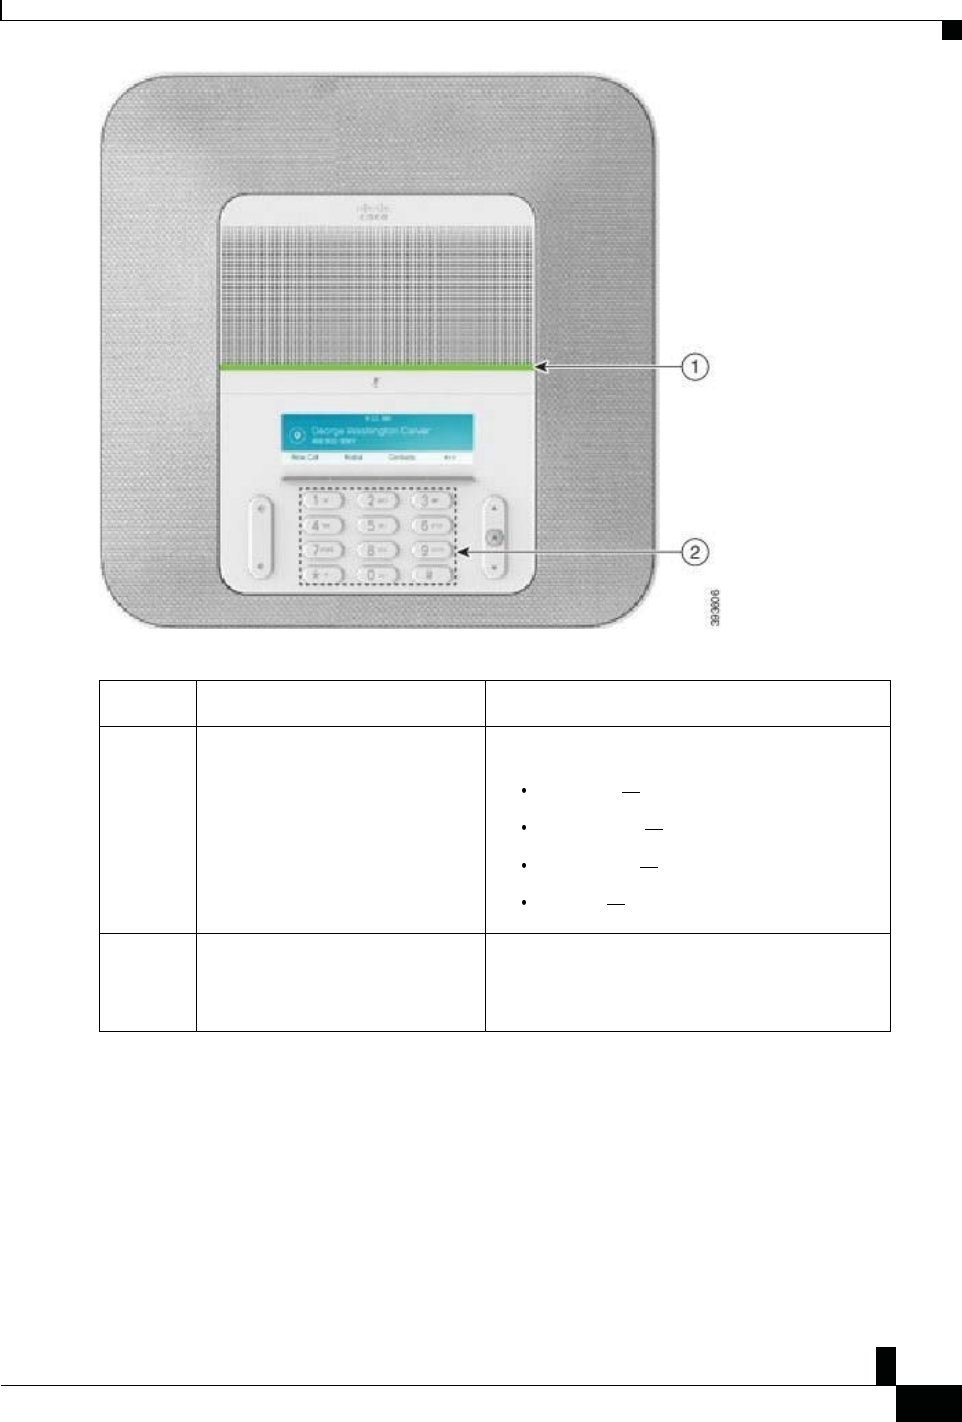
&ŝŐƵƌĞϭϯ͗DŽďŝůŝƚLJͲ/ŵƉĂŝƌĞĚĐĐĞƐƐŝďŝůŝƚLJ&ĞĂƚƵƌĞƐ
Zs/tZ&dͲ/^KKE&/Ed/>
ŝƐĐŽ/WŽŶĨĞƌĞŶĐĞWŚŽŶĞϴϴϯϮhƐĞƌ'ƵŝĚĞ
Ϯϯ
zŽƵƌWŚŽŶĞ
dĂďůĞϯ͗DŽďŝůŝƚLJͲ/ŵƉĂŝƌĞĚĐĐĞƐƐŝďŝůŝƚLJ&ĞĂƚƵƌĞƐ
/ƚĞŵ ĐĐĞƐƐŝďŝůŝƚLJ&ĞĂƚƵƌĞ ĞƐĐƌŝƉƚŝŽŶ
1 LED bar Indicates your phone's status:
Green, solid Active call
Green, flashing Incoming call
Green, pulsing Held call
Red, solid Muted call
2 Tactile-discernible buttons and
functions, including a nib on Key 5 Allow you to easily locate your phone's keys. For
example, Key 5 has a nib, which you can use to locate
other key positions.
dƌŽƵďůĞƐŚŽŽƚŝŶŐ

Zs/tZ&dͲ/^KKE&/Ed/>
ŝƐĐŽ/WŽŶĨĞƌĞŶĐĞWŚŽŶĞϴϴϯϮhƐĞƌ'ƵŝĚĞ
Ϯϰ
z
ŽƵƌ WŚŽŶĞ
ĐĐĞƐƐŝďŝůŝƚLJ&ĞĂƚƵƌĞƐ
dŚŝƌĚͲWĂƌƚLJĐĐĞƐƐŝďŝůŝƚLJƉƉůŝĐĂƚŝŽŶƐ
Cisco works closely with partners to provide solutions that complement the Accessibility and usability of Cisco
Products and Solutions. There are third-party applications such as real-time Captioning on Cisco IP phones, Text
Telephones for the Deaf (TDD/TTY), Real Time Text (RTT), hearing/voice carry over (HCO/VCO), audible
Caller ID, Inline amplifiers for handsets for louder call sound, busy lights , audio/visual emergency notifications
through Cisco IP phones (supporting users with disabilities), etc.
Here's a link to a presentation about all the accessibility features of Cisco Unified Communications products,
and some third party assistive technology which works with it:
http://www.cisco.com/c/dam/en_us/about/responsibility/accessibility/products/Accessibility_Innovation_
Cisco_Unified_Communications.pdf
For more information about third-party applications, contact your administrator.
dƌŽƵďůĞƐŚŽŽƚŝŶŐ
You may experience issues related to the following scenarios:
Your phone cannot communicate with the call control system.
The call control system has communication or internal problems.
Your phone has internal problems.
If you experience problems, your administrator can help troubleshoot the root cause of the problem.
&ŝŶĚ/ŶĨŽƌŵĂƚŝŽŶďŽƵƚzŽƵƌWŚŽŶĞ
Your administrator may ask for information about your phone. This information uniquely identifies the phone
for troubleshooting purposes.
WƌŽĐĞĚƵƌĞ
^ƚĞƉϭ Press Settings.
^ƚĞƉϮ Select System information.
^ƚĞƉϯ Press Exit.
ZĞƉŽƌƚĂůůYƵĂůŝƚLJ/ƐƐƵĞƐ
Your administrator may temporarily configure your phone with the Quality Reporting Tool (QRT) to
troubleshoot performance problems. Depending on the configuration, use the QRT to:
Immediately report an audio problem on a current call.
Select a general problem from a list of categories and choose reason codes.

Zs/tZ&dͲ/^KKE&/Ed/>
ŝƐĐŽ/WŽŶĨĞƌĞŶĐĞWŚŽŶĞϴϴϯϮhƐĞƌ'ƵŝĚĞ
Ϯϱ
z
ŽƵƌ WŚŽŶĞ
ŝƐĐŽKŶĞͲzĞĂƌ>ŝŵŝƚĞĚ,ĂƌĚǁĂƌĞtĂƌƌĂŶƚLJdĞƌŵƐ
WƌŽĐĞĚƵƌĞ
^ƚĞƉϭ Press Report quality.
^ƚĞƉϮ Scroll and select the item that closely matches your problem.
^ƚĞƉϯ Press the Select softkey to send the information to your system administrator.
ZĞƉŽƌƚůůWŚŽŶĞ/ƐƐƵĞƐ
You can use the Cisco Collaboration Problem Report Tool (PRT) to collect and send phone logs, and to
report problems to your administrator. If you see a message that the PRT upload has failed, the problem
report is saved on the phone and you should alert your administrator.
WƌŽĐĞĚƵƌĞ
^ƚĞƉϭ Select Settings > System information > Report problem.
^ƚĞƉϮ Enter the date and time that you experienced the problem in the Date of problem and Time of problem fields.
^ƚĞƉϯ Select Problem description.
^ƚĞƉϰ Select a description from the displayed list, then press Submit.
>ŽƐƚWŚŽŶĞŽŶŶĞĐƚŝǀŝƚLJ
Sometimes your phone can lose its connection to the call control system. When this connection is lost, your
phone displays a message.
If you are on an active call when the connection is lost, the call continues. However, you do not have access
to all normal phone functions because some functions require information from the call control system. Your
softkeys might not work as you expect.
When the phone reconnects to the call control system, you'll be able to use your phone normally again.
ŝƐĐŽKŶĞͲzĞĂƌ>ŝŵŝƚĞĚ,ĂƌĚǁĂƌĞtĂƌƌĂŶƚLJdĞƌŵƐ
Special terms apply to your hardware warranty and services that you can use during the warranty period.

Zs/tZ&dͲ/^KKE&/Ed/>
ŝƐĐŽ/WŽŶĨĞƌĞŶĐĞWŚŽŶĞϴϴϯϮhƐĞƌ'ƵŝĚĞ
Ϯϲ
ĂůůƐ
Your formal Warranty Statement, including the warranties and license agreements applicable to Cisco
software, is available on Cisco.com at this URL: https://www.cisco.com/go/hwwarranty.
,WdZ
Ϯ
ĂůůƐ
Make Calls, page 25
Answer Calls, page 27
Mute Your Call, page 29
Hold Calls, page 29
Forward Calls, page 30
Transfer Calls, page 30
Conference Calls and Meetings, page 31
DĂŬĞĂůůƐ
Your phone works just like a regular phone. But we make it easier for you to make calls.
DĂŬĞĂĂůů
Use your phone just like any other phone to make a call.
WƌŽĐĞĚƵƌĞ
Enter a number and press Call.
ZĞĚŝĂůĂEƵŵďĞƌ
You can call the most recently dialed phone number.

ŝƐĐŽ/WŽŶĨĞƌĞŶĐĞWŚŽŶĞϴϴϯϮhƐĞƌ'ƵŝĚĞ
Ϯϳ
WƌŽĐĞĚƵƌĞ
Press Redial.
^ƉĞĞĚŝĂů
^ƉĞĞĚŝĂů
You can assign codes to quickly dial the numbers of people you call often. Before you can use speed-dial
features on your phone, set up speed dial in the Self Care portal. Speed-dial codes allow you to phone number
from a code (sometimes referred to as abbreviated dialing).
ZĞůĂƚĞĚdŽƉŝĐƐ
Self Care Portal, on page 11
Speed-Dial Numbers, on page 12
DĂŬĞĂ^ƉĞĞĚͲŝĂůĂůůǁŝƚŚzŽƵƌŽŶĨĞƌĞŶĐĞWŚŽŶĞ
ĞĨŽƌĞzŽƵĞŐŝŶ
Set up speed-dial codes in the Self Care portal.
WƌŽĐĞĚƵƌĞ
^ƚĞƉϭ Press down on the Navigation bar or press Favorites.
^ƚĞƉϮ Select a speed-dial entry and press Call.
DĂŬĞĂĂůůtŝƚŚĂ^ƉĞĞĚͲŝĂůŽĚĞ
ĞĨŽƌĞzŽƵĞŐŝŶ
Set up speed-dial codes in the Self Care portal.
WƌŽĐĞĚƵƌĞ
Enter the speed-dial code and press Abbr dial.
'ĞƚEŽƚŝĨŝĞĚtŚĞŶĂŽŶƚĂĐƚŝƐǀĂŝůĂďůĞ
If you call someone and their line is busy or they do not answer, you can be notified with a special ringtone
and a message when they are available.

Zs/tZ&dͲ/^KKE&/Ed/>
ŝƐĐŽ/WŽŶĨĞƌĞŶĐĞWŚŽŶĞϴϴϯϮhƐĞƌ'ƵŝĚĞ
Ϯϴ
ĂůůƐ
WƌŽĐĞĚƵƌĞ
^ƚĞƉϭ Press Callback while you are listening to the busy tone or ring sound.
^ƚĞƉϮ Press Exit to exit the confirmation screen.
^ƚĞƉϯWhen you hear the ringtone that the person is available and see the message, press Dial to place the call again.

Zs/tZ&dͲ/^KKE&/Ed/>
ŝƐĐŽ/WŽŶĨĞƌĞŶĐĞWŚŽŶĞϴϴϯϮhƐĞƌ'ƵŝĚĞ
Ϯϵ
ĂůůƐ
ŝĂůĂŶ/ŶƚĞƌŶĂƚŝŽŶĂůEƵŵďĞƌ
ŝĂůĂŶ/ŶƚĞƌŶĂƚŝŽŶĂůEƵŵďĞƌ
You can dial international calls when you prefix the phone number with a plus (+) sign.
WƌŽĐĞĚƵƌĞ
^ƚĞƉϭ Press and hold star (*) for at least 1 second.
The plus (+) sign is displayed as the first digit in the phone number.
^ƚĞƉϮ Enter the phone number.
^ƚĞƉϯ Press Call or wait 10 seconds after the last key press to automatically place the call.
ĂůůƐdŚĂƚZĞƋƵŝƌĞĂŝůůŝŶŐŽĚĞŽƌƵƚŚŽƌŝnjĂƚŝŽŶŽĚĞ
Your administrator may require that you enter a billing code or authorization code (or both codes) after you
dial a phone number. The billing code, called a Client Matter Code, is used for accounting or billing purposes.
The authorization code, called a Forced Authorization Code, controls access to certain phone numbers.
When a billing code is required, the phone displays Enter Client Matter Code. Enter the billing
code. The phone displays the billing code that you entered, and you hear a special tone.
When an authorization code is required, the phone displays Enter Authorization Code, the dialed
number changes to ******** , and you hear a special tone. For security reasons, the phone displays a *
instead of the number entered.
When both a billing code and an authorization code are required, you are prompted for the authorization code
first. Then you are prompted for the billing code.
ZĞůĂƚĞĚdŽƉŝĐƐ
Speed-Dial Numbers, on page 12
^ĞĐƵƌĞĂůůƐ
Your administrator can take steps to protect your calls from tampering by people outside your company.
When a lock icon is displayed on your phone during a call, your phone call is secure. Depending upon how
your phone is configured, you may have to sign on before you make a call or before a security tone plays
over your handset.

Zs/tZ&dͲ/^KKE&/Ed/>
ŝƐĐŽ/WŽŶĨĞƌĞŶĐĞWŚŽŶĞϴϴϯϮhƐĞƌ'ƵŝĚĞ
ϯϬ
ĂůůƐ
ŶƐǁĞƌĂůůƐ
Your Cisco IP Phone works just like a regular phone. But we make it easier for you to answer calls.
ŶƐǁĞƌĂĂůů
ŶƐǁĞƌĂĂůů
WƌŽĐĞĚƵƌĞ
Press Answer.
ŶƐǁĞƌĂůůtĂŝƚŝŶŐŽŶzŽƵƌŽŶĨĞƌĞŶĐĞWŚŽŶĞ
When you're on an active call, you know that a call is waiting when you hear a single beep and see a message
on the conference phone screen.
WƌŽĐĞĚƵƌĞ
Press Answer.
ĞĐůŝŶĞĂĂůů
You can send a ringing call to your voicemail system.
WƌŽĐĞĚƵƌĞ
Press Decline.
dƵƌŶKŶŽEŽƚŝƐƚƵƌď
Use do not disturb (DND) to silence your phone and ignore incoming call notifications when you need to
avoid distractions.
When you turn on DND, your incoming calls are forwarded to another number, such as your voicemail, if it
is set up.
WƌŽĐĞĚƵƌĞ
^ƚĞƉϭ Press Do not disturb to turn on DND.
^ƚĞƉϮ Press Turn off DND to turn off DND.

Zs/tZ&dͲ/^KKE&/Ed/>
ŝƐĐŽ/WŽŶĨĞƌĞŶĐĞWŚŽŶĞϴϴϯϮhƐĞƌ'ƵŝĚĞ
ϯϭ
ĂůůƐ
dƌĂĐĞĂ^ƵƐƉŝĐŝŽƵƐĂůů
If you receive unwanted or harassing calls, use malicious call identification (MCID) to alert your
administrator. Your phone sends a silent notification message to your administrator with information about
the call.
DƵƚĞzŽƵƌĂůů
WƌŽĐĞĚƵƌĞ
Press Report caller.
DƵƚĞzŽƵƌĂůů
While you are on a call, you can mute the audio, so that you can hear the other person, but they cannot hear
you.
When you have a call muted, the LED bar lights red.
WƌŽĐĞĚƵƌĞ
^ƚĞƉϭ
When you press Mute on an expansion microphone, the phone and all microphones are muted.
^ƚĞƉϮ Press Mute again to turn mute off.
,ŽůĚĂůůƐ
WƵƚĂĂůůŽŶ,ŽůĚ
You can put an active call on hold and then resume the call when you're ready.
WƌŽĐĞĚƵƌĞ
^ƚĞƉϭ Press Hold.
Press Mute on the phone o
r
Mute on an expansion microphone.

Zs/tZ&dͲ/^KKE&/Ed/>
ŝƐĐŽ/WŽŶĨĞƌĞŶĐĞWŚŽŶĞϴϴϯϮhƐĞƌ'ƵŝĚĞ
ϯϮ
ĂůůƐ
^ƚĞƉϮ To resume a call from hold, press Resume.
ŶƐǁĞƌĂĂůů>ĞĨƚŽŶ,ŽůĚĨŽƌdŽŽ>ŽŶŐ
When you've left a call on hold too long, you'll be notified with these cues:
Single ring, repeating at intervals
Flashing LED bar
Visual notification on the phone screen
^ǁĂƉĞƚǁĞĞŶĐƚŝǀĞĂŶĚ,ĞůĚĂůůƐ
WƌŽĐĞĚƵƌĞ
Press Answer to resume the held call.
^ǁĂƉĞƚǁĞĞŶĐƚŝǀĞĂŶĚ,ĞůĚĂůůƐ
You can easily switch between active and held calls.
WƌŽĐĞĚƵƌĞ
Press Swap to switch to the held call.
&ŽƌǁĂƌĚĂůůƐ
You can forward calls from your phone to another number.
There are two ways of forwarding your calls:
Forward all calls
Forward calls in special situations, such as when the phone is busy or there is no answer.
When a phone is forwarded, you see the Forward all icon on the screen.
WƌŽĐĞĚƵƌĞ
^ƚĞƉϭ When the phone is inactive, press Forward All.

Zs/tZ&dͲ/^KKE&/Ed/>
ŝƐĐŽ/WŽŶĨĞƌĞŶĐĞWŚŽŶĞϴϴϯϮhƐĞƌ'ƵŝĚĞ
ϯϯ
ĂůůƐ
^ƚĞƉϮ Enter the call forward target number exactly as you would dial it from your phone, or select an entry from
your list of recent calls.
ZĞůĂƚĞĚdŽƉŝĐƐ
Self Care Portal, on page 11
dƌĂŶƐĨĞƌĂůůƐ
You can transfer an active call to another person.
dƌĂŶƐĨĞƌĂĂůůƚŽŶŽƚŚĞƌWĞƌƐŽŶ
When you transfer a call, you can stay on the original call until the other person answers. This way, you can
talk privately with the other person before you remove yourself from the call. If you don't want to talk,
transfer the call before the other person answers.
ŽŶƐƵůƚĞĨŽƌĞzŽƵŽŵƉůĞƚĞĂdƌĂŶƐĨĞƌ
You can also swap between both callers to consult with them individually before you remove yourself from
the call.
WƌŽĐĞĚƵƌĞ
^ƚĞƉϭ From a call that is not on hold, press Transfer.
^ƚĞƉϮ Enter the other person's phone number.
^ƚĞƉϯ (Optional) Wait until you hear the line ring or until the other person answers the call.
^ƚĞƉϰ Press Transfer again.
ŽŶƐƵůƚĞĨŽƌĞzŽƵŽŵƉůĞƚĞĂdƌĂŶƐĨĞƌ
Before you transfer a call, you can talk to the person that you're transferring the call to. You can also swap
between that call and the call that you're transferring, before you complete the transfer.
ĞĨŽƌĞzŽƵĞŐŝŶ
You have an active call that needs to be transferred.

Zs/tZ&dͲ/^KKE&/Ed/>
ŝƐĐŽ/WŽŶĨĞƌĞŶĐĞWŚŽŶĞϴϴϯϮhƐĞƌ'ƵŝĚĞ
ϯϰ
ĂůůƐ
WƌŽĐĞĚƵƌĞ
^ƚĞƉϭ Press Transfer.
^ƚĞƉϮ Enter the other person's phone number.
^ƚĞƉϯ Press Swap to return to the held call.
^ƚĞƉϰ Press Transfer to complete the transfer.
ŽŶĨĞƌĞŶĐĞĂůůƐĂŶĚDĞĞƚŝŶŐƐ
You can talk with several people in a single call. You can dial another person and add them to the call.
When you add more than one person to a conference call, wait a few seconds between adding participants.
As the conference host, you can remove individual participants from the conference. The conference ends
when all participants hang up.
ĚĚŶŽƚŚĞƌWĞƌƐŽŶƚŽĂĂůů
When you are on a call, you can add someone else to your conversation.
^ǁĂƉĞƚǁĞĞŶĂůůƐĞĨŽƌĞzŽƵŽŵƉůĞƚĞĂŽŶĨĞƌĞŶĐĞ
WƌŽĐĞĚƵƌĞ
^ƚĞƉϭ From an active call, press Conf.
^ƚĞƉϮ Enter a number.
^ƚĞƉϯ (Optional) Wait until you hear the line ring or until the other person answers the call.
^ƚĞƉϰ Press Conf.
^ǁĂƉĞƚǁĞĞŶĂůůƐĞĨŽƌĞzŽƵŽŵƉůĞƚĞĂŽŶĨĞƌĞŶĐĞ
You can talk to a person before you add them to a conference. You can also swap between the conference
call and the call with the other person.
WƌŽĐĞĚƵƌĞ

Zs/tZ&dͲ/^KKE&/Ed/>
ŝƐĐŽ/WŽŶĨĞƌĞŶĐĞWŚŽŶĞϴϴϯϮhƐĞƌ'ƵŝĚĞ
ϯϱ
ĂůůƐ
^ƚĞƉϭ Call a new conference participant, but do not add the participant to the conference. Wait
until the call is connected.
^ƚĞƉϮ Press Swap to toggle between the participant and the conference.
sŝĞǁĂŶĚZĞŵŽǀĞŽŶĨĞƌĞŶĐĞWĂƌƚŝĐŝƉĂŶƚƐ
If you create a conference, you can view the details of the last 16 participants who join the conference. You
can also remove participants.
WƌŽĐĞĚƵƌĞ
^ƚĞƉϭ While you are in a conference, press Show Details to view a list of participants.
^ƚĞƉϮ (Optional) Highlight a participant and press Remove to drop the participant from the conference.

Zs/tZ&dͲ/^KKE&/Ed/>
ŝƐĐŽ/WŽŶĨĞƌĞŶĐĞWŚŽŶĞϴϴϯϮhƐĞƌ'ƵŝĚĞ
ϯϲ
ŽŶƚĂĐƚƐ
,WdZ
ϯ
ŽŶƚĂĐƚƐ
Corporate Directory, page 33
Personal Directory, page 33
Cisco Web Dialer, page 37
ŽƌƉŽƌĂƚĞŝƌĞĐƚŽƌLJ
You can look up a coworker's number from your phone, which makes it easier to give them a call. Your
administrator sets up and maintains the directory.
ŝĂůĂŽŶƚĂĐƚŝŶƚŚĞŽƌƉŽƌĂƚĞŝƌĞĐƚŽƌLJ
WƌŽĐĞĚƵƌĞ
^ƚĞƉϭ Press Contacts.
^ƚĞƉϮ Select Corporate Directory.
^ƚĞƉϯ Select a search criteria.
^ƚĞƉϰ Enter your search criteria and press Submit.
^ƚĞƉϱ Select the contact and press Dial.
WĞƌƐŽŶĂůŝƌĞĐƚŽƌLJ
Use the personal directory to store the contact information for friends, family, or coworkers. You can add your
own contacts to the personal directory. You can add special speed-dial codes for people who you often call.
ŝƐĐŽ/WŽŶĨĞƌĞŶĐĞWŚŽŶĞϴϴϯϮhƐĞƌ'ƵŝĚĞ
ϯϳ
You can set up your personal directory from your phone or from the Self Care portal. Use your phone to assign
speed-dial codes to the directory entries.
^ŝŐŶ/ŶĂŶĚKƵƚŽĨĂWĞƌƐŽŶĂůŝƌĞĐƚŽƌLJ
ZĞůĂƚĞĚdŽƉŝĐƐ
Self Care Portal, on page 11
^ŝŐŶ/ŶĂŶĚKƵƚŽĨĂWĞƌƐŽŶĂůŝƌĞĐƚŽƌLJ
ĞĨŽƌĞzŽƵĞŐŝŶ
Before you can sign in to your personal directory, you need your user ID and PIN. Contact your administrator if
you don't know this information.
WƌŽĐĞĚƵƌĞ
^ƚĞƉϭ Press Contacts.
^ƚĞƉϮ Select Personal directory.
^ƚĞƉϯ Enter your user ID and PIN, and press Submit.
^ƚĞƉϰ To sign out, select Log out, press Select, and then press OK.
ĚĚĂEĞǁŽŶƚĂĐƚƚŽzŽƵƌWĞƌƐŽŶĂůŝƌĞĐƚŽƌLJ
WƌŽĐĞĚƵƌĞ
^ƚĞƉϭ Press Contacts.
^ƚĞƉϮ Sign in to your personal directory.
^ƚĞƉϯ Select Personal Address Book and press Submit.
^ƚĞƉϰ Press New.
^ƚĞƉϱ Enter first name, last name, and optionally a nickname.
^ƚĞƉϲ Press Phones, enter the phone number along with any required access codes, and then press Submit.
Zs/tZ&dͲ/^KKE&/Ed/>

Zs/tZ&dͲ/^KKE&/Ed/>
ŝƐĐŽ/WŽŶĨĞƌĞŶĐĞWŚŽŶĞϴϴϯϮhƐĞƌ'ƵŝĚĞ
ϯϴ
ŽŶƚĂĐƚƐ
^ĞĂƌĐŚĨŽƌĂŽŶƚĂĐƚŝŶzŽƵƌWĞƌƐŽŶĂůŝƌĞĐƚŽƌLJ
WƌŽĐĞĚƵƌĞ
^ƚĞƉϭ Press Contacts.
^ƚĞƉϮ Sign in to your personal directory.
^ƚĞƉϯ Select Personal Address Book.
^ƚĞƉϰ Select a search criteria.
^ƚĞƉϱ Enter your search criteria and press Submit.
ĂůůĂŽŶƚĂĐƚŝŶzŽƵƌWĞƌƐŽŶĂůŝƌĞĐƚŽƌLJ
WƌŽĐĞĚƵƌĞ
^ƚĞƉϭ Press Contacts.
^ƚĞƉϮ Sign in to your personal directory.
^ƚĞƉϯ Select your Personal directory and search for an entry.
^ƚĞƉϰ Select the personal address book entry that you want to dial.
^ƚĞƉϱ Select the required fast-dial code and press Call.
ƐƐŝŐŶĂ&ĂƐƚͲŝĂůŽĚĞƚŽĂŽŶƚĂĐƚ
A fast-dial code makes it easier to call a contact.
WƌŽĐĞĚƵƌĞ
^ƚĞƉϭ Press Contacts.
^ƚĞƉϮ Sign in to your personal directory.
^ƚĞƉϯ Select Personal Address Book.
^ƚĞƉϰ Select a search criteria.
^ƚĞƉϱ Enter the search criteria information and press Submit.
^ƚĞƉϲ Select the contact.
^ƚĞƉϳ Press FastDial.
^ƚĞƉϴ Select a number and press Select.
^ƚĞƉϵ Scroll to an unassigned fast-dial index and press Submit.

ŝƐĐŽ/WŽŶĨĞƌĞŶĐĞWŚŽŶĞϴϴϯϮhƐĞƌ'ƵŝĚĞ
ϯϵ
ĂůůĂŽŶƚĂĐƚǁŝƚŚĂ&ĂƐƚͲŝĂůŽĚĞ
ĂůůĂŽŶƚĂĐƚǁŝƚŚĂ&ĂƐƚͲŝĂůŽĚĞ
WƌŽĐĞĚƵƌĞ
^ƚĞƉϭ Press Contacts.
^ƚĞƉϮ Sign in to your personal directory.
^ƚĞƉϯ Select Personal Fast Dials and scroll to a fast-dial code.
^ƚĞƉϰ Select the required fast-dial code and press Call.
ĚŝƚĂŽŶƚĂĐƚŝŶzŽƵƌWĞƌƐŽŶĂůŝƌĞĐƚŽƌLJ
WƌŽĐĞĚƵƌĞ
^ƚĞƉϭ Press Contacts.
^ƚĞƉϮ Sign in to your Personal directory.
^ƚĞƉϯ Select Personal address book and search for an entry.
^ƚĞƉϰ Press Select, then Edit.
^ƚĞƉϱ Modify the entry information.
^ƚĞƉϲ Press Phones to modify a phone number.
^ƚĞƉϳ Press Update.
ZĞŵŽǀĞĂŽŶƚĂĐƚĨƌŽŵzŽƵƌWĞƌƐŽŶĂůŝƌĞĐƚŽƌLJ
WƌŽĐĞĚƵƌĞ
^ƚĞƉϭ Press Contacts.
^ƚĞƉϮ Sign in to your personal directory.

Zs/tZ&dͲ/^KKE&/Ed/>
ŝƐĐŽ/WŽŶĨĞƌĞŶĐĞWŚŽŶĞϴϴϯϮhƐĞƌ'ƵŝĚĞ
ϰϬ
ŽŶƚĂĐƚƐ
^ƚĞƉϯ Select Personal Address Book and search for an entry.
^ƚĞƉϰ Press Select, then Edit, then Delete.
^ƚĞƉϱ Press OK to confirm the deletion.
Zs/tZ&dͲ/^KKE&/Ed/>
ĞůĞƚĞĂ&ĂƐƚͲŝĂůŽĚĞ
WƌŽĐĞĚƵƌĞ
^ƚĞƉϭ Press Contacts.
^ƚĞƉϮ Sign in to your personal directory.
^ƚĞƉϯ Select Personal Fast Dials and search for a fast-dial code.
^ƚĞƉϰ Select the required code and press Remove.
^ƚĞƉϱ Select the index and press Remove.
ŝƐĐŽtĞďŝĂůĞƌ
You can use Cisco Web Dialer, a web browser, and your Cisco IP phone to make calls from web and desktop
applications. Use your web browser and go to a website or your company directory, and then click a hyperlinked
phone number to begin your call.
You need a user ID and password to make a call. Your administrator can give you this information. First-time
users have to configure their preferences before a call.
For more information, see the Cisco Web Dialer document in https://www.cisco.com/c/en/us/support/
unified-communications/unified-communications-manager-callmanager/ products-installation-and-
configuration-guides-list.html

ŝƐĐŽ/WŽŶĨĞƌĞŶĐĞWŚŽŶĞϴϴϯϮhƐĞƌ'ƵŝĚĞ
ϰϭ
ŽŶƚĂĐƚƐ
ŝƐĐŽtĞďŝĂůĞƌ
Zs/tZ&dͲ/^KKE&/Ed/>

Zs/tZ&dͲ/^KKE&/Ed/>
ŝƐĐŽ/WŽŶĨĞƌĞŶĐĞWŚŽŶĞϴϴϯϮhƐĞƌ'ƵŝĚĞ
ϰϮ
,WdZ
ϰ
ZĞĐĞŶƚĂůůƐ
Recent Calls List, page 39
View Your Recent Calls, page 39
Return a Recent Call, page 39
Clear the Recent Calls List, page 40
Delete a Call Record , page 40
ZĞĐĞŶƚĂůůƐ>ŝƐƚ
Use the Recents list to see the 150 most recent individual calls and call groups.
If your Recents list reaches the maximum size, the next new entry overwrites the oldest entry in the list.
Calls in the Recents list are grouped if they are to and from the same number and are consecutive. Missed calls
from the same number also get grouped.
sŝĞǁzŽƵƌZĞĐĞŶƚĂůůƐ
Check to see who's called you recently.
WƌŽĐĞĚƵƌĞ
Select Recents.
When the phone is in the idle state, you can also view the Recent calls list by pressing the Navigation cluster up.
ZĞƚƵƌŶĂZĞĐĞŶƚĂůů
You can easily call someone who has called you.
ZĞĐĞŶƚĂůůƐůĞĂƌƚŚĞZĞĐĞŶƚĂůůƐ>ŝƐƚ

ŝƐĐŽ/WŽŶĨĞƌĞŶĐĞWŚŽŶĞϴϴϯϮhƐĞƌ'ƵŝĚĞ
ϰϯ
WƌŽĐĞĚƵƌĞ
^ƚĞƉ
ϭ Select Recents.
^ƚĞƉ
Ϯ Select the number that
you want to dial.
^ƚĞƉ
ϯ Press Call.
ůĞĂƌƚŚĞZĞĐĞŶƚĂůůƐ>ŝƐƚ
You can clear the Recents list on your phone.
WƌŽĐĞĚƵƌĞ
^ƚĞƉϭ Select Recents.
^ƚĞƉϮ Press Clear.
^ƚĞƉϯ Press Delete.
ĞůĞƚĞĂĂůůZĞĐŽƌĚ
You can edit Recents to remove a single call from your history. This helps preserve important contact
information because Recents holds only 150 calls.
WƌŽĐĞĚƵƌĞ
^ƚĞƉϭ Select Recents.
^ƚĞƉϮ Highlight the individual record or call group that you want to delete.
^ƚĞƉϯ Press Delete.
^ƚĞƉϰ Press Delete again to confirm.

Zs/tZ&dͲ/^KKE&/Ed/>
ŝƐĐŽ/WŽŶĨĞƌĞŶĐĞWŚŽŶĞϴϴϯϮhƐĞƌ'ƵŝĚĞ
ϰϰ
,WdZ
ϱ
sŽŝĐĞŵĂŝů
Your Voicemail Account, page 41
Check for New Voice Messages, page 41
Access Voicemail, page 42
zŽƵƌsŽŝĐĞŵĂŝůĐĐŽƵŶƚ
You can access your voice messages directly from your phone. But your administrator must set up your
voicemail account and set up your phone to access the voicemail system.
The Messages softkey on your phone acts as a speed dial into the voicemail system.
EŽƚĞ If the conference phone is a shared phone used in a conference room, the Messages softkey may not
display.
The voicemail system is not part of the phone. The voicemail system is a separate system that the phone and the
call server communicate with to give you voicemail capability.
When you aren t at your desk, you can call your voicemail system to access your voicemail. Typically, your
voicemail system has a phone number that you can dial directly and then follow the prompts to log into your
voice mailbox. Your administrator can give you the voicemail system phone number.
Because each voicemail system is different, we can't tell you how to use your voicemail system. For information
about your voicemail commands, see the voicemail system user documentation or contact your administrator.
ŚĞĐŬĨŽƌEĞǁsŽŝĐĞDĞƐƐĂŐĞƐ
To find out whether you have new voicemail messages, the number of missed calls and voicemail messages is
displayed on your screen. If you have more than 99 new messages, a plus (+) sign is displayed.
You will also hear a stutter tone played on the speaker when you use off-hook dialing. This stutter tone is line-
specific. You only hear it when you use a line that has voice messages.
sŽŝĐĞŵĂŝů
ĐĐĞƐƐsŽŝĐĞŵĂŝů

ŝƐĐŽ/WŽŶĨĞƌĞŶĐĞWŚŽŶĞϴϴϯϮhƐĞƌ'ƵŝĚĞ
ϰϱ
ZĞůĂƚĞĚdŽƉŝĐƐ
Self Care Portal, on page 11
ĐĐĞƐƐsŽŝĐĞŵĂŝů
WƌŽĐĞĚƵƌĞ
^ƚĞƉϭ Press Messages.
^ƚĞƉϮ Follow the voice prompts.

Zs/tZ&dͲ/^KKE&/Ed/>
ŝƐĐŽ/WŽŶĨĞƌĞŶĐĞWŚŽŶĞϴϴϯϮhƐĞƌ'ƵŝĚĞ
ϰϲ
,WdZ
ϲ
^ĞƚƚŝŶŐƐ
Change the Ringtone, page 43
Adjust the Phone Ringer Volume, page 43
Adjust the Volume During a Call, page 44
ŚĂŶŐĞƚŚĞZŝŶŐƚŽŶĞ
You can change the sound that your phone uses for incoming calls.
WƌŽĐĞĚƵƌĞ
^ƚĞƉϭ Select Settings > Preferences > Ringtone.
^ƚĞƉϮ Scroll through the list of ringtones and press Play to hear a sample.
^ƚĞƉϯ Press Set to use the ringtone.
ĚũƵƐƚƚŚĞWŚŽŶĞZŝŶŐĞƌsŽůƵŵĞ
If your phone ringer is too loud or too soft when you get an incoming call, you can change the ringer volume.
Changes to the ringer volume do not affect the call volume you hear when you are on a call.
WƌŽĐĞĚƵƌĞ
Press Volume up or down to adjust the volume when the phone is not in use.
^ĞƚƚŝŶŐƐĚũƵƐƚƚŚĞsŽůƵŵĞƵƌŝŶŐĂĂůů

ŝƐĐŽ/WŽŶĨĞƌĞŶĐĞWŚŽŶĞϴϴϯϮhƐĞƌ'ƵŝĚĞ
ϰϳ
ĚũƵƐƚƚŚĞsŽůƵŵĞƵƌŝŶŐĂĂůů
If the sound in your conference phone is too loud or too soft, you can change the volume while you are listening
to the other person.
WƌŽĐĞĚƵƌĞ
Press Volume up or down to adjust the volume while you are on a call.

Zs/tZ&dͲ/^KKE&/Ed/>
ŝƐĐŽ/WŽŶĨĞƌĞŶĐĞWŚŽŶĞϴϴϯϮhƐĞƌ'ƵŝĚĞ
ϰϴ
,WdZ
ϳ
ƉƉůŝĐĂƚŝŽŶƐ
Available Applications, page 45
View Active Applications, page 45
Switch to Active Applications, page 46
Close Active Applications, page 46
ǀĂŝůĂďůĞƉƉůŝĐĂƚŝŽŶƐ
Cisco phones don't include these applications by default. But your company might have added applications such
as the weather, stock information, company news, to-do lists, or similar information and services.
sŝĞǁĐƚŝǀĞƉƉůŝĐĂƚŝŽŶƐ
You can easily see what applications you already have open.
WƌŽĐĞĚƵƌĞ
^ƚĞƉϭ Press Settings.
^ƚĞƉϮ Select Running applications.
^ƚĞƉϯ Press Exit.
ƉƉůŝĐĂƚŝŽŶƐ^ǁŝƚĐŚƚŽĐƚŝǀĞƉƉůŝĐĂƚŝŽŶƐ
^ǁŝƚĐŚƚŽĐƚŝǀĞƉƉůŝĐĂƚŝŽŶƐ
WƌŽĐĞĚƵƌĞ

ŝƐĐŽ/WŽŶĨĞƌĞŶĐĞWŚŽŶĞϴϴϯϮhƐĞƌ'ƵŝĚĞ
ϰϵ
^ƚĞƉϭ Press Settings.
^ƚĞƉϮ Select Running applications.
^ƚĞƉ
ϯ Select a running
application and press
Switch to to open and
use the selected
application.
^ƚĞƉ
ϰ Press Exit.
ůŽƐĞĐƚŝǀĞƉƉůŝĐĂƚŝŽŶƐ
WƌŽĐĞĚƵƌĞ
^ƚĞƉϭ Press Settings.
^ƚĞƉϮ Select Running applications.
^ƚĞƉϯ Select a running application and press Close app to close the application.
^ƚĞƉϰ Press Close, then press Exit.
,WdZ
ϴ
WƌŽĚƵĐƚ^ĂĨĞƚLJĂŶĚ^ĞĐƵƌŝƚLJ
Safety and Performance Information, page 47
Compliance Statements, page 49
Cisco Product Security Overview, page 55
Important Online Information, page 56

Zs/tZ&dͲ/^KKE&/Ed/>
ŝƐĐŽ/WŽŶĨĞƌĞŶĐĞWŚŽŶĞϴϴϯϮhƐĞƌ'ƵŝĚĞ
ϱϬ
^ĂĨĞƚLJĂŶĚWĞƌĨŽƌŵĂŶĐĞ/ŶĨŽƌŵĂƚŝŽŶ
WŽǁĞƌKƵƚĂŐĞ
Your access to emergency service through the phone requires that the phone receive power. If a power
interruption occurs, service or emergency calling service dialing does not function until power is restored. If a
power failure or disruption occurs, you may need to reset or reconfigure the equipment before you can use
service or emergency calling service dialing.
ZĞŐƵůĂƚŽƌLJŽŵĂŝŶƐ
The radio frequency (RF) for this phone is configured for a specific regulatory domain. If you use this phone
outside of the specific regulatory domain, the phone will not function properly, and you might violate local
regulations.
,ĞĂůƚŚͲĂƌĞŶǀŝƌŽŶŵĞŶƚƐ
This product is not a medical device and uses an unlicensed frequency band that is susceptible to interference
from other devices or equipment.

Zs/tZ&dͲ/^KKE&/Ed/>
ŝƐĐŽ/WŽŶĨĞƌĞŶĐĞWŚŽŶĞϴϴϯϮhƐĞƌ'ƵŝĚĞ
ϱϭ
WƌŽĚƵĐƚ^ĂĨĞƚLJĂŶĚ^ĞĐƵƌŝƚLJ
džƚĞƌŶĂůĞǀŝĐĞƐ
džƚĞƌŶĂůĞǀŝĐĞƐ
We recommend that you use good-quality external devices that are shielded against unwanted radio frequency
(RF) and audio frequency (AF) signals. External devices include headsets, cables, and connectors.
Depending on the quality of these devices and their proximity to other devices, such as mobile phones or two-
way radios, some audio noise may still occur. In these cases, we recommend that you take one or more of these
actions:
Move the external device away from the source of the RF or AF signals.
Route the external device cables away from the source of the RF or AF signals.
Use shielded cables for the external device, or use cables with a better shield and connector.
Shorten the length of the external device cable.
Apply ferrites or other such devices on the cables for the external device.
Cisco cannot guarantee the performance of external devices, cables, and connectors.
ĂƵƚŝŽŶIn European Union countries, use only external speakers, microphones, and headsets that are fully compliant with
the EMC Directive [89/336/EC].
tĂLJƐƚŽWƌŽǀŝĚĞWŽǁĞƌƚŽzŽƵƌWŚŽŶĞ
You can provide power to your phone in one of two ways:
Use the power adapter that comes with your phone.
If your network supports Power over Ethernet (PoE), you can plug your phone into the network. Plug an
Ethernet cable into the Ethernet phone port and into the network.
If you are not sure whether your network supports PoE, check with your administrator.
WŚŽŶĞĞŚĂǀŝŽƌƵƌŝŶŐdŝŵĞƐŽĨEĞƚǁŽƌŬŽŶŐĞƐƚŝŽŶ
Anything that degrades network performance can affect phone voice and video quality, and in some cases, can
cause a call to drop. Sources of network degradation can include, but are not limited to, the following
activities:
Administrative tasks, such as an internal port scan or security scan
Attacks that occur on your network, such as a Denial of Service attack
ŽŵƉůŝĂŶĐĞ^ƚĂƚĞŵĞŶƚƐ

Zs/tZ&dͲ/^KKE&/Ed/>
ŝƐĐŽ/WŽŶĨĞƌĞŶĐĞWŚŽŶĞϴϴϯϮhƐĞƌ'ƵŝĚĞ
ϱϮ
WƌŽĚƵĐƚ ^ĂĨĞƚLJĂŶĚ^ĞĐƵƌŝƚLJ
ŽŵƉůŝĂŶĐĞ^ƚĂƚĞŵĞŶƚƐ
ŽŵƉůŝĂŶĐĞ^ƚĂƚĞŵĞŶƚƐĨŽƌƚŚĞƵƌŽƉĞĂŶhŶŝŽŶ
DĂƌŬŝŶŐ
The following CE mark is affixed to the equipment and packaging.
Z&džƉŽƐƵƌĞ^ƚĂƚĞŵĞŶƚĨŽƌƚŚĞƵƌŽƉĞĂŶhŶŝŽŶ
This device has been evaluated and found compliant in accordance with EU EMF Directive 1999/519/EC.
ŽŵƉůŝĂŶĐĞ^ƚĂƚĞŵĞŶƚƐĨŽƌƚŚĞh^
WĂƌƚϭϱZĂĚŝŽĞǀŝĐĞ
ĂƵƚŝŽŶThe Part 15 radio device operates on a non-interference basis with other devices operating at this frequency.
Any changes or modification to said product not expressly approved by Cisco, including the use of non-
Cisco antennas, could void the user s authority to operate this device.
ŽŵƉůŝĂŶĐĞ^ƚĂƚĞŵĞŶƚƐĨŽƌĂŶĂĚĂ
This device complies with Industry Canada license-exempt RSS standard(s). Operation is subject to the
following two conditions: (1) this device may not cause interference, and (2) this device must accept any
interference, including interference that may cause undesired operation of the device. Privacy of
Communications may not be ensured when using this phone.
This product meets the applicable Innovation, Science and Economic Development Canada technical
specifications.
ǀŝƐĚĞŽŶĨŽƌŵŝƚĠĂŶĂĚŝĞŶ
Ce dispositif est conforme aux normes CNR exemptes de licence d Industrie Canada. Le fonctionnement de ce
dispositif est autorisé sous réserve des deux conditions suivantes : (1) il ne doit pas produire de brouillage et (2)
lutilisateur du dispositif doit être prêt à accepter tout brouillage radioélectrique reçu même si ce brouillage est
susceptible de compromettre le fonctionnement du dispositif.
ŽŵƉůŝĂŶĐĞ^ƚĂƚĞŵĞŶƚƐĨŽƌĂŶĂĚĂ

Zs/tZ&dͲ/^KKE&/Ed/>
ŝƐĐŽ/WŽŶĨĞƌĞŶĐĞWŚŽŶĞϴϴϯϮhƐĞƌ'ƵŝĚĞ
ϱϯ
WƌŽĚƵĐƚ^ĂĨĞƚLJĂŶĚ^ĞĐƵƌŝƚLJ
ĂŶĂĚŝĂŶZ&džƉŽƐƵƌĞ^ƚĂƚĞŵĞŶƚ
THIS DEVICE MEETS THE LIMITS AS REFERENCED BY ISED RSS-102 R5 FOR EXPOSURE TO RADIO
WAVES
Your device includes a radio transmitter and receiver. It is designed not to exceed the General populace
(uncontrolled) limits for exposure to radio waves (radio frequency electromagnetic fields) as referenced in RSS-102
which references Health Canada Safety Code 6 and include a substantial safety margin designed to assure the safety
of all persons, regardless of age and health.
As such the systems are designed to be operated as to avoid contact with the antennas by the end user. It is
recommended to set the system in a location where the antennas can remain at least a minimum distance as specified
from the user in accordance to the regulatory guidelines which are designed to reduce the overall exposure of the user
or operator.
The device has been tested and found compliant with the applicable regulations as part of the radio certification process.
ĠĐůĂƌĂƚŝŽŶĚΖdžƉŽƐŝƚŝŽŶĂƵdžZ&ĂŶĂĚŝĞŶŶĞ
CE PÉRIPHÉRIQUE RESPECTE LES LIMITES DÉCRITES PAR LA NORME RSS-102 R5 D'EXPOSITION À
DES ONDES RADIO
Votre appareil comprend un émetteur et un récepteur radio. Il est conçu pour ne pas dépasser les limites applicables à
la population générale (ne faisant pas l'objet de contrôles périodiques) d'exposition à des ondes radio (champs
électromagnétiques de fréquences radio) comme indiqué dans la norme RSS-102 qui sert de référence au règlement de
sécurité n°6 sur l'état de santé du Canada et inclut une marge de sécurité importantes conçue pour garantir la sécurité
de toutes les personnes, quels que soient leur âge et état de santé.
En tant que tels, les systèmes sont conçus pour être utilisés en évitant le contact avec les antennes par l'utilisateur final.
Il est recommandé de positionner le système à un endroit où les antennes peuvent demeurer à au moins une distance
minimum préconisée de l'utilisateur, conformément aux instructions des réglementations qui sont conçues pour réduire
l'exposition globale de l'utilisateur ou de l'opérateur.
Le périphérique a été testé et déclaré conforme aux réglementations applicables dans le cadre du processus de
certification radio.
ĂŶĂĚŝĂŶ,ŝŐŚͲWŽǁĞƌZĂĚĂƌƐ^ƚĂƚĞŵĞŶƚ
Users should also be advised that high-power radars are allocated as primary users (that is, priority users) of the bands
5250-5350 MHz and 5650-5850 MHz and that these radars could cause interference and/or damage to LE-LAN devices.
Devraient également être informés des utilisateurs que les radars à haute puissance sont désignés comme utilisateurs
principaux (à savoir des utilisateurs prioritaires) des bandes 5250-5350 MHz et 5650 à 5.850 MHz et que ces radars
pourraient provoquer des interférences et / ou endommager les périphériques LE-LAN.
ŽŵƉůŝĂŶĐĞ^ƚĂƚĞŵĞŶƚƐĨŽƌEĞǁĞĂůĂŶĚ

Zs/tZ&dͲ/^KKE&/Ed/>
ŝƐĐŽ/WŽŶĨĞƌĞŶĐĞWŚŽŶĞϴϴϯϮhƐĞƌ'ƵŝĚĞ
ϱϰ
WƌŽĚƵĐƚ ^ĂĨĞƚLJĂŶĚ^ĞĐƵƌŝƚLJ
ŽŵƉůŝĂŶĐĞ^ƚĂƚĞŵĞŶƚƐĨŽƌEĞǁĞĂůĂŶĚ
WĞƌŵŝƚƚŽŽŶŶĞĐƚ;WdͿ'ĞŶĞƌĂůtĂƌŶŝŶŐ
The grant of a Telepermit for any item of terminal equipment indicates only that Telecom has accepted that the
item complies with minimum conditions for connection to its network. It indicates no endorsement of the
product by Telecom, nor does it provide any sort of warranty. Above all, it provides no assurance that any item
will work correctly in all respects with another item of Telepermitted equipment of a different make or model,
nor does it imply that any product is compatible with all of Telecom's network services.
Zs/tZ&dͲ/^KKE&/Ed/>
ŝƐĐŽ/WŽŶĨĞƌĞŶĐĞWŚŽŶĞϴϴϯϮhƐĞƌ'ƵŝĚĞ
ϱϱ
WƌŽĚƵĐƚ^ĂĨĞƚLJĂŶĚ^ĞĐƵƌŝƚLJ
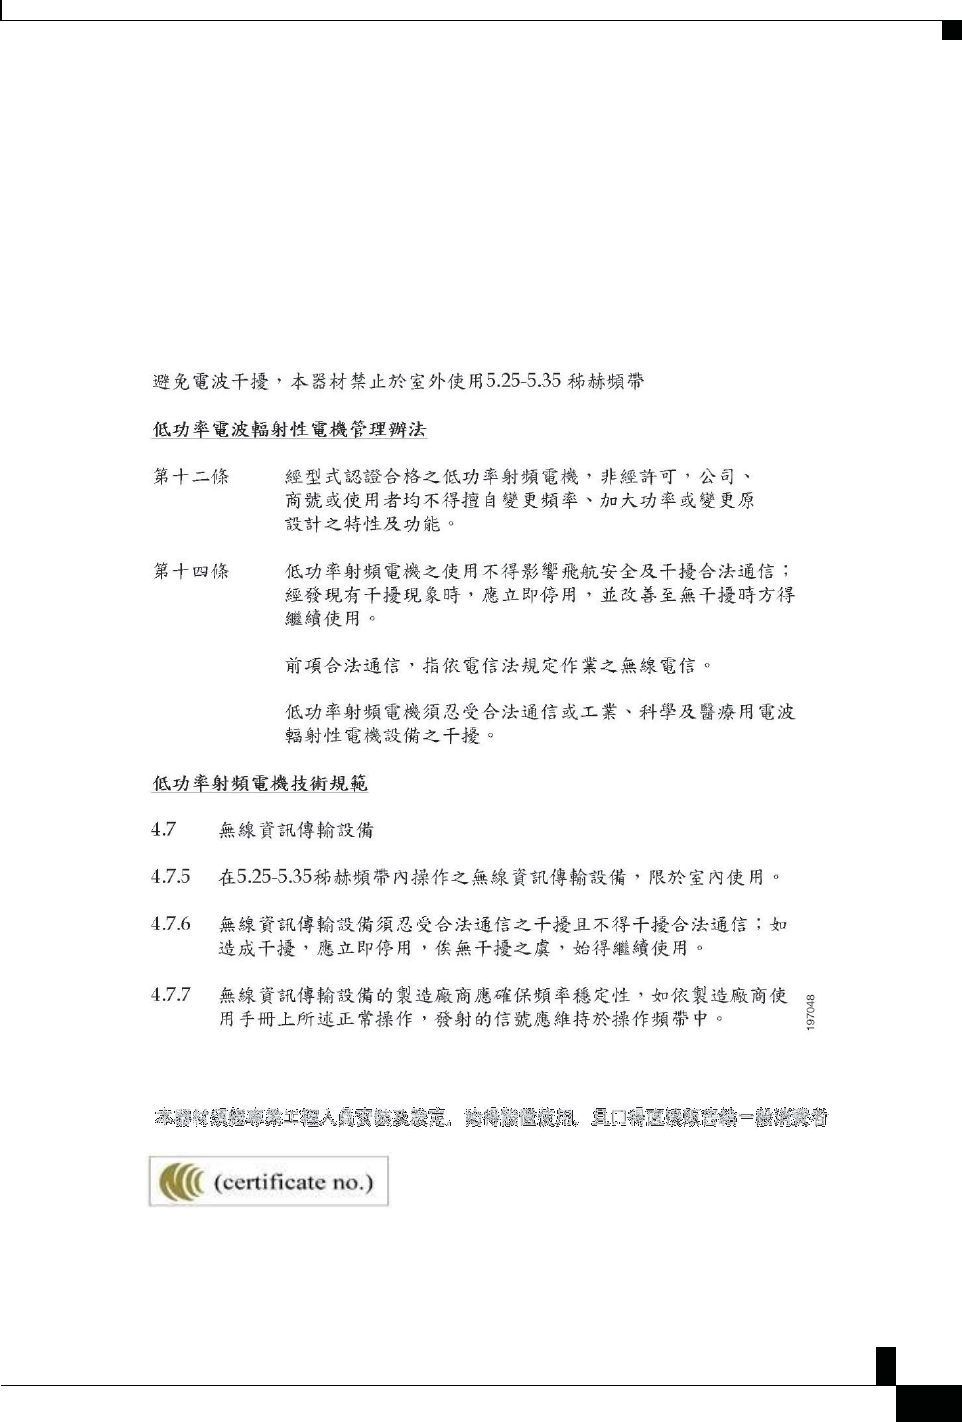
ŽŵƉůŝĂŶĐĞ^ƚĂƚĞŵĞŶƚƐĨŽƌdĂŝǁĂŶ
ŽŵƉůŝĂŶĐĞ^ƚĂƚĞŵĞŶƚƐĨŽƌdĂŝǁĂŶ
'dtĂƌŶŝŶŐ^ƚĂƚĞŵĞŶƚĨŽƌŝƐĐŽtŝƌĞůĞƐƐ/WWŚŽŶĞϴϴϮdž^ĞƌŝĞƐ
ŽŵƉůŝĂŶĐĞ^ƚĂƚĞŵĞŶƚĨŽƌƌŐĞŶƚŝŶĂ
Zs/tZ&dͲ/^KKE&/Ed/>
ŝƐĐŽ/WŽŶĨĞƌĞŶĐĞWŚŽŶĞϴϴϯϮhƐĞƌ'ƵŝĚĞ
ϱϲ
WƌŽĚƵĐƚ ^ĂĨĞƚLJĂŶĚ^ĞĐƵƌŝƚLJ
ŽŵƉůŝĂŶĐĞ^ƚĂƚĞŵĞŶƚĨŽƌƌŐĞŶƚŝŶĂ
ĚǀĞƌƚĞŶĐŝĂ
No utilizar una fuente de alimentación con caracteristícas distintas a las expresadas ya que podría ser peligroso.
CP-8832-MIC-WLS= (CNC ID: xxxx)
ŽŵƉůŝĂŶĐĞ/ŶĨŽƌŵĂƚŝŽŶĨŽƌƌĂnjŝů
ƌƚ͘ϲǑͲϱϬϲ
This equipment is a secondary type device, that is, it is not protected against harmful interference, even if the
interference is caused by a device of the same type, and it also cannot cause any interference to primary type
devices.
For more information, go to this URL: http://www.anatel.gov.br
Este equipamento opera em caráter secundário, isto é, não tem direito a proteção contra interferência prejudicial,
mesmo de estações do mesmo tipo, e não pode causar interferência a sistemas operando em caráter primário.
Site Anatel: http://www.anatel.gov.br
ŽŵƉůŝĂŶĐĞ^ƚĂƚĞŵĞŶƚĨŽƌ^ŝŶŐĂƉŽƌĞ
ŽŵƉůŝĂŶĐĞ/ŶĨŽƌŵĂƚŝŽŶĨŽƌŚŝŶĂ
ůĂƐƐtĂƌŶŝŶŐ^ƚĂƚĞŵĞŶƚ
ŽŵƉůŝĂŶĐĞ/ŶĨŽƌŵĂƚŝŽŶĨŽƌ:ĂƉĂŶ

Zs/tZ&dͲ/^KKE&/Ed/>
ŝƐĐŽ/WŽŶĨĞƌĞŶĐĞWŚŽŶĞϴϴϯϮhƐĞƌ'ƵŝĚĞ
ϱϳ
WƌŽĚƵĐƚ^ĂĨĞƚLJĂŶĚ^ĞĐƵƌŝƚLJ
ŽŵƉůŝĂŶĐĞ/ŶĨŽƌŵĂƚŝŽŶĨŽƌ:ĂƉĂŶ
VCCI Compliance for Class B Equipment
Japan JATE Radio Compliance CP-8832-MIC-WLS=
5.2/5.3GHz is limited to indoor use only in Japan
ŽŵƉůŝĂŶĐĞ/ŶĨŽƌŵĂƚŝŽŶĨŽƌ<ŽƌĞĂ
TNY-XXXXX
ŽŵƉůŝĂŶĐĞ/ŶĨŽƌŵĂƚŝŽŶĨŽƌDĞdžŝĐŽ
IFETEL:xxxxxx
Approval:xxxx
ŽŵƉůŝĂŶĐĞ/ŶĨŽƌŵĂƚŝŽŶĨŽƌZƵƐƐŝĂ
Eurasia Customs Union Mark (Russia, Belarus, Kazakhstan)
&ŽŵƉůŝĂŶĐĞ^ƚĂƚĞŵĞŶƚƐ
The Federal Communications Commission requires compliance statements for the following:
ŝƐĐŽWƌŽĚƵĐƚ^ĞĐƵƌŝƚLJKǀĞƌǀŝĞǁ

Zs/tZ&dͲ/^KKE&/Ed/>
ŝƐĐŽ/WŽŶĨĞƌĞŶĐĞWŚŽŶĞϴϴϯϮhƐĞƌ'ƵŝĚĞ
ϱϴ
WƌŽĚƵĐƚ ^ĂĨĞƚLJĂŶĚ^ĞĐƵƌŝƚLJ
&WĂƌƚϭϱ͘Ϯϭ^ƚĂƚĞŵĞŶƚ
Changes or modifications not expressly approved by the party responsible for compliance could void the user s
authority to operate the equipment.
This device complies with part 15 of the FCC Rules. Operation is subject to the following two conditions: (1)
This device may not cause harmful interference, and (2) this device must accept any interference received,
including interference that may cause undesired operation. Privacy of communications may not be ensured when
using this phone.
&Z&ZĂĚŝĂƚŝŽŶdžƉŽƐƵƌĞ^ƚĂƚĞŵĞŶƚ
This equipment complies with FCC radiation exposure limits set forth for an uncontrolled environment. End
users must follow the specific operating instructions for satisfying RF exposure compliance. This transmitter
must be at least 20 cm from the user and must not be collocated or operating in conjunction with any other
antenna or transmitter.
The device for operation in the band 5150 5250 MHz is only for indoor use to reduce the potential for harmful
interference to co-channel mobile satellite systems.
&ZĞĐĞŝǀĞƌƐĂŶĚůĂƐƐŝŐŝƚĂů^ƚĂƚĞŵĞŶƚ
This product has been tested and complies with the specifications for a Class B digital device, pursuant to Part
15 of the FCC Rules. These limits are designed to provide reasonable protection against harmful interference in
a residential installation. This equipment generates, uses, and can radiate radio frequency energy and, if not
installed and used according to the instructions, may cause harmful interference to radio communications.
However, there is no guarantee that interference will not occur in a particular installation.
If this equipment does cause harmful interference to radio or television reception, which is found by turning the
equipment off and on, the user is encouraged to try to correct the interference by one or more of the following
measures:
Reorient or relocate the receiving antenna
Increase the separation between the equipment or devices
Connect the equipment to an outlet other than the receiver's
Consult a dealer or an experienced radio/TV technician for assistance
ŝƐĐŽWƌŽĚƵĐƚ^ĞĐƵƌŝƚLJKǀĞƌǀŝĞǁ
This product contains cryptographic features and is subject to U.S. and local country laws that govern import,
export, transfer, and use. Delivery of Cisco cryptographic products does not imply third-party authority to
import, export, distribute, or use encryption. Importers, exporters, distributors, and users are responsible for
compliance with U.S. and local country laws. By using this product, you agree to comply with applicable laws
and regulations. If you are unable to comply with U.S. and local laws, return this product immediately.
Further information regarding U.S. export regulations can be found at https://www.bis.doc.gov/
policiesandregulations/ear/index.htm.
/ŵƉŽƌƚĂŶƚKŶůŝŶĞ/ŶĨŽƌŵĂƚŝŽŶ

Zs/tZ&dͲ/^KKE&/Ed/>
ŝƐĐŽ/WŽŶĨĞƌĞŶĐĞWŚŽŶĞϴϴϯϮhƐĞƌ'ƵŝĚĞ
ϱϵ
WƌŽĚƵĐƚ^ĂĨĞƚLJĂŶĚ^ĞĐƵƌŝƚLJ
/ŵƉŽƌƚĂŶƚKŶůŝŶĞ/ŶĨŽƌŵĂƚŝŽŶ
ŶĚhƐĞƌ>ŝĐĞŶƐĞŐƌĞĞŵĞŶƚ
The End User License Agreement (EULA) is located here: https://www.cisco.com/go/eula
ZĞŐƵůĂƚŽƌLJŽŵƉůŝĂŶĐĞĂŶĚ^ĂĨĞƚLJ/ŶĨŽƌŵĂƚŝŽŶ
Regulatory Compliance and Safety Information (RCSI) is located here:
https://www.cisco.com/c/dam/en/us/td/docs/voice_ip_comm/cuipph/8832/regulatory_compliance/ RCSI-0314-
book.pdf
WŽǁĞƌĚĂƉƚŽƌĨŽƌtŝƌĞůĞƐƐDŝĐĐŚĂƌŐŝŶŐĐƌĂĚůĞ
1. Adaptor and battery ratings, the power adaptor output rating is 5V/3A, the battery is 3.7V, 600mAH.
2. For Product sold with power adaptor: “For PLUGGABLE EQUIPMENT, the socket-outlet shall be installed near the equipment
and shall be easily accessible"
3. USB statement: "Equipment is to be supplied from an identified USB port complying with the requirements of Limited power
source"
4. Use only power adaptor model AQ18A-59CFAsupplied by Phi-Hong Co. for charger unit.
5. Use only rechargeable batteries model U463042PG supplied by SHENZHEN UTILITY POWER SOURCE CCO. LTD for mic
unit"
1. La capacité nominale de sortie de l'adaptateur est de 5V / 3A, la batterie est de 3.7V, 600mAH.
2. Pour les produits à BRANCHER à UNEPRISE DE COURANT, la prise de courant doit être installée près du produit, afin
d’assurer une accessibilité sécuritaire à la prise de courant.
3. L'équipement doit être fourni à partir d'un acquiescement gauche identifié d’USB aux conditions de la source d'énergie
limitée