Cisco Systems SPA302D MOBILITY ENHANCED CORDLESS HANDSET User Manual spa302d qsg comb en
Cisco Systems Inc MOBILITY ENHANCED CORDLESS HANDSET spa302d qsg comb en
USERS MANUAL
Quick Start Guide
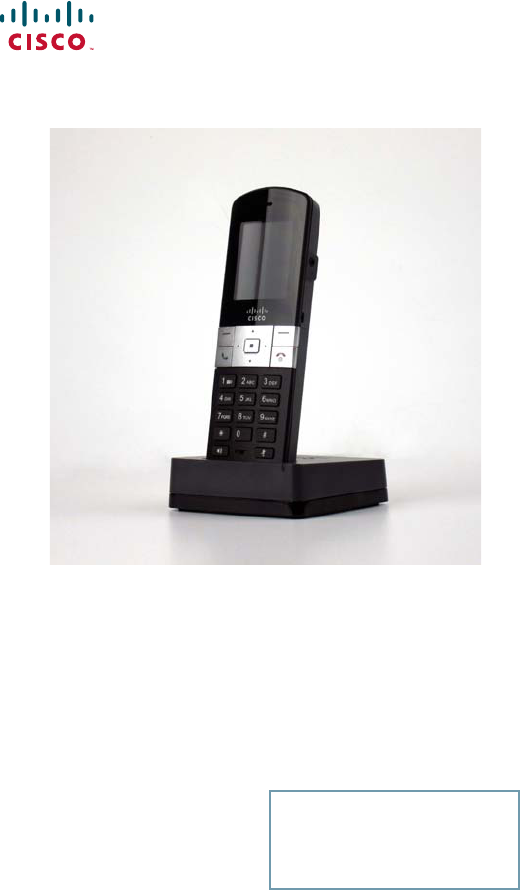
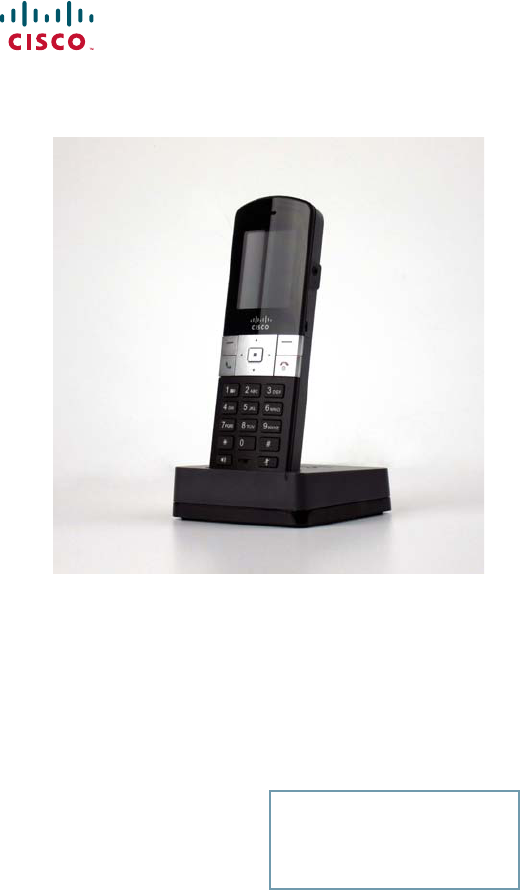
Cisco SPA302D Mobility Enhanced Cordless
Handset
Versión en Español en el CD
Version en français sur CD
Versione italiana sul CD
Deutsch Version auf CD
Versão em português em CD
2 Cisco SPA302D
Welcome
Thank you for choosing the Cisco SPA302D. This guide describes how to
physically set up and register your Cisco SPA302D to the Cisco SPA232D
ATA. It also describes how to perform some basic tasks, such as placing
and answering calls, and configuring basic phone options.
Package Contents
•Cisco SPA302D Mobility Enhanced Cordless Handset
•Charging Cradle
•Belt Clip
•Power Adapter
•Power Clip
•Two rechargeable AAA batteries
•Product CD-ROM
•Quick Start Guide
Before You Begin
Before you begin the installation, make sure that you have the following
equipment and services:
•Cisco SPA232D Mobility Enhanced ATA, which has an integrated DECT
Base Station to provide telephone service for the SPA302D
•Active Internet connection
•Active Public Switched Telephone Network (PSTN) connection or Voice
over IP (VoIP) phone service account
•PC with web browser, for using web-based system management tools
(Microsoft Internet Explorer, Mozilla Firefox, and Apple Safari are
supported)
Battery Warning
CAUTION Use only size AAA Ni-MH 800 mAh (1.2V) rechargeable
batteries in the Cisco SPA302D handset. Place the handset
in the charging cradle for a recommended initial charge of 10
hours before using the handset for the first time.
Cisco SPA302D 3
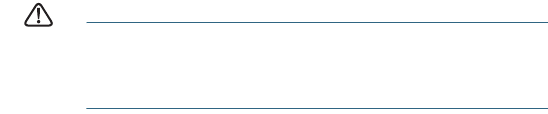
Cisco SPA302D Features
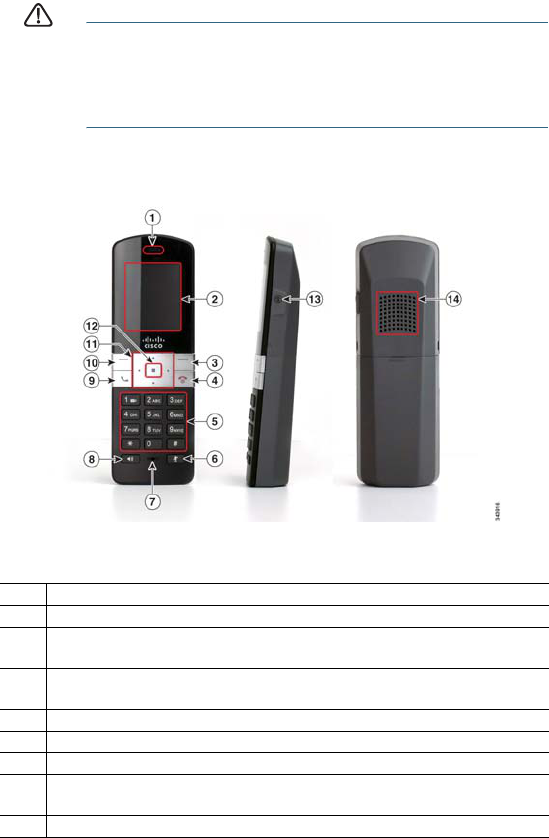
Table 1 Handset Features
1Receiver.
2 Handset display.
3 Right softkey. Press the softkey to perform the action shown in the
lower right of the handset display.
4 End Call button. Press the button and hold it to turn off the handset.
5Keypad.
6 Mute button.
7 Microphone.
8 Speakerphone button. Press this button during a call to use the
speakerphone.
9Start Call button.
10 Left softkey. Press the softkey to perform the action shown in the
lower left of the handset display.
11 4-way navigation keypad. Press the arrow buttons to move up,
down, left, or right through menus displayed on the handset.
12 Center Select button.
13 Headset port.
14 Speaker.
4 Cisco SPA302D
Handset Setup and Registration
Charging the Handset
STEP 1Remove the back cover of the handset.
STEP 2Insert the two AAA rechargeable batteries (included) into the
handset. (See Battery Warning in “Before You Begin.”)
Correct battery placement is shown on the label inside the battery
compartment. If the batteries are charged, the handset turns on
when the batteries are inserted. If the batteries are not charged,
the handset turns on when it is placed into the charging cradle.
STEP 3Remove the protective film from the handset and charging cradle.
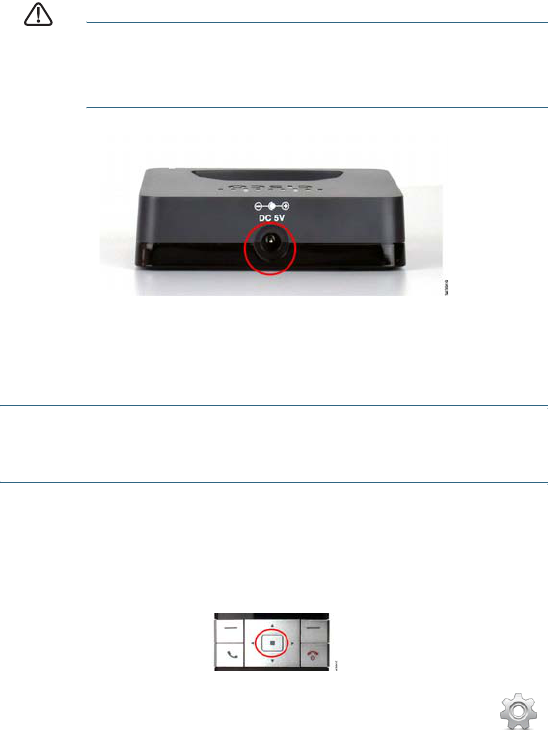
STEP 4Insert the power clip into the power adapter.
STEP 5Plug the power adapter into the power source.
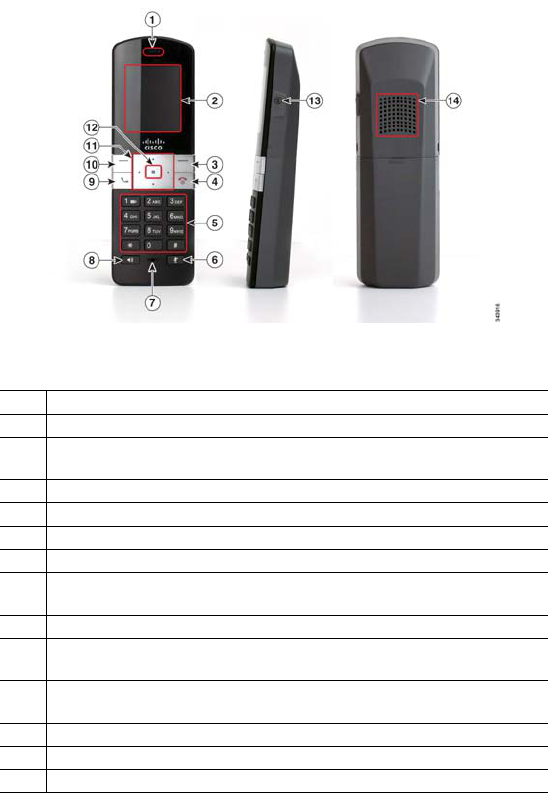
STEP 6Connect the power adapter into the charging cradle in the port
shown below.
CAUTION Only use the power adapter designed for use with Cisco
SPA300 Series devices.
STEP 7Place the handset into the charging cradle. The light on the
charging cradle appears solid green when the handset is charging.
Charge the handset for a minimum of 10 hours before using the
handset for the first time to ensure that the handset is fully charged.
Cisco SPA302D 5
Registering the Handset to the Cisco SPA232D Mobility
Enhanced ATA
STEP 1Install and configure the Cisco SPA232D. See the Cisco SPA232D
Quick Start Guide for more information.
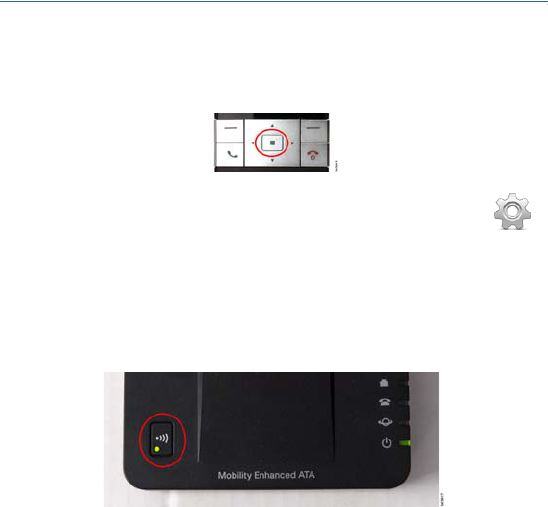
STEP 2On the Cisco SPA302 handset, press the Select button in the
center of the 4-way navigation keypad.
STEP 5Select Register.
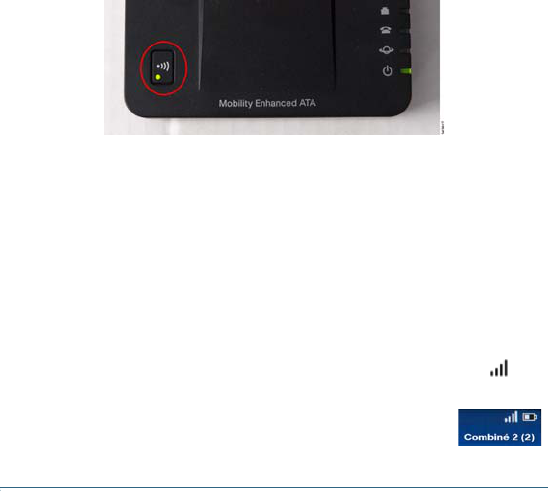
STEP 6On the Cisco SPA232D, press the Page/Registration button and
hold it down for at least seven seconds until the green status light
flashes quickly.
TIP If you press the button for fewer than seven seconds, the
green status light flashes slowly, indicating the unit is in
“paging” mode and is not in registration mode. Registration
will not work if the unit is in paging mode.
STEP 3
STEP 4
Using the navigation arrows, scroll to the Settings icon
and press the center navigation button to select it.
Select Handset Registration.

6 Cisco SPA302D
STEP 7The default PIN is blank, so do not enter a PIN. Press the left
softkey to confirm that you want to register the handset. The
“registering” message appears.
Using Your Cisco SPA302D
Placing a Call
To place a call, do one of the following tasks:
•Enter the number on the keypad and press the green Start Call button.
Depending on your phone system configuration, you may have to enter
a digit, such as 9, before entering the number to place an external call.
•To use the speakerphone, enter the number on the keypad and press
the Speakerphone button.
Answering or Ignoring a Call
To answer an incoming call, do one of the following tasks:
•Press the Start Call button.
•Press the left softkey to select Answer.
•Press the Speakerphone button to answer with the speakerphone.
To decline to answer a call, press the right softkey to select Ignore.
Putting a Call on Hold
STEP 8To verify that the handset registered to the base
station, confirm that the signal strength icon is solid
(not flashing) and that the handset ID, such as
Handset 1 or Handset 2, appears near the top right
corner of the display screen.
To put a call on hold, press the left softkey to select Options.
Scroll to Hold and press the center Select button. The hold icon
and on-screen message indicates a call is on hold.
To resume the call, press the left softkey to select Options. Scroll
to Resume and press the center Select button. The active call
icon indicates the call is active again.

Cisco SPA302D 7
Ending a Call
To end a call, do one of the following tasks:
•Press the red End Call button.
•Press the right softkey to select End Call.
Using Call Waiting
If call waiting is enabled, while on a call, a beep tone will alert you of a
second incoming call.
To answer the call, press the left softkey to select Answer and put the first
call on hold. To ignore the call, press the right softkey to select Ignore.
To return to the first call, do one of the following tasks:
•Press the right softkey to select End Call to end the active call and
return to the call on hold.
•Press the left softkey to select Options and choose Swap to place the
current call on hold and return to the first call. The active call is shown at
the top of the screen and is indicated by the active call icon.
Transferring a Call
To transfer a call:
STEP 1Press the left softkey to select Options.
STEP 2Scroll to Transfer and press the Select button.
STEP 3Enter the number to which to transfer. The Cisco SPA302D
automatically dials the number.
STEP 4You can transfer before the called number answers, or you can
wait to speak to the called number. To transfer, press the left
softkey to select Options, scroll to Transfer, then press the left
softkey button.
Adjusting Volume and Muting
To adjust the audio volume during a call: Press the right arrow button on the
4-way navigation keypad to increase the volume. Press the left arrow
button to decrease the volume.

8 Cisco SPA302D
To adjust the ringtone volume when a call is not in progress: Press the right
arrow button to increase the volume. Press the left arrow button to
decrease the volume.
Configuring Call Preferences
You can configure the following preferences:
• Do Not Disturb—Incoming calls do not reach your handset. (They will
not display in the Received Calls list.)
• Call Waiting—If call waiting is enabled, while on a call, a beep tone will
alert you of a second incoming call.
• Block Caller ID—Prevents your number from displaying on the Caller
ID of numbers that you call.
• Block Anonym Call—Blocks incoming calls to your handset from
callers who have blocked their caller ID.
NOTE Depending on how your handset is configured (connected to the IP
network or the PSTN), these preferences may not be available on your
handset.
To configure features such as Do Not Disturb, Call Waiting, and more:
STEP 4Press the up or down arrow button to scroll to the setting you want
to configure.
STEP 5Use the right and left arrow buttons to turn the feature on or off.
STEP 6Press the left softkey (Save), or the center Select button to save
your changes.
To turn off the ringer, continue to press the left arrow button until
the message on the display and the ringer off icon indicate that
the ringer is turned off.
To mute the handset microphone, press the Mute button on the
handset. The mute icon appears at the top of the handset display.
STEP 1Press the Select button to view the available preferences.
STEP 2Scroll to Call Settings and press the Select button again.
STEP 3Press the Select button to choose Call Preferences.
Cisco SPA302D 9
Turning the Handset On and Off
To turn the handset off and on, press and hold the End Call button.
NOTE Placing the handset into the cradle automatically turns the handset
on, even if it has been shut off.
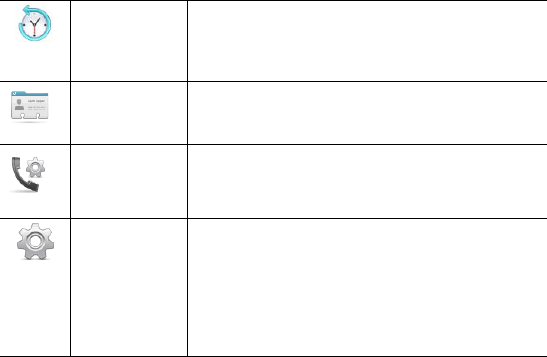
Accessing Additional Handset Functions
You can access additional handset functions by pressing the Select
button. The table below lists some of these functions; for more information,
see the Cisco SPA302D Mobility Enhanced Cordless Handset User
Guide, available on Cisco.com.
Call History View a list of calls placed from and received by
the handset. Use the left and right arrow
buttons to filter calls by Incoming, Outgoing, and
Missed status.
Contacts View lists of private and shared contacts.
Call Settings Configure or view call preferences, speed dials,
call forwarding, and other options.
Settings Perform handset registration, configure network
settings, choose ringtones, update handset
software, perform a factory reset to restore the
handset to its original settings, view handset
information (such as model and software
version) and view and configure other options.

10 Cisco SPA302D
Where to Go From Here
Support
Cisco Small Business
Support Community
www.cisco.com/go/smallbizsupport
Cisco Small Business
Support and Resources
www.cisco.com/go/smallbizhelp
Cisco Small Business
Firmware Downloads
www.cisco.com/go/software
Select a link to download firmware for Cisco
Small Business Products. No login is
required.
Cisco Small Business
Open Source Requests
www.cisco.com/go/
smallbiz_opensource_request
Regulatory Compliance
and Safety Information for
the Cisco SPA302D
www.cisco.com/en/US/products/ps10998/
prod_installation_guides_list.html
Product Documentation
Cisco Small Business
SPA300 Series IP Phones
www.cisco.com/go/300phones
Cisco Small Business
Analog Telephone
Adapters
www.cisco.com/go/smallbizvoicegateways
Cisco Small Business
Cisco Partner Central
for Small Business
(Partner Login Required)
www.cisco.com/web/partners/sell/smb
Cisco Small Business
Home
www.cisco.com/smb
Cisco SPA302D 11

Americas Headquarters
Cisco Systems, Inc.
170 West Tasman Drive
San Jose, CA 95134-1706
USA
www.cisco.com
Small Business Support, Global: www.cisco.com/go/sbsc
Cisco and the Cisco logo are trademarks or registered trademarks of Cisco and/or its affiliates
in the U.S. and other countries. To view a list of Ciscotrademarks, go to this URL:
www.cisco.com/go/trademarks. Third-party trademarks mentioned are the property of their
respective owners. The use of the word partner does not imply a partnership relationship
between Cisco and any other company. (1110R)
© 2012 Cisco Systems, Inc. All rights reserved.
Guide de démarrage rapide
Combiné sans fil Cisco SPA302D Mobility
Enhanced
Versión en Español en el CD
Version en français sur CD
Versione italiana sul CD
Deutsch Version auf CD
Versão em português em CD
2 Cisco SPA302D
Bienvenue
Merci d'avoir choisi le Cisco SPA302D. Ce guide explique comment
configurer physiquement et enregistrer votre Cisco SPA302D auprès de
l'adaptateur de terminal analogique Cisco SPA232D. Il décrit également la
procédure à suivre pour réaliser des tâches essentielles, telles que passer
des appels ou y répondre, et configurer des options de base du téléphone.
Contenu du colis
•Combiné sans fil Cisco SPA302D Mobility Enhanced
•Chargeur
•Clip ceinture
•Adaptateur secteur
•Embout secteur
•Deux piles AAA rechargeables
•CD-ROM du produit
•Guide de démarrage rapide
Avant de commencer
Avant de procéder à l'installation, assurez-vous de disposer du matériel et
des services suivants :
•Adaptateur de terminal analogique Cisco SPA232D Mobility Enhanced,
intégrant une station de base DECT pour fournir un service de
téléphonie au SPA302D
•Une connexion Internet active
•Une connexion active au réseau téléphonique public commuté (PSTN)
ou un compte de service de téléphonie Voix sur IP (VoIP)
•Un ordinateur avec navigateur Web, permettant d'utiliser les outils Web
de gestion du système (Microsoft Internet Explorer, Mozilla Firefox et
Apple Safari sont pris en charge)
Cisco SPA302D 3
Avertissement concernant les piles
CAUTION Utilisez uniquement des piles rechargeables AAA Ni-MH
800 mAh (1,2V) dans le combiné Cisco SPA302D. Placez le
combiné sur le chargeur pour une charge initiale
recommandée de 10 heures avant la première utilisation du
combiné.Cisco SPA232D
Fonctionnalités du Cisco SPA302D
Tableau1 Fonctionnalités du combiné
1Récepteur.
2 Écran du combiné.
3 Touche droite. Appuyez sur cette touche pour effectuer l'action
indiquée en bas à droite de l'écran du combiné.
4 Bouton de fin d'appel. Appuyez sur ce bouton et maintenez-le
enfoncé pour éteindre le combiné.
5Clavier.
6 Touche sourdine.
7 Microphone.
8 Bouton du haut-parleur. Appuyez sur ce bouton pendant un appel
pour utiliser le haut-parleur.
9 Bouton de début d'appel.
4 Cisco SPA302D
Configuration et enregistrement du combiné
Chargement du combiné
ÉTAPE 1Retirez le cache arrière du combiné.
ÉTAPE 2Insérez les deux piles rechargeables AAA (incluses) dans le
combiné (reportez-vous à la section Avertissement concernant
les piles de «Avant de commencer»).
Le positionnement correct des piles est indiqué à l'intérieur du
compartiment. Si les piles sont chargées, le combiné s'allume une
fois les piles insérées. Si elles ne le sont pas, il s'allume lorsqu'il
est placé sur le chargeur.
ÉTAPE 3Retirez le film de protection du combiné et du chargeur.
ÉTAPE 4Insérez l'embout secteur dans l'adaptateur secteur.
ÉTAPE 5Branchez l'adaptateur au secteur.
10 Touche gauche. Appuyez sur cette touche pour effectuer l'action
indiquée en bas à gauche de l'écran du combiné.
11 Clavier de navigation quadridirectionnel. Appuyez sur les flèches
pour naviguer vers le haut, vers le bas, à gauche ou à droite dans
les menus affichés sur le combiné.
12 Touche centrale de sélection.
13 Port de casque.
14 Haut-parleur.
Cisco SPA302D 5
ÉTAPE 6Connectez l'adaptateur au chargeur dans le port indiqué ci-
dessous.
AVERTISSEMENT Utilisez uniquement l'adaptateur conçu pour être utilisé
avec les appareils de la gamme Cisco SPA30Utilisez
uniquement l'adaptateur conçu pour être utilisé avec
les appareils de la gamme Cisco SPA300 Series.
ÉTAPE 7Placez le combiné dans le chargeur. Le voyant du chargeur est
vert lorsque le combiné est en charge. Chargez le combiné
pendant au moins 10 heures avant de l'utiliser pour la première
fois, afin de garantir une charge complète.
Enregistrement du combiné auprès de l'adaptateur de
terminal analogique Cisco SPA232D Mobility Enhanced
ÉTAPE 1Installez et configurez le Cisco SPA232D. Pour plus d'informations,
reportez-vous au Guide de démarrage rapide du système Cisco
SPA232D.
ÉTAPE 2Sur le combiné Cisco SPA302, appuyez sur la touche centrale de
sélection du clavier de navigation quadridirectionnel.
ÉTAPE 5Sélectionnez Enregistrer.
ÉTAPE 3
ÉTAPE 4
À l'aide des flèches de navigation, faites défiler jusqu'à
l'icône des paramètres et appuyez sur la touche
centrale de navigation pour la sélectionner.
Sélectionnez Enregistrement du combiné.
6 Cisco SPA302D
ÉTAPE 6Sur le système Cisco SPA232D, maintenez le bouton d'annonce
générale/enregistrement enfoncé pendant au moins sept
secondes, jusqu'à ce que le voyant vert clignote rapidement.
Astuce: si vous appuyez sur le bouton pendant moins de sept
secondes, le voyant d'état vert clignote lentement, pour indiquer
que le système est en mode d'annonce générale et non en mode
d'enregistrement. L'enregistrement ne pourra pas se faire si le
système est en mode d'annonce générale.
ÉTAPE 7Le code PIN par défaut est vierge. Il n'est donc pas nécessaire de
saisir un code PIN. Appuyez sur la touche gauche pour confirmer que
vous souhaitez enregistrer le combiné. Le message «Inscription…»
s'affiche.
Utilisation de votre Cisco SPA302D
Établissement d'un appel
Pour passer un appel, effectuez l'une des opérations suivantes:
•Entrez le numéro sur le clavier et appuyez sur le bouton vert de début
d'appel. Selon la configuration de votre système téléphonique, pour
passer un appel externe, il se peut que vous deviez entrer un chiffre (p.
ex. 9), avant d'entrer le numéro souhaité.
•Pour utiliser le haut-parleur, entrez le numéro sur le clavier et appuyez
sur le bouton du haut-parleur.
ÉTAPE 8Pour vérifier que le combiné est enregistré par la
station de base, vérifiez que l'icône de force du
signal est allumée (et ne clignote pas) et que l'ID du
combiné (Combiné 1 ou Combiné 2) apparaît en
haut à droite de l'écran du combiné.

Cisco SPA302D 7
Répondre ou ignorer un appel
Pour répondre à un appel entrant, effectuez l'une des opérations suivantes:
•Appuyez sur le bouton de début d'appel.
•Appuyez sur la touche gauche pour sélectionner Répondre.
•Appuyez sur le bouton du haut-parleur pour répondre avec le haut-
parleur.
Pour ignorer un appel, appuyez sur la touche droite pour sélectionner
Ignorer.
Placer un appel en attente
Fin d'un appel
Pour terminer un appel, effectuez l'une des opérations suivantes:
•Appuyez sur le bouton de fin d'appel.
•Appuyez sur la touche droite pour sélectionner Fin de l'appel.
Utilisation de l'option Appel en attente
Si l'option Appel en attente est activée, une tonalité vous alertera d'un
deuxième appel entrant lorsque vous êtes en ligne.
Pour prendre l'appel, appuyez sur la touche gauche pour sélectionner
Répondre et placer le premier appel en attente. Pour ignorer l'appel,
appuyez sur la touche droite pour sélectionner Ignorer.
Pour reprendre l'appel initial, effectuez l'une des opérations suivantes:
•Appuyez sur la touche droite pour sélectionner Fin de l'appel, pour
terminer l'appel en cours et revenir à l'appel en attente.
•Appuyez sur la touche gauche pour sélectionner Options, puis
Basculer pour mettre en attente l'appel en cours et revenir à l'appel
initial. L'appel en cours est indiqué en haut de l'écran par l'icône d'appel
actif.
Pour placer un appel en attente, appuyez sur la touche gauche
pour sélectionner Options. Faites défiler jusqu'à En attente et
appuyez sur la touche centrale de sélection. L'icône d'attente et
un message à l'écran indiquent qu'un appel est en attente.
Pour reprendre l'appel, appuyez sur la touche gauche pour
sélectionner Options. Faites défiler jusqu'à Reprendre et appuyez
sur la touche centrale de sélection. L'icône d'appel actif indique
que l'appel est à nouveau actif.

8 Cisco SPA302D
Transfert d'un appel
Pour transférer un appel:
ÉTAPE 1Appuyez sur la touche gauche pour sélectionner Options.
ÉTAPE 2Faites défiler jusqu'à Transférer et appuyez sur la touche centrale
de sélection.
ÉTAPE 3Entrez le numéro auquel vous souhaitez transférer l'appel. Le
Cisco SPA302D compose automatiquement le numéro.
ÉTAPE 4Vous pouvez transférer l'appel avant que le numéro appelé
réponde ou attendre de parler au numéro appeler. Pour transférer,
appuyez sur la touche gauche pour sélectionner Options, faites
défiler jusqu'à Transférer, puis appuyez sur la touche gauche.
Réglage du volume et du mode Silencieux
Pour régler le volume pendant un appel: appuyez sur la flèche droite sur la
touche de navigation quadridirectionnelle pour augmenter le volume.
Appuyez sur la flèche gauche pour réduire le volume.
Pour régler le volume de la sonnerie lorsqu'aucun appel n'est en cours:
appuyez sur la flèche droite pour augmenter le volume. Appuyez sur la
flèche gauche pour réduire le volume.
Configuration des préférences d'appel
Vous pouvez configurer les préférences suivantes:
• Ne pas déranger: les appels entrants ne parviennent pas à votre
combiné (ils ne s'affichent pas dans la liste des appels reçus).
• Appel en attente: si l'option Appel en attente est activée, une tonalité
vous alertera d'un deuxième appel entrant lorsque vous êtes en ligne.
Pour éteindre la sonnerie, continuez à appuyer sur la flèche
gauche jusqu'à ce que le message à l'écran et l'icône de sonnerie
désactivée indiquent que la sonnerie est désactivée.
Pour désactiver le microphone, appuyez sur la touche de
désactivation du microphone du combiné. L'icône
correspondante apparaît en haut de l'écran du combiné.

Cisco SPA302D 9
• Bloquer l'ID d'appel: empêche votre numéro d'apparaître sur l'ID de
l'appelant des numéros que vous appelez.
• Bloquer les appels anonymes: bloque les appels entrants sur votre
combiné dont l'ID d'appelant est bloqué.
REMARQUE Selon la configuration de votre combiné (connecté au réseau
IP ou au réseau public commuté), ces préférences peuvent ne pas être
disponibles sur votre combiné.
Pour configurer des fonctionnalités telles que Ne pas déranger, Appel en
attente, etc.:
ÉTAPE 4Appuyez sur les flèches haut et bas pour faire défiler les
paramètres que vous souhaitez configurer.
ÉTAPE 5Utilisez sur les flèches droite et gauche pour activer ou désactiver
les fonctionnalités.
ÉTAPE 6Appuyez sur la touche gauche (Enregistrer) ou sur la touche
centrale de sélection pour enregistrer vos modifications.
Activation et désactivation du combiné
Pour activer et désactiver le combiné, appuyez sur le bouton de fin
d'appel et maintenez-le enfoncé.
REMARQUE Si vous placez le combiné sur le chargeur, il s'active
automatiquement, même s'il a été éteint.
ÉTAPE 1Appuyez sur la touche de sélection pour afficher les
préférences disponibles.
ÉTAPE 2Faites défiler jusqu'à Paramètres d'appel et appuyez à
nouveau sur la touche centrale de sélection.
ÉTAPE 3Appuyez sur la touche de sélection pour sélectionner
les Préférences d'appel.
10 Cisco SPA302D
Accès aux fonctions supplémentaires du combiné
Vous pouvez accéder aux fonctions supplémentaires du combiné en
appuyant sur la touche de sélection. Le tableau suivant présente certaines de
ces fonctions. Pour plus d'informations, reportez-vous au Guide d'utilisation du
combiné sans fil Cisco SPA302D Mobility Enhanced, disponible sur
Cisco.com.
Historique
des appels
Afficher une liste des appels passés depuis et
reçus par le combiné. Utilisez les flèches droite
et gauche pour filtrer les appels selon leur état:
entrants, sortants et manqués.
Contacts Affichez les listes de contacts privés et
partagés.
Paramètres
d'appel
Configurez ou affichez les préférences d'appel,
de numéros rapides, de renvoi d'appel et
d'autres options.
Paramètres Enregistrez le combiné, configurez les
paramètres réseau, choisissez les sonneries,
mettez à jour le logiciel du combiné, restaurez
les paramètres d'usine du combiné, affichez les
informations du combiné (tels que le modèle et
la version logicielle) et affichez et configurez
d'autres options.
Cisco SPA302D 11
Problèmes et solutions
Assistance
Communauté
d'assistance
Cisco Small Business
www.cisco.com/go/smallbizsupport
Assistance et ressources
Cisco Small Business
www.cisco.com/go/smallbizhelp
Téléchargements de
micrologiciels
Cisco Small Business
www.cisco.com/go/software
Sélectionnez un lien pour télécharger le
micrologiciel d'un produit Cisco Small
Business. Aucune connexion n'est requise.
Requêtes Open Source
Cisco Small Business
www.cisco.com/go/
smallbiz_opensource_request
Informations relatives à la
conformité et à la sécurité
du Cisco SPA302D
www.cisco.com/en/US/products/ps10998/
prod_installation_guides_list.html
Documentation sur les produits
Téléphones IP Cisco
Small Business SPA300
Series
www.cisco.com/go/300phones
Adaptateurs de terminal
analogique Cisco Small
Business
www.cisco.com/go/smallbizvoicegateways
Cisco Small Business
Cisco Partner Central
pour Small Business
(Identification partenaire
obligatoire)
www.Cisco.com/web/partners/sell/smb
Accueil
Cisco Small Business
www.Cisco.com/smb

Siège social pour les Amériques
Cisco Systems, Inc.
170 West Tasman Drive
San Jose, CA 95134-1706
États-Unis
www.cisco.com
Assistance aux petites et moyennes entreprises - Monde:
www.cisco.com/go/sbsc
Cisco et le logo Cisco sont des marques commerciales ou des marques commerciales
déposées de Cisco Systems, Inc. et/ou de ses filiales aux États-Unis et dans d'autres pays.
Pour consulter la liste des marques commerciales de Cisco, rendez-vous sur :
www.cisco.com/go/trademarks. Les autres marques commerciales mentionnées sont la
propriété de leurs détenteurs respectifs. L'utilisation du terme « partenaire » n'implique pas de
relation de partenariat entre Cisco et une autre société. (1110R)
© 2012 Cisco Systems, Inc. Tous droits réservés.
78-20869-01
78-20869-01
Printed in China PRC
Imprimé en République populaire de Chine
6001-13610011R(YT)

FCC Interference Information
This device complies with Part 15 of the FCC Rules. Operation is subject to the following two
conditions: (1) This device may not cause harmful interference; and (2) This device must
accept any interference received, including interference that may cause undesired operation.
This equipment has been tested and found to comply with the limits for a Class B digital device,
pursuant to Part 15 of the FCC Rules. These limits are designed to provide reasonable
protection against harmful interference in a residential installation.
This equipment generates, uses, and can radiate radio frequency energy and, if not installed
and used in accordance with the instructions, may cause harmful interference to radio
communications. However, there is no guarantee that interference will not occur in a particular
installation.
If this equipment does cause harmful interference to radio or television reception, which can be
determined by turning the equipment off and on, the user is encouraged to try to correct the
interference by one or more of the following measures:
• Reorient or relocate the receiving antenna (that is, the antenna for radio or television that is
“receiving” the interference).
• Reorient or relocate and increase the separation between the telecommunications
equipment and receiving antenna.
• Connect the telecommunications equipment into an outlet on a circuit different from that to
which the receiving antenna is connected
FCC RF Radiation Exposure Statement
The installation of the base unit should allow at least 20 centimeter between the base and
persons to be in compliance with FCC RF exposure guidelines. For body worn operation, the
portable part (handset) has been tested and meets FCC RF exposure guidelines.
This device must not be co-located or operating in conjunction with any other antenna or
transmitter. The changes or modifications not expressly approved by the party responsible for
compliance could void the user’s authority to operate the equipment.
CANADIAN REPRESENTATIVE & ADDRESS:
Cisco Systems Canada Co
100 Middlefield Road, Toronto, Ontario, M1S 4M6, CANADA
TEL.:416-321-7646
This device complies with Industry Canada licence-exempt RSS standard(s). Operation is subject
to the following two conditions: (1) this device may not cause interference, and (2) this device
must accept any interference, including interference that may cause undesired operation of the
device.
Le présent appareil est conforme aux CNR d'Industrie Canada applicables aux appareils radio
exempts de licence. L'exploitation est autorisée aux deux conditions suivantes : (1) l'appareil ne
doit pas produire de brouillage, et (2) l'utilisateur de l'appareil doit accepter tout brouillage
radioélectrique subi, même si le brouillage est susceptible d'en compromettre le fonctionnement.