Citi Sound Electronic CS-2250 2.4GHz 40 Channel Analog Modulation Cordless Phone User Manual
Citi Sound Electronic Limited 2.4GHz 40 Channel Analog Modulation Cordless Phone
Contents
- 1. User Manual
- 2. FCC Information
User Manual
INSTRUCTION MANUAL
2.4GHz CORDLESS PHONE
Please read carefully before operation this unit

IMPORTANT SAFETY INSTRUCTIONS
When using your telephone equipment, basic safety precautions should always
be followed to reduce the risk of fire, electric shock and injury to persons,
including the following
1. Read and understand all instructions
2. Do not use the telephone near water, for example, near a bath tub, wash
bowl, kitchen sink, or laundry tub, in a wet base, or near a swimming pool.
3. Avoid using a telephone (other then a cordless type) during an electrical
storm. There may be a remote risk of electric shock from lightning.
4. Operate this telephone only with the correct electrical voltage in your shown
on the label or in the owner’s manual. If you are not sure of the voltage in
your home, consult your dealer or local power company.
5. Do not allow anything to rest on the power cord. Do not install the phone
where people will walk on the cord.
6. Do not overload wall outlets and extension cords. This can increase to risk
of fire or electric shock.
7. Never push objects of any kind through slots in the phone. They could
touch dangerous voltage points or short out part that could result in a risk
of fire or electric shock. Never spill liquid of any kind on the telephone.
8. To reduce the risk of electric shock, do not take this telephone apart. When
service or repair on this telephone, take it to a qualified service
representative. Opening or removing covers may expose you to dangerous
voltage or other risks. Incorrect reassembly can cause electric shock when
the appliance is used.
9. Unplug this telephone from the wall outlet and consult a qualified service
representative in any of the following situations:
a. When the power supply cord is frayed or damaged,
b. If liquid has been spilled into the telephone.
c. If the product has been exposed to rain or water.
d. If the telephone does not operate normally by following the operating
instructions. Adjust only those controls may result in damage and will often
require extensive work by a qualified technician to restore the telephone to
normal operation.
e. If the telephone has been dropped or the case has been damaged.
f. If the telephone exhibits a distinct change in performance.
10. Avoid using a telephone during an electrical storm. There may be remote
risk of electric shock from lightning.
11. Do not use the telephone to report a gas leak in the vicinity of the leak.
12. Never install telephone wiring during a lightning storm.
13. Never install telephone jacks in wet locations unless the jack is specifically
designed for wet locations.
14. Never touch uninsulated telephone wires or terminals unless the telephone
line has been disconnected at the network interface.
15. Use only the power cord and batteries indicated in this manual. Do not
dispose of the battery pack in fire. They may explode. Check with local
codes for possible special disposal instructions.
CAUTION:
Danger of explosion if battery is incorrectly replaced.
Replace only with the same or equivalent type recommended by the
manufacturer.
Dispose of used batteries according to the manufacturer’s instructions
SAVE THESE INSTRUCTIONS
IMPORTANTES MESURES DE SÉCURITÉ
Certaines mesures de sécurité doivent être prises pendant lutilisation de
matérial téléphonique afin de réauire les risques dincendie, de choc éléctrique
et de blessures. En voici quelquesunes:
1. Ne pas utiliser lappareil près de lean, p,ex., près dune baignolre, dun
lavabo, dun évier de cuisine, dun bac à laver. Dans un sous-sol humide ou
près dune piscine.
2. Éviter dutiliser le téléphone (sauf sil sagit dun appareil sans fil) pendant
un orage électrique. Caci peut présenter un risque de choc électrique causé
par la foudre.
3. Ne pas utiliser lappareil téléphonique pour signaler une fuite de gaz sil est
situé près de la fuite.
4. Utiliser seulement le cordon dalimentation et le type de plies indiqués dans
ce manual. Ne pas jeter les piles dans le feu : elles peuvent exploser. Se
conformer aux réglements pertinents quant à l élimination des plies.
5. ATTENTION-Il y a danger dexplosion sil y a remplcement incorrect de la
batterie. Remplacer uniquement avec une batterie du même type ou dun
type équivalent recommandé par le constructeur. Mettre au rebut les
batteries usagées conformément aux instructions du fabricant.
1 2

CONSERVER CES INSTRUCTIONS
BATTERY SAFETY
CAUTION:
To reduce the risk of fire or personal injury, read and follow these instructions:
1. Use only the following type and size battery pack:
SANIK 03/01
Ni-Cd AA 300mAh 3.6V,
SANIK Battery Co. Ltd.
Ni-Cd Batter Pack: SANIK Ni-Cd 2/3AA 300mAh 3.6V
2. Do not open or mutilate the battery pack. Released electrolyte is corrosive
and may cause damage to the eyes or skin. It may be toxic if swallowed.
3. Exercise care in handing the battery pack to prevent shorting the battery
with conductive materials such as rings, bracelets and keys. The battery or
conductor may overheat and cause burns.
4. Charge the battery pack provided with or identified for use with this product
only in accordance with the instructions and limitations specified in this
manual.
ATTENTION:
The product that you have purchased contains a rechargeable battery. The
battery is recyclable. At the end of its useful life, under various state and local
laws, it may be illegal to dispose of this battery into the municipal waste stream.
Check with your local solid waste officials for details for details in your area for
recycling options or proper disposal.
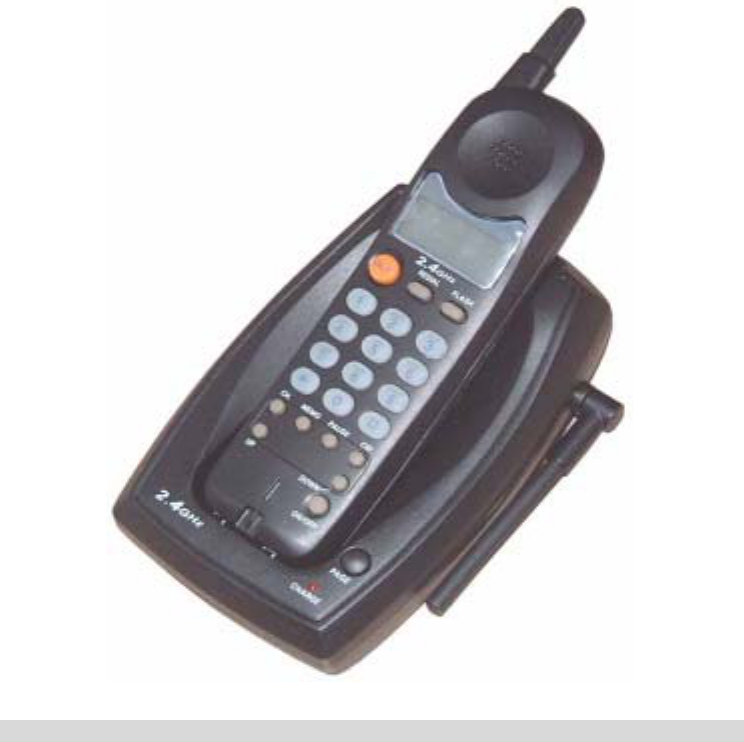
FEATURE LIST:
2.4GHz Operation Frequency.
40-Channels Auto-Scanning or Manual Selectable.
1’048’576 Automatic Digital Security Code.
Pre-Dialing with Clear LCD for Handset.
Flash and Last Number Redial Function.
Low battery Indicator on LCD.
CHARGE LED Indicator.
Receiver Volume High/Norm selector.
Tone/Pulse Dial mode selector on the Base unit.
Name Book function.
Touch Any Key To Answer Incoming Call on the Handset.
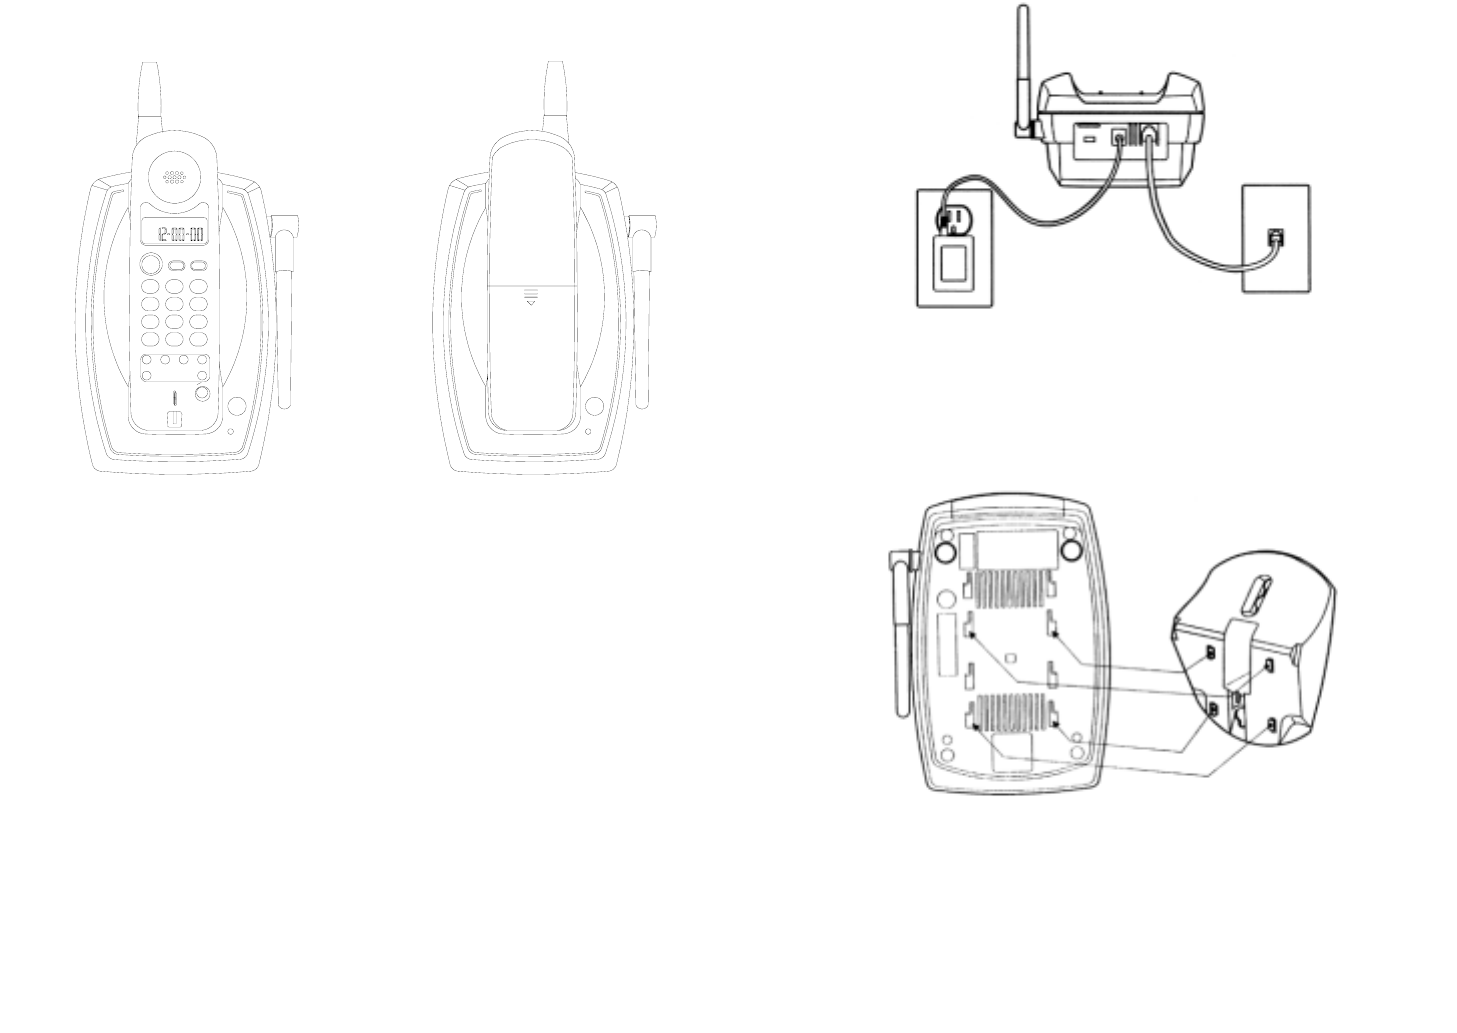
LOCATION OF CONTROLS:
CHARGE
PAGE
DOWN BUTTON
CODE BUTTON
PAUSE BUTTON
REDIAL BUTTON
FLASH BUTTON
UP BUTTON
CH. BUTTON
STORE BUTTON
TALK BUTTON
LCD DISPLAY
PAGE BUTTON
CHARGE INDICATOR
9
8
7
DOWN
UP
SET
PAUSE
*
CH. STORE
PQRS TUV
0
CODE
#
WXYZ
1
GHI4JKL
5
TALK
2ABC 3
MNO
6
DEF
REDIAL FLASH
SET BUTTON
INSTALLATION
BATTERY INSTALLATION:
1. Open the battery compartment cover at back of Handset.
2. Load in a 3.6V 300mAh recharge battery.
3 4
NOTE: Before initial use, put you handset for CHARGE MODE to charge the
handset for 12 hours.
PAGE
CHARGE
PAGE
ON/OFF
2.4GHz
FLASH
DEF
WXYZ
MNO
#
CH. MEMO PAUSE
UP DOWN
7
*0
8
PQRS 9
TUV
1
45
GHI 6
JKL
ABC
23
TALK
2.4GHz
REDIAL
CID
CHARGE
2.4GHz
Charge Mode Stand By Mode
3. Plug one end of flat cable to line jack of base unit, plug the other end to wall
jack.
4. Plug the power supply adapter into the power 9V DC jack on the top of the
base unit and connect the adapter to an AC outlet.
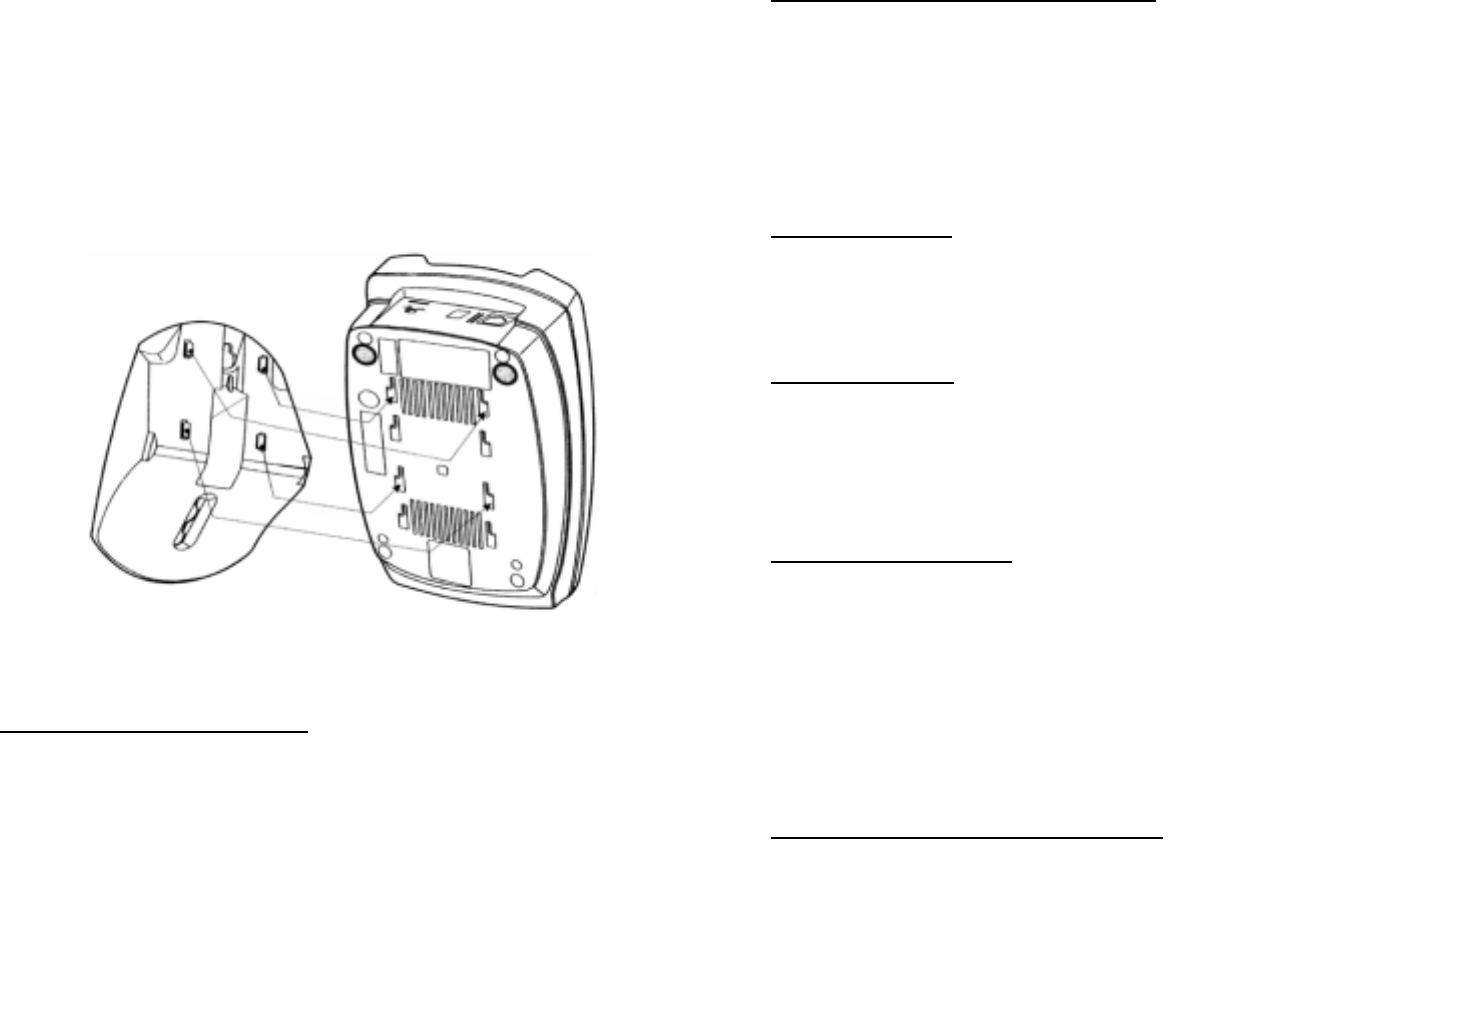
DESK MOUNTING
One of the special of your equipment is the unique design of the mounting
bracket which can hold your phone at an angel of 45° when desk mounting.
There are two positions to choose from:
1. Normal position (mounting Bracket not required).
For normal position, as shown in figure 1, place the BASE UNIT on any desired
but suitable location.
Figure 1
2. 45° POSITION (see Figure 2)
With the back of the base unit facing up, insert the hooks of the mounting
bracket into to the matching slots of the base unit, as specified in figure 2. The
slide the mounting bracket into place.
Figure 2
WALL MOUNTING
You may choose to put the base unit of your cordless telephone on wall.
1. With the back of the base unit facing up, connect the line cord to the
5 6
telephone jack. Insert the free end of the line cord through the hole of the
mounting bracket.
2. Insert the hooks of the mounting bracket into the matching slots the base
unit (as shown below). Then slide the mounting bracket into place. Plug the
free end of the short telephone line cord into the modular wall jack.
3. Align the upper keyhole on the mounting bracket with the upper stud of the
wall plate, so that the opening end of the mounting bracket matches the
lower stud, then pull the base unit down until securely seated.
Figure 3
SETUP THE TELEPHONE
1’048’576 DIGITAL CODE SECURITY
Many cordless telephone operate similarly and on the same frequency without
digital code security. Another cordless Handset could make calls using your
Base and telephone line. Therefore to avoid any unauthorized calls through your
Base, a Digital code feature was added to your Cordless phone. This Digital
Code is shared only between the Handset and Base. The code is set
automatically when you first use the phone.
Reset Your Security Code ---Important Steps!
1. Remove the Handsets unit from the base then press and hold down PAGE
button on the Base unit about 5 second.
2. Press CODE button on the Handset.
3. When you hearing continuous beep tone, the Digital Code is reset randomly
to one of 1’048’576 codes.
4. Release the PAGE button on Base unit.
SET LCD CONTRAST
Press SET button and then press the “2” button, LCD will display: “CONTRAST
ADJ”. Press UP or DOWN buttons to set desired contrast level and press SET
button to confirm and exit setting.
SET RINGER ON/OFF
1. Press SET button and then press the 3 button, “RING ON” or “RING OFF”
will appear on the LCD display.
2. Press UP and DOWN to switch the RING ON or RING OFF.
3. Press SET button to confirm.
SET UP THE TIME & CLOCK
1. Press SET button and then press the “4” button, LCD will show: “SET
TIME”, the month icon will be blinking.
2. Press UP and DOWN to set the correct month.
3. Press SET button to confirm and shift to date setting.
4. Press UP and DOWN to set the correct date.
5. Press SET button to confirm and shift to hour setting.
6. Repeat above operation to set hour and minute.
RECEIVER VOLUME HIGH/NORM SELECTION
The volume selector should be set to the Norm position. But when you want to
hear some undertone talk, slide the selector to High position.
7 8

SELECTING CHANNEL
During conversation, you might need to manually channel in order to get rid
of static. Press “CH.” button to seek clear channel.
T/P DIALING SELECTOR
You can choose the type of dialing by selecting TONE/PULSE mode.
OPERATION
RECEIVING CALLS AS A NORMAL TELEPHONE
When you phone ringing.
1. Pick up the handset and press TALK button to receive calls.
2. When conversation is over press TALK button to release line.
MAKING CALLS AS A NORMAL TELEPHONE
Method 1.Normal dialing
1. Press TALK button and dial the number you want to call.
2. Press TALK button to release the telephone line when conversation is over.
Method 2 Pre-Dialing (On-Hook Dialing)
1. In the stand by state, dial the number you want to call. Press the FLASH
button to delete any wrong digit.
2. Press TALK button to dial out the number.
3. Press TALK button once again to finish conversation.
LAST NUMBER REDIALING
In the stand by state, press TALK button and then press the REDIAL button, the
last dialed-out number will be redialed out automatically.
NOTE: To redial after hearing a busy signal press FLASH and then press REDIAL
button.
FLASH FUNCTION
Press the FLASH button to terminate a call institute another call or to getting
another call from “call waiting”.
PAUSE FUNCTION
To dial a number from an automatic switch board system (PABX), you must first
dial an access code. Then pause a few second to wait for an outside line. The
“REDIAL” button stores a 2-3 seconds pause to give the automatic switchboard
time to find available outside line.
NAME BOOK FUNCTION OPERATION
STORE A PHONEBOOK ENTRY
1. In the stand by mode, then press “STORE” button, LCD will show “NAME” icon.
2. Use number key (2-9) to enter the name, press “0” button to enter space.
You can press “FLASH” to clear any wrong letter and digit.
For example, if you wish to enter the name ‘DAVE’:
a. To enter the letter D, press 3 once. To enter the letter A, press 2 once, the cursor
will automatically move to the right and display the letter. To enter the letter V,
press 8 three times. To enter the letter E, press 3 twice.
b. If the next letter you wish to enter is on the same button you have just pressed,
allow the cursor to move to the right before trying to enter it.
VIEWING PHONEBOOK ENTRIES
1. In the stand by mode, press STORE button, the LCD will show: “XX
memories”.
2. Press UP or DOWN button to enter review phone book entry.
3. You can key in a letter to search similar name data.
DIAL A PHONE BOOK ENTRY
1. In the stand by mode, press STORE button, the LCD will show: “XX
memories”.
2. Press UP or DOWN button to enter review phone book entry.
3. When the number you want to call is displayed on the LCD press “#” button,
the current number will be dialed automatically.
9 10

4. In case the phone number is a long-distance number, add a long distance
number by press 0 or 1.
5. If you want to dial a number without area code, press 7 to dialing out last
seven number, or press 8 to dialing out last eight number.
TO EDIT PHONE NUMBER WITH NAME
1. In the stand by mode, press STORE button, the LCD will show: “XX
memories”.
2. Press SET button to enter edit phonebook entry.
3. Press FLASH button to delete any incorrect digits and then enter the
correct number using the keypad
4. Press STORE button to enter edit letter.
5. Press FLASH button to delete any incorrect characters, then re-enter the
correct characters using the keypad.
DELETING A PHONEBOOK ENTRY
1. In the stand by mode, press STORE button, the LCD will show: “XX
memories”.
2. Press UP or DOWN button to enter review phone book entry.
3. Press FLASH twice to delete current phonebook entry.
TO EARSE NAME BOOK RECORD
1. In the stand by mode, press STORE button, the LCD will show: “XX
memories”.
2. Press FLASH twice will delete all phonebook entry.
PROBLEM SOLVING
Problem solving section
For your assistance, we have listed below a few common problems.
Phone does not work, check the following:
Base unit is plugged into power source.
Handset is charged.
Tone/pulse switch is in the right position.
Line cord is plugged into the jack.
Range of phone limited, check the following:
Antenna on base unit is raised.
Base unit is centrally located in your residence.
Base unit is not located near appliances.
No dial tone, check the following:
Telephone plug is connected to the telephone line.
If you had a power failure or had unplugged the base unit, replace the handset on the base unit for
2 to 5 seconds to reset the system.
Received signal flutters or fades, check the following:
Battery pack in handset is fully charged.
Handset is not too far from the base unit.
Antenna on base unit is raised.
Interference on reception, check the following:
Noise may be picked up from electrical products in the home or electrical storms. Generally, this
noise is a minor annoyance and should not be interpreted as a defect in your system.
Choose an alternate channel using the CH button on the handset.
Excess static, check the following:
1. Check to see that the antenna is not touching another metal object.
2. Raise the antenna.
If after pressing the TALK button, you receive three beeps and no dial tone, check the
following:
1. Reset the handset by placing it on the base unit for 2-5 seconds.
Note: If no telephone in the house are working, disconnect one set at a time to verify that none of
the phones are causing the problem. If you still have a problem after doing this and you telephone
still does not work, please contact you local phone company.
11 12

Consumer Information:
This equipment complies with Part 68 of the FCC rules and the requirements adopted
by the ACTA. On the bottom of this equipment is a label that contains, among other
information, a product identifier in the format US:AAAEQ##TXXXX. If requested, this
number must be provided to the telephone company.
An applicable certification jacks Universal Service Order Codes (USOC) for the
equipment is provided (i.e., RJ11C) in the packaging with each piece of approved
terminal equipment.
A plug and jack used to connect this equipment to the premises wiring and telephone
network must comply with the applicable FCC Part 68 rules and requirements adopted
by the ACTA. A compliant telephone cord and modular plug is provided with this
product. It is designed to be connected to a compatible modular jack that is also
compliant. See installation instructions for details.
The REN is used to determine the number of devices that may be connected to a
telephone line. Excessive RENs on a telephone line may result in the devices not
ringing in response to an incoming call. In most but not all areas, the sum of RENs
should not exceed five (5.0). To be certain of the number of devices that may be
connected to a line, as determined by the total RENs, contact the local telephone
company. [For products approved after July 23, 2001, the REN for this product is part
of the product identifier that has the format US:AAAEQ##TXXXX. The digits
represented by ## are the REN without a decimal point (e.g., 03 is a REN of 0.3). For
earlier products, the REN is separately shown on the label.
If this equipment causes harm to the telephone network, the telephone company will
notify you in advance that temporary discontinuance of service may be required. But if
advance notice isn't practical, the telephone company will notify the customer as soon
as possible. Also, you will be advised of your right to file a complaint with the FCC if
you believe it is necessary.
The telephone company may make changes in its facilities, equipment, operations or
procedures that could affect the operation of the equipment. If this happens the
telephone company will provide advance notice in order for you to make necessary
modifications to maintain uninterrupted service.
Please follow instructions for repairing if any (e.g. battery replacement section);
otherwise do not alternate or repair any parts of device except specified.
Connection to party line service is subject to state tariffs. Contact the state public utility
commission, public service commission or corporation commission for information.
This equipment is hearing aid compatible.
NOTICE: If your home has specially wired alarm equipment connected to the
telephone line, ensure the installation of this [equipment ID] does not disable your
alarm equipment. If you have questions about what will disable alarm equipment,
consult your telephone company or a qualified installer.
Should you experience trouble with this equipment, please contact (company name
or service center in the U.S.A. and phone number) for repair or warranty
information. If the equipment is causing harm to the telephone network, the telephone
company may request that you disconnect the equipment until the problem is resolved.
NOTICE: According to telephone company reports, AC electrical surges, typically
resulting from lightning strikes, are very destructive to telephone equipment connected
to AC power sources. To minimize damage from these types of surges, a surge
arrestor is recommended.
Warning: Changes or modifications to this unit not expressly approved by the party
responsible for compliance could void the user’s authority to operate the equipment.
NOTE: This equipment has been tested and found to comply with the limits for a
Class B digital device, pursuant to Part 15 of the FCC Rules. These limits are
designed to provide reasonable protection against harmful interference in a residential
installation. This equipment generates, uses and can radiate radio frequency energy
and, if not installed and used in accordance with the instructions, may cause harmful
13 14
interference to radio communications.
However, there is no guarantee that interference will not occur in a particular
installation. If this equipment does cause harmful interference to radio or television
reception which can be determined by turning the equipment off and on, the user in
encouraged to try to correct the interference by one or more of the following
measures.
Reorient or relocate the receiving antenna.
Increase the separation between the equipment and receiver.
Connect the equipment in to an outlet on a circuit different form that to which the
receiver is needed.
Consult the dealer or an experienced radio/TV technician for help.
If shielded cables or special accessories are required for compliance, a statement
must be included which instructs the user to employ them, e.g.,
Shielded cables must be used with this unit to ensure compliance with the Class B
FCC limits.
The shipping address of the repair center is:
Southern Telecom Inc
14c 53rd Street
Brooklyn, NY. 11232
Should you have any questions or problems concerning this product, please
contact our customer service department at:
1-718-567-0536