Citizen CT S300 User Manual To The 68832579 E7f8 4751 8fba F17457460744
User Manual: Citizen CT-S300 to the manual
Open the PDF directly: View PDF  .
.
Page Count: 32
- Declaration of Conformity
- GENERAL PRECAUTIONS
- SAFETY PRECAUTIONS ... WHICH SHOULD BE STRICTLY OBSERVED
- PRECAUTIONS ON PRINTER INSTALLATION
- PRECAUTIONS IN HANDLING THE PRINTER
- DAILY MAINTENANCE
- THE TABLE OF CONTENTS
- 1. GENERAL OUTLINE
- 2. EXPLANATION OF PRINTER PARTS
- 3. PREPARATION
- 4. MAINTENANCE AND TROUBLESHOOTING
- 5. OTHER
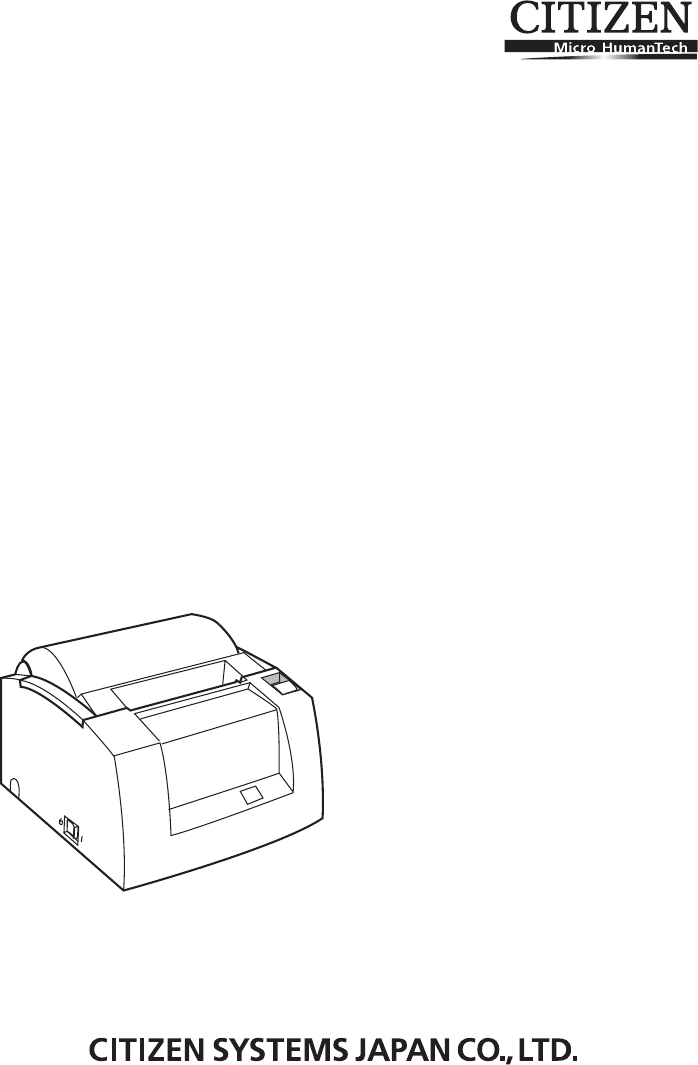
LINE THERMAL PRINTER
MODEL CT-S300
User’s Manual

This printer conforms to the following Standards:
Low Voltage Directive 73/23/EEC, 93/68/EEC and the EMC Directive 89/336/EEC,
92/31/EEC, 93/68/EEC.
LVD:EN60950
EMC : EN55022 Class A
EN61000-3-2
EN61000-3-3
EN55024
This declaration is applied only for 230V model.
Declaration of Conformity
CITIZEN is a registered trade mark of Citizen Holdings Co., Japan
CITIZEN es una marca registrada de Citizen Holdings Co., Japón
Company names and product names in this manual are trademarks or
registered trademarks of relevant companies.
Copyright c 2008 by CITIZEN SYSTEMS JAPAN CO., LTD.

IMPORTANT: This equipment generates, uses, and can radiate radio frequency energy
and if not installed and used in accordance with the instruction manual, may cause
interference to radio communications. It has been tested and found to comply with
the limits for a Class A computing device pursuant to Subpart J of Part 15 of FCC
Rules, which are designed to provide reasonable protection against such interference
when operated in a commercial environment. Operation of this equipment in a
residential area is likely to cause interference, in which case the user at his own
expense will be required to take whatever measures may be necessary to correct
the interference.
CAUTION: Use shielded cable for this equipment.
Sicherheitshinweis
Die Steckdose zum Anschluß dieses Druckers muß nahe dem Gerät angebracht und
leicht zugänglich sein.
For Uses in Canada
This digital apparatus does not exceed the class A limits for radio noise emissions
from digital apparatus, as set out in the radio interference regulations of the Canadian
department of communications.
Pour L’utilisateurs Canadiens
Cet appareil numérique ne dépasse pas les limites de carégorie a pour les émissions
de bruit radio émanant d’appareils numériques, tel que prévu dans les réglements
sur l’interférence radio du départment Canadien des communications.

— 1 —
GENERAL PRECAUTIONS
● Before using this product, be sure to read through this manual. After having read
this manual, keep it in a safe, readily accessible place for future reference.
● The information contained herein is subject to change without prior notice.
● Reproduction or transfer of part or all of this document in any means is prohibited
without permission from CITIZEN SYSTEMS.
●Note that CITIZEN SYSTEMS is not responsible for any operation results regardless
of missing, error, or misprinting in this manual.
●Note that CITIZEN SYSTEMS is not responsible for any trouble caused as a result
of using options or consumables that are not specified in this manual.
●Except explained elsewhere in this manual, do not attempt to service, disassemble,
or repair this product.
●Note that CITIZEN SYSTEMS is not responsible for any damage attributable to
incorrect operation/handling or improper operating environments that are not
specified in this manual.
●Data are basically for temporary use, not stored for a long period or permanently.
Please note that CITIZEN SYSTEMS is not responsible for damage or lost profit
resulting from the loss of data caused by accidents, repairs, tests or other
occurrence.
●If you find loss of information, error, or uncertain matter, please contact your
CITIZEN SYSTEMS dealer.
●If you find any disordered or missing page(s), contact your CITIZEN SYSTEMS
dealer for replacement.
— 2 —
SAFETY PRECAUTIONS ... WHICH SHOULD BE STRICTLY OBSERVED
Before using this product for the first time, carefully read these SAFETY PRECAUTIONS.
Incorrect operation may result in unexpected accidents (fire, shock, or injury).
●After having read this Manual, keep it in a safe, readily accessible place for future
reference.
●Some of the descriptions contained in this manual may not be relevant to some printer
models.
In order to prevent injury hazard to operators, third parties or damage to property, special
warning symbols are used in this user’s manual to indicate important items to be strictly
observed.
The following describes the degree of hazard and damage that could occur if the printer
is improperly operated by ignoring the instructions indicated by the warning symbols.
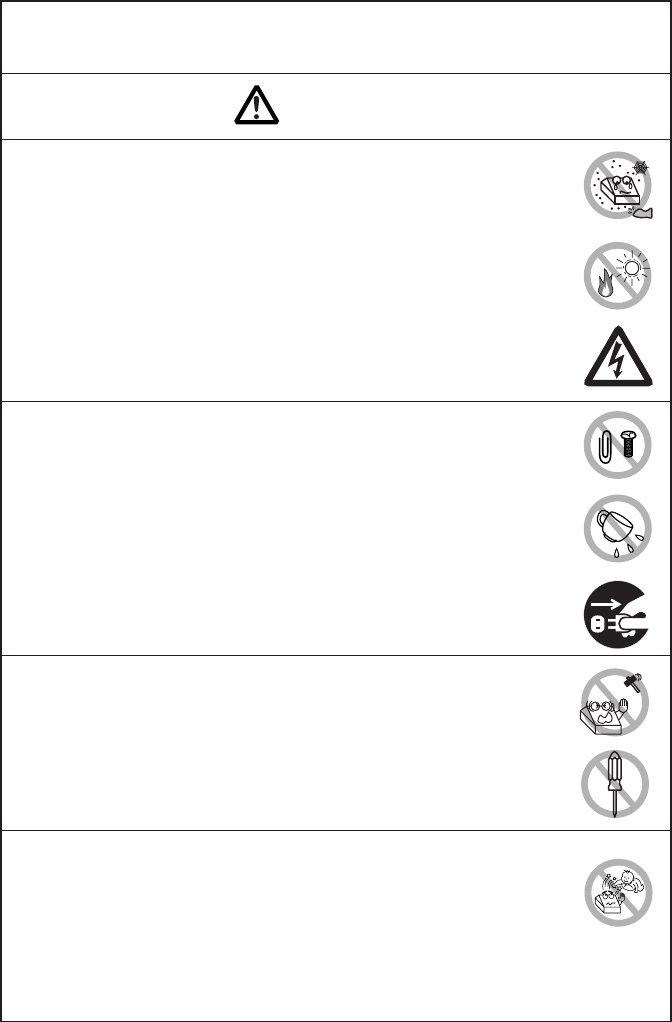
This symbol is used to alert your attention to important items.
Neglecting precautions indicated by this symbol may result in fatal or serious injury.
WARNING
Neglecting precautions indicated by this symbol may result in injury or damage to
properties.
CAUTION
This symbol is used to alert you to the danger of electric shock or electrostatic
damage.
This symbol denotes a request to unplug the printer from the wall outlet.
This symbol is used to indicate the “information” on the use, or the like.
This symbol is used to indicate prohibited actions.
— 3 —
Do not use or store this product in a place where it will be exposed to:
●Flames or moist air
●Direct sunlight
●Hot airflow or radiation from a heating device
●Salty air or corrosive gases
●Ill-ventilated atmosphere
●Chemical reactions in a laboratory
●Airborne oil, steel particles, or dust
●Static electricity or strong magnetic field
•Neglecting these warnings may result in printer failure, overheating,
emission of smoke, fire, or electric shock.
PRECAUTIONS ON PRINTER INSTALLATION
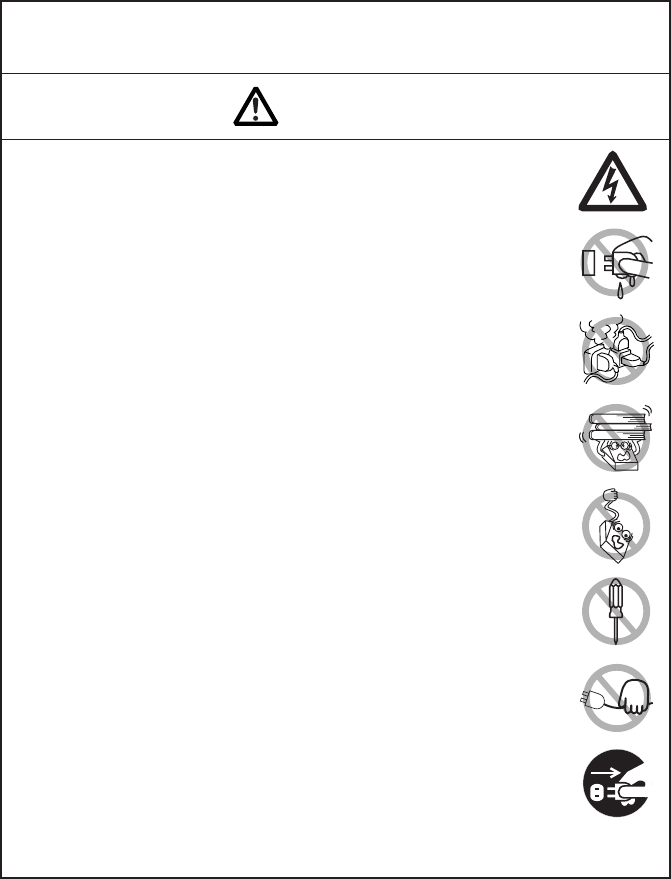
Do not drop any foreign object nor spill liquid into the printer. Do not
place any object on the printer either.
●Do not drop any metallic object such as paper clip, pin or screw into
the printer.
●Do not place a flower vase, pot or cup containing water on the printer.
●Do not spill coffee, soft drinks or any other liquid into the printer.
●Do not spray insecticide or any other chemical liquid over the printer.
•A metallic foreign object, if accidentally dropped into the printer,
may cause printer failure, fire, or electric shock. Should it occur,
immediately turn the printer off, unplug it from the supply outlet,
and call your local CITIZEN SYSTEMS dealer.
Do not handle the printer in the following ways:
●Do not allow the printer to sustain strong impacts or hard jolts (e.g.,
trampling, dropping, striking with a hard edge).
●Never attempt to disassemble or modify the printer.
•Neglecting to handle properly may result in printer failure,
overheating, emission of smoke, fire, or electric shock.
WARNING
Install, use, or store the printer out of the reach of children.
•Electric appliances could cause an unexpected injury or accident if
they are handled or used improperly.
•Keep the power cord and signal cables out of the reach of children.
Also children should not be allowed to gain access to any internal
part of the printer.
•The plastic bag the printer came in must be disposed of properly or
kept away from children. Wearing it over the head may lead to
suffocation.
— 4 —
Place the printer on a flat, stable surface without vibration.
• Otherwise dropping may cause injury.
Do not use the printer under the following conditions.
●A state where the printer ventilation holes are blocked by a nearby
wall or something
●A state where any object is placed on the printer
●A state where the printer is covered or wrapped by a cloth or bed
clothing
•Be careful about internal heat buildup, which could cause fire and
deform the case.
●Avoid using the printer near a radio or TV set or from supplying it
from the same outlet as these appliances.
●Avoid using the printer interconnected with a cable or cord that has
no protection against noise. (For interconnections, use shielded or a
twisted pair of cables and ferrite cores, or other anti-noise devices.)
●Avoid using the printer with a device that is a strong source of noise.
•The printer may have an adverse effect on nearby radio or TV
transmissions. There may also be cases when nearby electrical
appliances adversely influence the printer, causing data errors or
malfunction.
CAUTION
Use the printer with its grounding post connected to a convenient
grounding facility.
•If leakage occurs electric shock may result.
Do not connect the printer’s grounding post onto any of the following
facilities.
●Utility gas piping
A gas explosion could result
●Telephone line ground
●Lightning rod
If lightning strikes a large surge of current may cause fire or shock.
●Utility water pipes
Plastic water pipes should not be used for grounding. (Those
approved by a Waterworks Department may be used.)
Before connecting or disconnecting the grounding lead to or from the
printer, always unplug it from supply outlet.
— 5 —
PRECAUTIONS IN HANDLING THE PRINTER
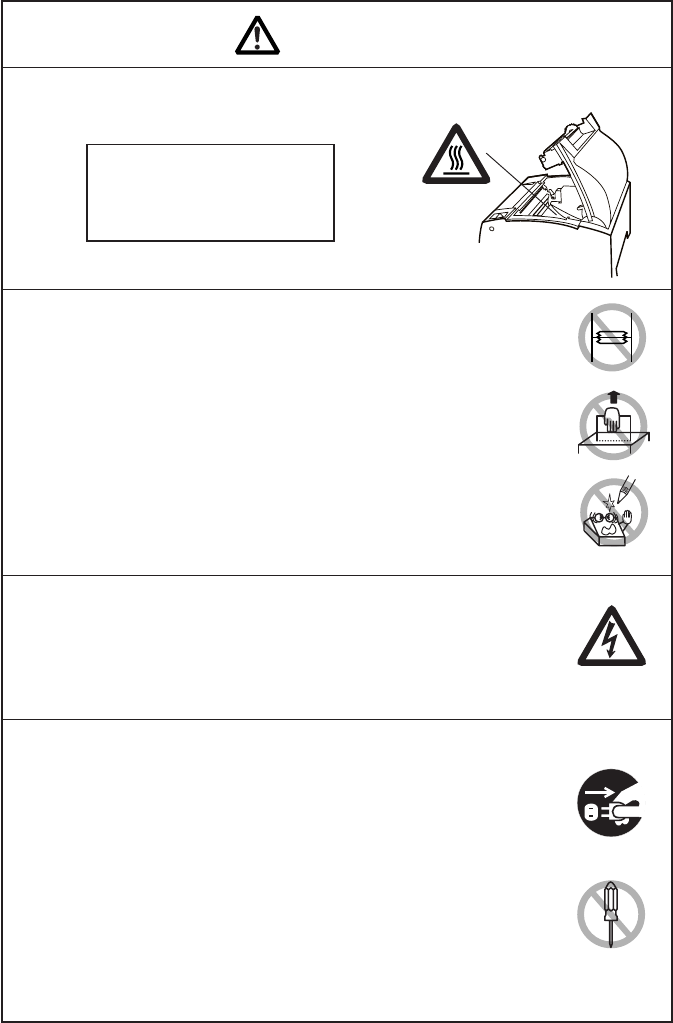
Please observe the following precautions for power source and power
cord:
●Do not plug or unplug the power cord with a wet hand.
●Use the printer only at the specified supply voltage and frequency.
●Use only the specified AC adapter with the printer.
●Check to make sure that the supply outlet from which the printer is
powered has a sufficient capacity.
●Do not supply the printer from a power strip or current tap shared
with other appliances.
●Do not plug the power cord into a supply outlet with dust or debris
left on its plug.
●Do not use a deformed or damaged power cord.
●Do not move the printer while the printer power is on.
•Neglecting to handle properly may result in printer failure, emission
of smoke, fire, or electric shock.
•An overload may cause the power cord to overheat or fire or the
circuit breaker to trip.
●Do not allow anything to rest on the power cord. Do not place the
printer where the power cord will be trampled on.
●Do not use or carry the printer with its power cord bent, twisted, or
pulled.
●Do not attempt to modify the power cord unnecessarily.
●Do not lay the power cord in the neighbor of a heating device.
•Neglecting these cautions may cause wires or insulation to break,
which could result in leakage, electric shock, or printer failure. If a
power cord sustains damage contact your CITIZEN SYSTEMS dealer.
●Do not leave things around the supply outlet.
●Supply power to the printer form a convenient wall outlet, readily
accessible in an emergency.
•The printer may not be immediately shut down in an emergency.
●Insert the power plug fully into the outlet.
●If the printer is not to be used for a long time, leave it disconnected
from its supply outlet.
●Hold the plug and connector when plugging or unplugging the power
cord or signal cable after turning off the printer and the appliance
connected to it.
WARNING
— 6 —
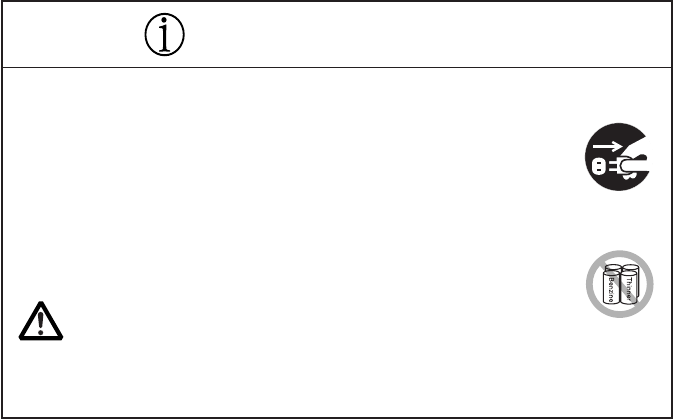
Caution label is attached on the position shown in the following figure. Carefully
read the precautions in handling before using the printer.
THIS LABEL INDICATES THE
RISK OF ANY INJURY DUE TO
“HIGH TEMPERATURE” OF
THE PRINT HEAD.
To prevent possible malfunction or failure observe the following.
●Avoid operating the printer without paper properly loaded.
●Avoid the use of paper not complying with specifications.
•May result in poor print quality.
●Avoid using torn pieces of paper or spliced with plastic adhesive
tapes.
●Avoid forcibly pulling already loaded paper by hand.
●Avoid wedging the paper in by the paper cover.
•May jam paper. To release, refer to “Removing Jammed Paper” in
this manual.
●Avoid using a sharp pointed device to operate panel keys.
Be sure to firmly insert the cable plug into its mating socket.
•A cross connection may damage the printer’s internal electronics or
the host system’s hardware.
Only use the printer with devices that have designated solenoid
specifications for the cash drawer interface connector.
•Neglecting this caution may result in malfunction or failure.
To prevent injury and printer failures from worsening, observe the
following:
●Do not touch the printing surface of the thermal head.
●Do not touch any of the moving parts (e.g., paper cutter, gears, active
electrical parts) while the printer is working.
●In case of trouble do not attempt to repair the printer. Ask CITIZEN
SYSTEMS service for repair.
●Be careful that the paper cover does not entrap your hands or fingers.
●Be careful with sharp edges on the printer. Don’t allow them to injure
you or damage property.
•May result in electric shock, burn, or injury.
•If the printer emits smoke, an odd smell, or unusual noise while
printing, immediately abort the current print session and unplug
the printer from the supply outlet.
CAUTION
— 7 —
Observe the following precautions for daily maintenance.
●When cleaning the printer, always turn it off and unplug it from the
supply outlet.
●Use a soft, dry cloth for cleaning the surface of the printer case.
●For severe stains, use a soft cloth slightly dampened with water.
●Never use organic cleaning solvent such as alcohol, paint thinner,
trichloroethylene, benzene, or ketone. Never use a chemically
processed cleaning cloth.
●To remove paper chips, use a soft brush.
●When transporting the printer, remove the roll paper form its paper
holder.
CAUTION
•The thermal head is at a dangerously high temperature immediately
after printing. Allow it to cool off before launching maintenance
work.
DAILY MAINTENANCE

— 8 —
THE TABLE OF CONTENTS
1. GENERAL OUTLINE ...................................................................9
1.1 Features ..........................................................................................9
1.2 Unpacking .....................................................................................10
1.3 Model Classification ..................................................................... 10
1.4 Basic Specifications ..................................................................... 11
2. EXPLANATION OF PRINTER PARTS ....................................... 12
2.1 Printer Appearance ......................................................................12
2.2 Paper Cover Inside .......................................................................14
2.3 Other Built-in Functions ............................................................... 14
3. PREPARATION ..........................................................................15
3.1 Connecting the AC Adapter and AC Power Cord ......................15
3.2 Connecting Interface Cables .......................................................16
3.3 Connecting the Cash Drawer ......................................................17
3.4 Installing the Printer ..................................................................... 18
3.5 Partition for 58-mm Wide Paper Roll .......................................... 18
3.6 Setting DIP Switch .......................................................................19
3.7 Adjusting the Paper Near-end Sensor ........................................20
4. MAINTENANCE AND TROUBLESHOOTING ..........................21
4.1 Setting/Replacing Paper Rolls .....................................................21
4.2 Removing Jammed Paper ...........................................................21
4.3 Cleaning the Print Head ...............................................................22
4.4 When the Paper Cover Cannot Be Opened ................................22
4.5 Self-printing ..................................................................................23
4.6 Hexadecimal Dump Printing .......................................................23
4.7 Error Indication .............................................................................24
5. OTHER .......................................................................................25
5.1 External Views and Dimensions .................................................25
5.2 Manual Setting of Memory Switch .............................................26
5.3 Printing Paper ................................................................................28

— 9 —
1. GENERAL OUTLINE
The CT-S300 is a thermal line printer designed for use with a broad array of
terminal equipment including, data, POS, and kitchen terminals.
With extensive features, it can be used in a wide range of applications.
1.1 Features
●Compact design.
●Paper drop-in mechanism facilitating paper handling and head cleaning.
●High speed (130 mm/s) printing.
●Low-noise printing.
●Built-in input buffer.
●Barcode printing.
●Page mode. Now you can arrange pages freely.
●Registration of user-defined characters and logos into flash memory.
●Built-in cash drawer interface.
●Auto cutter mechanism provided as a standard unit (full cut/partial cut).
●Can use 80 mm or 58 mm wide paper roll.
●Replaceable interface board.
●A variety of functions selectable with memory switch.
●The printer allows horizontal, vertical, or wall-mounted (optional) installation.
●Built-in buzzer.
●Two types of power supply. Select between built-in power supply type and
AC adapter type.
●Various kinds of customization are permitted.
●2-color printing is supported.
— 10 —
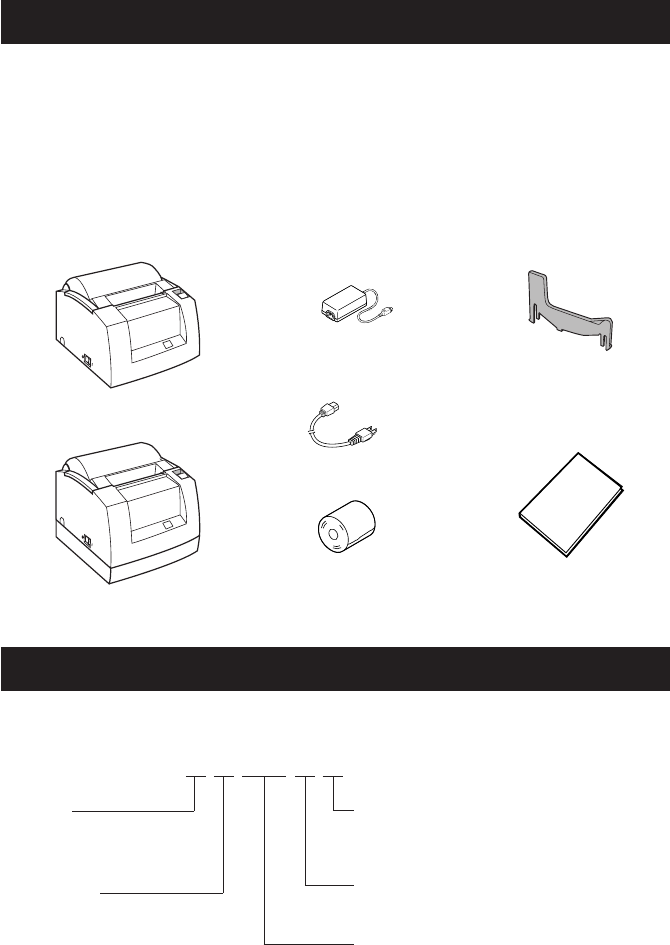
1.2 Unpacking
When unpacking the printer, confirm that the following are provided:
●Printer: 1
●AC adapter (AC adapter type): 1
●AC power cord: 1
●Sample paper roll: 1 roll
●Partition for 58-mm wide paper roll: 1
●User’s manual (This manual): 1
Printer
(AC adapter type)
Sample paper roll
Partition for 58-mm
wide paper roll
User’s manual
(This manual)
AC adapter
(AC adapter type)
AC power cord
Printer
(Built-in power supply type)
CT - S300 - R F 120 A
Black mark sensor for back side
None: No sensor (Standard)
M1: Left black mark sensor
M2: Right black mark sensor
Power supply
A: AC adapter type
S: Built-in power supply type
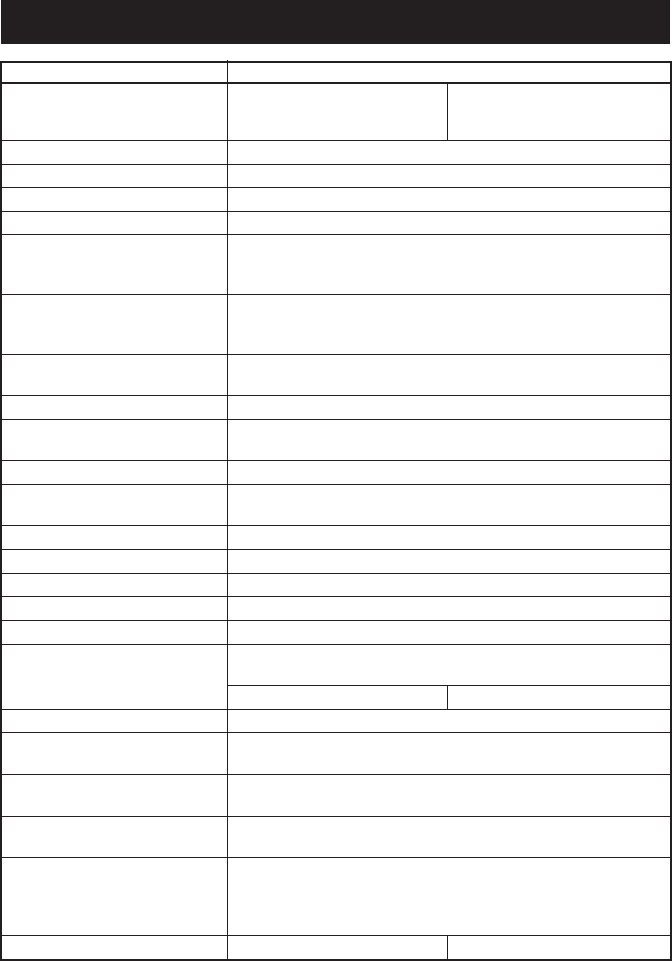
1.3 Model Classification
The printer models are classified by the following designation method:
Character set
F: International
Interface
R: Serial RS-232C compliant
P: Parallel IEEE 1284 compliant
U: USB
Power cord specification
100: For AC 100V
120: For AC 120V
230: For AC 230V
— 11 —
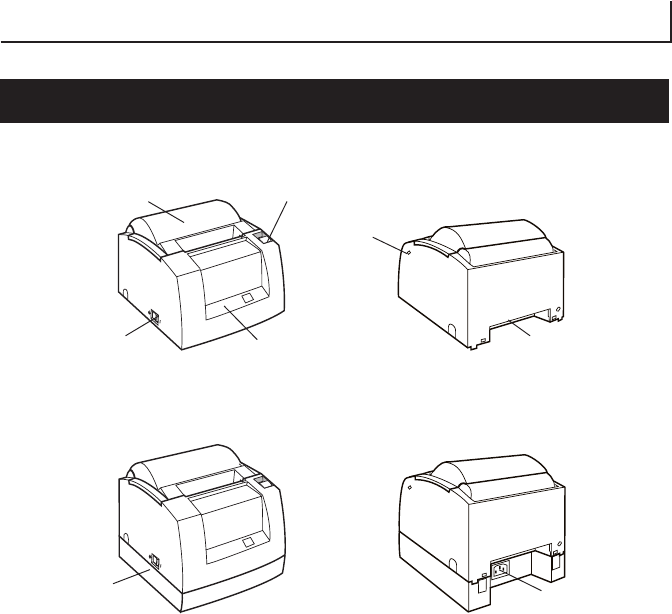
Item Specifications
Model CT-S300-RF120 CT-S300-RF230
CT-S300-PF120 CT-S300-PF230
CT-S300-UF120 CT-S300-UF230
Print method Line thermal dot print method
Print width 72 mm/576 dots, (48 mm/384 dots) *1
Dot density 8 × 8 dots/mm (203 dpi)
Print speed 130 mm/s (Fastest, print density level 0), 1040 dot lines/s
Number of print columns *2 Font A: 48/42 (32/30) columns; 12 × 24 dots
( ) shows the value with Font B: 64/56 (42/40) columns; 9 × 17 dots
58 mm wide paper. Font C: 72/63 (48/45) columns; 8 × 16 dots
Character size Font A: 1.50 × 3.00 mm
Font B: 1.13 × 2.13 mm
Font C: 1.00 × 2.00 mm
Character type Alphanumeric, International, PC850/852/857/858/860/863/864/
865/866/WPC1252/Katakana/Thai code 18
User memory
256 KB (Capable of registering user-defined characters and logos)
Types of bar code UPC-A/E, JAN (EAN) 13/8 columns, ITF, CODE 39, CODE 128,
CODABAR, CODE 93
Line spacing 4.23 mm (1/6 inch)
Paper roll Thermal paper roll: 80 mm/58 mm × φ83 mm
Paper thickness: 65-75 µm
Interfacing Serial (RS-232C compliant), Parallel (IEEE 1284 compliant), USB
Cash drawer interface 2 cash drawers are supported.
Input buffer 4k bytes/45 bytes
Supply voltage DC 24 V ±7%
Power consumption Approx. 70 W (in normal printing)
AC adapter Rated input: AC 100 to 240 V, 50/60 Hz, 150 VA
Rated output: DC 24 V, 2A
35AD-U 35AD-E
Weight Approx. 1.2 kg
Outside dimensions 145 (W) × 195 (D) × 121 (H) mm (AC Adapter Type)
145 (W) × 195 (D) × 159 (H) mm (Built-in Power Supply Type)
Operating temperature and 5 to 40°C, 35 to 85% RH (No condensation)
humidity
Storage temperature and −20 to 60°C, 10 to 90% RH (No condensation)
humidity
Reliability Print head life: 100 km, 1 × 10⁸ pulses (At normal temperature/
humidity with recommended paper used)
Auto cutter life: 1 million cuts (At normal temperature/
humidity with recommended paper used)
Safety standard *3 UL, C-UL, FCC Class A TUV, GS, CE marking
Notes:
*1: Value in parentheses shows the case when a 58-mm wide paper roll is used.
*2: The number of printable columns is selectable with a DIP switch.
*3: Represents the safety standards acquired when CITIZEN SYSTEMS-made adapters (35AD
series) are used.
1.4 Basic Specifications
+0
−1
+0
−1
— 12 —
2.
EXPLANATION OF PRINTER PARTS
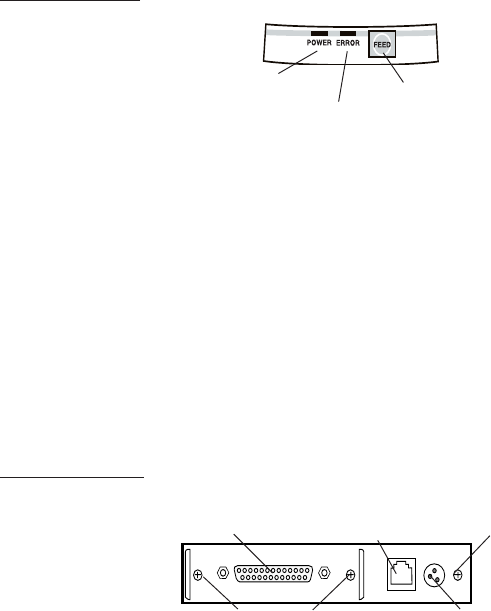
2.1 Printer Appearance
Paper cover
Power switch Operation panel
Cover open lever
Cutter lock releasing
feed hole
Rear connector
Power box unit
(Front view) (Rear view)
AC Adapter Type
Built-in Power Supply Type
(Front view) (Rear view)
AC inlet
●Paper cover
Paper is located inside this cover.
●Cover open lever
To refill or replace paper, open the paper cover by pulling this lever fully to
the root.
●Power switch
This switch turns the printer power ON/OFF.
●Cutter lock releasing feed hole
When the cutter blade is kept protruded after abnormal termination or paper
jam, the paper cover cannot be opened. Insert a Phillips screwdriver through
this hole and adjust the screw to restore the blade.
●AC inlet (Built-in power supply type)
Connects to AC cable.
— 13 —
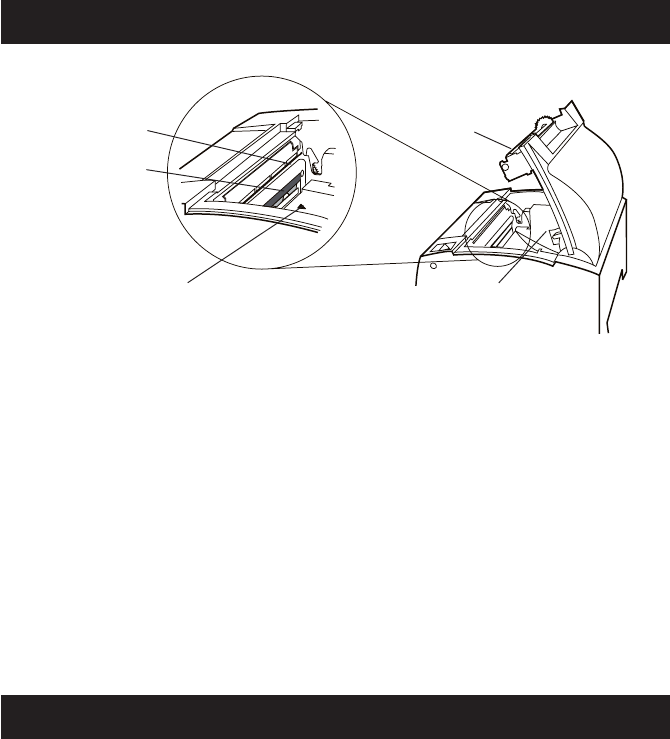
●POWER LED
Lights when the printer power is on and goes off when the printer power is
off. May blink or light in a special mode or in case of a failure.
●ERROR LED
Lights or blinks when paper is empty or in case of a failure.
The interval length of blinking shows the type of error.
●FEED switch
Pressing this switch once causes a paper feed of one line. The longer the
switch is pressed, the more the paper is fed.
In case of auto cutter error, press the FEED switch after removing the cause
of the error to clear the error.
POWER LED
ERROR LED
FEED switch
Interface connector
(Serial, parallel, etc.)
Cash drawer
interface connector
Power connector
Rear Connectors
Interface board
mounting screws
Operation Panel
●Interface connector (Serial, parallel, etc.)
Connects to the interface cable. A DIP switch is provided on the serial interface
board.
●Cash drawer interface connector
Connects to the cable from the cash drawer.
●Power connector
Connects to the cable from AC adapter.
Grounding terminal
for drawer
— 14 —
2.2 Paper Cover Inside
●Paper feed roller
Feeds paper as part of print mechanism.
●Paper-near-end sensor
Changes the setting in accordance with the inner diameter of paper roll or
setting status.
●Auto cutter
Cuts the paper with a command at the end of printing. Cutting method is
selectable between partial cut and full cut with a command.
●Print (thermal) head
Prints characters and/or graphic data on thermal paper.
●Paper-end sensor
Stops printing when this sensor detects paper end.
2.3 Other Built-in Functions
●Buzzer
This printer has a built-in buzzer. It is operated in case of an error, operation,
or by a command.
●User memory
Allows registration of user-defined characters and logo data on the nonvolatile
memory. Data registered remains even after the printer power is off.
●Memory switch
Setting of various kinds of functions can be registered on nonvolatile memory.
The setting registered is valid even if the printer power is turned off. In
additional memory switch setting can be changed by manual operation.
Paper feed roller
Paper-end sensor
Auto cutter
Print (thermal)
head
Paper-near-end sensor
— 15 —
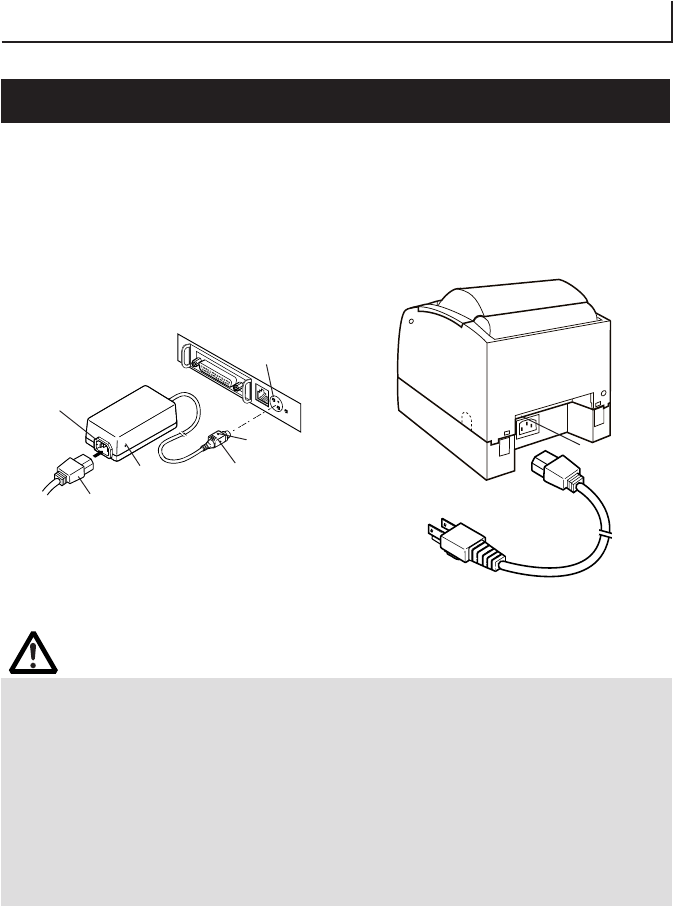
3. PREPARATION
3.1
Connecting the AC Adapter and AC Power Cord
1. Turn off the printer power.
2. For the AC adapter type only: With the flat side of the AC adapter’s cable
connector facing upward, insert the cable connector into the power connector
on the back side of the printer.
3. Connect the AC power cord to the inlet of the printer, and insert the AC
power-cord plug into a suitable wall outlet.
AC inlet
Cable connector
AC power cord
AC power cord
AC inlet
AC Adapter Type
Built-in Power Supply Type
Power connector
AC adapter
Flat side
CAUTION!
●Use only the specified AC adapter with the printer.
●When disconnecting a cable, do not pull out by the cable. Always hold the plug.
●Always keep the AC power supply away from other noise generating equipment.
●Do not pull the power cord. Otherwise fire, electric shock, or power disconnection
may result.
●If lightning is approaching, unplug the AC power cord from the wall outlet. Otherwise
fire or electric shock may result.
●Keep the power cord away from heat generating appliances. Otherwise the shield of
power cord may be fused resulting in a fire or electric shock.
●If the printer is not to be used for a long time, leave it disconnected from its supply
outlet.
— 16 —
Printer
Pin Signal
2TXD
3RXD
4RTS
6 DSR
7SG
20 DTR
PC
Signal Pin
FG 1
TXD 2
RXD 3
CTS 5
DSR 6
SG 7
DTR 20
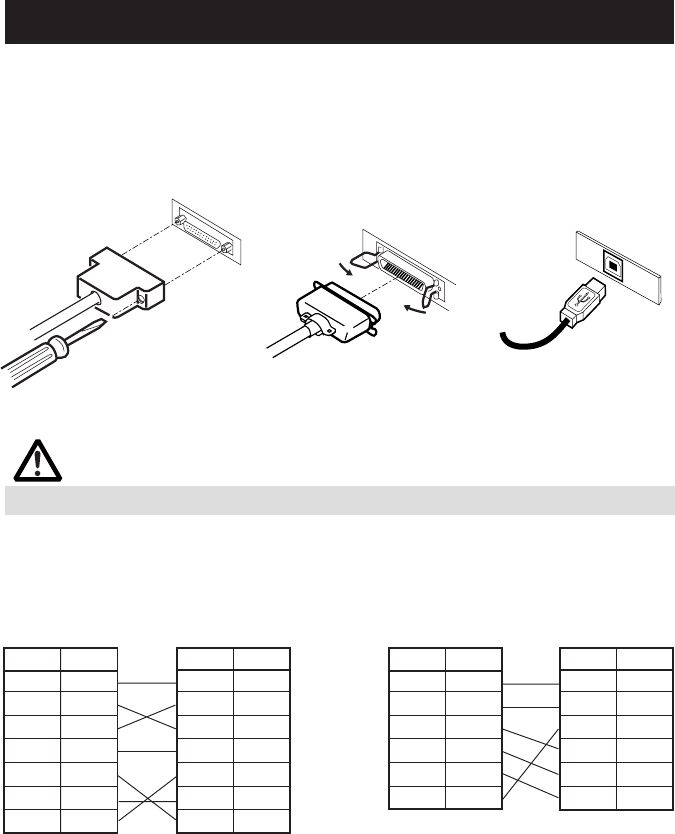
3.2 Connecting Interface Cables
Turn off the printer power and unplug the power connector. Then follow the
procedure for interface cable connection.
Orient the interface cable terminal correctly and insert it into the interface
connector.
In case of a built-in power supply type, remove the power box unit before
connection.
CAUTION!
When disconnecting the cable, always hold the connector.
Serial Interface Parallel Interface
For serial interface cable, use the one with the following connection.
25-pin - 25-pin cable 9-pin - 25-pin cable
Printer
Pin Signal
1FG
2 TXD
3 RXD
4RTS
6 DSR
7SG
20 DTR
PC
Signal Pin
RXD 2
TXD 3
DTR 4
SG 5
DSR 6
CTS 8
USB Interface
— 17 —
CAUTION!
Do not connect any other device than the specified cash drawer to the cash drawer
interface connector. (Do not connect a telephone line either.)
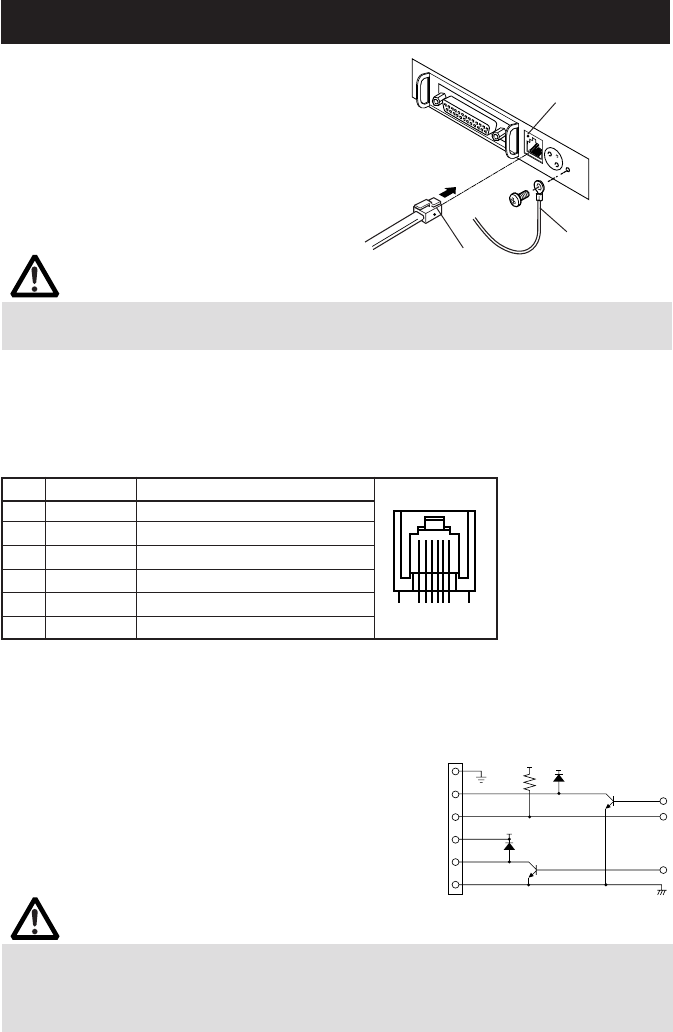
3.3 Connecting the Cash Drawer
Cash drawer
interface connector
Cash drawer cable connector
Ground line
1. Turn off the printer power.
2. Orient the cash drawer cable connector
correctly, insert it into the cash drawer
interface connector on the back of the
printer.
3. Connect the drawer‘s ground line to the
printer‘s ground terminal with a screw.
For built-in power type, remove the power
box unit before connection.
In case of a built-in power supply type, remove the power box unit before
connection.
(1) Connector Pin Configuration
(2) Electrical characteristics
1) Driving voltage: 24 VDC
2) Driving current: Approx. 1A max. (shall not exceed 510 ms.)
3) DRSW signal: Signal levels: “L” = 0 to 0.5 V, “H” = 3 to 5 V
(3) DRSW signal
DRSW signal status can be tested with
the DLE+EOT, GS+a, or GS+r command or
at pin 34 on the parallel interface port.
(4) Drive Circuit (printer side)
No. Signal Function
1 FG Frame Ground
2 DRAWER 1 Drawer 1 drive signal
3 DRSW Drawer switch input
4 VDR Drawer drive power supply
5 DRAWER 2 Drawer 2 drive signal
6 GND Common ground on circuits
61
Connector used:
TM5RJ3-66 (Hirose)
or equivalent
Applicable connector:
TM3P-66P (Hirose) or
equivalent
CAUTION!
●No output is produced while printing.
●The cash drawers 1 and 2 cannot be driven simultaneously.
●A solenoid used for the cash drawer should be of 24 Ω or more. The output current
should be kept at 1A or less; otherwise, breakdown or burning could occur.
VDR
1
2
3
4
5
6
VDR
5V
— 18 —
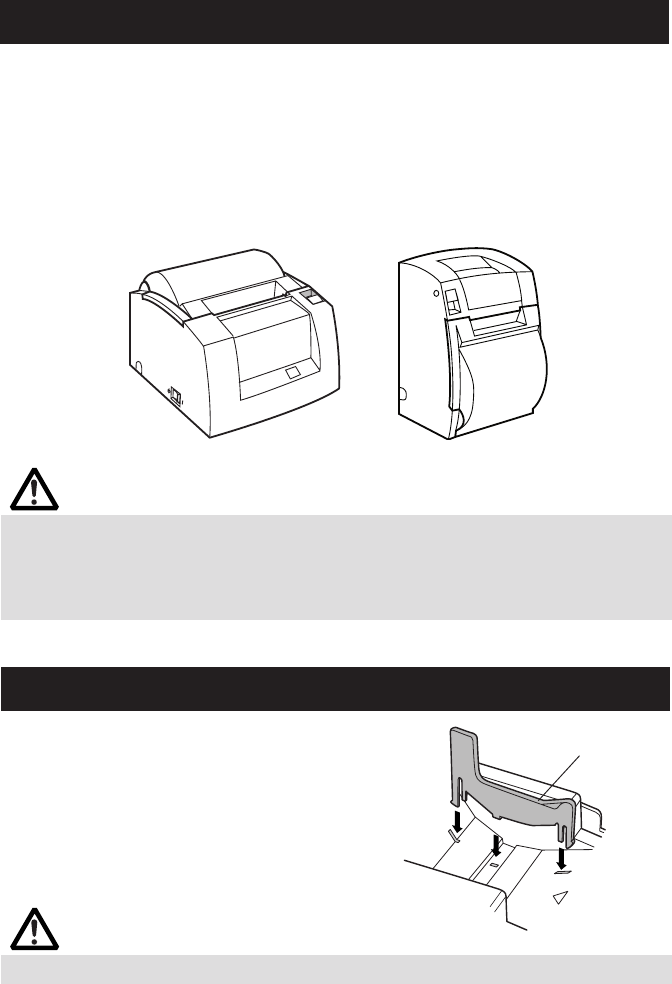
3.4 Installing the Printer
The printer can be installed horizontally, vertically, and on the wall.
At the time of shipment, the printer is set for horizontal installation. To install
the printer vertically or on the wall, the following adjustments are required.
1. Adjustment of paper near-end sensor position (See section 3.7)
2. Anti-slip rubber feet (for vertical setting)
3. Optional wall-mounting kit (for wall-mounting)
4. Optional right-angle AC cable (when installing the printer with built-in power
supply vertically)
Horizontal position Vertical position
CAUTION!
●When used in vertical position, the printer ejects paper not to fall naturally even with
full cutting. Be careful in using the printer built in equipment, etc.
●When using in horizontal setting, avoid cutting full. Otherwise, the cut paper may
drop into the cutter and may result in double cutting and narrow pieces of paper. This
may cause paper jam.
3.5 Partition for 58-mm Wide Paper Roll
1. Turn off the printer power.
2. Open the paper cover.
3. Attach the “Partition” supplied with the
printer to the position shown in the figure.
4. Referring to the section of memory switch
setting change the paper width setting to
58 mm.
CAUTION!
When using the 58-mm wide paper always use the printer with 58 mm paper only.
Partition
— 19 —
Initial
Settings
1
Communication condition
DIP switch setting Memory switch ON
setting method
setting
2 Hand shake XON/XOFF DTR/DSR OFF
3 Bit length 7 bits 8 bits OFF
4 Parity check With parity None OFF
5 Parity selection Even parity Odd parity OFF
6ON
7ON
8 INIT Reset Invalid OFF
Selecting baud rate
Switch No.
67
2400 OFF OFF
4800 ON OFF
9600 OFF ON
19200 ON ON
38400 bps can also be selected by a command, etc.
3.6 Setting DIP Switch
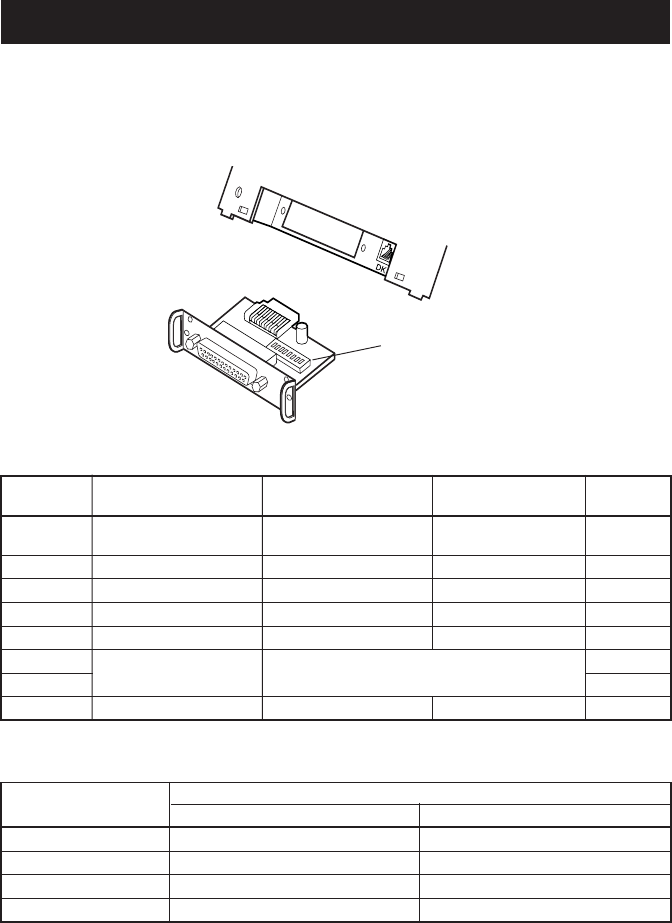
The DIP switch is present on the serial interface.
Remove the board fixing screws, take out the interface board, and then set the
DIP switch.
The function of each switch is as shown below.
Baud Rate (bps)
Switch No. Function ON OFF
Baud rate selection See Table below.
DIP switch
— 20 —
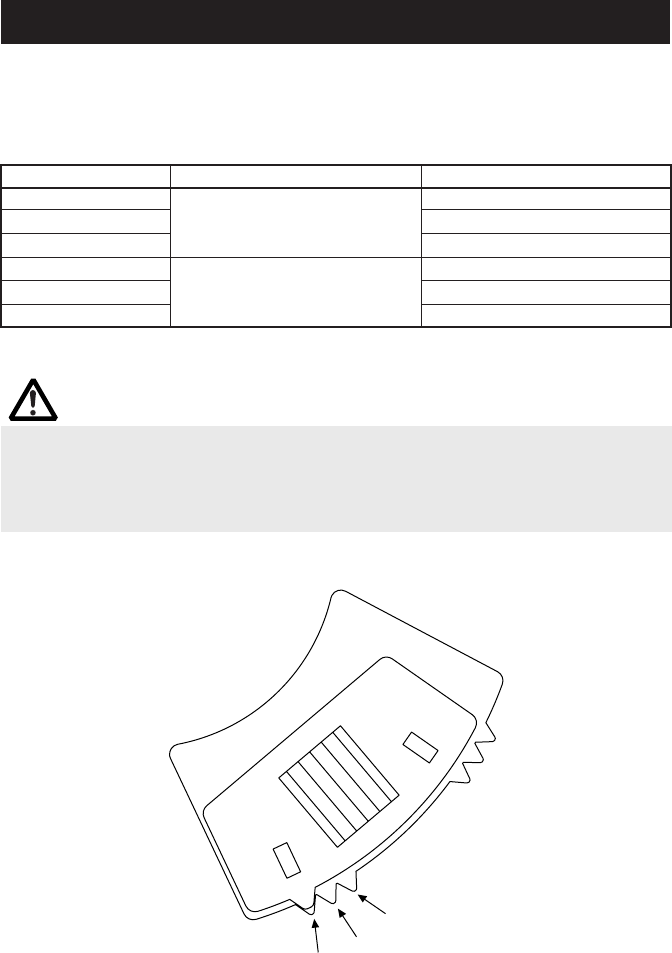
3.7 Adjusting the Paper Near-end Sensor
1. Push in the paper near-end sensor unit.
2. Move the paper near-end sensor unit to the right and left while pushing it.
The position to be set varies in accordance with the setting of the printer,
horizontal or vertical, or the diameter of the paper roll as shown in the
following figure.
Sensor Position Installation Method Paper Roll External Diameter (mm)
1φ22
2 Horizontal φ24
3φ27
3φ22
2 Vertical (Wall-mounted) φ24
1φ27
CAUTION!
●Paper remainder (outside diameter of roll) differs by the type of paper roll used.
●The external diameter of the paper roll is only for reference.
●Recommended outer diameter of paper roll core is φ18. If, however, using a paper roll
with a diameter of φ22 is unavoidable, adjustments to “1” for horizontal positioning
and “3” for vertical positioning cannot be used.
1
2
3
— 21 —
4.
MAINTENANCE AND TROUBLESHOOTING
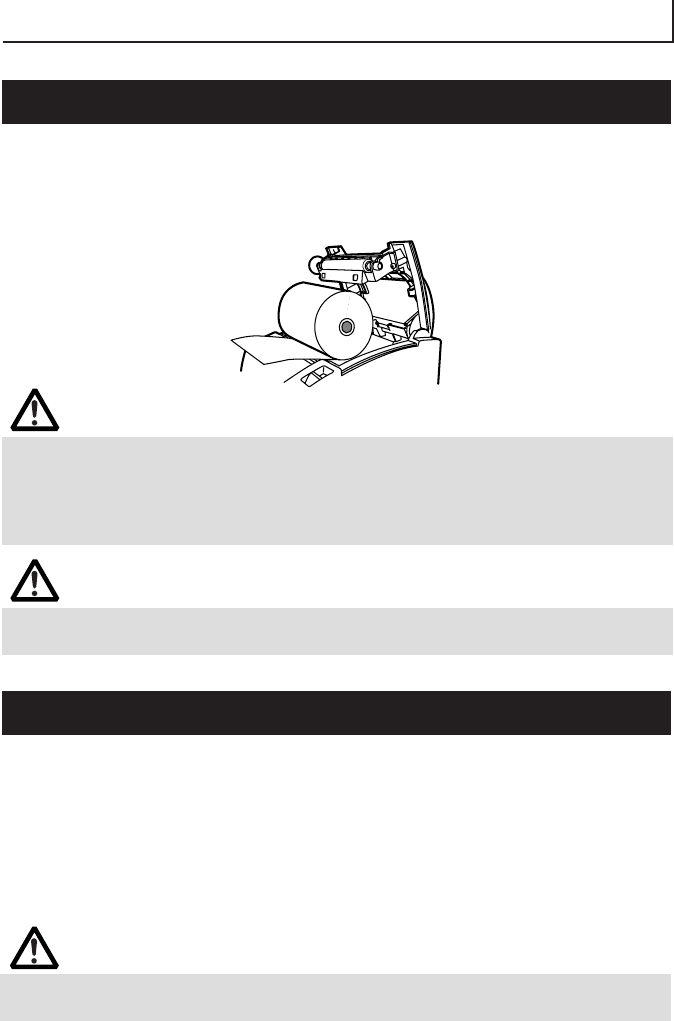
4.1 Setting/Replacing Paper Rolls
1. Pull the cover open lever fully toward you.
2. Open the paper cover.
3. Insert a paper roll with is print area facing down as shown in the figure and
pull out the paper end straightforward by several cm out of the printer.
4. Close the paper cover until a click can be heard.
CAUTION!
●Always use the specified types of paper roll.
●Confirm that the paper roll is set correctly.
●When the paper is skewed and not extended straightforward from under the cover,
open the cover and adjust the paper correctly.
●When closing the cover, press on the center part of the cover to close it firmly.
WARNING
When opening the paper cover, take care not to touch the print head or cutter blade.
Otherwise, burning or injury of hand may result.
4.2 Removing Jammed Paper
1. Turn the printer power off.
2. Open the paper cover.
If the cutter blade remains protruded with paper jammed, do not open the
paper cover forcibly. Referring to section 4.4, restore the blade to the normal
position and then open the cover.
3. Remove the jammed paper including any paper chips remaining. (Also take
out the paper roll from the holder.)
4. Turn on the printer. The auto cutter mechanism is initialized and the alarm
is cleared.
CAUTION!
The print head is hot immediately after printing. Do not touch it with your hand. Do
not touch the heating element of the head with a bare hand or metal object either.
— 22 —
4.3 Cleaning the Print Head
1. Turn the printer power off.
2. Open the paper cover.
3. Wait several minutes. Wipe off any debris on the heating element of the
head using a cotton swab soaked in ethyl alcohol.
CAUTION!
The print head is hot immediately after printing. Do not touch it with your hand. Do
not touch the heating element of the head with a bare hand or metal object either.
4.4
When the Paper Cover Cannot Be Opened
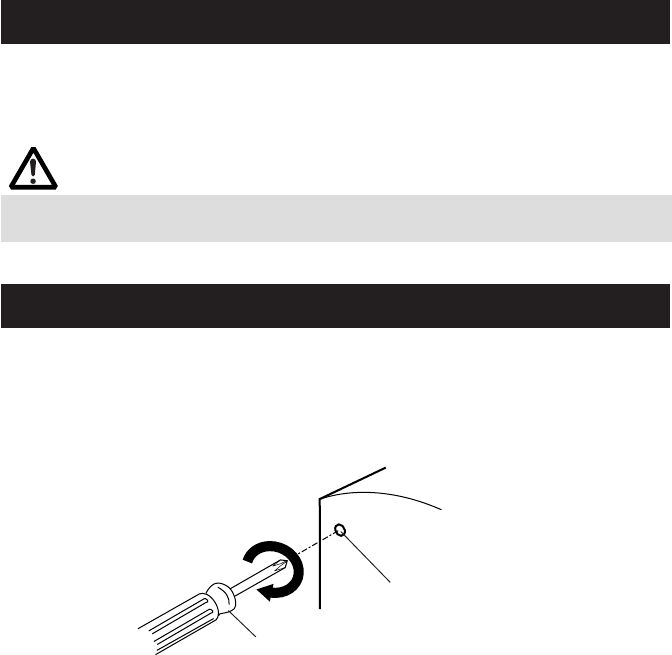
If the cutter blade remains protruded due to paper jam or for any abnormality,
opening the paper cover may be disabled.
In this case, do not open the paper cover forcibly. Insert a Phillips screwdriver
into the cutter lock releasing feed hole and turn it in the direction of arrow
(clockwise).
Use a #1 screwdriver.
When you find that both ends of the blade reached the lowest position, stop
turning the screwdriver. Open the cover and follow the procedure of removing
jam or other cause of trouble.
Cutter lock releasing feed hole
Phillips screwdriver
— 23 —
CT-S300
V1.xxx
Serial Interface
Baud rate : 19200 bps
Data bit : 8 bits
Parity : None
Handshaking : DTR/DSR
Buffer Size
4K Bytes
Dip switches
DS1
1 2 3 4 5 6 7 8
ON O O O
OFF O O O O O
Memory switches
SW1
1 2 3 4 5 6 7 8
ON
OFF O O O O O O O O
SW2
1 2 3 4 5 6 7 8
ON O O O
OFF O O O O O
SW3
1 2 3 4 5 6 7 8
ON
OFF O O O O O O O O
SW4
1 2 3 4 5 6 7 8
ON
OFF O O O O O O O O
4.5 Self-printing
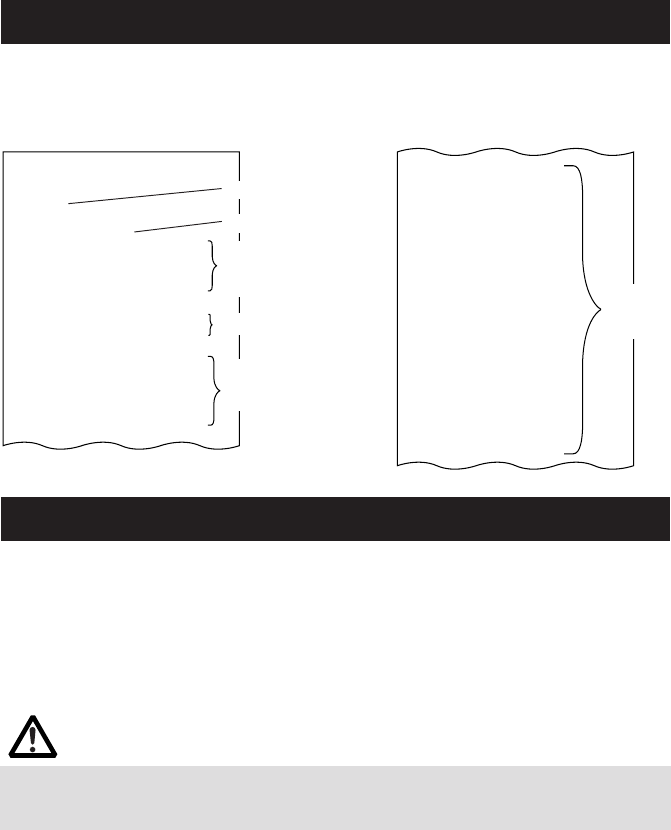
Insert paper into the printer. With the FEED switch pressed and held, turn the
printer power on, keep the FEED switch held for about 1 second, and then release
the FEED switch. The printer starts self-printing. The printer prints model name,
version, DIP switch setting, memory switch setting, and built-in fonts.
4.6 Hexadecimal Dump Printing
This function is to print all received data in hexadecimal numbers. If problems
such as missing data, data duplication, etc. should occur, this function allows
checking whether or not the printer is receiving data correctly.
Set paper to the printer and keep the paper cover open. With the FEED switch
pressed and held, turn the printer power on and then close the paper cover.
The printer prints “HEX dump print mode” followed by the received data printed
in hexadecimal numbers and some characters.
CAUTION!
●The printer prints “.” if there is no characters corresponding to data.
●During hexadecimal dump, functions except some command will be disabled.
●If print data does not cover a line, press the FEED switch to print the line.
When you press the FEED switch three times consecutively, or you turn the
printer power off, or the printer receives a reset signal from the interface, the
hexadecimal dump printing is terminated.
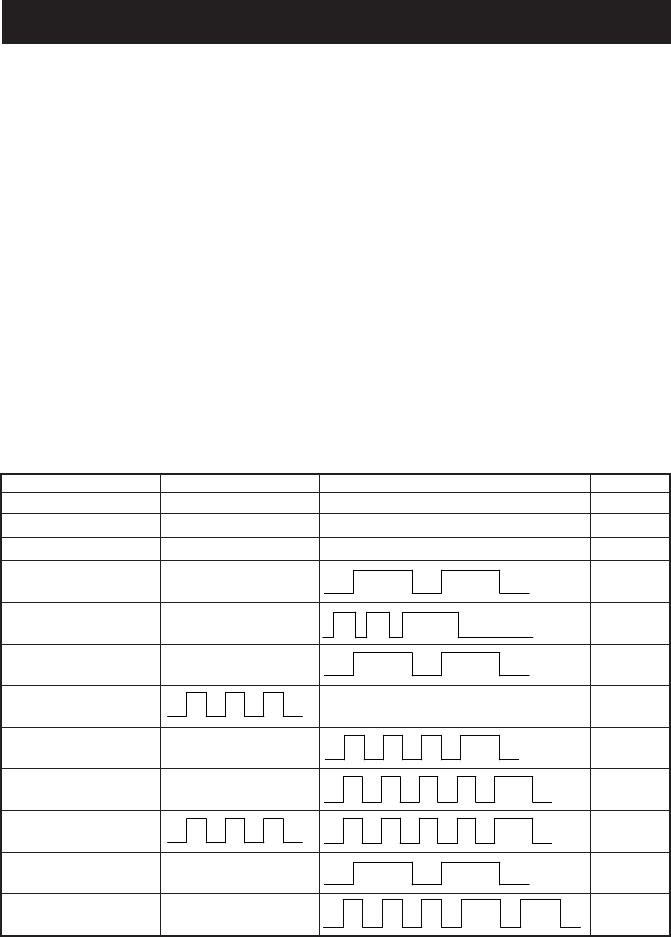
Print example
HEX DUMP PRINT MODE
1B 21 00 1B 20 04 41 42 43 44 .!.. .ABCD
45 46 47 48 49 4A 4B 4C 4D 4E EFGHIJKLMN
4F 50 0D 0A 31 32 33 0D 0A OP..123..
Memory
switch
setting
Serial communication
condition (Only serial
interface model)
DIP switch setting
(Only serial interface
model)
Firmware version
Interface
Buffer size
— 24 —
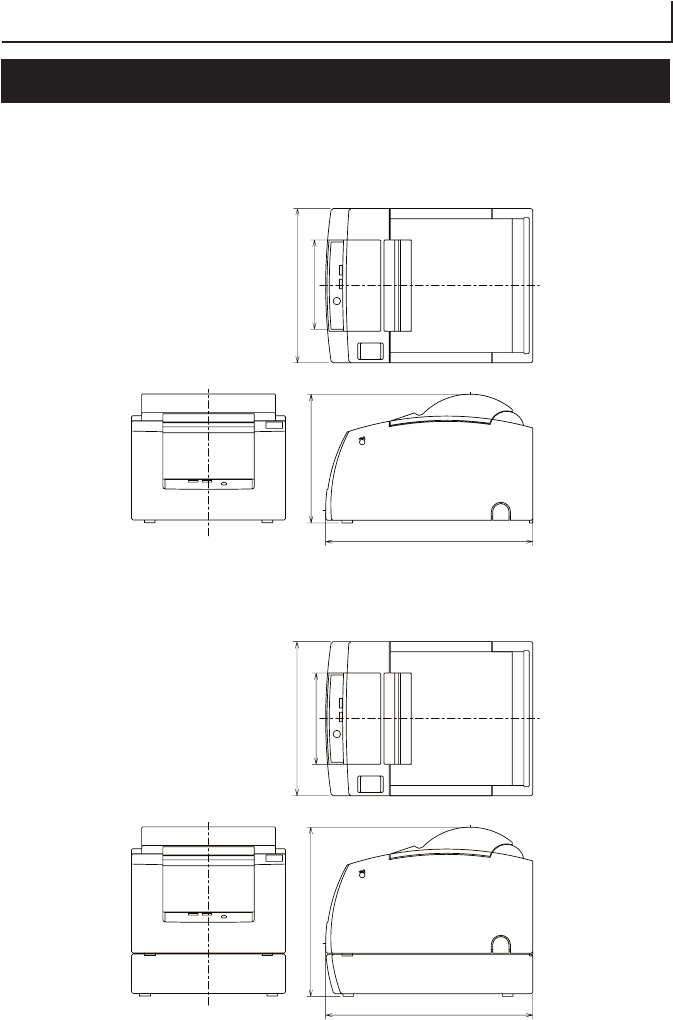
4.7 Error Indication
●
Paper end
Paper empty is detected in two steps: paper near-end and paper end. It causes the ERROR lamp to light. If
paper end is detected, refill the paper. If the paper cover is open, a paper-end is detected.
●
Paper cover open
During printing, do not open the paper cover. If you open the paper cover accidentally, the ERROR lamp
blinks. Confirm the paper and close the over. Printing resumes automatically.
●
Thermal head overheat
When you print dense characters or dark image, the head temperature rises. If the head temperature exceeds
a specified level, the printer stops printing operation and waits till the head temperature is lowered. During
waiting, the ERROR lamp blinks. When the head temperature is lowered, printing resumes automatically.
●
Cutter lock
If the cutter blade stops operating due to paper jam or the like, the ERROR lamp blinks. Remove the cause of
the trouble and press the FEED switch. If the blade does not move and the cover does not open yet even in
the above procedure, follow the procedure in section 4.4 to open the paper cover.
●
Black Mark detection error (in Black Mark mode)
When no Black Mark can be detected even if a certain amount of paper feed is carried out for Black mark
detection, a Black Mark detection error occurs. If black detection continues more than the specified period,
a No Paper condition is assumed and the same error as No Paper is indicated.
Lighting and blinking status of each error including the above is shown below.
Status POWER Lamp ERROR Lamp Buzzer
Paper-end Lights Lights O
Paper near-end Lights Lights
Cover open error Lights Light O
Cover open error *1 Lightss O
Cutter lock error Lights O
Head overheat error Lights
Memory check error Lights
Low voltage error Lights
High voltage error Lights
Sum check error
Macro execution Lights
wait *2
Black Mark detection Lights O
error
*1: When the printer is printing.
*2: The ERROR lamp may blink even in the execution of macro function.
— 25 —
5. OTHER
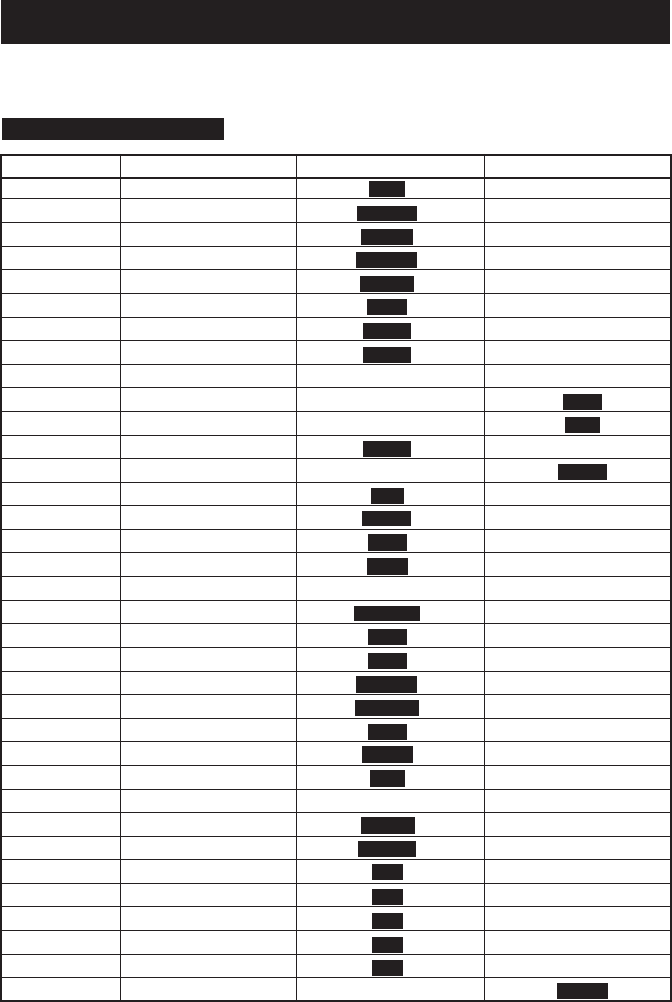
5.1 External Views and Dimensions
(Unit: millimeter)
Built-in Power Supply Type
AC Adapter Type
195
121 84
145
159 86
145
195
— 26 —
5.2 Manual Setting of Memory Switch
Memory switches can be set manually or by a command.
For manual setting, refer to the next page.
The function of each memory switch is shown in the following table. (The
white-on-black characters are factory setting.)
Switch No. Setting 0 (OFF) 1 (ON)
Memory SW1-1 Power ON Info Send Not send
Memory SW1-2 Buffer Size 4k bytes 45 bytes
Memory SW1-3 Busy Condition Full/Err Full
Memory SW1-4 Receive Error Print “?” No Print
Memory SW1-5 CR mode Ignored LF
Memory SW1-6 Reserved Fixed −
Memory SW1-7 DSR Signal Invalid Valid
Memory SW1-8 Init Signal Invalid Valid
Memory SW2-1 Reserved −Fixed
Memory SW2-2 Auto Cutter Invalid Valid
Memory SW2-3 Spool Print Invalid Valid
Memory SW2-4 Full Col Print CBM1000 EPSON
Memory SW2-5 Resume aft PE Next To p
Memory SW2-6 Paper width 80 mm 58 mm
Memory SW2-7 Reserved Fixed −
Memory SW2-8 NPE Sensor Valid Invalid
Memory SW3-1 Resum Cttr Err Feed S/W Command
Memory SW3-2 Resum Open Err Close Command
Memory SW3-3 Parallel 31 Pin Valid Invalid
Memory SW3-4 Paper Select Thermal Black MK
Memory SW3-5 Column Number 48/32 col 42/30 col
Memory SW3-6 No use Fixed −
Memory SW3-7
CBM1000 Mode
Invalid Valid
Memory SW3-8
Open w/Printing
Auto Manual
Memory SW4-1 Auto Length Invalid Valid
Memory SW4-2 BM Sensor Surface Back
Memory SW4-3 No use OFF Fixed
Memory SW4-4 No use OFF Fixed
Memory SW4-5 No use OFF Fixed
Memory SW4-6 No use OFF Fixed
Memory SW4-7 No use OFF Fixed
Memory SW4-8 Full Cut Cmd Full Cut Partial
— 27 —
Manual Setting of Memory Switch (Memory SW)
The memory switch can be selected, changed, or written by the combination of
three actions: pressing the FEED switch, pressing and holding the FEED switch,
and opening or closing the paper cover.
1. Entering memory switch setting mode.
Set paper to the printer and keep the printer cover open. With the FEED
switch pressed and held, turn the printer power on, and then press the
FEED switch twice. Close the cover. If the current settings of the memory
switch etc. are printed, the printer is now in the memory switch setting
mode.
2. Selecting memory switch
When the FEED switch is pressed short (within 2 seconds), printing occurs
in the order of “Memory SW1” → “Memory SW2” → “Memory SW3” →
“Memory SW4” → “Write/Factory Setting” → “Memory SW1” → ......
repeatedly. When the memory switch you want to change is reached,
press and hold the FEED switch (for more than 2 seconds).
3. Selecting each switch item
There are eight setting items for each switch. Press and hold the FEED
switch for long, the printer goes to the next item and prints the current
setting of the item. Repeat pressing and holding till the item you want to
change setting is reached.
Memory SW (1) 00000000
0: OFF state
1: ON state
4. Changing the setting
When the item you want to change is reached, press the FEED switch short.
The changed set value is printed. (To return to the previous setting press
the FEED switch short). When you press the FEED switch long, the set
value is accepted and then the printer goes to the next setting item.
Power ON notify setting (Valid )
OFF state: ERROR LED OFF
ON state: ERROR LED ON
— 28 —
5. Returning to the memory switch select mode
When the setting of the desired content is completed, open the paper cover
and then close the paper cover. This allows the printer to print the setting
of the changed memory switch.
6. Saving the setting and exiting the memory switch setting mode
Press the FEED switch short to move to “Write/Factory Setting”. Then
press and hold the FEED switch. The printer prints the content of new
setting and exits the memory switch setting mode to return to the normal
standby state.
* Unless saving the setting is executed, the changed setting cannot be
enabled.
7. Initializing the memory switch
When you want to return the memory switch setting to the initial state, go
to “Write/Factory Setting” in the above procedure. Here, open the paper
cover and press and hold the FEED switch till buzzer sounds. This allows
the printer to return to the initial state.
* All the memory switches settings are returned to the factory set values.
4446
ø12
65~75 µm
ø18
Paper width 80 +0
−1
Maximum print area 72
Maximum print area 48
φ83 or less
Printing surface
Unit: mm
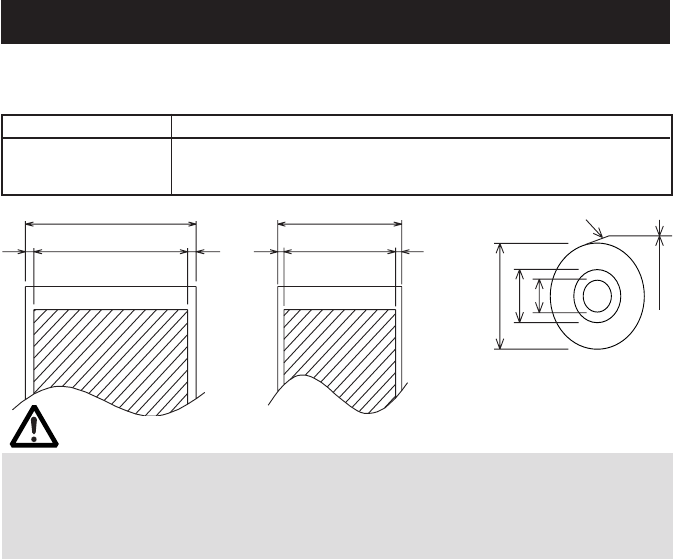
5.3 Printing Paper
Use the print paper shown in the following table or the paper with equivalent
quality.
Paper Type Product Name
Recommended thermal TF50KS-E2D from Nippon Paper
paper roll KF50-HAD, PD150R, PD160R from Ohji Paper
F220VP, HP220A, F230AA from Mitsubishi Paper
Paper width 58 +0
−1
CAUTION!
Use the paper with the start of winding to roll core is as shown below.
●No fold line is present and paper is along the inner diameter.
●No turnup is present.
●No pasting to core is present.
●Outer winding (print side out) is used.
2.01E-0804
Printed in Japan
